John Clutch
-
Posts
364 -
Joined
-
Last visited
Content Type
Profiles
Forums
Events
Gallery
Everything posted by John Clutch
-
This car is very inspiring, as Im working on a 1/12 scale version. Thanks for sharing
-
Im not sure where I saw this first, maybe even here LOL but I wish I had the hands for this. Pin-striping. https://www.youtube.com/watch?v=UsTIMxeO_ng
-
Disgusting. Disgustingly gorgeous.
-
That tank came out perfect. Copper is a great media to work with. I collect coins, particularly copper from the US, Canada, the UK and Mexico. And my lastest addiction is civil war tokens. Copper looks great to me, no matter new or 200 years old.
-
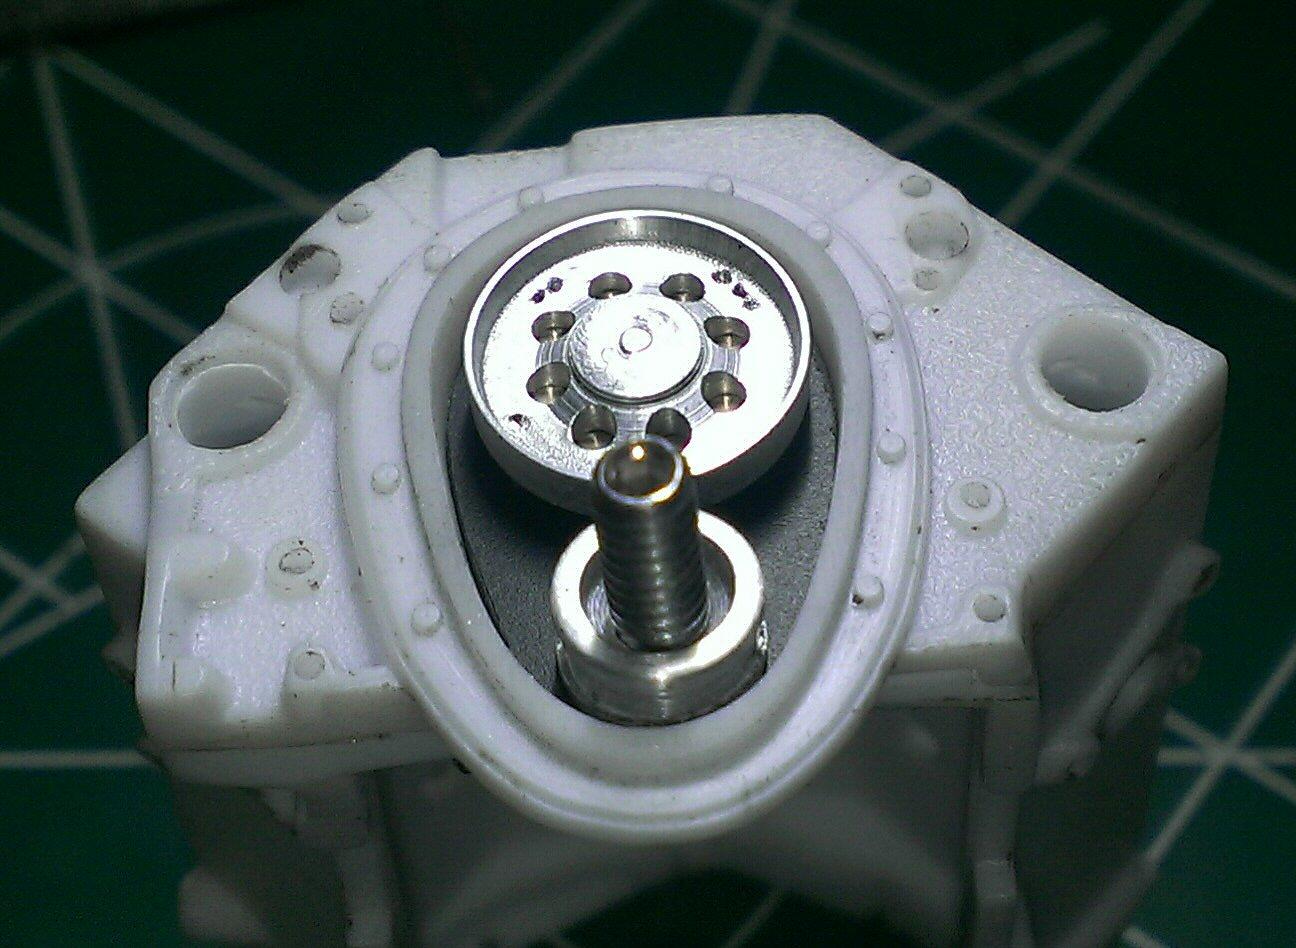
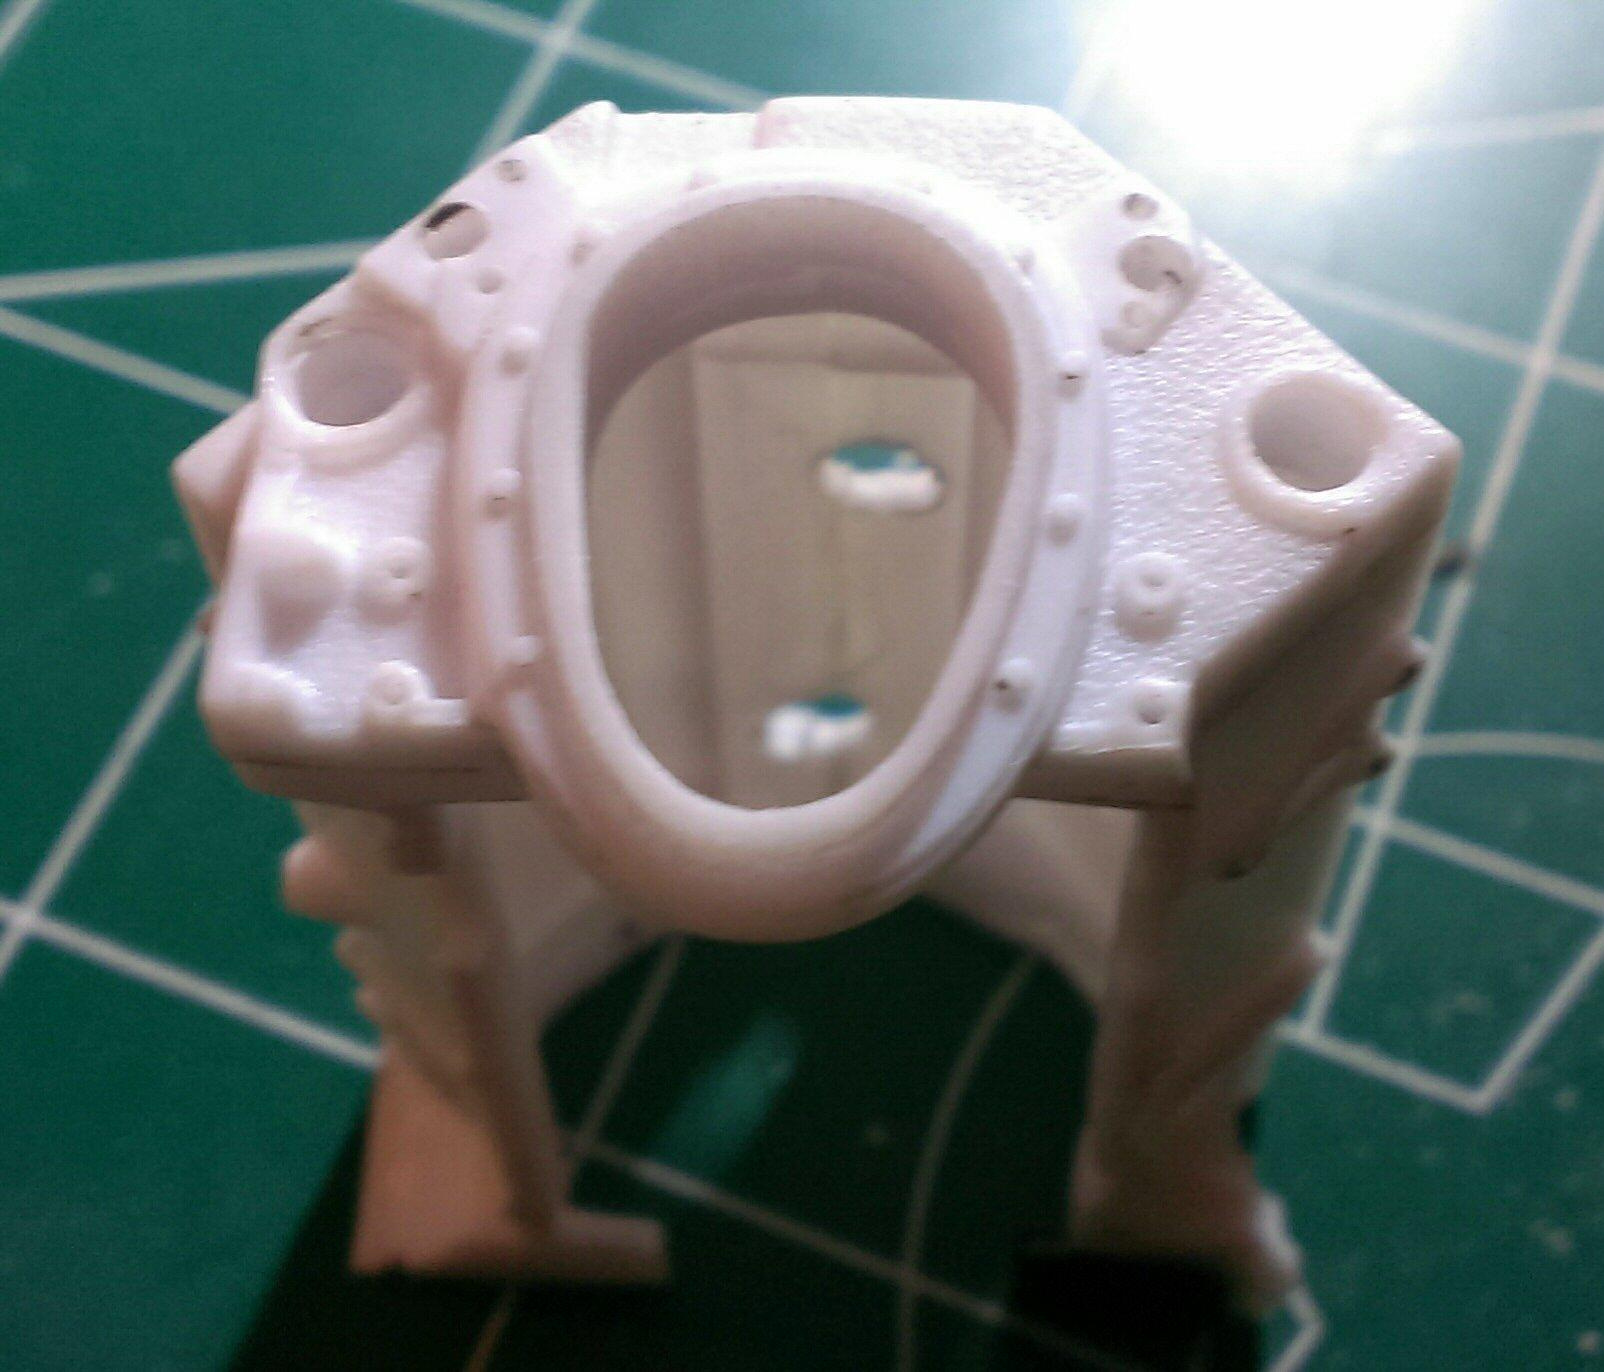
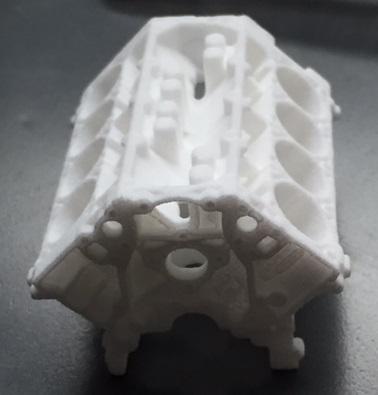
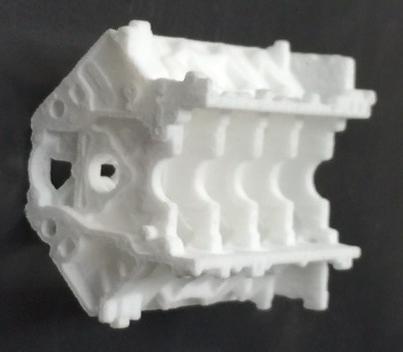
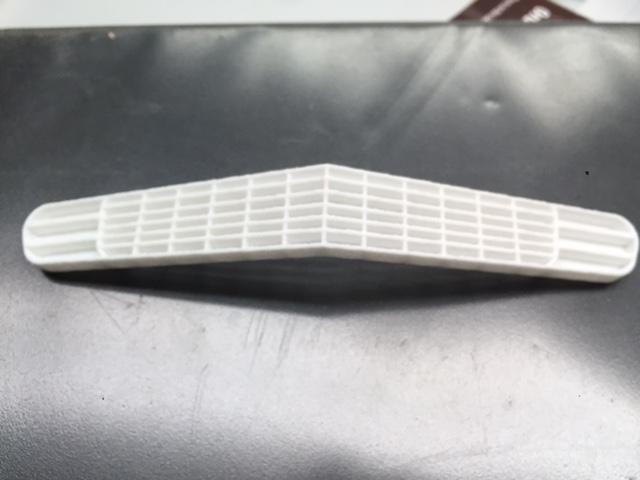
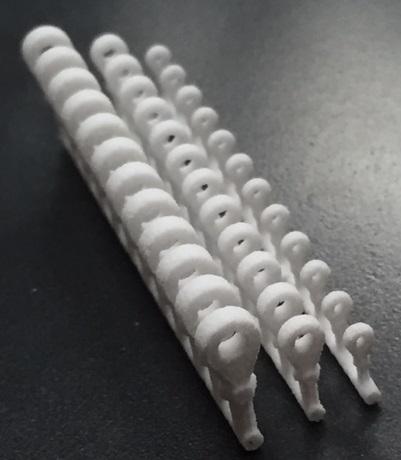
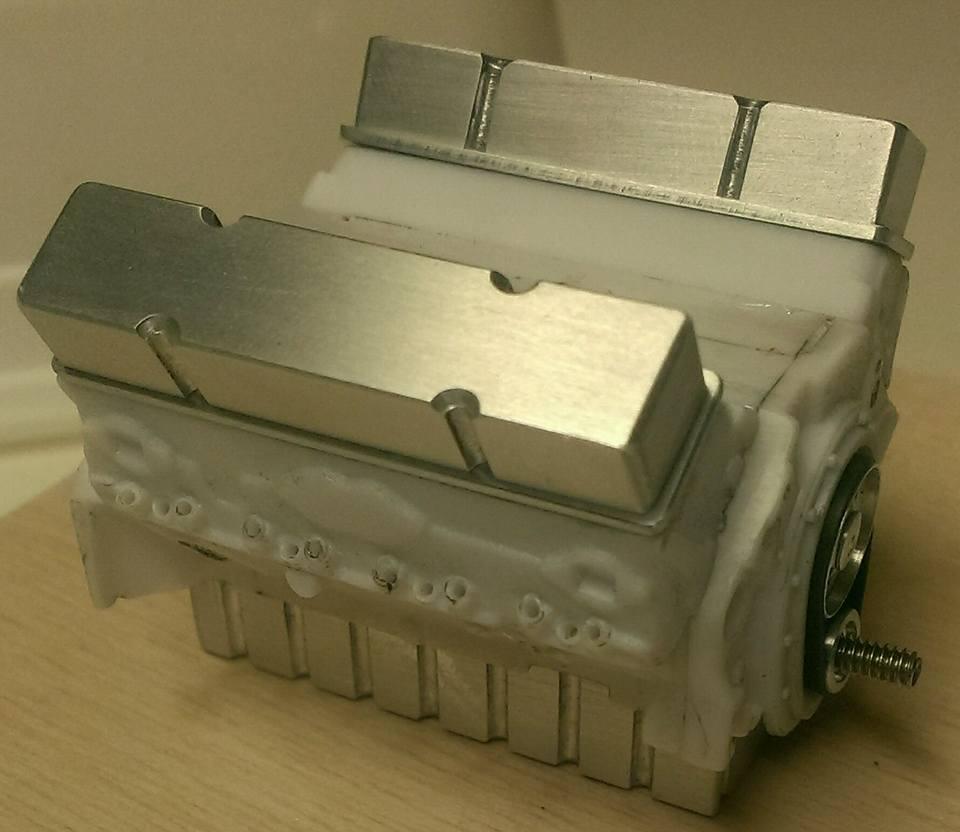
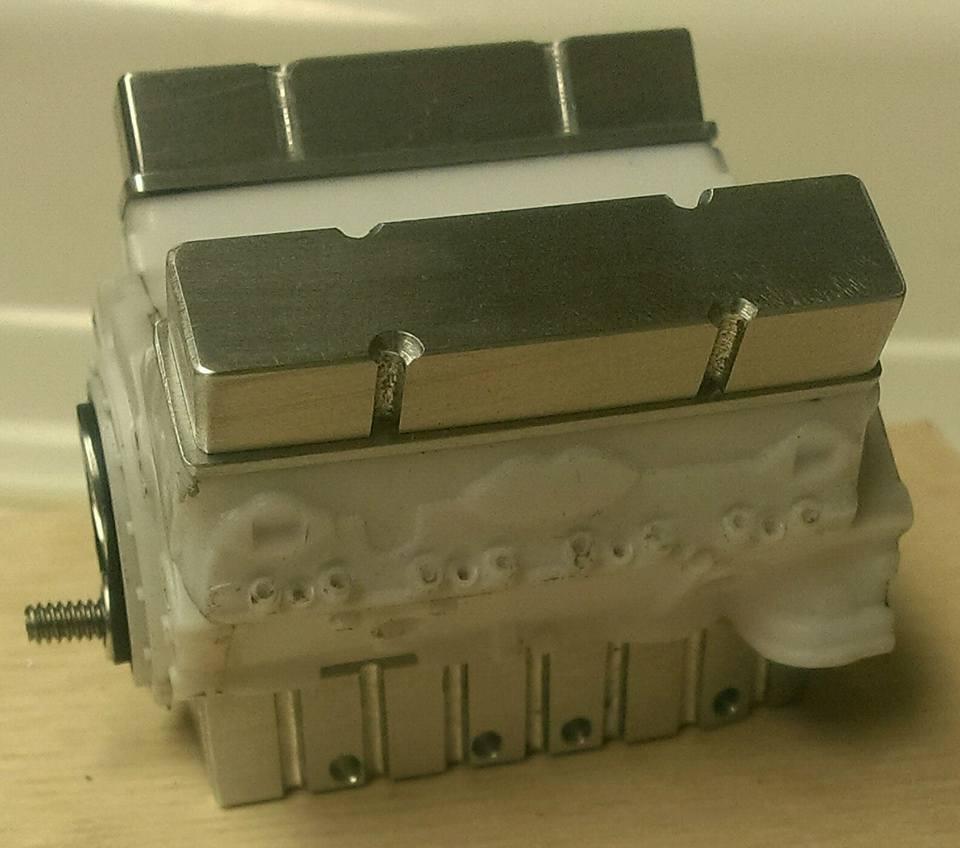
 Thank you Phantom1 and LeadFred. Looking at the project as a whole, it doesnt really look like I have done much. But when I look at each component, there is actually a lot of hours there. It was never was the type to document my work. This is really the first project that im doing so. As a fabricator, the love is in the fabrication. The research is fun also, but it really consumes a lot of its time. The good thing about researching is you really start to appreciate the collection of data you put together and thats the reminder itself. My pin board is covered with drawings. LOL you would think that since the project is in 1/12 scale, that it would require 1/12th the work. Nope. Its more like 12 times more. Im in awe of you 1/24 scale guys, especially Codi. I have the luxury of mechanically fastening a good part of the components together. I dont know how you wizards achieve such a crisp detailed finish with glue and paint. Do you guys employ a team of super mice or something? LOL. Anyway....... Im.blown away by the detail of this 3D printing parts. I chased all the holes on the block. Not only are they all there, but they are all in the right position. By texture along, I knew I needed to true up all the mounting surfaces and assumed nothing will be flat. After all, its a printed part. How flush could everything be,right? Well, these parts are alot flatter than I would have ever imagined. Thats insane to me. The cylinder heads just needed the tabs cut off, otherwise they are flat and true, plus if I wanted to drill out the bolt heads, everything would match up. Really cool stuff. Thanks for looking.
 -
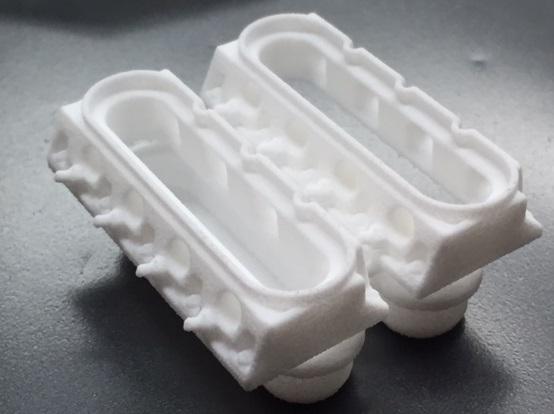
I received some parts from Shapeways, including the LS3 block/heads/covers, RS/SS grill and tie rod end kits. AND I found out that Shapeway is 10 BLOCKS and 2 Avenues away from me !!!!! You have a choice when it comes to product time on each piece. For example, the engine block would cost $6 more and it would have taken an extra week to produce. I decided to see what the "normal" production time first, and from what Im seeing Im very happy with. Its so nice that I cant believe Ill be covering all that up!!! Maybe someday Ill build an entire motor to sit on a engine stand. I will deck the block a little on the face and cylinder surfaces, as the rest of it looks great as a as-cast piece. Same with the cylinder heads. The grill will require some finish work though, but is incredible also. Same with the tie rods.

-
Datsun 510 Pro/Stock "SWEET PAIN" COMPLETED BUILD
John Clutch replied to LeadFred's topic in WIP: Drag Racing Models
Im building a 1/12 Camaro to X275 class specs. It will be a single turbo set up, with the turbo being placed in the center, right behind the front spoiler. So I will make two independent cooling systems for each side of the engine. In through the cylinder head, out through the block. That could be a consideration for you also. -
Datsun 510 Pro/Stock "SWEET PAIN" COMPLETED BUILD
John Clutch replied to LeadFred's topic in WIP: Drag Racing Models
Looks fantastic. Now with the fenders/hood in place, you can see just how much space that motor takes. What are you gonna do for a radiator? -
Soupy Sales MPC Challenger re-release
John Clutch replied to sflam123's topic in WIP: Drag Racing Models
Looks great! -
1934 Duesenberg dual cowl phaeton modified - Monogram 1/24
John Clutch replied to CarlR's topic in Model Cars
Its gorgeous. Relocating the spare tire really smoothed out the shape of the car. -
I believe TIG welding aluminum became common practice during WW2, so I imagine aluminum sheetmetal intakes on 60s gassers should be period correct.
-
Lookin great !
-
Thanks guys!
-
El Cheapo modelling machinery
John Clutch replied to Davoski's topic in Model Building Questions and Answers
Oh. And if there is no gibbs/gib plate to adjust, you can forget about all together. -
El Cheapo modelling machinery
John Clutch replied to Davoski's topic in Model Building Questions and Answers
The biggest issue with any "toy" machinery is the quality of the spindle bearings. Give the spindle a tug to see if there is any slop anywhere, before starting it up. There should be none. Run the machine at half speed for 5 minutes or so with no load on it. While its running, put your hand over the head stock (where the spindle bearings are supported) and see if any heat is building up. A good bearing will run cool a long time. If it gets warm, the bearing tolerance is usually too tight. If its nice and cool, thats a good sign IF..........you turn the machine off and check the spindle bearing slop. If you have no slop cold, slop when hot, then the bearings tolerances are too loose (bearing outer race is too thin), and youre almost guaranteed a poor finish on whatever your cutting. If its loose when cold, tight warm, then the ball bearings are either too small or not enough lube) DONT run the machine hot. I have a Microlux 7x16 lathe that starts to get warm after 20 minutes or so, and Im very critical about running it. Thats me though. I know people who run this lathe and the grizzly units for hours on end and dont have issues. If you plan on running the unit for long periods of time, I suggest you save your money and get a decent unit instead. Just by looking at the pics I wouldnt run it longer than 15 minutes or so. Its a domino effect, if you have vibration at the spindle, it will transfer to the rest of the unit and it will slowly start eating itself. If the rest of the unit is right, you shouldnt have issues. Just stay on top of the gibbs. -
Datsun 510 Pro/Stock "SWEET PAIN" COMPLETED BUILD
John Clutch replied to LeadFred's topic in WIP: Drag Racing Models
Ahhhhhhh yes!!!!! Paint ! That can only mean one thing -
Great eye for the body line angle. That makes a world of difference, plus deuces look killer with a lot of body rake.
-
Thank you phantom1. I know my progress has been at a snail pace, but I hope by October, I can start spending more time on this. Im hoping to get it done by April for the NNL East. If its painted by February, I think Ill have a shot, but Im not gonna rush it Valve Covers: It still needs breathers but not sure where they will go. Ill build an intake first and then decide. The height of them Im not sure about, the intake will help decide that also. They are two piece, just like the oil pan, so I can fly cut them later if I wish. Belt Drive: Went shopping for rubber bands yesterday but just couldnt find anything that would look good for the belt. Then to the hardware store looking at o-rings. Too fat. The belt needs to be 1/2" in diameter and .010 thick to look right, since the pulleys do not have grooves. As Im starting to solder some connectors for my rc car, it hits me.......shrink tubing! I had a piece 1/2" diameter and .010 thick! Just killed the shine with some sandpaper, cut a sliver and it went onto the pulleys PERFECTLY. Nearly zero tension. I couldnt plan it any better. My favorite part of the build so far LOL As I mentioned earlier, this motor will not go into this project. I ordered a LS3 block/heads and will continue working on this sbc til the parts arrive. Thanks for looking and comments are always welcome
-
Small update. Made a belt drive and valve covers (forgot to take pics of the valve covers but they are sweet ! ) As you can see, I used the existing timing chain cover bolt pattern for the belt drive. I sand it smooth and then hogged it out. What you dont see is I built up the area behind the belt driven, to about 1/4", so I can fastener the cam and crank pulleys. I used a 4-40 x 1/4" set screw for the crank and made a sex bolt for the cam. The cam might get the dry sump pump attached to it, not sure what Im gonna do yet. Thanks for looking and comments are always welcomed.
-
And just like that, plans changed!!! I was just made aware that Shapeways makes a 1/12 scale LS3 engine, which was my original plans. Started working on drawings with the intent of building it from scratch. I purchased a block and heads, plus a RS/SS grill and tie rod ends. I will still complete this SBC first, as the long block is close to be completed anyway. Will most likely purchase another kit and build a tube frame car with a blower using the SBC. Maybe with a 80s/90s theme.
-
Large scale LS1?
John Clutch replied to drummerdad's topic in General Automotive Talk (Trucks and Cars)
I just order the LS3 block and heads, the RS/SS grill for the Camaro and tie rod end kit. Thanks again for posting this! -
Large scale LS1?
John Clutch replied to drummerdad's topic in General Automotive Talk (Trucks and Cars)
You sir, just made my day. Actually, you just made my year. I was planning on building a block and heads from scratch. Thank you!!!!!!!! -
Wow. The amount of detail youre adding is fantastic. The only suggestion I have is about your keyboard. Blow that sucker off and wrap it in saran wrap. Learned that from a shop I use to work at.
-
1/10 scratch built Holden HX Overlander Panel Van
John Clutch replied to prestonlal's topic in WIP: Model Cars
Great color !!! And the hood hinges are awesome

.jpg.bbdf0a7f2dd83fd53d5768a33ddbc28e.jpg)