Ferbz
-
Posts
508 -
Joined
-
Last visited
Content Type
Profiles
Forums
Events
Gallery
Everything posted by Ferbz
-
Agreed, it is very rewarding to do something yourself. Besides, I wasn't convinced I could make the resin headlights look the way I wanted.
-
Thanks!
-
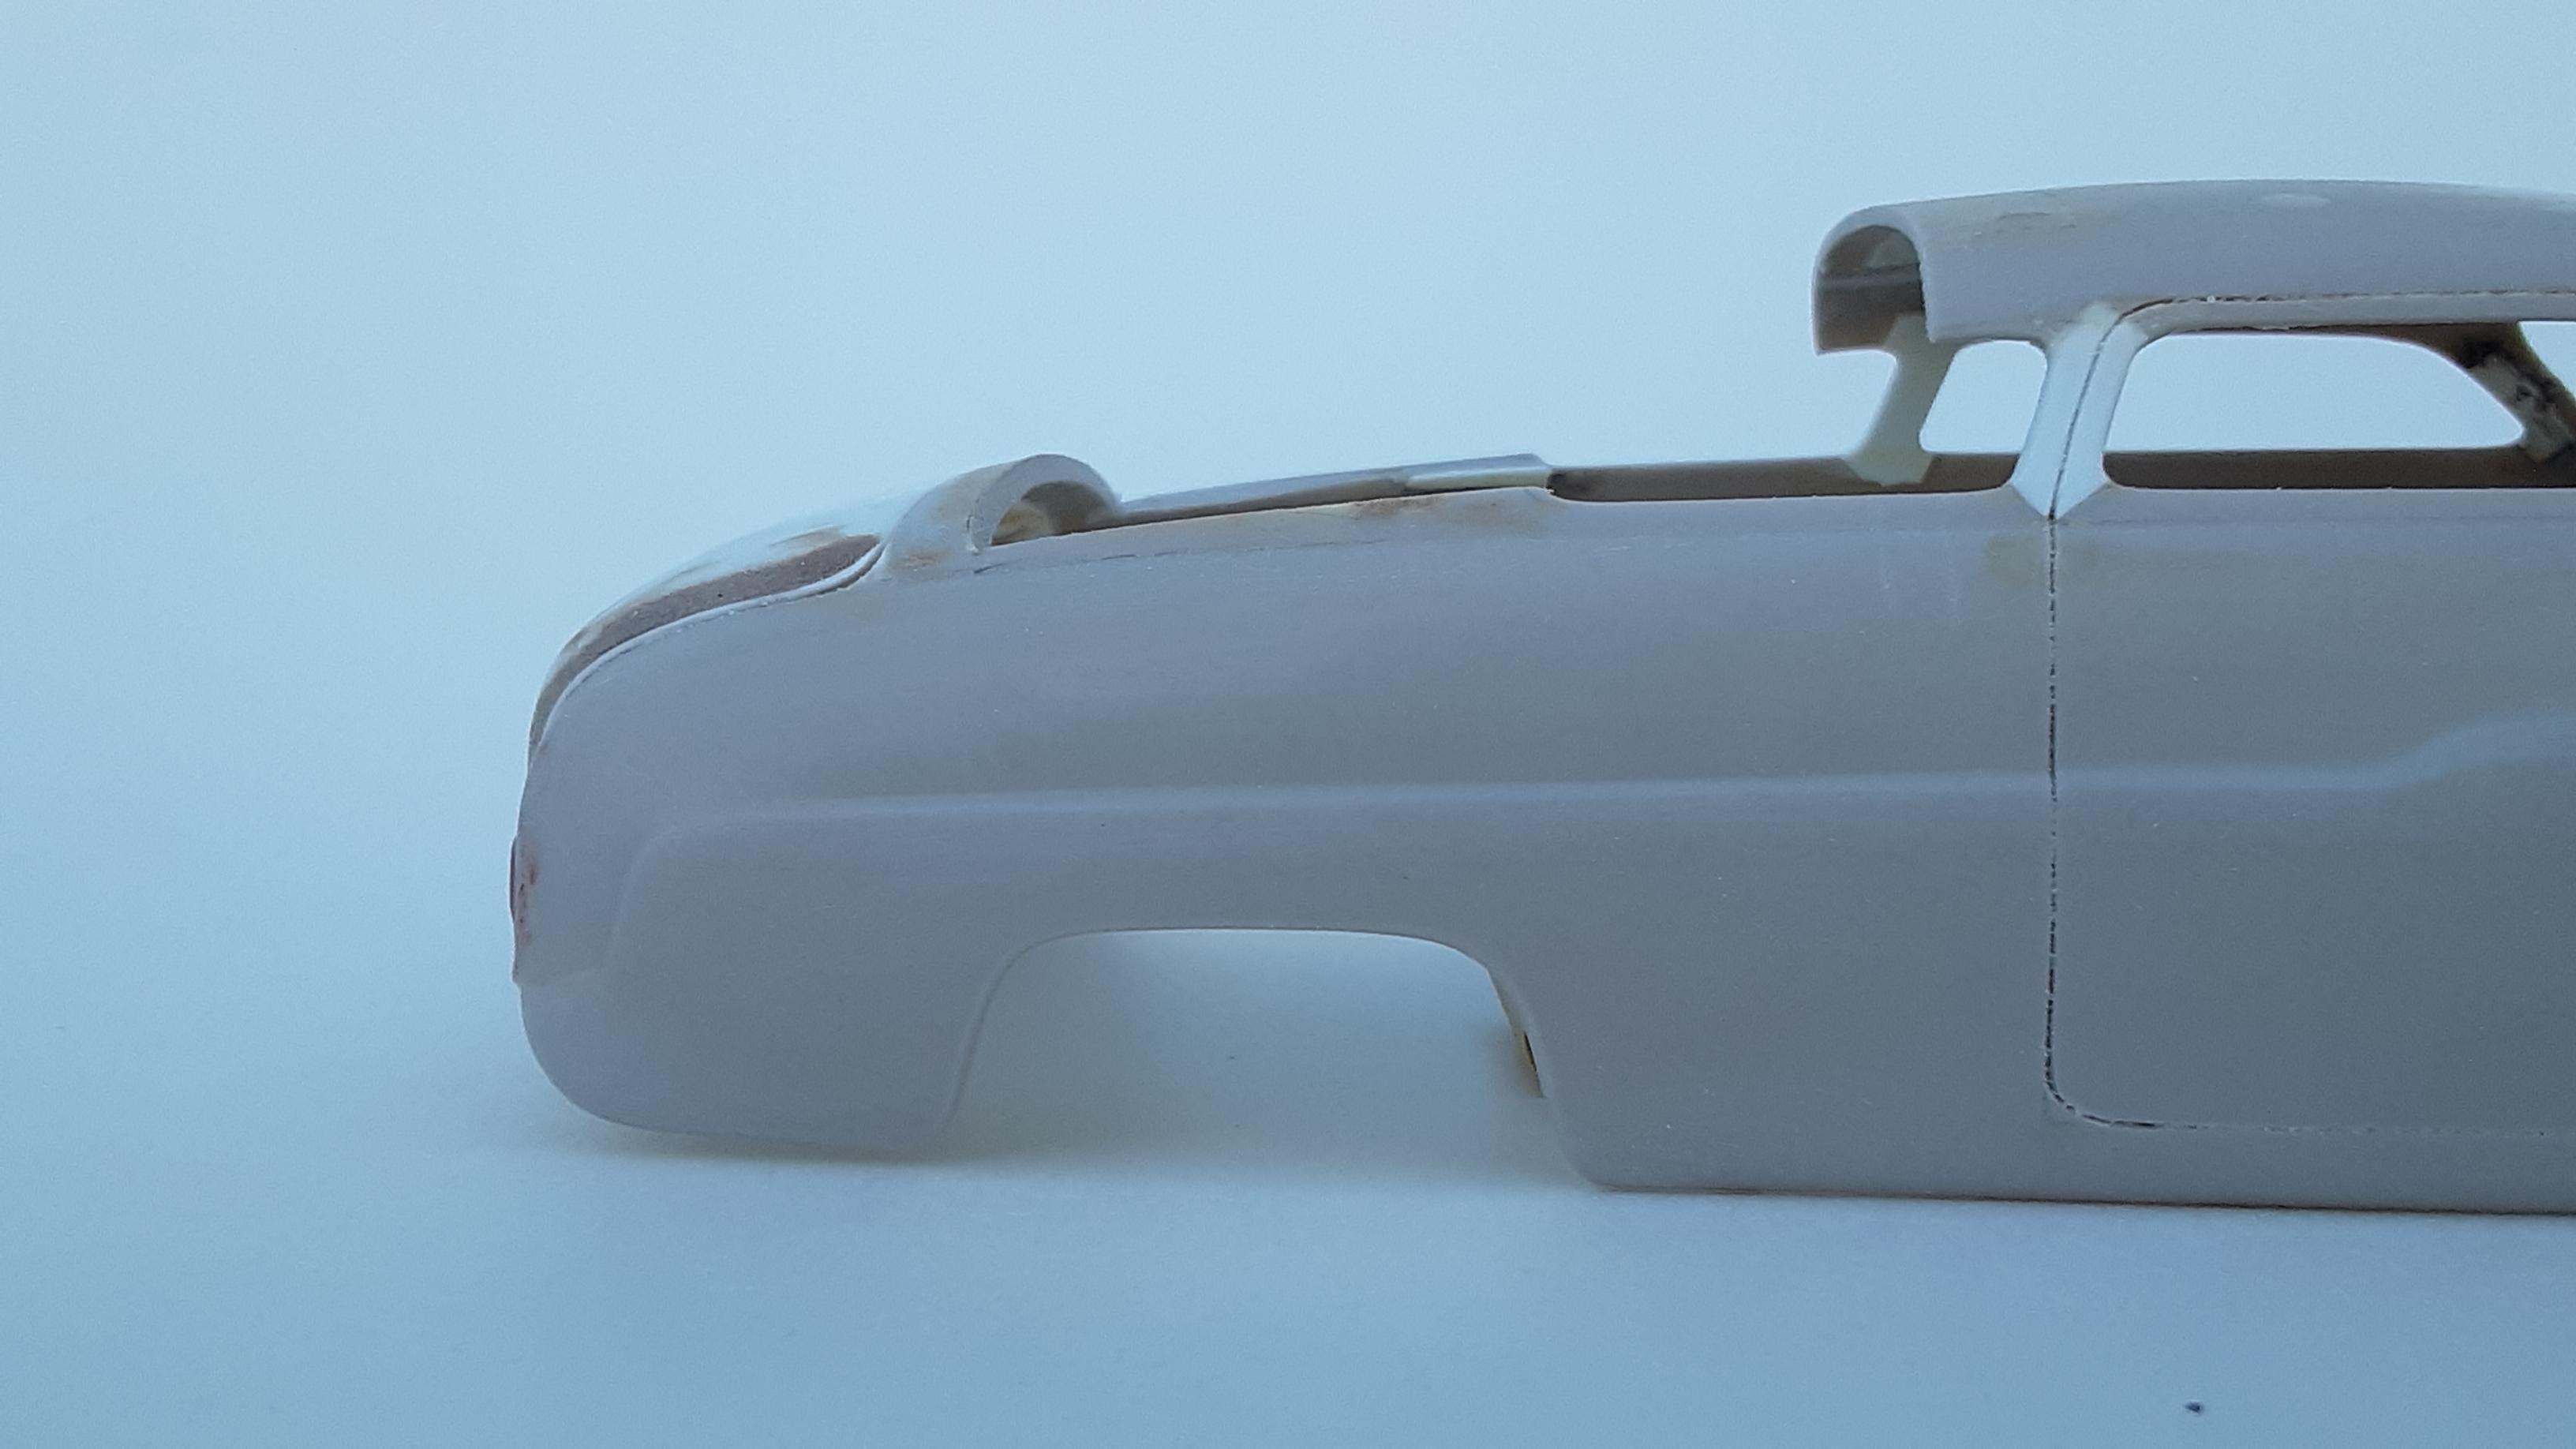
I had chopped the top on this body sometime before I decided to make it a copy of the 1:1 car. At somepoint, a friend pointed out that the rear window placement on the 1:1 car was expertly placed farther forward/slightly up ward into the top(by Butch Hurlhey, who did all the custom body mods). I dont like redoing work that I was already pleased with, but after studying pics of the real car, my chop job was quite different. I pushed aside the uneasy feeling in my stomach and grabbed my saw and went to work. I cut away the rear window including the rear part of the top, moved it 3-4" scale inches forward and filled in the gap at the deck. it is a much closer representation of the chop on the real car. My model remains only semi-accurate though because I ended up chopping the model a bit more than the real thing. The 1:1 car was chopped 3.5in while my model is a bit more, maybe more like 4-4.5". It's an accomodation I'm willing to make at this point

-
Thanks! It's coming along slowly. Still a ways to go.....
-
Thanks!
-
Thanks! Yup, it's an earlier release of the AMT kit that I chopped(twice in fact! lol I'll post some pics about it). The headlights are in fact 53 Buick units that were frenched into the fenders. Even though there are resin pieces available, I ended up scratchbuilding my own doing these steps using sheet plastic and putty:
-
Thanks! Most of the 'jumps' in my skill level have happened when I tried something that an advanced modeler has already done. I bet most of us modeling nerds can say something similar
-
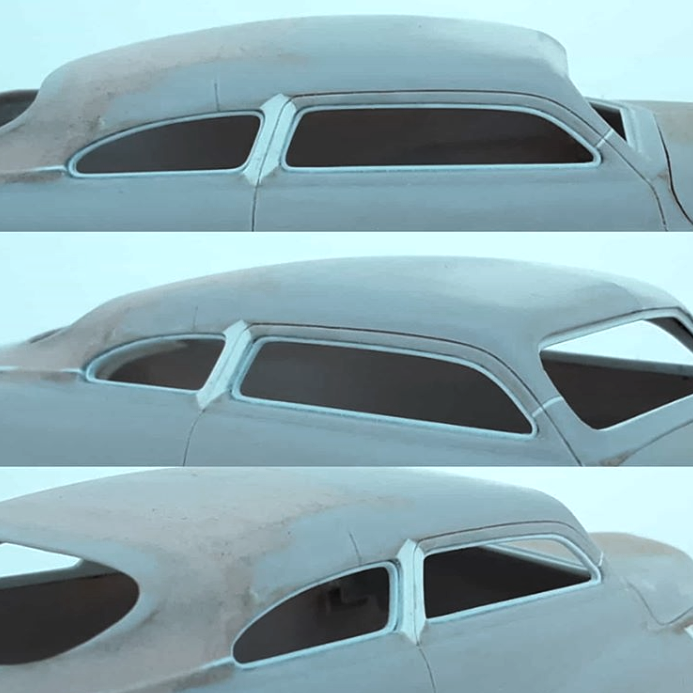
At one point somebody talked me into trying to make my own B pillars rather than cobbling together the original pieces during the chop(which I've done and do not enjoy doing lol These pics show Evergreen plastic blocks replacing the pillars. I also thought I'd try scratchbuilding the stainless window trim and interior winow moldings(which I've seen Steve Boutte successfully do). It's extra work for sure, but I really like the results so far. While I was at it, I thought I'd try making the front windshield more realistic by creating an inner groove for the 'glass' to sit within then make the stainless trim from Evergreen square rod(I also got this idea from Steve Boutte who I think got it from Rik Hoving ).
-
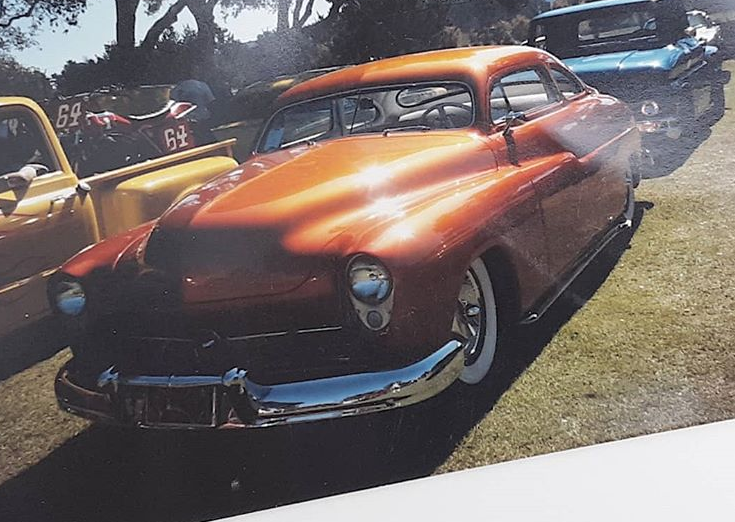
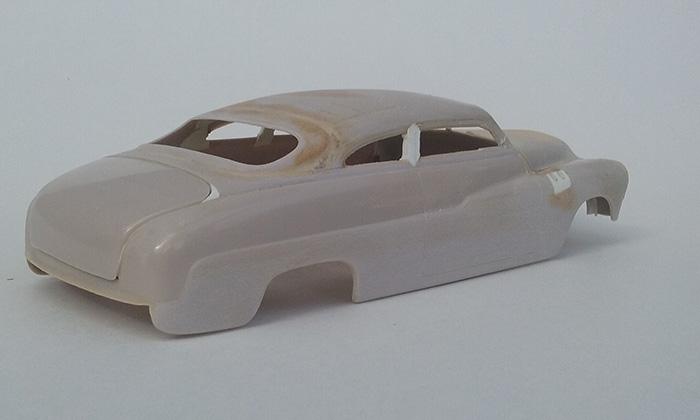
My current project is this AMT 49 Merc that will be a replica(as best I can )of a 1:1 50 Merc that was built in the late 70s in Salinas, Ca near where I grew up. This is something I've been wanting to do as I've been enamored with the real car since I first saw it in person in the ealry 80s as a young buck modeler Thankfully, the 1:1 car has recently been lovingly restored, and it's unlikely that it will ever end up in my garage, I'll hopefully end up with a scale copy in my display cabinet lol I've modeled an accurate copy of a real car and I'm quickly learning that it is a different kind of model building, really(I've already gotten a little off target here and there as you'll see lol Getting as many of the details correct is paramount, particularly when building a car that is 'typical'(or rather, iconic)like a chopped Merc. Similar to 32 chopped Ford hotrods, many of them are very similar as most of the major modifications follow tried and true aesthetics that come from years of understanding form and function of these cars. I find that the differences that distinguish one Merc or Duece from another are in the details of the modifications. Curly's Merc stood out from the start with it's wild candy tangerine paint job and tasteful and traditional body mods(with some unique touches). I'll start with a pic of the 1:1 car that I took back in the mid 80s. I hope you follow along as I attempt to build my dream car in scale!
-
The paint under the clear is guitar lacquer, which i thought might have been the problem(disparate brands can sometimes cause issues, even tho they are the same type of paint: lacquer). But I tried the same Duplicolor spray can lacquer over a different paint and it did the same thing....
-
Thanks for posting the pic of the two different Duplicolor cans. I've not used any of those red cans yet. Are they lacquer as well?
-
I'm not happy that you've had the same problem, but I'm sure glad it's not just me going crazy Did the surface get irregular on you as well? Such a weird thing to happen.... BTW, I did not know Krylon made a clear lacquer....I'll give it a try!
-
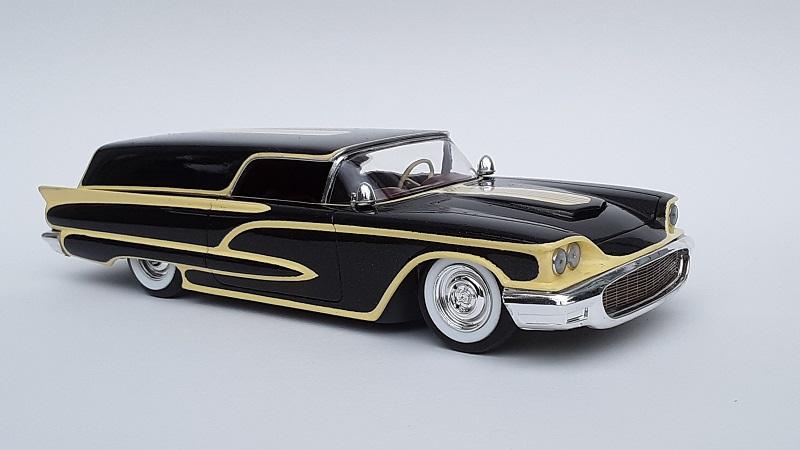
One thing I'll mention: you may notice the finish is a bit bumpy and irregular. The clearcoat would not dry and remained tacky for months! I tried a bunch of things to get it to dry/harden to no avail. Once it started to feel like it was hardening, I proceeded to wetsand it. As I let it sit a few days the surface started to get bumpy and weird! I've never had this happen to me before, but after some experimenting I figured it has something to do with the clear that I used(Duplicolor spray can acrylic lacquer, blue can). A bad can/batch perhaps? Needless to say, I was very frustrated and am staying away from that particular can from now on. I polished it the best I could and am leaving it as you see it here. It looks pretty good in pictures, but in person it's a different story lol Anyhow, I'm glad it's done, and am moving on....
-
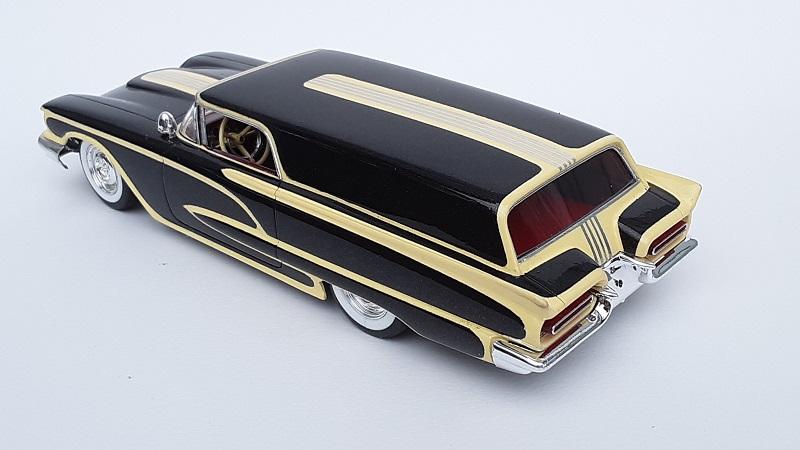
This needs a couple more details like Bellflower exhaust tips and a rear license plate to hide the two big holes in the rear bumper but I'm gonna call it done(so I can post it here!) Feel free to check out the progress of this build under On The Workbench. I basically used two removable hardtops to make the stretched sedan delivery top, scratchbuilt the interior cargo area, did some shaving/smoothing and tried my hand at laying out a Larry Watson pattern paintjob. I've had this idea rolling around in my head for years and have finally gotten around to executing it(I'm sure many of you probably know what that's like...)
-
Thanks man Thanks so much!
-
Thanks! Yup, it's basically Watson's inconic pattern. I improvised a bit on the top and around the back. The colors are also inspired from a real car: Dick Jackson's 58 T bird: Black and Cream Yellow go great together I think. And to set it off and be a bit different, I went with dark red for the interior.
-
Thanks! I realized afterwards that there's a separate chat for osting tips/tricks. I'll have to remember it next time Glad you found it helpful! I actually used a different brass railroad mesh on a previous build(see inside the grill in the attached pic)This one has a diagonal pattern which I like better, but I can't find it anywhere! It's K&S brand that makes it. This one was sturdy enough that I just glued in place without a styrene backing:
-
Thanks! But trust me, this paint job looks way better in pics than in real life I asked around how other people masked off their panel patterns. I discovered that many people cut masking tape into thin strips. This way, the tape can curve nicely when laying down patterns. I found that cutting 1mm strips worked best for me. I used the green 3M tape(the good stuff)but still found it to be too thick of a material which leaves a thick paint edge. I did spray the black using a spray can which loads more material on the surface than airbrushing, but i wanted more paint on the surface so i could blocksand it flat. It worked out ok, but I still want to find a thinner, more delicate tape. The worst part of this paint job was the clearcoat I ended up fighting the whole way! More on that in another post....
-
Hey Mr. Metallic, take a look at my recent post I did just what you suggested and I think it works! I also considered scribing a line up the sides and around the top surrounding the rear window to further explain how the rear hatch would open, but I just didnt want to clutter up the smoothness of the top and risk busy-ing up the paint job pattern. It's just a model implying the idea of a custom delivery wagon and how it might look. I'm ok leaving the functionality to the viewer's imaginations
-
Also, I thought I'd share a build tip: I discovered I can use model railroad brass photoetch fencing material as grid mesh for the front grill insert as well as for the tail light housing inserts. I cut/shaped two thin sheet styrene pieces so that they fit into the tail light housings. I then spray glued the brass mesh material to the styrene pieces, trimmed the excess and glued them into the housings. Parts pack tail lights were then glued on top of them. Finally the lenses were detailed a bit using a chrome pen. The front grill insert was done the same way except I painted the styrene insert piece a dark gray before spray gluing the mesh to it. I bought the 4" x 6" brass photoetch sheet for $9 at my local hobby store that sells model railroad stuff. I may be able to do 3 more models with what I have left of the sheet. Not bad cost wise in my book I hope this info is helpful! Once I add the final details to this model I'll post pics in the 'Under Glass' chat. Here's a couple detail shots in the meantime:
-
So it's been quite a while since I've posted any progress here(mostly because the project has stalled due to clearcoat hangups). I'm getting super close to finishing up now though. I need to add a license plate(to hide the big holes in the rear bumper), scratchbuild some Bellflower tips and install them, and I'm gonna call it done! Here's how it looks:
-
I realized I hadn't posted pics of the scratchbuilt interior cargo area. The rear seat area was cut away and the cargo area was built from styrene. The rear inner wheel wells were also raised a bit to accomodate the lowering height I plan to have. Since this pic the interior has been painted and I've begun adding carpet using craft felt sheet. I'll post pics of this as well
-
Thanks! I usually try to do something different with my builds yet still still stay true to traditional custom trends. I've had this idea rolling around in my head for a long time and it feels good to finally have a go at building it. Stay tuned for more progress pics as well as the eventual finished product
-
I finally have some progress pics to share!(apologies for the quick and dirty indoor shots, I'll post better outdoor lighting pics next....) The T bird sedan delivery now has paint on it. I went with Larry Watson's iconic panel pattern using Dick Jackson's black and cream color combo. I added some chrome tape lines on the hood and top to break up those big flat areas to give those areas some interest. Since these pics I've sprayed a Spakle Gold clearcoat over it all and am waiting for it to dry before wetsanding/polishing.
-
Agreed on all counts! First primer is usually a bittersweet thing, no? On one hand, you can start to see how the body work looks in a unified shade/color, but on the other hand, it'll reveal all the sins hidden in the initial filler and plastic work. Next is the 'spot putty/sand/primer/repeat' stage which I like the least....