Ferbz
-
Posts
508 -
Joined
-
Last visited
Content Type
Profiles
Forums
Events
Gallery
Everything posted by Ferbz
-
Chopped/channeled 50 Ford Custom Pickup
Ferbz replied to Ferbz's topic in Model Trucks: Pickups, Vans, SUVs, Light Commercial
Thank you! I studied a few of the custom pickups that were in some of those old magazines for inspiration! ? -
Chopped/channeled 50 Ford Custom Pickup
Ferbz replied to Ferbz's topic in Model Trucks: Pickups, Vans, SUVs, Light Commercial
Thanks very much! The body color is Testors Extreme lacquer Gold under satin clear. The interior is pearl white under matte clear. I made the exhaust pipes from solid aluminum rod (it bends better than tubing) ? -
Chopped/channeled 50 Ford Custom Pickup
Ferbz replied to Ferbz's topic in Model Trucks: Pickups, Vans, SUVs, Light Commercial
Thanks! lol Yeah, in factory stock form it is NOT a handsome truck ? A proper 'shave and haircut' and 'nipping and tucking' in the right places with the right amounts makes for an appealing overall impression I think. Can you tag me on your F100 progress? I'd love to see what you do with it! ? -
Glad you like it! Thanks for following along! Funny thing: The closer I get to the finish line on a build, the more stuff I find that needs to get done lol I'll continue to post progress though.... ??
-
Thanks man I appreciate that! ??
-
Thanks! I'd like to get better at doing fade/blend paintjobs like this. No way around it except to do it alot lol ?
-
Ha! I'm convinced it probably looks better in pics than in real life but thanks anyway lol Speaking of Gene Winfield, I really don't understand how he's been able to get his fades so nice and even in such a large (1:1 scale) format! Same goes for all those full scale custom painters out there that are good at doing fades and blends ?
-
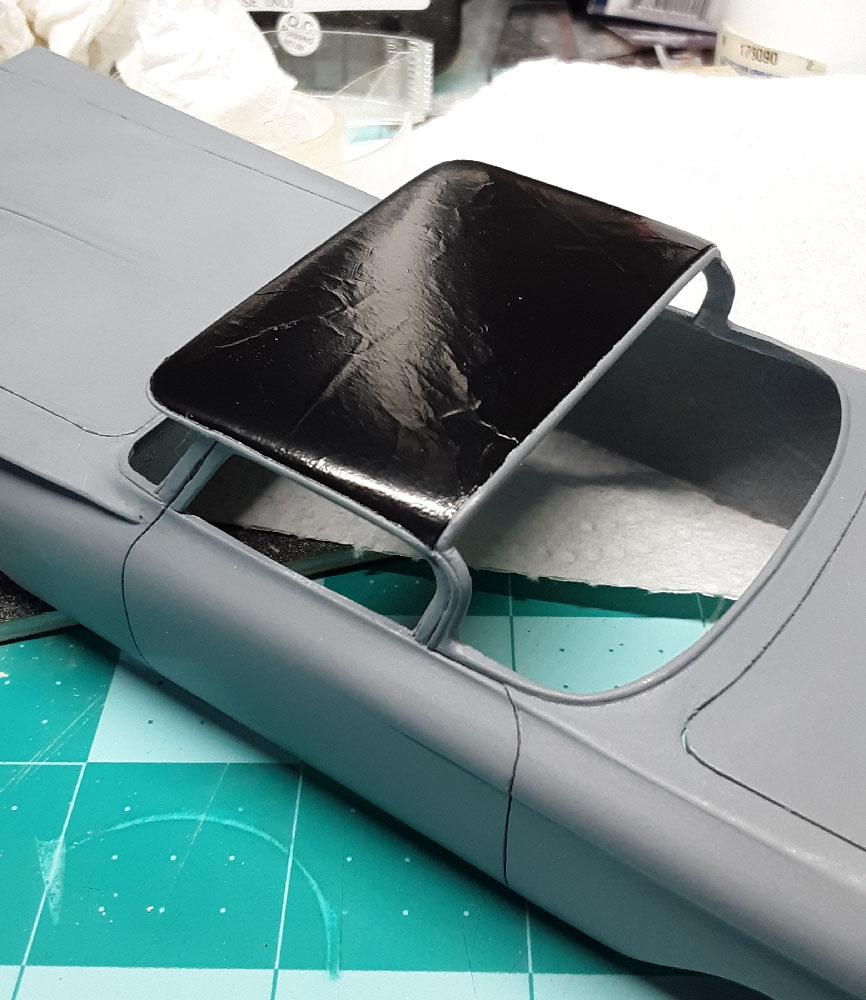
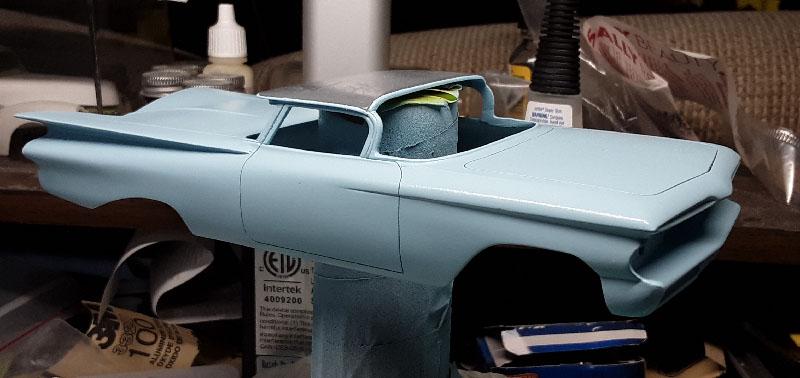
A little update: Paintwork on the body is progressing! I've been able to airbrush the nail polish fades, pearl, and clearcoat. I must say painting fades is really fun....but really tough to do! At least for me lol I made a conscious effort this time to build up the fades slowly and as evenly as I could. It usually ends up looking heavy handed to me though due to having to add more and more passes to get the fades to look even and consistent. It's STILL not as even and as nice as I wanted lol Maybe someday I will have done enough of these kinds of paintjobs that I'll end up with the quality I see in my mind! I'm happy with it for now tho as it did not completely blow up on me and the overall impression that I wanted is there....I'll take my wins whenever I can get them! ? The next step is to mask off the top and paint it gloss black after this initial pass cures. And thanks to all who posted suggestions on how to remove the BMF adhesive residue from the top! I ended up using auto wax and grease remover very sparingly, gingerly, and carefully ?

-
Thanks! Yes the 59 Chevys are among my favorite GM designs ?
-
Thanks for all the info! I was thinking of Goo Gone, actually. Also, auto wax and grease remover. Experiment time!
-
Thanks! It's coming along nicely so far..... ?
-
Thanks! I dont normally use it as a masking material, but I've used it in the past with adequate results. I think part of the problem is that the black BMF I used is REALLY old lol I may try that Tamiya thinner once the paint cures!
-
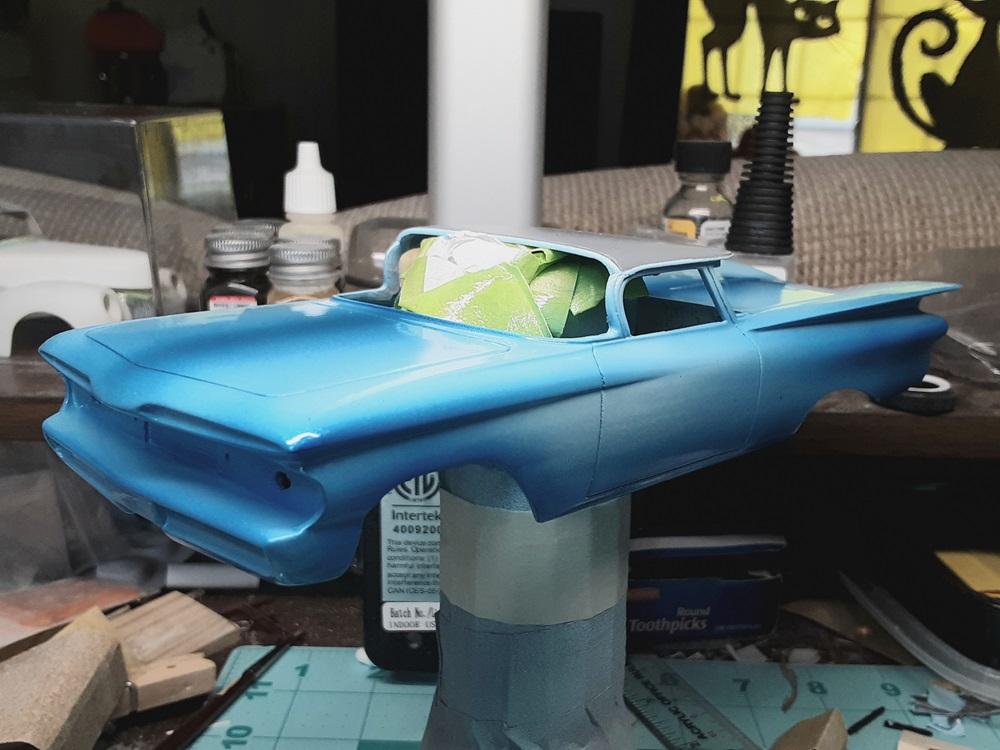
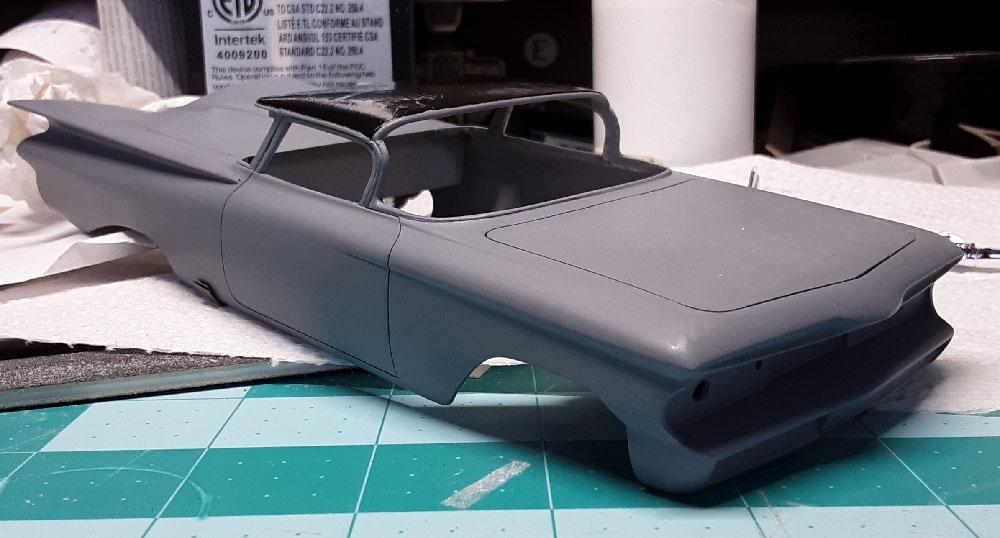
Chopped El Camino update! Final primer coat was block wet sanded, the top was masked with black BMF, and Sonic Blue guitar lacquer base coat was sprayed. The BMF left adhesive residue on the top when I peeled it off ? Anybody know what would be a safe way to remove the residue? The top will eventually sprayed black and candy fades with pearl is planned over the blue base coat. For the interior, it was painted white pearl, black spark plug wire was used for piping, and felt material was cut to into shapes and glued into place for carpet. Paint detailing the dash, gluing it into place, then gluing the steering wheel and shifter should finish off the interior. For the body, once the base coat cures completely, wet color sanding will commence then the candy fades will get airbrushed. Wish me luck! lol
-
Thanks!
-
Thanks! With the Tremayne Merc I learned that building scale replicas are tough! There is an extra amount of pressure to get the details as accurate as possible. I gave it my best effort and am pleased overall with the outcome, but I won't be doing another replica anytime soon! lol
-
Chopped/channeled 50 Ford Custom Pickup
Ferbz replied to Ferbz's topic in Model Trucks: Pickups, Vans, SUVs, Light Commercial
Thanks! Glad you like it ? Thanks! -
Chopped/channeled 50 Ford Custom Pickup
Ferbz replied to Ferbz's topic in Model Trucks: Pickups, Vans, SUVs, Light Commercial
Thanks! Glad you like it! I wasn't around when this was 'the style' but I love the era and did my best to capture it ? -
Chopped/channeled 50 Ford Custom Pickup
Ferbz replied to Ferbz's topic in Model Trucks: Pickups, Vans, SUVs, Light Commercial
Thanks! That was my goal with this project from the outset. So glad you approve! -
Chopped/channeled 50 Ford Custom Pickup
Ferbz replied to Ferbz's topic in Model Trucks: Pickups, Vans, SUVs, Light Commercial
Wow! You were around during the 'golden age' of customs....very cool! -
I've been using the Plastic Wood for over 20yrs now. And while it seems the formula has changed over the years, it's still a product that I trust when needing to do major custom body modifications. It doesn't shrink or swell, which is one of the main reasons why I like it. Another reason why I like it is that I dont have to fiddle with a separate hardener or wait hours for it to harden. With proper paint prep my lacquer paint jobs don't affect it at all. My process involves thinning it very slightly with acetone so it spreads nicely. It doesn't take very long to harden; I would say within half hour to an hour I start to knock it down and shape it with 180 grit. Once I have it rough shaped, I start to fine tune it with finer grits stepping down quickly with 240 and/or 320 and 400. You're right about the coarseness in the sense that it will need primer and some glazing putty here and there (I've used both the red bondo brand spot putty and the green 3M glazing putty for this) to remove pin holes and fine sanding scratches, which I find I would have to do whether I used Plastic Wood for custom mods or not. With any technique or product you have to spend time with it and learn how it works and how you can get it to work for you. I guess Plastic Wood 'resonates' with me since it's been my go-to filler all these years. Here's a pic I posted in another thread where I show a little step by step on how I used Plastic Wood to shape and form frenched Buick headlights on a Merc and the end result:
-
Thanks! All in all, things are going fairly smoothly with it too!
-
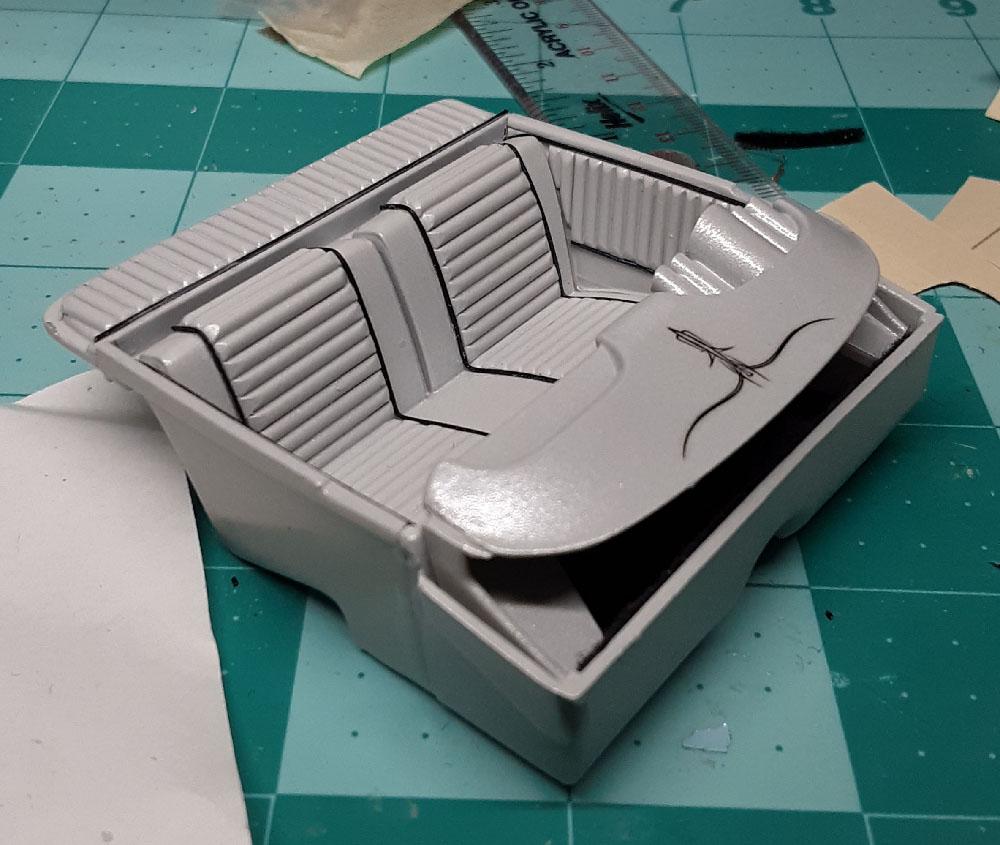
Here I moved my attention to the interior for a bit. I cut away the door panels so I could more easily get to sanding away the factory details on the panels and seats. I then added .080 half round rod for tuck and roll patterns on the seats, door panels, as well as the rear window package tray. This will get covered with primer, white pearl paint and satin clear, then black spark plug wire will be used for piping:
-
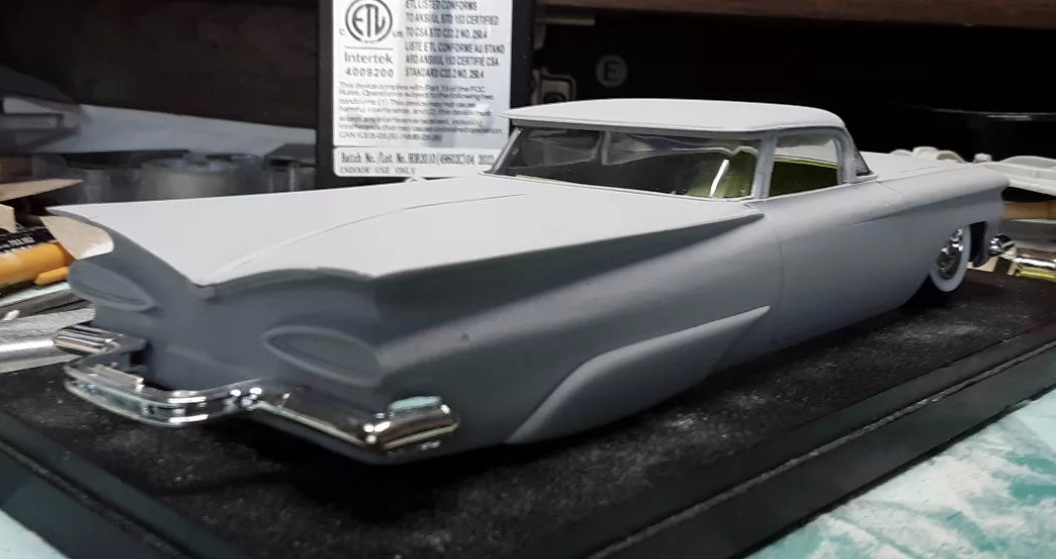
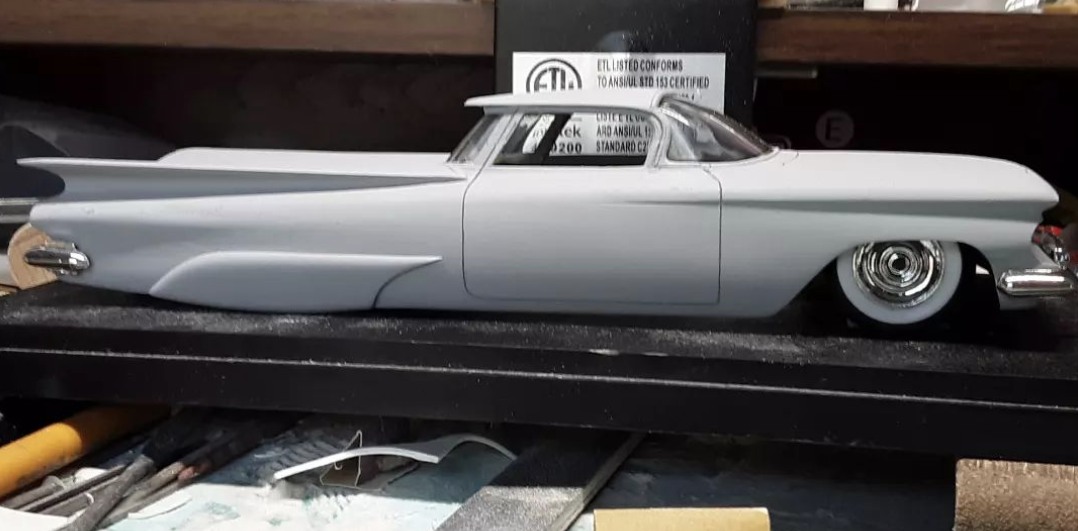
Project update! Here are some mockup pics after I sprayed a quick coat of primer just so see how the bodywork is shaping up. Rounds of glazing putty, sanding, primering ensues from here on out until bodywork is good enough for paint:
-
Thanks! What rendering? lol
-
This is amazing! How are you bending it?