Ferbz
-
Posts
508 -
Joined
-
Last visited
Content Type
Profiles
Forums
Events
Gallery
Everything posted by Ferbz
-
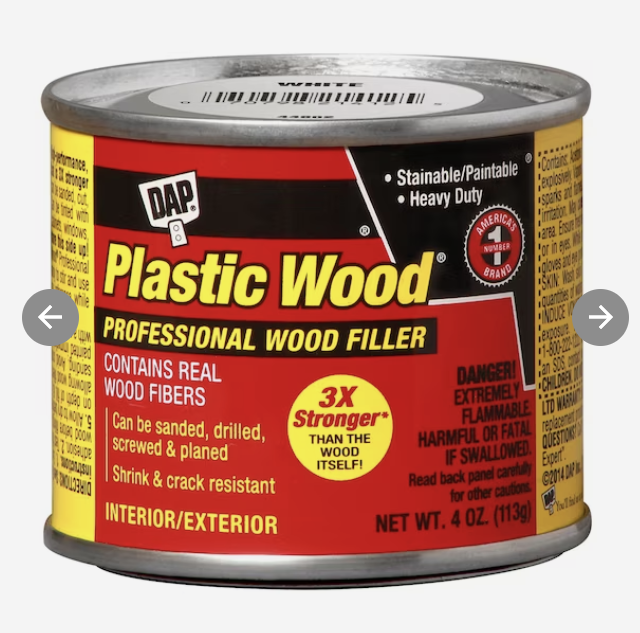
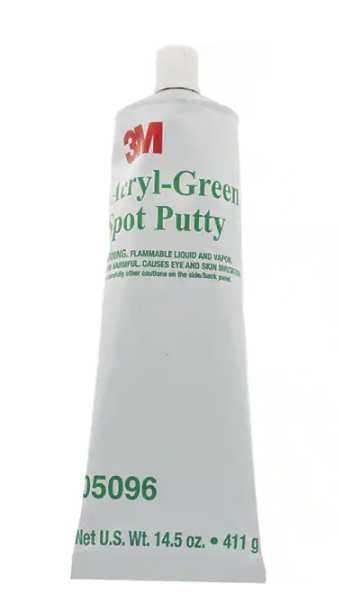
I do alot of custom body work and have used DAP brand Plastic Wood for relatively large areas and/or thicker shaping and molding. I've used it for MANY years without incidence. It does not shrink or swell under the most active types of paint(like automotive lacquer)with proper primering and final paint prepping. I use small amounts of acetone to thin it as needed. One caveat is that it often requires a spot glazing putty pass as part of primer/paint prep to fill any pinholes and/or fine sanding scratches, which you would often need to do anyway when doing any type of custom bodywork. For this I use the tube 3M Acryl-Green spot putty. Neither of these require figuring out how much hardener to use or long hardening/drying times, which I find super convenient. I also use CA glue/baking powder for filling small imperfections, cut lines, holes, etc. If you try Plastic Wood for yourself, do not buy the tube as it tends to dry out before you end up using the majority of it. Instead, buy the small 4oz. can for $10 or less. Available at most big hardware stores (like Home Depot, Lowe's, etc).

-
One tip that may help you get the paint to match as close as possible is to temporarily tape the skirts below the body nearby the rear wheel opening. This way, you'll be spraying the skirts AND body at the same time with the same amount of spray passes, and the same amount of paint material going on both the body and the skirts at the same time, etc.
-
Don, you may have to make them yourself. If you have decent Photoshop and/or Illustrator skills, maybe you can make the decals on the computer and print them out on inkjet waterslide decal material. I've done this very thing not too long ago on a build. I found clear decal print sheets at Hobby Lobby (cant recall the brand at the moment), made my design in Photoshop, printed it out, then applied the decal to my model. Obviously, there are a couple important points to keep in mind if you go this route: You'll want to make sure your image file(s) are the right scale for your model and at the correct resolution (highest is best, like 300dpi), follow the instructions for the printable decal sheet that you use. The sheets I bought called for lightly spraying the printed decal(s) with a clear fixative or clear matte spray (maybe all brands call for this?) If this is not done, the image on the decal will dissolve when placed in water. Luckily, I printed a couple copies of my image to test this first! Lastly, and this is not crucial, but I would recommend protecting the decals with a clear coat over them once you applied them to your model and have dried completely.
-
You should be able to find MEK in large hardware stores like Home Depot and/or Lowe's for $10 or less for a quart.
-
I mainly build customs which means using lots of liquid adhesive for body mods and scratch building. For many, many years I used Tenax7 which was a great liquid adhesive. Some years ago I discovered MEK for myself and have been using it exclusively. I switched over to it mostly because of how inexpensive it is compared to most all the popular liquid adhesives like Tenax7, Plastic Weld, WeldOn, etc. But I also discovered MEK's great drying time and welding properties. The one thing I would mention is that I found the fumes of MEK to be really strong, much stronger than the above mentioned glues! I use it in a well ventilated area, and cap it in between brush dips to minimize the fume's effects. I don't really do this (I probably should) but if you really want to protect yourself, you can always use a single cartridge respirator mask as well. I may be extra sensitive to it, but I've had dizziness, headaches, and even sinus pain when I wasn't careful enough. Lastly, I try to avoid getting it on my skin as it absorbs too quickly to wash off ?
-
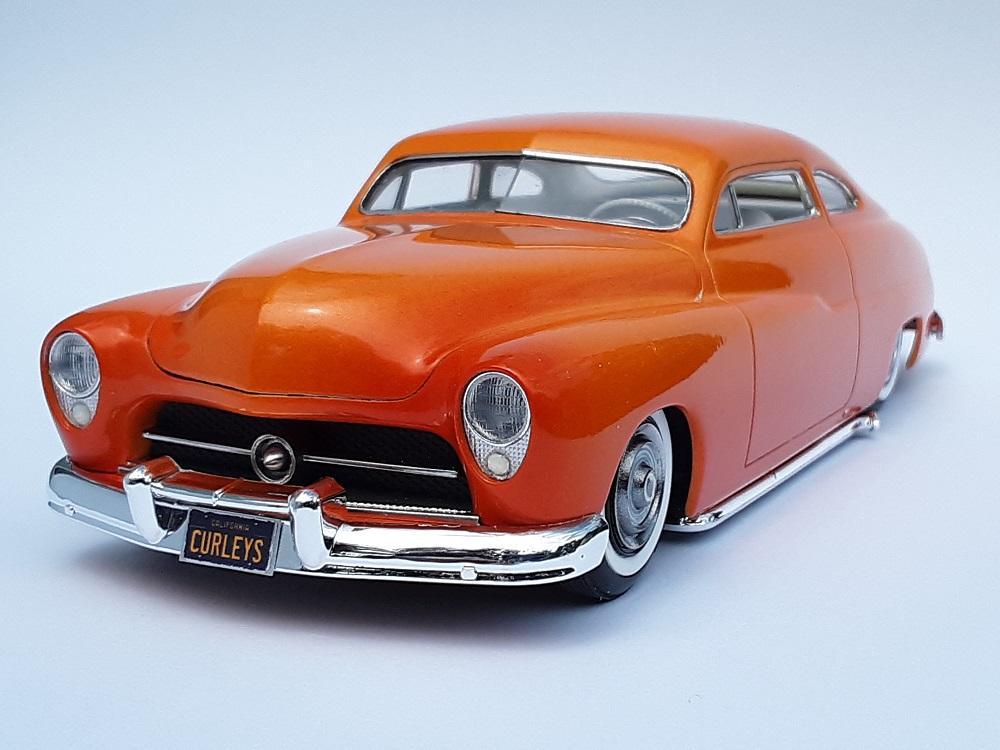
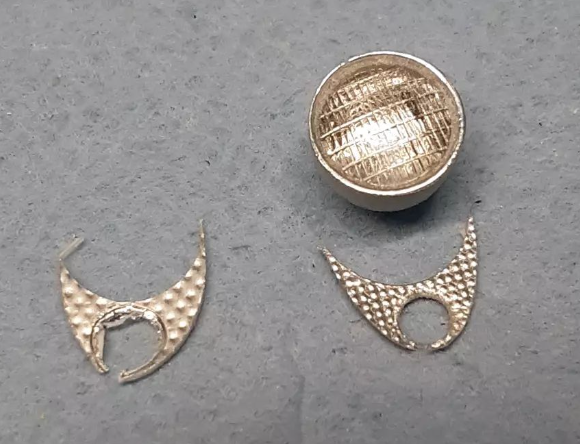
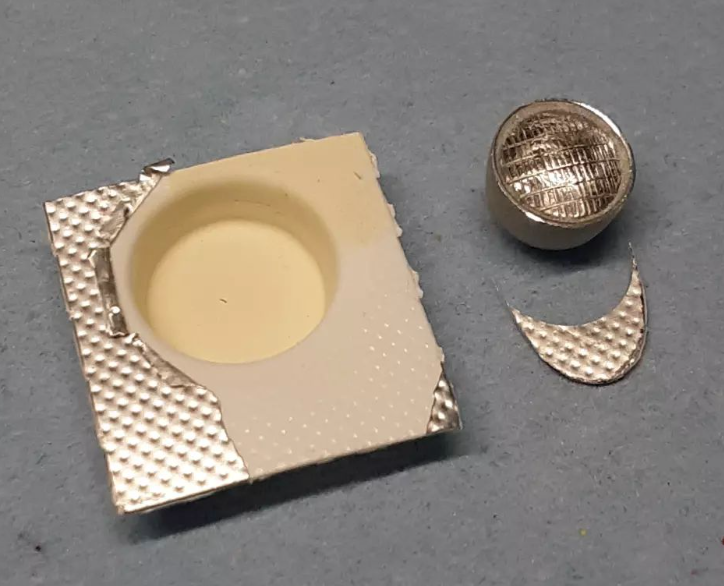
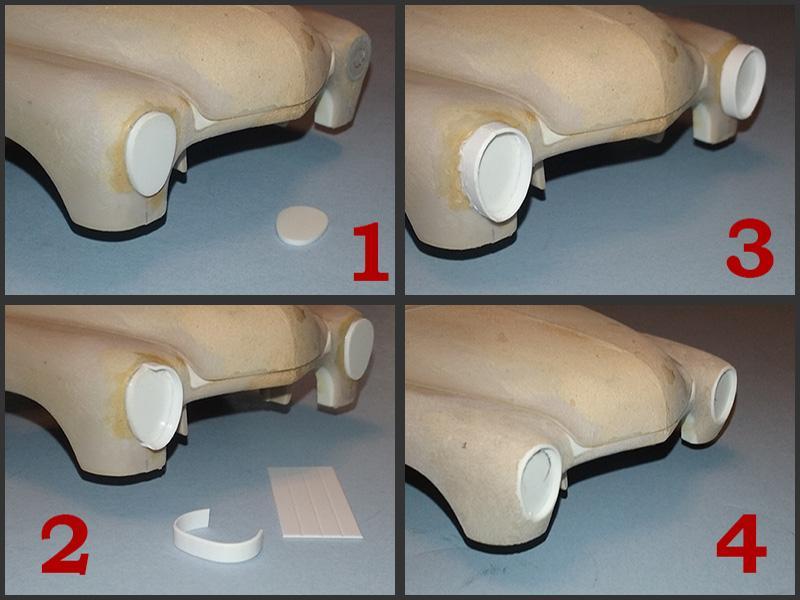
At the completion of my 1:25th scale replica of Curley Tremayne's 50 Mercury, some folks asked me how I made the frenched Buick headlights that the original 1:1 car had. I realize this may be a bit advanced for the average model car builder, but with patience, planning, and careful work, I believe any modeler with some scratch building skills could accomplish this. Step 1: Using the diameter of a standard headlight(and thinned bezel), I cut and sanded two face plates (temporarily stuck together using double sided scotch tape to help ensure I end up with identical pieces) of sheet styrene to the upside down 'egg' shape of the Buick headlight area. Once I was pleased with their shape, I glued them in place to the front of the fenders. Before gluing them, double check to make sure your egg shaped plates are large enough to accommodate a standard headlight bucket/bezel. I used the AMT 49 Merc round backed buckets with the bezel lip diameter sanded down a bit. Step 2: Wrap these face plates around the outside with strips of styrene, carefully bending them to shape, then gluing them into place. Step 3: I'm actually doing this as I go from the start, but it's a good idea to double check your measurements to make sure both sides are as identical as possible! Step 4: Using the putty of your choice (I personally use DAP Plastic Wood for thicker work like this) add putty around the outside of the headlights and sand/shape until the headlights are molded nicely to the front of the fenders. As you do this, use the lips of the strips as your guide and shape/sand away just enough to get the lip depth you like. Step 5: Sorry not shown here, but cut out the round holes for the headlight buckets in the now frenched face plates. Open up the round holes slowly and test fit the buckets until they fit comfortably in them. As I mentioned, I used the AMT Merc kit's round backed headlight bezels by gluing in the headlight lenses and sanding down the outside diameter of the bezel lips so that they fit inside the plates. These pics show the prepared headlight bucket and the face plate material I cut out of plastic pill holders that have textured foil. Cut them out larger than you need, then slowly sand them to the shape and routinely test fit them as you go until they fit comfortably inside the frenched opening. I used a hole punch to cut out the turn signal holes in them. Punch the holes first before cutting/sanding them to shape or you might risk damaging them like I did shown here! lol For final assembly, glue the foil textured plastic pieces into place, then glue the headlight buckets into their holes. Paint the turn signal holes white, then add a drop of two part 5min epoxy to represent the lenses. I've included a pic of the finished results. Hopefully this helps and that I haven't missed anything lol Feel free to hit me up if you have any questions and hopefully I can help!
- 1 reply
-
- 8
-

-

-
Monogram 1955 Ford F-100 Kustom
Ferbz replied to Dan Hay's topic in Model Trucks: Pickups, Vans, SUVs, Light Commercial
Great build! Very tasteful custom touches ? I painted my custom 50 Ford pickup the same color AND made similar exhaust pipes for it! Great minds think alike they say ? -
How to use Metallic paints
Ferbz replied to George Rom's topic in Model Building Questions and Answers
Just now seeing your question here. Have you had any luck since your post or gotten any further info? Not sure what's going on with the dullness, but one thing I know for sure is that metallics usually need a gloss clear coat over them anyway. Maybe post pics of the dullness of the regular color as well as your metallic color? -
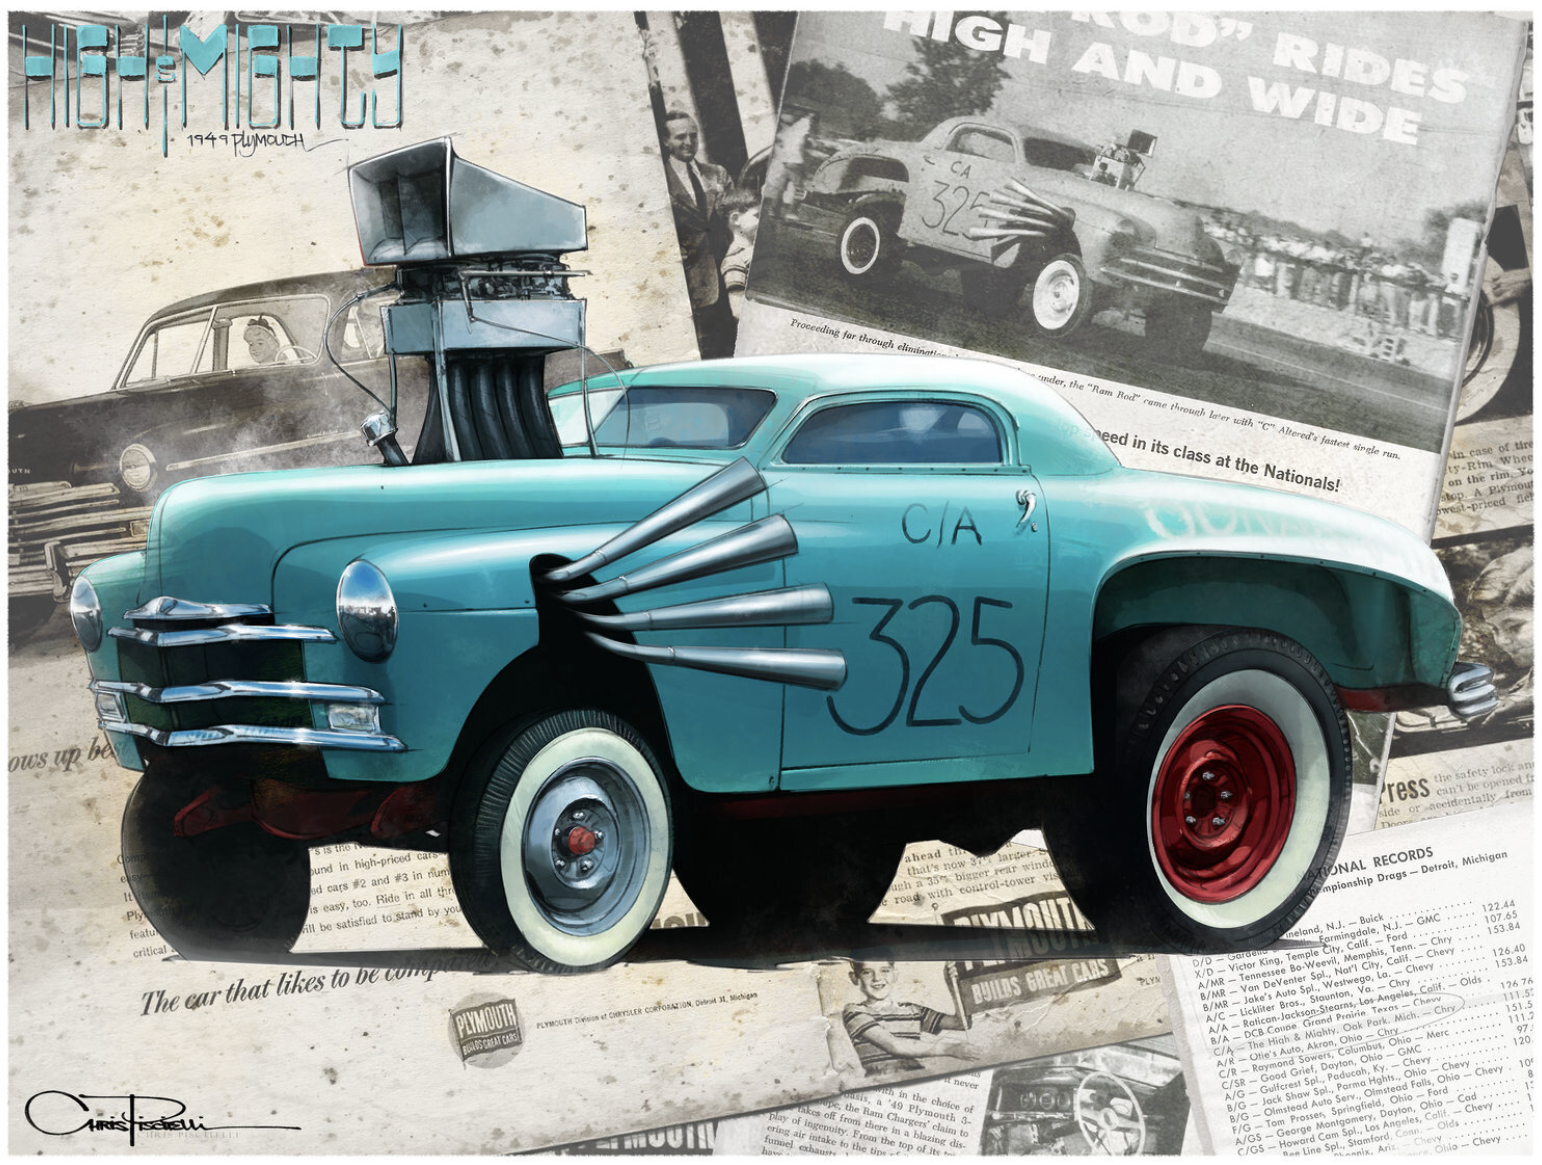
Great score on finding that 8x10! I think sometimes ideas need to simmer (and fester!) inside until they're ready ? I've been a hot rod/custom car lover since I was a kid but never knew the High and Mighty car existed until I came across an illustration of it that was done by artist/designer Chris Piscetelli. I just loved how he exaggerated the proportions here and there to make a great caricature. I feel like he captured the spirit of the car really well. I liked it so much I ordered a print of it from him lol And then coming across your scale build really got my cylinders firing! ?
-
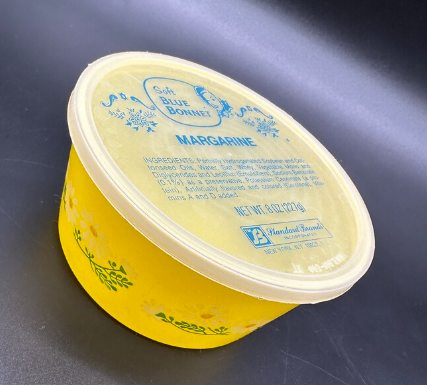
Great solution to a very common problem! Back in the 80s(!) I was spilling my liquid adhesive left and right. I finally grabbed one of my mom's plastic margarine butter dishes (anybody old enough like me to remember those? lol) turned it upside down, cut a round hole in it slightly smaller than my glue bottle, then shoved the bottle down into it. Voila...spill proof! ? Any old small round plastic container will do, as many people here have mentioned. I also added a small hole to the top to hold my glue brush, and I no longer take it out and replace the old bottle with a new bottle. I just pour new adhesive into the old bottle when it gets low while it stays in it's holder: ?
-
I recently came across your build looking for reference pics of the the real car.....Nice job! ? What struck me about the original car is it's crazy caricature-y look. What a wild car especially for it's day! It's got a great story behind it and I'm thinking my next build will be inspired by the 1:1 High N' Mighty car ?
-
Wow! ? I'm not sure I would personally place myself anywhere near in the same ballpark as Juha Ario but that's very flattering, thanks!
-
Thank you!
-
Dang! Such a nice build! The craftsmanship is superb ??
-
Love it! The detail/paint work is super nice, especially on the flathead motor! ??
-
This promises to be a super cool build! I haven't built one of those Studebakers yet and have always wanted to try my hand at it. You may have inspired me to pick one up!
-
Thanks! So very true! I'm just glad it wasn't a complete disaster and that one side of the model is decent to show lol Customs in general take alot of time to build in my experience. Add to that the fact that I'm a slow builder lol As a result, I do tend to get a bit excited once I start to finally see the finish line, but final assembly stage is where you usually want to slow down and really take your time. Even then, like you said, stuff indeed happens!
-
Thanks! I never really know what kind of impression a build will make when it's done. I usually have a pretty good vision of how it'll look in the end, but as you probably know, builds tend to have a life of their own and they 'turn out how they turn out' ? Aside from the paint job getting messed up in certain areas, the overall impression has pleasantly surprised me a bit. Someone mentioned to me that it has a GM concept vehicle dream car vibe to it, which I kind of like! ?
-
Thanks I appreciate that! With this build it's the overall vision that gets the points in my book rather than the execution. You gotta take your wins where/when you can!
-
Here are the problem areas : In my previous post you can see some areas where there are white spots here and there, and as I mentioned around the passenger wheel opening, and the big cloudy area on the passenger door. There is also a smaller but noticeable cloudy spot on the bed cover at the tip of the center behind the rear window. I may still try to touch up the small spots with a small brush if I can match the color of the fades....
-
The GOOD news: This build needs some touching up including some exhaust tips, but I'm calling this guy done! I quickly took these pics outside under a gray, cloudy sky. I'll post pics with better lighting in the 'Finished' forum. The BAD news: some weird clouding/spotting in some areas started appearing over time as I let the clearcoat cure. I suspect it has something to do with using the acrylic lacquer auto reducer I used to thin the nail polish for the fades. It must be incompatible with the spray can nitrocellulose clear I used for the final coats. It's weird cuz I've used combo before but maybe it has to do with the amount of acrylic reducer I used. The worst area was around the passenger side front wheel opening which I was able to cleverly hide as a last ditch effort with a scallop design using black BMF. BUT! when I went to use I use wax and grease remover to remove the excess BMF adhesive residue from the body it reacted and brought out that cloudiness I was seeing elsewhere which I've never seen it do before (sigh). Next time I'll try using the same spray can nitro clear in the nail polish. Either way, even though I'm bummed that the paintjob went sideways on me, I am proud of the build as I was able to materialize and see my vision for it come to life. I also learned some good lessons and honed some skills on this build! I'll just have to display it showing only the good side lol On to the next one.... ?
-
Agreed! I think I recall reading somewhere that Sam Barris had made ALOT of cuts to get the trunk on his Buick to flow to the way he wanted. It was SO much work he said he would never do another one (lol) which I dont think he ever did. Like you I also want to try chopping a 51 Chevy Fleetline. I've seen a couple of 1:1 cars and models that were chopped successfully, but am still a bit intimidated by that trunk area. I have some confidence in my skillset to do it, and I have a general sense on how to proceed, but I would like to have a fairly solid direction before I start. I only have one AMT kit in my stash to play with!
-
Great profile! It's not easy to get the chop on 39-40 coupes to flow nicely. Did it get finished? Here's my last attempt:
-
Just stumbled across this build......love it! Did it get finished?
-
Chopped/channeled 50 Ford Custom Pickup
Ferbz replied to Ferbz's topic in Model Trucks: Pickups, Vans, SUVs, Light Commercial
Thanks! Not all my builds work out quite as well as this one did lol ?