Jhedir6
-
Posts
1,440 -
Joined
-
Last visited
Content Type
Profiles
Forums
Events
Gallery
Everything posted by Jhedir6
-
Doh.....just noticed I put this in the Under Glass section....if a mod could be so kind to move it to the wip section please...thanks.
-
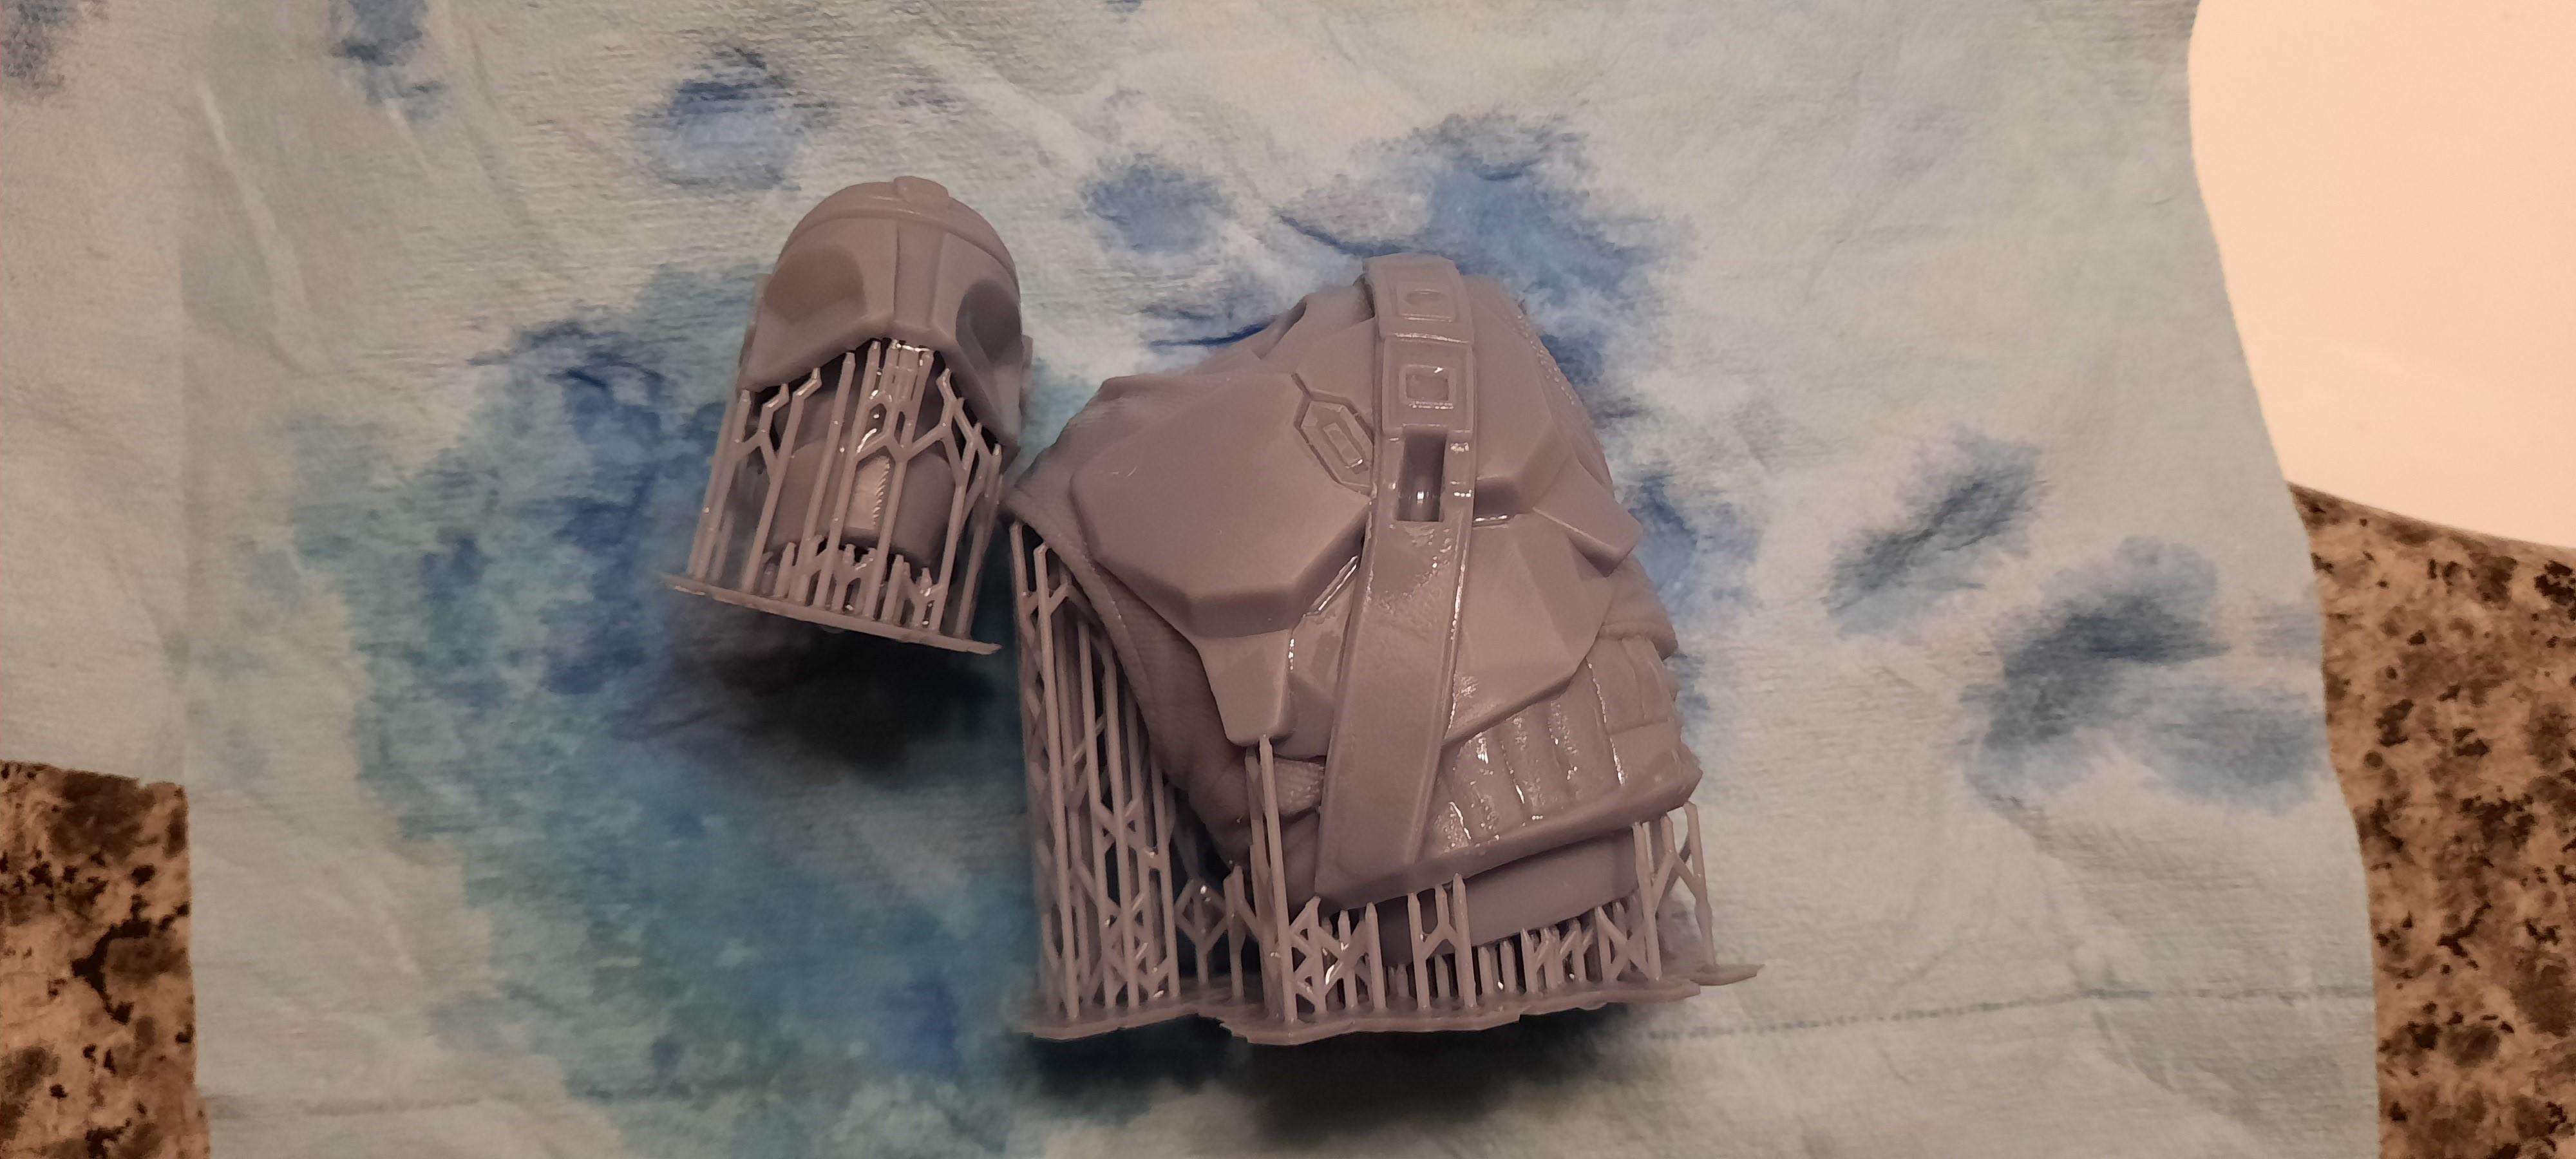
First update: First file has been printed and amazingly I seem to have nailed the use of the slicing software (Chitubox) and my settings on the printer cause the print came out perfect. Here it is after removing the printer cover hanging upside down on the build plate. I made sure to add supports under the model and not attach it directly to the build plate. Doing this makes it much more difficult to remove the printed file from the build plate. Next up here it is after being removed from the build plate and cleaned in 99% isopropyl alcohol and then some soapy water. I did goof up here a little bit, I hollowed out the model in Chitubox to save on resin (a feature built into the software) and then put drain holes in spots to allow excess resin to drain out (again the hole feature is in the software) but I don't think I did it right for this particular file as the head is solid, there should have been some hollow space in there. I did get the body right cause I have a couple drain holes and go all the excess resin and cleaning solutions out of it. The head being solid probably added like an hour to my print time for this one file ( total was just over 7hrs). The supports need to be removed, they literally just peel off like the shell on a hard boiled egg with a very satisfying crunching sound. And finally a shot after the supports removed and another wash and then some curing time with my UV light I bought. I'm still messing around with cure times so I may hit it again. This is all 100% new to me so I'm learning as I go. There are still a few nubs from the supports to trim off and sand down but over all the surface is smooth where its suppose to be ( the armour plates) and the texture on the cloth parts of the armour and belts are outstanding. I've not sanded anything and I think a quick wet sand is all I'll need before some primer. Likely I'll clean and sand the parts as I go so once all the files are done I can just prime them all and then start painting. I plan on doing some car parts soon, but I wanted something a bit more "ready to go" to start with for my first print(s). Likely I'll be printing most of the week and won't get a chance to start painting till next weekend. All comments welcome and appreciated. Thanks for looking in.

-
As the title states this will be a 3D model print of The Mandalorian and Baby Yoda (Grogu). This will be my first ever large scale figure model. Luckily there's no real faces to paint as I don't think I have the painting skills for a realistic humanoid face, but plan on doing another figure soon that will require just that. For starters, I am using a Elegoo Mars 2 Mono (my first 3D printer) that using liquid resin as its print medium. I bought the 3D file of of here. I am using the FLA files which gives a bigger scale model and also breaks down the parts more for easier painting. I also scaled the model up by another 20% so I'm not sure exactly how tall he'll be when I'm done but I'm guessing somewhere around 13-15 inches. Each number in the above pic is a separate downloadable file and you are able to import each one individually to a build plate and group the smaller items together to fill up a build. I did not print the jet pack or the smaller of the two cloaks and the base is actually 4 quarters that need be be attached together. I also grouped a bunch of the small items together and ended up with a total of 15 files to print out. If the print previews (which can estimate the print time for each file as well as the amount of resin consumed) I should end up with a print that costs me about $22 in raw resin and should take around 66hrs to print in total. My first print (the head and torso) are currently printing and should be done in a couple of hours. I'm hoping to have a wip of that up later on this evening. All comments appreciated and I'm happy to try and answer any questions you might have.
-
I didn't officially "get this today" but I did order it. Going to dip my toes into the 3D printing set. Should be here by next weekend so, just have to decide what to print first. https://www.amazon.ca/gp/product/B08LKQLZRR/ref=ppx_yo_dt_b_asin_title_o00_s00?ie=UTF8&psc=1
-
There are some sites that have 3D files for cars that can be bought, or some have free files too. There are many, I've found a few sites, but I can't remember the one I like atm, if I find it I'll link it. But for now here's one https://cults3d.com/en/3d-model/various/ford-super-duty Just google 3D print files with what you're looking for and you might find exactly what you're looking for.
-
I feel you, I've not touched my build in weeks. I did get my wheels/tire combo ordered, they were custom made and 3D printed so hopefully they'll ship soon. Lots of great progress guys. Looking forward to more updates. Hoping to get back to mine soon, maybe some paint this weekend.
-
2020 Shelby GT500 TK--Coming Soon !!!
Jhedir6 replied to Jhedir6's topic in Car Aftermarket / Resin / 3D Printed
Fugu released some more update pics. Looks like the 3D tests are printed, and they're working on some fine tuning. Hopefully not too much longer for this.
-
2014 Ford Raptor
Jhedir6 replied to Jhedir6's topic in WIP: Model Trucks: Pickups, Vans, SUVs, Light Commercial
Yeah, yours came out amazing Tom. It's actually probably the best and most detailed snap kit I can think of. I really wish Revell had done a full on kit of this truck, but atleast this snap version was much better than the quick build version they did on the Gen2. The only real knock against this snap kit is that they did not include waterslide decals, the stickers are good for the kids, sure, but given the size of the sheet, they could have easily added another small sheet with proper waterslide decals. Sort of an update....I got all the parts cleaned and primed before I came to work tonight, but, like the idiot I am, I forgot to take a pic. I'll post one when I get home, before painting later on today. Shooting for a 3 day build. I should be able to get all the painting done today and probably the clear as well. -
I've got another one of these in yesterday, and since I've been in a bit of a modeling funk for the past month or more I think I'll crack this open later today (chillin' at work right now) and go for a start to finish build (fingers crossed) without getting sidetracked. Not sure what colour I'm going with yet....I've got a ton of opened bottles, so likely I'll just pic something that's got enough paint left in it to do this up quick, instead of ordering anything new. Always open to any suggestions too. Hoping to have an actual update later on this afternoon.
-
NP Dan. Glad to help out. Why not either put the second car on just steelies (so it looks like its on skinnier transport wheels) or jack it up on stands like its being worked on till you get another set of the minilites?
-
Following.... I got one of these on my "to do list" which is far too long BTW you might want to try this link https://www.modelbuilderswh.com/collections/wheels-tires/products/minilite-15-wheels-tires-set-1-24th-scale Looking good so far Dan. The trailer looks amazing.
-
2020 Shelby GT500 TK--Coming Soon !!!
Jhedir6 replied to Jhedir6's topic in Car Aftermarket / Resin / 3D Printed
Most of their TK's are around the $50-60 US range. I'm betting this one will be higher as their doing interior and exterior details as well as wheels/tires.....my guess is $80ish but that's a guess I've not seen them post anything on a price point yet. -
https://www.facebook.com/marketplace/item/477556589938642/?ref=browse_tab&referral_code=marketplace_general
-
2020 Shelby GT500 TK--Coming Soon !!!
Jhedir6 posted a topic in Car Aftermarket / Resin / 3D Printed
The guys at Fugu Garage are working on a 2020 Shelby GT500 TK for the new Tamiya Mustang GT4 kit. Here are some pics from their FB page of the 3D print files they will make the resin masters from. The TK is also suppose to include all parts needed to make the GT4 race car into the GT500 road car...clear resin and wheels and tires as well. Can't wait to see this in person.
-
15th Annual 24HRS of Daytona Group Build - McLaren Senna
Jhedir6 replied to Jhedir6's topic in WIP: Model Cars
Well I'm not going to finish this year on time, unfortunately. This year's build fought me all the way, not the kit, which is challenging, but everything else. First my exhaust fan on my paint booth fried about 10 mins before the start so I had to go to the hardware store and pick up a new one and install it before I could start. Then my airbrush gave me fits, crappy primer coats followed by terrible paint coats. I was forced to do about nine layers to get decent coverage with sanding and a lot of swearing in between. Finally I figured it out and my last two coats of paint were "descent" but definitely not perfect. Once I finally got the paint done, I spent the next two hours looking for the decals I wanted to use (which I had in my hands two days before the start). I was just about to give up when they magically appeared. Luckily I only used a few so they went down fast and well and I was then able to get an "ok" clear on the whole thing. And finally as the clear was setting up, I decided to have a snack and a rest but started feeling unwell so I ended up sleeping for about 4 hours. Take all that BLAH_BLAH_BLAH_BLAH out of the equation, I think I would have finished with no issues. Oh well, next year. Anyways, I only took a couple pics, And this is what I was shooting for, hopefully I can get close to it.
-
Another year down and another 24HR build coming this weekend (Daytona weekend). I'll be watching the race and building this I'll try to keep up with some updates as the weekend progress', but there are a lot of pieces in this kit. The livery I've chosen should help speed up things a bit, but time will tell. More on Saturday afternoon.
-
Nice start. Looks great. You've leap frogged me on the progress. I love that orange. Will be watching.
-
My second Senna arrived today in the mail. This weekend is the annual 24hrs of Daytona Group Build over on FB.https://www.facebook.com/groups/2490663337730074 Originally I was planning on doing another of the Mustang GT4's but now that I've had a chance to pick at my first Senna a bit I think I can honestly finish one in 24 hrs so I'll be switching to the Senna for this year's build. I'll try to keep a WiP for the 24hr build updated over the weekend.
-
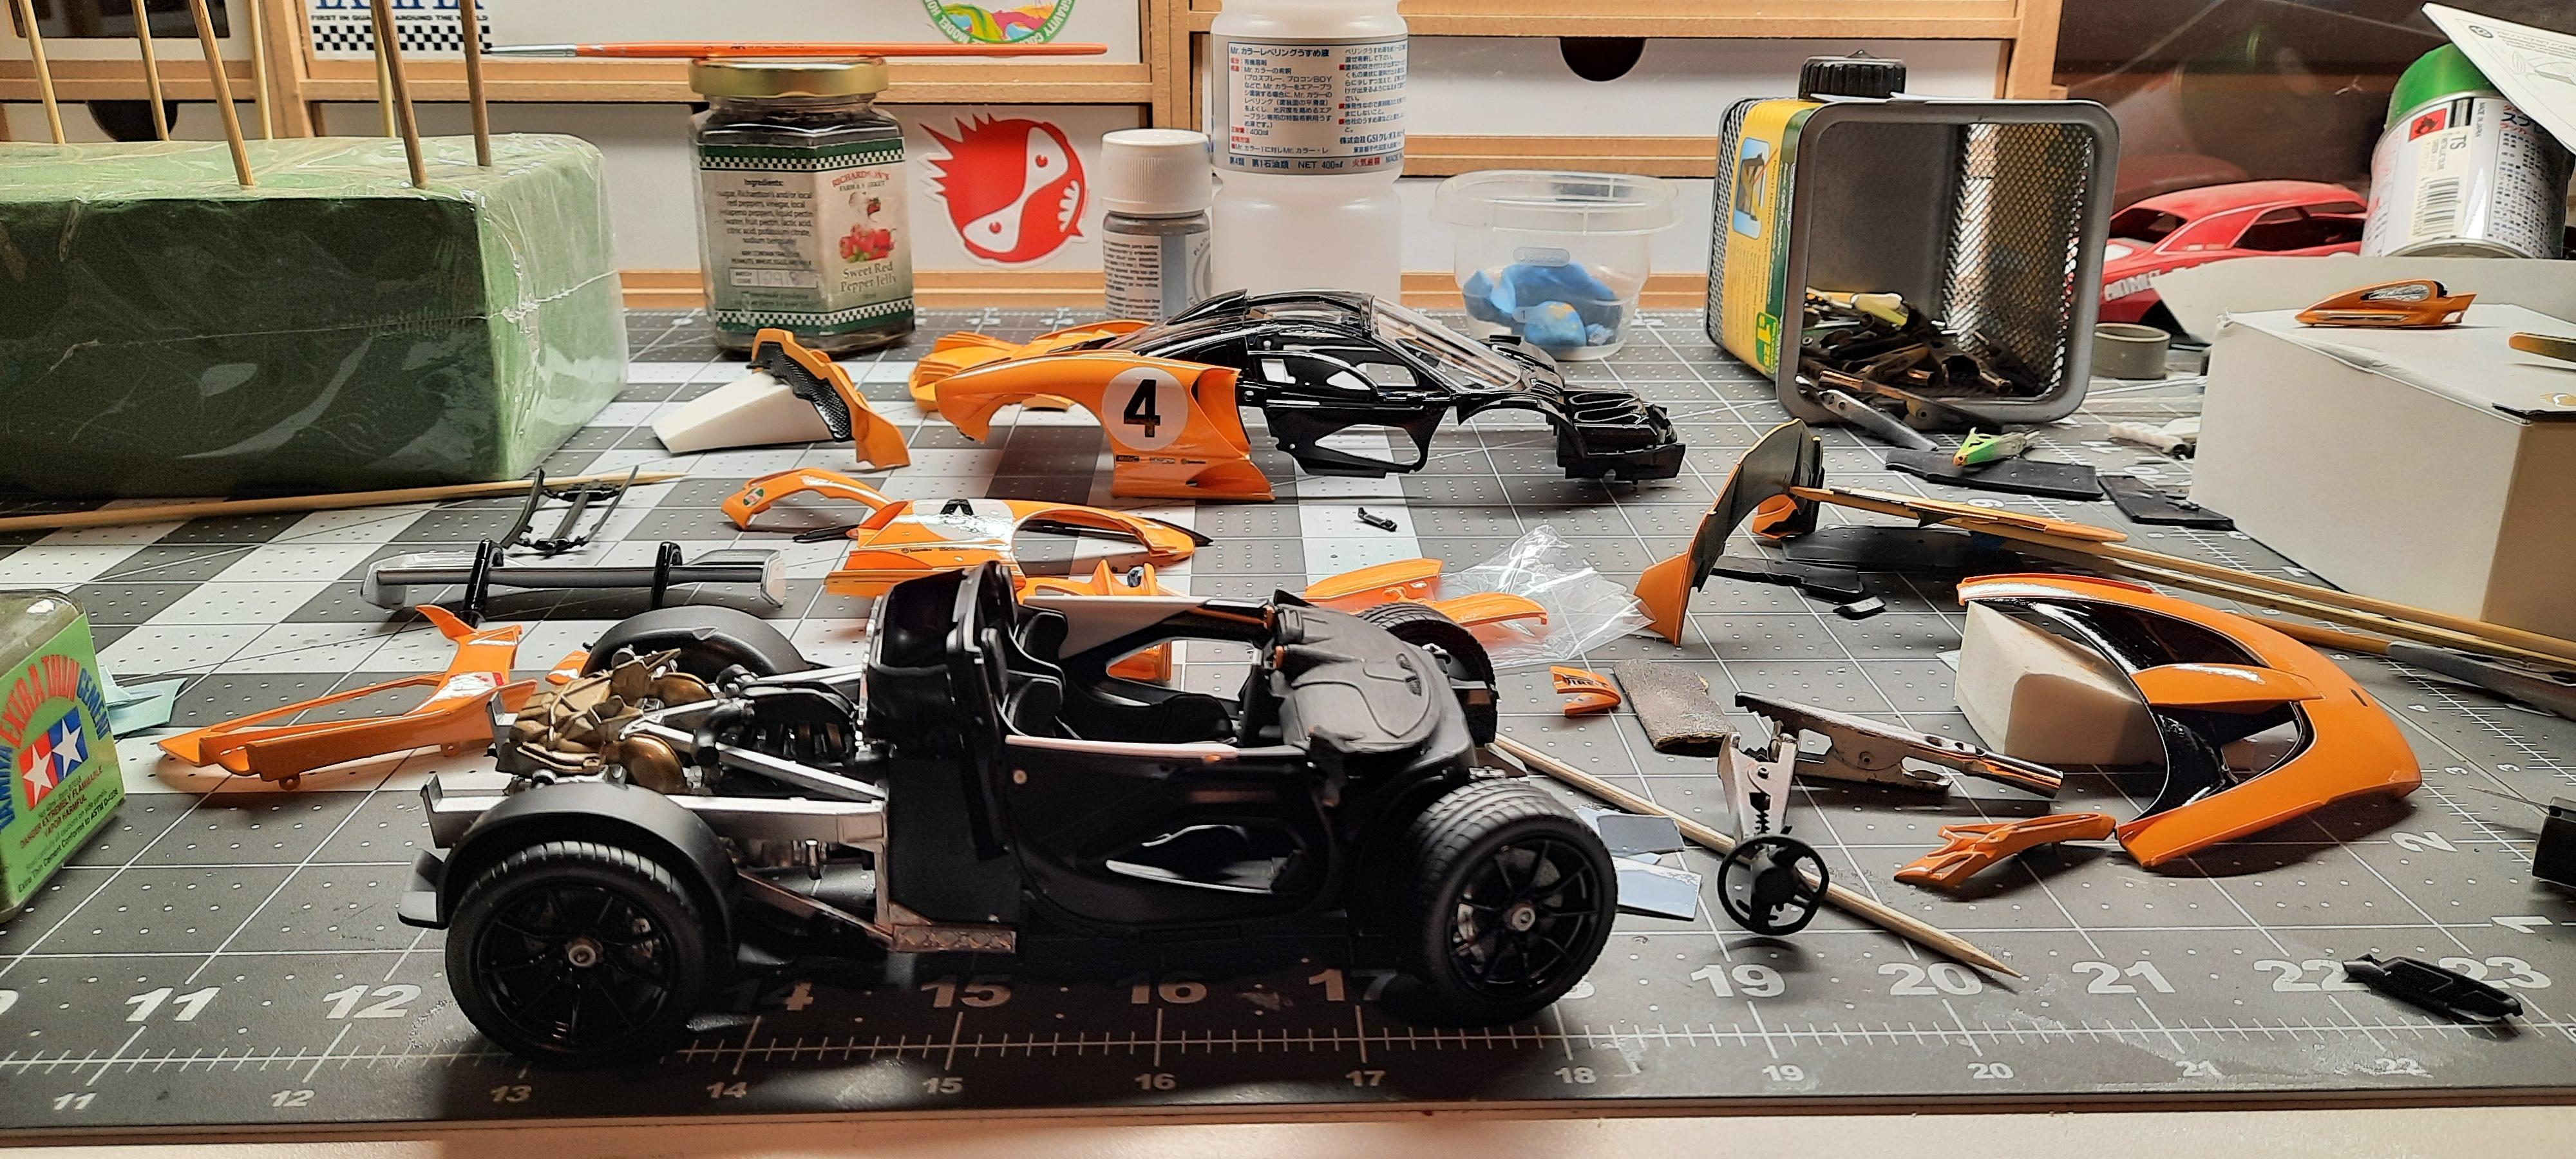
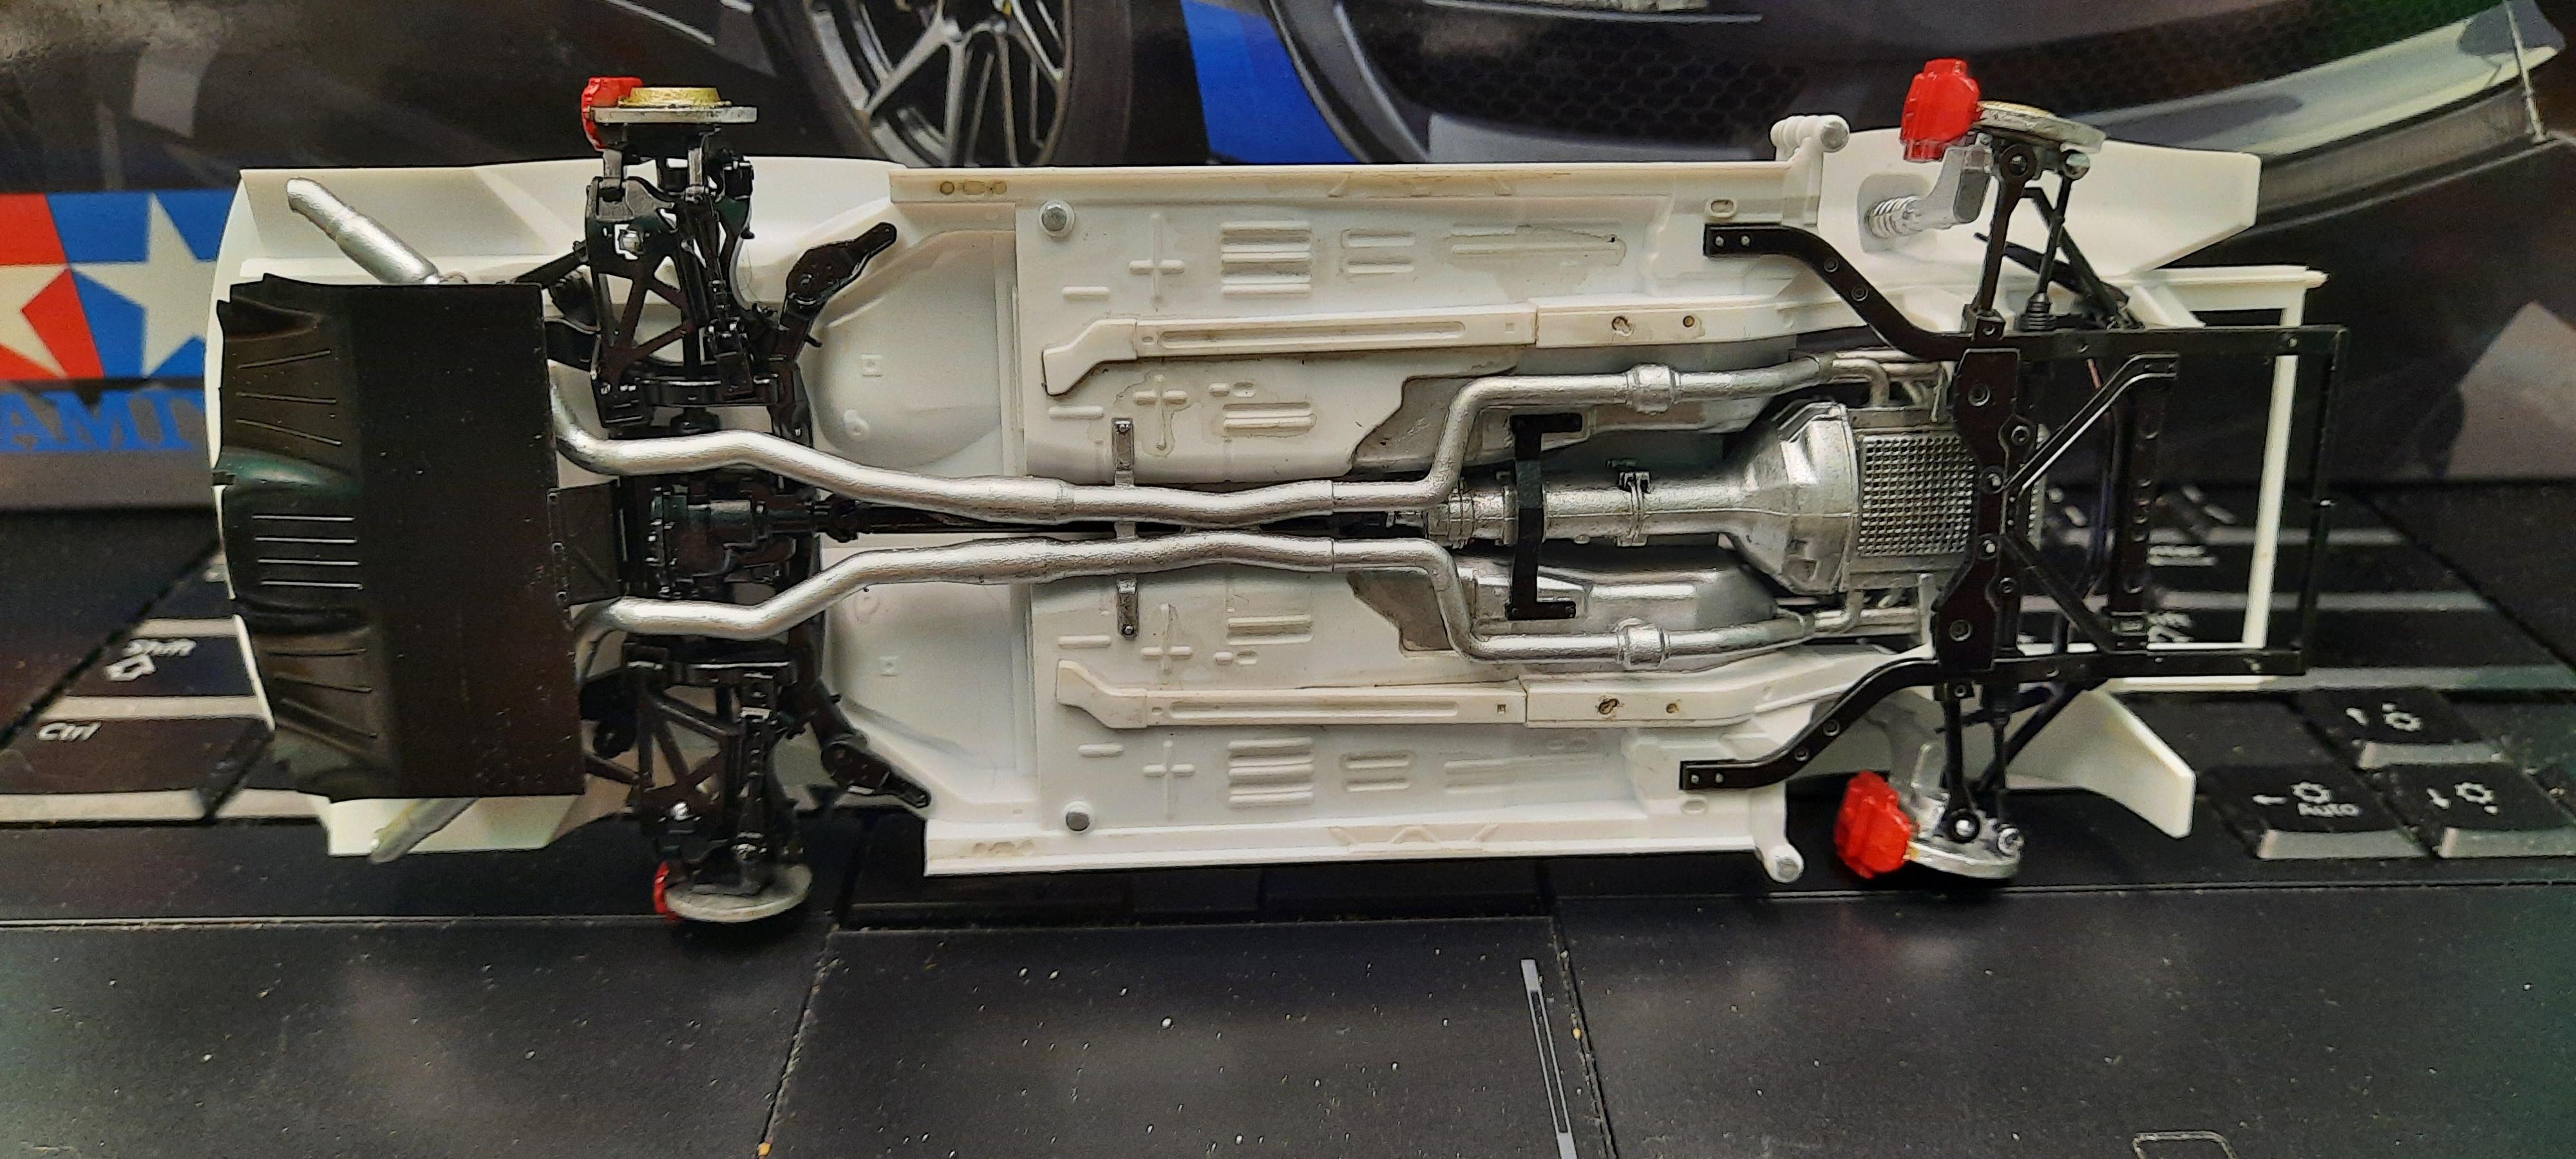
Quick unboxing photos of the new McLaren Senna from Tamiya. In a word.....A-maz-ing..... the kit looks stunning and not your normal car kit. Just a quick flip through the instructions shows that this will be a challenging kit. This will be one of those kits where following the instructions is going to be fairly important. I highly recommend spending a lot of time reading the instructions ( I didn't photo the "book" but there are 50 steps on this one) as nothing goes together like a normal car kit. This is going to be fun. In no particular order, Chassis components and some external trim parts. Interior tub and some more chassis bits. Suspension, exhaust, engine, brakes, wheels and more. Body panels. Some more body panels and interior parts. Monocoque chassis Clear parts.....as usual with Tamiya, probably the nicest, clearest "glass" out there. I didn't take any pics of the the decals (there's very few) or the tires as I left them at home by mistake. I also did not take any pics of the instruction booklet as its way too long, but it's typical Tamiya, beautifully drawn and very detailed. Now to get to work and see what is what in this thing. More later tonight I hope.
-
Drove to Toronto this morning to pick this bad boy up. Time for bed but later tonight at work I'll tear it open and post up some pics....and maybe a wip.
-
Zero paints - gritty finish question
Jhedir6 replied to Mcpesq817's topic in Model Building Questions and Answers
I have issues with Zero Paints doing this sometimes as well. Either you're putting it on way too thick and heavy, causing it to "burn" the primer and creating crazing under the paint and also I'd guess you're getting the grainy texture from the air pressure being too high causing some of the paint to dry in mid air before landing on the body. Turn the pressure down and spray light mist coats and let them dry for 5-10 mins before putting on the next coat. Once you have 5+ light coats on that are dry and no crazing or grittiness then you might try a "wet" coat, but dont go too wet, if there's too much wet paint on the body it will burn through what you have down already. -
If you aren't already using, I highly recommend this for straight up plastic to plastic. Best stuff there is.
-
Lots of great progress guys. Keep the updates coming. I put some primer on tonight to see what fixes I need on the hood still. I still havent filed down the hood over the headlights yet. I also drilled out some holes on the roof for the antennas I'll be running. I also added a "I dont know what it is" box to the roof from a Subaru rally car, it looks like it might be a camera pod, I honestly dont know. For the purpose of my build its going to be a FLIR radar pod..cause I said so. The wheels on it atm are the kit wheels and tires but will not be what I'm going to use, they're just on there for the time being.
-
Looks fantastic. I have the 5.2L Ford engine. Been debating putting it in my Mustang. I wasn't going to originally, but I may now since I have it. Really impressed with the level of detail coming from these 3D printed engines.
-
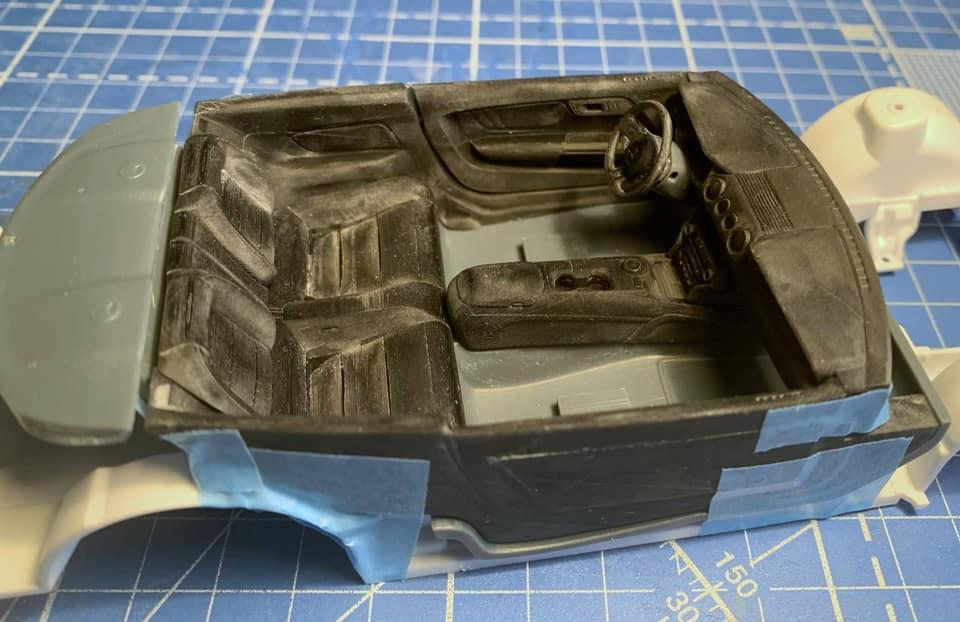
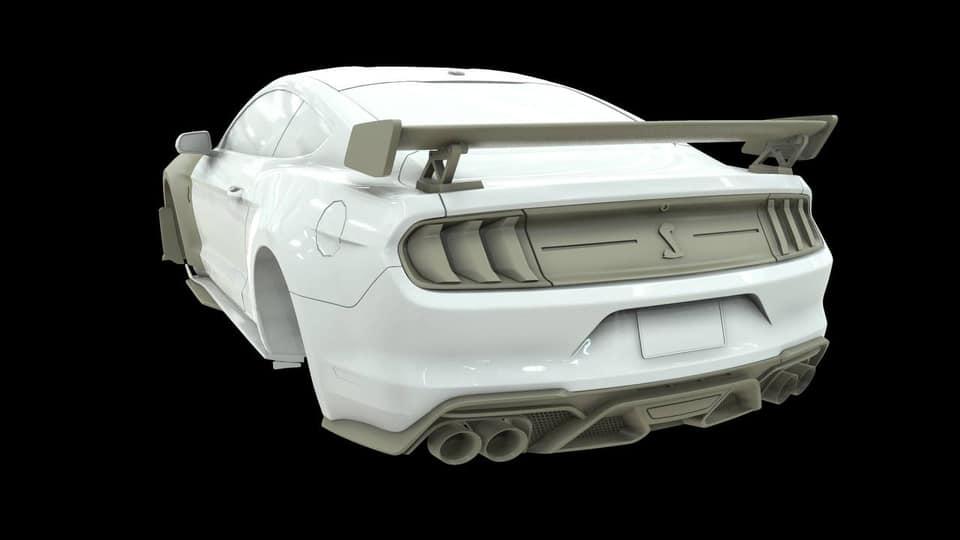
Couple more pics of the Mustang for tonight. Not getting a lot done here at work, but still moving forward. Chassis is almost complete. I still want to weather the exhaust some more but I forgot my weathering pastels at home, so will work on that on the weekend. I stained up the underside and may add some more. I did not paint the chassis (what will be) body colour, as I want it to look like a race car was quickly 'disguised" as a road car. Originally I wanted to have the windows be clear to show off the interior but now I think I'll "tint" them to help hide what lies underneath. I've also added in both the upper front grill and rear tail light valence from the diecast GT350R. The lower front grill insert is from the kit since it's stock looking already and fits better than the piece from the diecast. I still need to file the front edge of the hood over the headlights. As you can see in the pic it's not a perfect match, but very close. I may swap out the rear valence lights for the kit ones but I'm not sure yet. The kit valence has the fuel fillers in it which would make refueling for the long trip faster but then the car would look more race car. I will likely detail the trunk with fuel cells and just have the fillers be mounted in the trunk and just open the trunk for refueling, helping to keep the "stock" outside appearance.


.jpg.ec916acf8e50d17353e158ec2a9dafcd.jpg)