
Jantrix
-
Posts
11,225 -
Joined
-
Last visited
Content Type
Profiles
Forums
Events
Gallery
Everything posted by Jantrix
-

Failed tutorial - but still kinda cool
Jantrix replied to Jantrix's topic in Tips, Tricks, and Tutorials
I was concerned that pushing it down or lifting to slowly/quickly could cause issues, tearing the film like I did n in this instance. I was trying to take the "human factor" out of the equation. Thanks for your comments guys. -
Oh my. where did this come from?
-
I think we can all think of a few, and I think that's what will make this fun. We could get all sorts of builds.
-
Failed tutorial - but still kinda cool
Jantrix replied to Jantrix's topic in Tips, Tricks, and Tutorials
Nope, the paint was mostly dry, it scrubbed right off. -
Failed tutorial - but still kinda cool
Jantrix replied to Jantrix's topic in Tips, Tricks, and Tutorials
Well here's what I ended up with. I still think it's kinda cool and I may well leave it as is. However it was not as successful as I'd hoped. However I do think this method can work. My mistake? Was too much water above the model. If I had only 1/2 inch of water over the model, I don't think I would have lost as much paint on the sides of the bucket and it would have covered the car. More soon! My next attempt will be a yellow/blue/red blend over a Revell 41 Willys. -
Failed tutorial - but still kinda cool
Jantrix replied to Jantrix's topic in Tips, Tricks, and Tutorials
Step 5. Remove tape over hole. Let water drain from bucket. In my minds eye I saw a nice level descent of the water. What I didn't account for was the paint adhering to the side of the bucket and pulling away from the center of the bucket where I needed it, as you can see in the following pics. -
First off this tutorial is NOT of a successful paint technique. This attempt was a failure. Not an abysmal failure, but not what I intended. But, I still think this can work. Step into Robby-land and have a look. Okay, I've wanted to try this type of paint job forever. I don't know what it's called, I just know I like it. The theory is this. Model under the water, spray surface of water, pull model through the paint slick for a cool easter egg looking pattern. However I wanted to try to take the pulling the model out of the water step out of the equation so I don't have to worry about pulling too fast or slow. So I came up with this. Idea. Step 1. Paint model in a light color. Krylon Pebble tan this time. Step 2. Drill hole in bucket and put a piece of tape over it. Step 3. Duct tape model (on a stand) to bottom of bucket and fill the bucket with with water. This here is where I went wrong. Step 4. Spray surface of water with paint.
-
Jim, you just continue to put a smile on my face. I love originality and you just seem to eat, drink, sleep, breathe it.
-
Well done! It has a great 60's vibe.
-
Wow.
-
Chassis building Question
Jantrix replied to raildogg's topic in Model Building Questions and Answers
I agree with Chas. It is so much simpler to just get a pro-street kit and borrow the back half of the chassis. -
We've had several threads about the various bad kits that are out there and lets face it we all have at least one in our stash. How about a CBP based upon taking the proverbial sows ear and turning into a cool model? I have a AMT '67 GTO and a Revell IMSA Camaro that are spectacularly bad, and I've been itching to do something cool with them. Interested?? The rules would be as follows 1. Start January 1, 2013 and end December 31, 2013. 2. It's got to be based upon a really lousy kit, which as we know is open to opinion, but no one is gonna call you on it. If you say it's lousy, that's good enough for me. It's all for fun after all. And hey, rebuilding a really nasty glue-bomb would also fit the spirit of this CBP. 3. We may have a popular vote for the best build at the end. 4. That's about it. Anything goes. Any style, genre or scale. So who's in? Note: this thread is for gauging interest only. So don't go posting up pics of your planned build yet. If we have enough people interested, I'll close this thread and start another shortly before the new year.
-
Harley hits Grizzley Bear...
Jantrix replied to slusher's topic in General Automotive Talk (Trucks and Cars)
If you read further down the thread, someone proved it false. -
Thanks guys, I'll be hitting it hard this weekend. There really isn't any time consuming work left so getting to paint is pretty likely. More soon.
-
My garage is looking just as crowded. :lol:
-
Very nice work. A wonderful scene.
-
Thanks Erik, I appreciate the feedback.
-
Holy shnikes! I hadn't noticed that. Thanks very much Roger. EDIT- just Google imaged it. There are two reservoirs. One for coolant over flow the other for wiper fluid I'm guessing. However they are much smaller than the molded part. I think I'm going to do what you suggest.
-
talking about 427 cammers.......
Jantrix replied to tubbs's topic in Model Building Questions and Answers
Where is it making contact where is shouldn't be? -
LOVE IT! ABSURD OR NOT IT'S COOL.
-
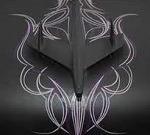
The bomber art is something I'm kicking around but the panel line and rivet thing has been done many, many times, and it's not my style to replicate what has already been done. I'm also considering some sort of tribal design.
-
2-carb manifold from Reps & Mins
Jantrix replied to Lyle Willits's topic in Car Aftermarket / Resin / 3D Printed
Excellent! -
Experiments with Duplicolr Prism Multi-Color Clear.
Jantrix replied to Longbox55's topic in Tips, Tricks, and Tutorials
This came in one of their rattle can sets a few years back. I've yet to use it on a model. I'm just waiting for the right kit. -
JUst this one from me this year. Revell (and others) 1/24 '37 cabriolet.
-
ID this seat for me please?
Jantrix replied to tjones87's topic in Model Building Questions and Answers
I checked both my 70's Camaro kits and neither matched your example. Sorry.