Andy Oldenburg
-
Posts
345 -
Joined
-
Last visited
Content Type
Profiles
Forums
Events
Gallery
Everything posted by Andy Oldenburg
-
Hi Jim, John, Andrew, Mike, J and Brian for checking out my post and your friendly replies!
-
Hello and thank you to all my responders! Thanks for your friendly support! Best model building wishes, Andy
-
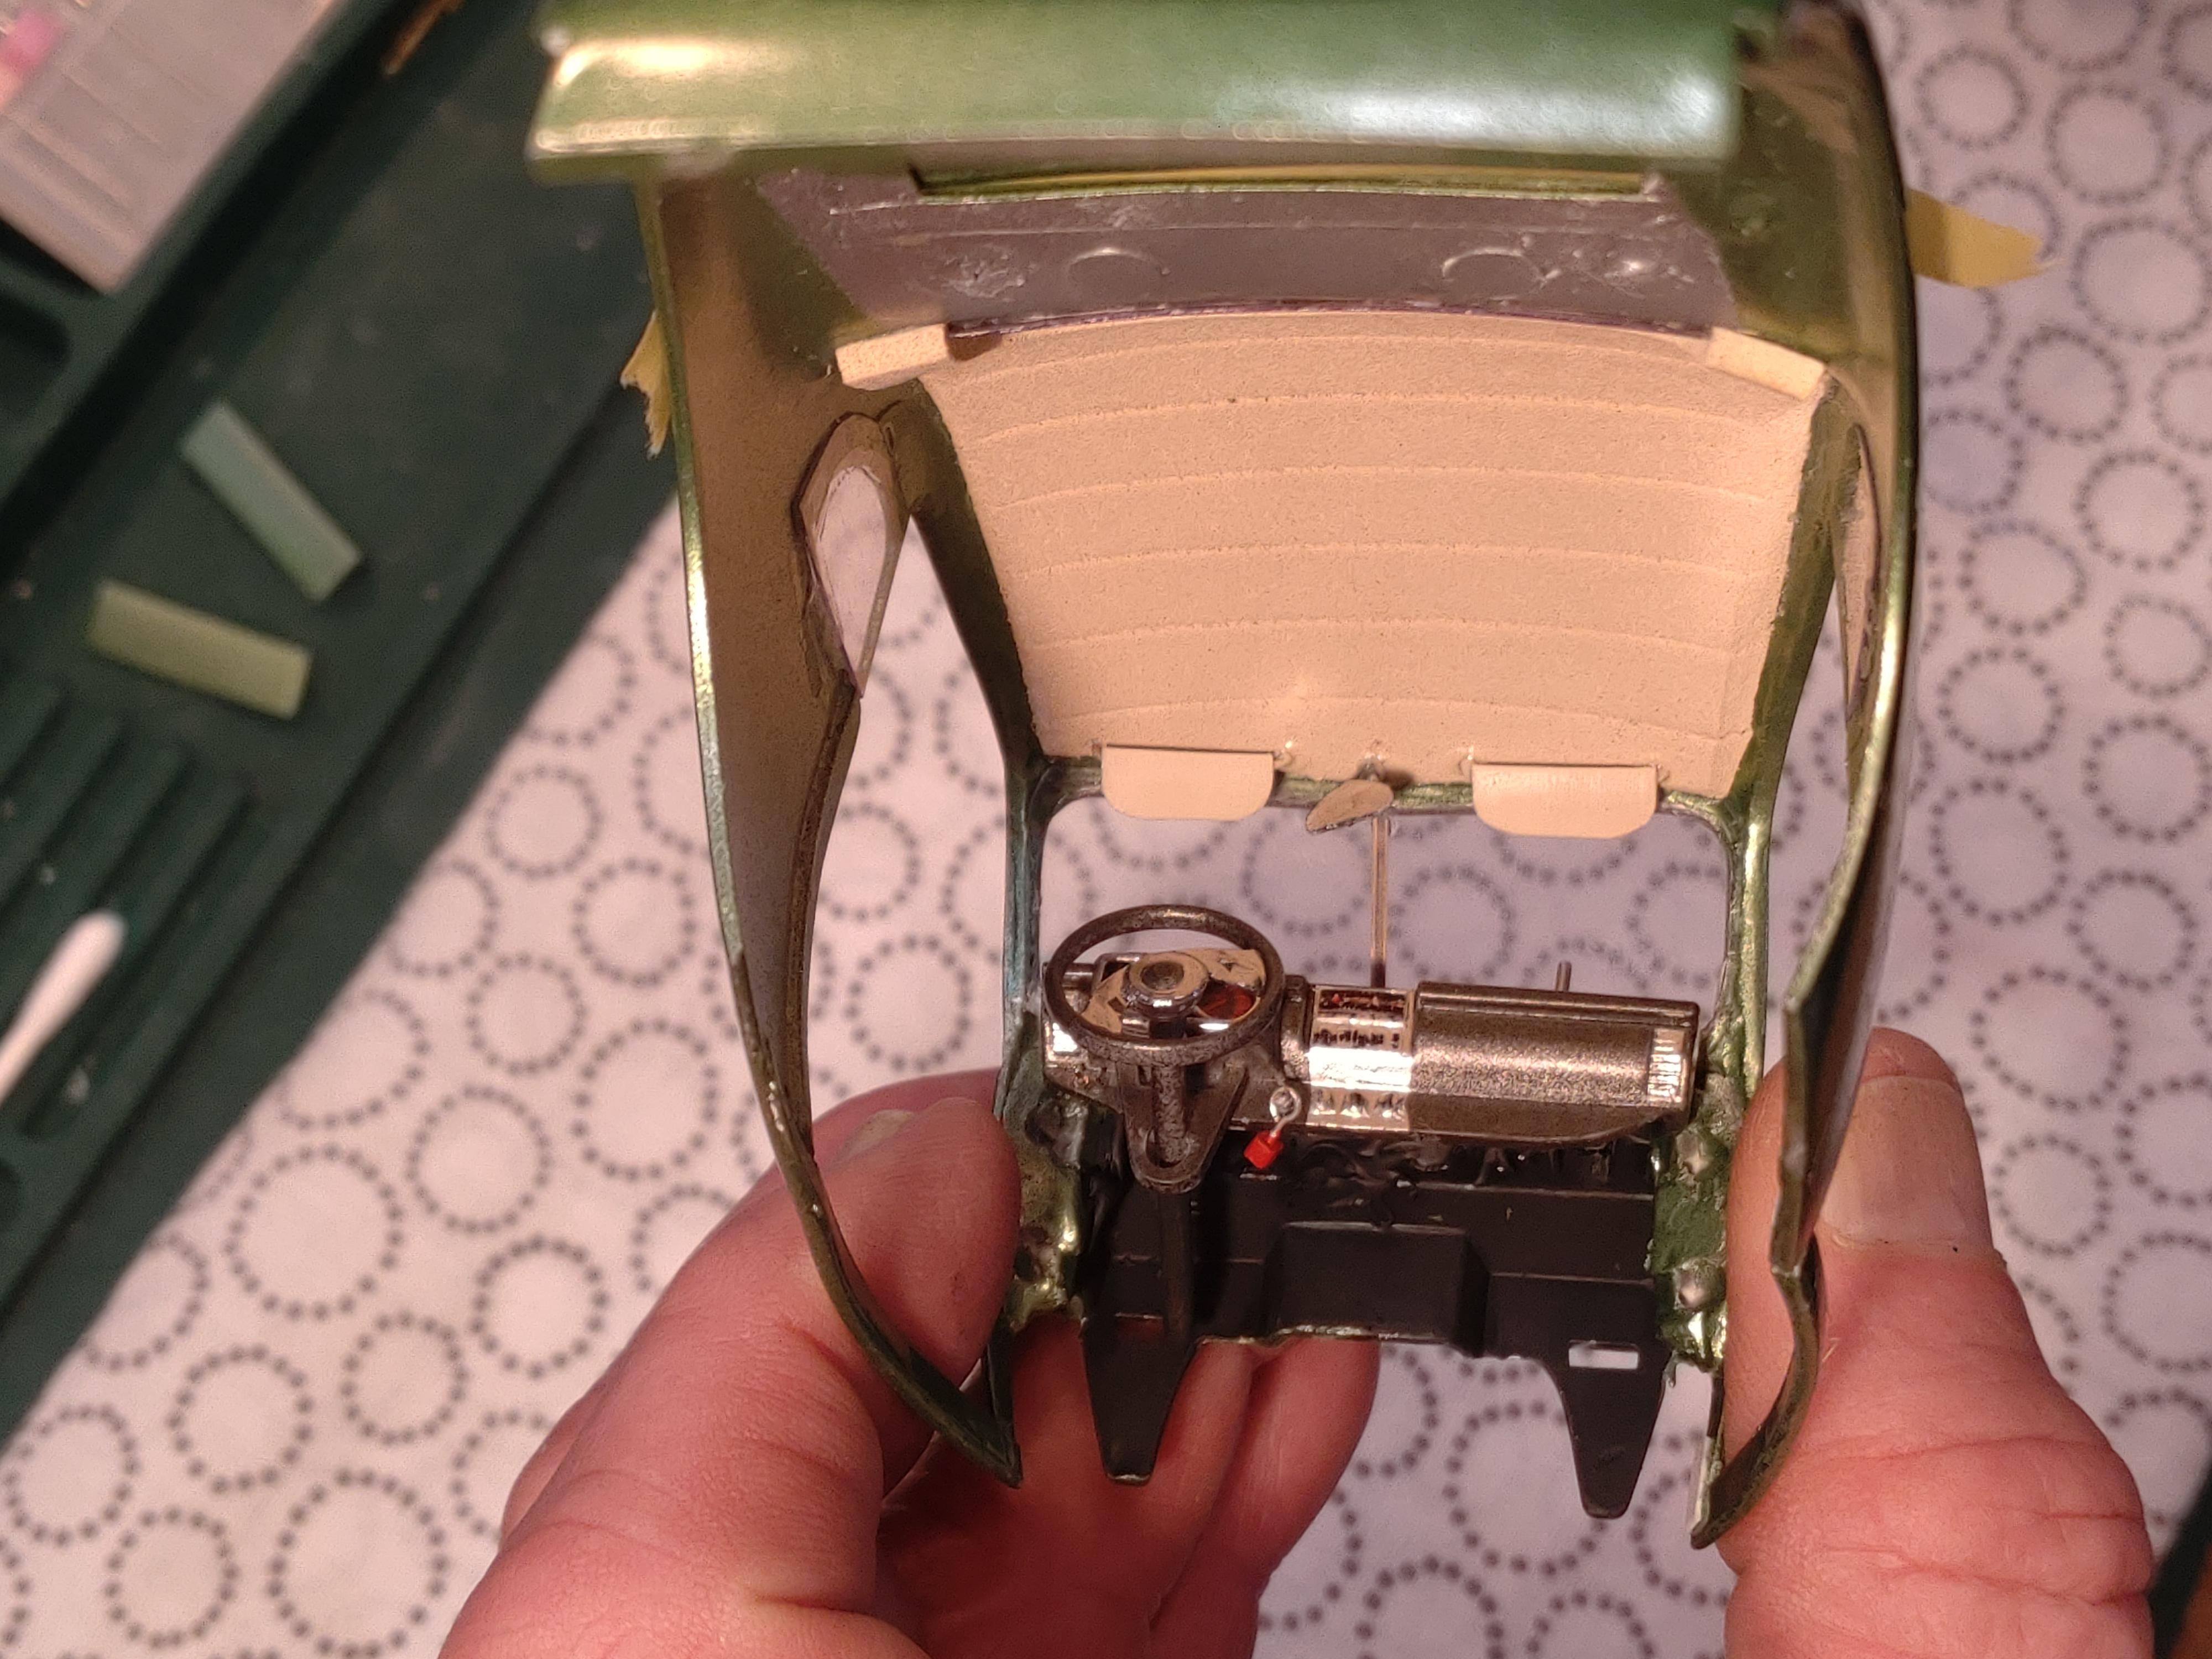
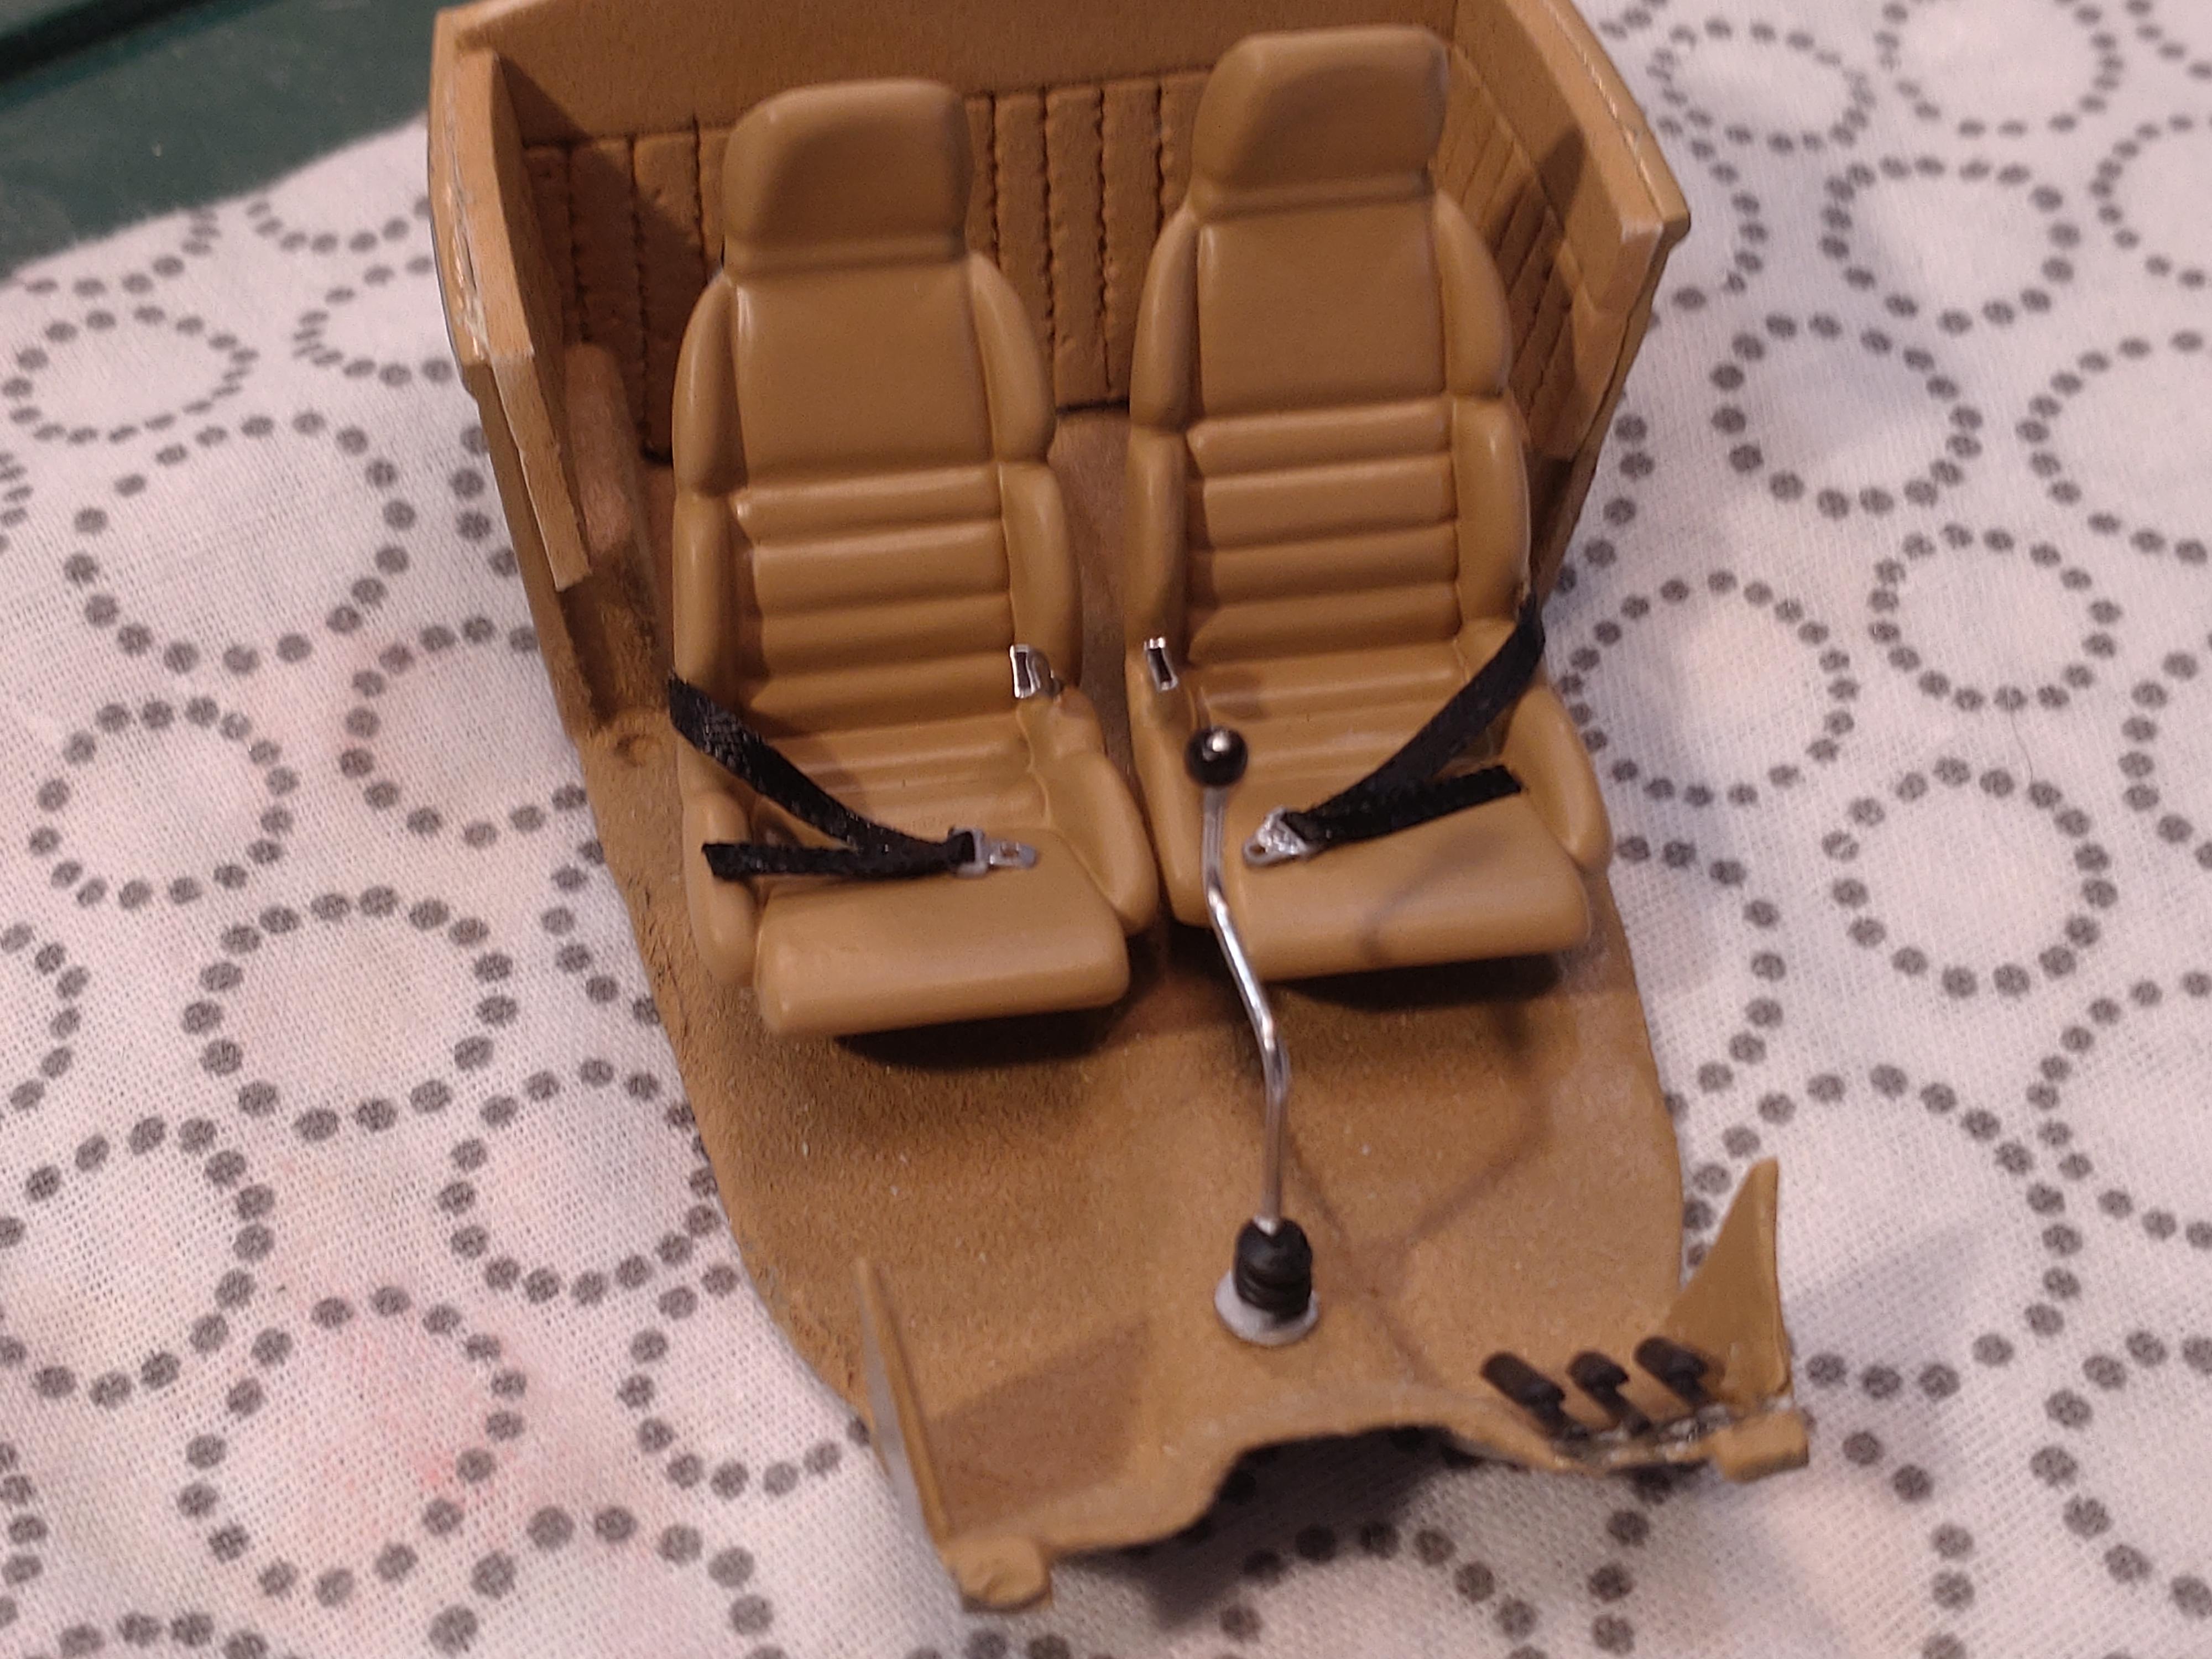
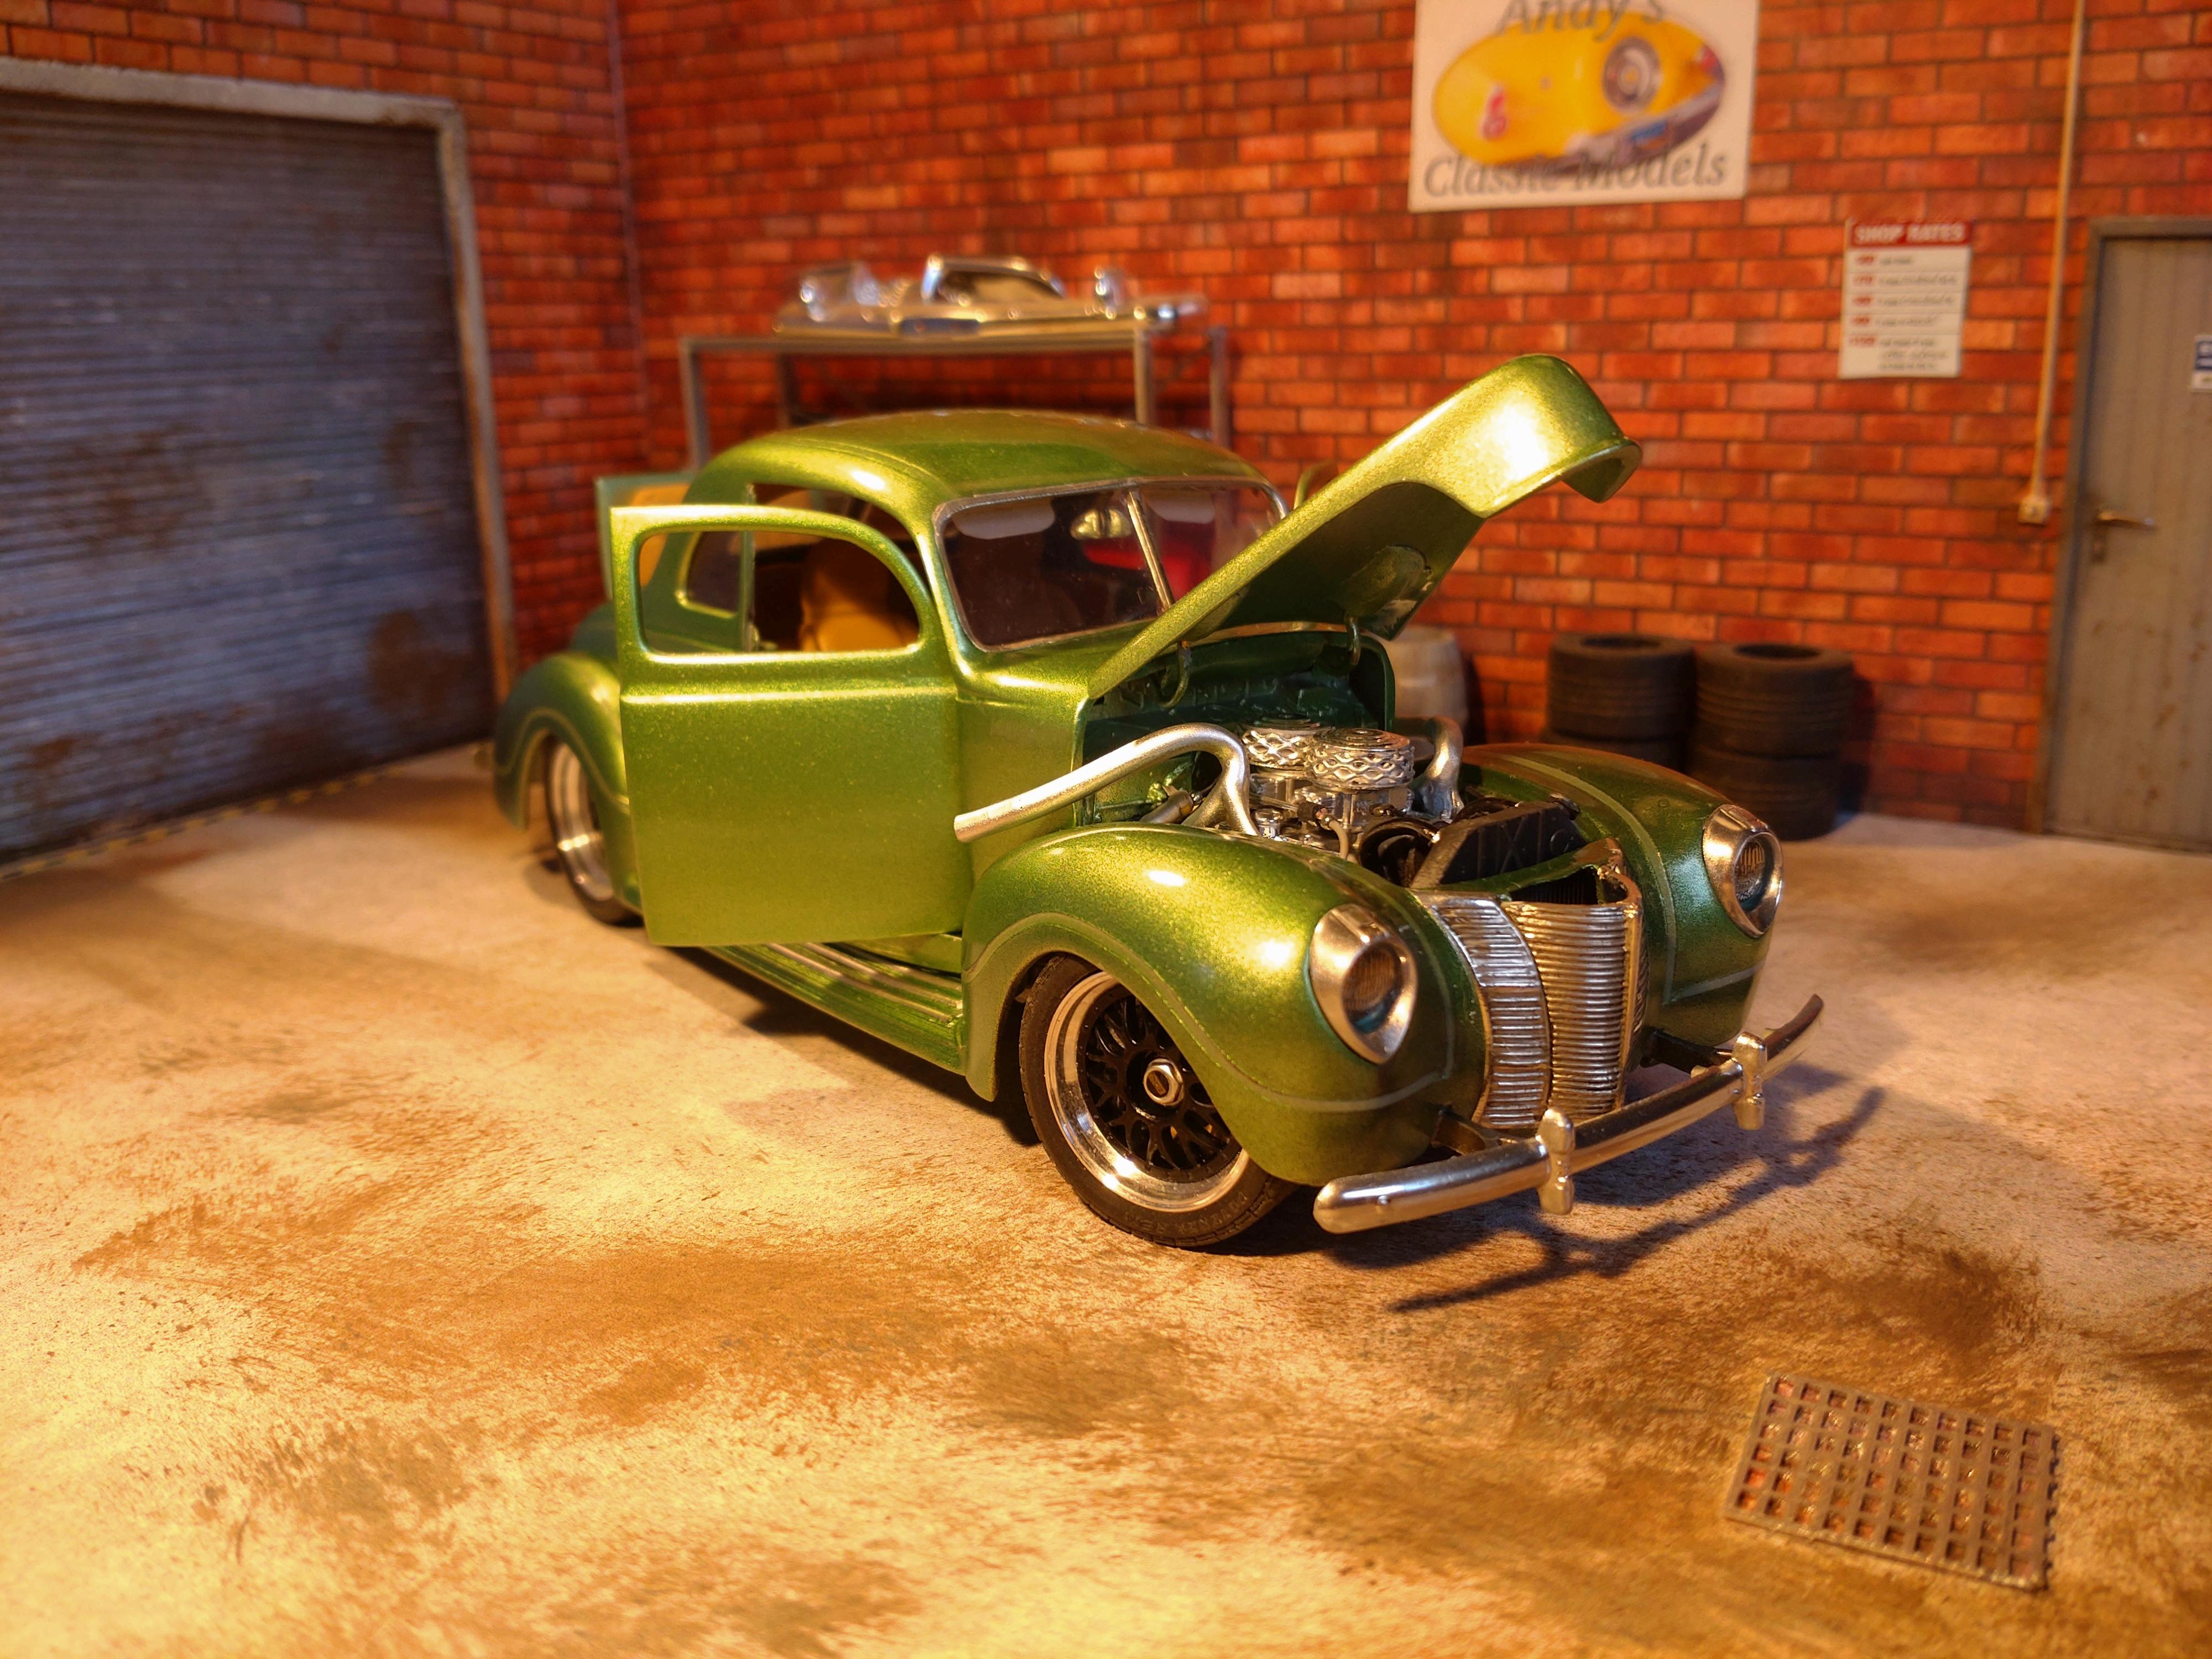
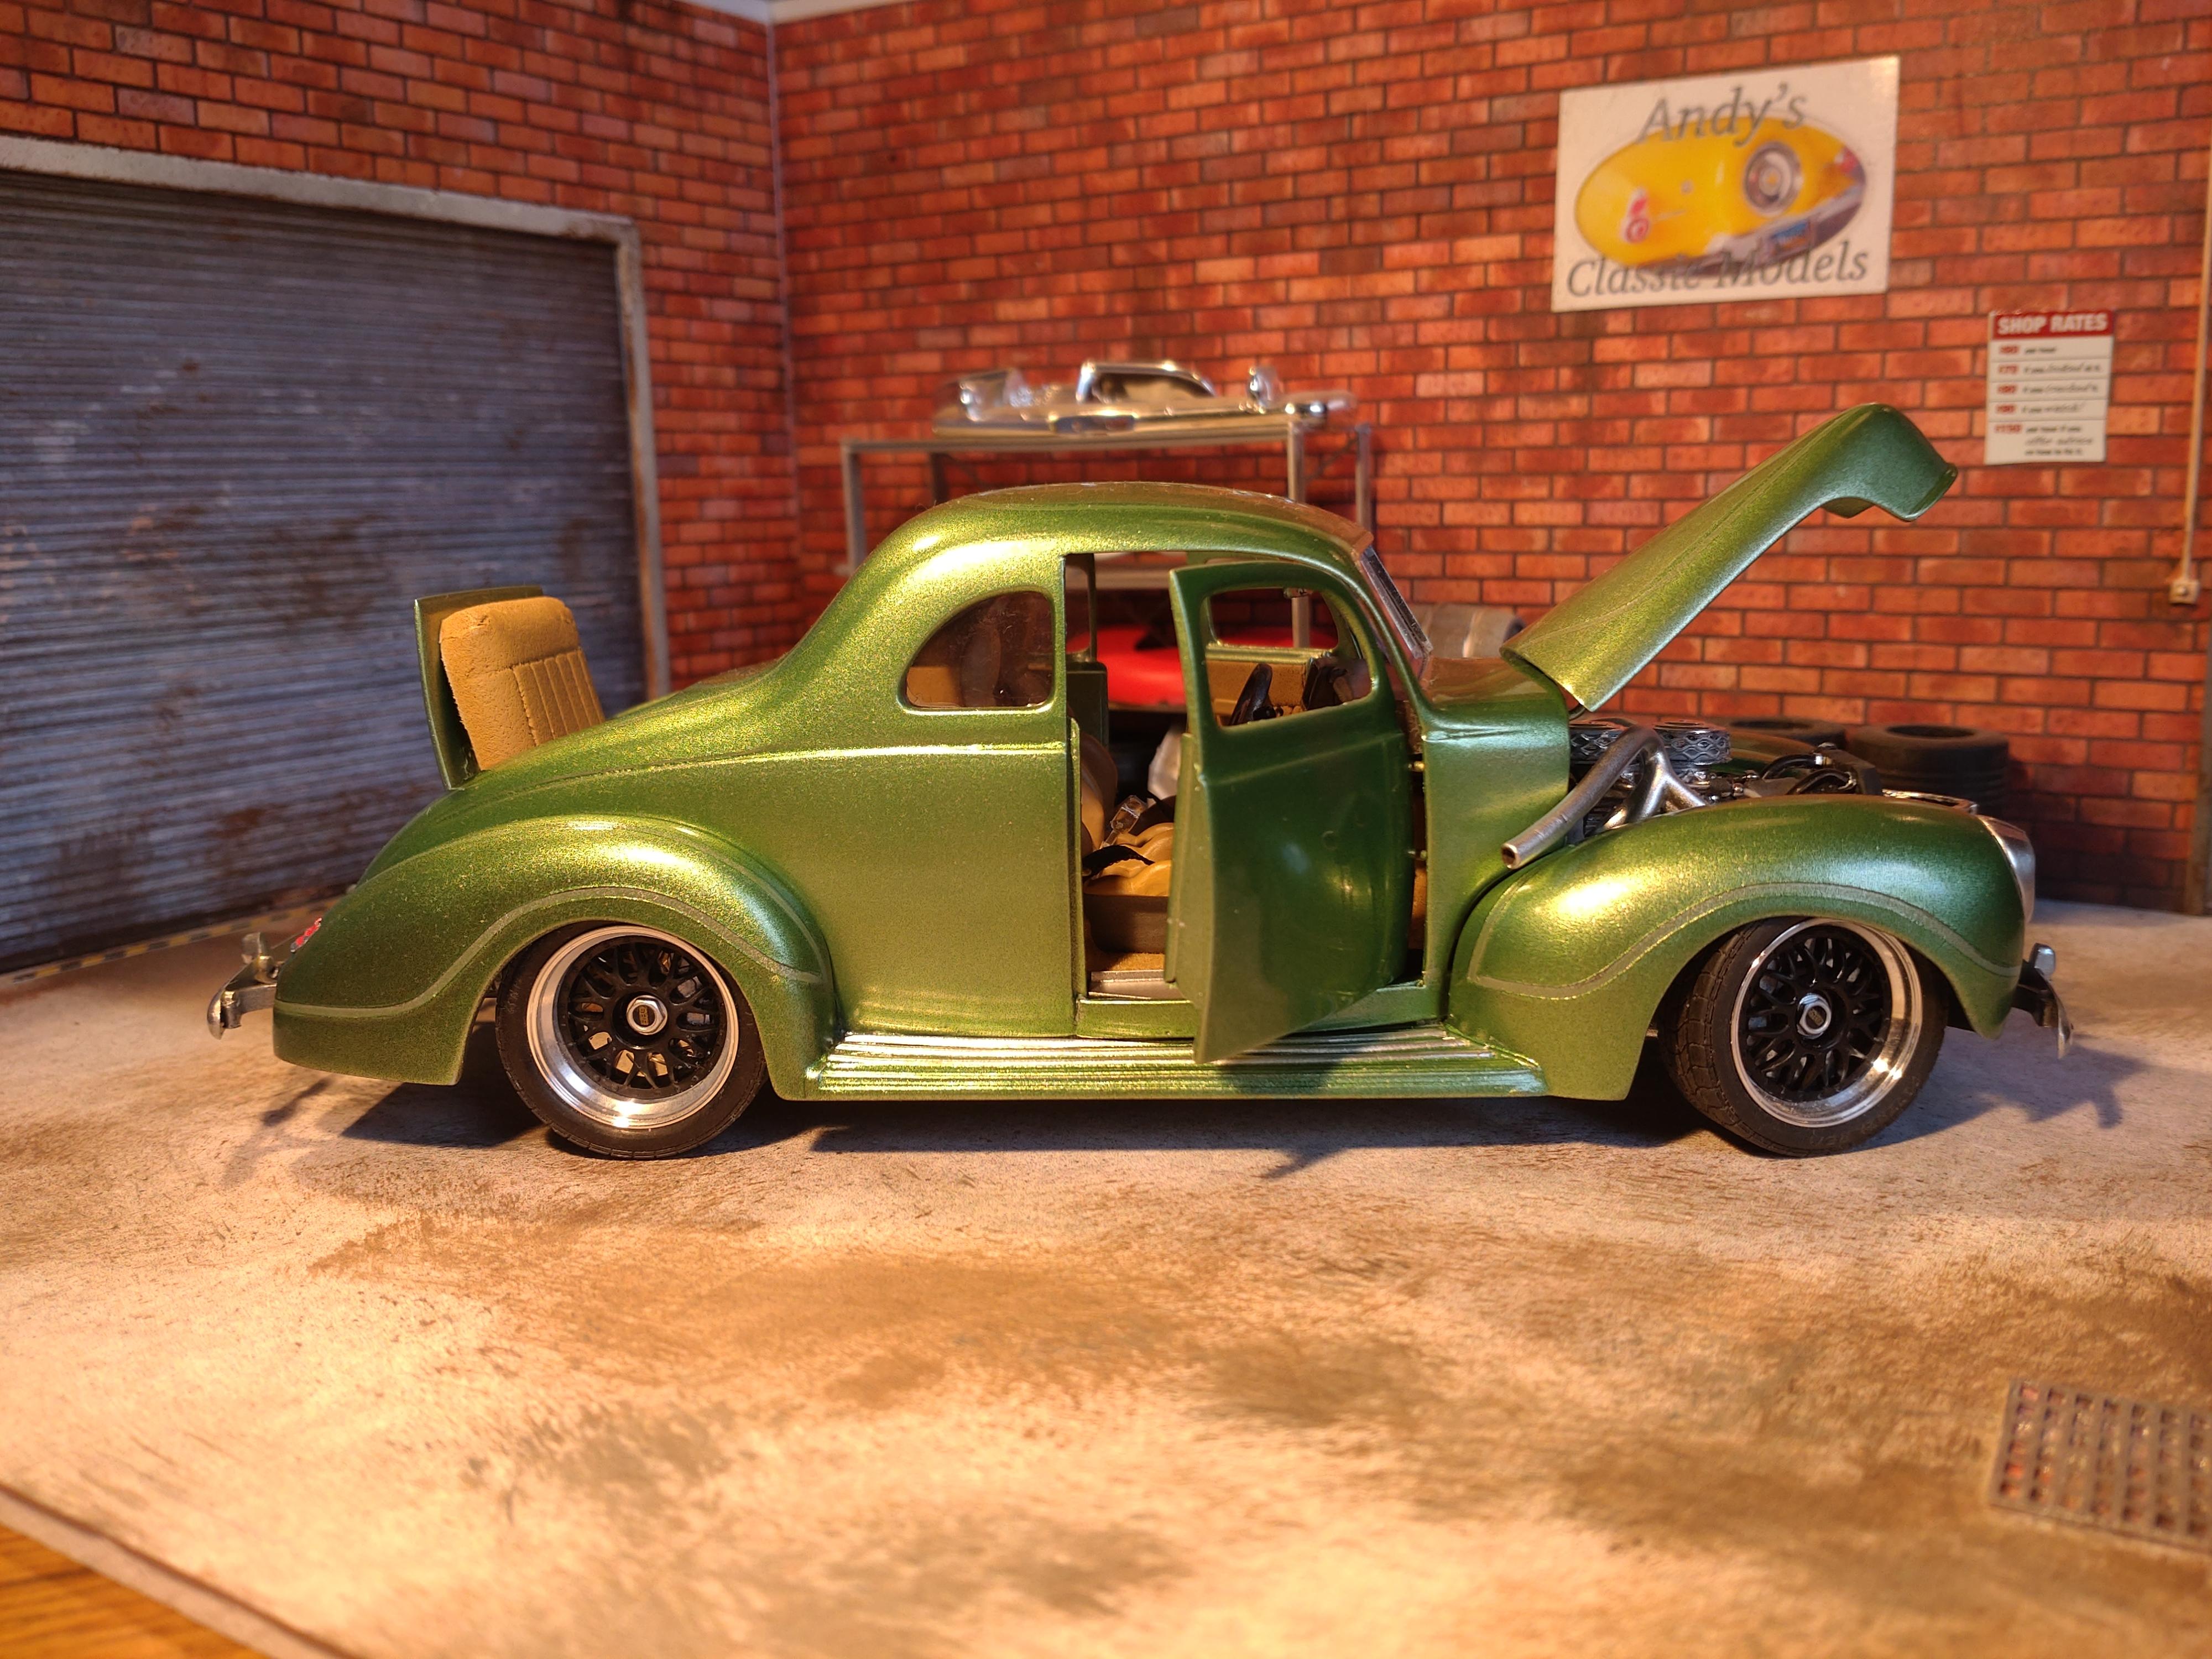
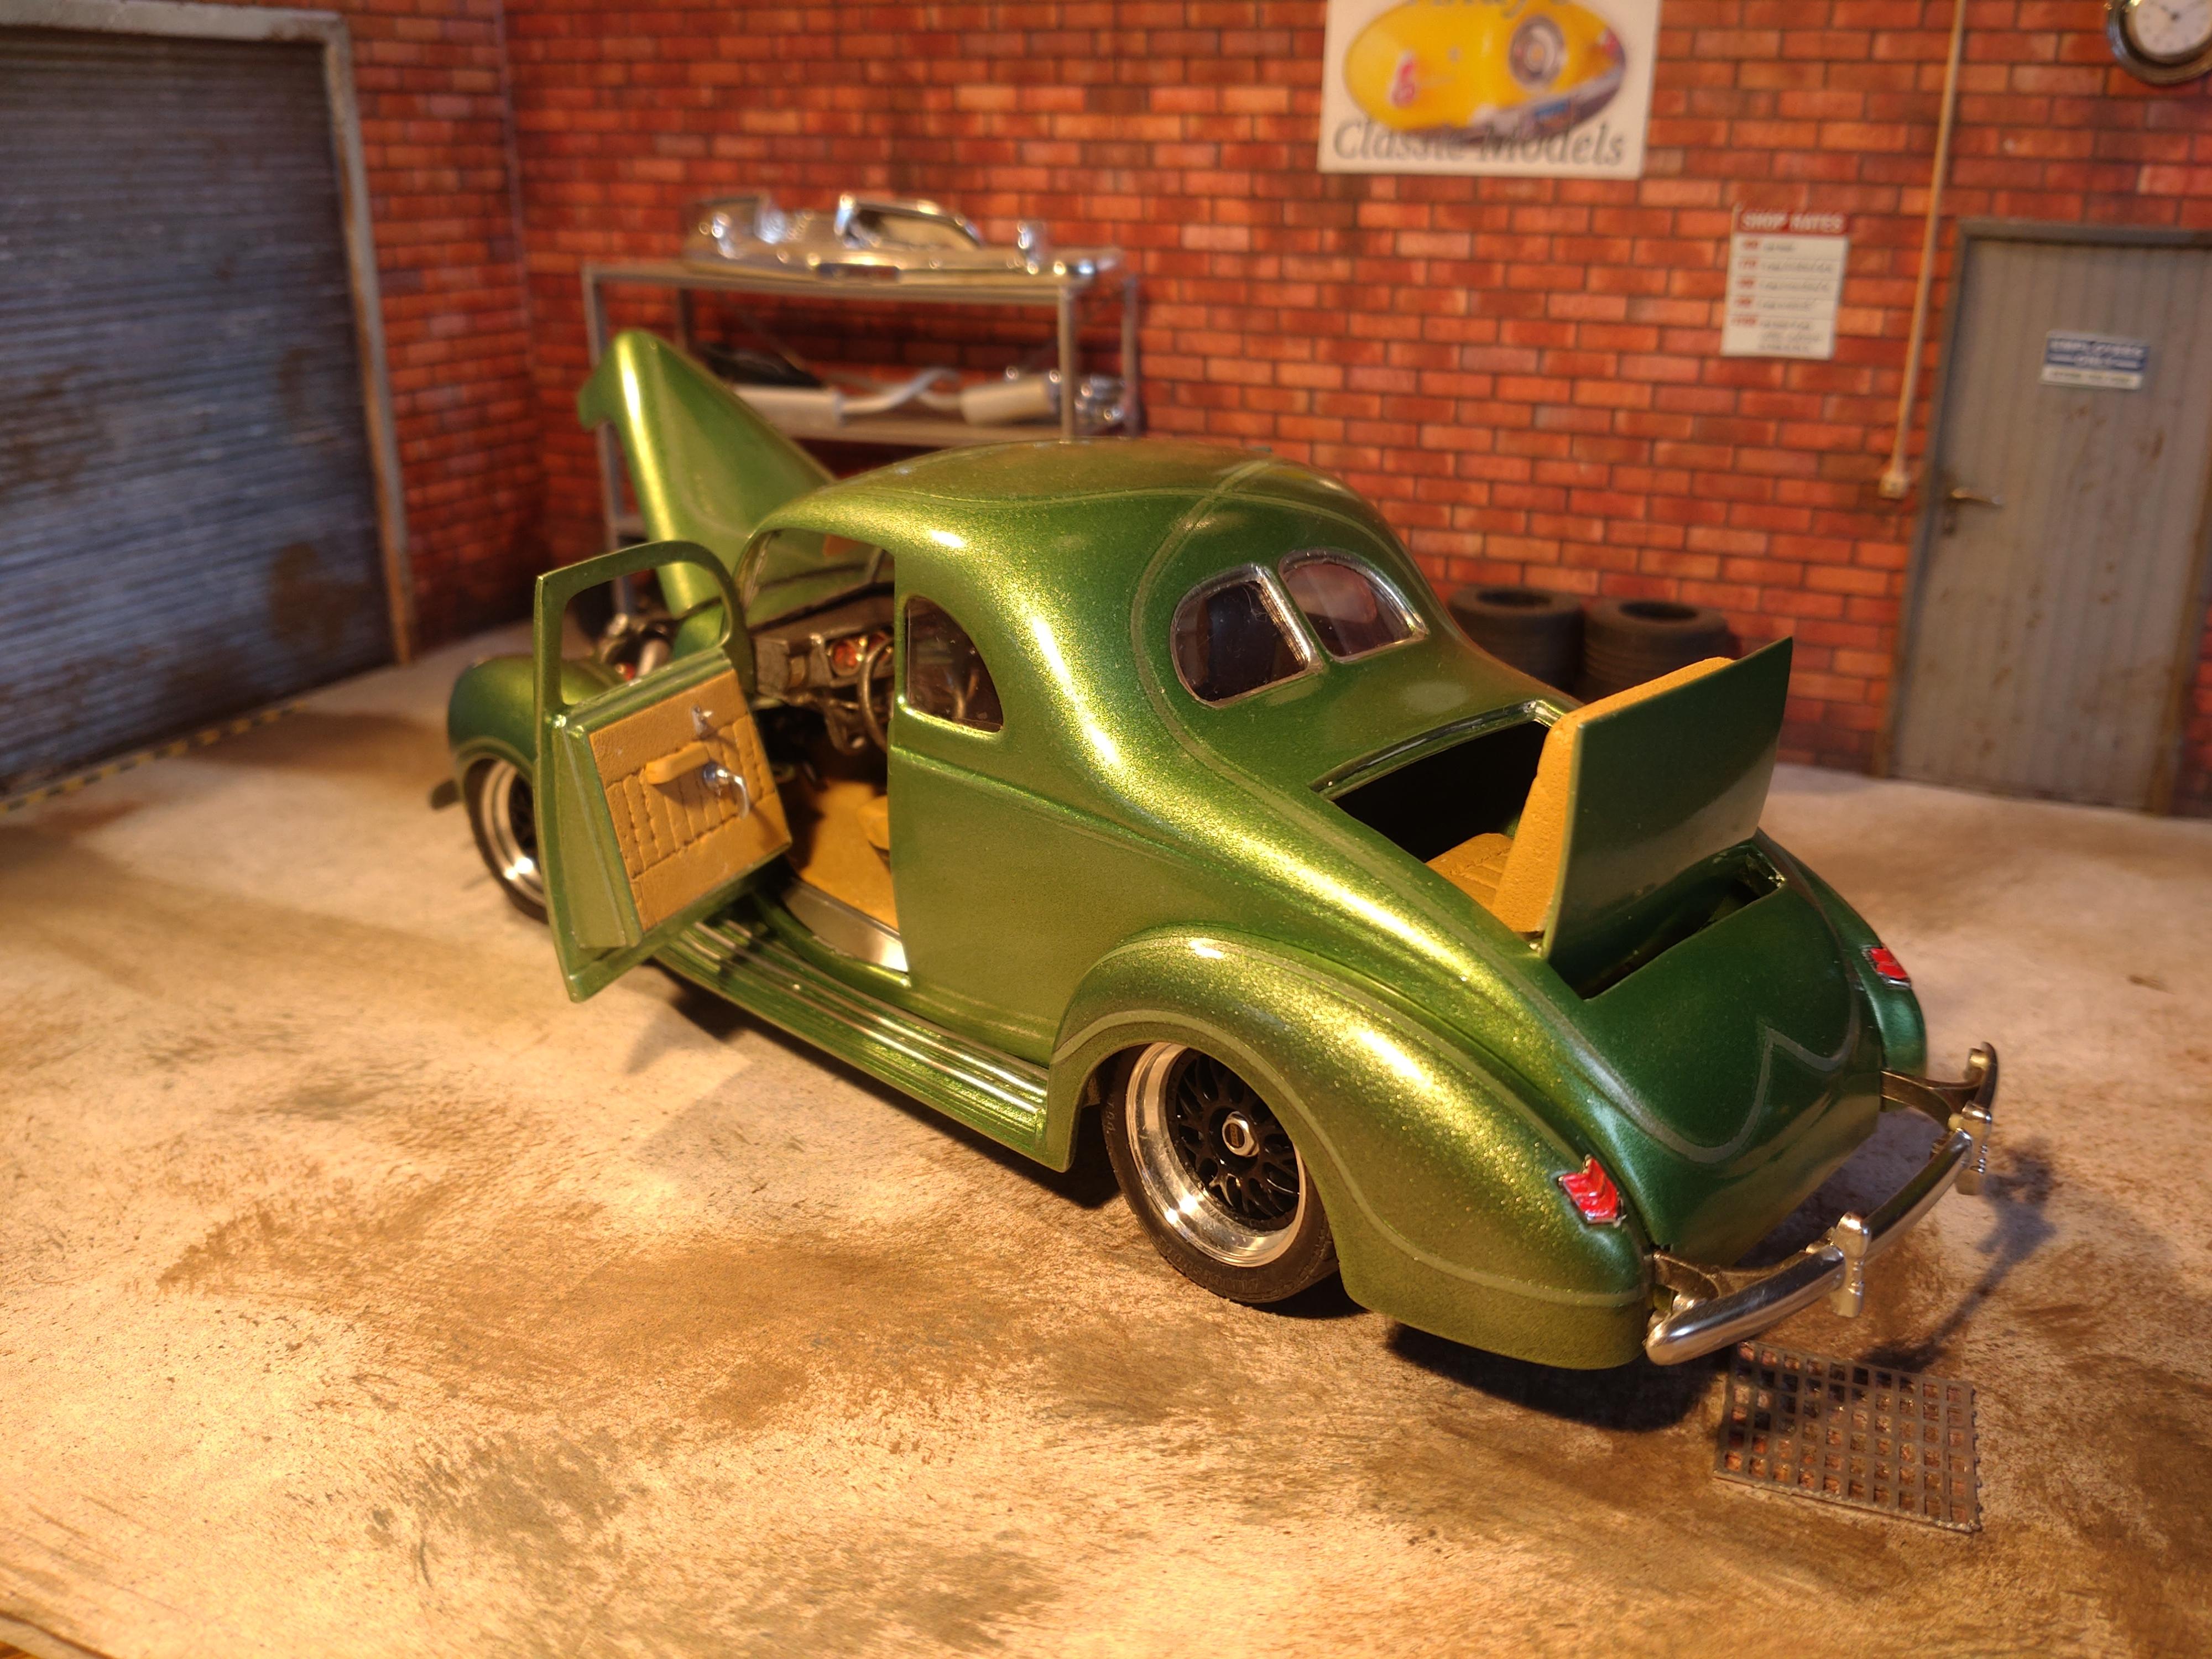
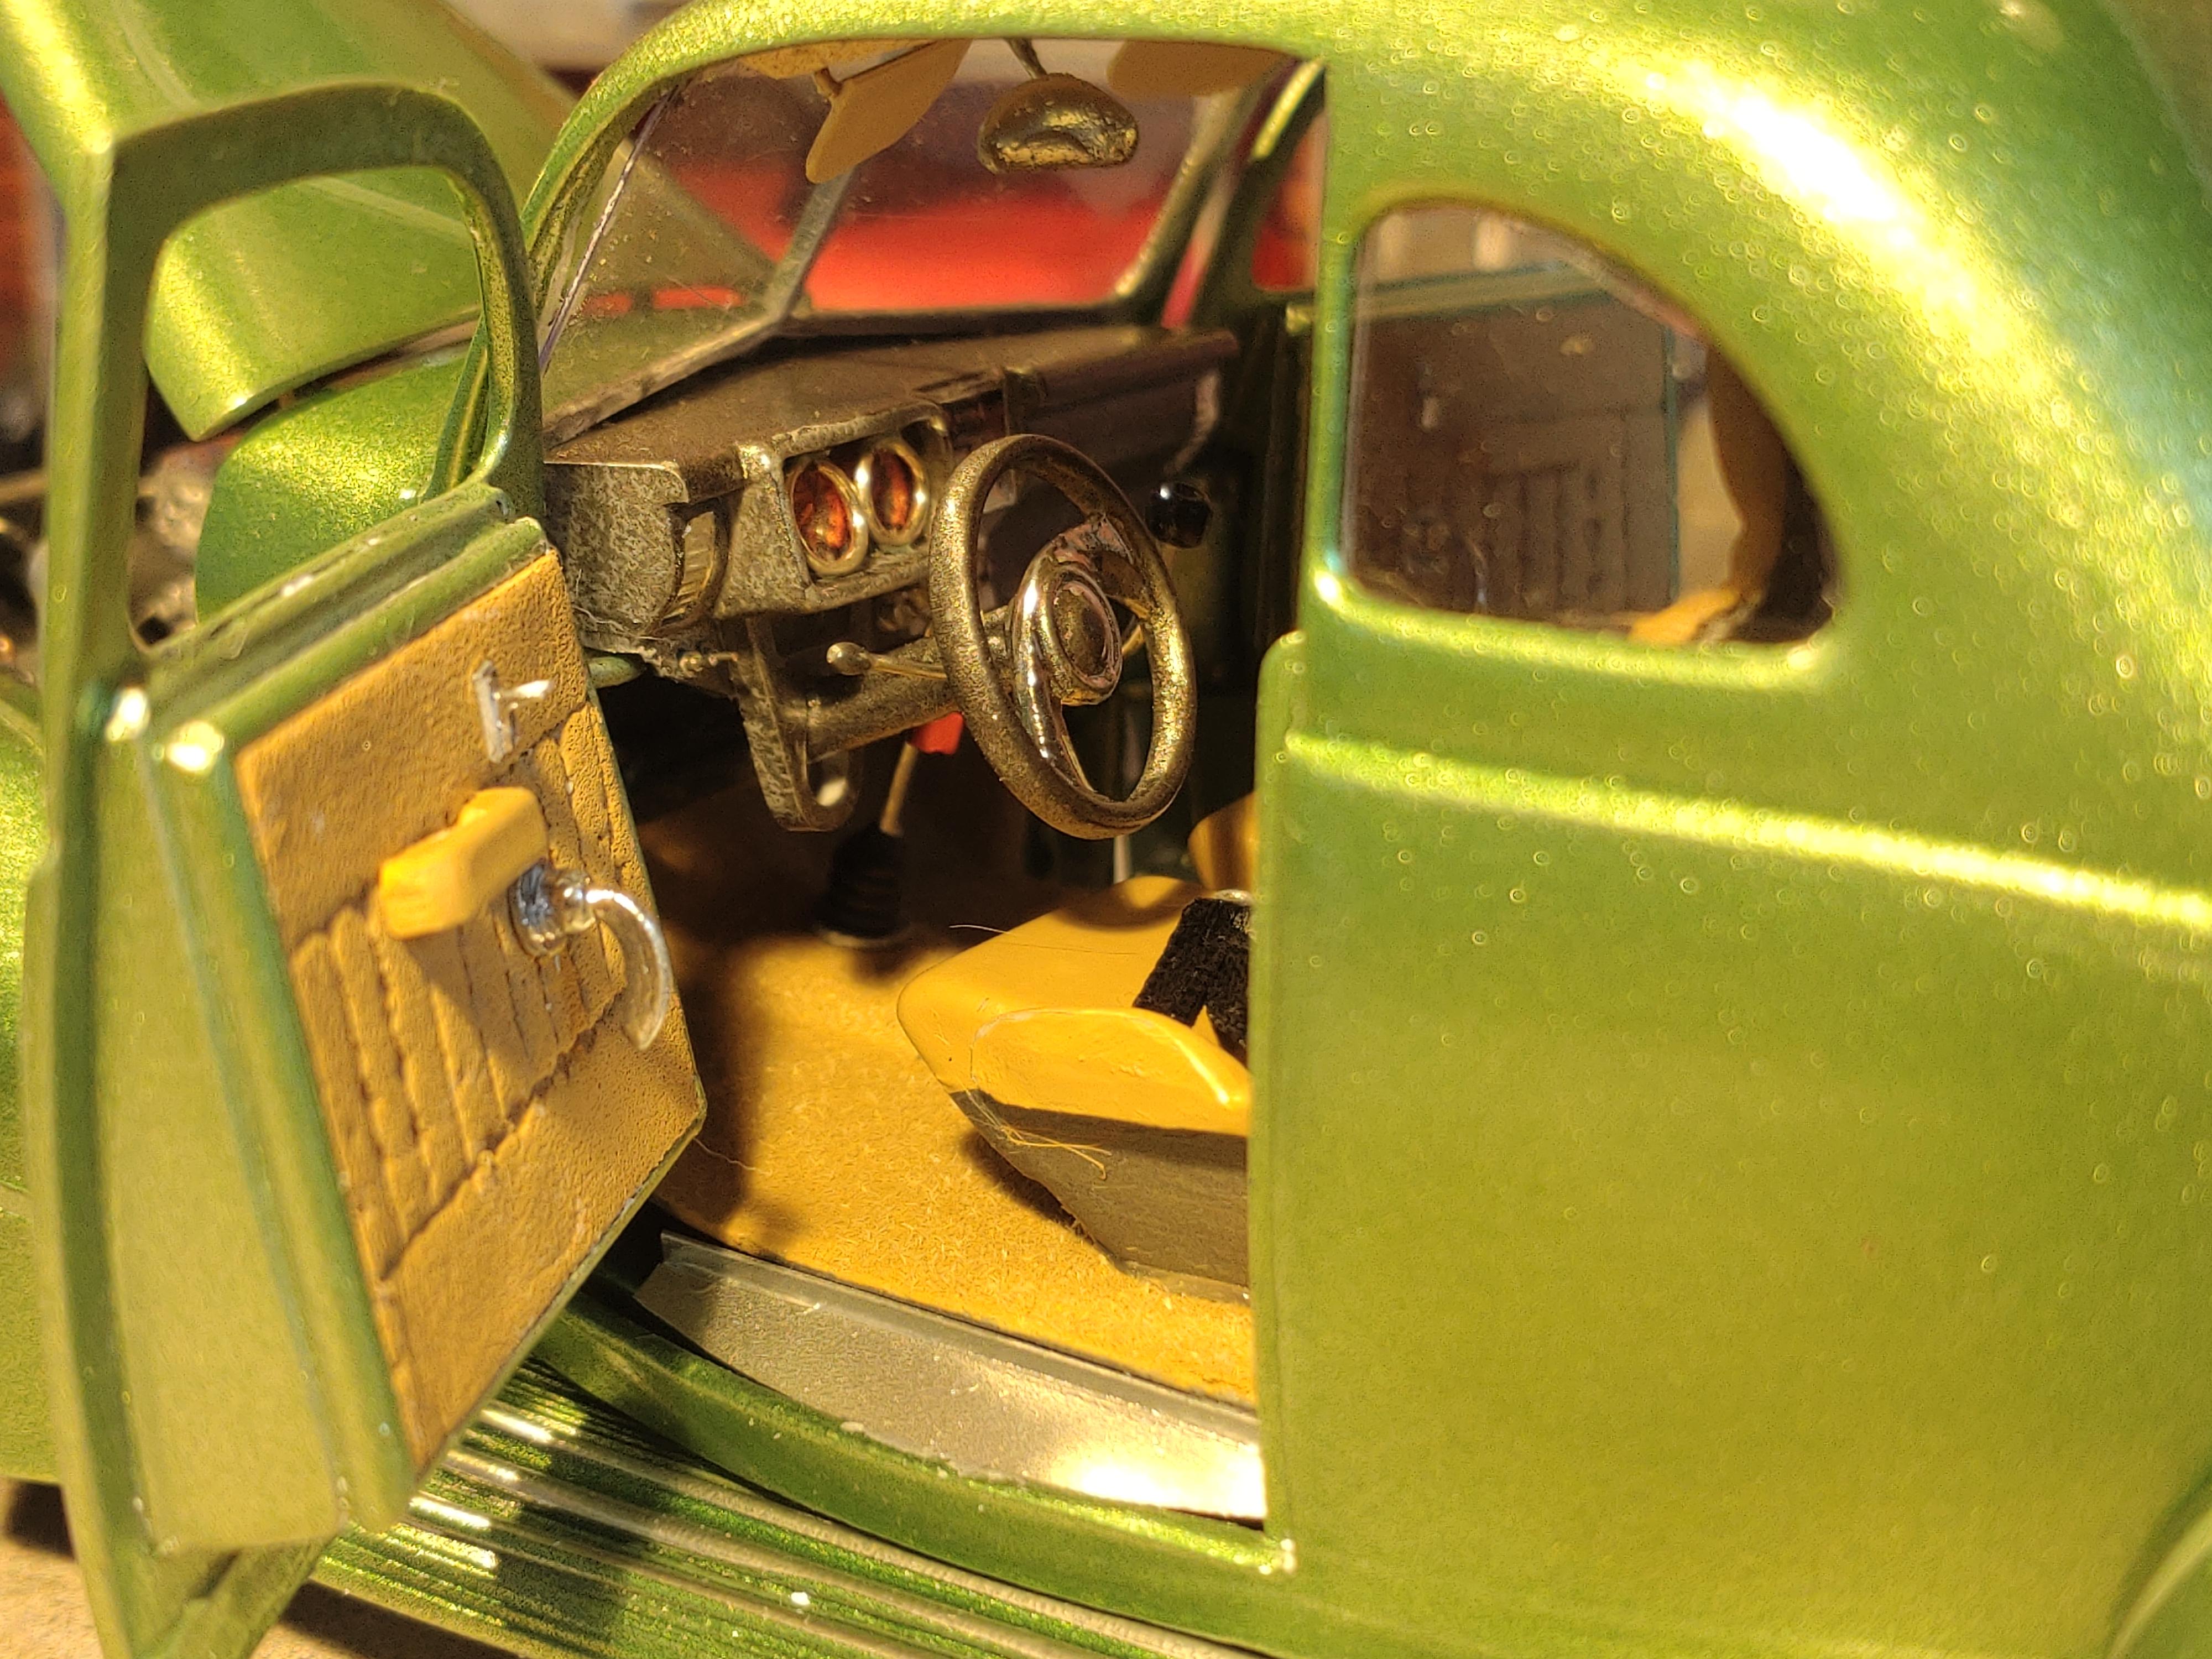
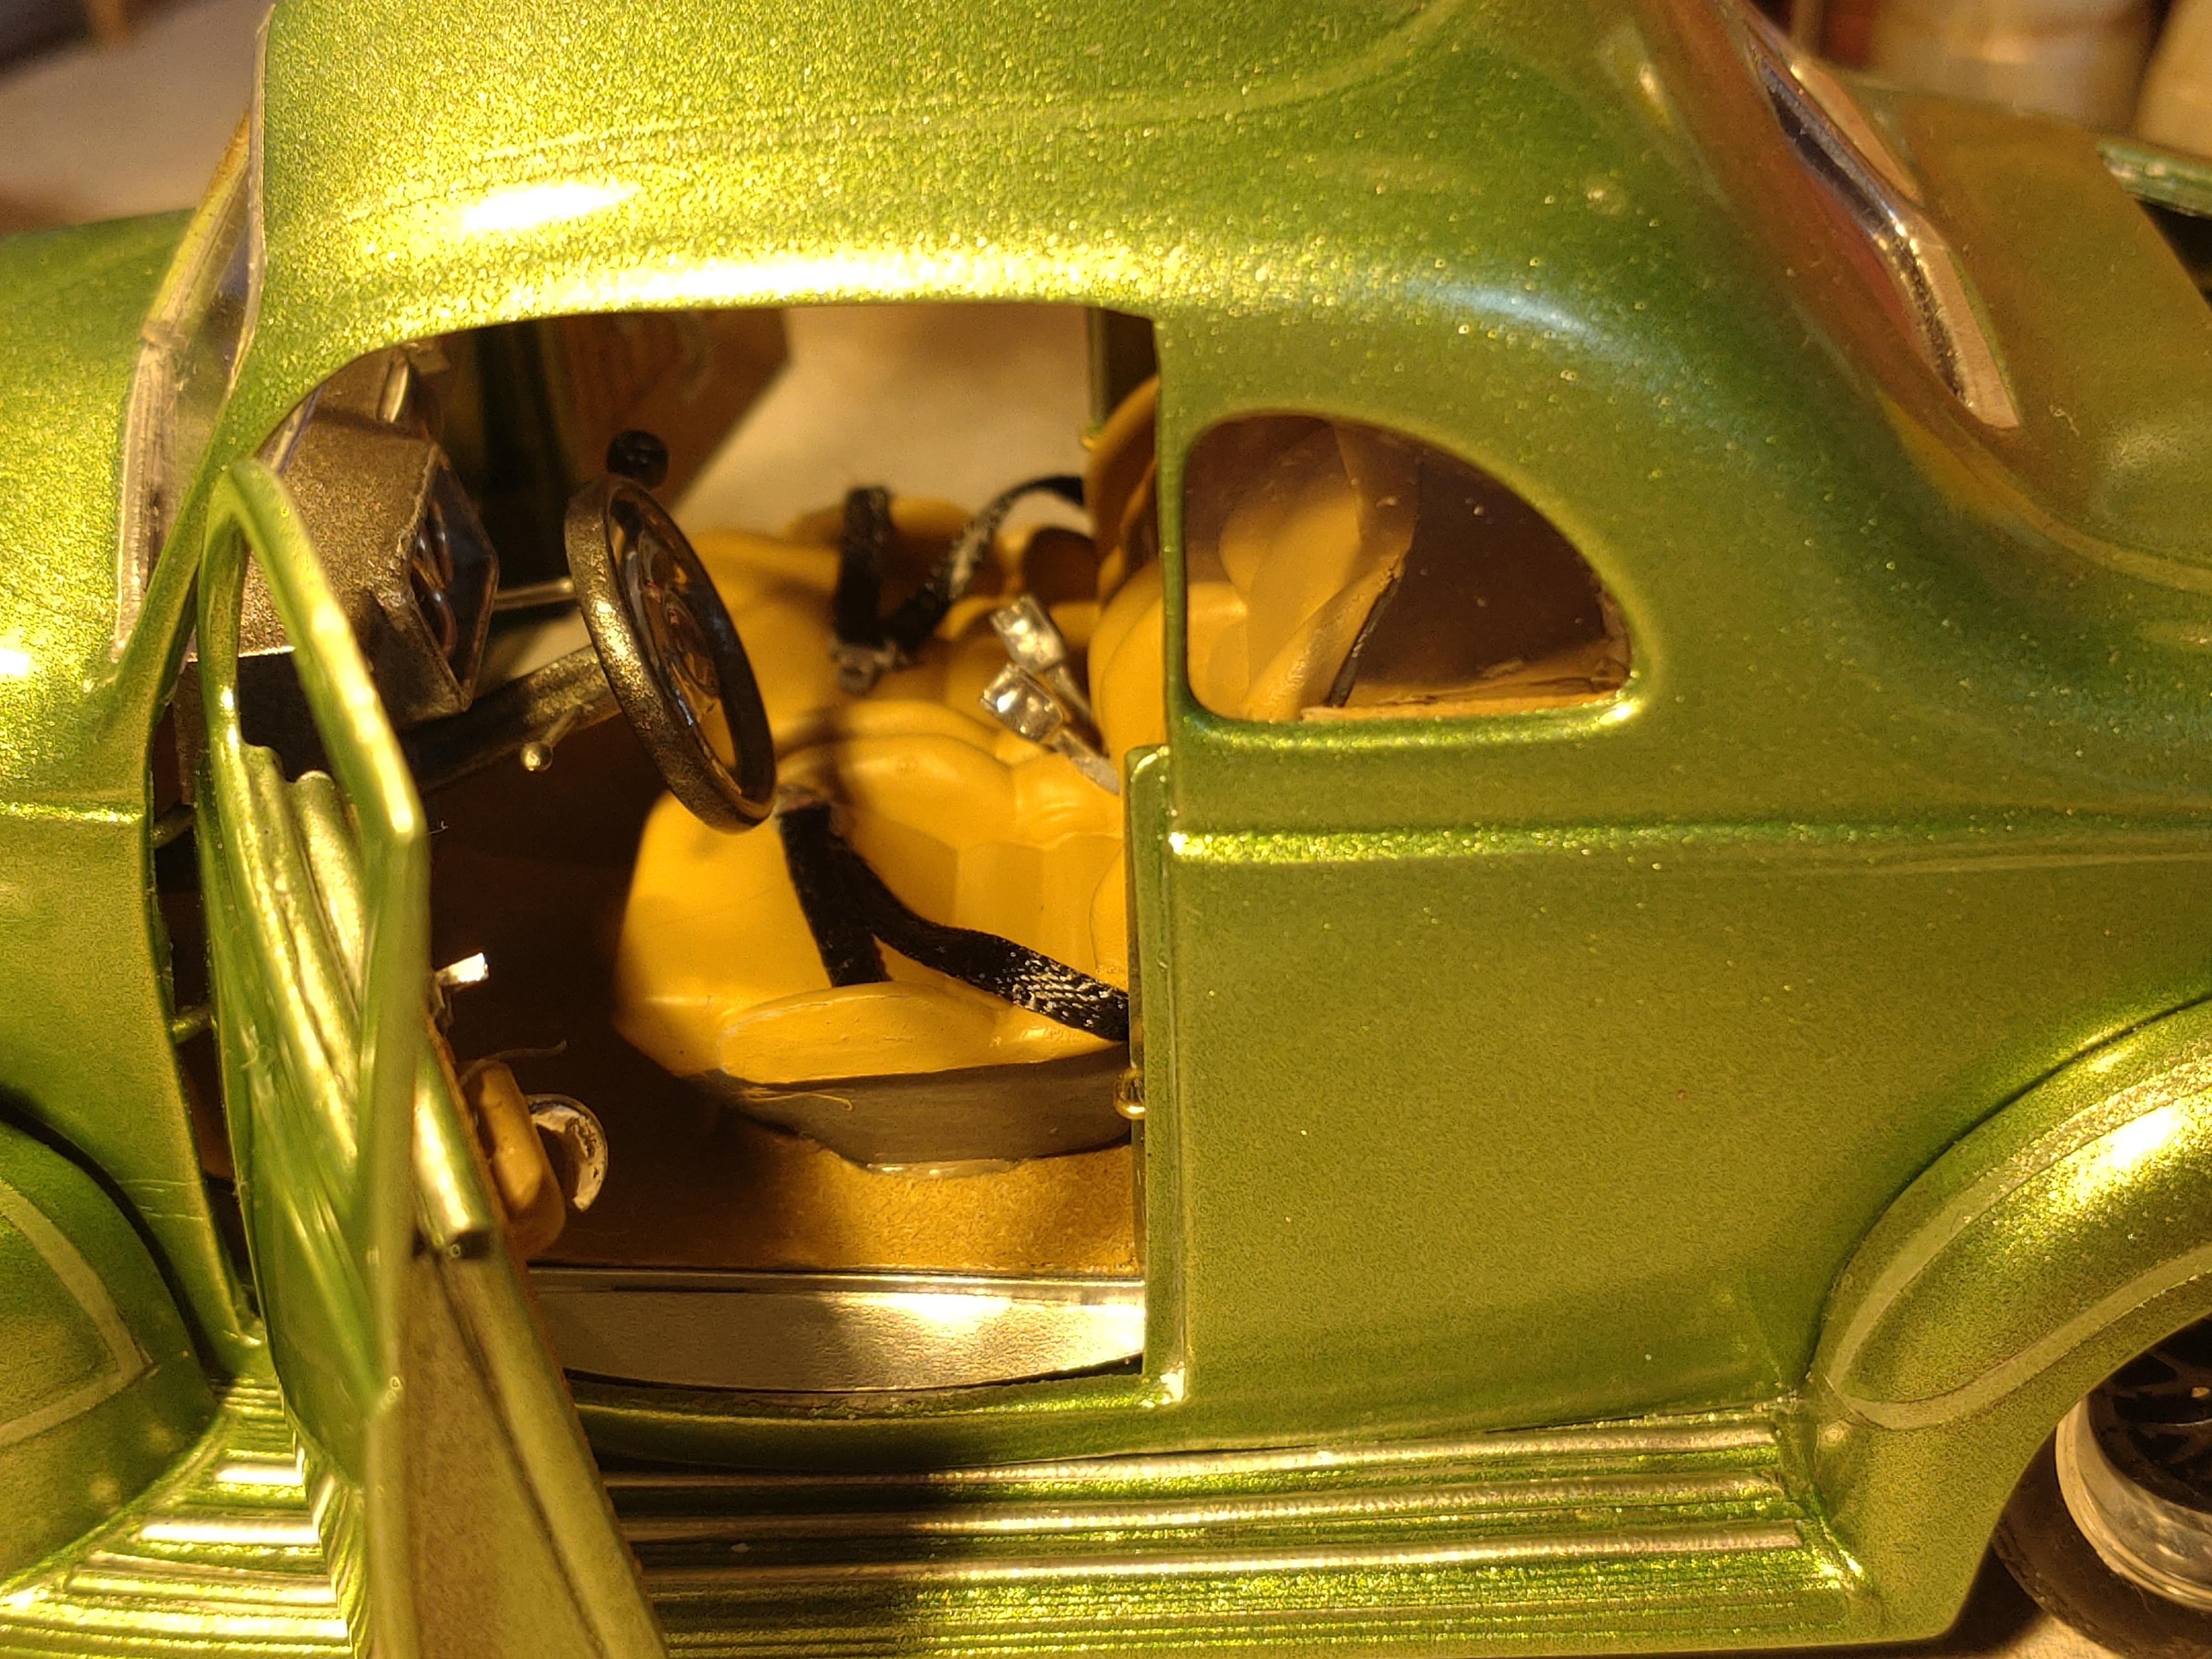
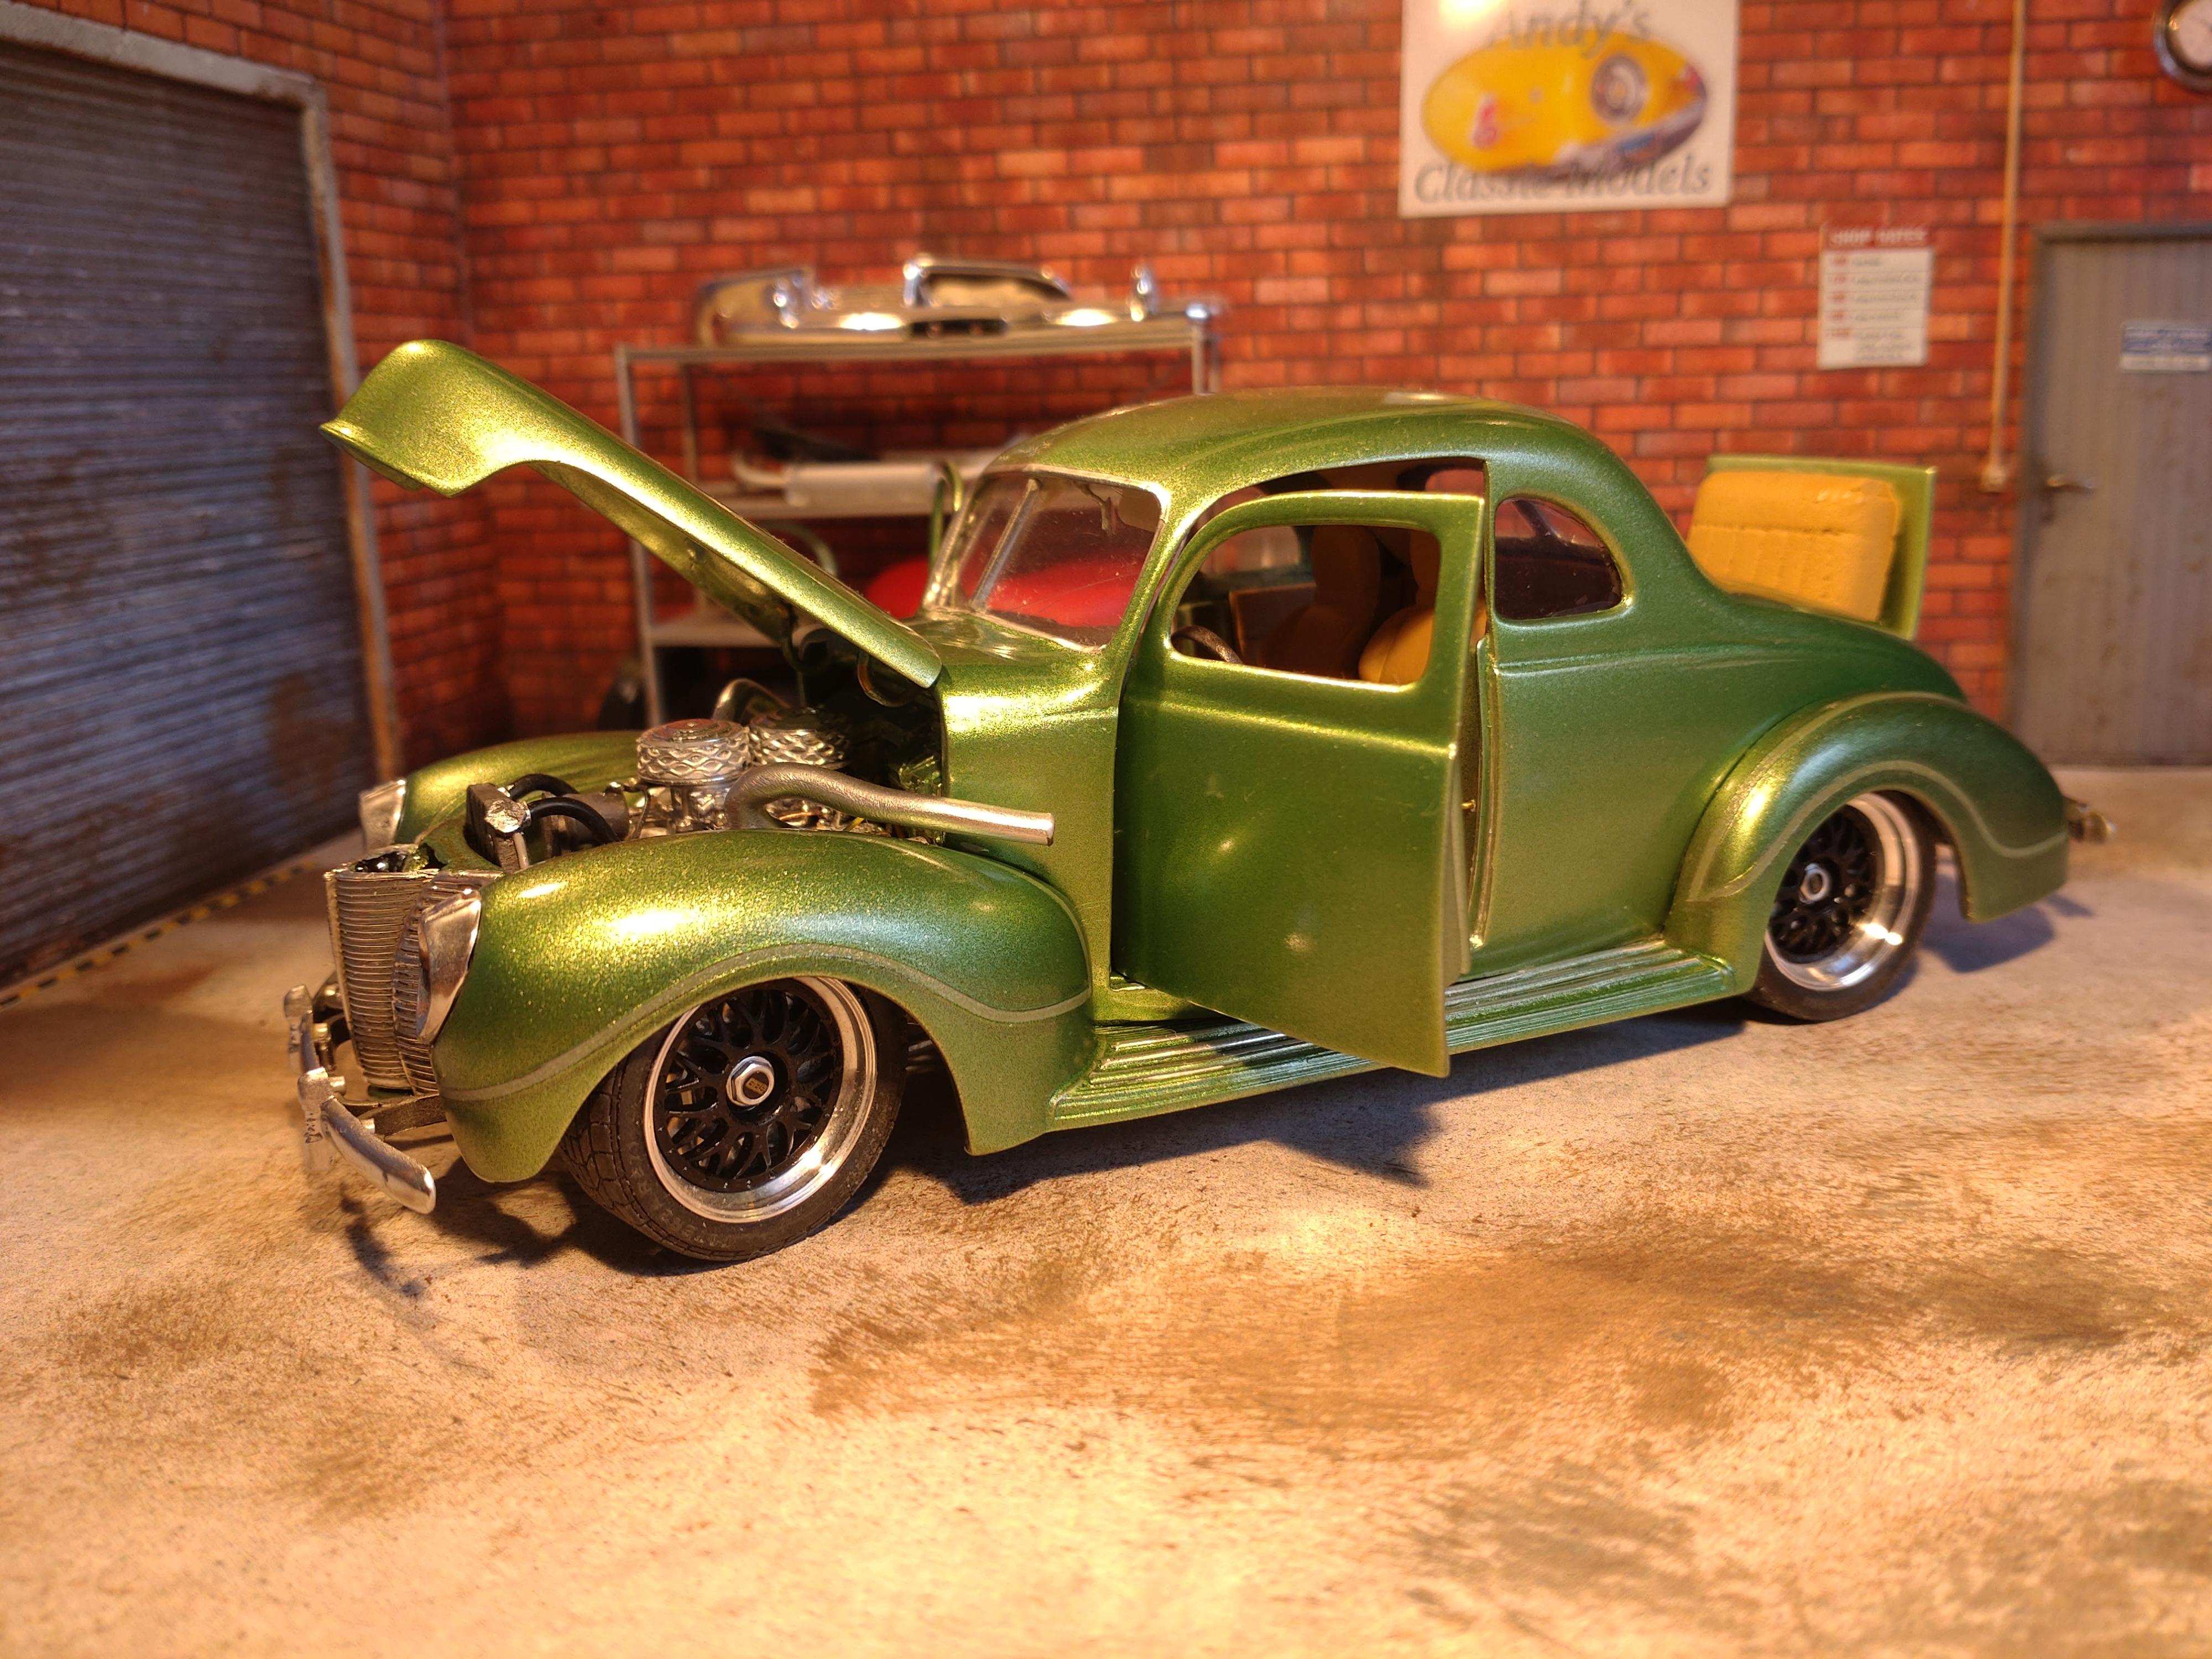
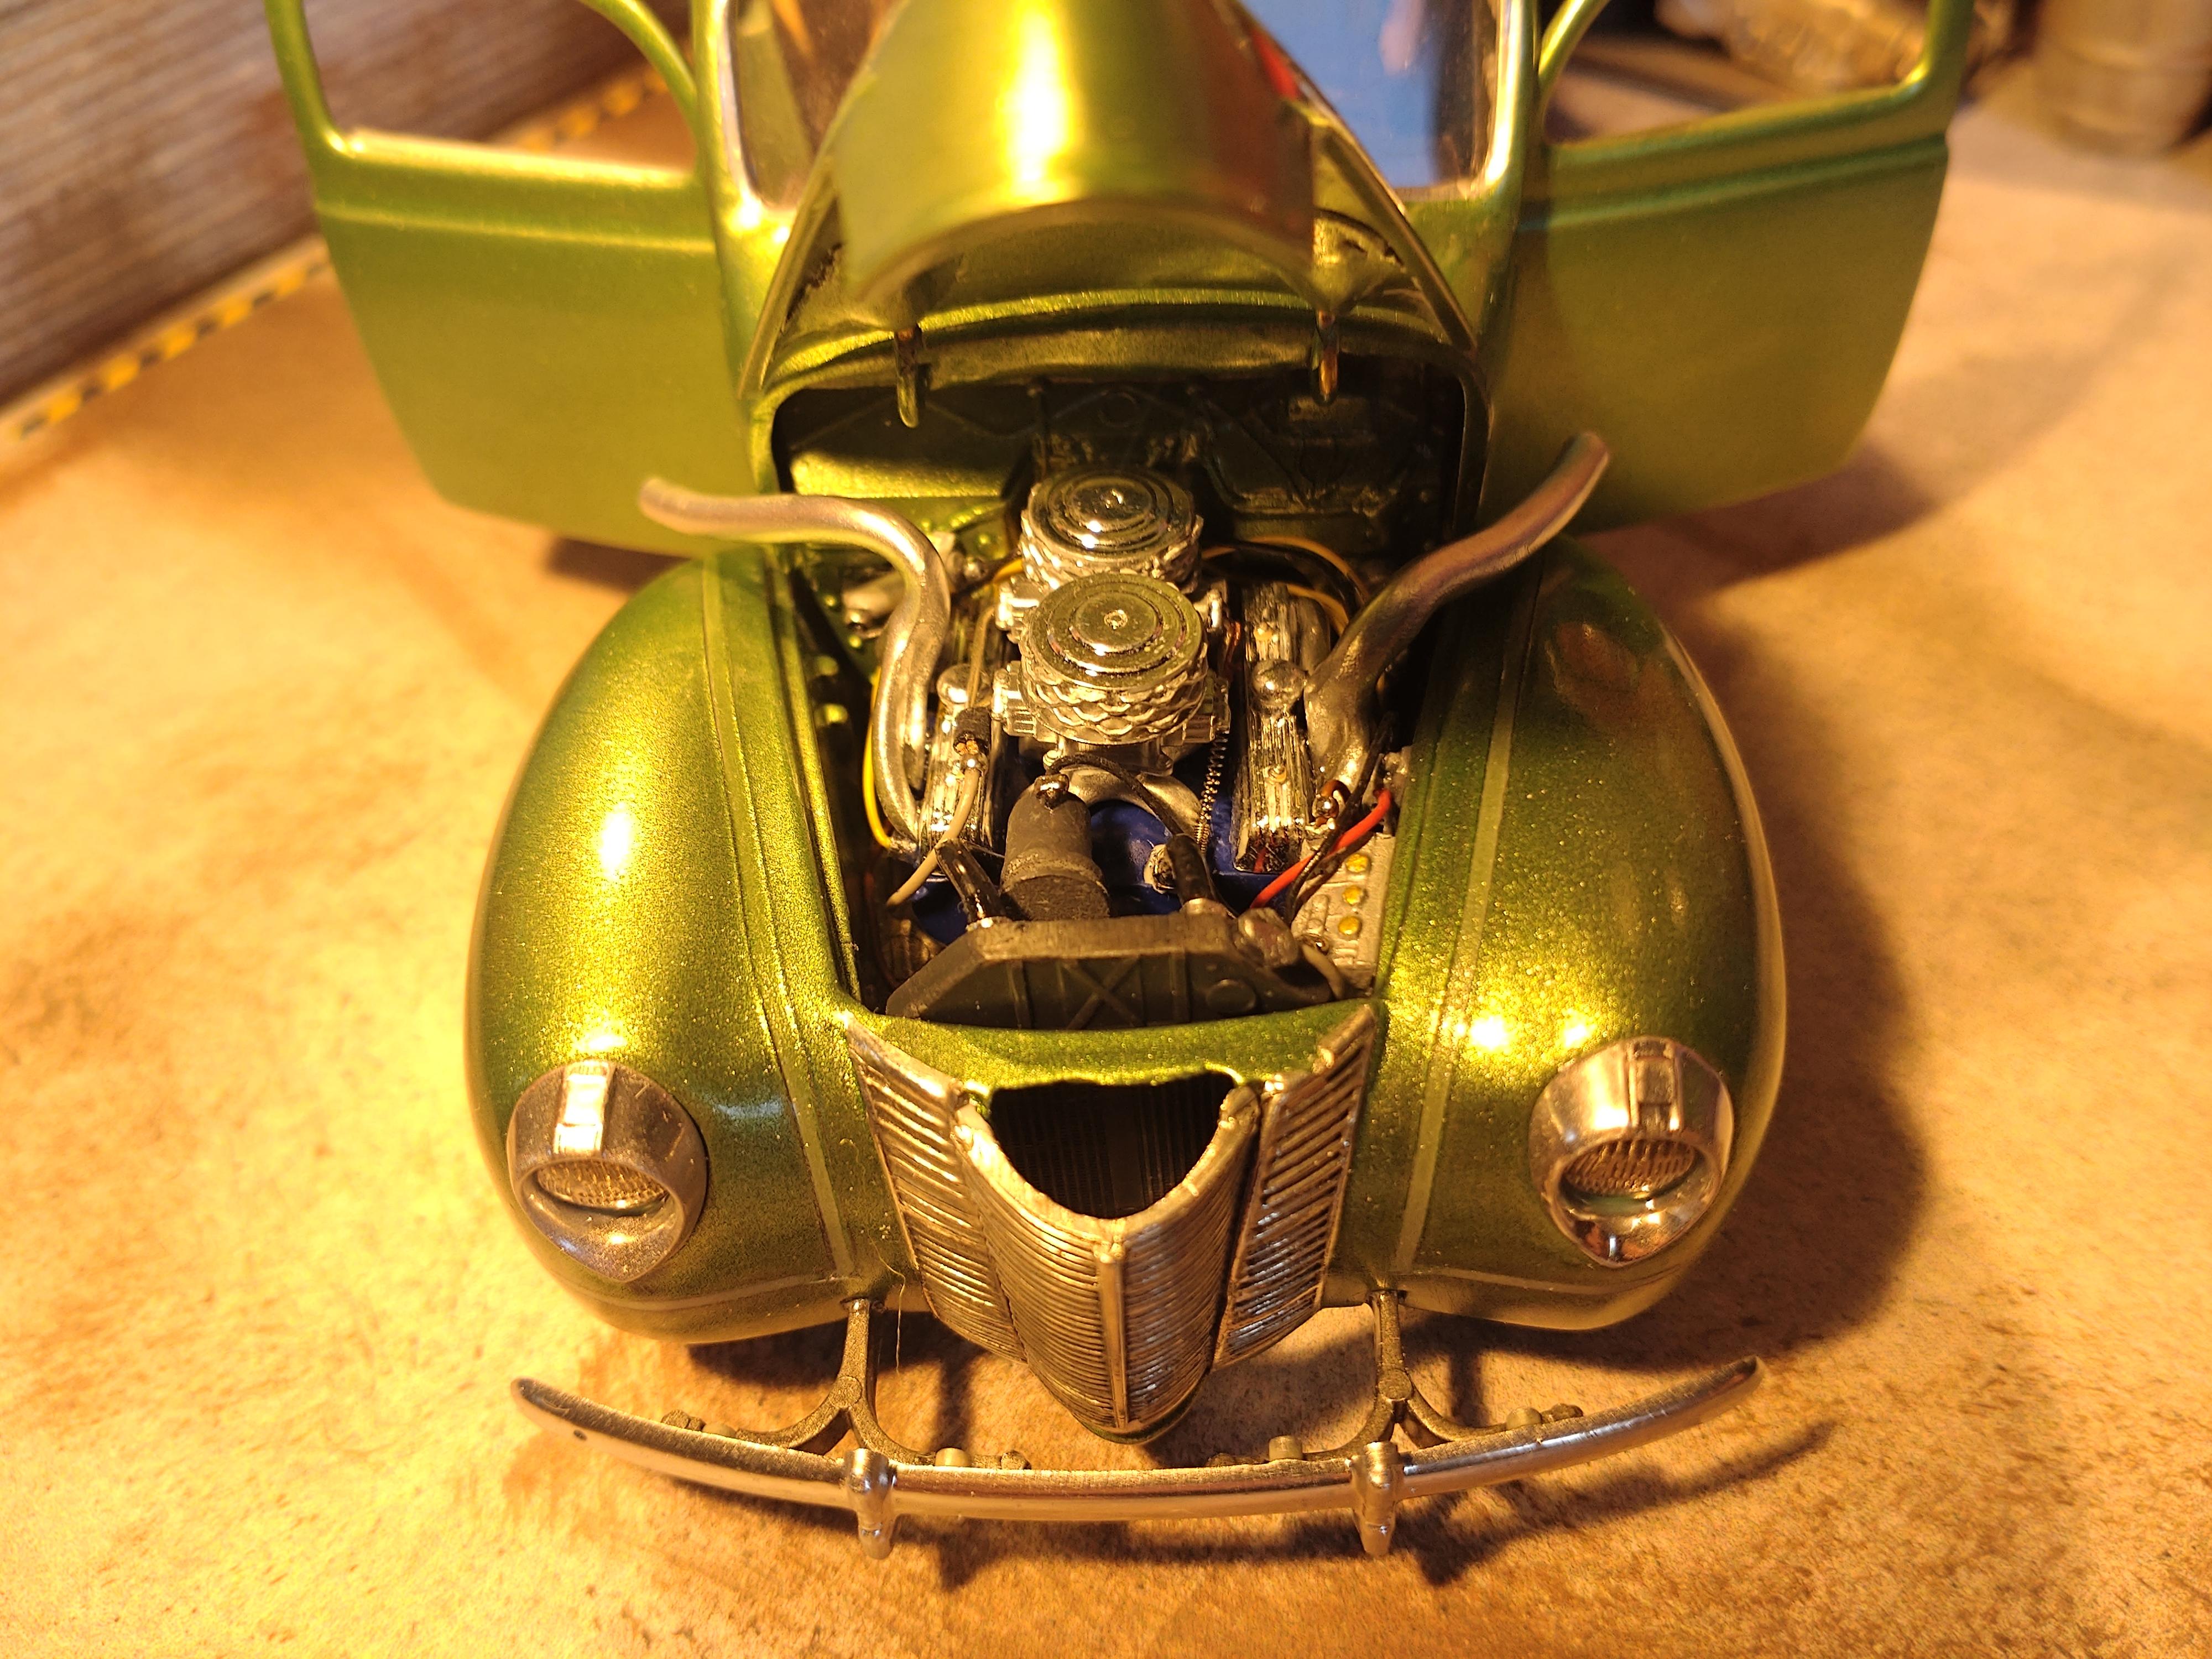
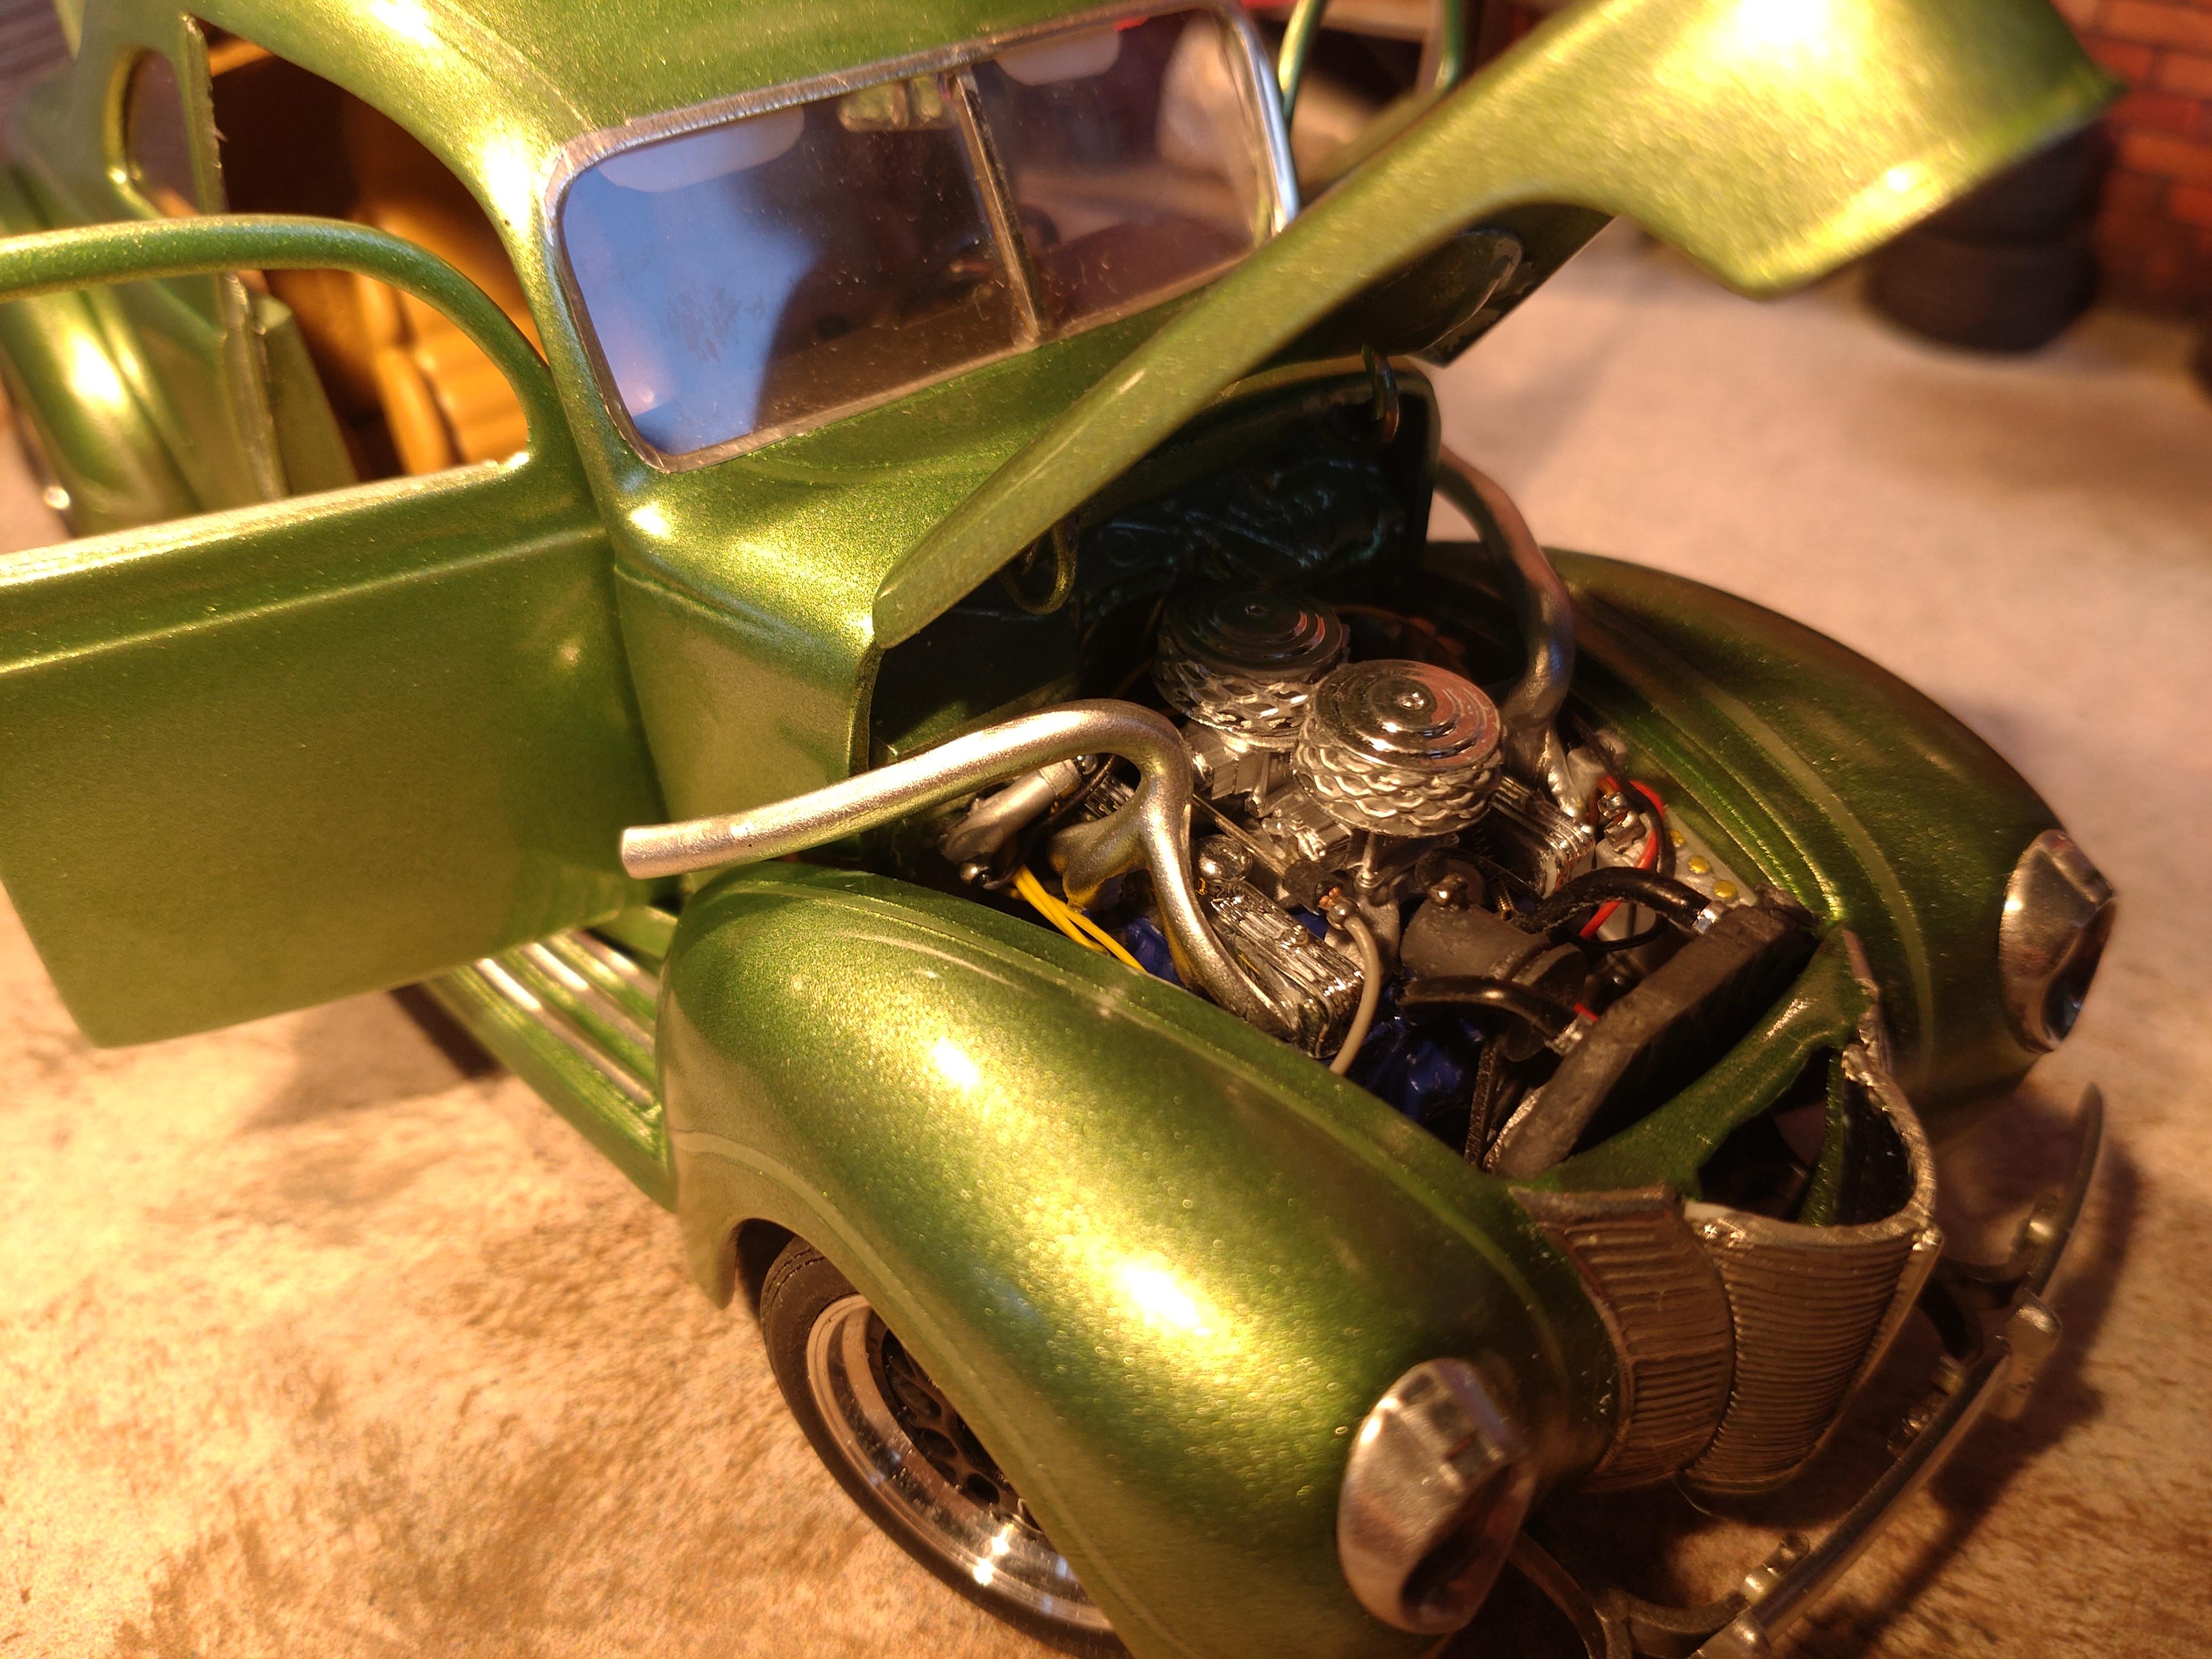
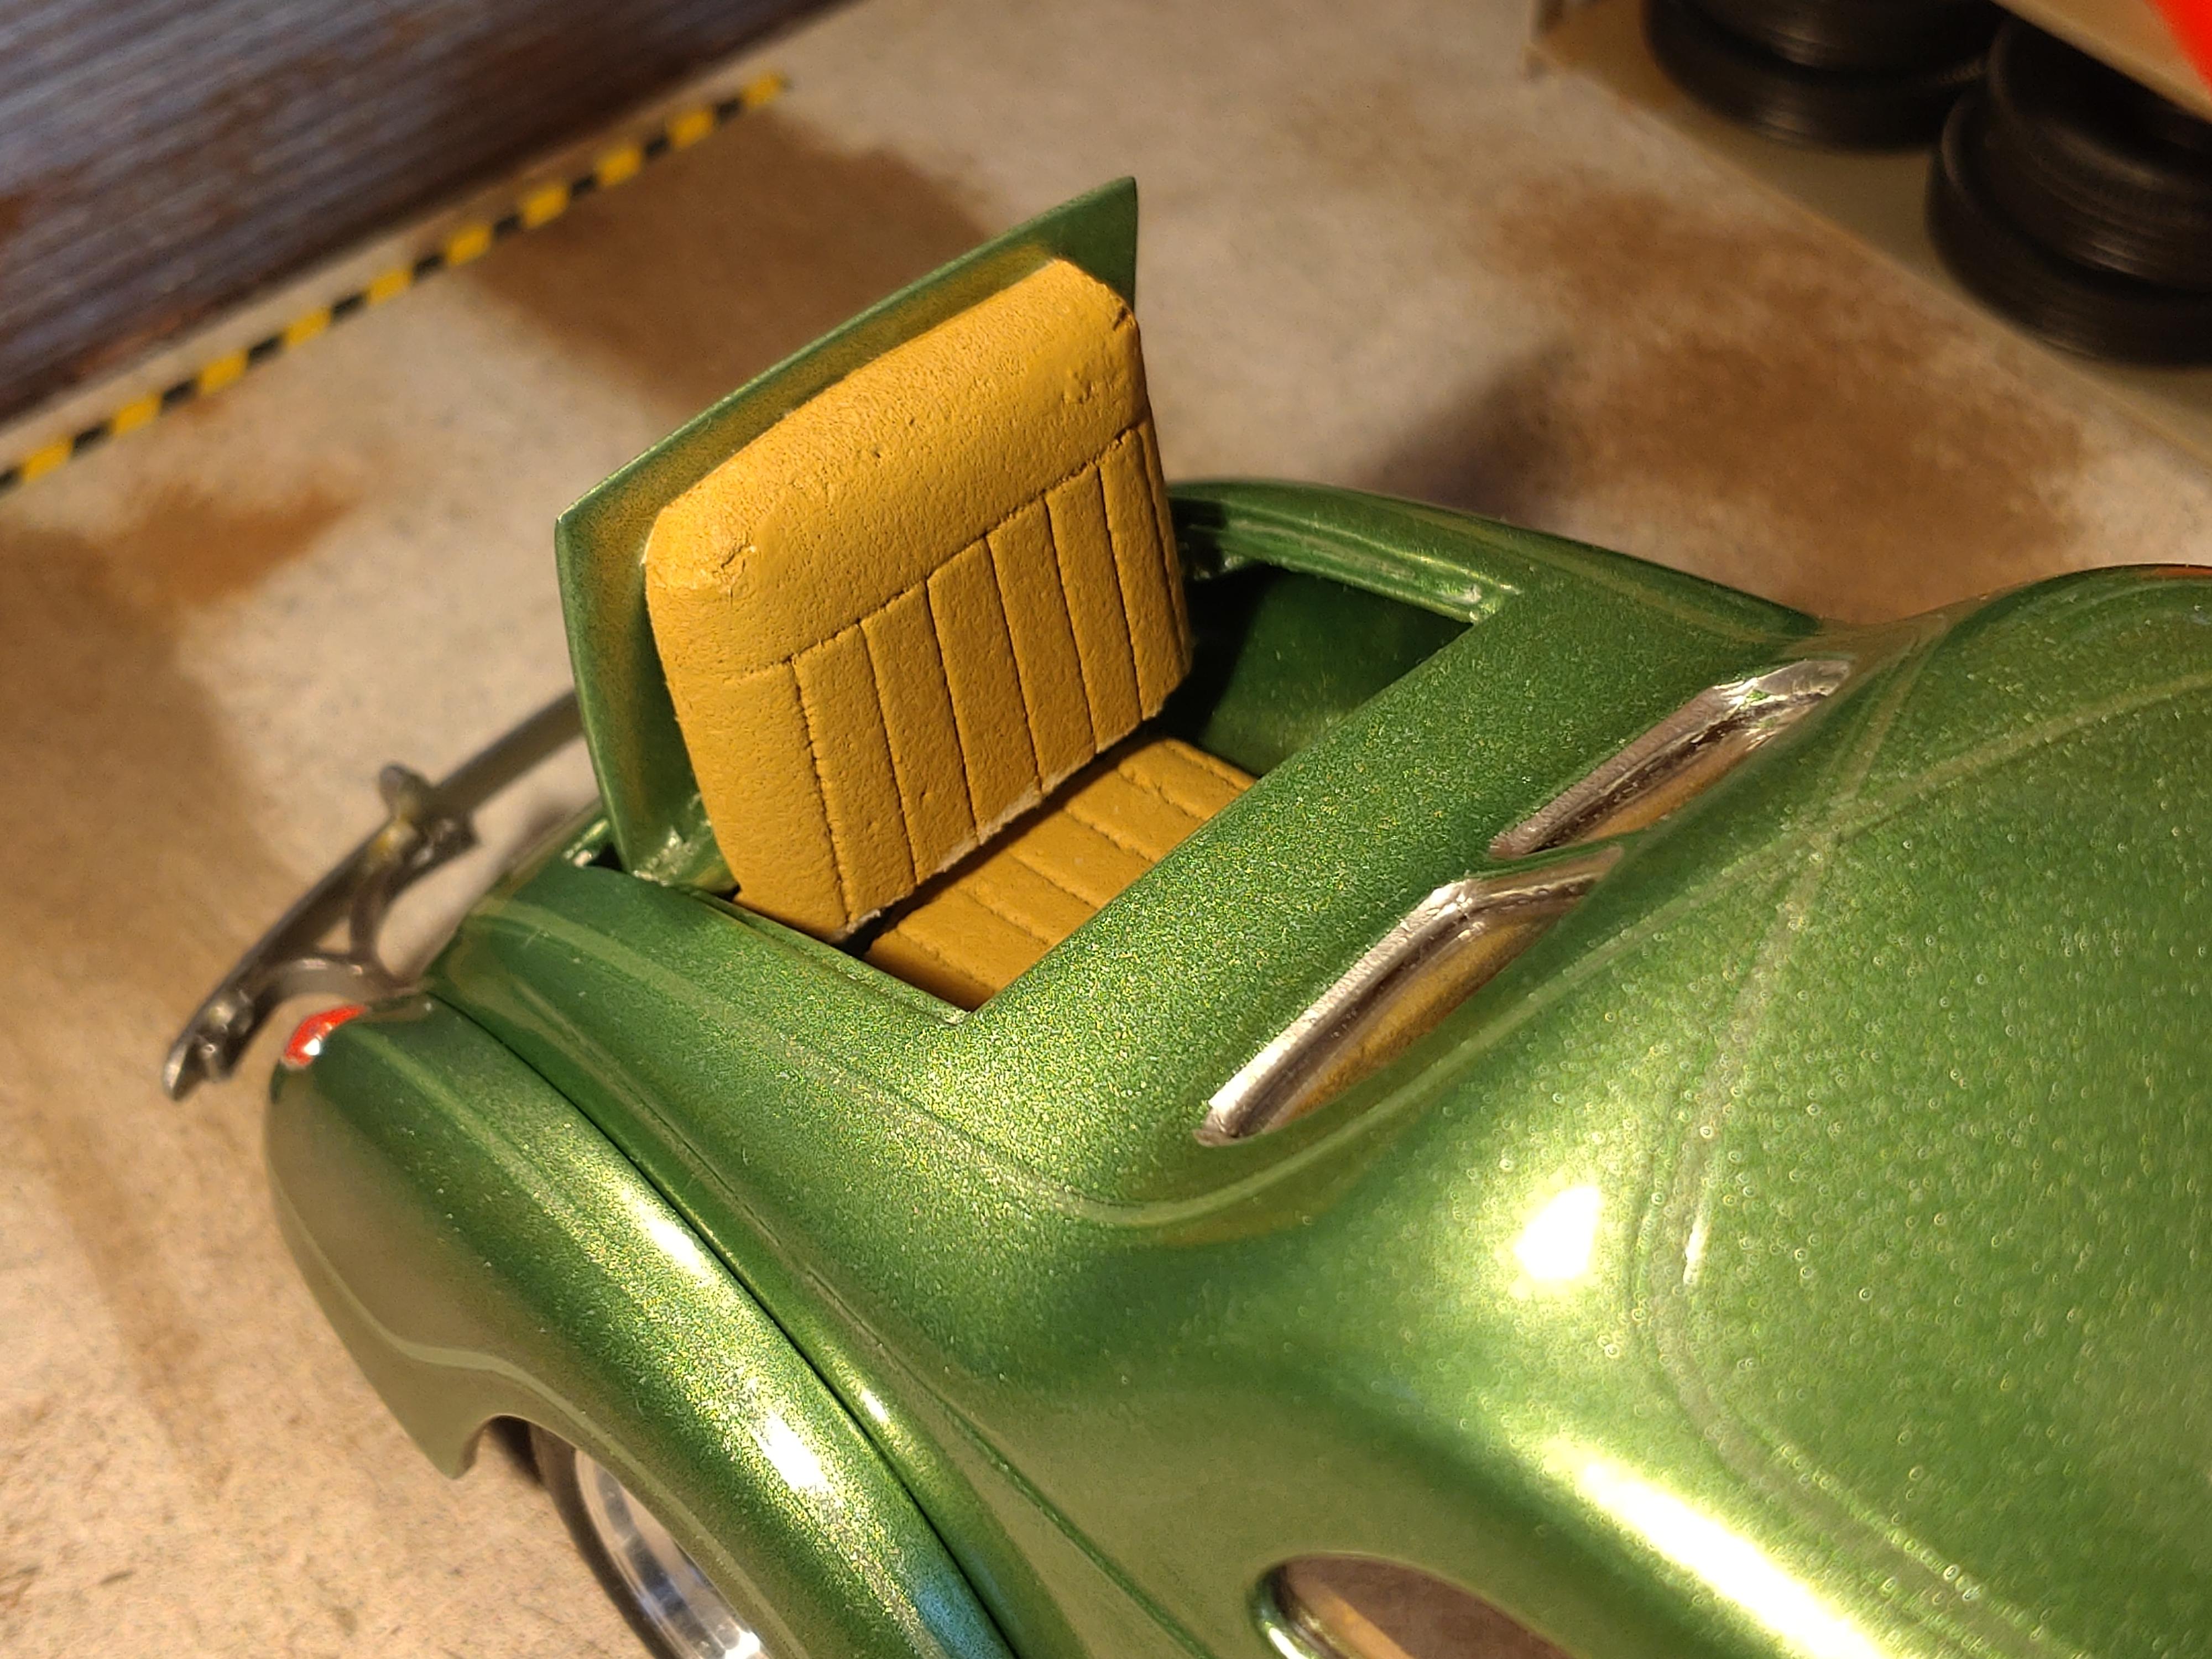
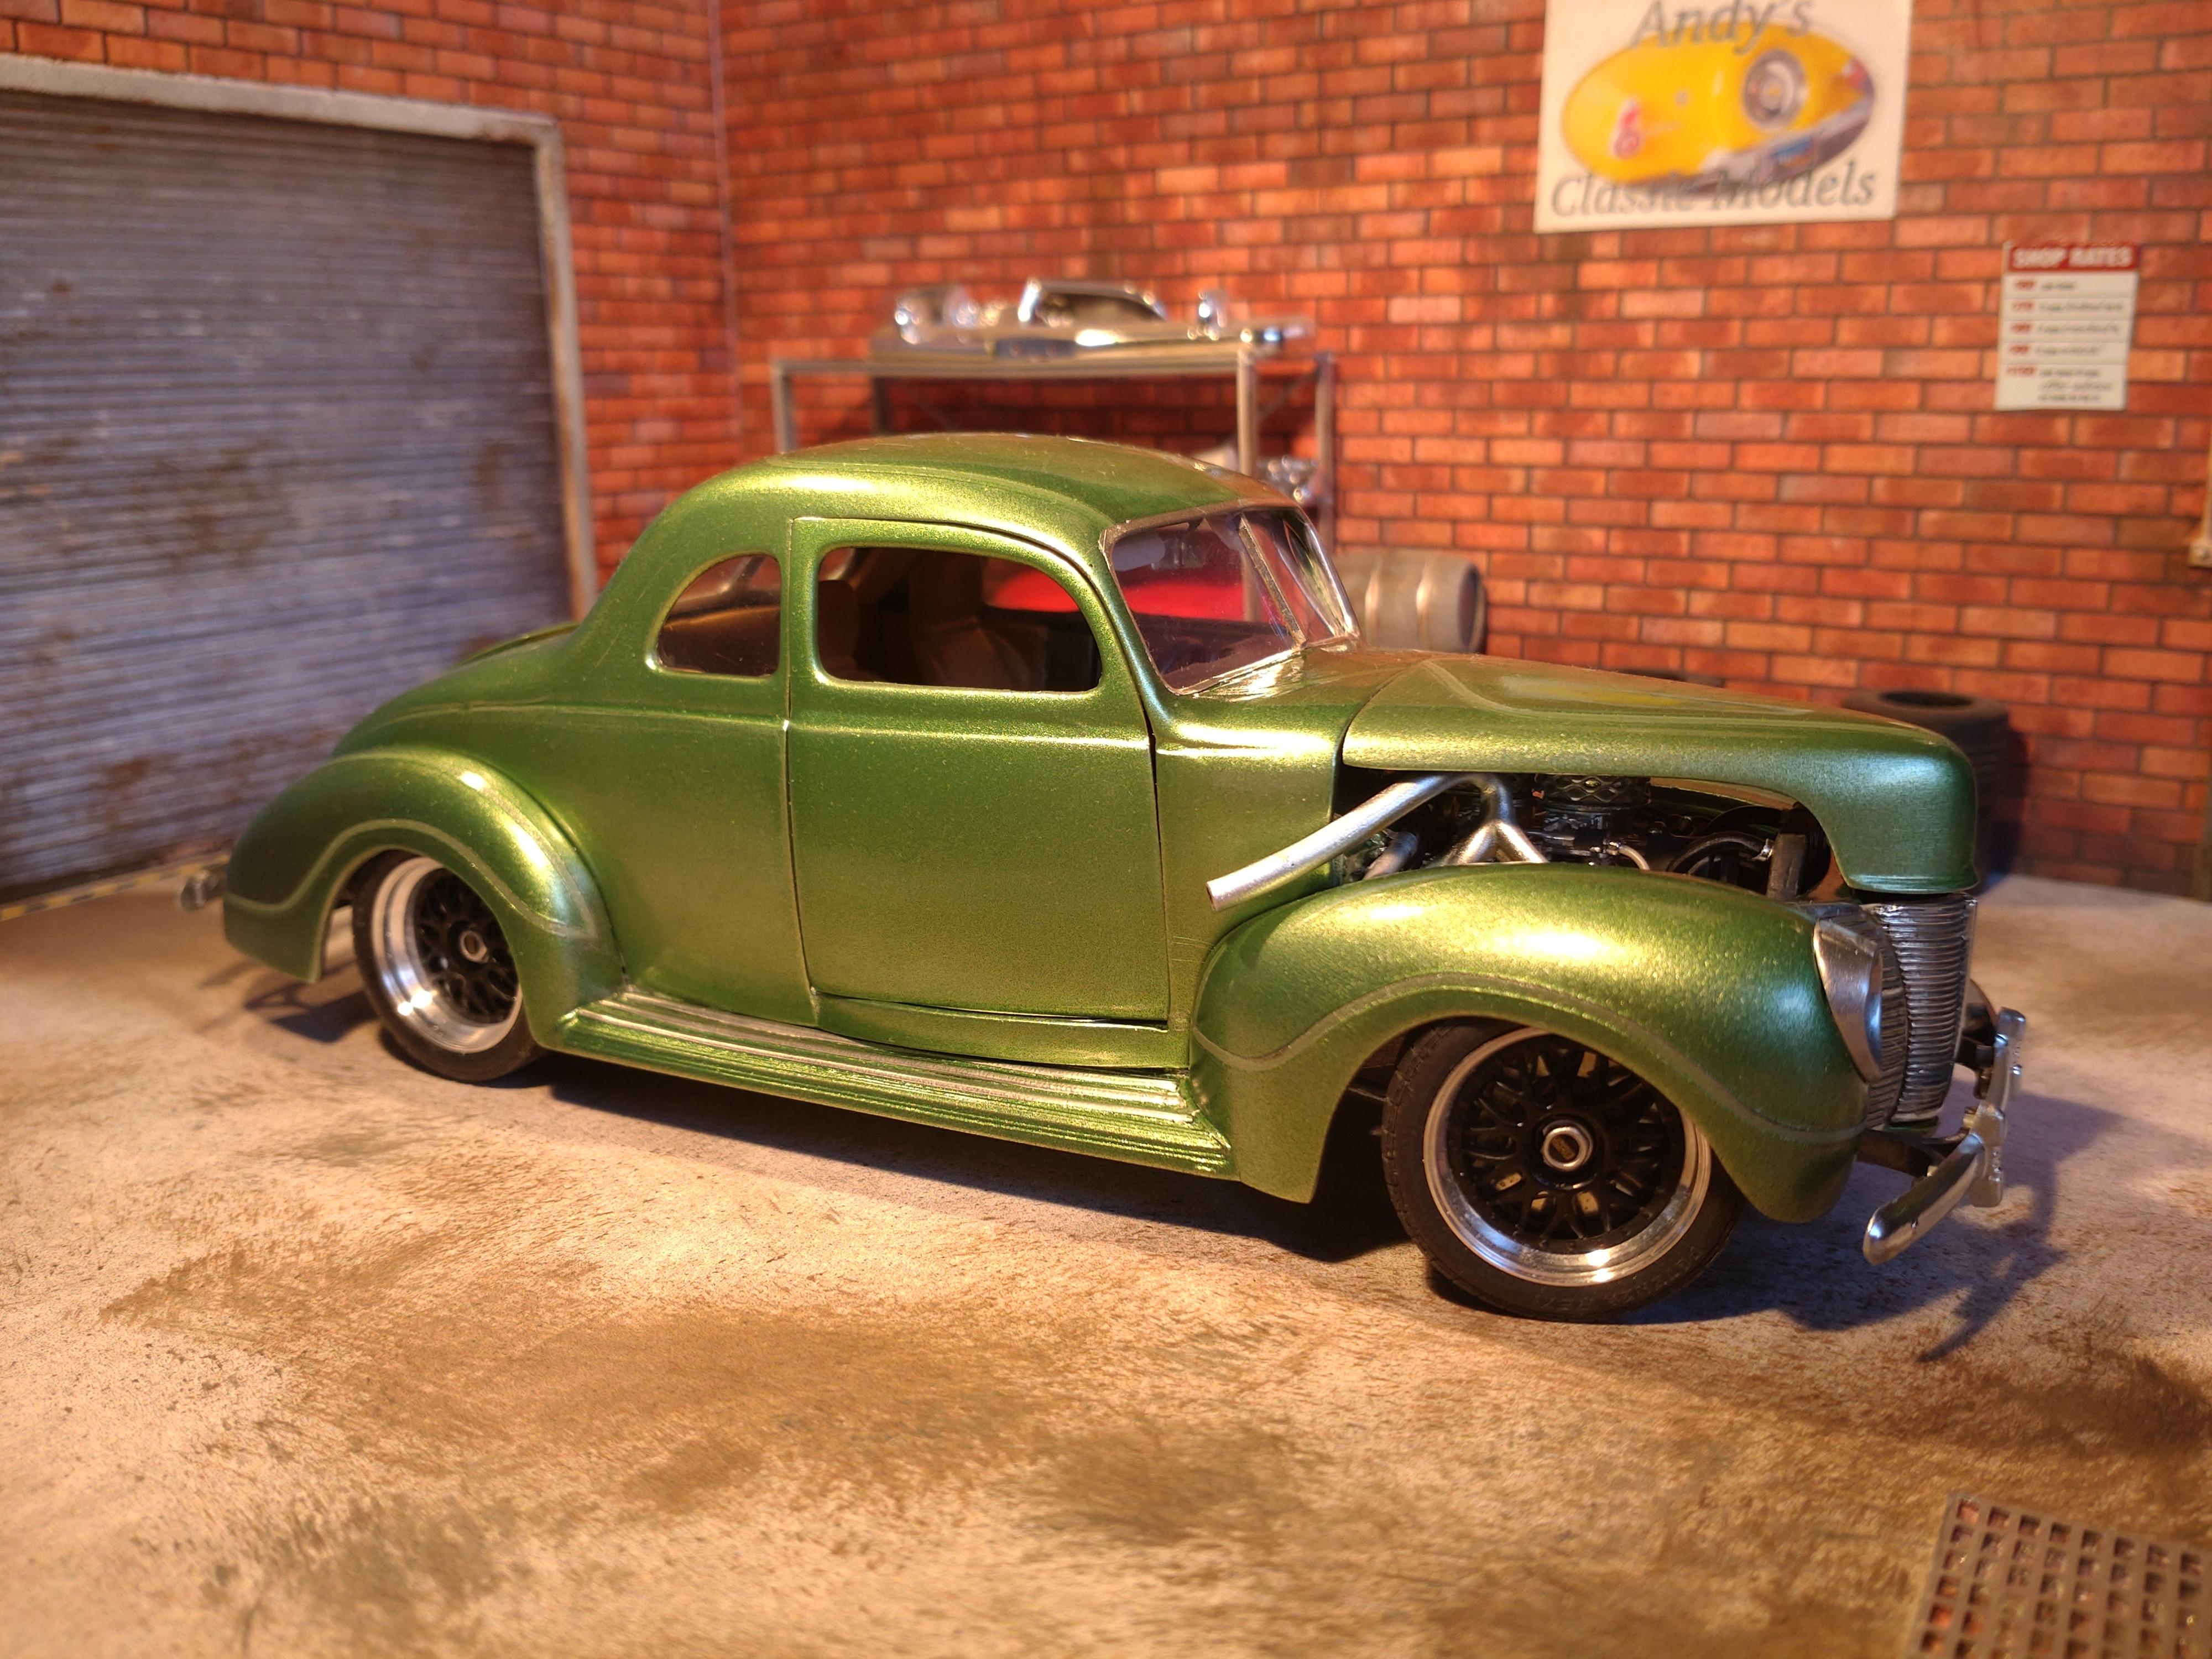
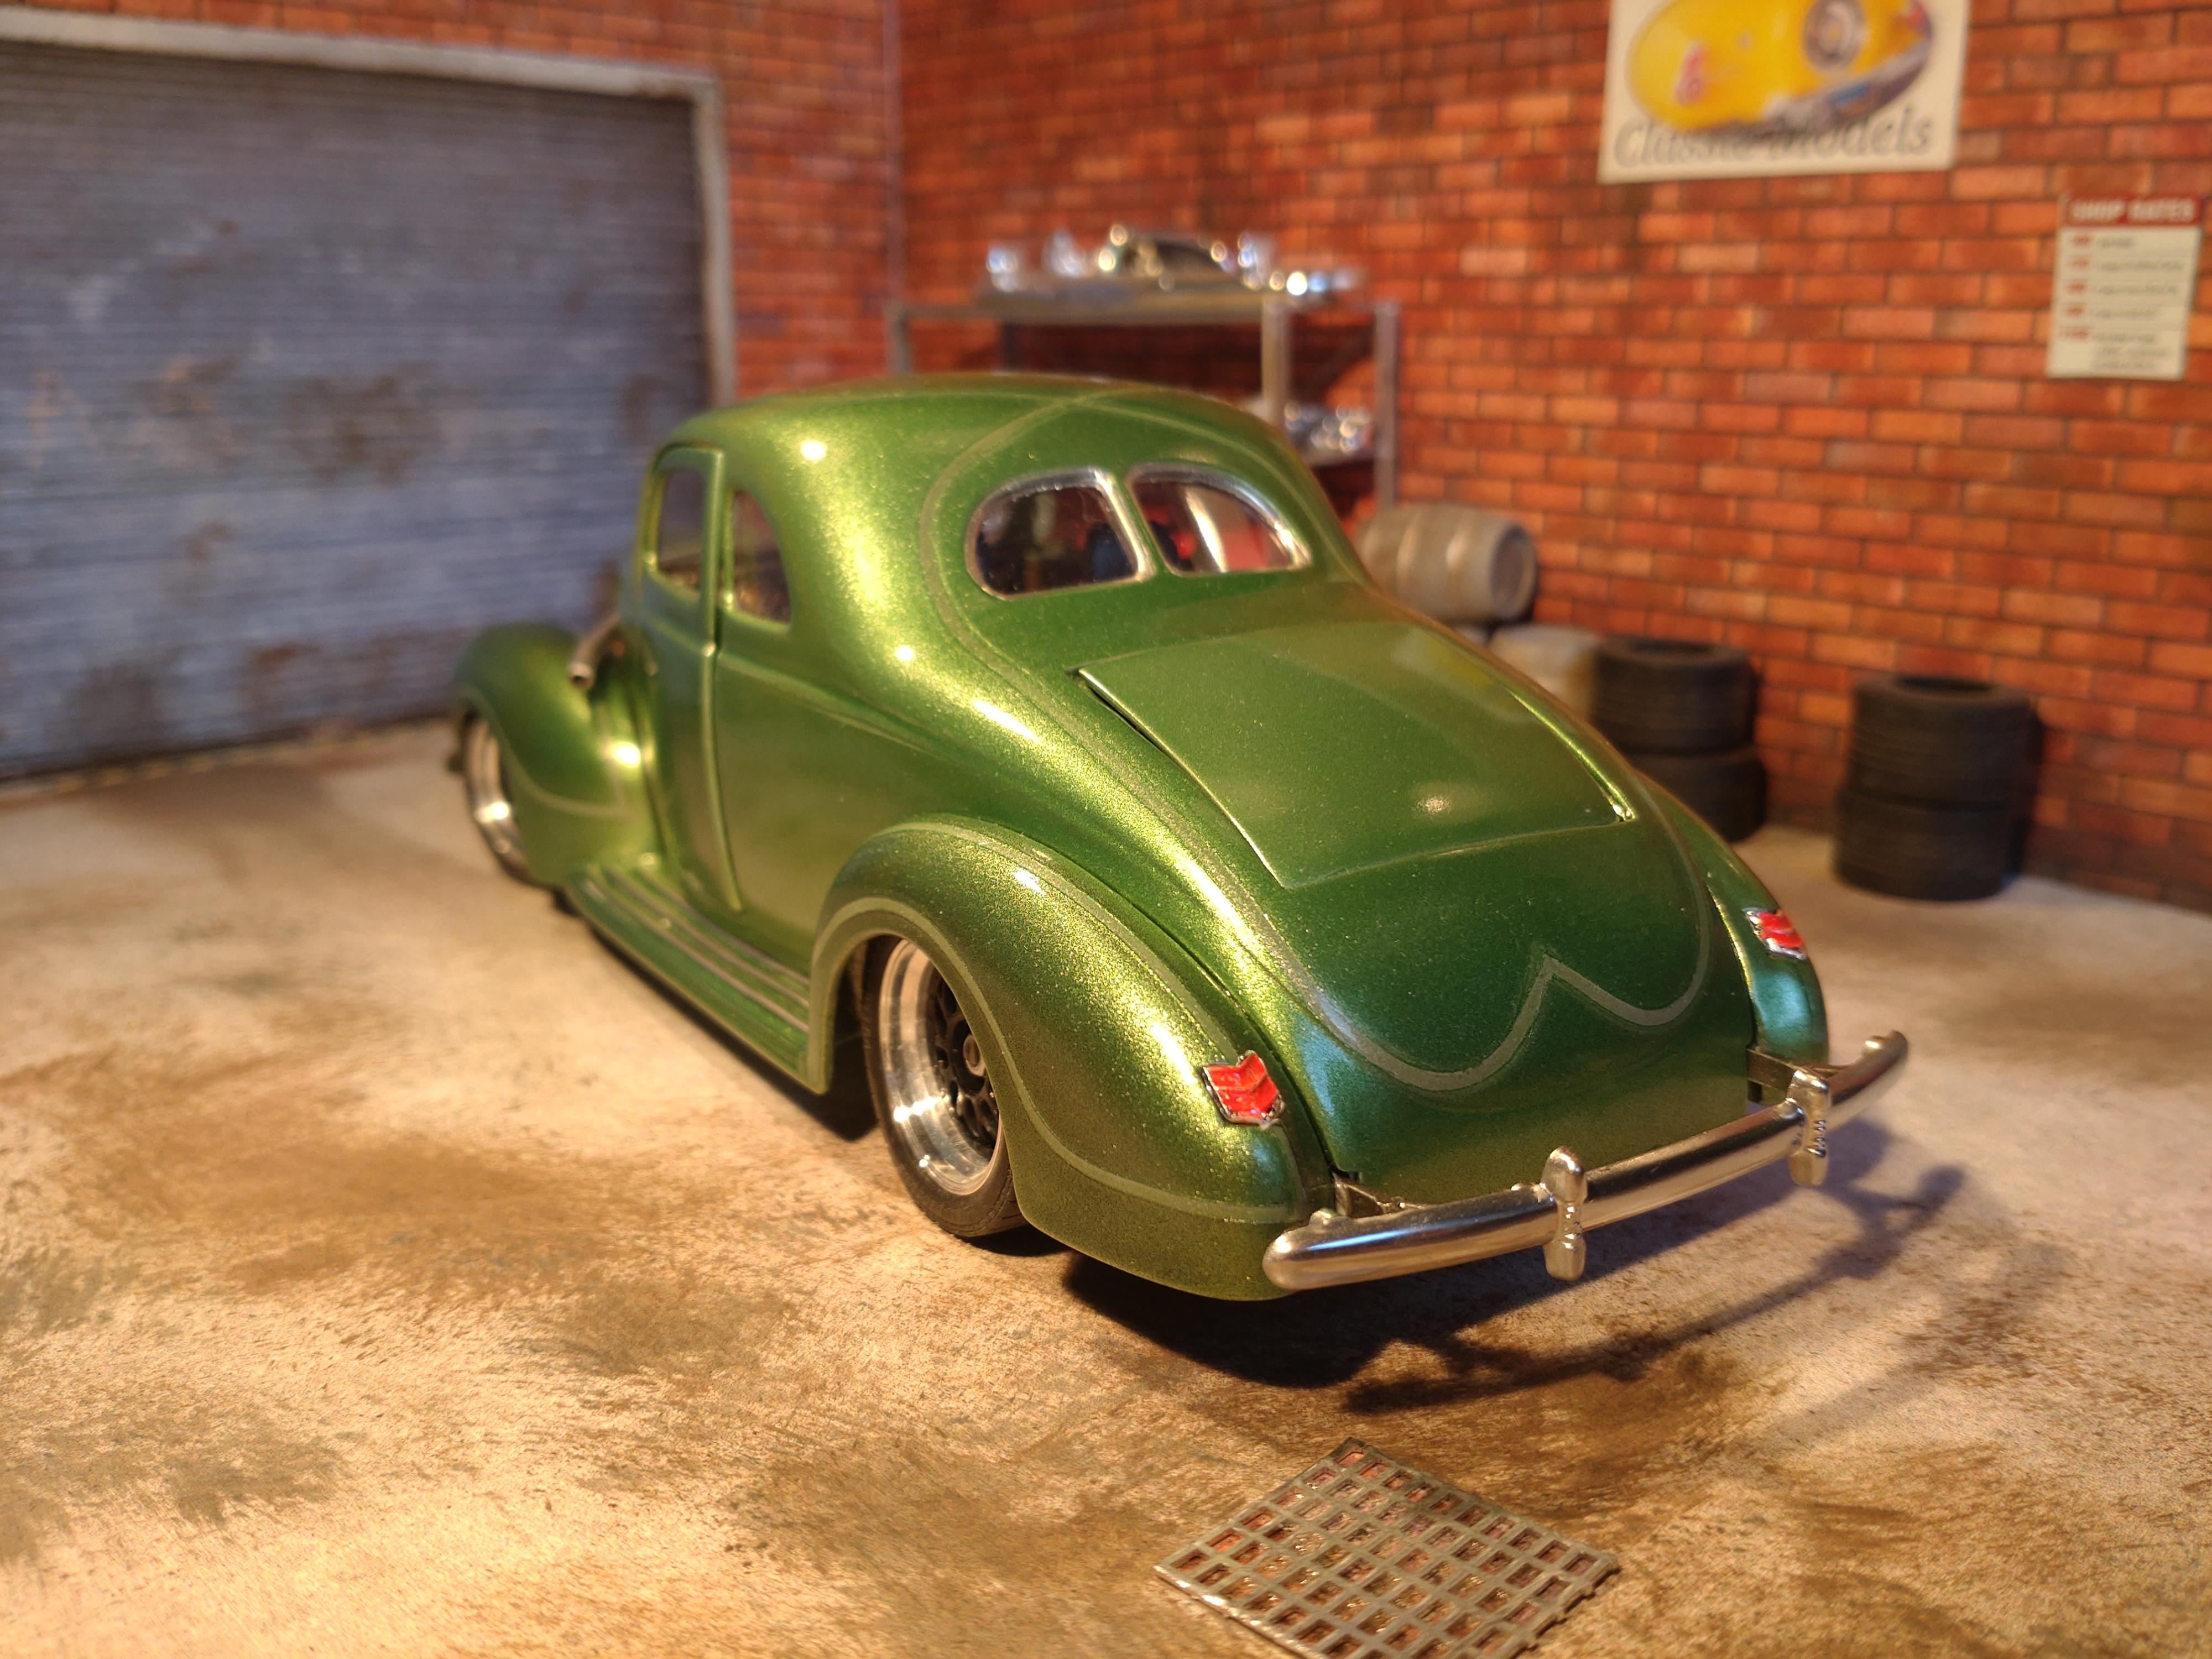
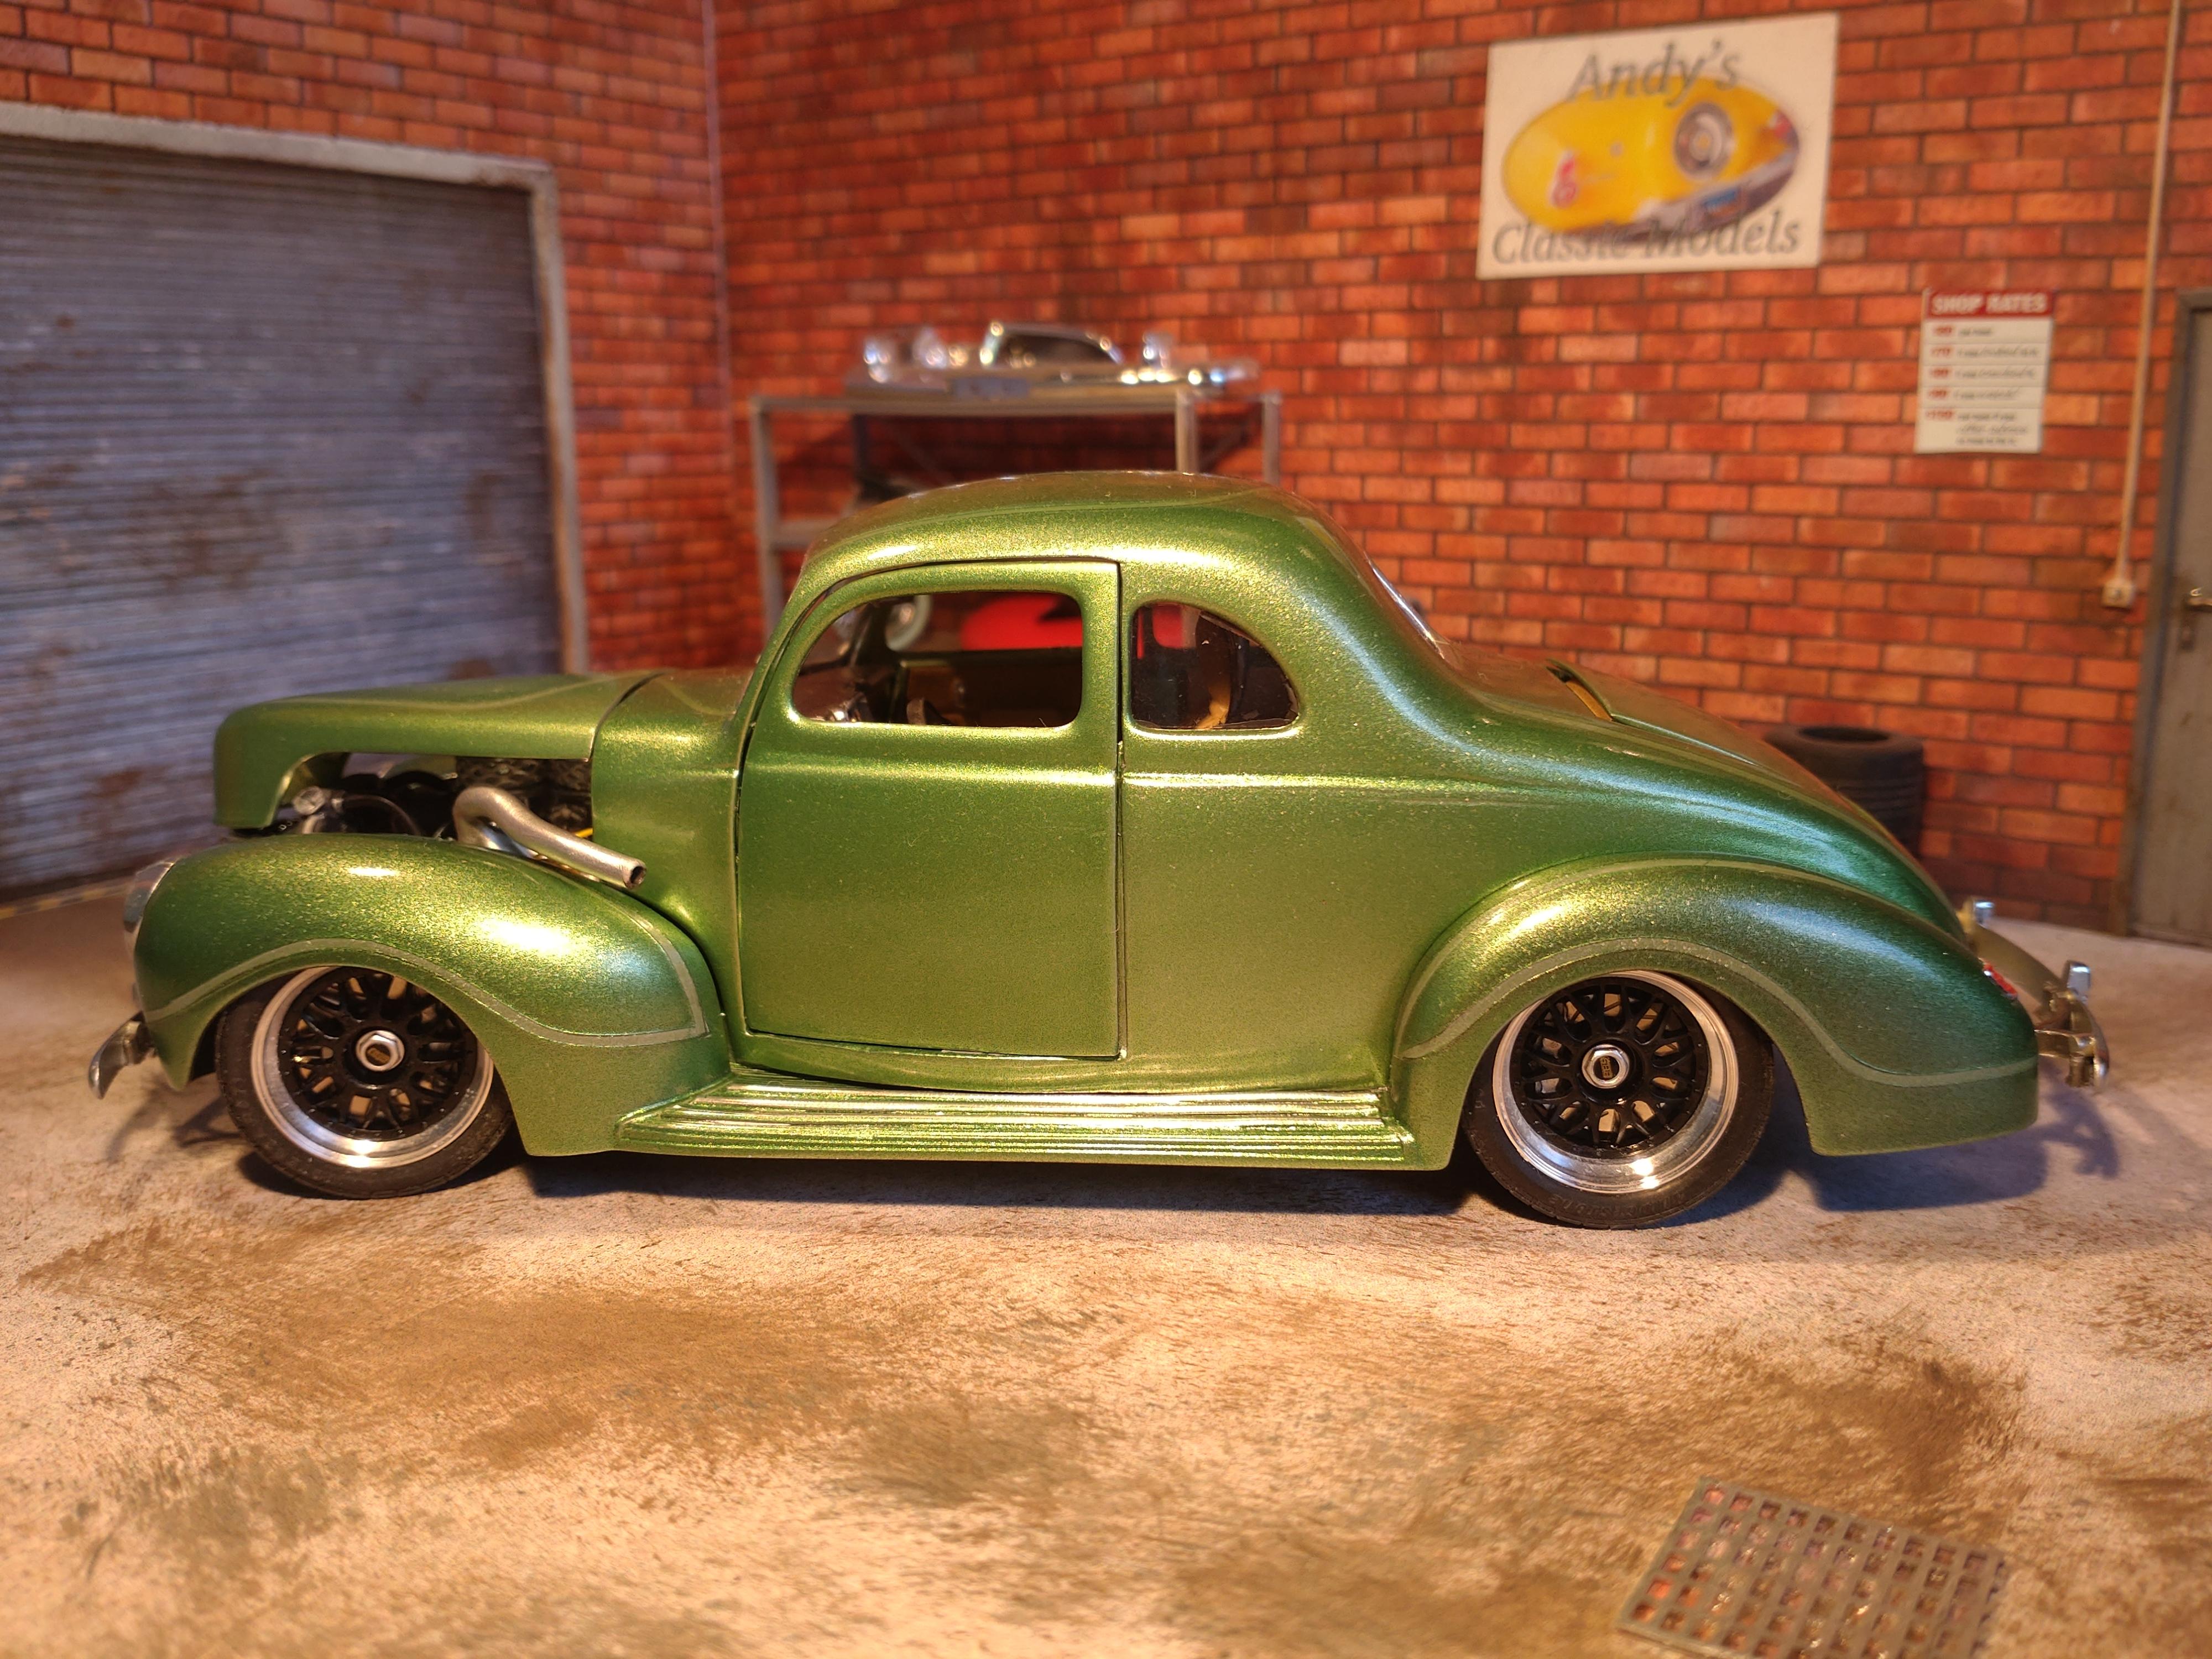
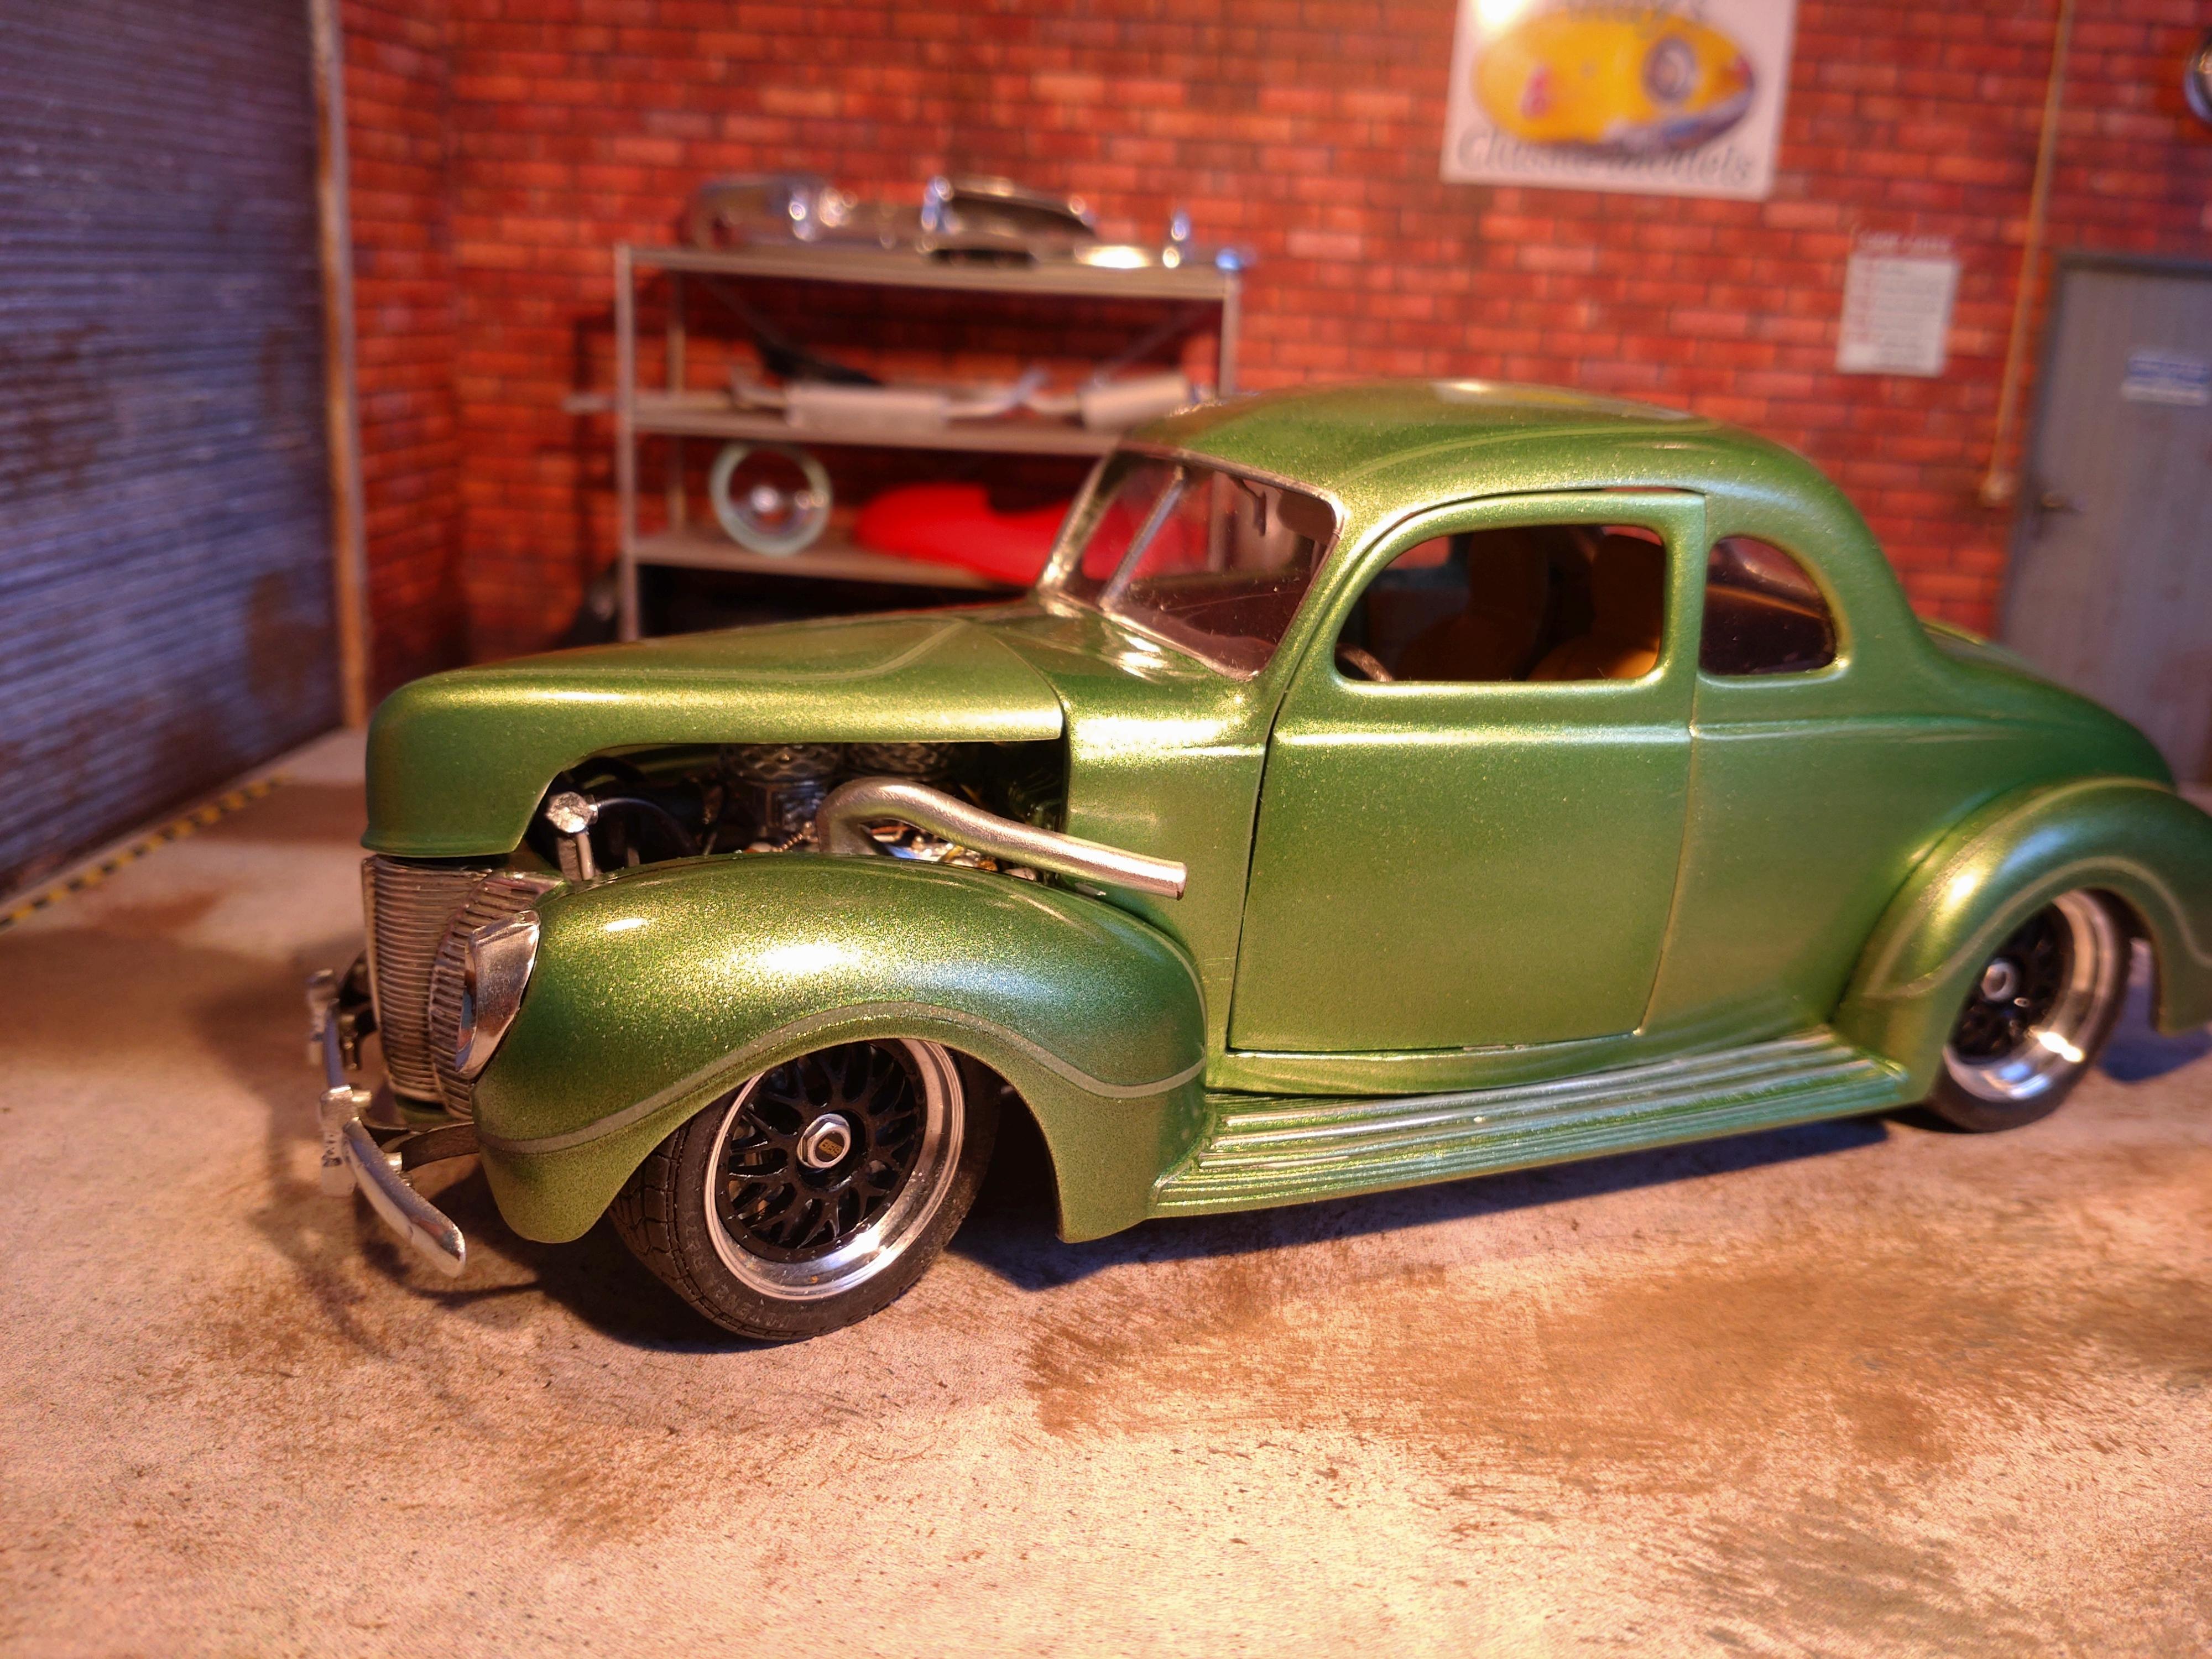
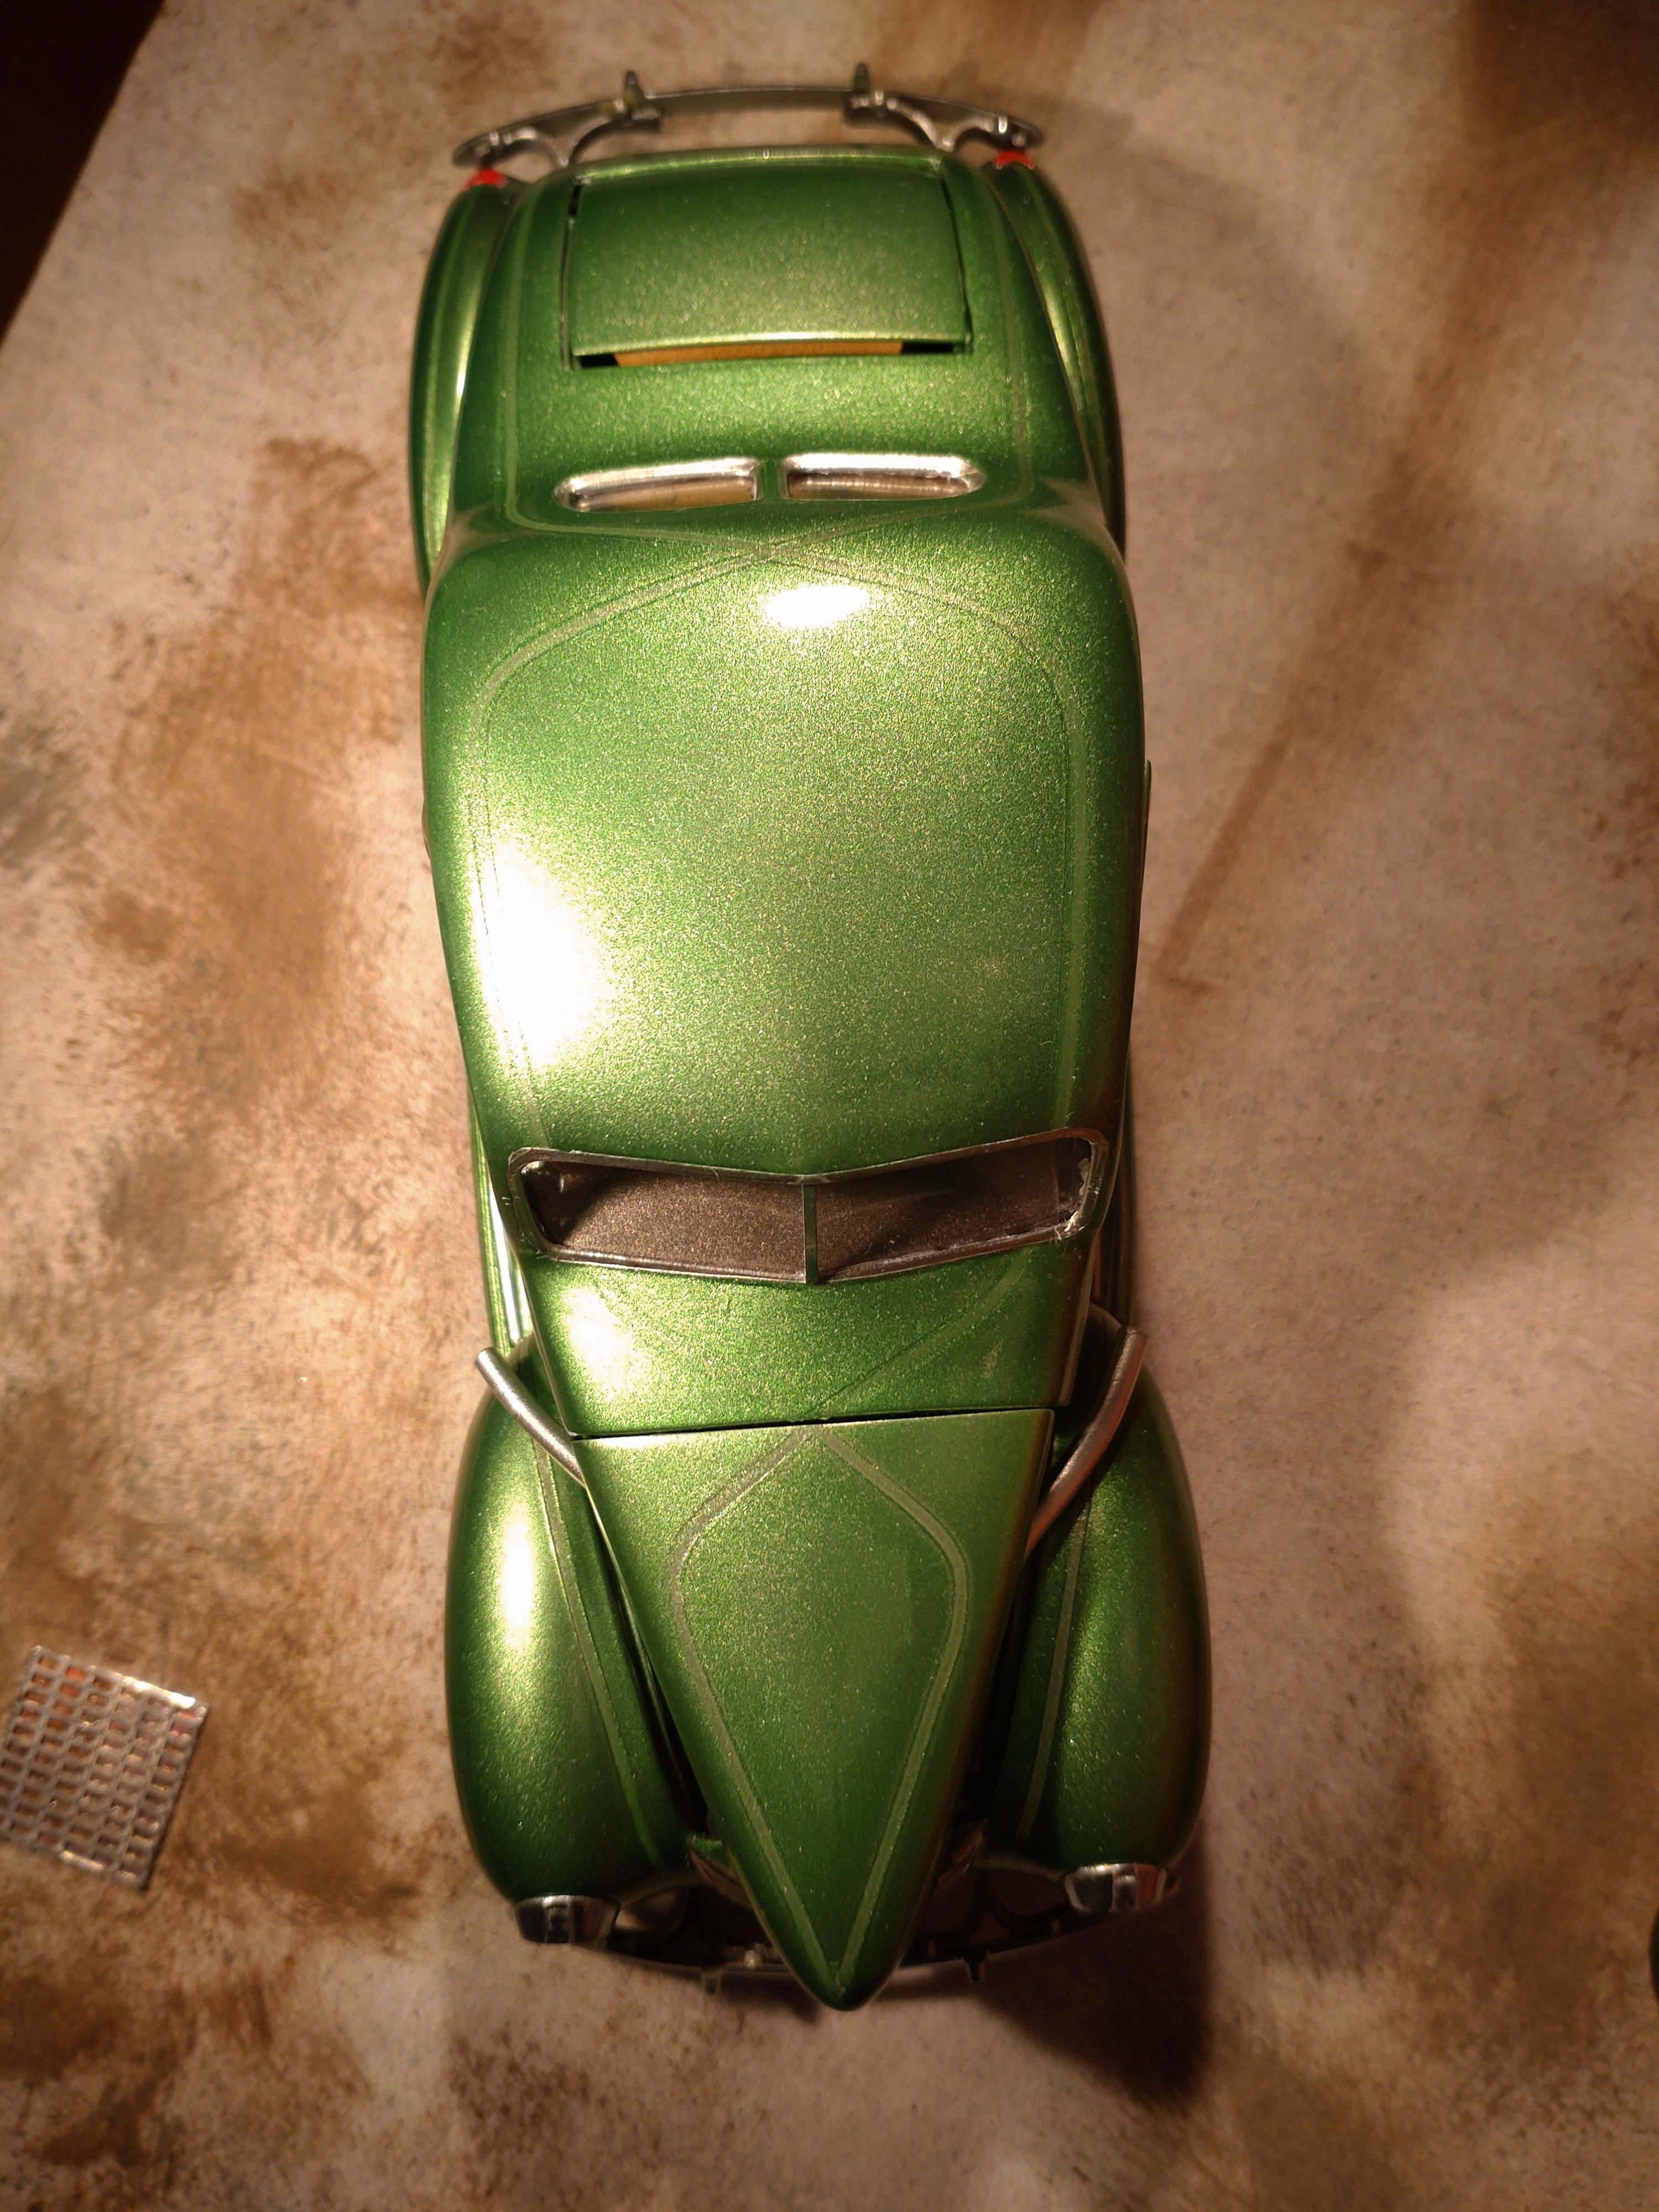
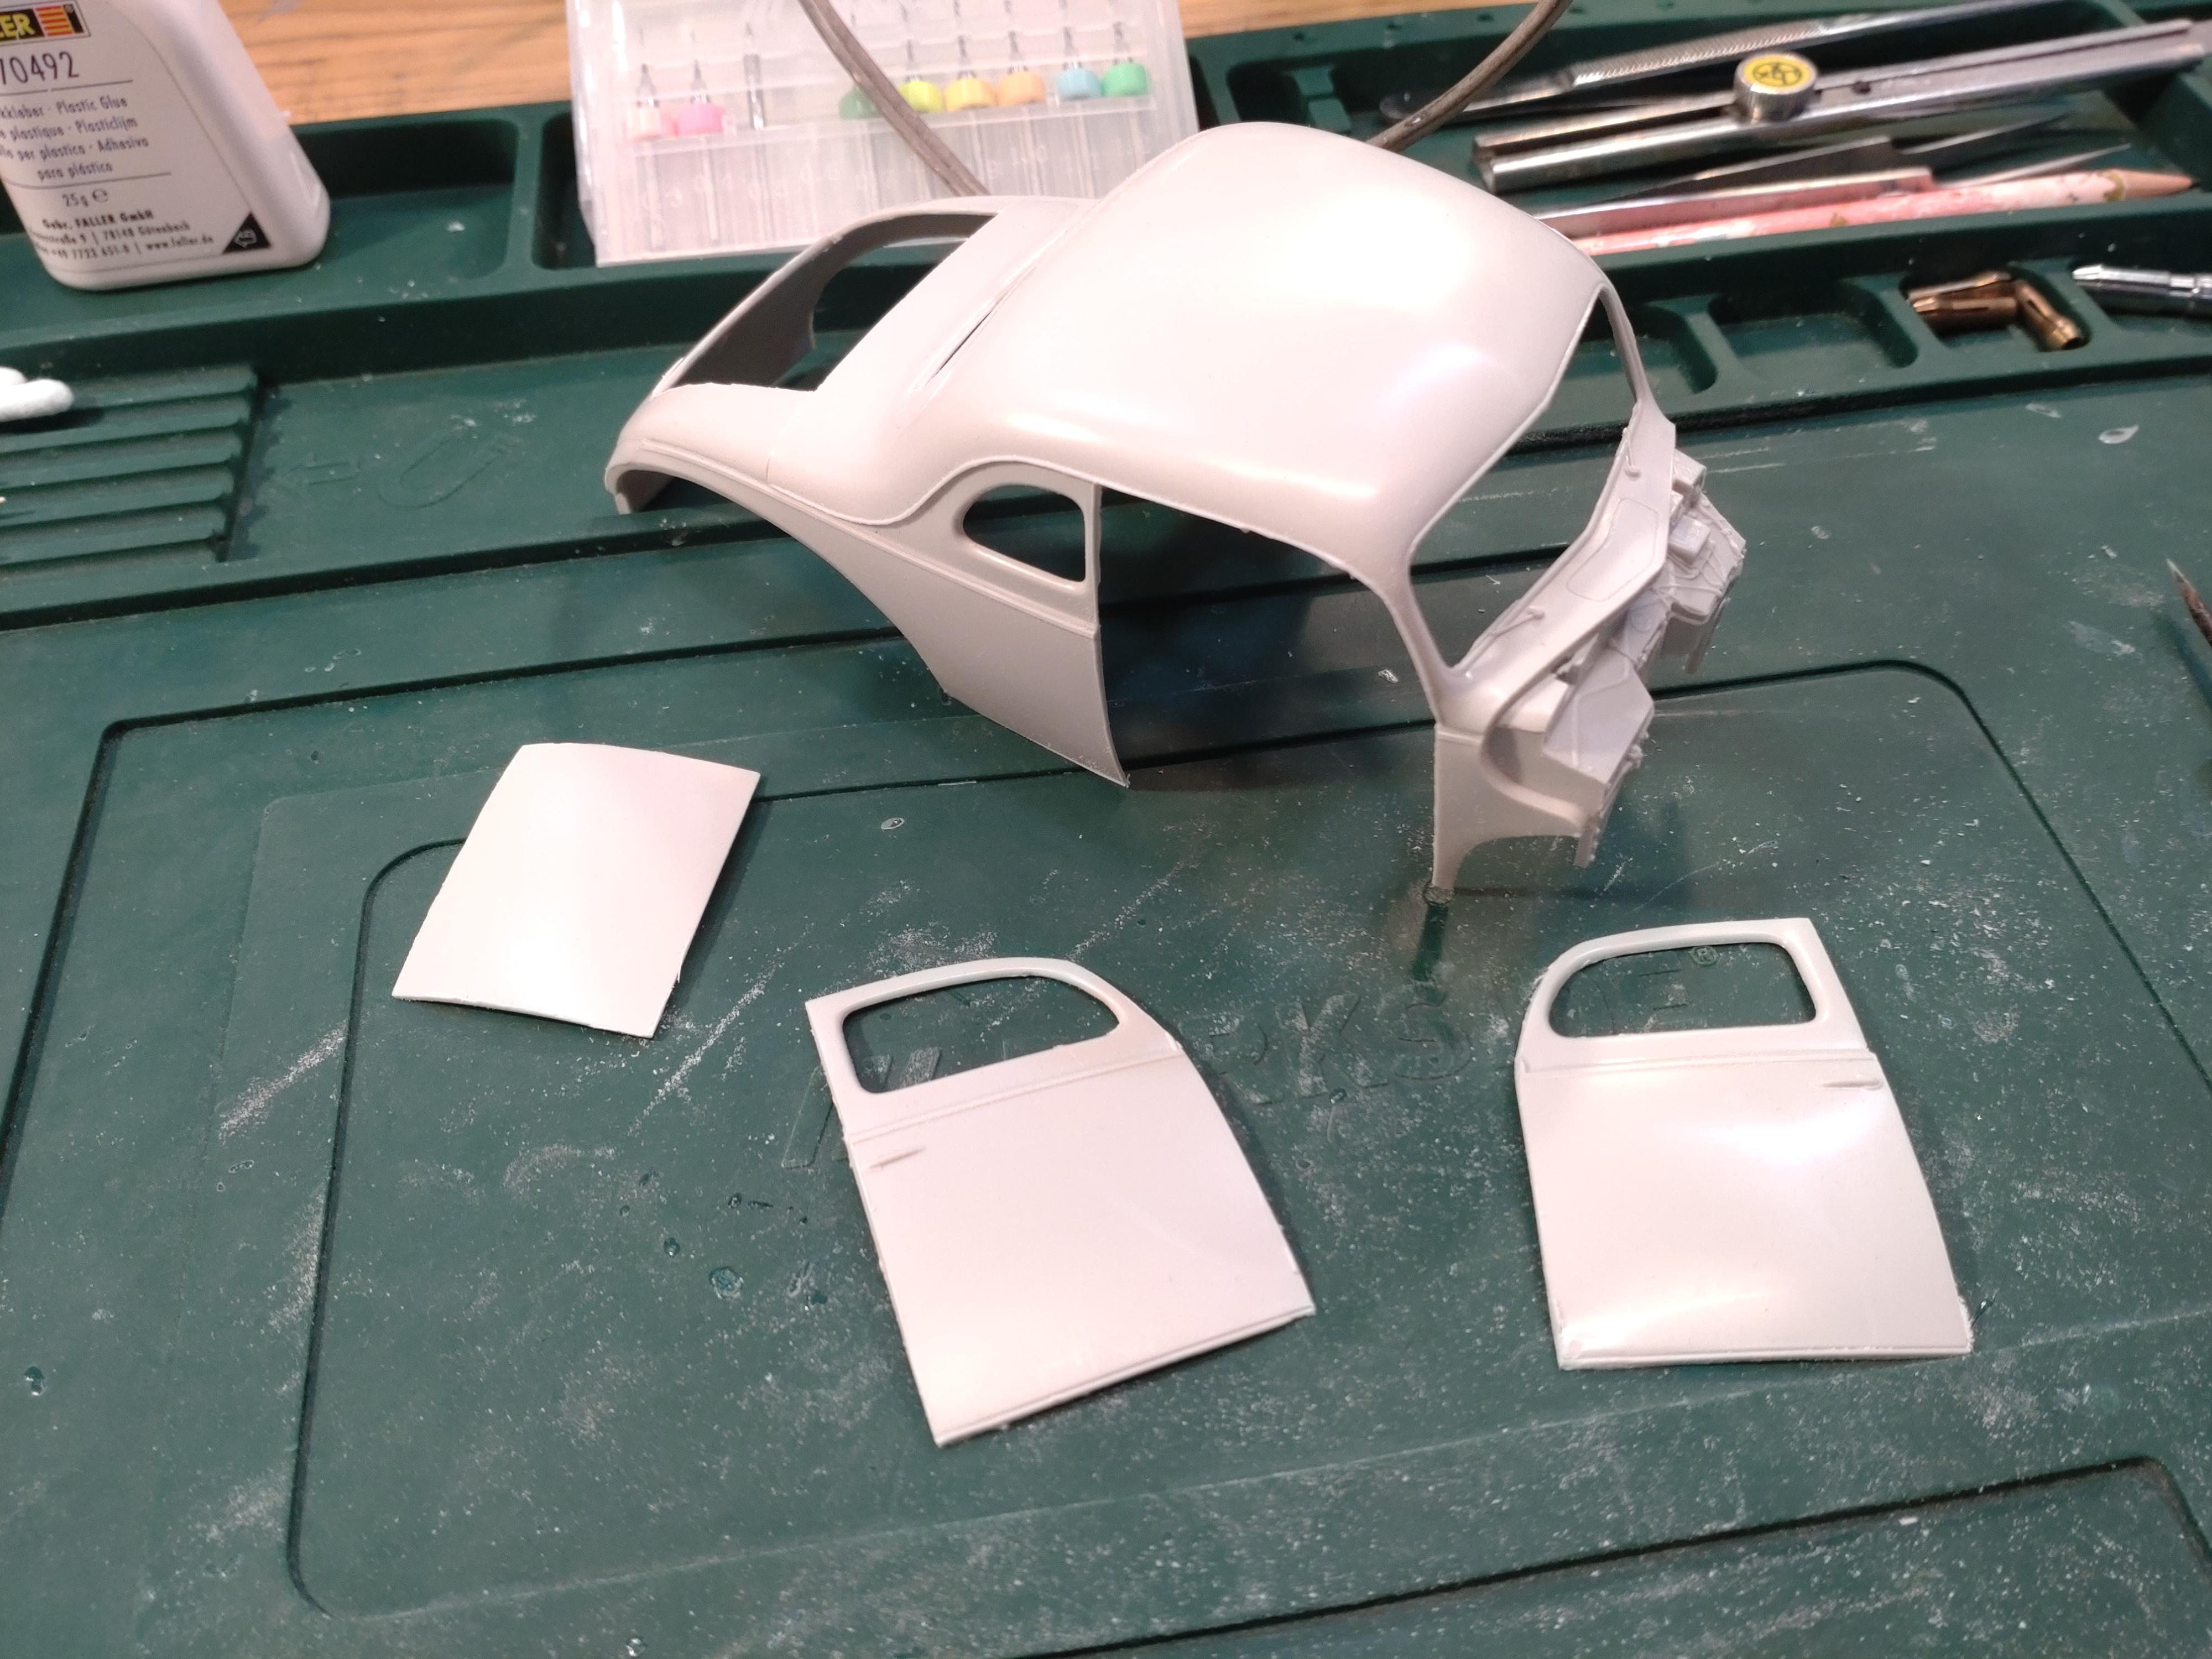
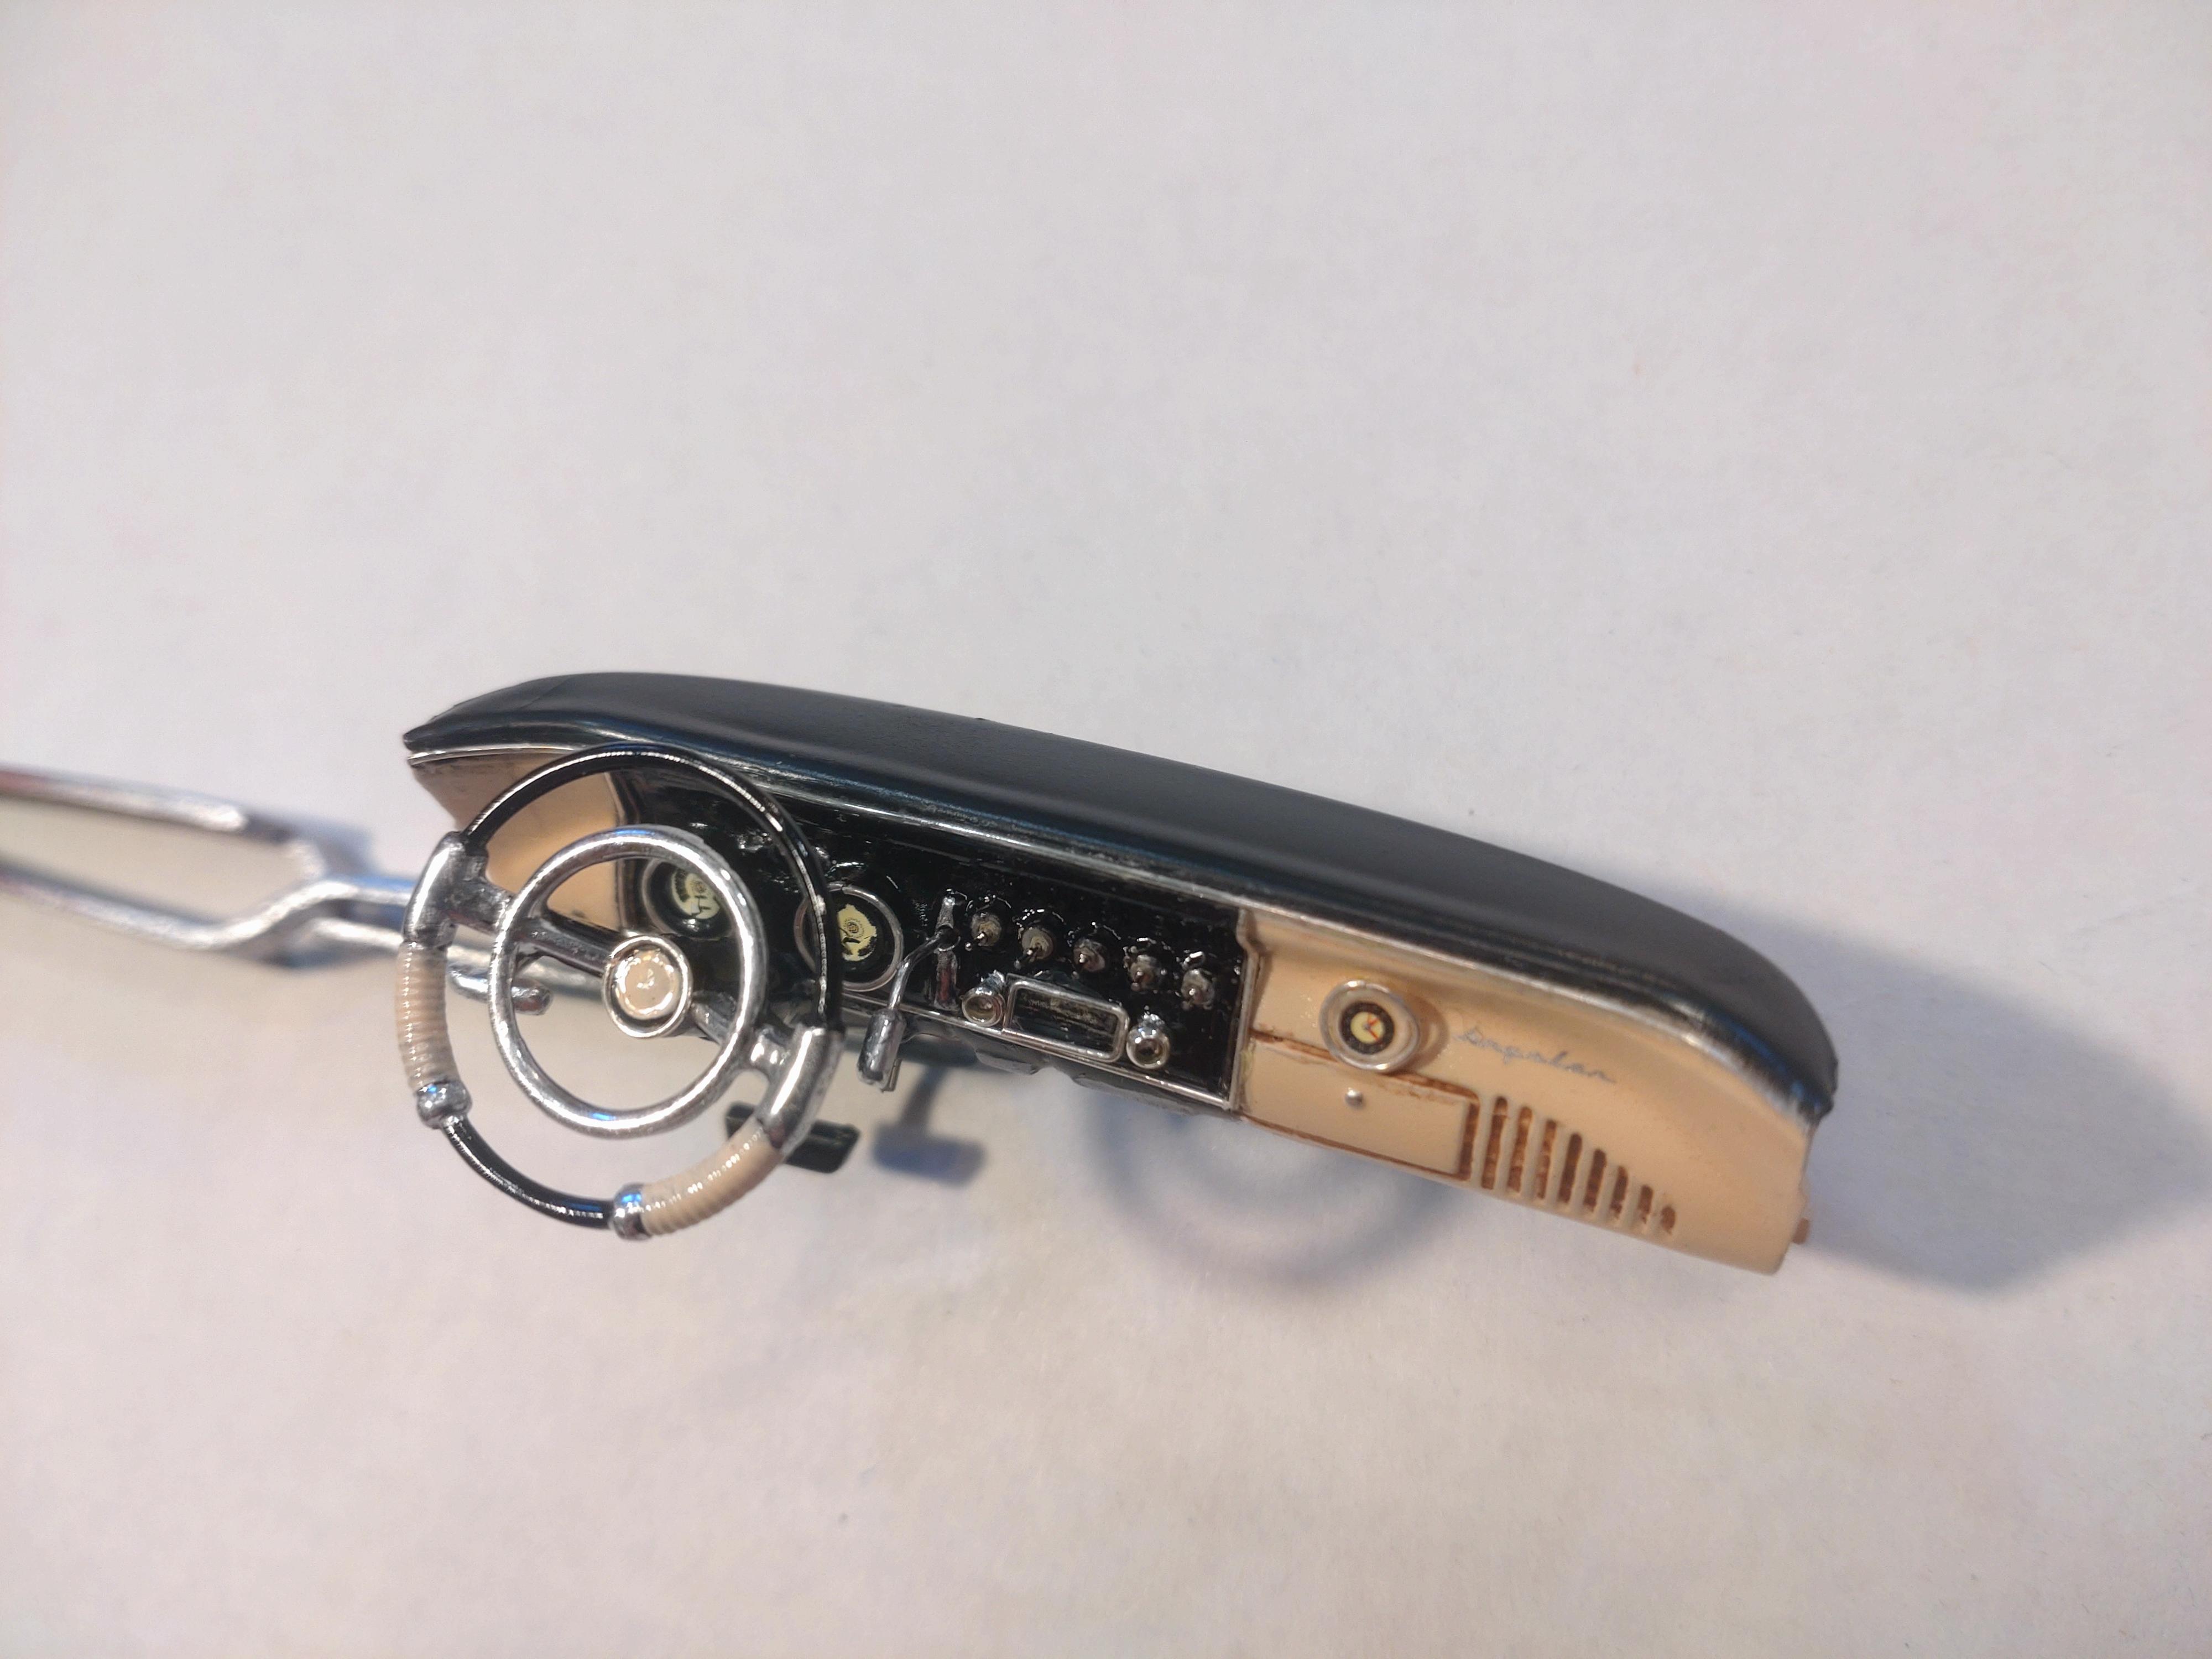
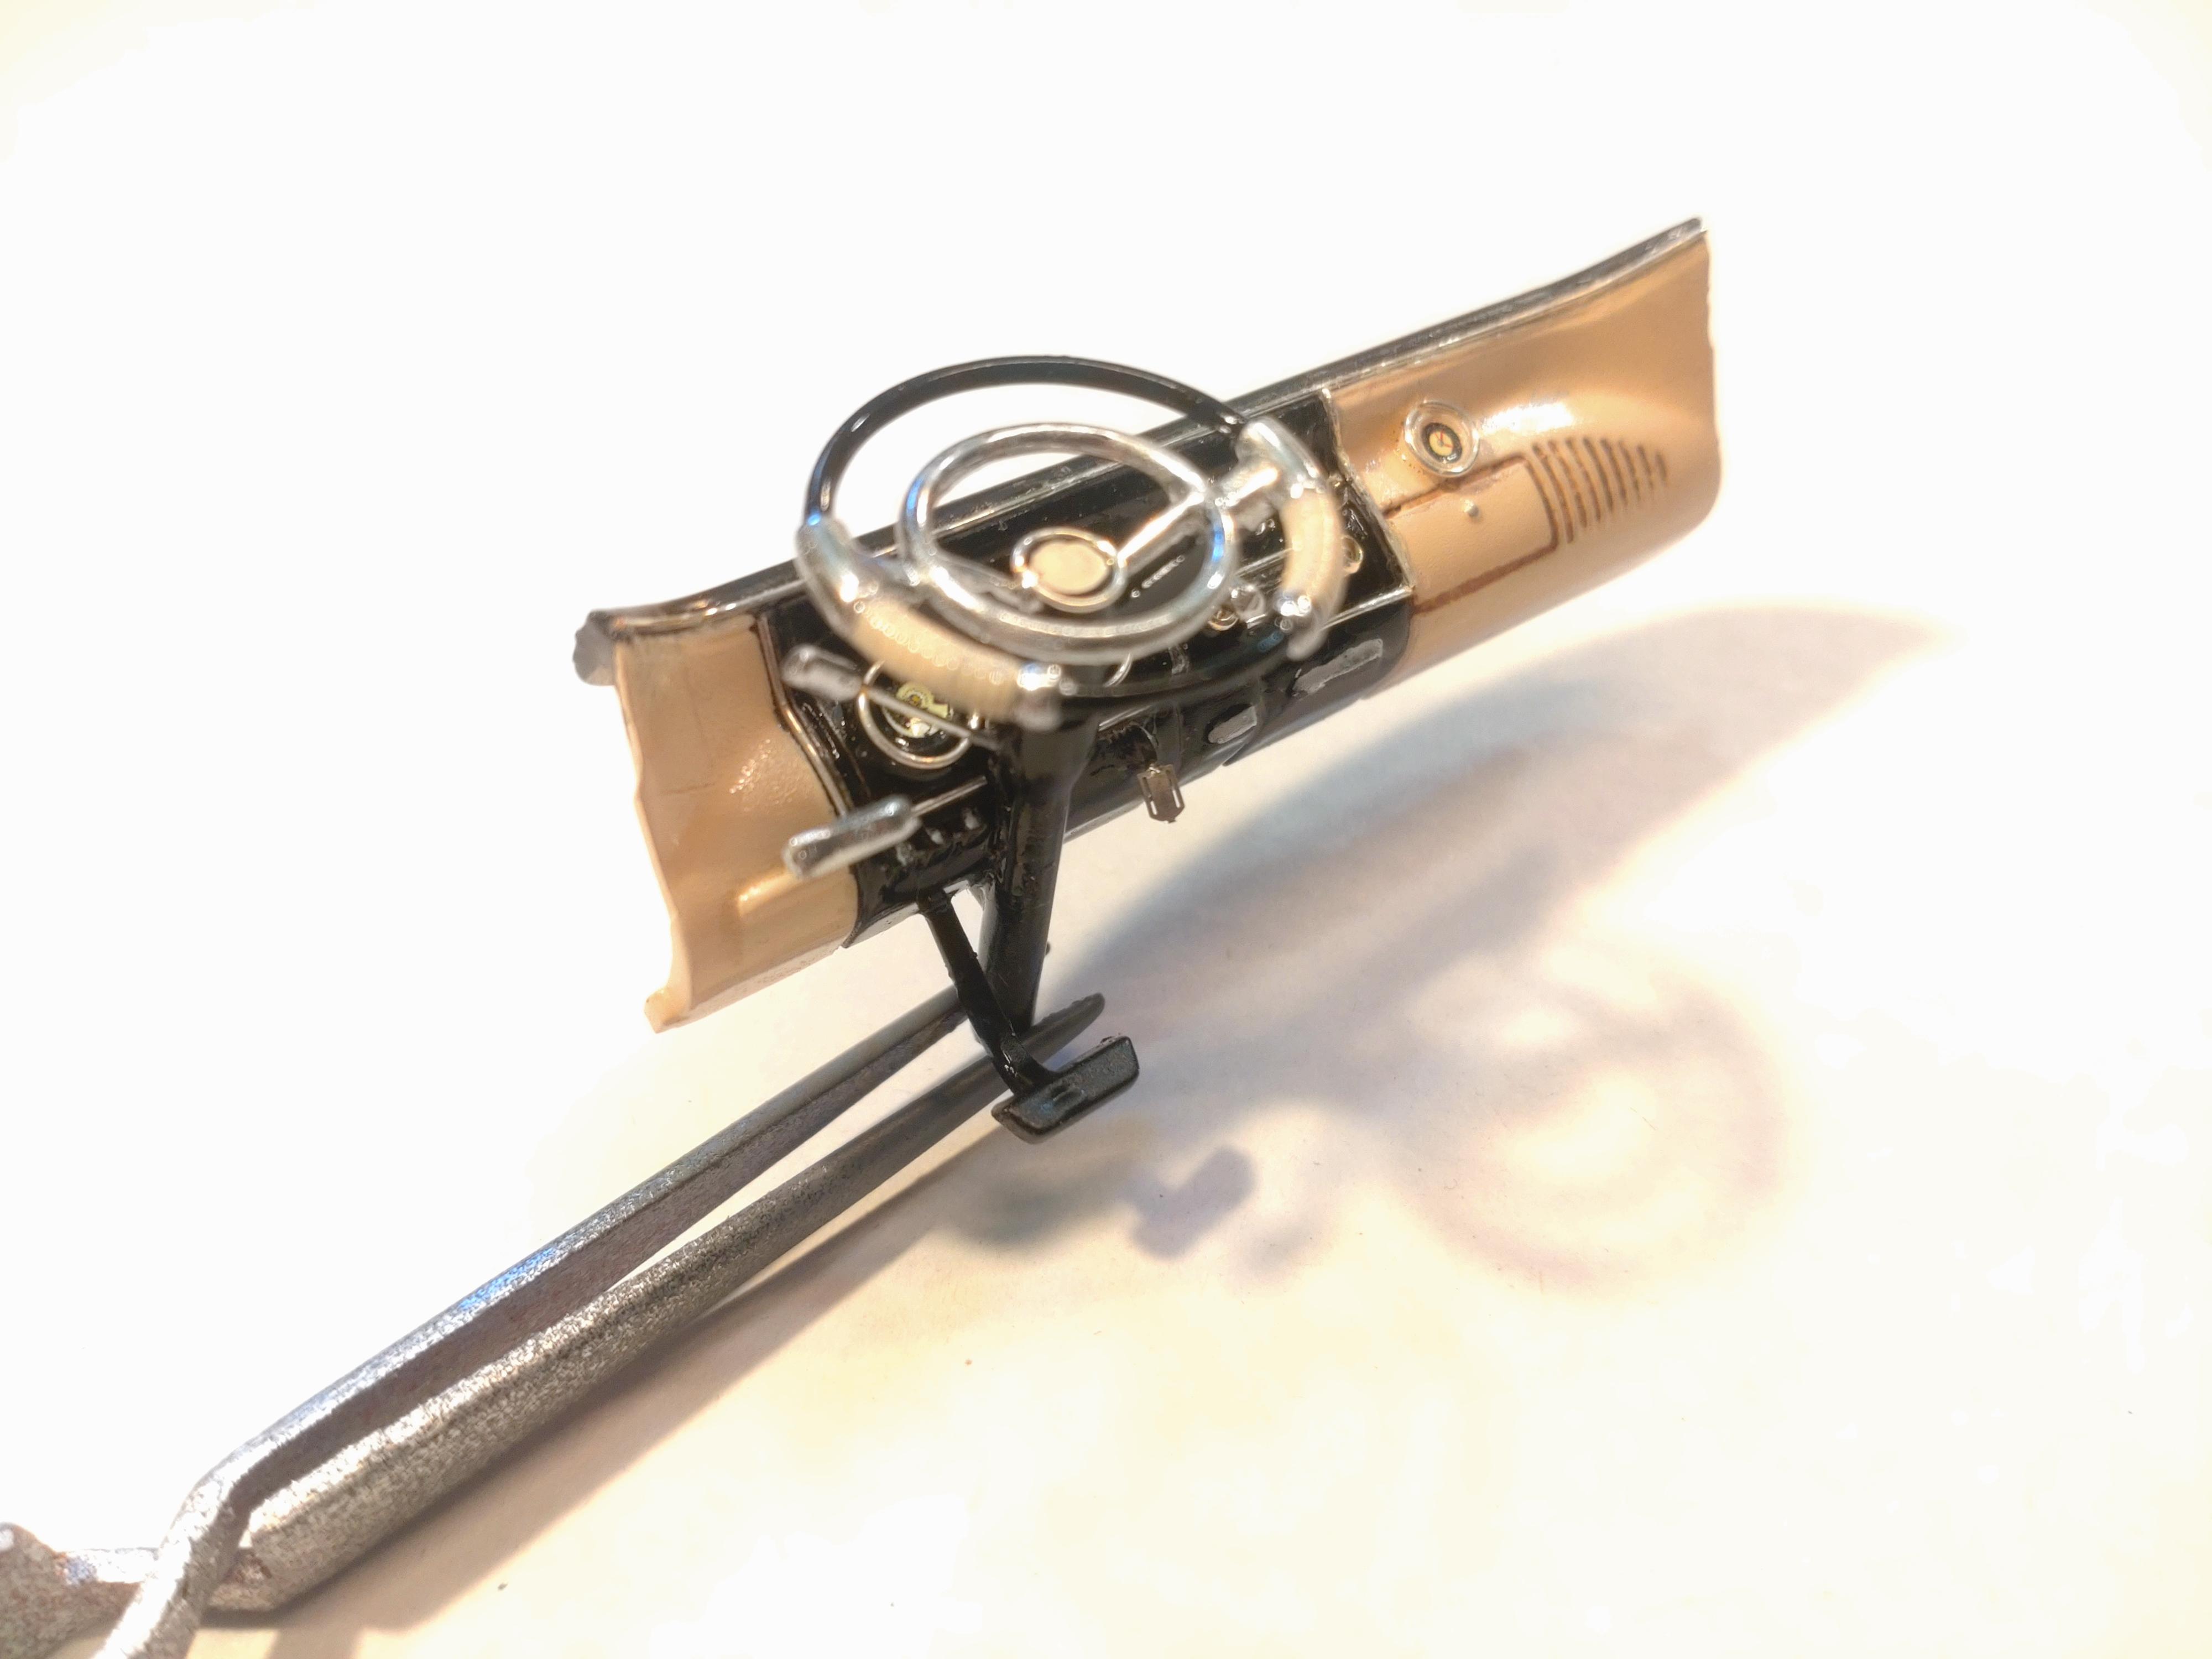
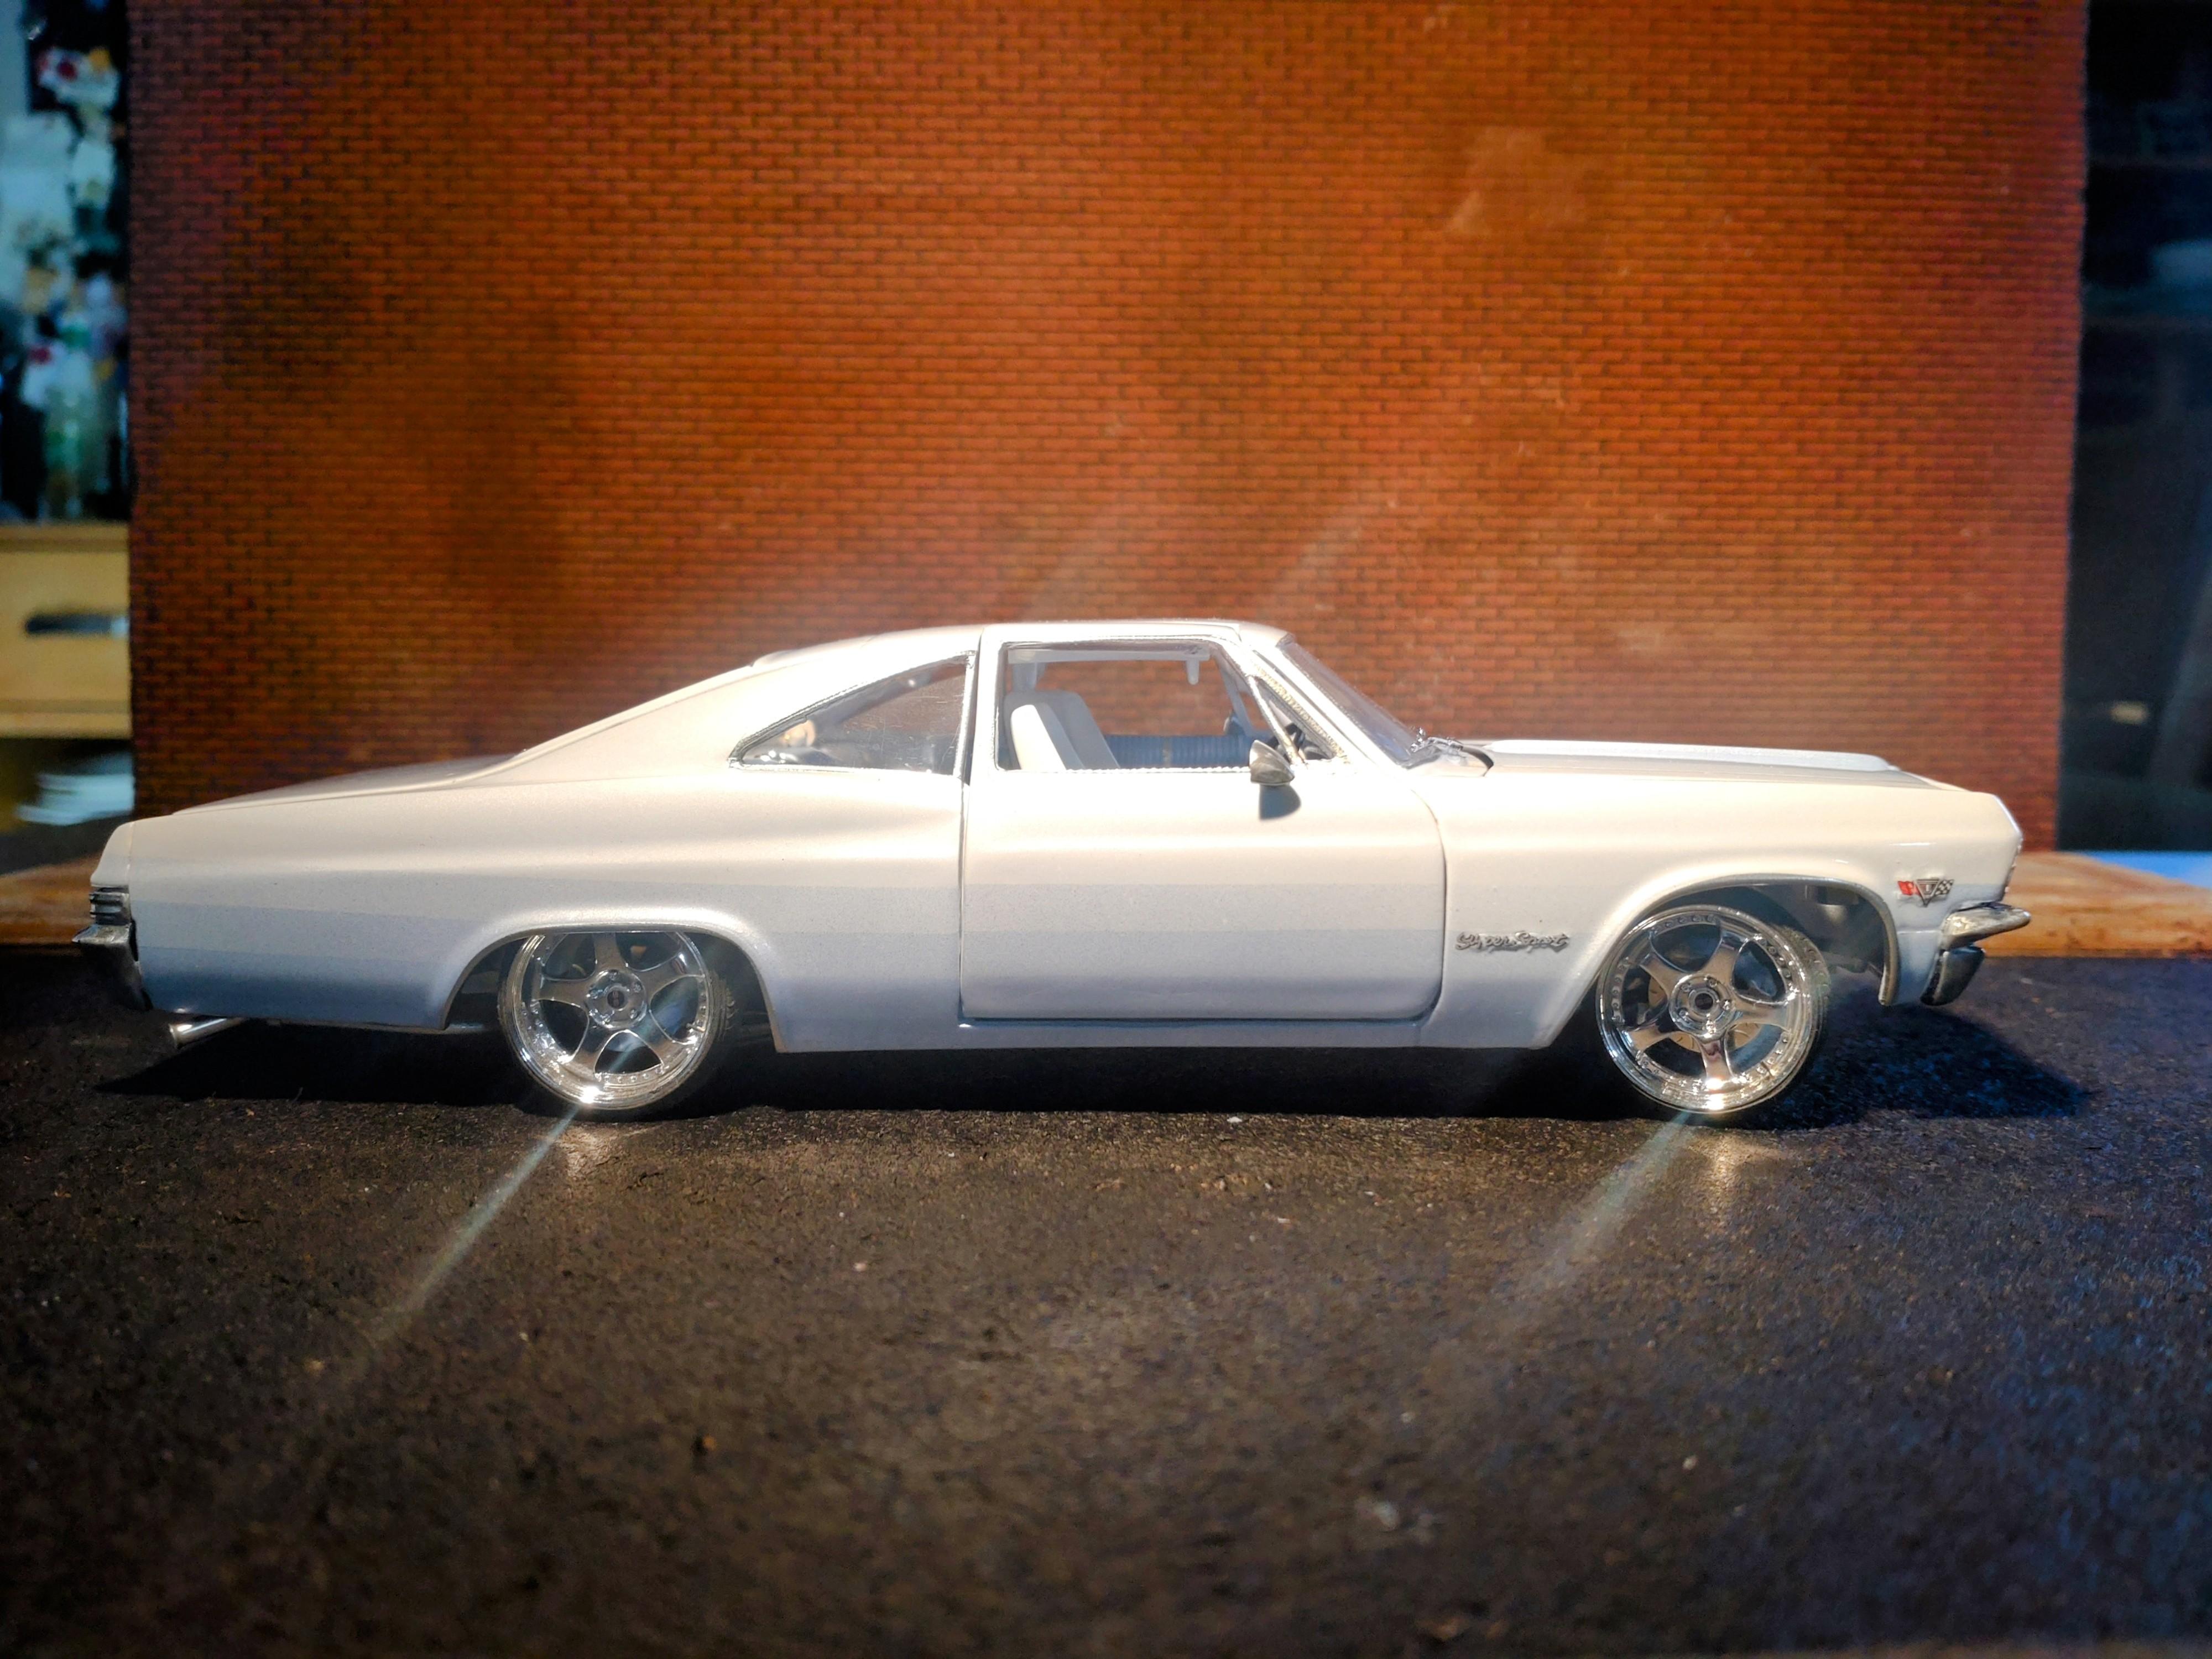
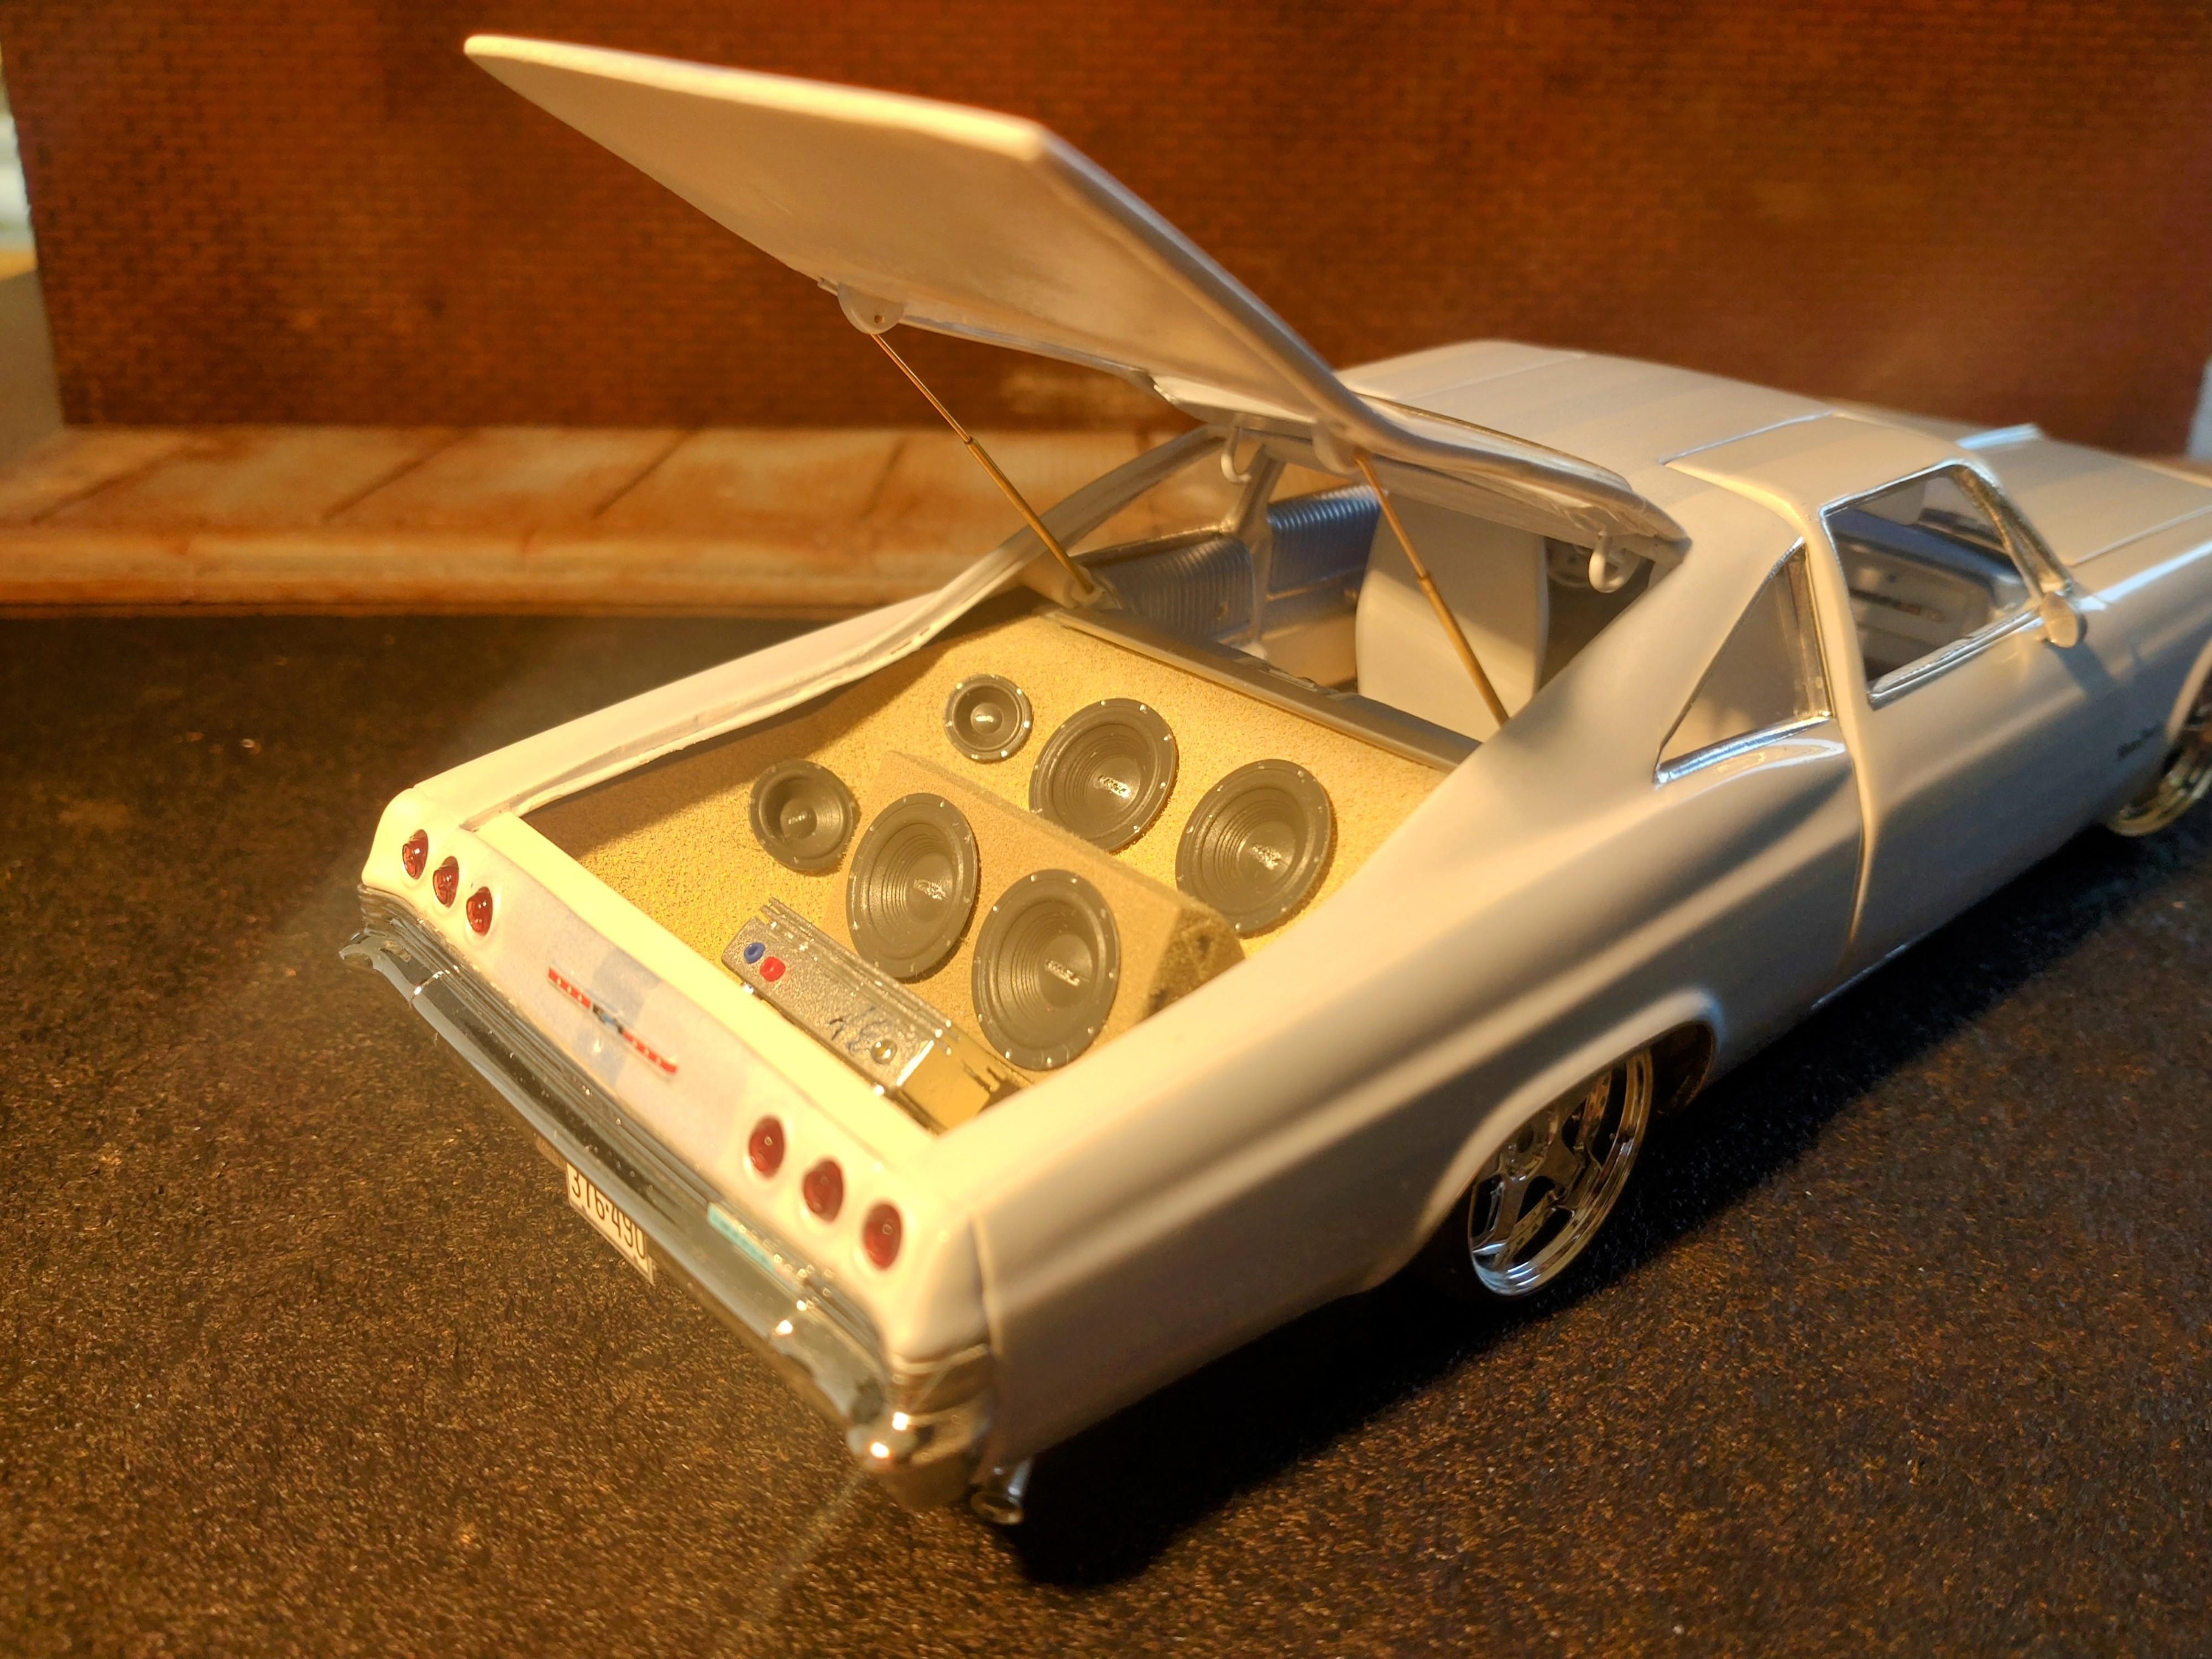
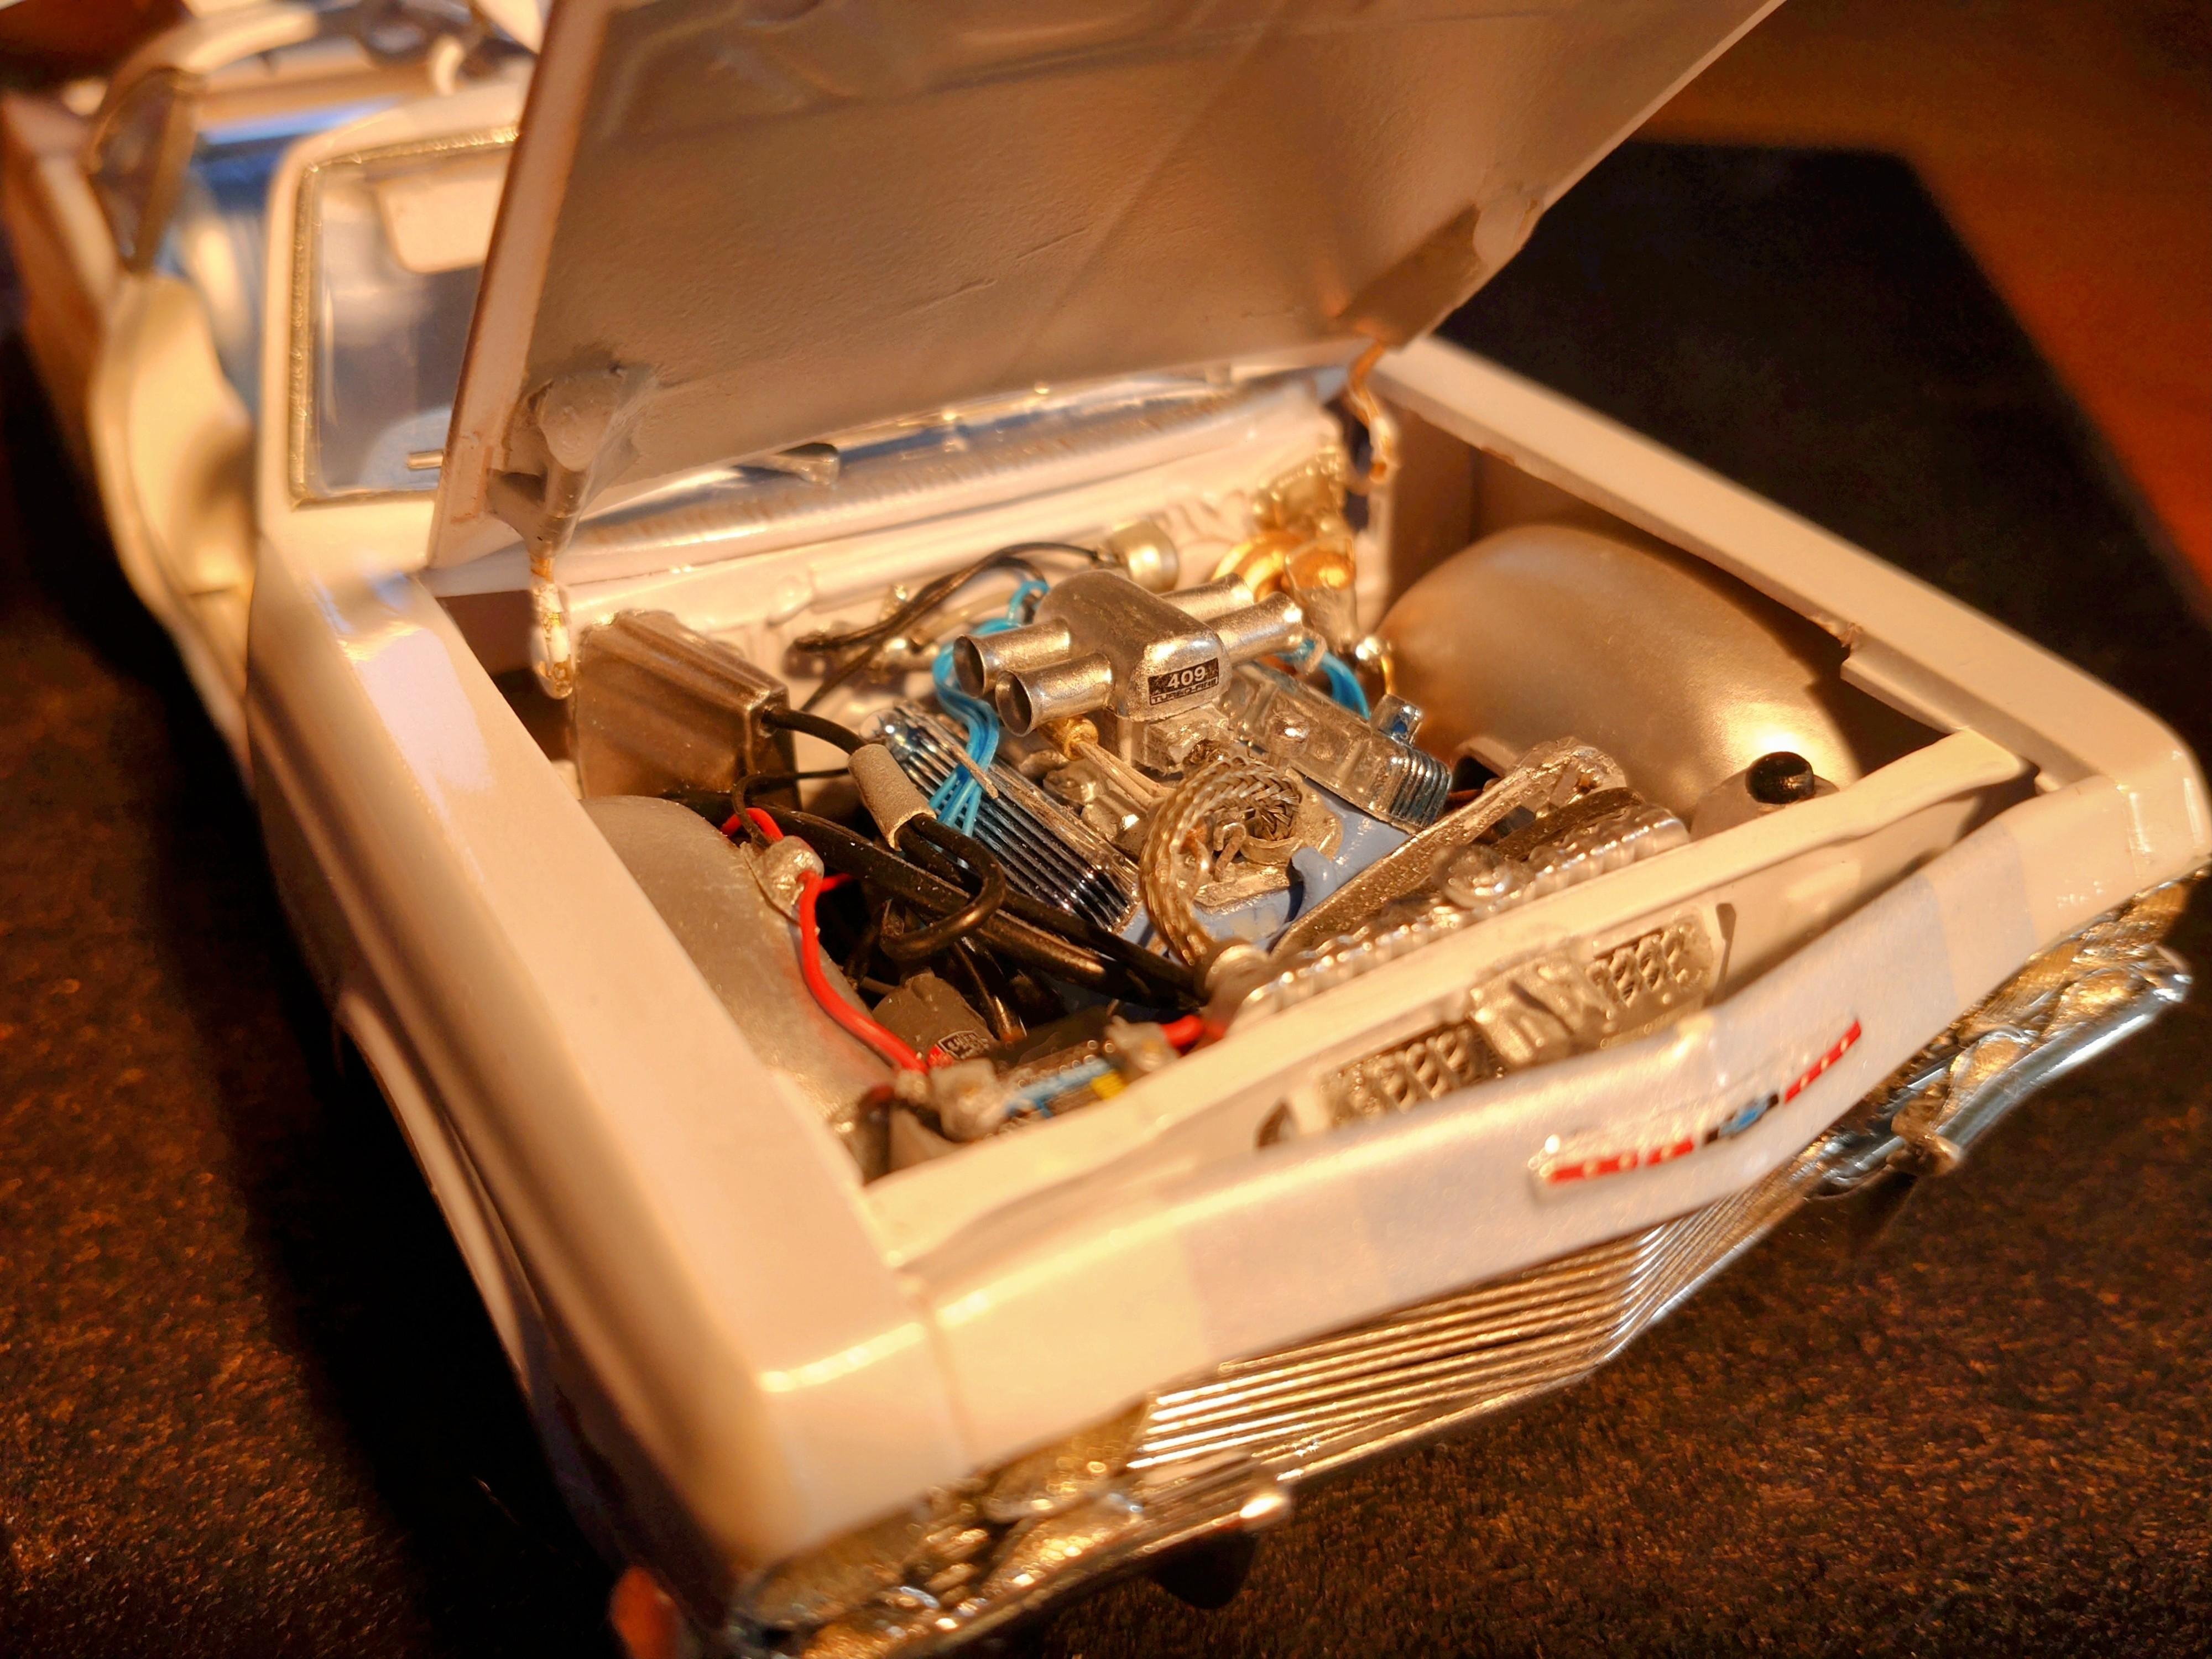
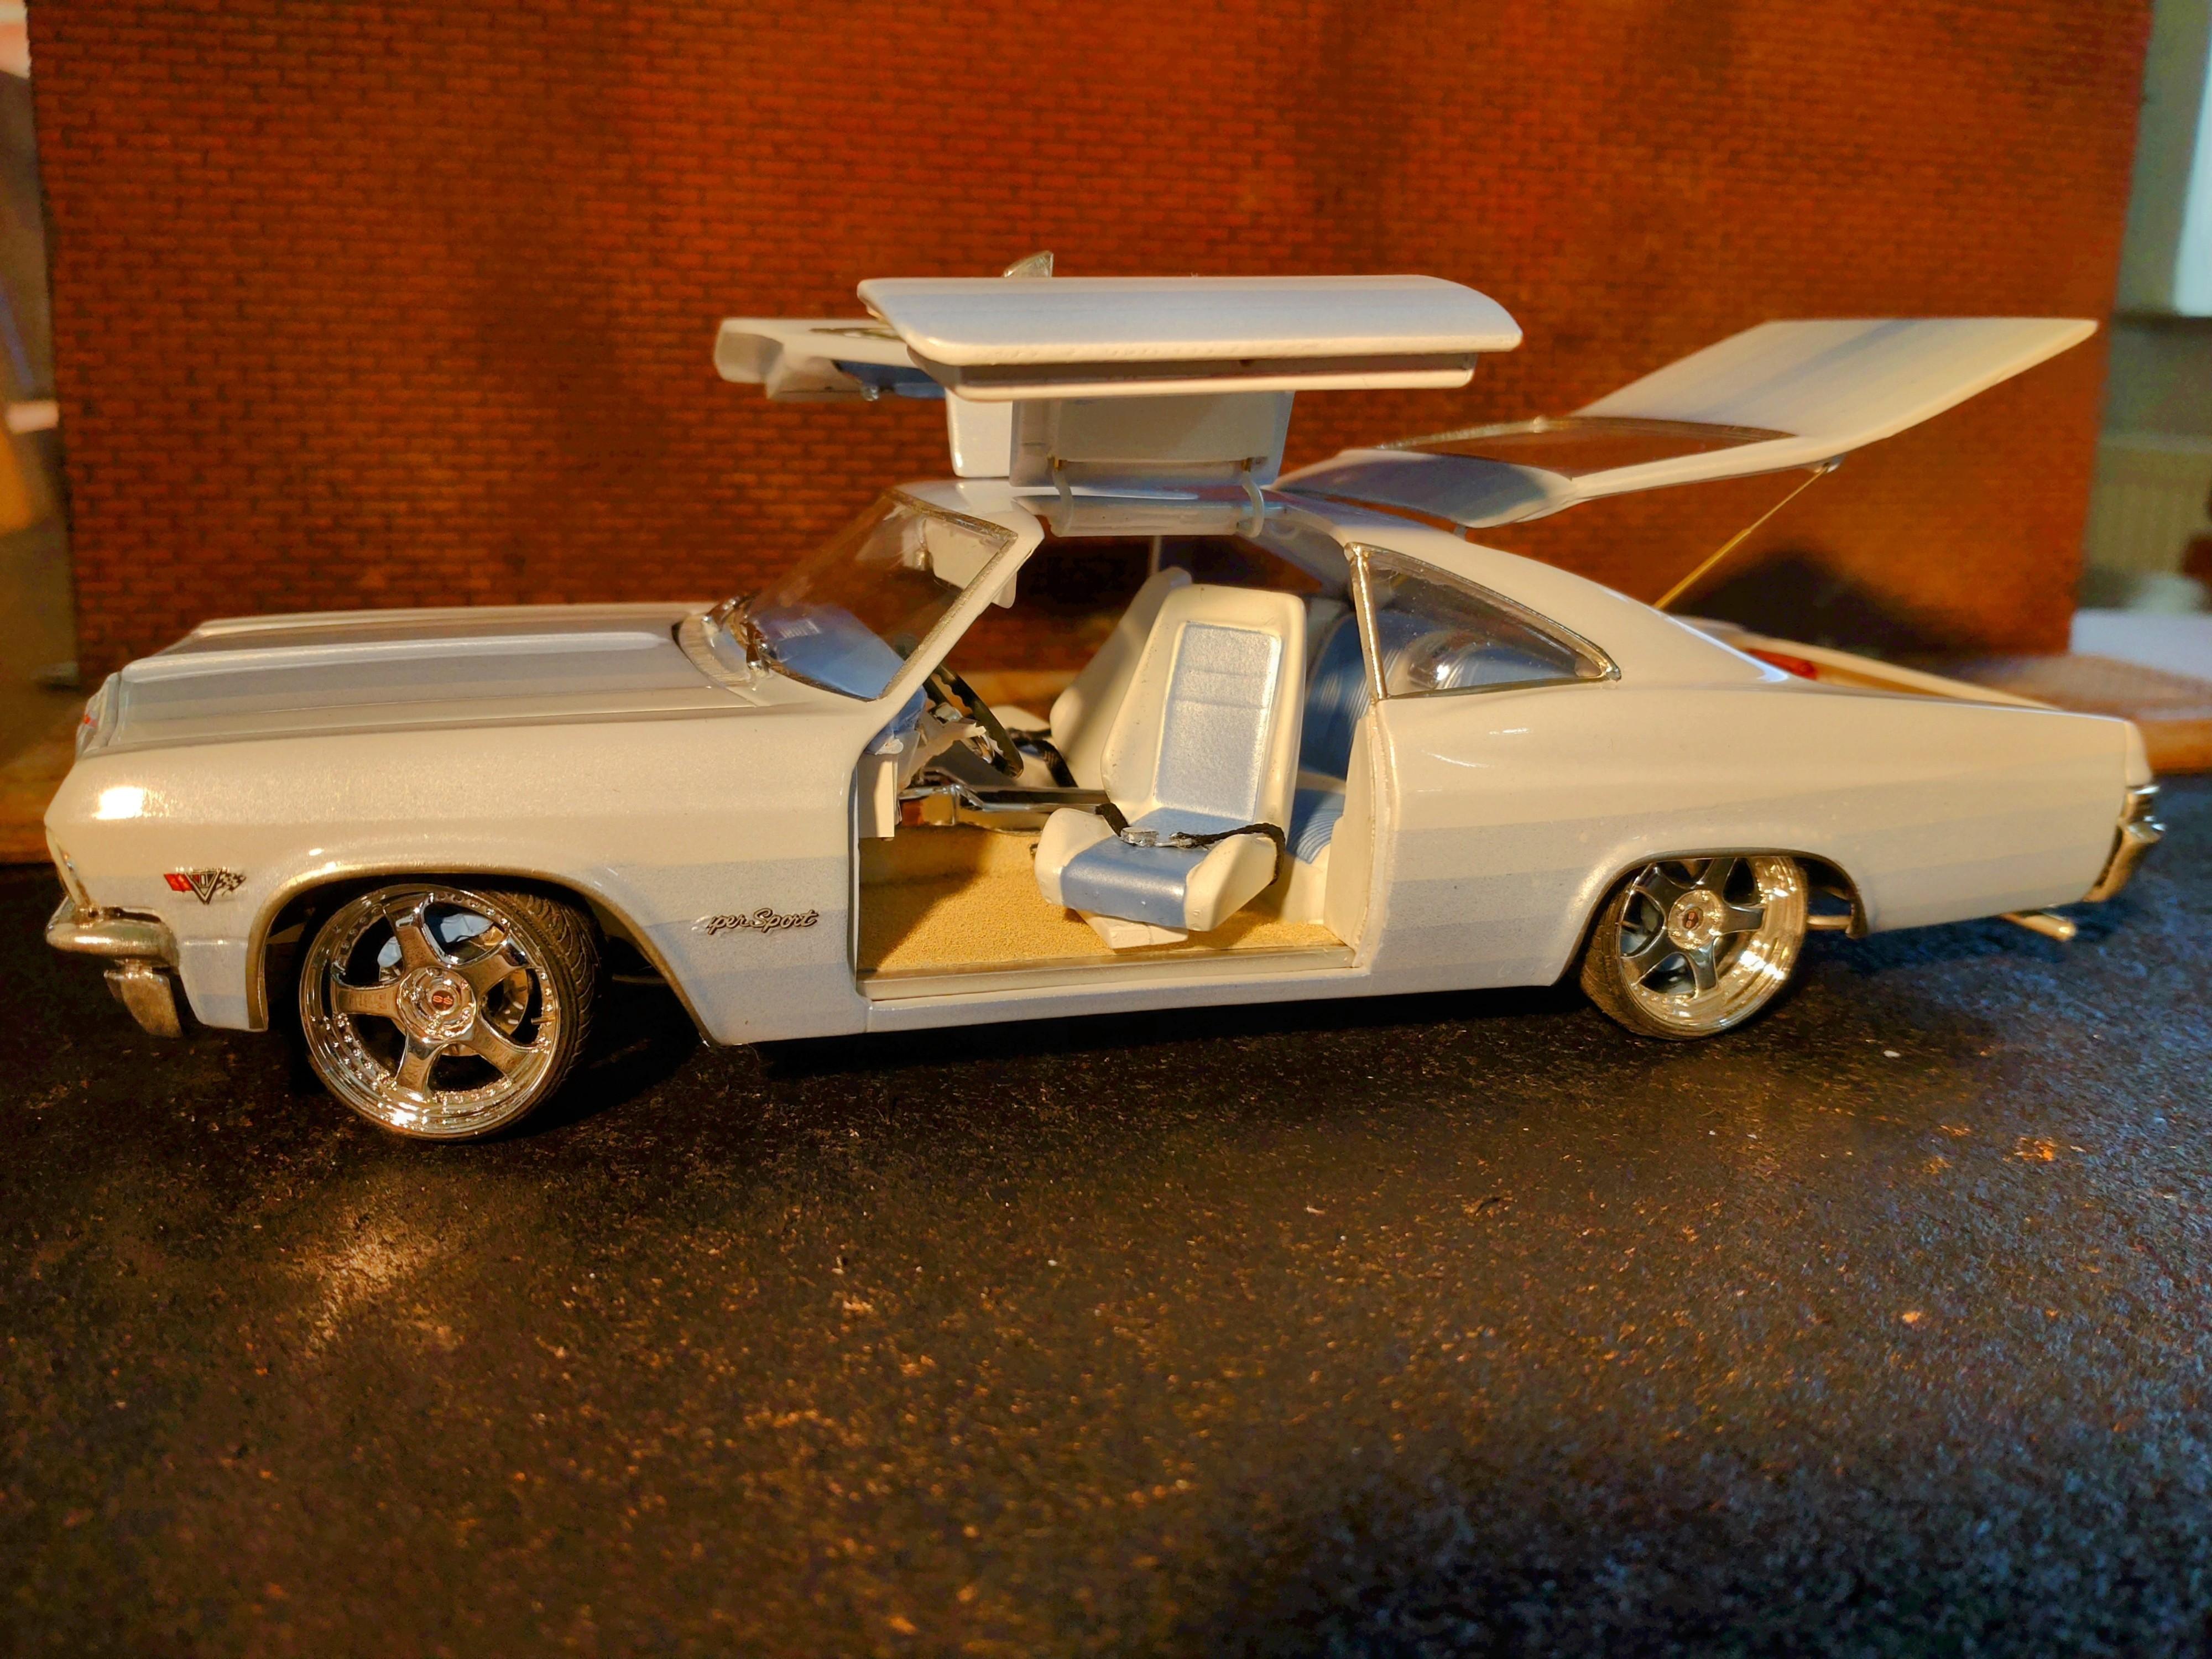
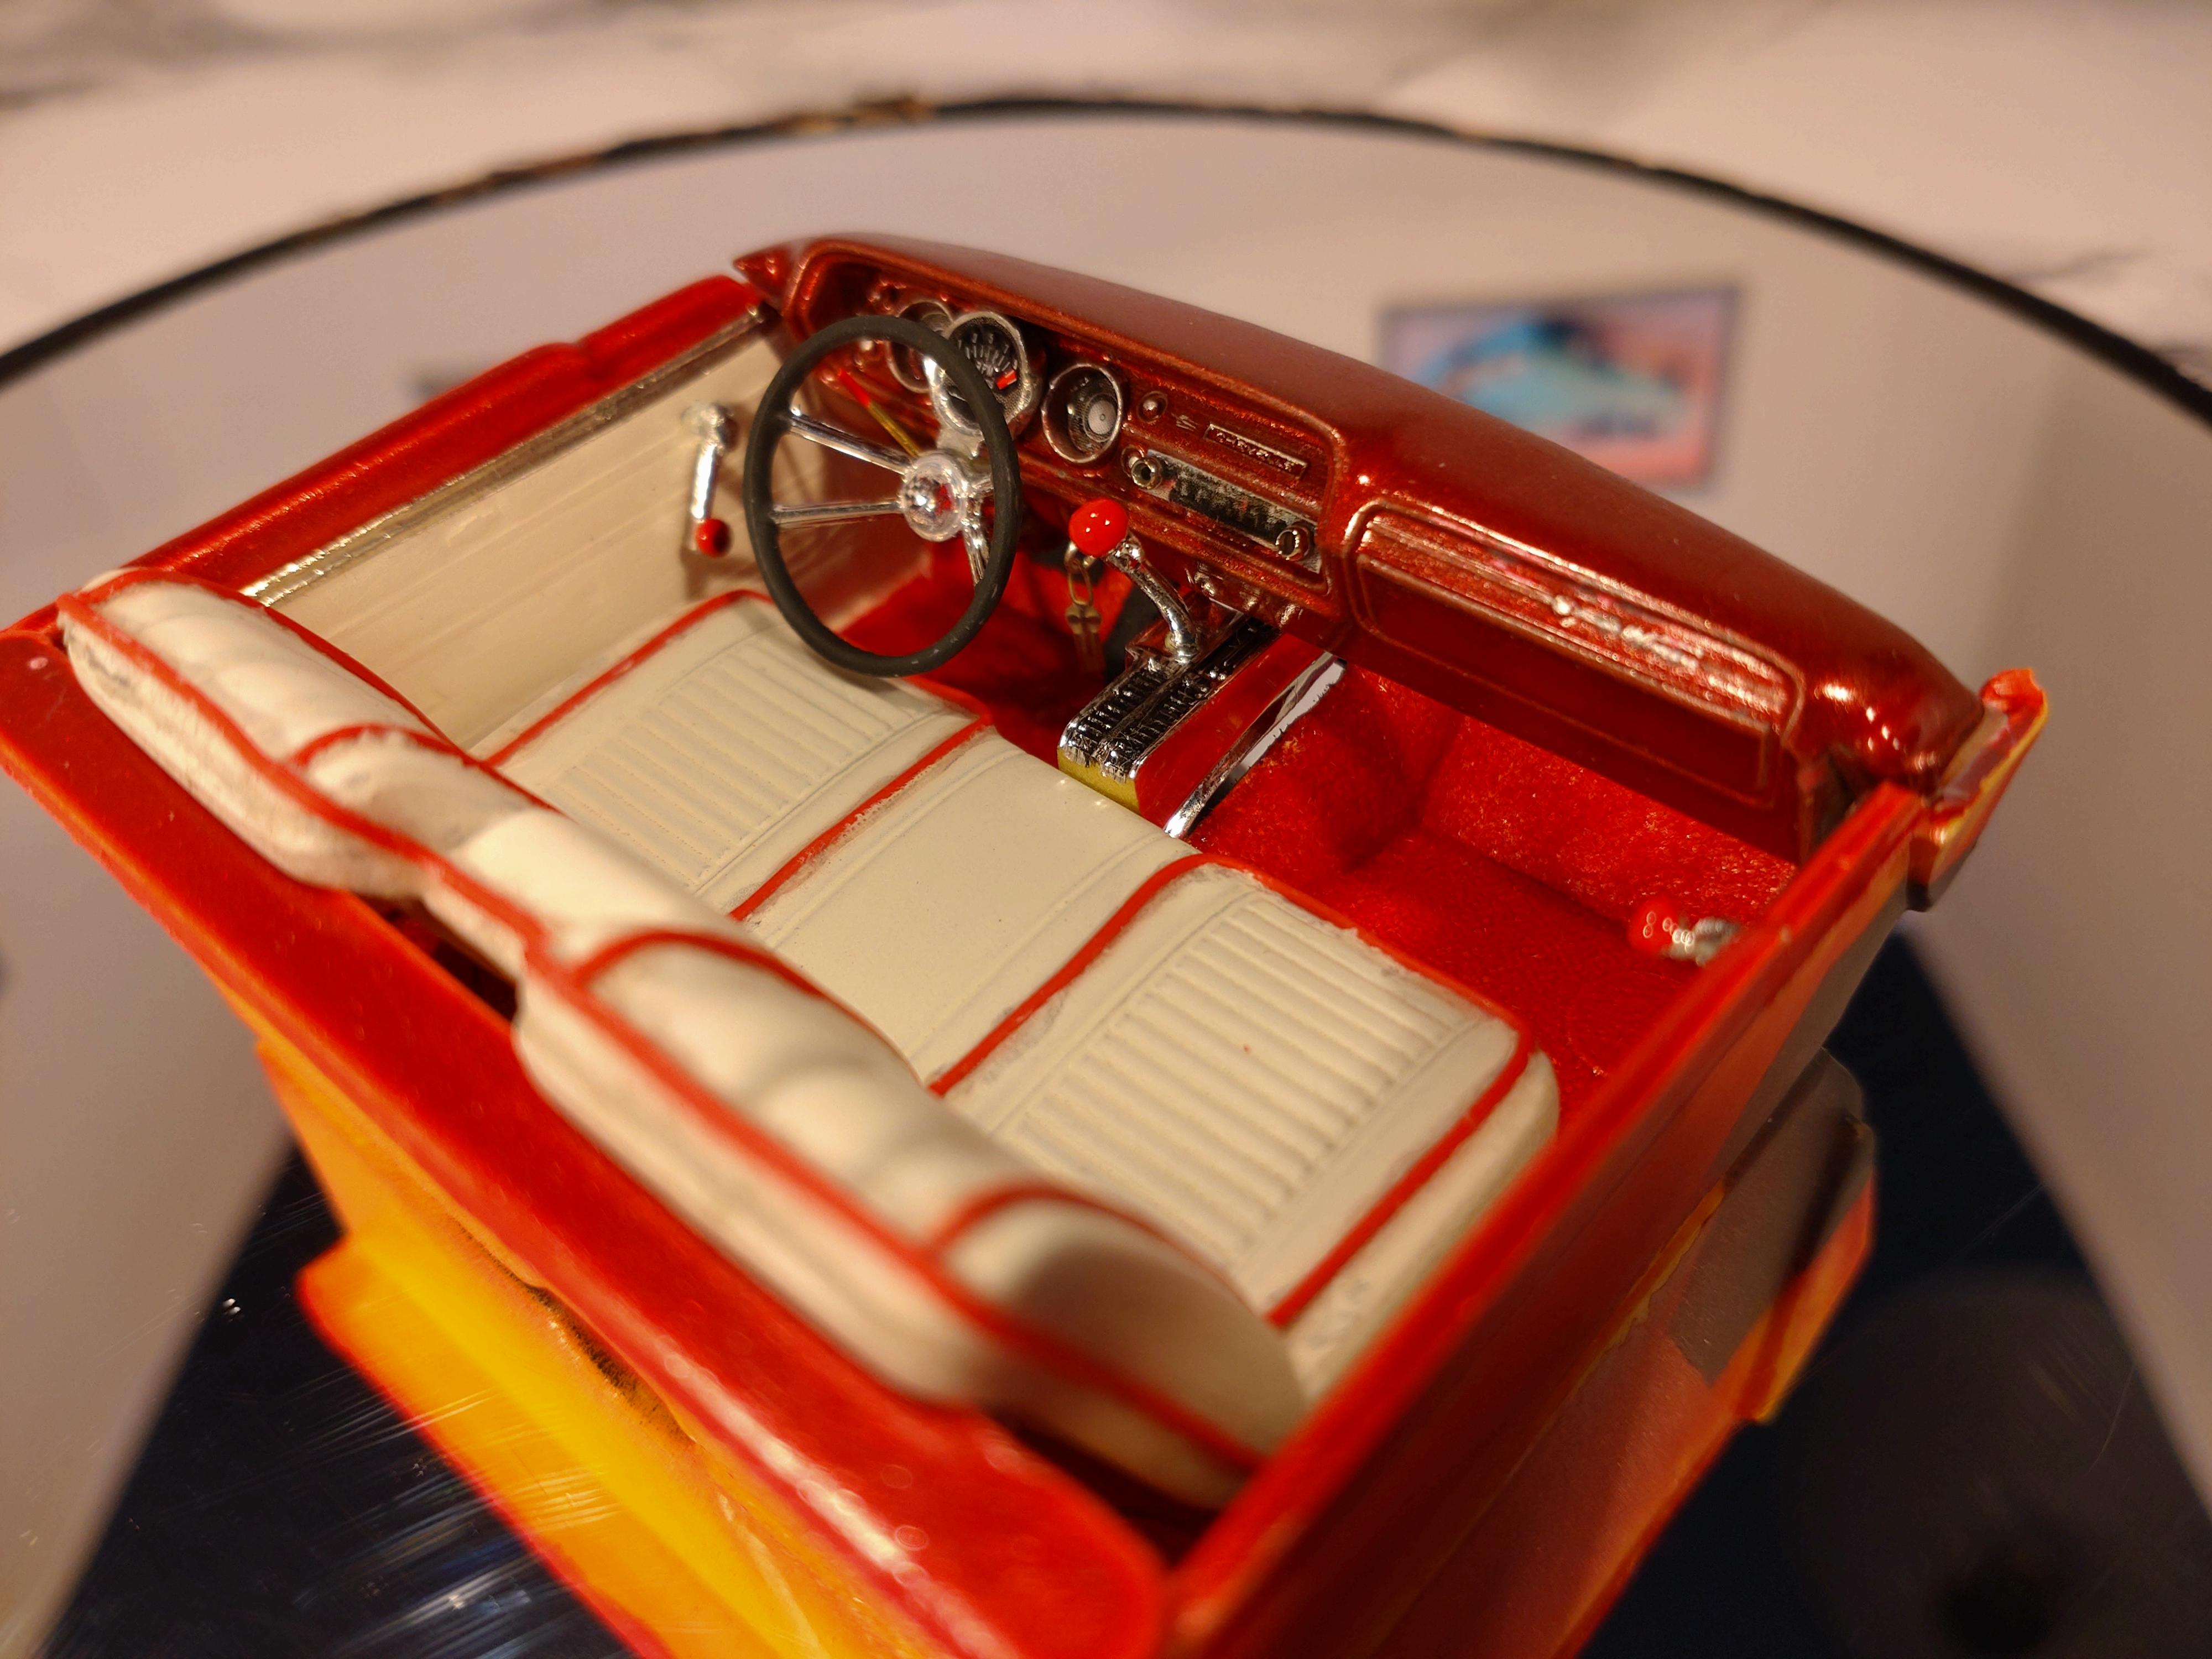
Hi everybody, nice to be back on the FORUM! I guess just about all of us have built this model before. This AMT/Ertl kit isn´t a highlight of complexity, but a grateful victim for customizing and heavy body work. I refrained from chopping the roof and wanted to keep the silhouette original. But there was plenty of work to do to make it my show rod. I shaved off all of the trim, door handles, roof drip and wipers, because in real life, this would be a show car with no street ambitions. I was out for round surfaces like polished pebbles. Beside the doors I cut out the trunk to accommodate a bench for the "kids". On a dark silver metallic there are 2 layers of metallic green (Molotow rattle can). Before the first layer I taped the shadow stripes on the fenders, hood and roof, making them a lighter green. Top coat is AK clear varnish. The wheels, disc brakes, calipers and the headlight lenses are from Scale Production. I hade to slice the front wheels to make them fit. The trunk is hinged with 1mm brass rods in 2mm styrene tubes. On this build for the first time I attached all hinge parts (trunk, hood and doors) with Tamiya epoxy putty. I was able to bridge gaps easily and everything stayed in place right from the start, without having to tape or stabilize during the hardening process. Unlike epoxy glue, nothing runs, drips or messes up the build. Just take care to rough sand all the sticking surfaces. The cushions are carved from modelling foam and covered with 2mm foam rubber. The door panels are also made of foam rubber placed in a frame of half-round stryrene. The armrest and handles are made of styrene and 1mm aluminum wire. The back of the interior compartment is also covered with foam rubber, with everything spray painted in a light leather toned finish, same as the seats. The floor is flocked in a matching color. I chose the custom dash from the kit and gave it some TLC with printed images for the gauges and the radio. Bare metal foil, wire rings, some toggle switches and a key chain enhance the dash. I added a headliner made of rubber foam also, along with sun visors and the rear mirror. I treated the engine with as much cables and lines as possible. The pulley wheels are deconstructed from the kit part and connected to the block with brass rods, then I wrapped a thin rubber belt around the pulleys. instead of a engine fan, the radiator has a cooling fan system. The brake booster, coil and relay are home made and just about completely fill the engine bay. The exhaust manifolds are from the kit, turned upside down and heat bent into shape. I liked the idea of keeping the exhaust pipes asymmetrical and since I chopped the hood a bit, they look fine creeping out of the sides. The carbs are 3D printed Holleys from Scale Production. The air filters are crafted from grid aluminum and spare covers. Because the rod is dropped, I had to adapt the front and rear suspension by grinding and cutting to lower by about 1 cm. Fuel and brake lines were added, same as shock absorbers. The rear end and the transmission are narrowed and rebuilt to accommodate the fat wheels. Now some images with all the doors open. This build was real fun and I hope you like it. Thanks for watching and if you watch my video, that would make my happy too! https://youtu.be/U-r7jinDEvg

- 19 replies
-
- 13
-

-

-

1955 Chrysler 300 - stock build with lighting
Andy Oldenburg replied to Andy Oldenburg's topic in Model Cars
Hi Supernurd, I wish it was "real" and mine! But I get along well having the Moebius version😄 -
1955 Chrysler 300 - stock build with lighting
Andy Oldenburg replied to Andy Oldenburg's topic in Model Cars
Hi David, thanks for your nice response! -
1955 Chrysler 300 - stock build with lighting
Andy Oldenburg replied to Andy Oldenburg's topic in Model Cars
Hi Steve, George, Carl, Ken, Larry, Petterway and Doyle, Many thanks for your kind response! I´m very happy you like my build. Best wishes, Andy -
1955 Chrysler 300 - stock build with lighting
Andy Oldenburg replied to Andy Oldenburg's topic in Model Cars
Hi guys, thanks for your friendly response! This hobby means so much to me, and my motivation is just to have fun and make those tiny steps forward in my skills. But well yes, I do enjoy getting the feedback out of our forum community 😊🙏😉 @Emre - Actually the door and trunk cutting was about 2 hours. What takes more time is the finishing with the lips and getting those hinges in a correct place. I am still not completely satisfied with the turnout, but it is getting better. I have a new technique to cut out the shapes. After the stress with scalpels ( they get stuck and are quite dangerous handling) and with a tiny circular saw (gets hot and melts the styrene) I SCRATCH out my doors. I found a small awl in my tool box and sharpened it and i just follow the molded outlines. I takes about 10-15 careful scratches to get through. Additionally I minimize the thickness of the body by grinding or sanding from the inside. Here are some images from my current build. It is worth a try! @Bill - you could be right about the mirror.... But I found images both with and without a mirror. Maybe it was an option to order. But I did refrain from adding seat belts 😂
-
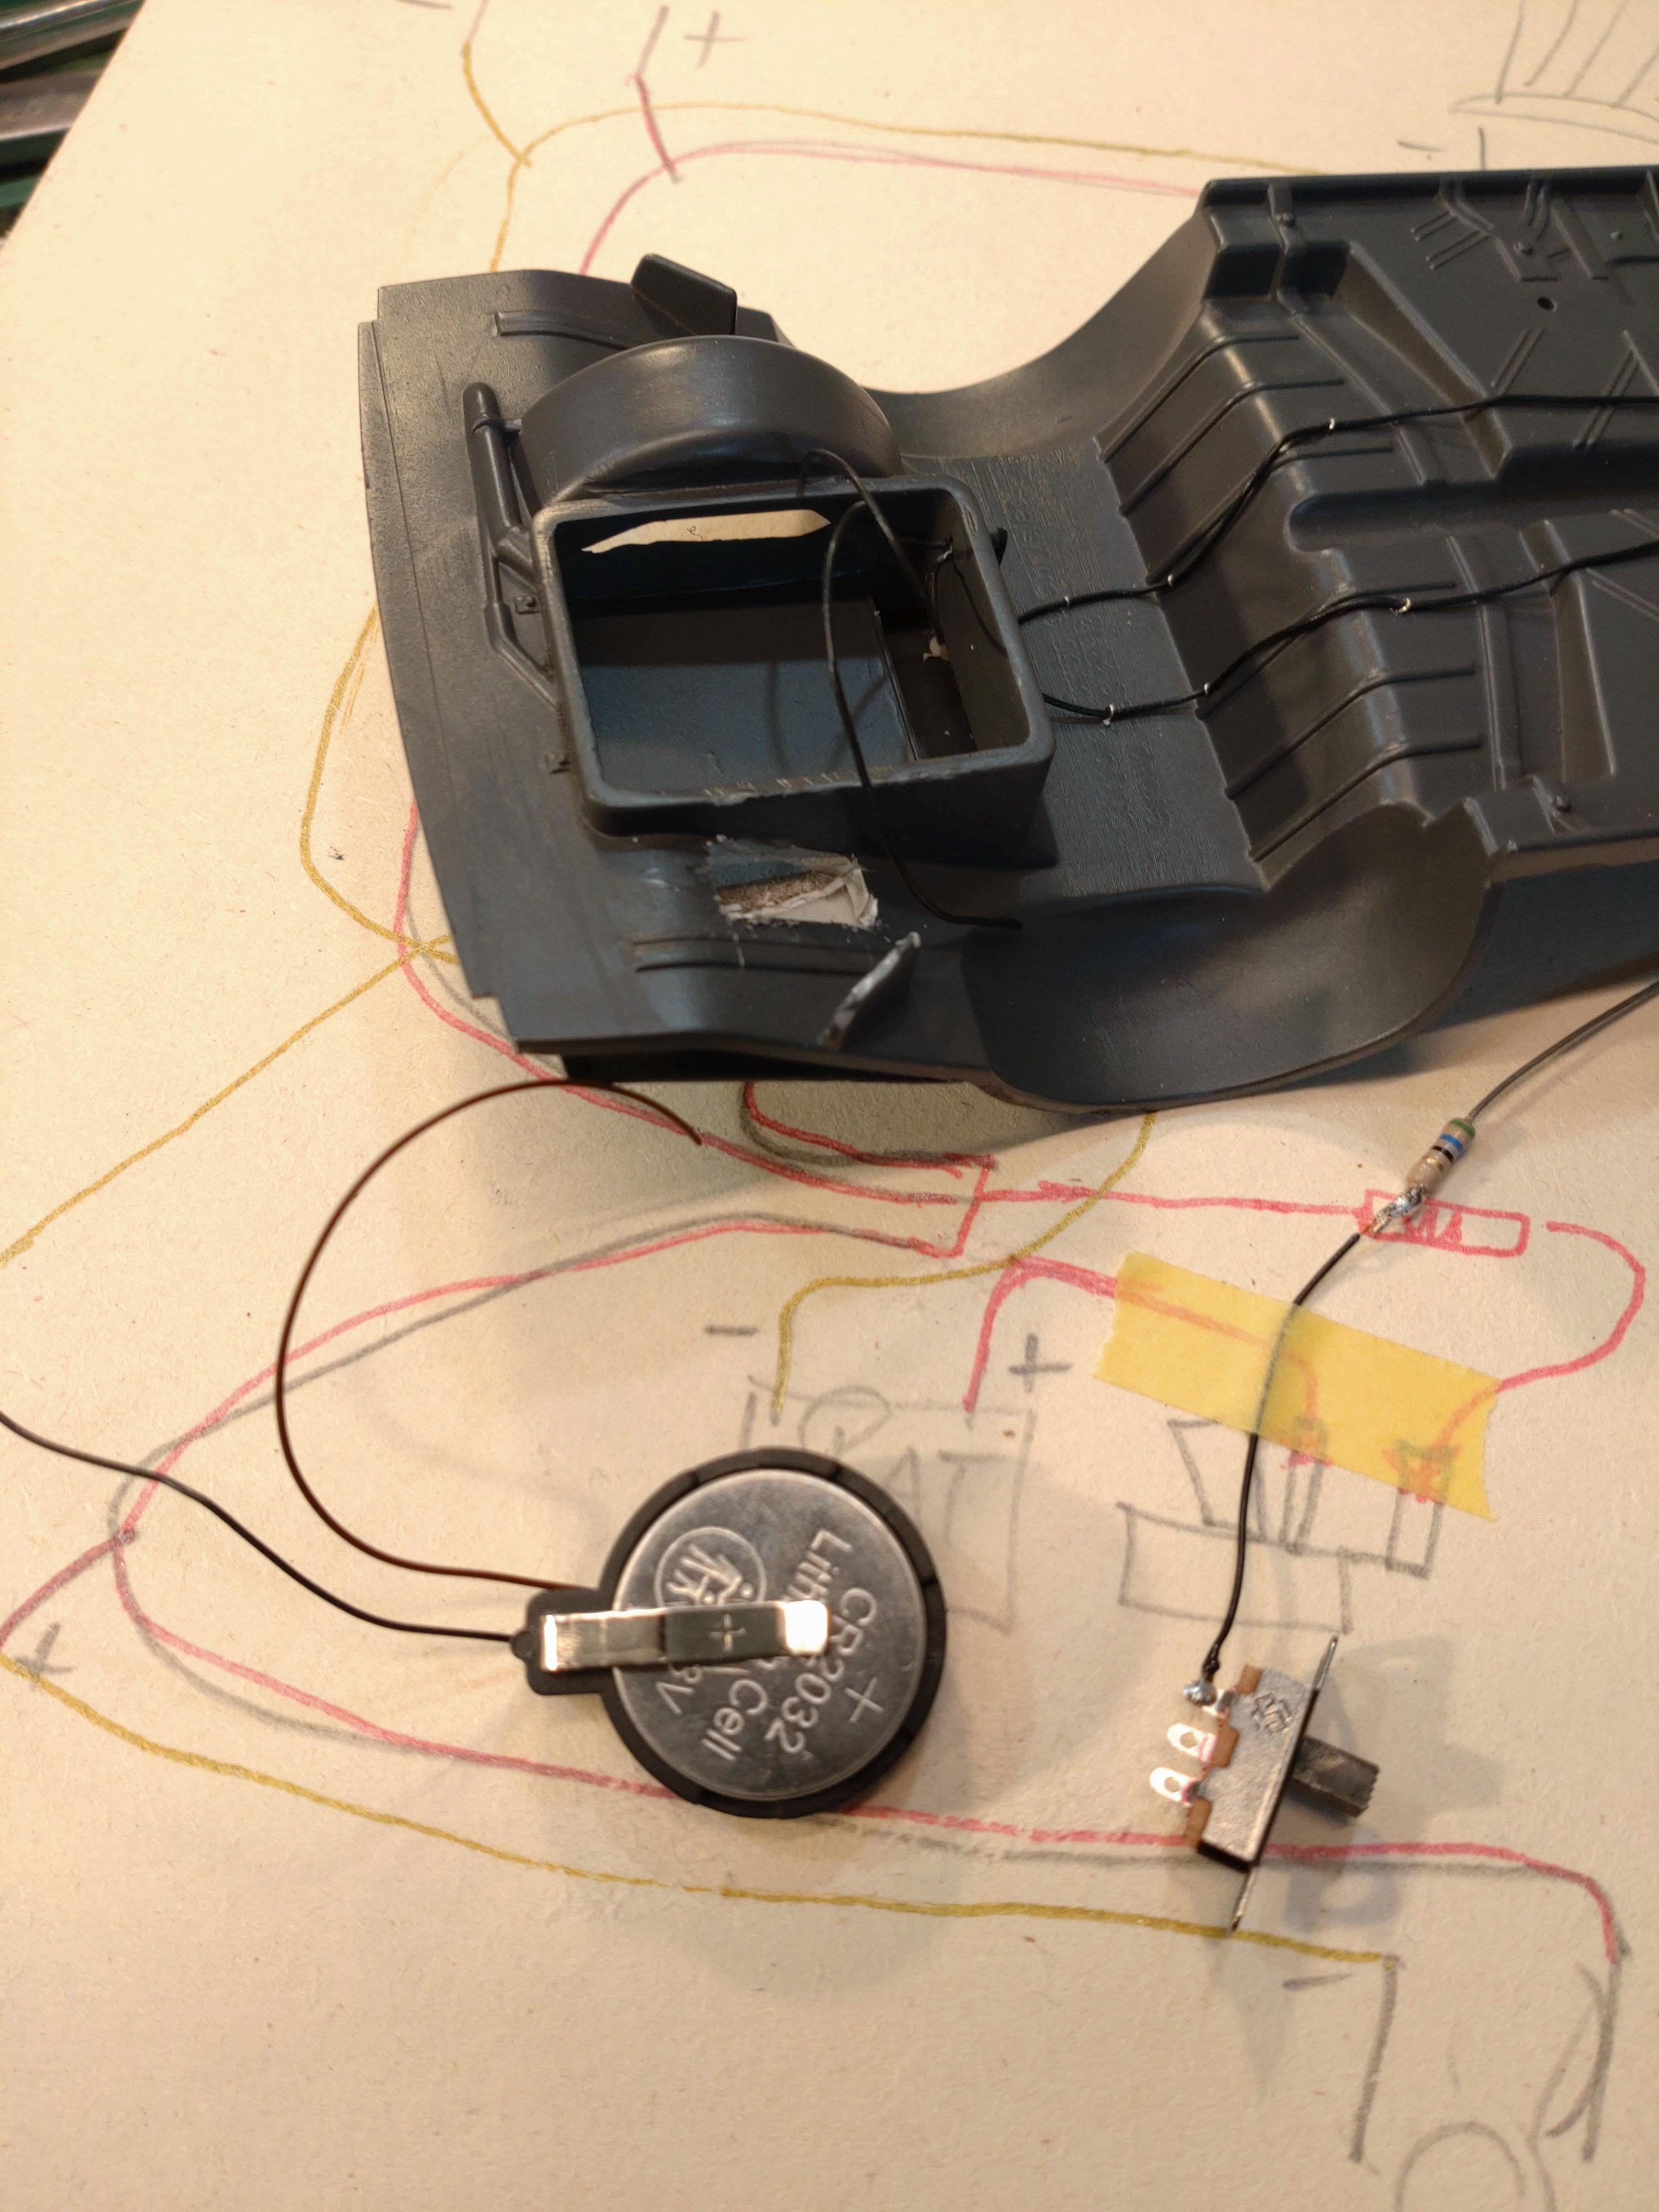
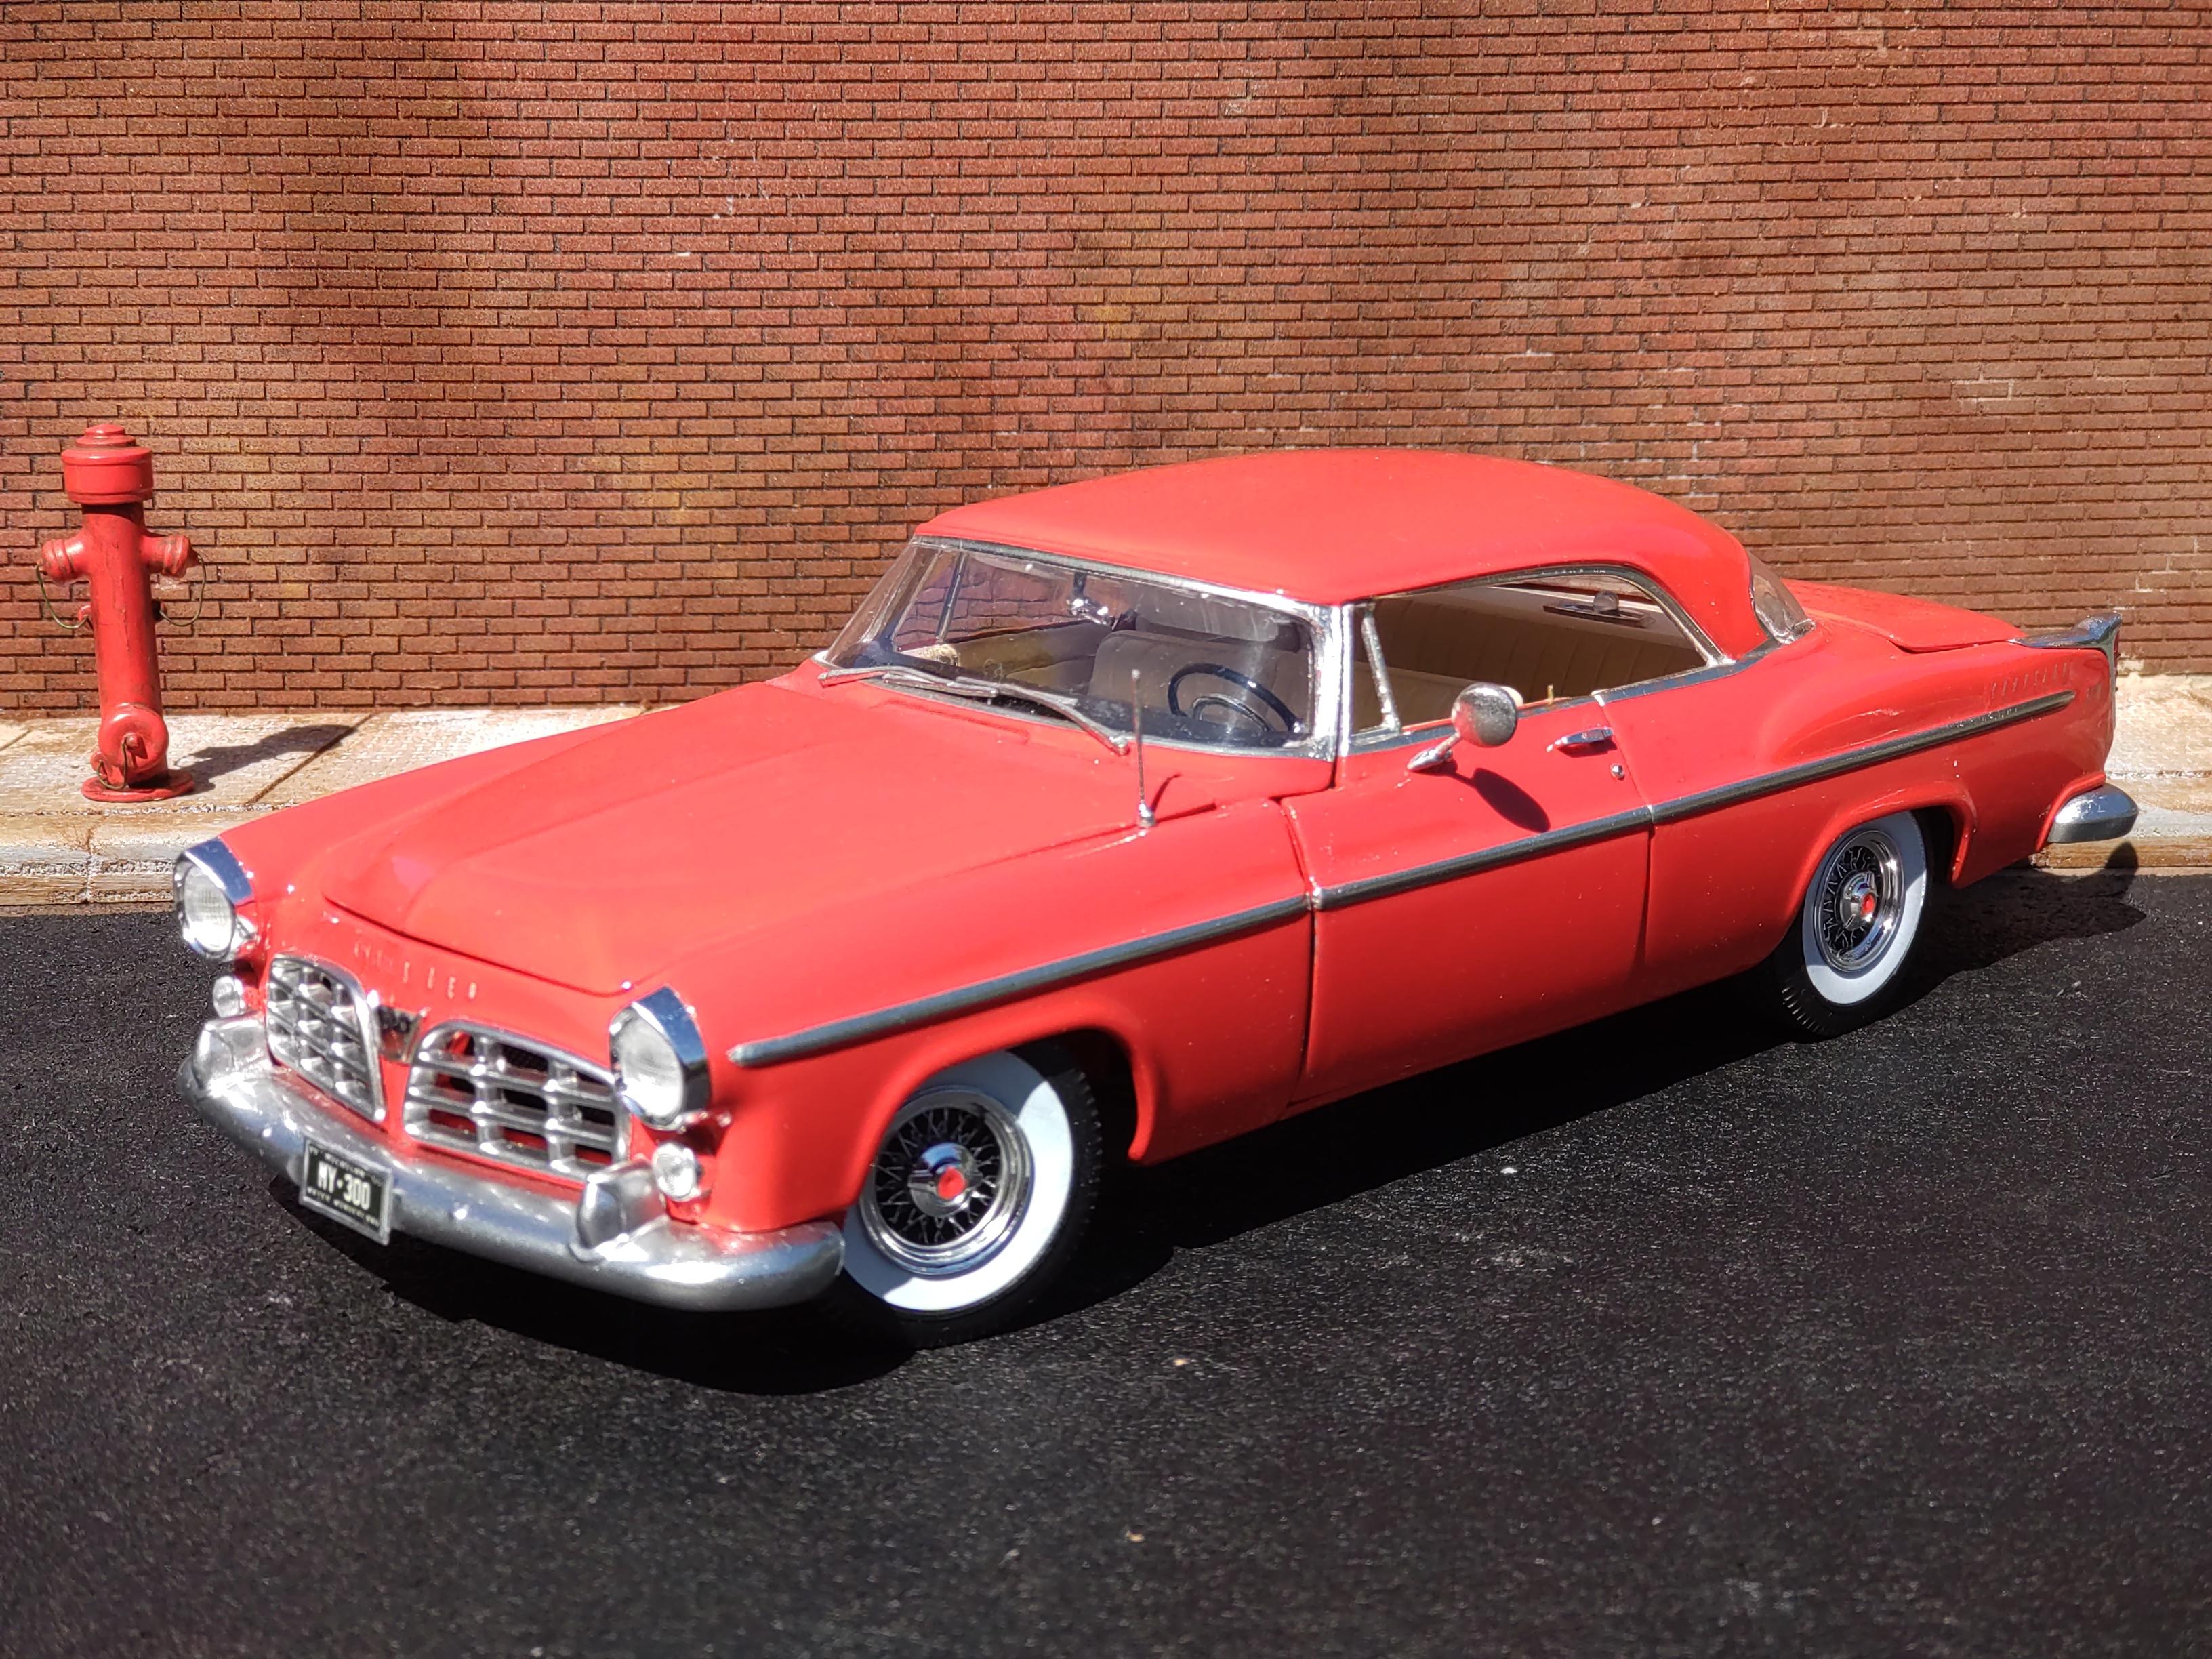
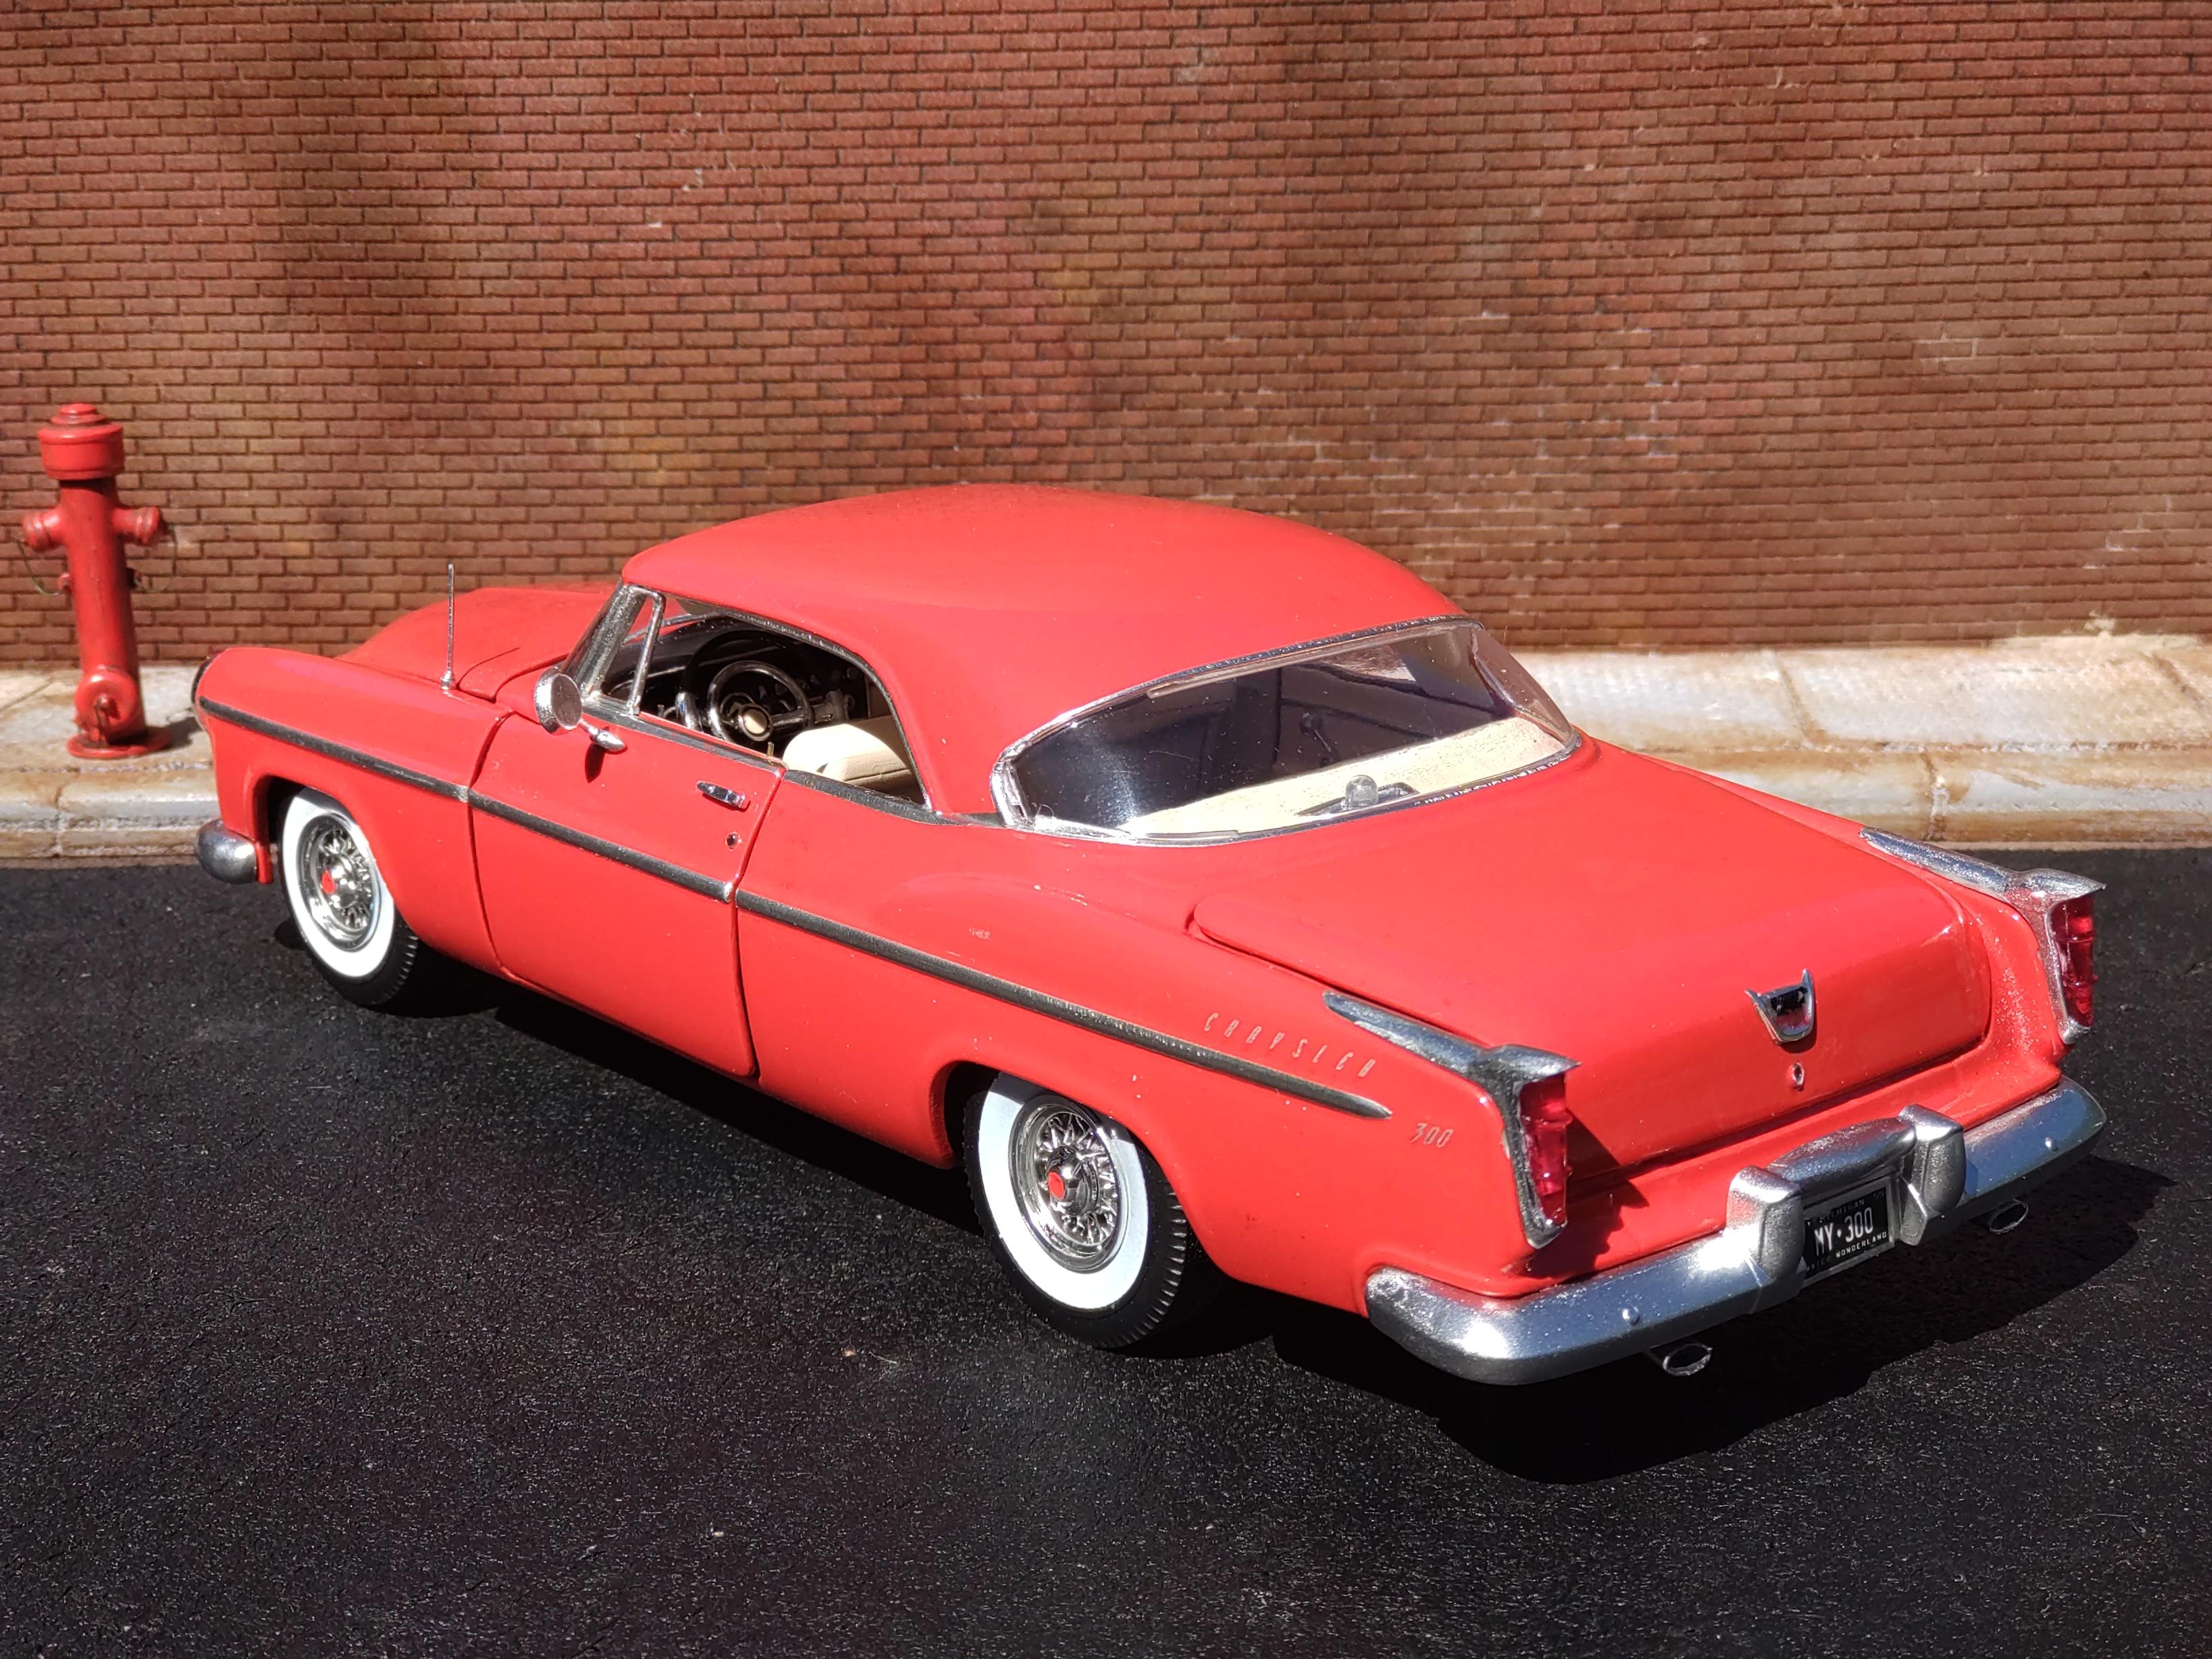
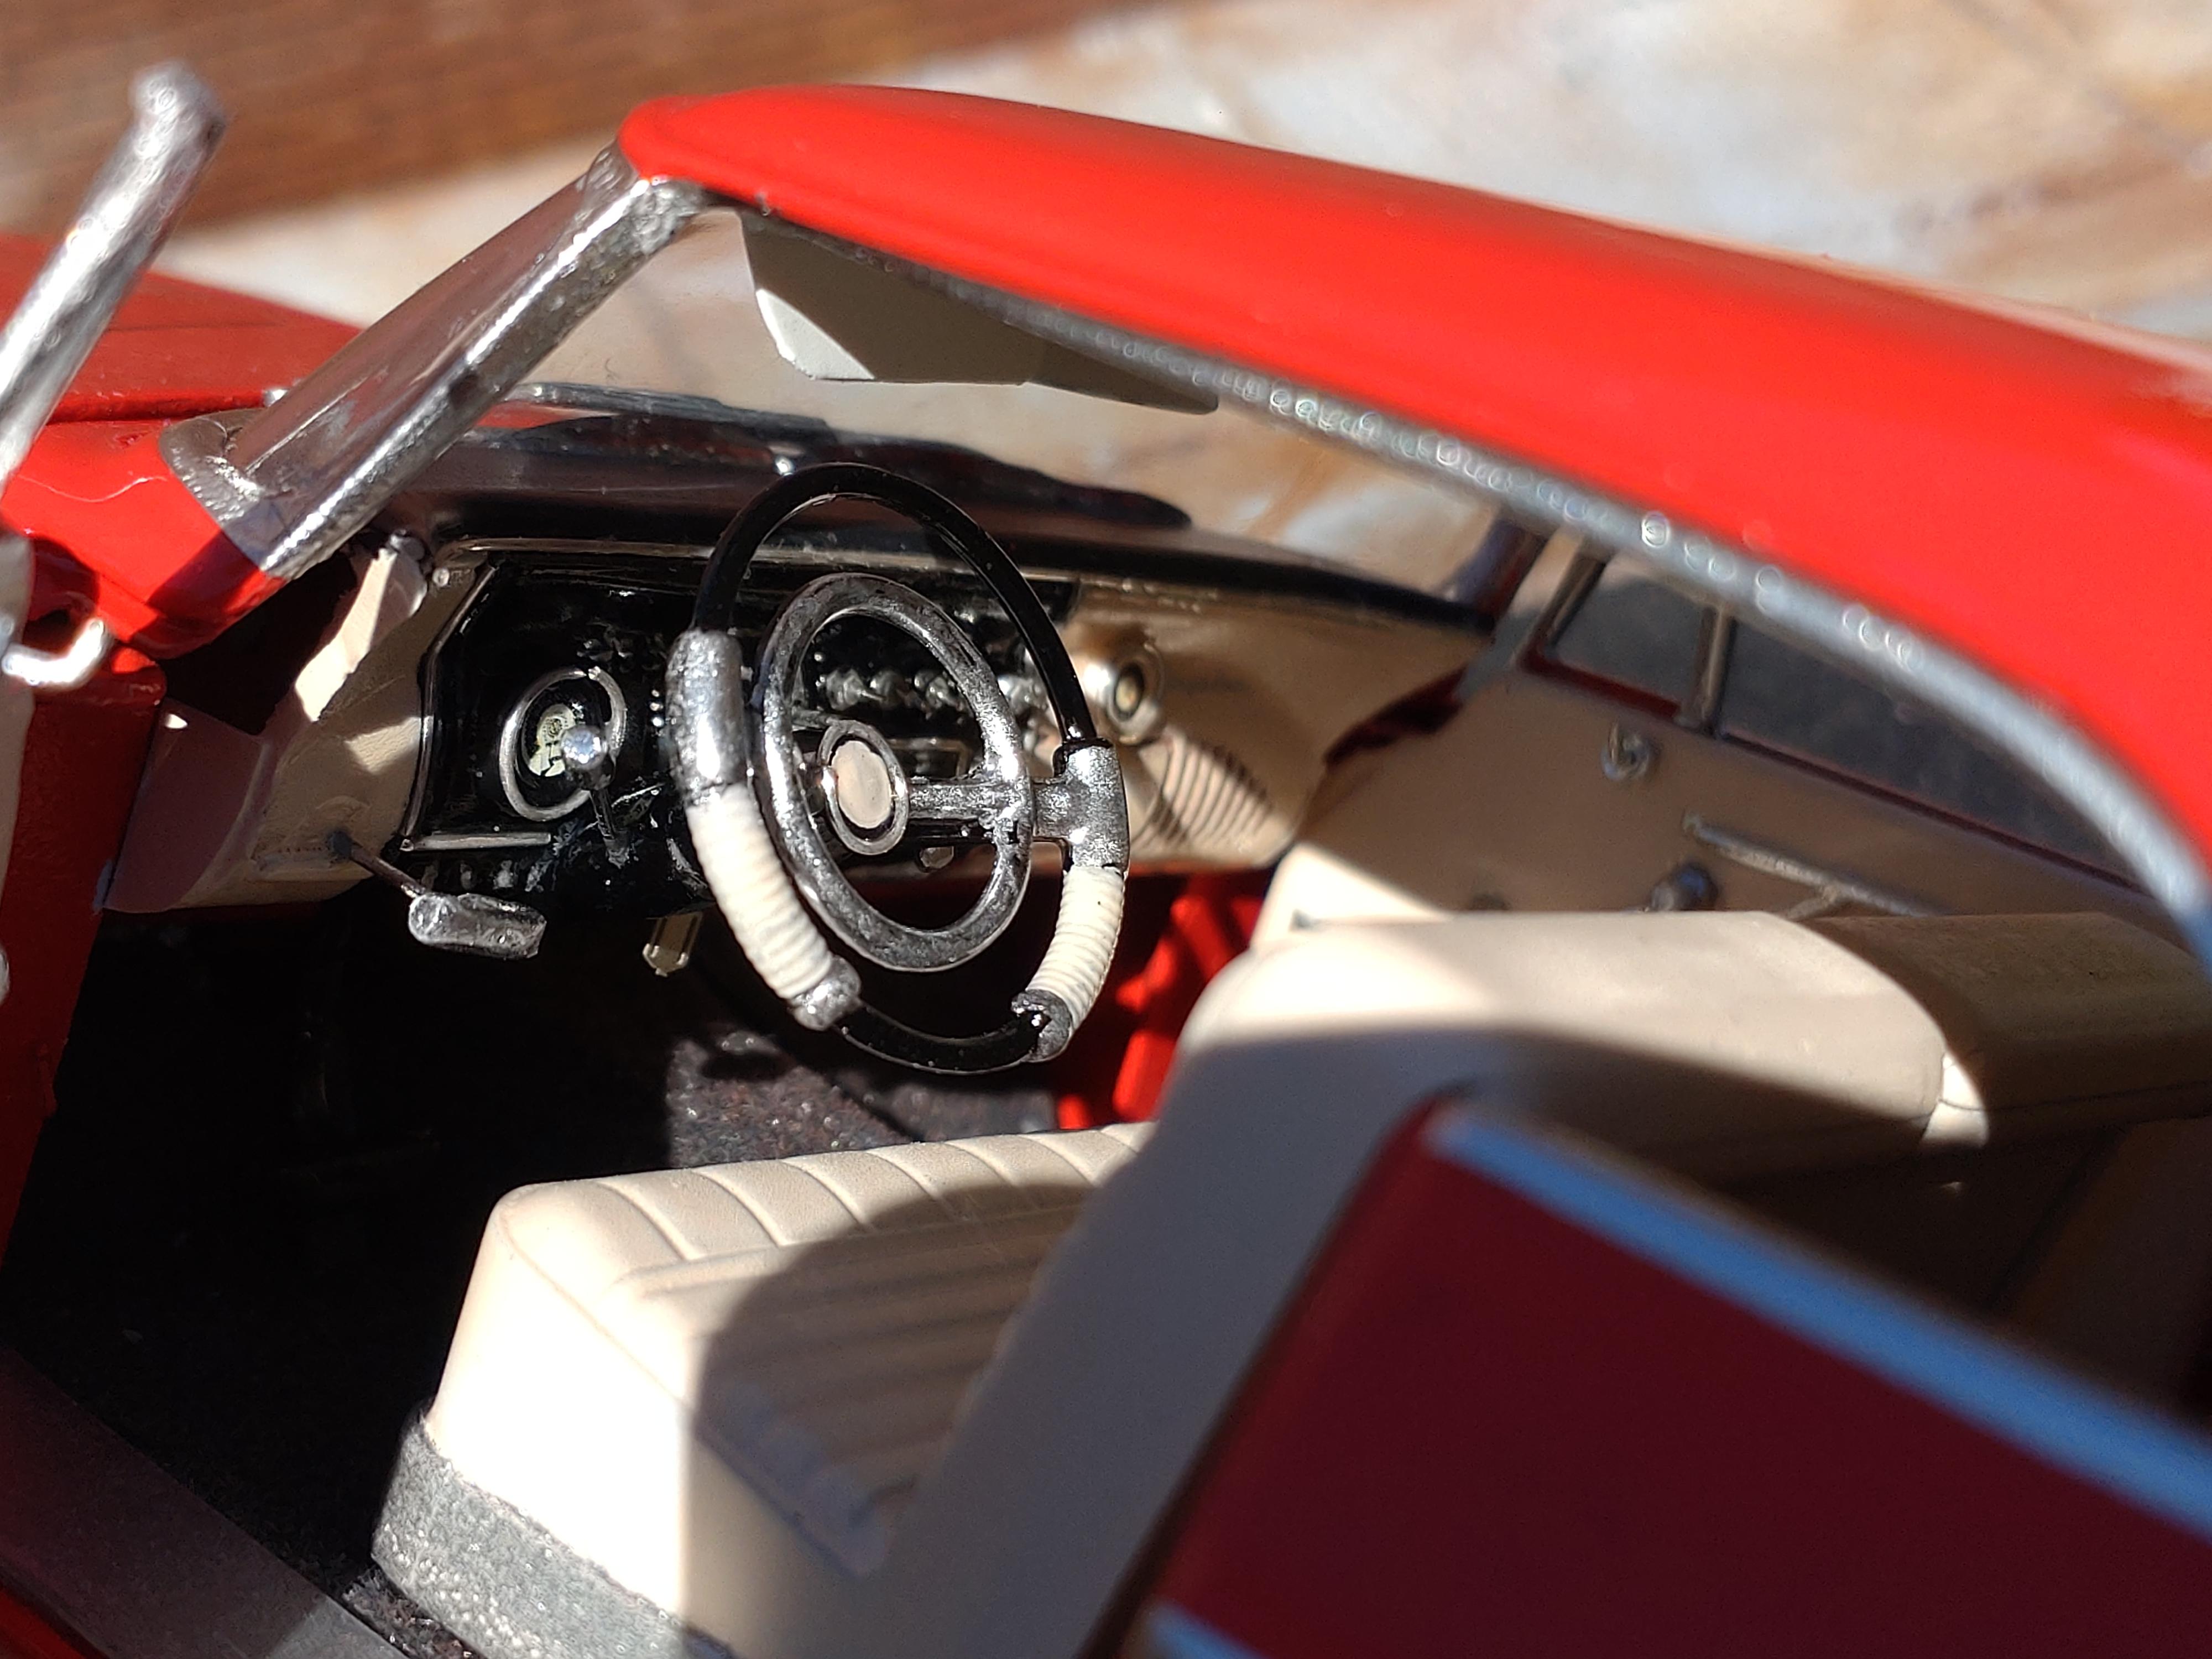
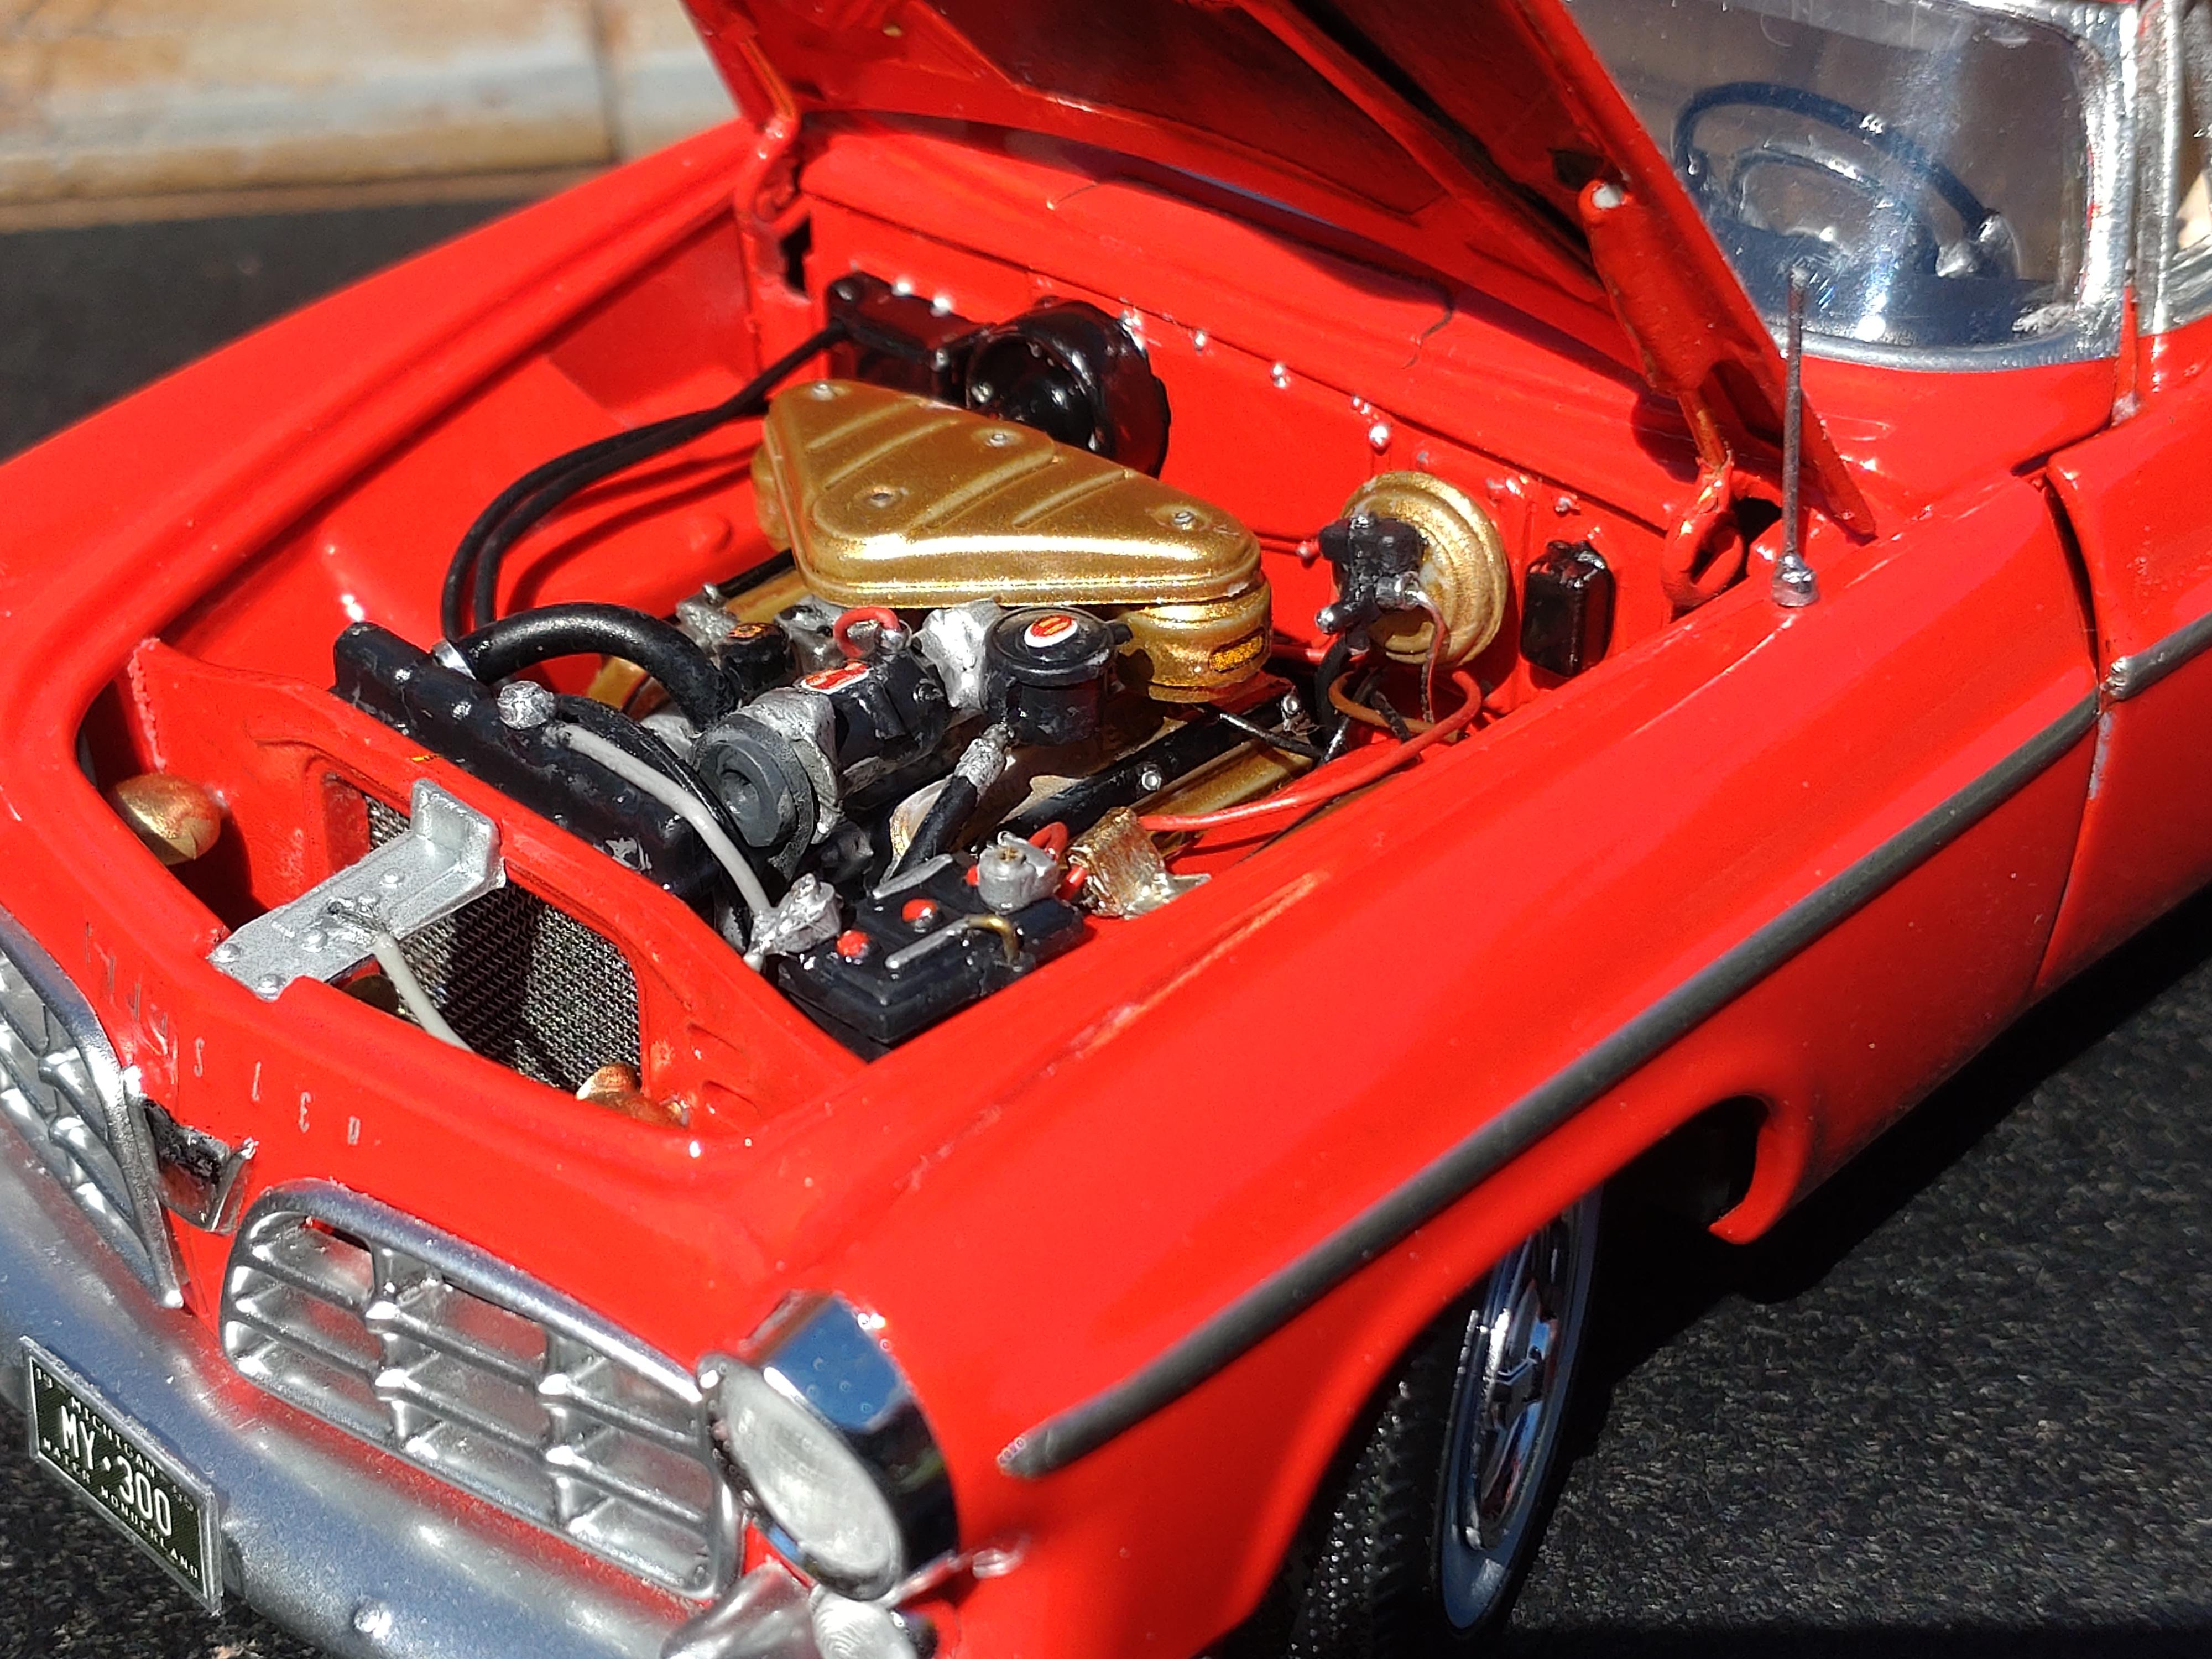
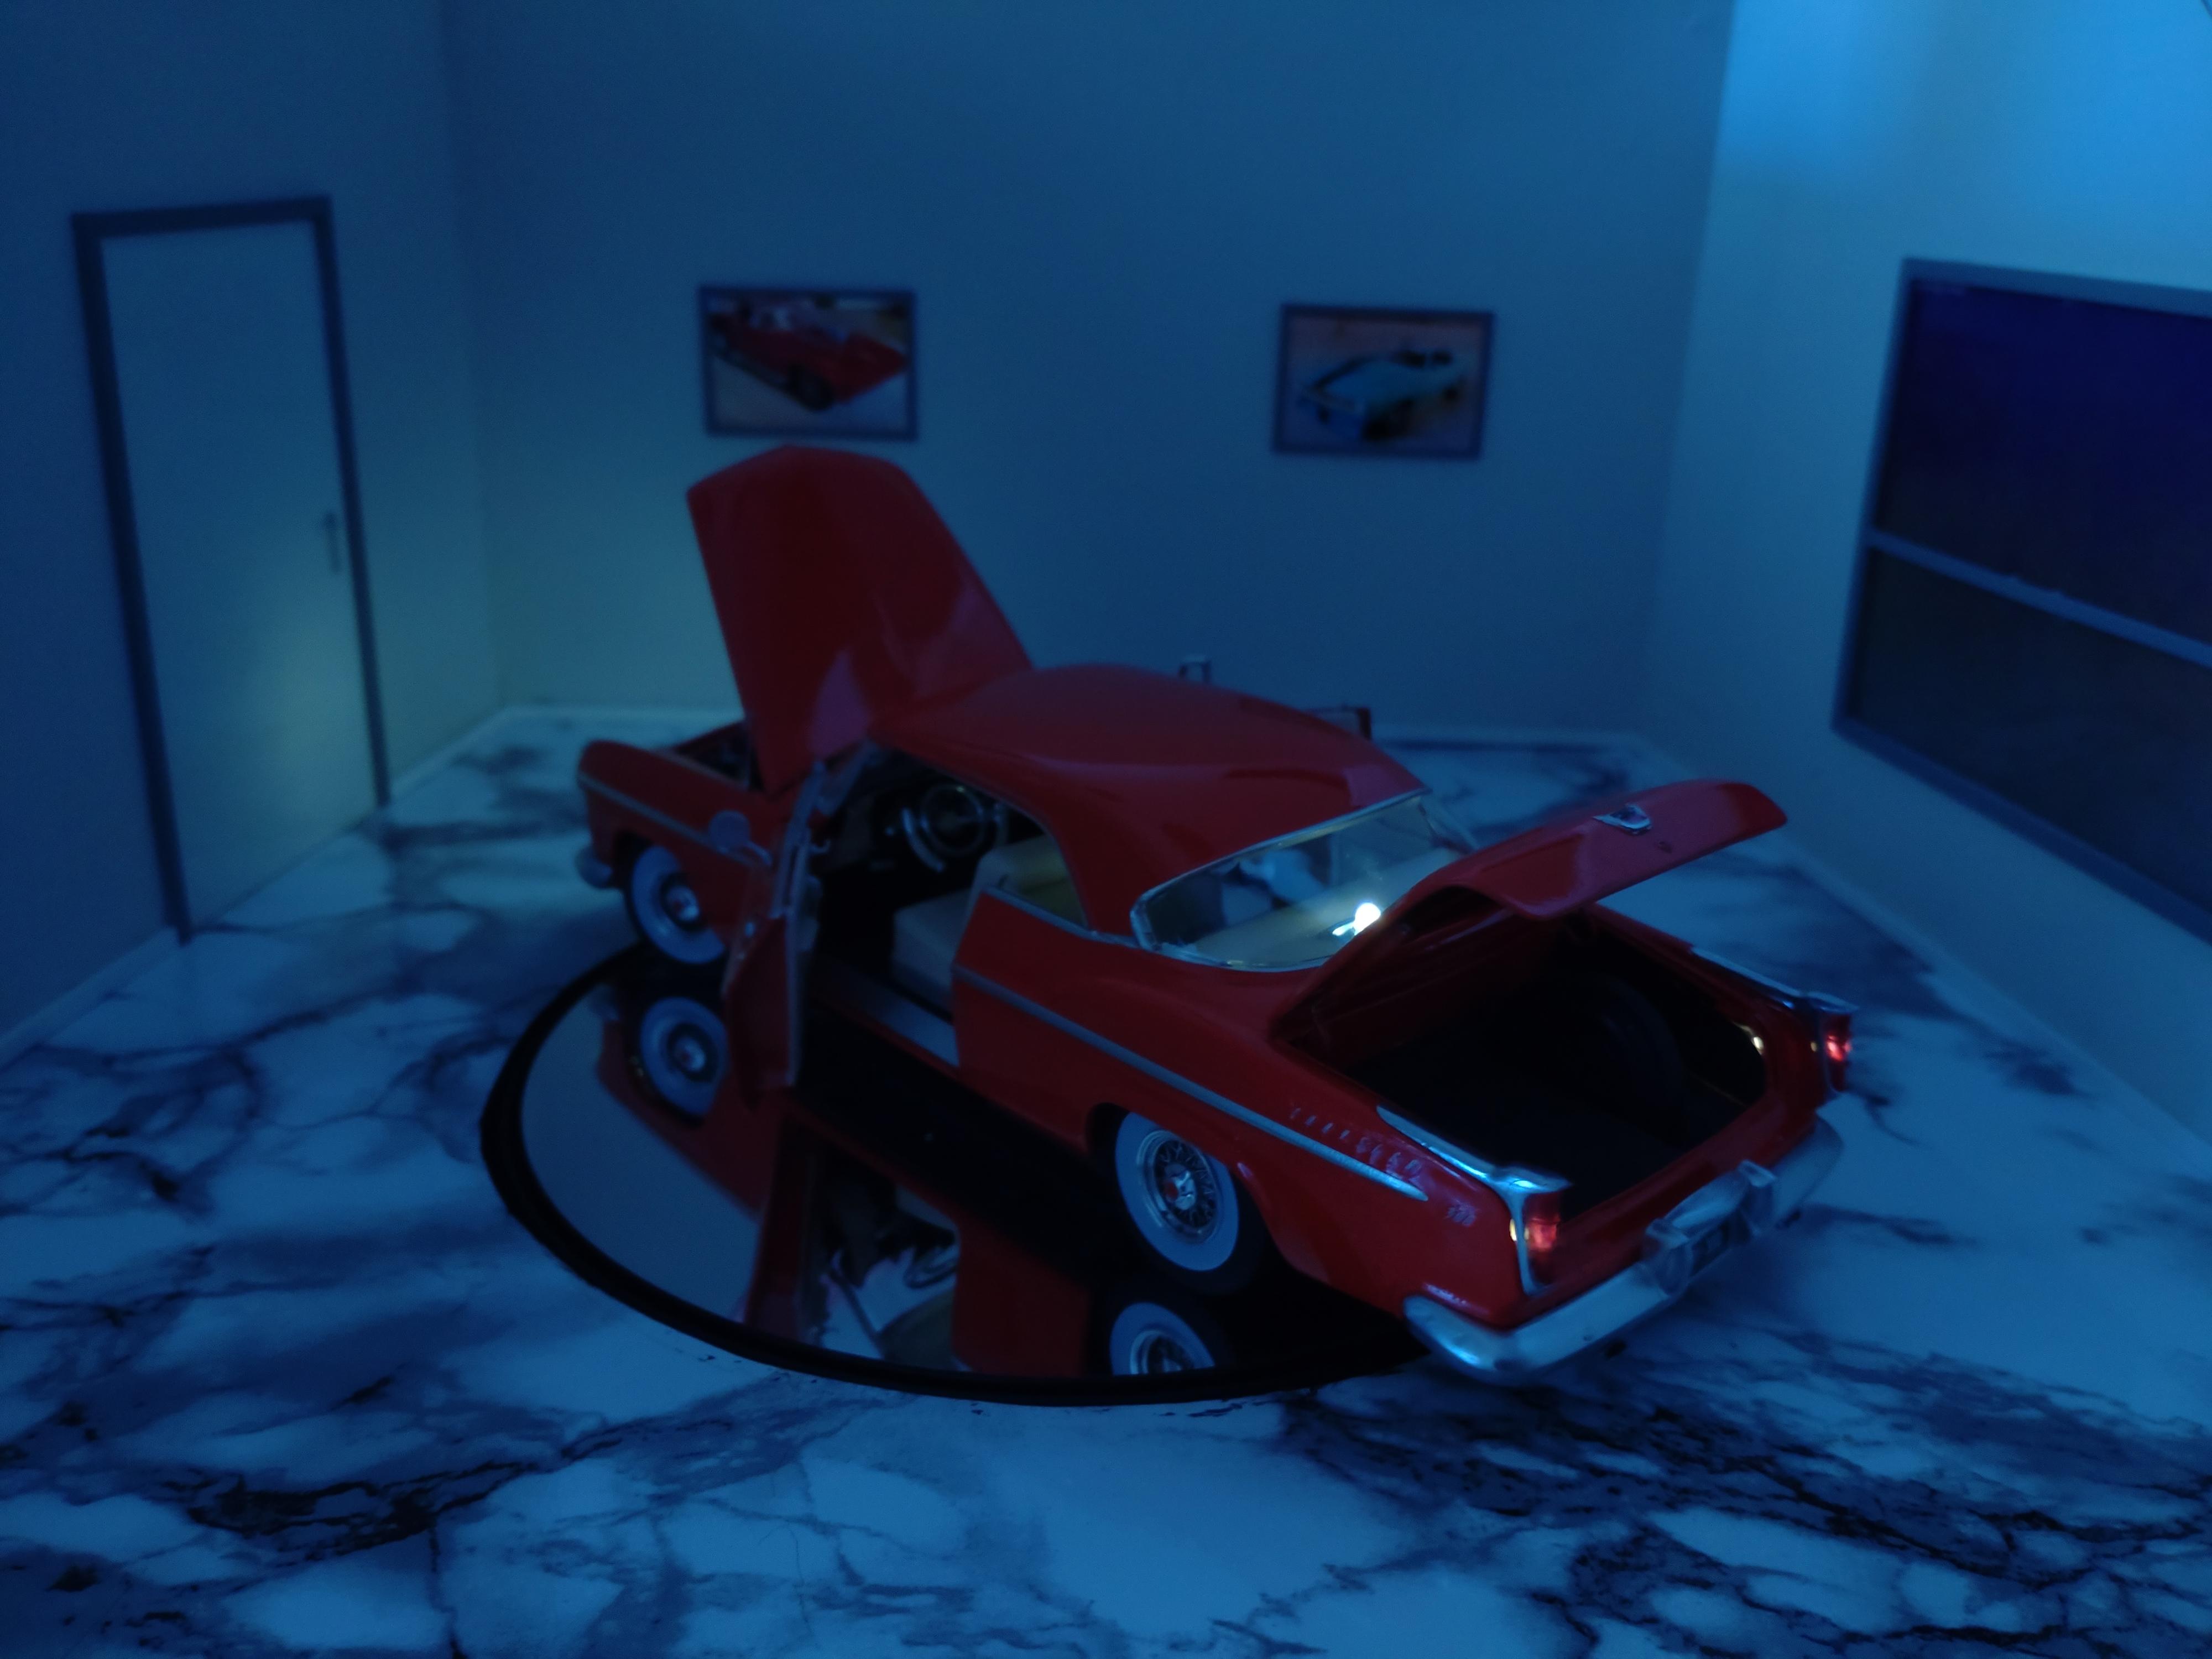
This is a Moebius kit and while I was building I remembered how I missed the crisp molding and the fine details of this manufacturer. Everything fits perfectly and the parts have more texture and sharpness than many AMT kits. This 300 is a fine example. The Chrysler 300 was a muscle car long before the term was established. Real power and a handling for fast driving, it wasn´t your average family car. Even the design looked fast and ahead of it´s time. Offered only in black, white and red, my choice for my build was easy. My goal was to get as close to a sales room mint stock look as possible. The red body is rattle can Montana Gold label S3000, finished with 2 layers of AK clear varnish. The BMF and the decals are protected under the final coating. I had to do some sanding on the bumpers because they had some molding issues. Instead of brush painting the Molotow chrome, this time I airbrushed the big parts with Molotow liquid chrome. After 4 days of drying they received an finish with AK clear too. I didn´t use much second market items this time. Actually only the door handles and the windshield wipers. The kit comes without a rear view mirror, so I fabricated it from styrene and a 8mm brass rod. I opened and hinged the doors and the trunk and equipped the door panels with hidden magnets. The second magnets are hidden in the front bench. The dash is enhanced with wire gauge rings and tiny toggle switches. The kit shift and winker levers were replaced with thinner home made wire levers. Plus the parking brake. The engine and the bay received a bunch of added details like extra wiring, hoses and lines. The radiator front is covered with metal mesh. The air filter cover and the valve covers are pimped with etched metal hex nuts. This is the first time I have equipped a model with lighting. It did add some extra time because I needed a little consulting. But fortunately I have an electronics shop in town and I could buy my stuff there. They only have 3mm LEDs though, so I made the best of it. In the meantime I have sourced 1,2mm LEDs, so the next build with lighting will give me some more options. Especially for the interior lighting. The battery is hidden in the gas tank, which I can open if the battery needs to be exchanged. I was able to hide all the wires and the lines to the front are the "brake and fuel" lines on the undercarriage. I hope you like my build and would be happy if you watch the video on YouTube: https://youtu.be/NeDH_tsS5Yg Thank your for watching and best wishes!
- 22 replies
-
- 20
-
-
Hi Brian and Claude, many happy returns for your nice remarks!
-
Hi Steve, to you too thanks for your friendly response!
-
Hi Bill and David, thanks for your friendly response! Or, in German: vielen Dank!
-
Hello Jim, Mario, Oliver, Larry, Dennis, Ricky, Emre, Carl, Jeff, Tom and Donato, to you also a big THANK YOU for your friendly response! Have a nice weekend! Andy
-
Wow, a shout-out to Samuel, Michael, Gene, Chris, David J, David E, Stuart, Brian, Alan, Bruce and Mark, Soooo much cool response! I guess I might have built a a nice model😉😄 Thanks for all that emotional support! I learned a lot on this build, made some mistakes and found new solutions. THATS what makes model building so fun! My next build will be a classic stock though, keeping the stress level low this time😂
-
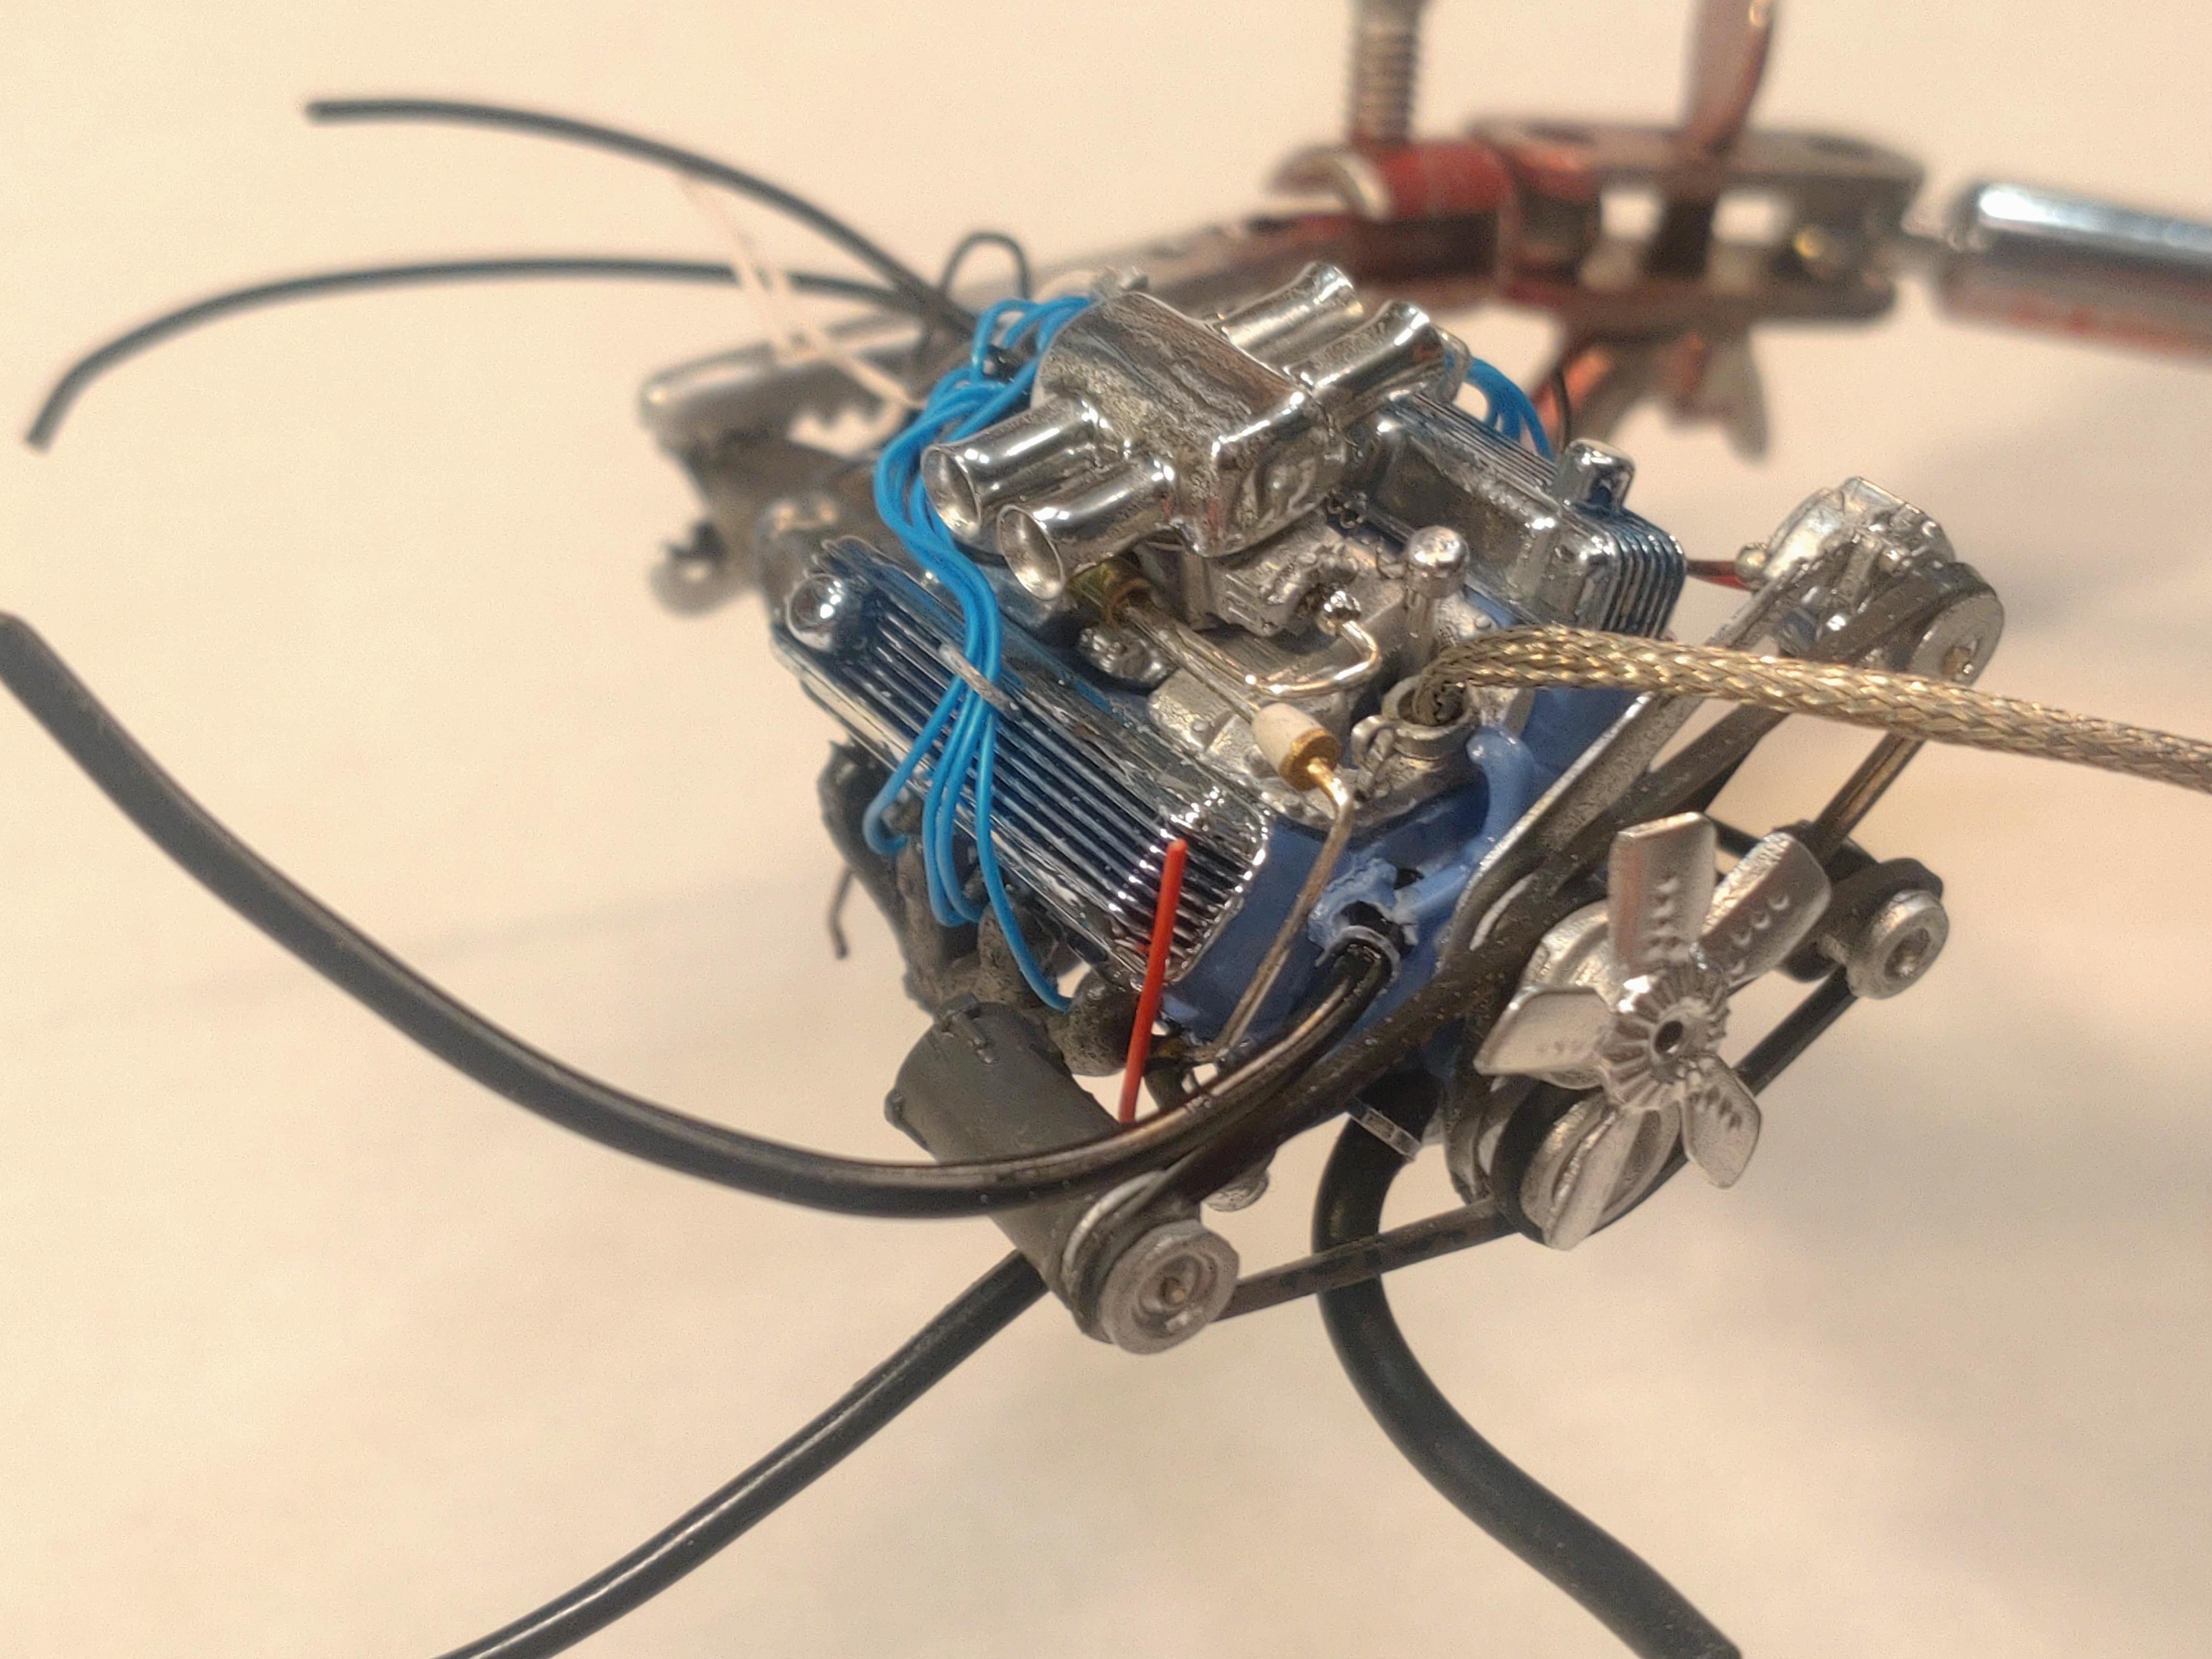
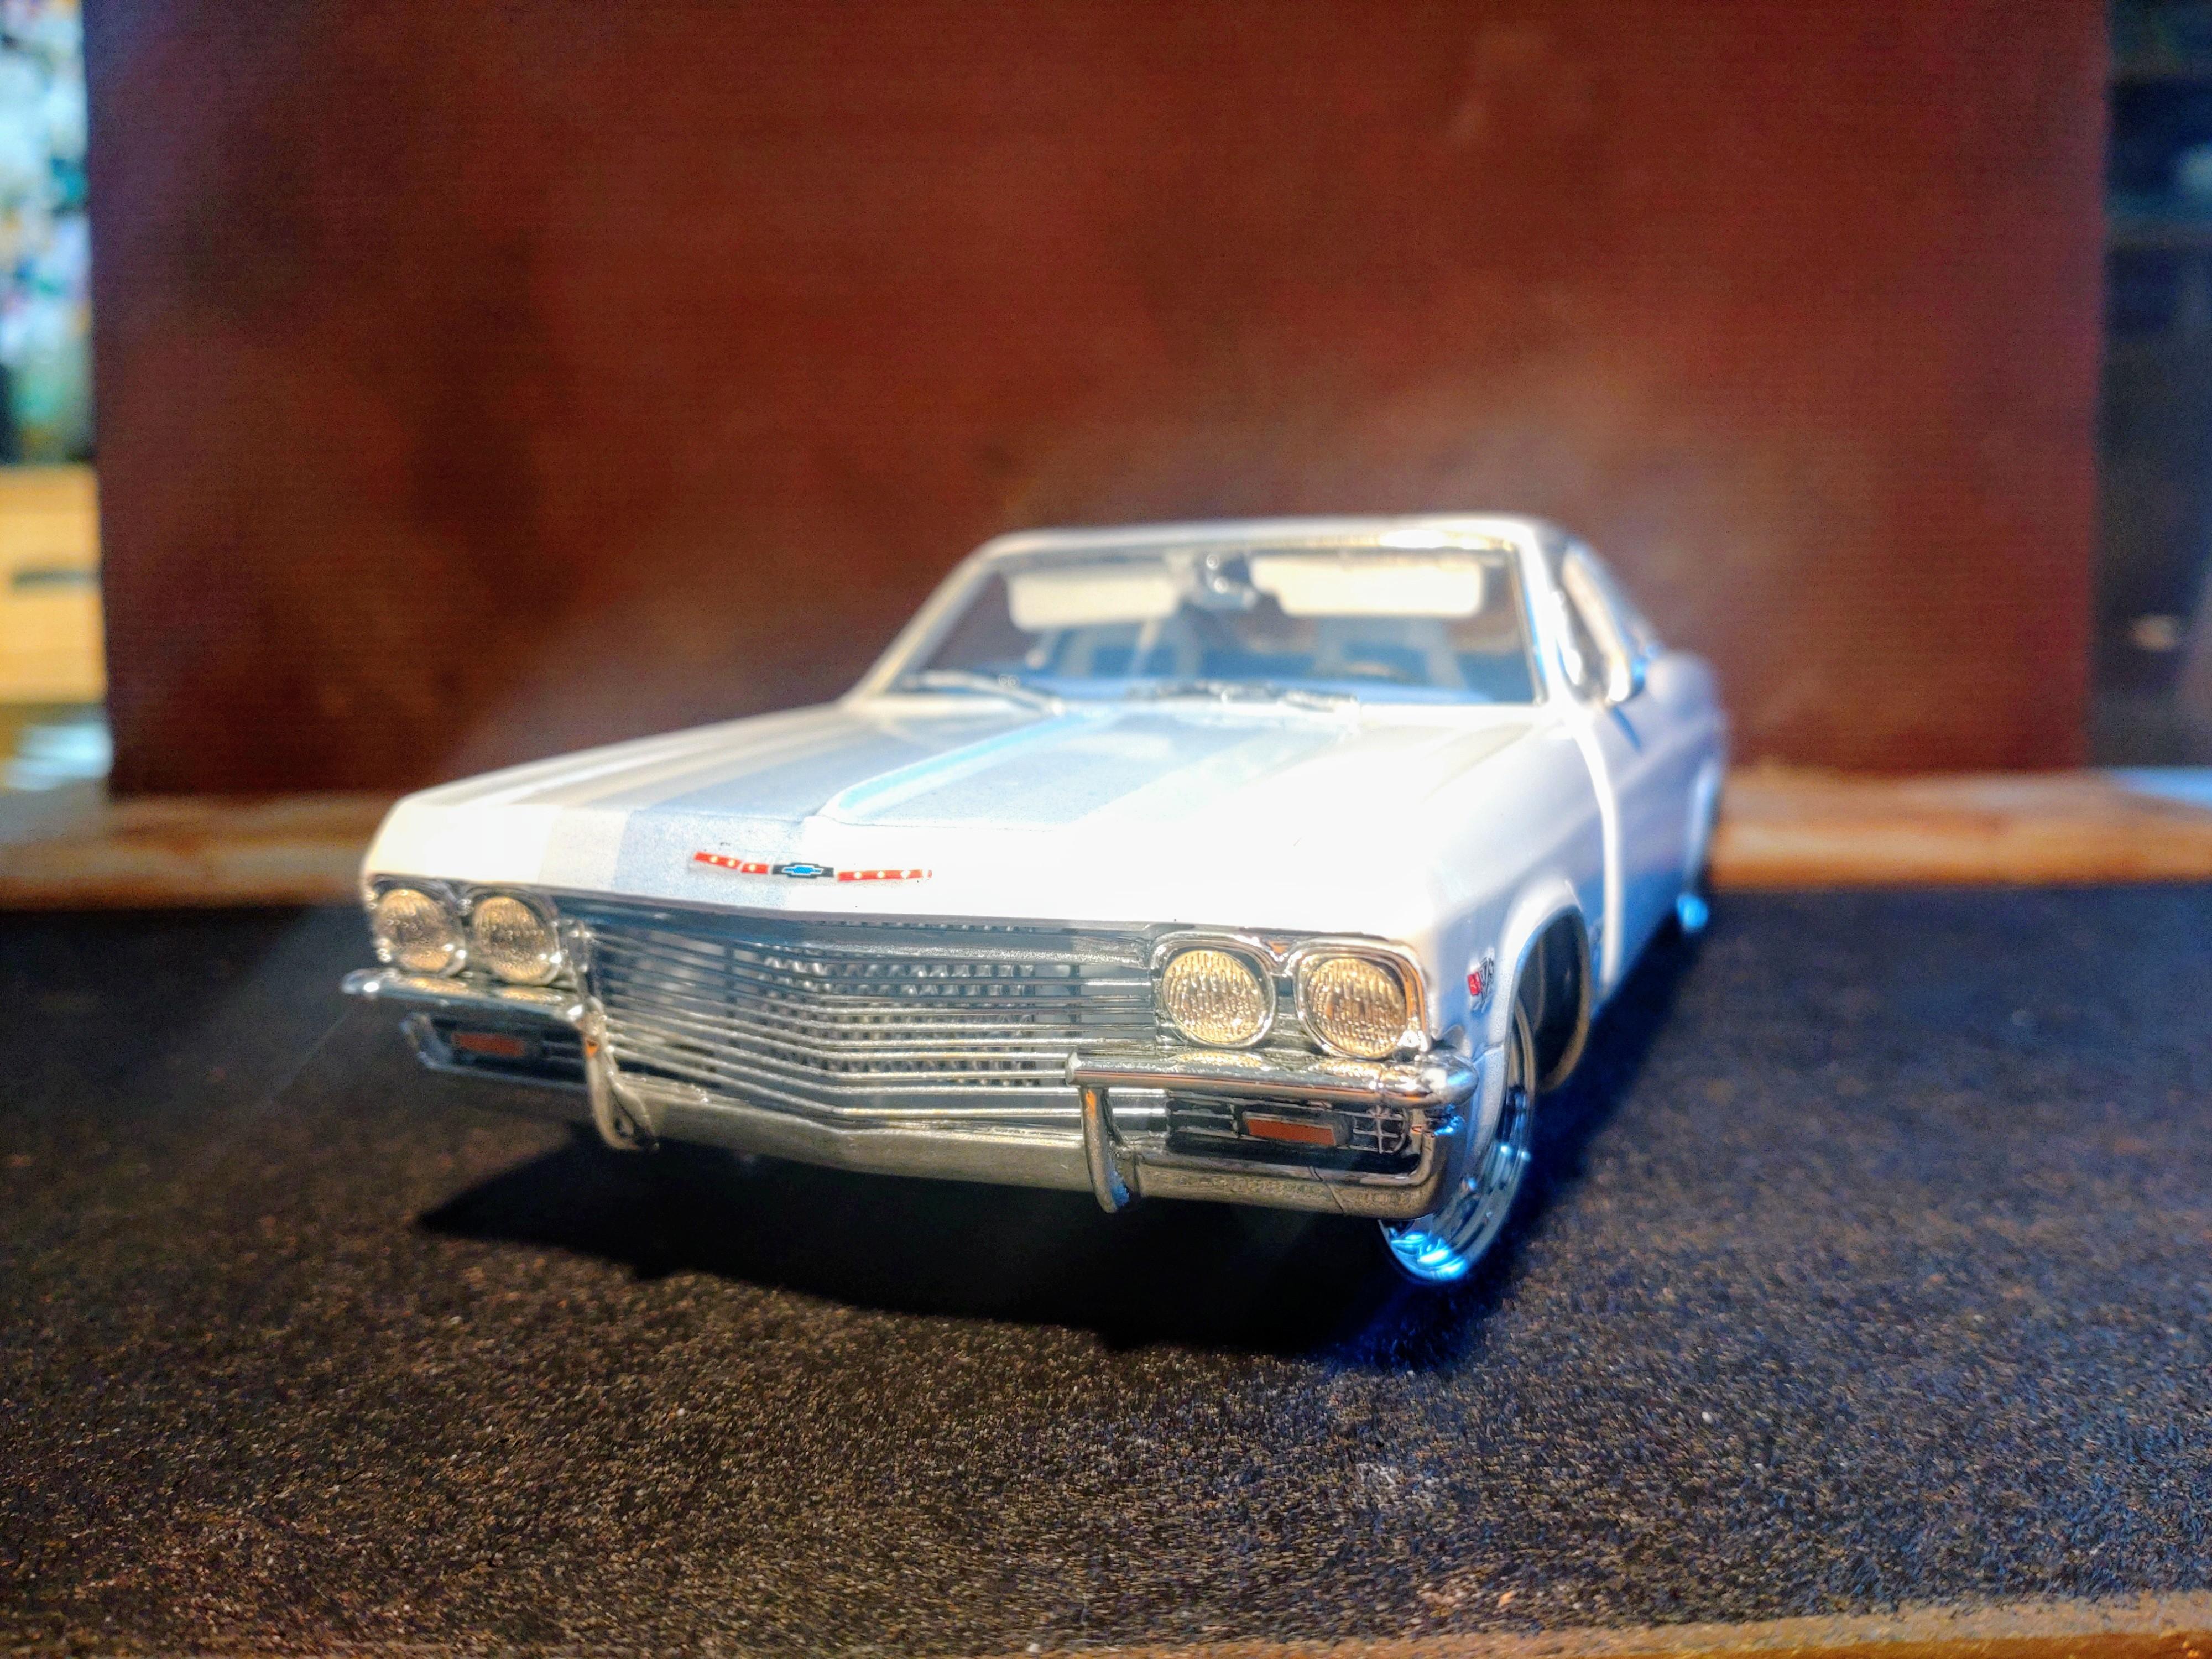
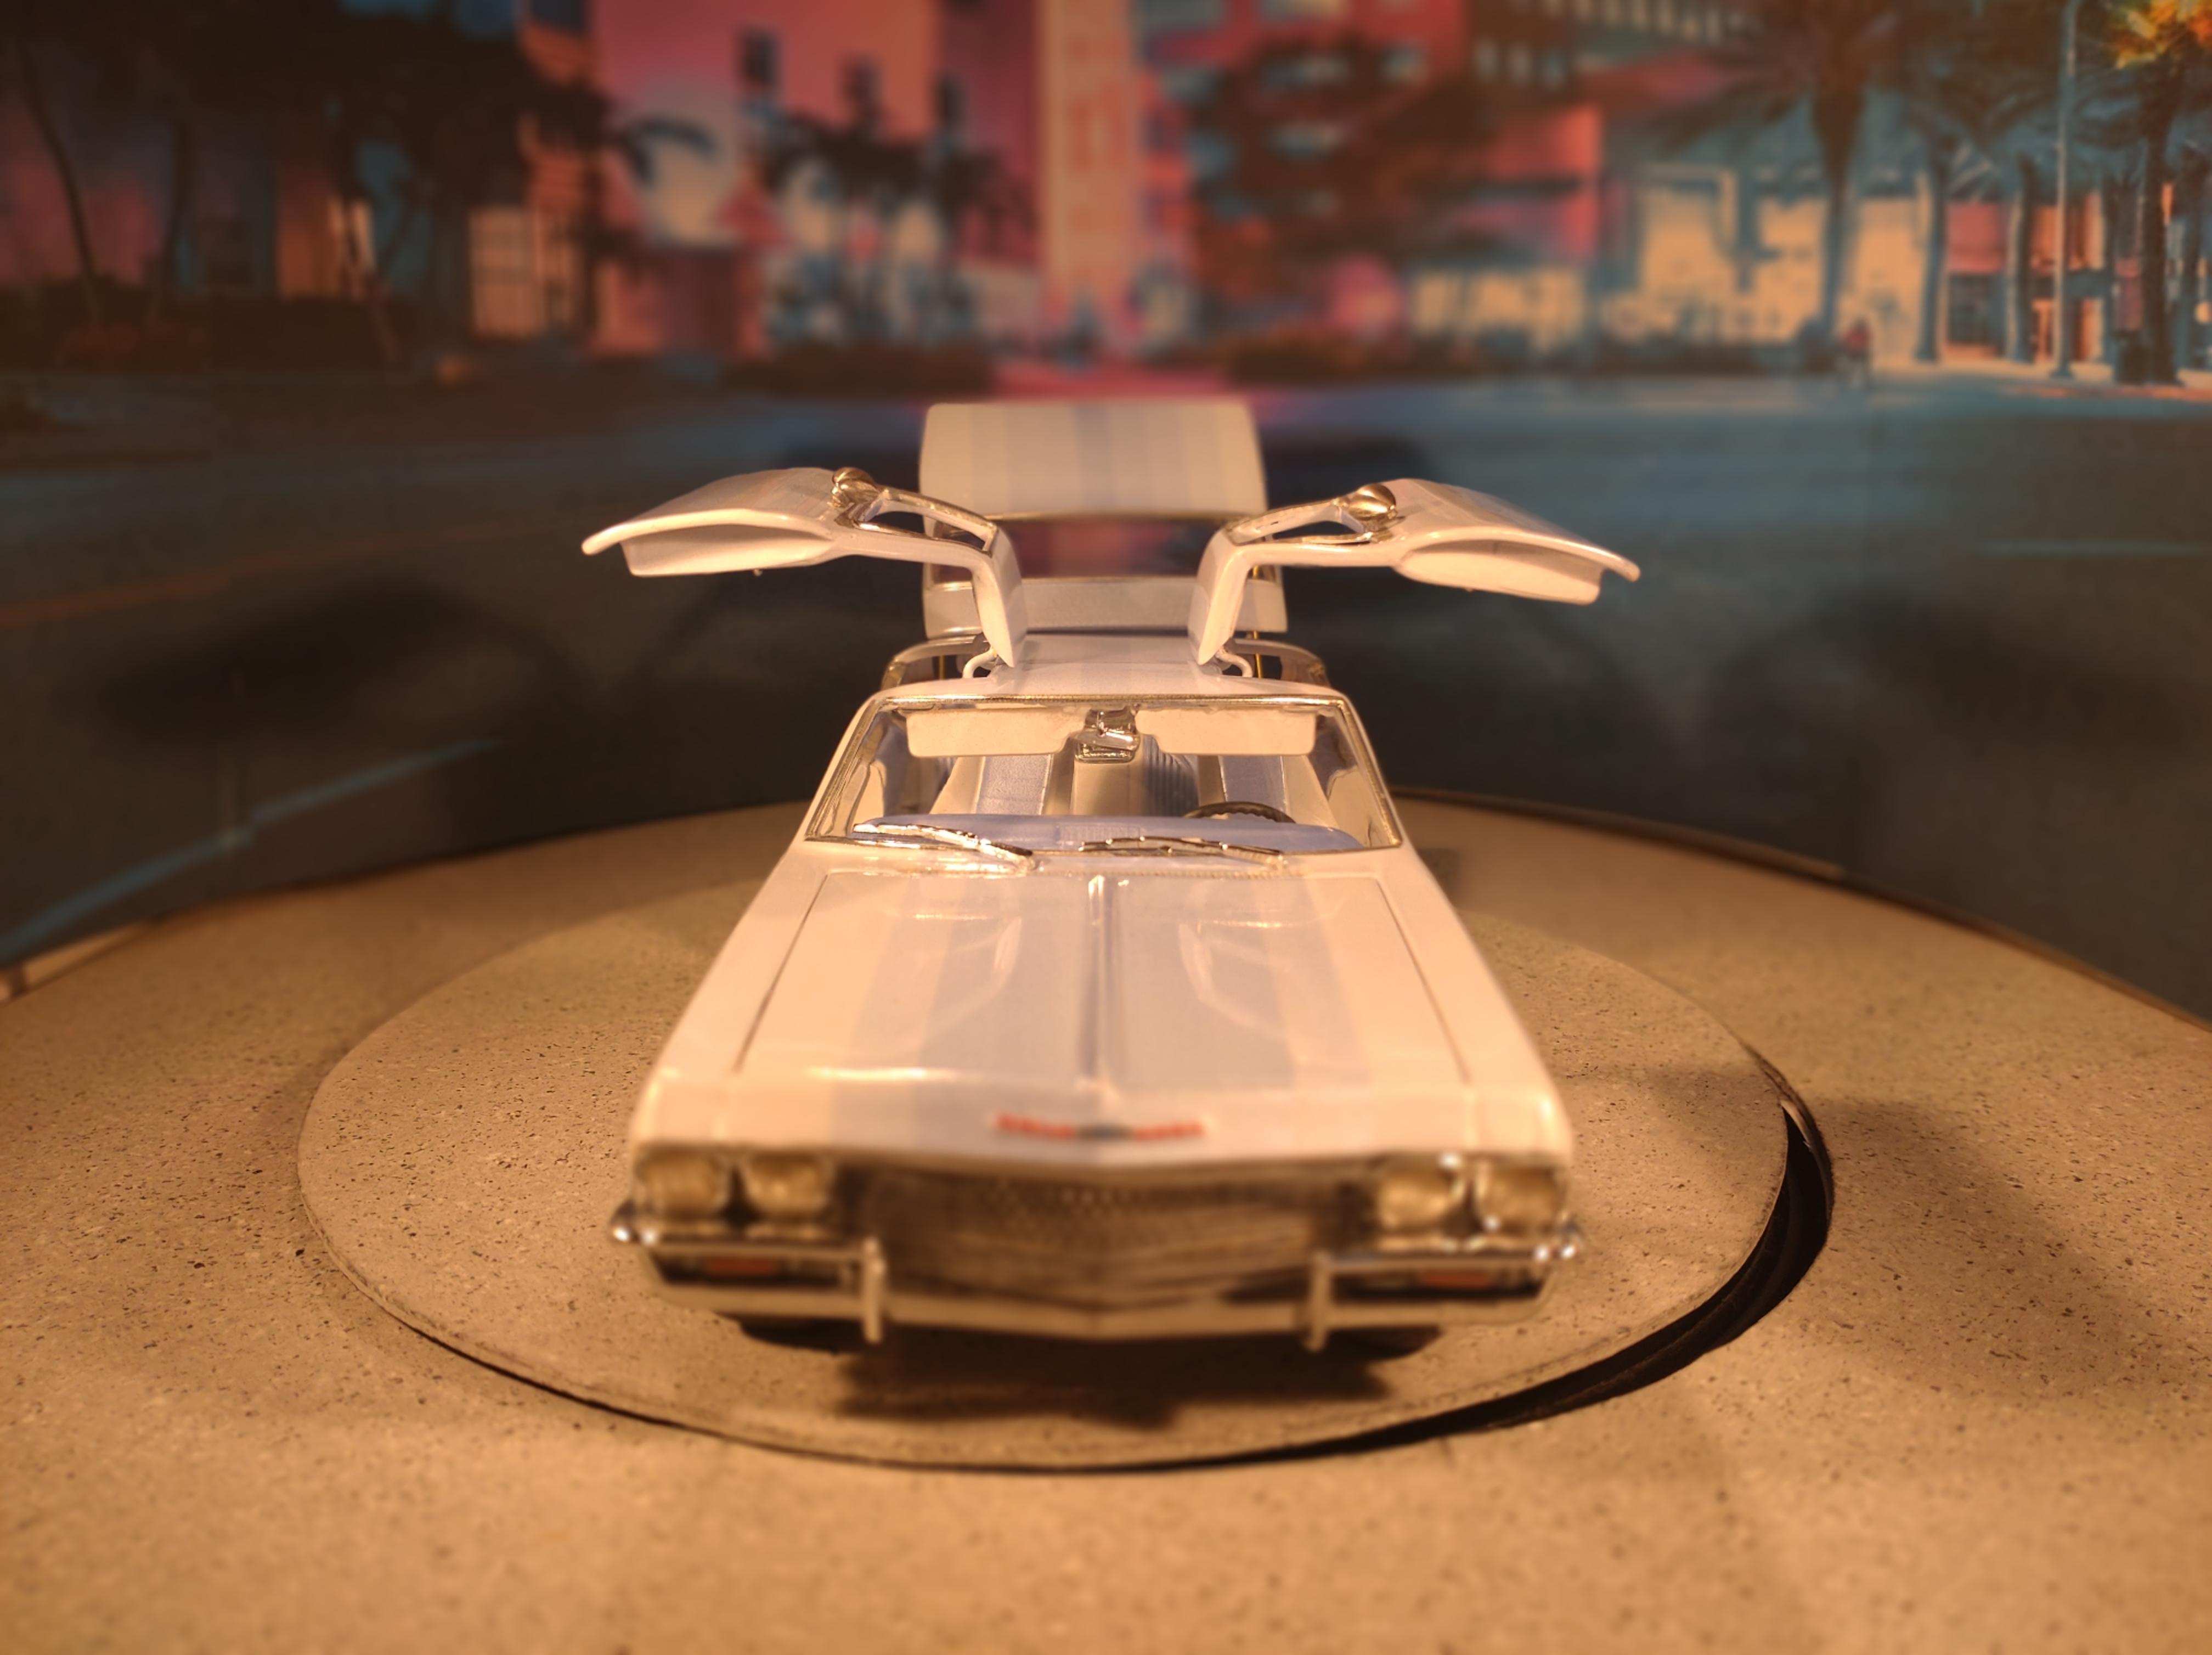
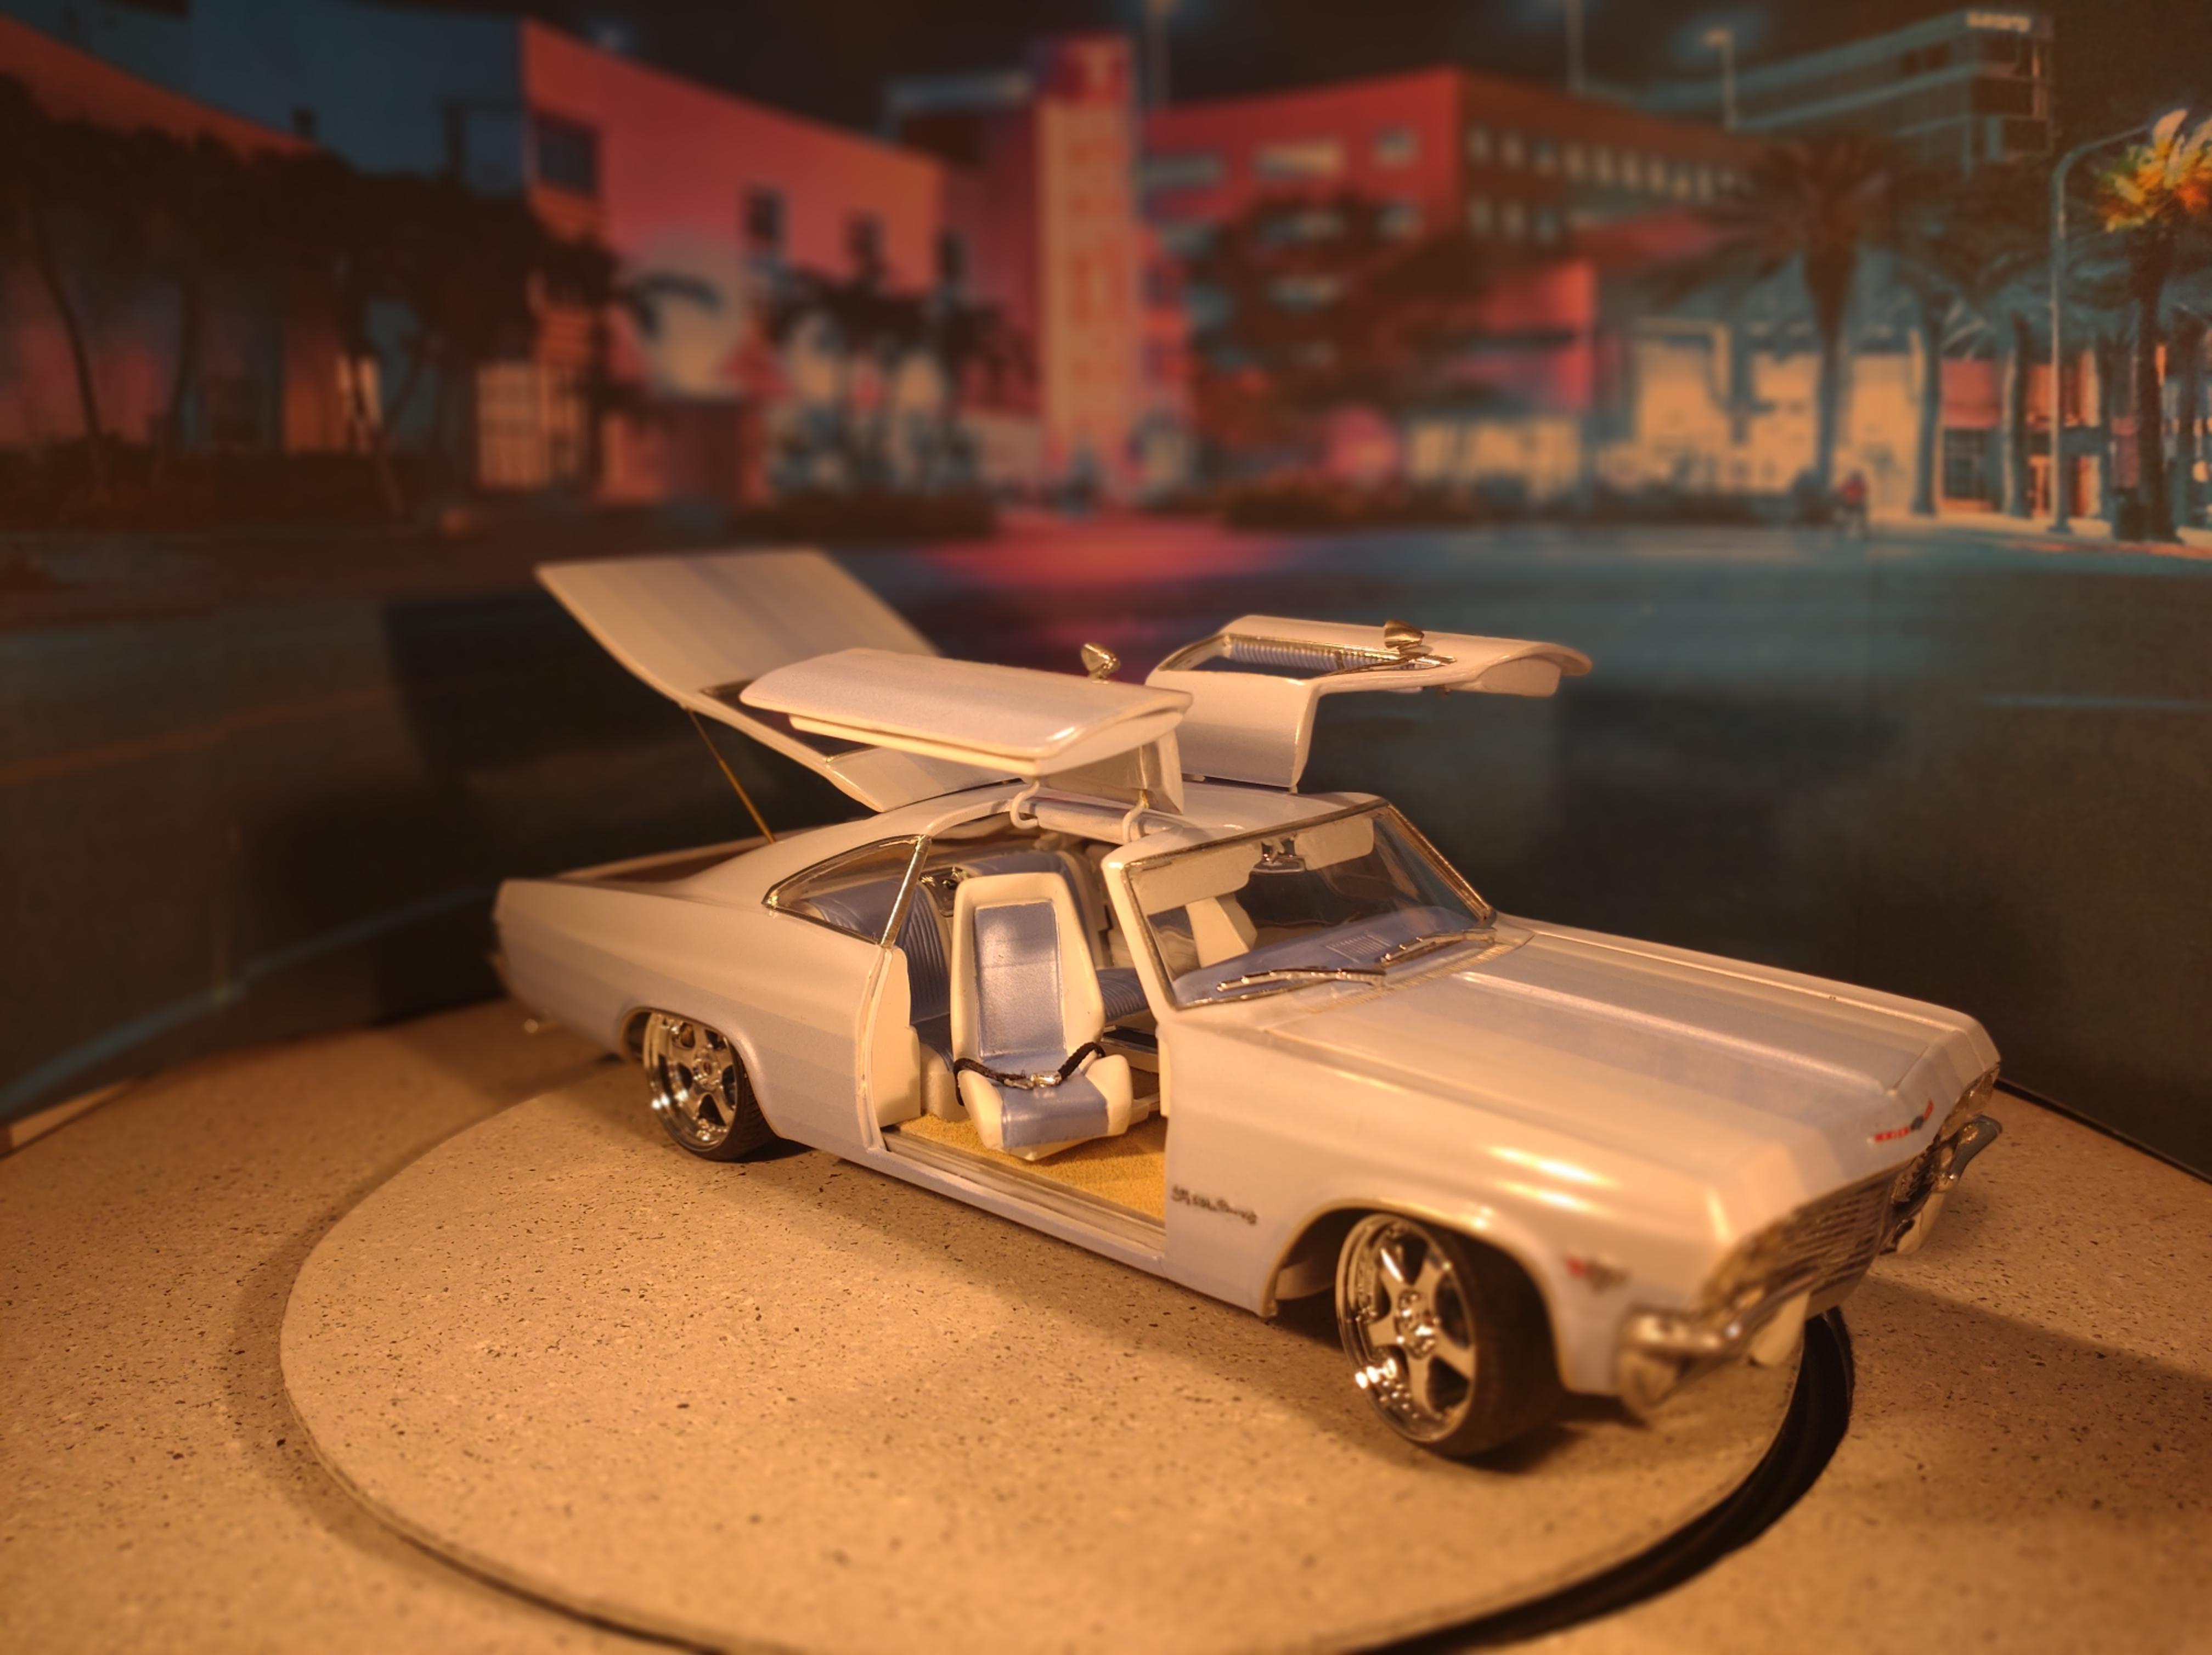
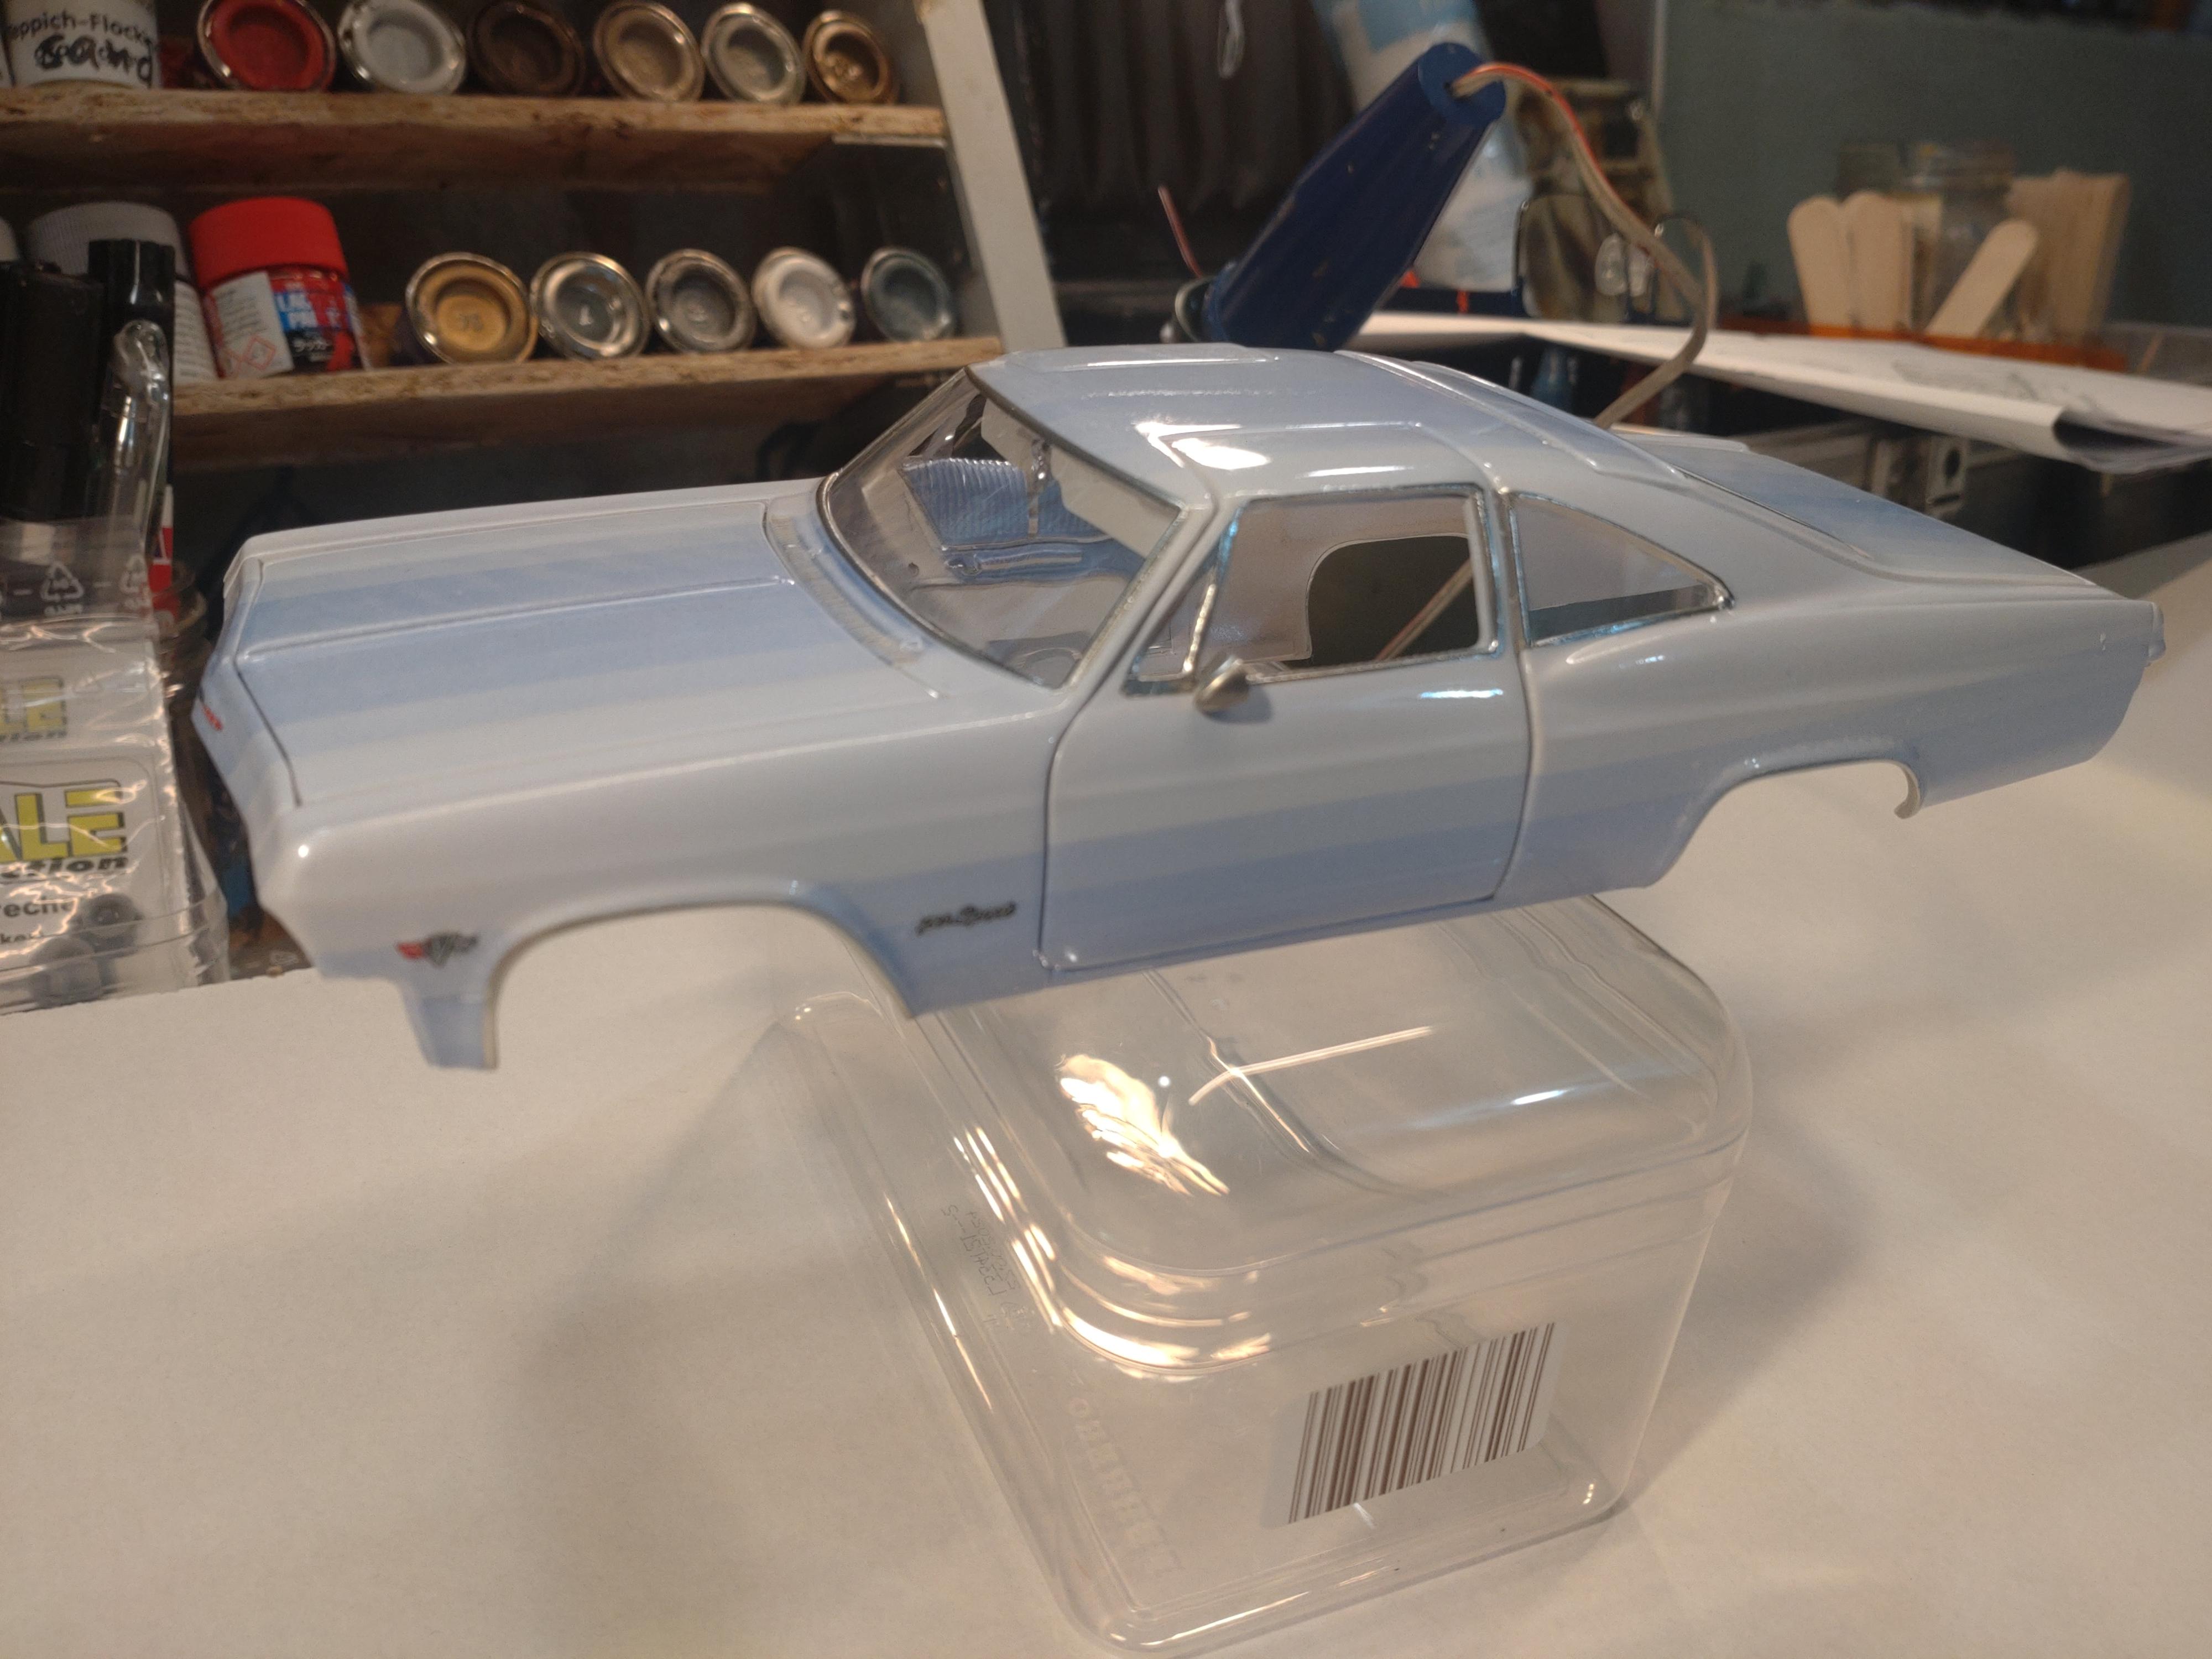
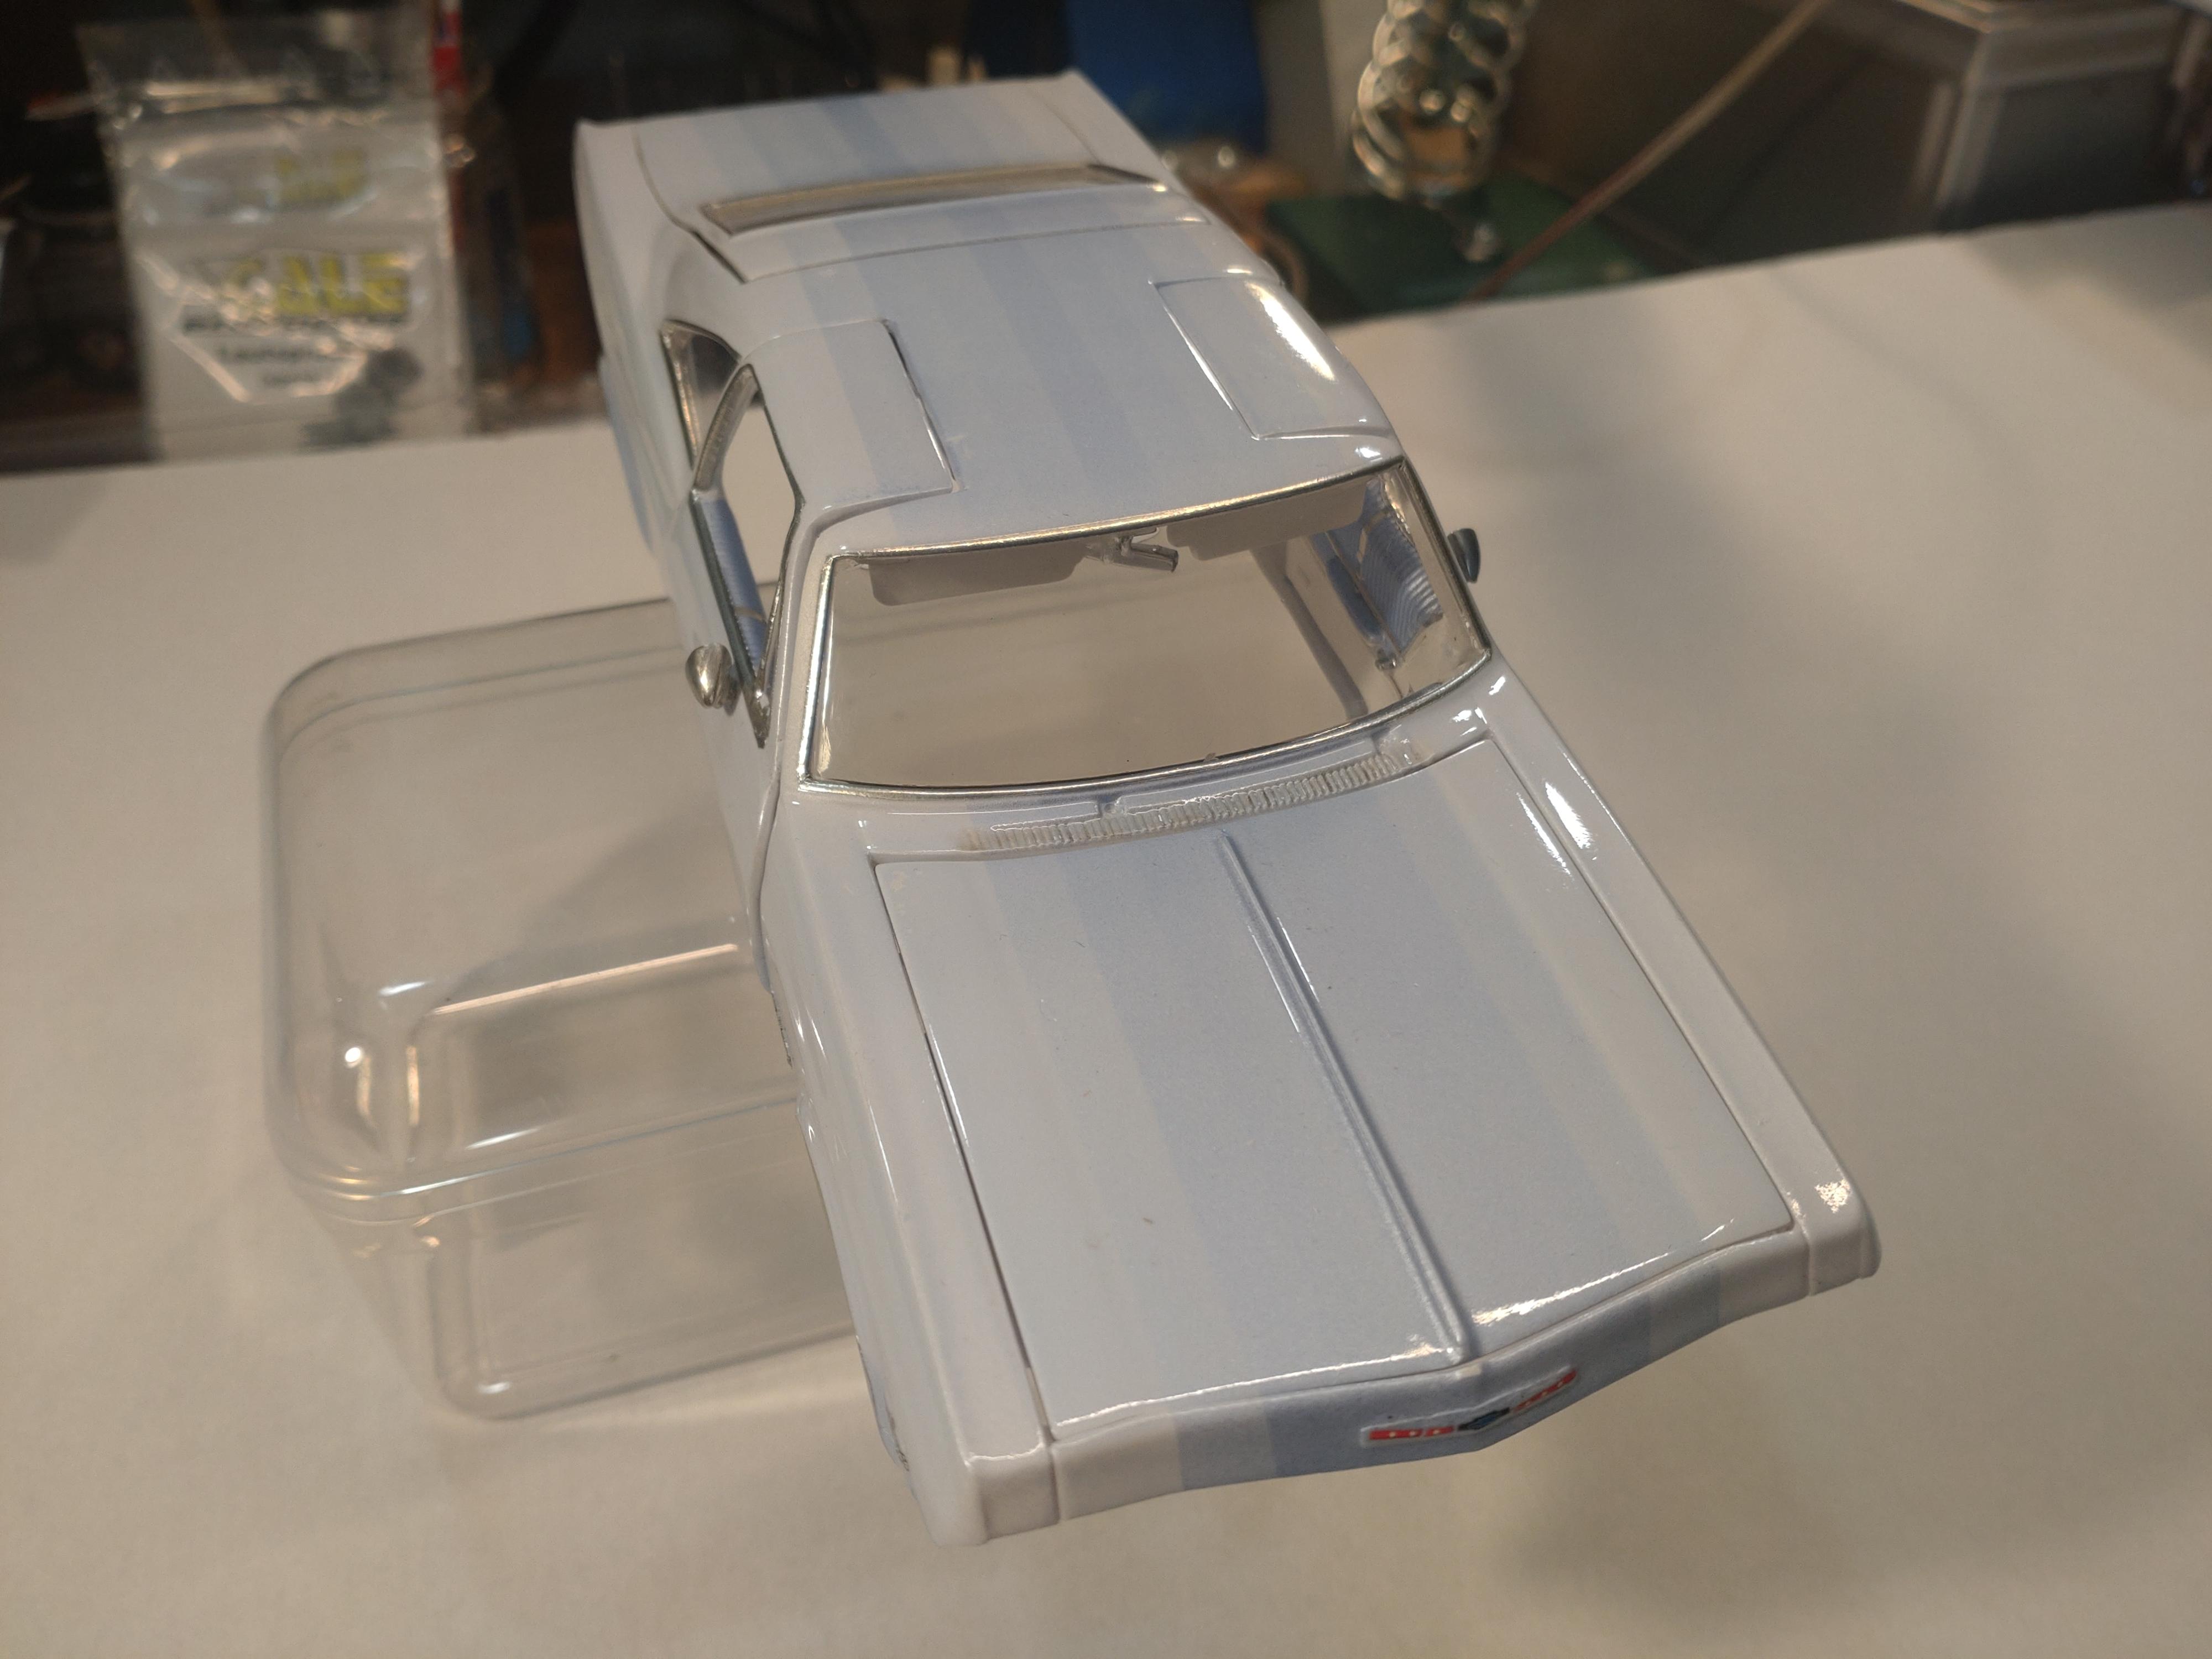
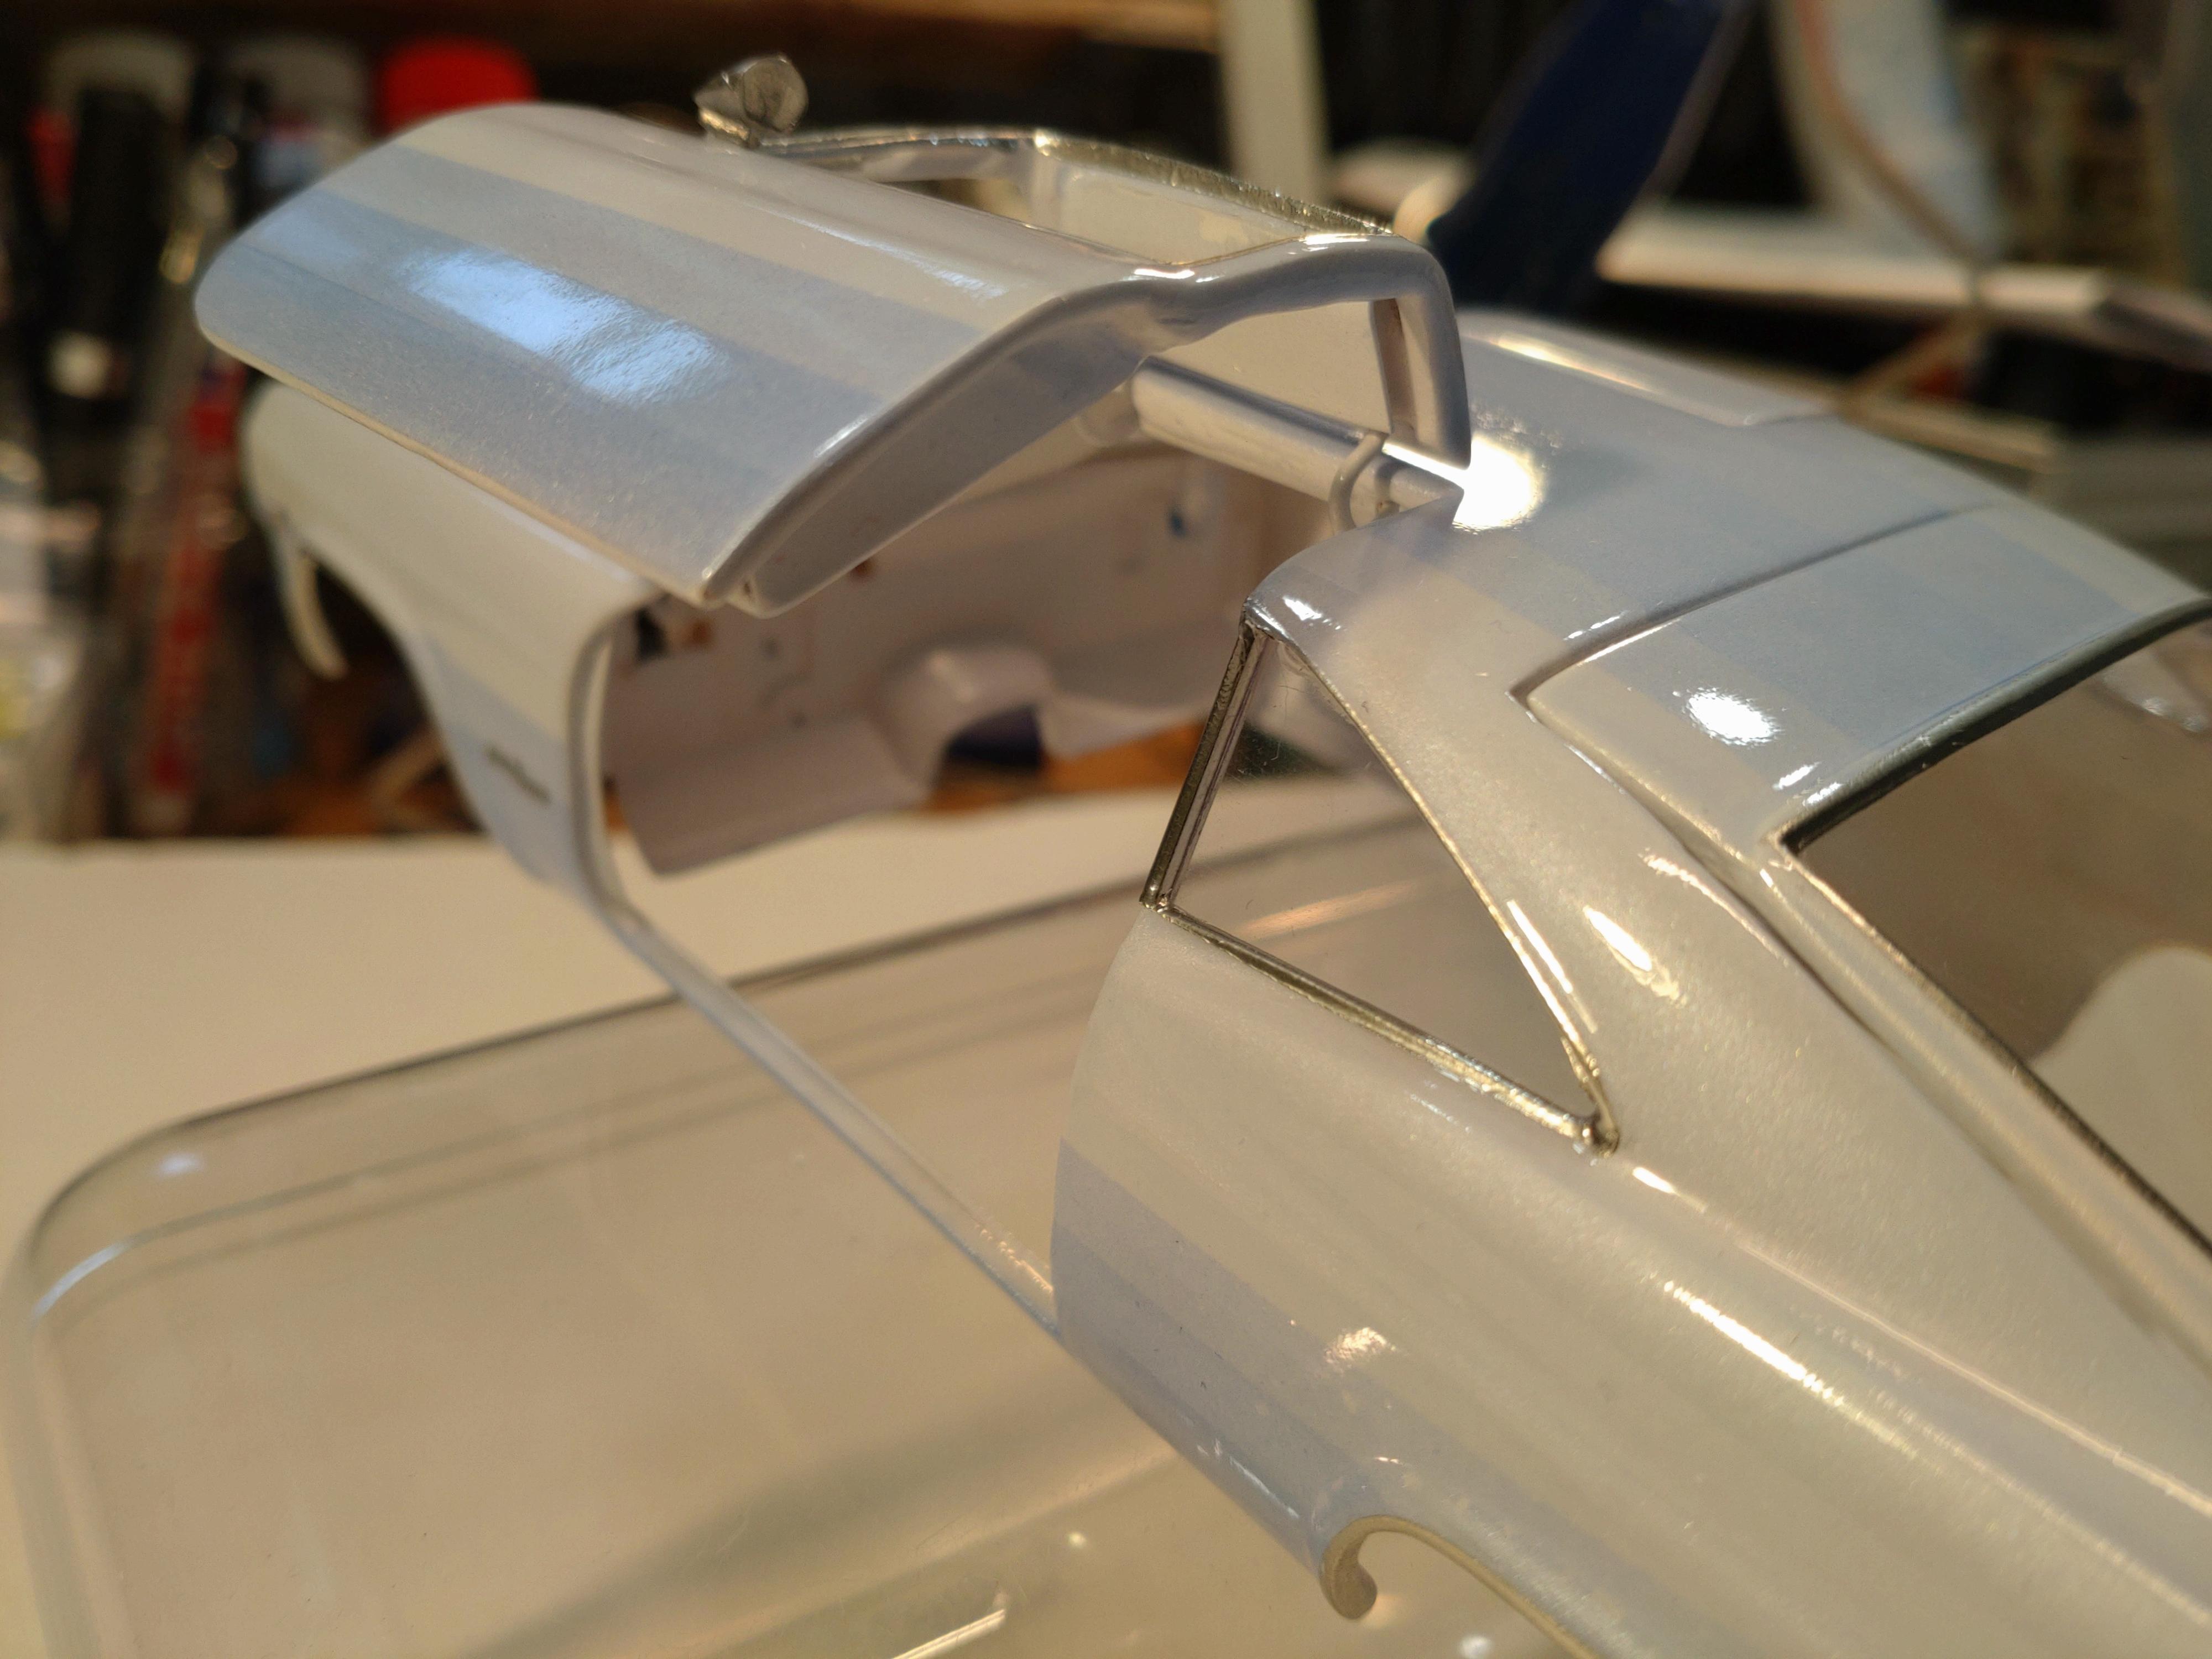
This was my longest build so far, and next to my happiness about the finished result, I do feel a bit exhausted too. I guess I bit off just about as much as I could chew😅. This is the Revell Impala in the Foose custom edition. The kit contains basically a stock Impala, but you get some extra Foose goodies to enhance your build. I was out to put as much show car flash into my build as I was able to and came up with some ideas that were a challenge. First getting the gull wings stable and working. Next that huge tailgate and finally the sliding swivel seats. On a white base coat I sprayed an light ice blue metallic. The fading stripes over the length of the top and over the rockers were a step by step job. After laying several strips of masking tape side by side, I started by spraying the middle stripe with a thin layer of medium blue metallic. Then taking off the next tape stripes working my way to the sides. Each time spraying only a thin layer of the same blue metallic. The layers build up in the middle but the outer (or upper) stripes stay lighter. After the BMF and decal work the body got 2 layers of AK clear varnish. The wheels, disc brakes, mirrors and head lamps are from Scale Production. I cut out the middle part of the grill and inserted a crafted grill made of .5mm brass rods embedded in U-shaped brass rods at the sides. Just gluing the window posts to the roof and door piece didn´t hold good enough to keep the together. I finally decided to connect the posts with .5mm brass rods and that ended my worries. I am still very careful opening the doors, but after all the sanding and handling they haven´t failed yet so I can stay cool now. My next challenge was getting the seats to glide out and swivel. The seats are printed second market and only connected to the slides with a metal peg. The slides are made of rectangular styrene tubes gliding on a brass rod. I can pull out each seat and turn them to the side. A B-pillar for the second row windows seamed logical to me. A 1/1 car would probably need them to get the doors weather tight. A show car like this needs a heavy sound system to impress the audience. The printed speakers come from Scale Production. Instead of a simple trunk I decided to cut the tailgate in one big piece. Like in real they needed "hydraulic" pistons to keep them up in place. These I fabricated from a .5mm rod in a 1mm brass tube. The trunk and the cabin floor are flocked in a light sand. The dash is enhanced with wire rings around the gauges and a key chain. I was able to use some Foose parts for the engine. I gave the engine my favorite detailing but wanted to bring in another wild idea. I love those trumpet shaped intake pipes, but on this build I didn´t want to cut open the hood or give it a scoop. I made the air filter box out of a styrene piece an inserted the pipes on the sides. In the end it just barely fits under the closed hood. The pulley/belt system was more work than usual, since this engine has three belts for three satellites. Each is connected to the block with a 1mm brass rod to pick up the tension from the rubber belt. The engine bay received some extra detailing and now looks as crammed as a real one. I enhanced the undercarriage with brake and fuel lines and the parking brake cables. There is a WIP thread about this build, but I had upload issues with this forum about half way. You can still see the body and interior work though. I hope you like my build😊 I would be pleased if you would watch my video at: https://youtu.be/tLgMaEGZuog Thanks and best wishes! Andy
- 32 replies
-
- 16
-
-
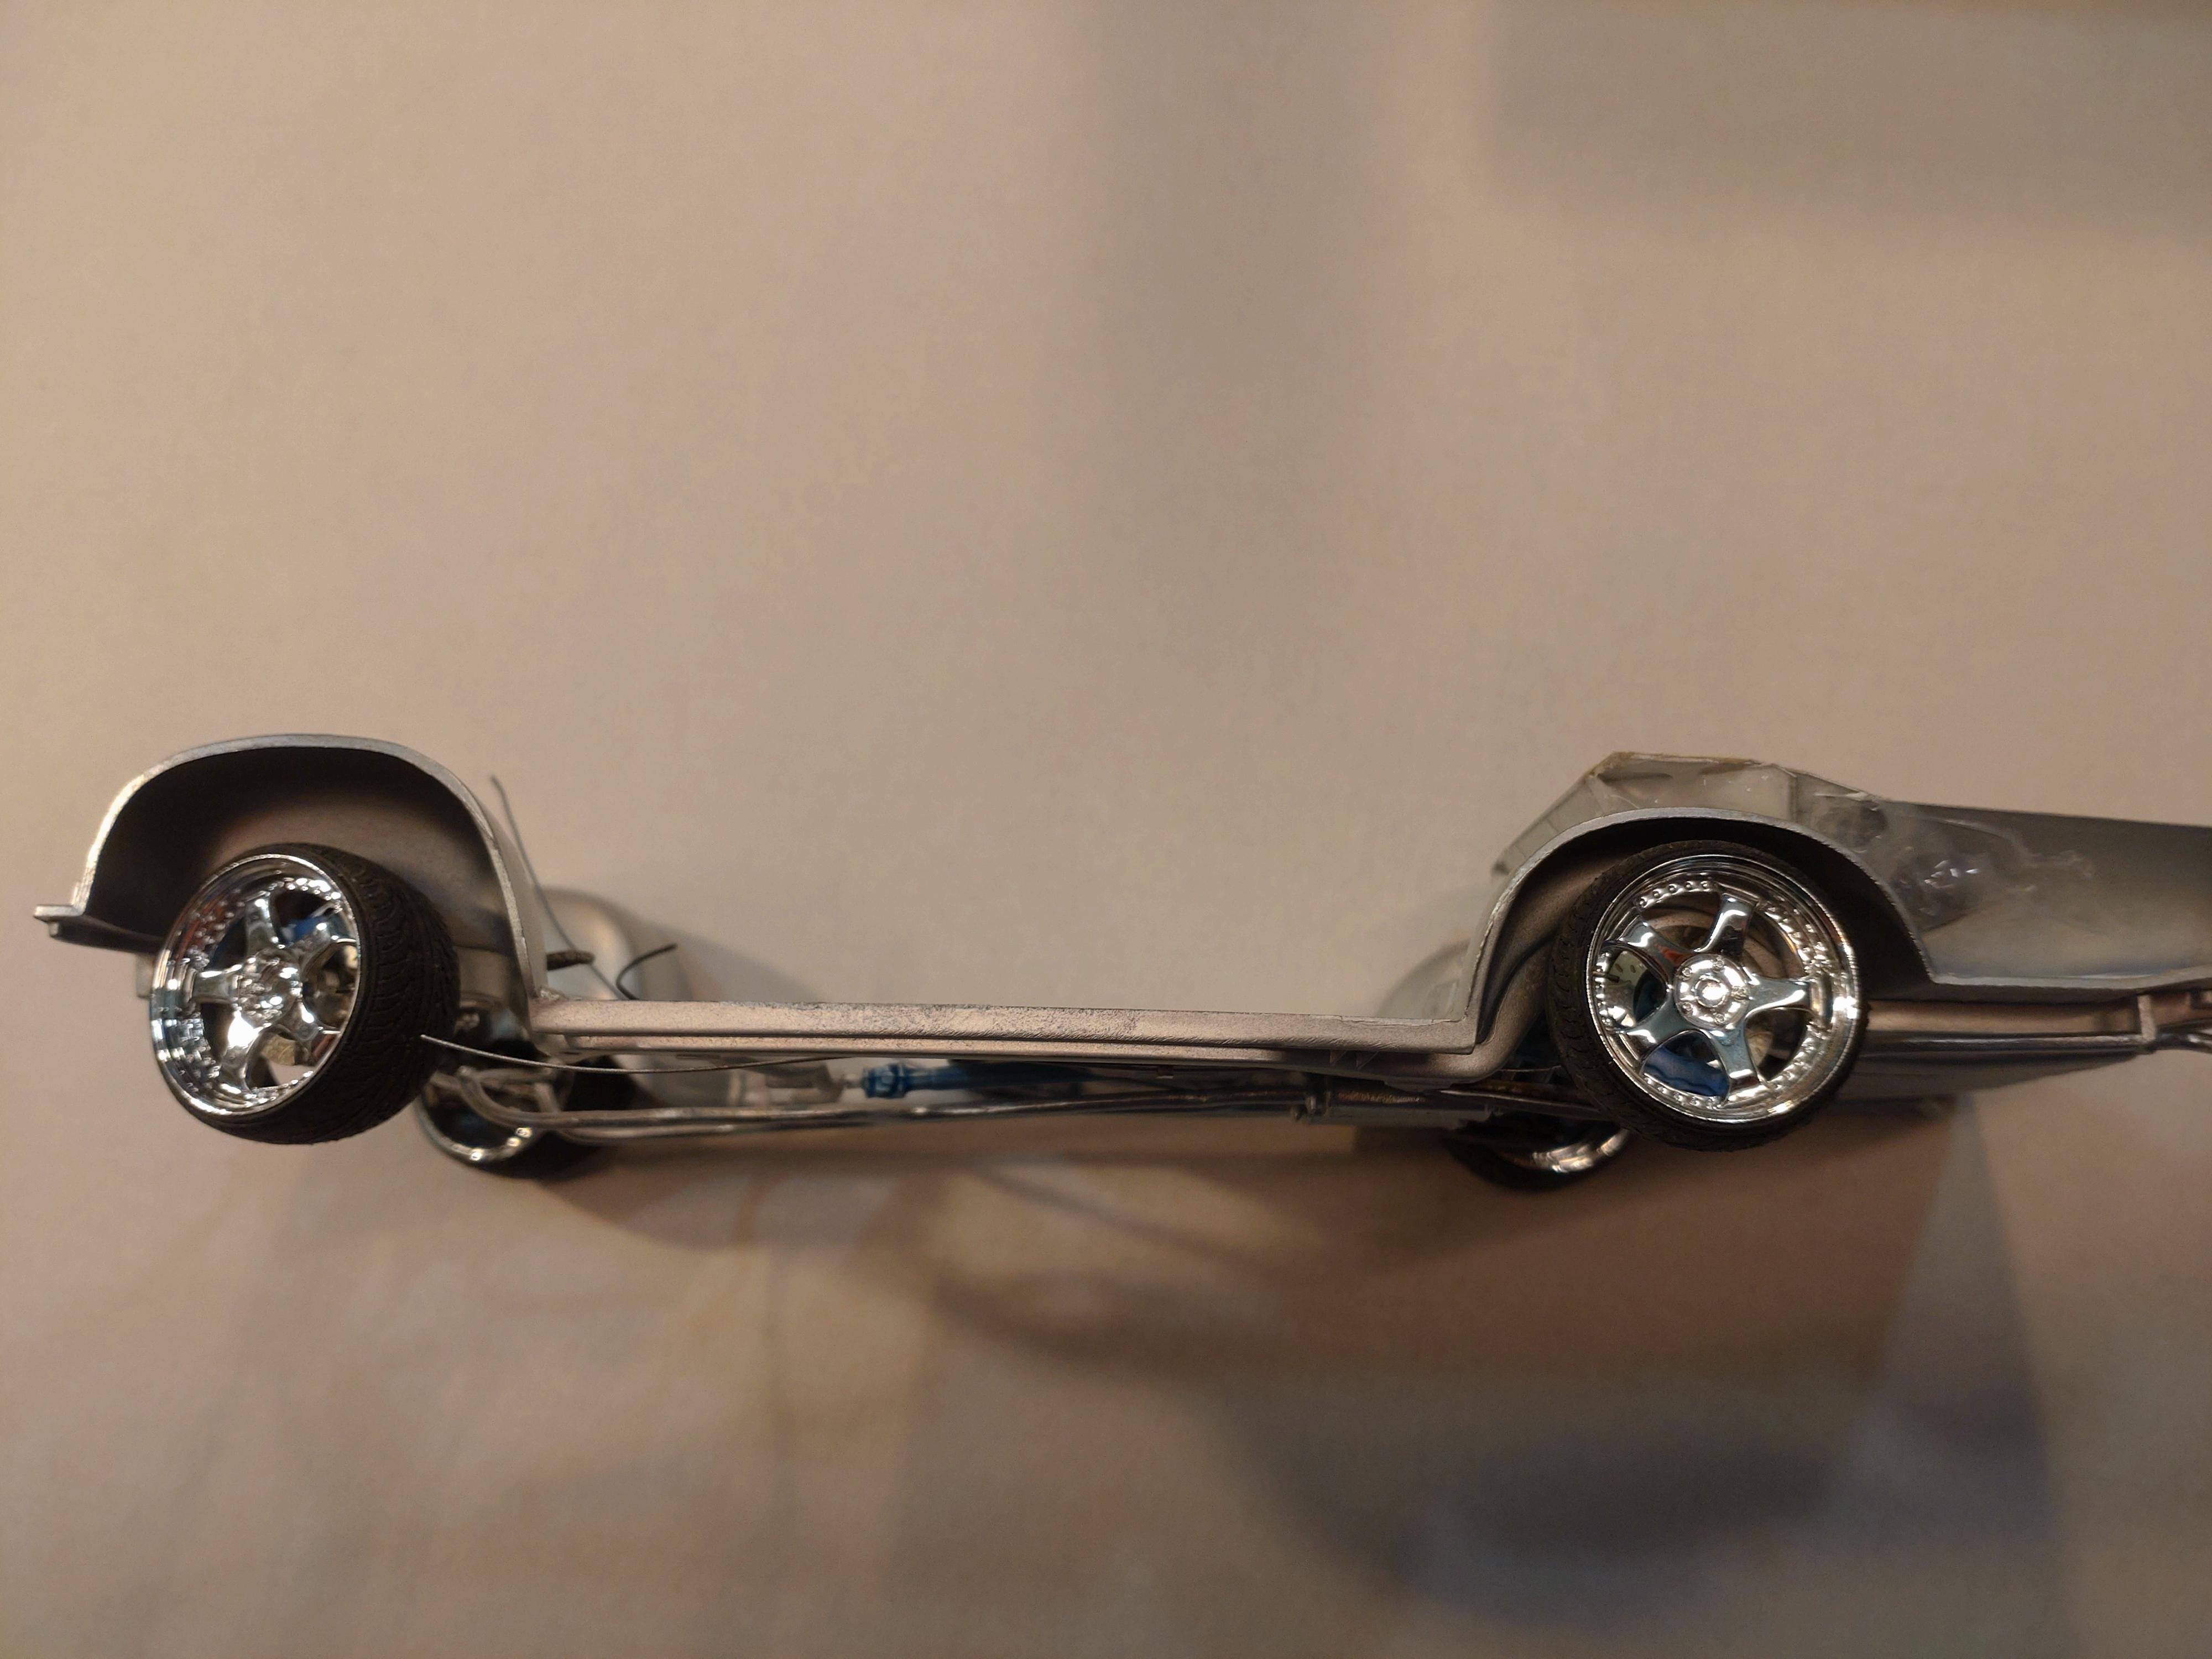
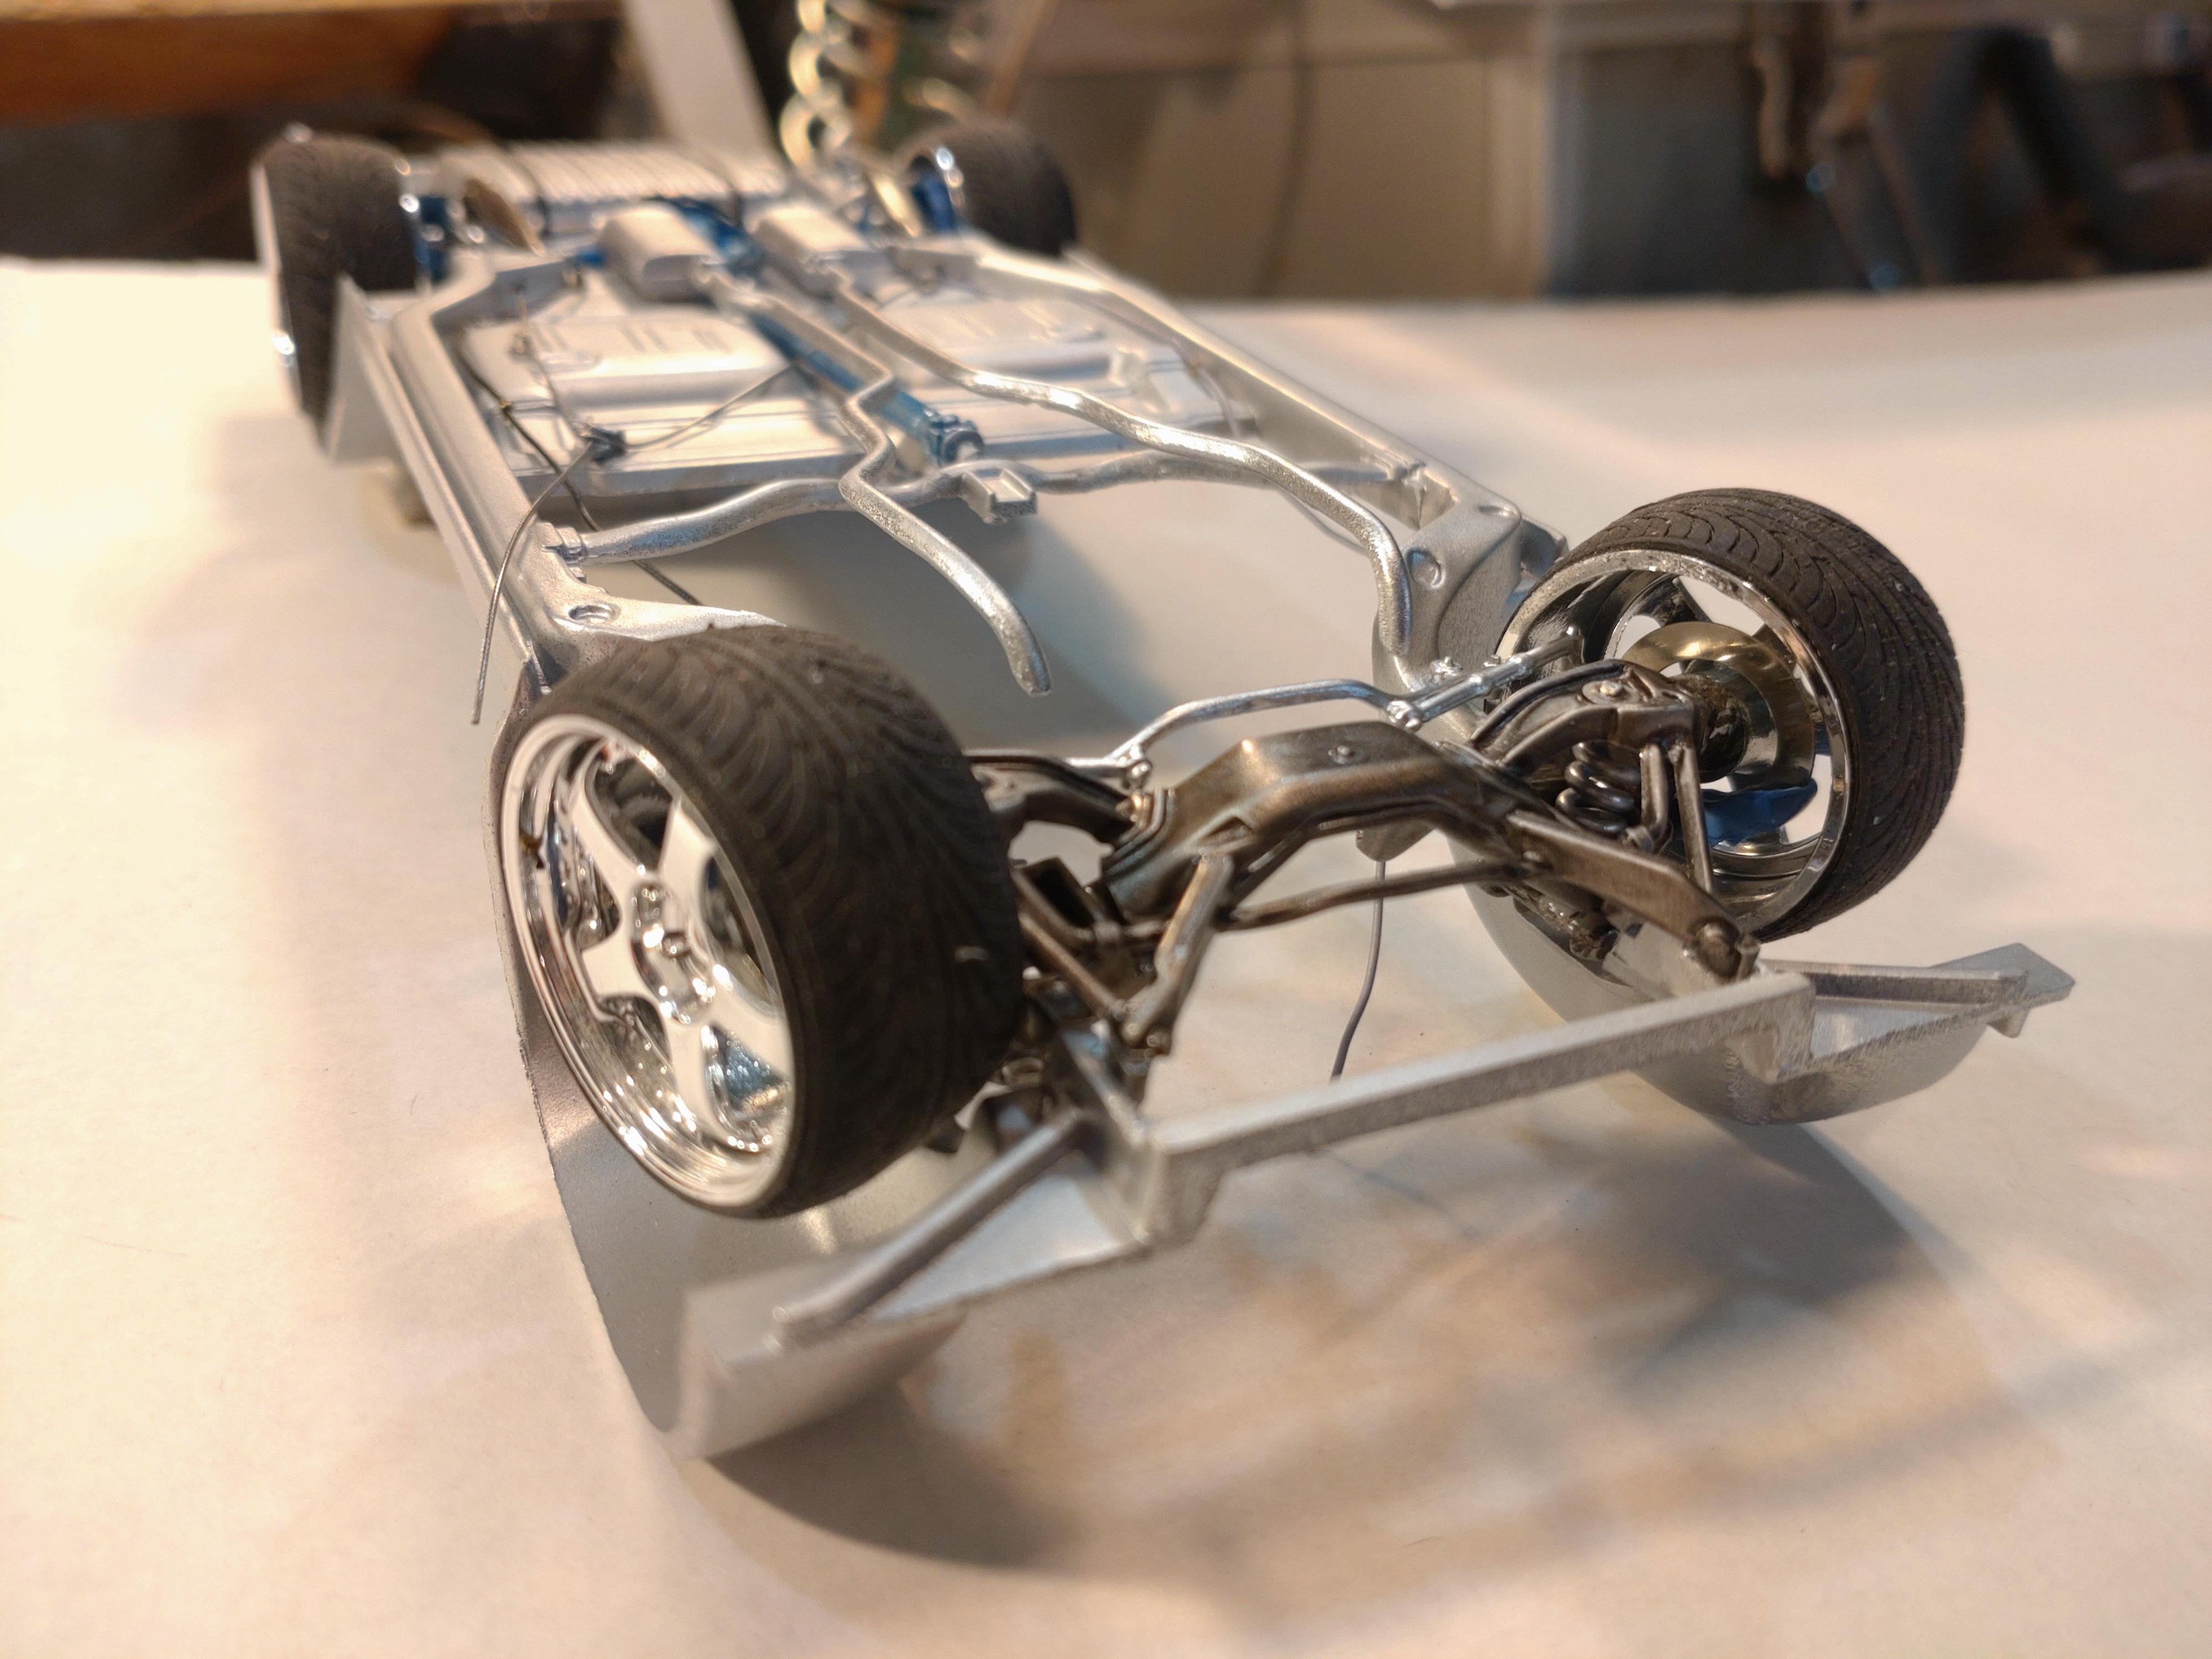
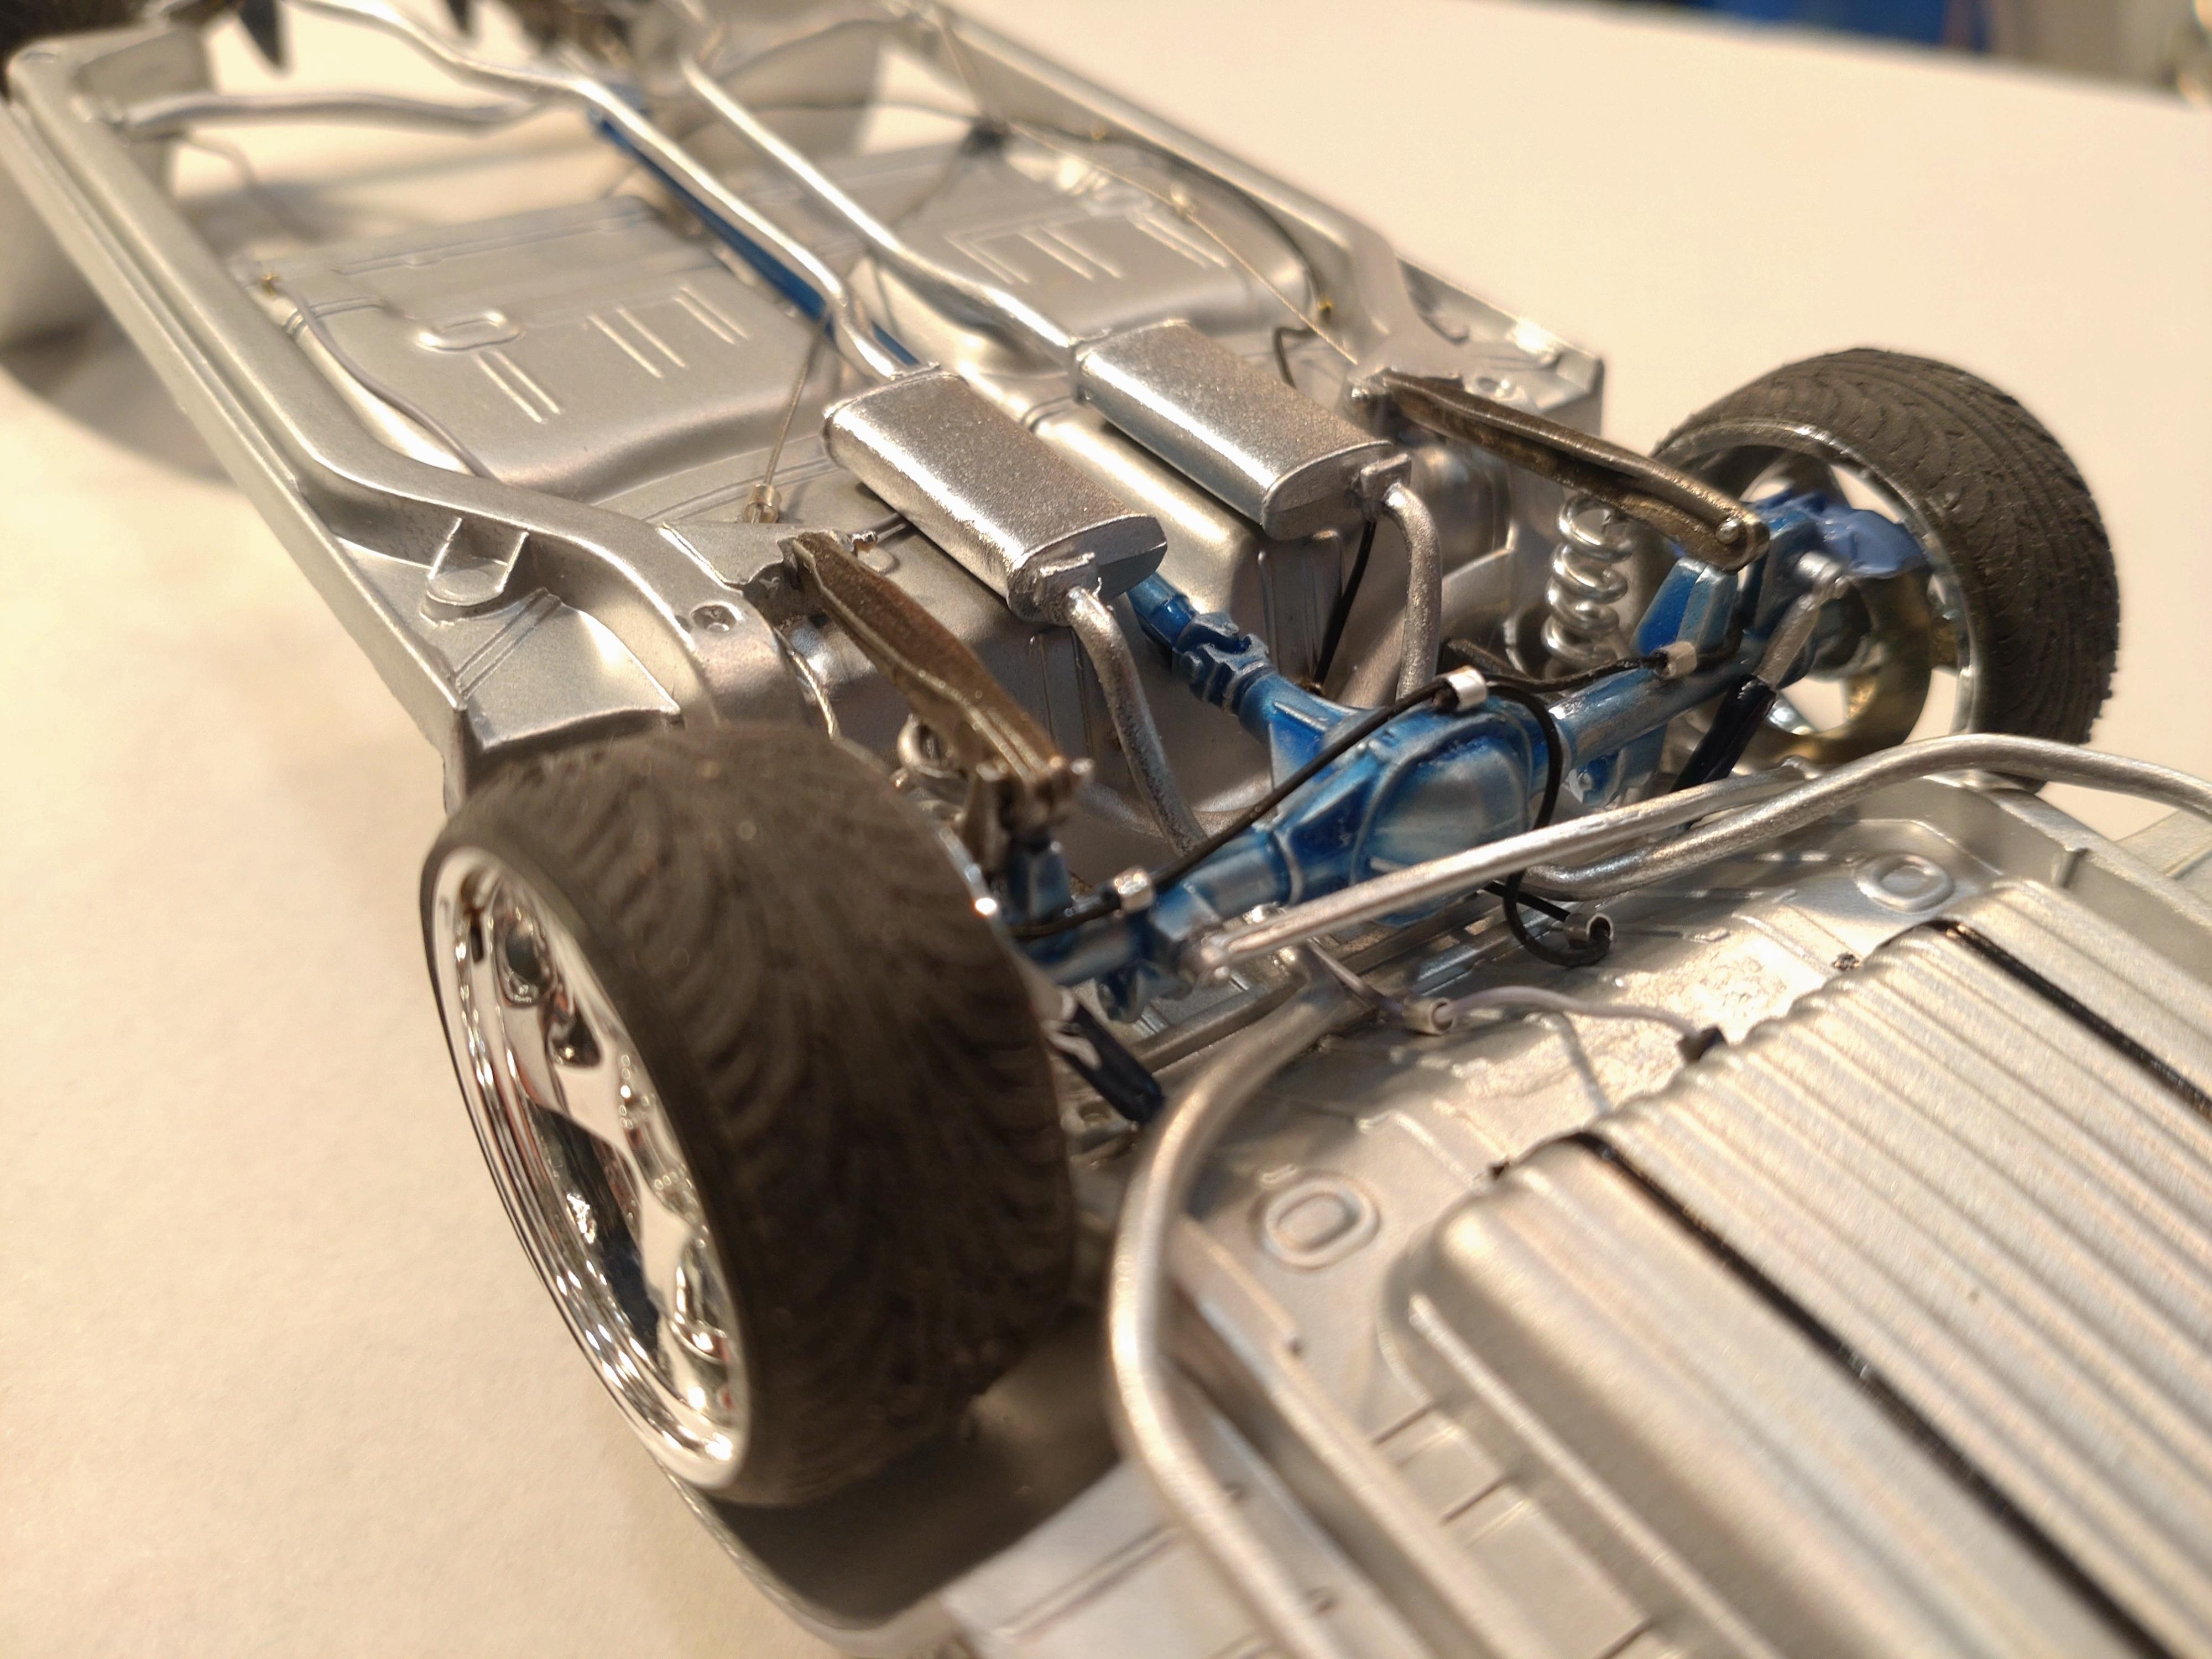
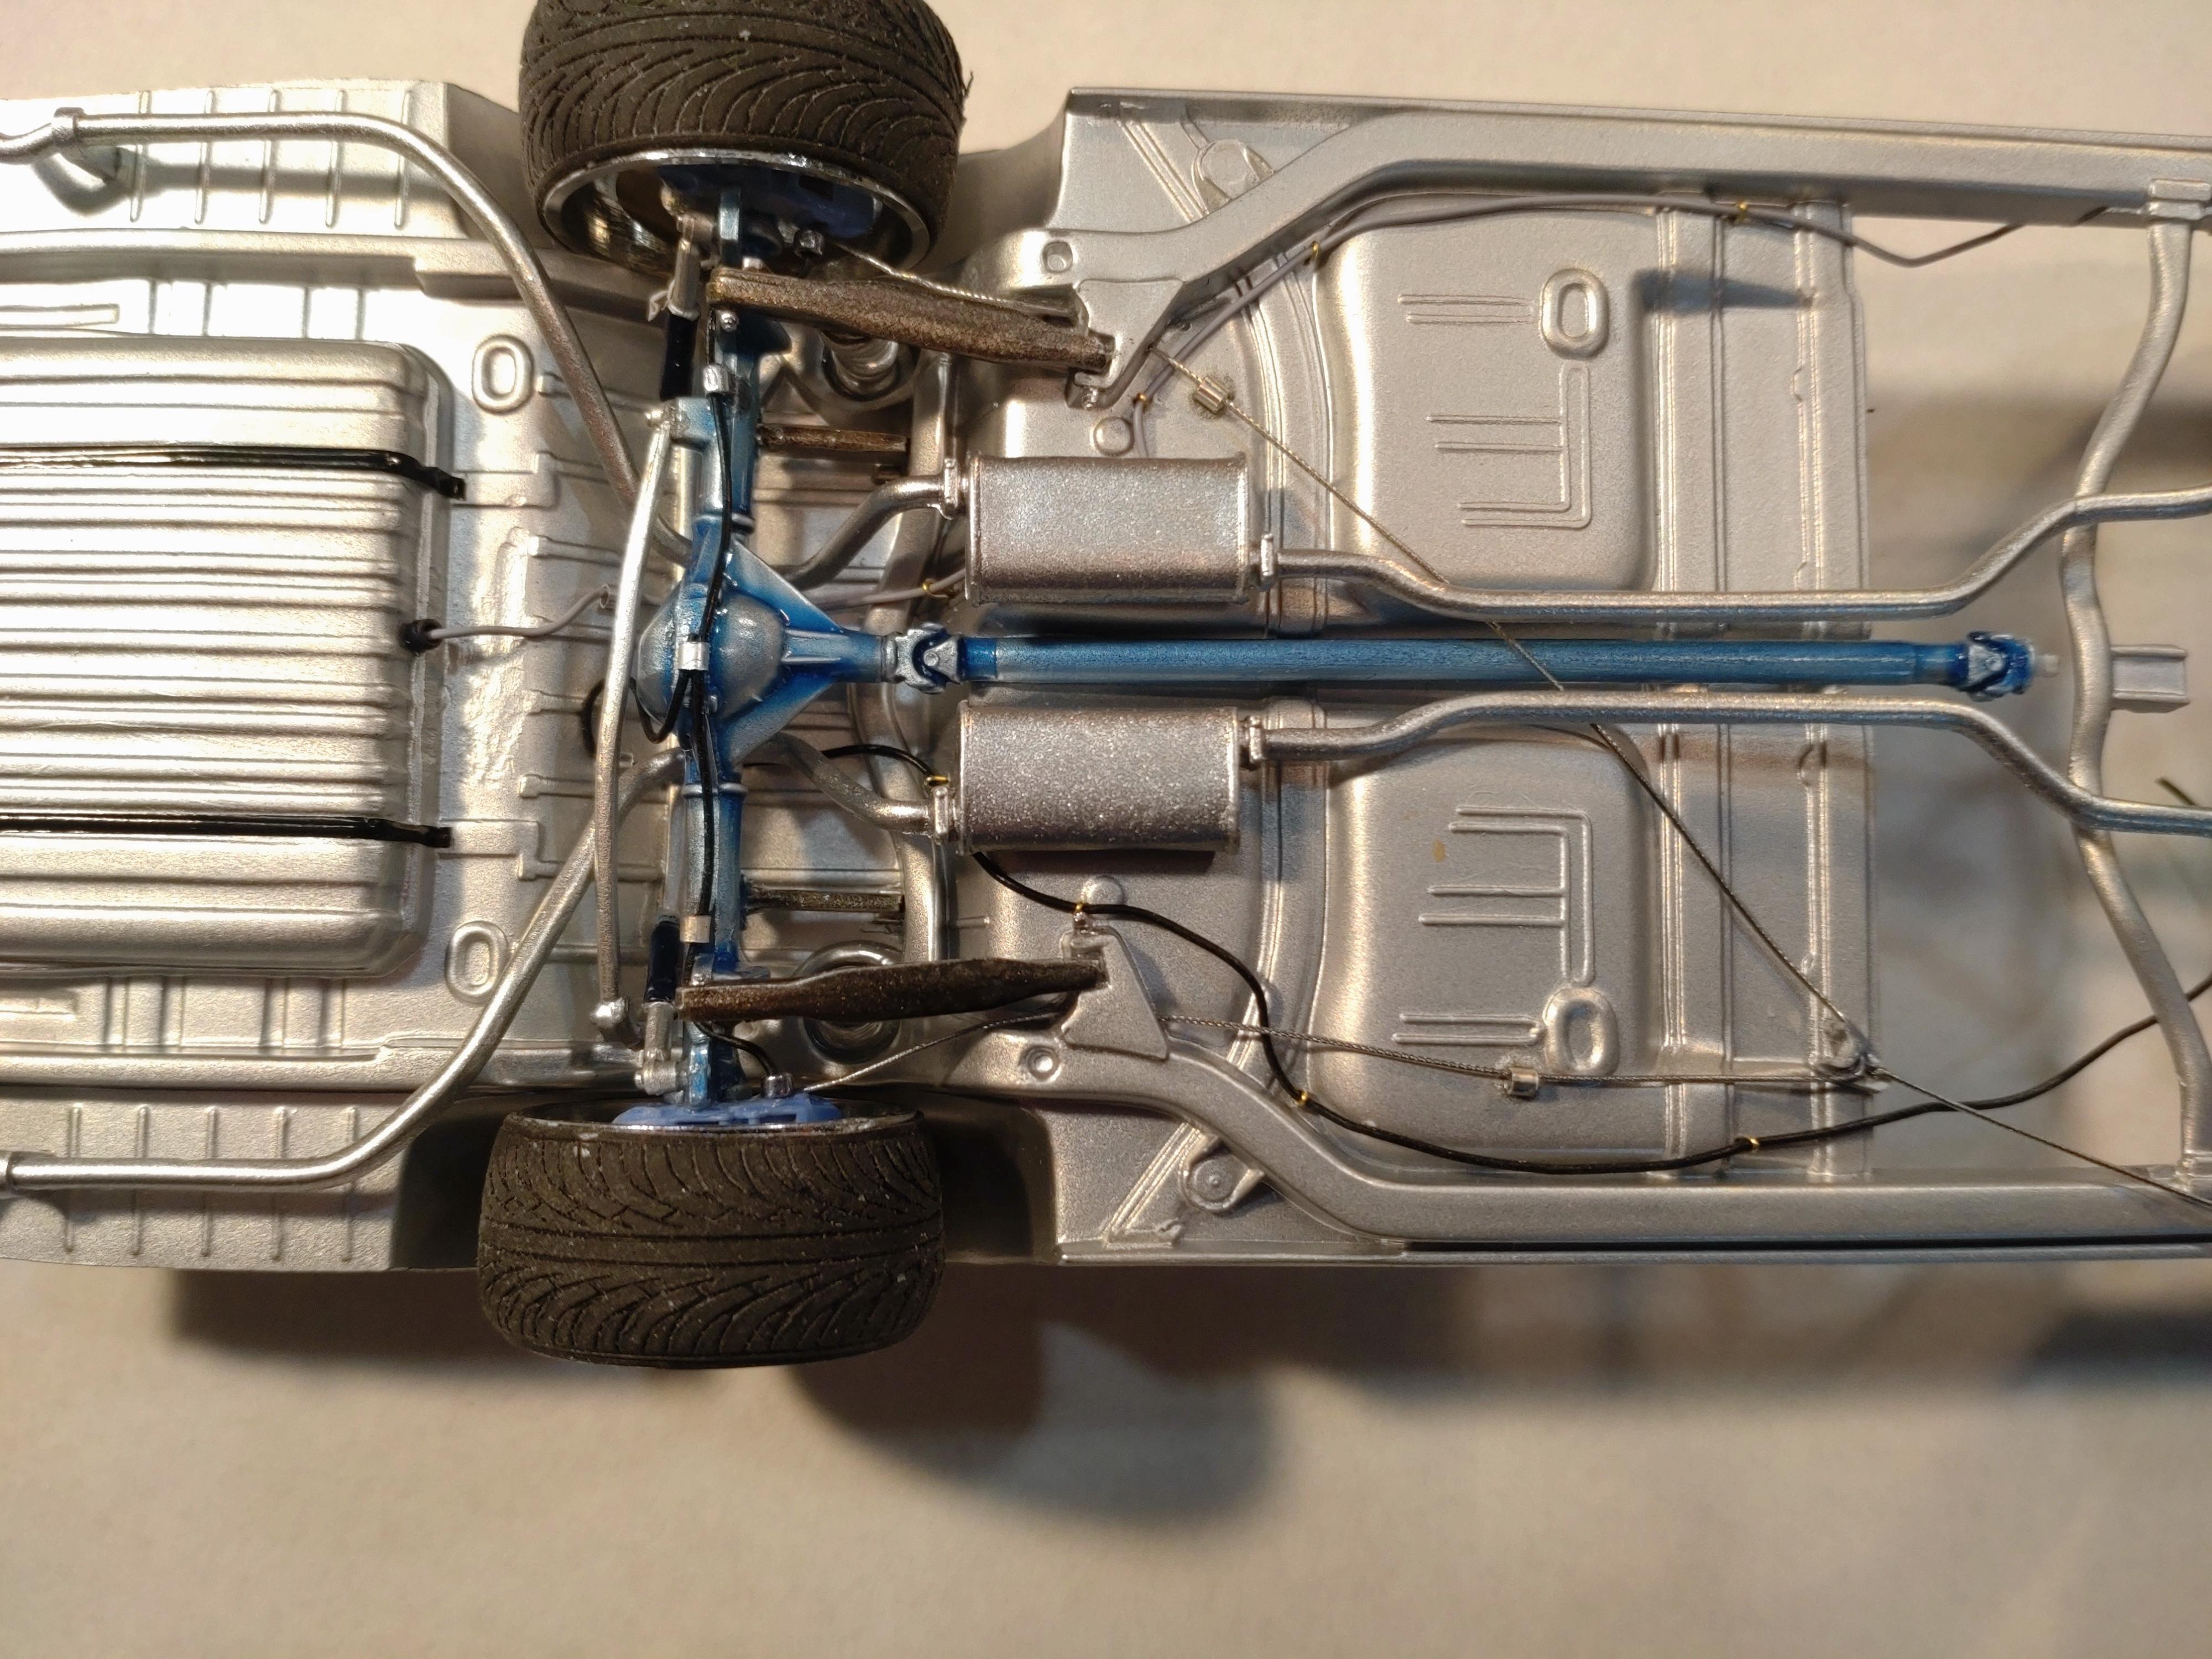
So now I have the chassis finished and so far, I have not made any major mistakes. (Well, actually ONE, which I will disclose later...) The undercarriage is sprayed in a silver metallic and I wanted to keep the bottom in a similar color code like the body. First job was to lay the fuel and brake lines. The parking brake is a very fine, vinyl coated cable usually used for fashion jewelry. Those tiny metal tubes are crimp beads, also from a crafts store specialized in fashion jewelry. Otherwise the line cables are connected to the chassis with .3mm florist wire. I loop the wire around the line and pull them through .8mm holes drilled into the bottom. After pulling them tight I just bend them flat on the top and secure them with super glue. I cut the "springs" off the suspension arms and replaced them with springs bent from 1mm aluminum wire. The silver primed axle and drive received a layer of transparent blue, before I attached the brake lines, the disc brakes and calipers. These are from Scale Production, same as the wheels. The kit contains a nice set of "Foose" custom wheels, but I will keep them for a future project. Connecting second market wheels usually ends up in some custom crafting. Sometimes I use wire pins, sometimes I have to incorporate short styrene tubes as spacers to bridge a gap. In this case the wheels just happened to fit right on to the axle, glued with epoxy. Where it makes sense I attached a few printed hex nuts to the suspension system for added detailing. The front suspension and steering did not need so much customizing. I did replace the plastic kit springs with wire springs and I was able to glue the brake calipers with super glue. My plan to give the wheels a slight steer meant cutting off the knuckles and gluing them into the correct angle (remember I have the steering wheel already set). So I checked out the correct setting at least ten times, and now guess what Andy did wrong? 🤔😲🫣😖 Jup, I messed it and glued it in the wrong direction and didn´t notice it until it was kind of too late, with the wheels attached 😅😂🤣 OK. you all know, but don´t tell my friends. With the wheels attached (the low profile tires really help a lot), this build will get a low stance. I might show a mock up with my next post. Now it´s time to start with the engine. Thanks for taking a look!
-
Hi Joe and Rich, you make me blush🫣🤗 Thanks for your friendly remarks!
-
Hi Chris, Sonny, Carl and Greg, thanks for your friendly response! 🙏 Ah well, it is a lot of work. But I rather take my time and let it take as long as necessary. I TRY(!) not to rush my builds, as I did a few years ago when I started. Afterwards I discovered all my flaws😖 You might know that feeling; working on a kit for several weeks..... AND STILL NOT FINISHED😆🤣 But patience rules!
-
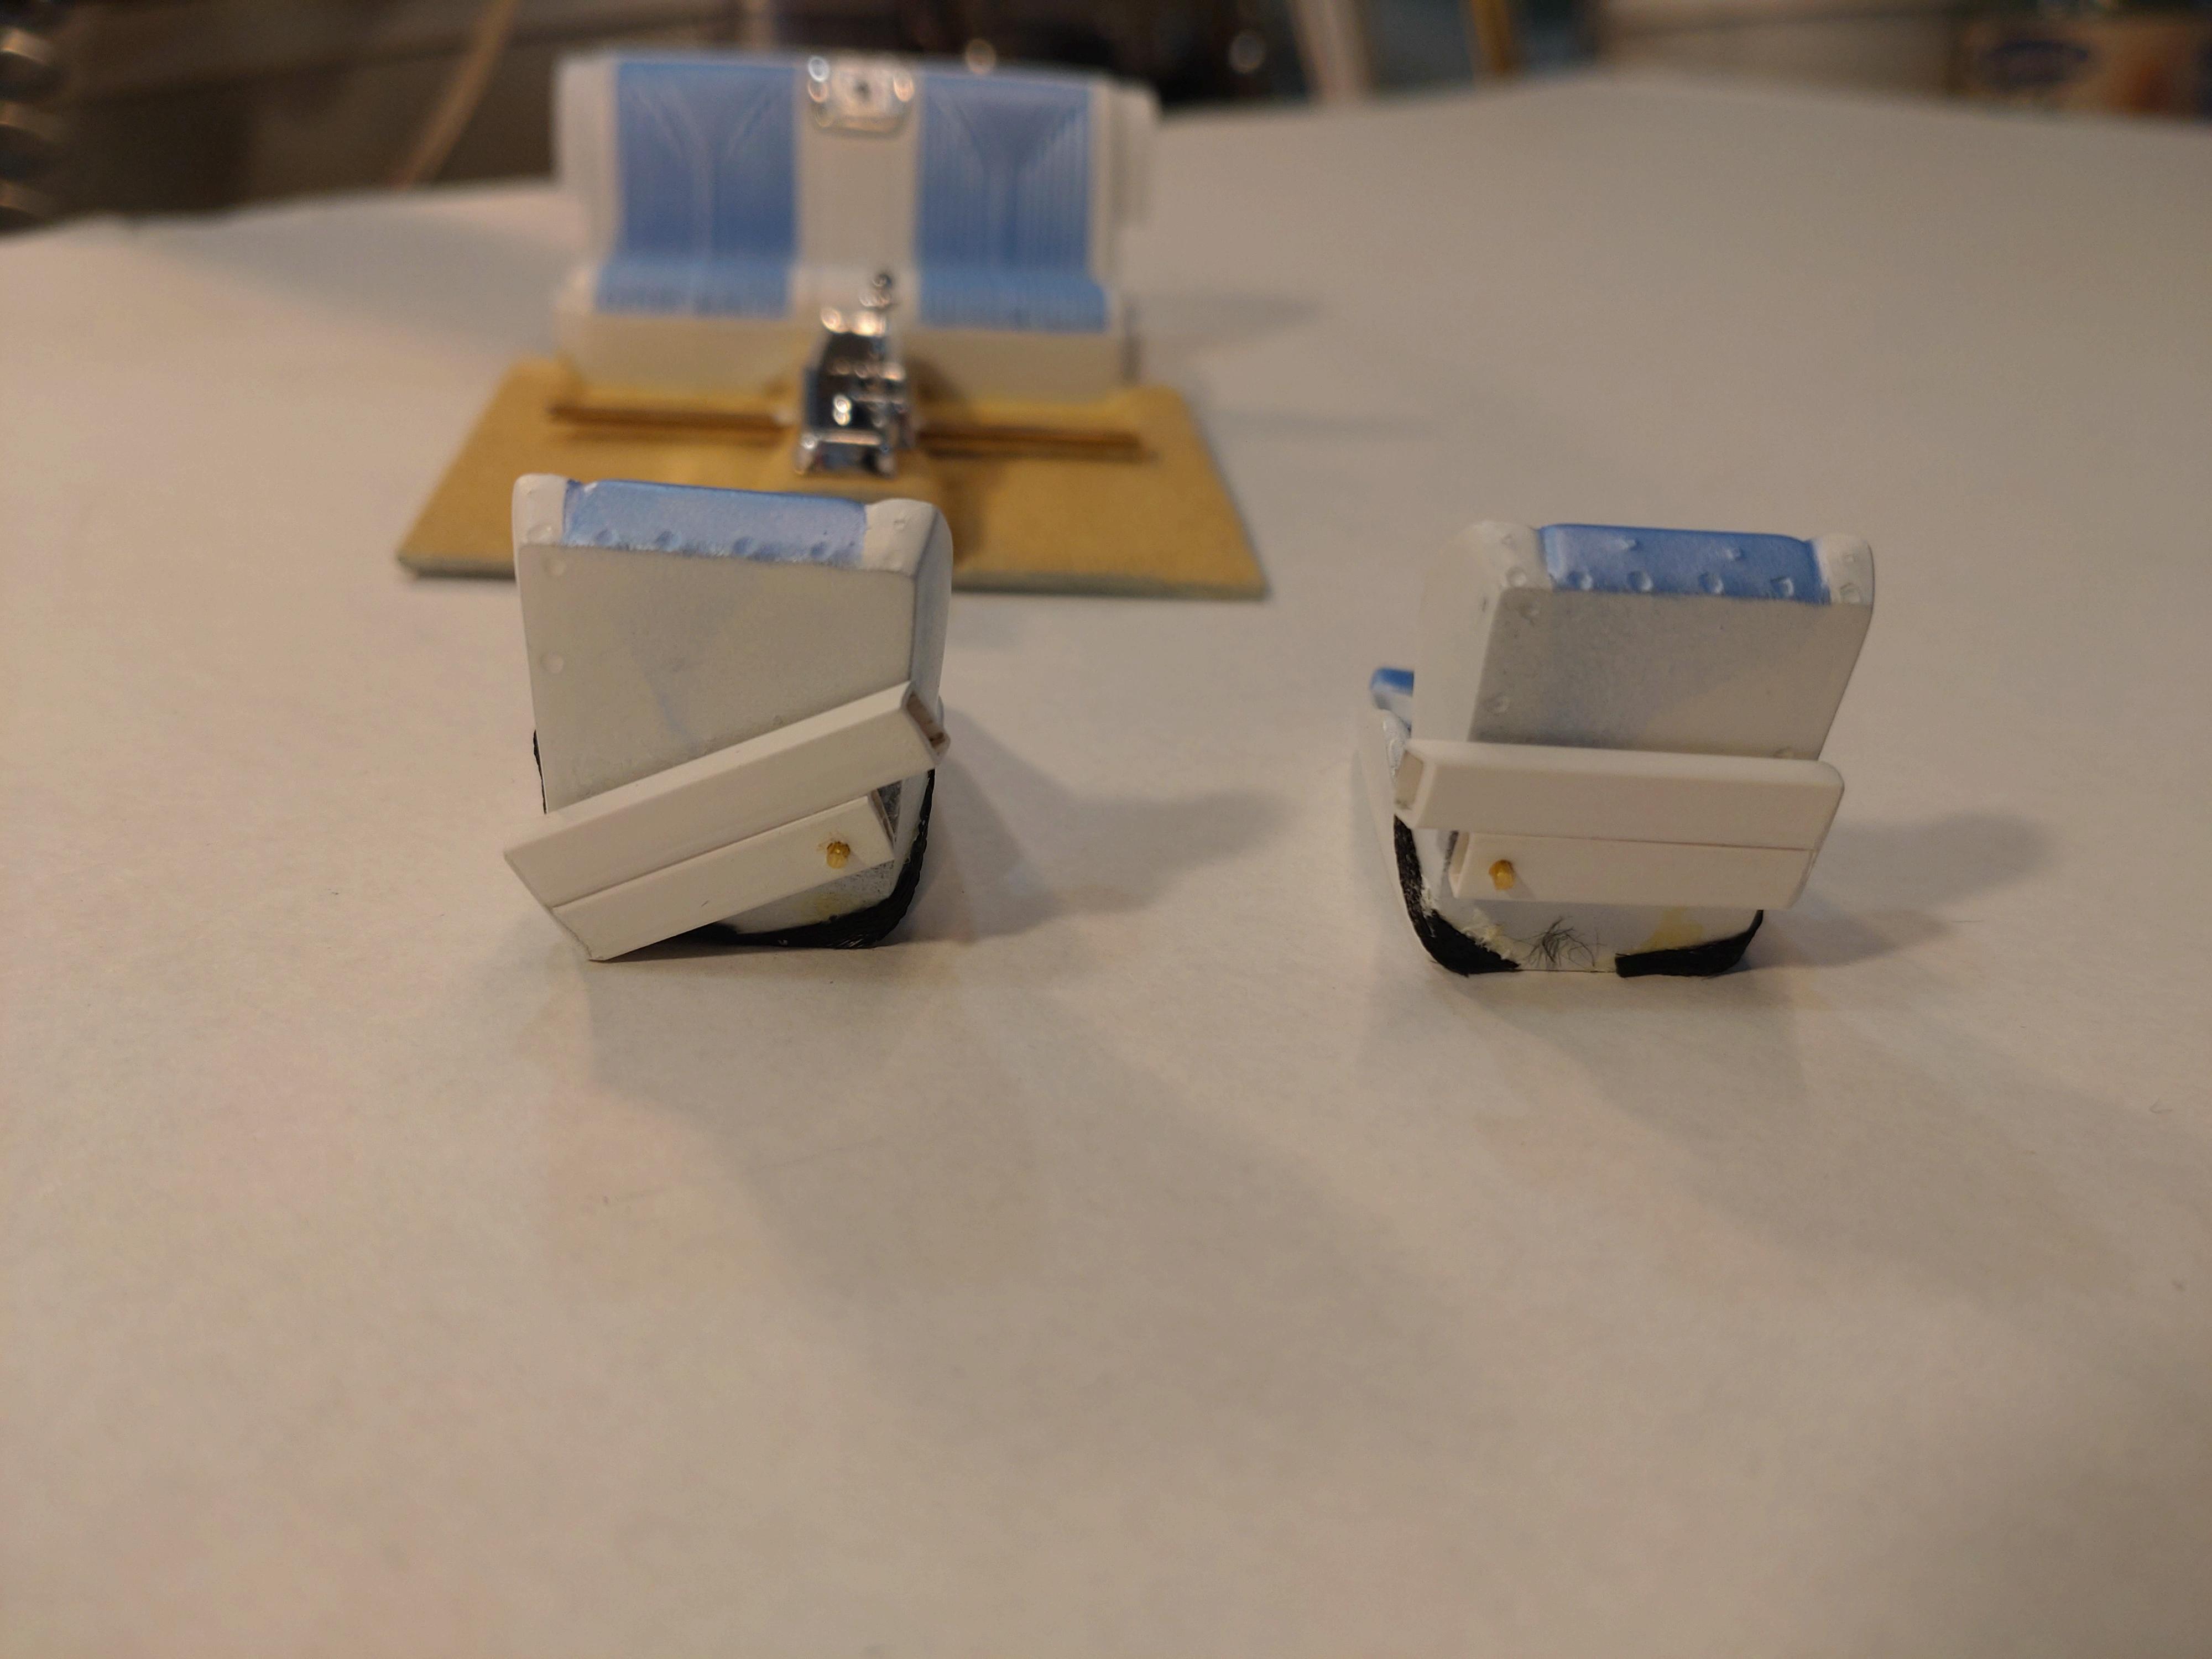
I´m finished with the interior. Just like the body, I wanted to try something new and had to figure out how to fabricate my ideas. The easy bit was getting a "BOSE" sound system into the trunk. The speakers are 3D printed by Scale Production, the amplifier is made out of styrene sheet and tubes. The floor is flocked in a sand color. To match the body I sticked to off white and light blue for the dash, doors and seats. The dash got a bit of extra details with wire rings around the gauges, a key chain and the extra pedal for the parking brake. The steering wheel is tipped to the left because I plan to attach the wheels accordingly. The door panels have a classic design, with some enhancing with BMF. The kit seats were replaced with racing buckets. These resin printed seat are also from Scale Production. My wish to make the seats slide out and swivel took a few days of mind pounding. I needed a solution that would build flat and easily move back and forth. Through the main tunnel I set a flat brass rod, glued under the tunnel with resin. The styrene sleds under the seats slide over this rectangular rod. To adapt the "hinge" I added a second rectangular tube. The seat itself is only connected to the sled with a 1mm brass peg. In the meantime I have painted the main brass rod white. The floor is flocked in sand just like the trunk. Here is how the sleds are made... The longer tube slides over the brass rod, the shorter tube is connected to the seat via the peg. The outside ends of the tubes are sealed with styrene. I hope I could explain this good enough. I case some questions arise, feel free the ask and of course feel free to copy! Best wishes and thanks for watching!
- 19 replies
-
- 10
-
-
-
It has been a while since I have last built a level 5 kit. This is the Revell "Foose Design" Impala. I really like the cars that Chip Foose builds and presents, but this one seems to be the stock Impala with special "Foose" parts added to the box. With so much detail already included, I had to think hard how to get my own flavor to the model. I am giving myself an extra challenge and wanted to do something I haven´t tried like this before. Call me crazy, but I am building real gull wing doors. Of course the nasty part is getting enough stability to the doors that they don´t break easy. Since this is a coupé, I added B-pillars and first tried it with styrene square bars. But the damn things would always break off at the roof or the door part. I was close to replacing the door´s A- and B-pillars with brass bars but on a last try I pinned every pillar in place with .5mm brass rods. And eureka, they held fast! I am not forcing my luck though, and will refrain from putting windows to the doors. With open "windows" I can grab the roof parts and carefully swivel the doors open. On a flat white base coat I sprayed an ice blue metallic. Then I masked the shadow stripes and worked my way from the middle to the sides, adding a very thin layer of light metallic blue step by step and peeling the next masking strip off. This way the first middle stripes build up color and get darker. Same thing with the sides, only here I worked my way from bottom to top. Clear coat is Molotov with the BMF and the decals protected under the final third layer. I created a big tailgate by cutting out the rear trunk with the complete window. The trunk will be filled with a fat sound system. Here you can see the extra B-pillar for the rear side window, a clear film used for the window. The door frames and the tailgate have received lips where possible and I tried to cover the tubes for the hinge wires as best as possible with sheet styrene. Here a view of the group of interior hinges and the sun visors. This will be a slow build. I have started with the interior tub, well, what´s left of it, and hope that another show idea will work as imagined. Thanks for watching!
- 19 replies
-
- 10
-
-
Hello Oliver, David, Michelle, Carl, Donato and Chris, thank you very much for your positive remarks! I hope you all had a very merry Christmas! Best wishes, Andy
-
Hello Larry, Tom, Glen, david, David, Steve, Dan, Nathan, Harry and Jeff, many THANKS for your enthusiastic response! Makes me happy🤗 I did forget to mention that I chopped the roof by about 6mm, needing to extend it in the middle to fit. That was when I decided to cut off the vent triangle frames. The windshield took some time to fit in properly in the aftermath because its curve didn´t match so well. Best wishes for Christmas!
-
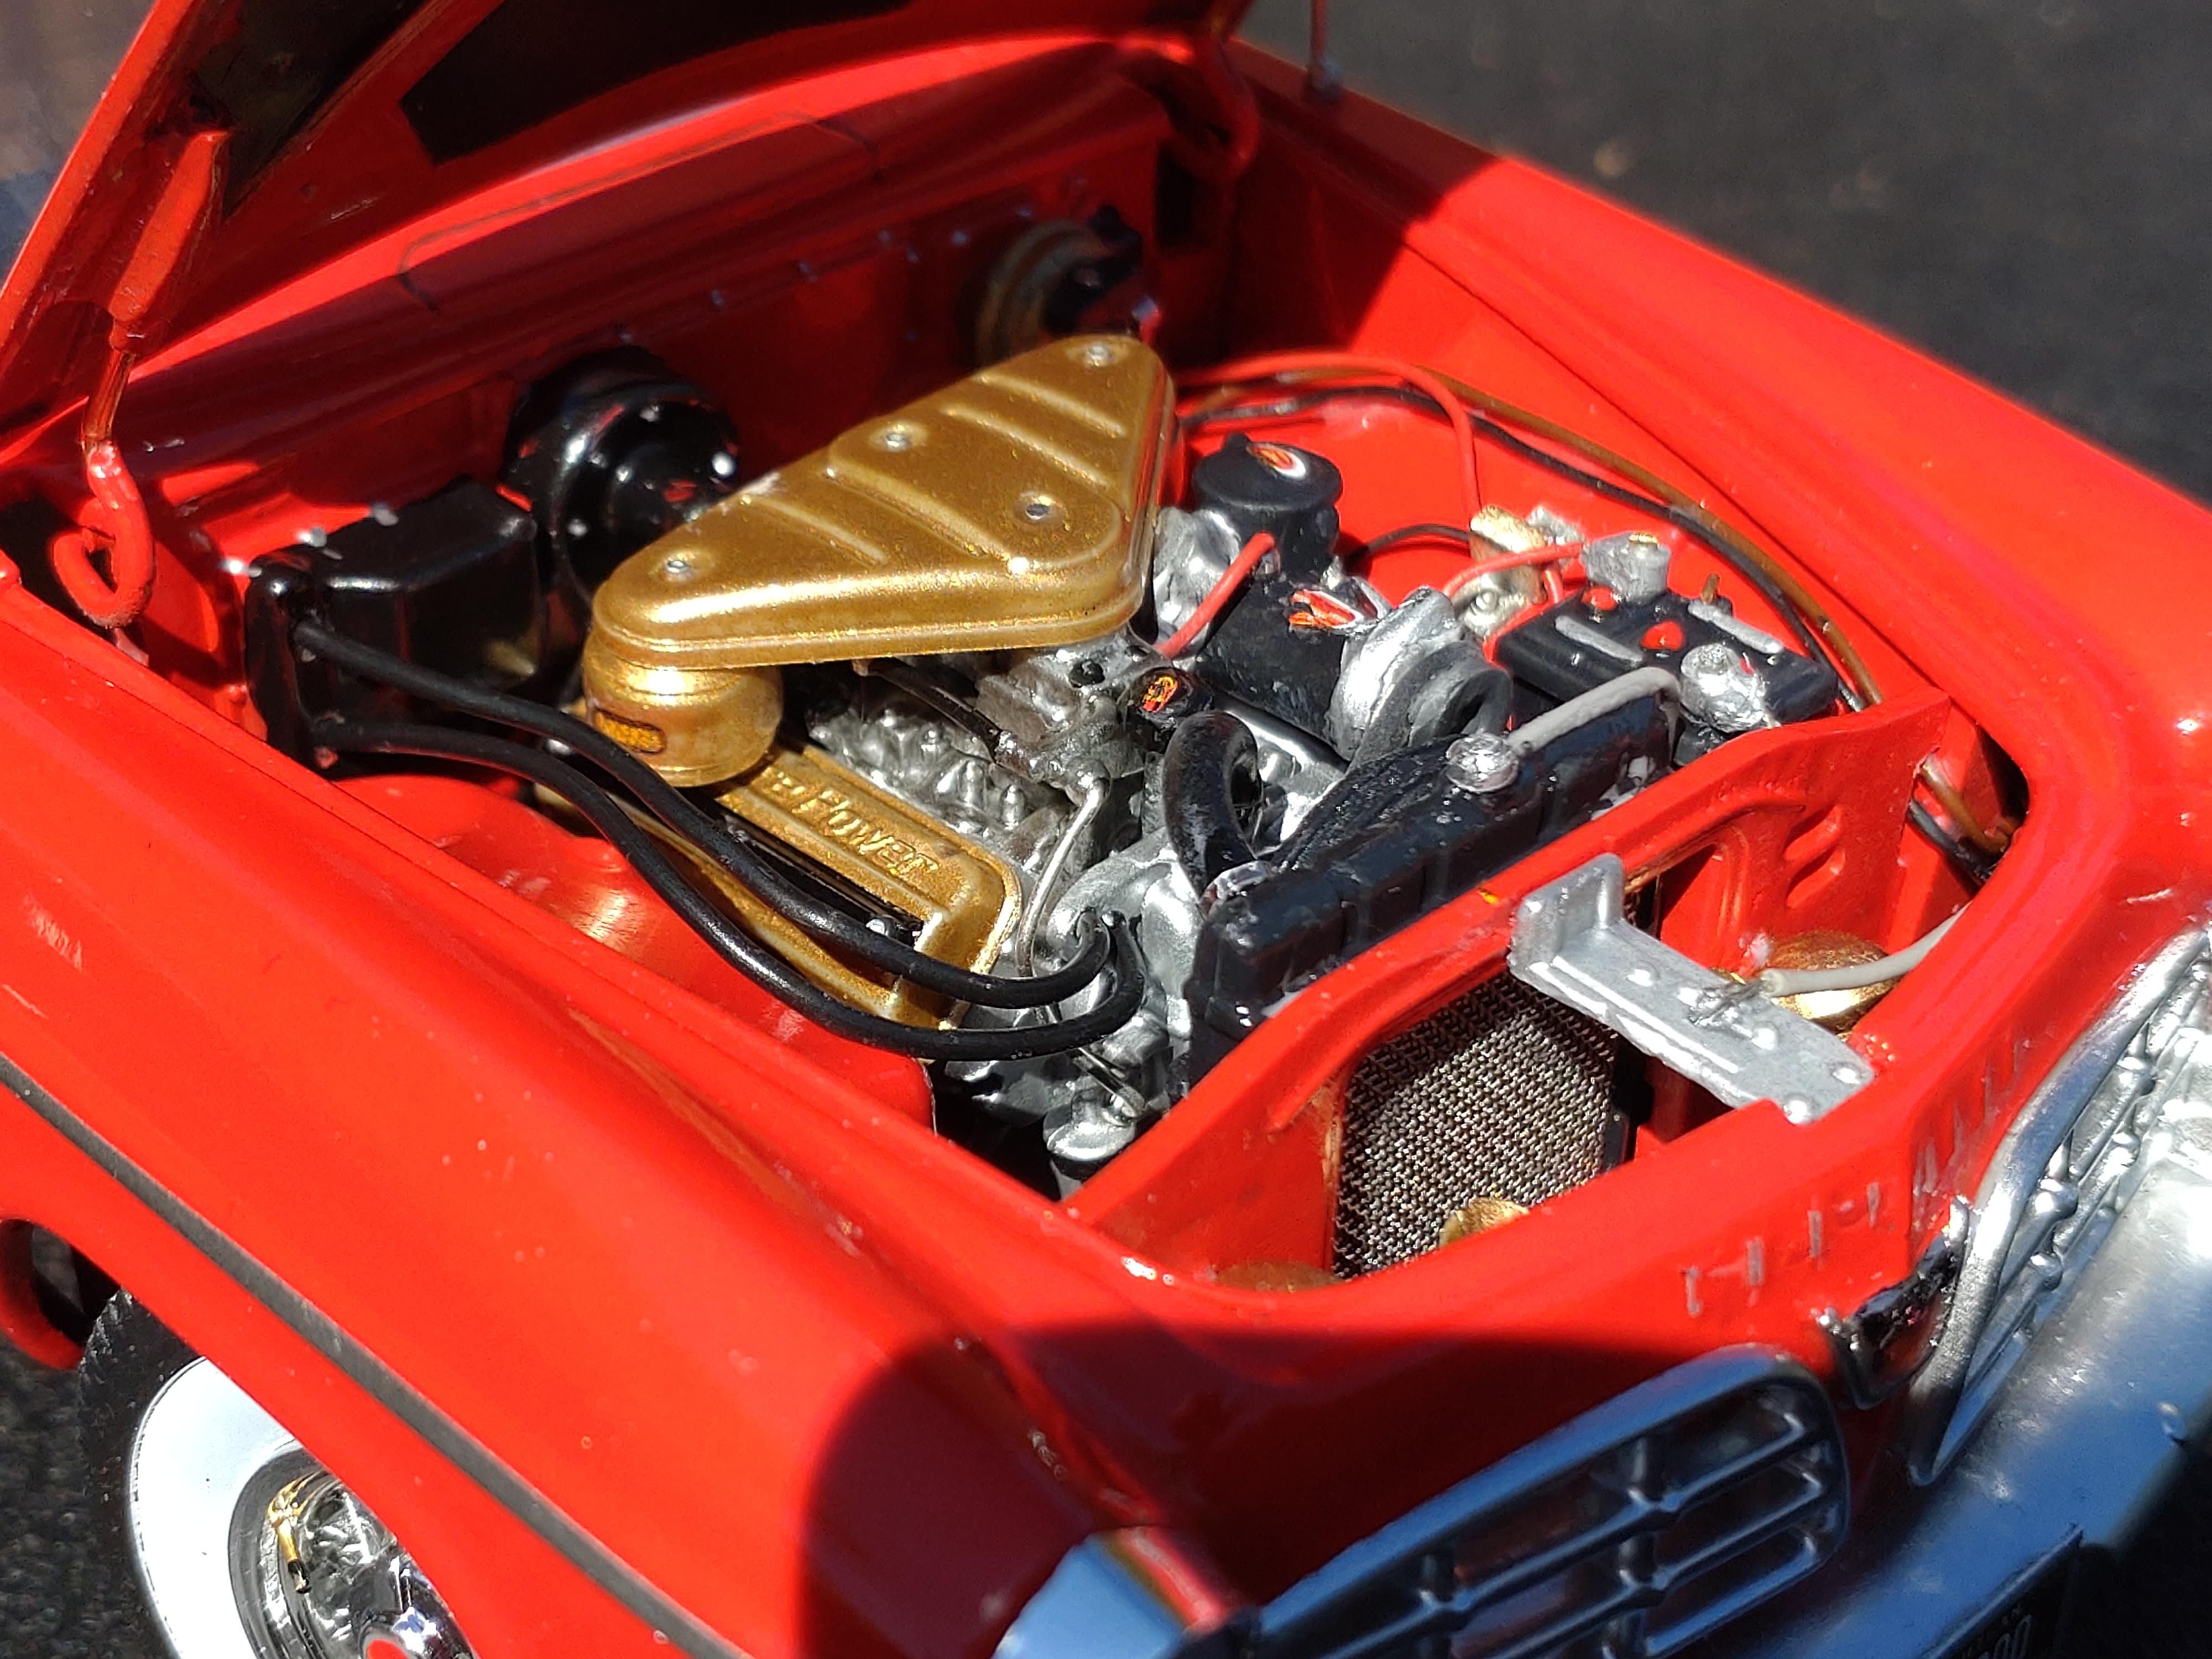
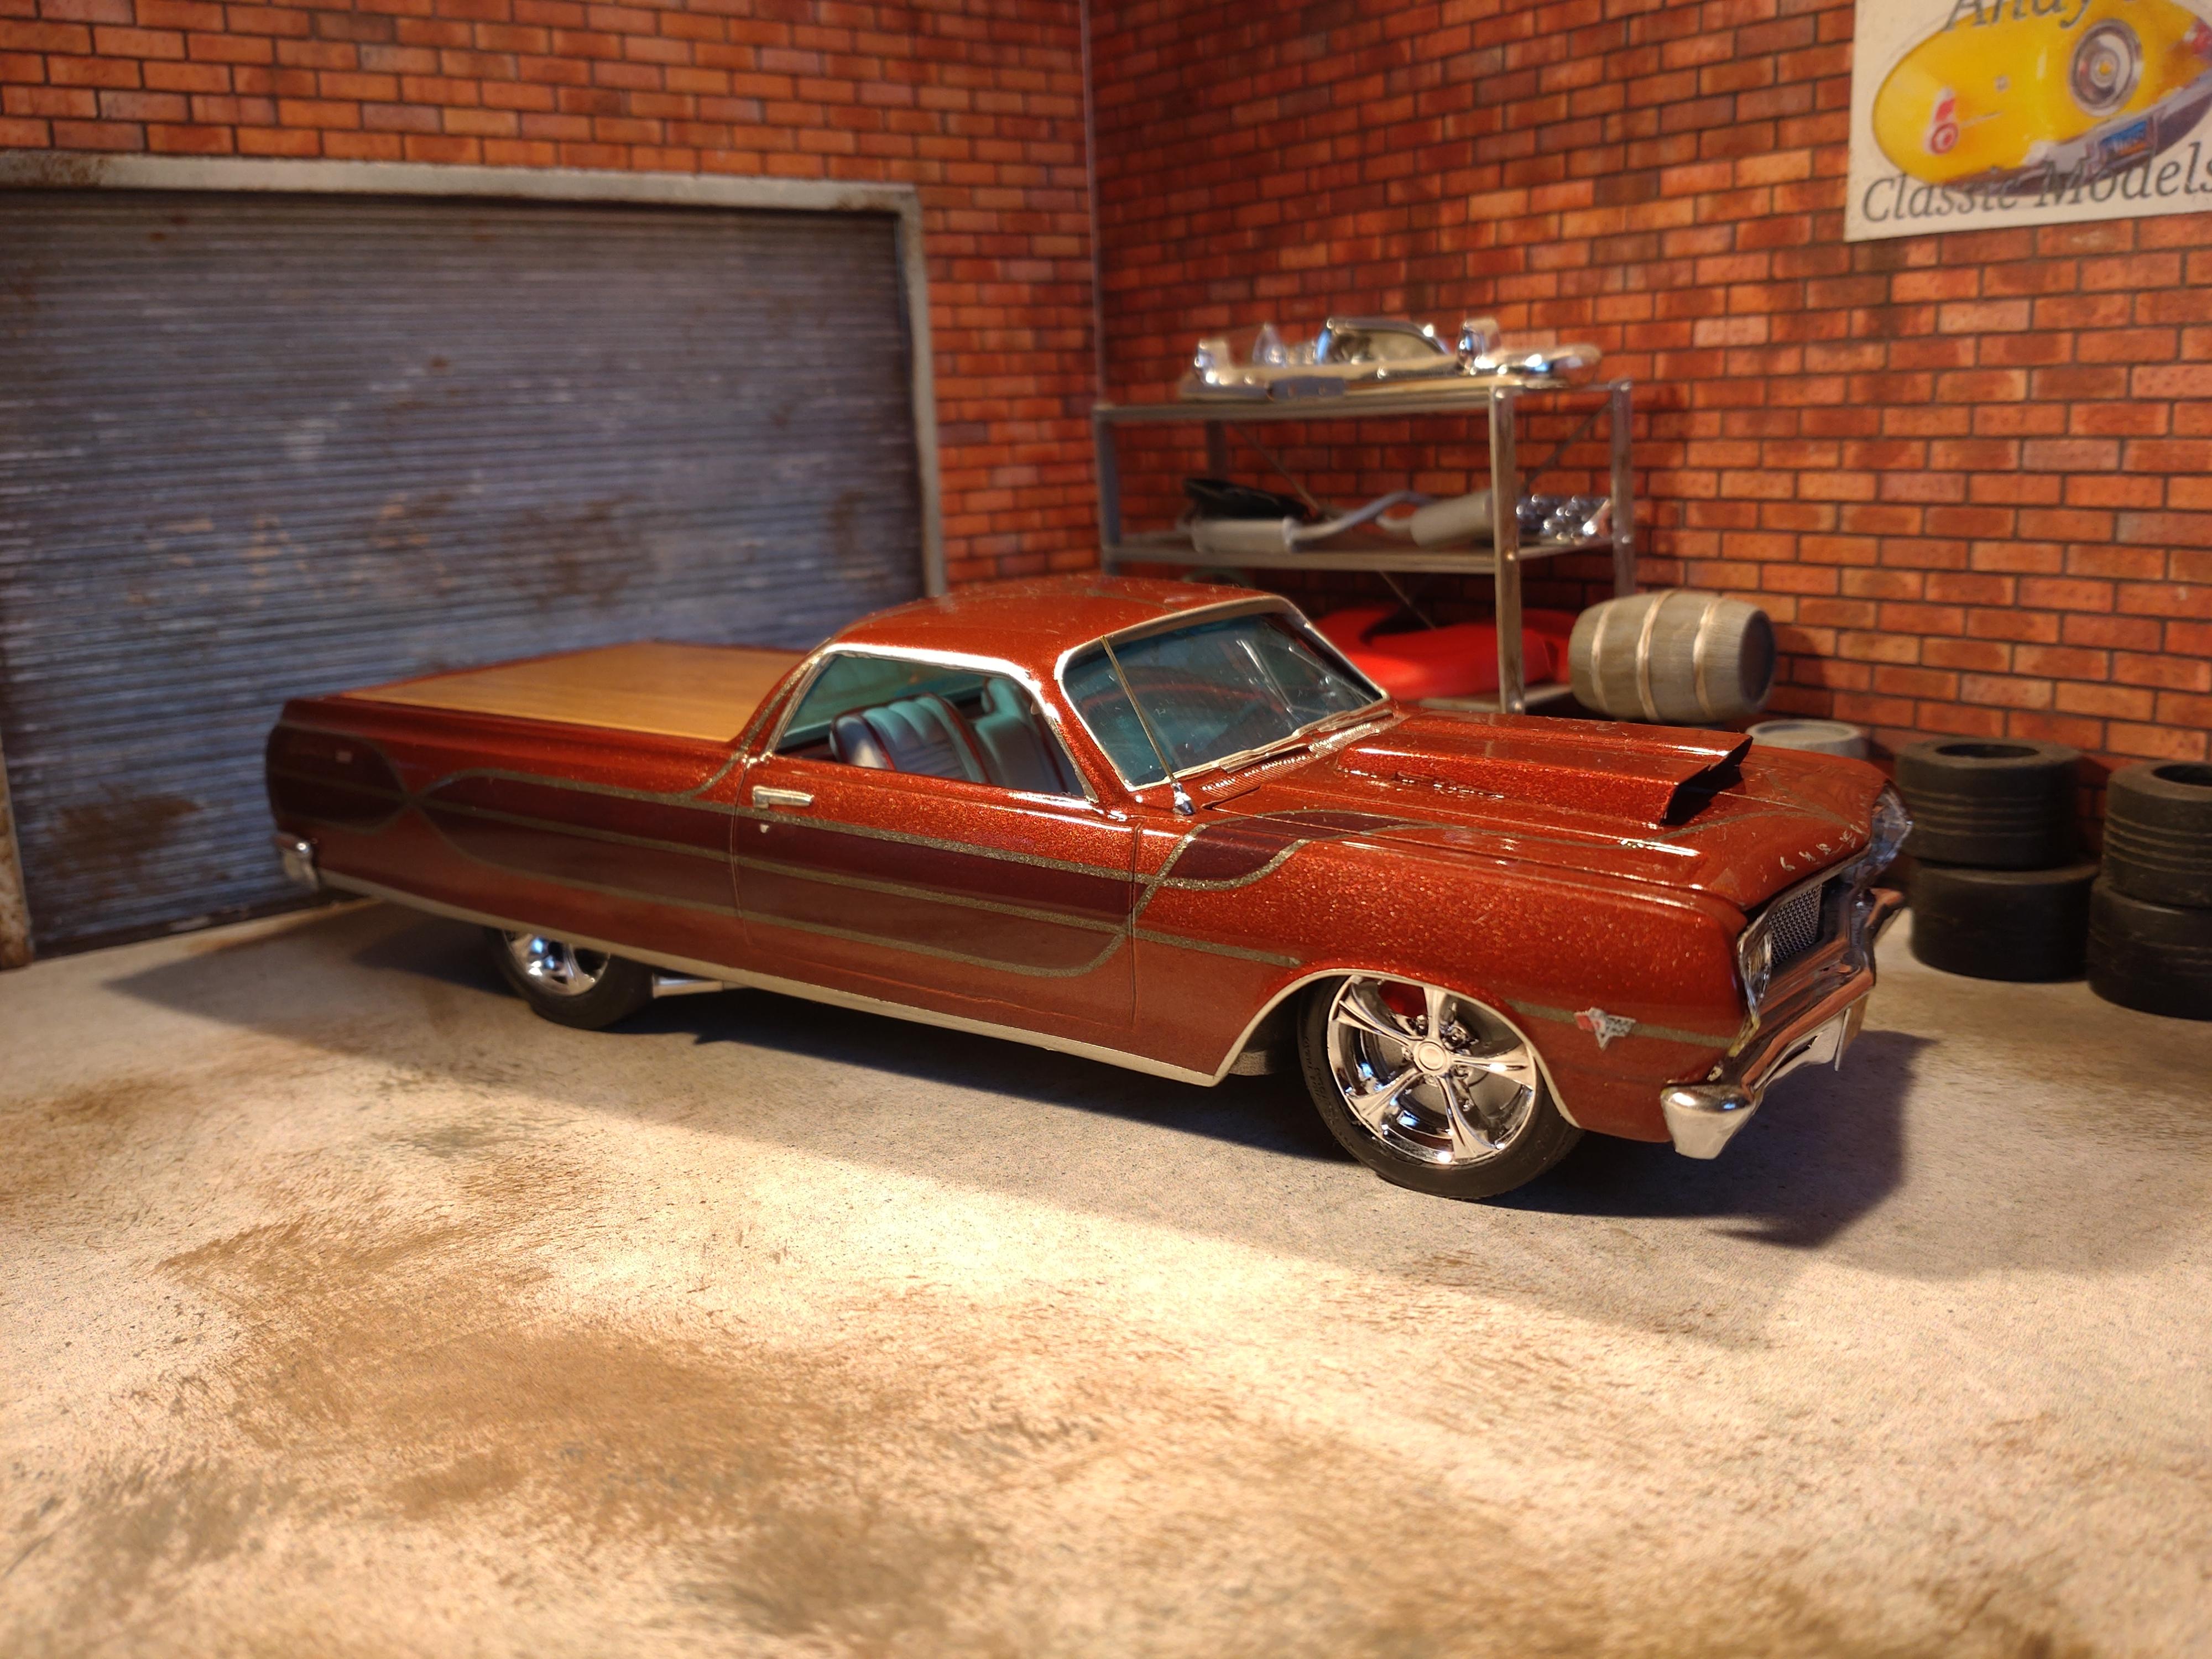
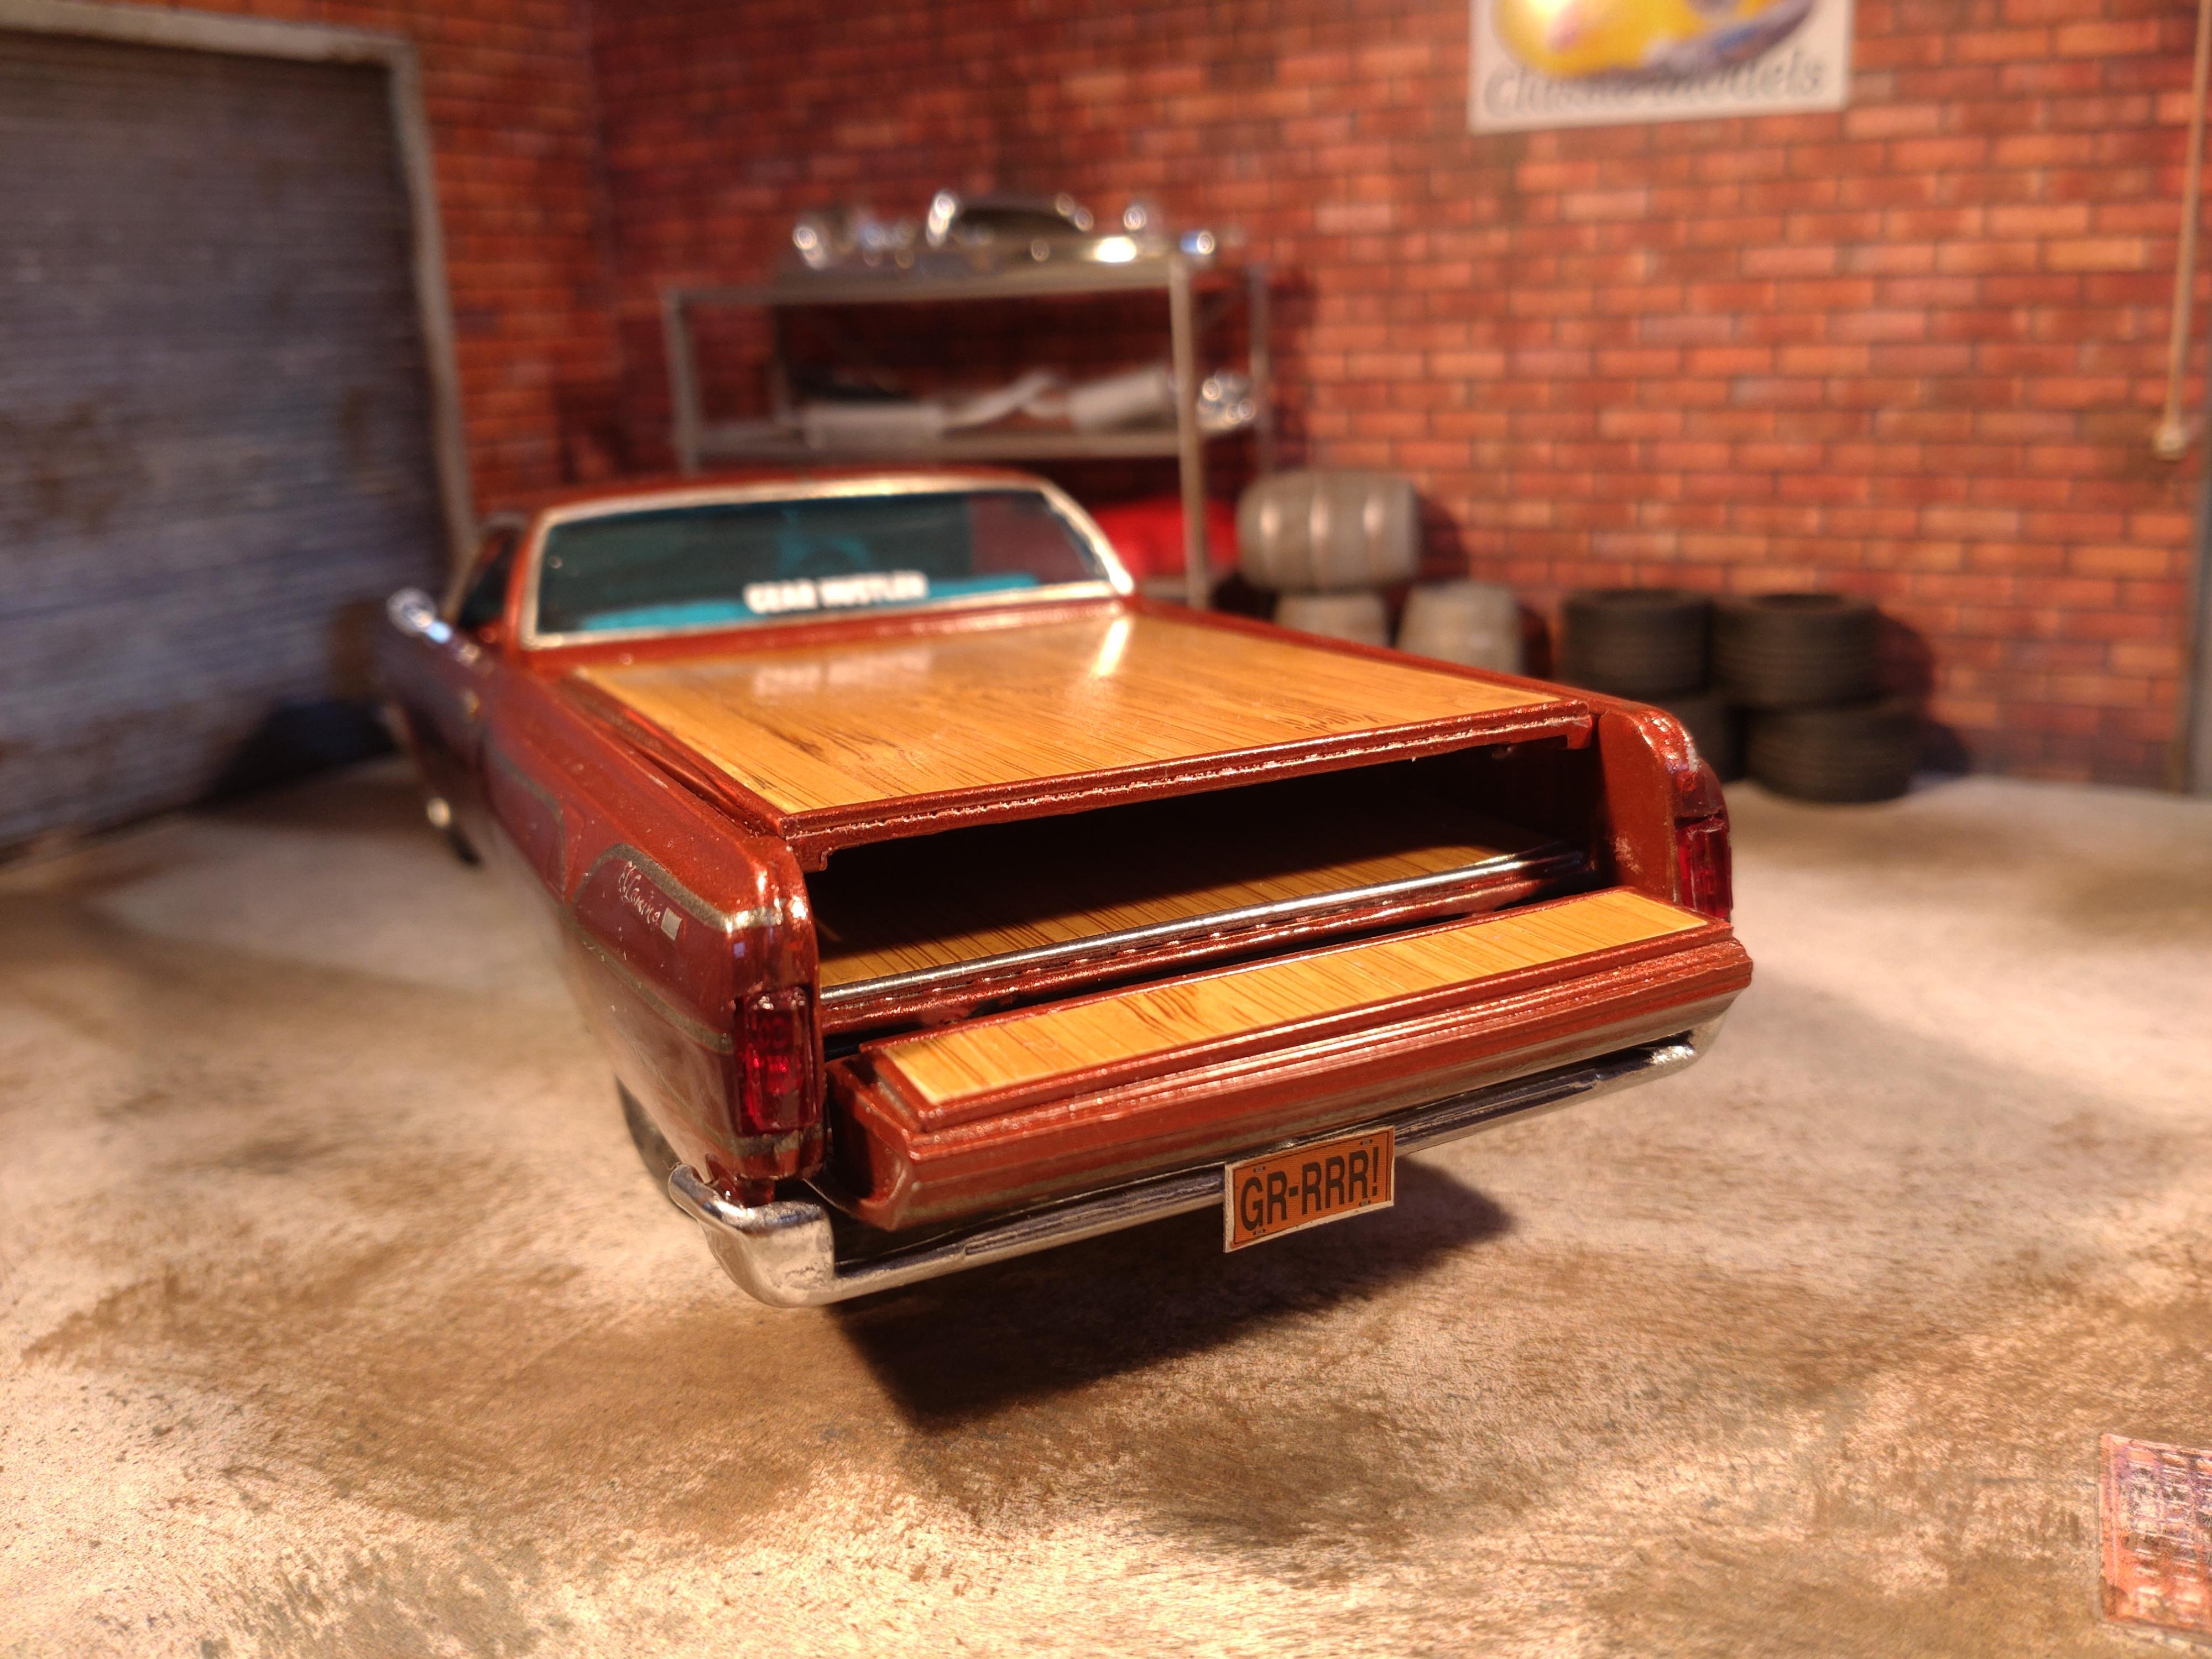
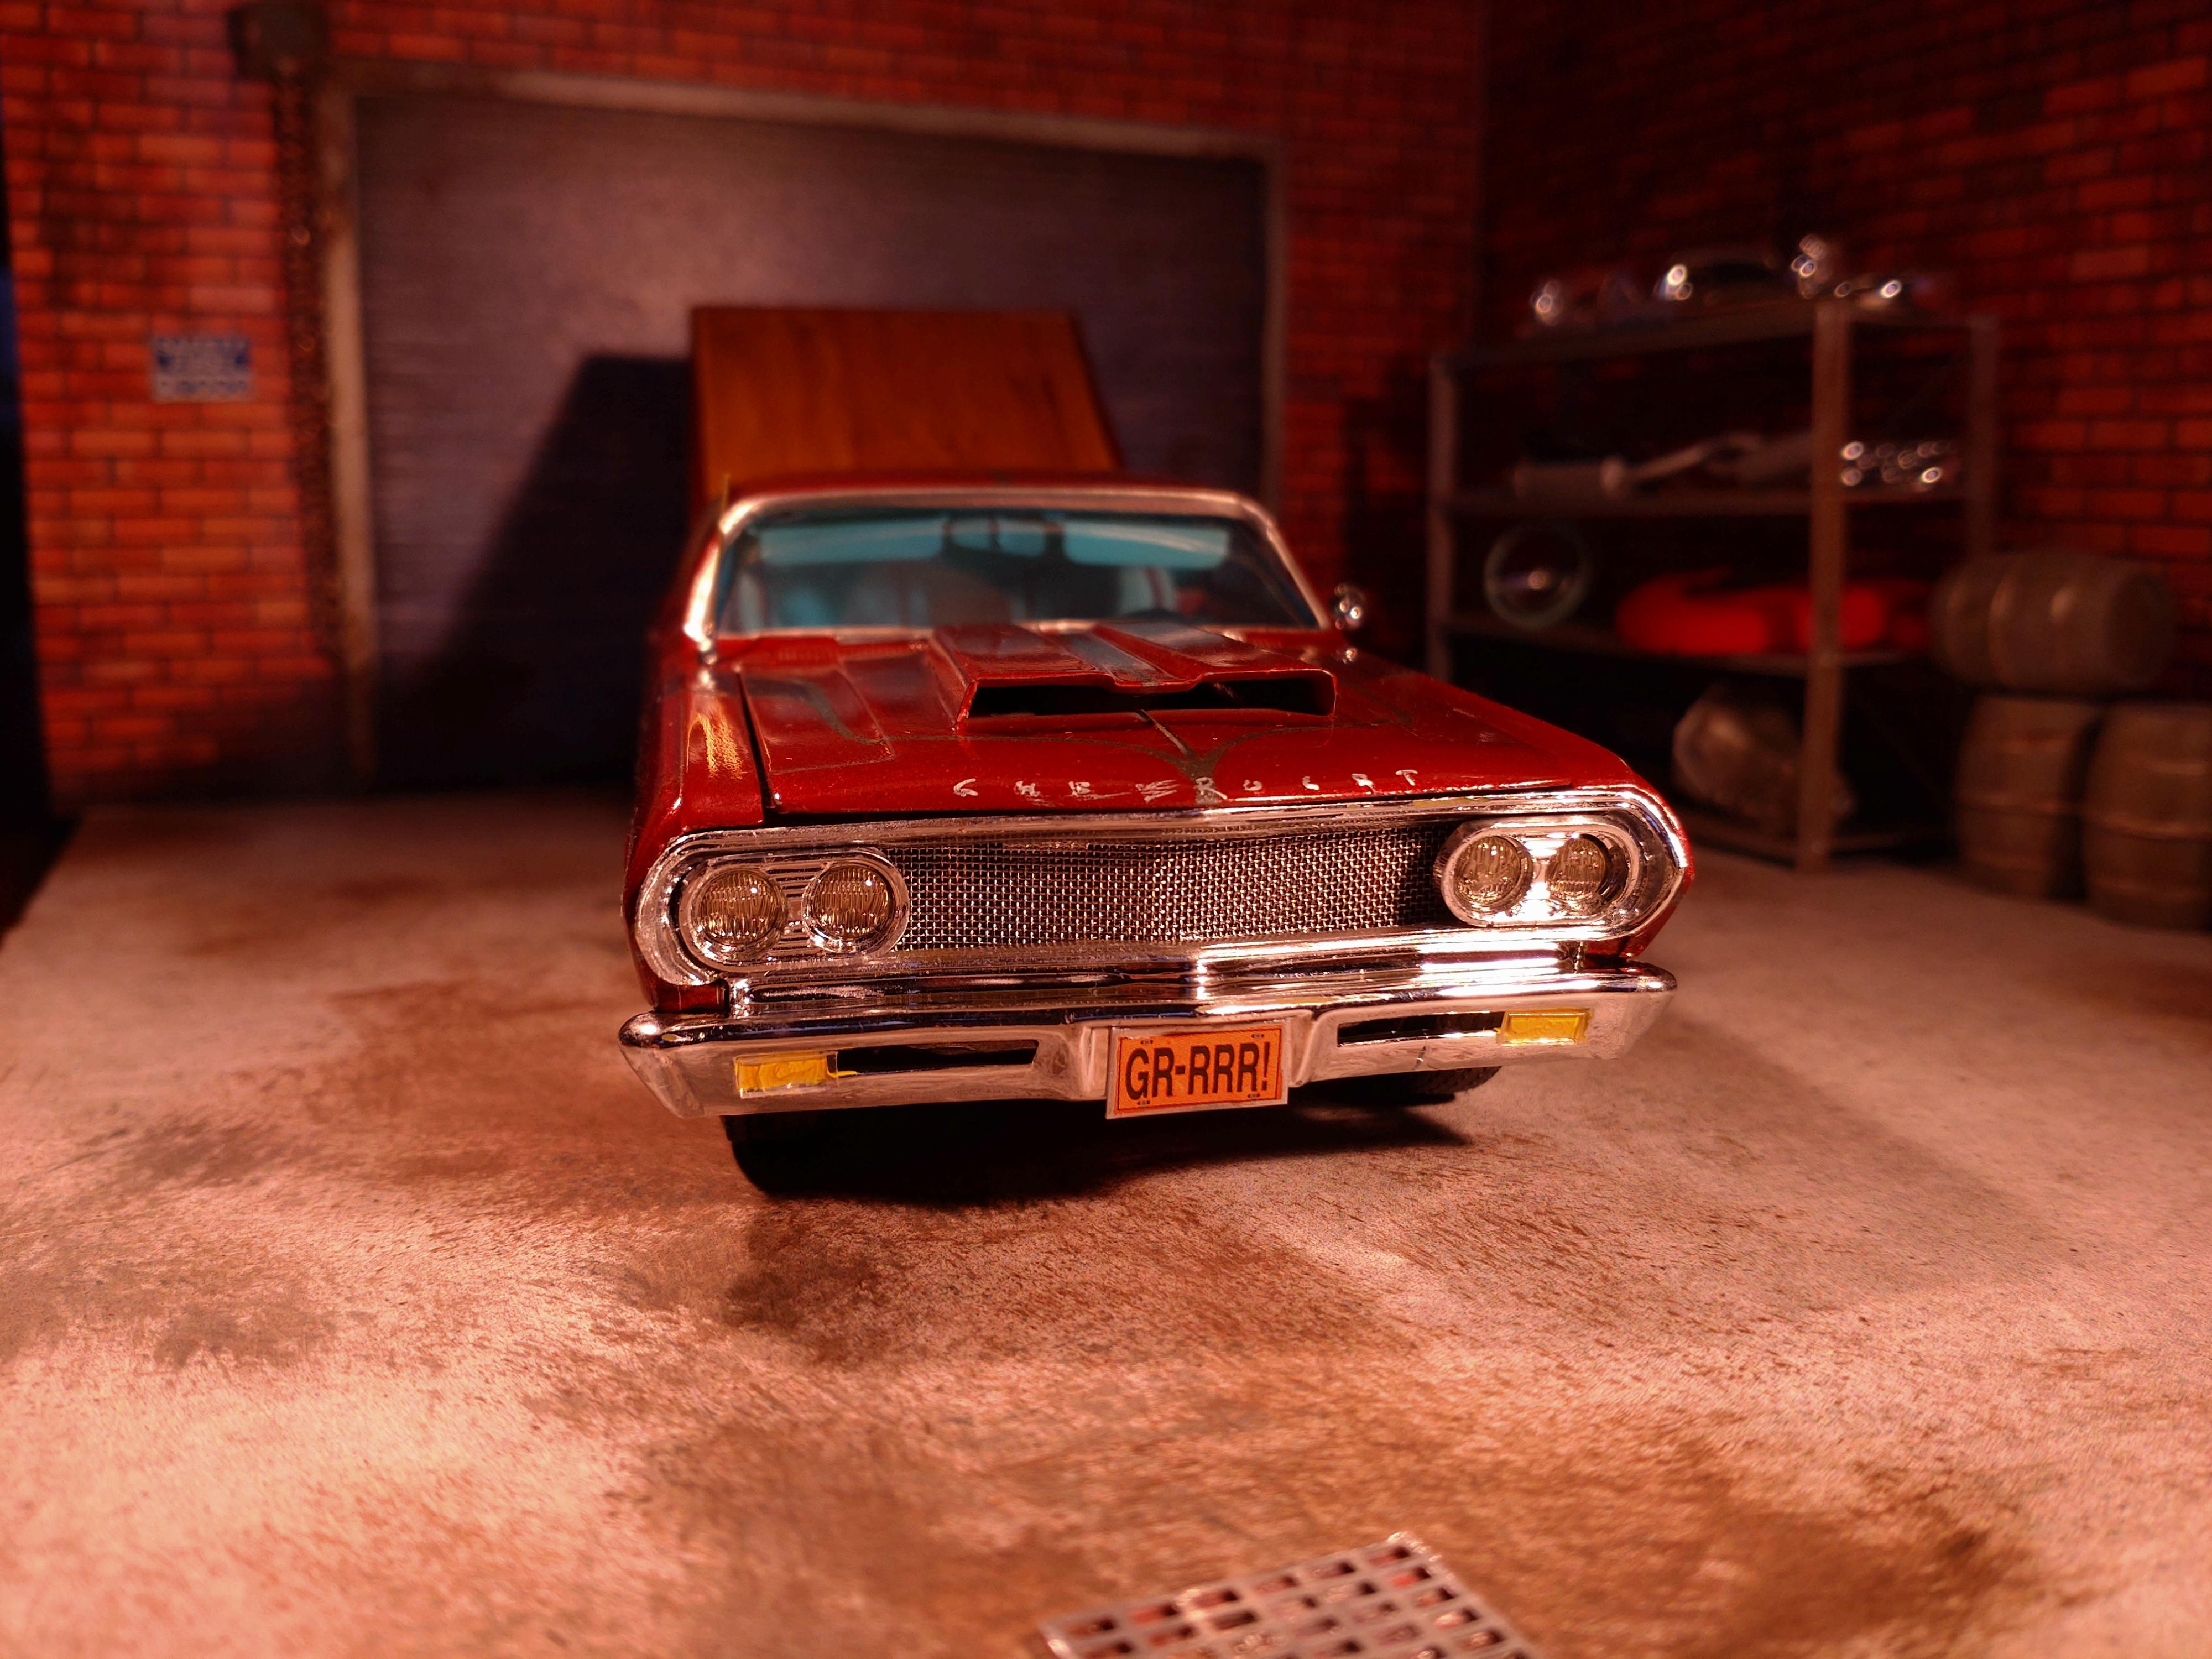
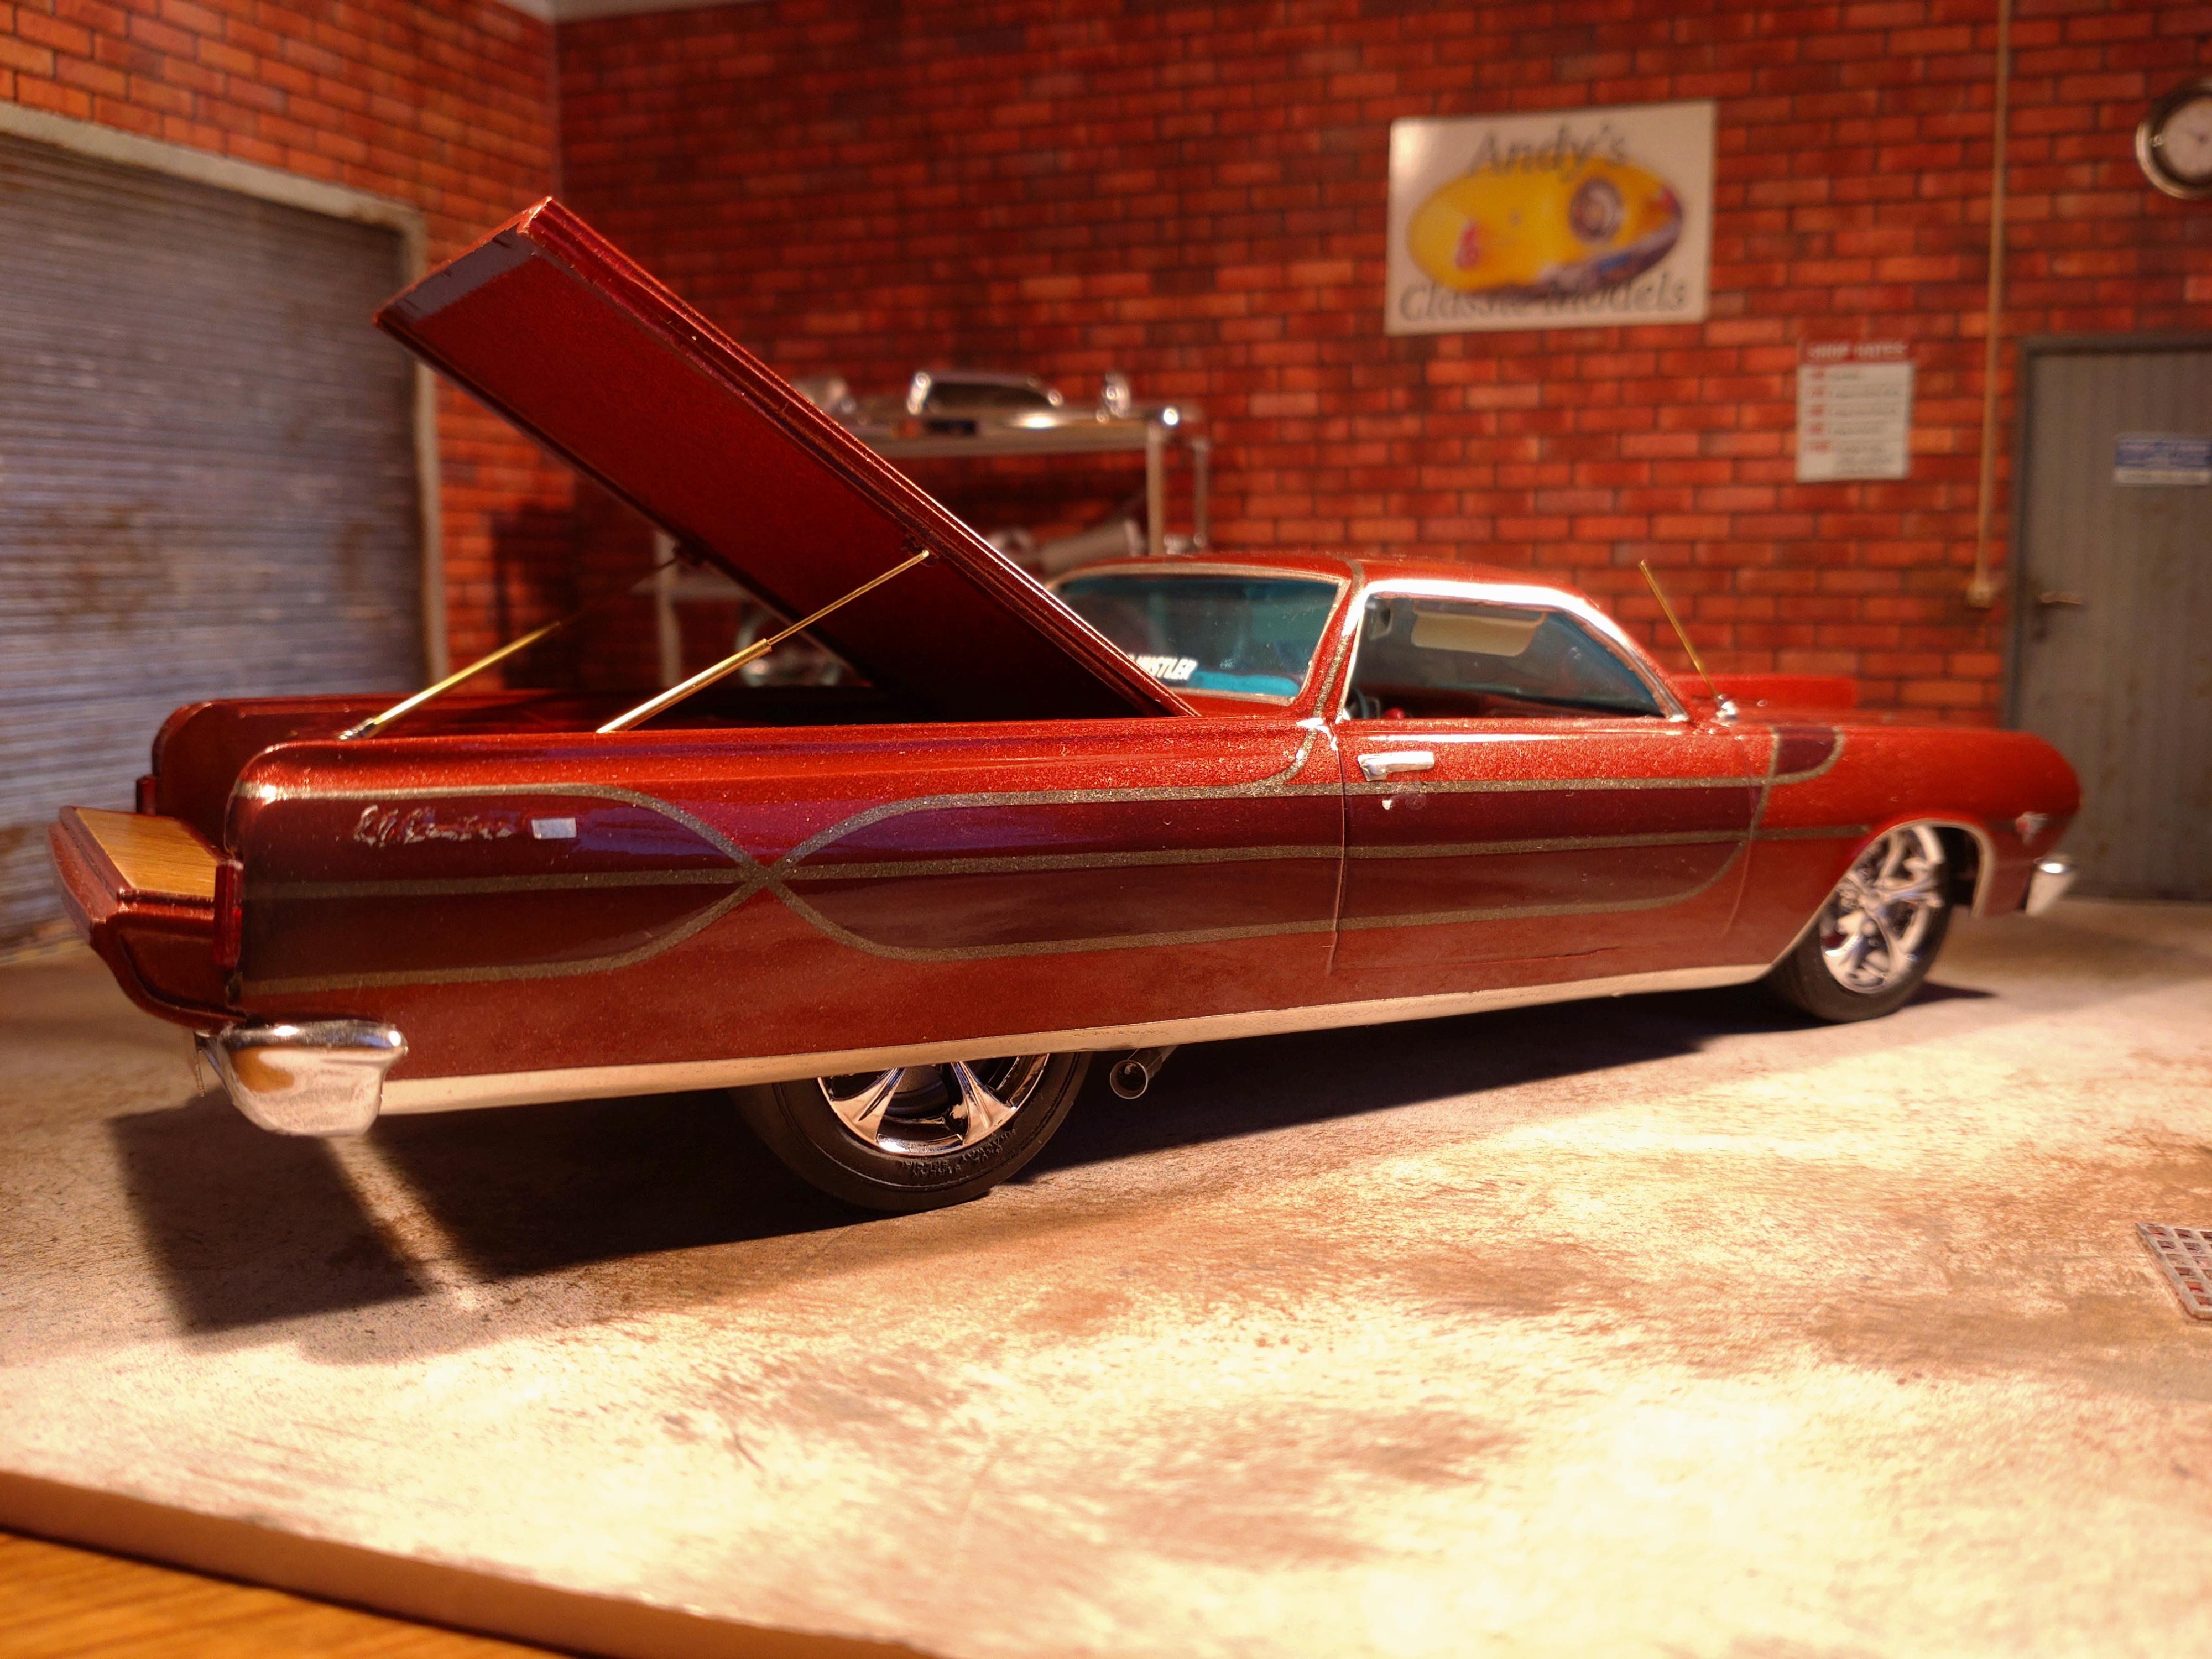
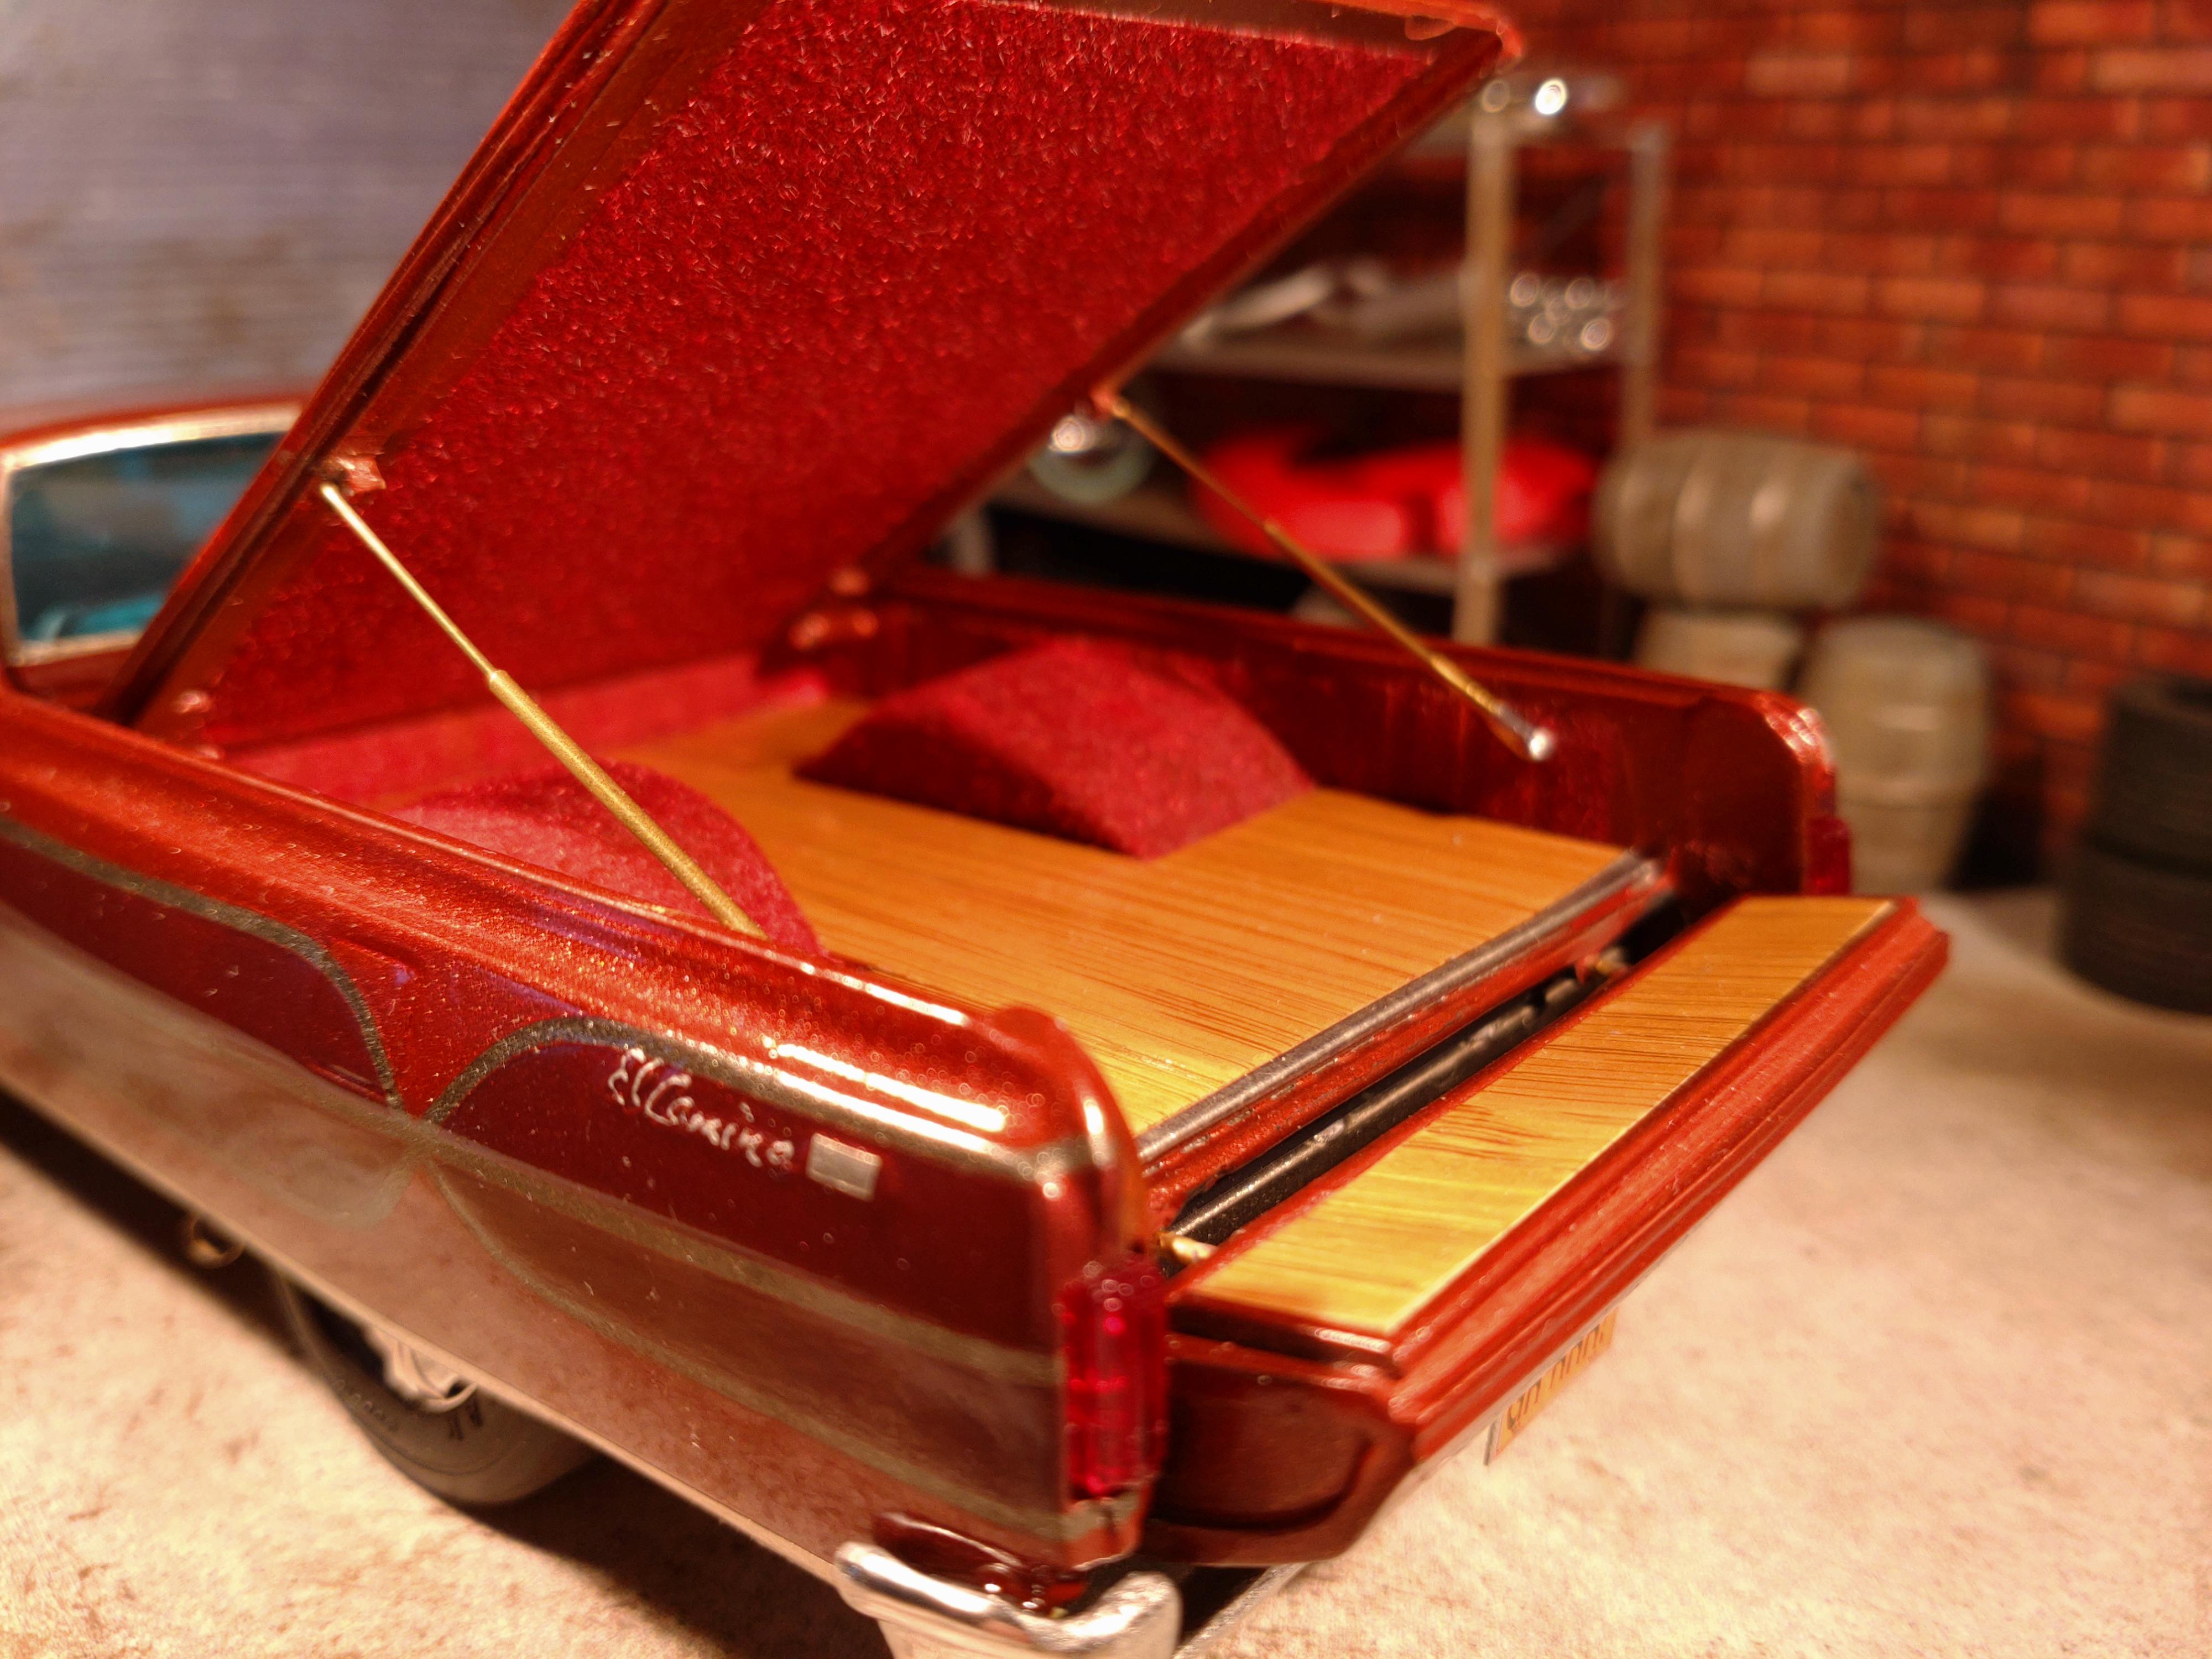
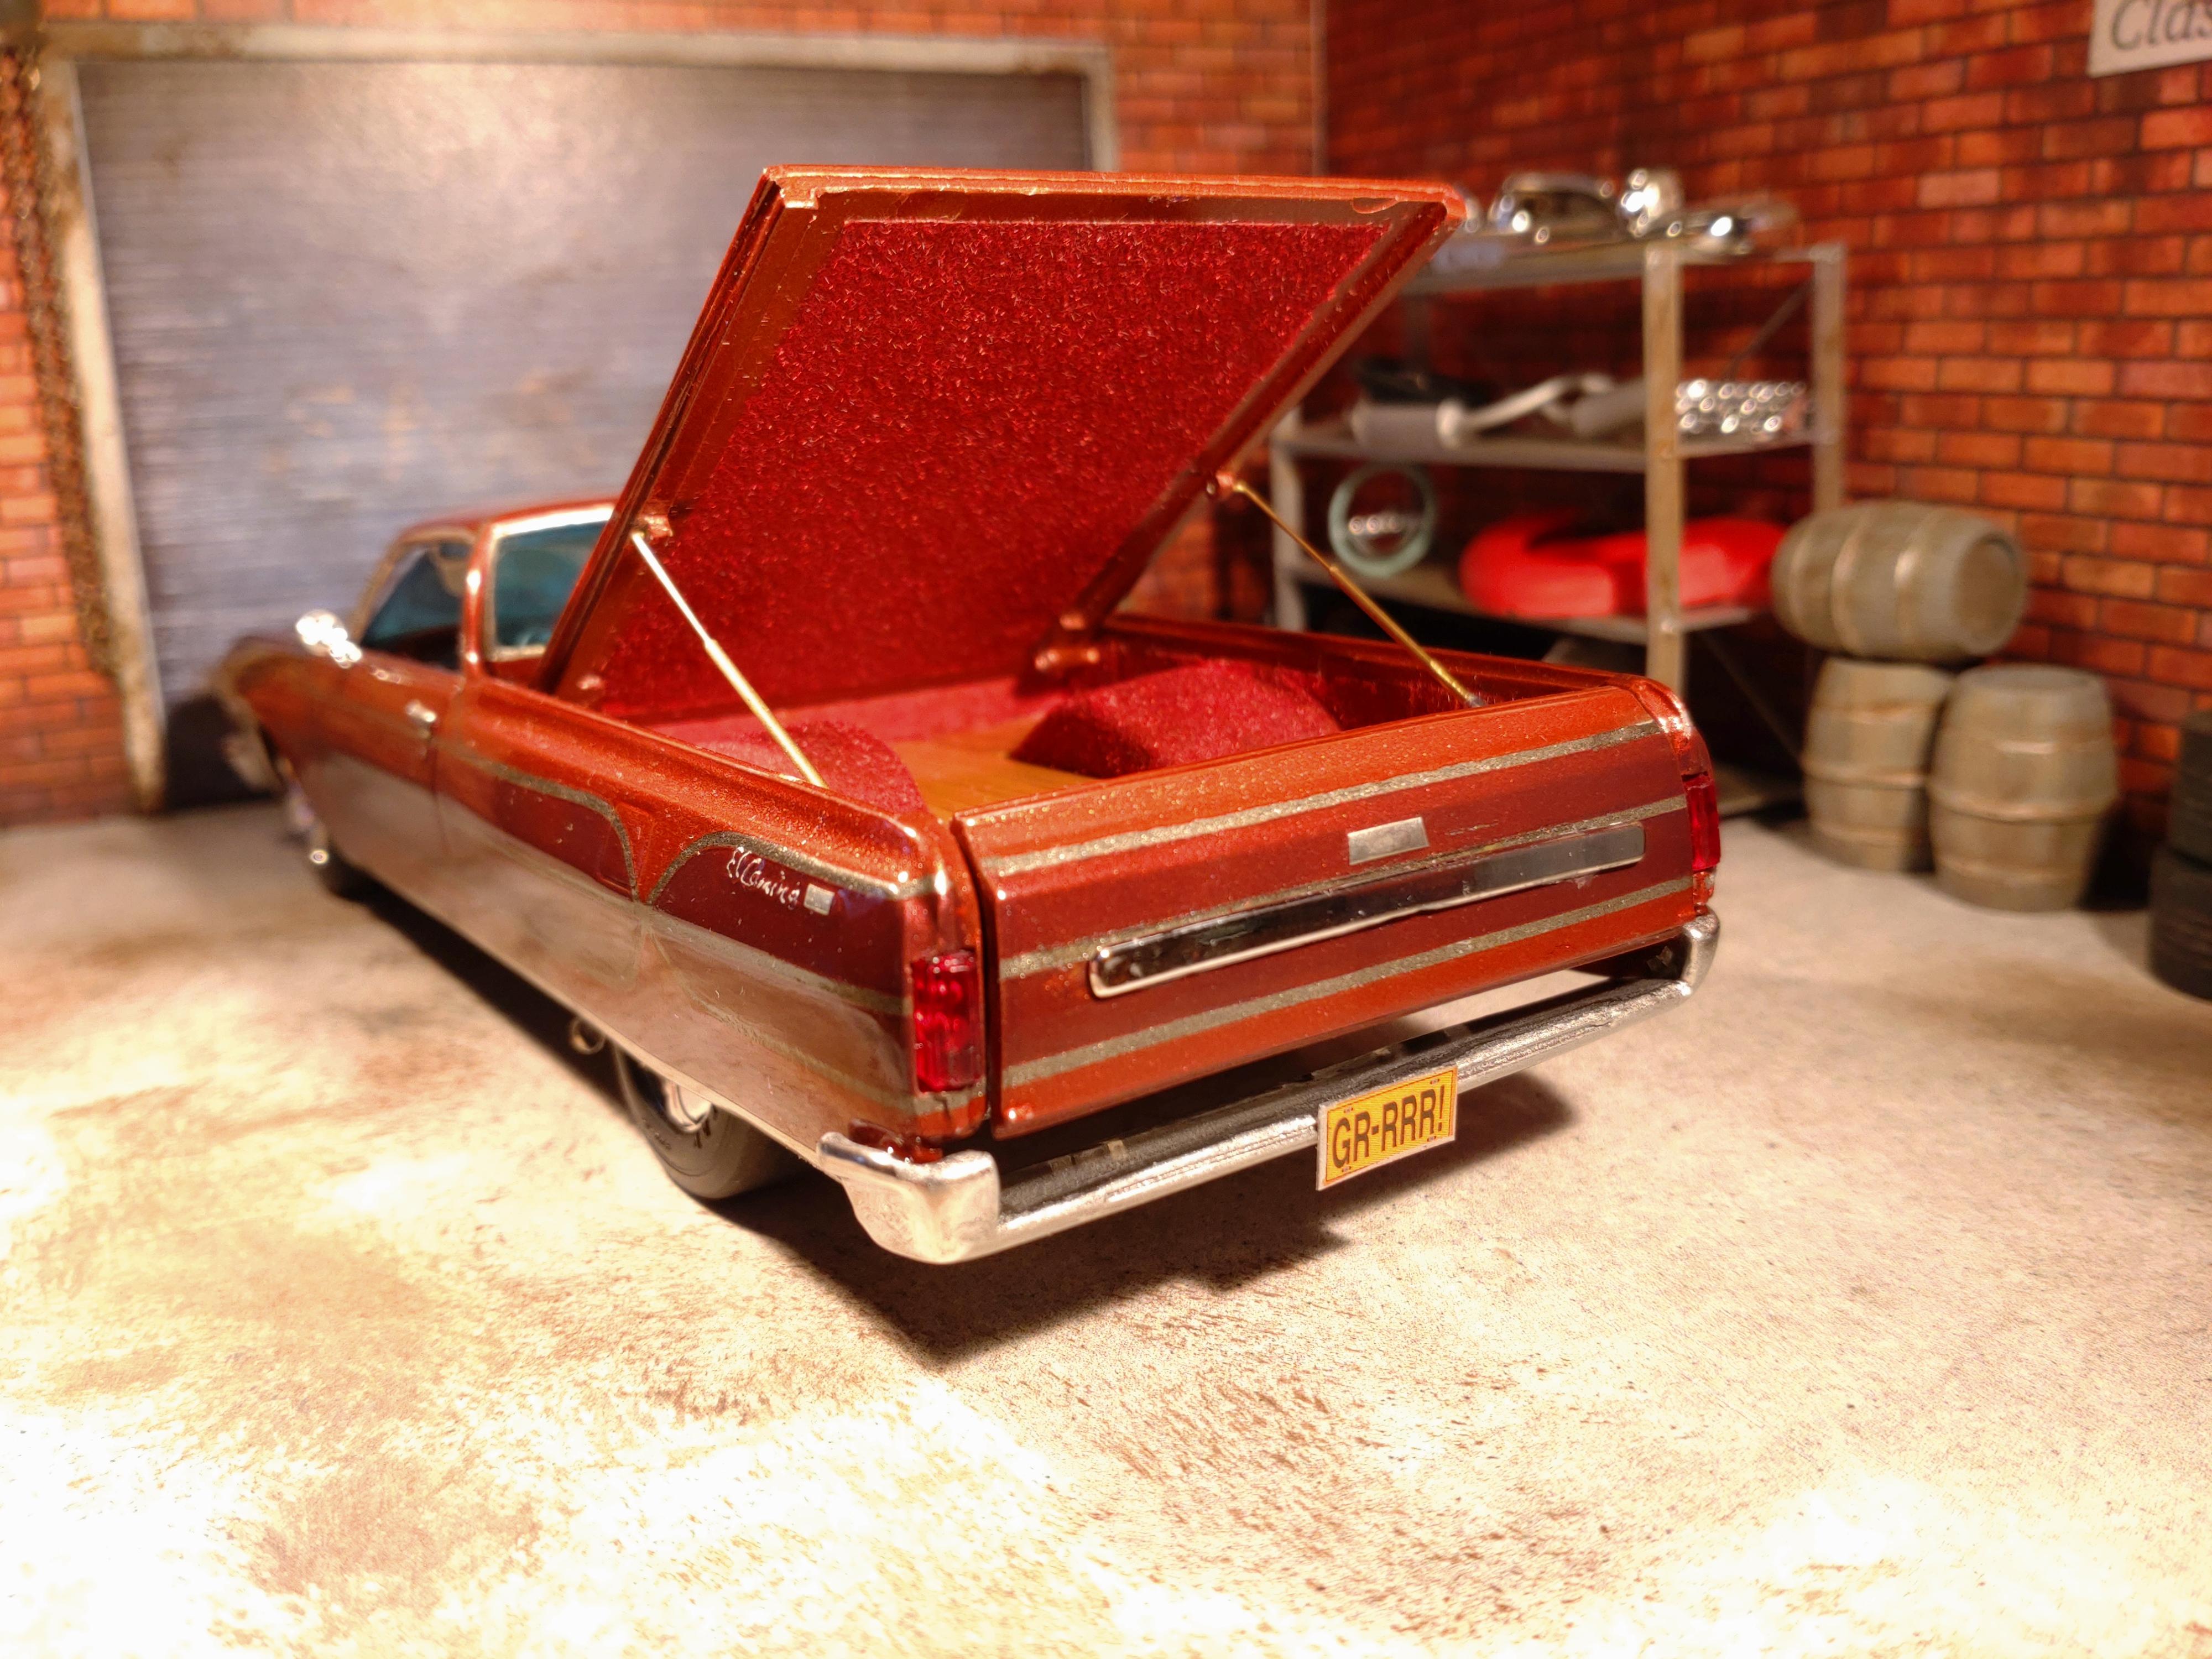
IMHO the ´59 El Camino has much more sex appeal and class than the ´64. (but i´ve already built that one..) Based on the Chevelle and dubbed with a simple 60´s design, it does look more like a utility vehicle than the ´59. I didn´t want to build the construction "gear hustler" depicted on the kit cover, but I was aware that a fancy show car was hidden in my box. The ideas came pouring and I decided to turn this build into a luxury version with a revved up engine and hot goodies. The paint is multiple layers of: flat grey, metallic dark silver, metallic red, some masking work and a transparent red for the panels. After super fine sanding, I sprayed 3 layers of AK crystal clear and the BMF is secured under the last coat. The rear wheel arch was filled with styrene and needed a few steps of putty and sanding until I was satisfied with the looks. The 20" wheels were in my scrap box, but I didn´t have the matching tires any more. So I had to carefully cut open existing tires to match for that low profile look. The wood on the bed cover and the bed floor is real veneer. The kit contains a shell cover for the bed, but I used the shell roof to fabricate the bed cover. It took three tries before I was happy with the hinging of the cover. Actually a simple solution, but tricky to get into the exact position. The "hydraulic" is a 1mm brass rod slipping into a 1.5mm brass tube. The bed walls and fenders are flocked. Cutting the bed door open meant filling the open spaces with styrene sheet and the bumper had to be adapted to let the door open down. The hinges were made of 1mm brass rod in 2mm styrene tube. I completely cut the grill out of the grill/bumper part and attached a fine metal mesh to the back. The headlight parts were again from my spares box and the lenses are from Scale Production. I goofed the Chevrolet lettering. The gel pen wasn´t dry yet when I started the last clear coat and I must have smeared it by accident. BLAH_BLAH_BLAH_BLAH happens.... I replaced the kit bucket seats with a bench and enhanced the edges with .5mm vinyl wire. Gluing it was a hassle and I am still thinking how to solve that problem next time. The radio is a print on photo paper, at least a few decals for the dash come with this kit. The floor is flocked and the cranks are 3mm stryrene rod, .5mm brass rod and glass beads. Since this is a level 3 kit, there are some wishes left unfulfilled about the detailing. The engine received a lot of wiring and high performance fuel lines (check that gauge..). The brake booster was home fabricated from styrene and wire, same as the relay, the coil and the hood latch. The filter lid is from my spare box and the belt is cut from a thin rubber mat. Being a level 3, this model comes with a single part undercarriage with very shady detailing. I cut out the drive middle and the complete read suspension and rebuilt the chassis with .5 and .8 mm styrene sheet. Like the fenders I had to adapt the undercarriage to those wide slicks. I was able to rescue the differential and incorporate it into my new rear suspension. Everything is made of styrene tubes and square rods and enhanced with printed hex nuts for details. The drive and exhaust system are also styrene tubes with the mufflers scavenged from my parts box. The brake and fuel lines put the cherry on top. When I started this build I had my doubts if my vision would work, or if I was going down the wrong road. But about half through the project I was happy about my decisions and had my yahoo moments when things worked and I moved to the next step. I hope you like my build and thanks for your attention! Check out the YouTube video for some "action"! https://youtu.be/ge7wpTjoLGs
-
Revell 1969 Pontiac GTO Judge 1/24 Scale in Orange.
Andy Oldenburg replied to Dragonhawk1066's topic in Model Cars
Hi Craig, the JUDGE rules, right? ! Excellent build and deserves a front row place on the shelf. -
Hi Anders, great looking stock Fairlane! Nice color combination. Yes, it was time to show it!
-
Hi Michelle, good work on that classic police car. Easy to imagine it pulling up to a donut drive in😅