Andy Oldenburg
-
Posts
345 -
Joined
-
Last visited
Content Type
Profiles
Forums
Events
Gallery
Everything posted by Andy Oldenburg
-
Hello John, thanks for your response and the further information on the Brougham. My kit is actually an Atlantis. I restarted model car building 3 years ago and so I missed out on a lot of science that you long time builders can look back on. If so, I would not have ordered this kit. But once I had it, it roused my ambition and then one step led to another. I do much research before ever build to check as many details as possible, but my images didn´t reveal the true look of those vents. Oh well.... Thanks for the hint, but I will not start carving this build for the vents?? Best wishes, Andy
-
Hi Ricky, thanks for your reply! The hood and trunk hinges are actually quite simple. The tricky part is getting both sides bent in exact the same length and angle, and of course gluing to the same opposite spots. I would not have tried this stunt 2 years ago...
-
Hi Steve, thanks for the advice! I have clipped the undercarriage on to check my trunk interior. Look like everything will be quite sturdy when glued correctly.
-
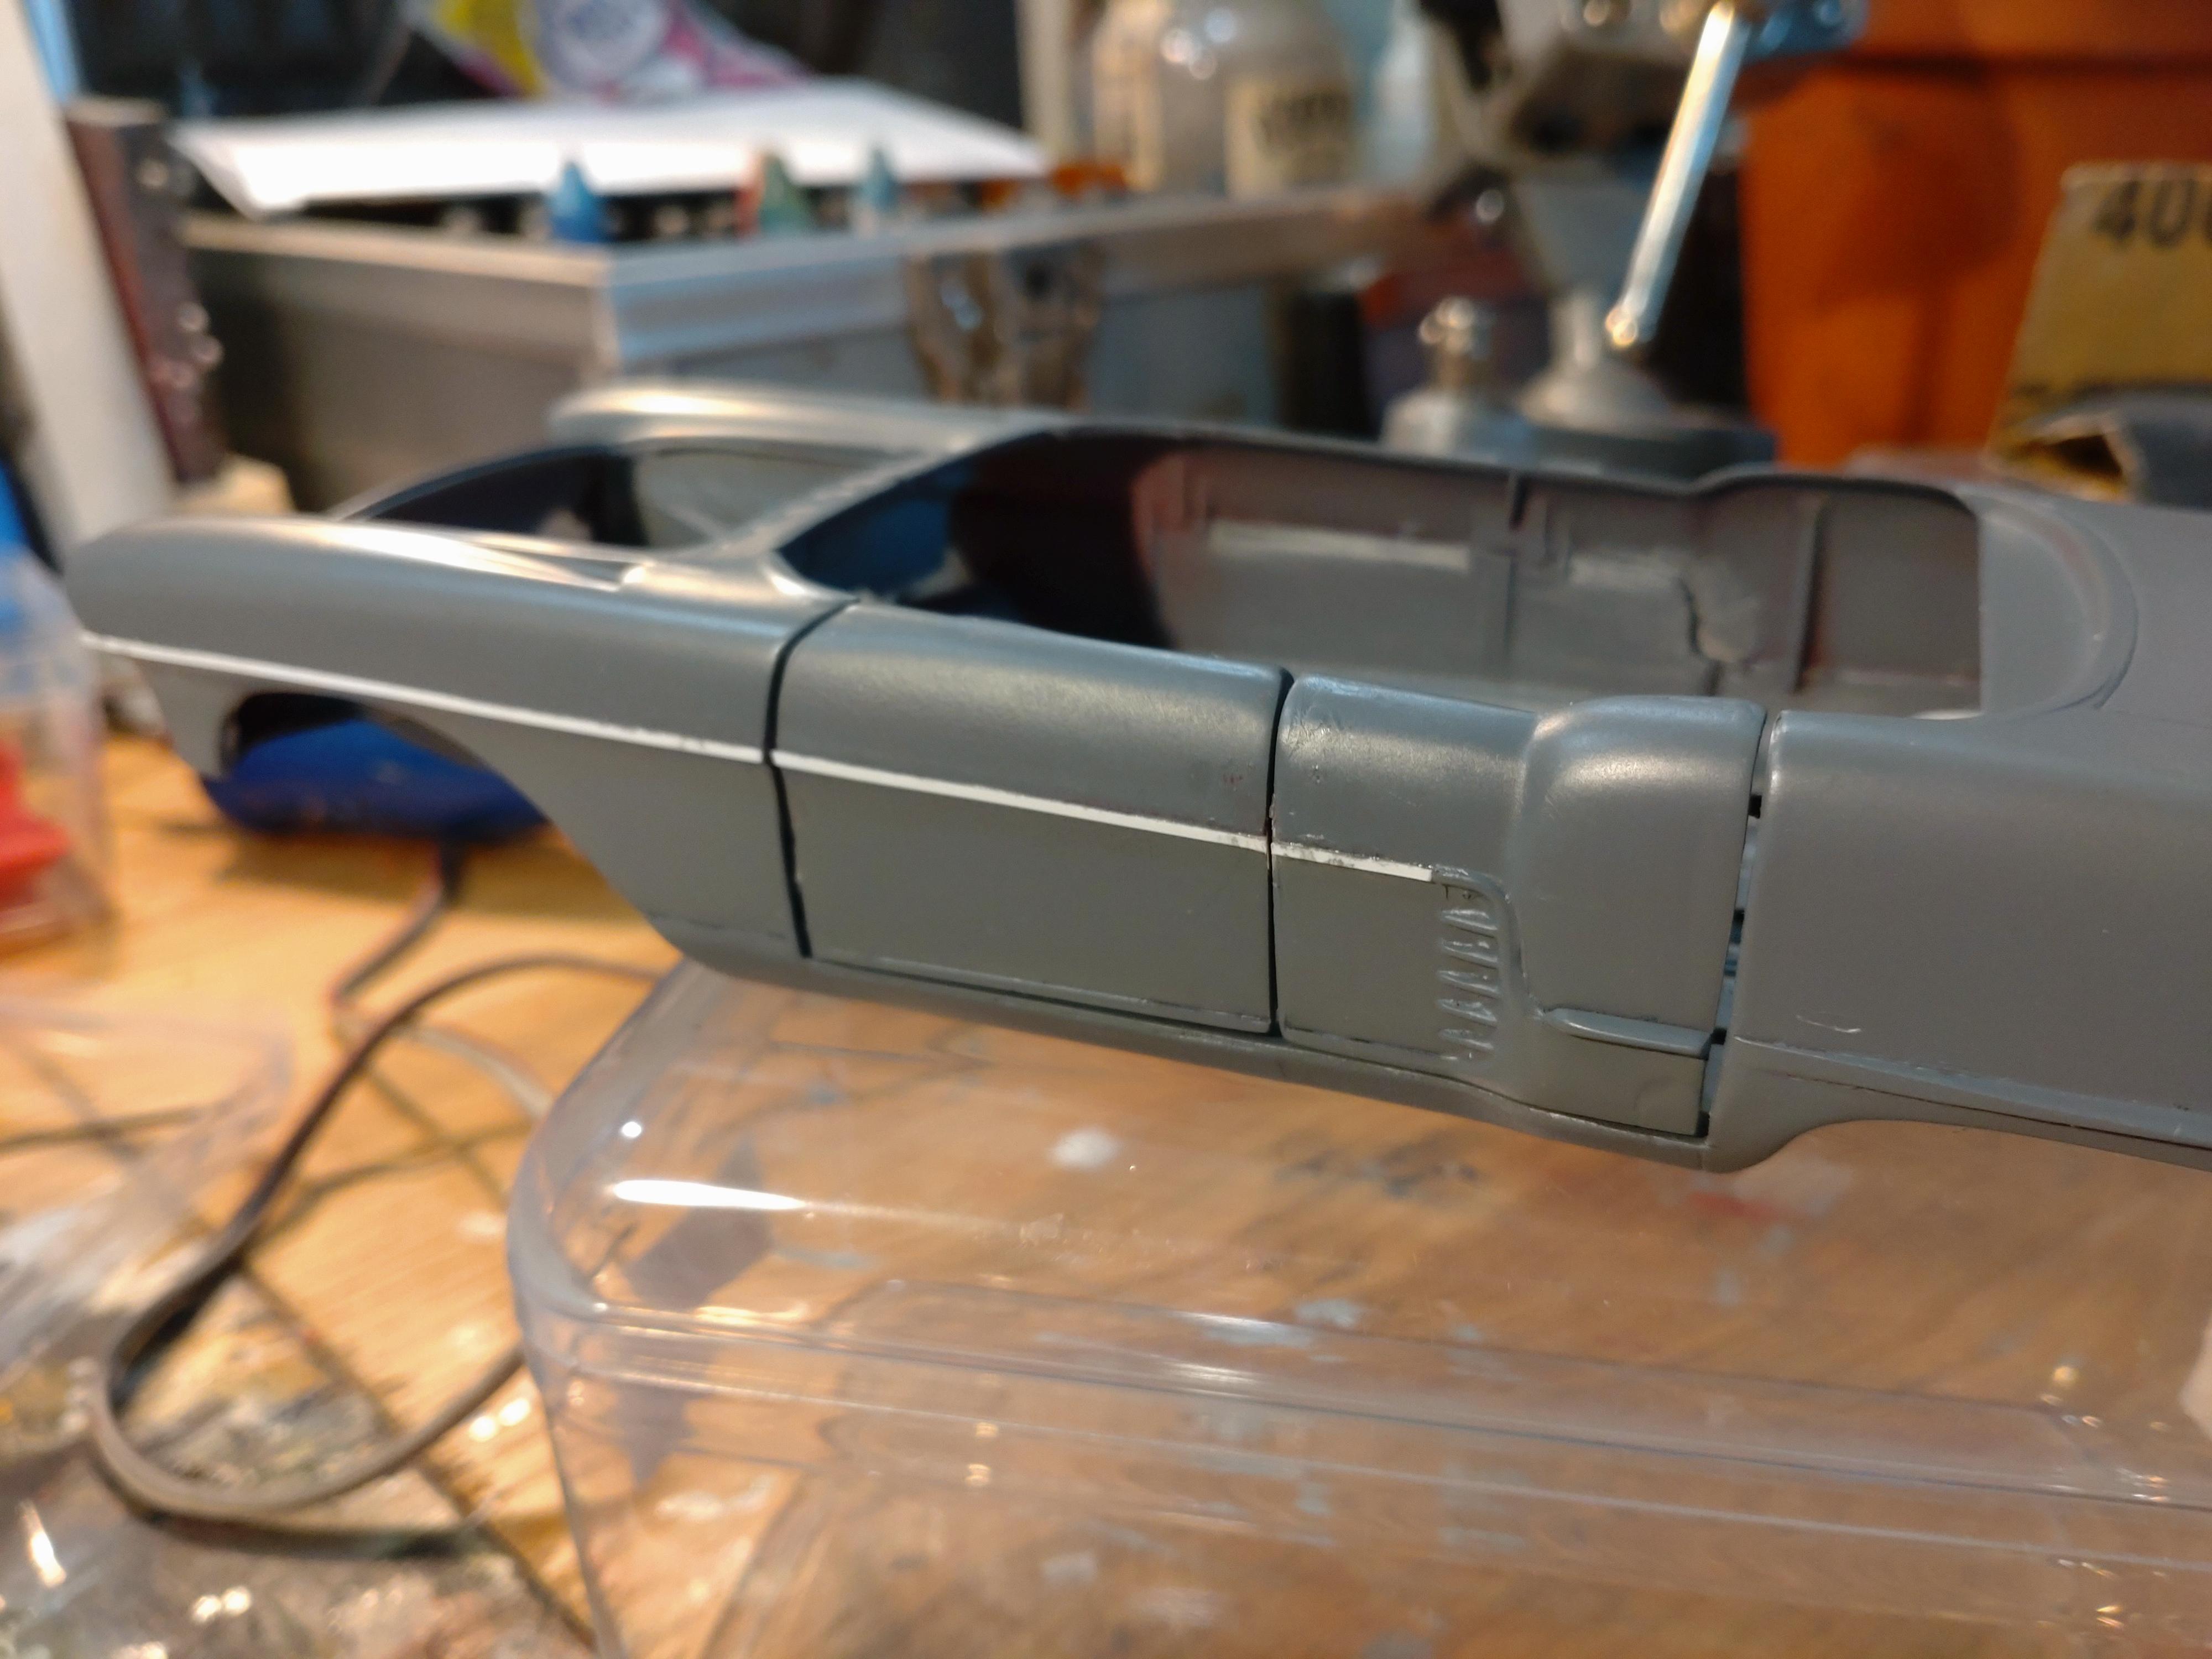
After building a few classic stocks, I was eager to try something extreme. I have watched some videos from low rider shows and meetings and got triggered to get crazy on my Revell GTO. This kit is very fine detailed and and the parts fit very good to me, so I don´t have to hassle with extra problems. ( I mean, other than those that I got into myself?). I opened the doors and the trunk with a scalpel and my micro tool saw. I have made it a habit to add another layer of 0.5mm styrene before I attach the lips to the trunk and the doors. The paint layers add up too much later and then the trunk and the doors don´t close correctly any more. The hinges are bent from 1mm brass rods and fit smooth into 2mm styrene tubes. I cut the rods to different lengths, that way it is easier to fumble the doors onto the body. The bonnet received a muscle hood and the rear wheel arch is filled with a skirt. The trunk and the doors are fixed with tape in preparation for attaching the hinges. After a first gluing of the hinge tubes I later did a second round of gluing with epoxy. I can´t afford losing a hinge once the build is too far into progress or even finished. This is a first mock up to check the stance and looks. I might even drop the body lower.... And this is what I meant with "crazy": I still have time to think about the paint job. It will be multi colored, but I am waiting for that bulb to light up over my head. Thanks for watching!

-
Hi Peter, that Gunze Sangyo does look like it had much more detailing right out of the box, even though it has a much smaller scale. Yes, our builds do look quite the same, what a coincidence! Sounds like a Japanese kit. I have heard that those manufacturers have a higher standard of detailing and fitting quality. I must check out what I can get from my European suppliers. So if you are already at car model building for over 30 years, I will not be able to catch up with your building record. I started 3 years ago during the Corona lock down. Remembered what I loved to do as a kid and it saved my soul. I´m glad to be in this forum and share my passion! Best wishes, Andy
-
Hello everybody, many thanks for all of your friendly replies! That really feels good....?? I´m still enjoying that feeling of getting this build done. It will get a front row place on the shelf. Merry Christmas and a happy model building new year!
-
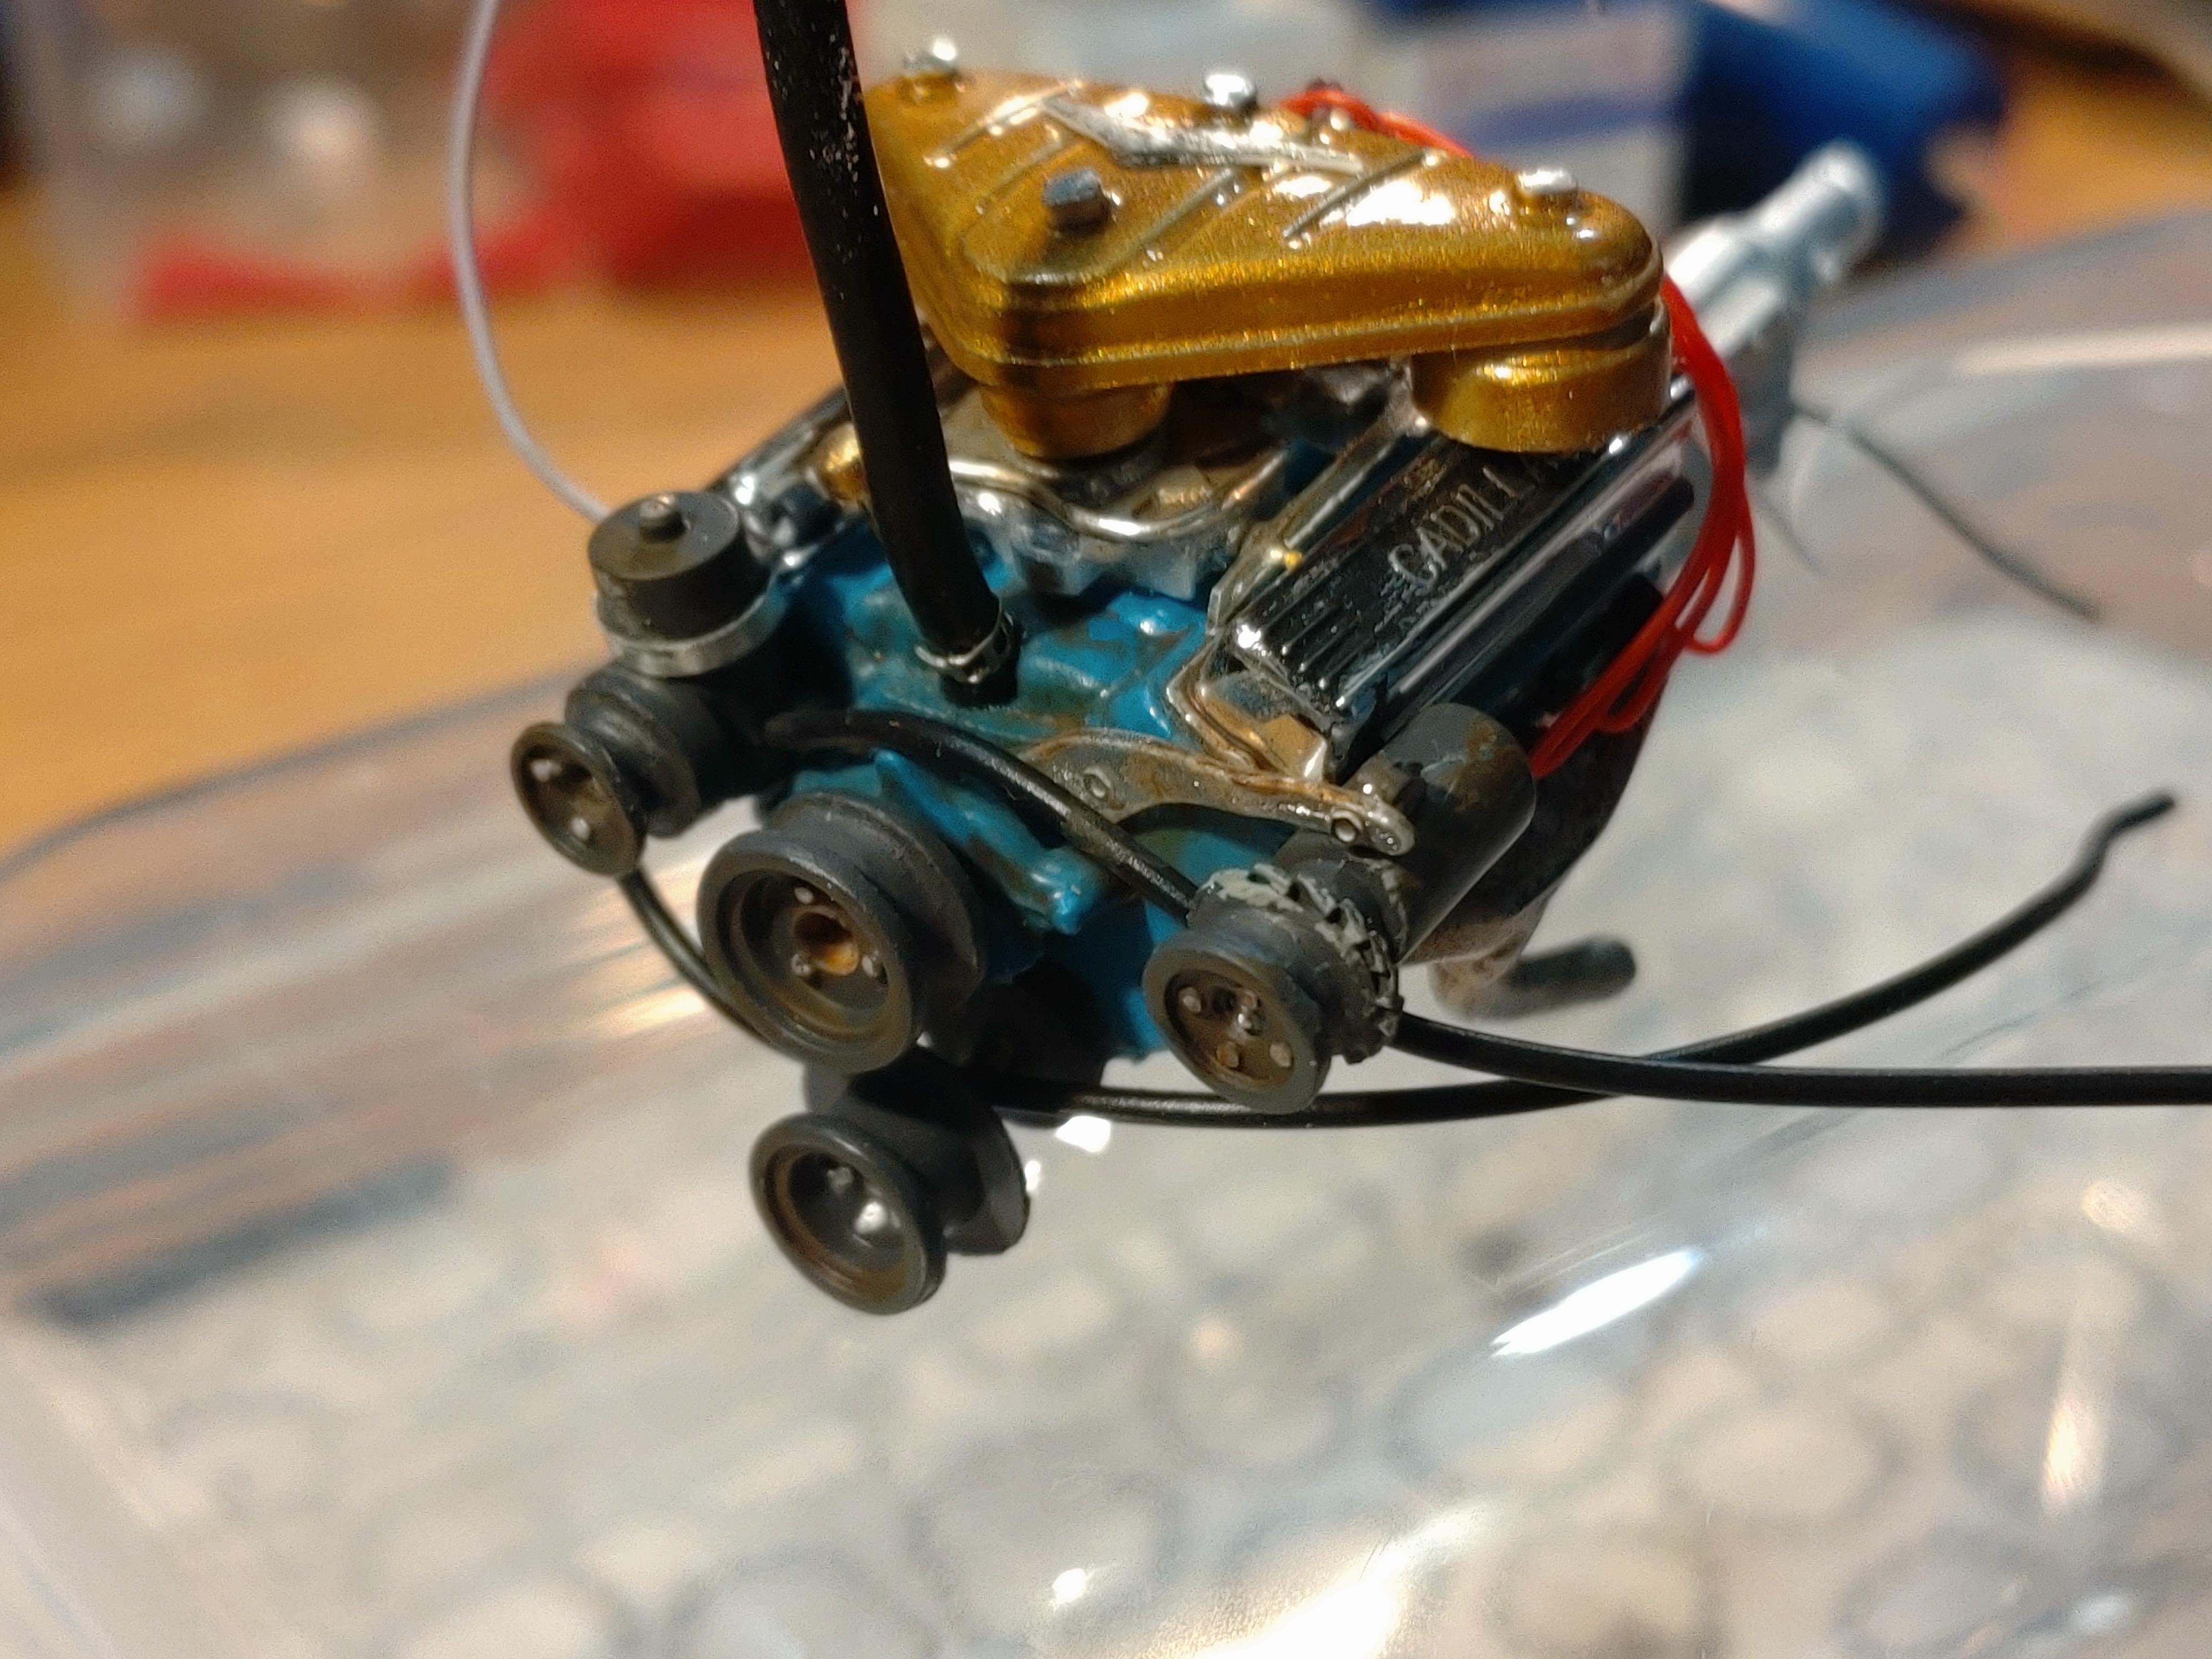
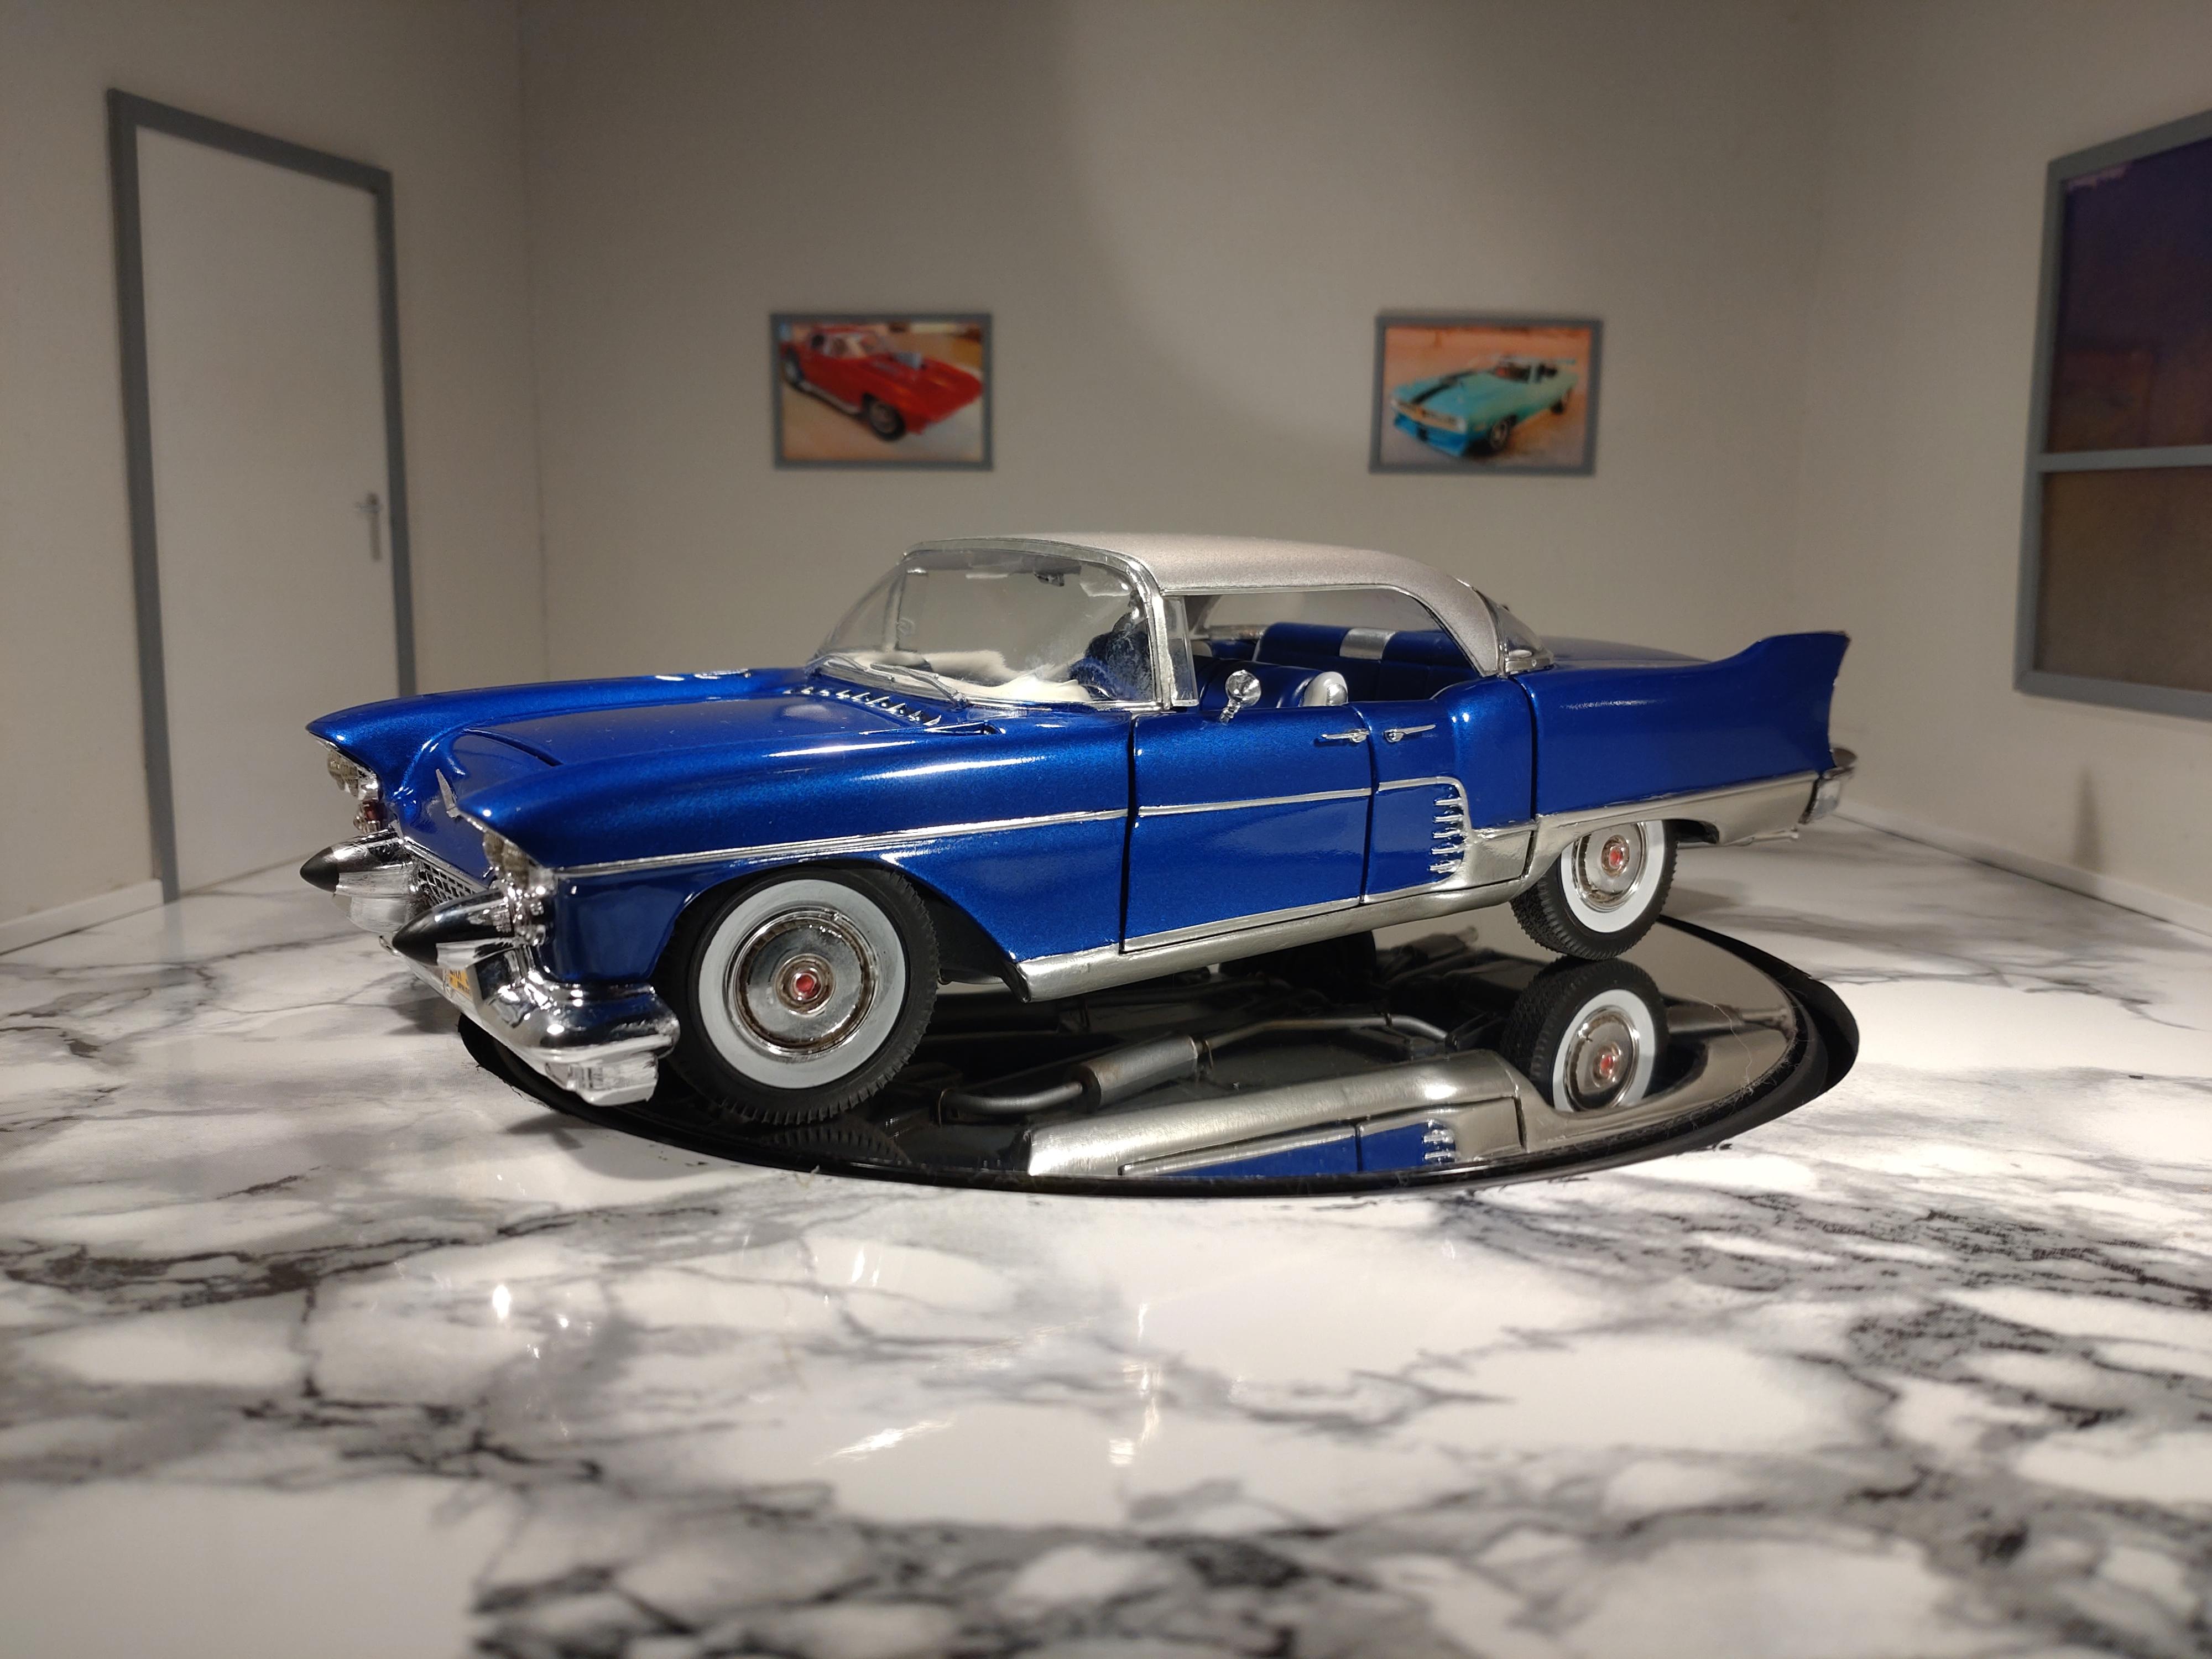
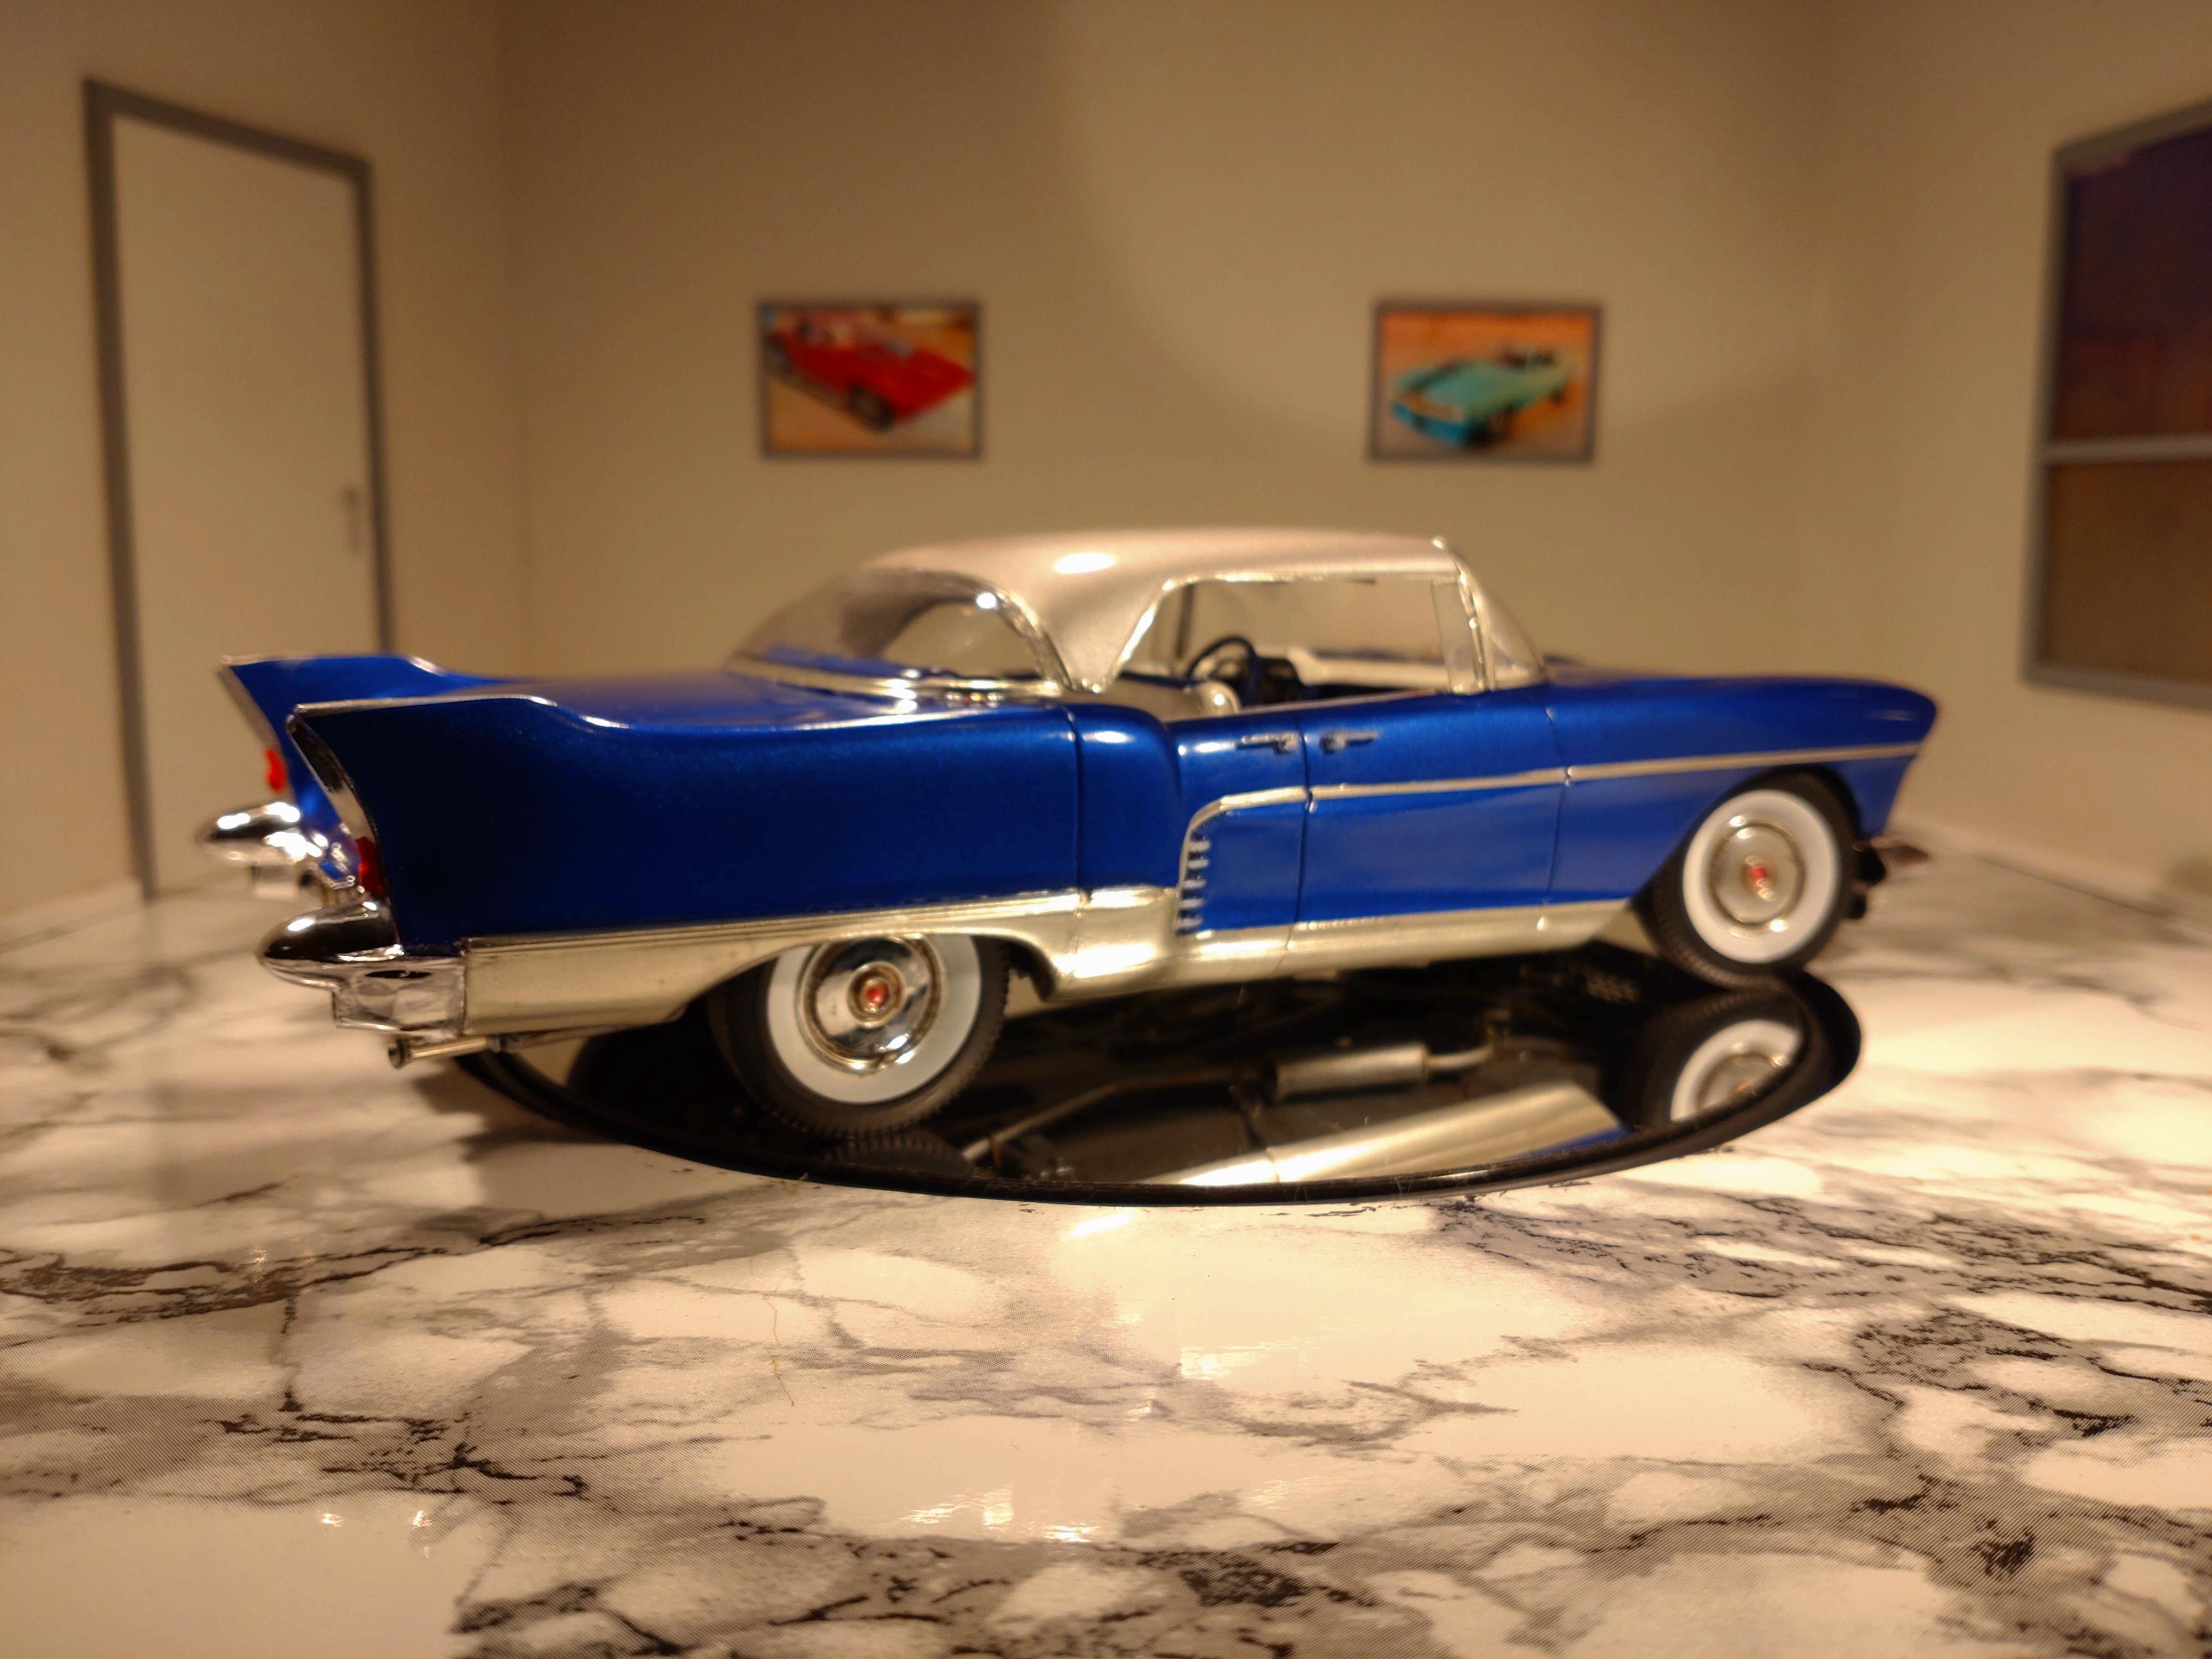
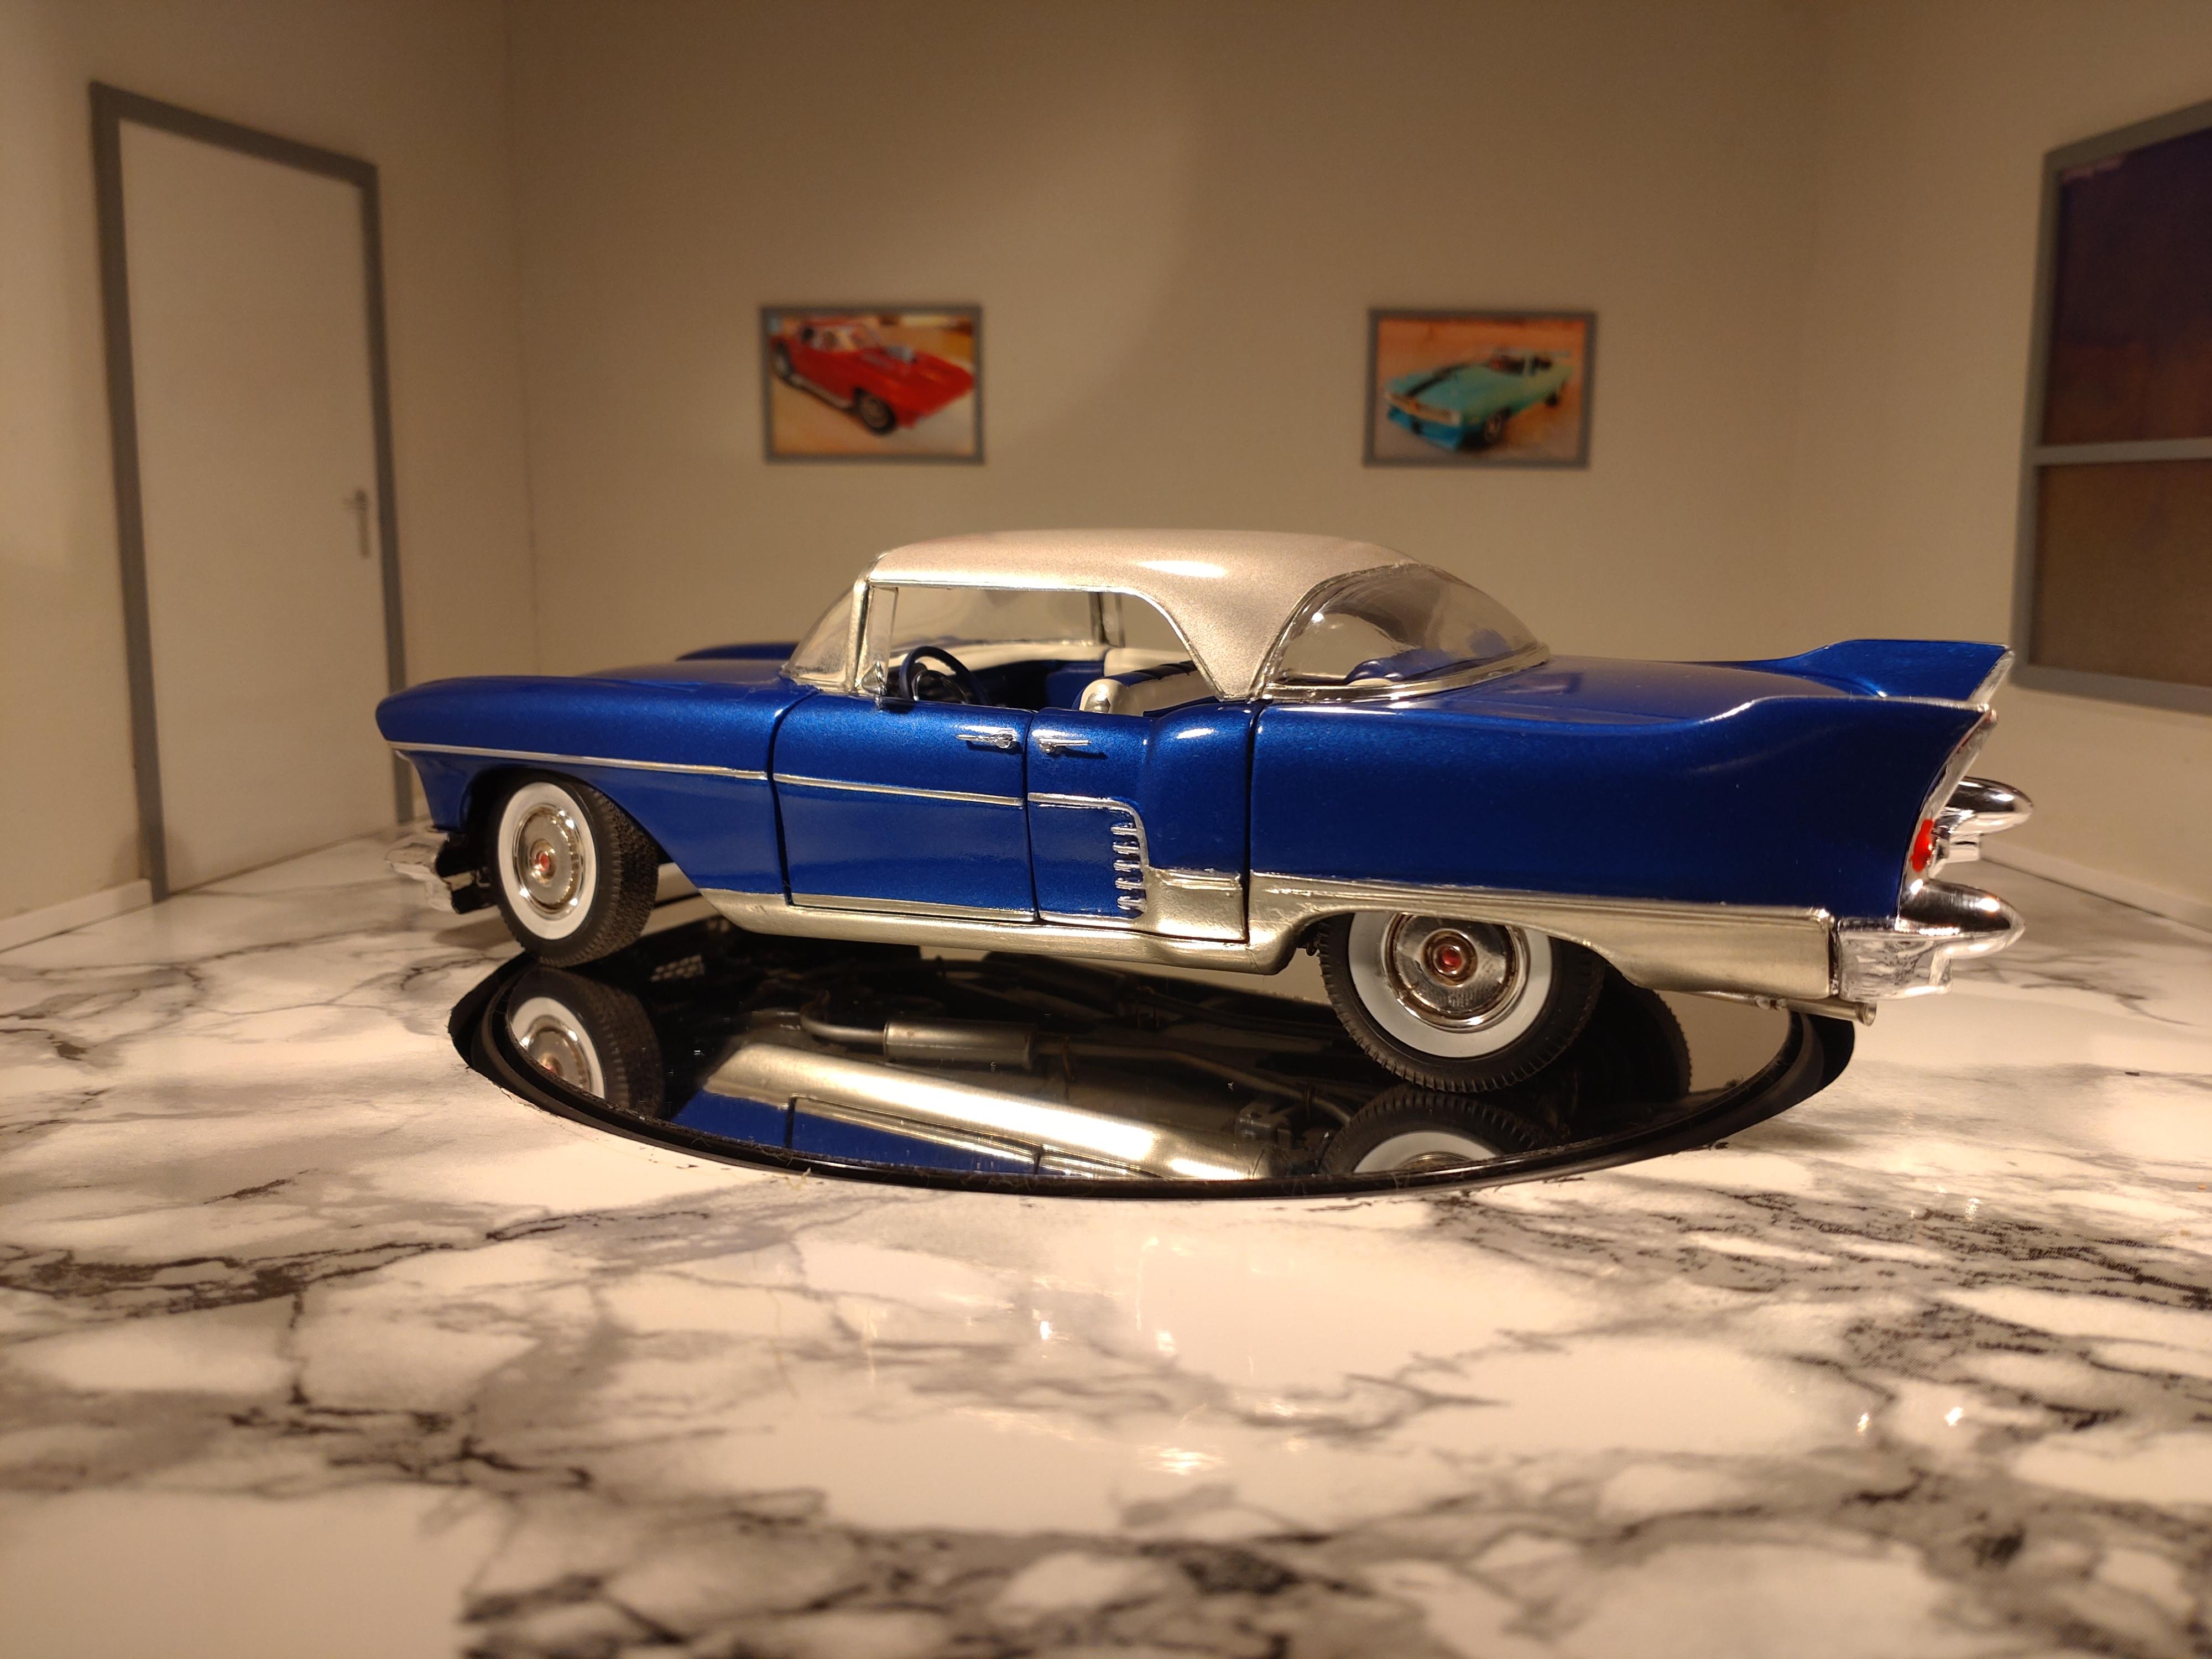
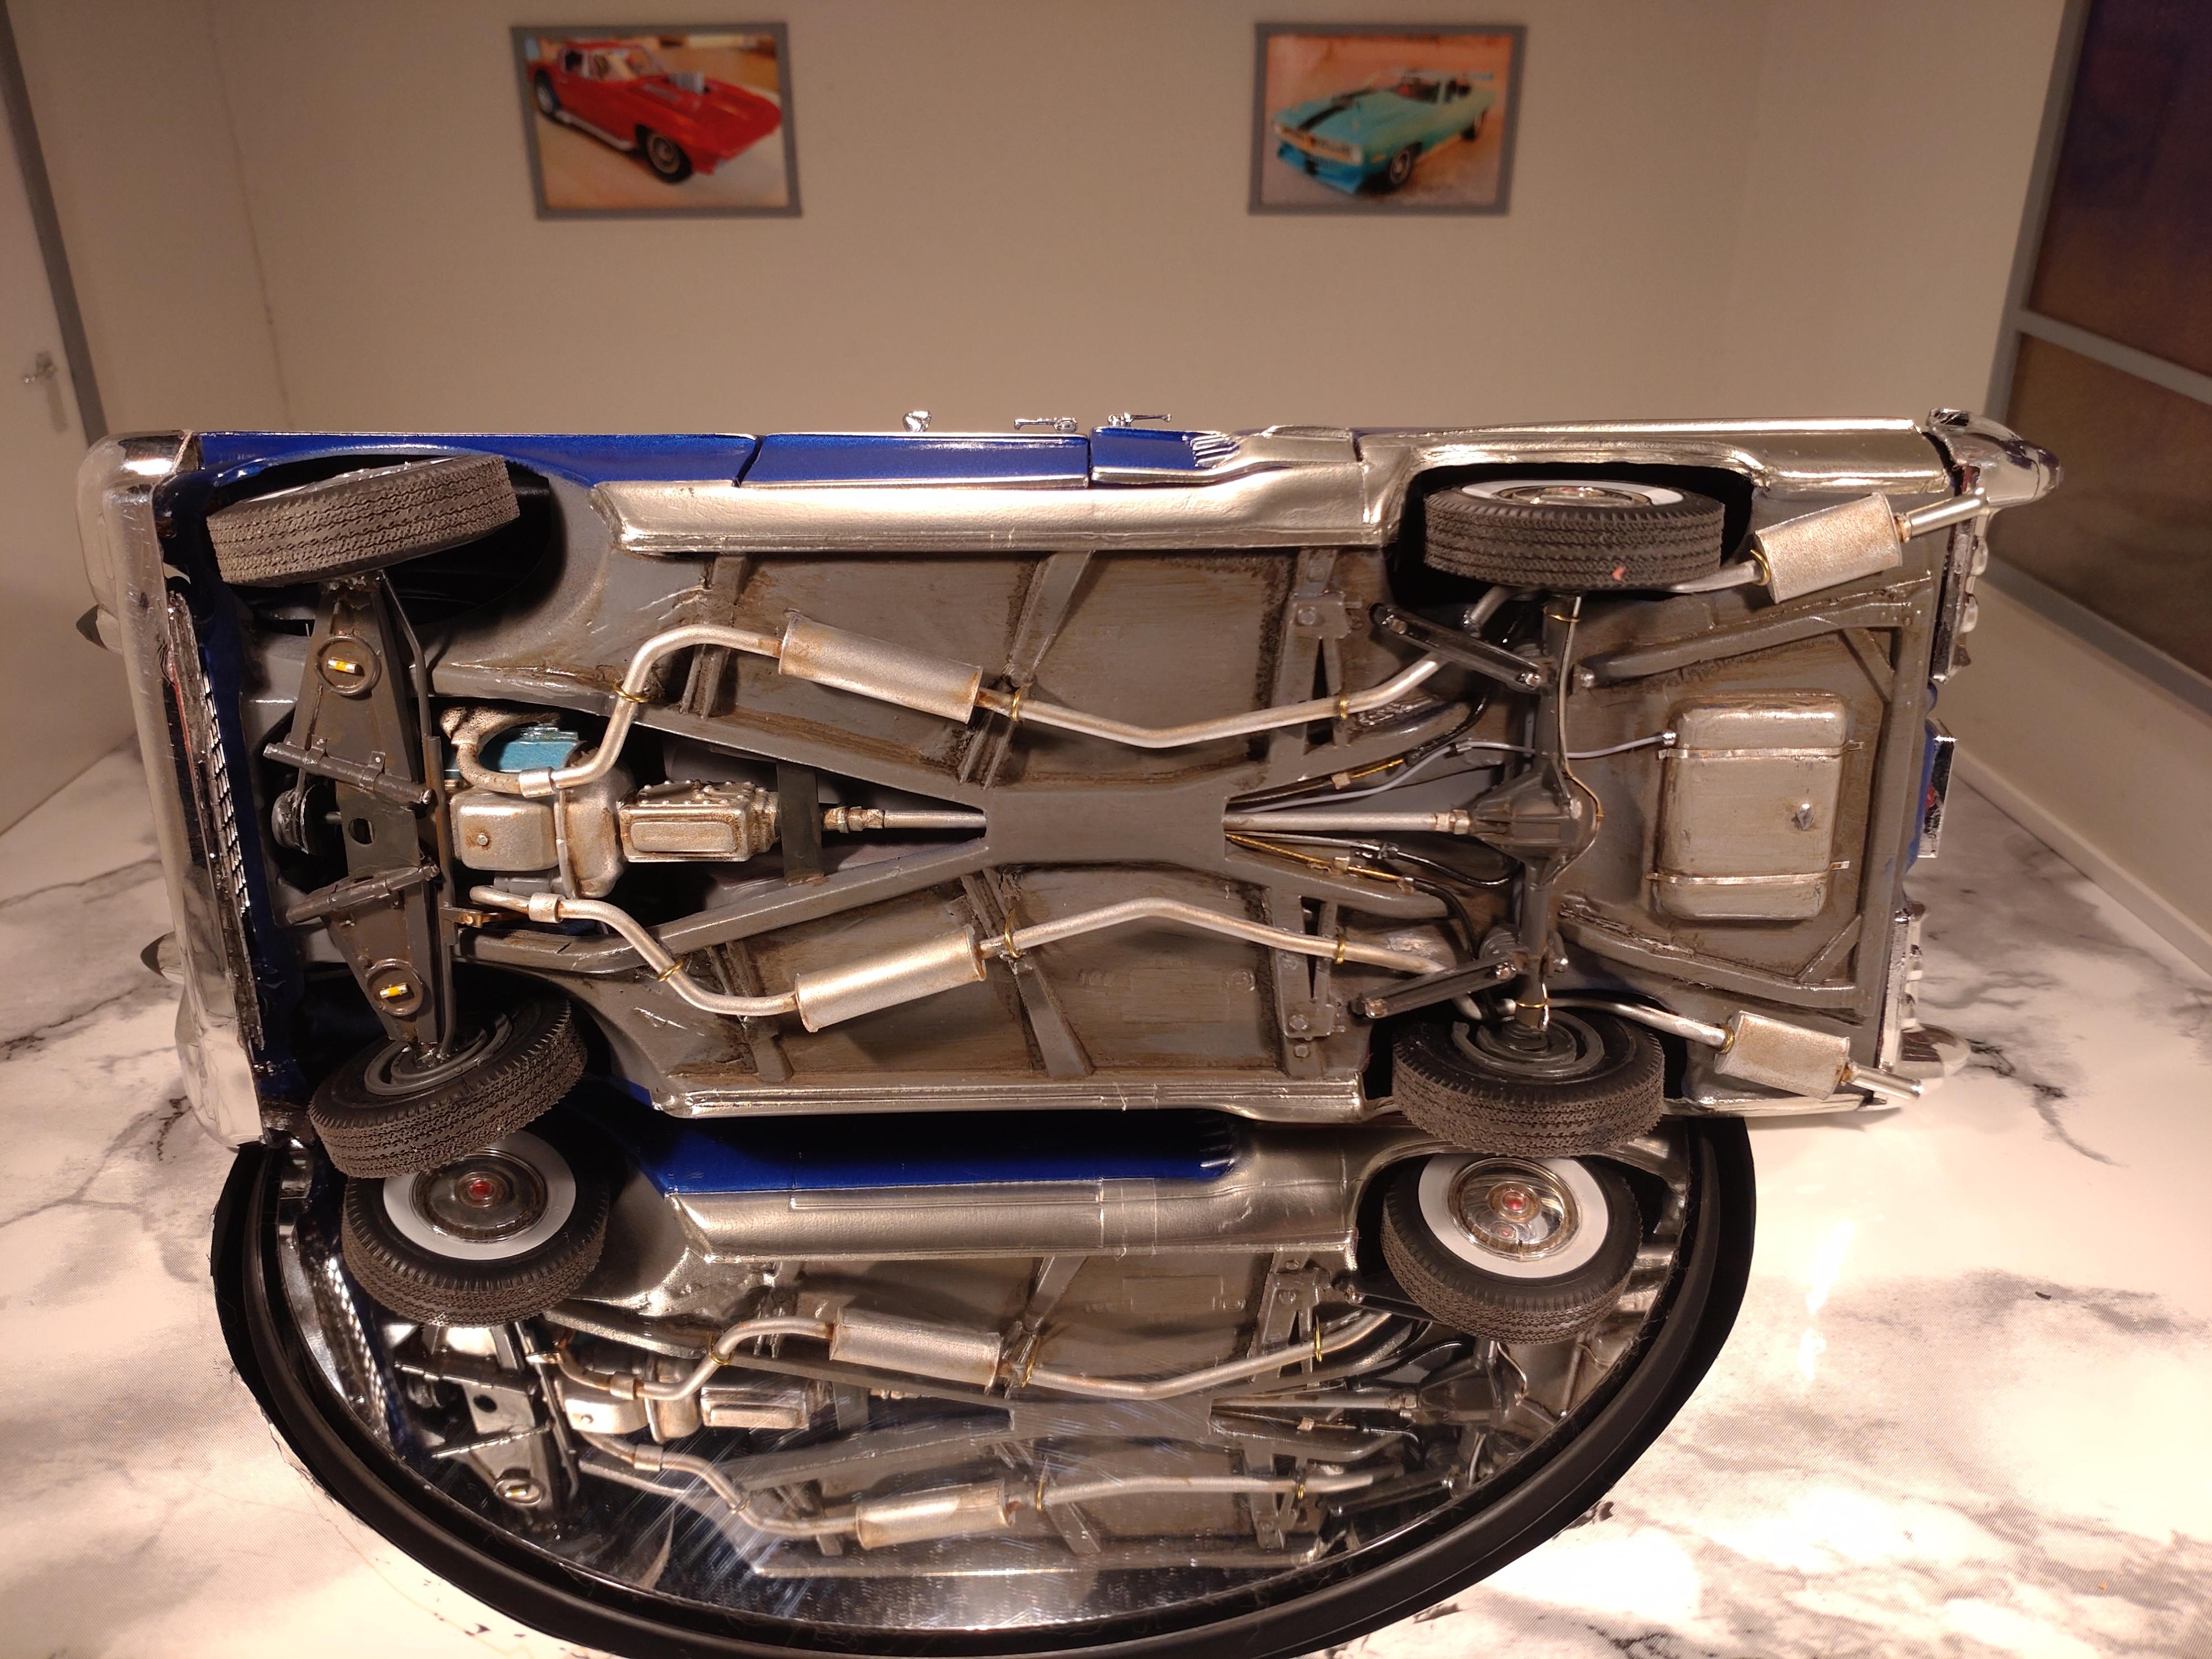
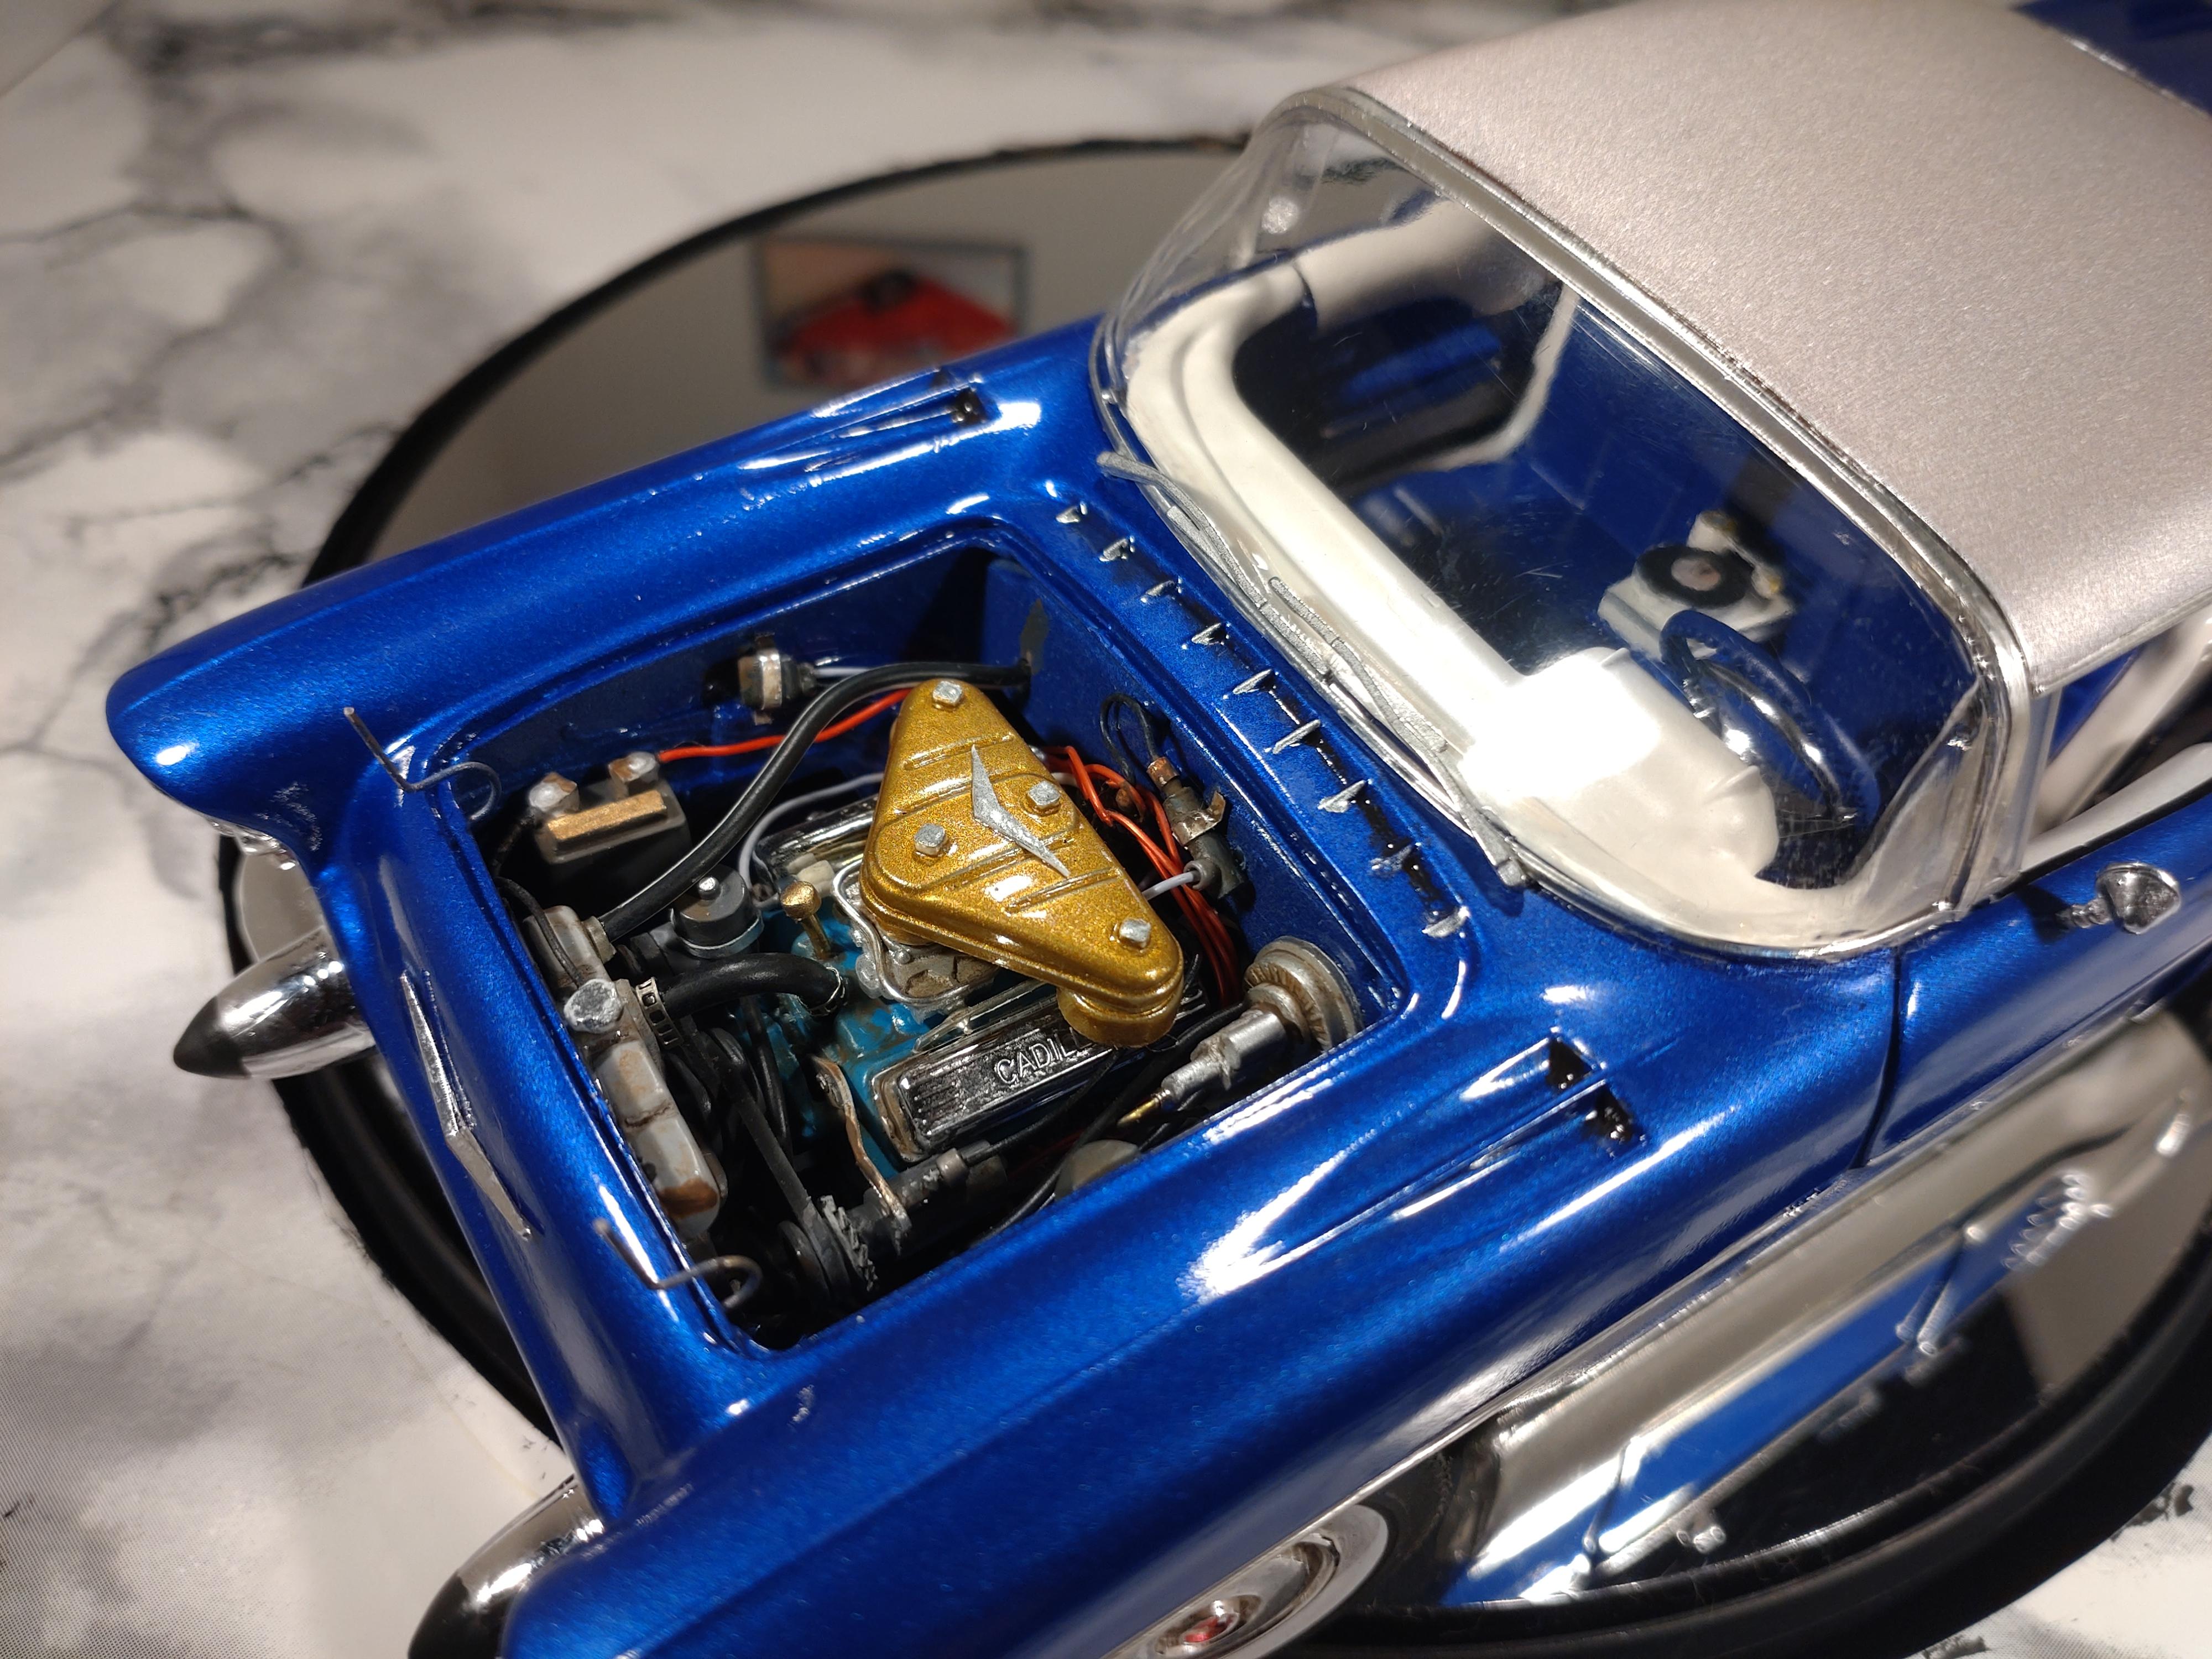
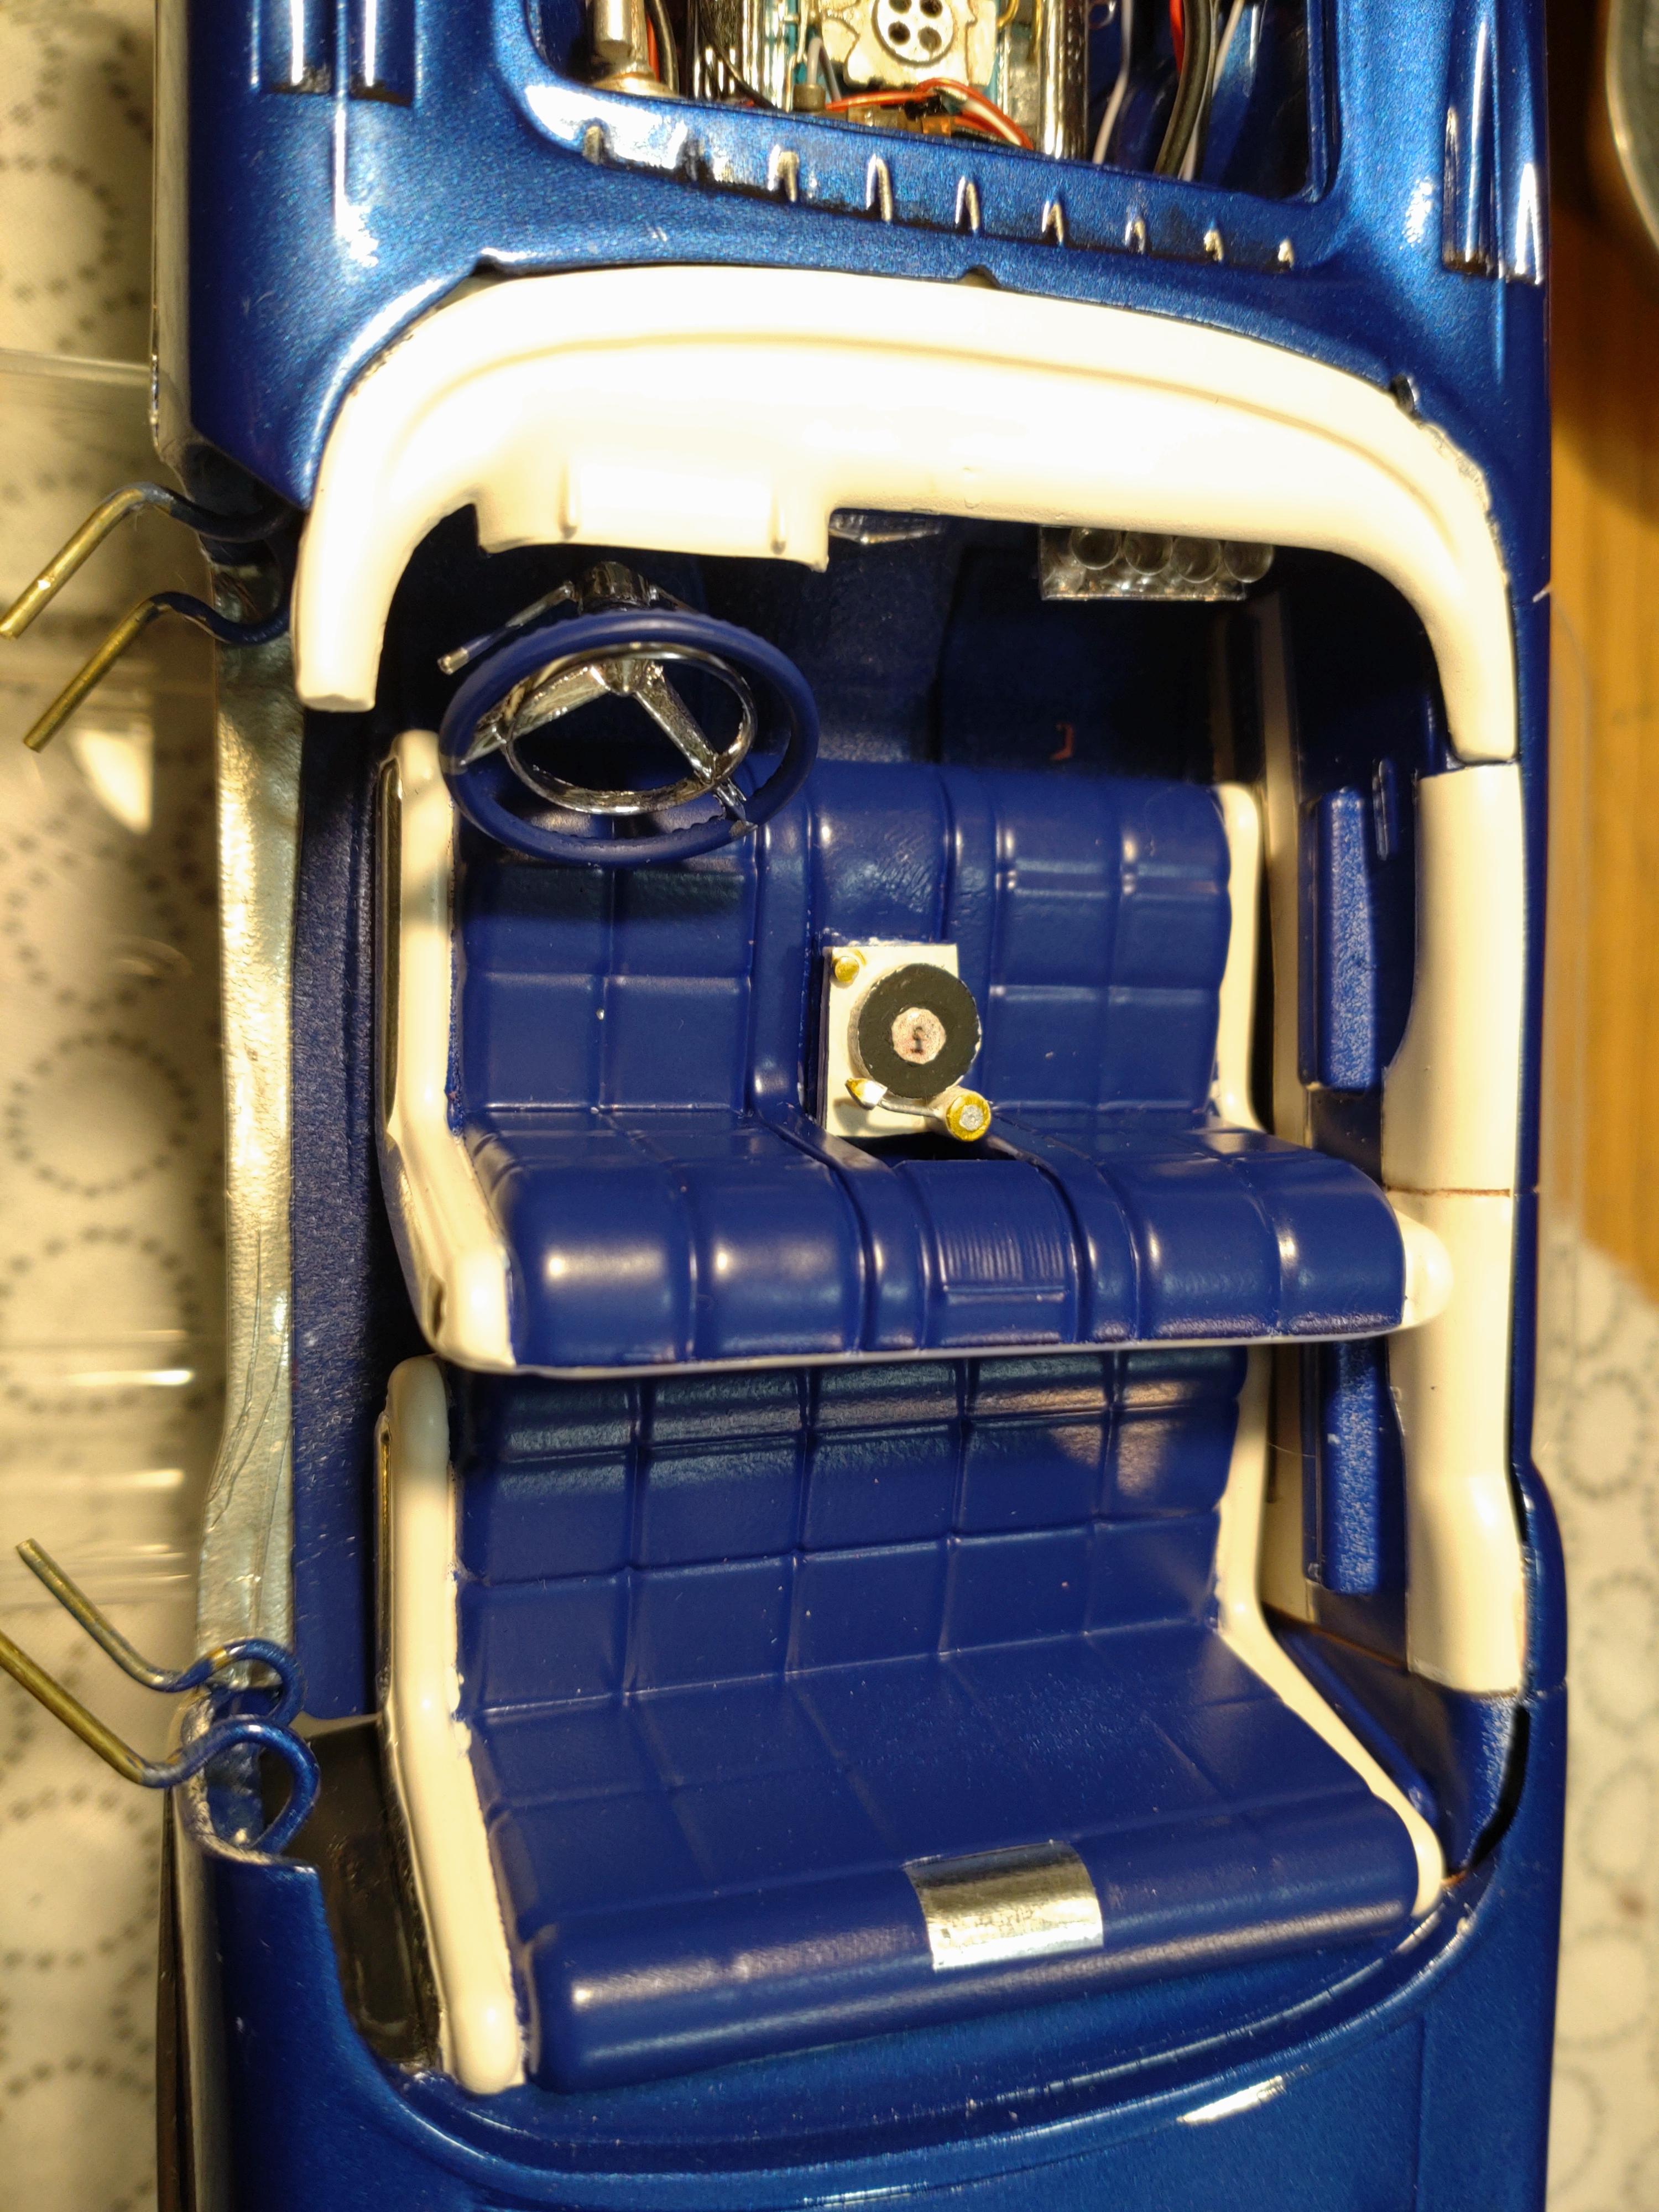
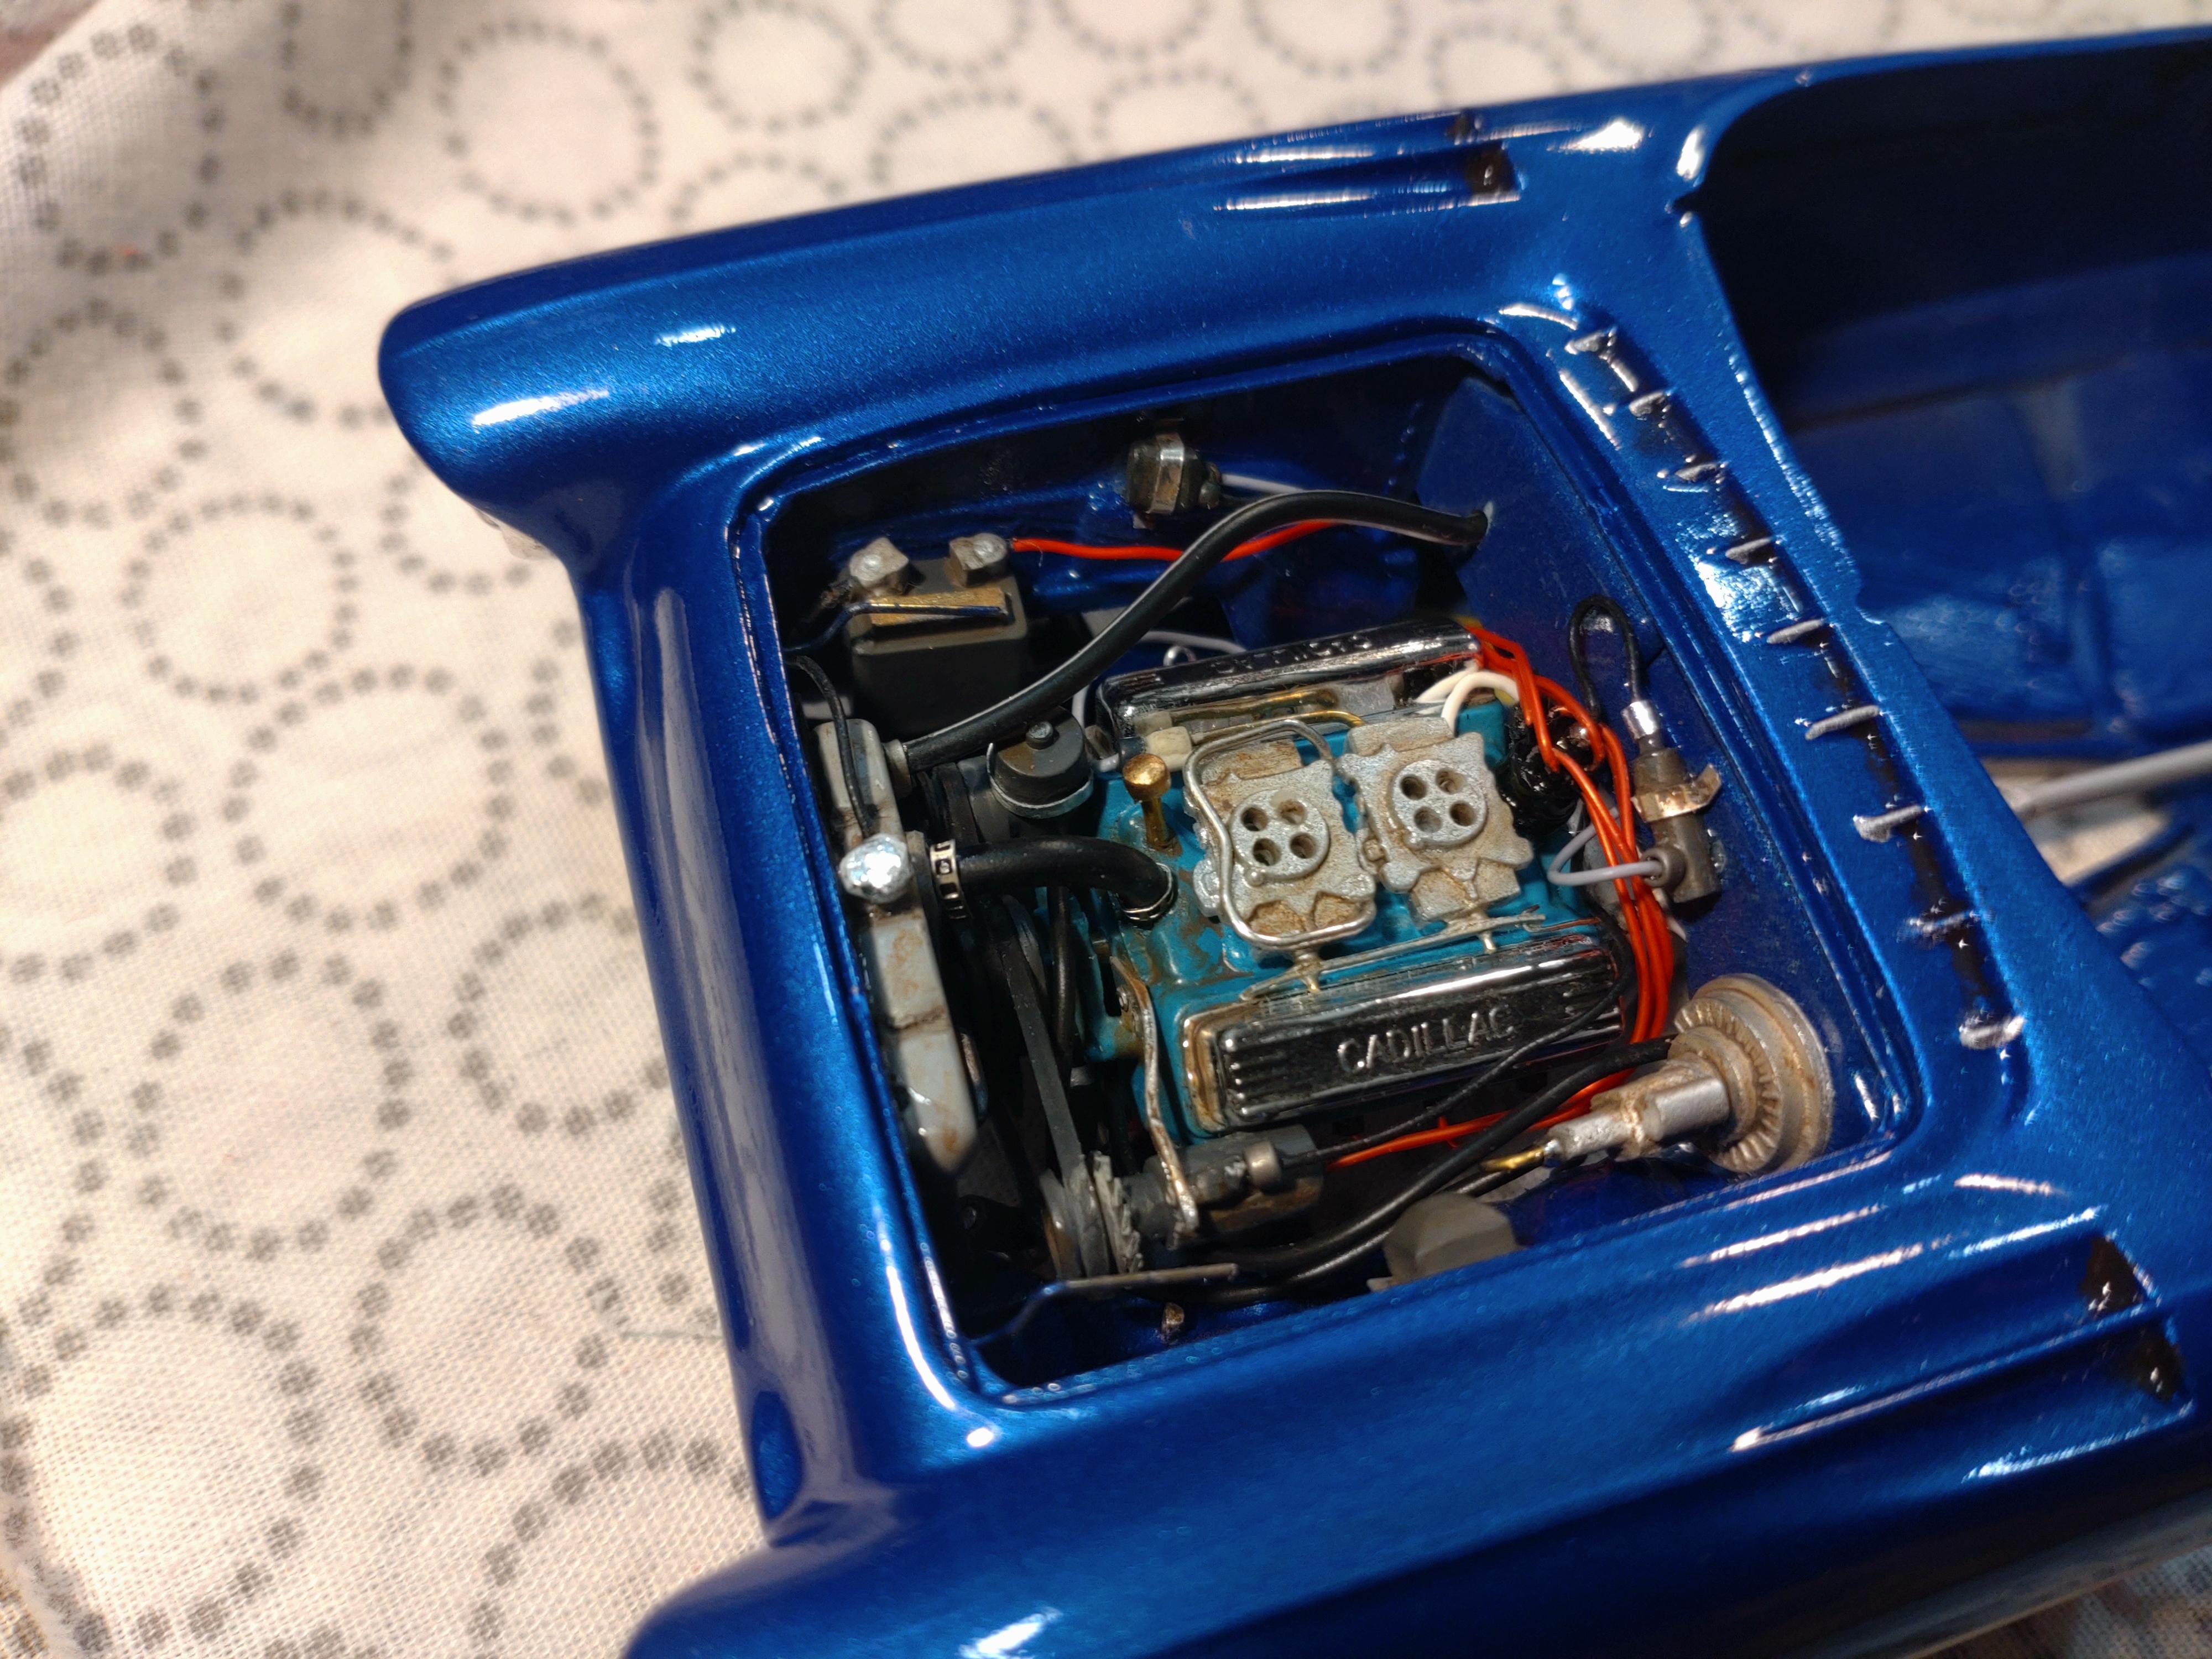
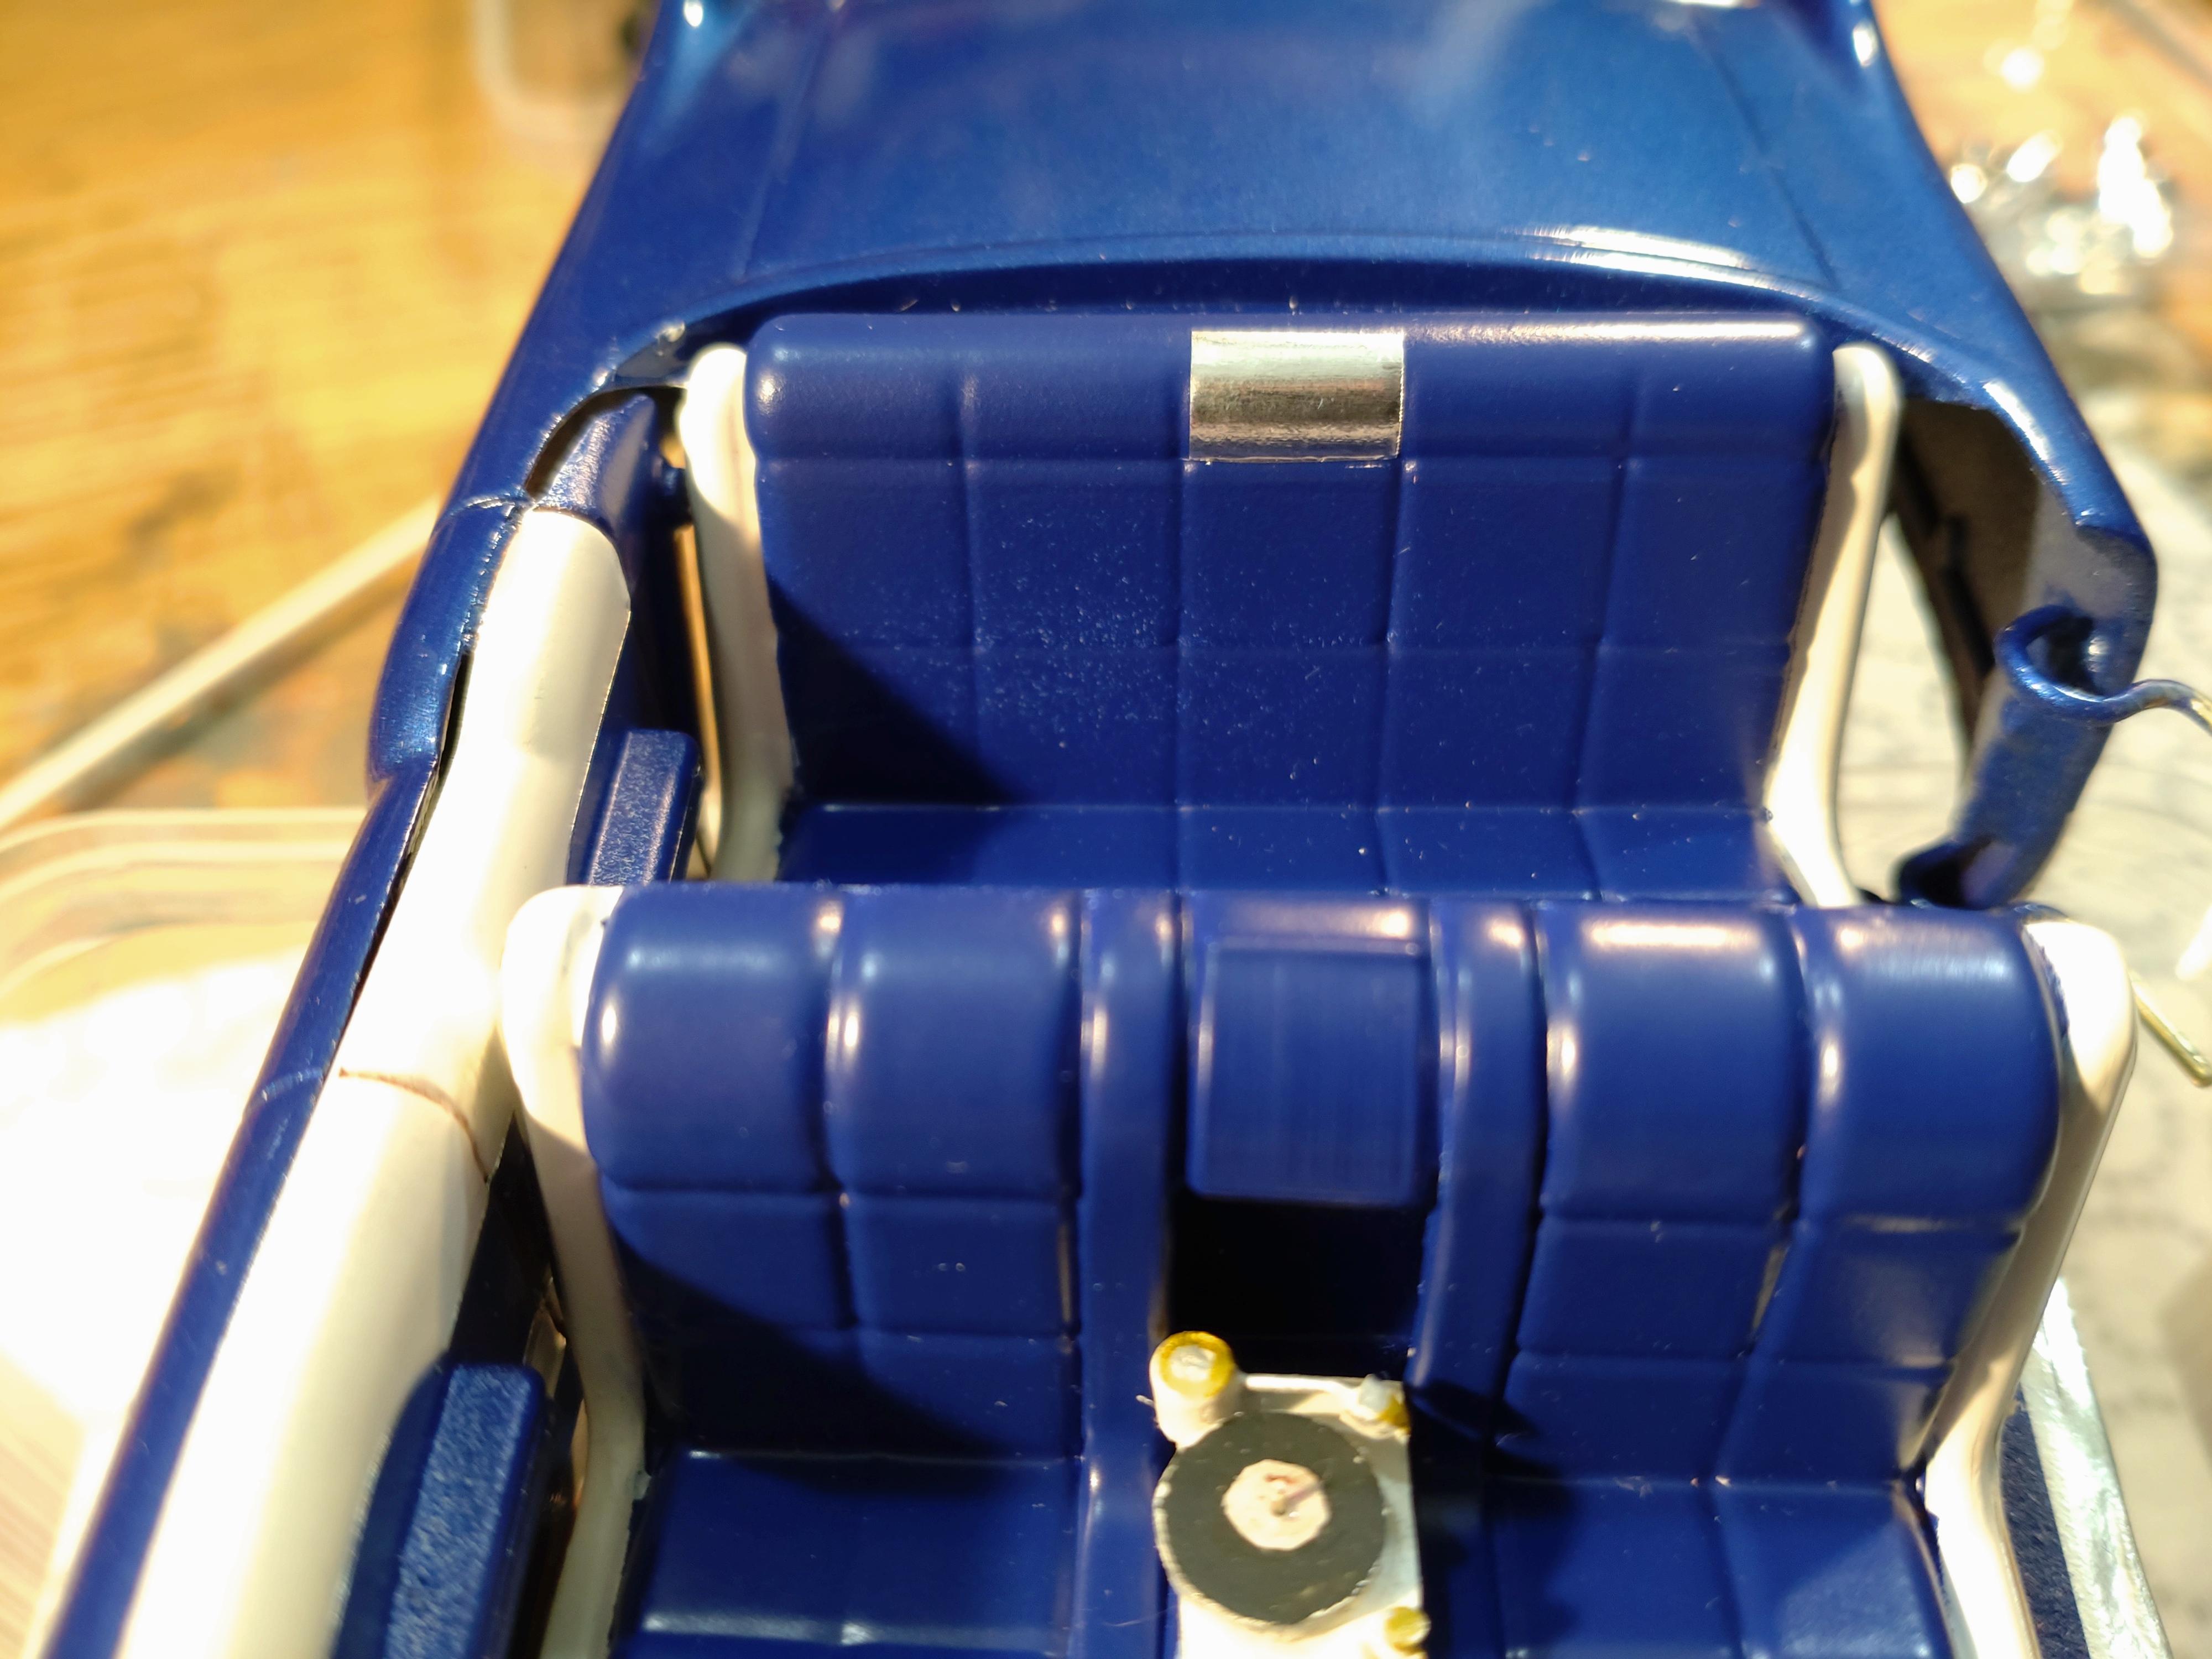
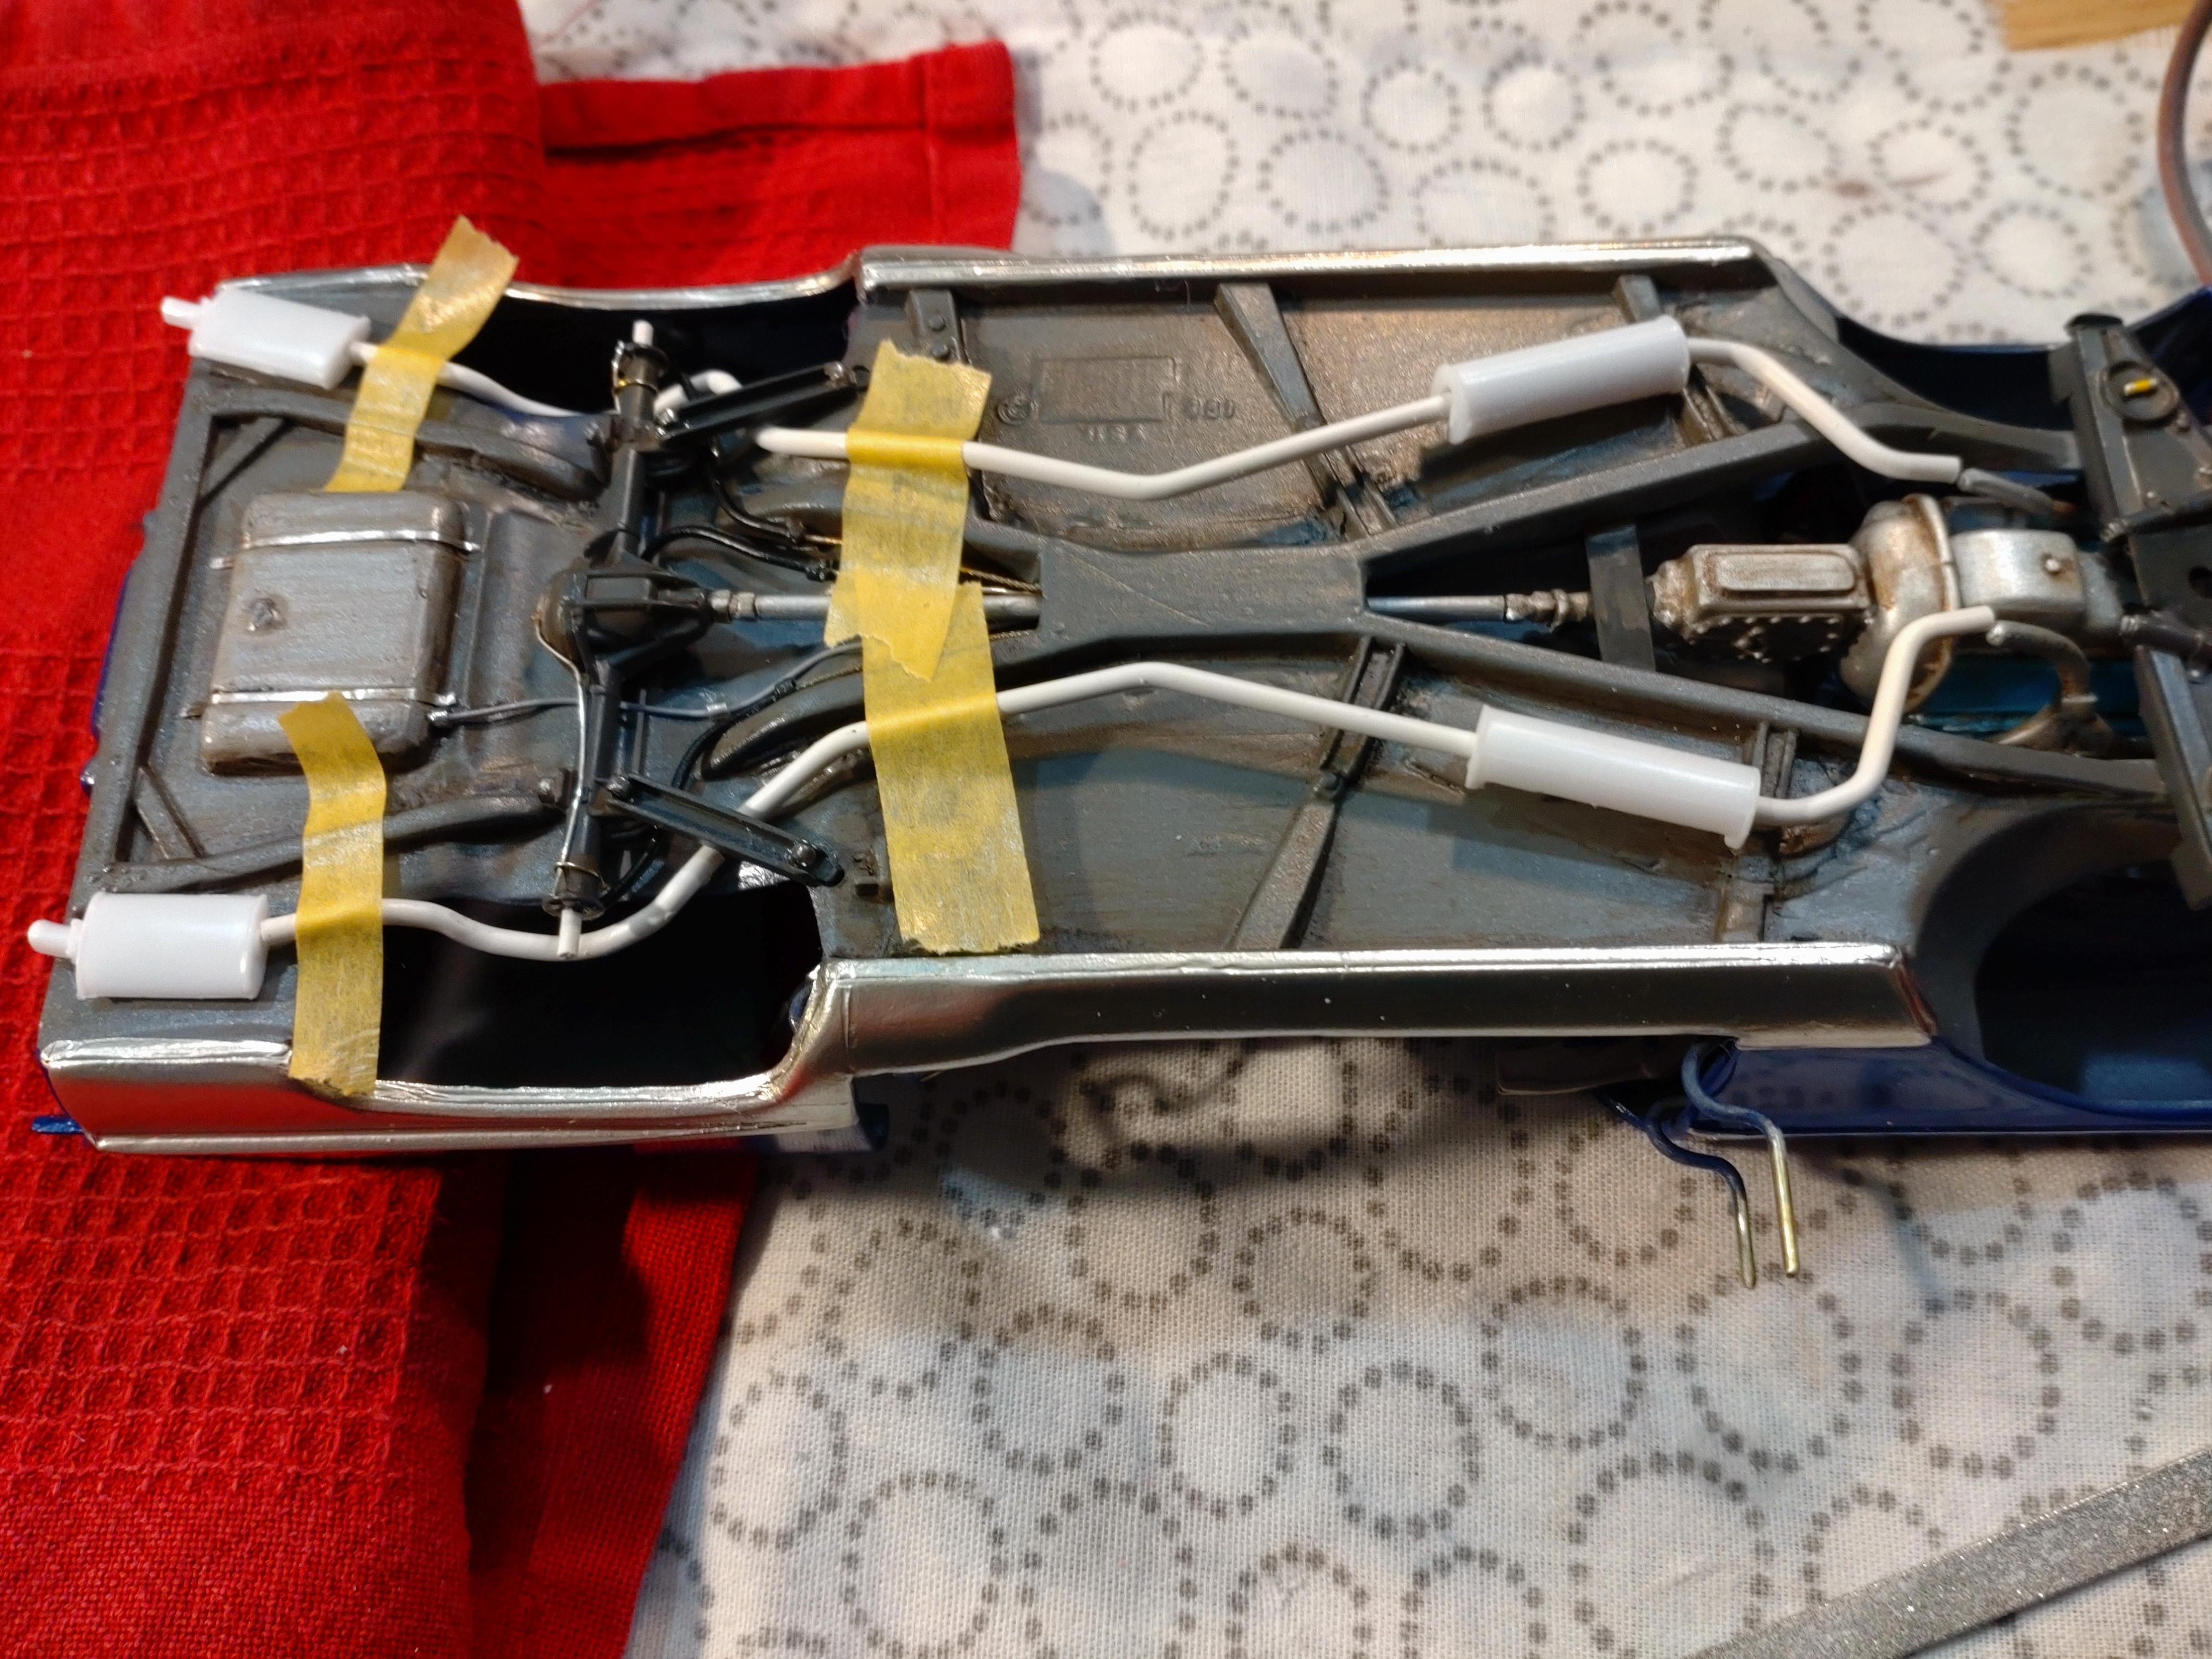
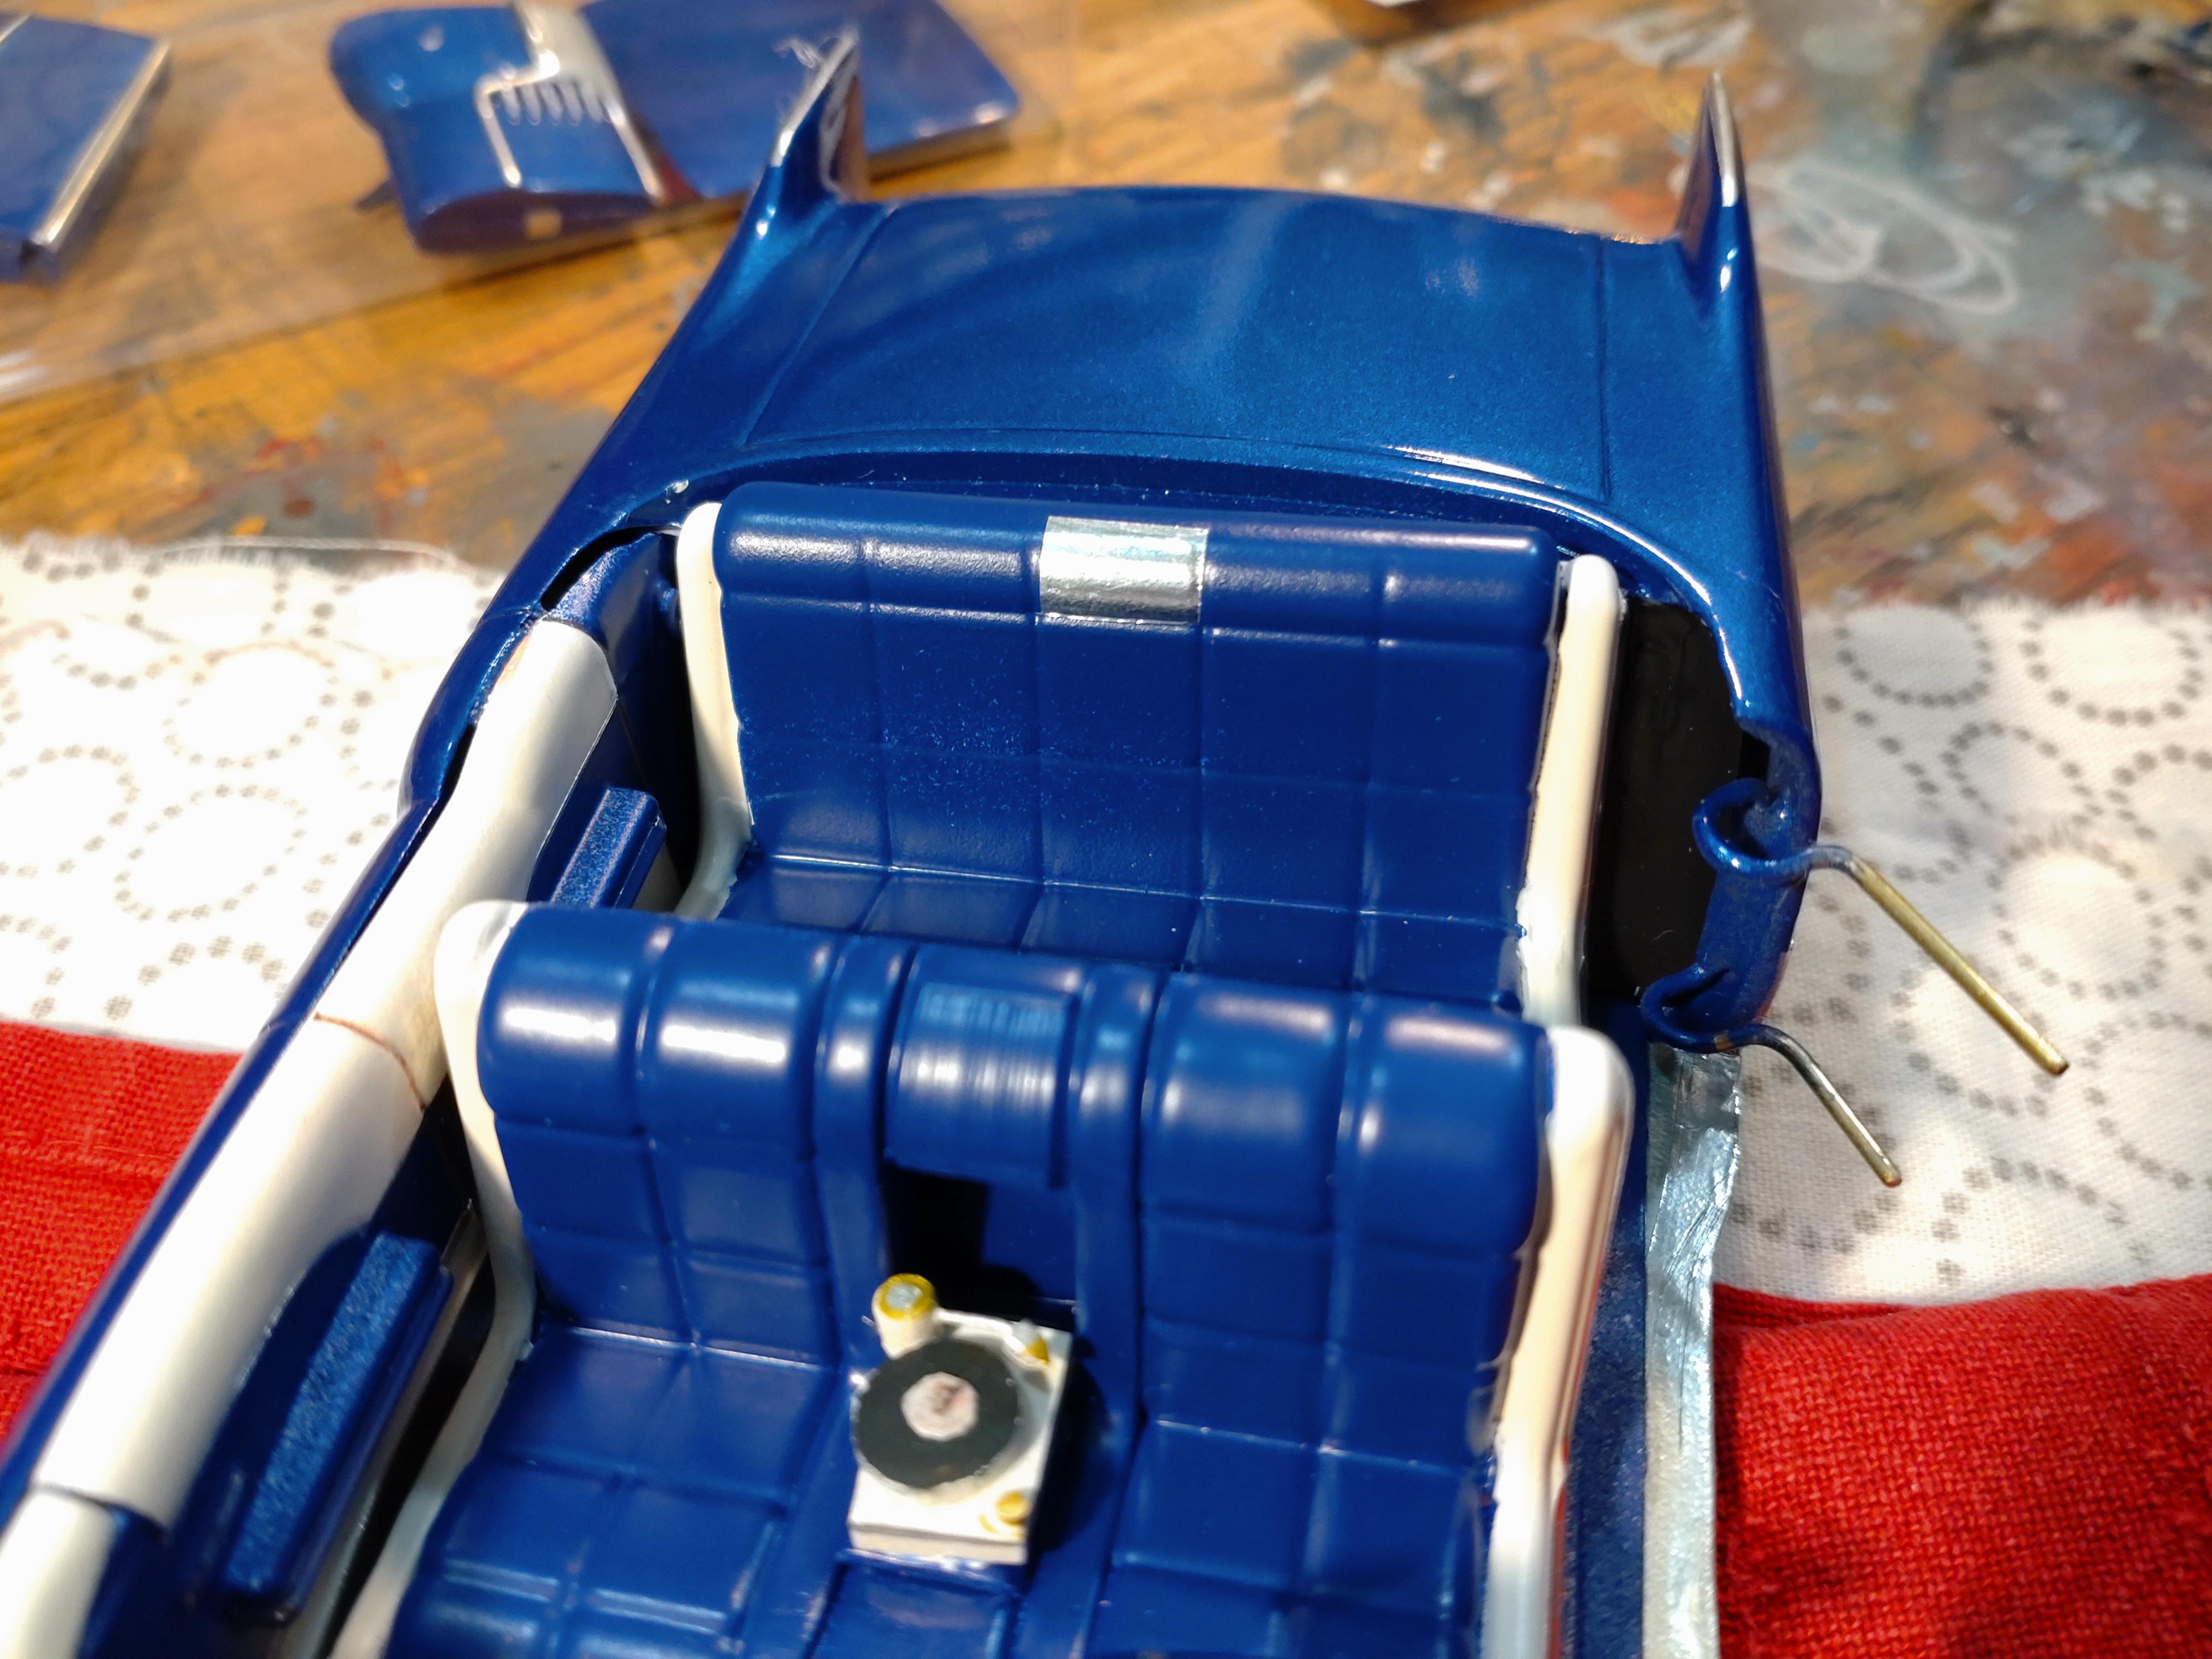
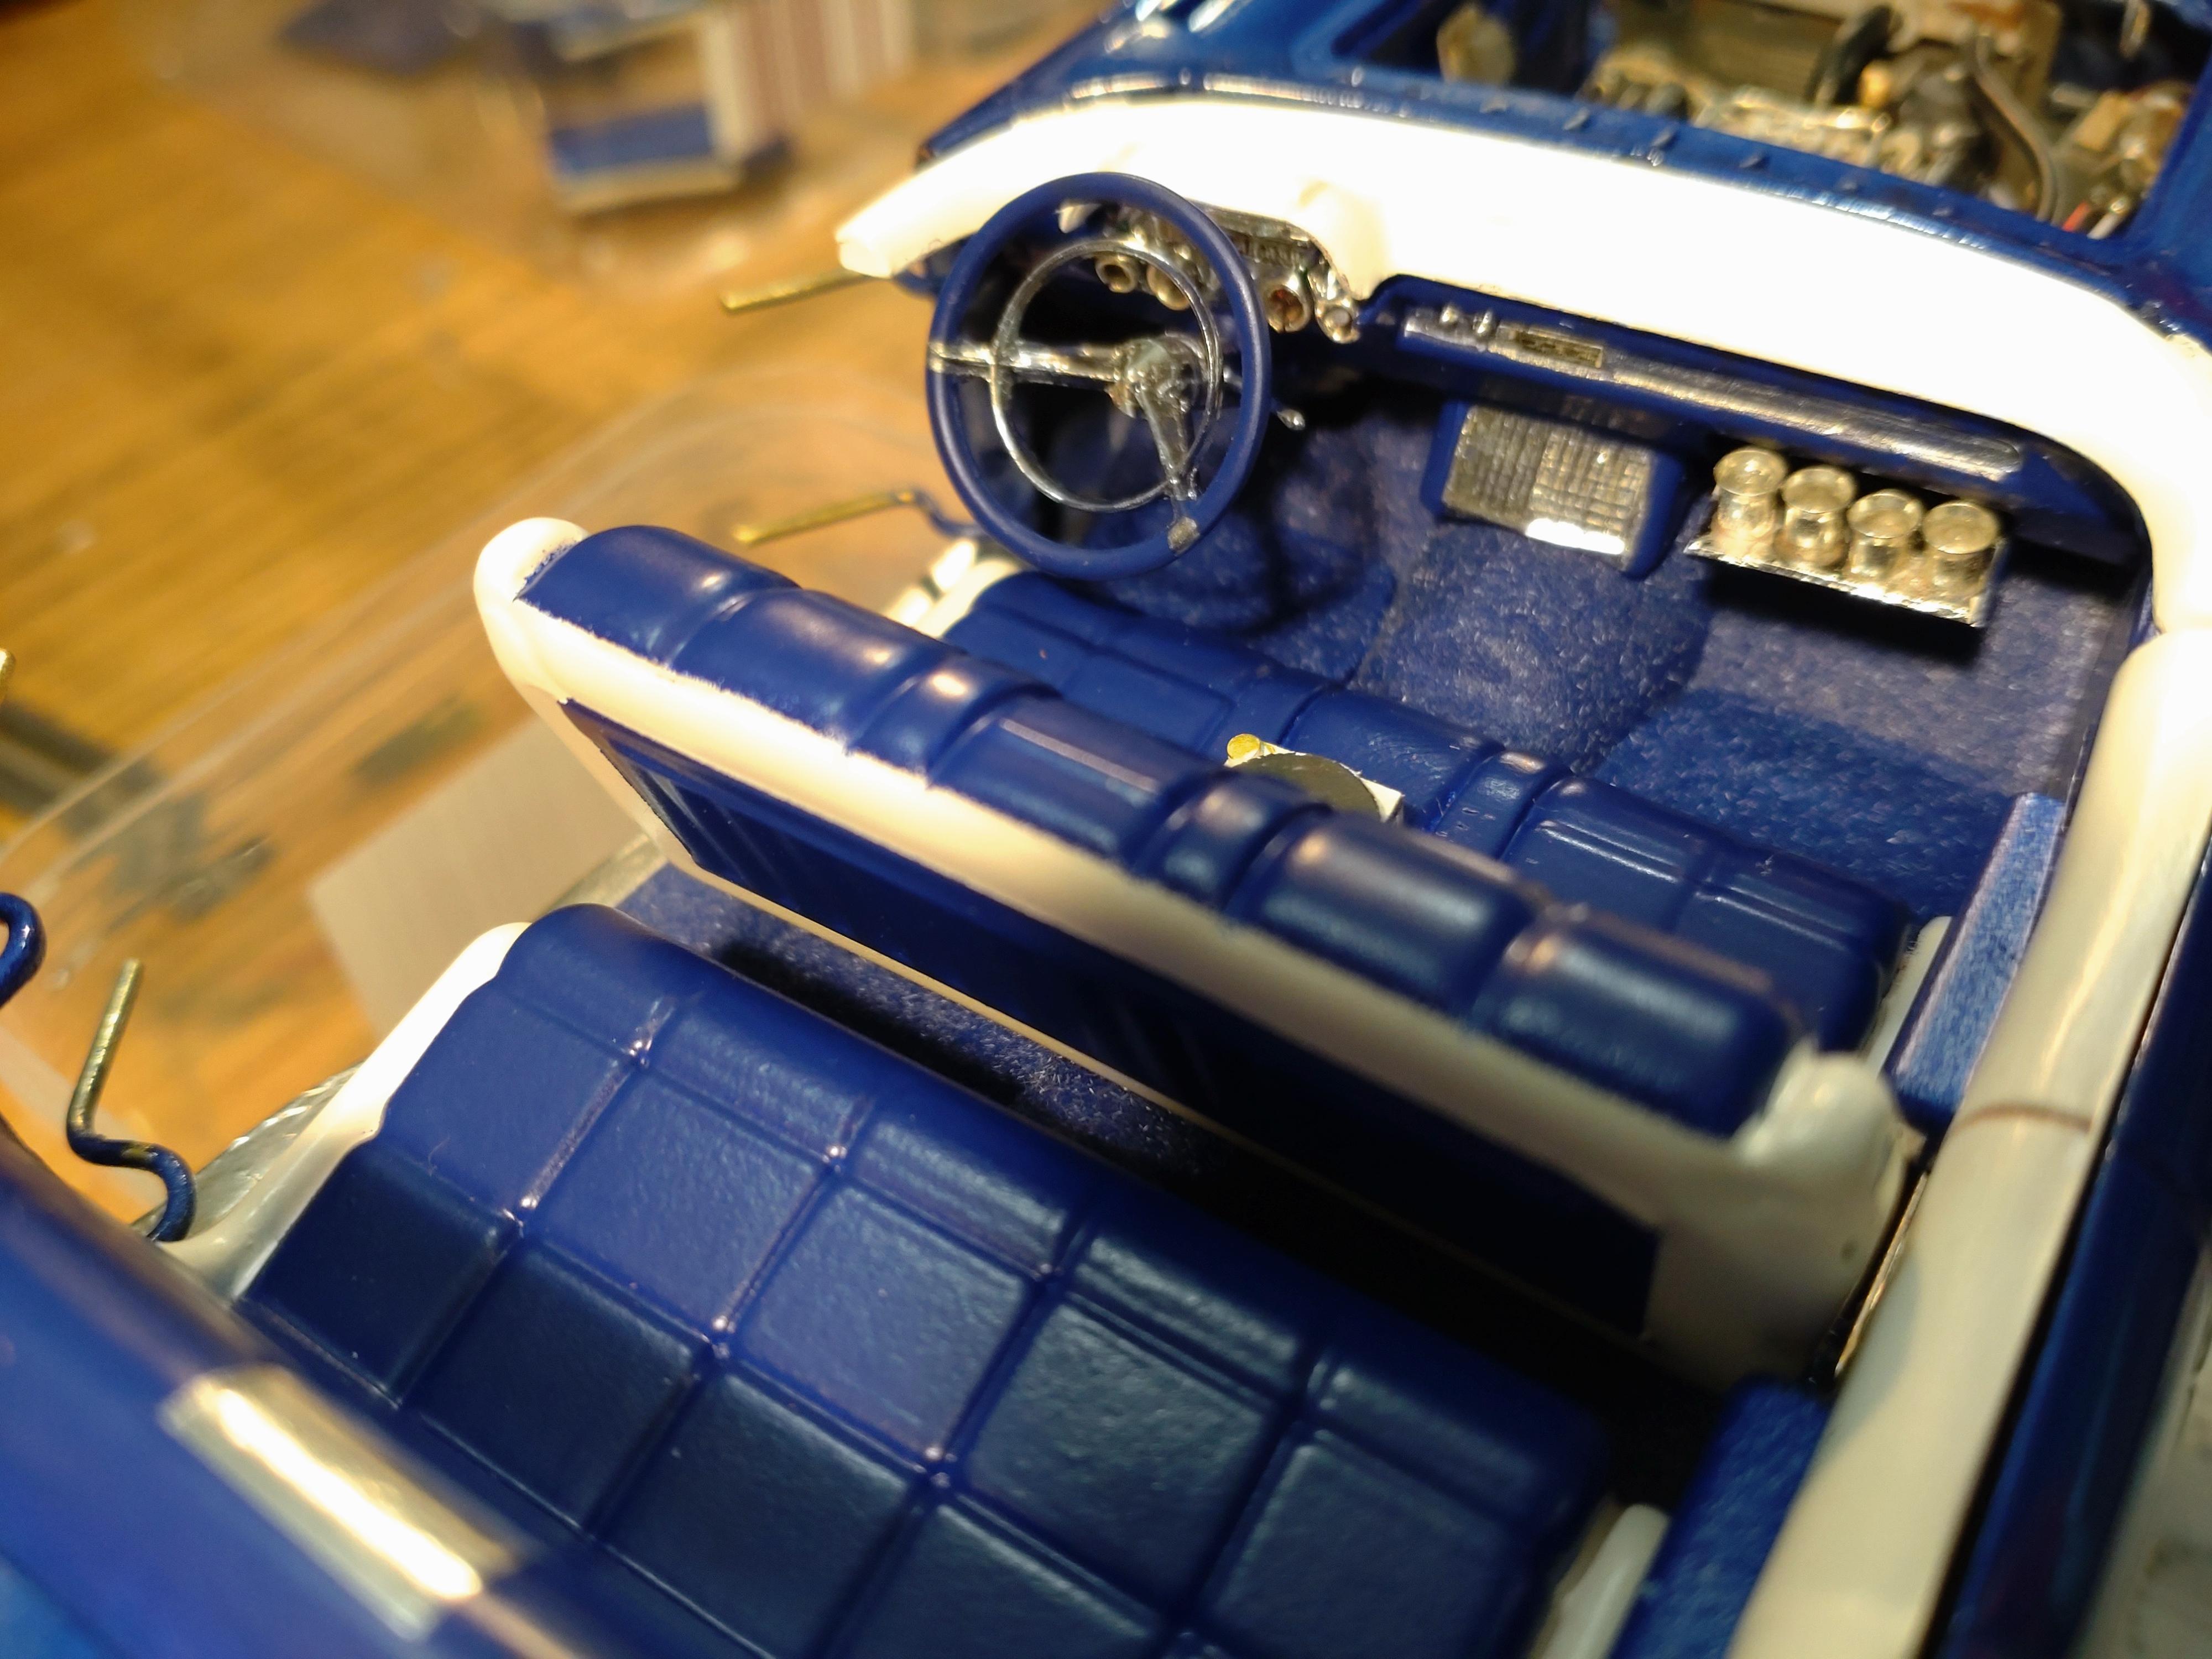
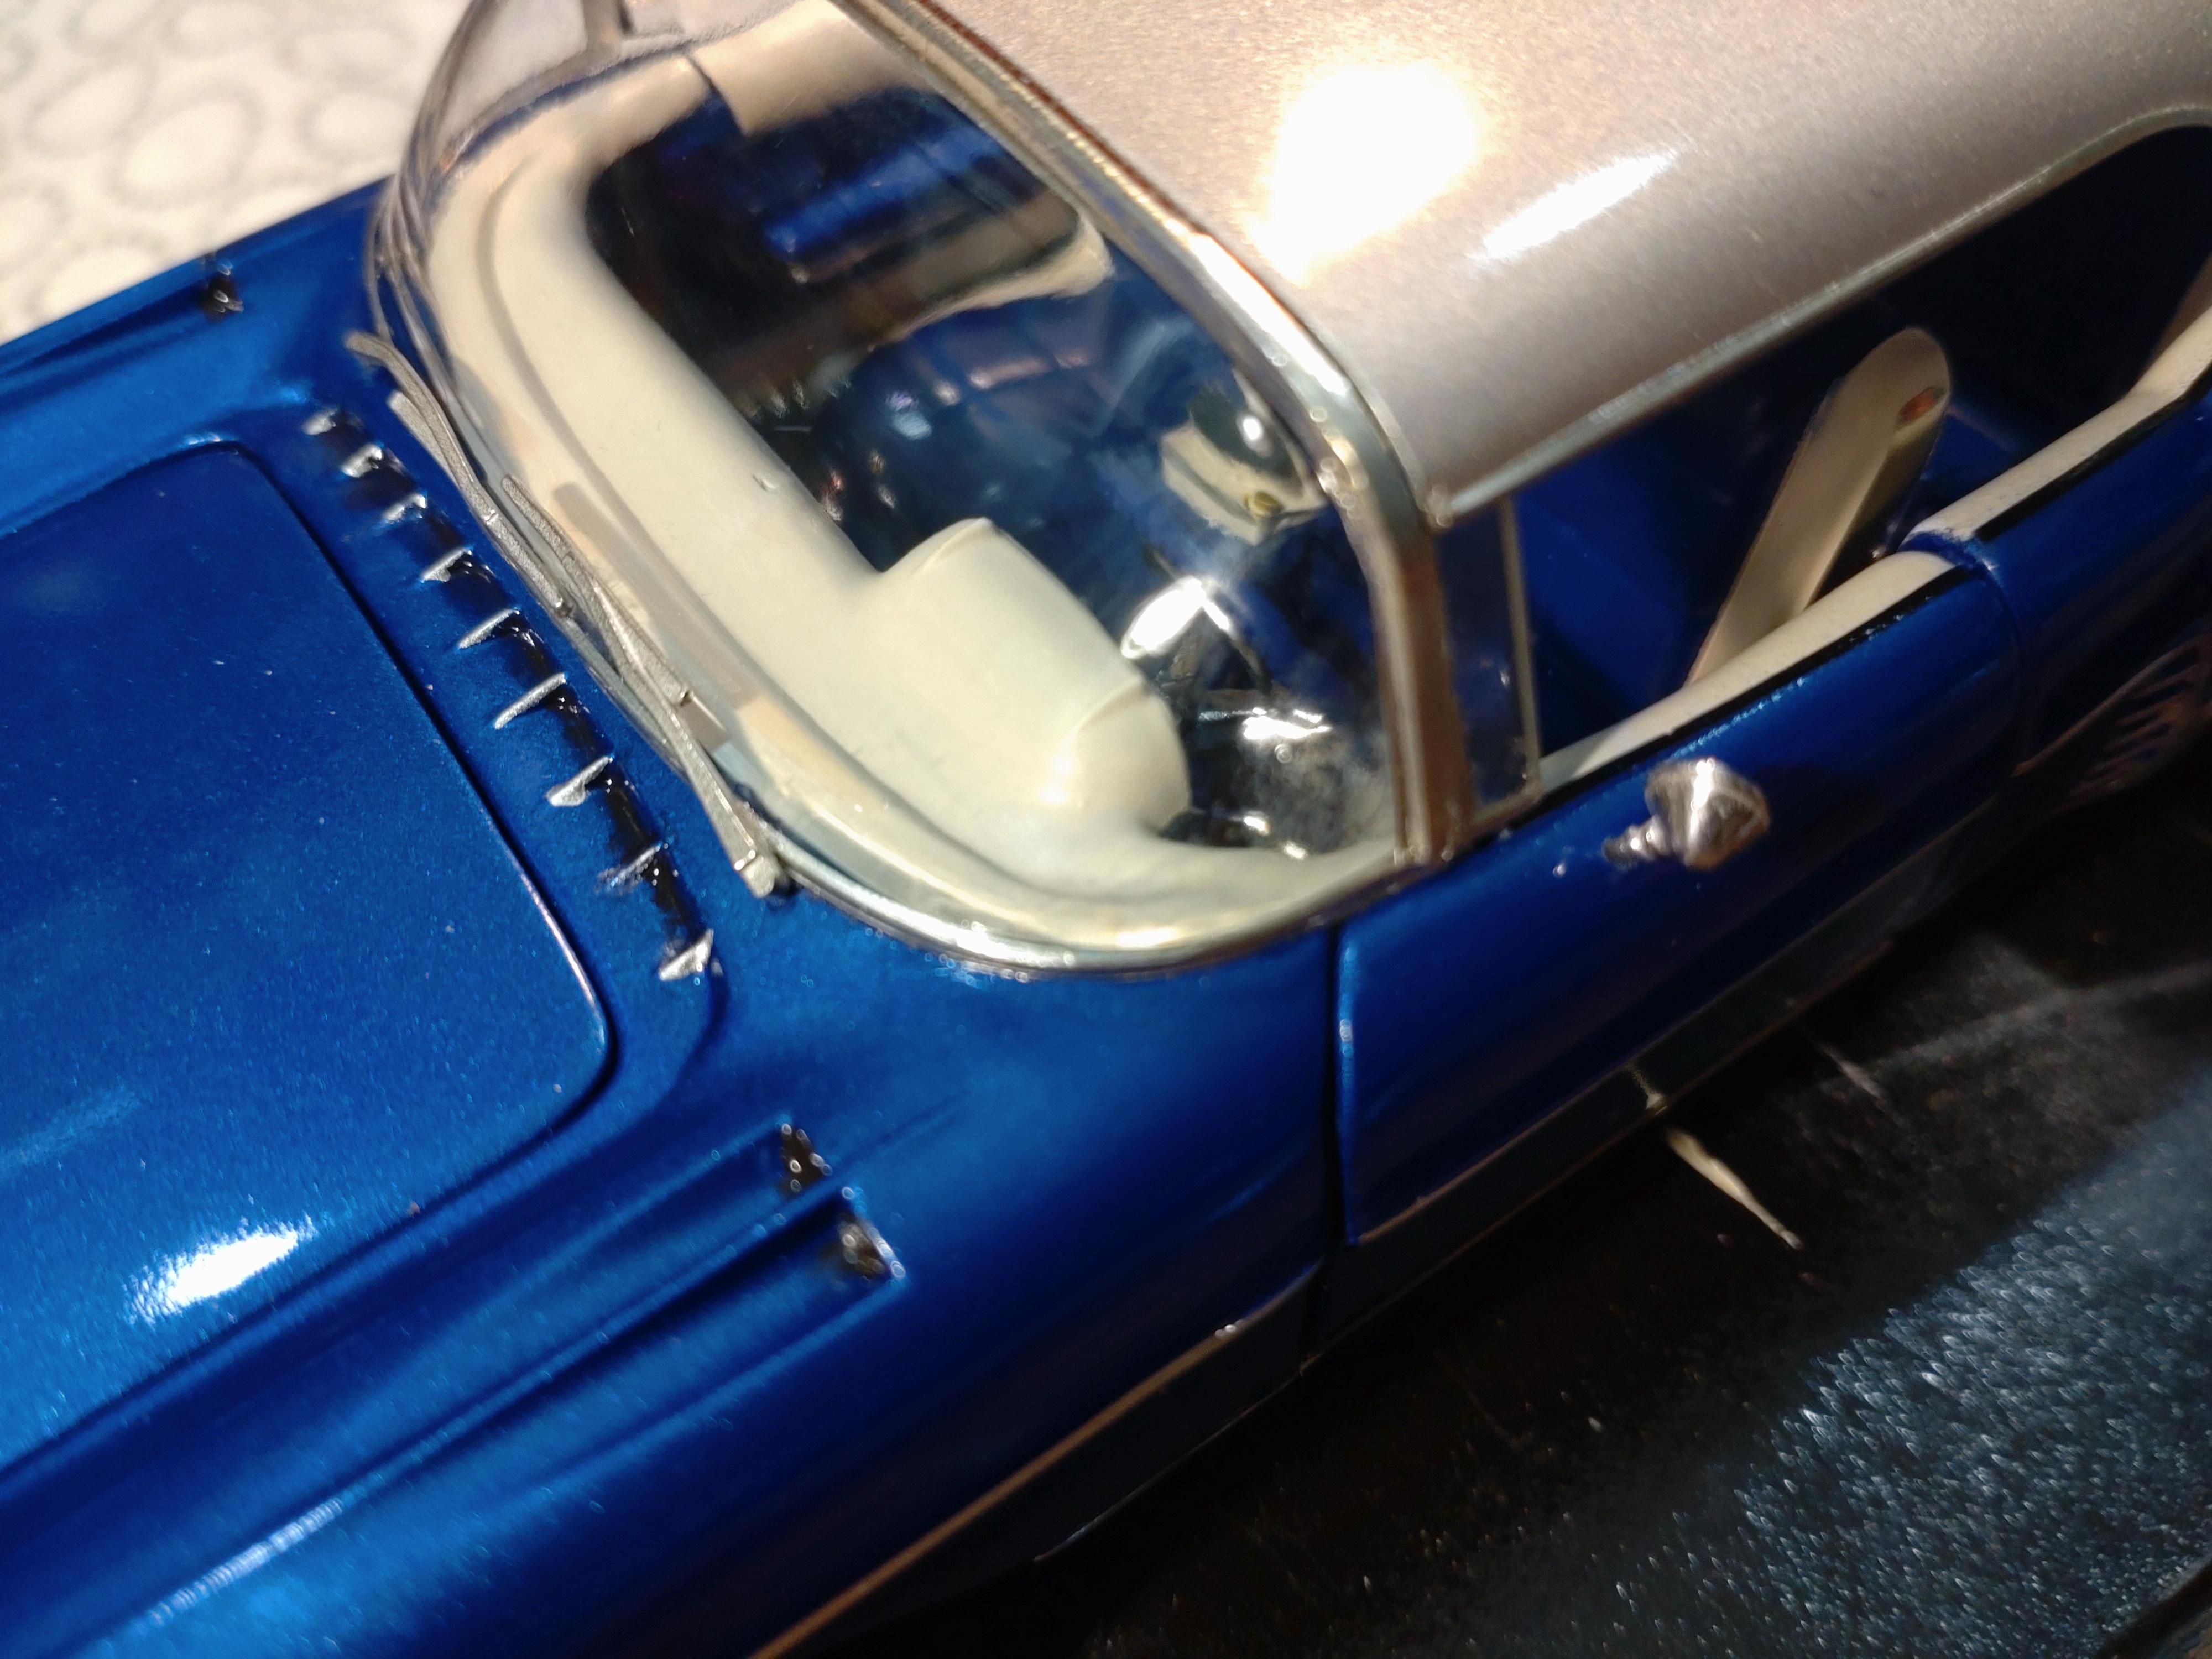
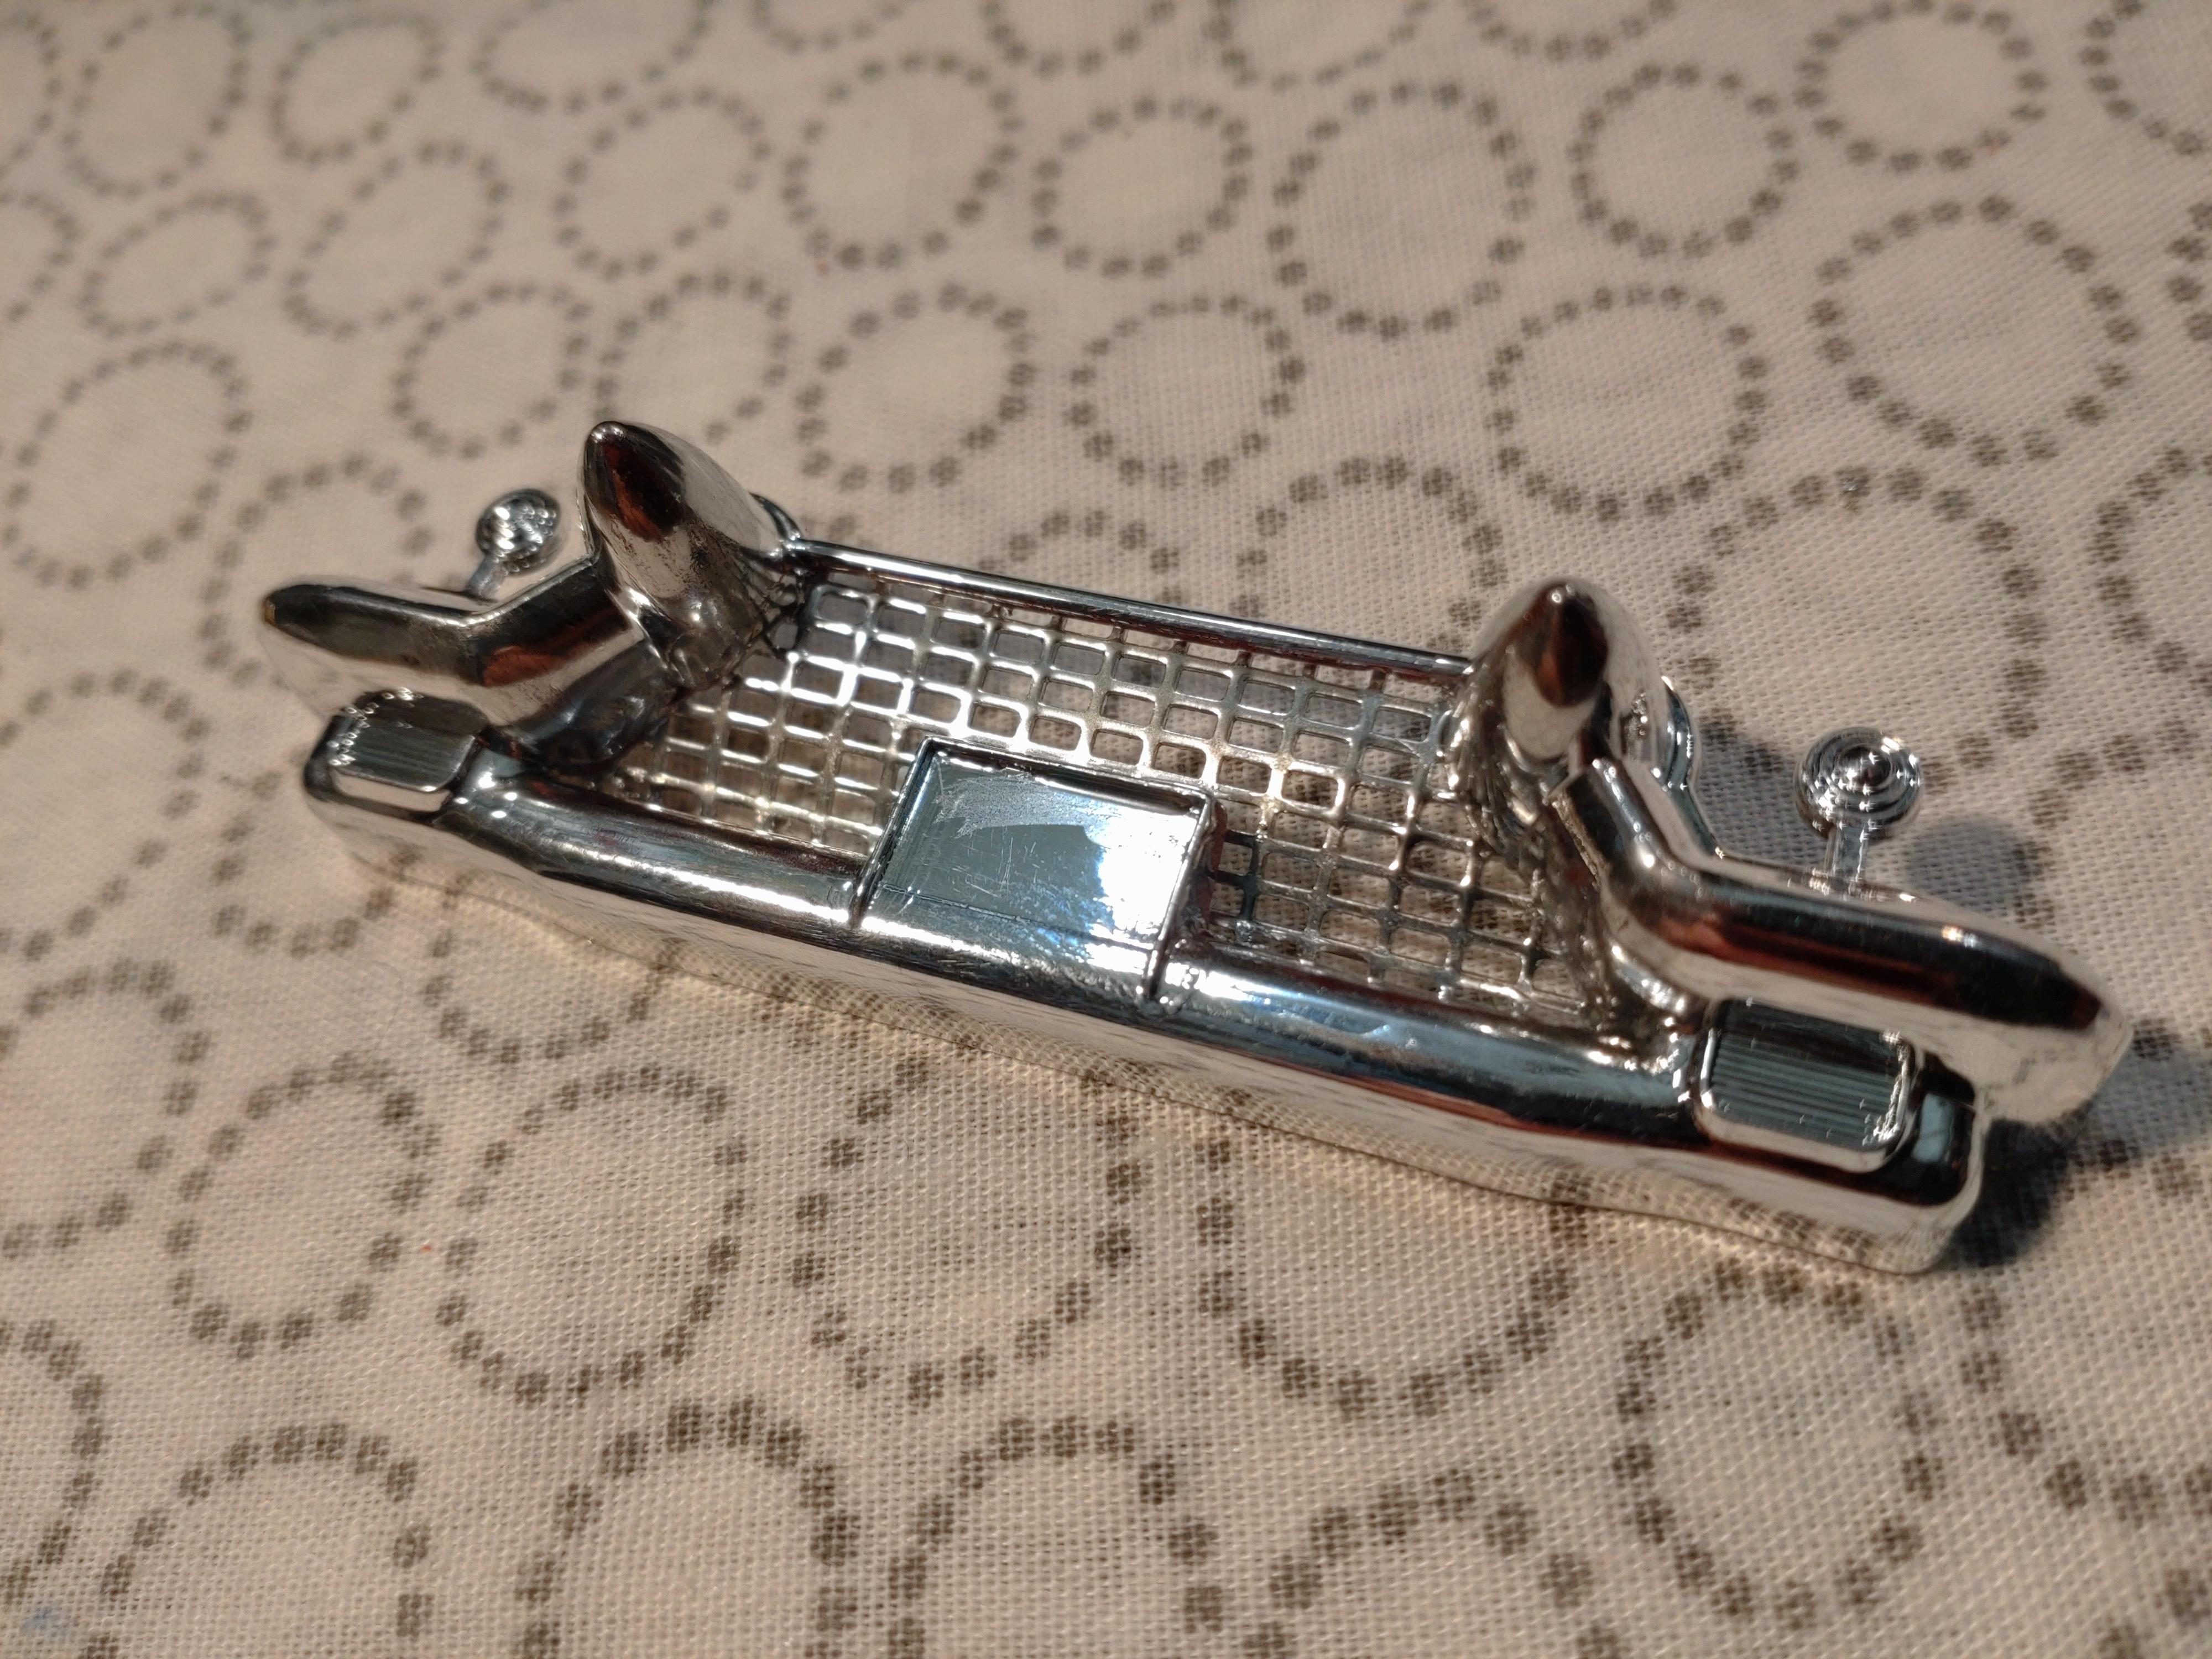
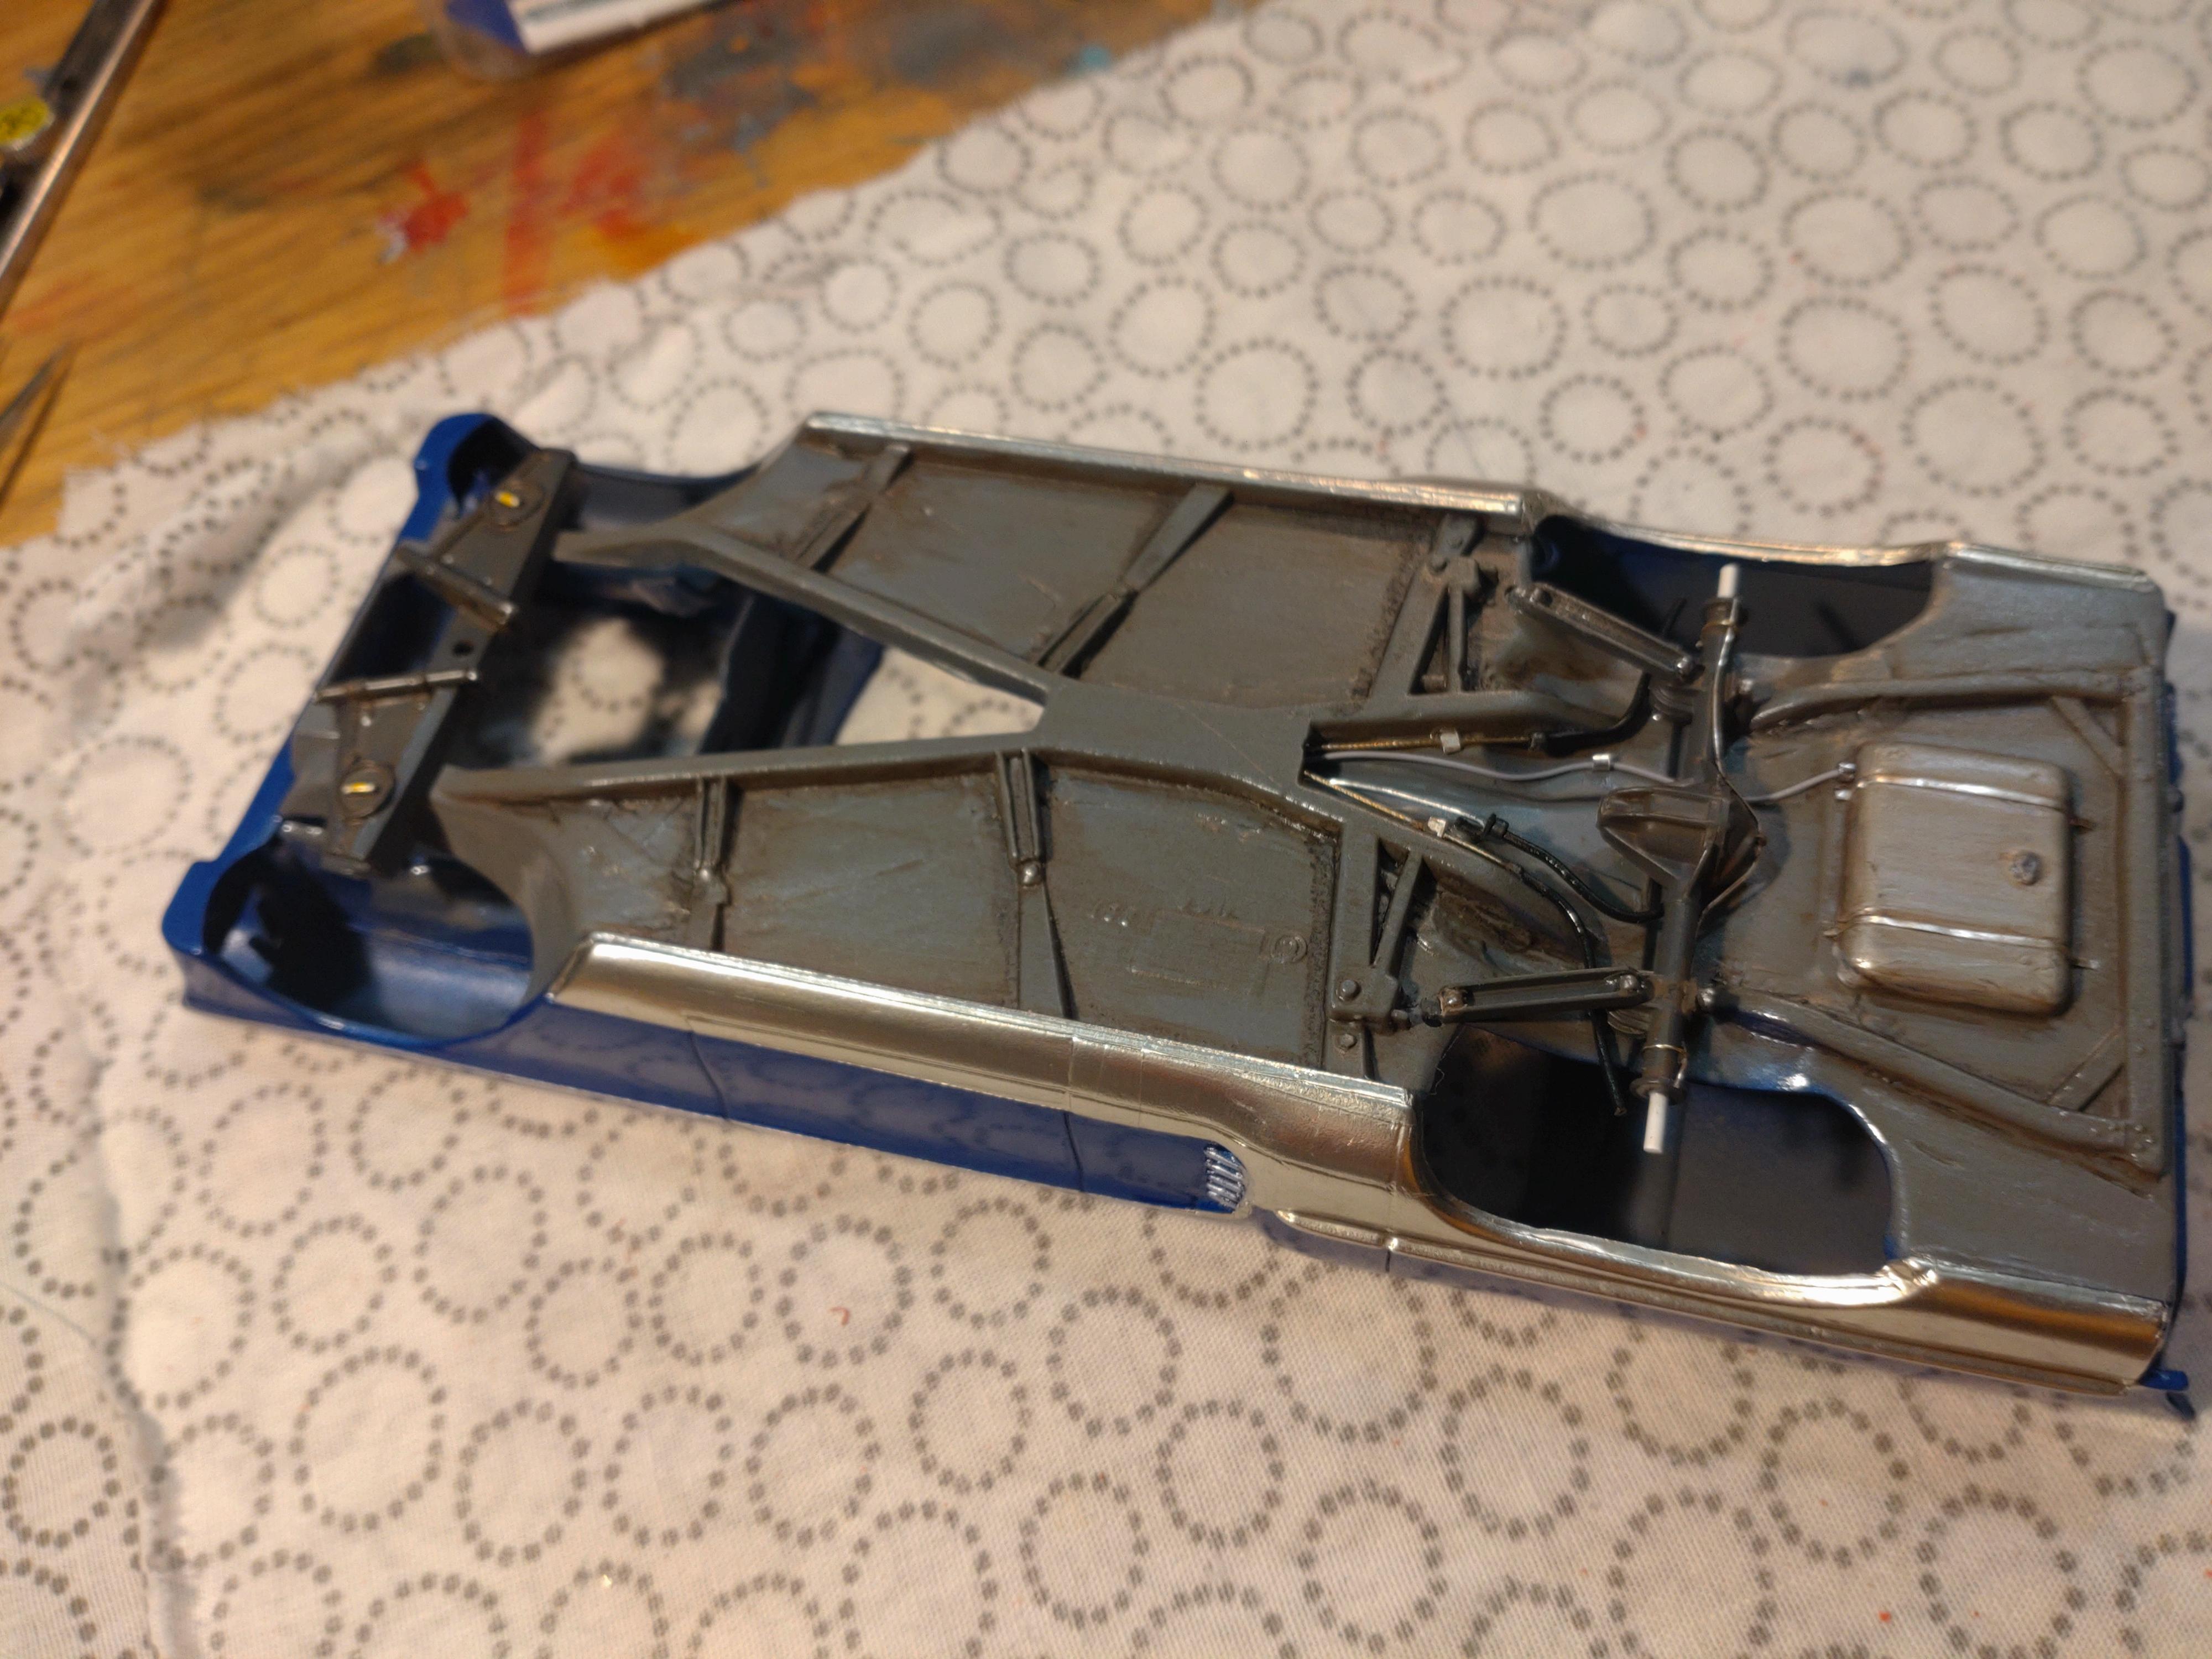
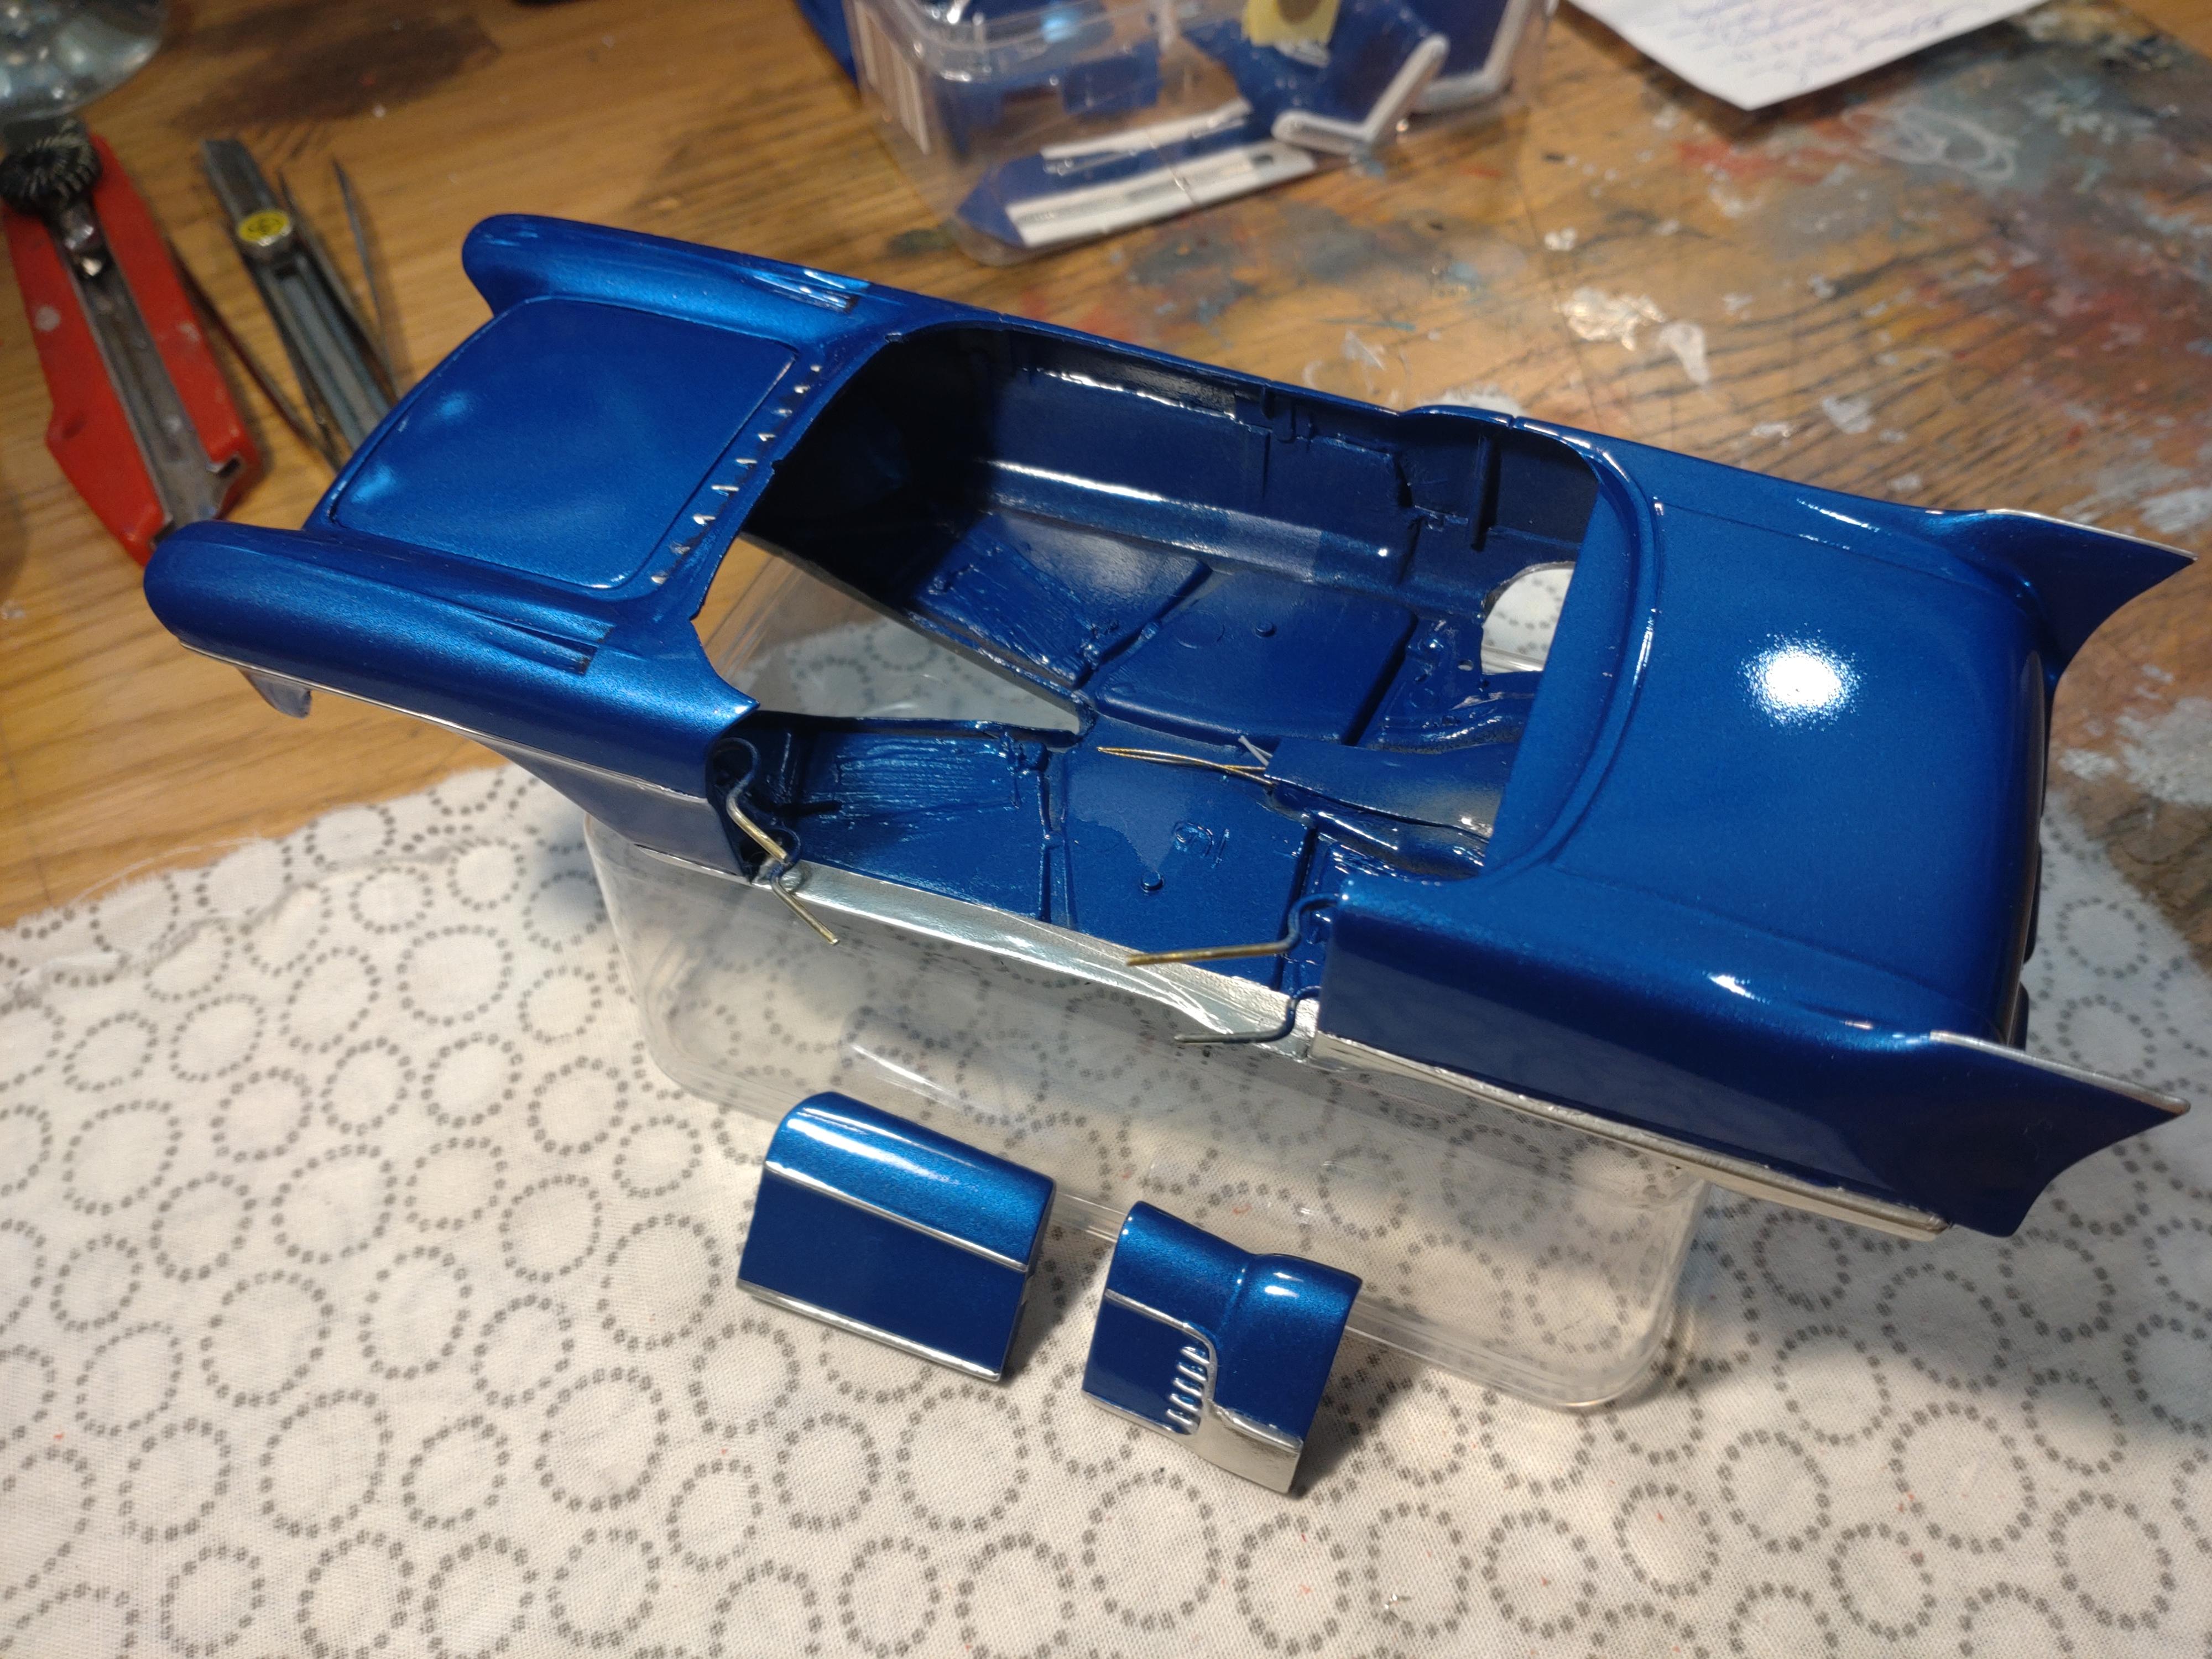
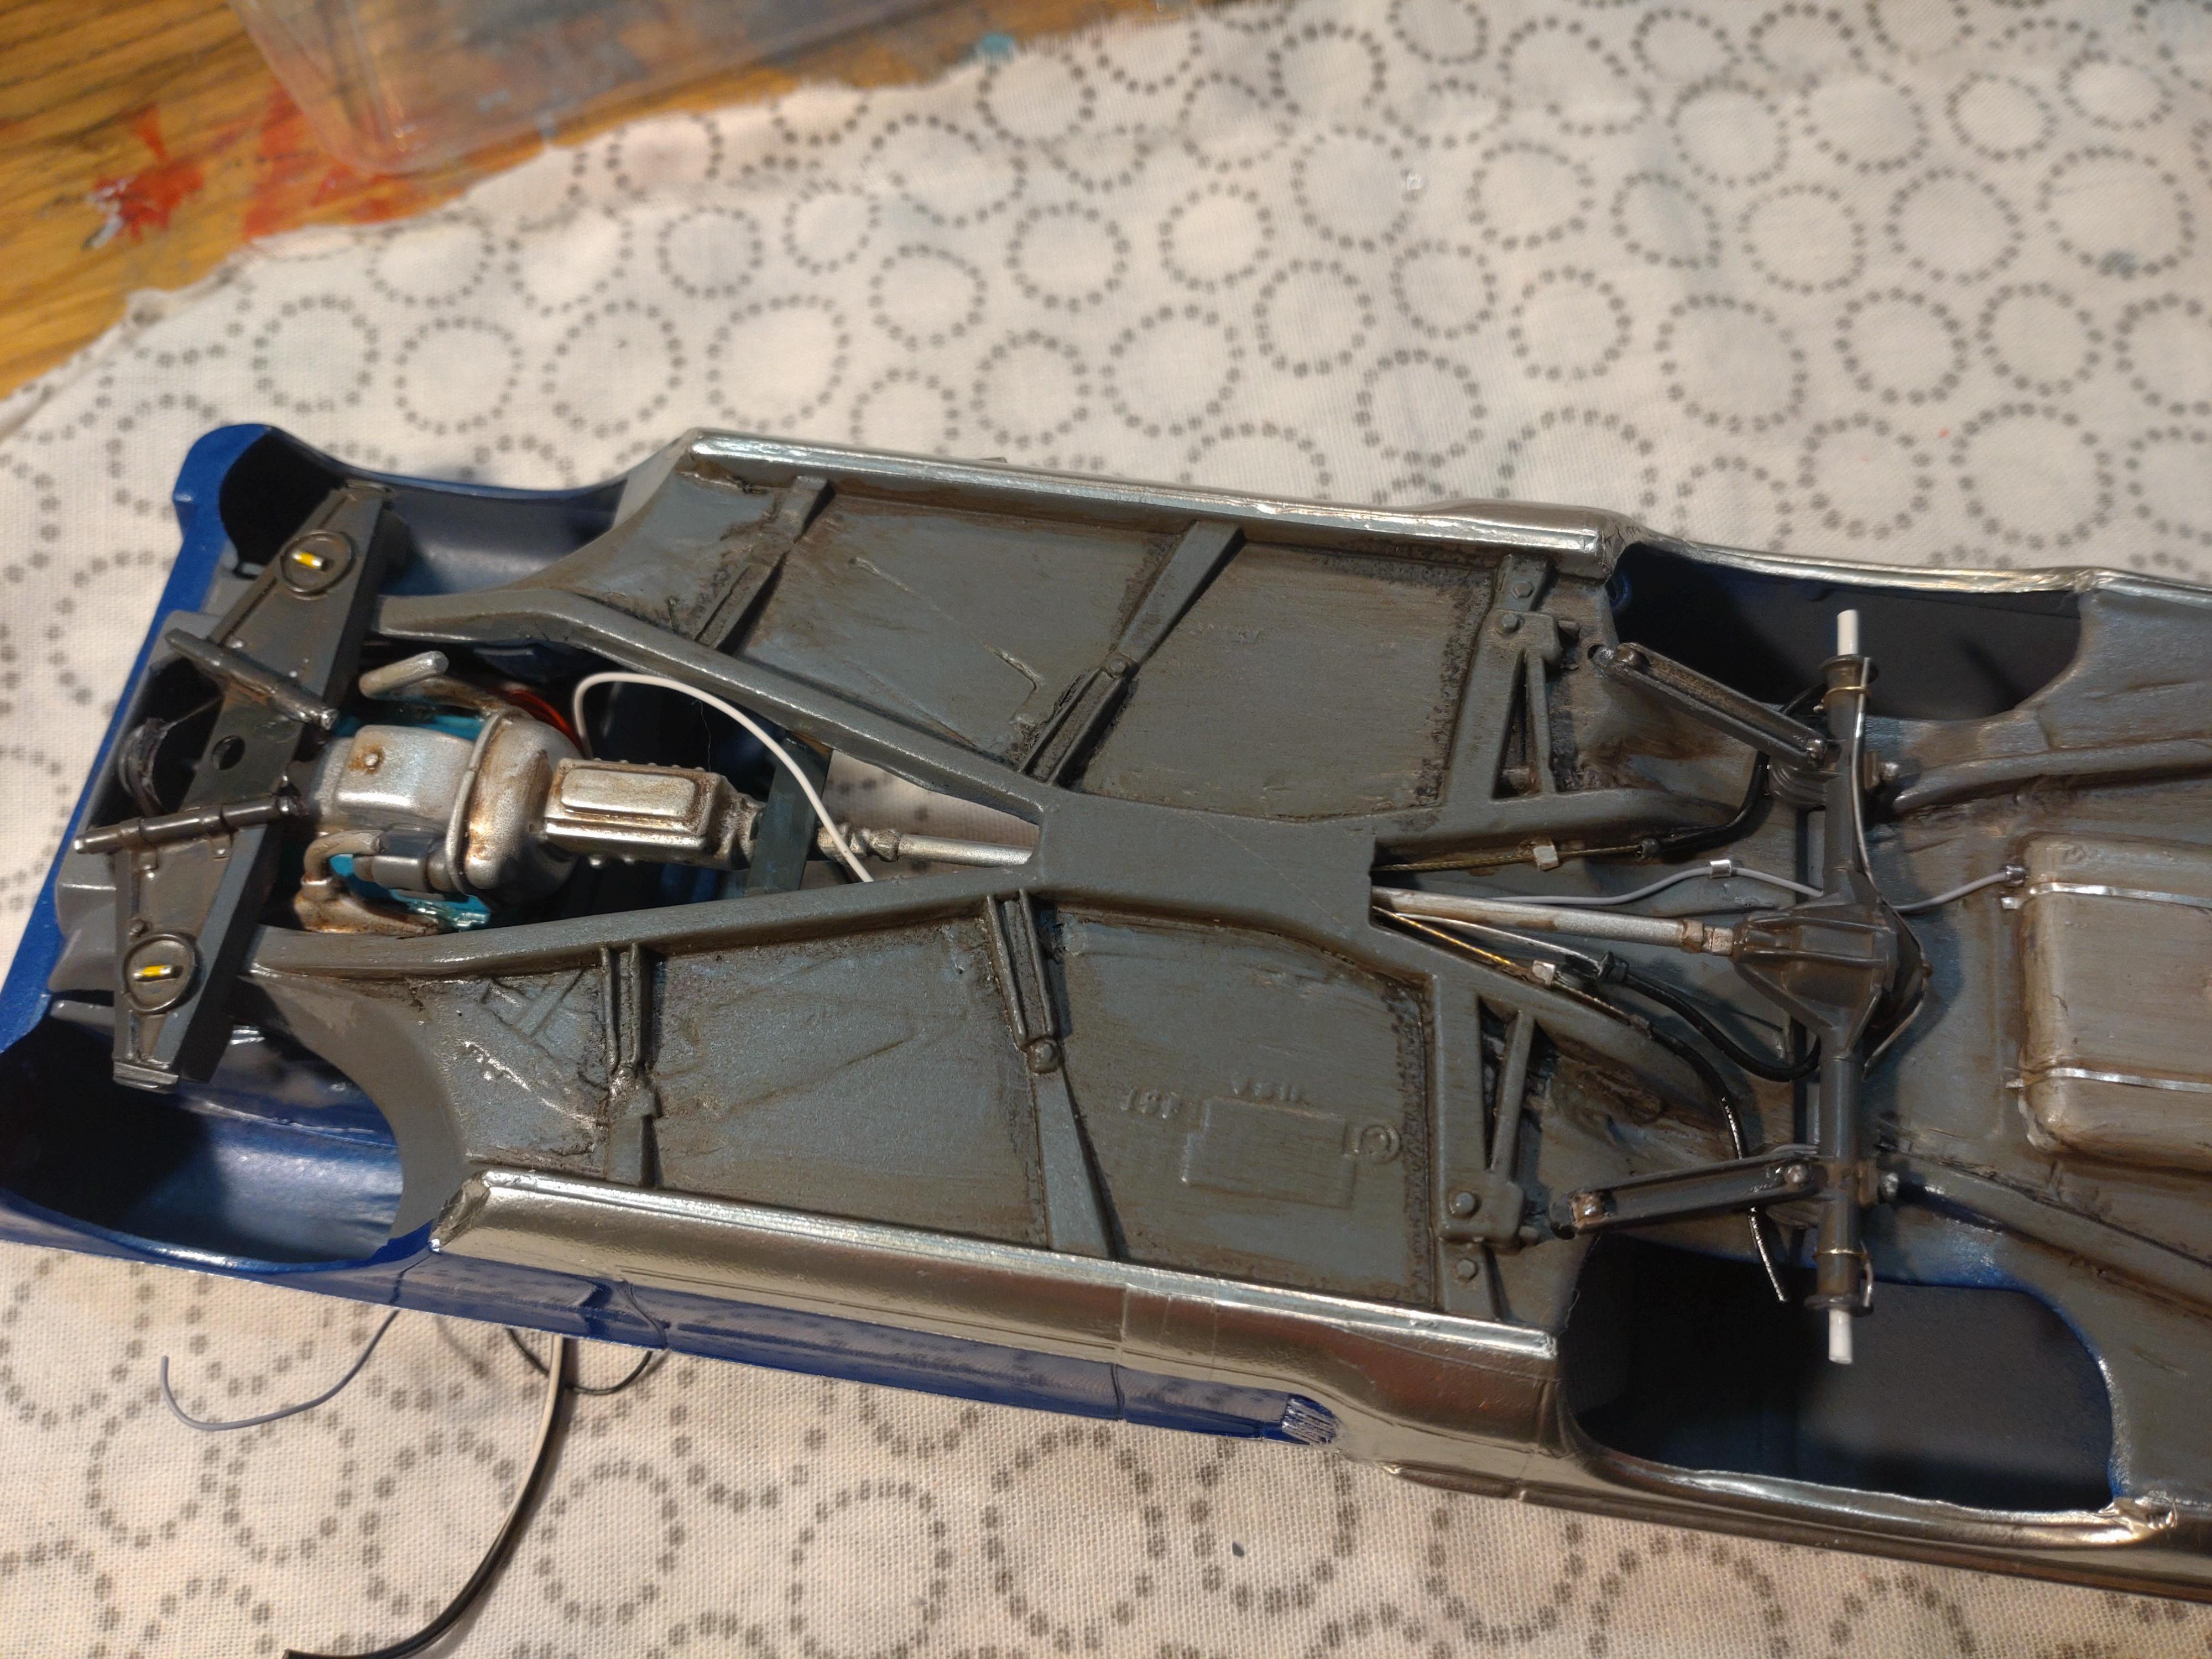
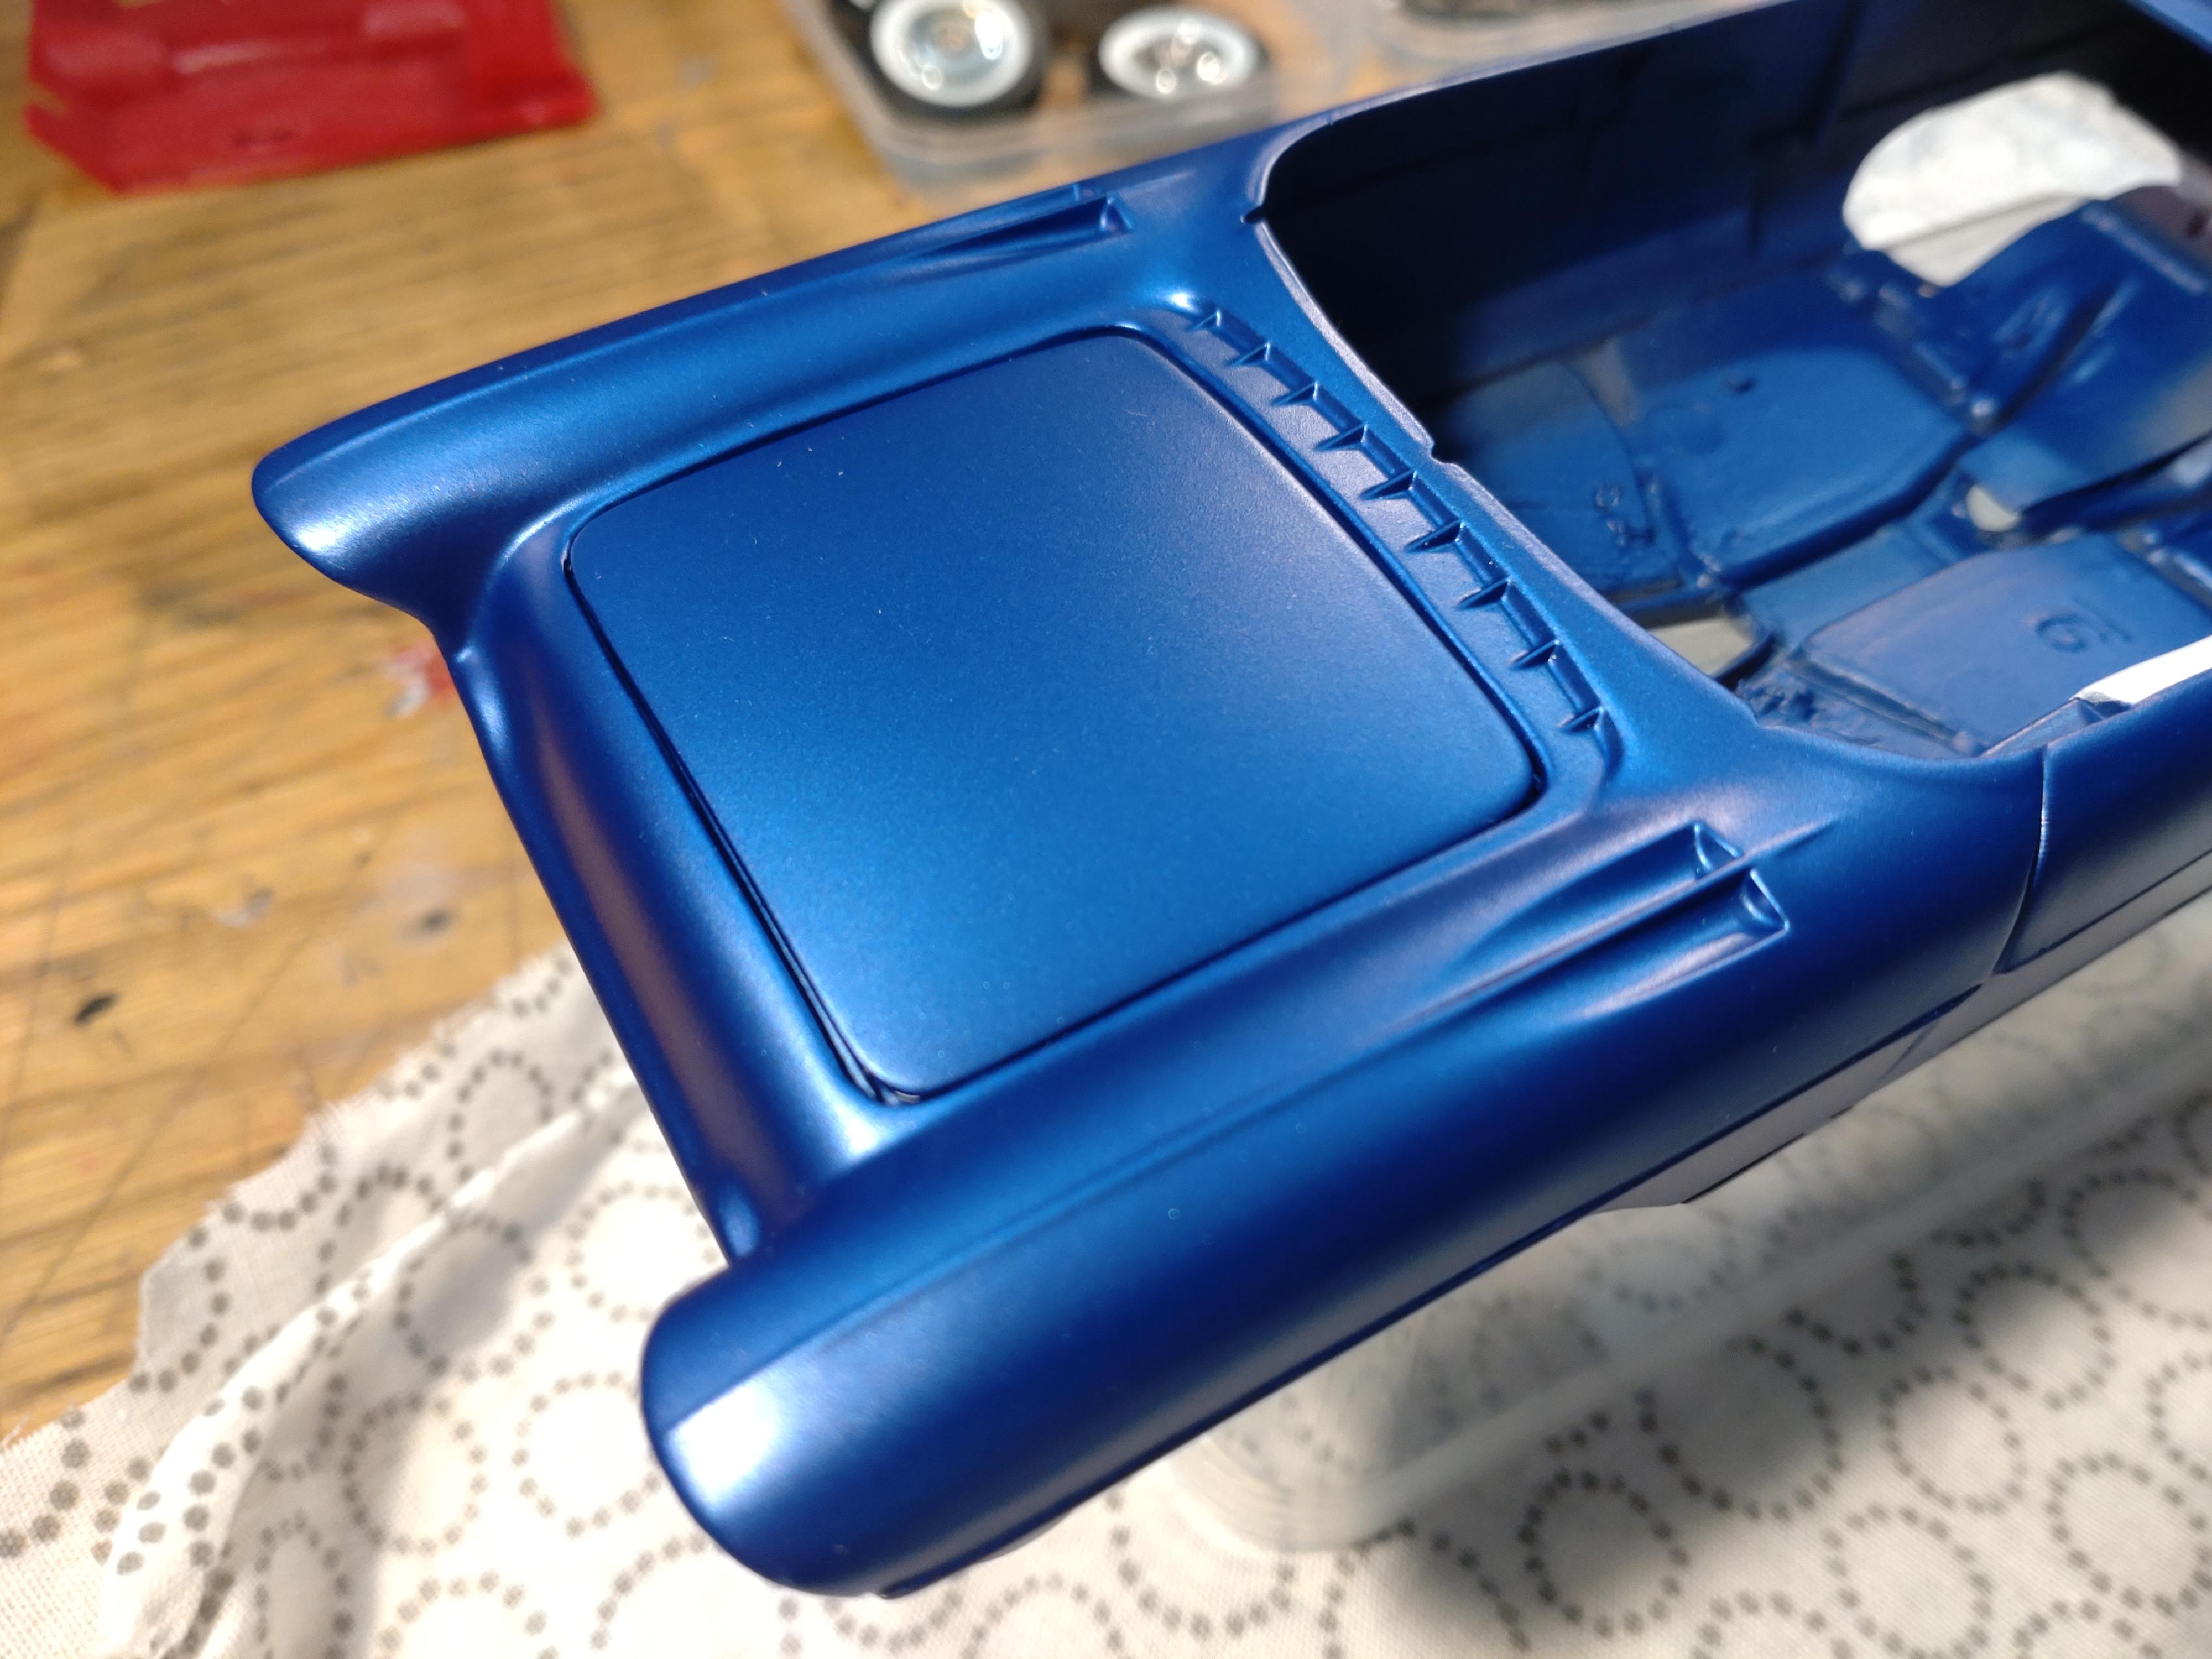
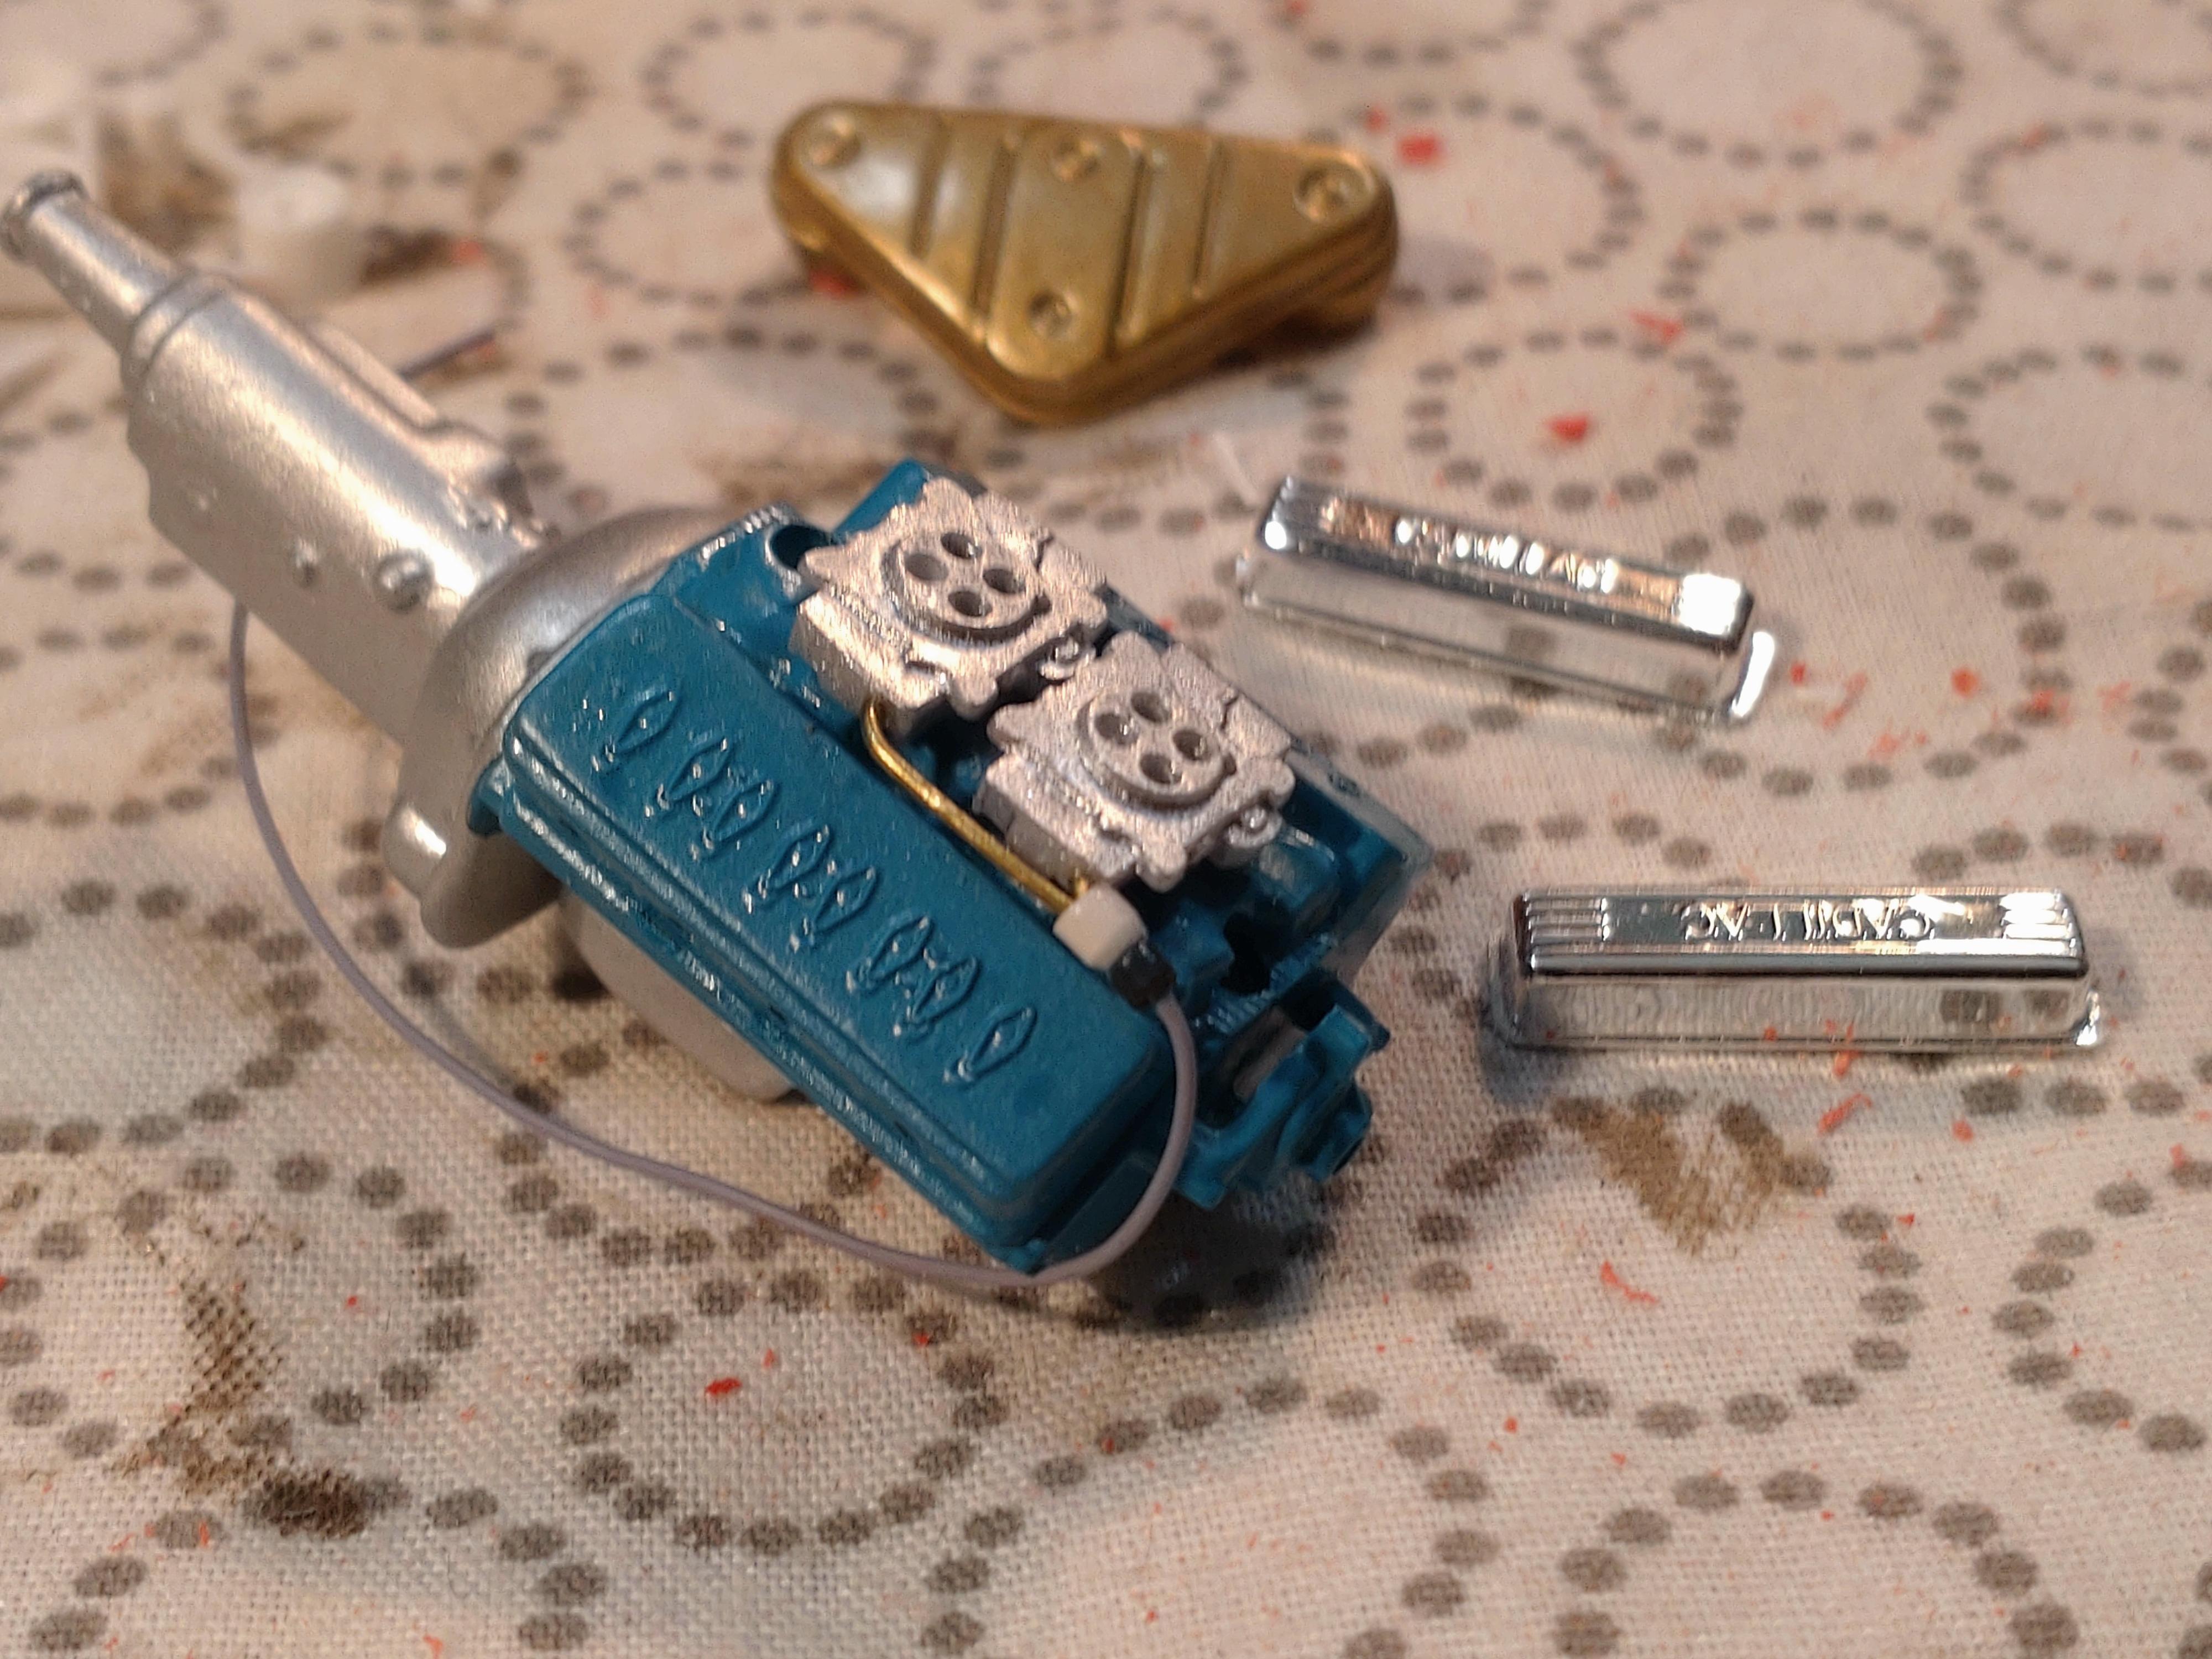
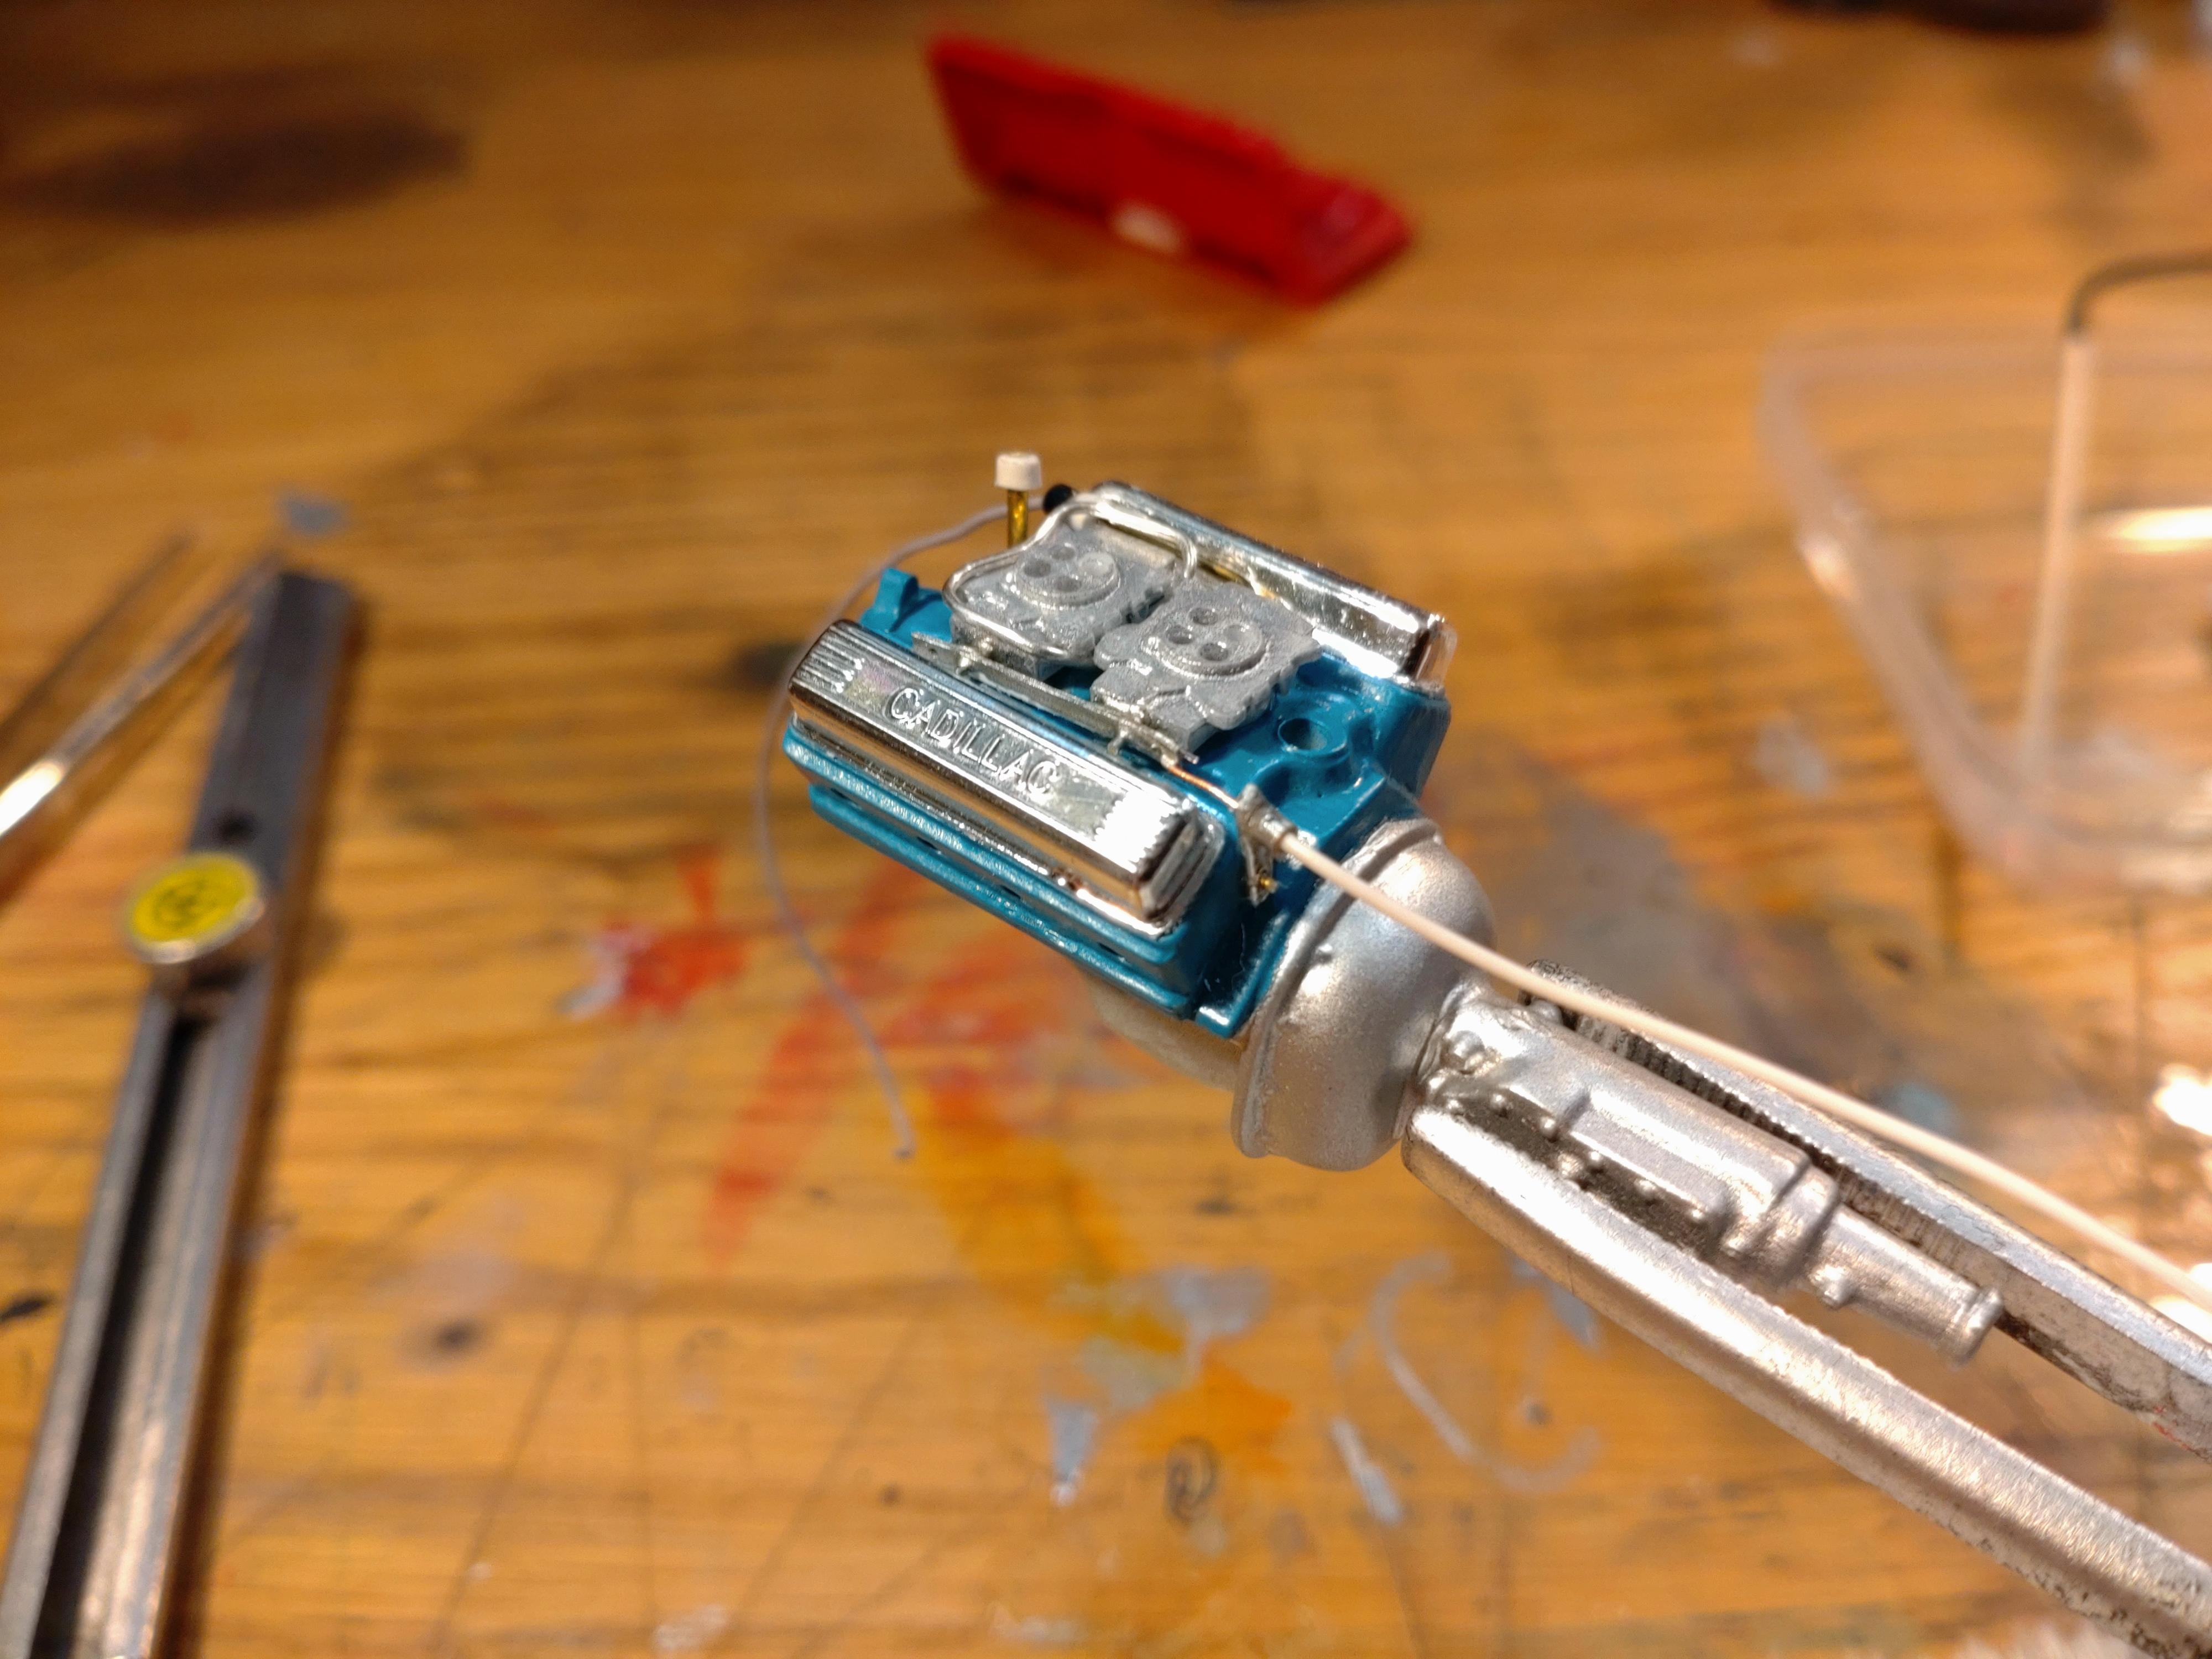
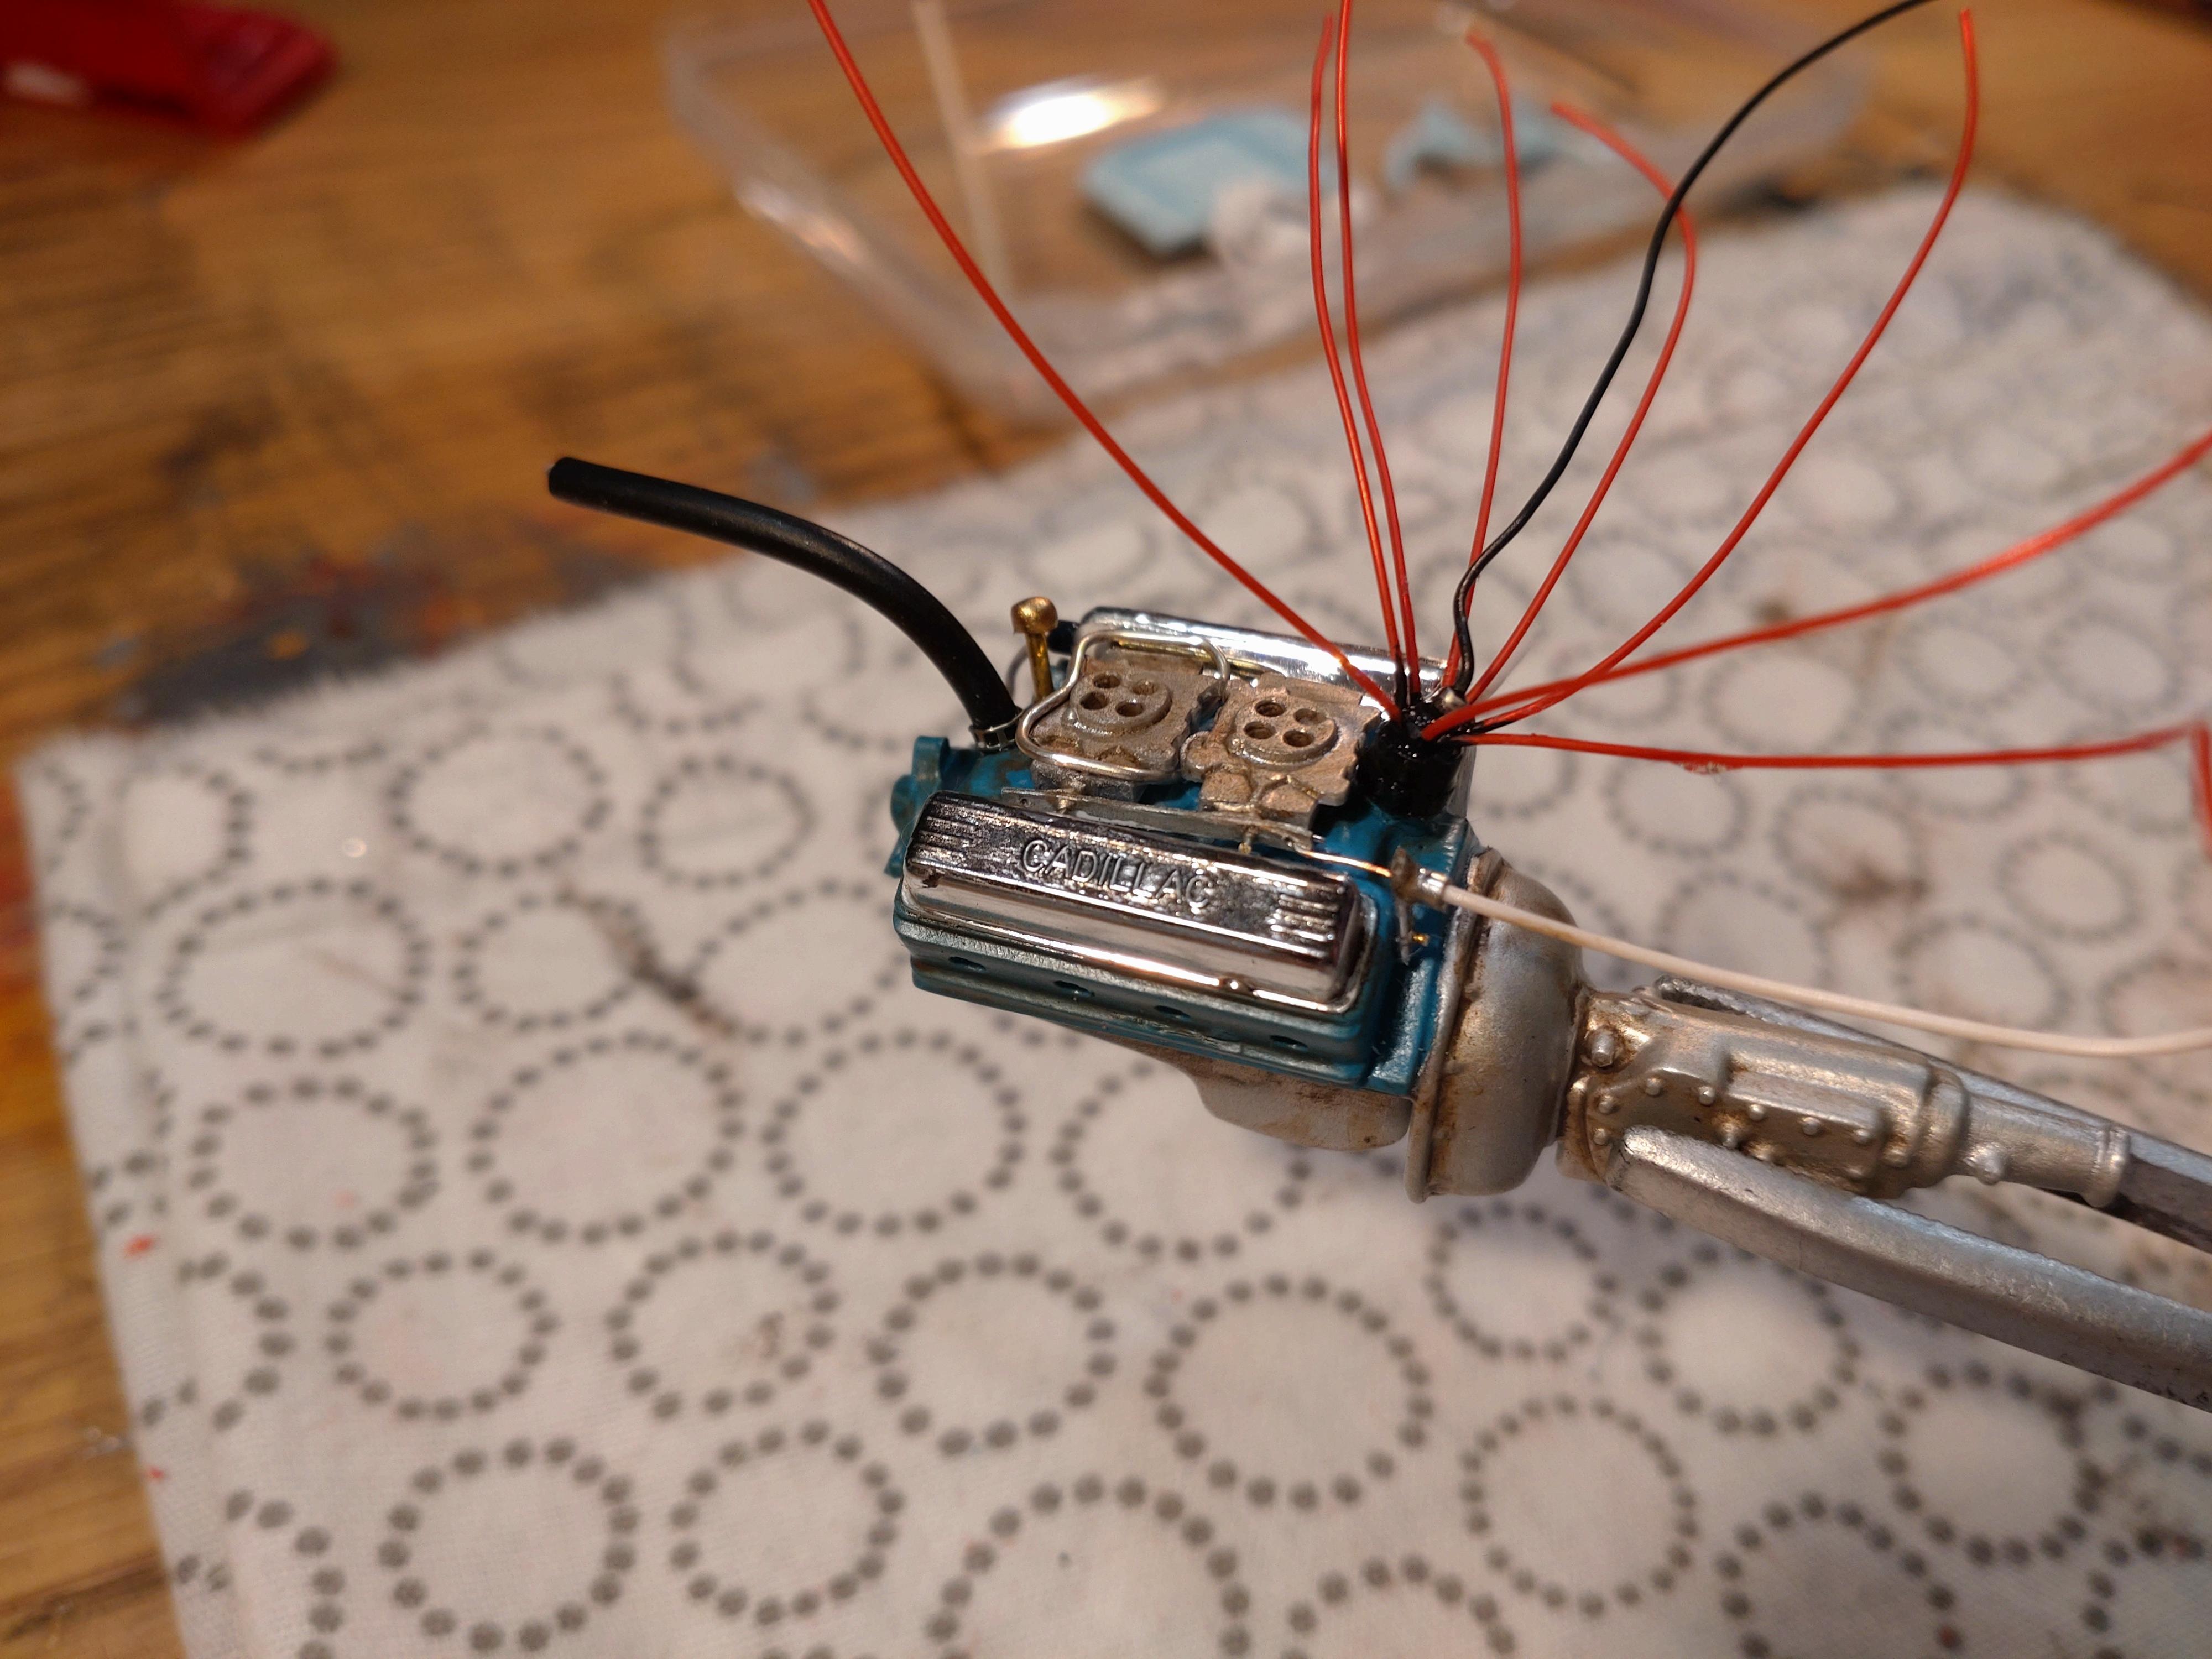
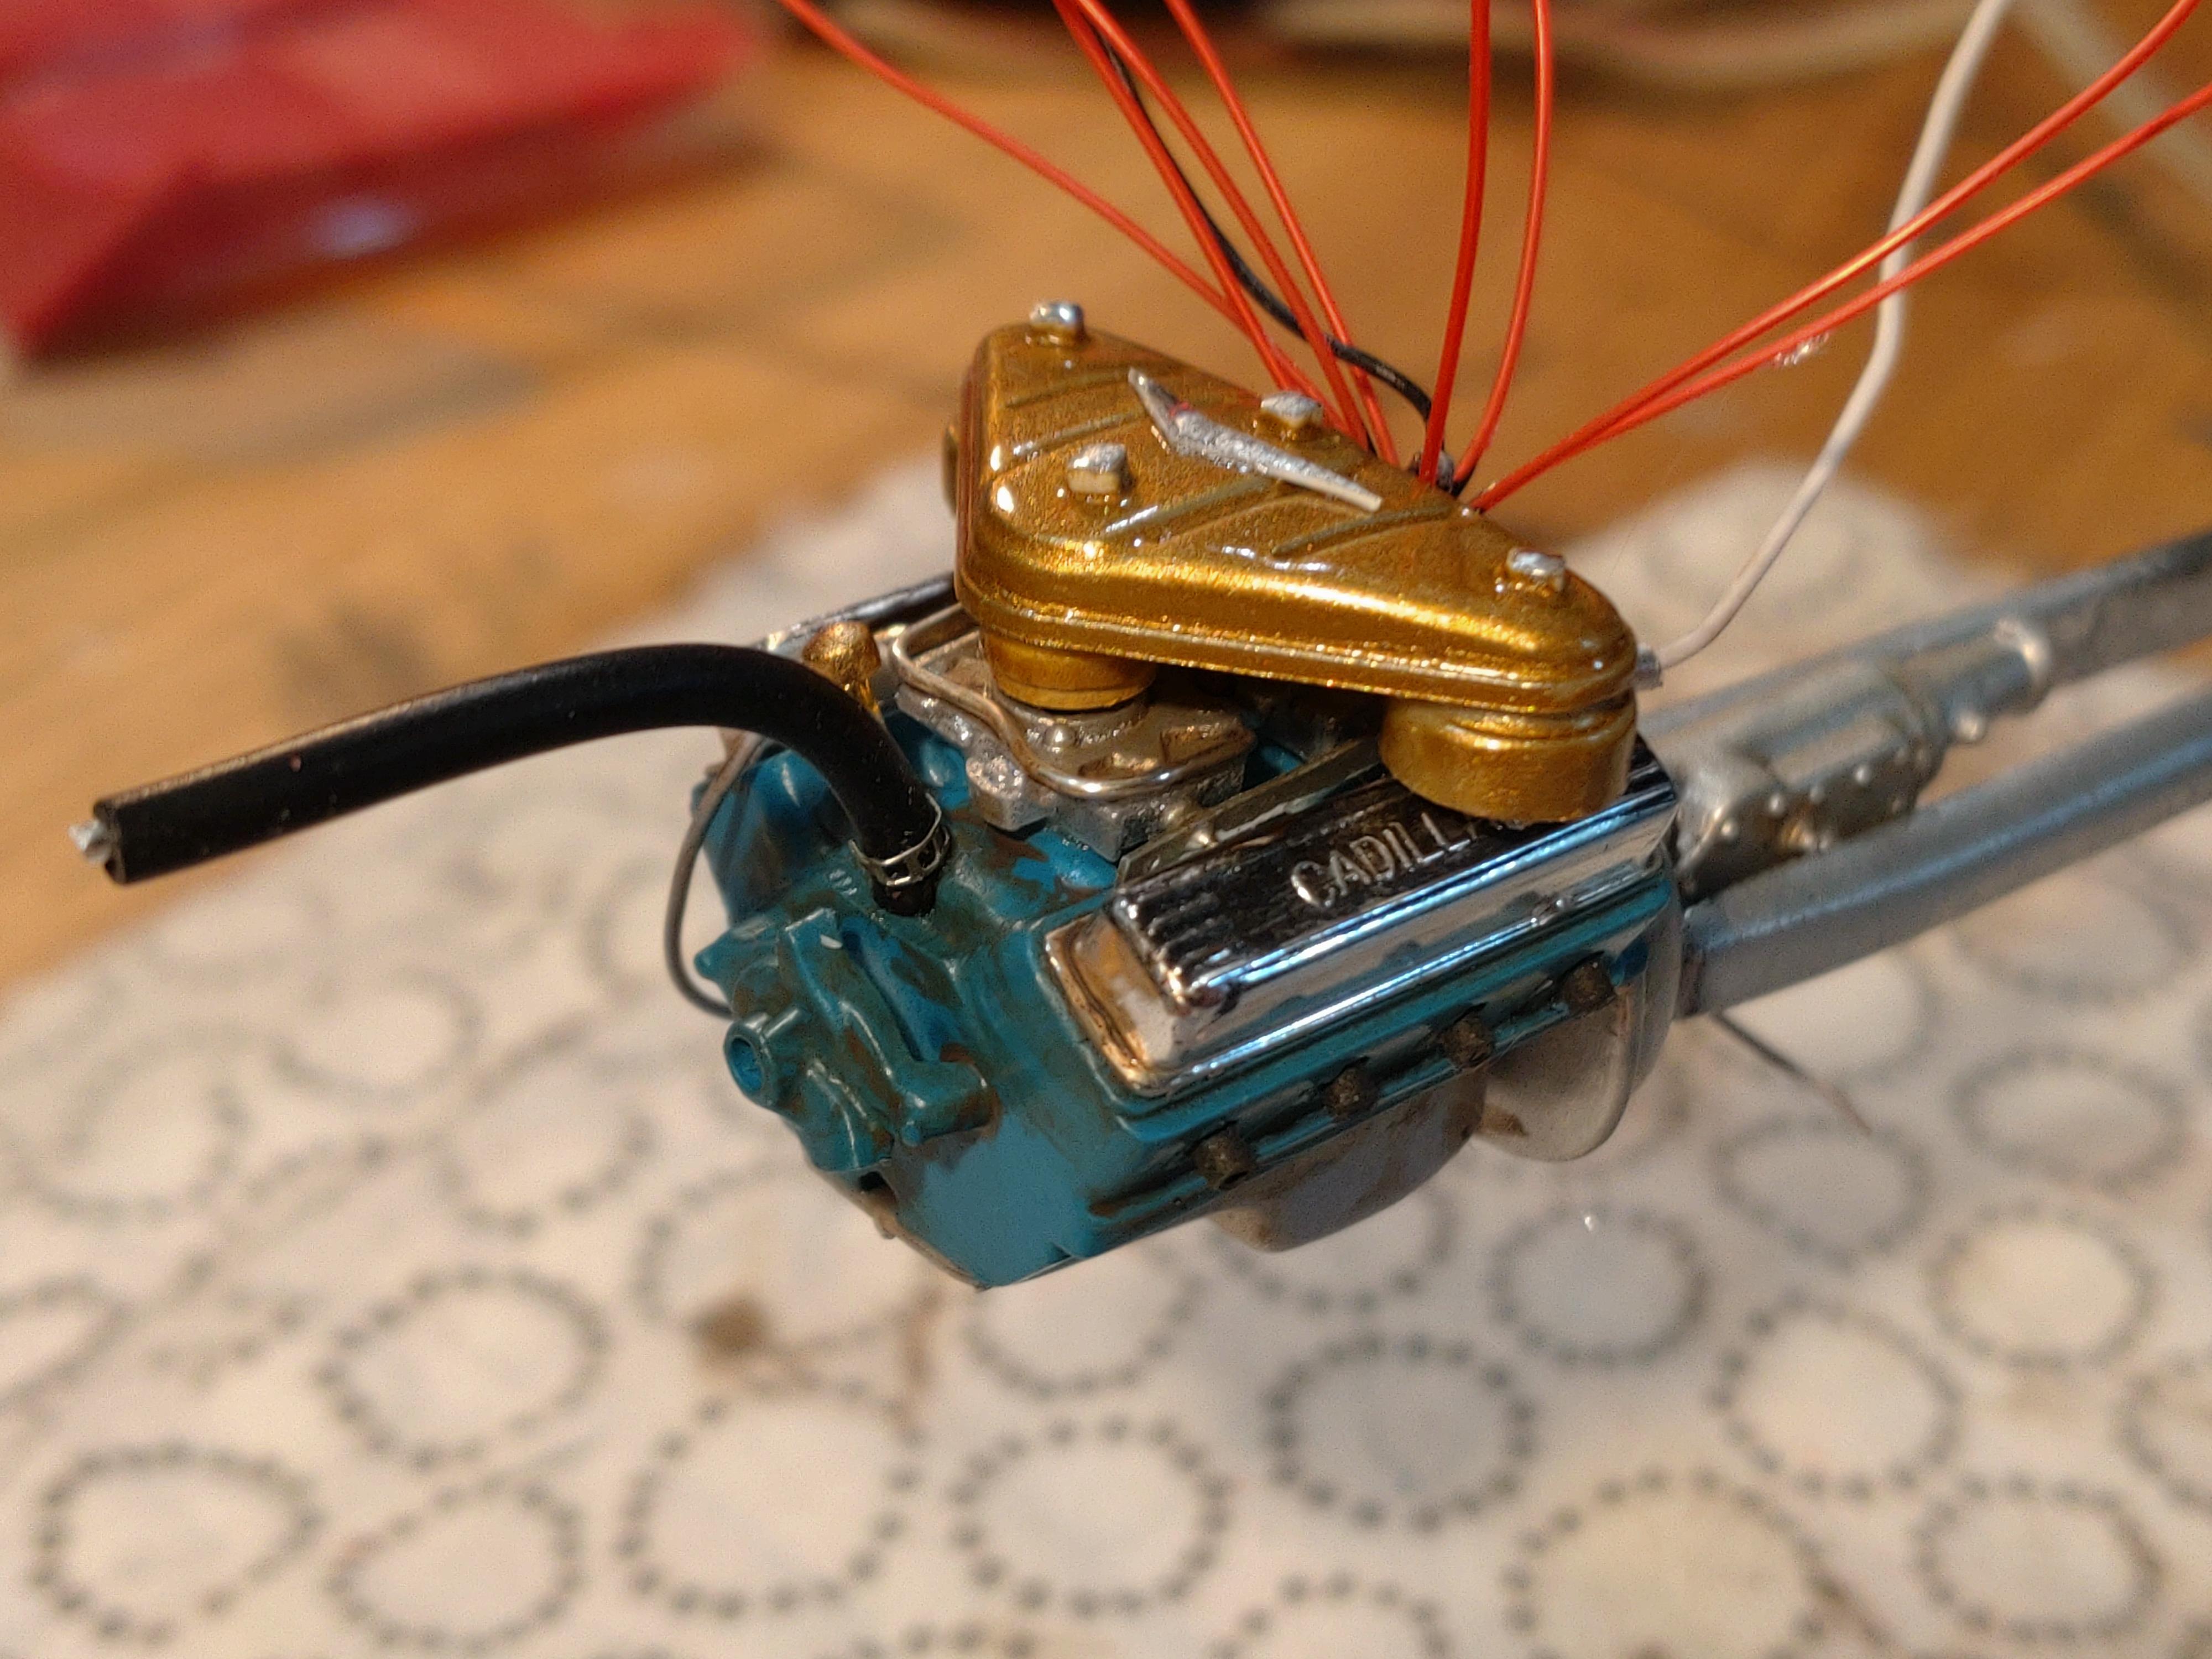
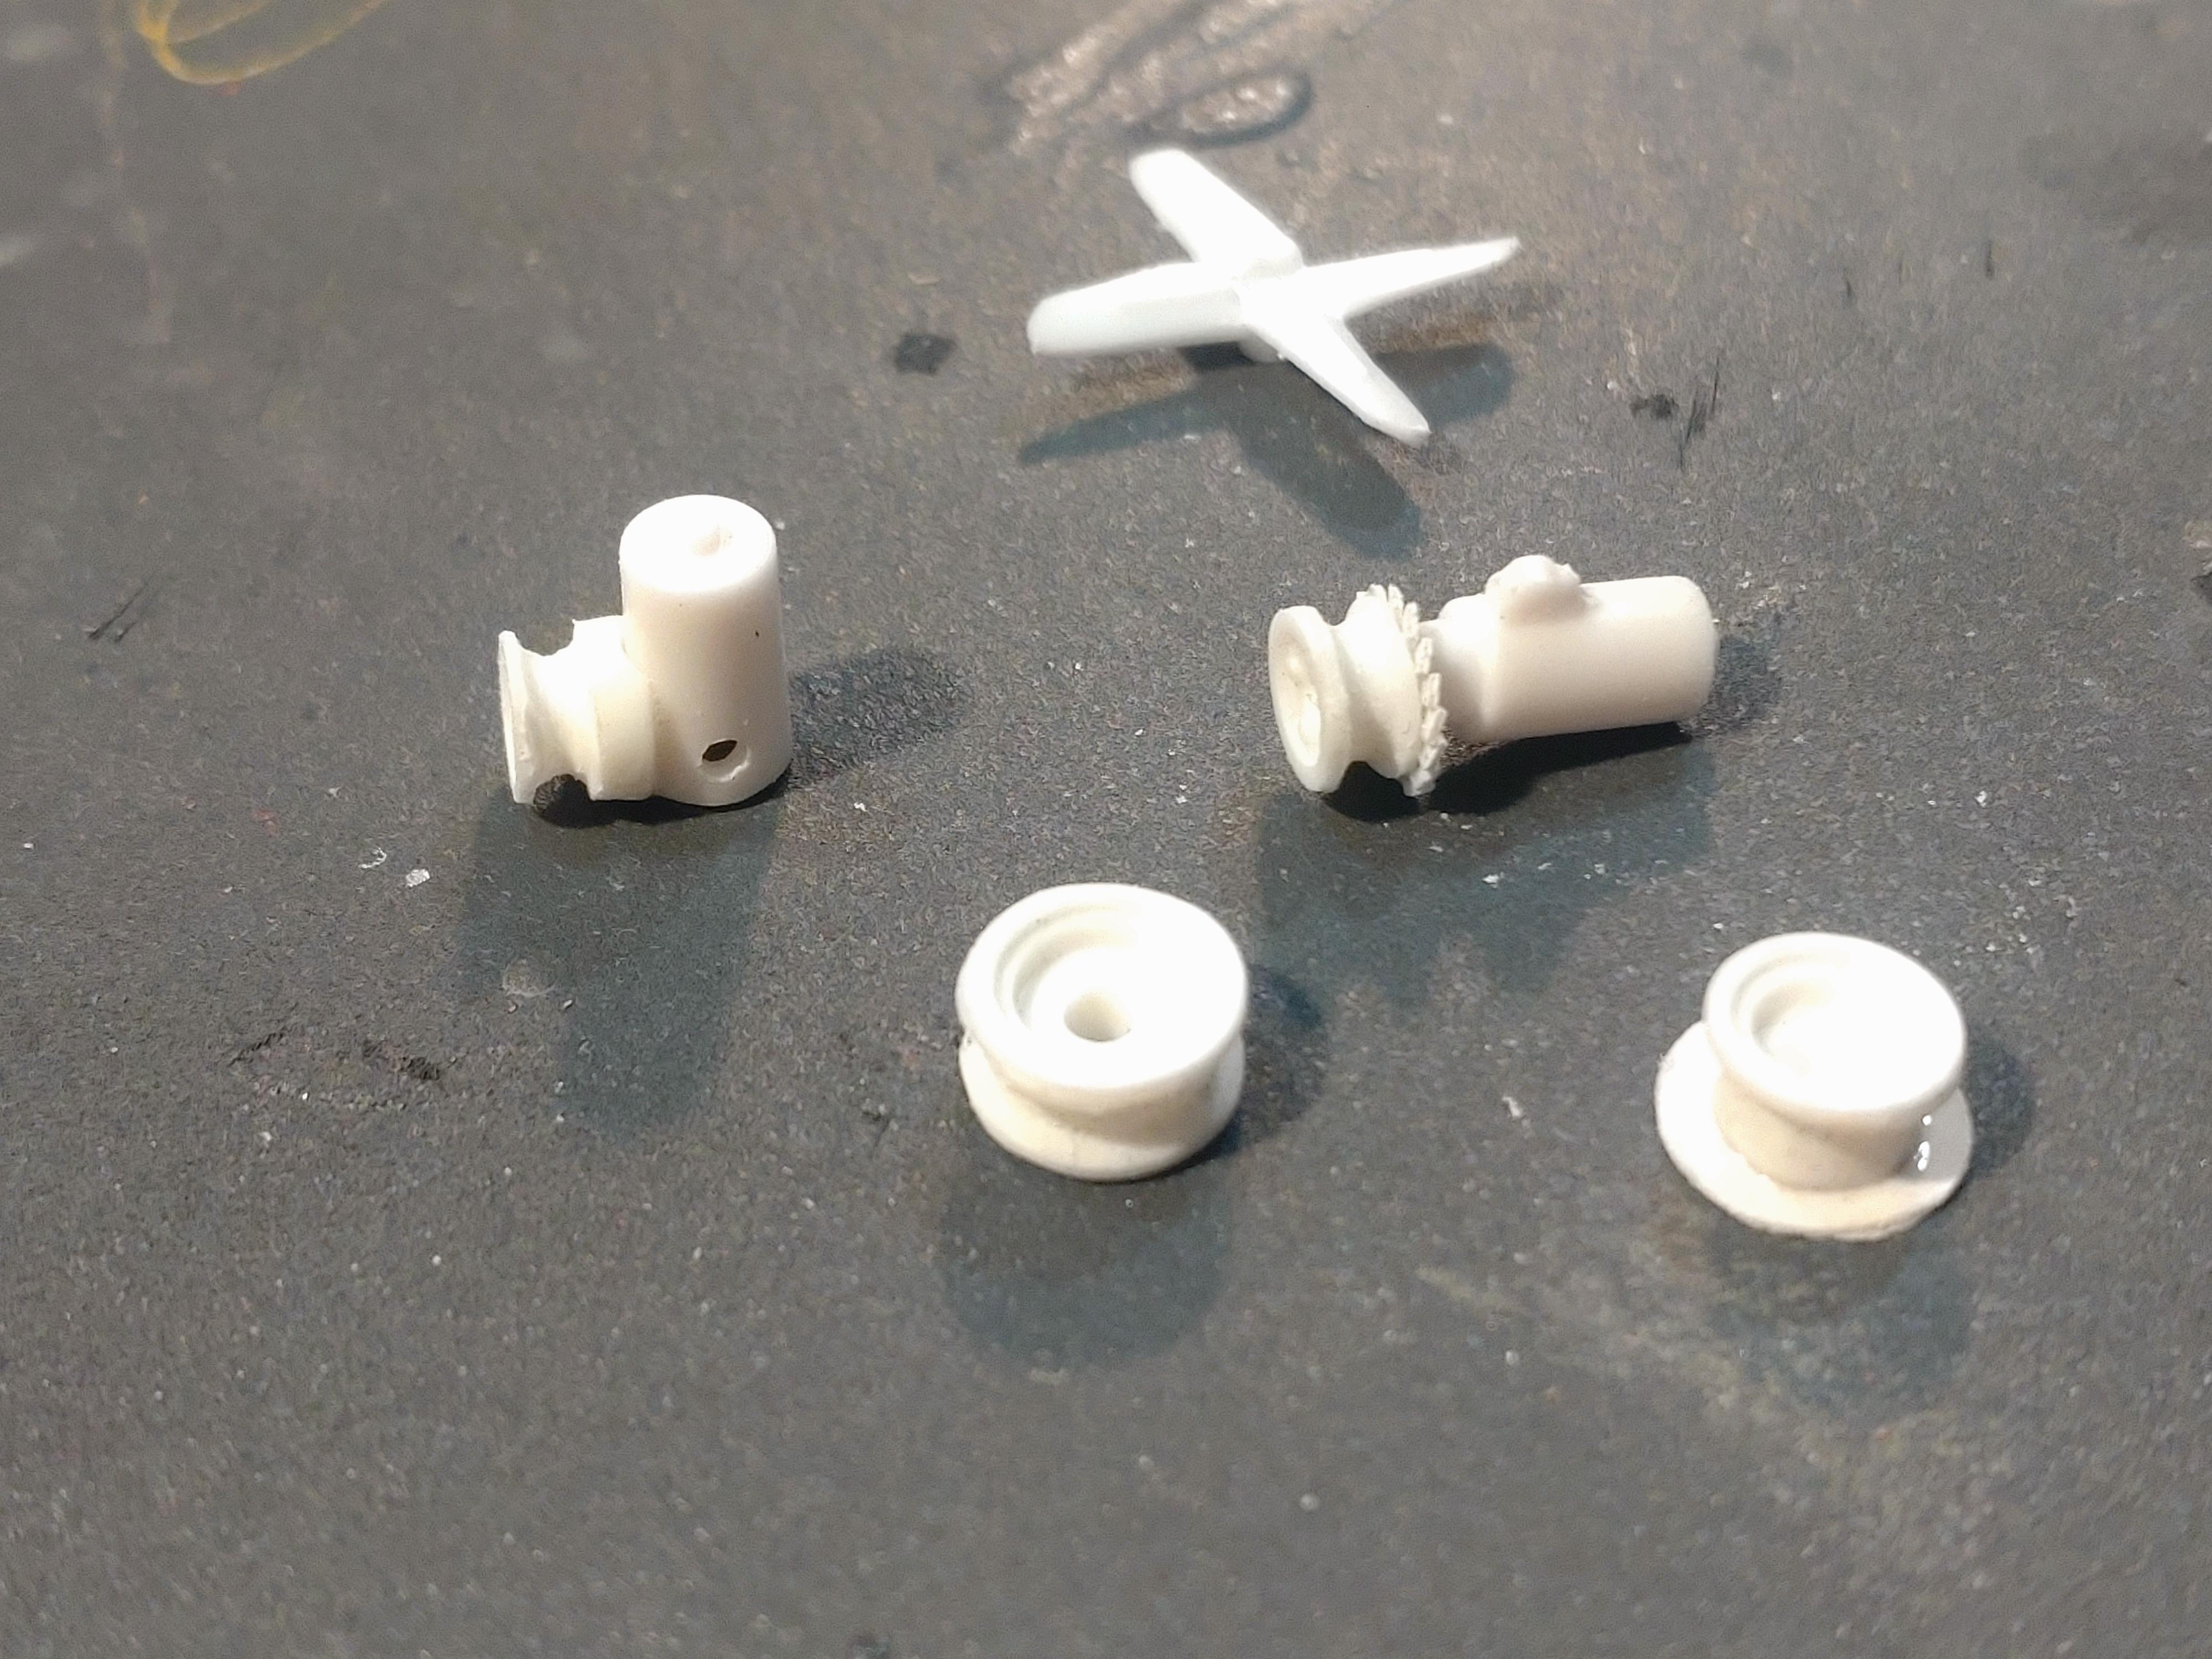
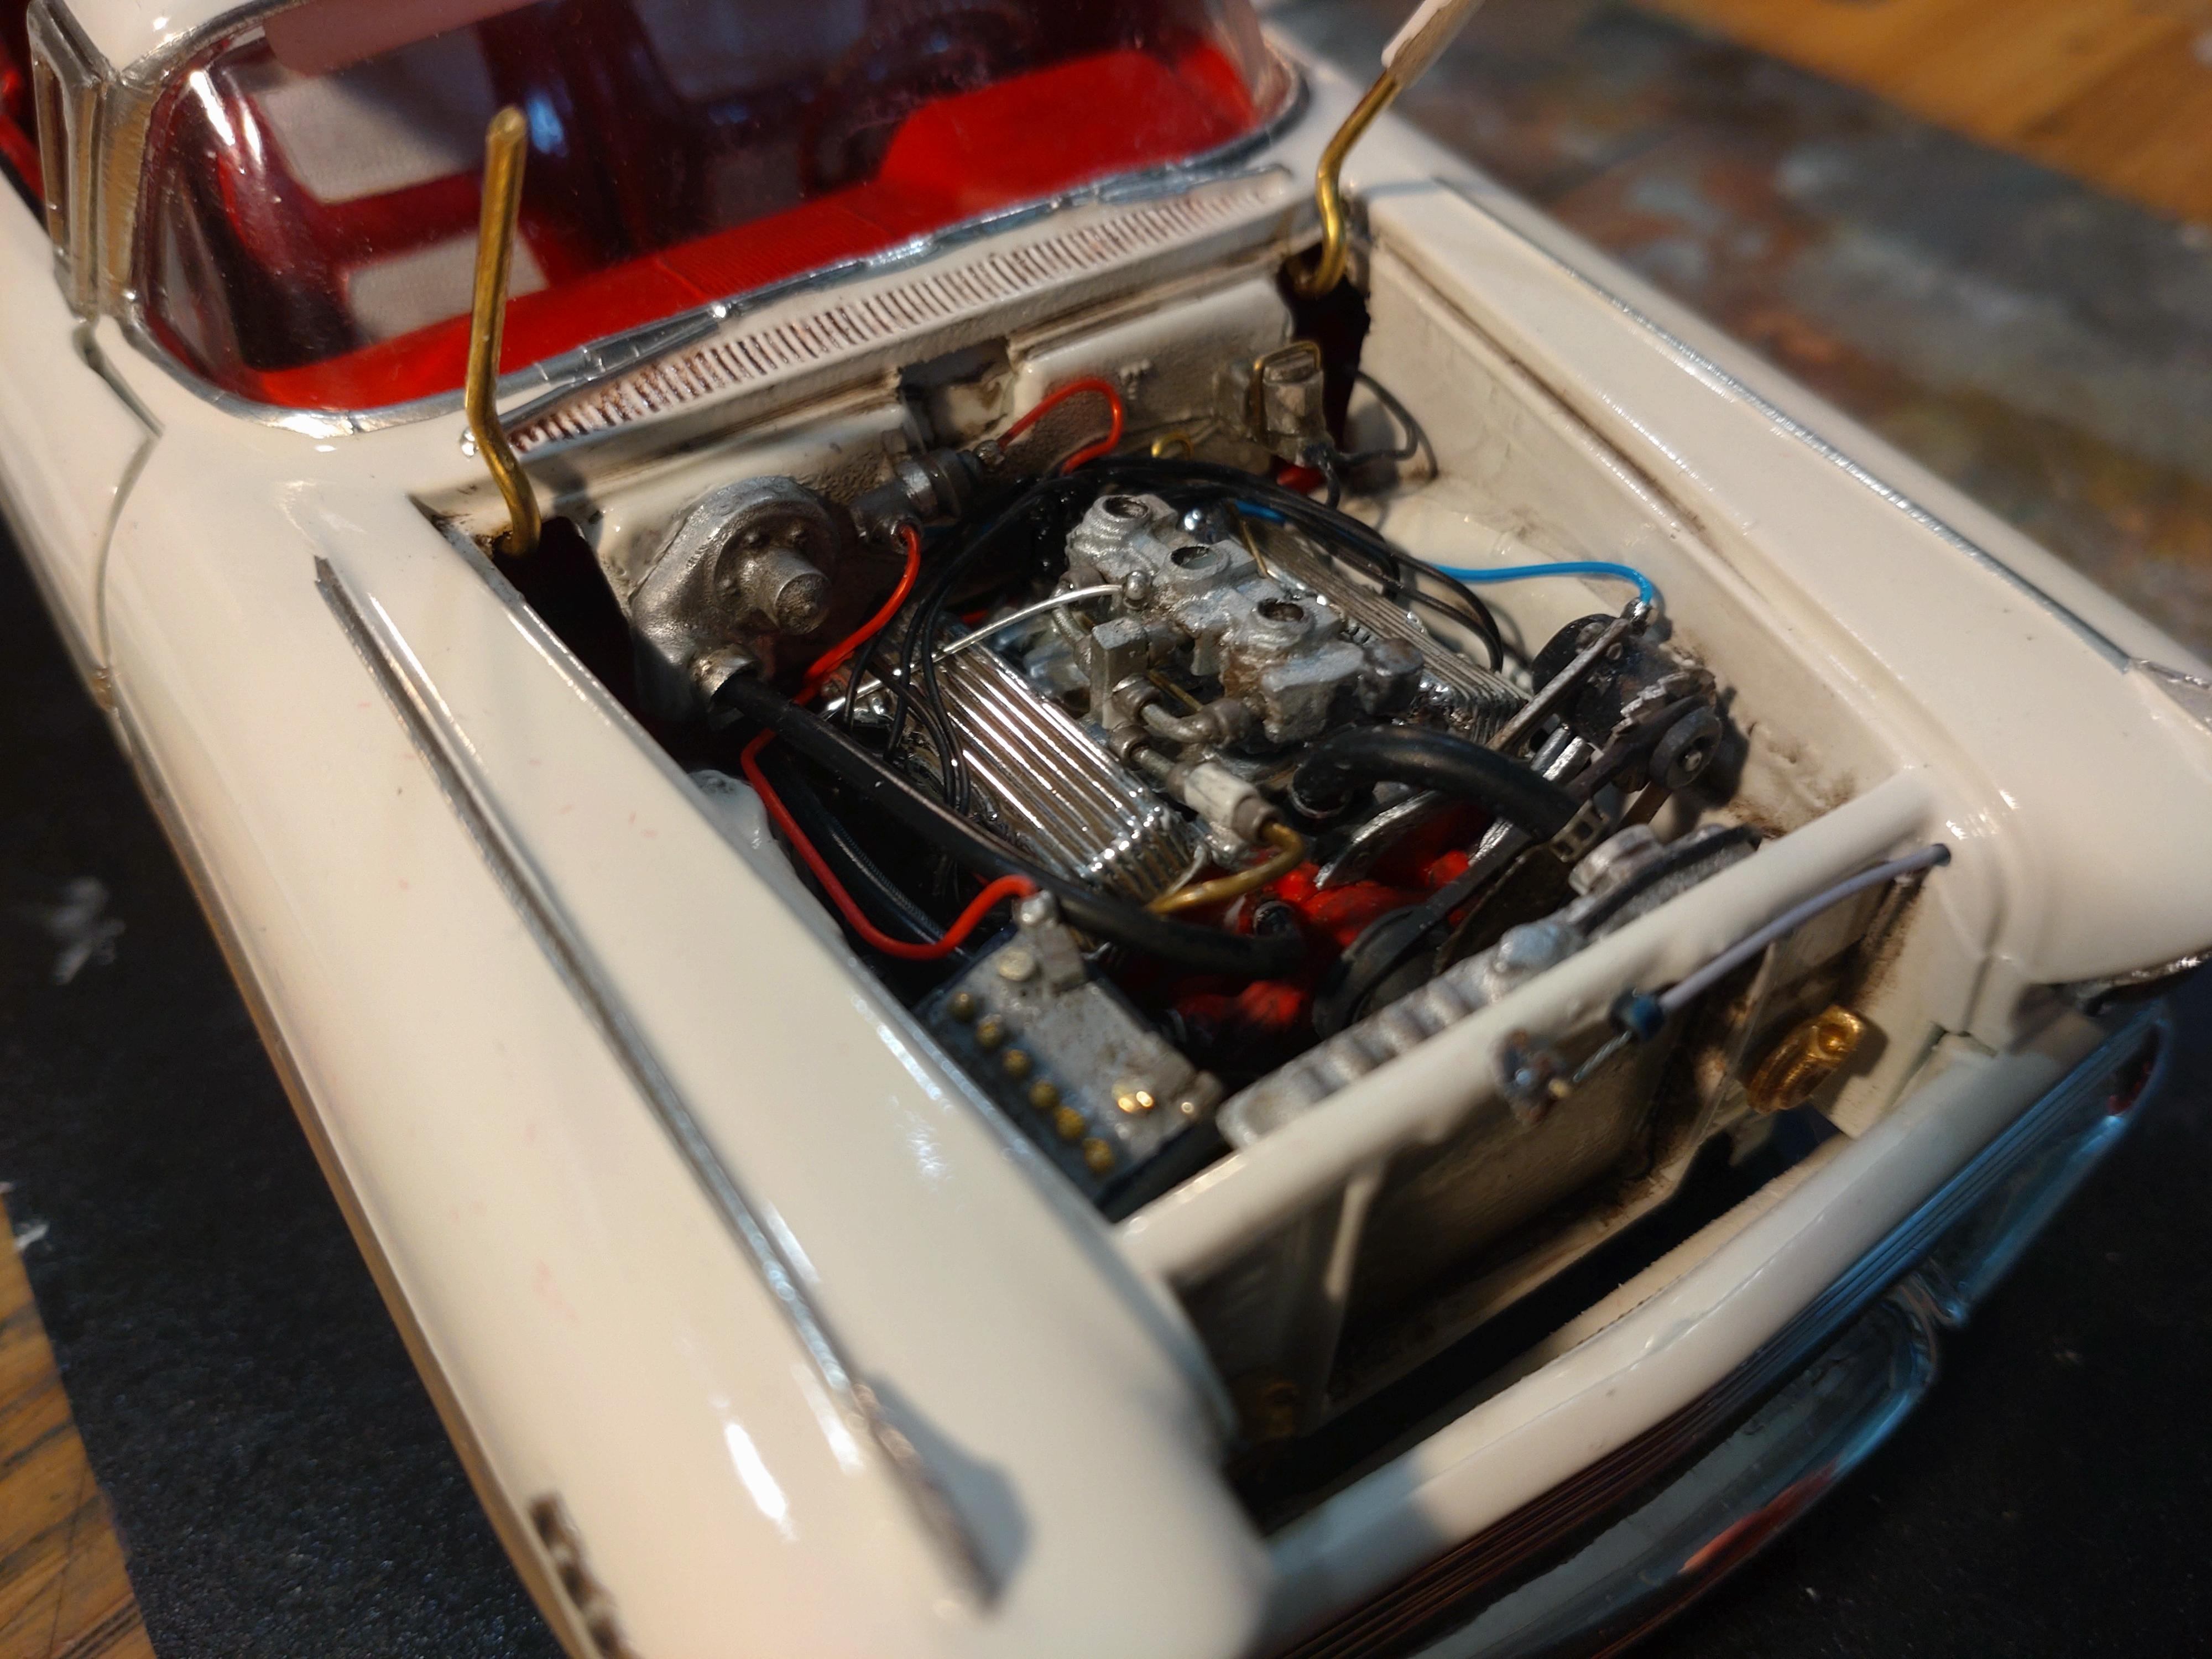
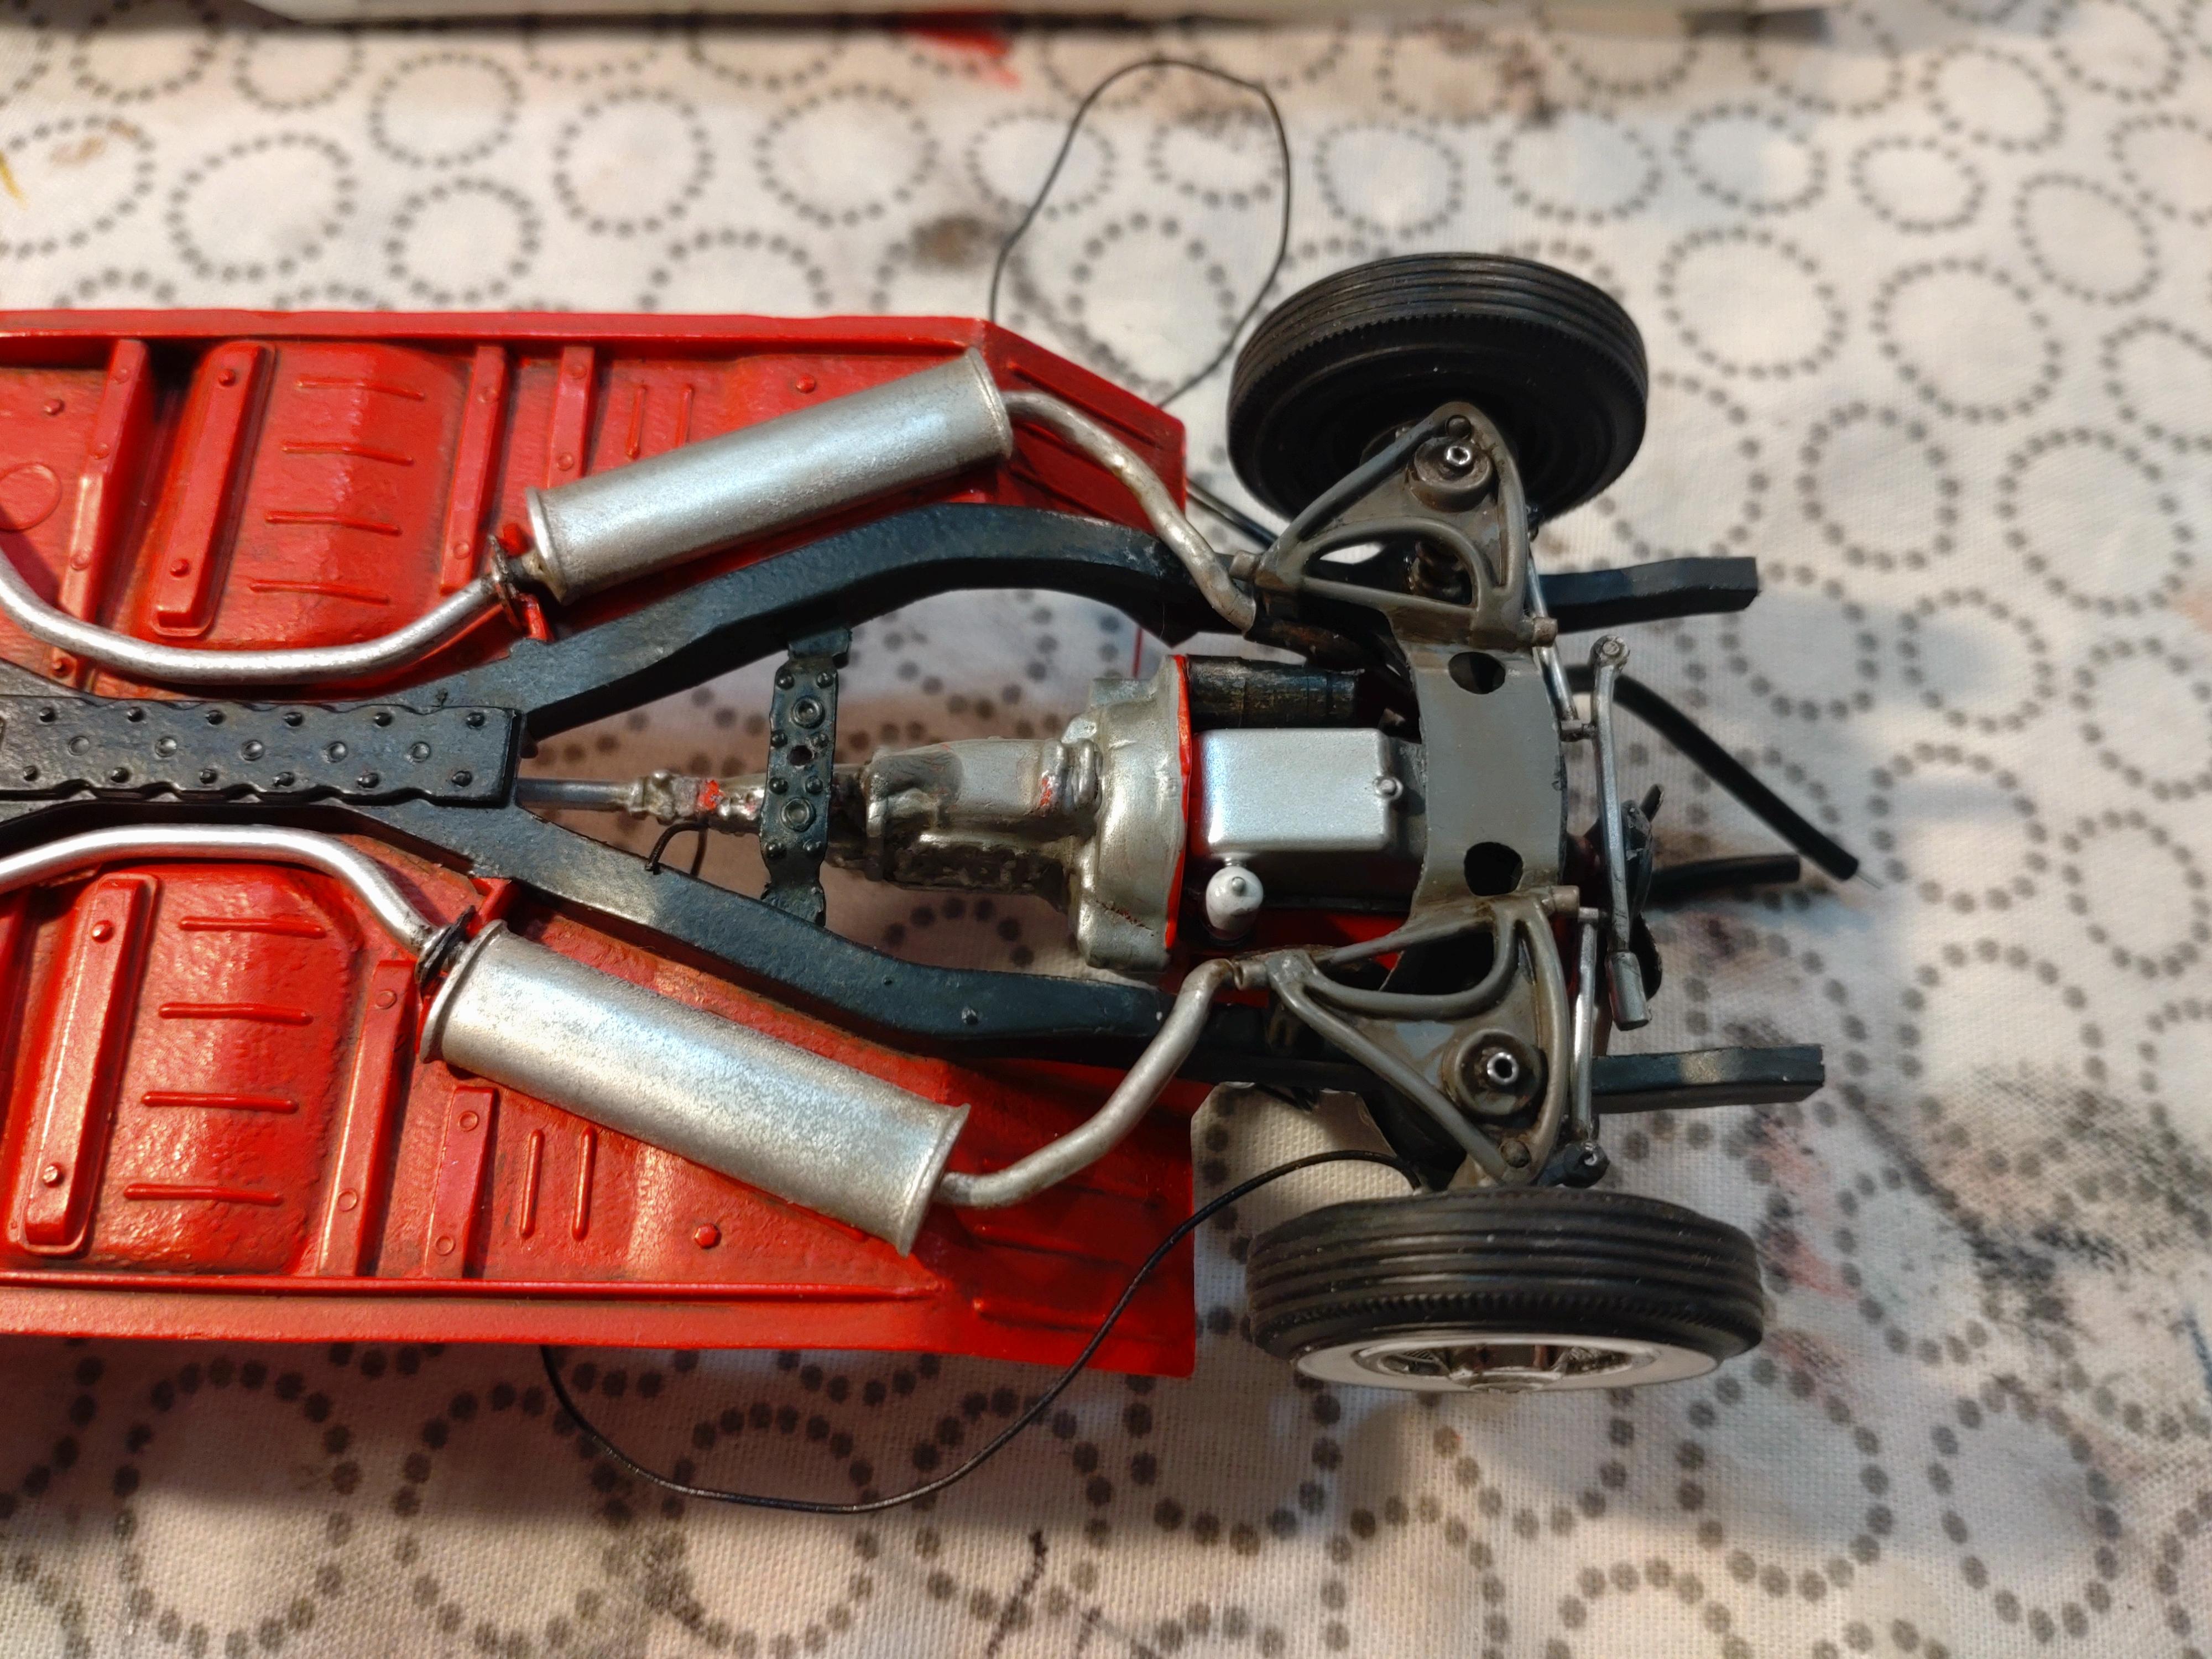
The ´57 Brougham was Cadillacs answer to Rolls Royce. It cost a staggering 13,000 $ but the manufacturing price was about 10,000 extra. Not a good deal for Cadillac but an impressive marketing move. This kit misses those standards by far. I was a bit shocked when I unboxed it and was on the brink of not building it at all. I learned later that the original issue was in 1958, but the very low level of molding and fitting quality is a disappointment. After shifting the chances of turning this kit into a reasonable build in my head, I took the challenge and set out to pack everything possible into my Brougham. The body and undercarriage are in an unusual molding setup. Two parts that connect at the belt line. This kit contains no engine and the details one could call almost nonexistent. Instead of tires you get plastic donuts. So I replaced a lot of parts (only about 60 in the box anyway?) and fabricated many details from scratch. Fortunately I had enough parts to build an engine and could cut an engine bay of a spare body. On a blue base coat I sprayed Schmincke AERO Color ultramarine blue with a 50% part of metallic fluid. After applying the BMF I sealed the body parts with AK gloss varnish and gave it a polish. The wheels and tires are from my parts box. The grill is cut out and replaced with a sheet metal grid from my model crafts dealer in town. Headlamps are lenses from Scale Production, same with other details like the wipers, door mirror and the handles. The suicide doors really hooked me and this build cried for getting them. Inside the drivers door I hid a micro magnet and the counterpart is behind the side of the drive seat. This keeps the doors in place and aligned because the drivers door holds the back door tight. The floor and the mats are flocked and the chrome is BMF with a occasional dab of Molotow chrome pen. I tried to get some of those original gimmicks into the interior and chose the record player in the front arm rest and the bar in the glove compartment. The dash got some upgrading for the gauges with printed images and 0.4mm silver wire for the trim. The engine is a mix of 3-4 different kits. Fortunately I had a air filter box that looks the the original. Detailing engines is always my favorite with every build. In this case I had to fabricate the power steering pump and the generator. The pulley wheels are deconstructed from a kit part and worked to pick up rubber belts. The wheels are connected to the block with 0.5 and 1mm brass pins. The grime comes from AK interior streaks. The extra parts in the engine bay are hand made from scratch styrene sheets and rods, wire and thin sheet aluminum. The undercarriage and all the parts for the suspension and transmission needed heavy working. A big part of the undercarriage I cut out or just grinded off. I discarded most of the kit parts and remodeled the few left to get some details on the bottom. The rear axle is from my spare box and received the extra details with styrene raw materials. The brake and fuel lines are inspired by original images. The exhaust system is finger bent 2mm styrene with mufflers from my parts box. Like the engine I weathered the bottom and added a bit of "rust". You can see the building progress in a thread on the WIP forum. The video will be released soon with this link: https://youtu.be/S5R_Goj9sR8 Thanks to everyone that followed me on the WIP and thank you for watching here!
- 45 replies
-
- 10
-

-
I´ve crossed the finish line! "Everything" done, but I will take a close look a while, if I might have missed something.... Thanks to everybody that has followed my progress. When I started I had no idea where my creativity would lead me. In the end I am really happy that I took the challenge and not put the kit to the back of the shelf. The engine bay has all the parts added and the bonnet closes too. The hinge is working fine. Left and right of the back bench there are ugly gaps that I want to get rid of. I glued dark pieces of styrene from the back. Before I glued the roof to the body I didn´t want to forget to take some pictures of the interior. The sun visors and the rear view mirror are attached. The 1:1 Brogham has an exhaust system that kind of weaves itself through the frame. I tried to copy that but the result didn´t look good to me. So I chose a conventional setup and feel OK with that. The exhaust pipe is finger bent from 2mm styrene rod. The mufflers were out of my scrap box. This is a first test fitting and I will work the parts a bit to make them fit better. Exhaust system is painted, weathered and equipped with hooks. Since the wheels are not from the original kit and the front suspension doesn´t have a kingpin, I chose a simple wire as a wheel axle. The wheels are all glued to their axles. The front bumper with the metal mesh grill is connected. Here is that post for the door locks. My plan to keep the doors closed with magnets works out fine. The counterpart of the hidden door magnet is tucked under the driver seat. The front door holds the back door closed and the alignment fits. The post has no function but adds realness. I will confess that I had to cheat a bit to make room for the post. I shifted the bench to the right by about 4mm. Being the kit as it is, some major parts didn´t quite fit in the end. The windshield is too wide by 5mm. I had to adapt the roof part and it was some juggling until the roof fit to the windows AND everything looked correct. Because I wanted the driver side to look best I had to push the windshield to the right. The wipers and the mirror are from Scale Production (Nooo, you don´t get detailed parts in this kit??) The door handles are epoxy after market. I did want them to fit at the precise spots, so I had to pin them. Which was a tricky task because of the size, but it worked out. Here the pinned handles before attaching. I will show the final images in the Under Glass forum. From Europe my humble thanks for all of your support! After a few classic builds my fingers are itching for something low and nasty again, and I have an idea what that will be..... Merry Christmas to everybody! Andy
-
Getting the paint job done always feels like a big step to me. Usually I don´t work on the "big groups" engine, body, interior and undercarriage parallel, but since the body and undercarriage on this kit are one piece, I had to adapt my building logistics. It seems I´m working on every corner of this kit at the same time. After applying the BMF the body received a final coat of AK gloss varnish and a soft polish. There isn´t that much chrome trim on the Brogham, but it does ad up to big areas. Here before the sealing.... And after... The undercarriage is just about finished too, except for the wheels. Which will be attached almost last. The rear axle with little left to do. Front and rear axles finished before the engine gets connected. Getting the engine into the bay was a bit messy. It sure was a good decision that I used pins to hold the front suspension in place. Since nothing of this is OOB but more or less scrap, it took some grinding and filing until the engine and the radiator fit snug and were low enough in the bay to let the bonnet close. After getting the engine secured I cut and attached the engine mounts and glued the drive. The front bumper was i bit too crude for my choice. I opened the grill and replaced it with a sheet metal grid structure. Here the step by step. First I cut a large area open and then grinded as much as possible with a micro drill. Next step was filing removing the last bit with diamond files and sanding up to grit 1200. The chrome is Molotow applied with a soft brush. In the meantime I have removed the vents and painted the bumper tips flat anthracite. The headlights are getting customized with "lenses". I grinded off the lights and applied headlights by Scale Production. The engine bay still looks a bit empty. Here are the parts that will enhance the bay: brake booster, battery, coil, relays. All hand made from scratch with styrene, wire and thin sheet metal. As you can see, I like to use pins for these parts. It makes them secure right from the start and I can´t pull them off again by mistake while connecting the lines. The dashboard is finished too. For the interior I want some sun visors and of course the missing rear view mirror. The mirror is 1mm sheet styrene connected to a 1mm aluminum wire, which I flattened after bending the curve. Chrome is again Molotow. The visors are 0.5mm styrene and fixed in different positions for a bit a realness and will be sprayed cream white. Thanks for watching!
-
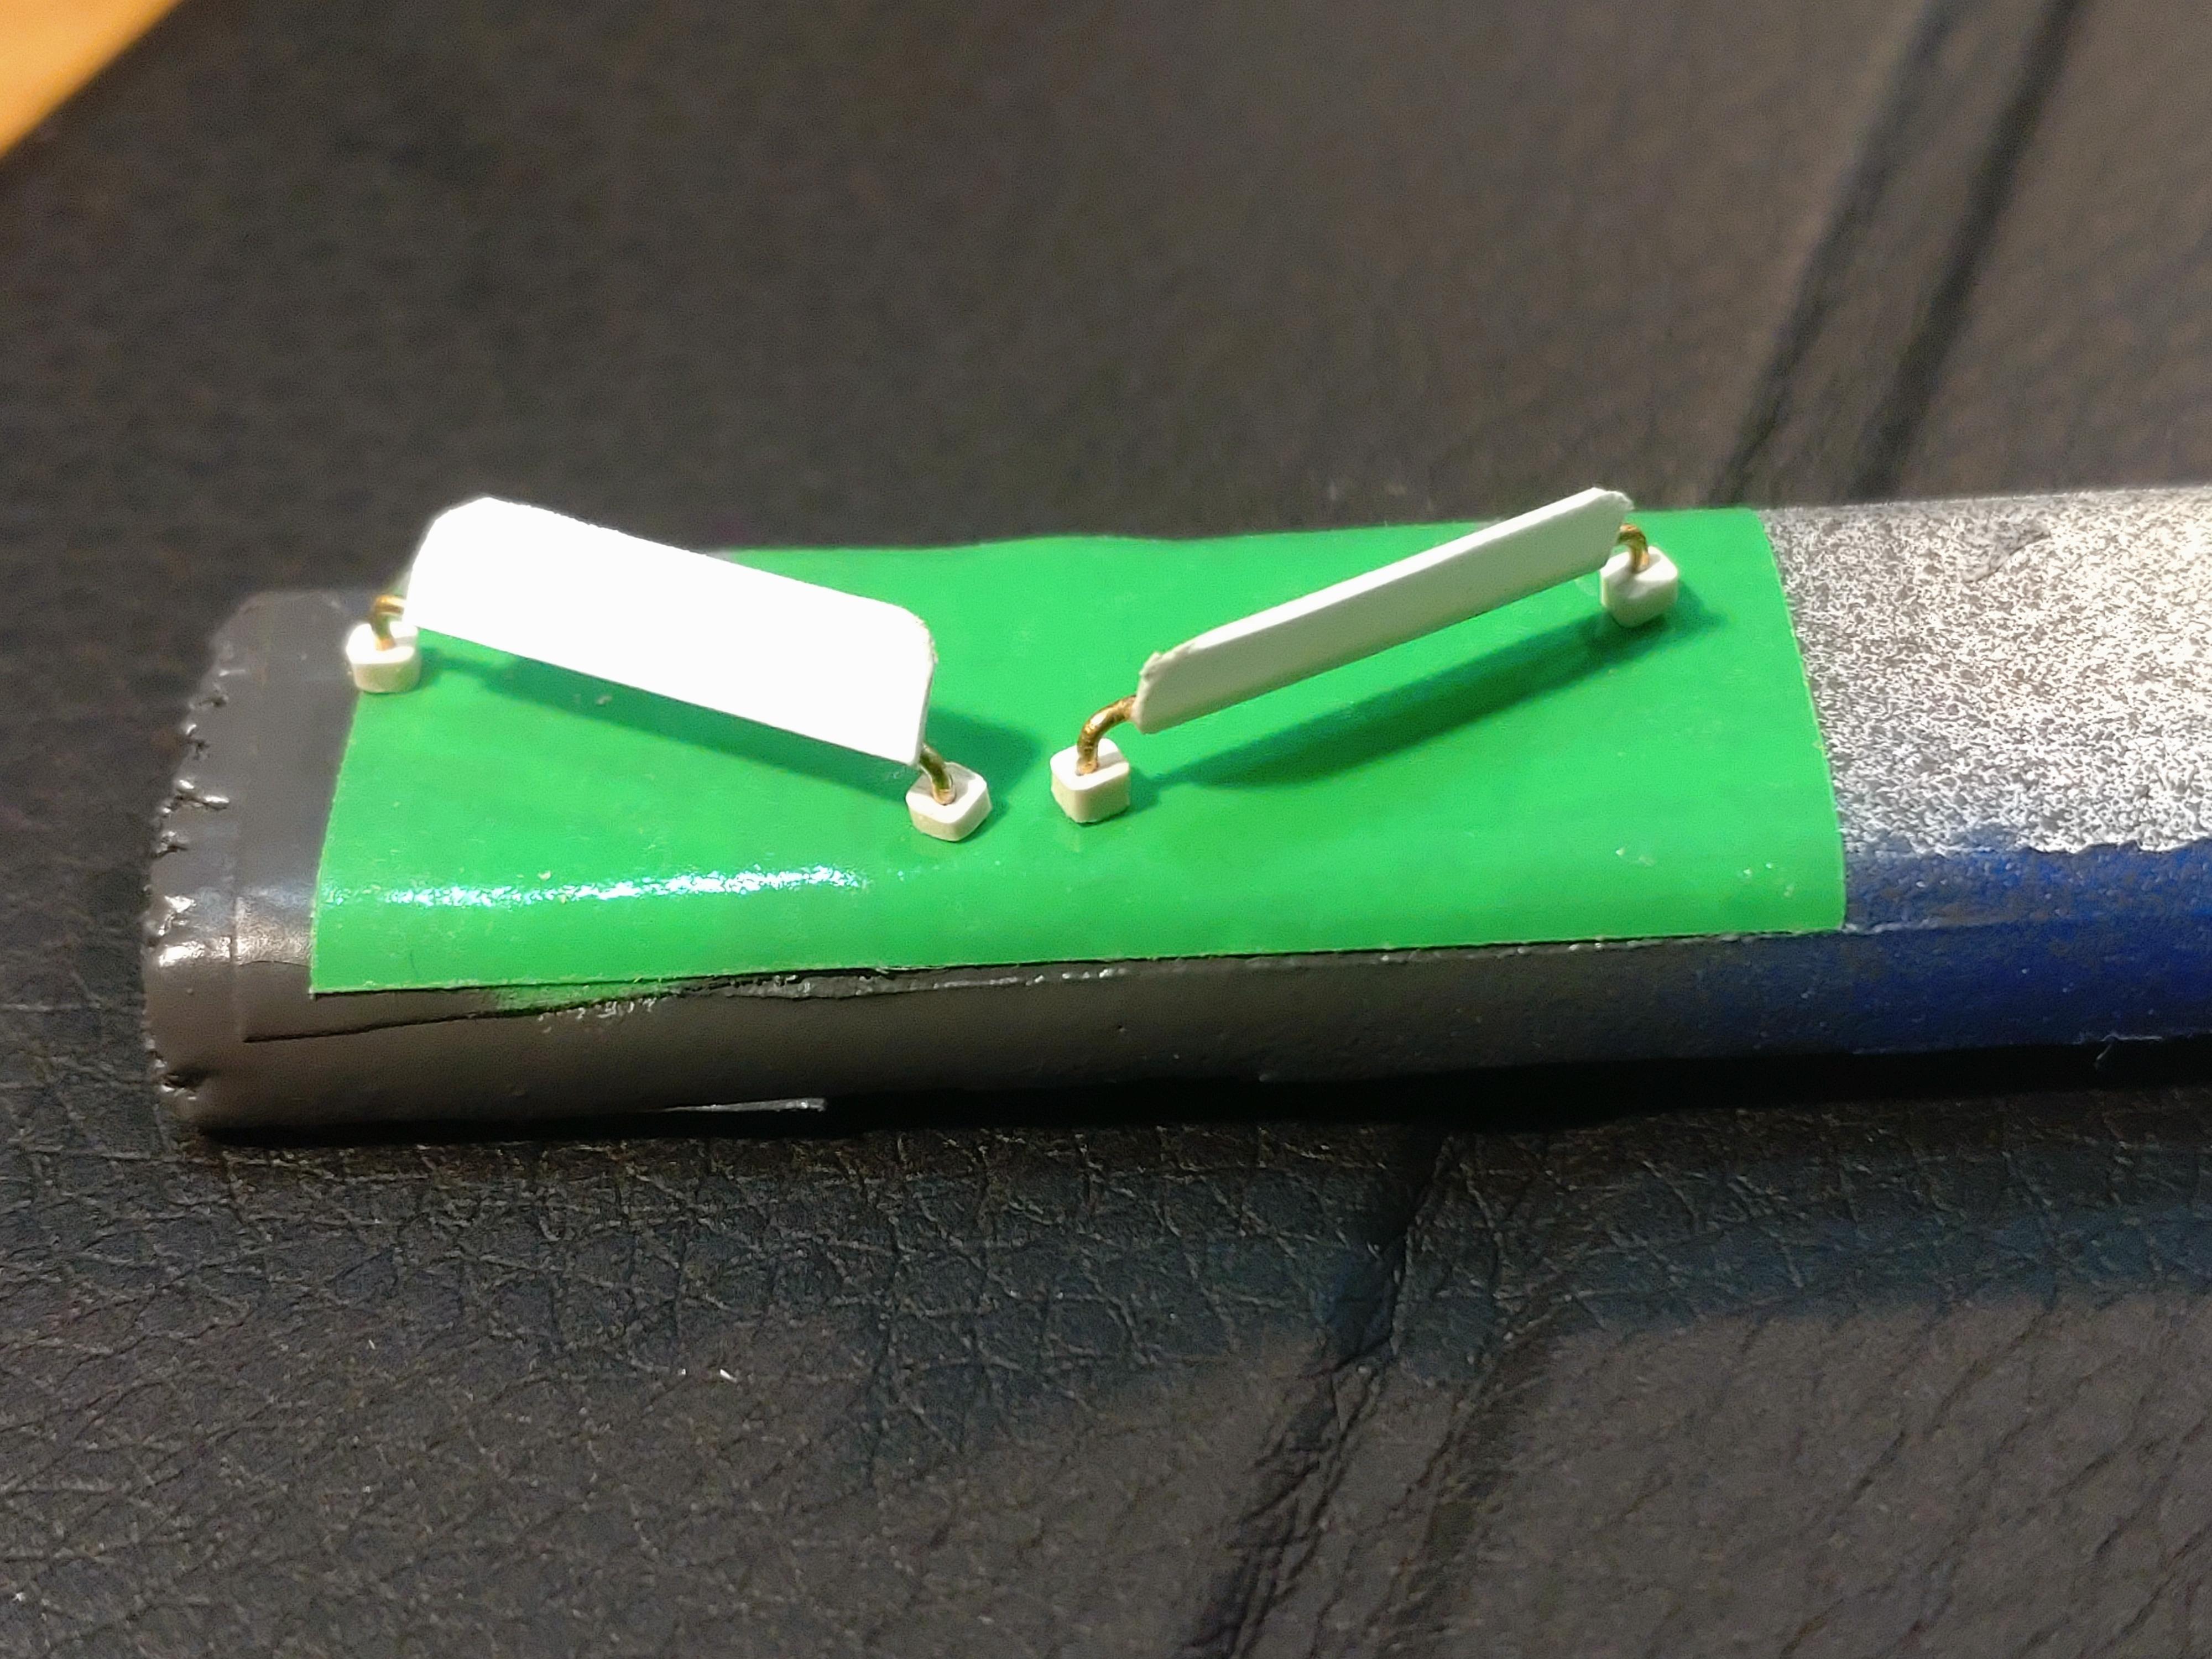
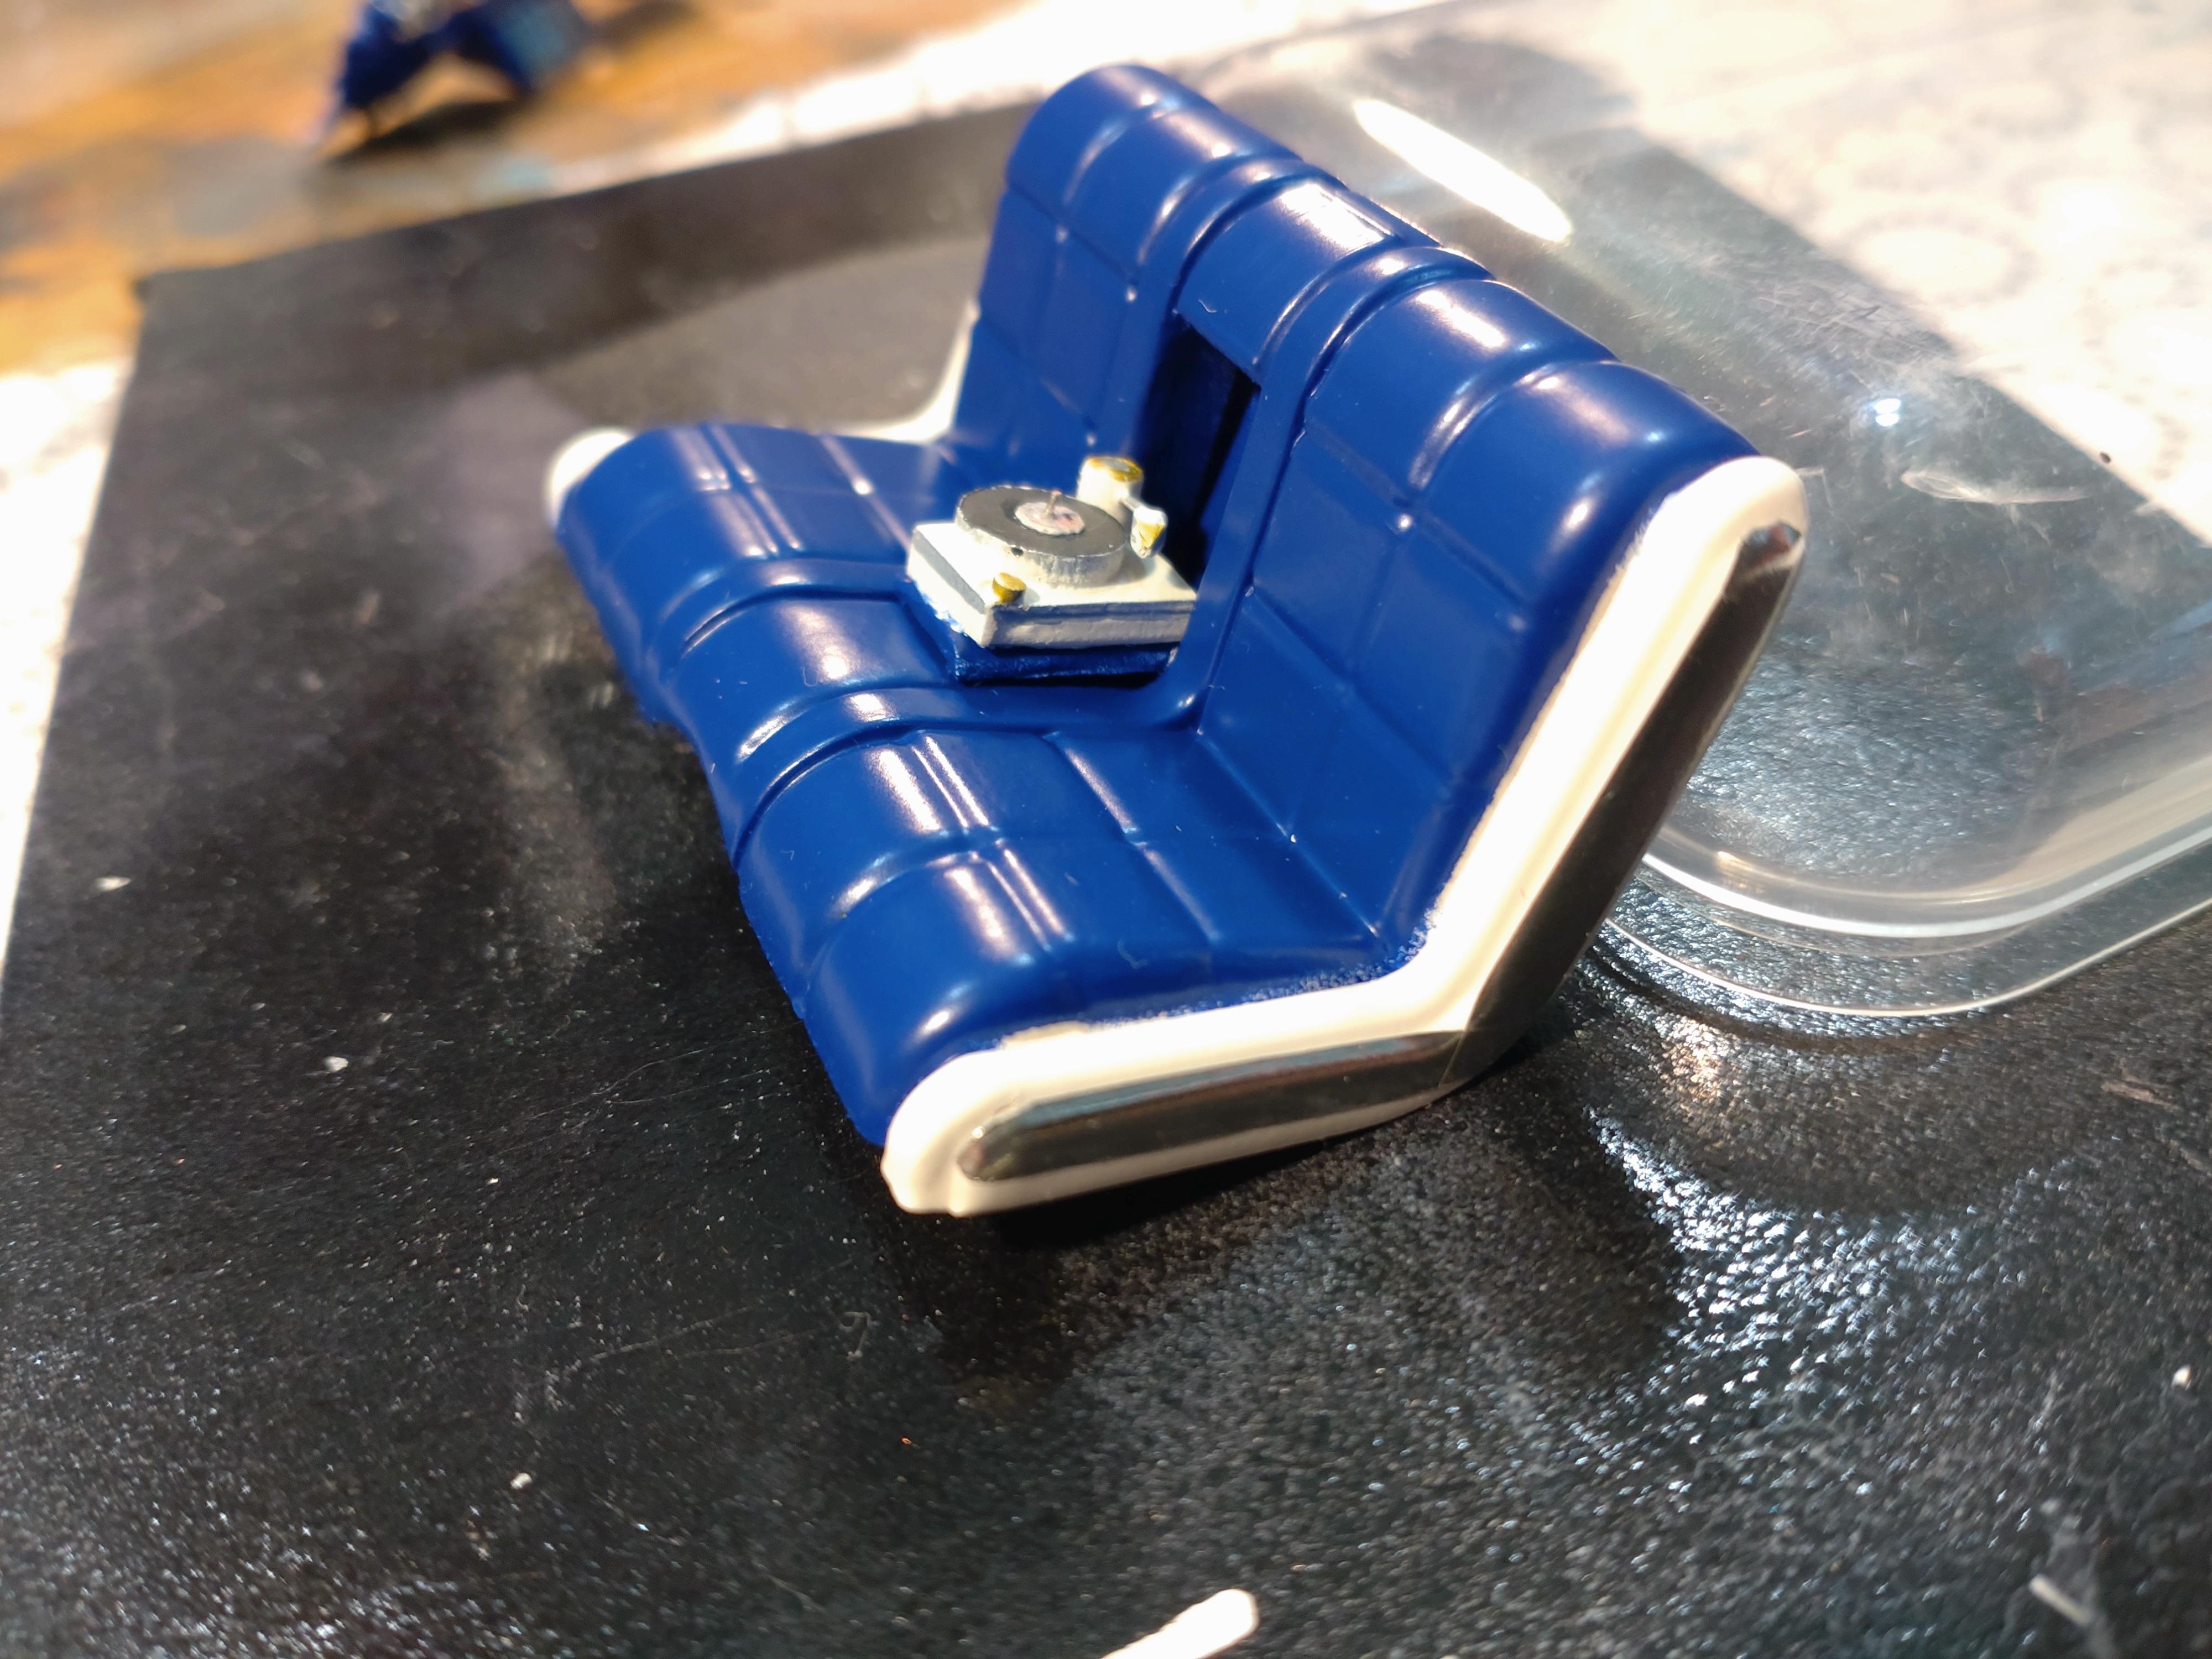
Thanks for the get well wishes! Day by day I´m moving on! But Covid is a bit.. @Steve - Your not the only one in this thread asking himself it this kit is worth the money and effort. Well, for historical reasons it might make sense trying this oldie. The actual issue is not it´s straits, it isn´t a hard to build kit. But that the molding and fitting quality is so bad despite the low number of parts. One can approach it with an attitude of "got that one done", but now it turned into a fulfilling challenge for me. What the heck, I will throw as much as I can at it. It´s just another kit. I have sprayed the body with the final color. I did a lot of paper and canvas art during the last decades and my favorite airbrush paint is definitely Schmincke AERO COLOR. It is fine enough to pass though a 0.15 mm nozzle, but still has a dense pigmentation and high opacity. It is easy to mix, especially in small amounts, and I cherish the brilliance when mixing the paint with the metallic fluid. In my case I wanted a bright untramarine and added a 50% part of metallic fluid. With the metallic fluid you must use a bigger nozzle though. I best choice is a DeVilbiss Sprite Major. It´s a double action with 0.25mm nozzle and a bigger paint cup. I prefer 40 - 50 psi air pressure. The surface is flat, so of course it needs a clear coat. I prefer AK gloss varnish. This first coat will be smoothend with grit 6000 later for the final sealing. On an old image I saw that the Brougham could be ordered with a record player on / in the middle arm rest. So why not try that? Here are the parts for the record player fabricated from styrene and a piece of wire. I will skip the intermediate steps for the interior and just show the door panels and the bench, with record player. Another very exiting luxury accessory was a "bar" for the glove compartment. I started this detail by cutting the compartment lid open first. Then fitting the lid to the dash in the open mode before moving on to the dashboard details. Of course this kit contains no decals. The gauges and the speed meter are images from the net reduced in size and printed on glossy photo paper, the same with the radio. The trim rings are 0.4mm silver plated wire. The chrome is Molotow pen applied with a hair brush. Now comes the bar... My best wish was getting VERY tiny tubes for 6 shot cups. Alas, the smallest I could get a hand on would make for say, 4 slightly bigger cups. These are set on a small tray covered with BMF. I will get the dashboard finished in the next step. Thanks for watching!
-
Thanks everyone for your kind response! I´ve been wrestling with Covid for a week and couldn´t make any progress. Hope to get into my shop this afternoon. More to come soon. @ peteski Peter: I´m grateful for every science because I am not a mechanic. Thanks!? I check that a generator produces DC, whereas an alternator goes AC. I just have to learn how to make the difference?. I guess it has to do with the production year and I have noticed that they look different? Best wishes to all of you!
-
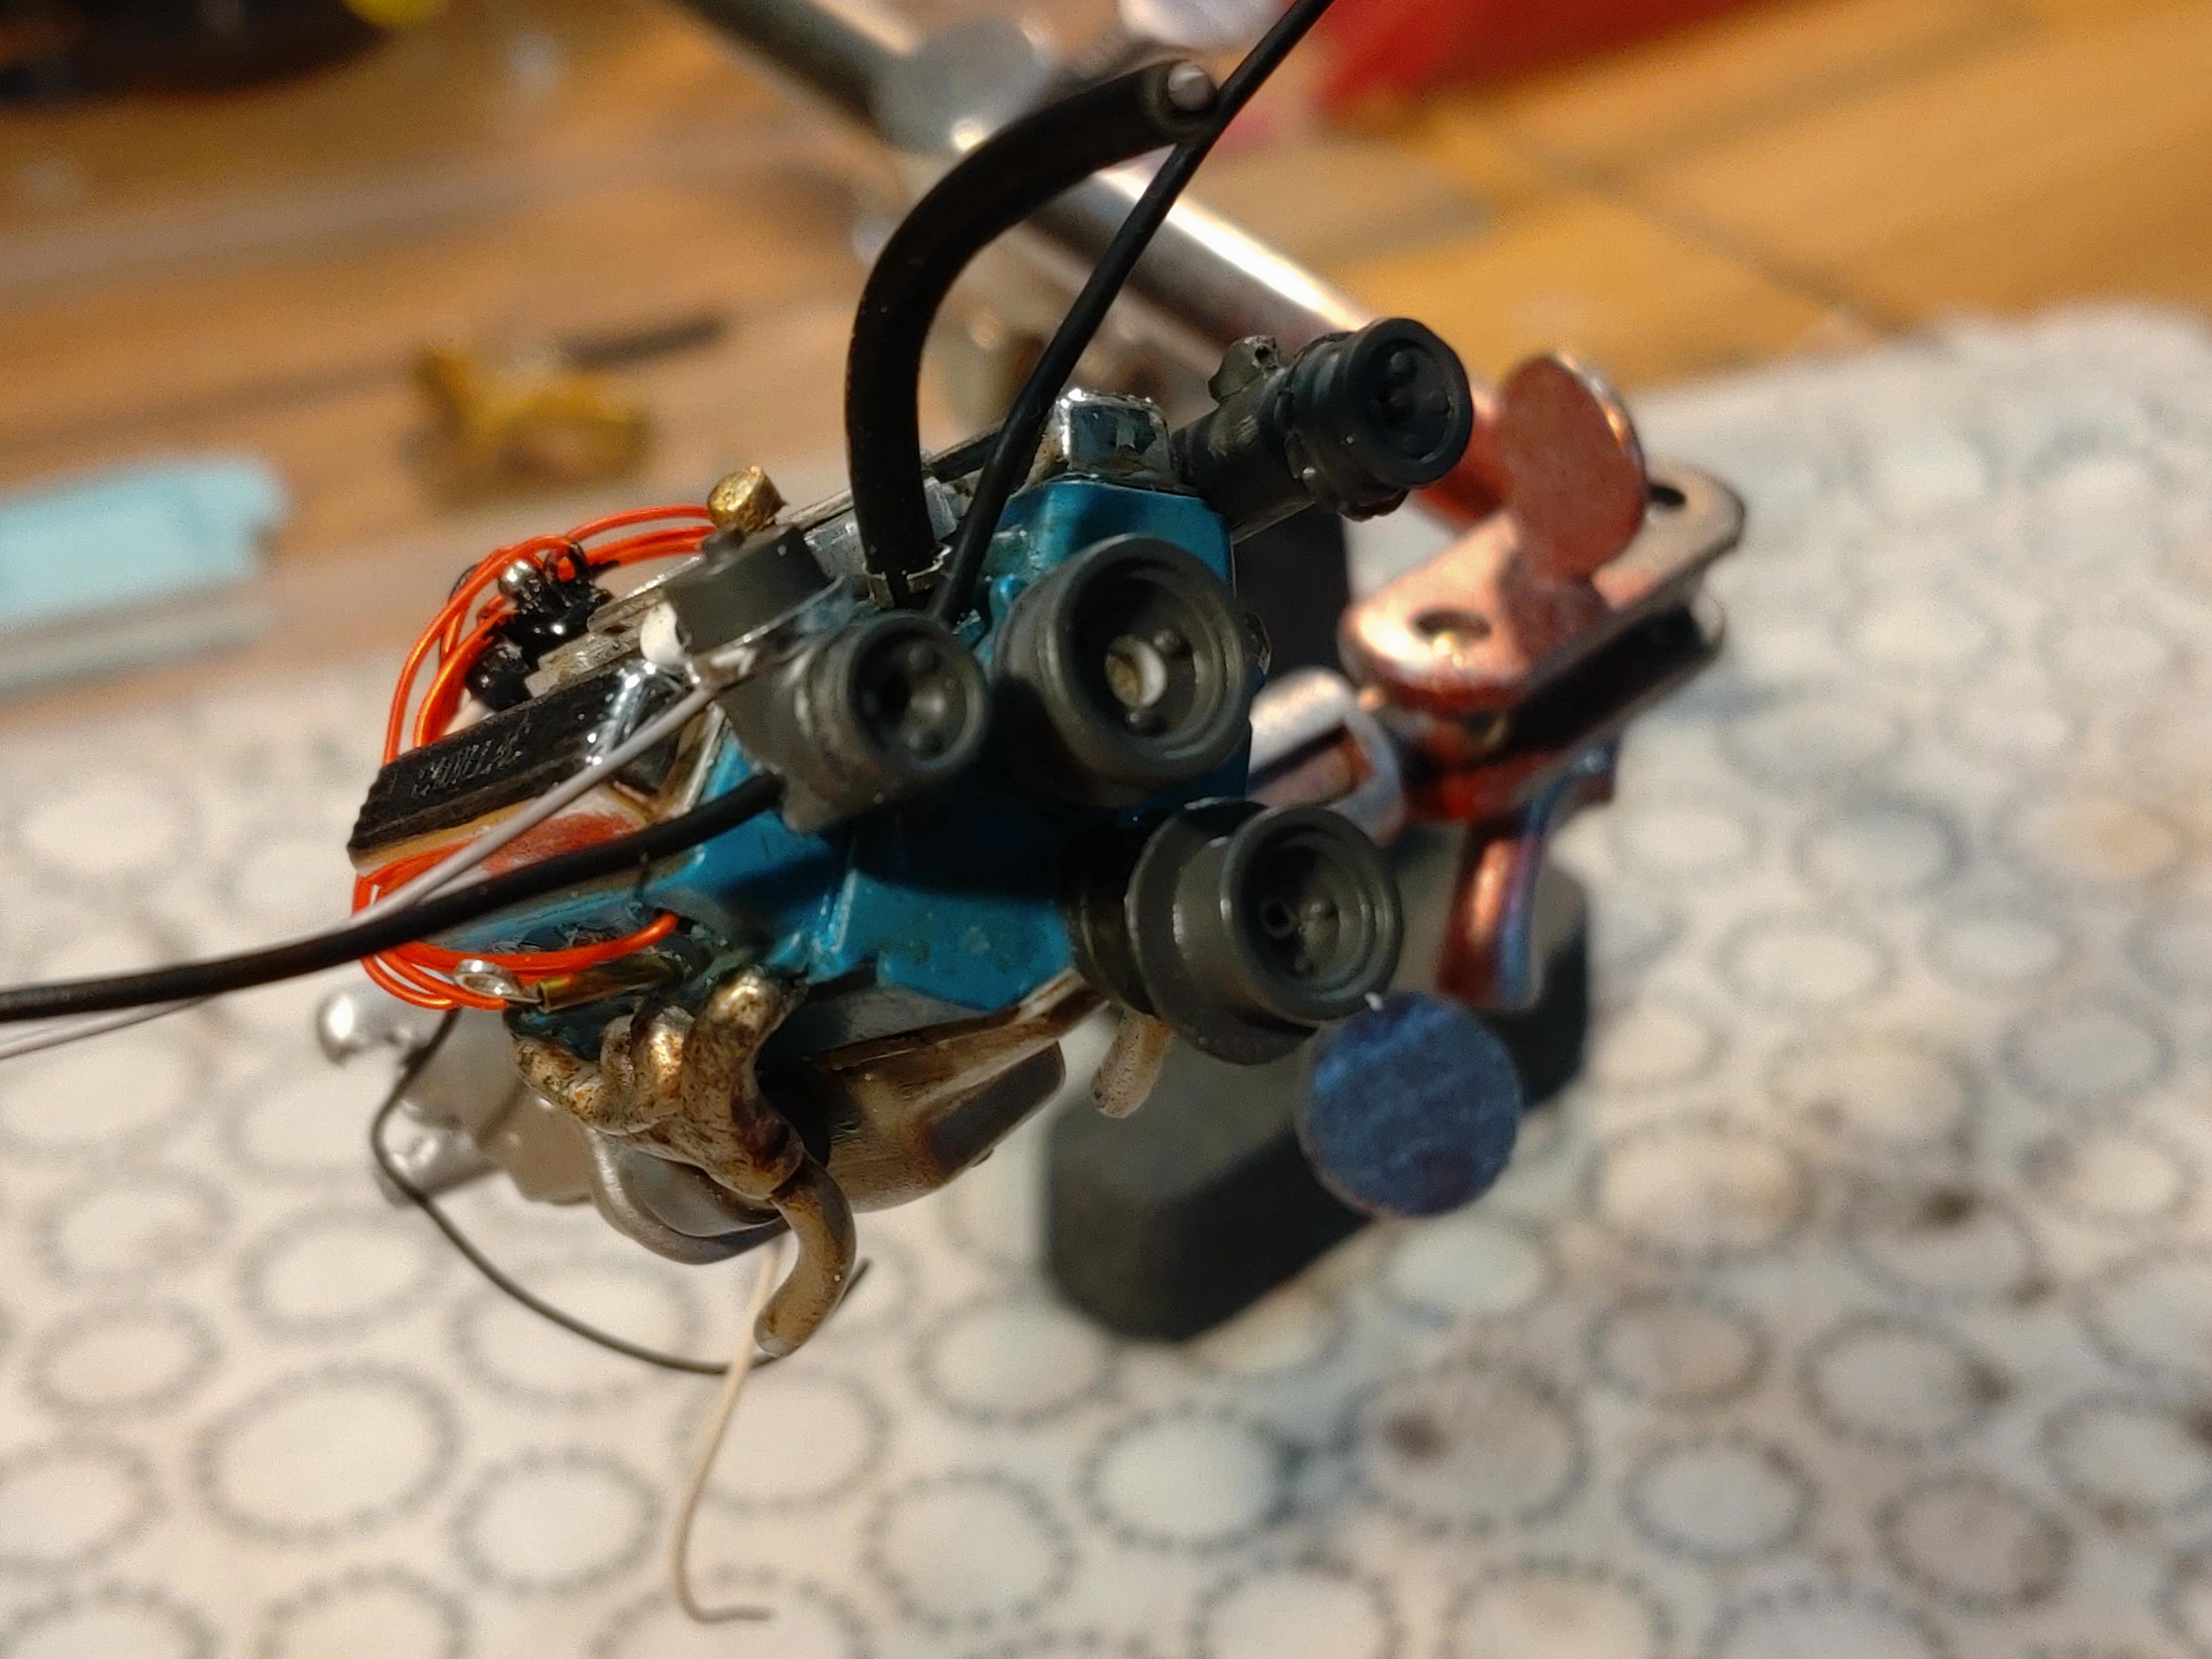
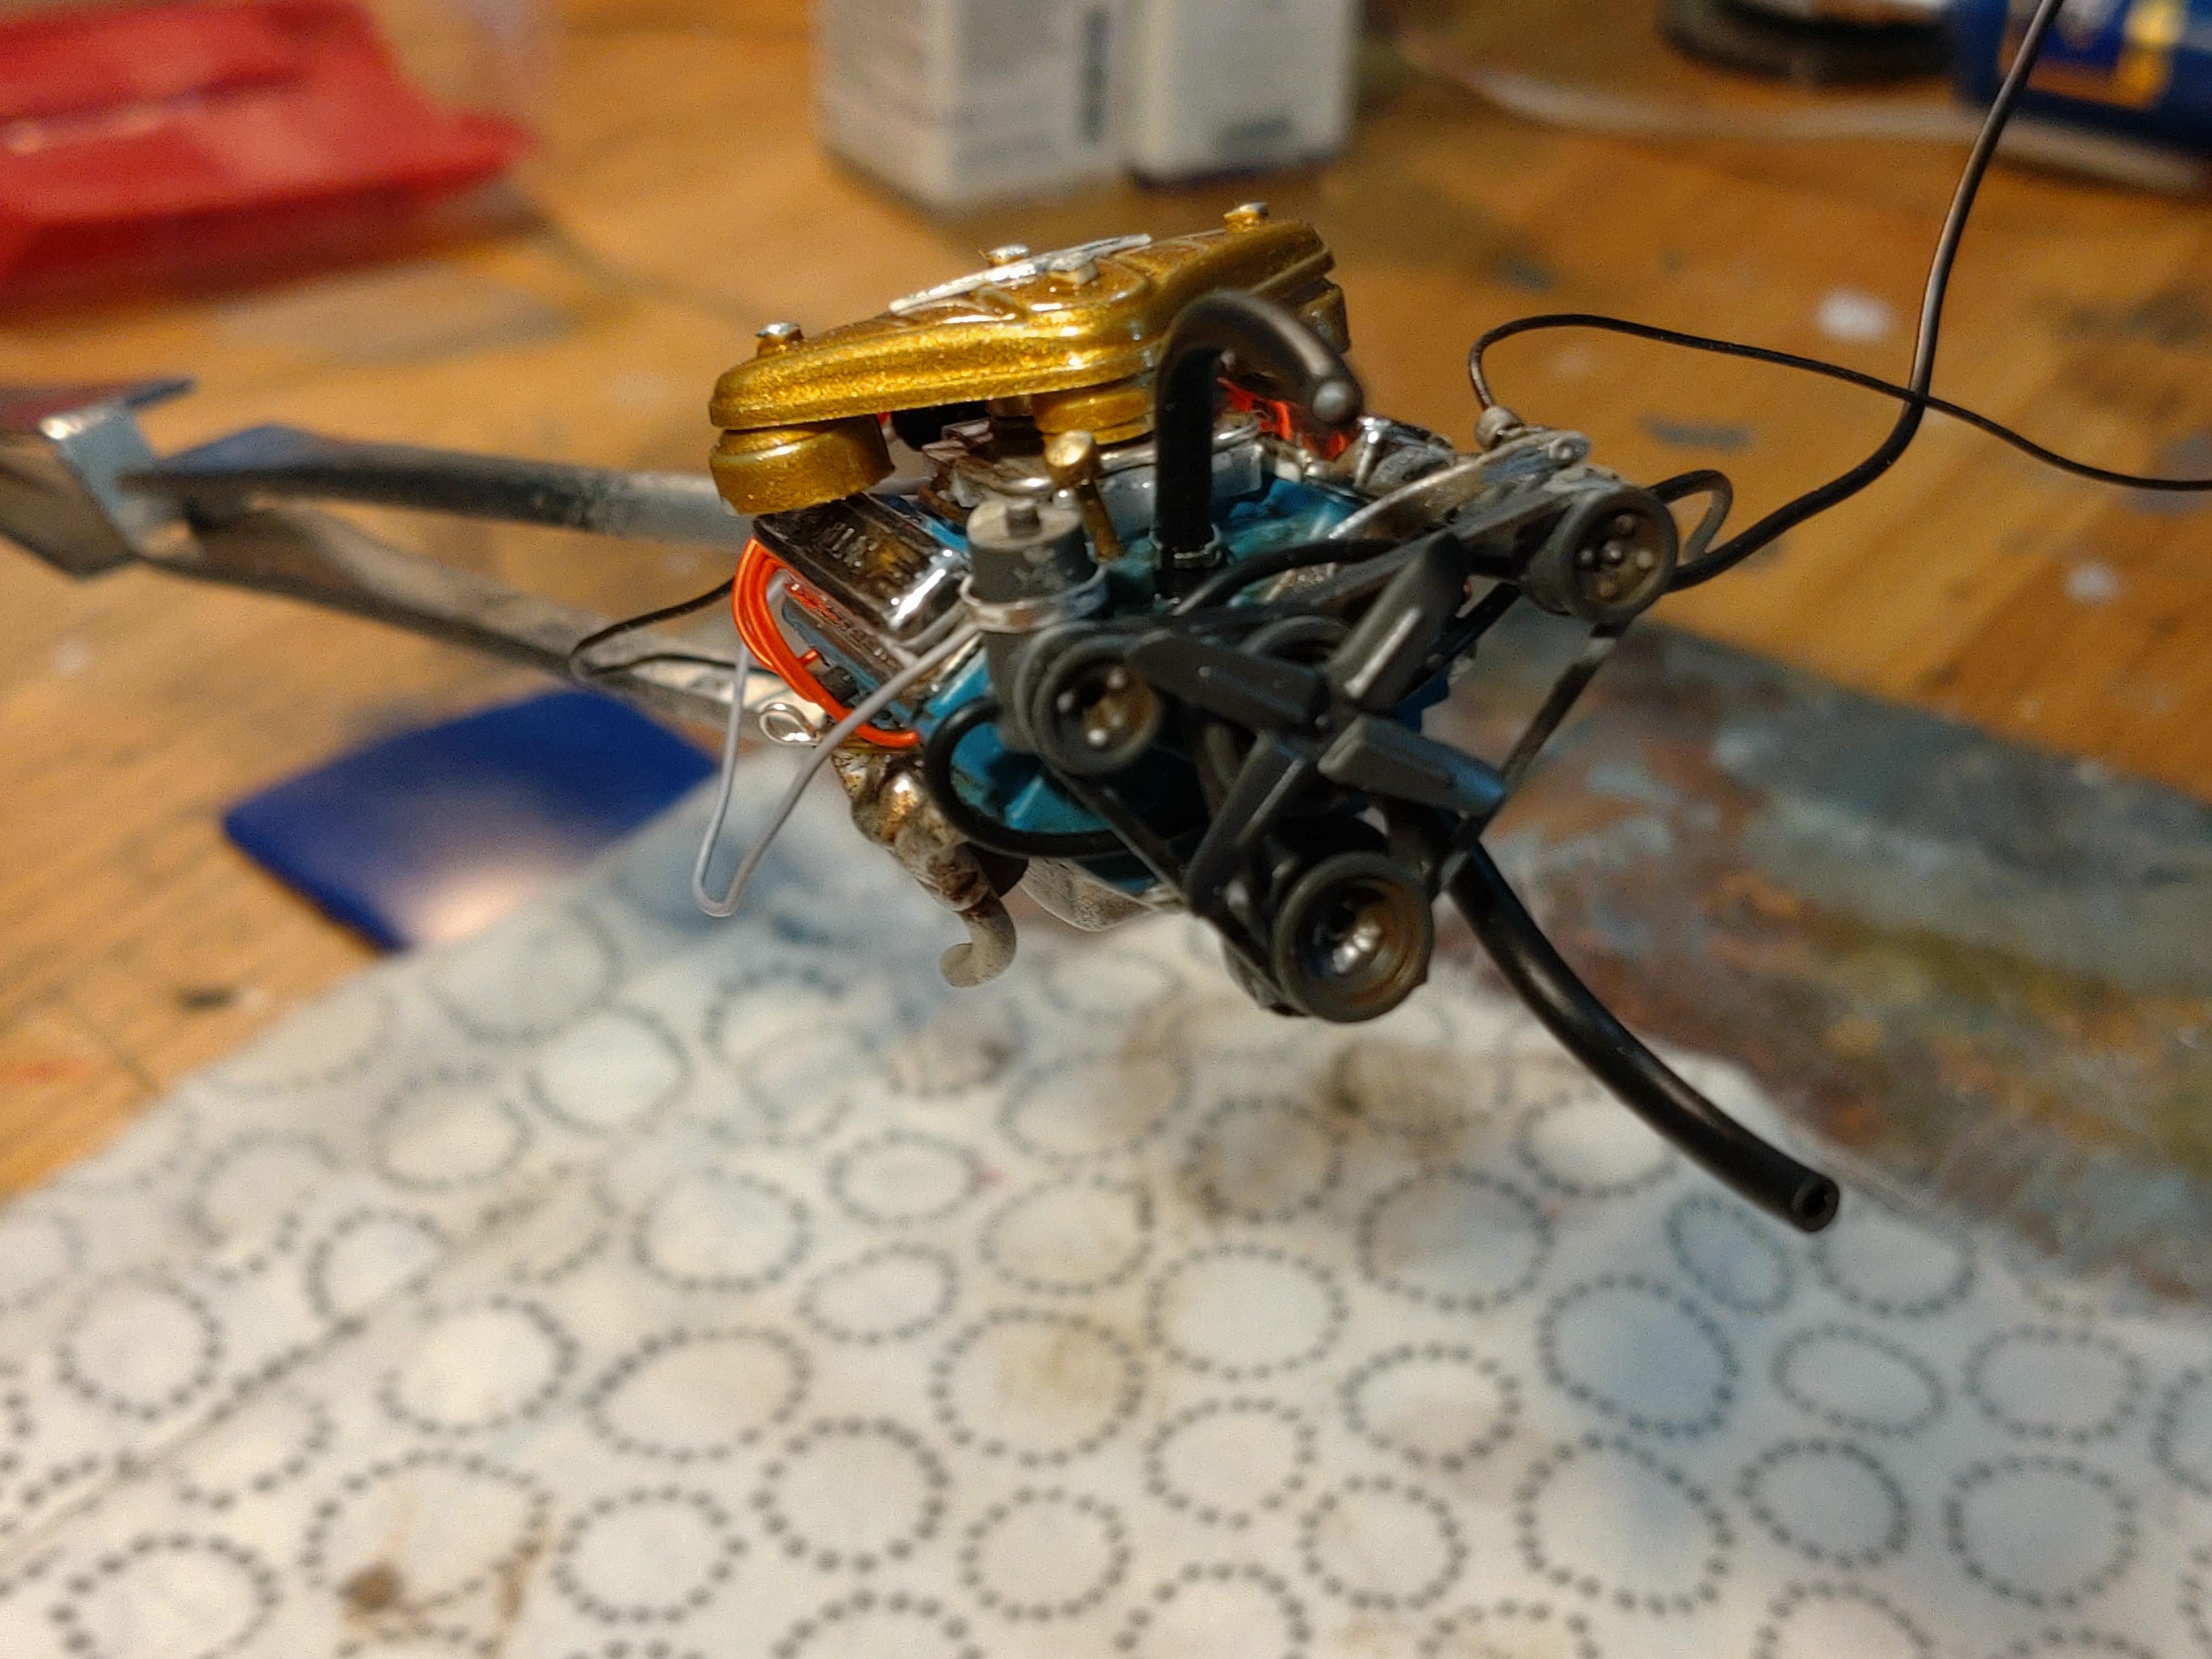
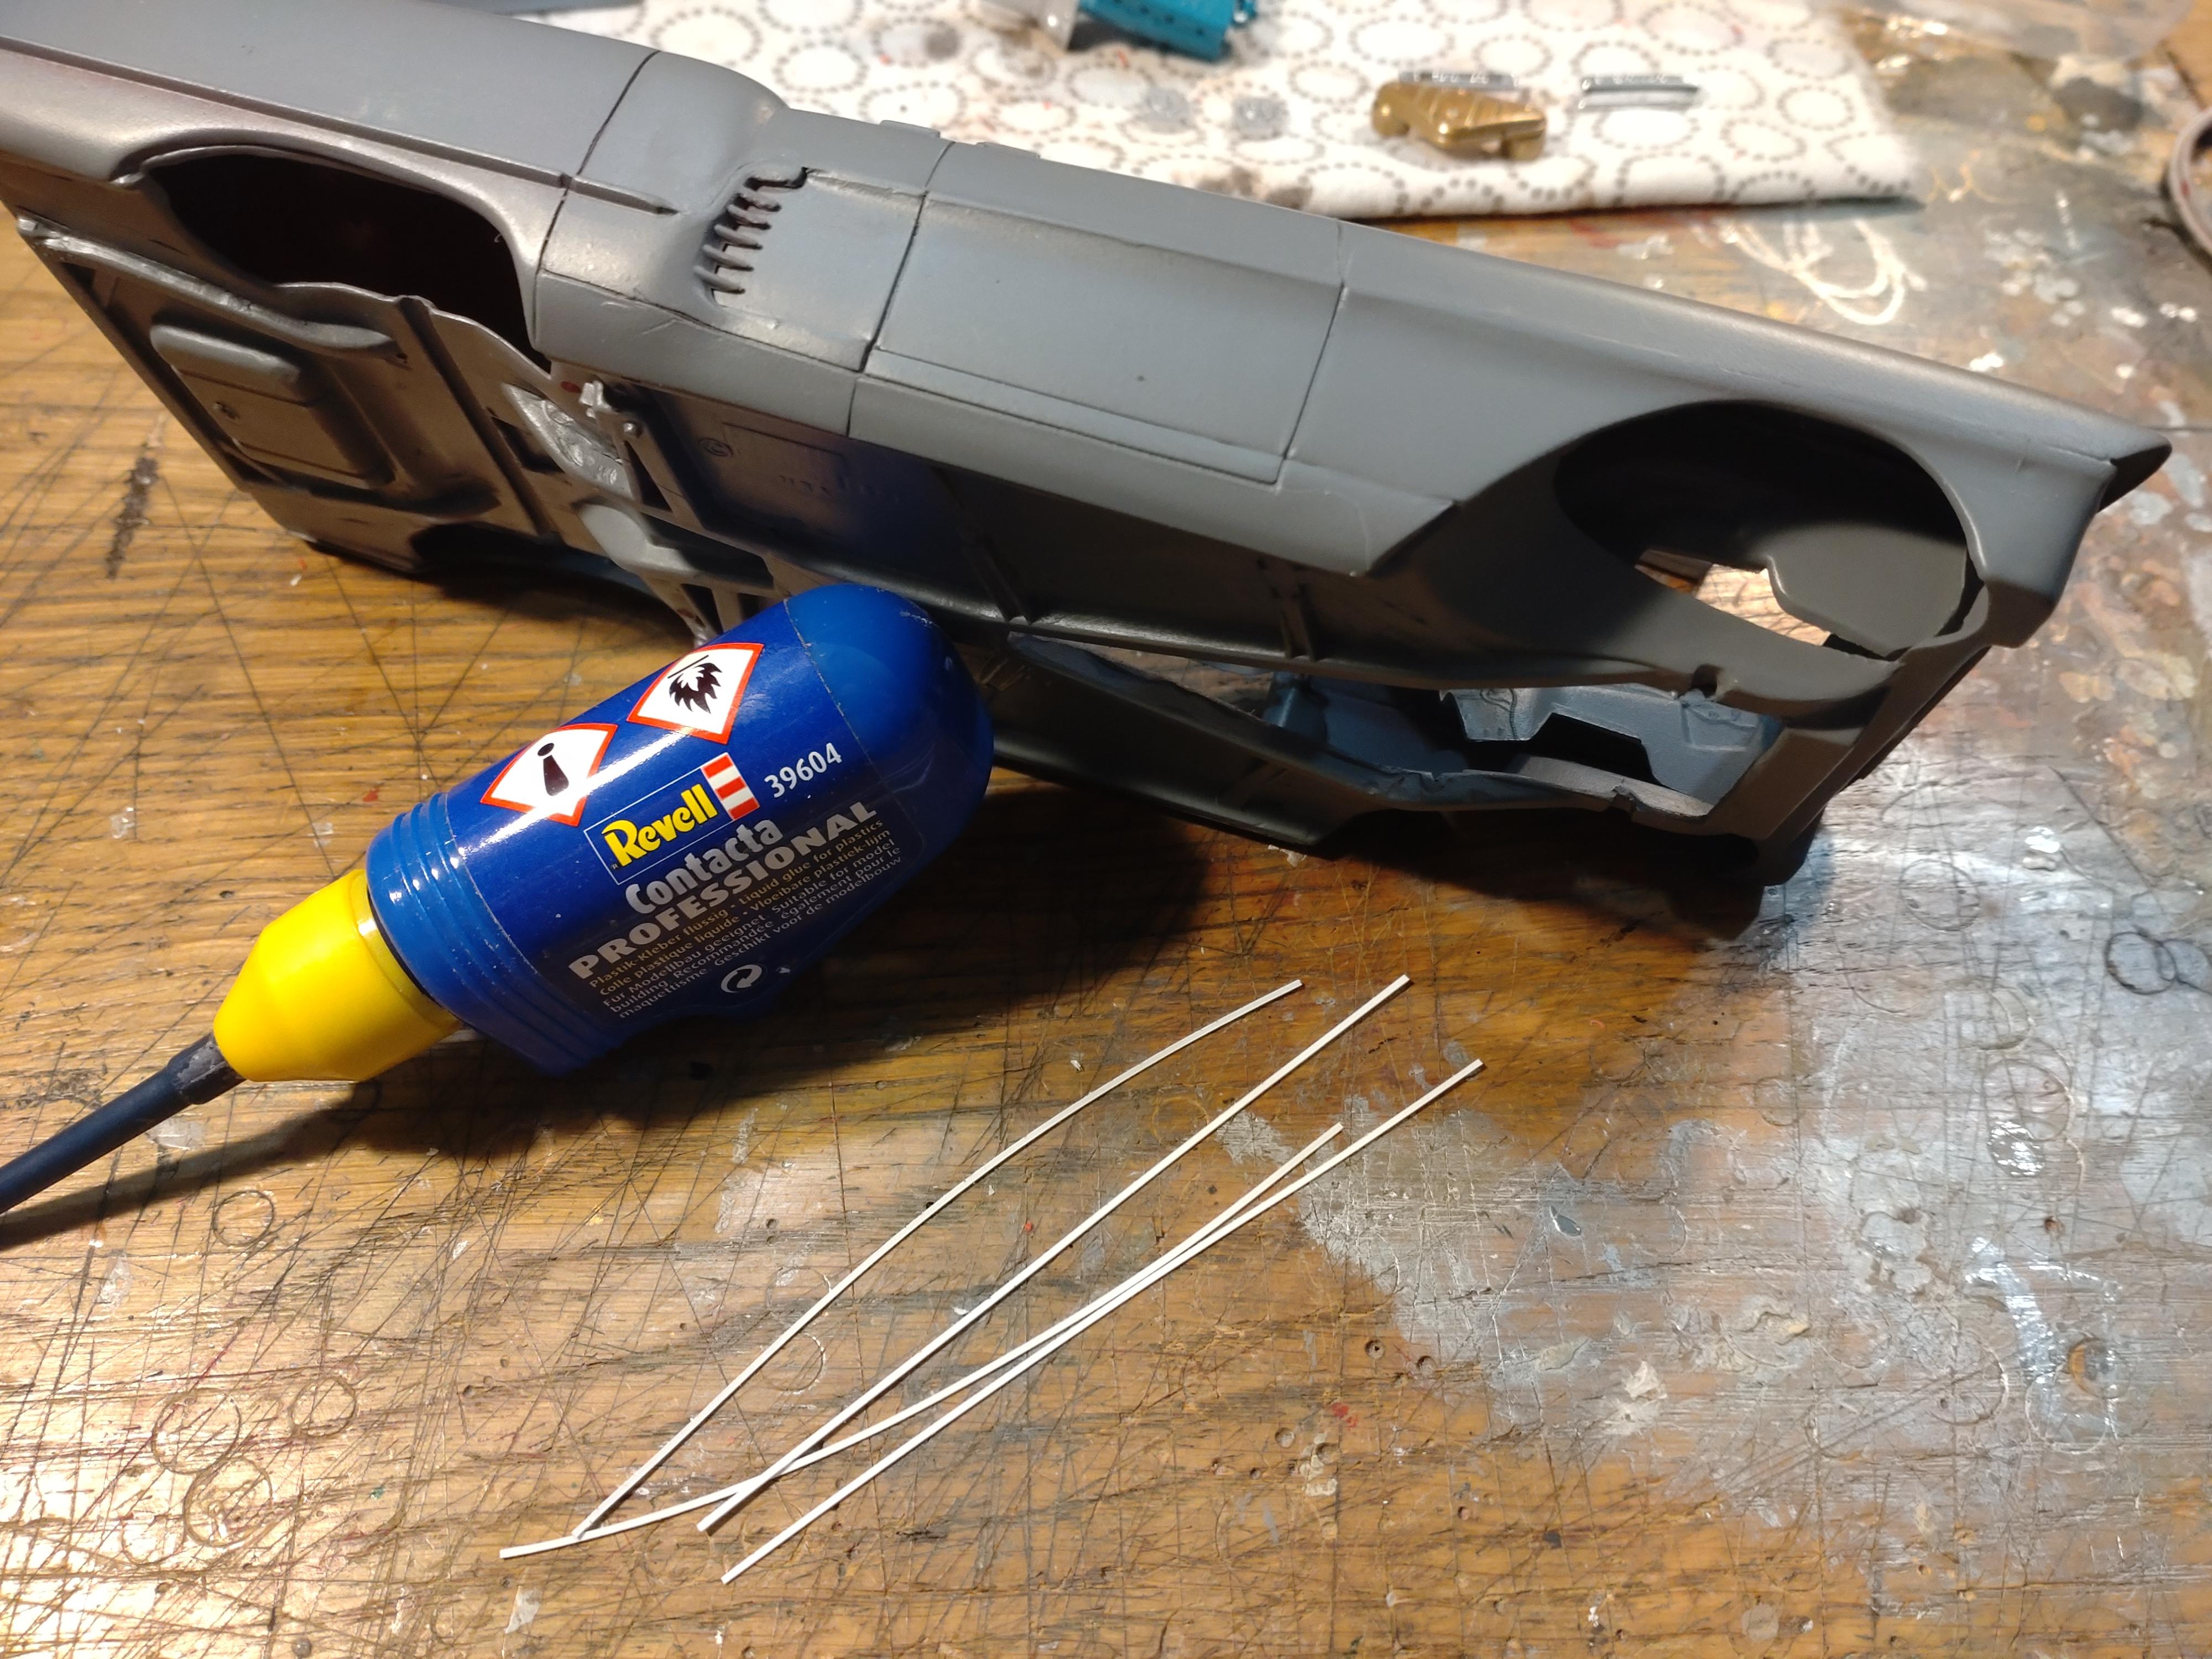
It did give me a heavy chuckle to read about some of your own experiences with this kit. I am not the only victim?. It seems to have a bad reputation... hmmmm, how come?? So I´m just about finished with the engine now. The pulley wheels, alternator and the power steering pump are all connected to the block with brass pins. They can take a rough handling and pull from the belts without bending off. Before I attached the belts I fabricated a mount for the alternator and added micro hex nuts. The parts received a bit of patina. Belts and fan attached... The body is spayed with a blue base coat. This gives an approximate impression of the body color. This model will end up with a metallic blue finish. The surface is smoothend with 6000 grit and ready for the final paint job. It was time to take care of the bonnet. I wanted to try something new about the hinges. Until now I have always been bending them out of 1mm brass wire and connecting them to the kit parts with 3mm styrene tubing. for this bonnet I tried out 0.5mm brass rod in a 1mm brass tubing. I think I will stick to 1mm hinges for doors, since they have to stay in shape and should not sag. But the bonnet has no weight to hold. And the much thinner rods look much more elegant. So this is the hinge glued to the inside of the engine bay. And tipped open looks quite fine to me. I will file off excess epoxy glue and spray the rods blue. The hood will receive a silencing mat at the end. My fingers are itching to start with the final paint job, but my instinct is telling me to take care of the undercarriage first. I do want to prevent messing the body by mistake while working the undercarriage. I will not be satisfied with the kit parts for the front and rear suspension. They look more like they fit to Fred Flintstones vehicle. But I was able to work the front part and add some details for more realism. After cutting away enough to match it to the engine, I found the right spot for later assembly and prepared the part with pins. This will also make the final connection to the frame bomb proof. Next I added the details with styrene sheet and tubes and 0.4mm wire. Spray painted in dark grey and touching up with patina. The kit rear axle and differential just don´t look correct to me. I found a axle in my boxes and fabricated the missing parts with styrene profiles. In the back you can see the red kit axle.... Next I added a few details and patina. The undercarriage isn´t deep enough for shock absorbers, so I had to fake it with short stumps. But this is a big improvement from the kit setup. Now the undercarriage has its final color. I must wait with the exhaust system until the engine and the suspension system are attached. I haven´t decided yet to paint the body next or finish the interior first.? Thanks for watching!
-
Hi John, happen to say, yes, I am planing to fabricate that side strut. Compared to all the other work, it won´t be that hard to build. Depending on the viewing angle, it doesn´t look that dominant to me. It does come to my mind though, how many rear passengers must have bumped their knees on that strut, or messed their fancy attire with grease...?
-
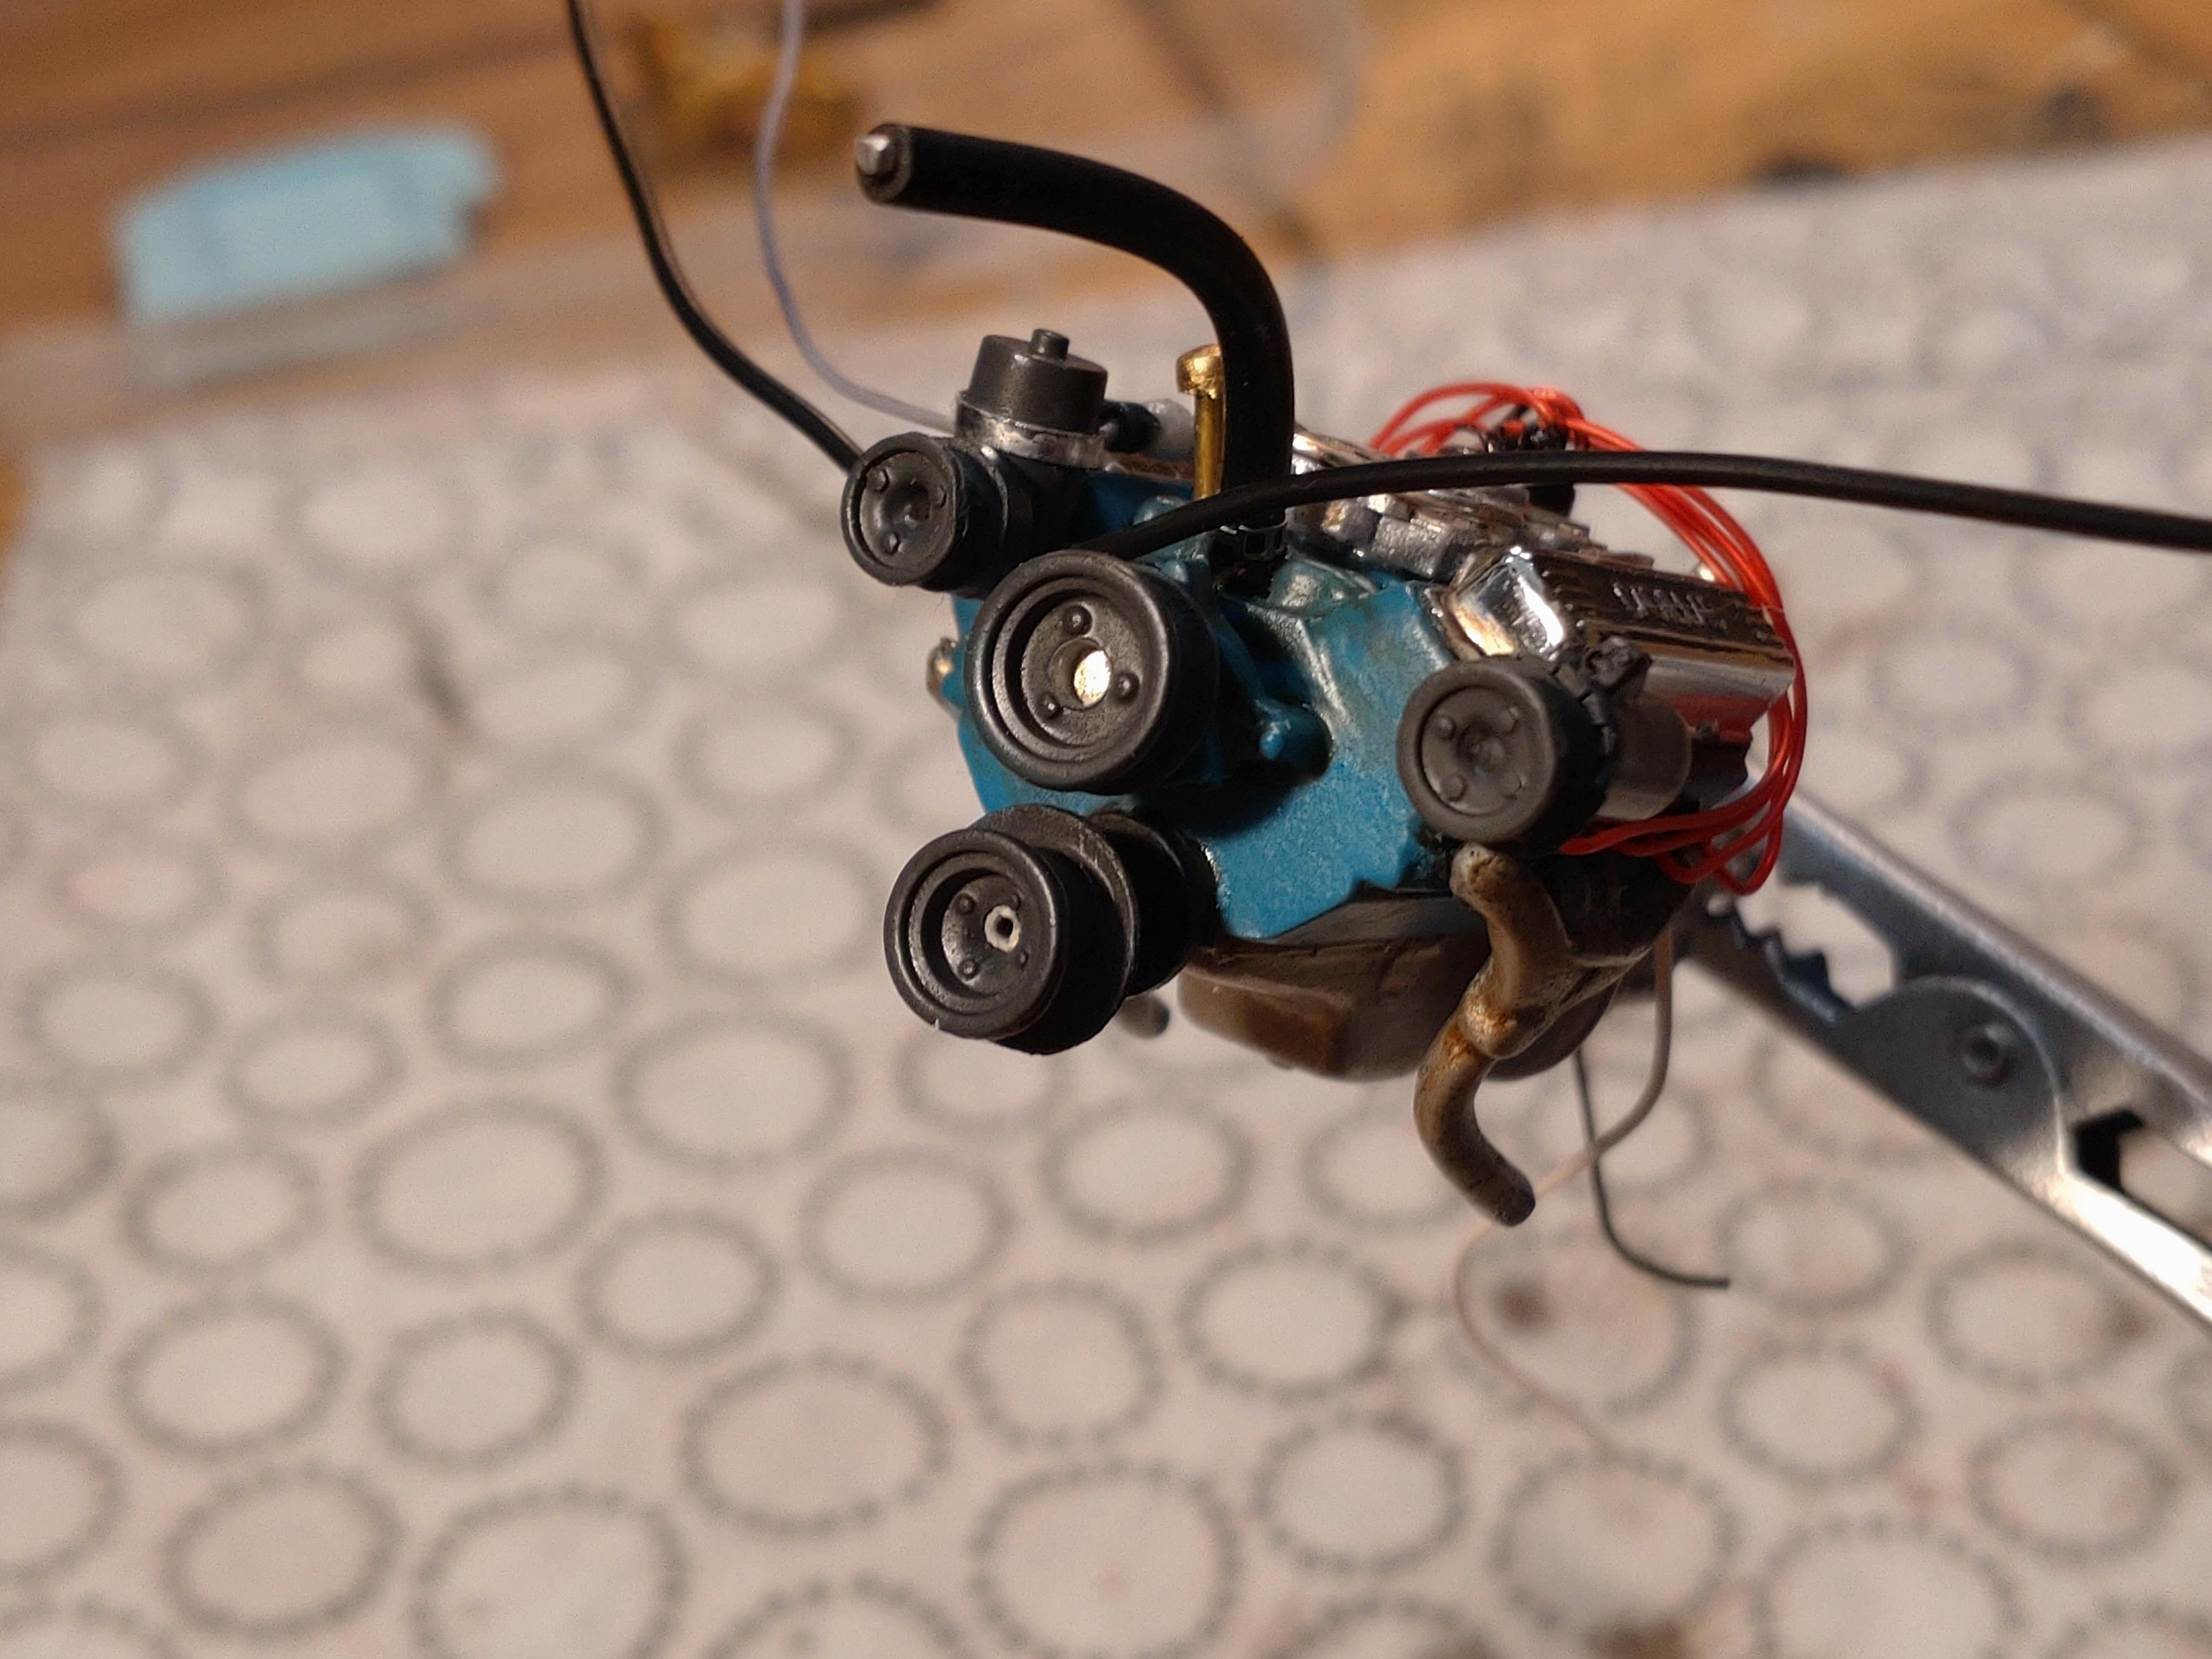
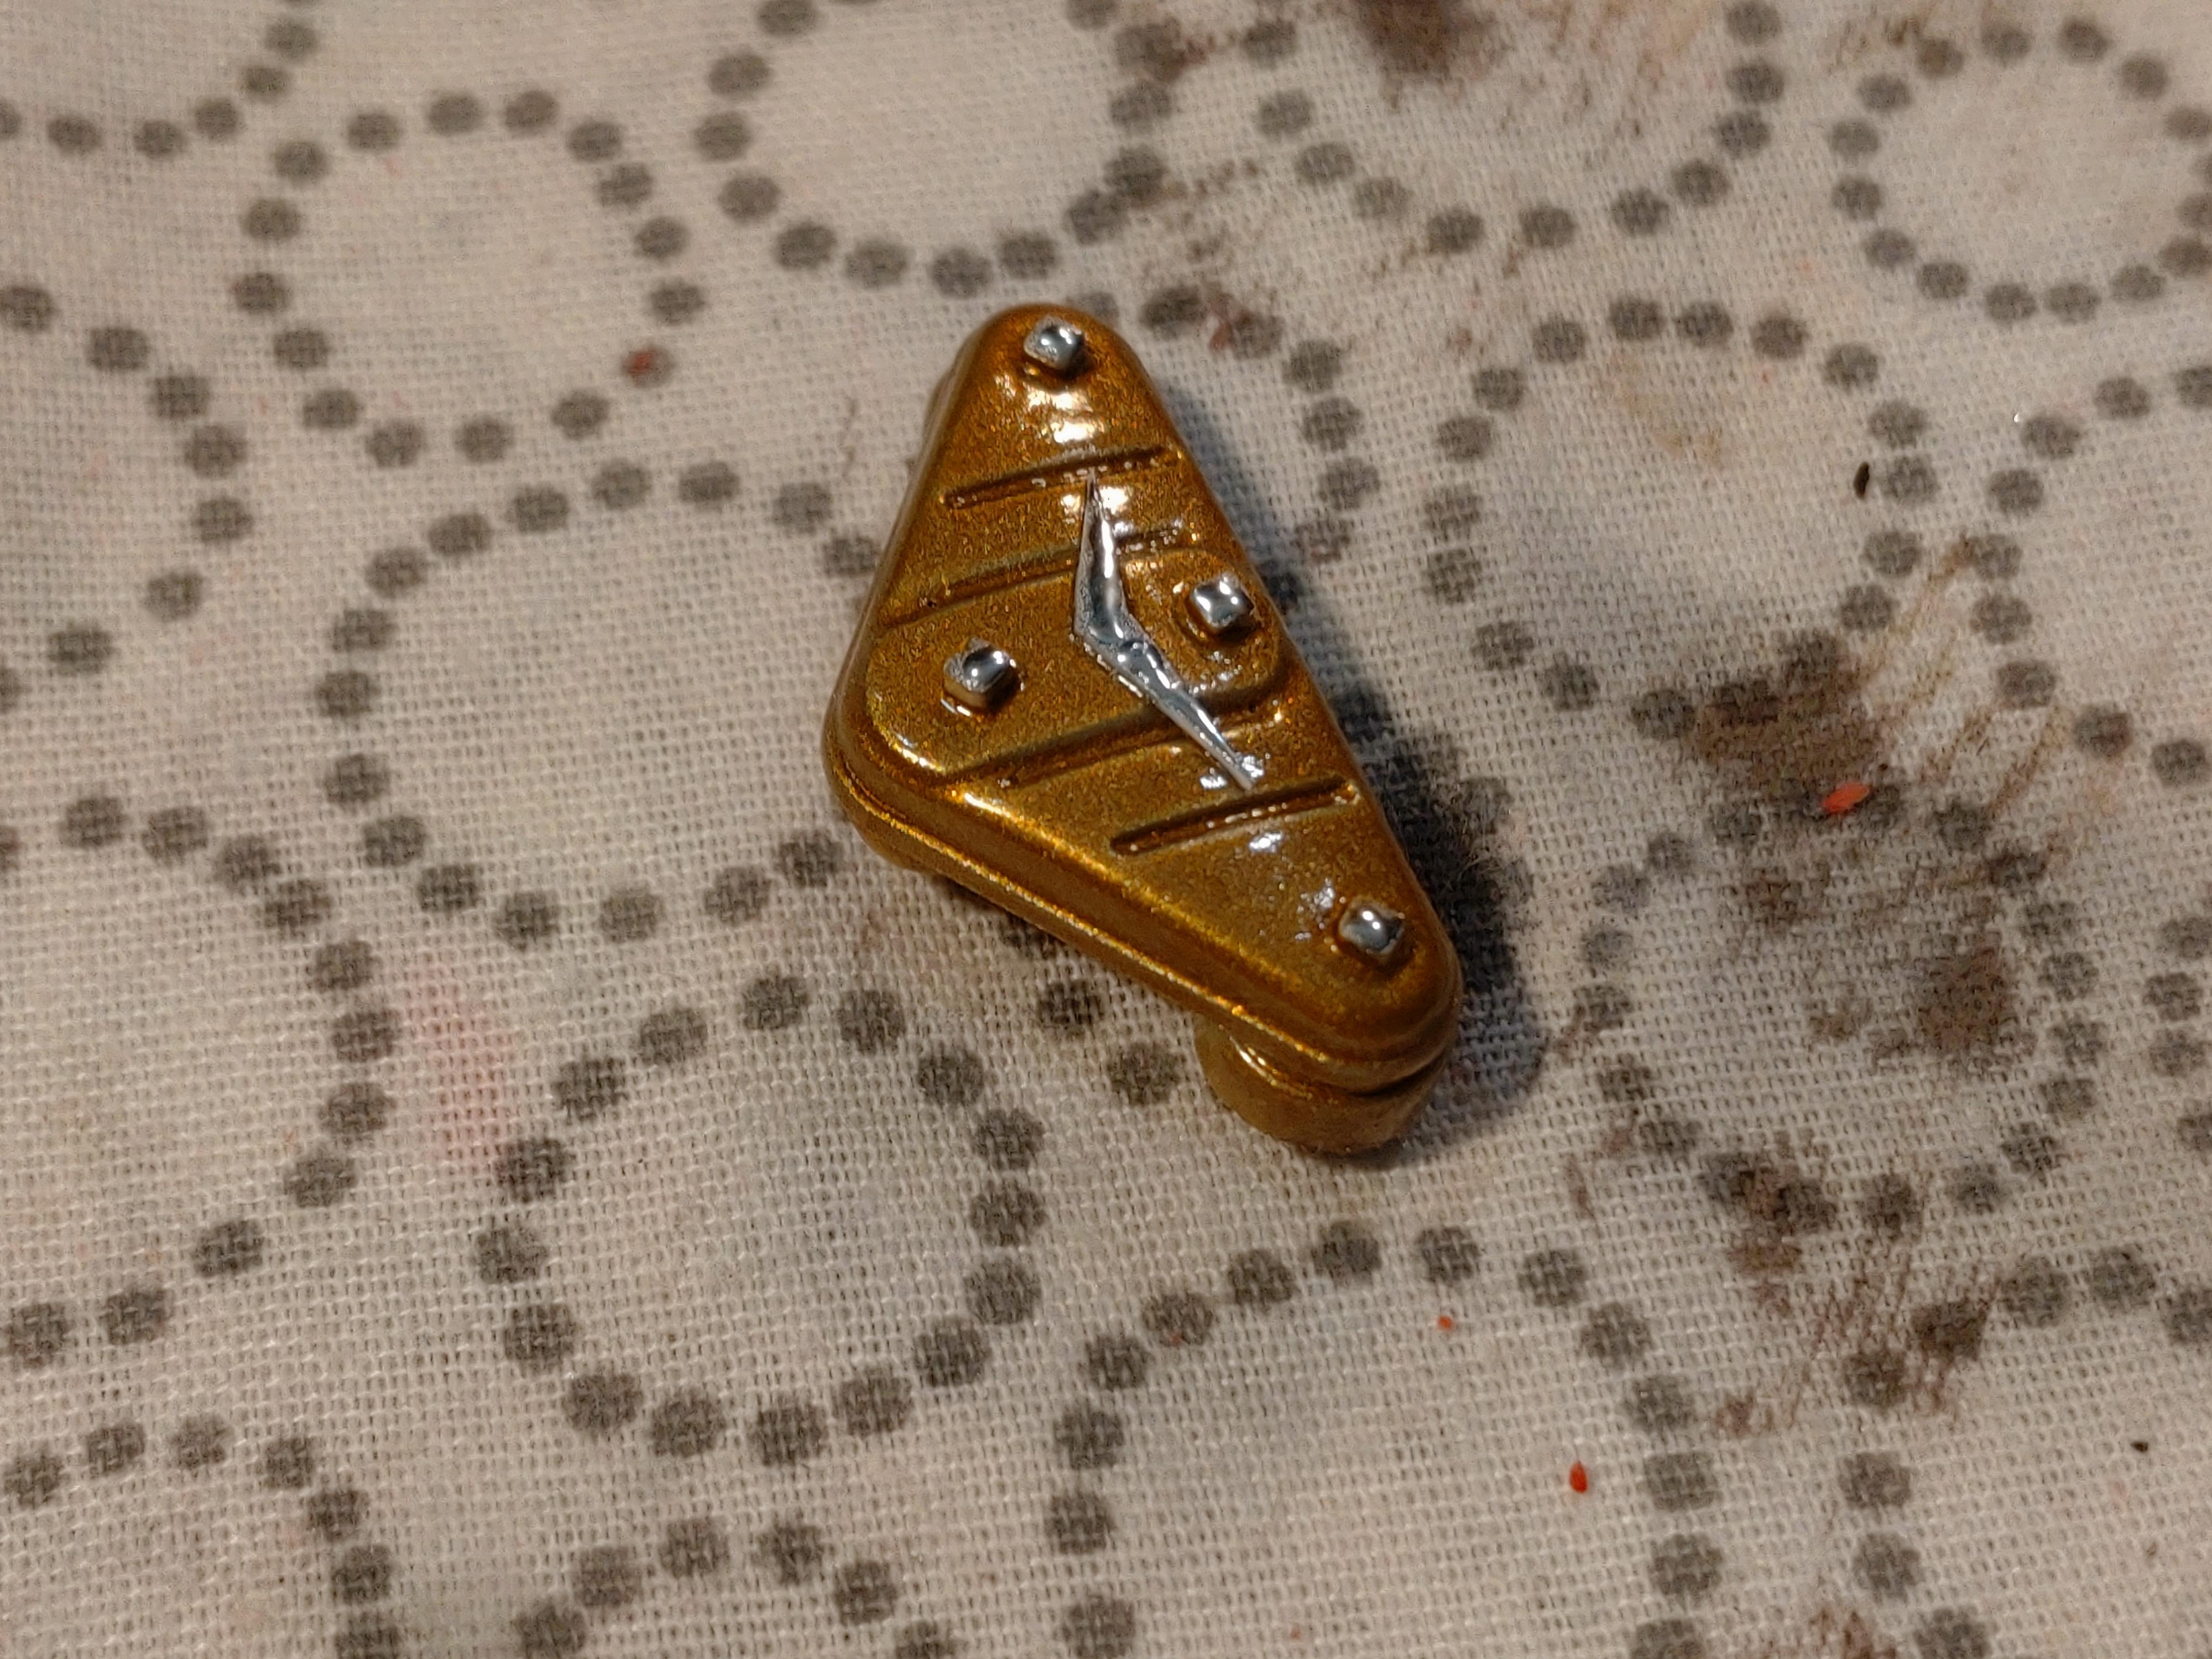
Hi guys, thanks for your response. I´m always surprised about how many of you must have a big stock of kits ready to be built. I usually only have my next project waiting for me??. @ Jim - Yes, the wind shield doesn´t have a frame, but the original only had a quite thin and elegant one. The top will connect to the roof, so it´s only about the side edges. The simplest would be just a strip of BMF. But i´m thinking about adding a thin styrene strip first to build a "frame". While the body is drying after sanding or the paint and putty have to harden I have started building the engine. Um, what engine? OK, I scavenged my boxes for parts that come as close as possible to the original. I even had that big triangular air filter left over. The engine will include parts from about 4 different kits. I´m adding some extra details for realness. The valve covers are not close to the simple painted original ones, but I had a pair with the Cadillac emblem. So it has a custom touch. Next step was giving the engine a mild used look. It´s from ´57.... The air filter received some enhancement with chrome knobs and that flying V. There are two 1mm pegs underneath that fit into the holes of the double Holleys. I couldn´t get any really good images of the belt and pulley setup. There seems to have been different variants. I will concentrate on the alternator and the power steering pump. Since I like working with "real" rubber belts, the pulley wheels needed some working. In this case I didn´t have to fabricate new wheels, but could use a kit part. I deconstructed the piece and cut off the wheels. After sanding the wheels round I used a triangular file for the first V-cut. Then I widened the V with a diamond file flat and smooth. These parts will be attached to the block with brass pins. That way they can take the slight pull of the rubber belts without breaking off. Looks like the body is dry now. Time for the color coat. hope to come back soon! Thanks for watching!
-
Thanks to everybody for you friendly response! I have bin moving on with this build. A few words about my first anguish about the kit. Nice to know now that the mold must be really old. This must explain why the major body parts didn´t fit very well at all. Anyway this kit cost about as much as a newly engineered issue (32 Euros), so I did have some minimum expectations. I´m skilled enough to get anything built, redesigned, chopped and put together. But in these cases I think about beginners that enter our hobby and abandon their build and quit building models because the first kit pick is a bummer. I covered the open areas of the doors with 0.5mm styrene. I usually cut the styrene pieces larger and cut the excess sheet after drying with a scalpel. The doors gaps have gotten smaller. I added a lip the the back door to further close the gap. I necessary I can add another thin layer later. The first base paint did reveal several murky areas. Now comes the boring part of building to me: Putty, sanding, putty, sanding, spraying, putty.....??? I cut thin strips of 0.5mm styrene to add the trim running the middle line. This will help cover up the poor fit of the body parts. Finished with extensive wet sanding. I´m letting the body dry a bit and after the next base coat will see how much putty work is left to do. As you can see I shaved off the door handles. Nicer ones are on their way now from Scale Production. Thanks for watching!
-
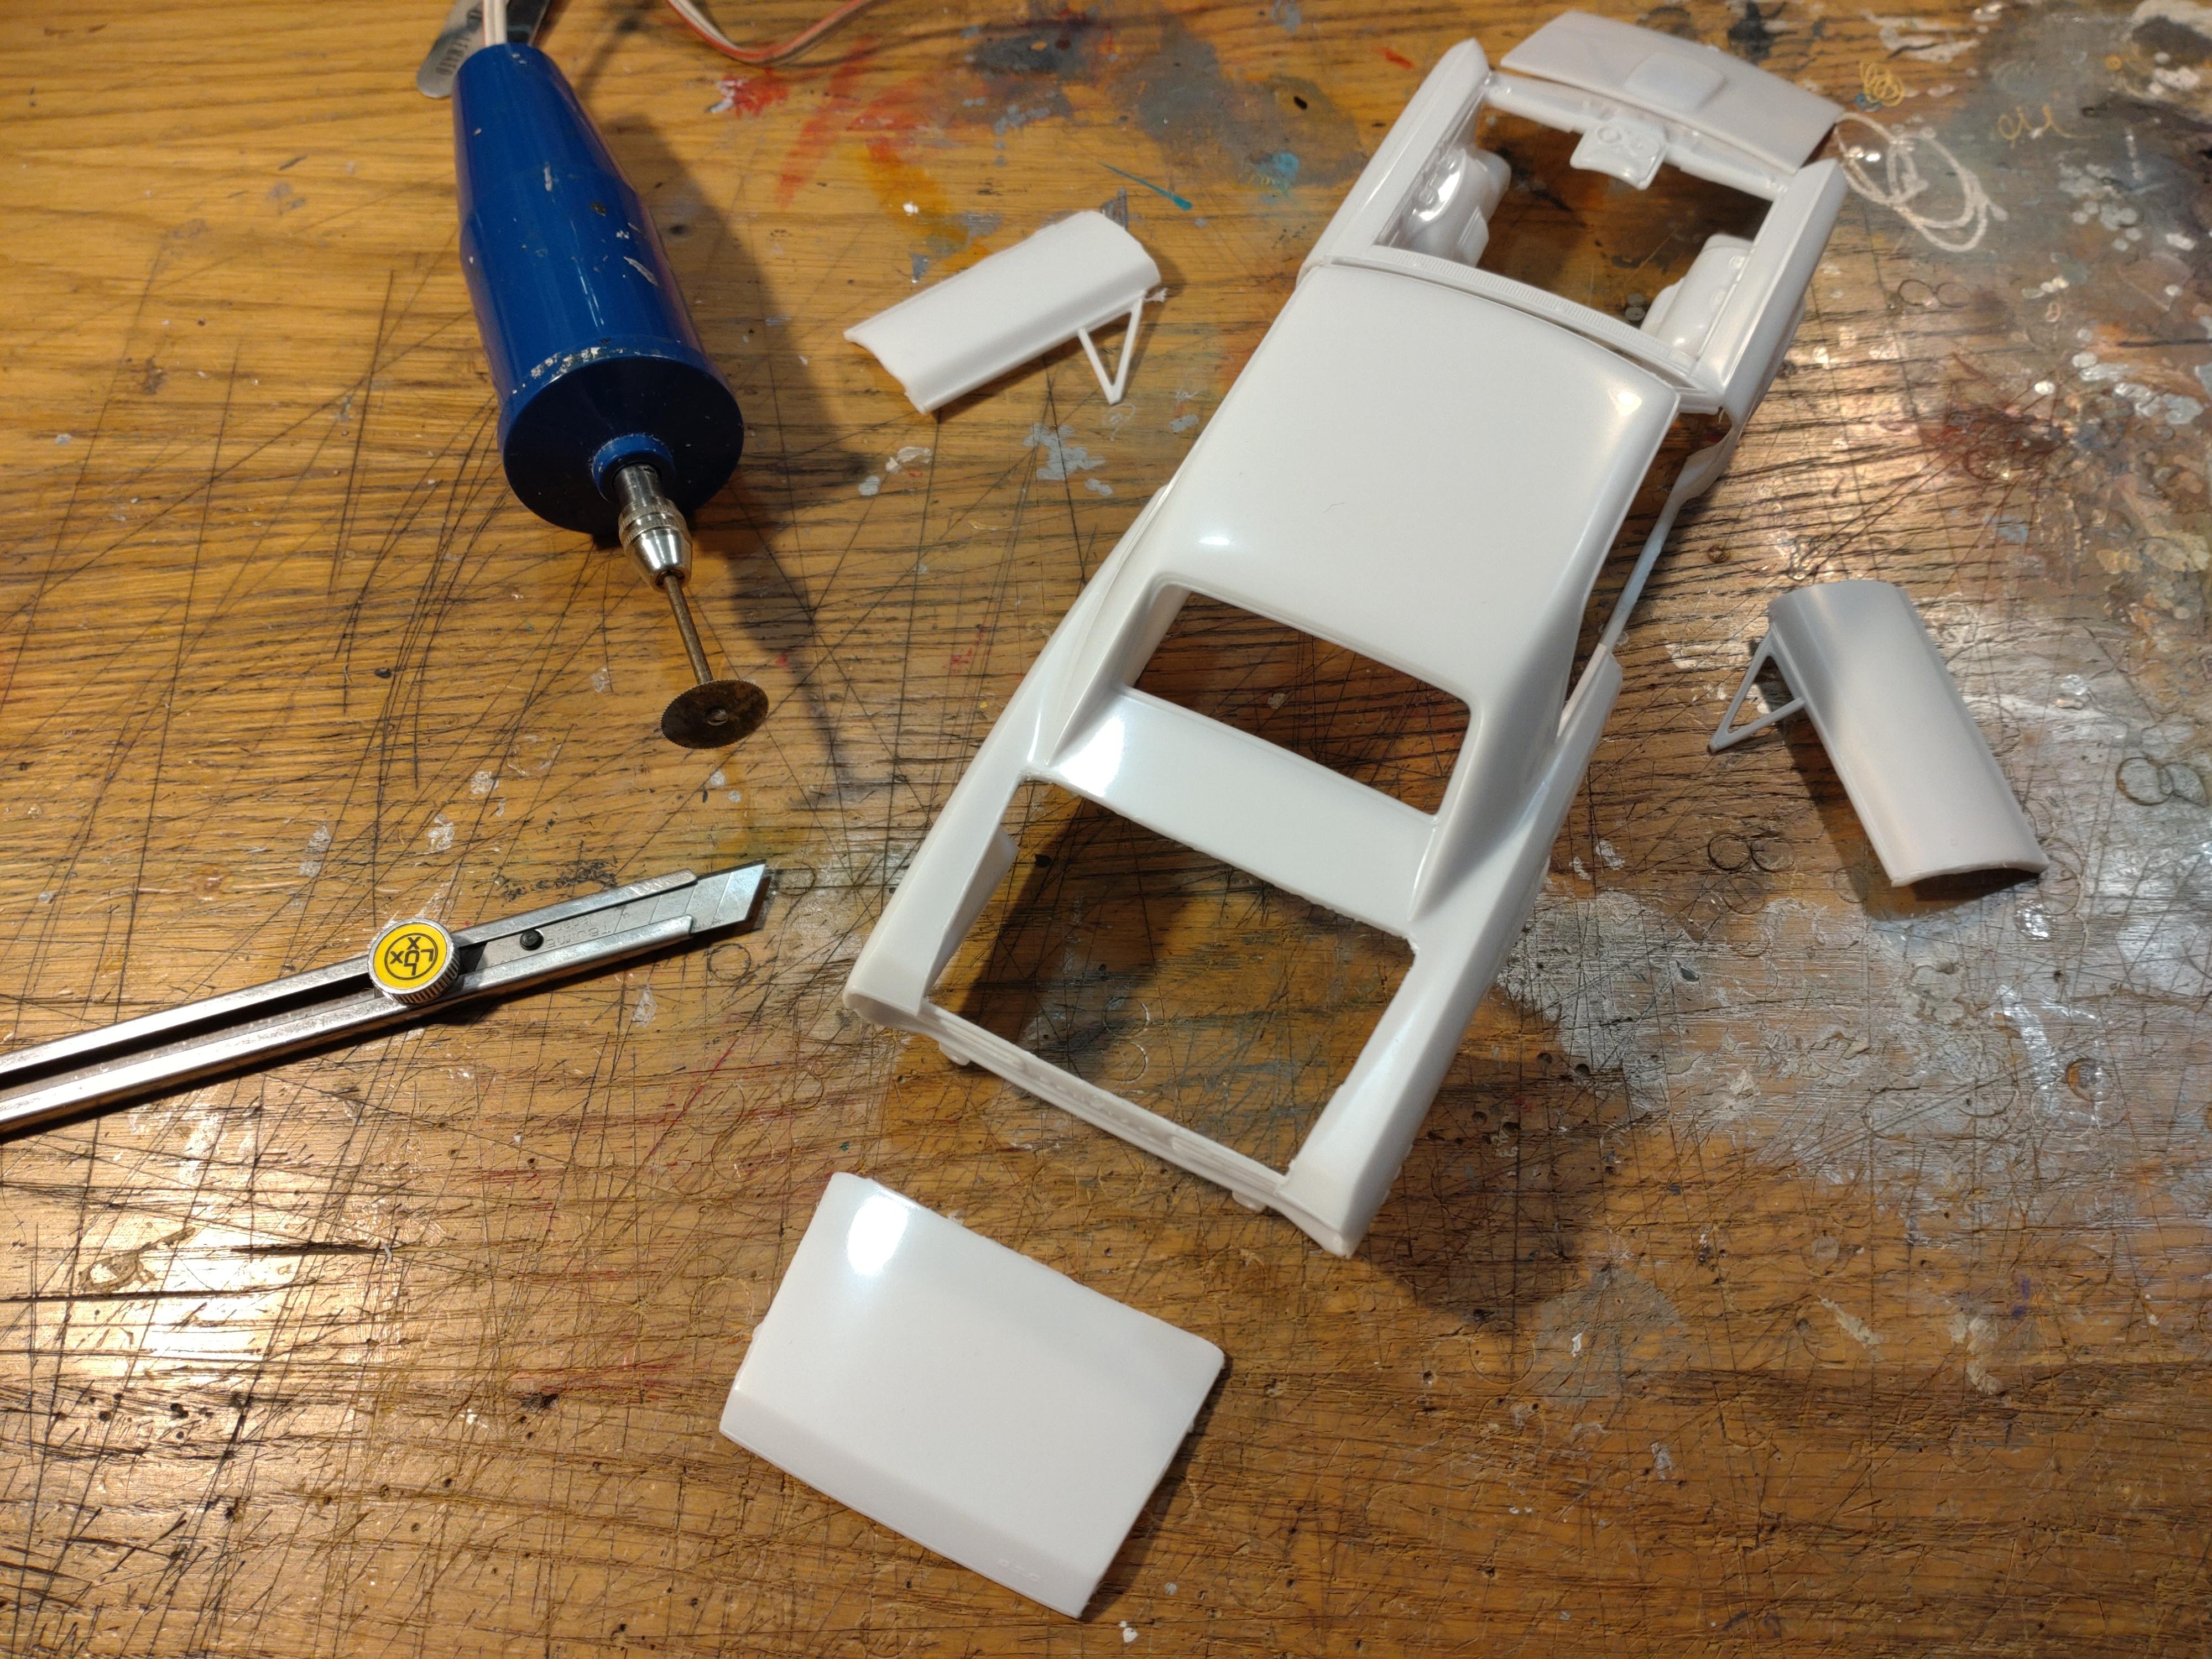
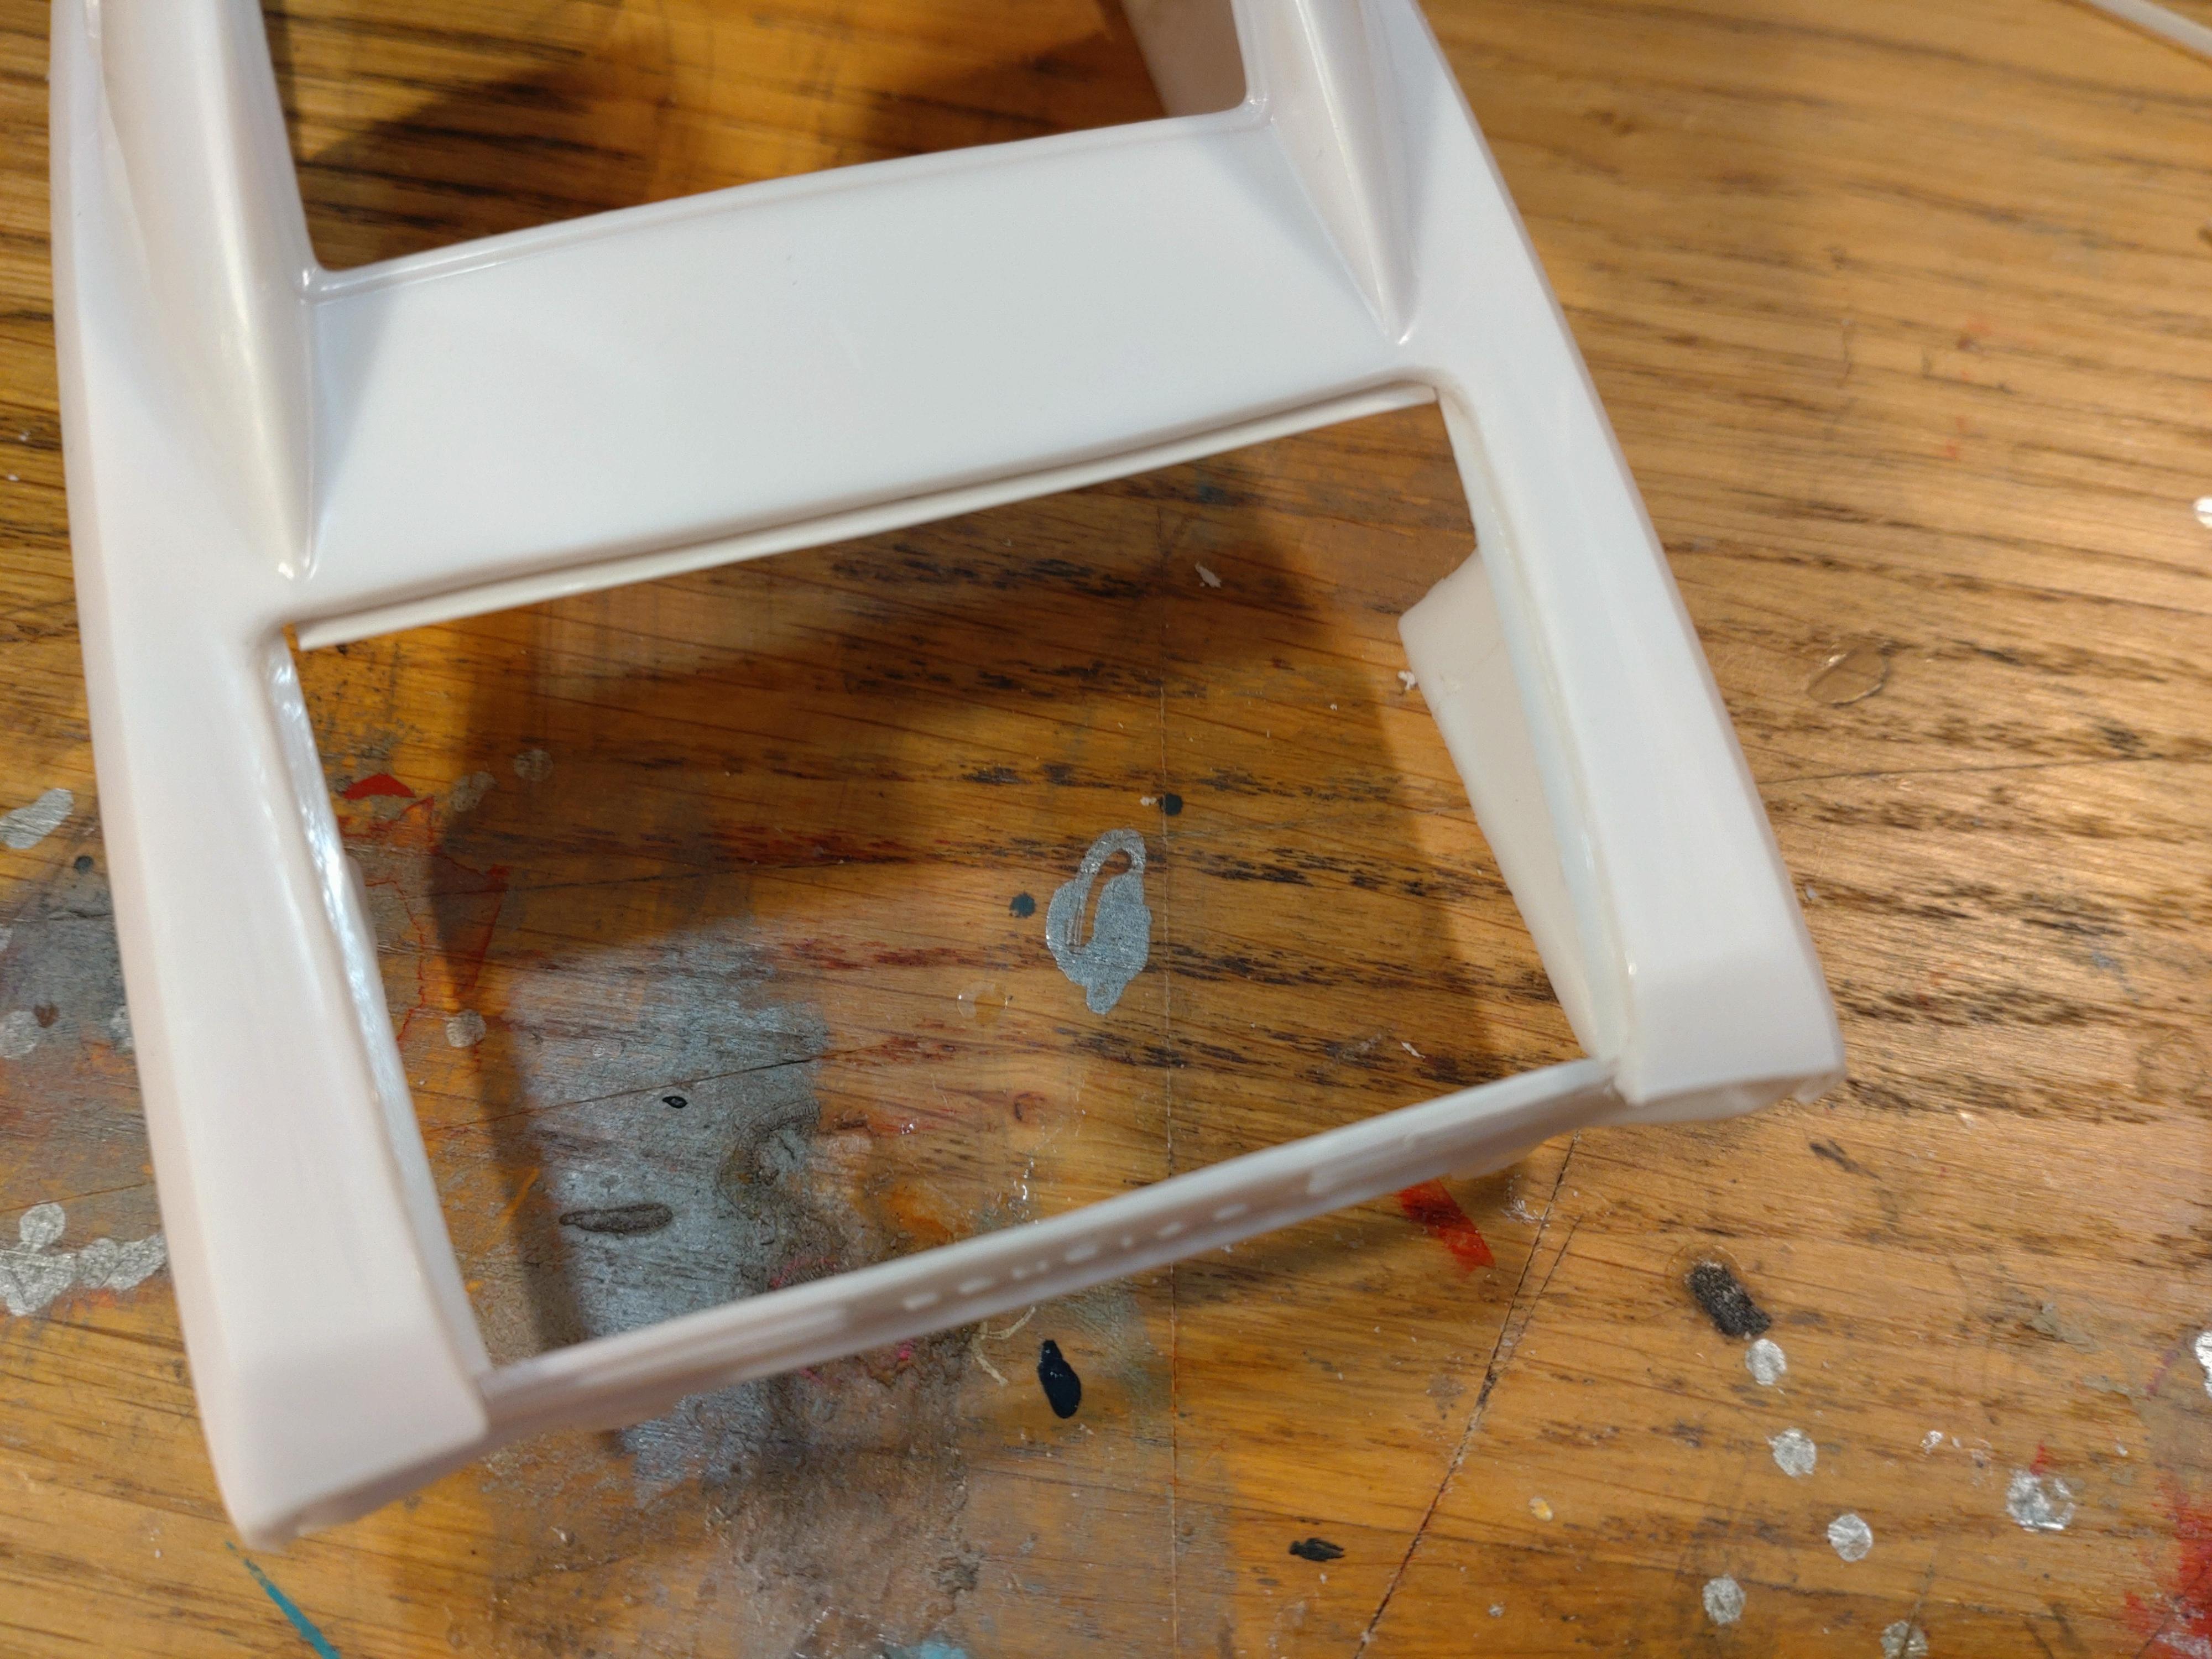
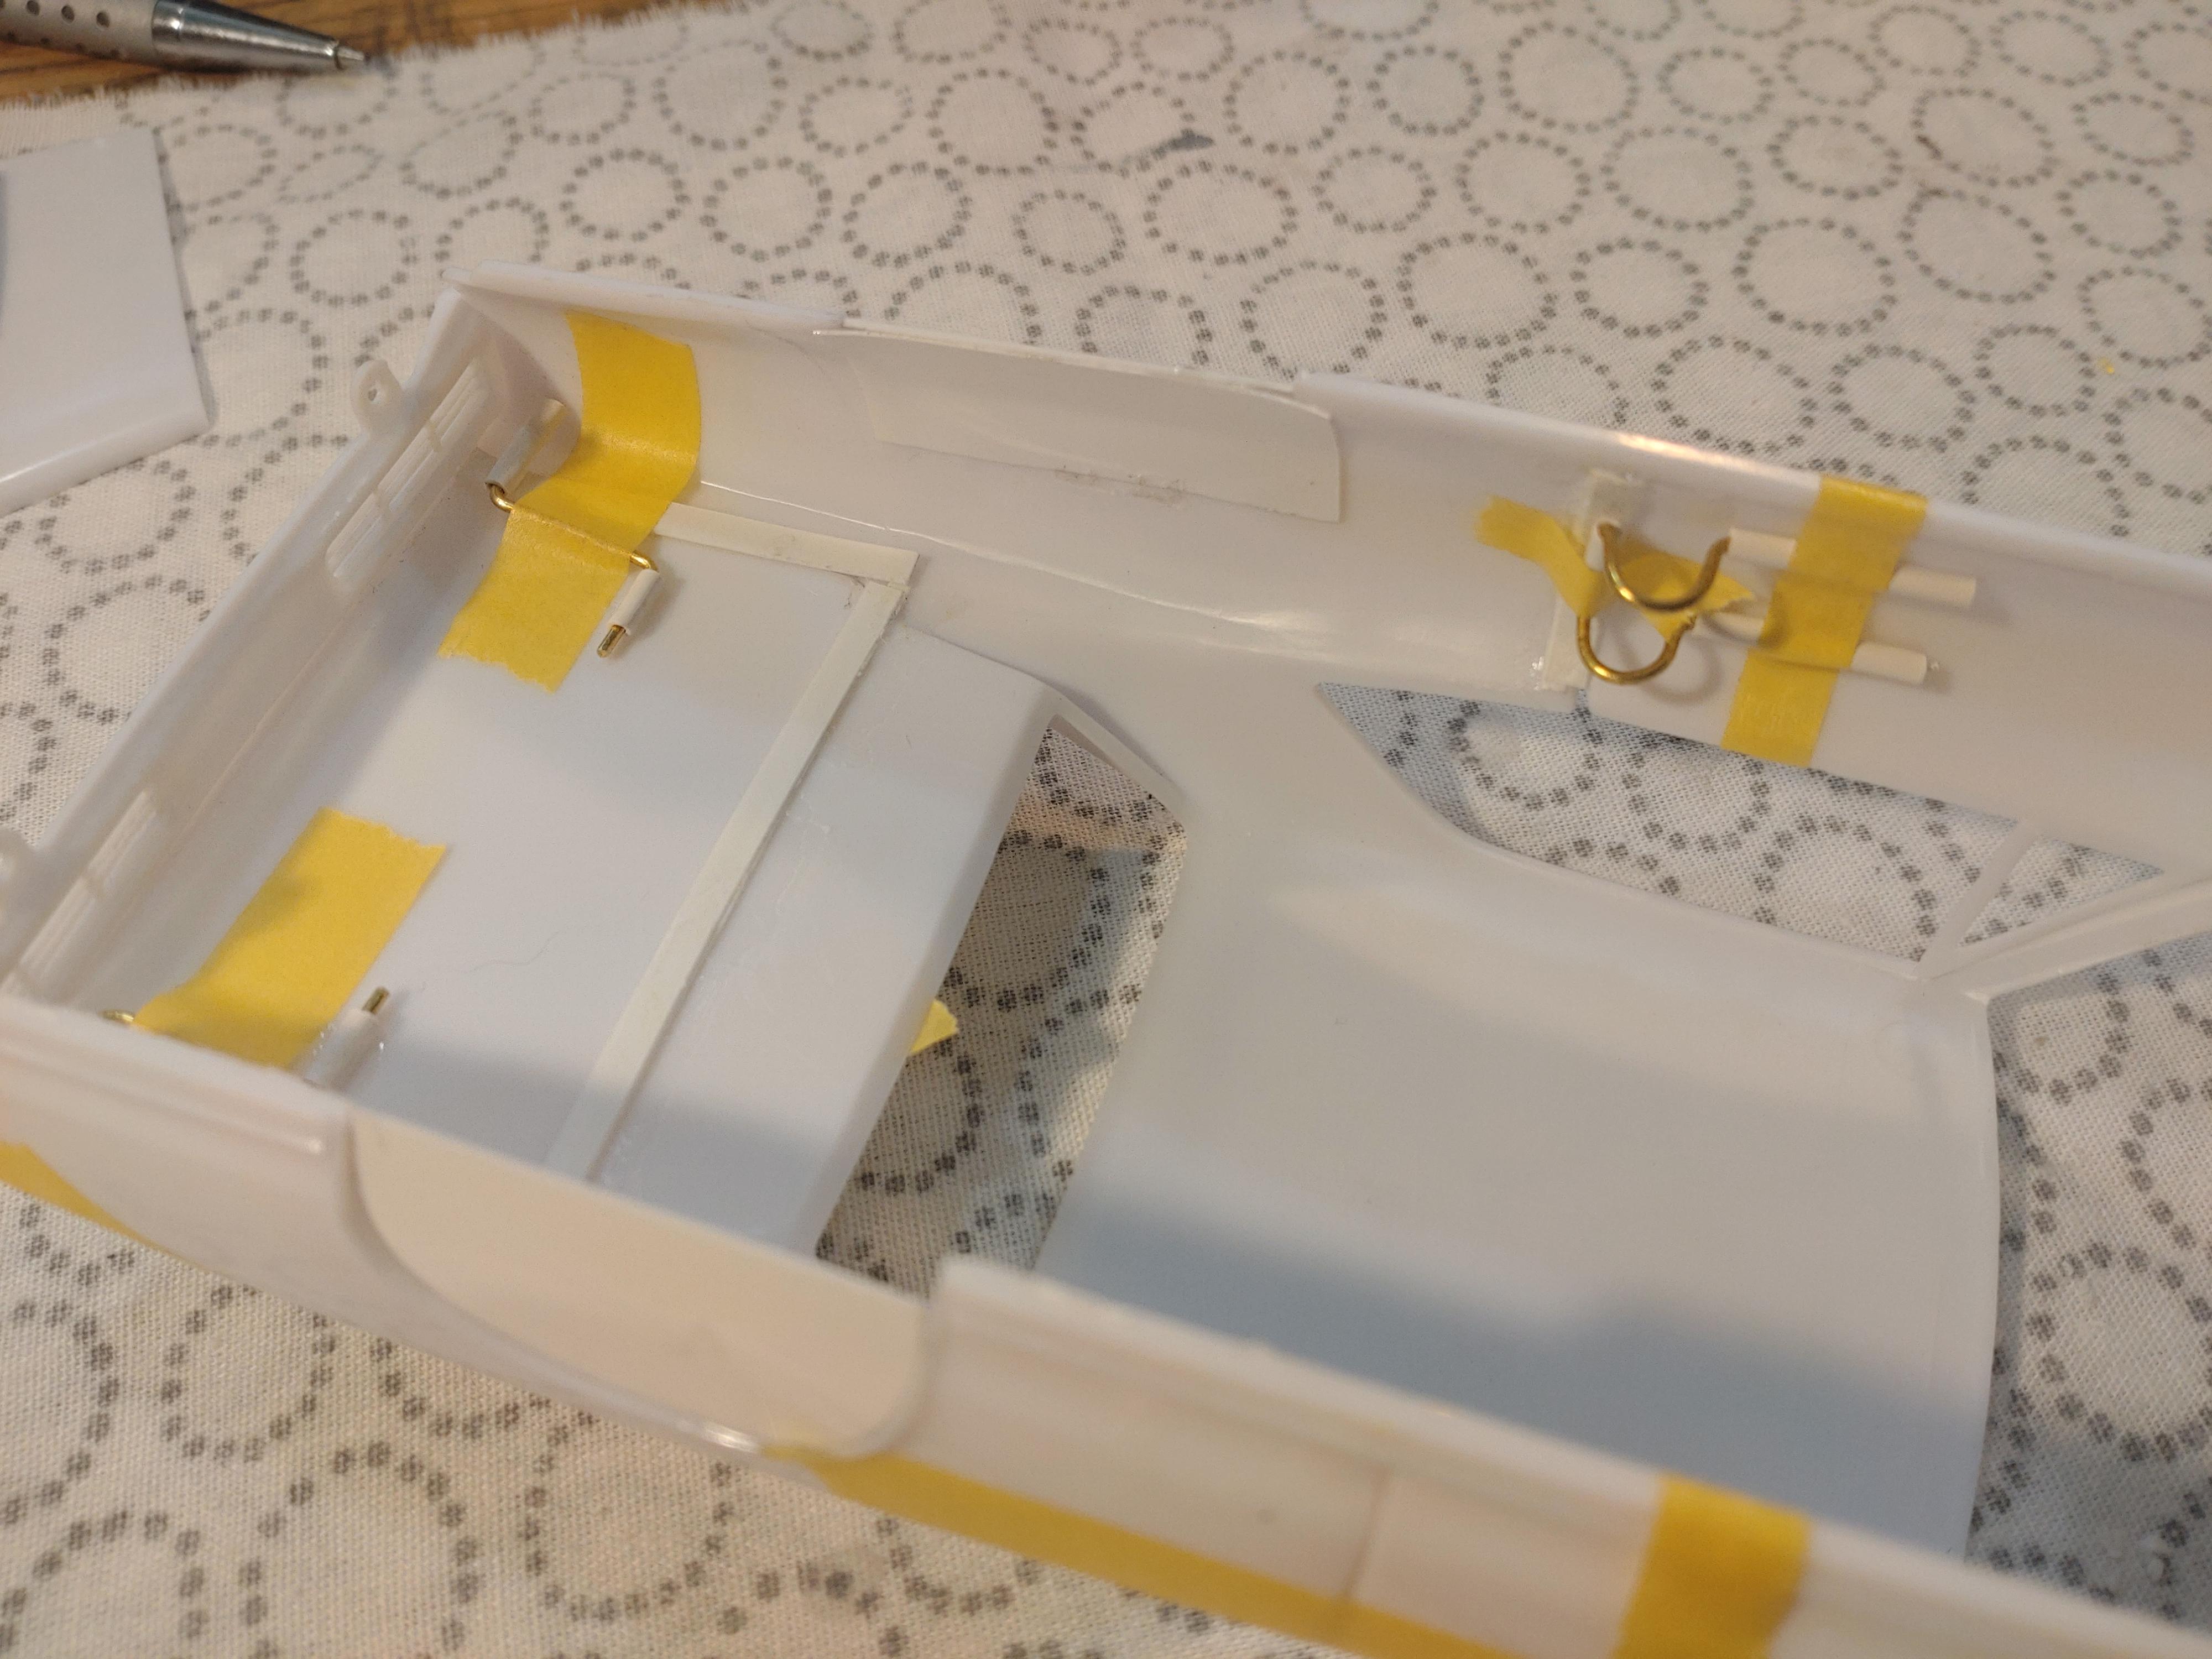
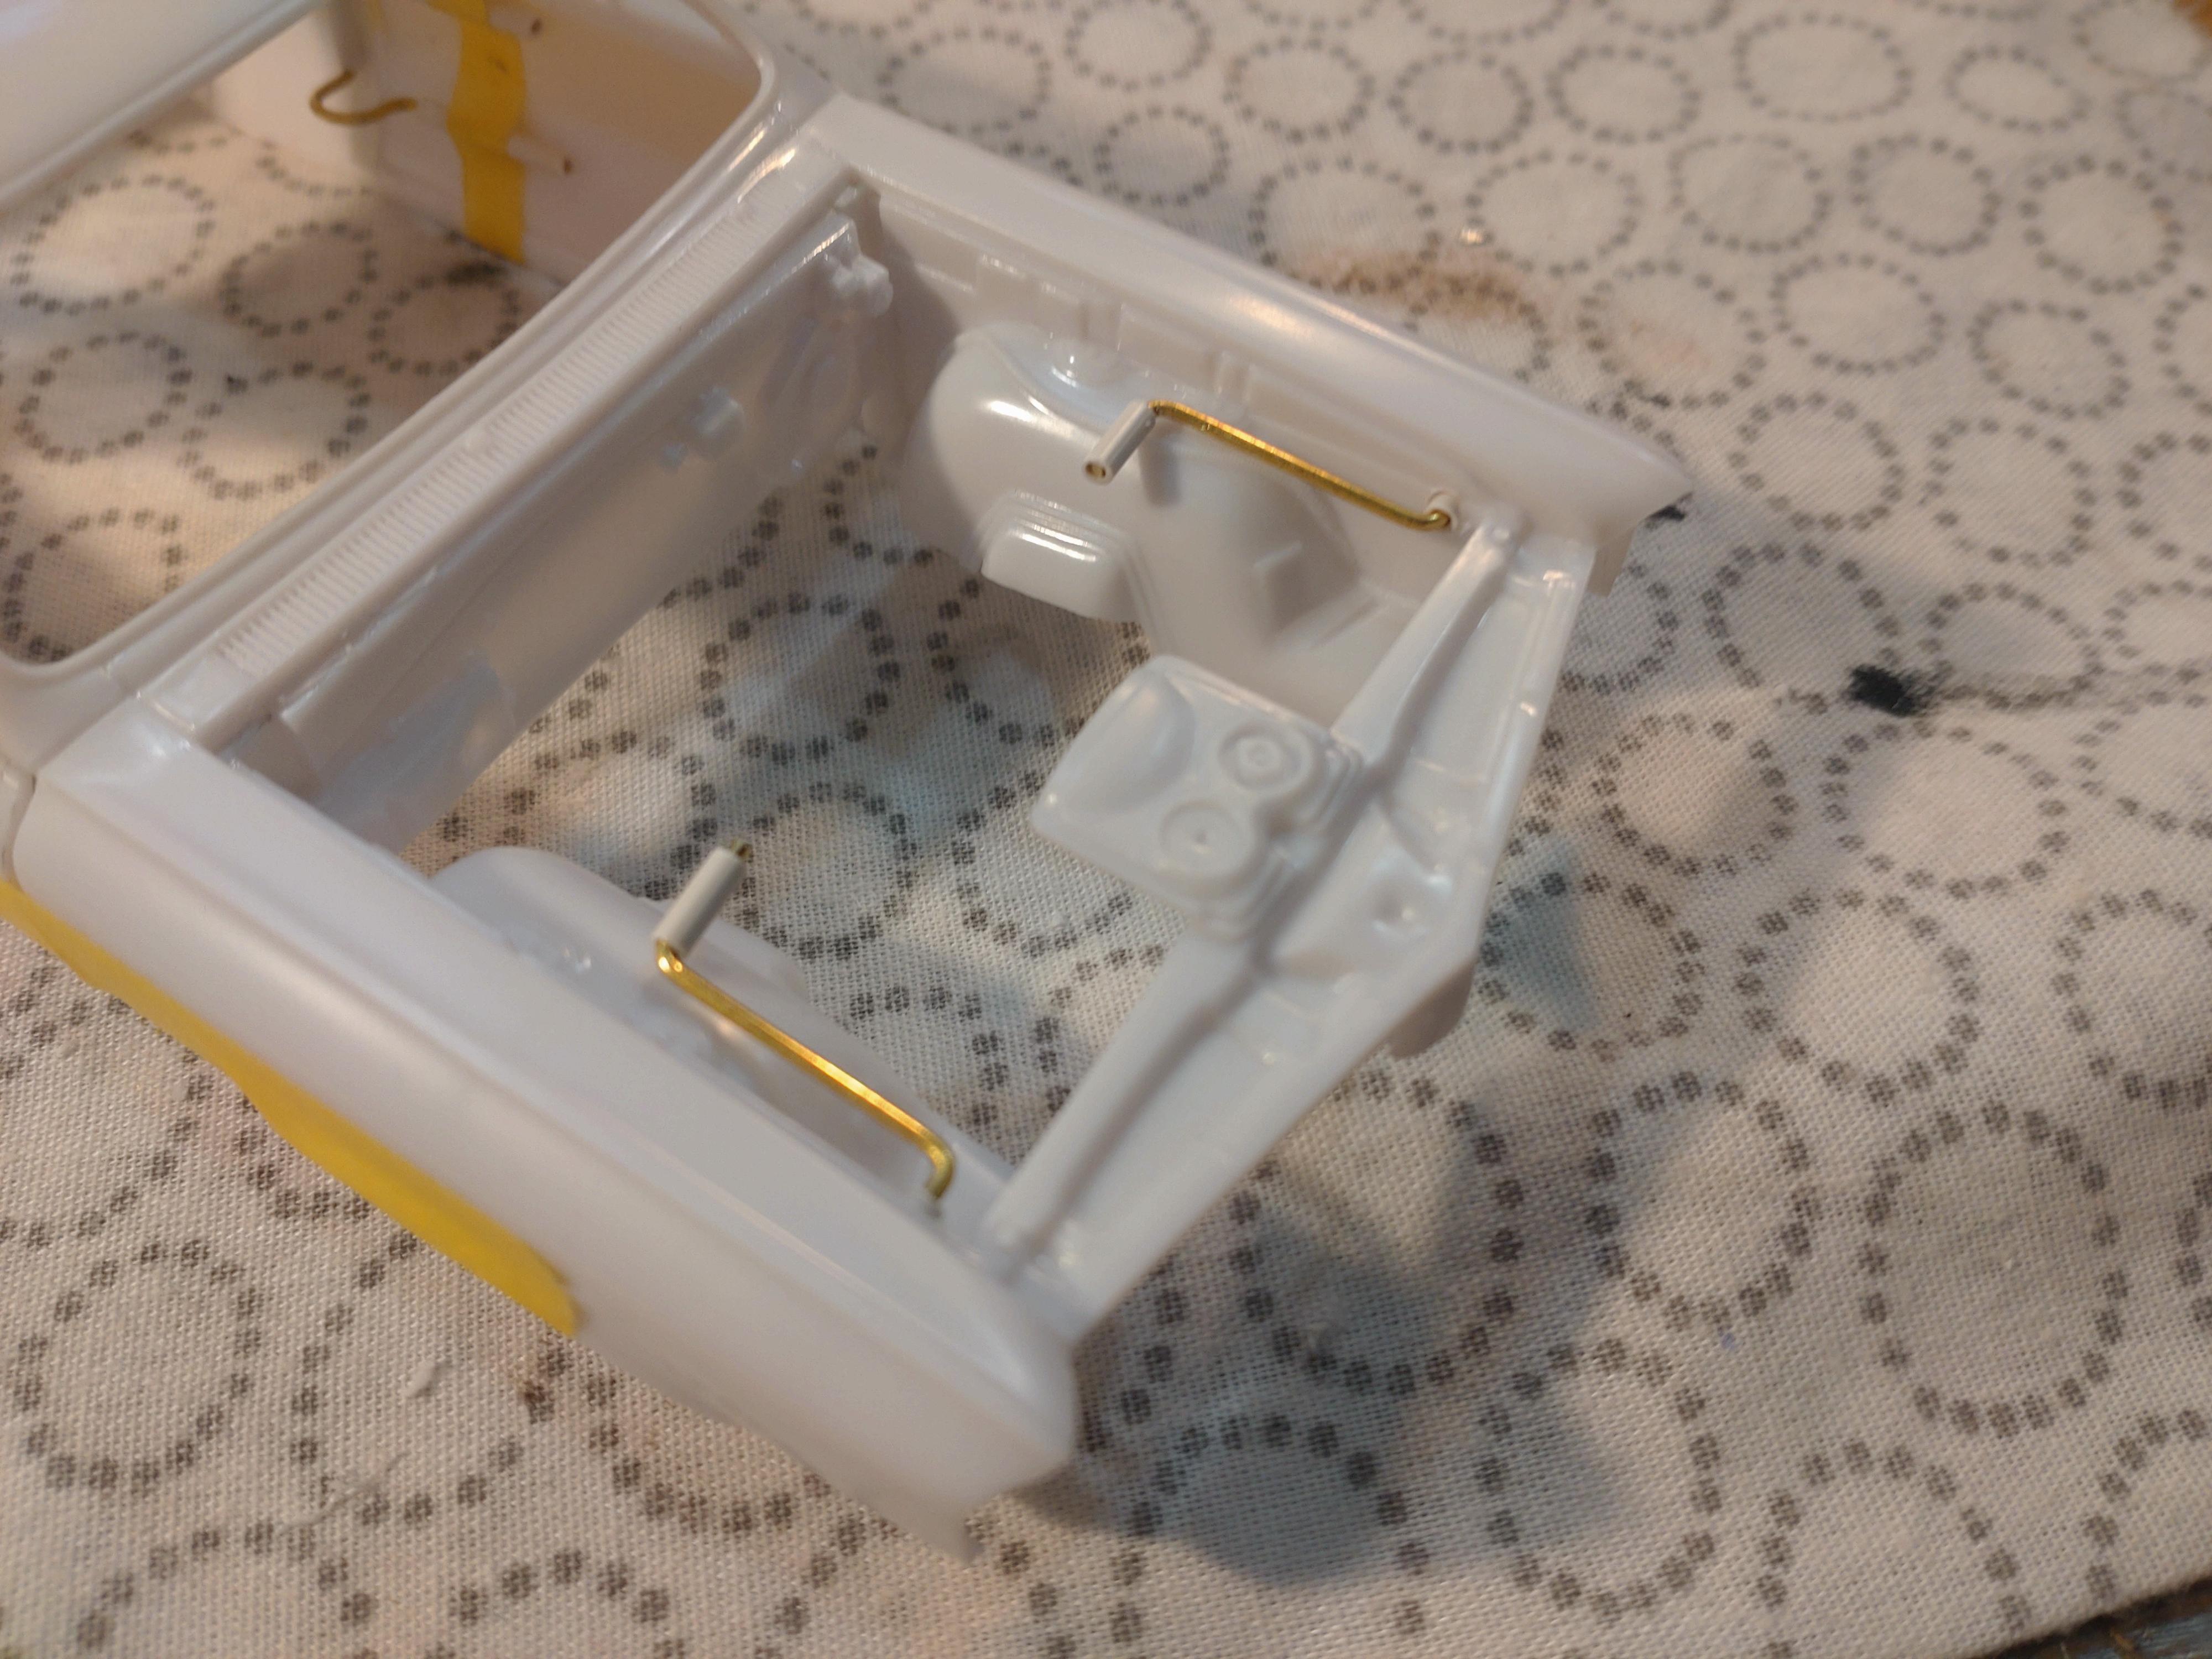
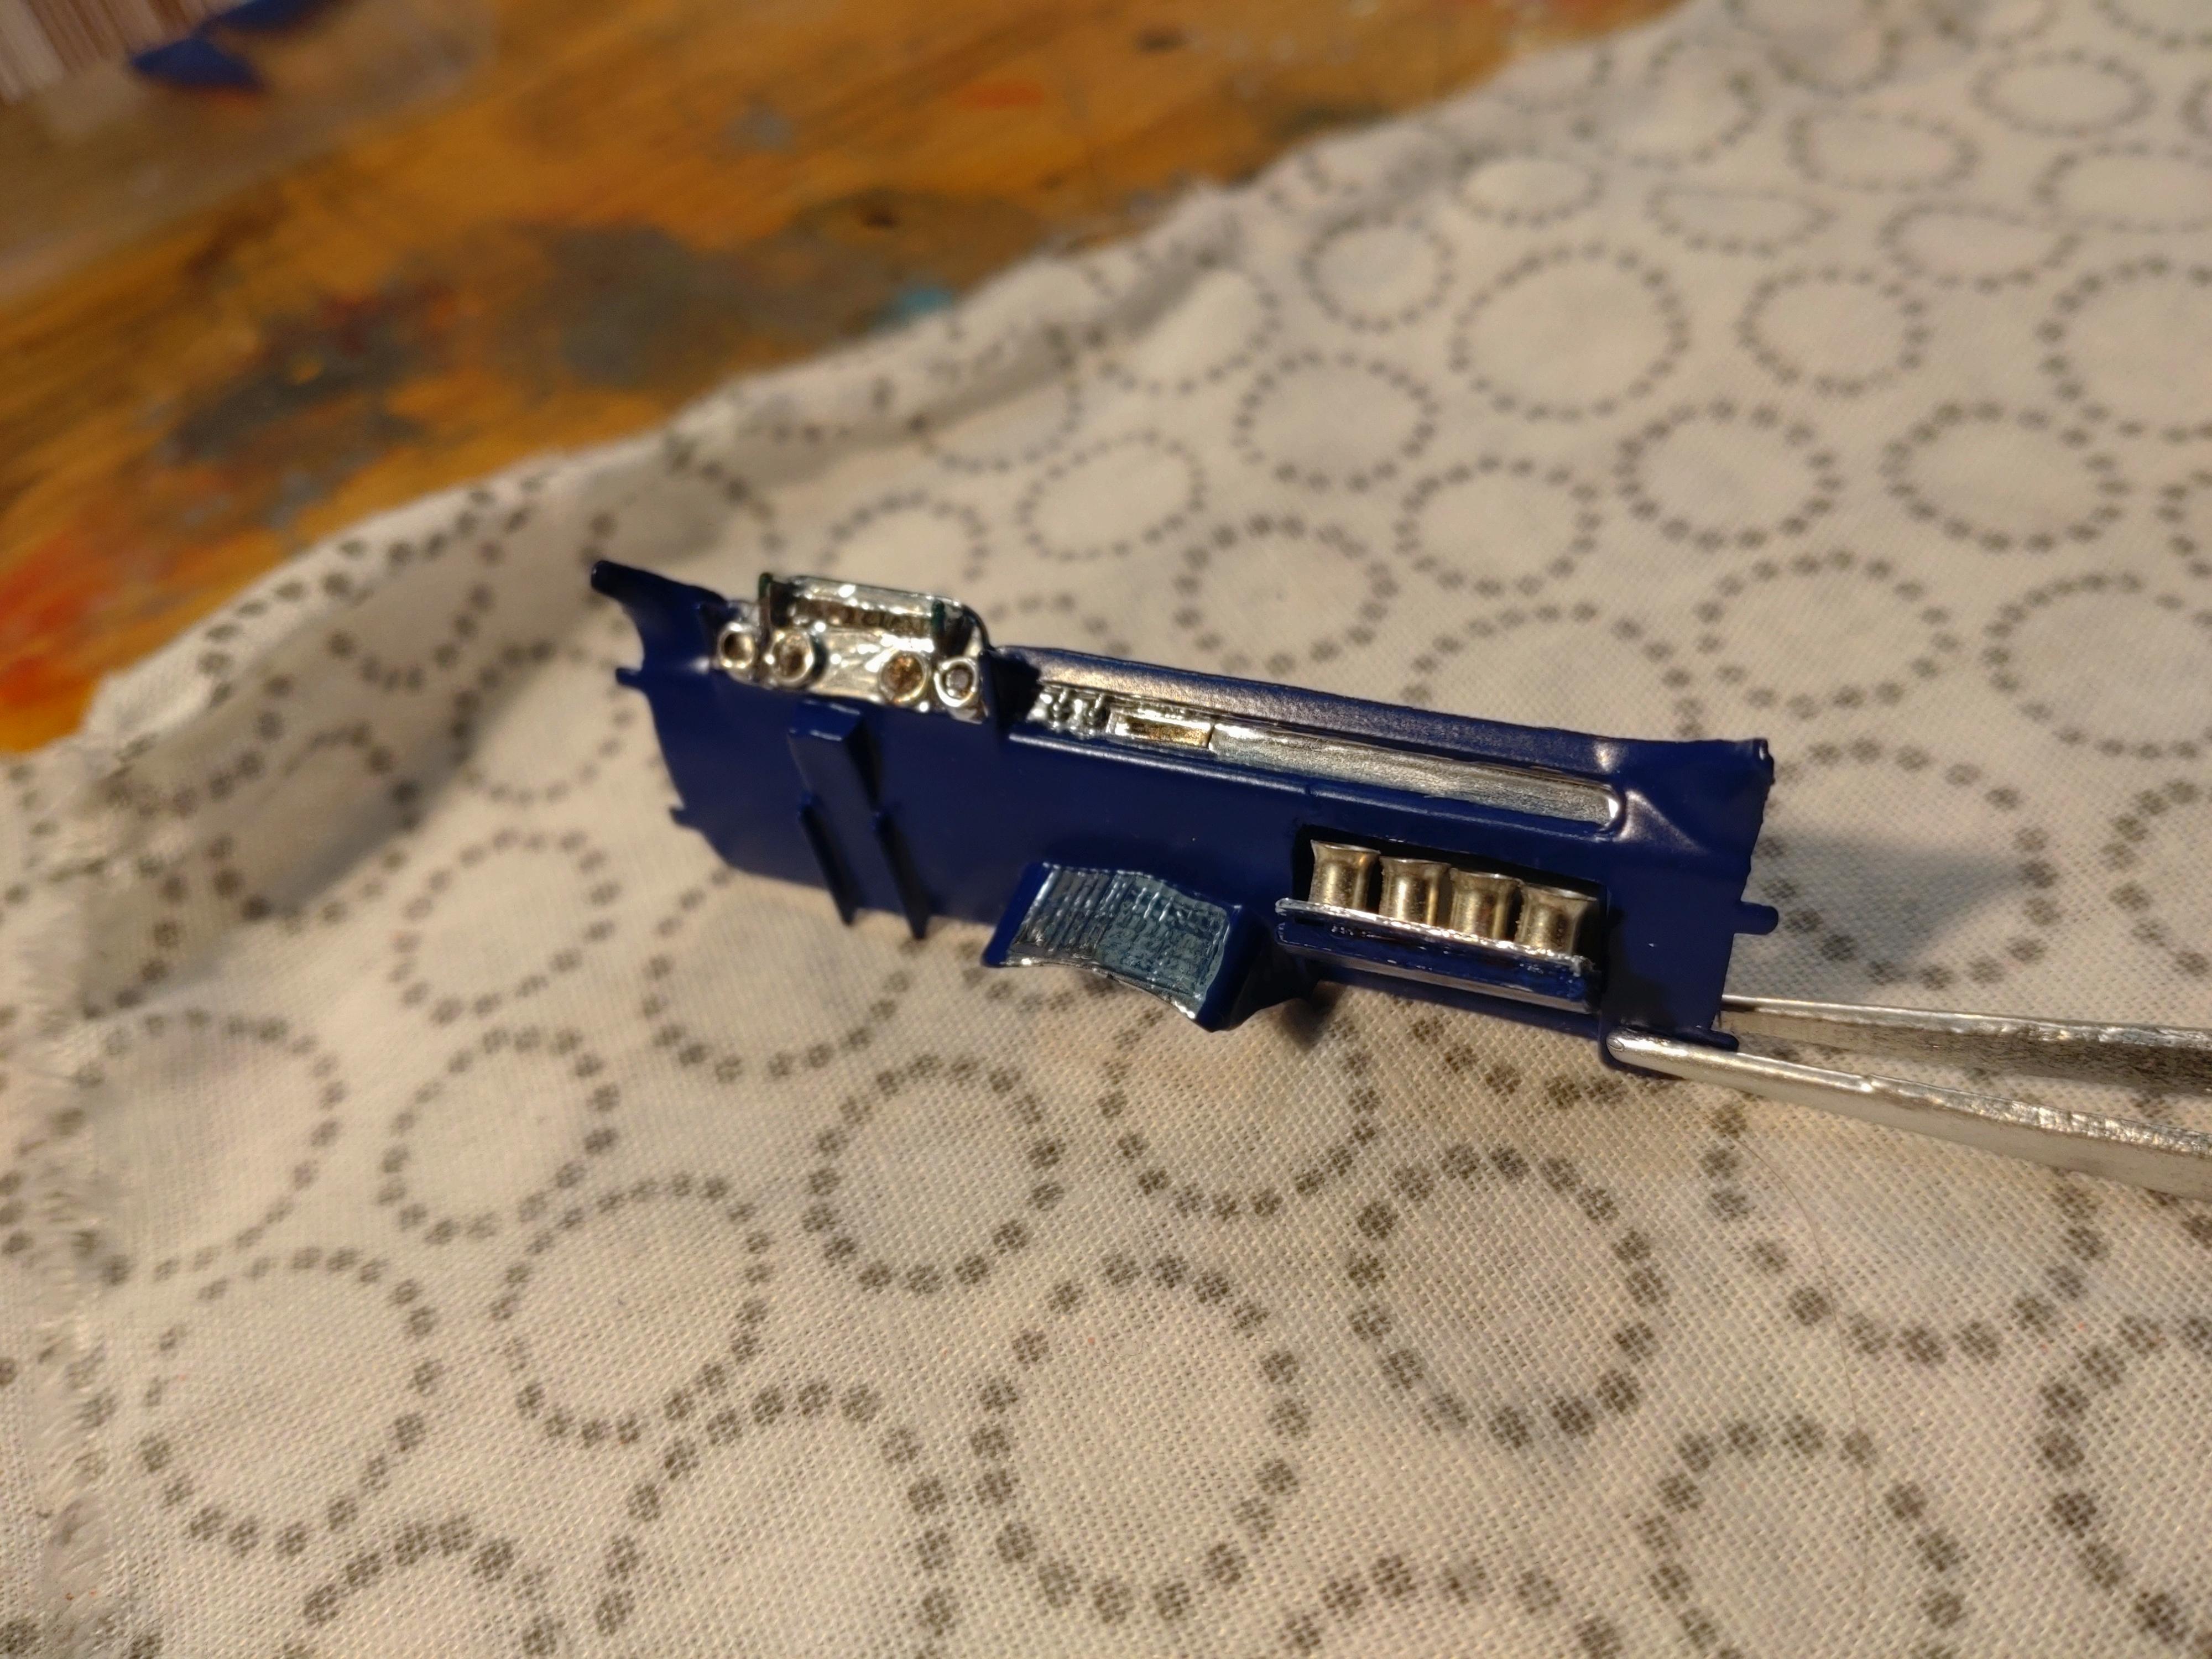
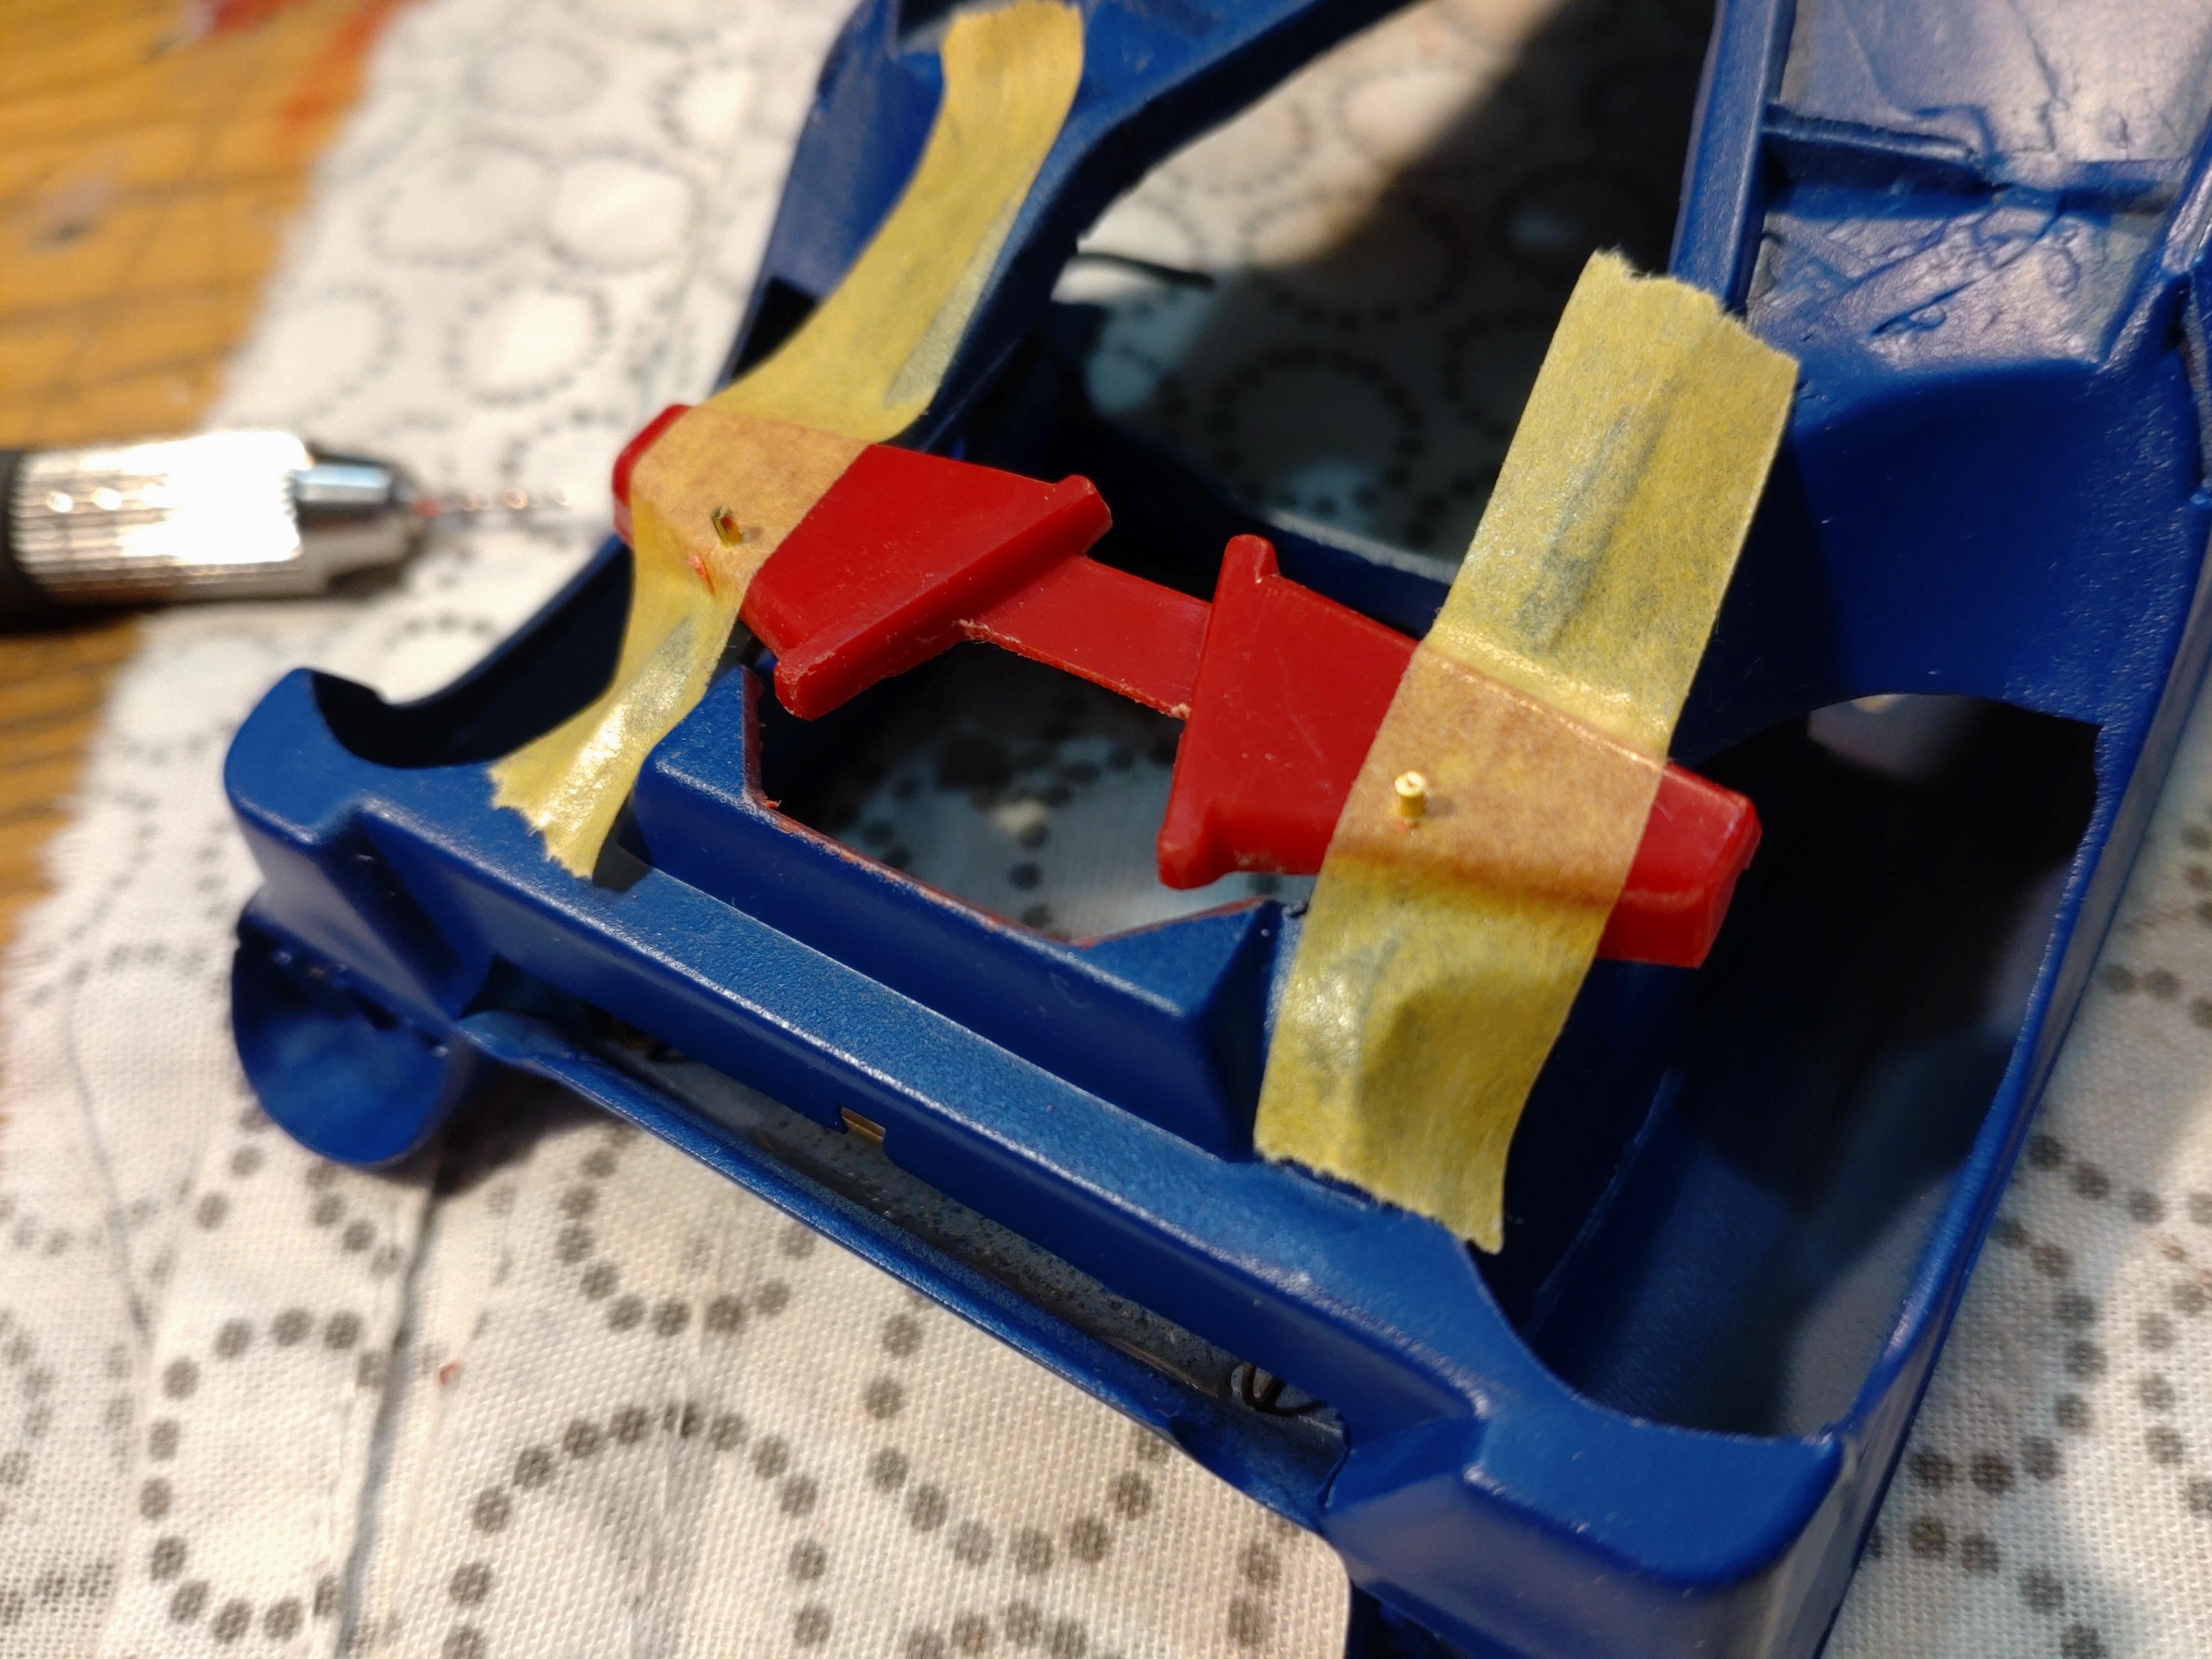
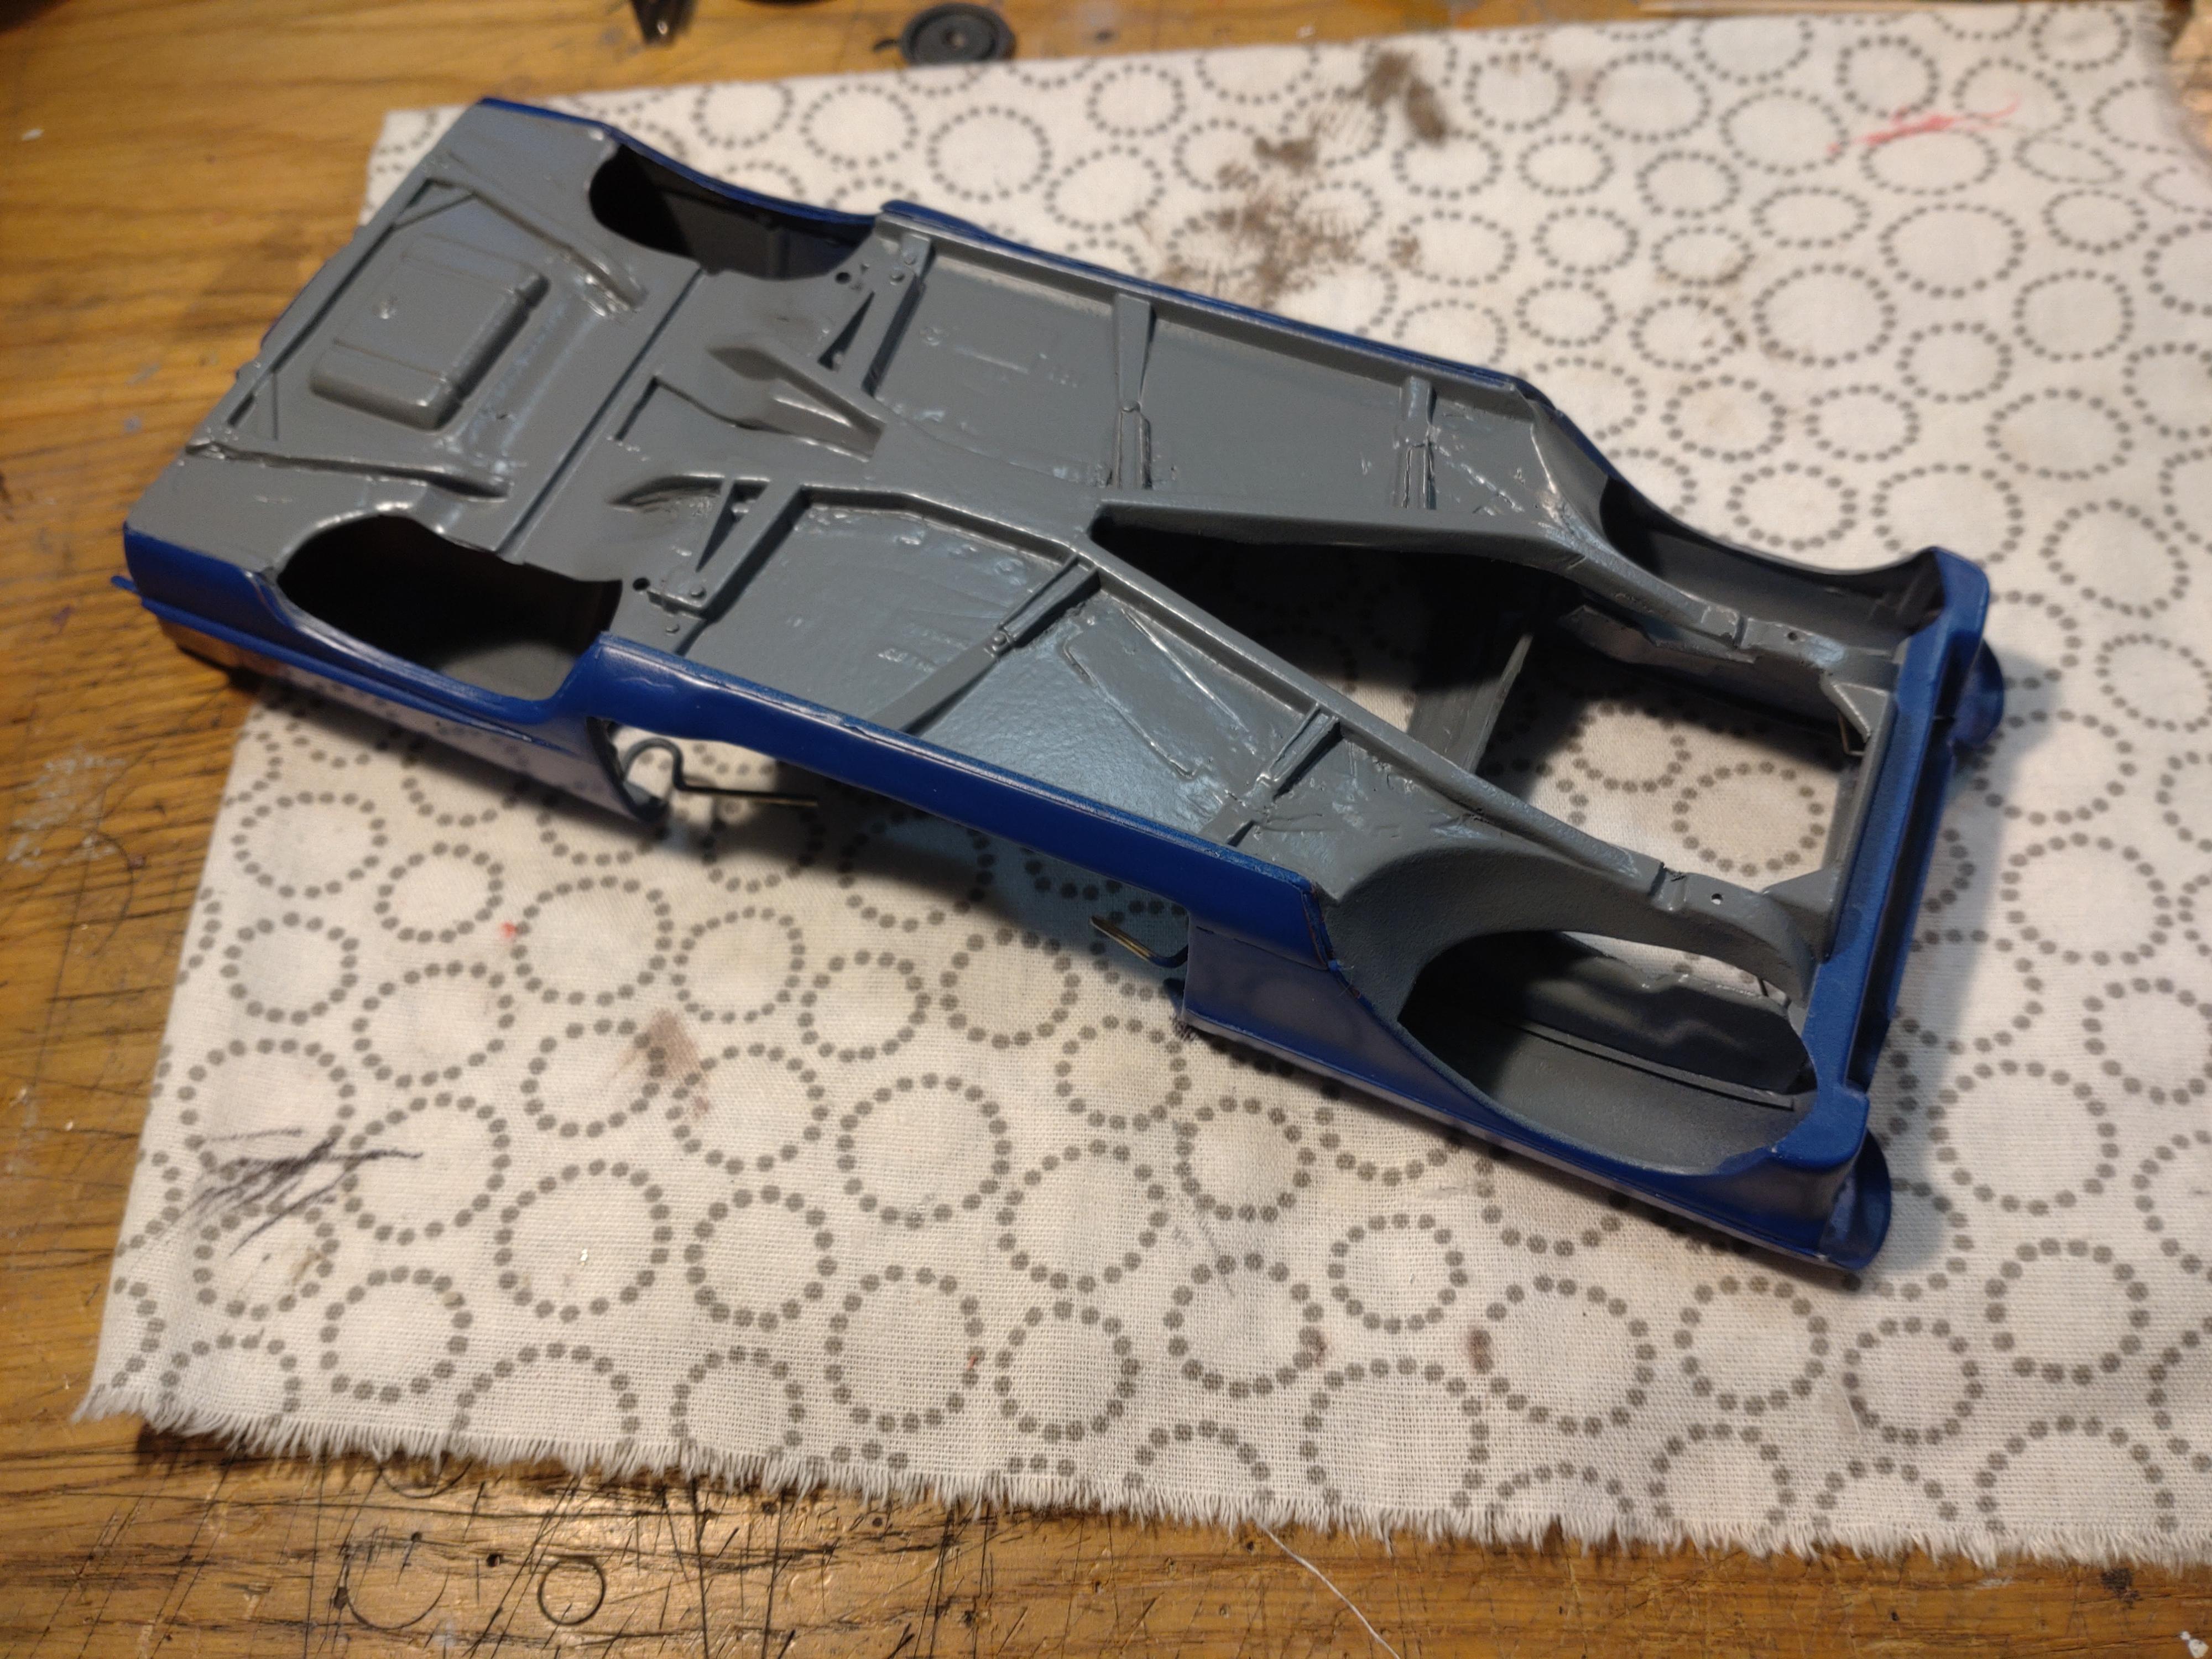
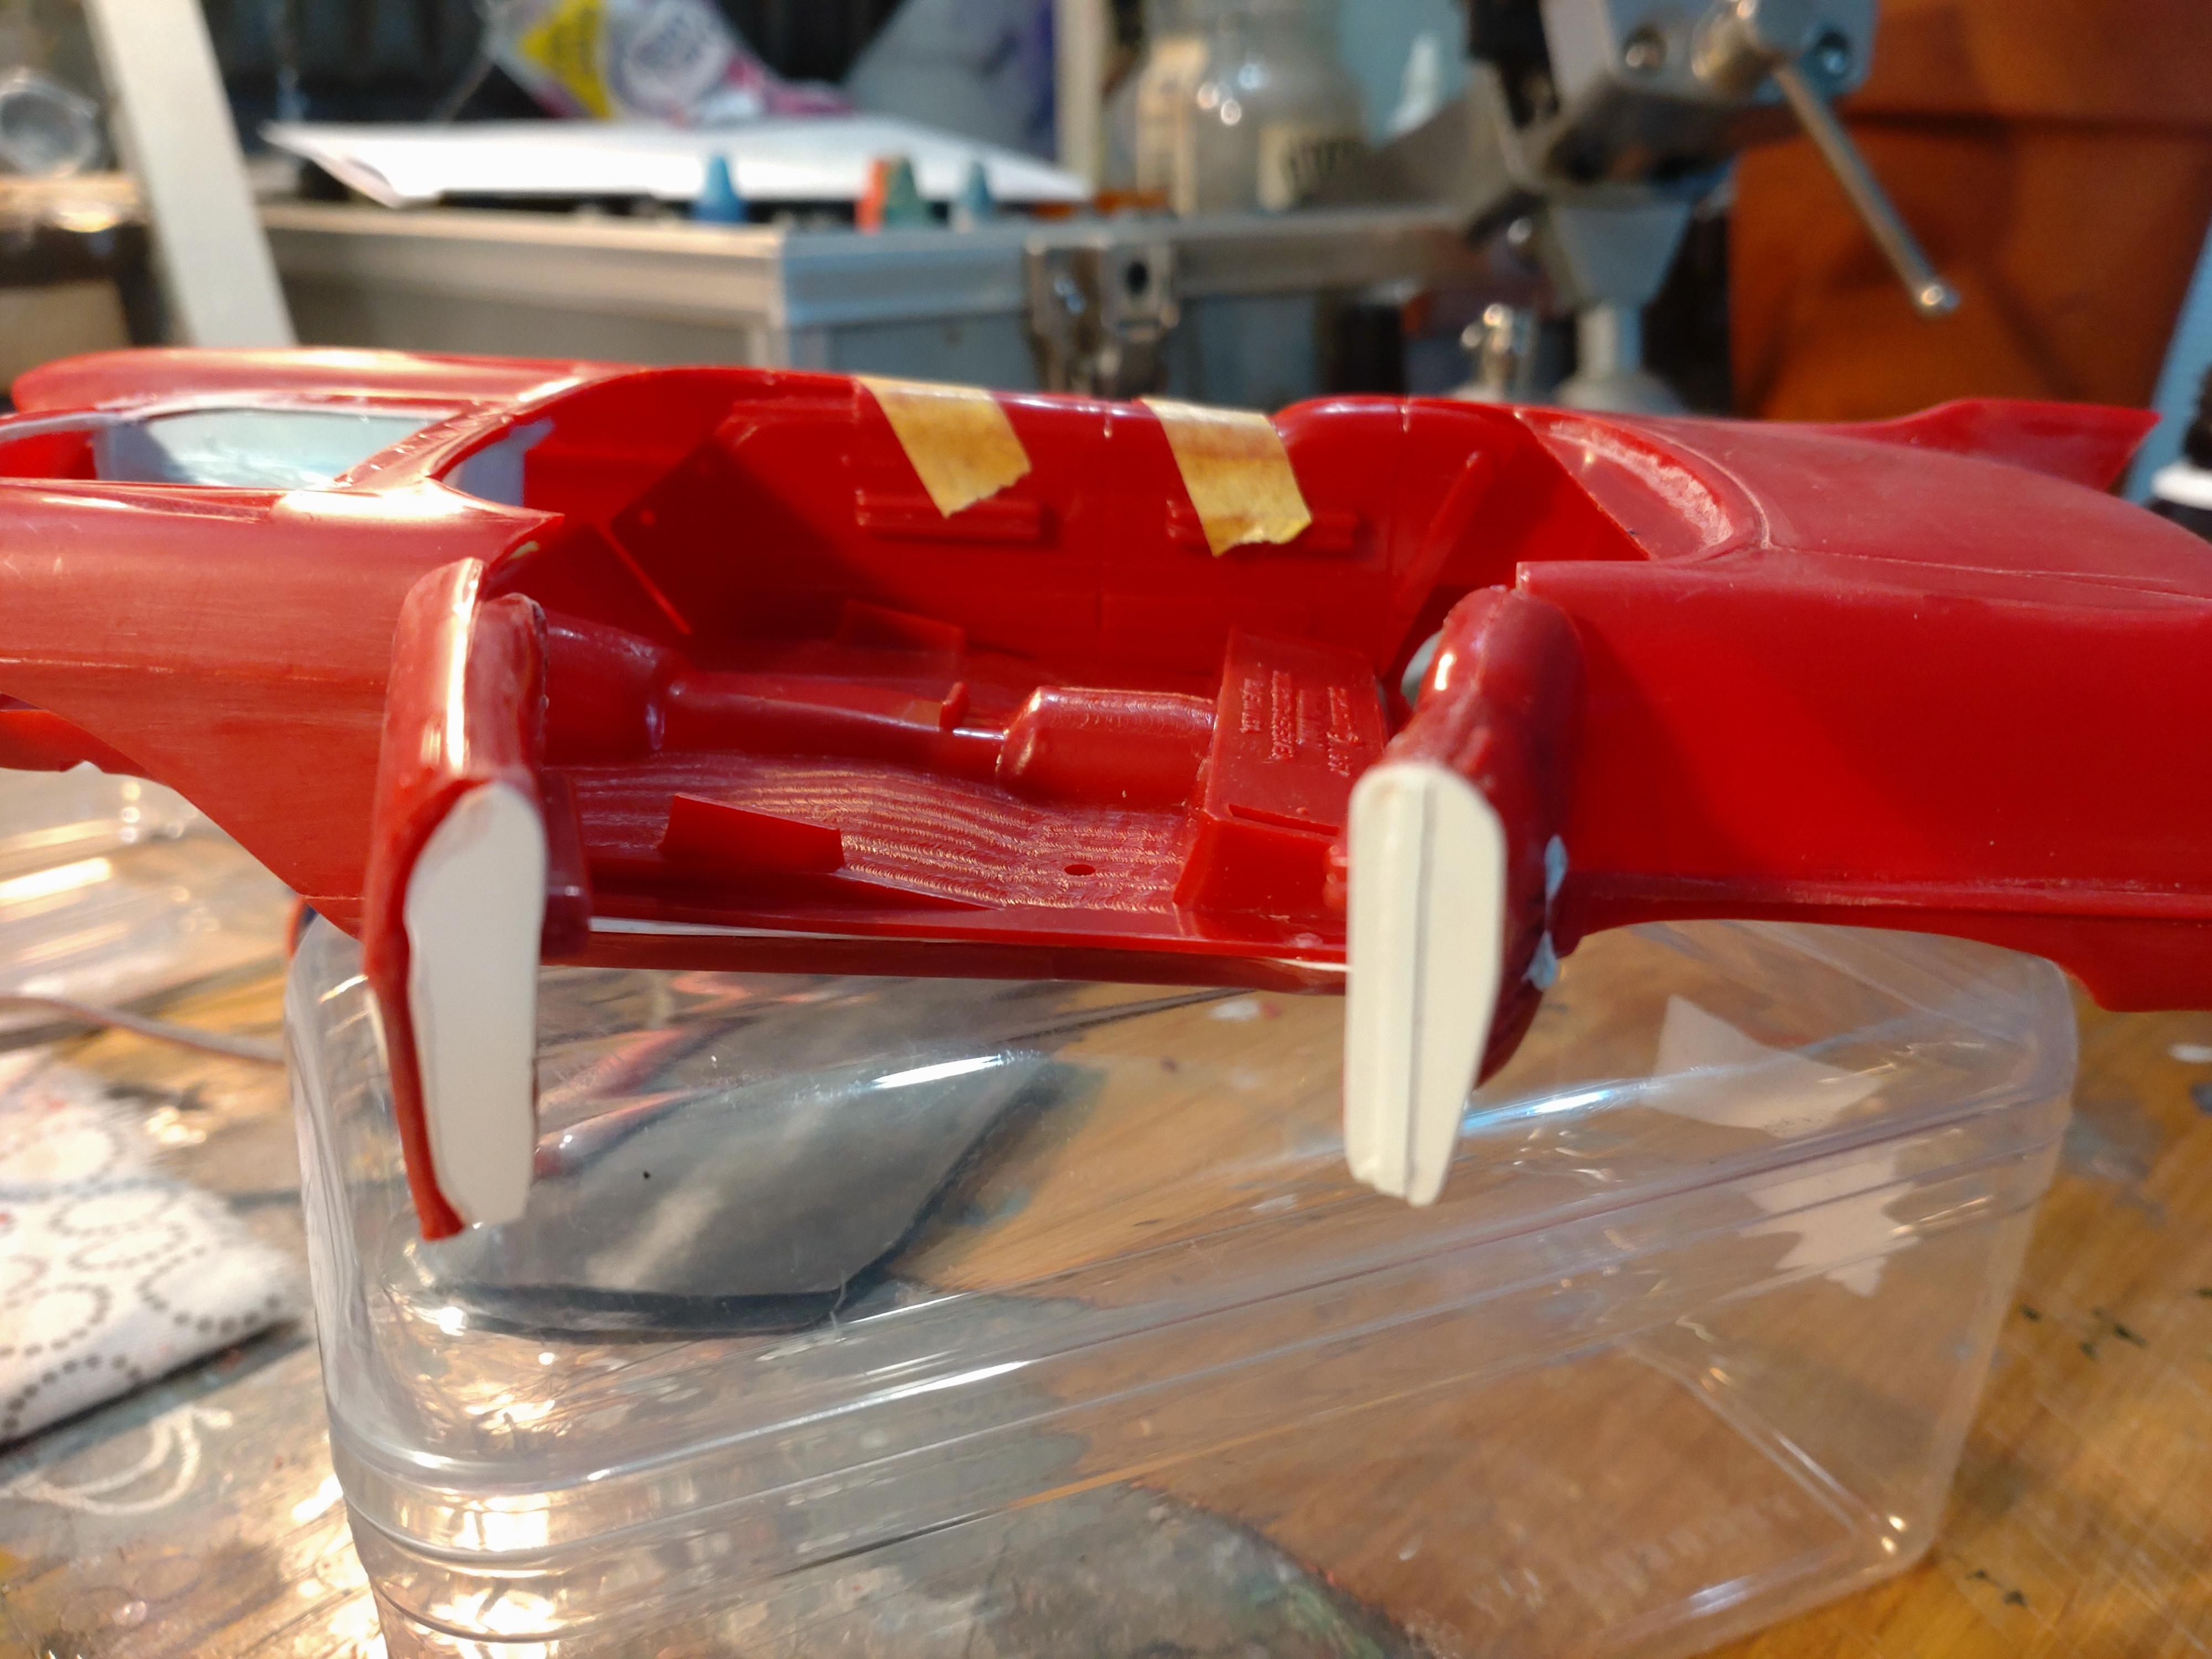
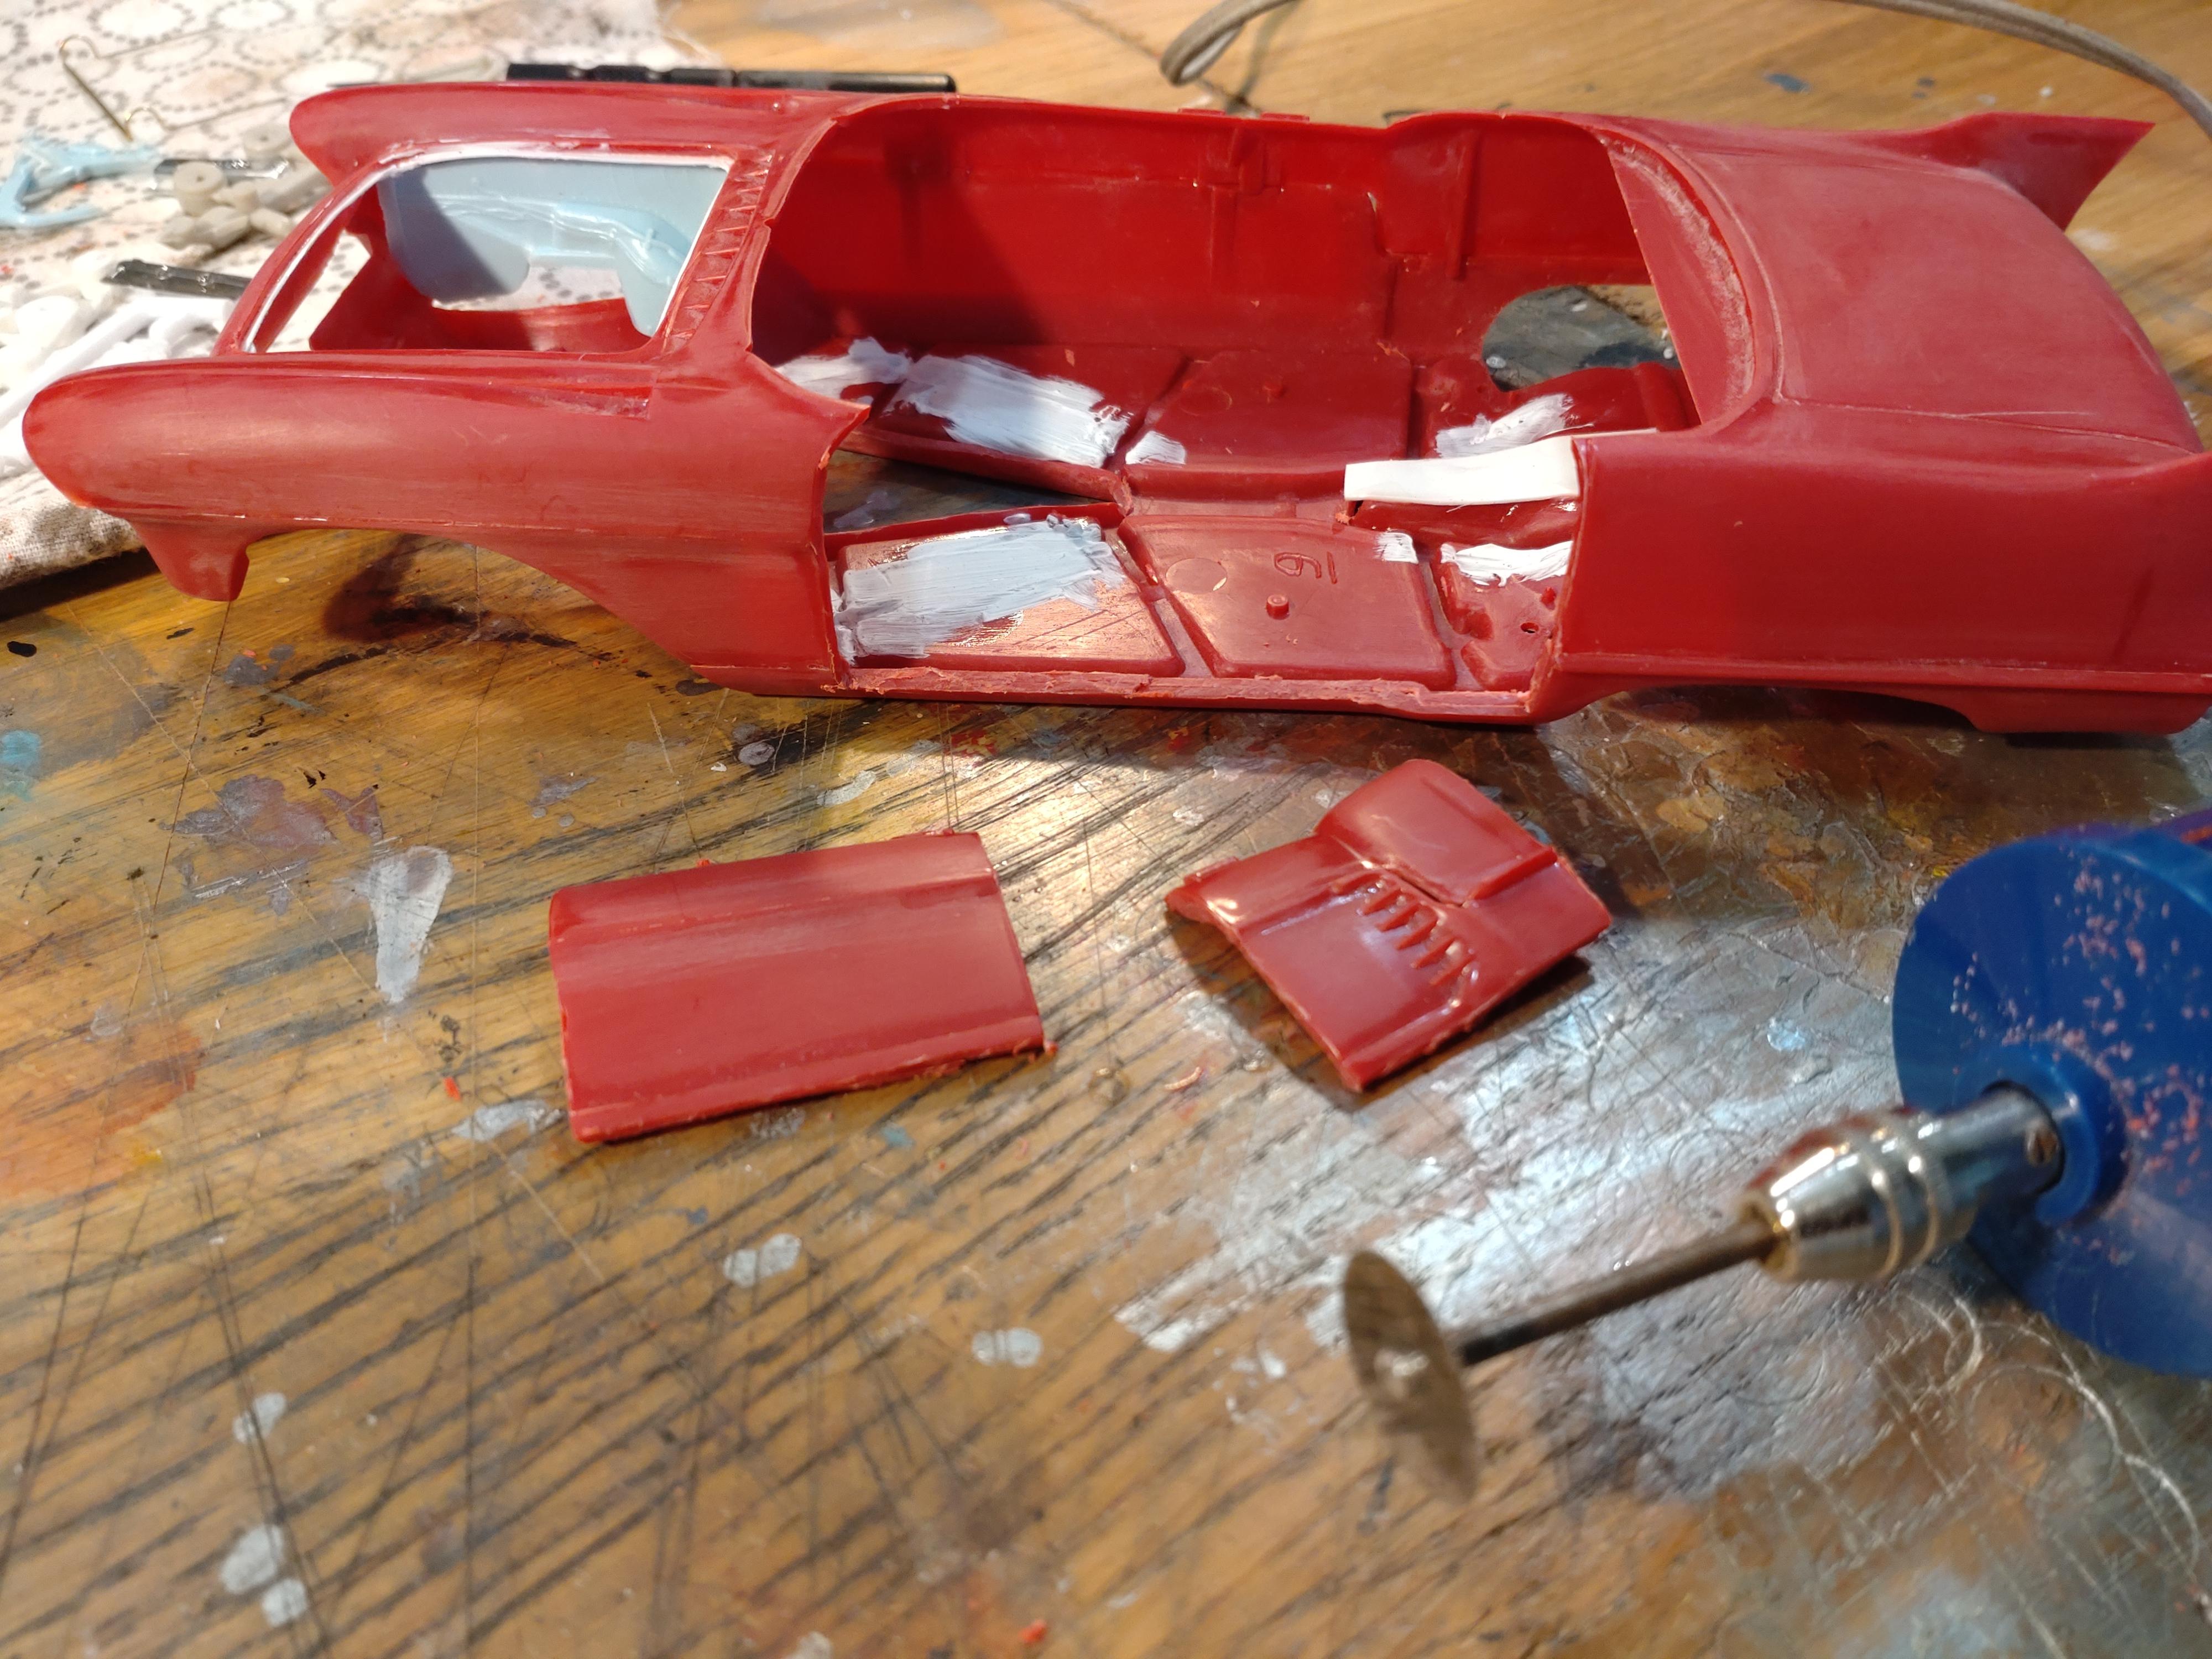
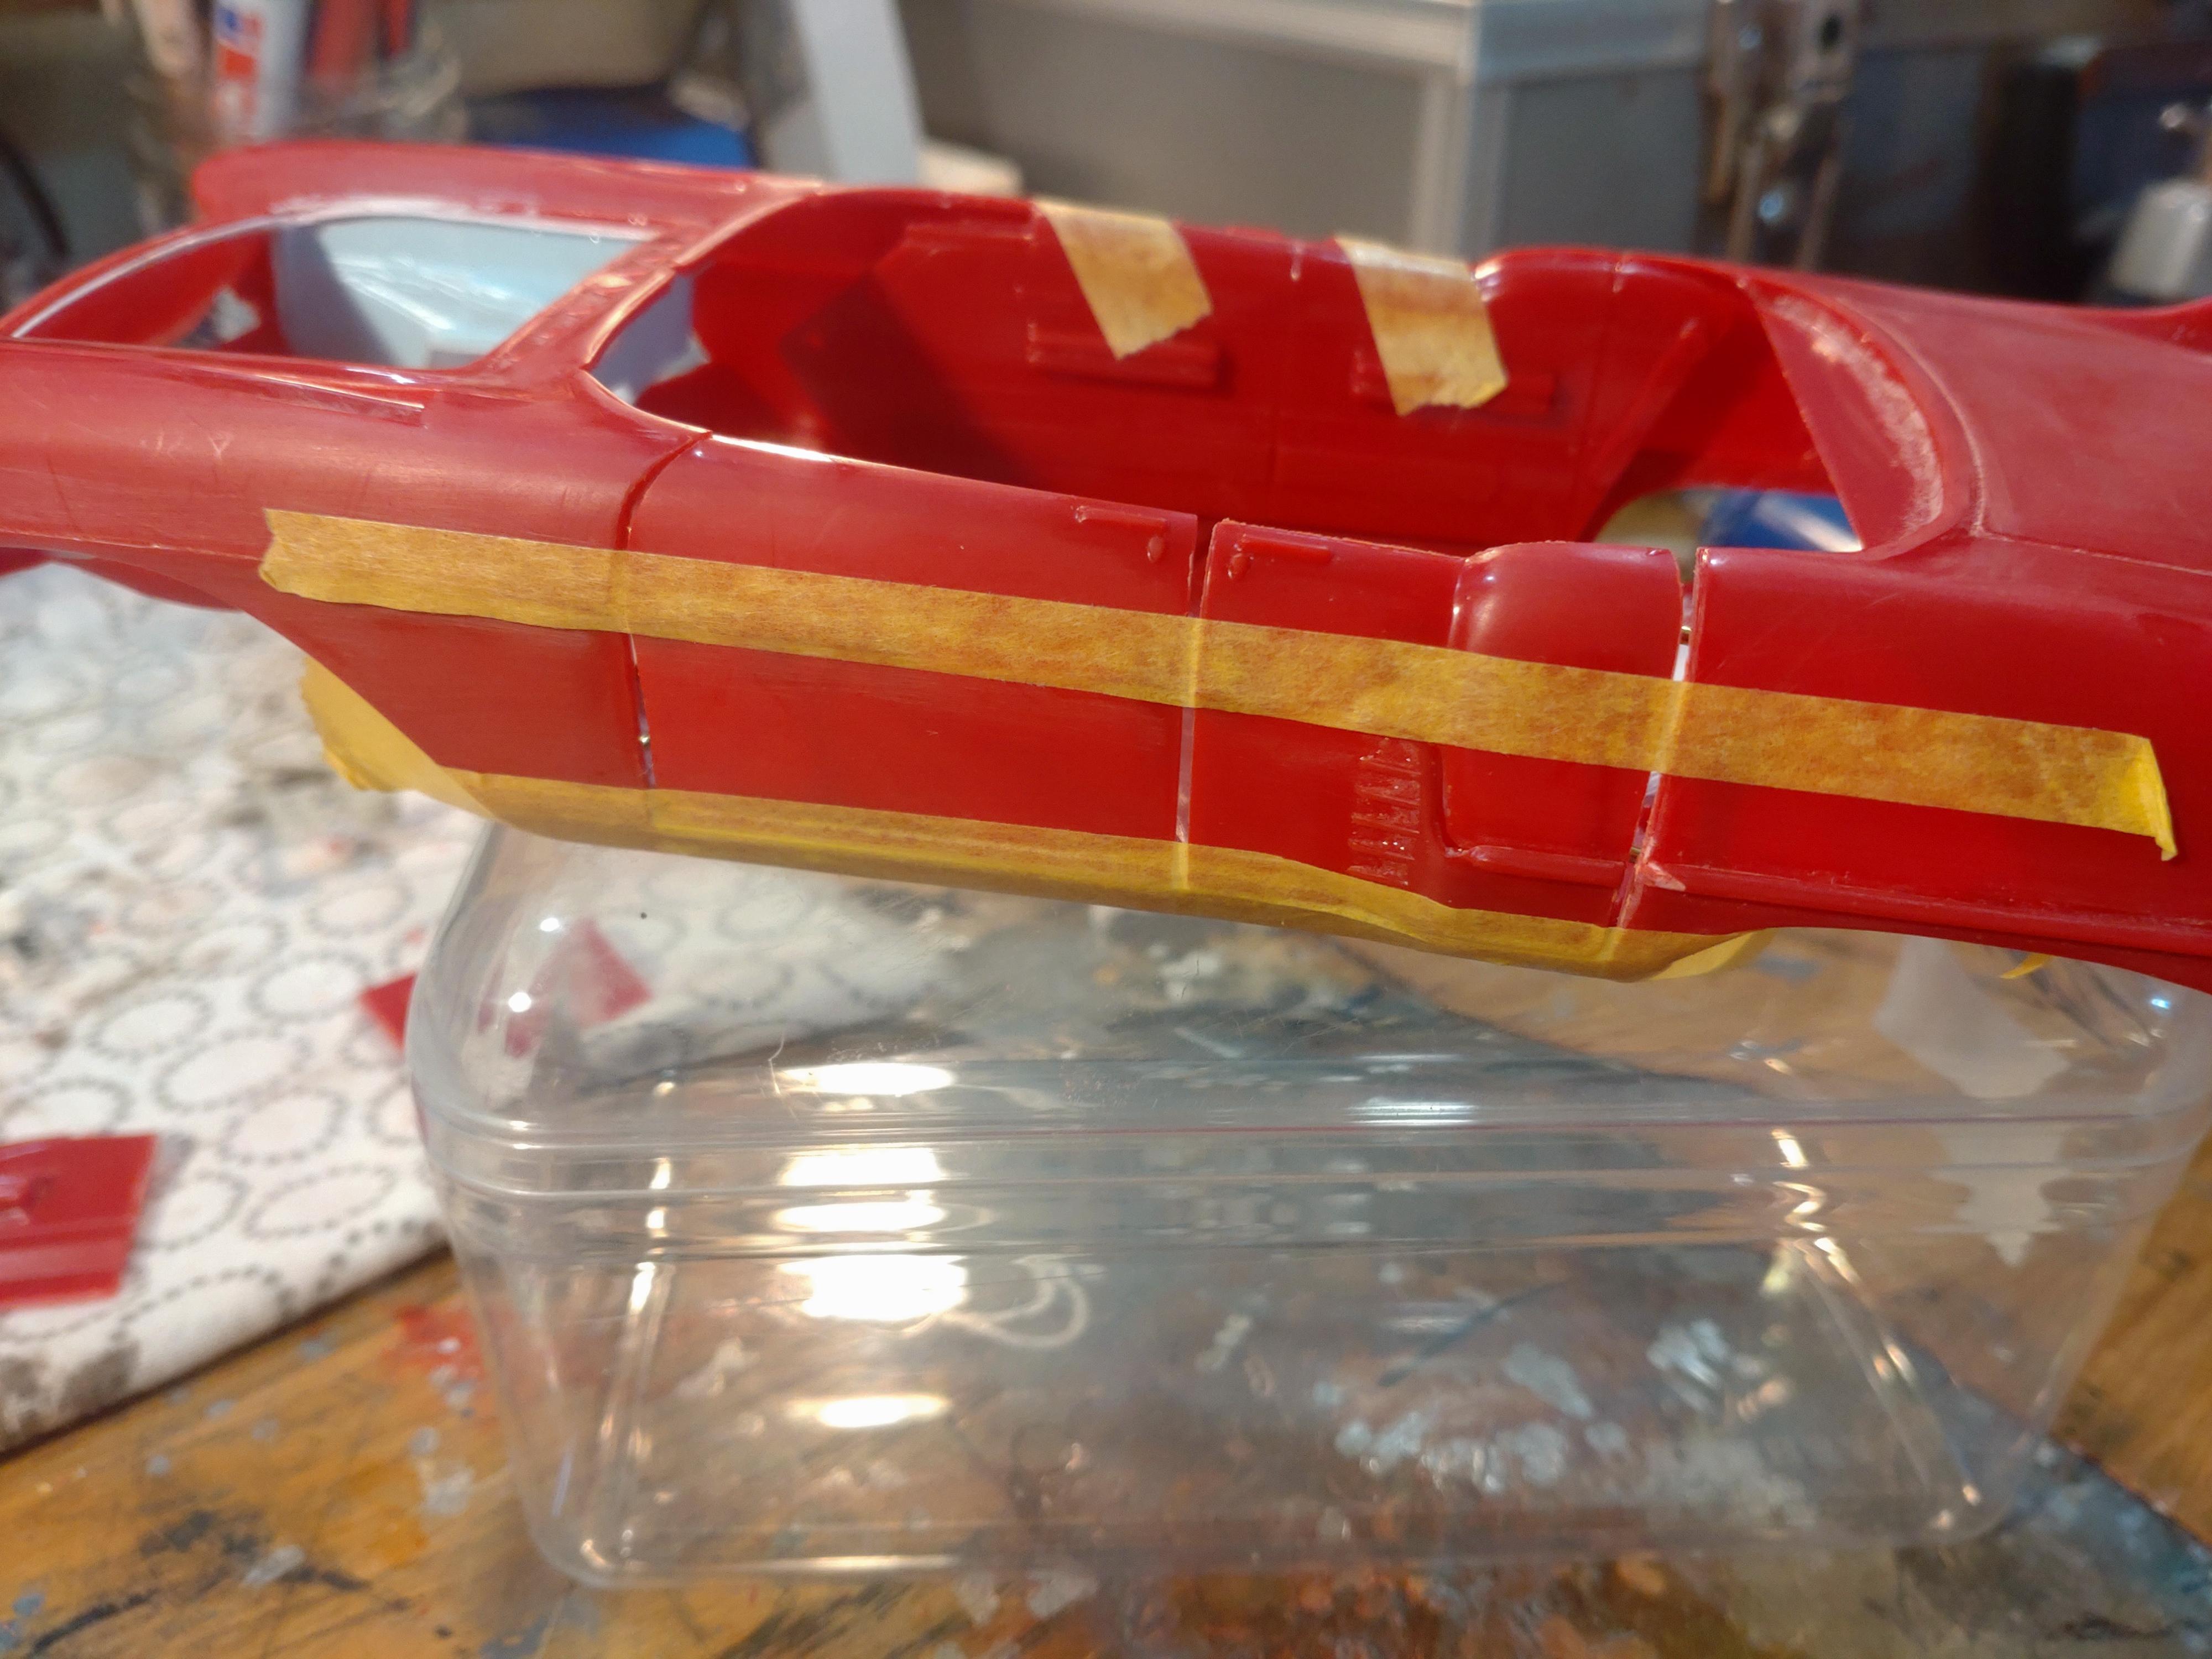
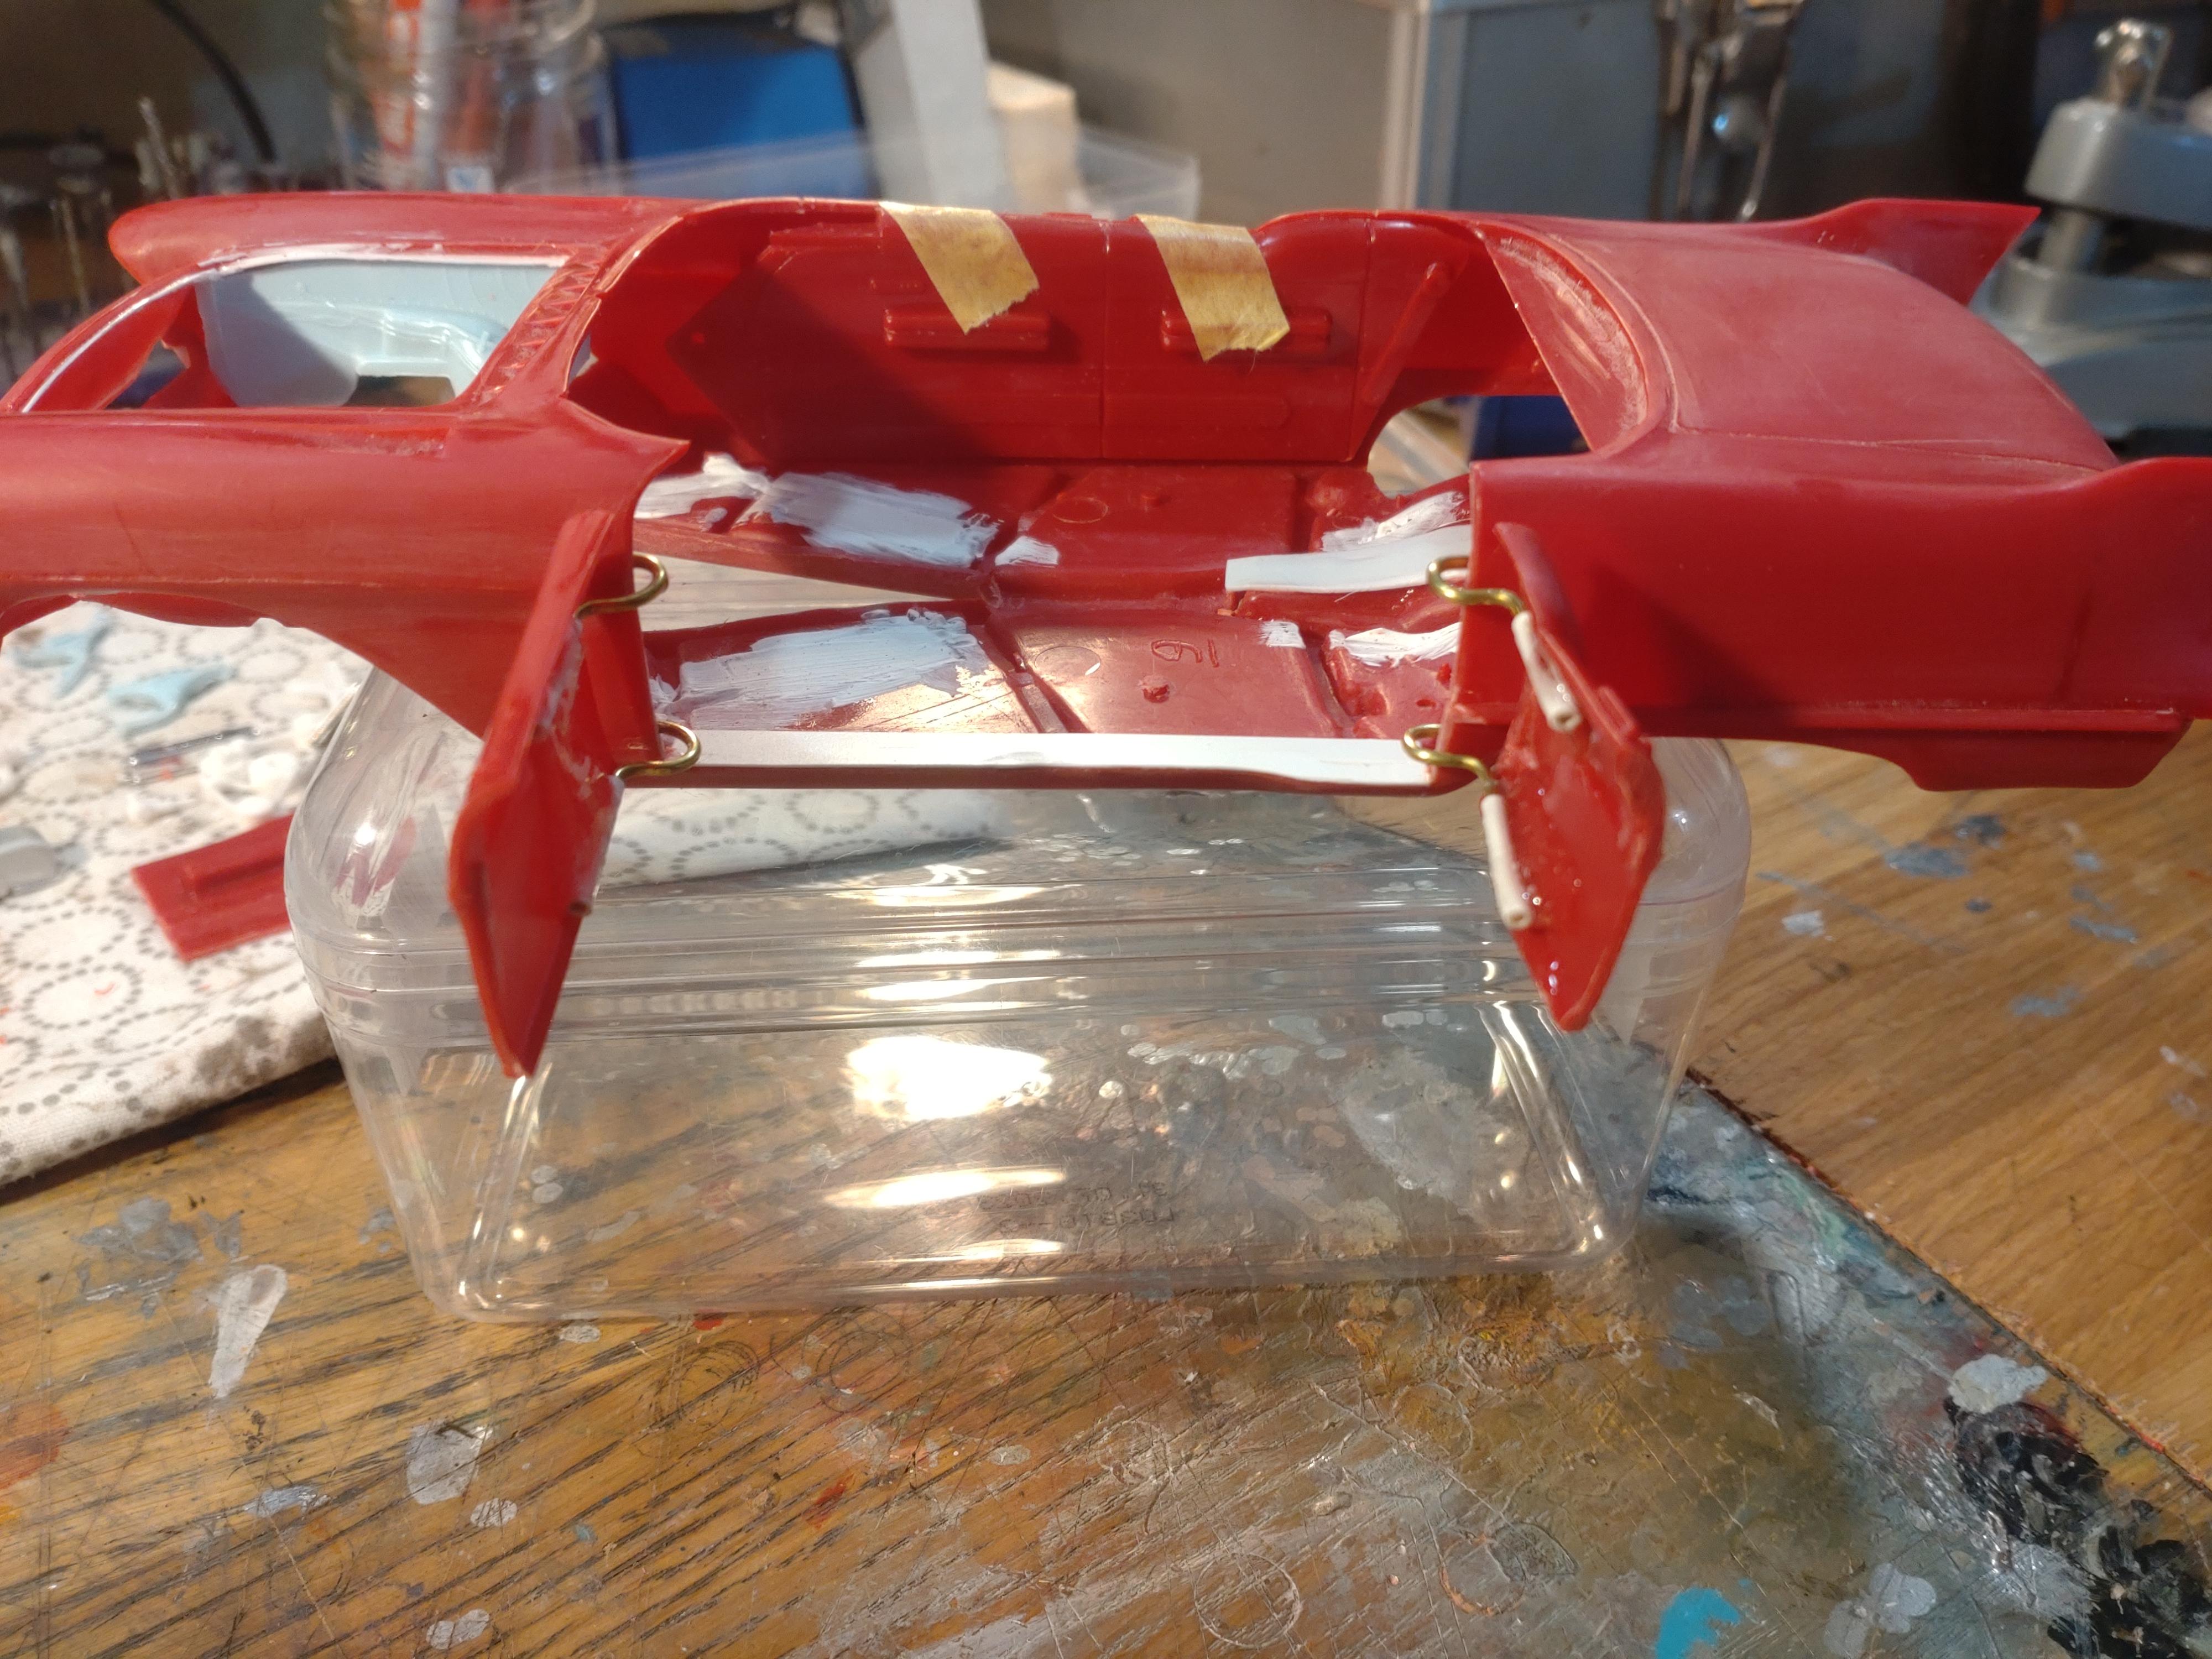
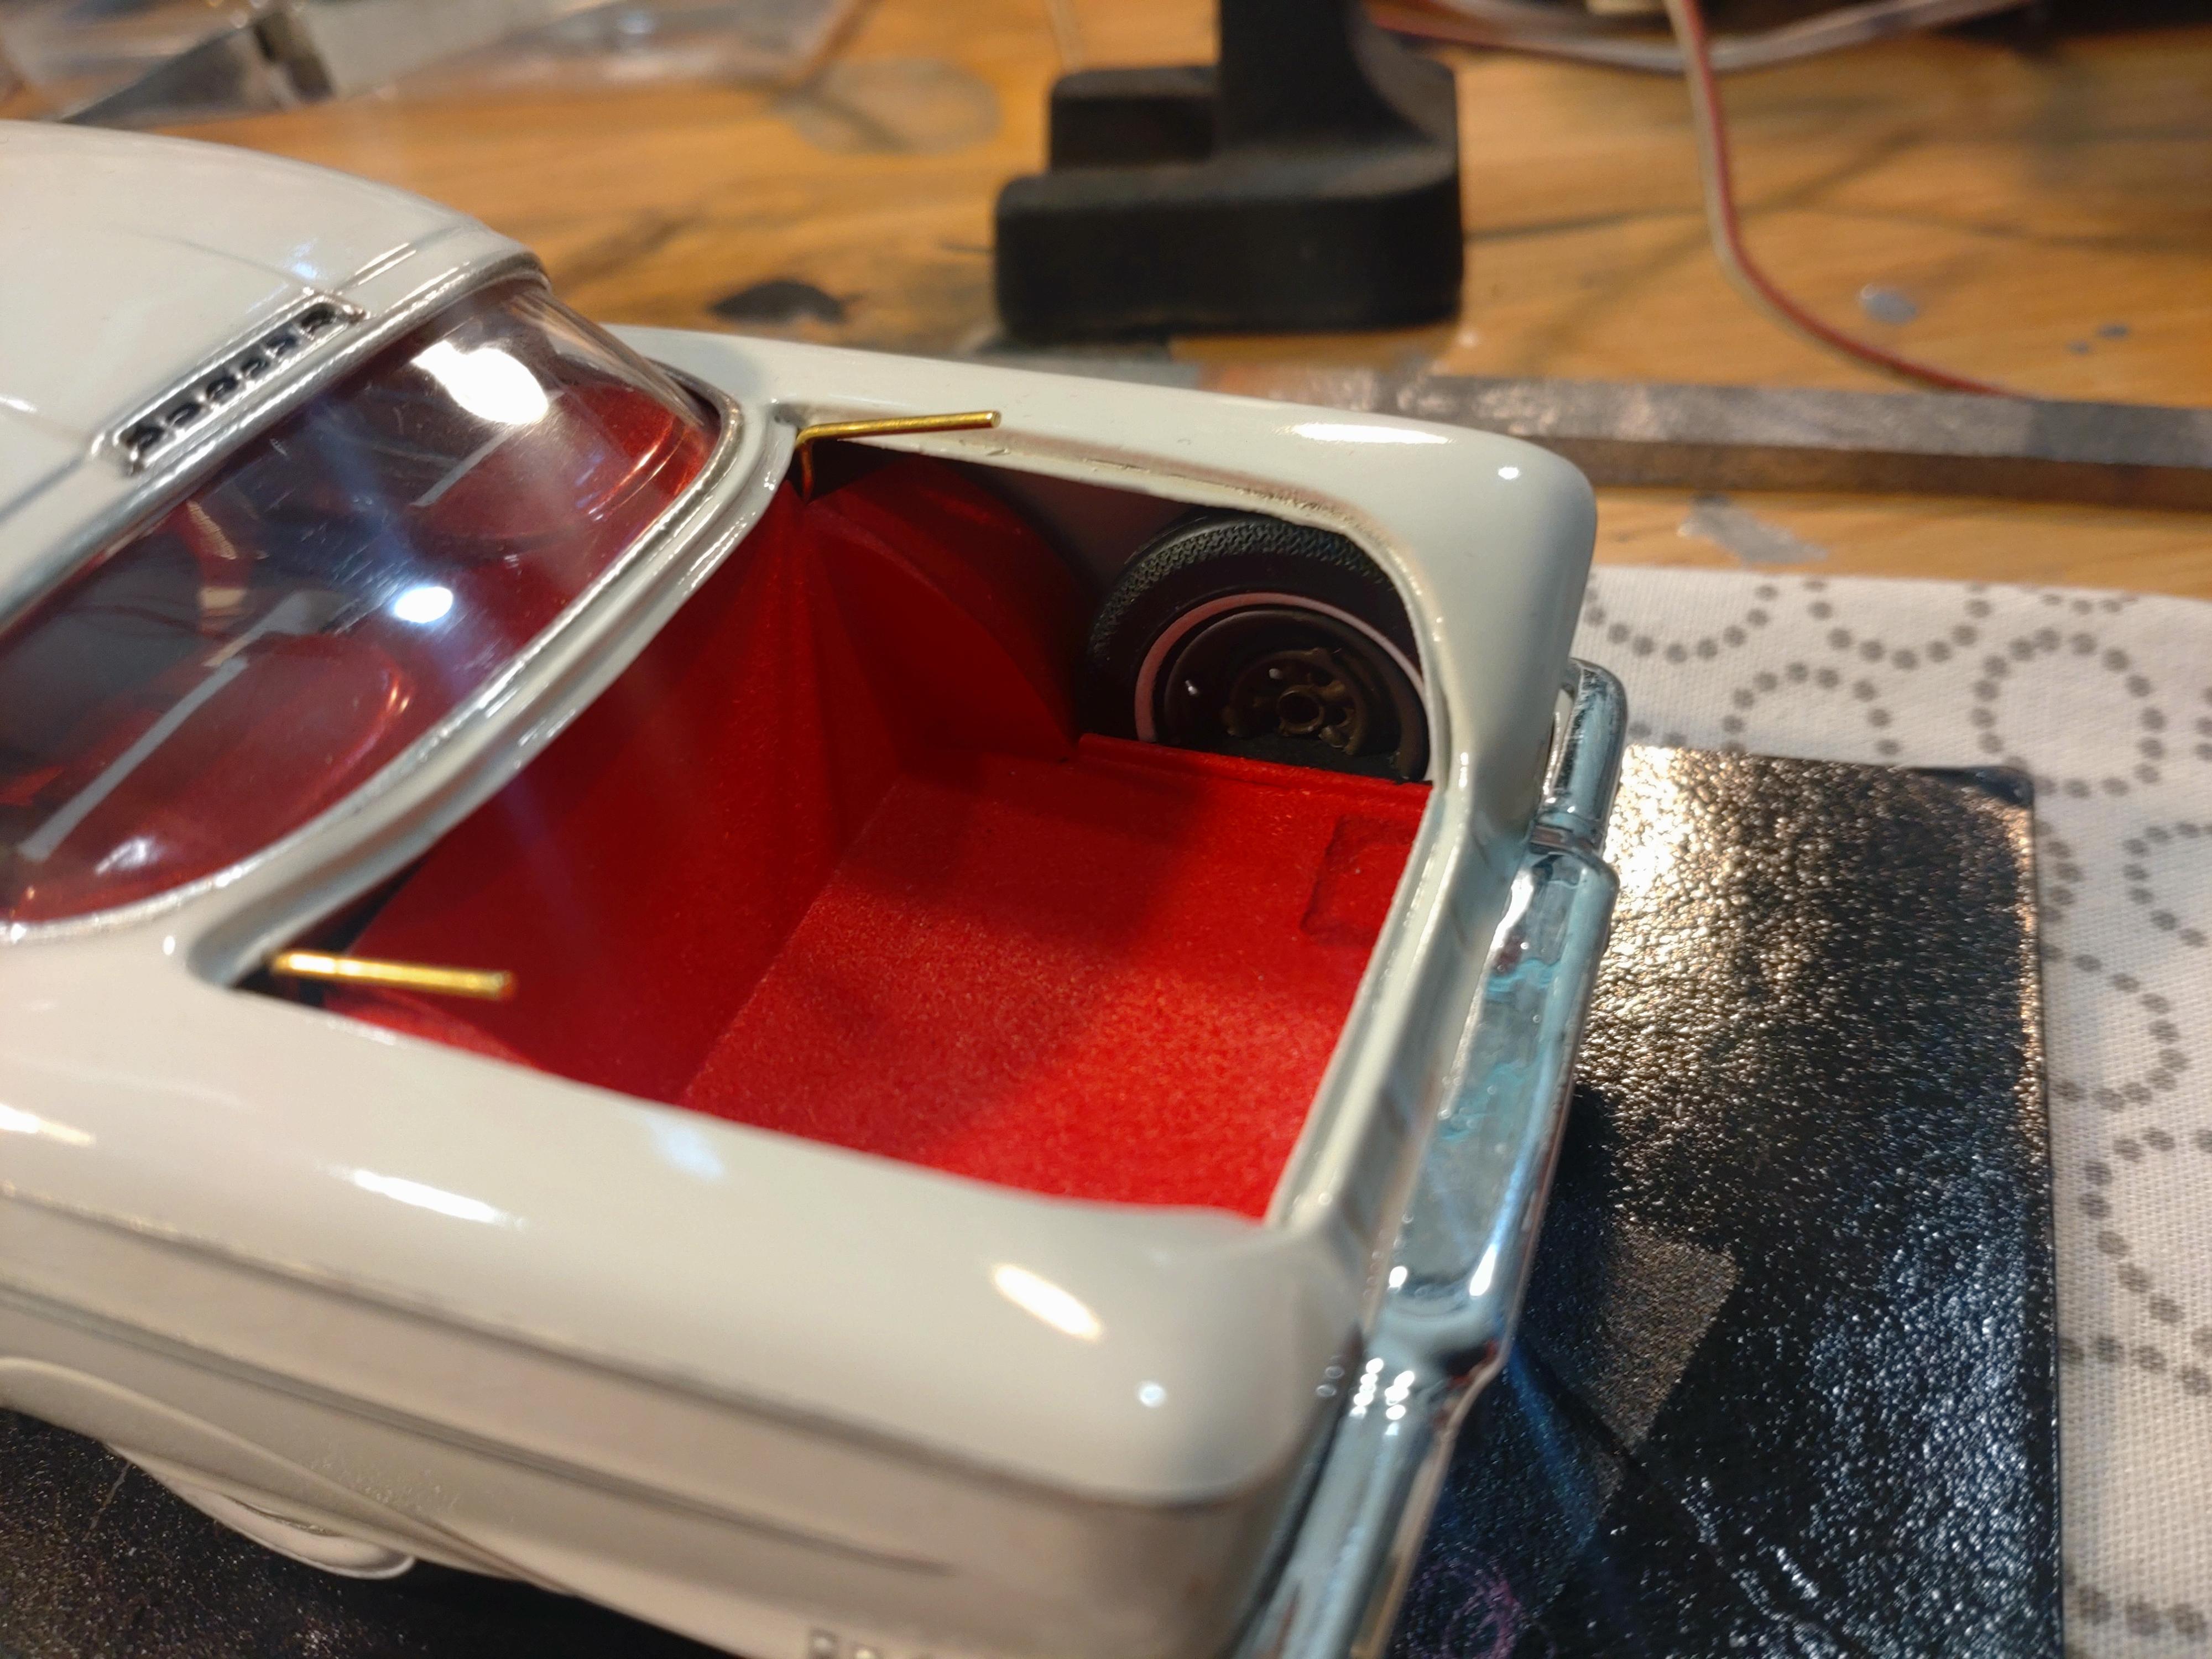
The Brougham was a luxurious premium car. At a list price of 13.000 Dollars only 704 were sold in the 2 years of construction. It cost more than the average Rolls Royce. And was doomed because Cadillac lost another 10.000 with every sale. A beautiful and rare classic. So I was looking forward to finally building my first Caddy. In contrast to my high expectations you can´t imagine my disappointment unboxing this kit. My vendor didn´t mention that the model only fits level 2: It has no engine, less than 60 parts, the "tires" are styrene donuts and the qualitiy level is §$%&? In a sentence, the crappiest kit I have ever laid my hands on. It took 2 days of brooding to make my decision to build or bin. I chose to give it my TLC and add as much details and levels as possible. I have enough spare parts to build a decent engine and turn this kit into a fine show. The body/undercarriage parts connect at the middle, where you would expect a chrome trim. Everything is molded quite crude. The undercarriage has all the details molded on (exhaust system, engine pan etc), so I had to cut and grind out large sections. And I did want an engine to look at. I was able to salvage an engine bay from an extra body (`58 Impala). After cutting the hood open I added lips and glued the bay into place. The hood needed small strips of styrene to fit smug into the opening. I filled the cavities on the bottom with sheet styrene and smoothed the surface with putty. Because I will add an exhaust system only a minimum of cleaning will be necessary. My order of work on this kit will be much different than my usual habit. Fortunately the roof is an extra part, so I can work the interior while getting the body finished. Opening the hood wasn´t enough complexity yet, so I decided to get some doors open! Yup, those opposite doors with the suicide back door. Needed some brain work to think it out, I didn´t want to go into a dead end street... The body glued and after first sanding: Now without the doors... The interior panels have to fit too... The hinges are the usual method, just that the doors are not flat. After fumbling to find the correct spots, I used 2-component epoxy to glue the styrene tubes. It fills the gapes very well and wont loosen later. The hinges themselves are 1mm brass. And by the way, I will only equip the driver side with doors (this is enough work already?). The tricky part is getting the doors into the correct place to glue the hinges to the inside of the body. Getting it crooked here is a minor catastrophe. Securing them in the right spot with tape. A look from the inside before applying the glue. Here too I trusted in epoxy. The door gaps might seem wide at this stage, but I will cover the open ends with sheet styrene and fill the cracks with putty. I hope to get under 1mm gaps in the end. Behold, the hinges work and the doors swing wide open! Just like the original Brougham. I want to avoid the doors not closing correctly when the build is finished and chose to hide magnets in the right places. The front door will hold the back door closed, so I will only need 2 magnets at the right places. One is under the bottom side of the interior panel. The other will be hidden in the driver seat. The magnets I happen to have at home are quite strong so they can bridge about 1cm and still keep up enough pull to keep the door closed, but not me having to pull too had to open the door. I do hope this works out! Heres the one in the door before I cover the holes. A lot of work ahead, but I´m happy to build this and am having a fine time. Thanks for watching!
-
Thanks everyone for your friendly response! @ Matthew: This kit did have opening doors from the start. There are a few kits out there that have this feature. Whatever one you might find, do take measures to check the fit of the doors before you start fine working on the body. Especially with the interior panels attached! Just about every model needs serious filing/sanding to make them fit neatly. What I did do on this one though, was open the trunk. The hinge mechanics are basically the same and with a little building experience quite easy and very rewarding! (oh well, you should reckon the extra time?). Good luck!
-
Wow! So many return messages on this thread? Thanks everyone! ? Seems I hit a sweet spot with this build. It´s become one of my favorites! (Well, maybe until the next build?)
-
Hi Dan, well I did mention that I added a bit of LUX. Happy that you love it, THANKS! ? But no low ride, fancy wheels or wild paint job on this one.
-
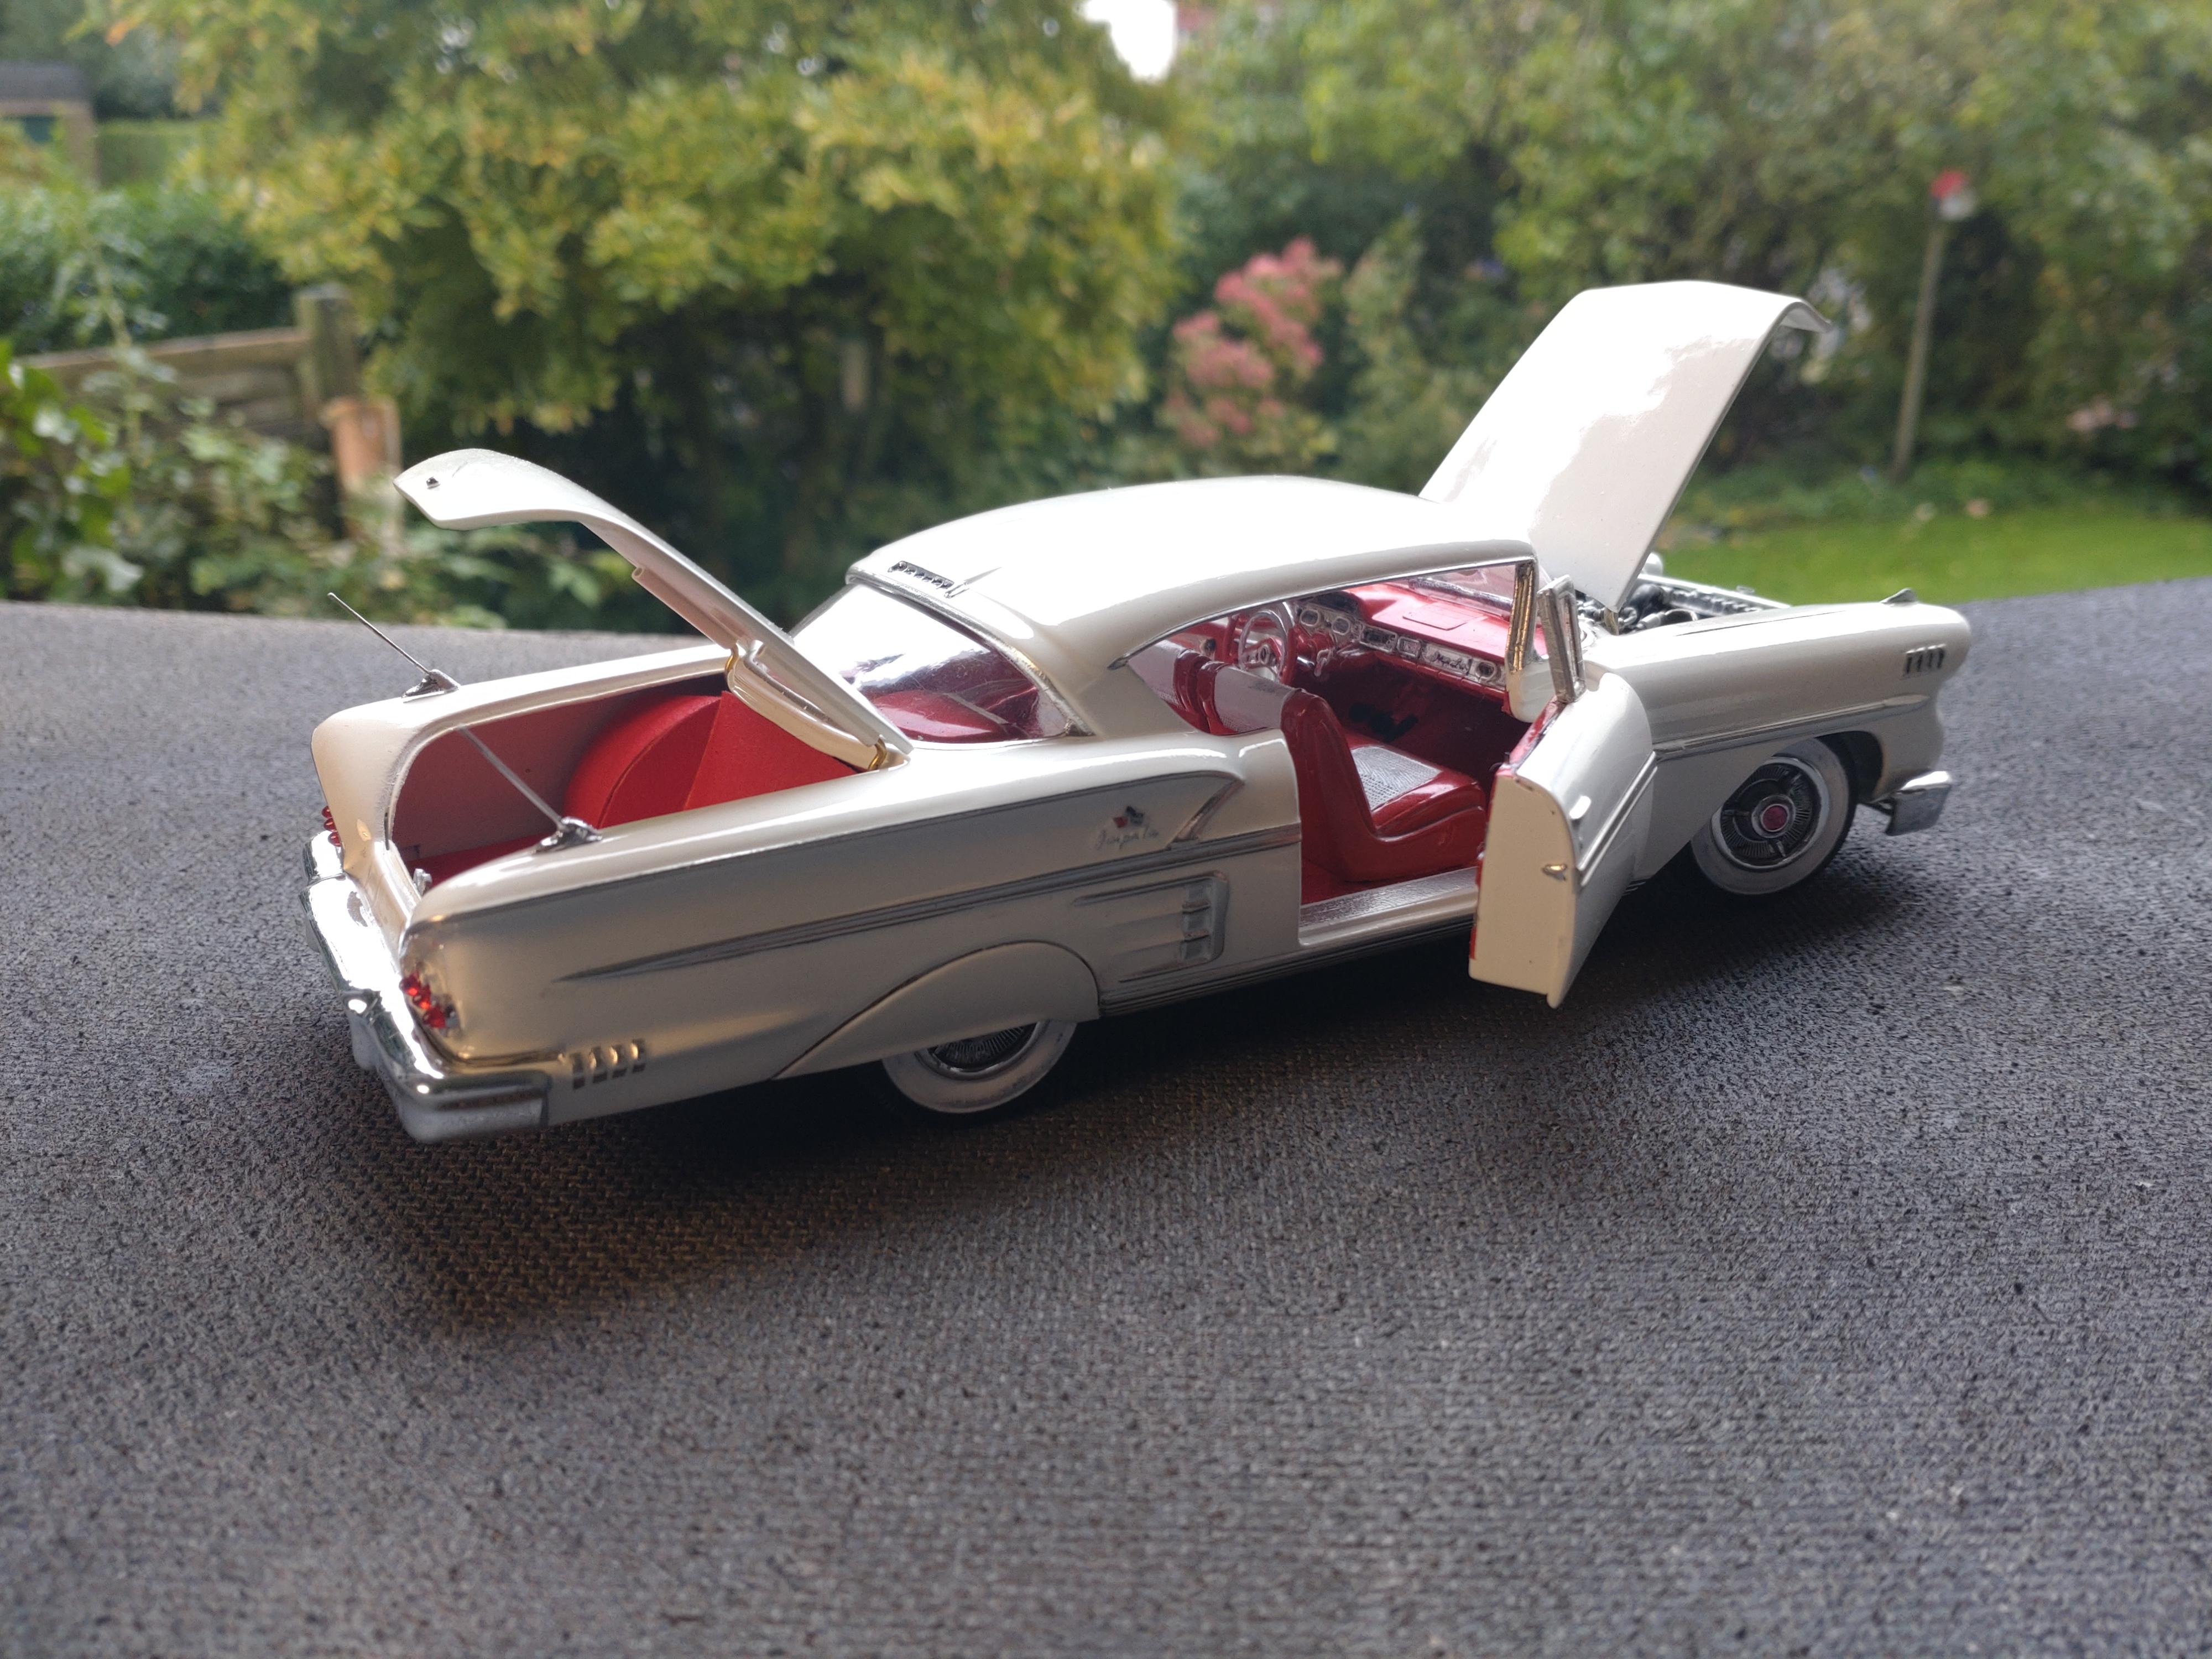
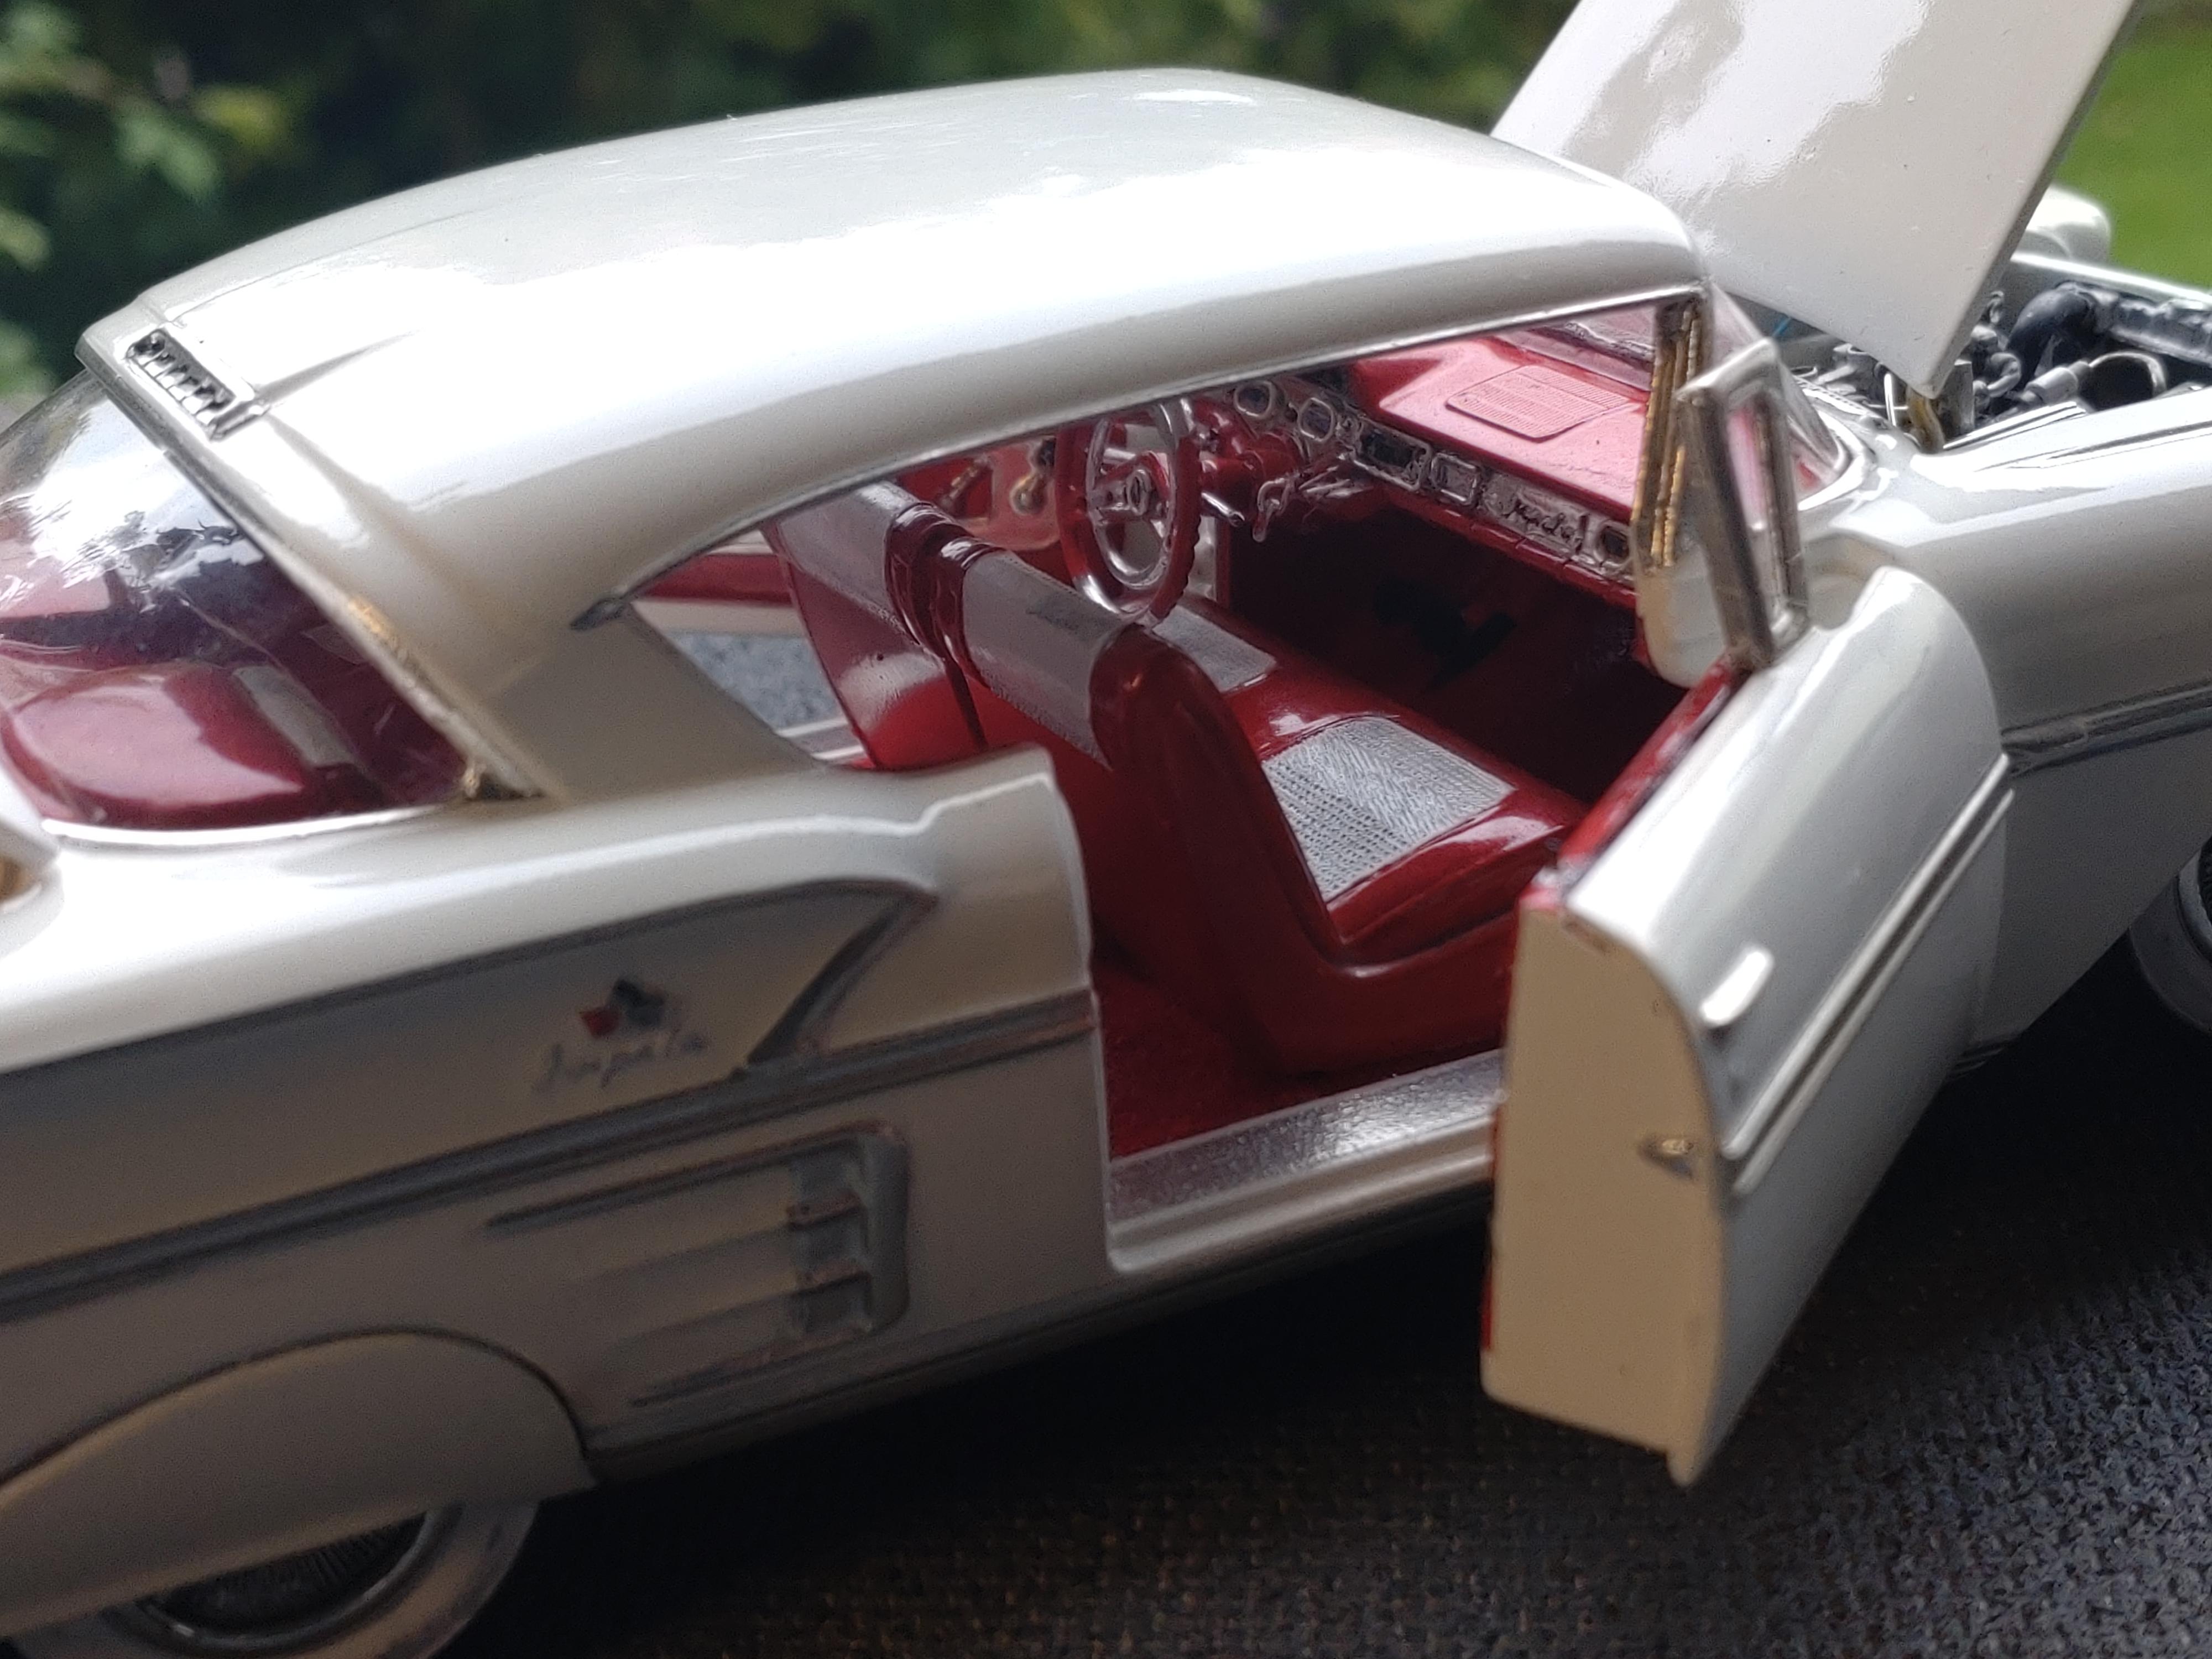
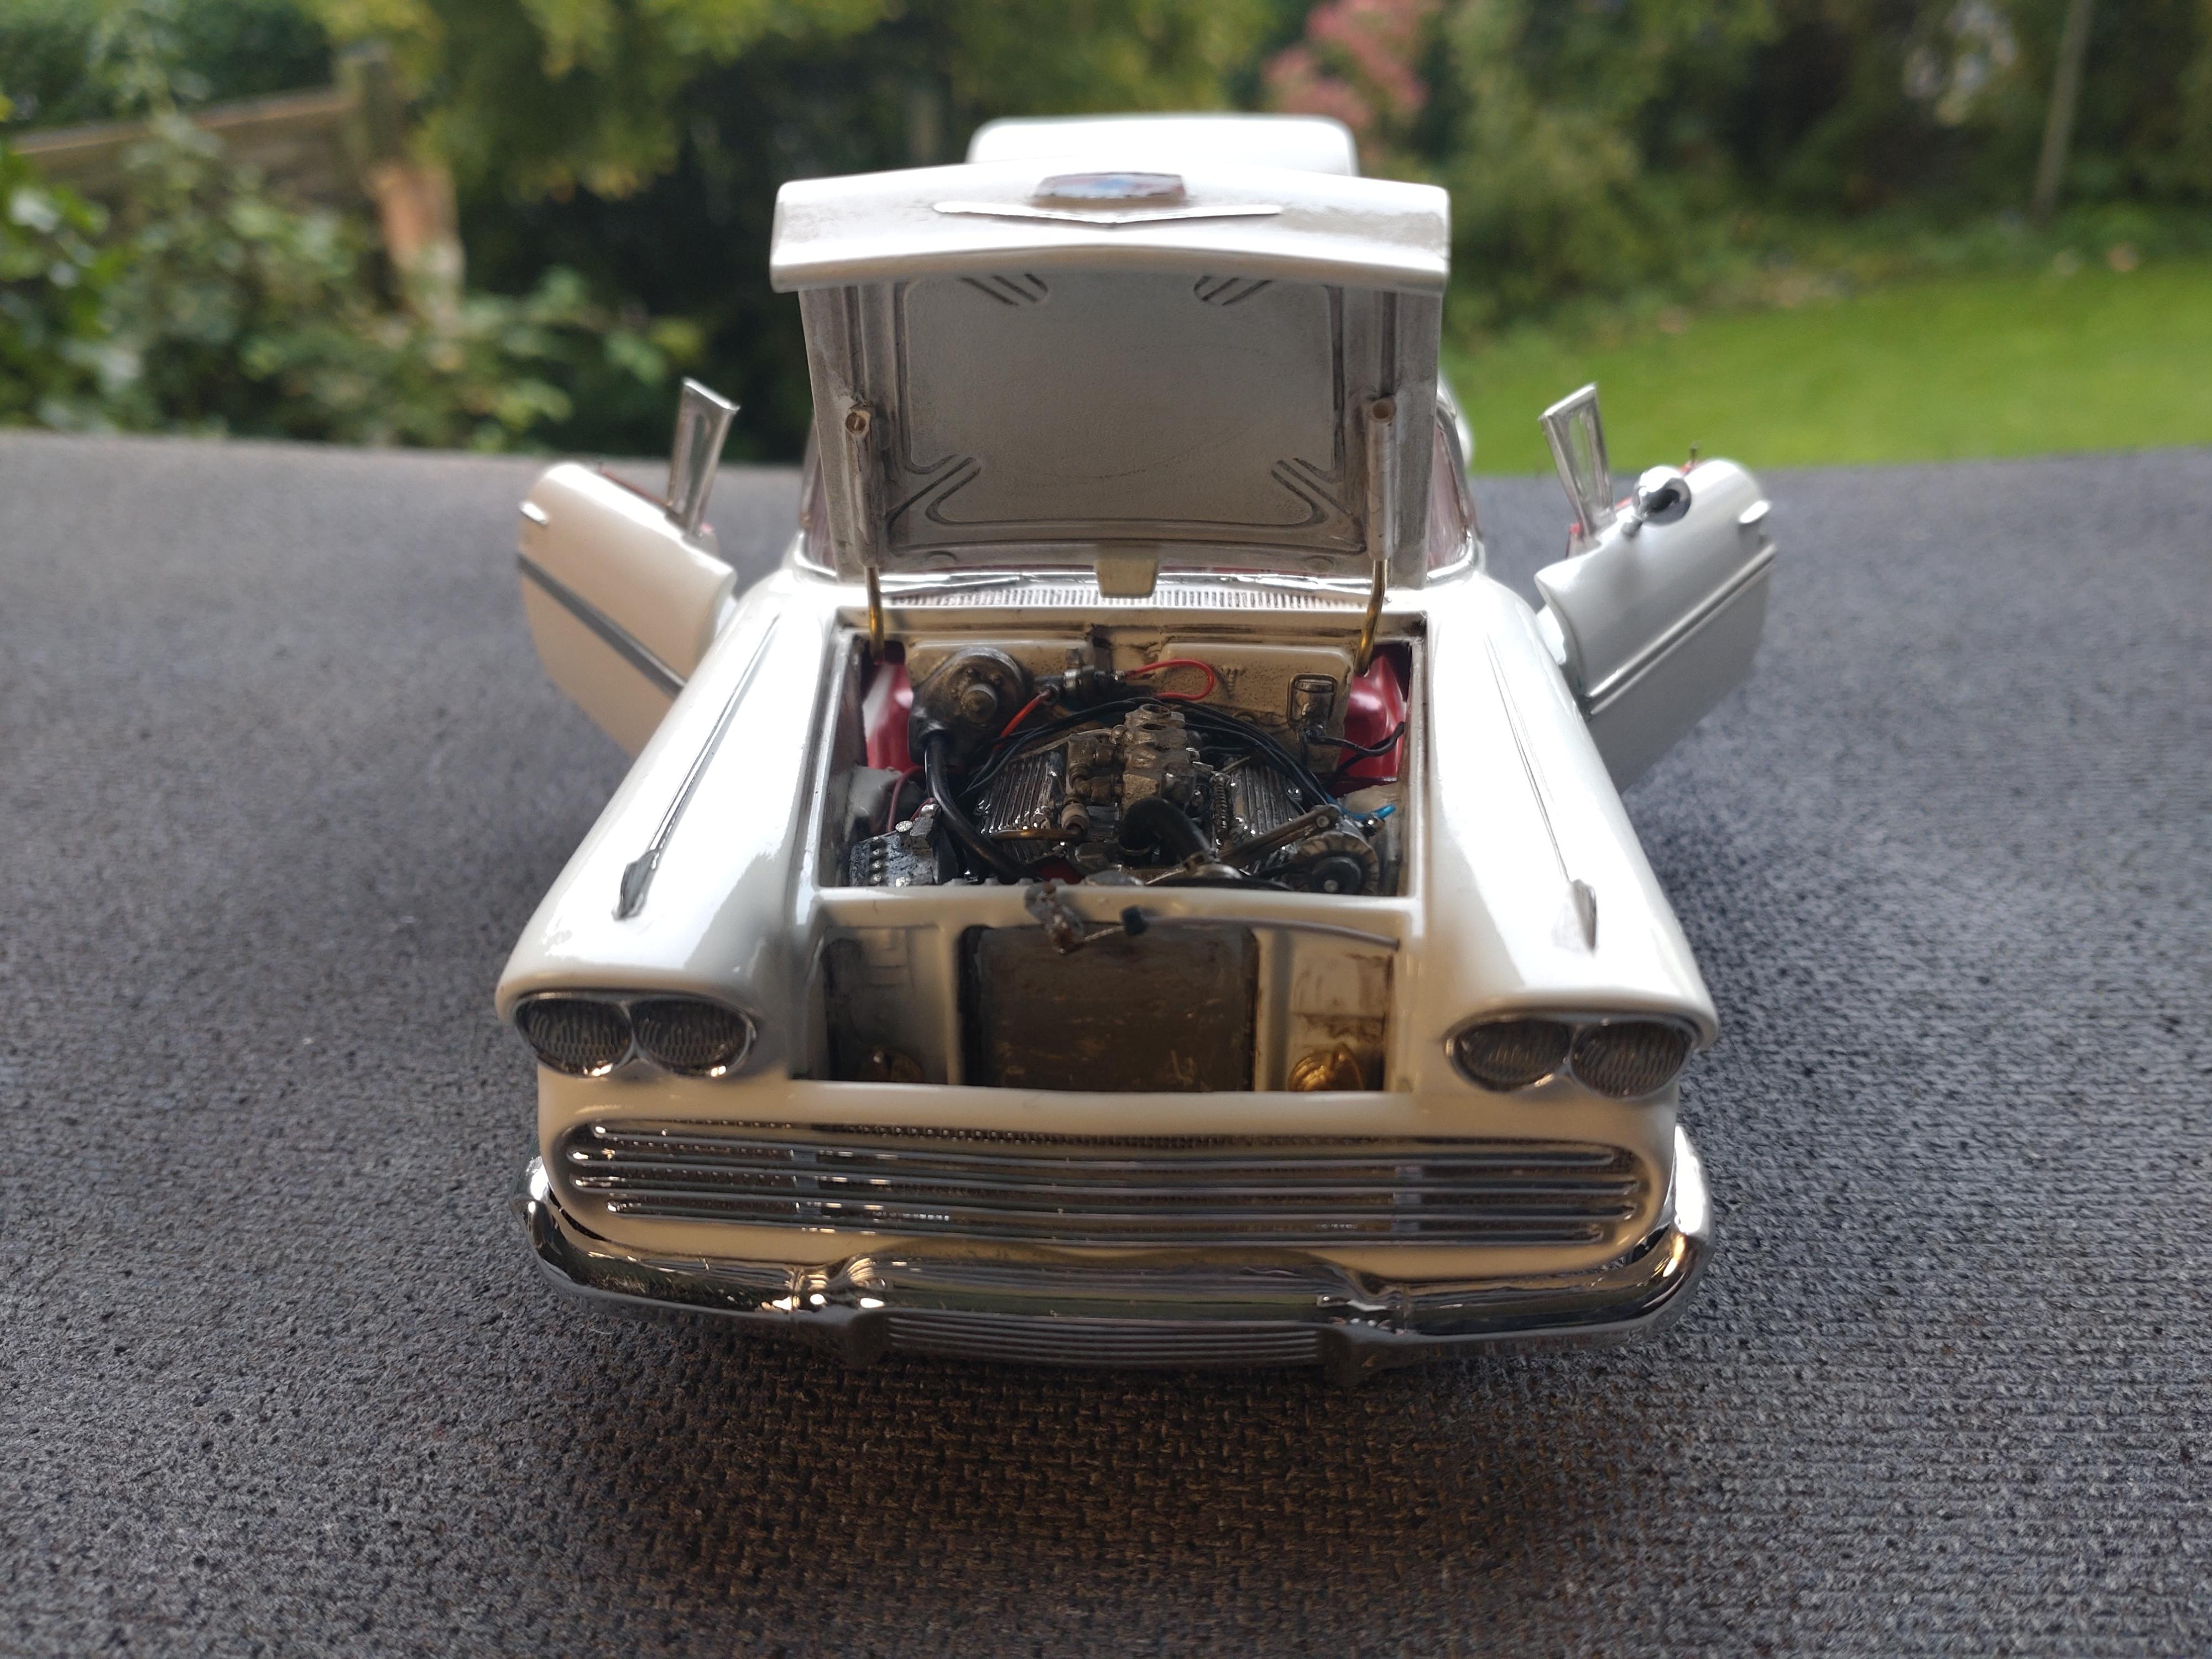
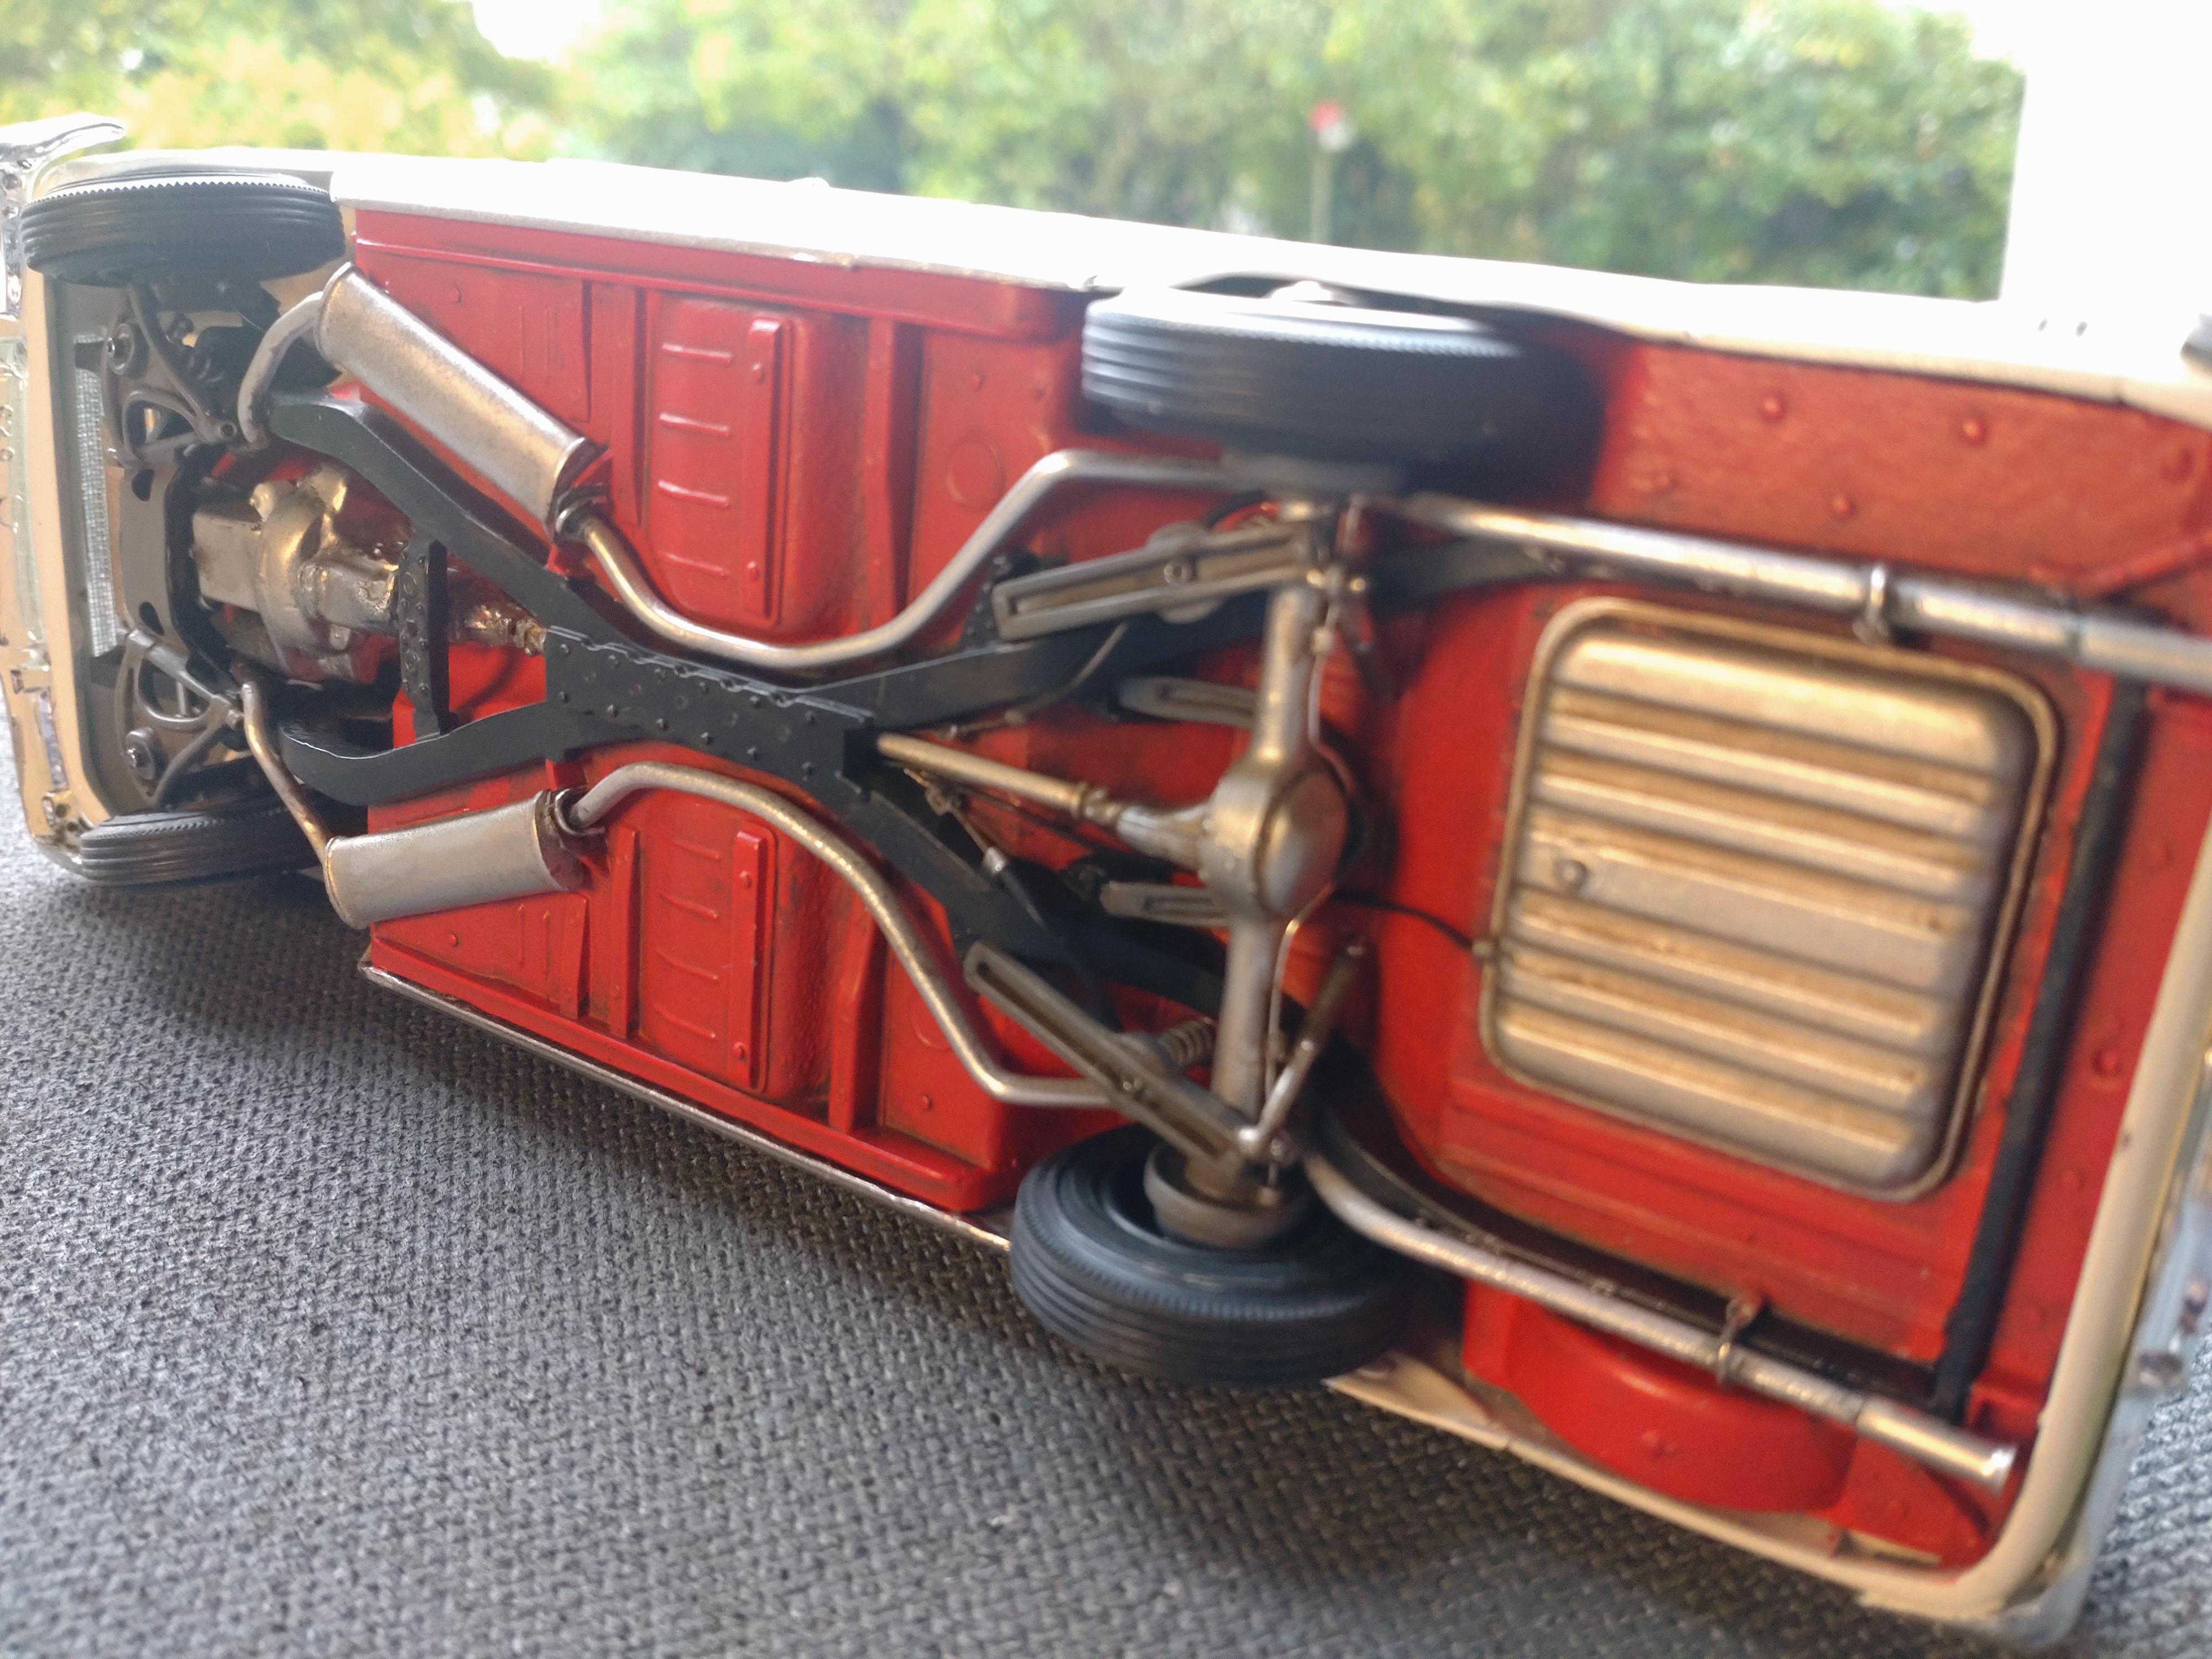
I´m moving this build from WIP to Under Glass. I had a few issues to the end, but won´t fuss about them anymore. (Guess I´m doing that right now???). Had a lot of fun with this build. It´s an ESCi ERTL kit and the overall quality was brilliant. I did some customizing to just about every major part. The trunk was opened and received hinges. The bonnet was also equipped with hinges. My idea was making this a classic stock build, but getting a good amount of luxury to the looks. I was uneasy at the start if the eggshell white might be too boring. But after applying the BMF I was confident that this baby looks fine. As a contrast the interior, the trunk and the undercarriage were crafted in red. A few parts needed to be fabricated because the kit didn´t include them (mirrors, engine parts) and the rest of the goodies I crafted from scratch styrene, wires, beads ect. The only after market items applied were the headlamps (Scale Production) and photo etched hex nuts on the engine. The base paint is Molotow cream white an AK clear varnish finish. For more details you can check out the WIP thread. Thanks for watching! You can see the video with this link: https://youtu.be/N9nkFPx3SNM
-
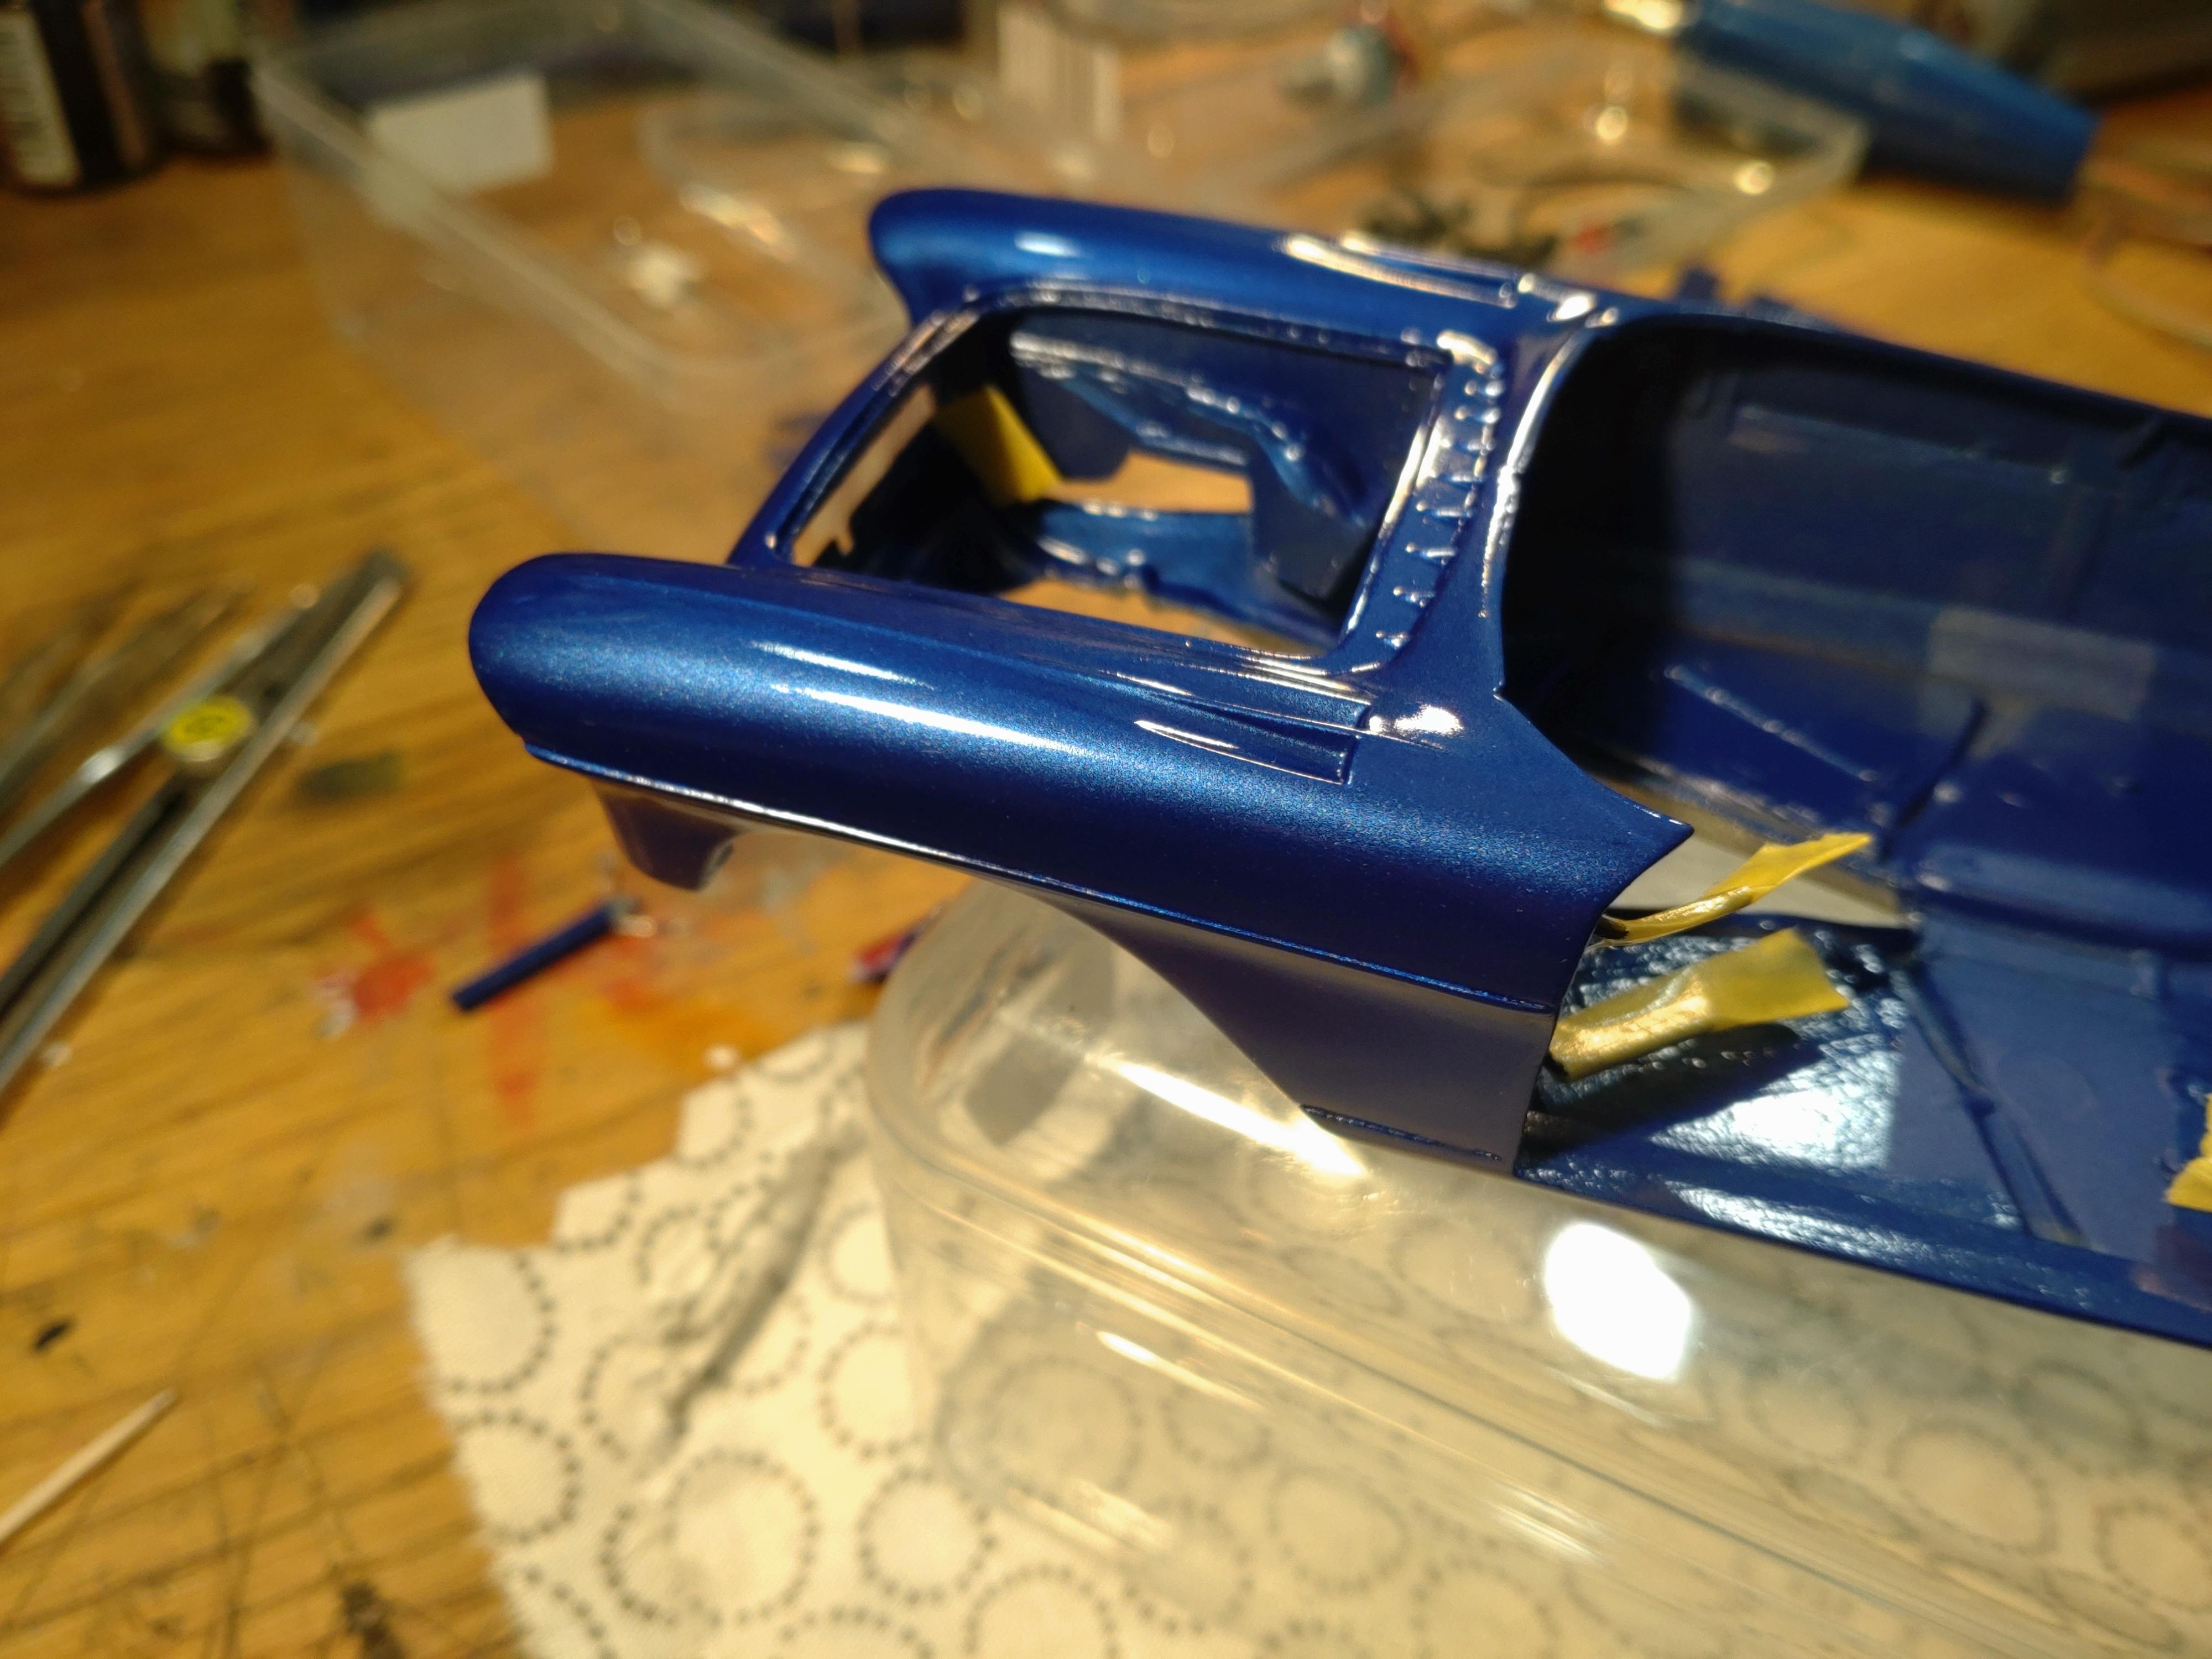
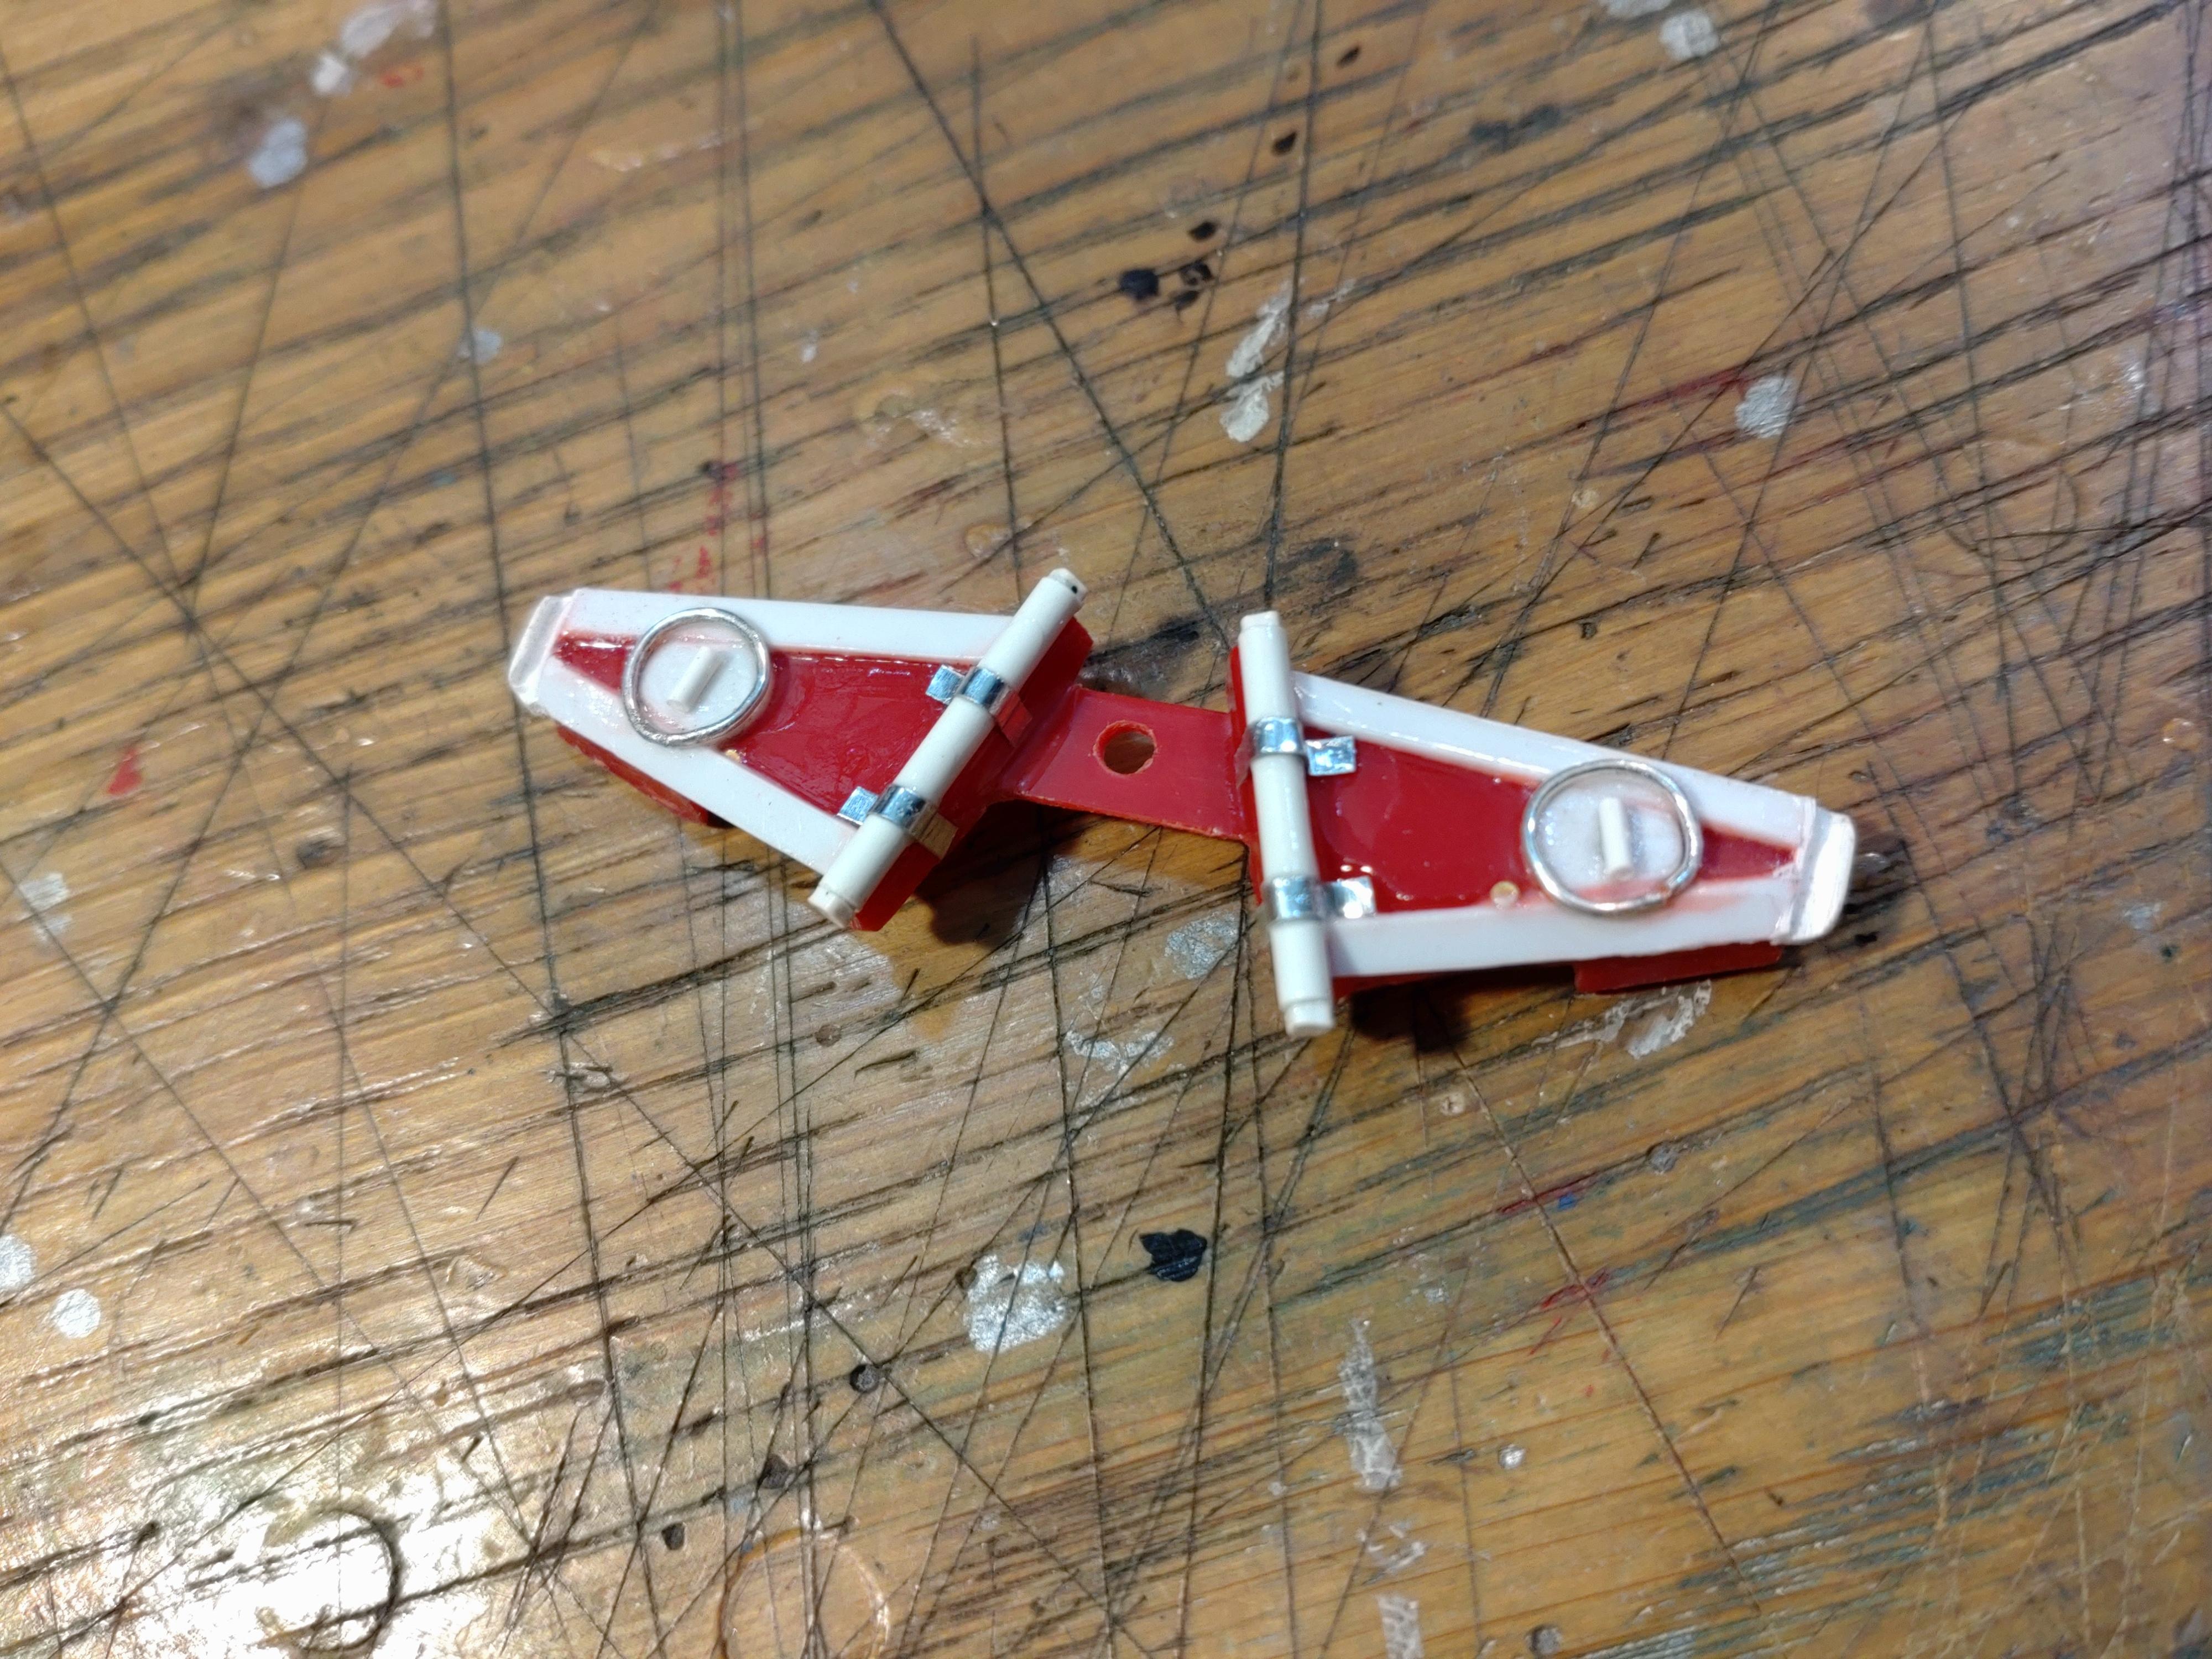
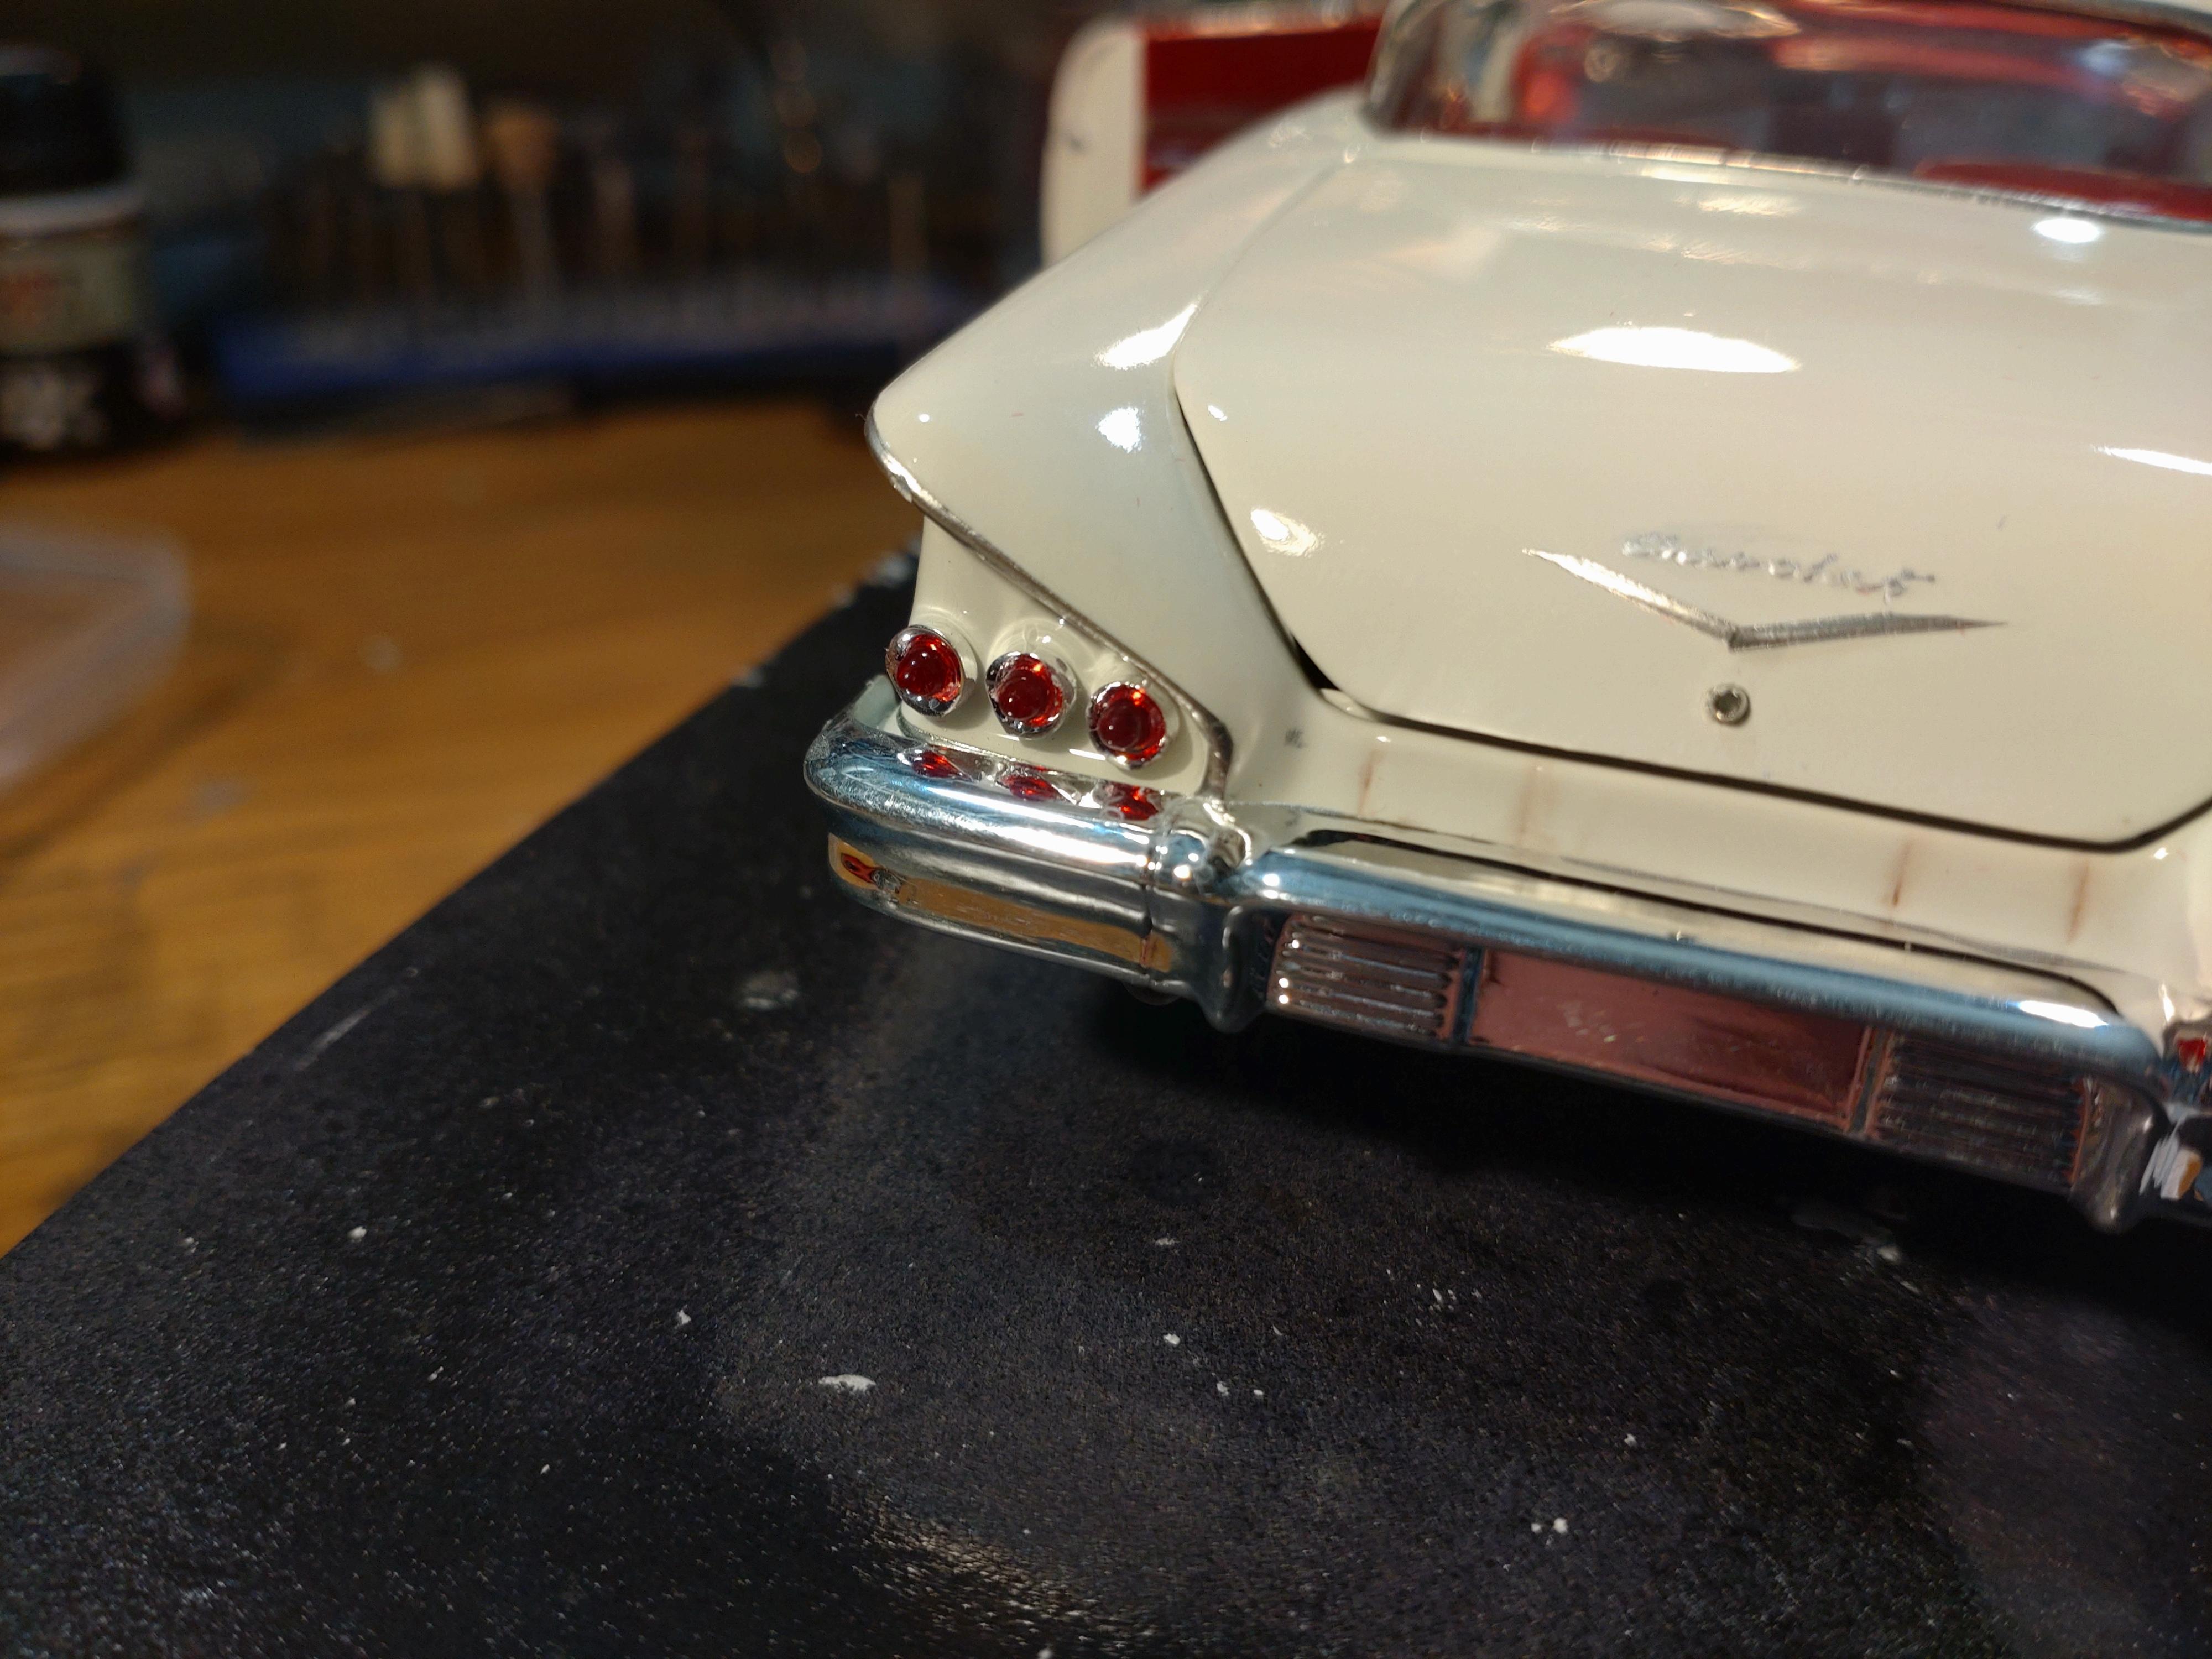
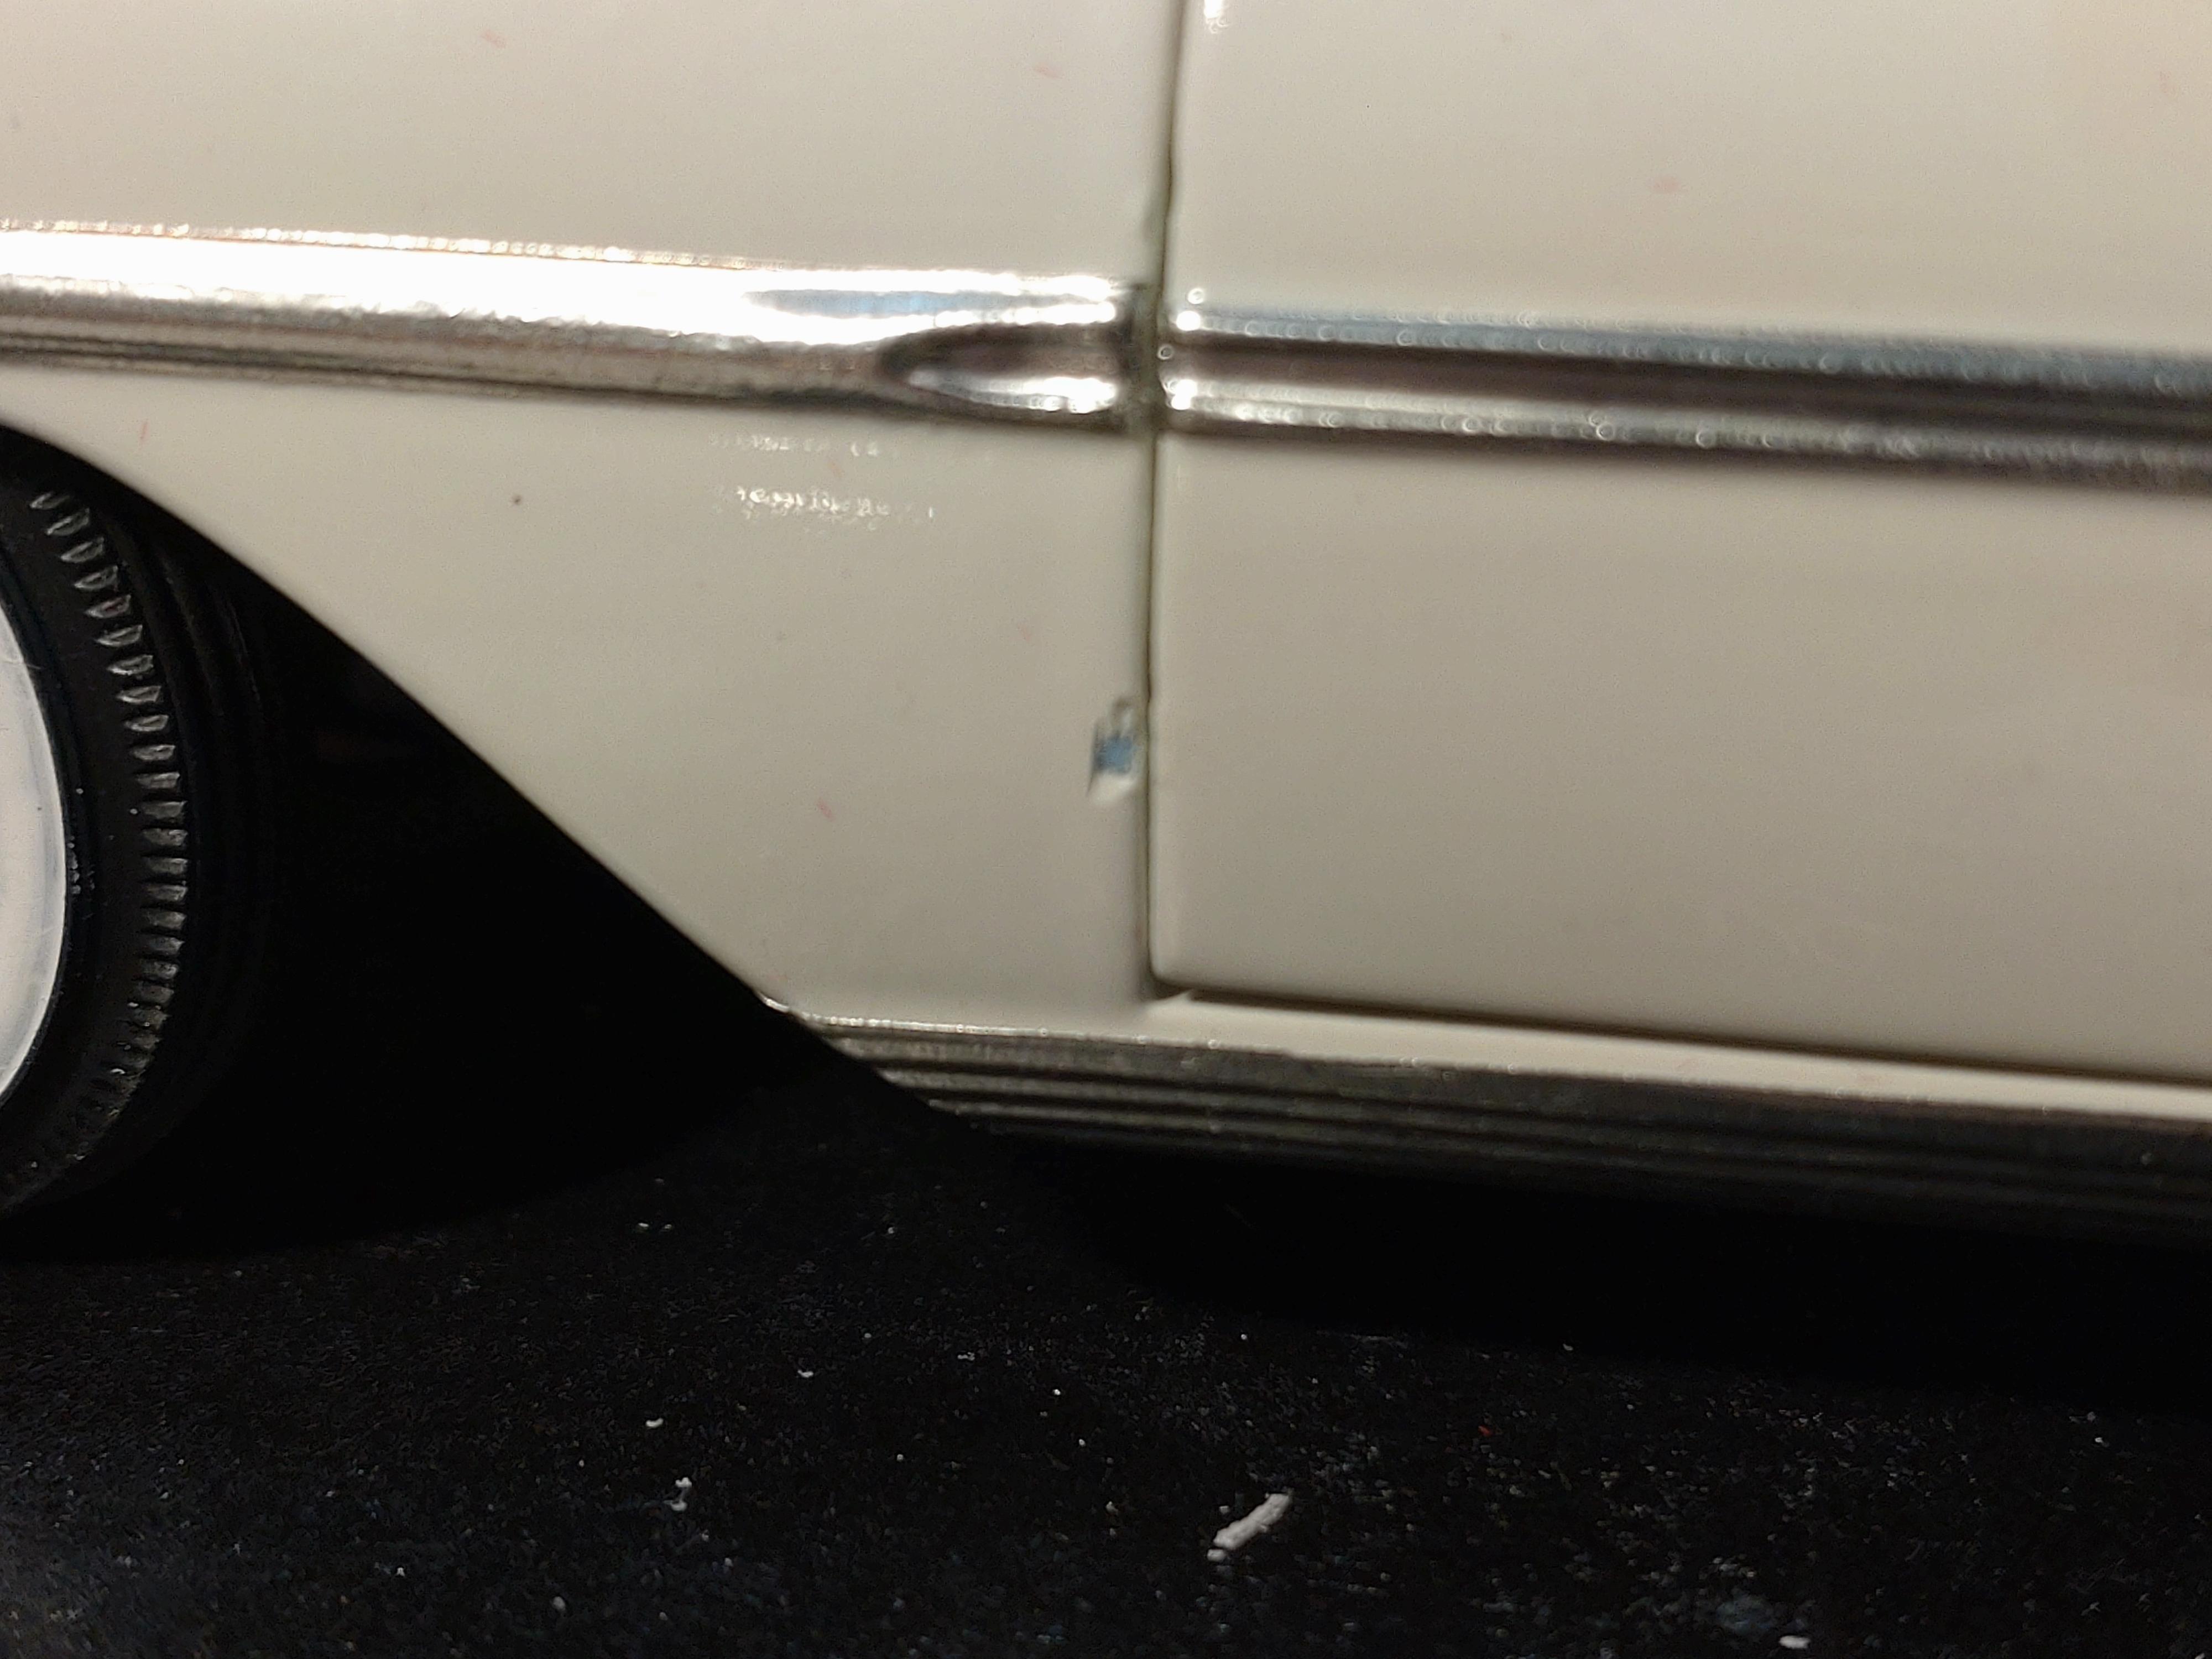
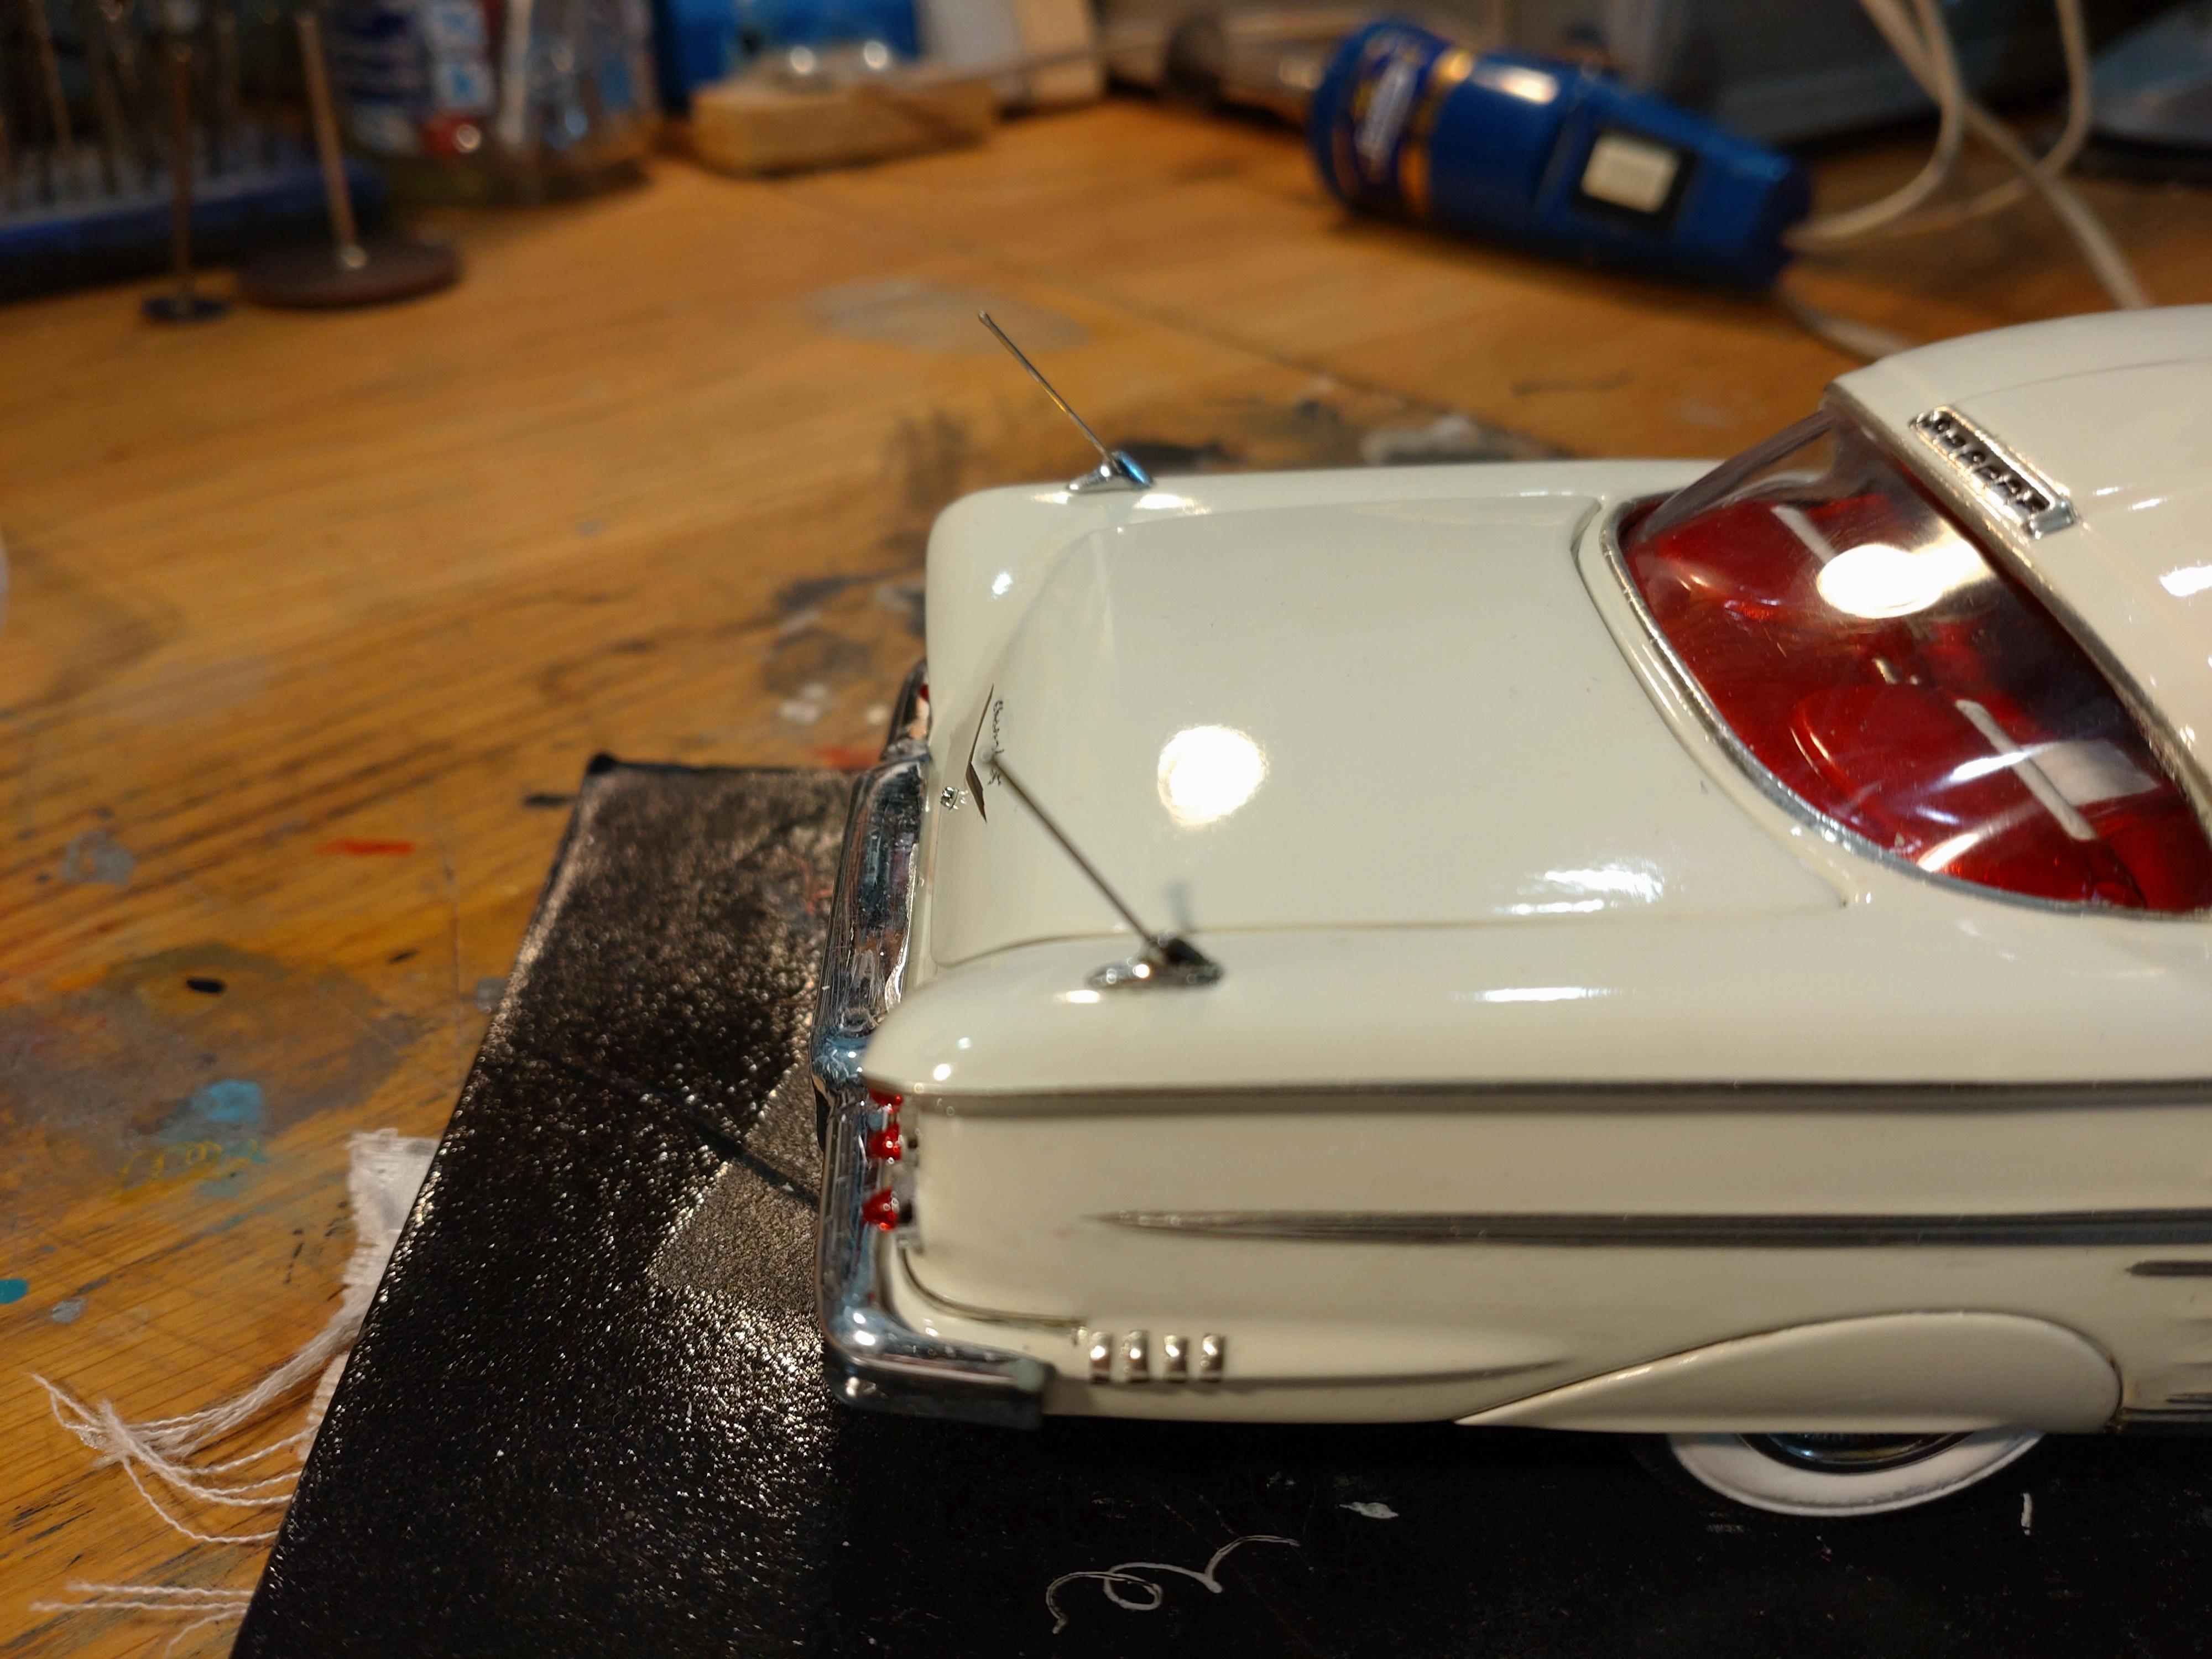
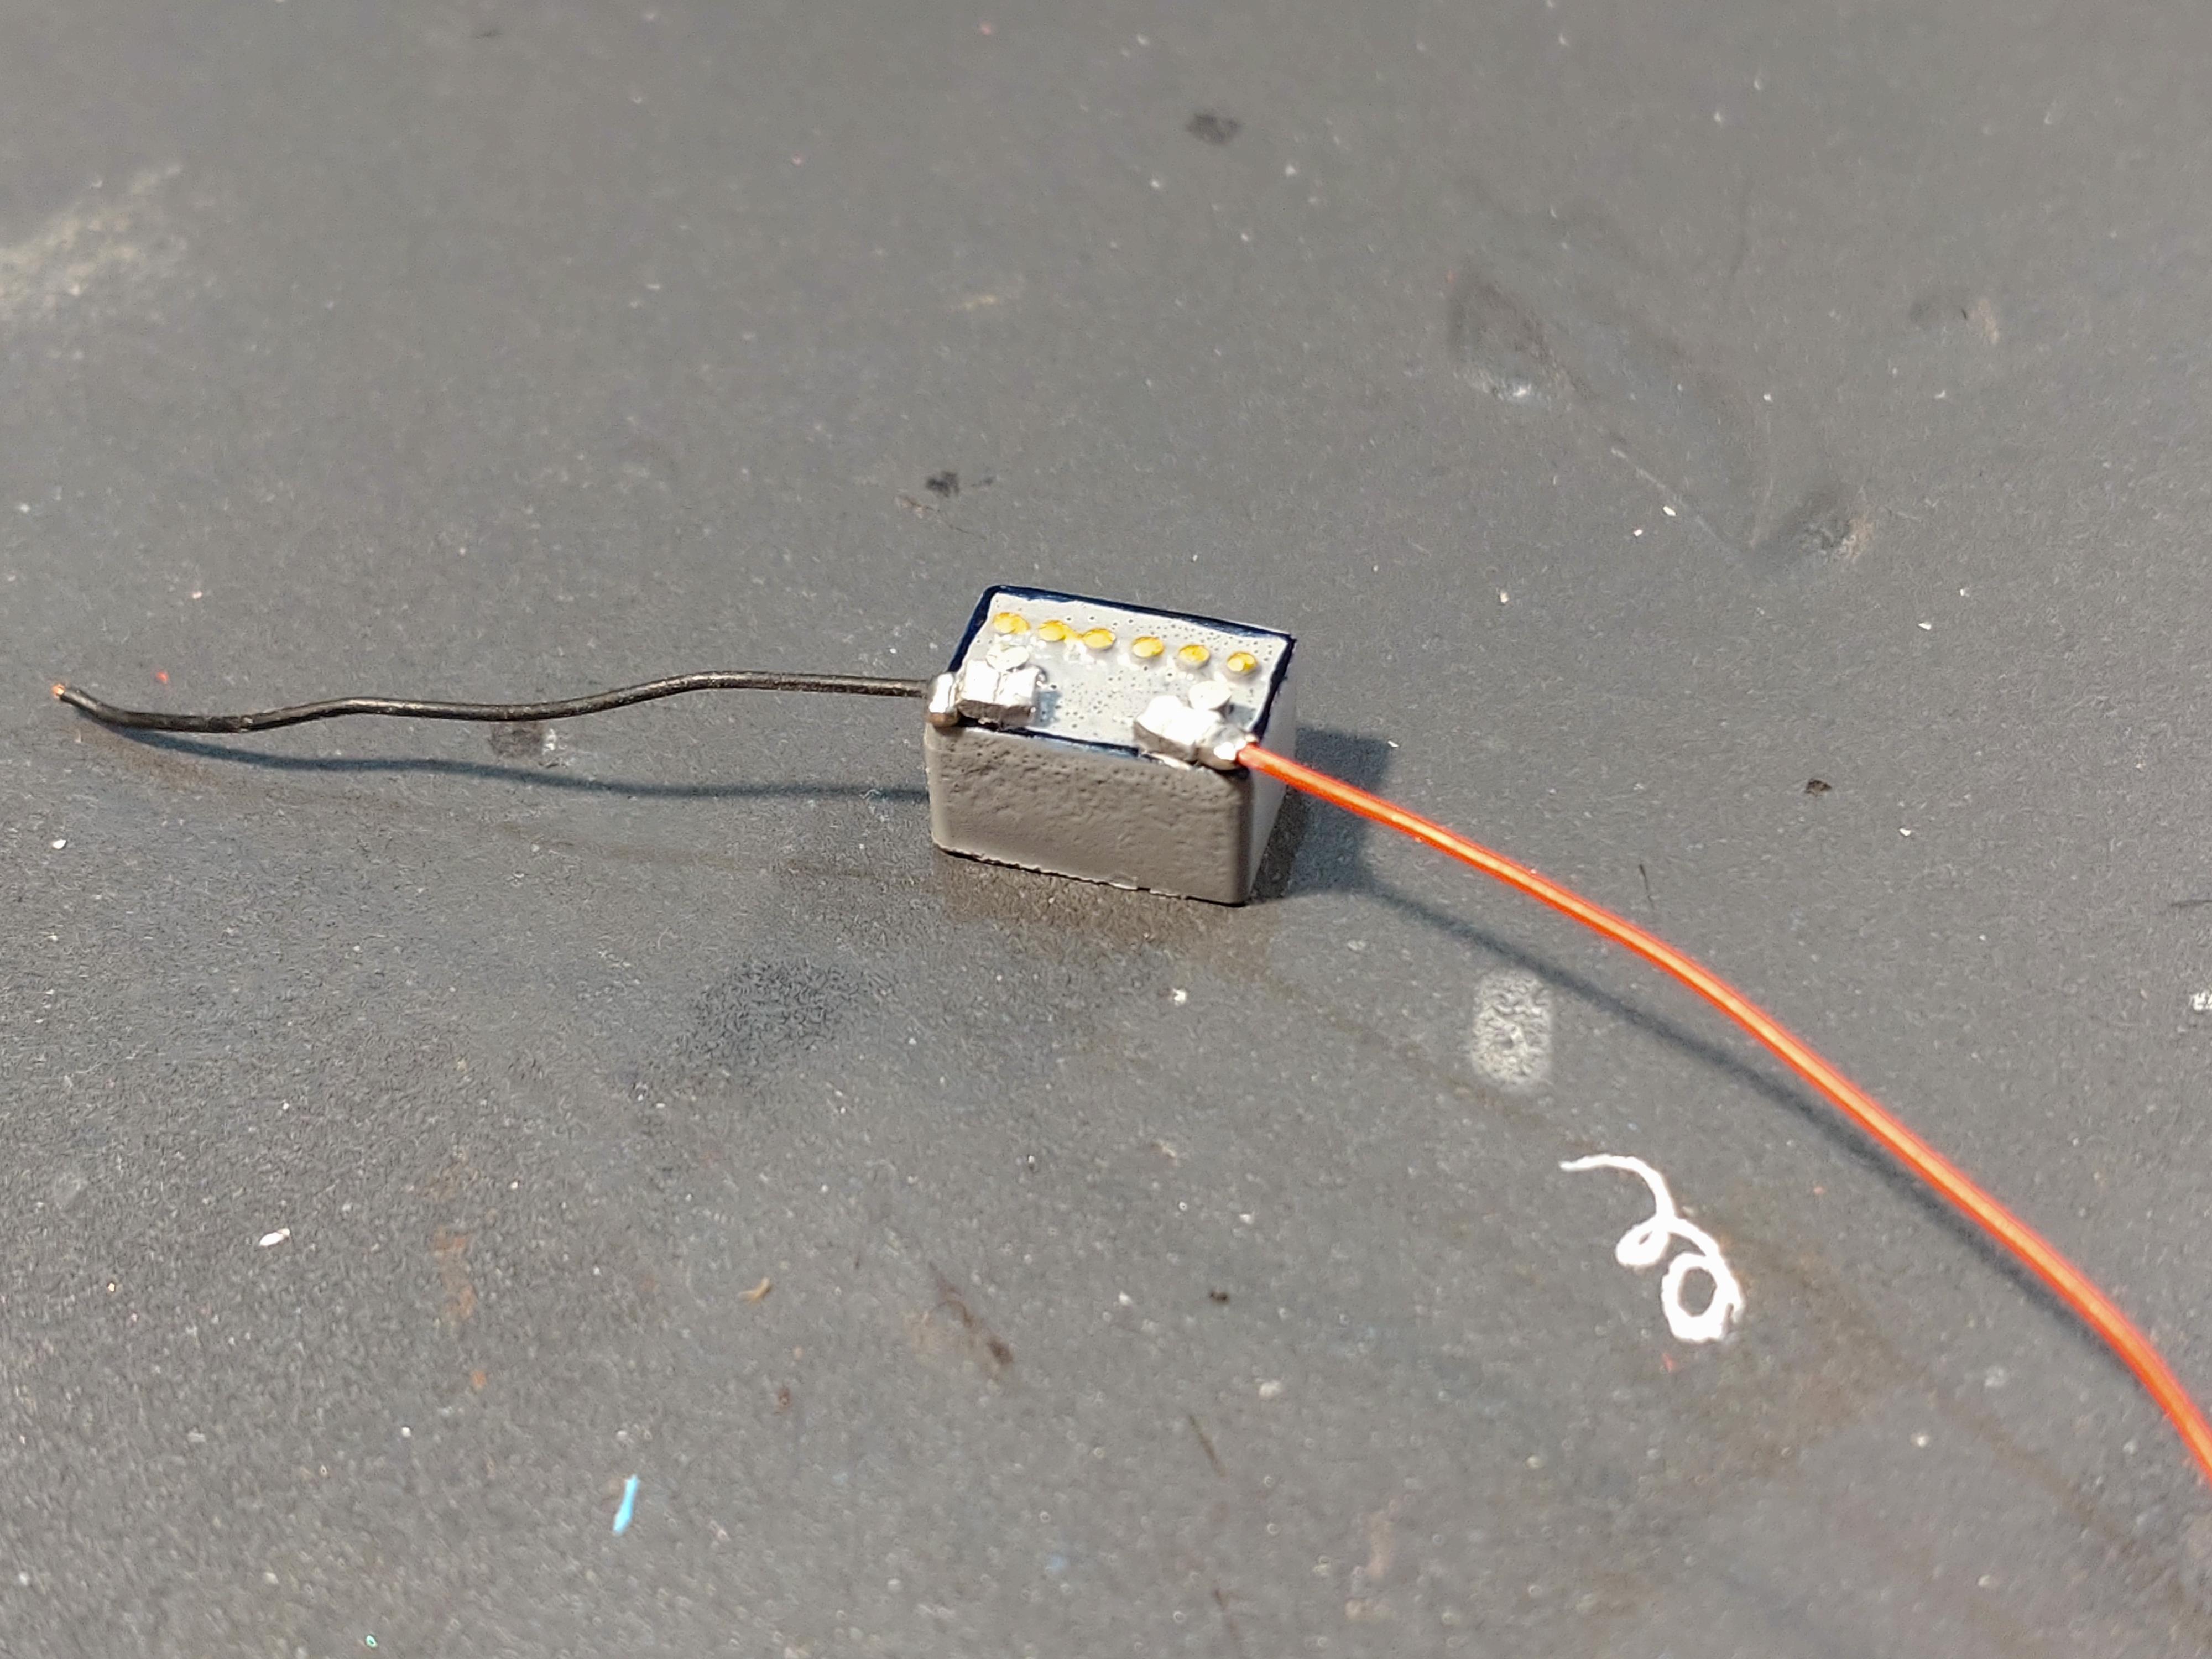
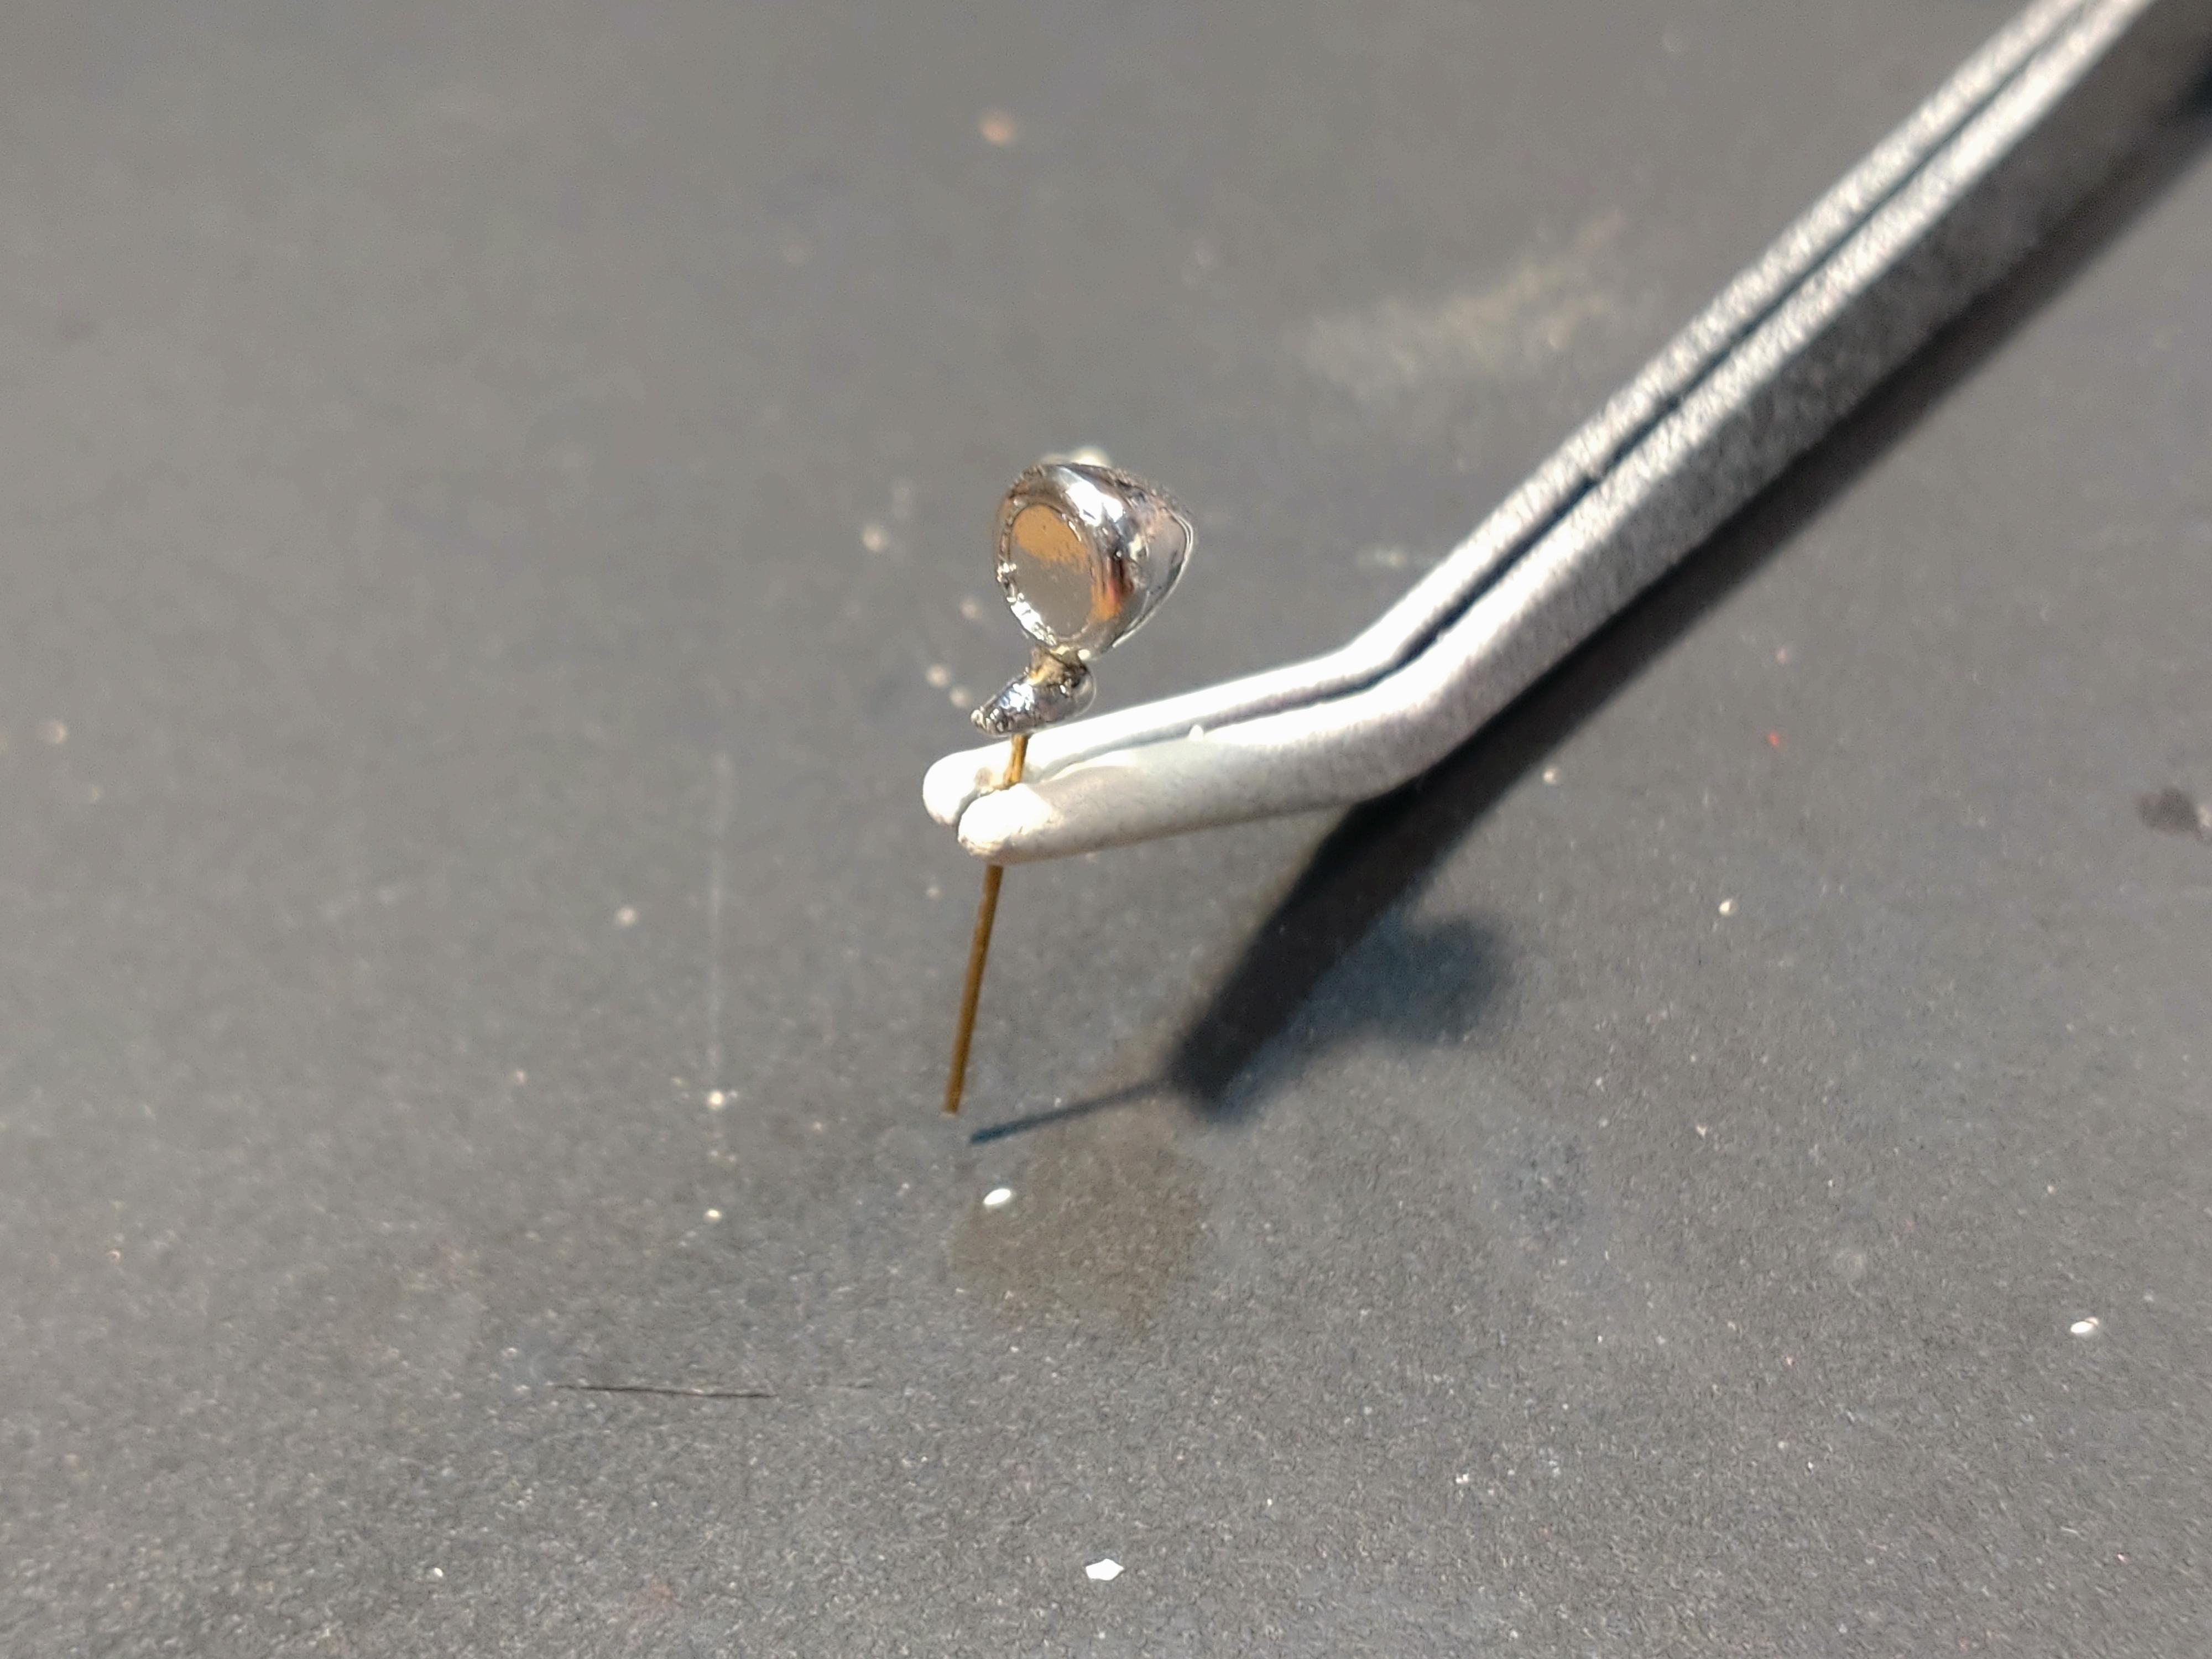
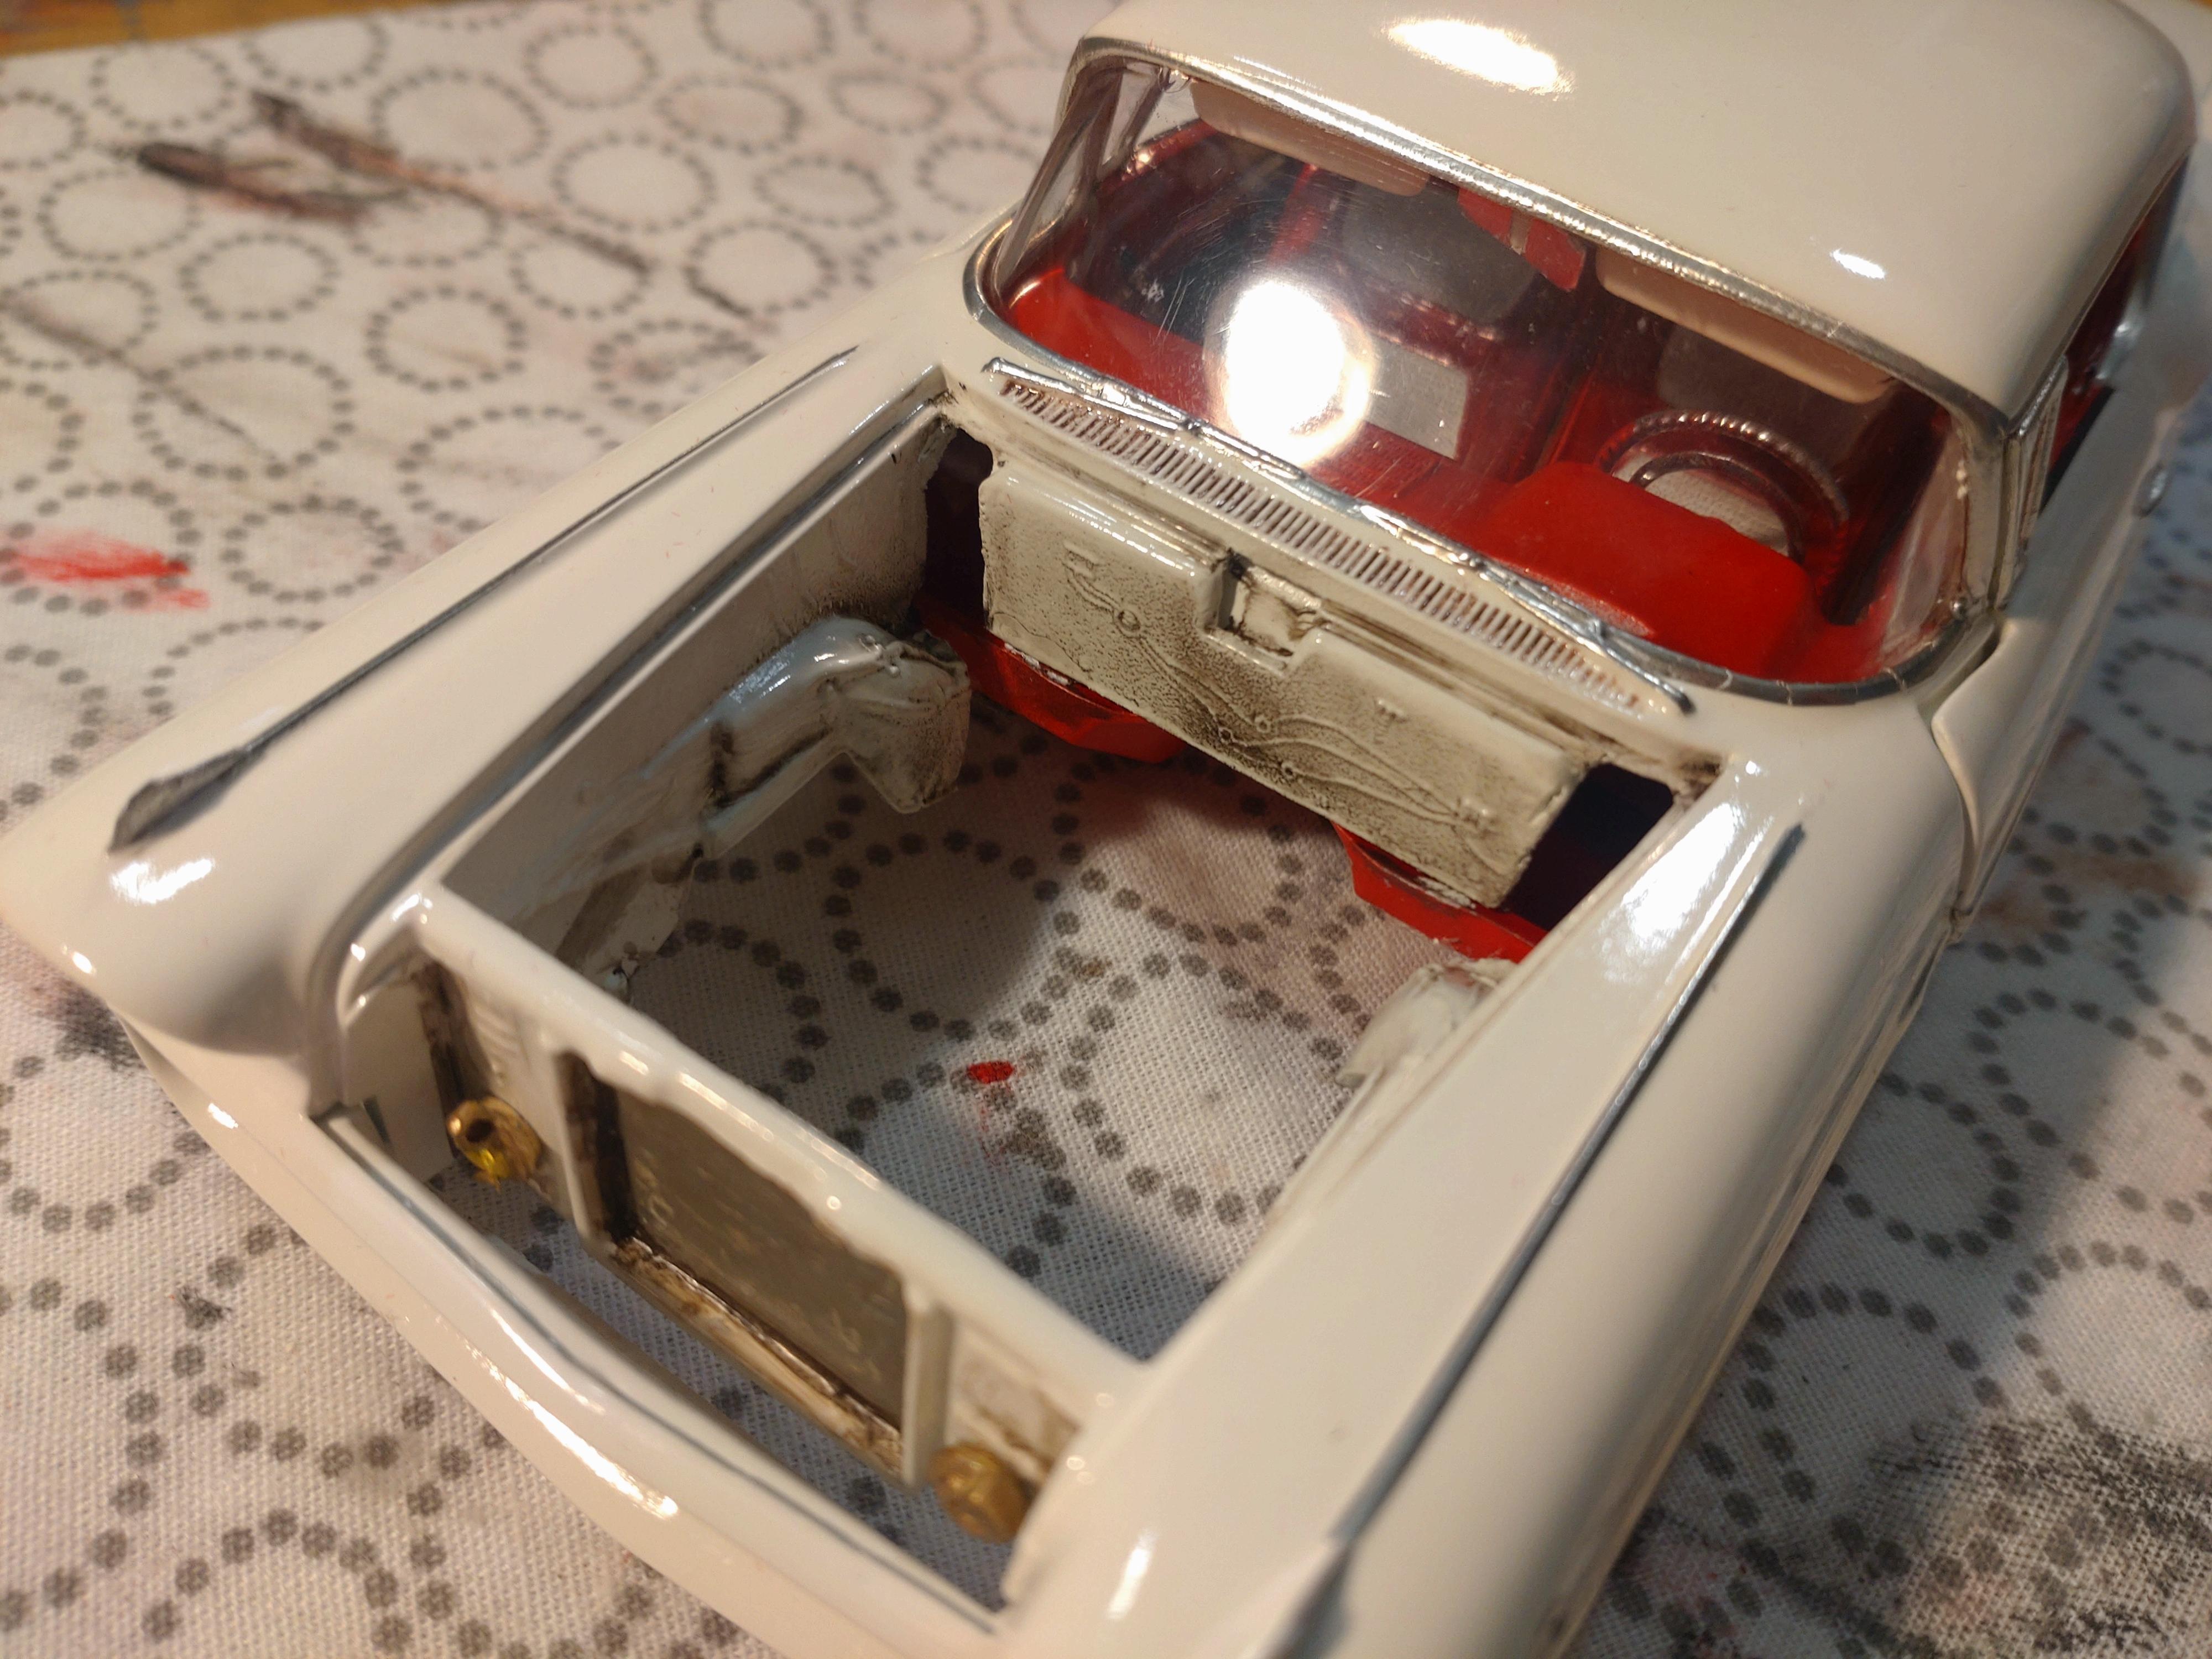
First of all I would like to express my thanks to all you guys watching this thread and for your friendly comments! ? I am finished with the building process now and here are the last images. Connecting the body with the undercarriage was quite smooth and needed only minor cutting and sanding. Starting at the tail I added a tiny metal bead to the trunk for the press/key button. Only later did I realize that the middle lamp of the taillights on the original car were white. Oh well... The trunk turned out fine. The surface is flocked red on red. Don´t get fooled by the spare wheel. I sliced it to make it fit. I could have opted between the standard bumper look or the custom front. Instead I decided early on that I wanted maximum opulence and combined both. The custom grill AND the heavy bumper. Behind the grill I set a piece of fine metal mesh. The headlights are by Scale Production. To the end I had the idea for a latch mechanism for the hood. Styrene hook set with a wire pin and piece of insulated wire. I filed the styrene to shape with diamond files. And a bit of rust too. The engine bay is as crowded as the real thing. The coil and the brake booster are home made with different pieces of styrene and wire. They too are connected with 0.5mm brass pins. I feel much more comfortable now with this procedure. Once attached to the body with super glue, I can work the wiring much harder now without risking to break them off again. Taking a last look in my big book, I discovered that my model needed those cool slanted double antennas. I filed styrene triangles glued to 0.5mm wire to shape and chromed them with a Molotow pen. And on these last days I was surprised and shocked by THIS! A hinge arm had applied too much pressure to the fender and chipped off the paint. I was fuming, damn! ? I haven´t experienced this before and didn´t take measures to prevent it. I could have/should have filed the arms thinner to have more room to swing. Well, lesson learned. I was aware that whatever I do, this flaw would stay visible. First I sanded the gap a bit wider to prevent further trouble. Then the chip was sanded "round". I carefully applied tiny drops of paint to cover the spot. The result is, well, OK. The spot looks like this now and I can get along with it. It´s an old car with history. The owner must have had issue...? I will show the final images on an "under glass" thread asap. Thanks for looking and best wishes!
-
Hi Gregory, looks like straight outa the ´70s, clean build! Like that aggressive stance signalling trouble looking at the next traffic stop. ?
-
So the interior tub is cut at the back end to fit, and it really did fit well. I didn´t have to do any filing on the dash or the sides, just cut a neat curve to match the rear window. The hinges for the trunk lid and the bonnet are working too? Starting to look like a car... I had to fabricate a door mirror because the kit didn´t have one. Fortunately I had a searchlight that does the job well after some mild working. The battery is finished also. Parts left to make from scratch for the engine bay are a coil and a brake booster, which I am currently working on. The engine bay itself has received a bit of grime. The missing parts from the exhaust manifold to the mufflers are really missing... I finger bended new ones from 3mm styrene. Looks like I will have to touch up the transmission a bit, paint has gotten chipped off during construction. Now comes the exiting part! Connecting body and chassis. I will show that asap!
-
Cool build! That customized tail makes it look mean. Love it??
-
This torn out ex racer has it´s best days long gone. You did a great job on the rust and patina! Could it still drive in real life????