Andy Oldenburg
-
Posts
345 -
Joined
-
Last visited
Content Type
Profiles
Forums
Events
Gallery
Everything posted by Andy Oldenburg
-
Hello Charles, great work, almost looks real! Good job on the undercarriage too (a grain of salt, no offense, sand those tires to make em looked as used as the weathered bottom ?) The paint job is excellent!
-

Revell 1967 Corvette 427 Coupe In 1/25 Scale.
Andy Oldenburg replied to Dragonhawk1066's topic in Model Cars
Hi Craig, very clean job on this classic ´Vette! Paint job and interior are perfect. -
Lindberg 1:24 Bugatti Royale Victoria
Andy Oldenburg replied to Funkychiken's topic in WIP: Model Cars
Great job on this build!? Love how you got those "chrome" parts look like real. The paint is outstanding! Super finish. -
Hi Bob, this project is starting good! Those cool wheels just have to fit, they will give you the extra points in the end. Waiting for the next pics.
-
My take on the most famous ‘55 gasser street machine’…
Andy Oldenburg replied to OldNYJim's topic in WIP: Model Cars
Good job on the hinges! This project is going where I like it. I havn´t made a gasser myself so far, but the tri-5 Chevys are definitely the best choice. Looking forward to the next steps. I like to cut those wires in slightly different lengths. It much easier to fiddle them into the tubes.? -
Thank you guys!
-
Wow, I´m flattered... Thanks everyone for your kind response! Well yes, that was a long job. But I loved every minute of it! ? Hardly made any mistakes this time and no goofing it in the end (you know, a spot of glue on the fingertips HOW COULD THAT HAPPEN AAARGH!) I have no next kit at home now, going on holiday. I will see what comes up next.
-
Hi Ryan, fantastic build! Great job? Ho did you do the benches? Did you apply a textile or that a special technique?
-
´63 Studebaker Avanti stock build
Andy Oldenburg replied to Andy Oldenburg's topic in WIP: Model Cars
Hi Carl, thanks for your comments! I just posted the thread, should be up any minute. -
Hey Derek, awesome build, very impressive!?? Love every decision you made for the concept, the details and of course the paint job. A fine model for the front row.
-
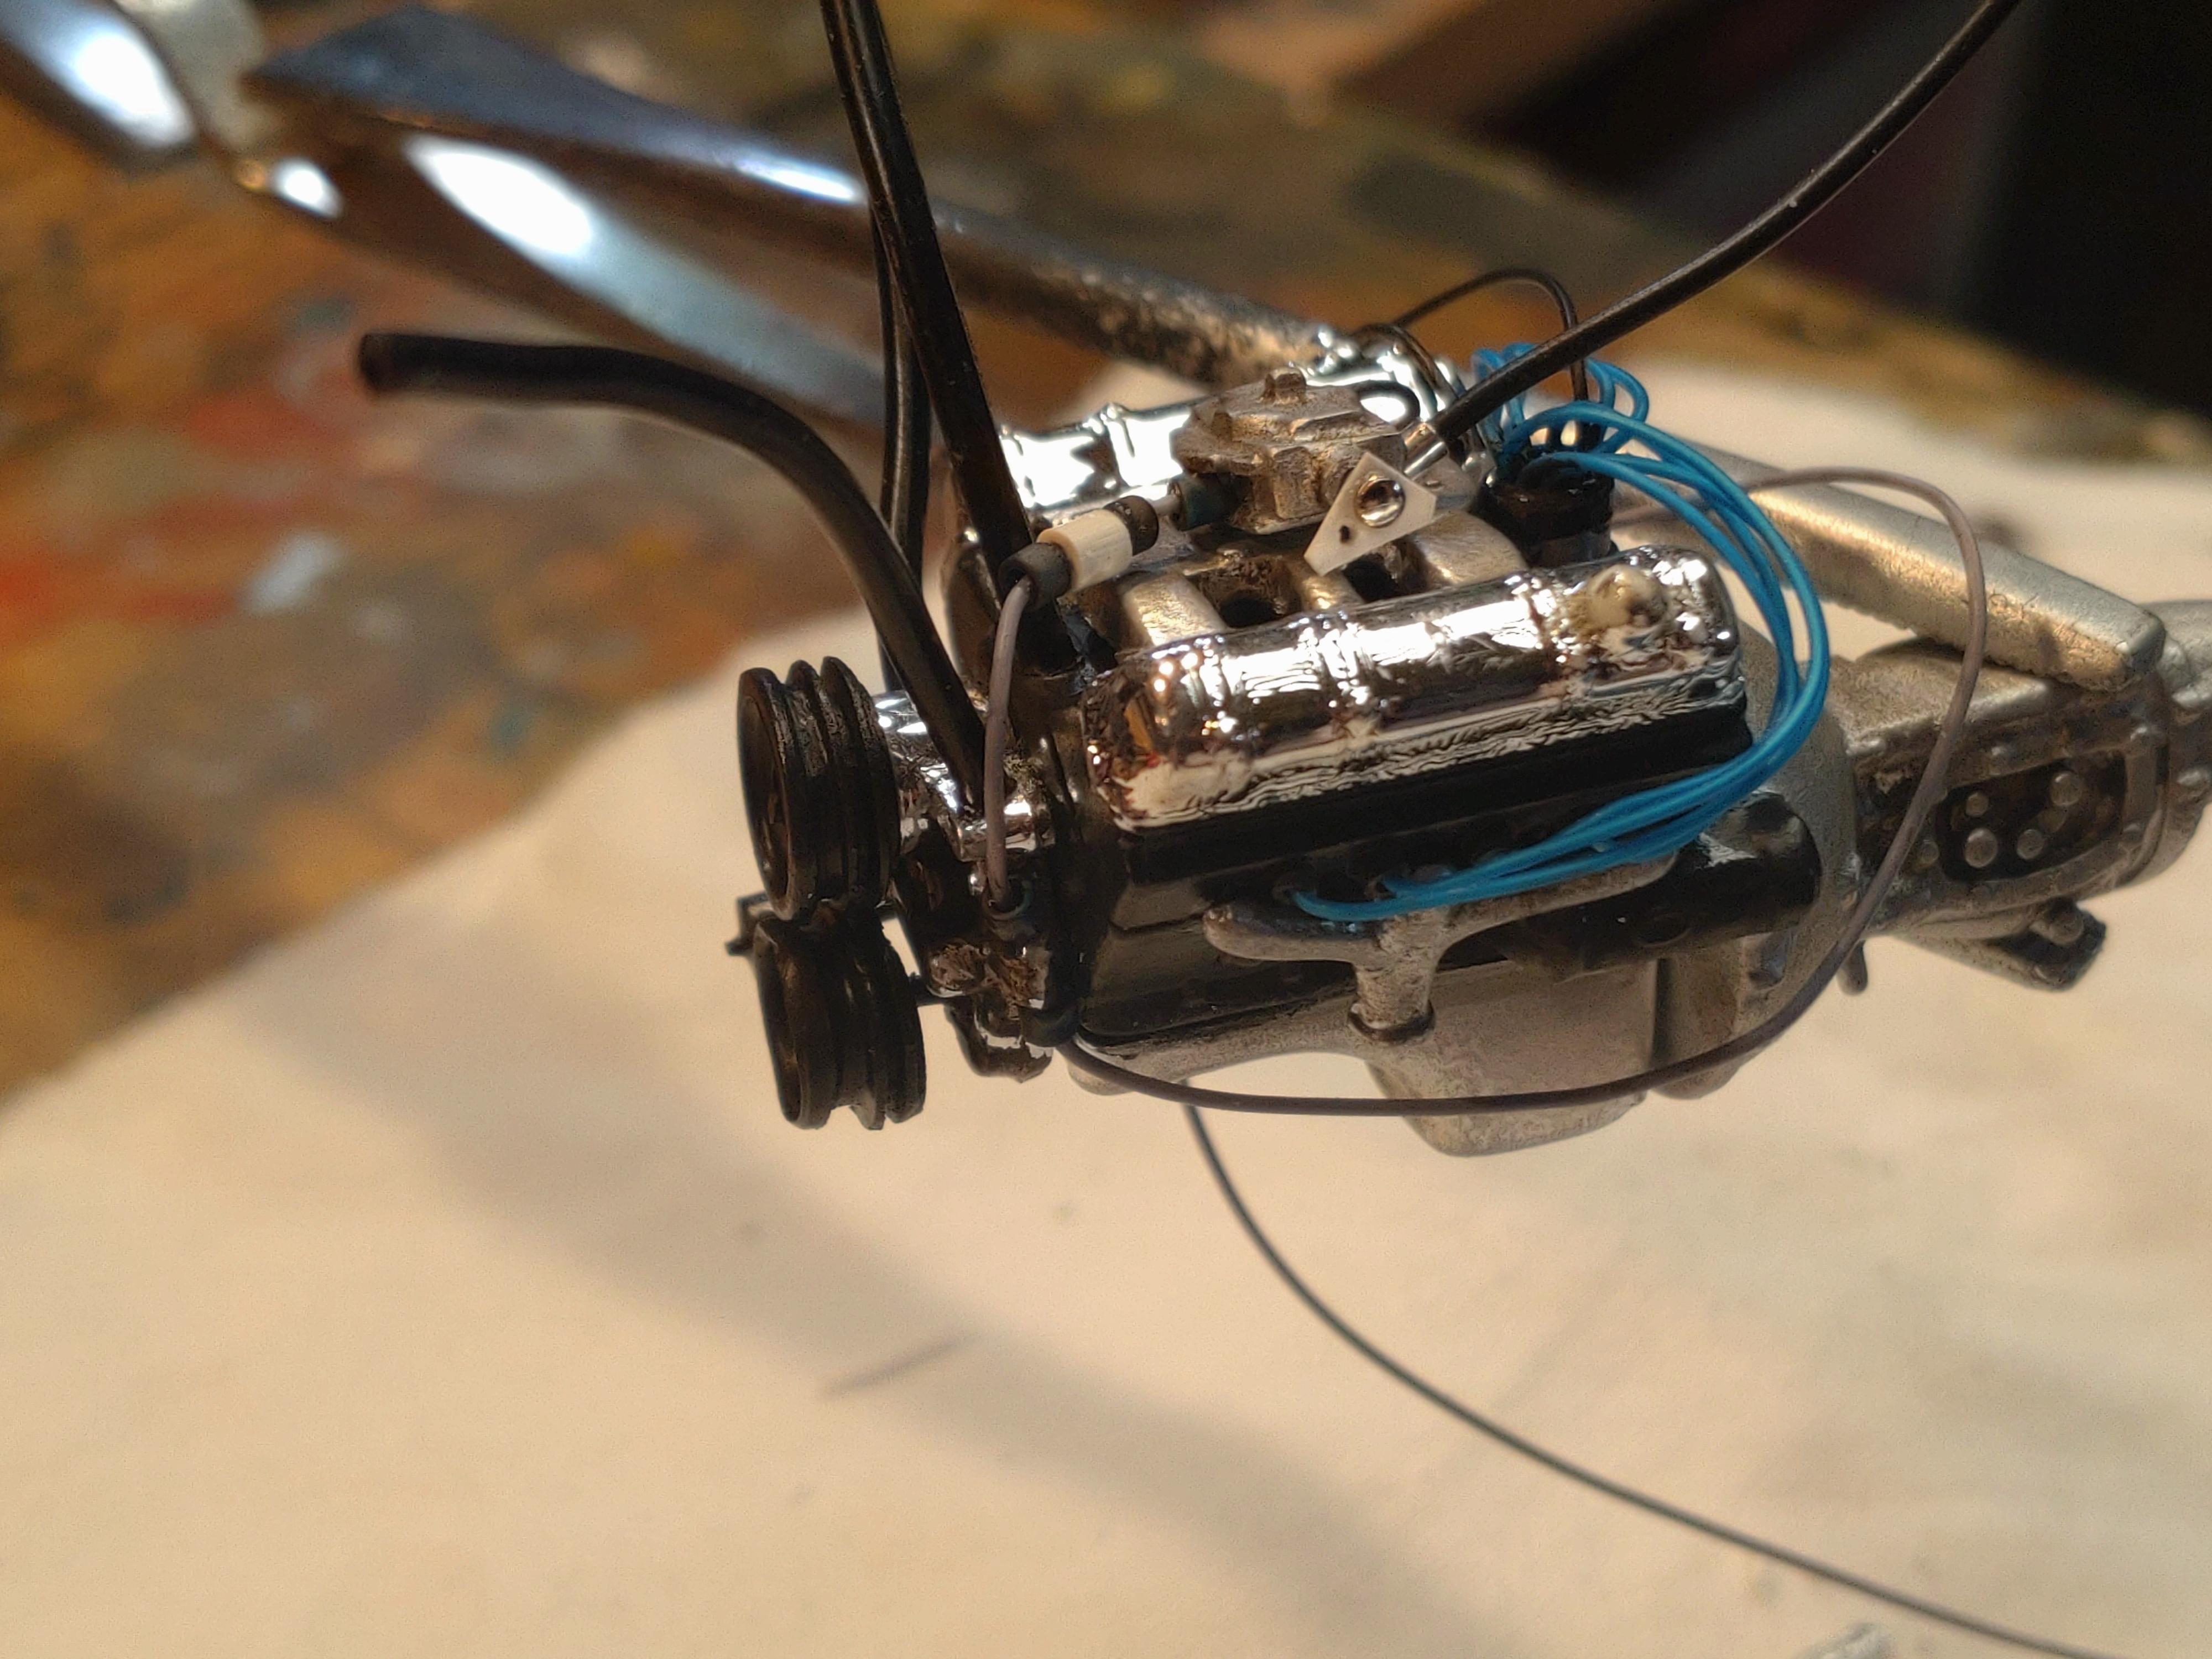
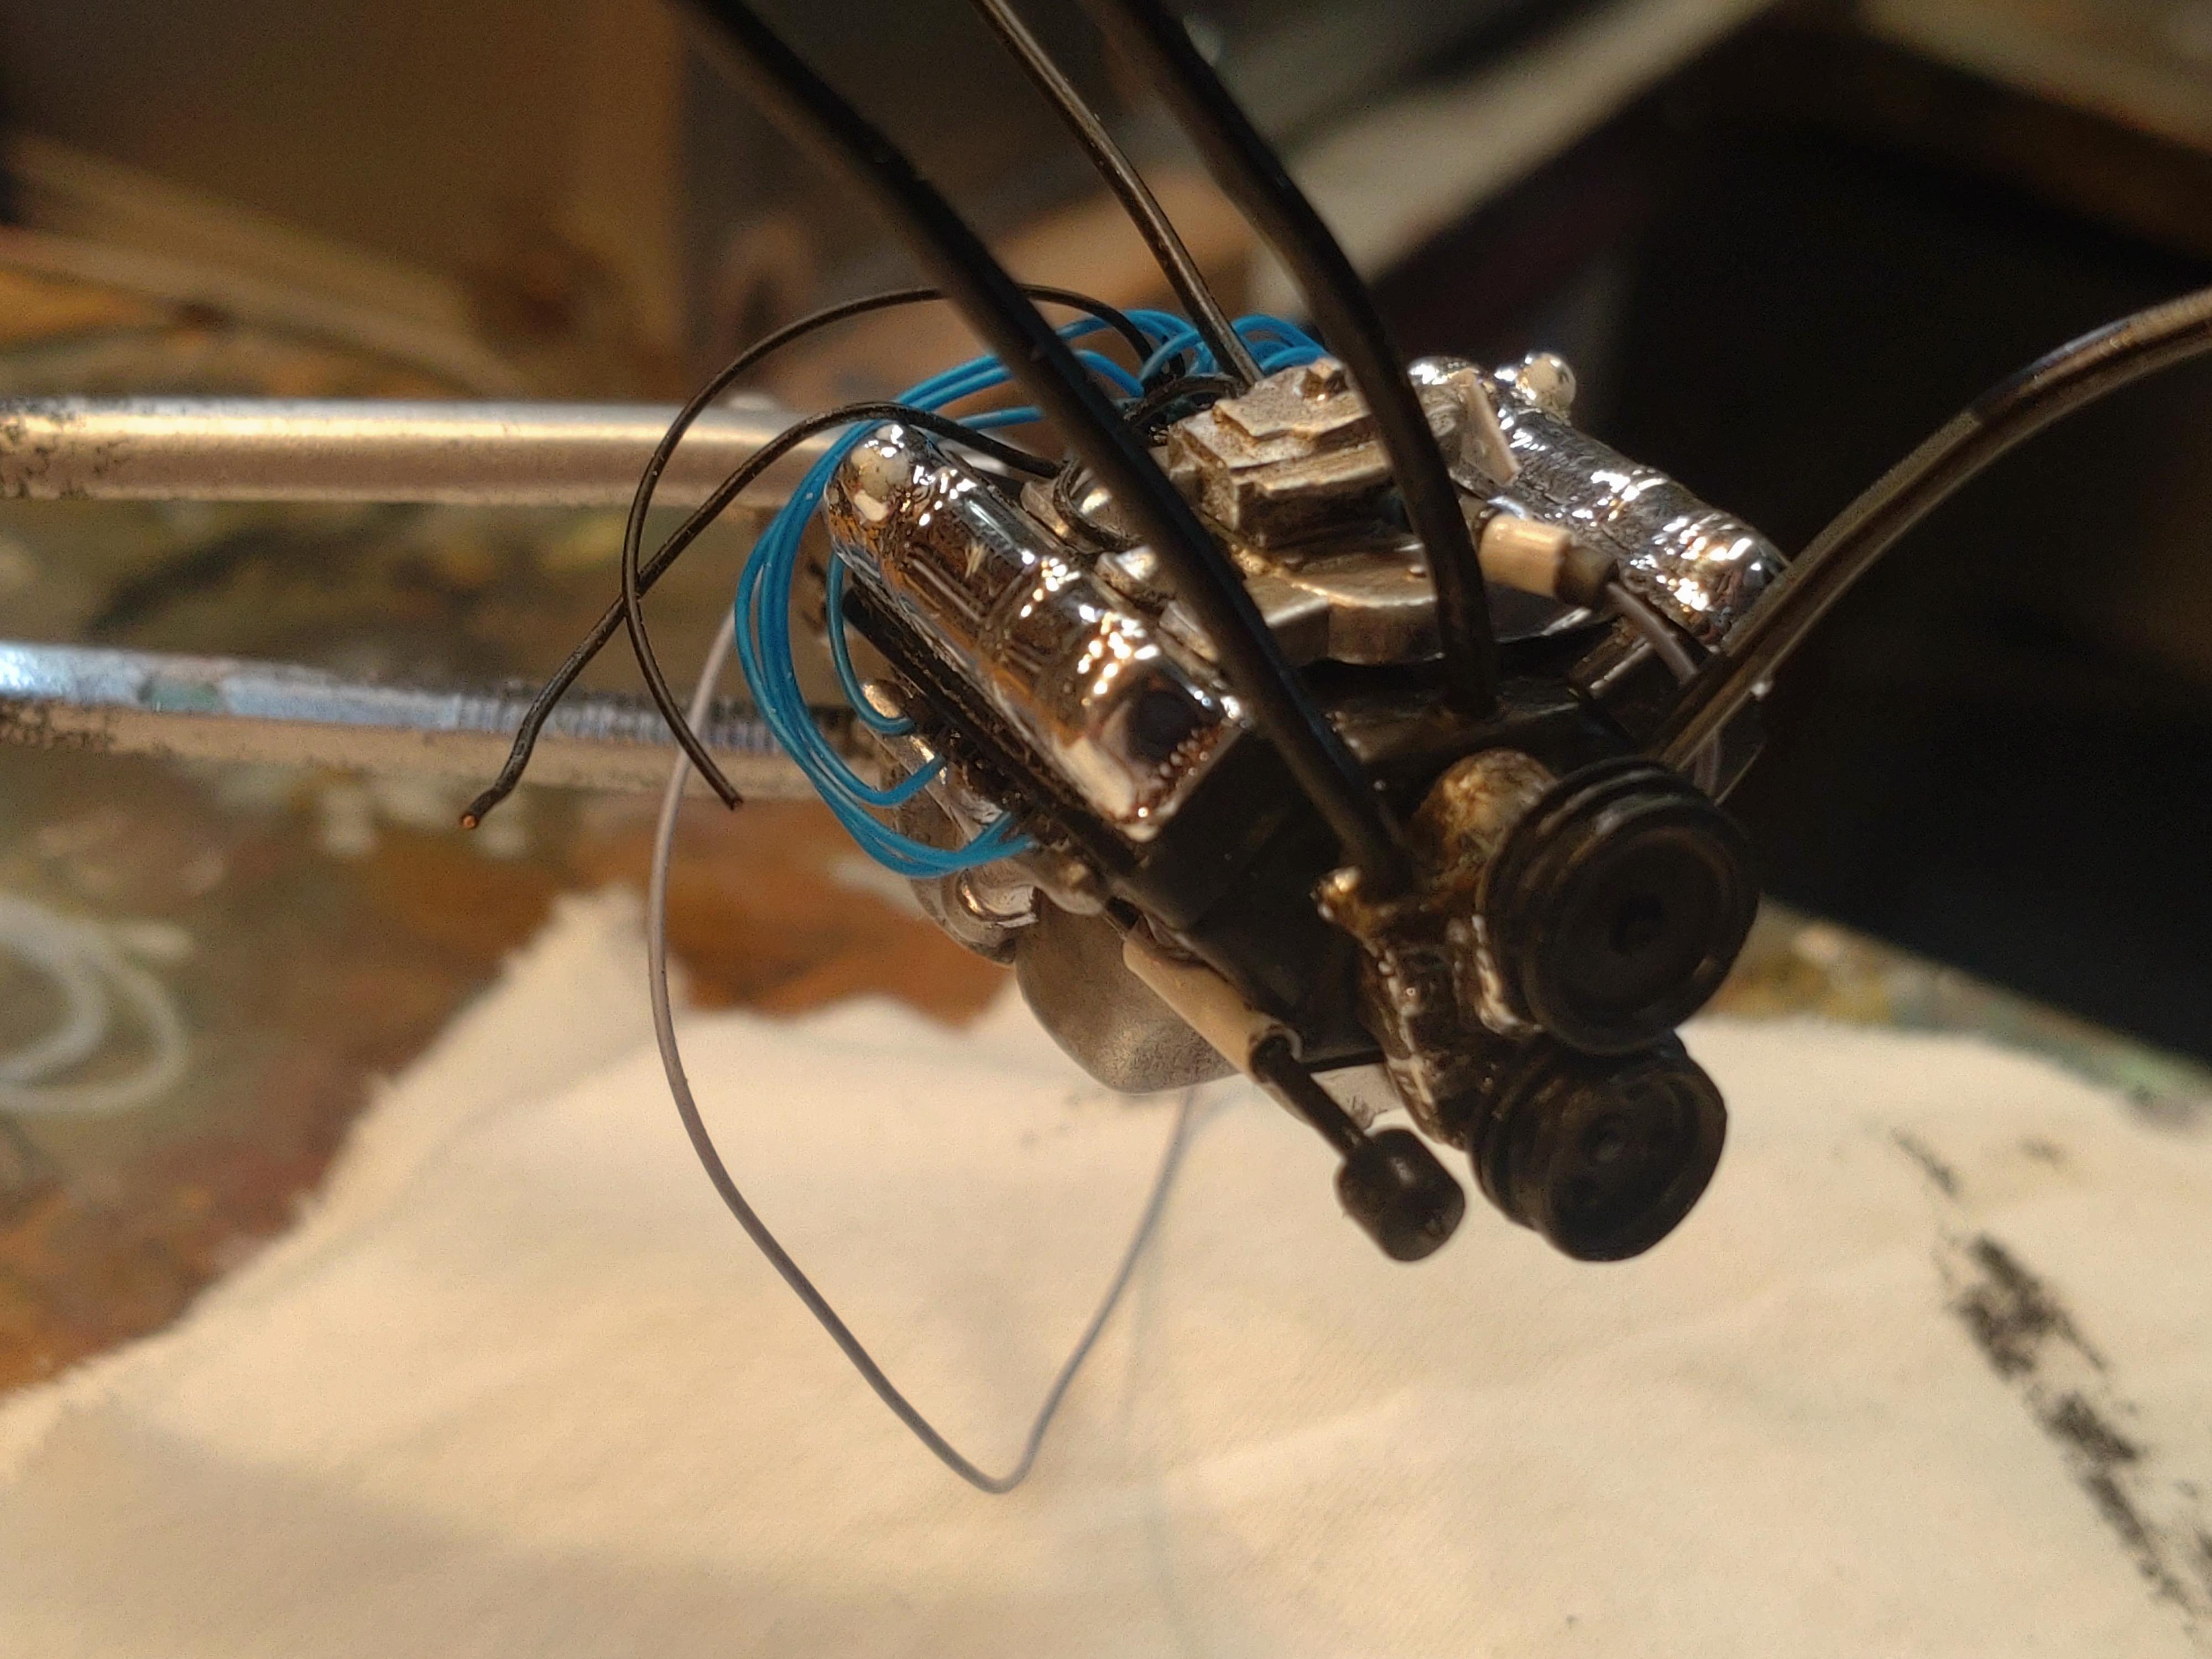
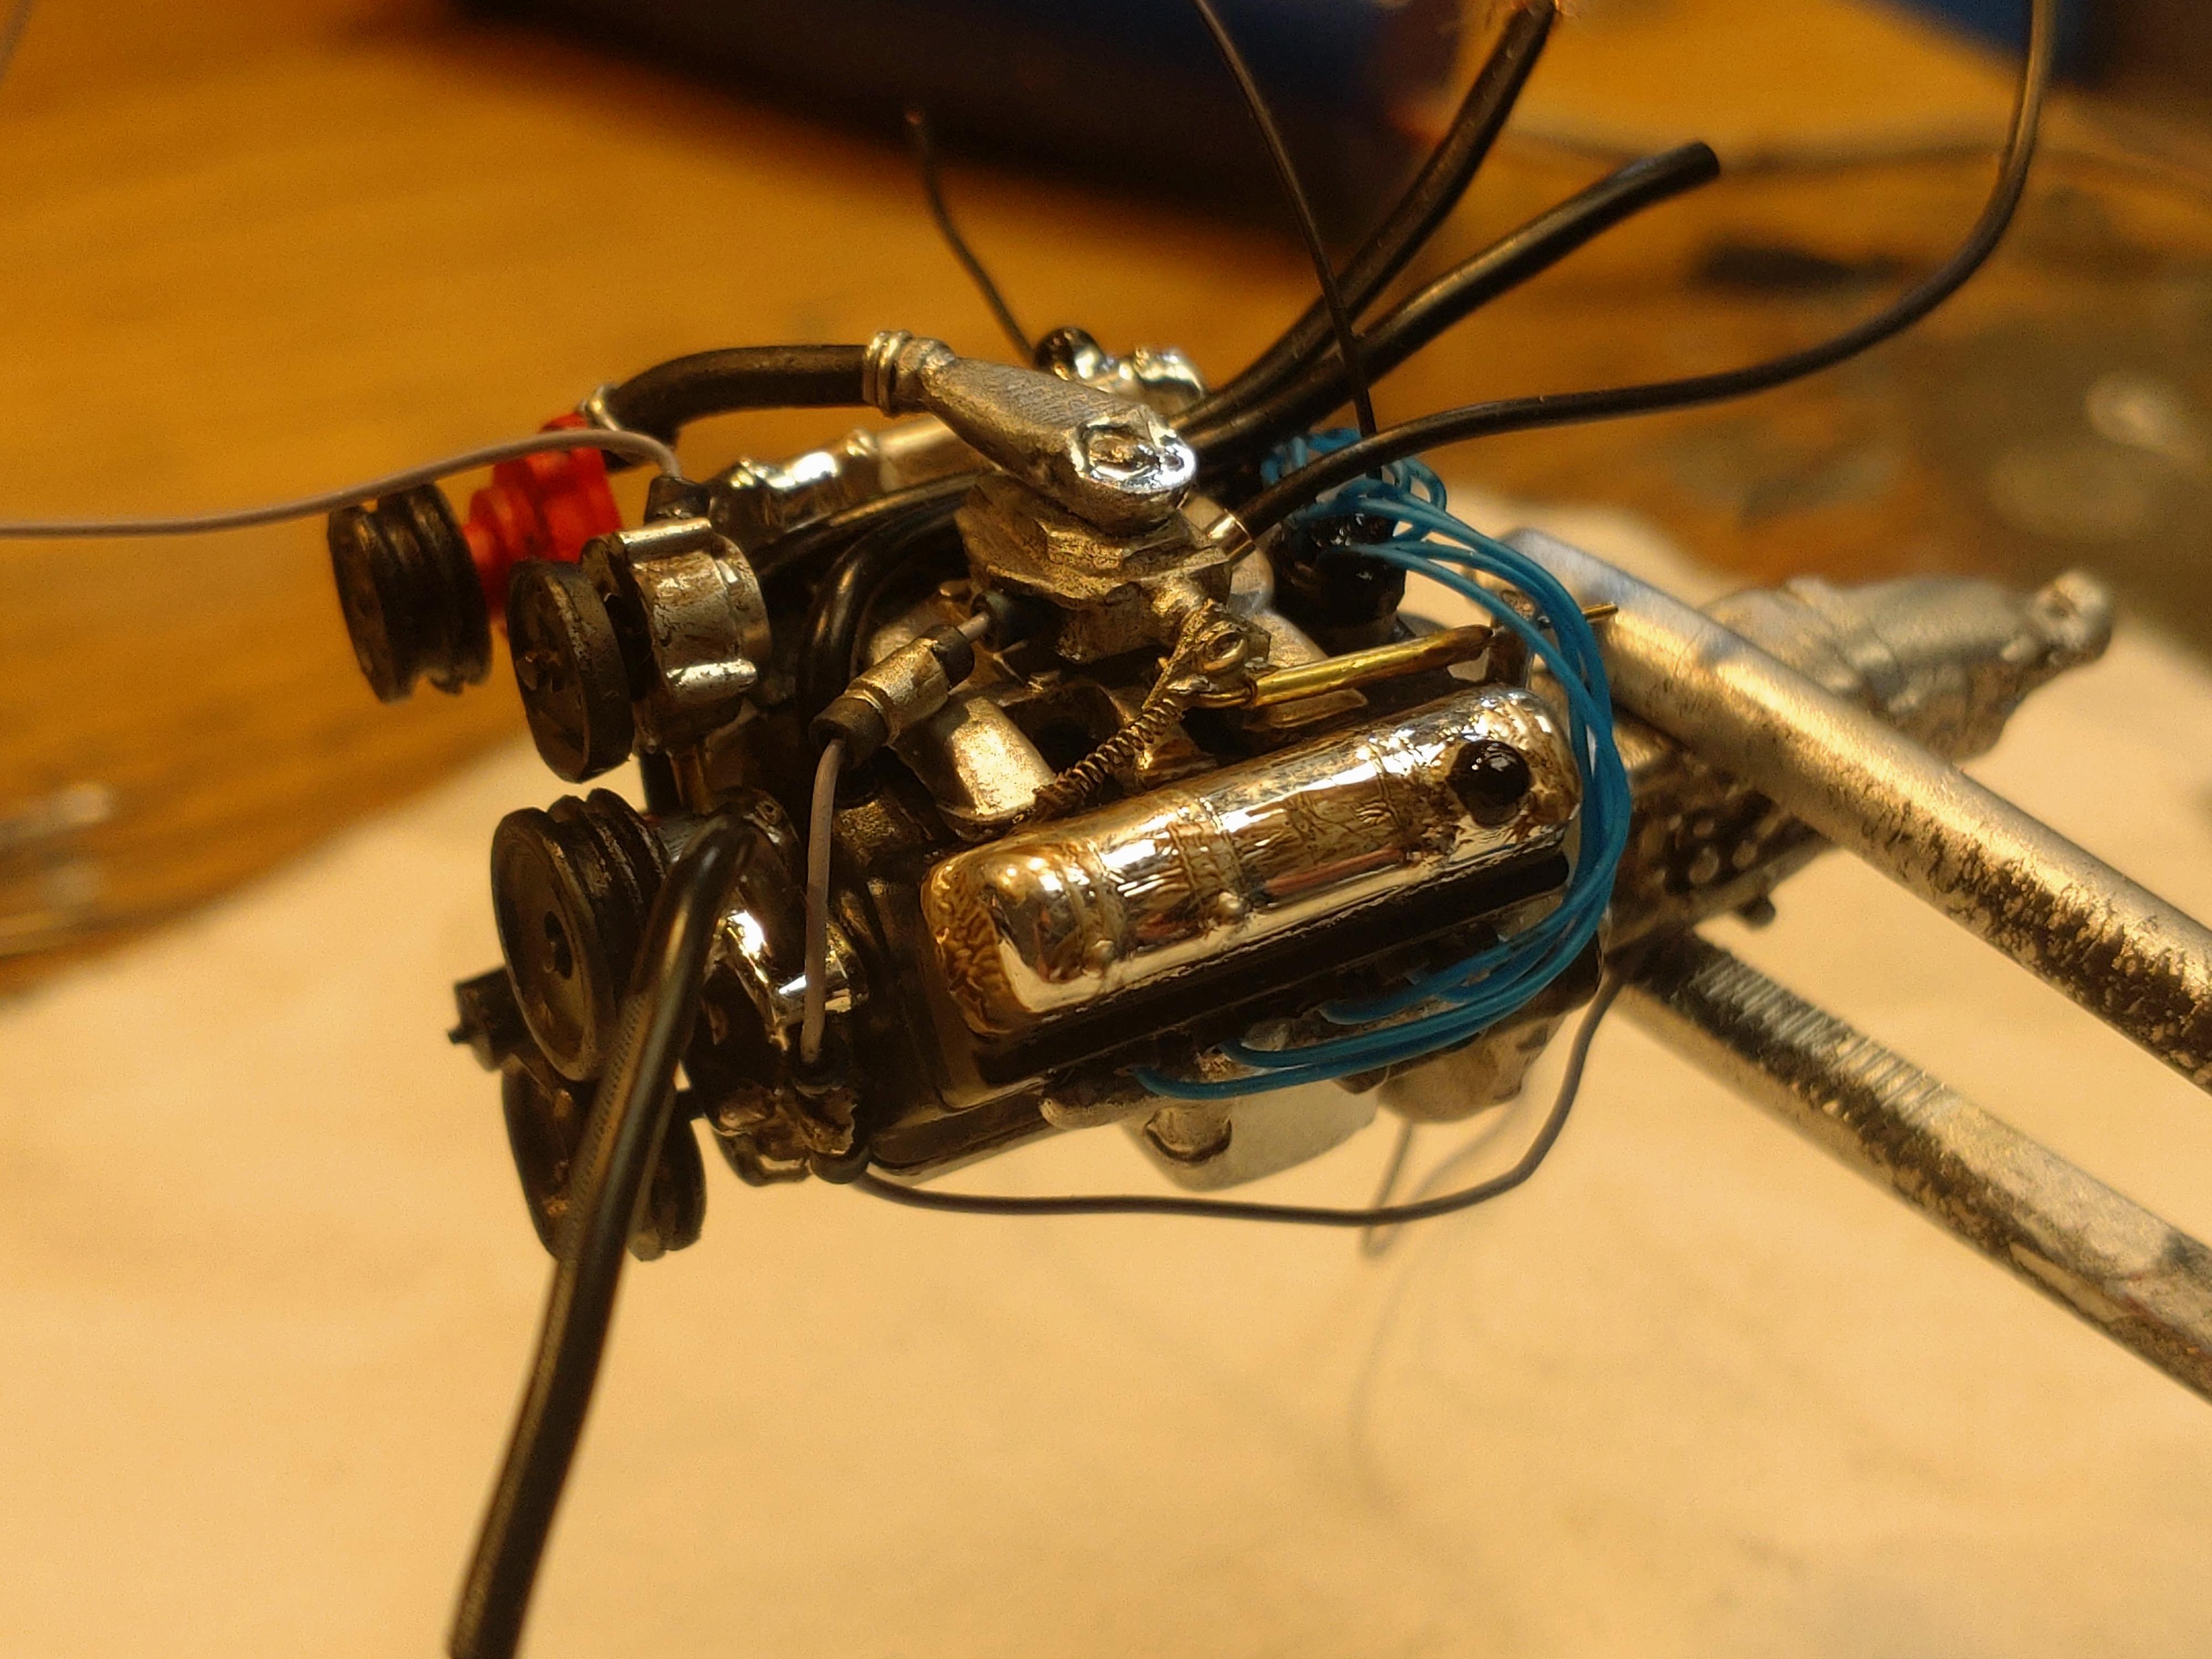
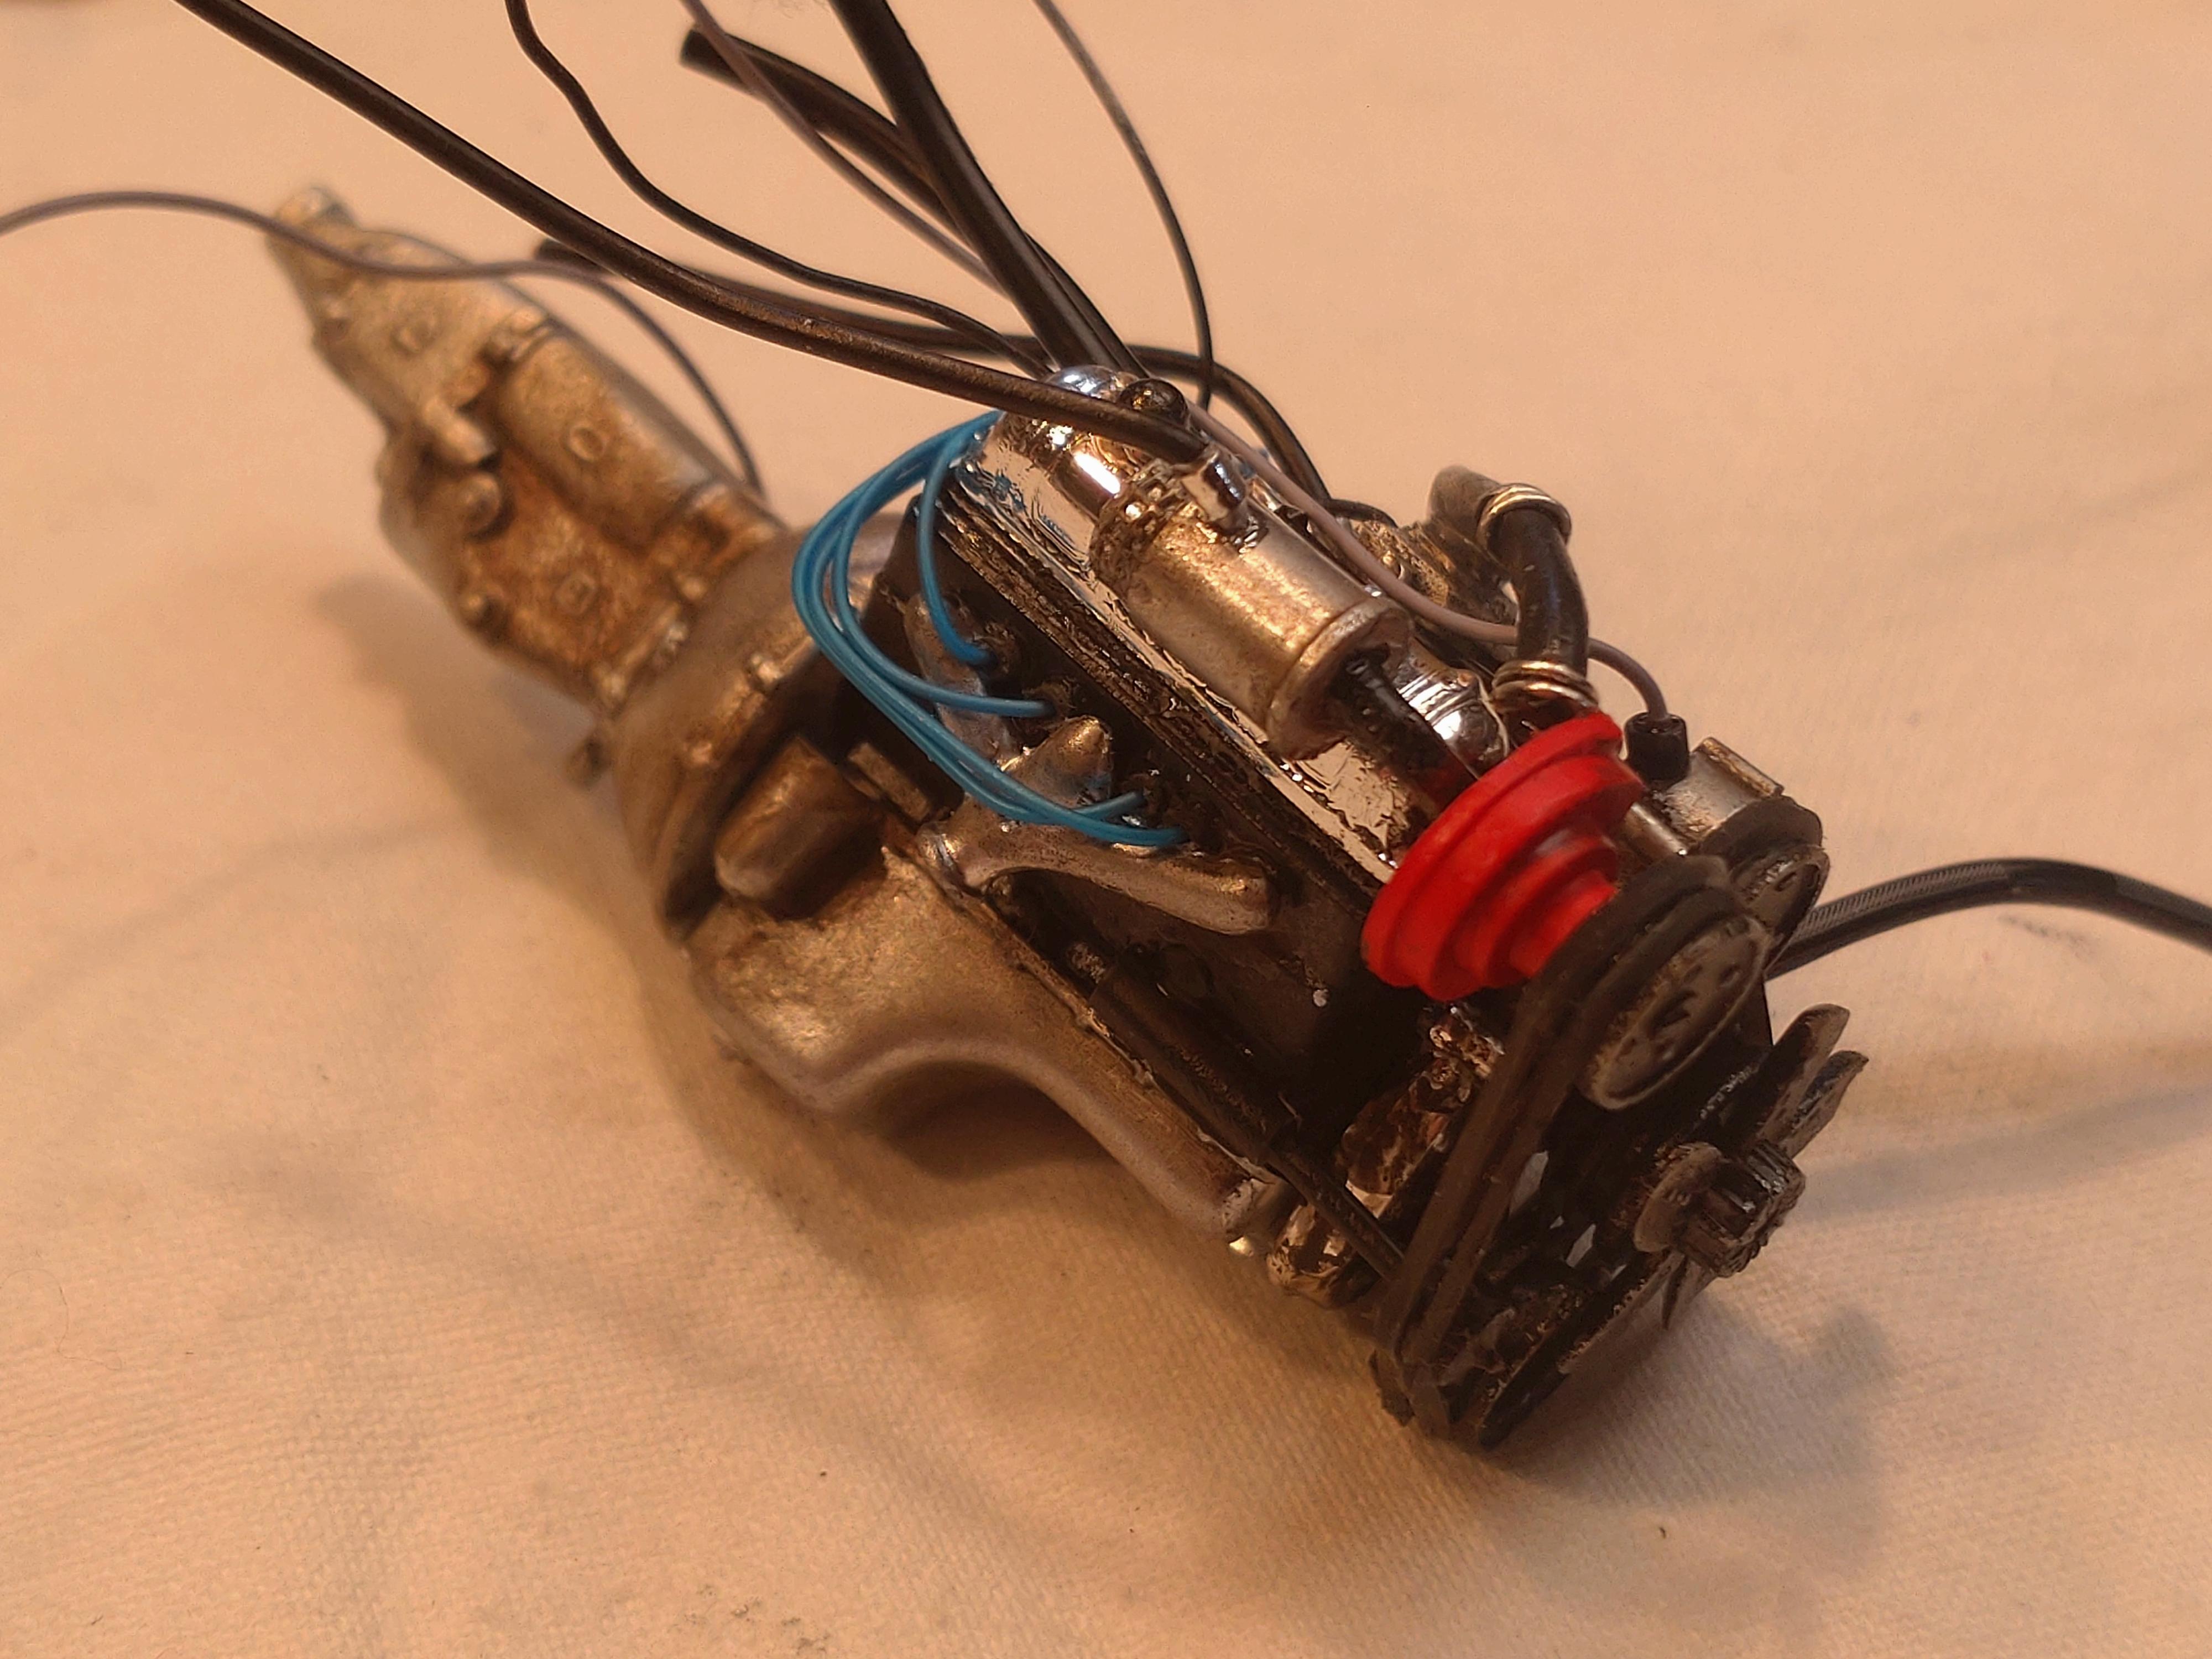
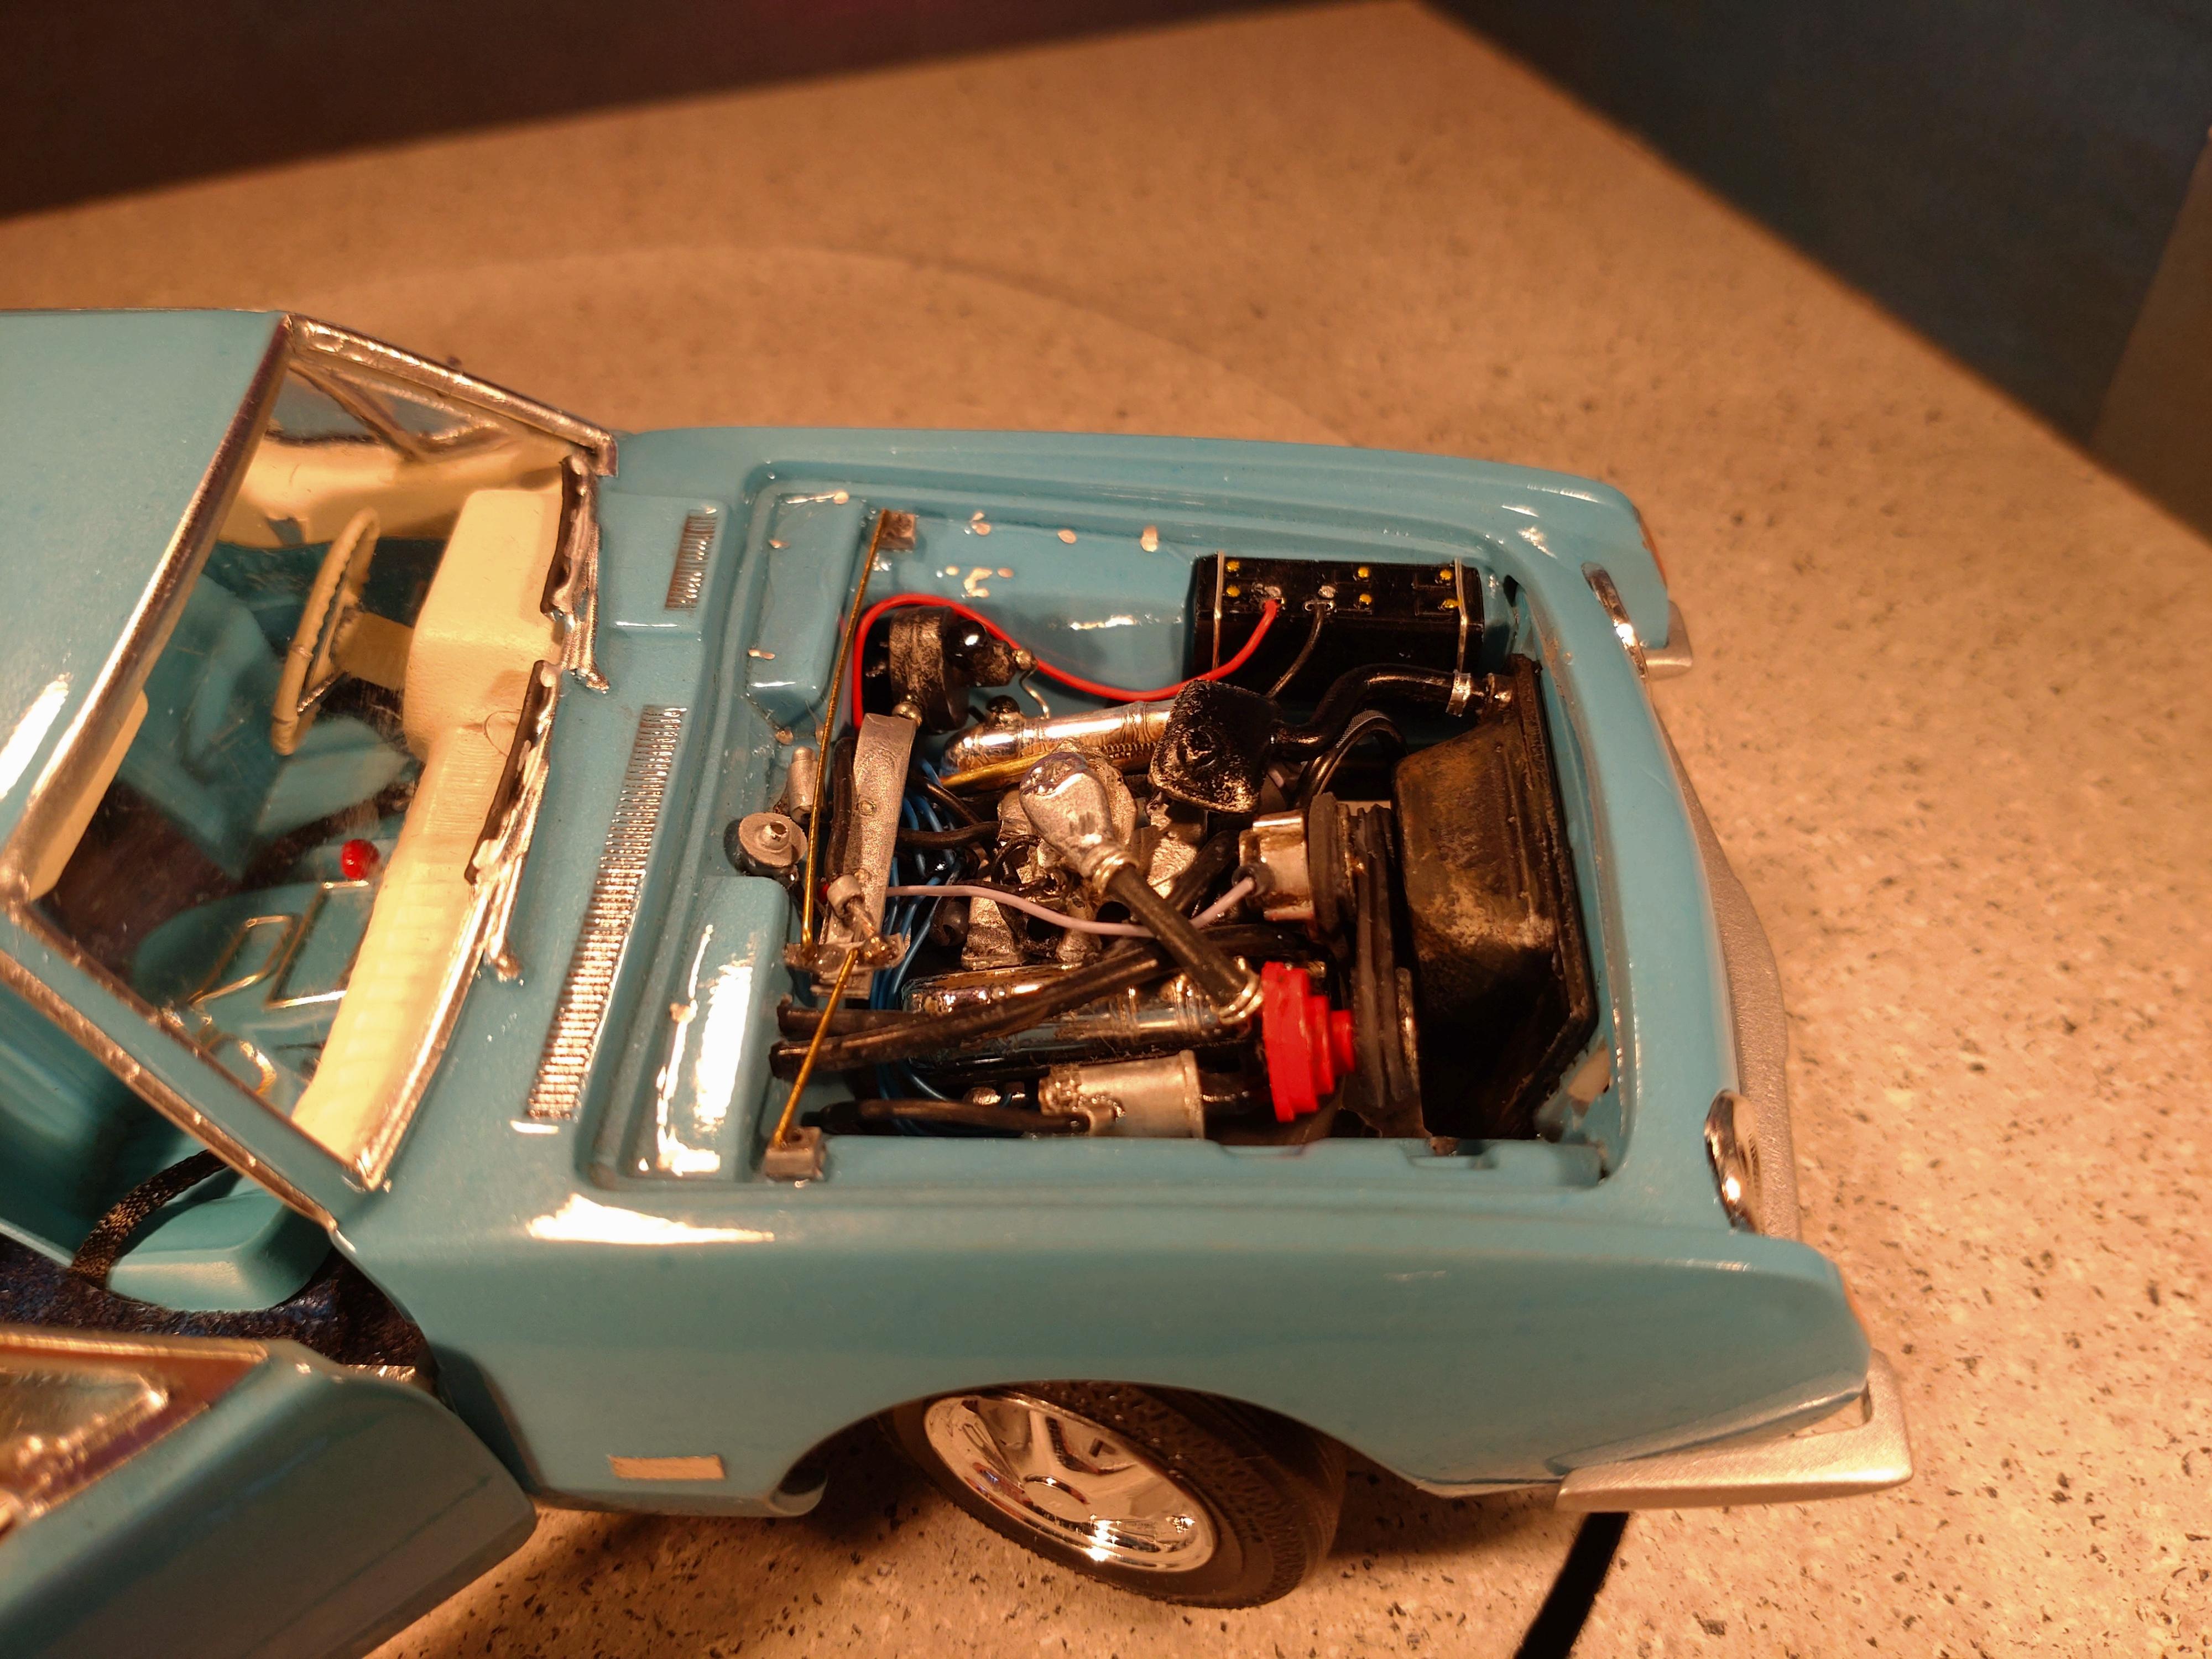
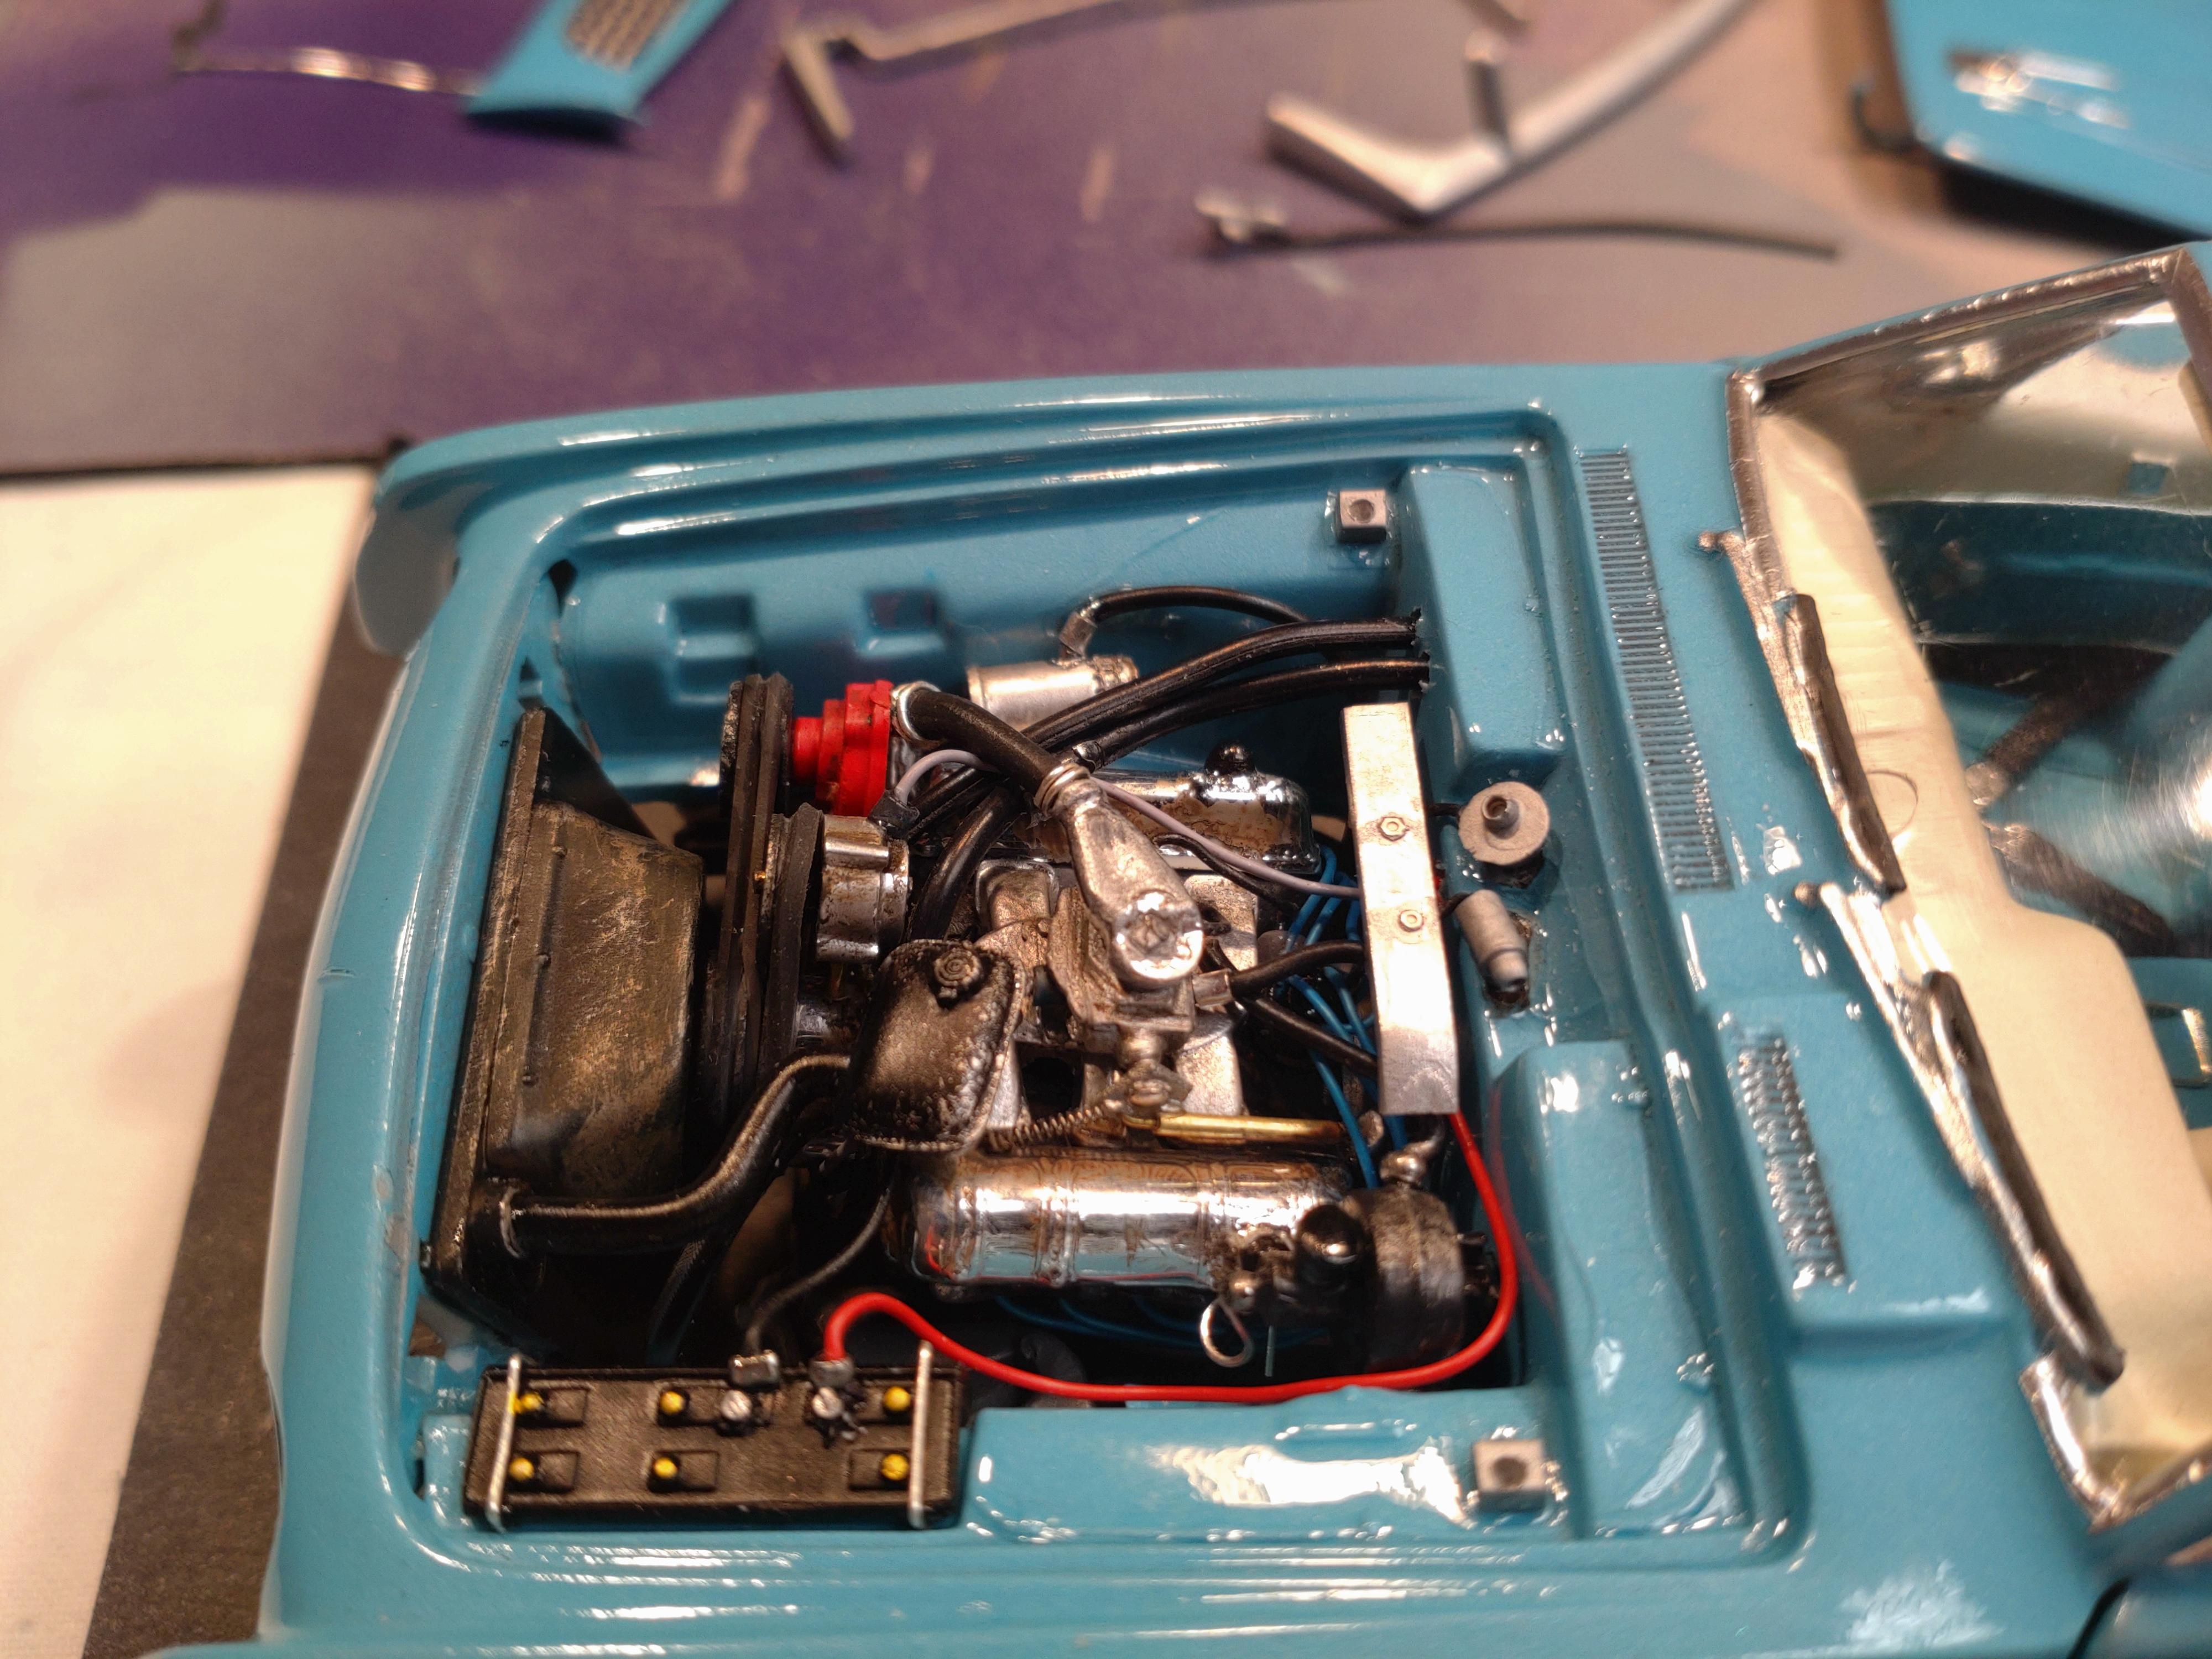
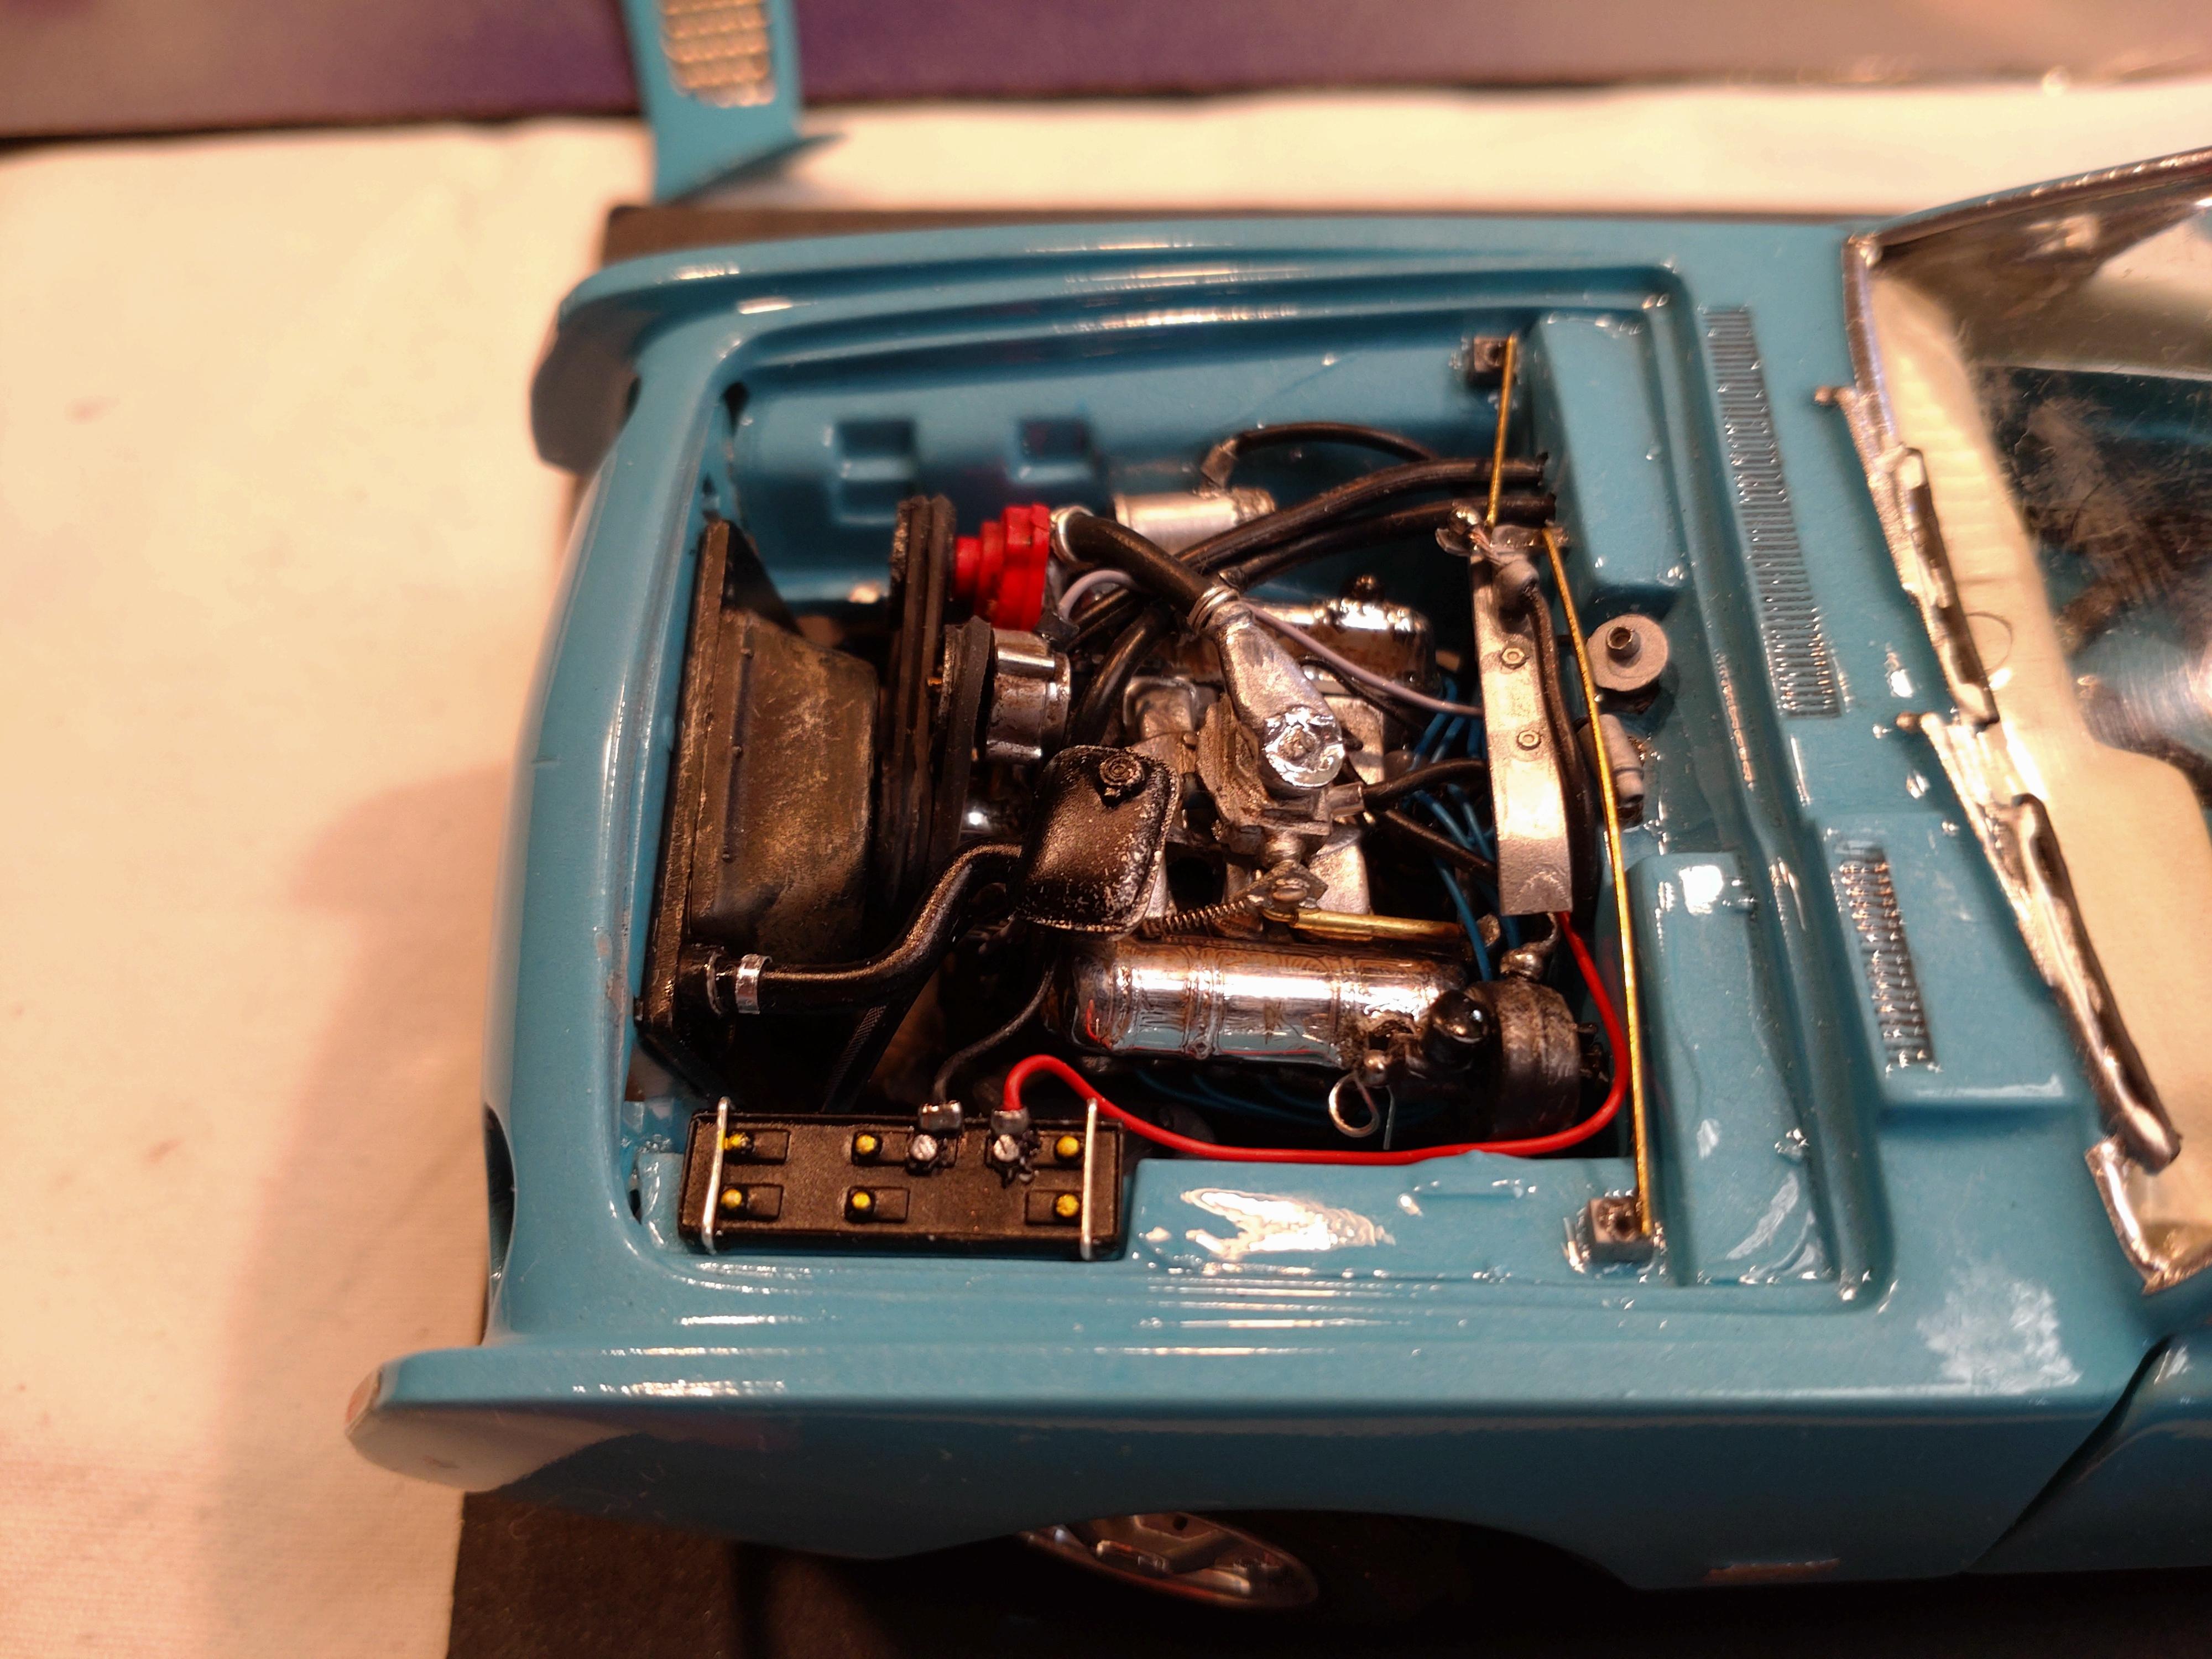
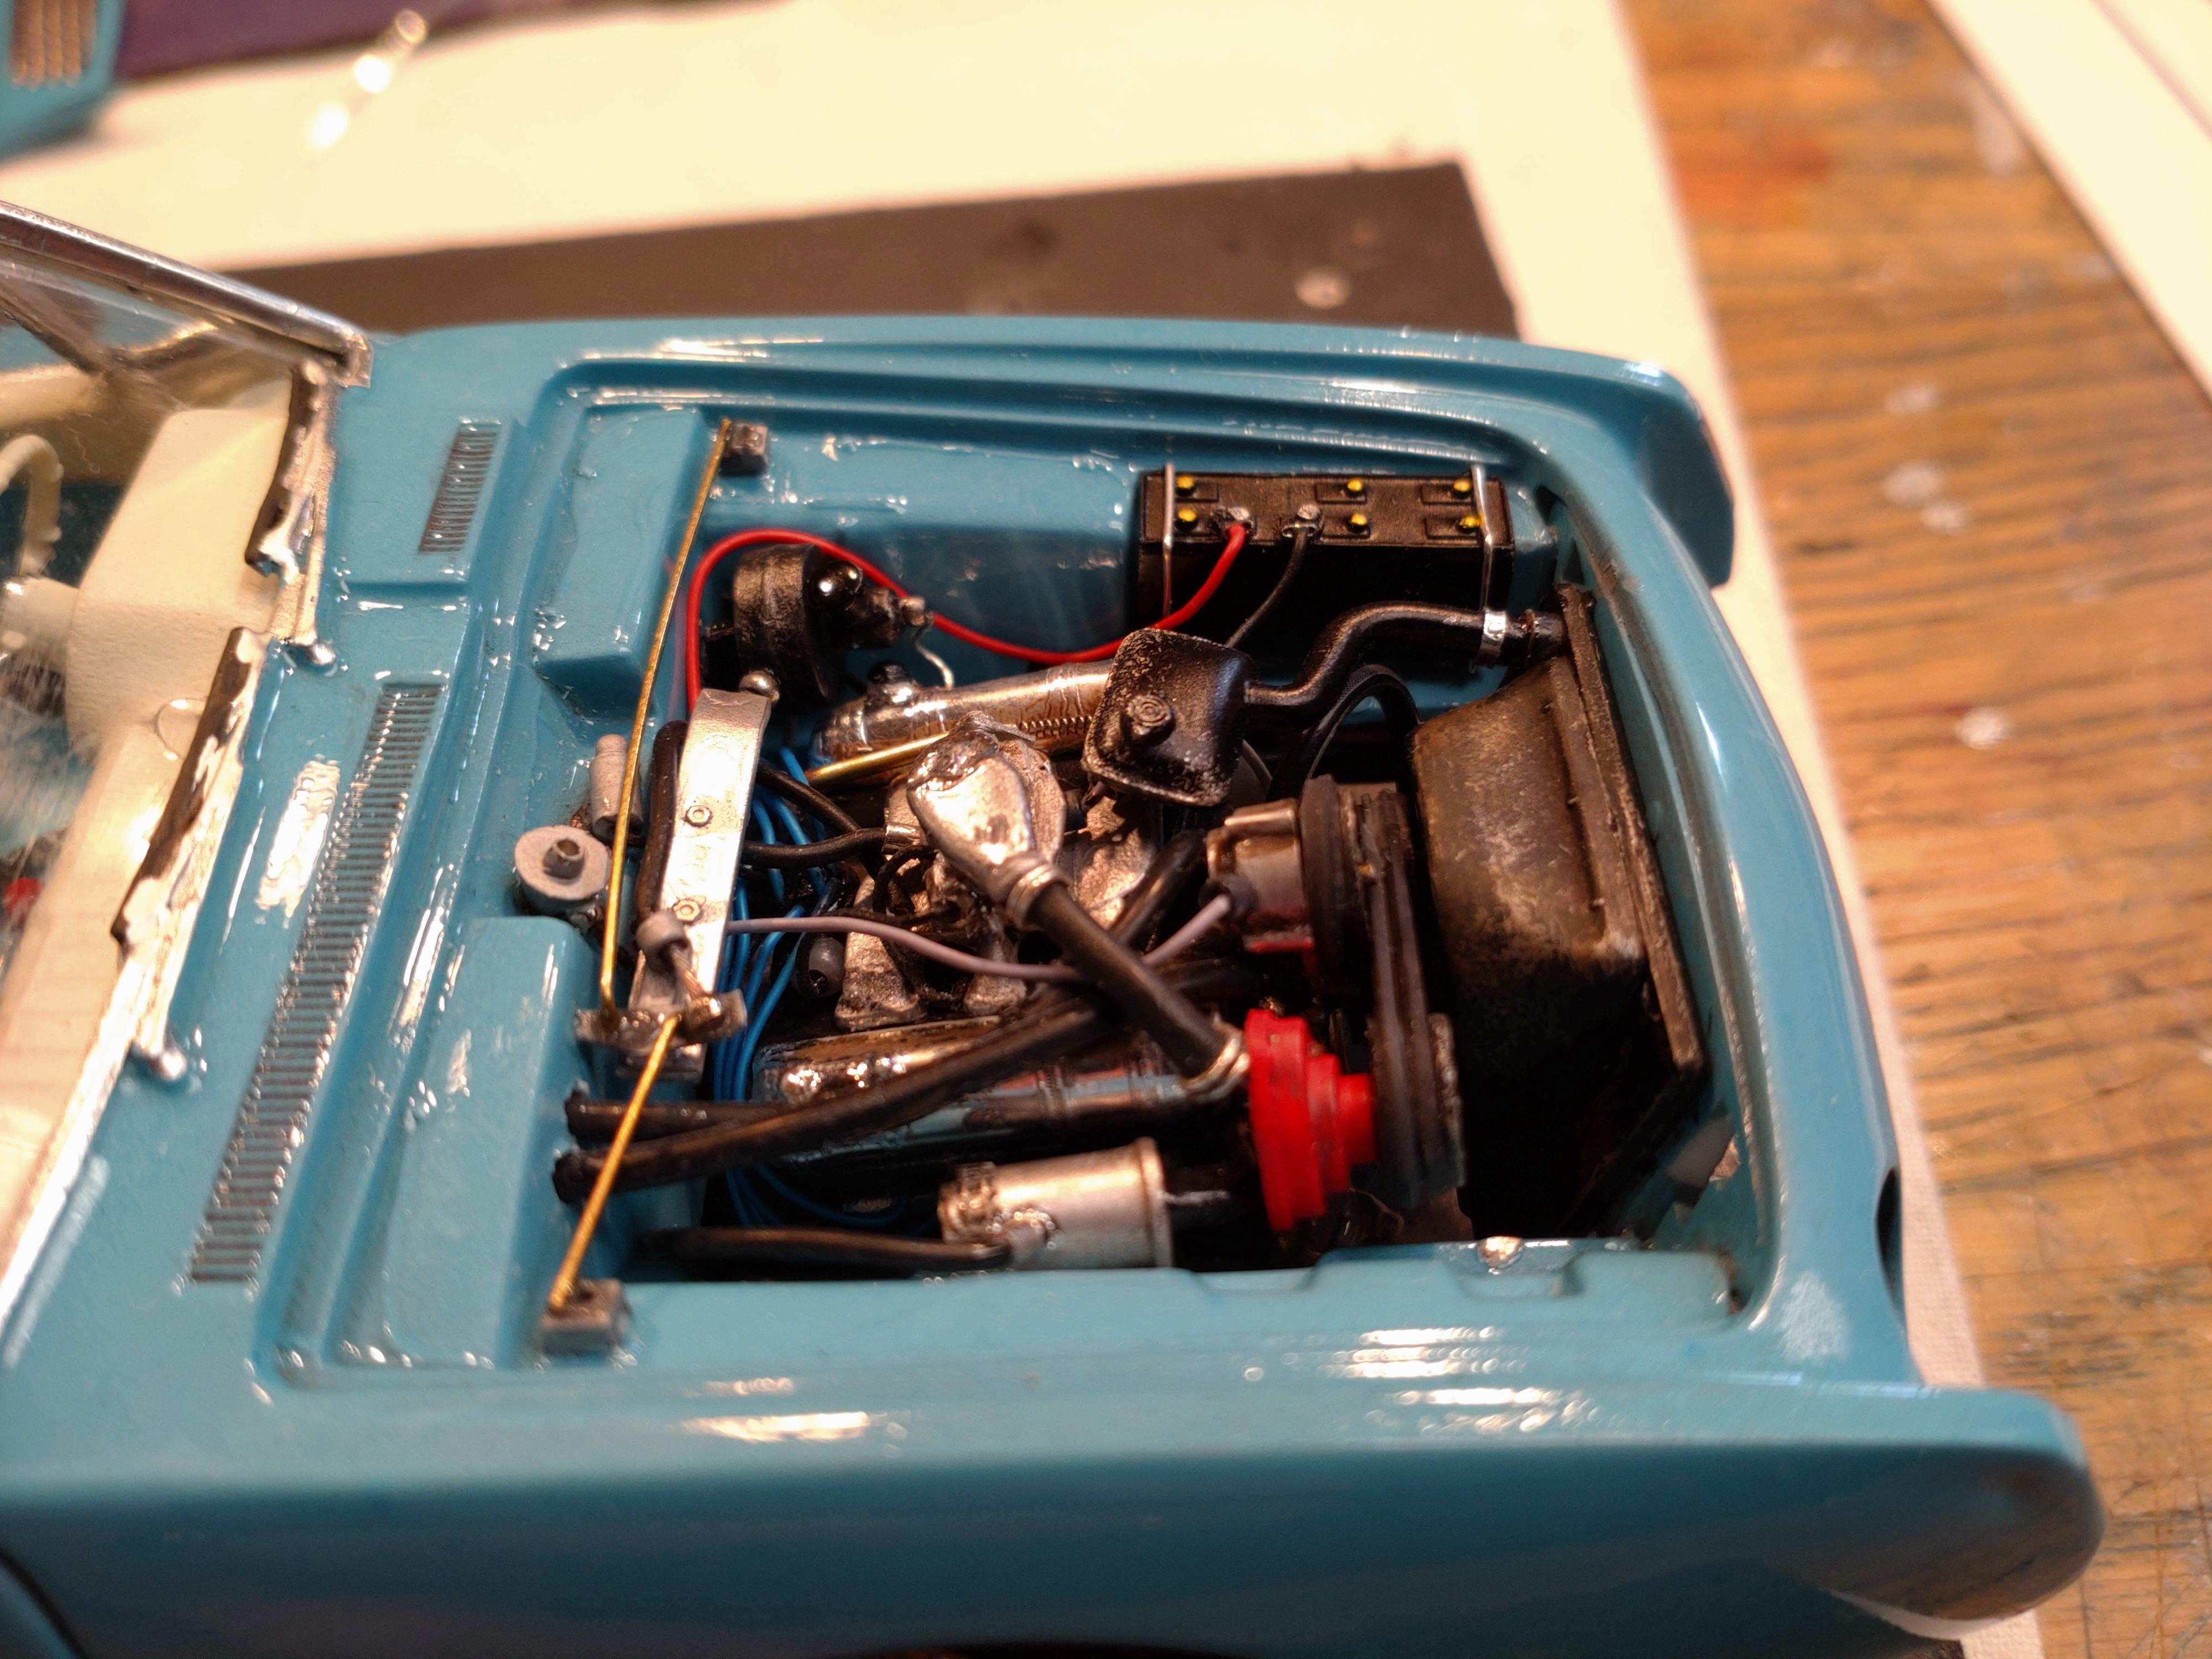
When I was a school kid a buddy´s father had an Avanti parked in the driveway. It looked very different than any other car of those days and I really liked it. 60 years later it still looks very different than any other car even of these days. (To be honest, I can´t remember ever seeing an original Avanti since then...) The design is unique and, in my opinion, beautiful. An epic classic that unfortunately didn´t have the fate to survive. This build is an AMT/Ertl kit. The overall quality is high, but I did miss a few parts to make it perfect: no decals, no brake booster etc. So I had to improvise, meaning doing what model builder do. The paint is mixed from Schmincke Aero Color airbrush acrylic with 25% metallic fluid on an grey base. Top coat is AK Clear Gloss with a bit of polishing. The chrome is Bare Metal MATT. Wheels are kit and generally I came out fine with the kit parts. Which dosn´t mean I didn´t have to pimp up the details for realness. The big parts like the interior tub and the doors needed some heavy filing and sanding to finally fit. Many chrome parts were plated very sloppy so I had to smooth out the bumpers, which would have shown too much. The interior trim and the gauge rings are 0.4mm silver plated wire. I scrap build the door handles and cranks and added seat belts. The floor is flocked black on dark blue. The engine was a bit of a challenge because I didn´t find as many images as usual from the big brands. It took a while to understand where some lines, hoses and cables were running so I made the best of it. The pulley wheels are home made and pinned to the block with 1mm brass rods. Interesting was the double belt for the Paxton compressor. The belts are cut from a 0.8mm rubber mat. The brake booster is a scrap part adapted for the purpose. Yes, the engine bay is very packed and in the end I was happy that the hood still fit and closed correctly. A bit of AK engine grime wrapped it up. The undercarriage has a few details added and I applied a bit more grime, rust and weathering. Thank you for watching! You can see the video with this link: https://youtu.be/Du0Fjtnh66w

-
´63 Studebaker Avanti stock build
Andy Oldenburg replied to Andy Oldenburg's topic in WIP: Model Cars
I´ve just about wrapped up the work on this baby. There are a few details I wanted to enhance on the body and the engine bay. Some things just were not part of the kit, others I wanted to replace. The paint is an unspectacular turquoise blue with a light metallic effect. I mixed it myself with Schmicke Aero Color airbrush paint, on a light grey base. The final coat is AK crystal clear. Of the things I like to add if possible are sun visors. You can´t see the molded on visors on the headliner anyway. A rear view mirror was missing in the kit also, so I made that one too. 0.3mm styrene and 0.5mm wire. The kit contained simple standard door mirrors, but the original Avanti had really cool mounts. I bent an aluminum 1mm wire to shape and worked it with a diamond file until it came close to the original. Then added the styrene mirror. Next a fine antenna, made of 0.5mm brass wire. The headlamps were fitted with real looking lenses by Scale Production. Looks much better than the plastic parts. The kit didn´t have a brake booster at all. I had a part in my scrap box that I could modify and adapt. I had to make sure it would fit later. The chassis fit the body fine, but of course all those lines, hoses and cables in the engine bay got in the way. Next up was connecting everything into the correct place. I will show the step by steps... My biggest worry was that the hood wouldn´t fit and close! But it all worked out fine and I am really happy to get this Avanti done without any issues. I will show the finished job on the UNDER GLAS forum. Thanks for watching the progress and best wishes!
-
Beautiful lli hotty! The result turned out as good as I expected?
-
Hi Steve, yes your right, I goofed it. Of course it´s a ´57. Damage done... And thanks for the props!
-
Roberto, that Super Bee is BAD A**! Love the stance and what your doing to make it really hot!
-
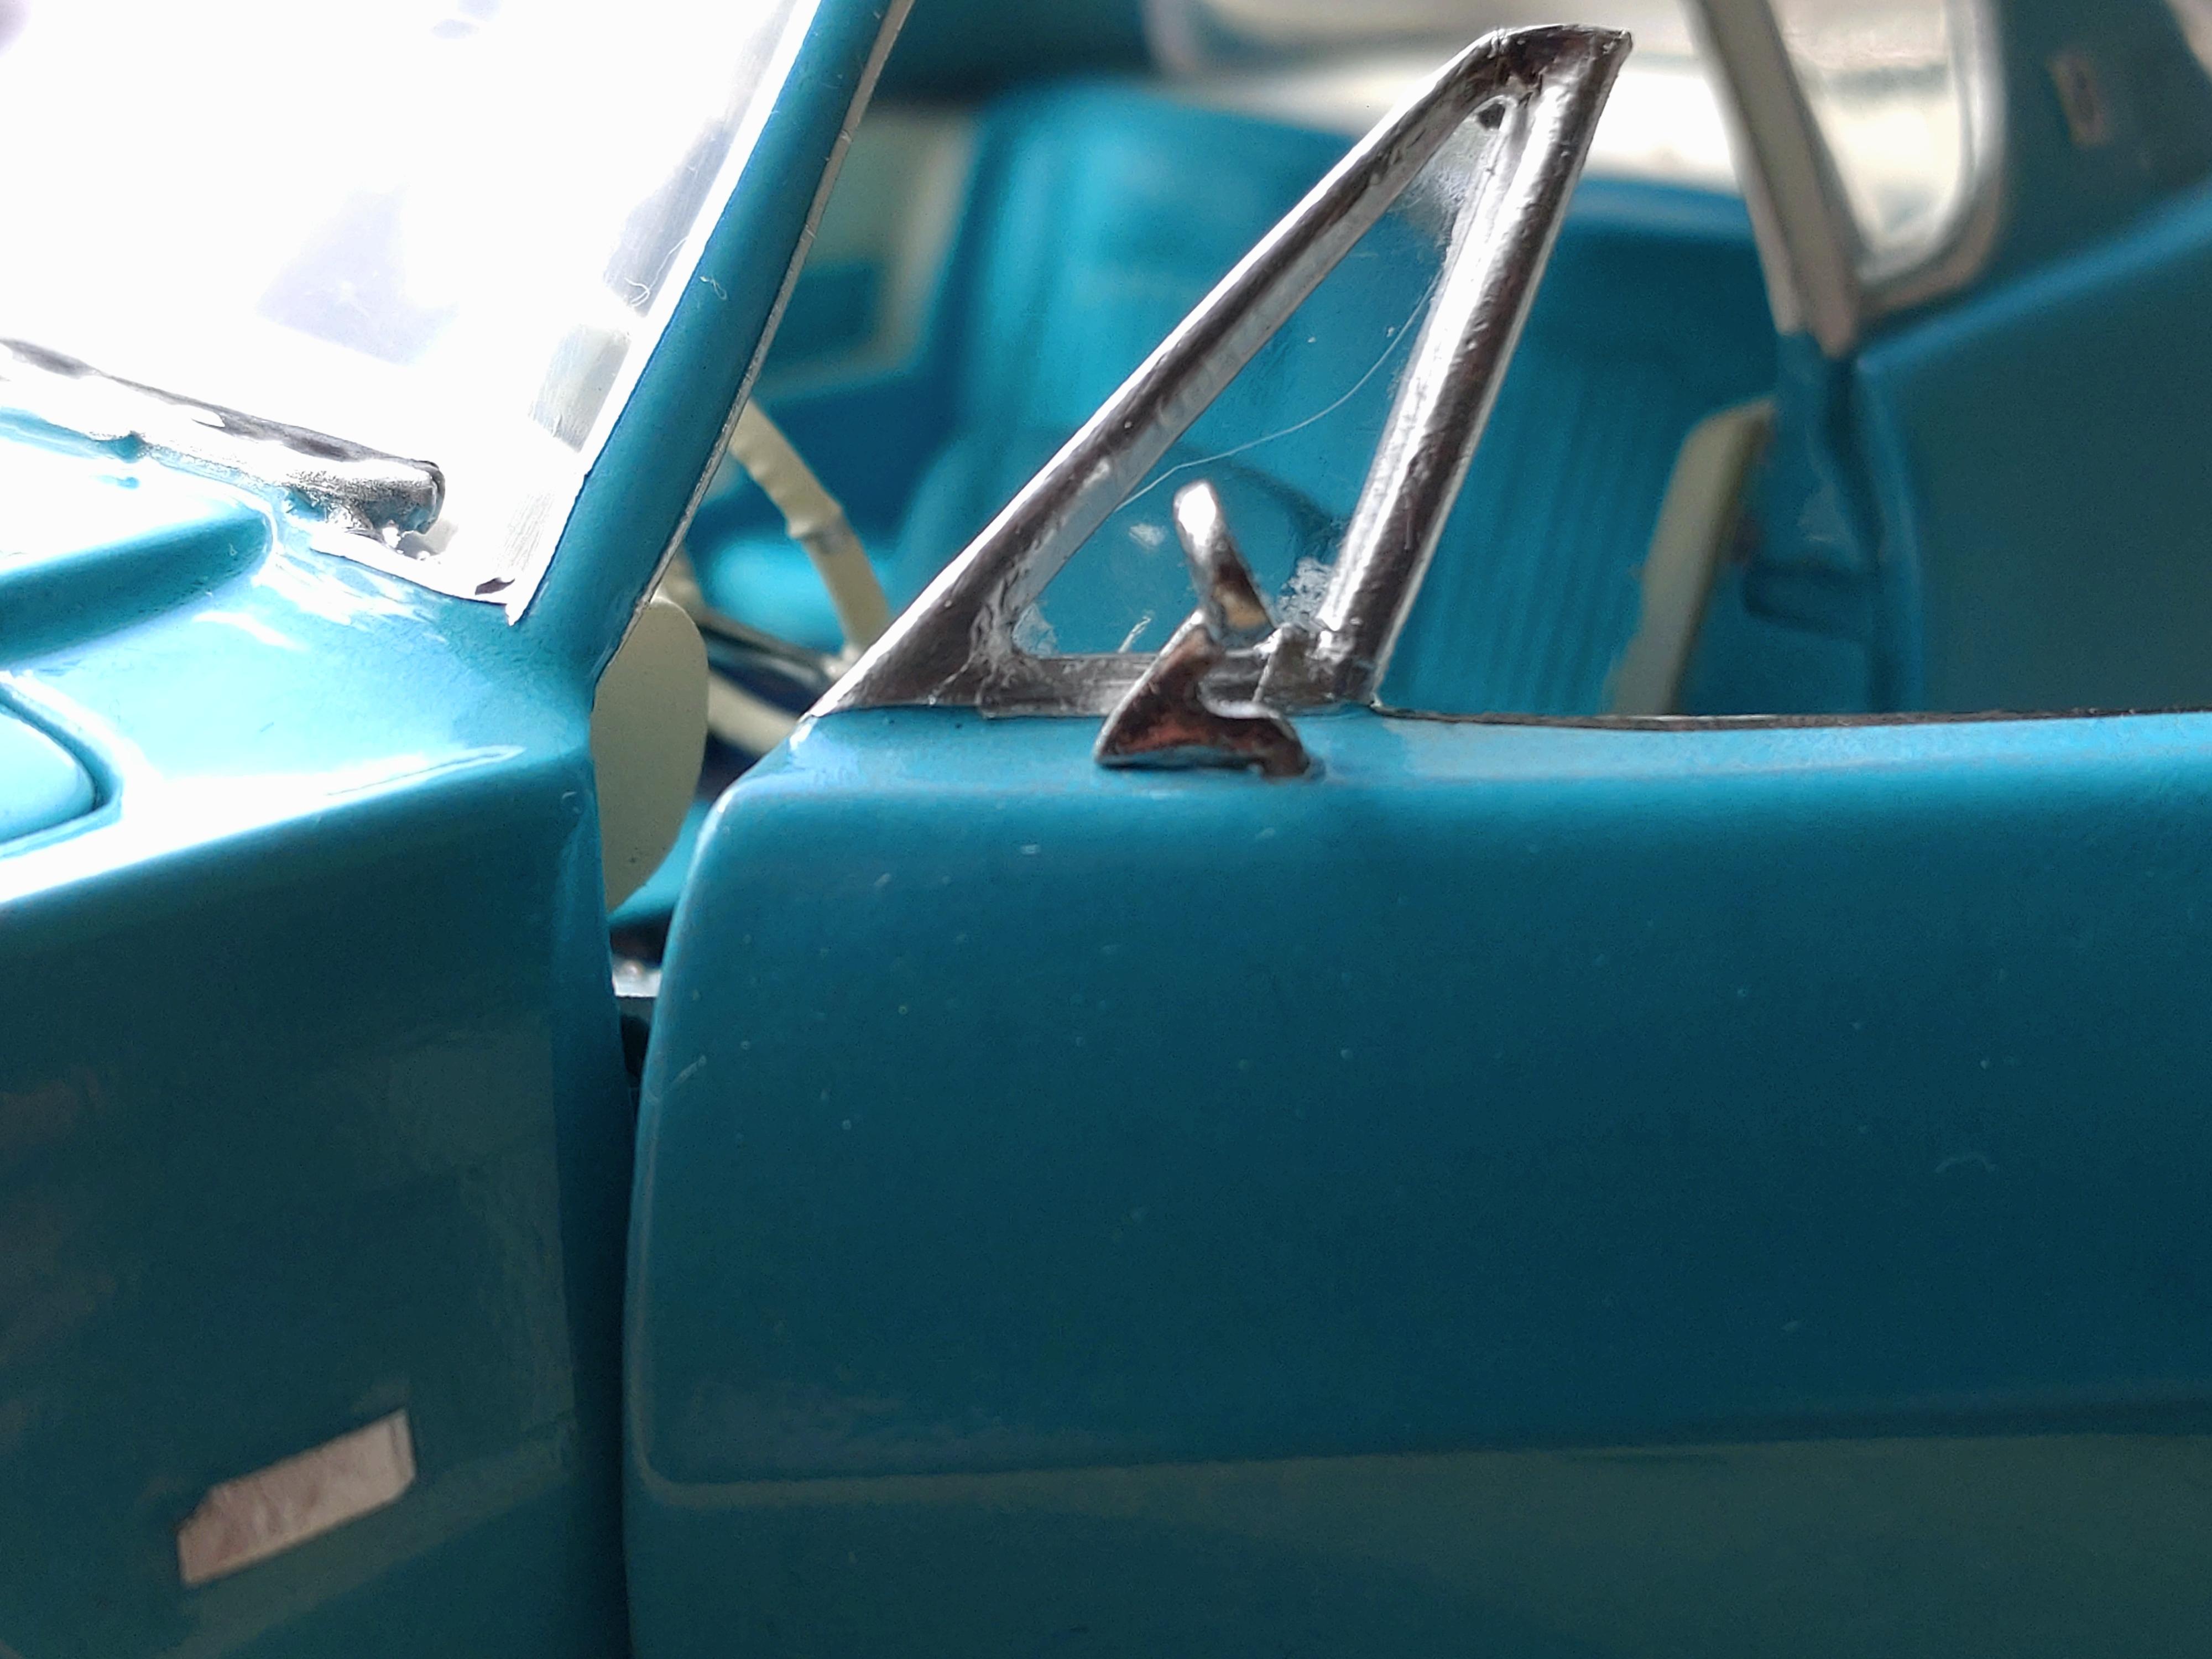
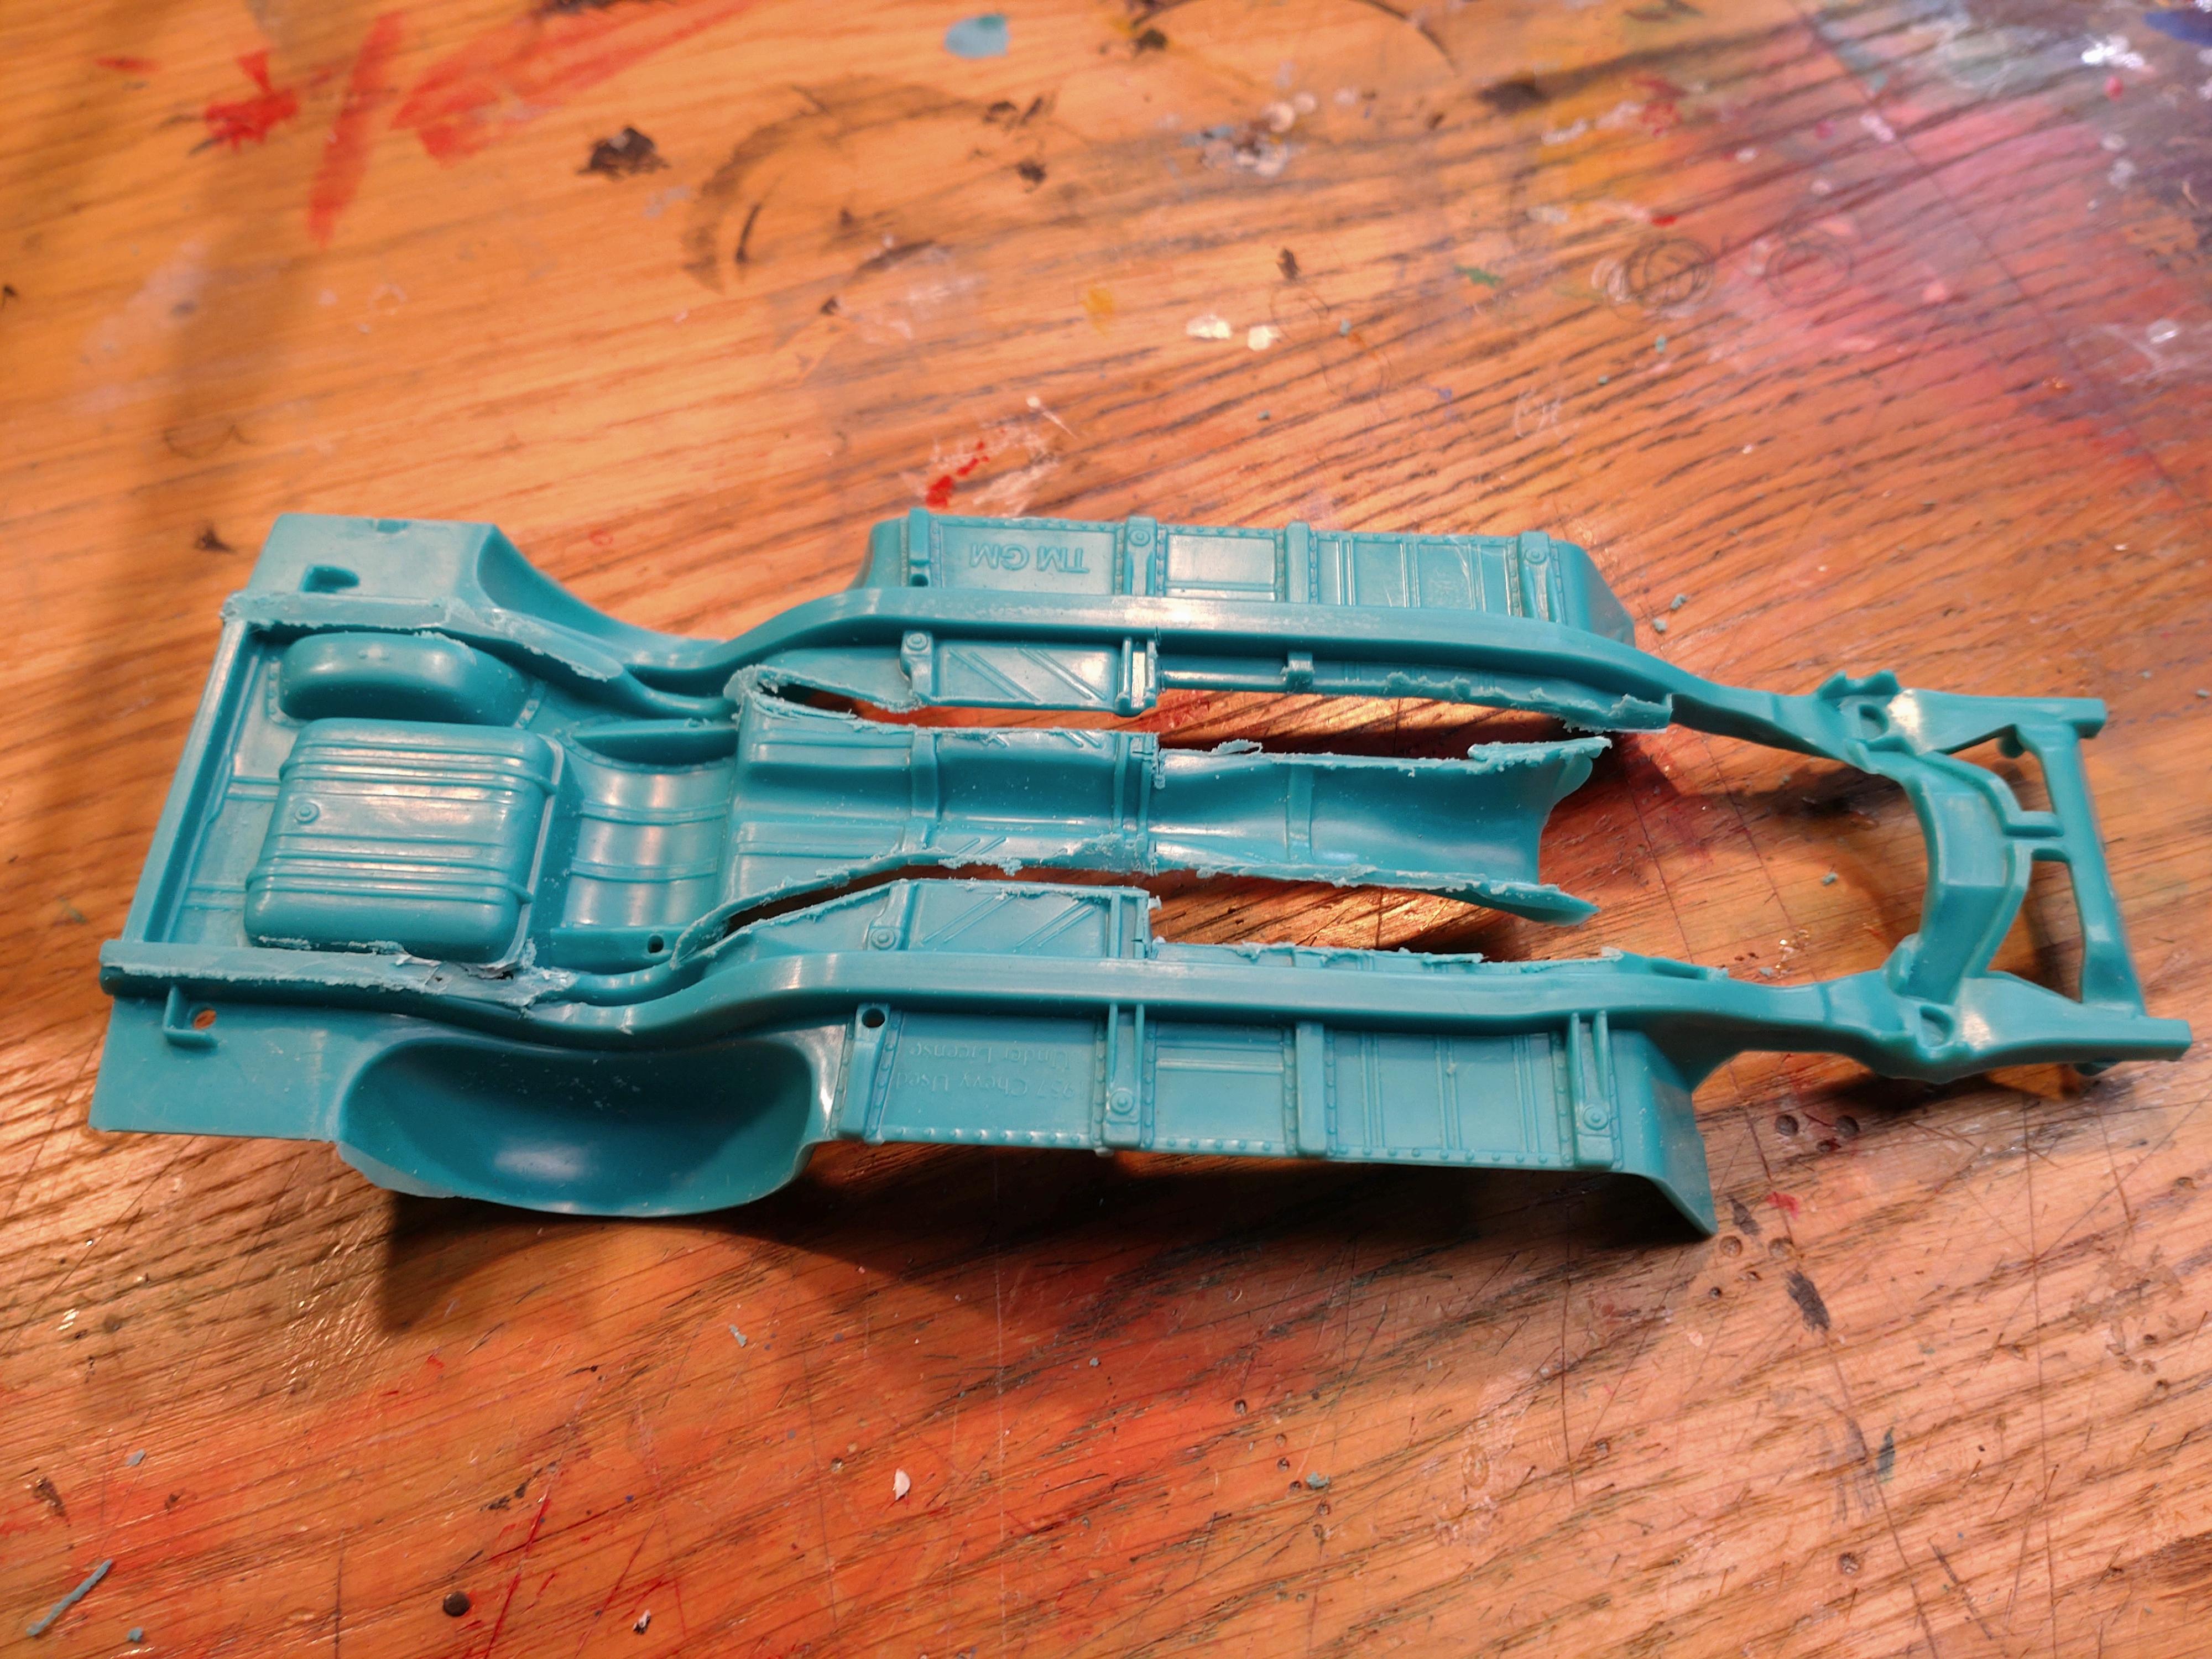
This is a kit of "lower complexity", but it was a cheap shot. I reckoned I would add the missing levels and see with what result I would end up with. I was indeed surprised to find everything molded in a turquoise blue but was eager to build my Bel Air. I happened to see this Bel Air with that sand/dark grey color in a Hot Rod magazine so my paint choice was also set. I replaced and added quite a few parts and details. The front grill was cut out and filled with a open grid structure out of thin aluminum. The hood ornaments I replaced with my own design. Rims and tires are different. The colors are from Mr. Paint and covered with coats of crystal clear and polished. Chrome is bare metal and a few drops of Molotov at the edges. The engine and engine bay are mostly stock out the box, but I added several details to for a more realistic look. The kit interior needed an upgrade. The door panels hardly had any structure, so I added armrests and window knobs. I replaced the front bench with bucket seats, added a tunnel cover and a better steering wheel. Floor is flocked. The undercarriage had a molded-on exhaust system, which I cut out and filled with sheet styrene. I replaced everything with spare mufflers and exhaust pipes that I bent out of 2mm styrene. I ended up weathering the bottom a bit. Thanks for watching! You can see the video with this link: https://youtu.be/XhWxFvQeDaY
-
Hey Sidney, very good job on that build?? I like all those details you added! And the finish fits fine to the era. How did you make those floor mats?
-
´63 Studebaker Avanti stock build
Andy Oldenburg replied to Andy Oldenburg's topic in WIP: Model Cars
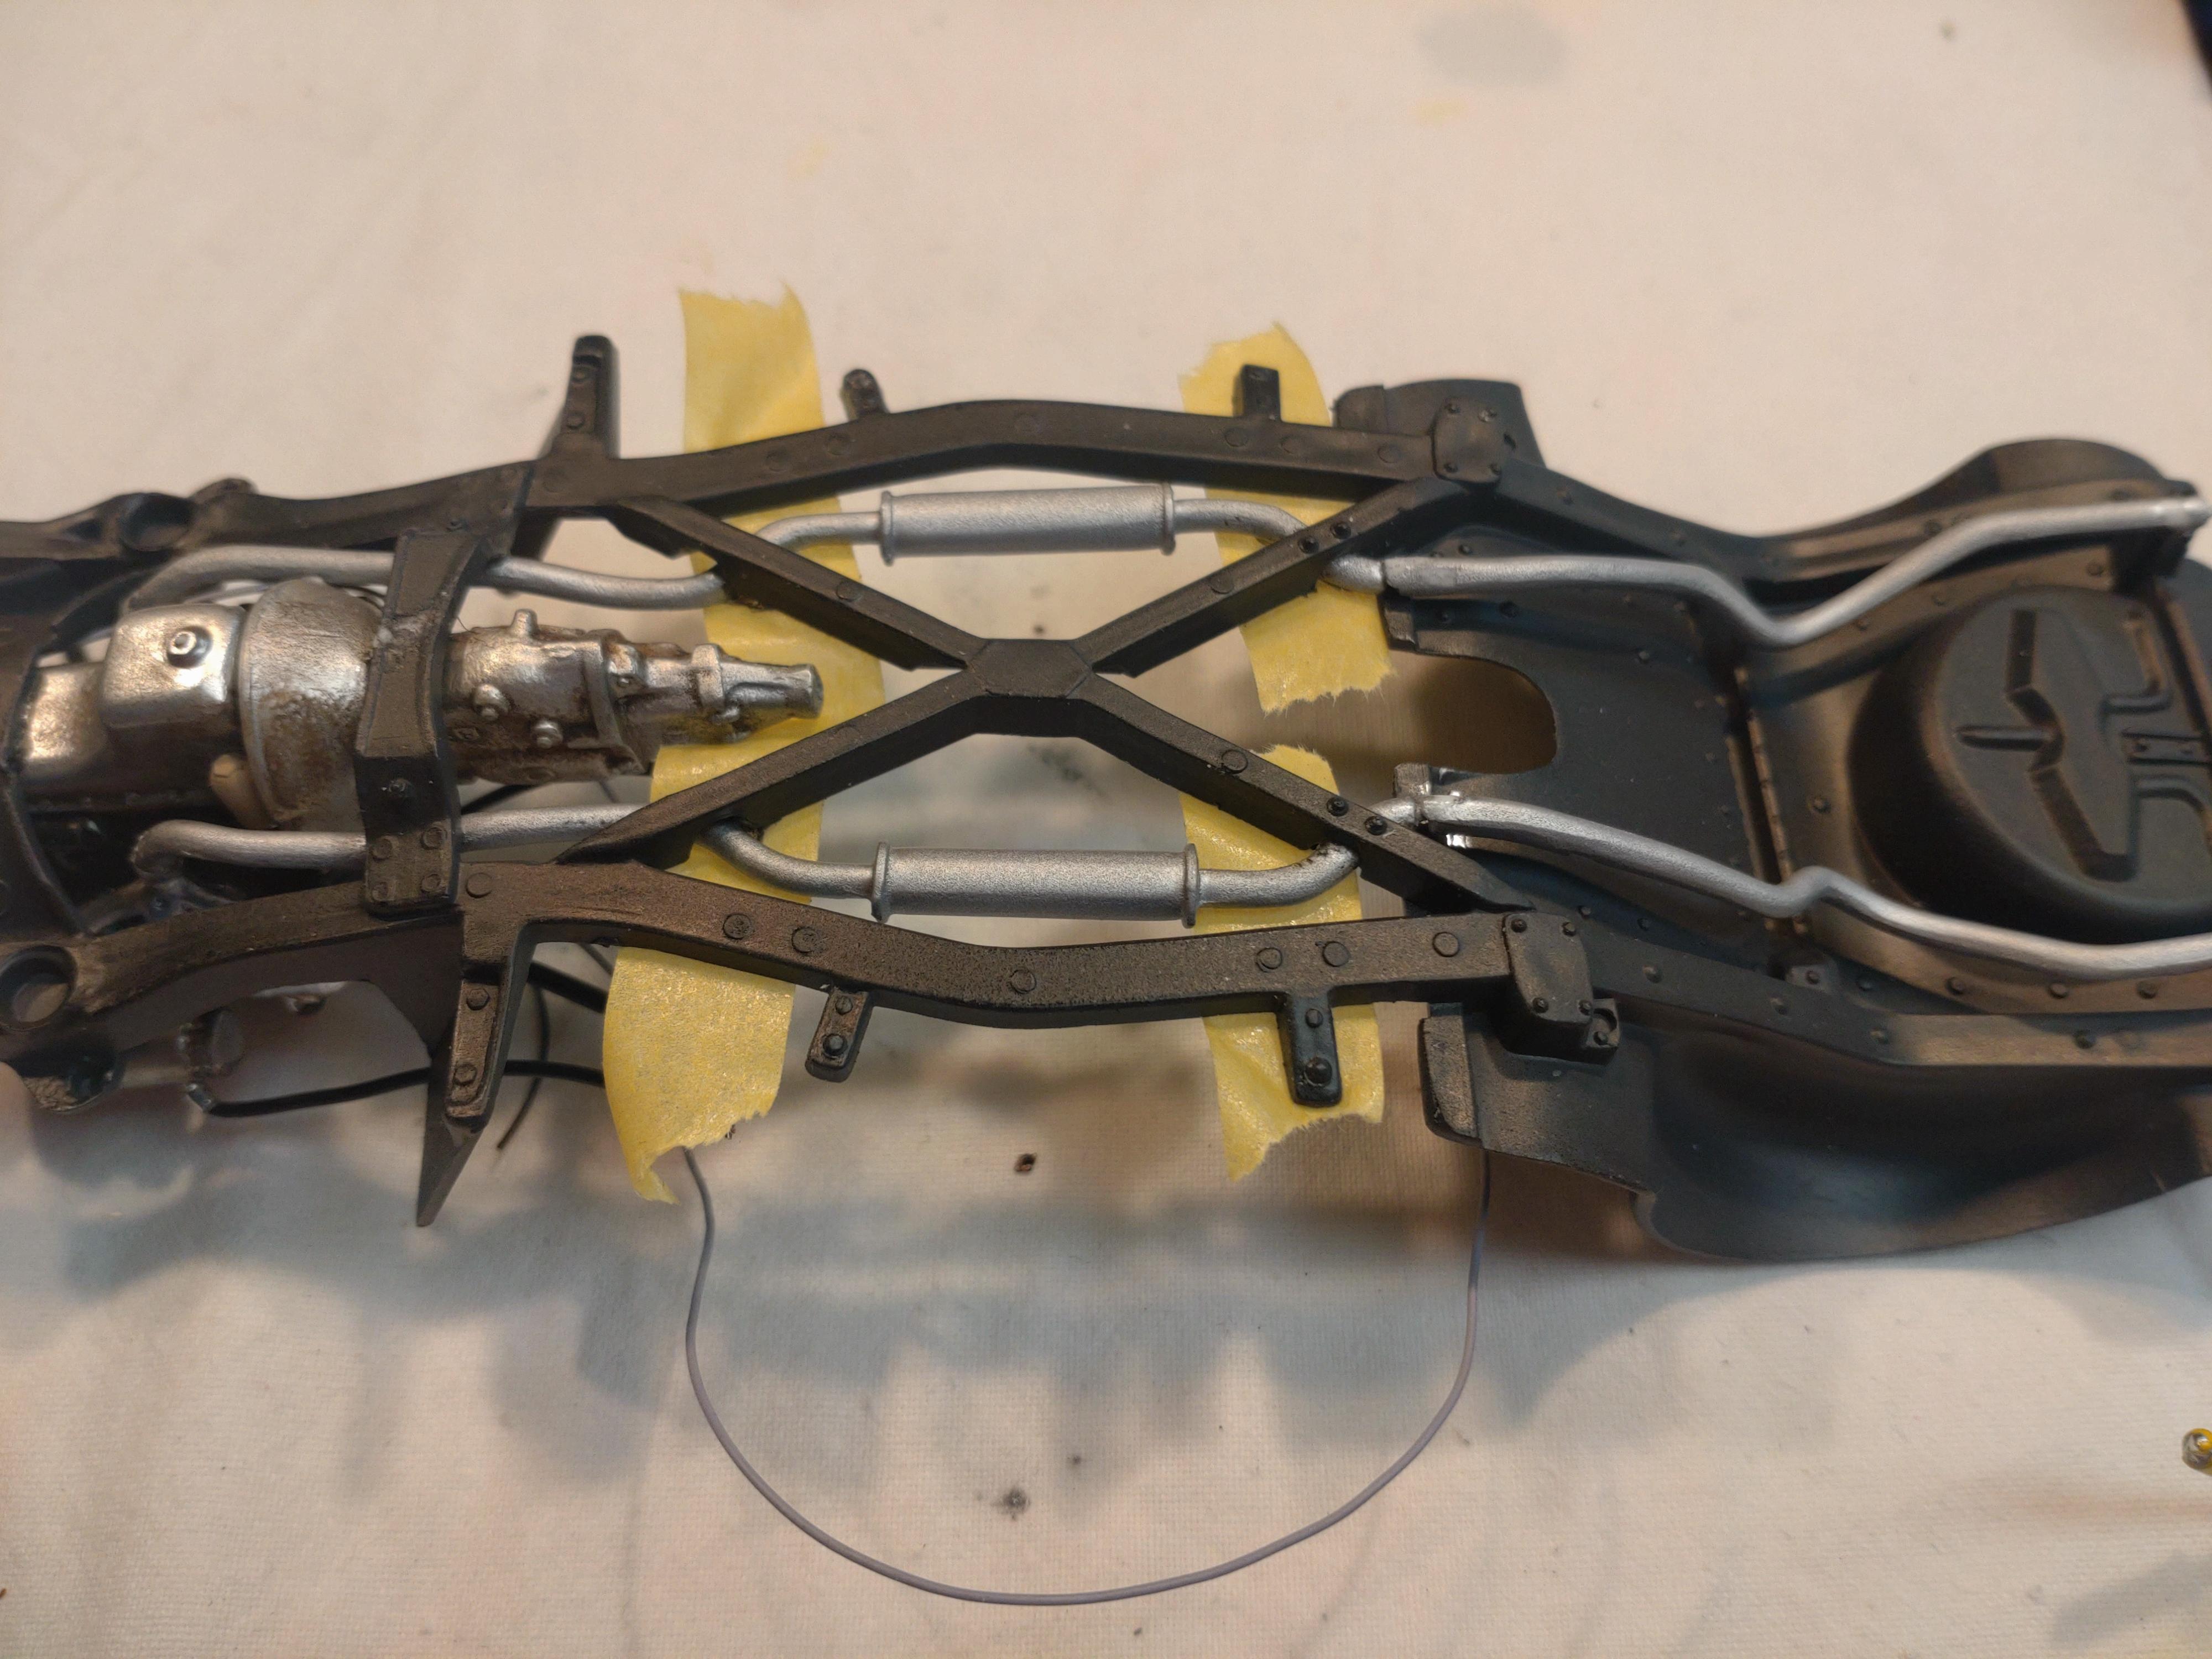
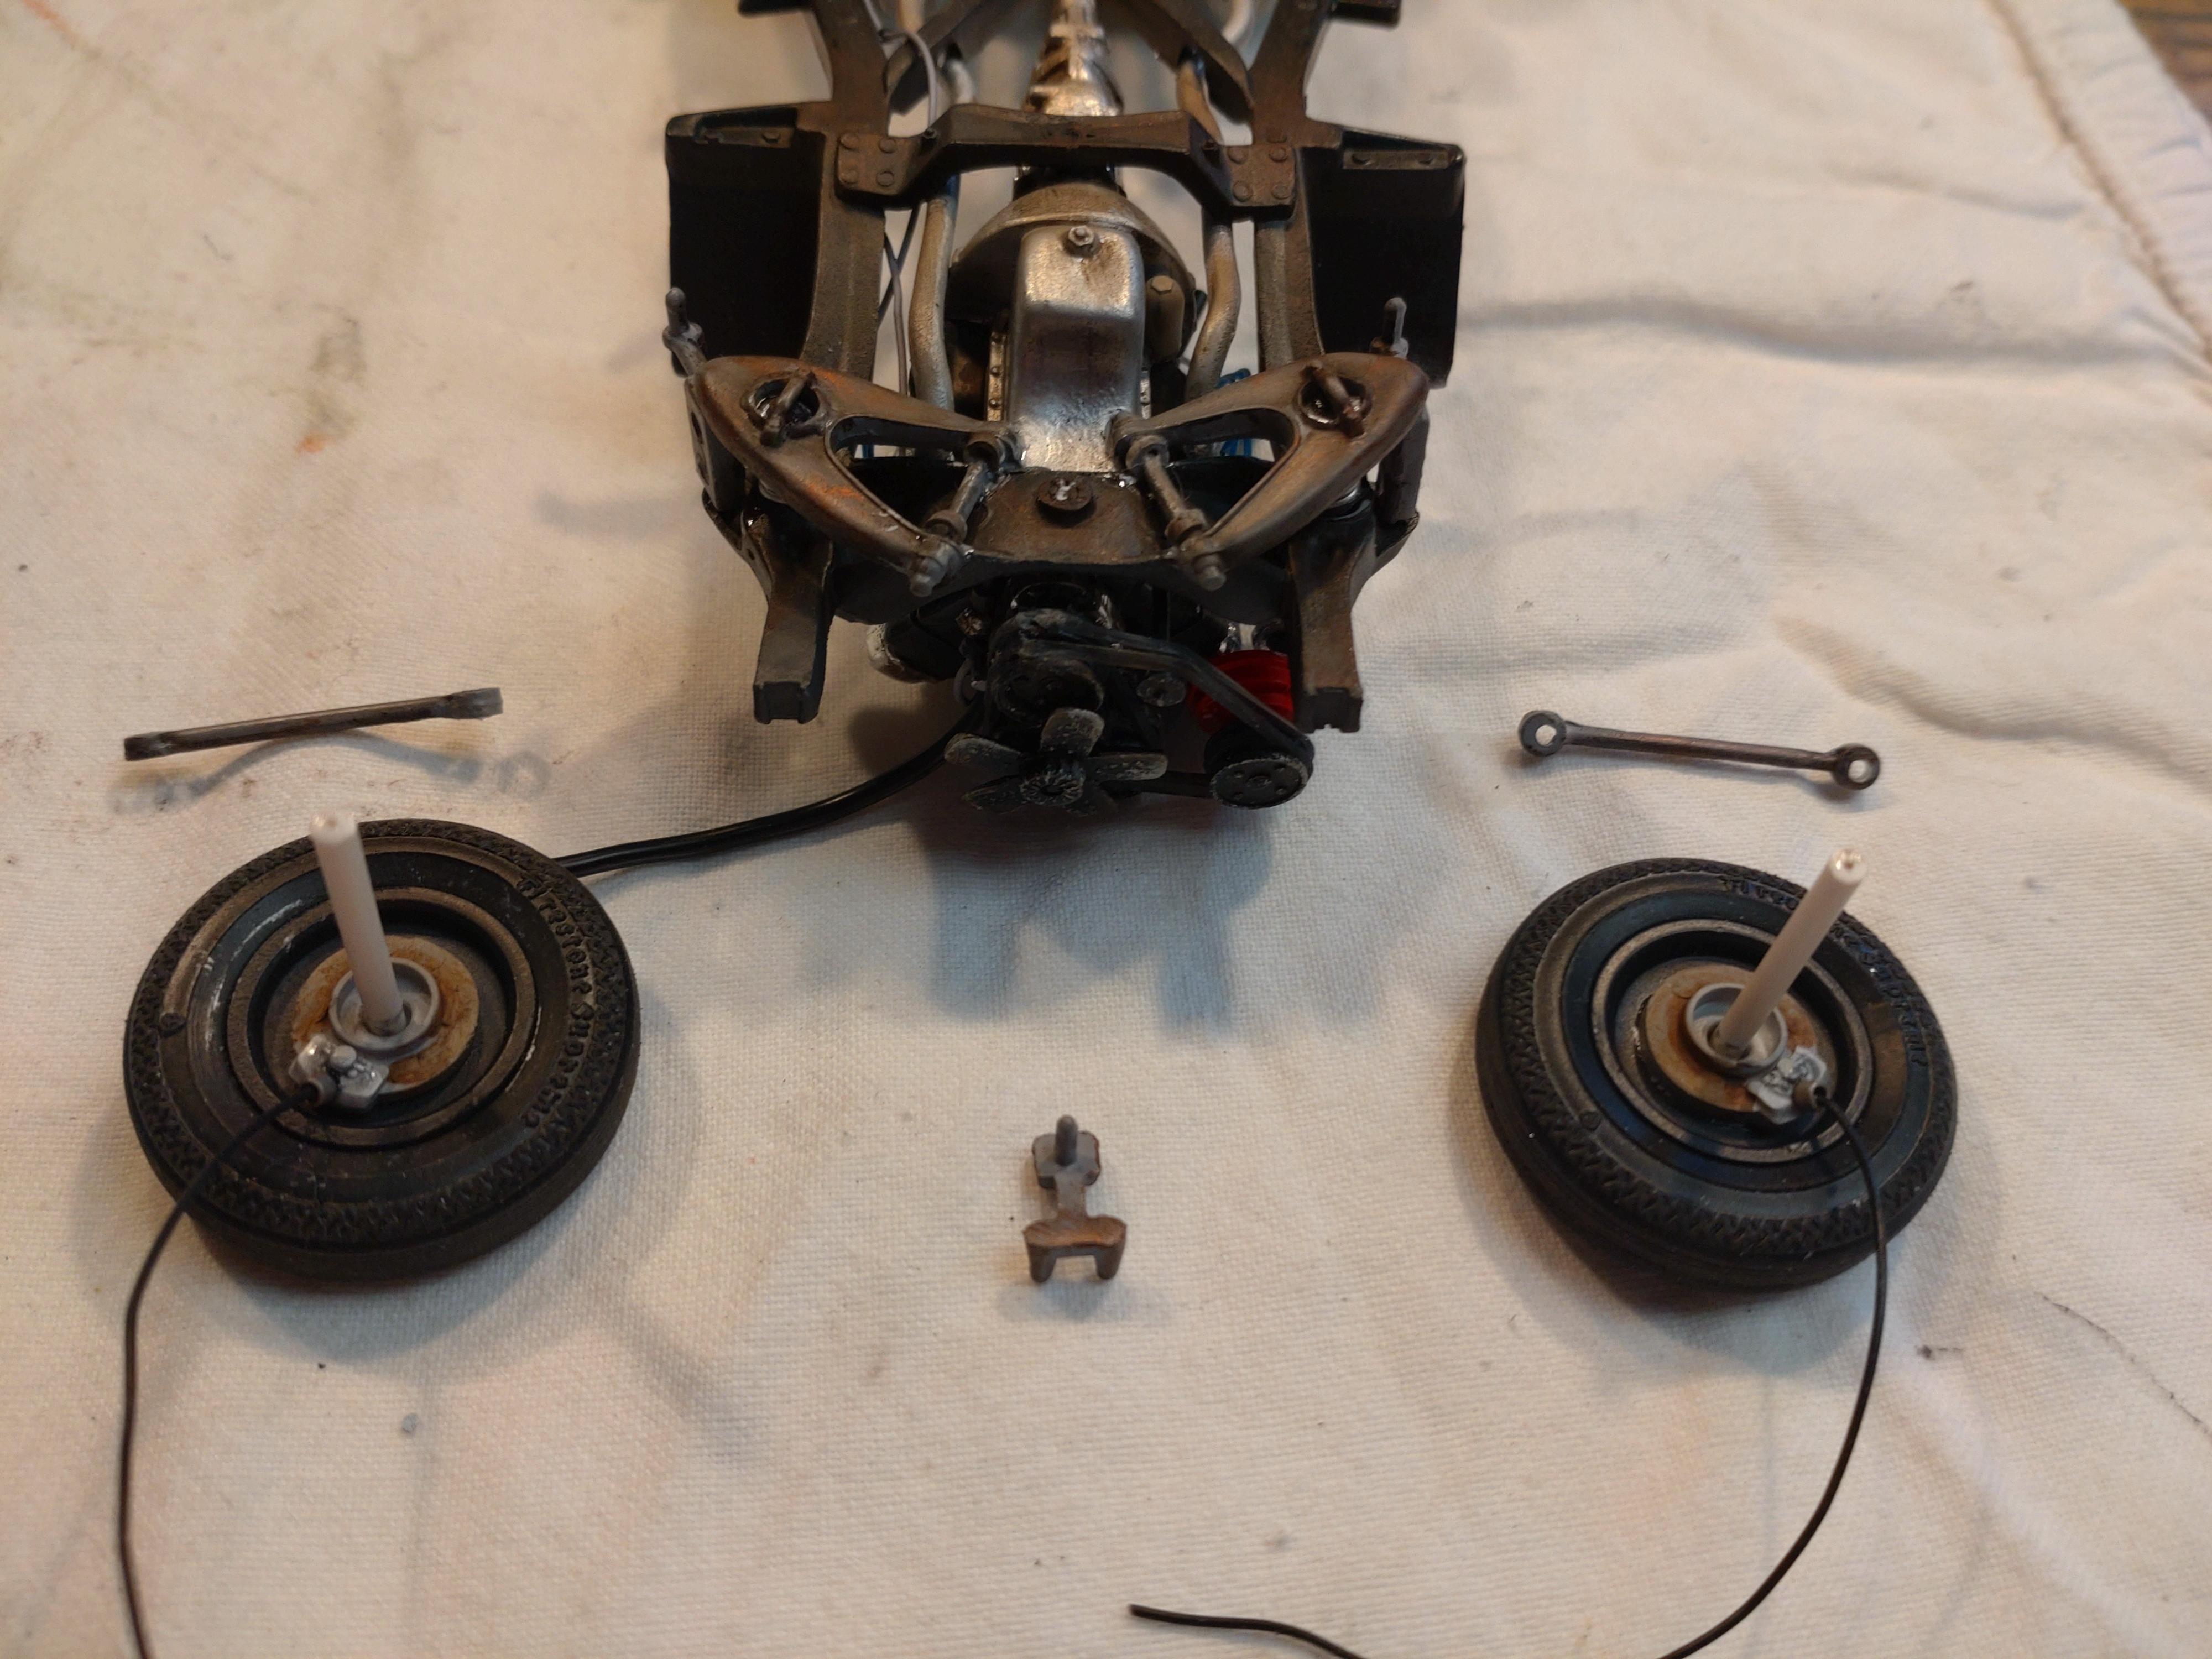
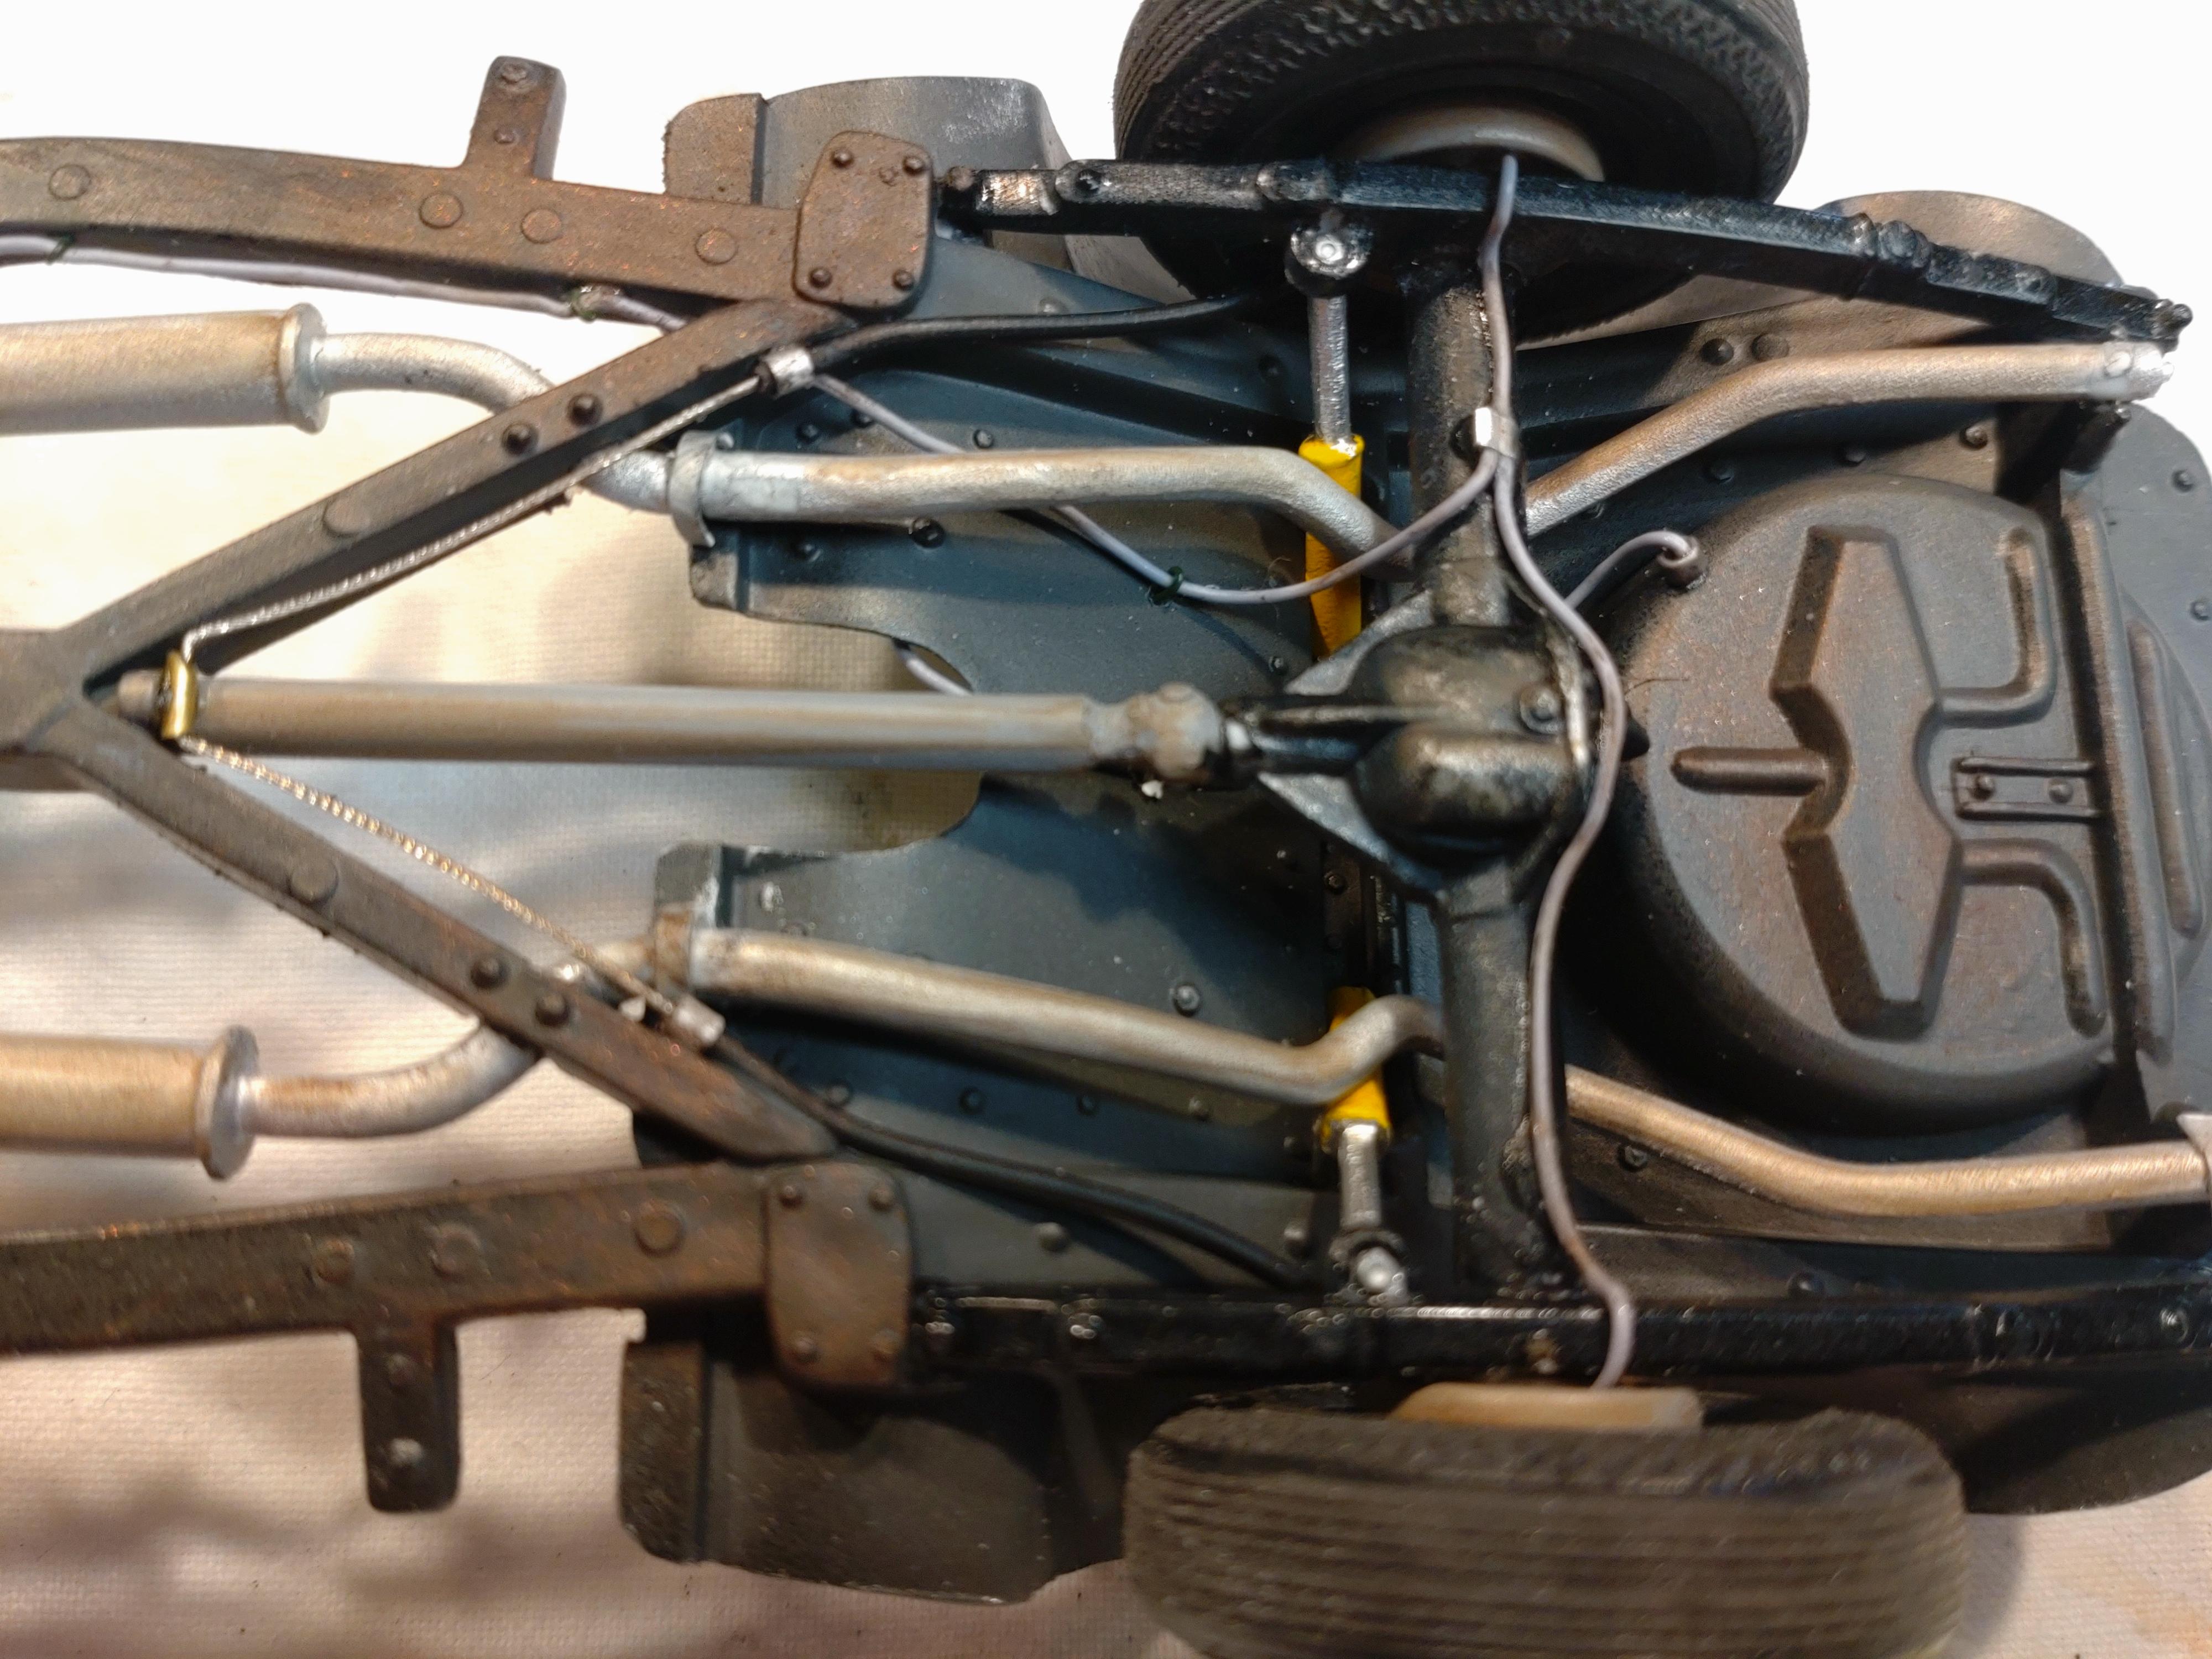
Thanks for your kind replies! This is an AMT/ERTL Prestige kit. The box is a bit bigger than the usual kits. Well, prestige.... The overall quality is the usual standard, but you get opening doors, which need some serious working to fit. I feel sad for the builder who dosn´t think about that at the beginning and ends up with non-closing doors. Oh yeah, and you get a bunch of parts like a trophy and so on.. that must be the PRESTIGE. ? The chassis is done now. I added the brake and fuel lines and gave it a bit of weathering. The steering is very nice and will make the model look much better on the shelf. Connecting the exhaust system.. The brake lines to the rear axle. I simply use super glue. For the parking brake line I have found a very thin cable in the jewelry corner of my crafts store. Ii stays straight with a certain tension but is elastic enough to go around corners. Unfortunately the front disc brakes will almost disappear. I highlighted the front suspension with micro etched hex nuts. It dosn´t show well here but the front springs are made of 1mm aluminum wire. Undercarriage completed. Now I´m sanding the body and looking forward to painting. Happy this time that I have no body work to putty, so the spraying should go easy. IF something evil dosn´t happen? Thanks for watching!
-
´63 Studebaker Avanti stock build
Andy Oldenburg replied to Andy Oldenburg's topic in WIP: Model Cars
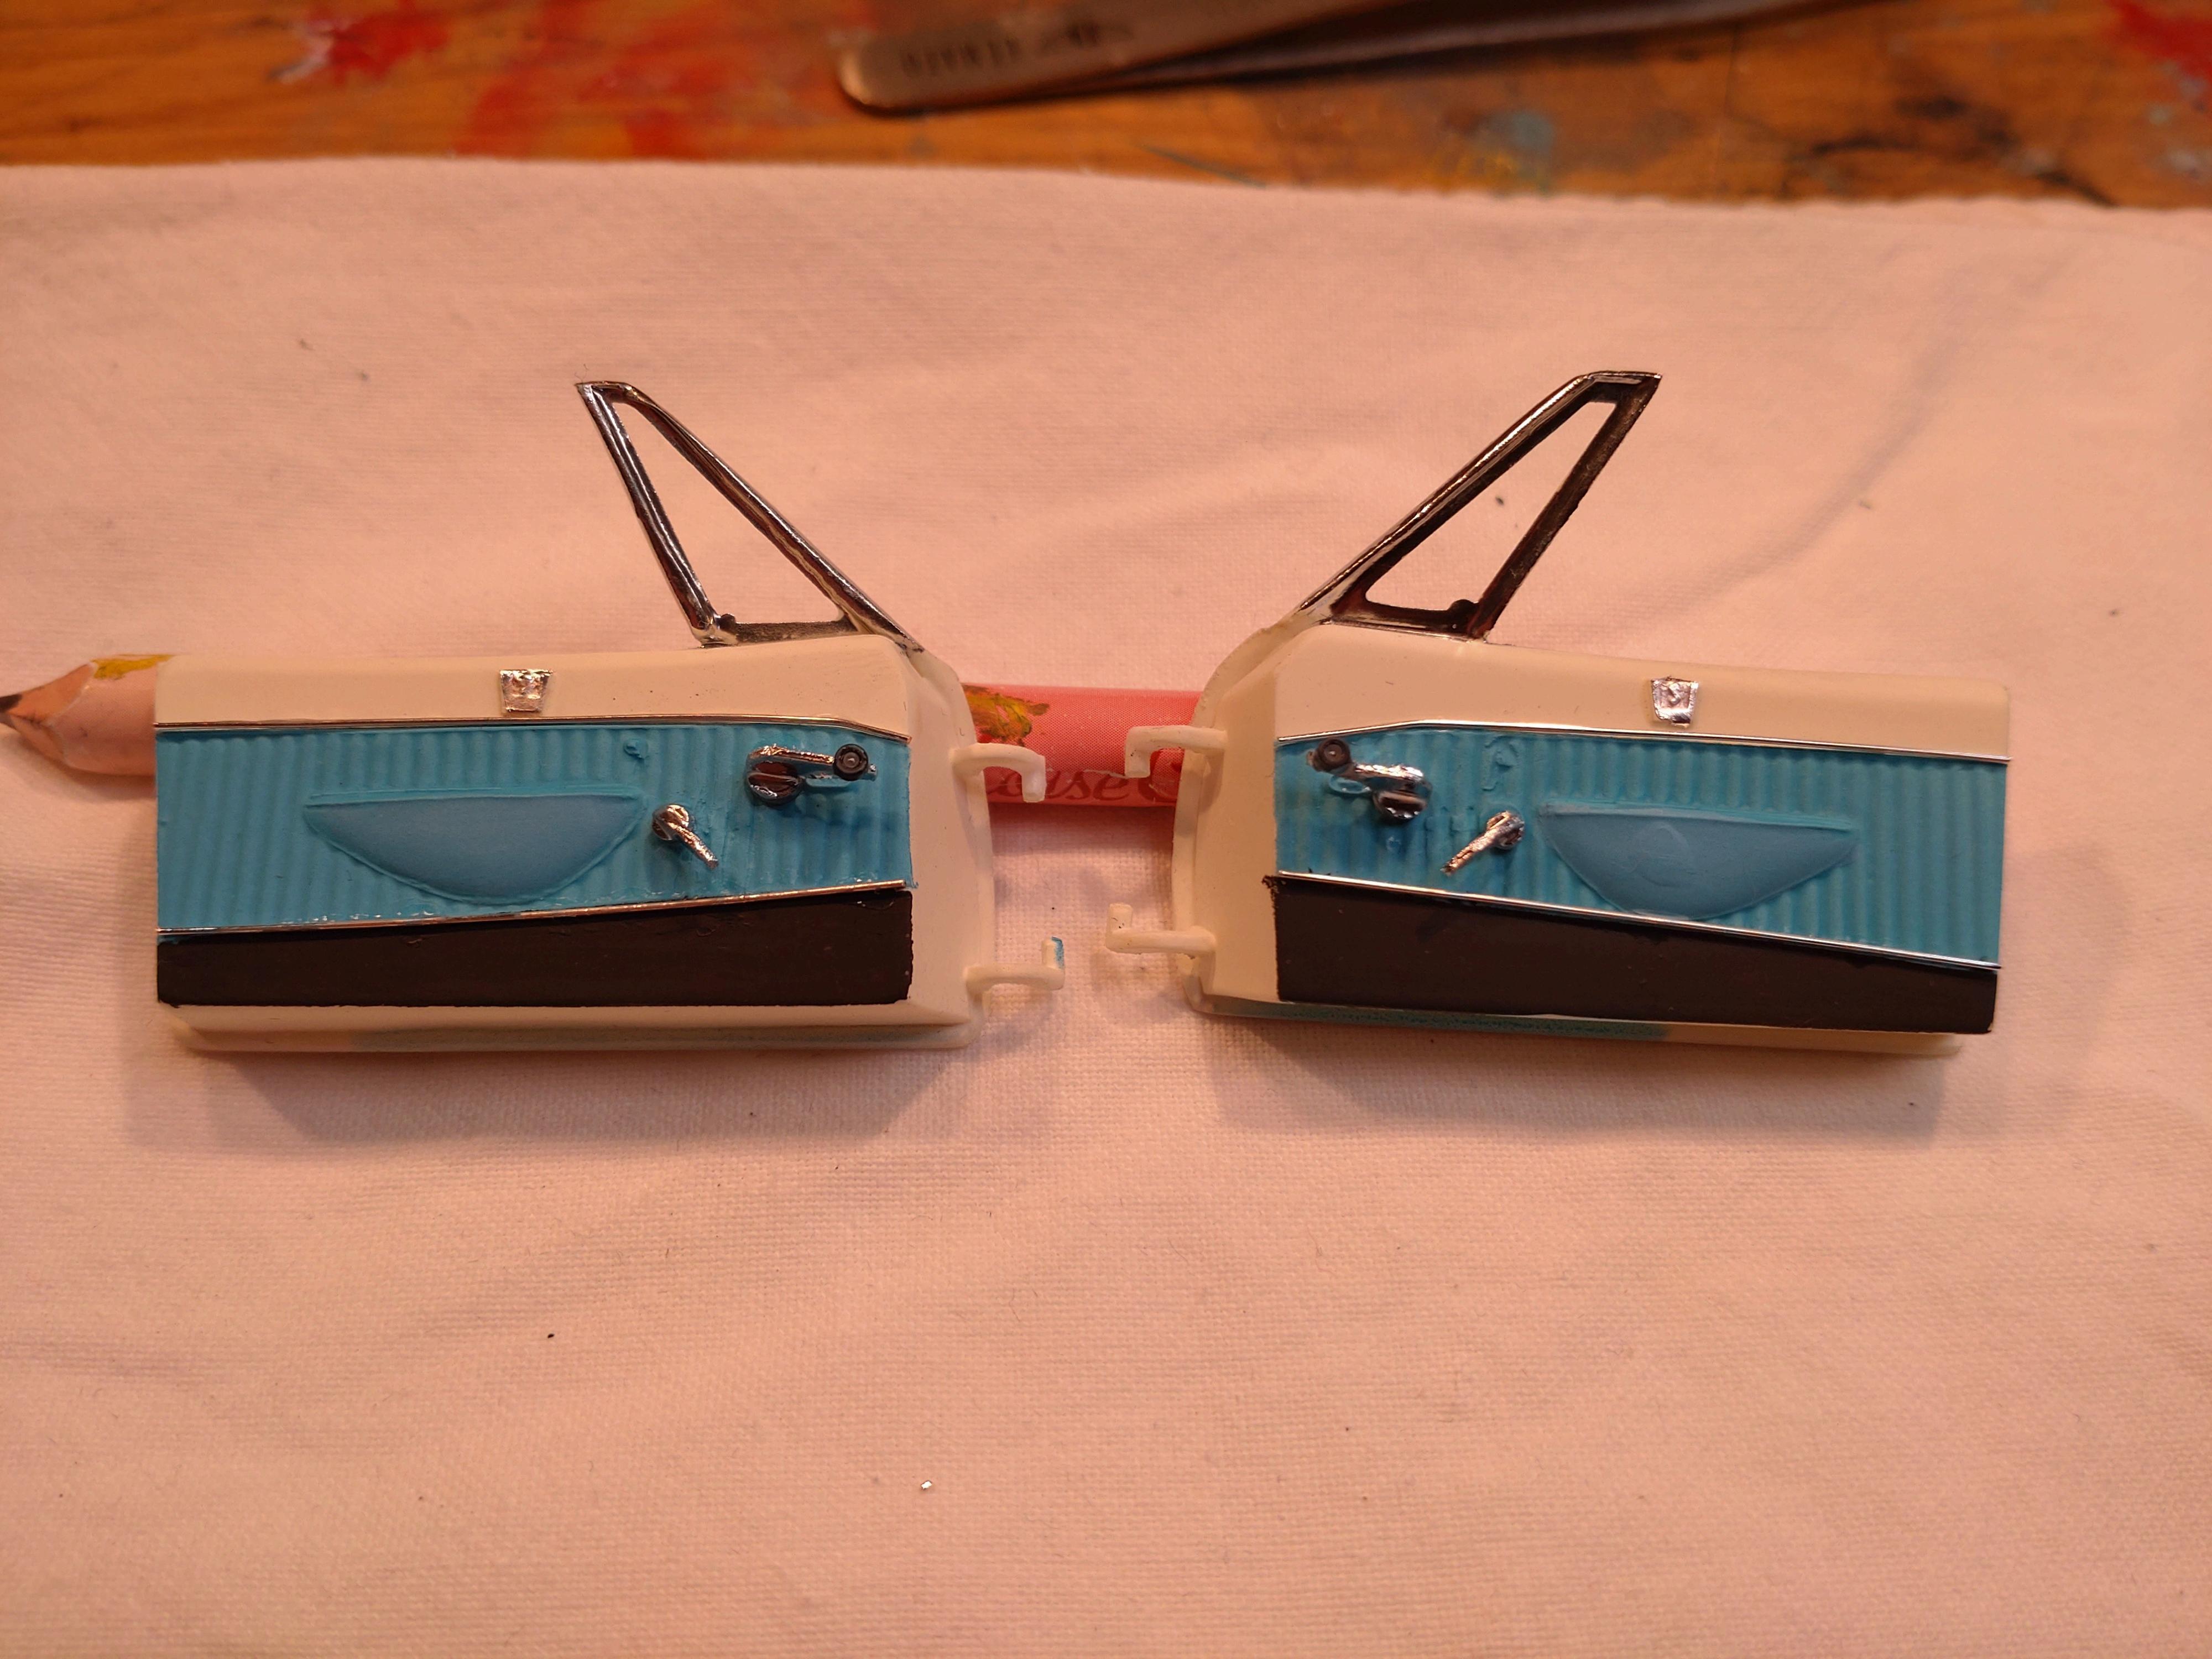
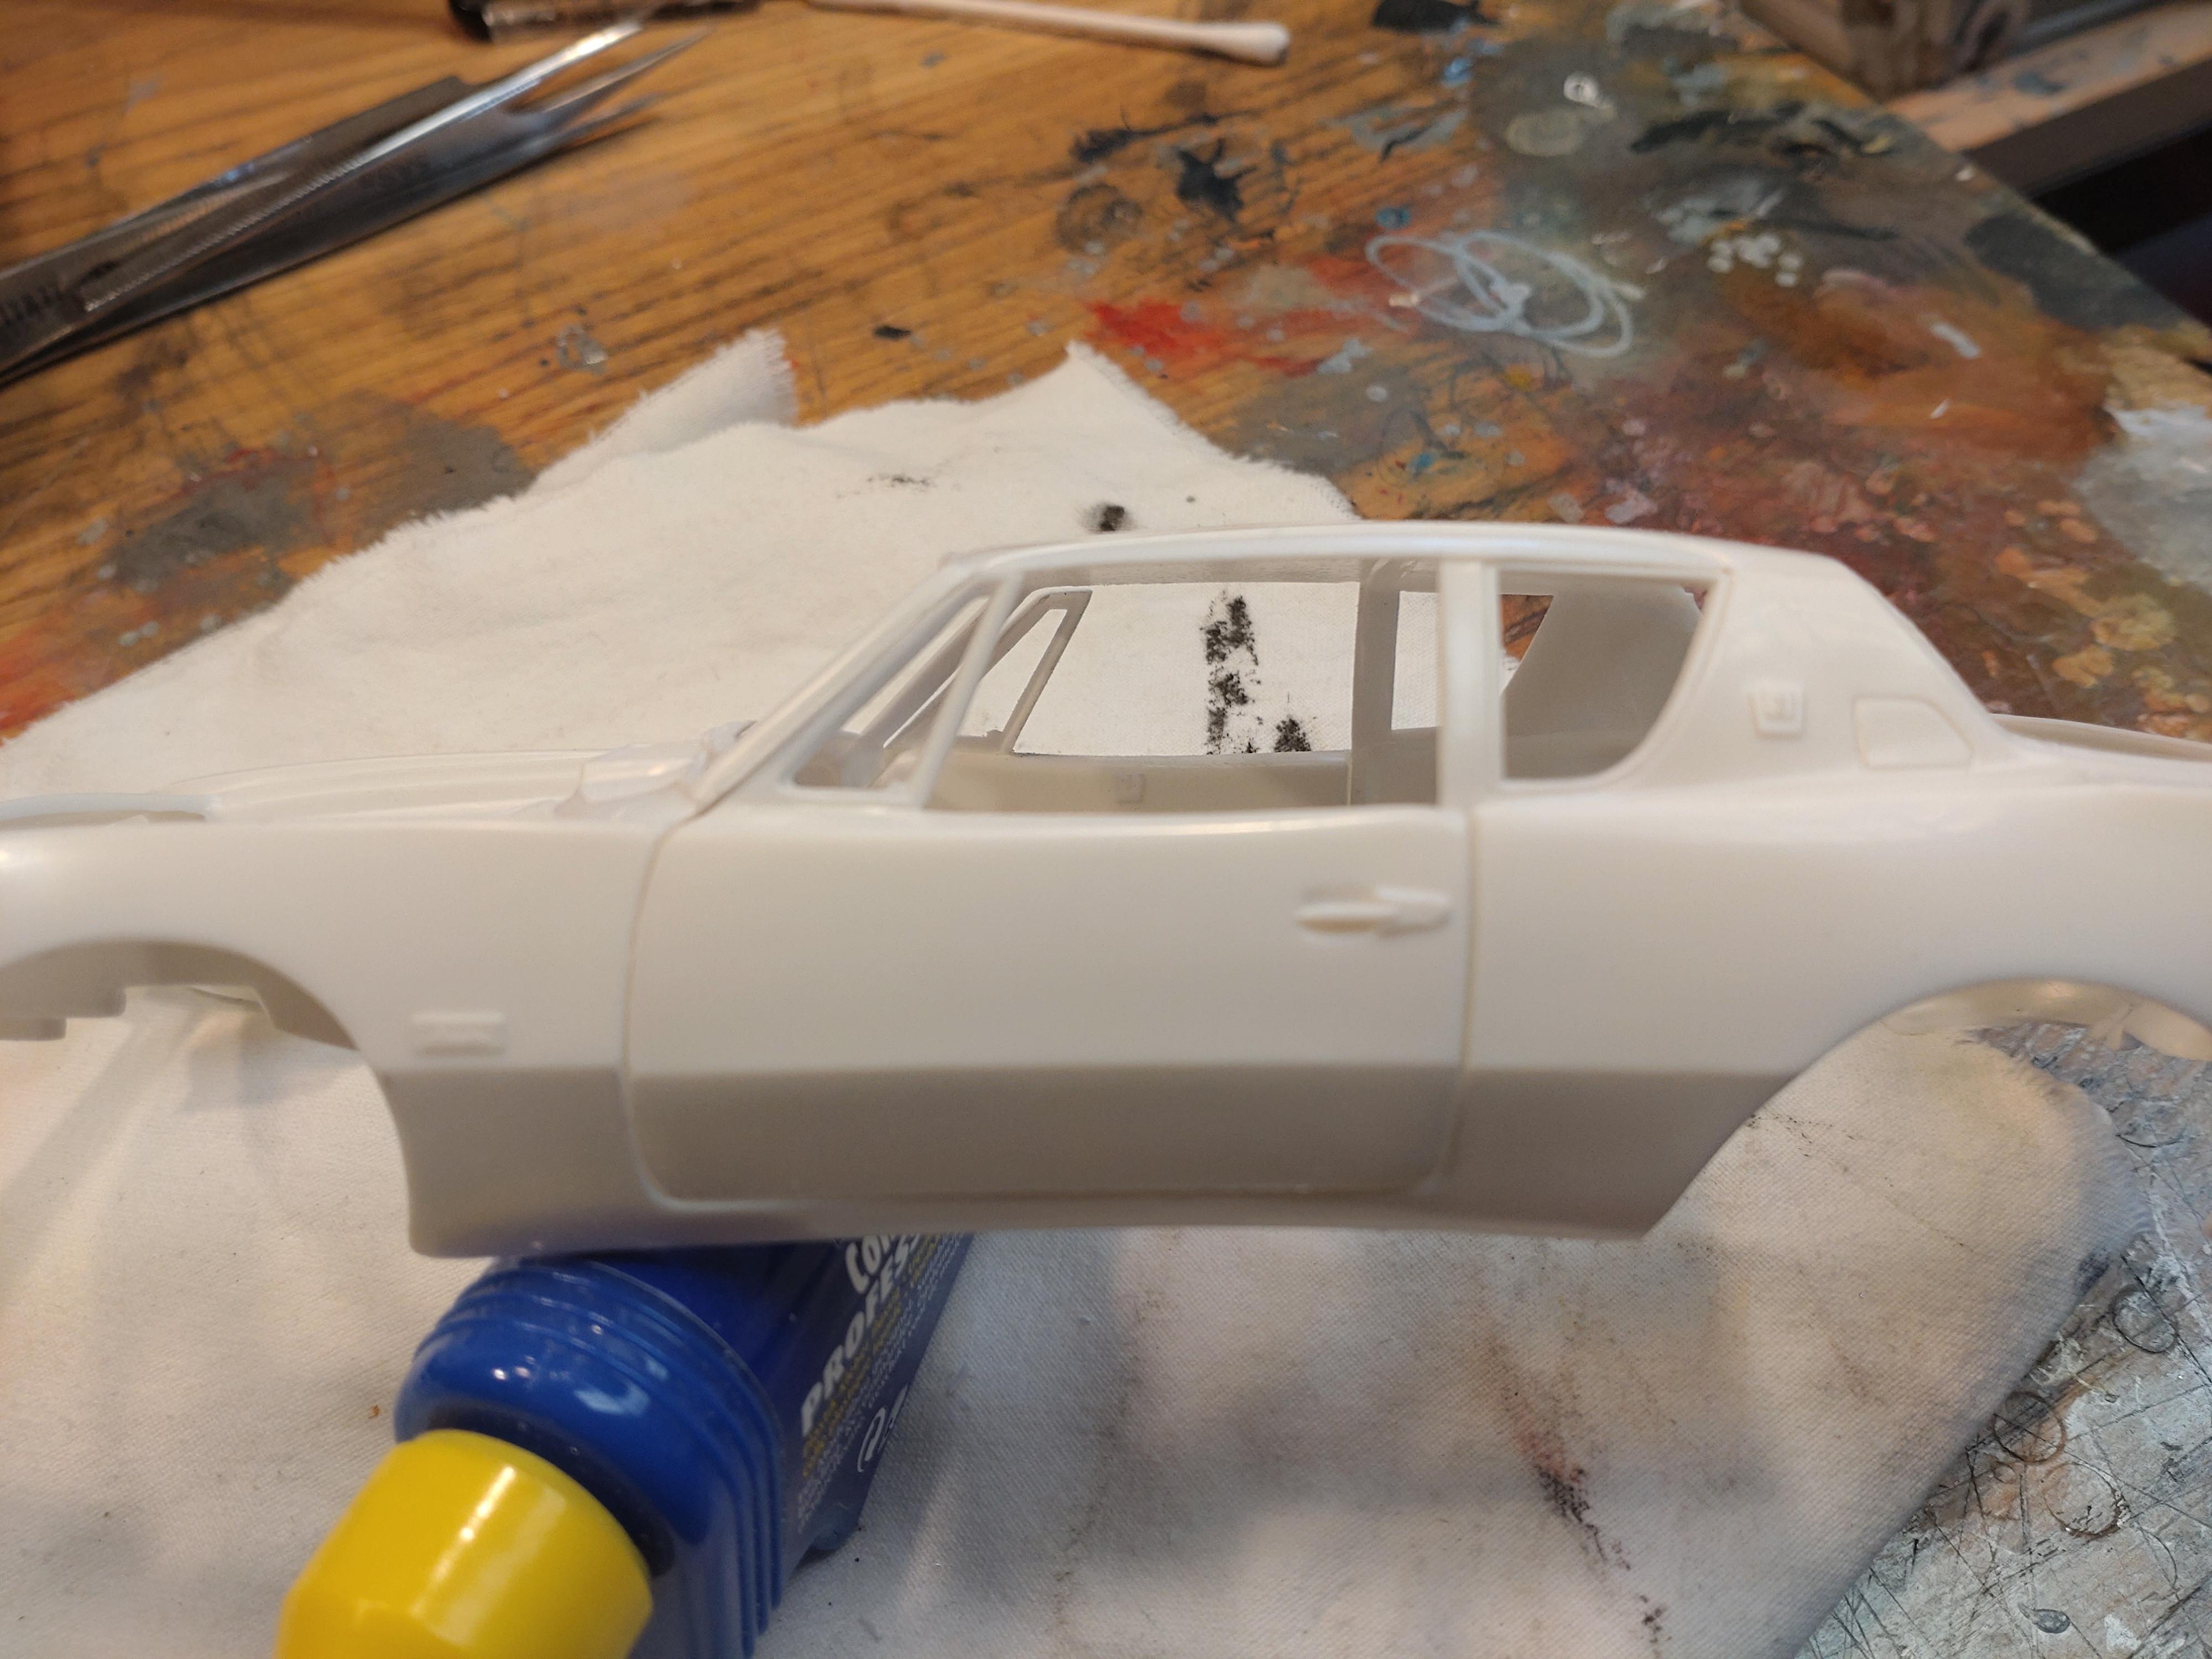
I´m moving on with the interior. The kit parts are quite clean, but of low detail. No decals for the dash either, hmmm. I made the best of it and enhanced the gauges with a wash and tipped in a bit of red with a gel pen. The Gauge rings and all the chrome trim are bent to shape with .4mm silver coated wire from a craft shop. For the other chrome parts I used bare metal and Molotow chrome, which I apply with a fine brush. The seats received a little smudge and the front seats belts. The floor is flocked. After I discovered the hand pulled parking brake on a image I had to add that. The door panels have only a hint of handles. I cut that off and crafted handles and the window cranks from styrene. After gluing the parts I sanded them into a correct shape with diamond files. The shine is Molotow chrome and the knobs are beads. Next step is the undercarriage. Thanks for watching!
-
Stunning build with all those scrap parts. Creativity meets craftsmanship! Pls tell me you NOT going for a "patina" paint job. This baby needs something special!
-
Great ideas around this rod! Very creative input for me. I have been using brass rods for different purposes for a while and until now haven´t had the need to solder them. But now I have seen that trick, I know I will need to apply it soon.
-
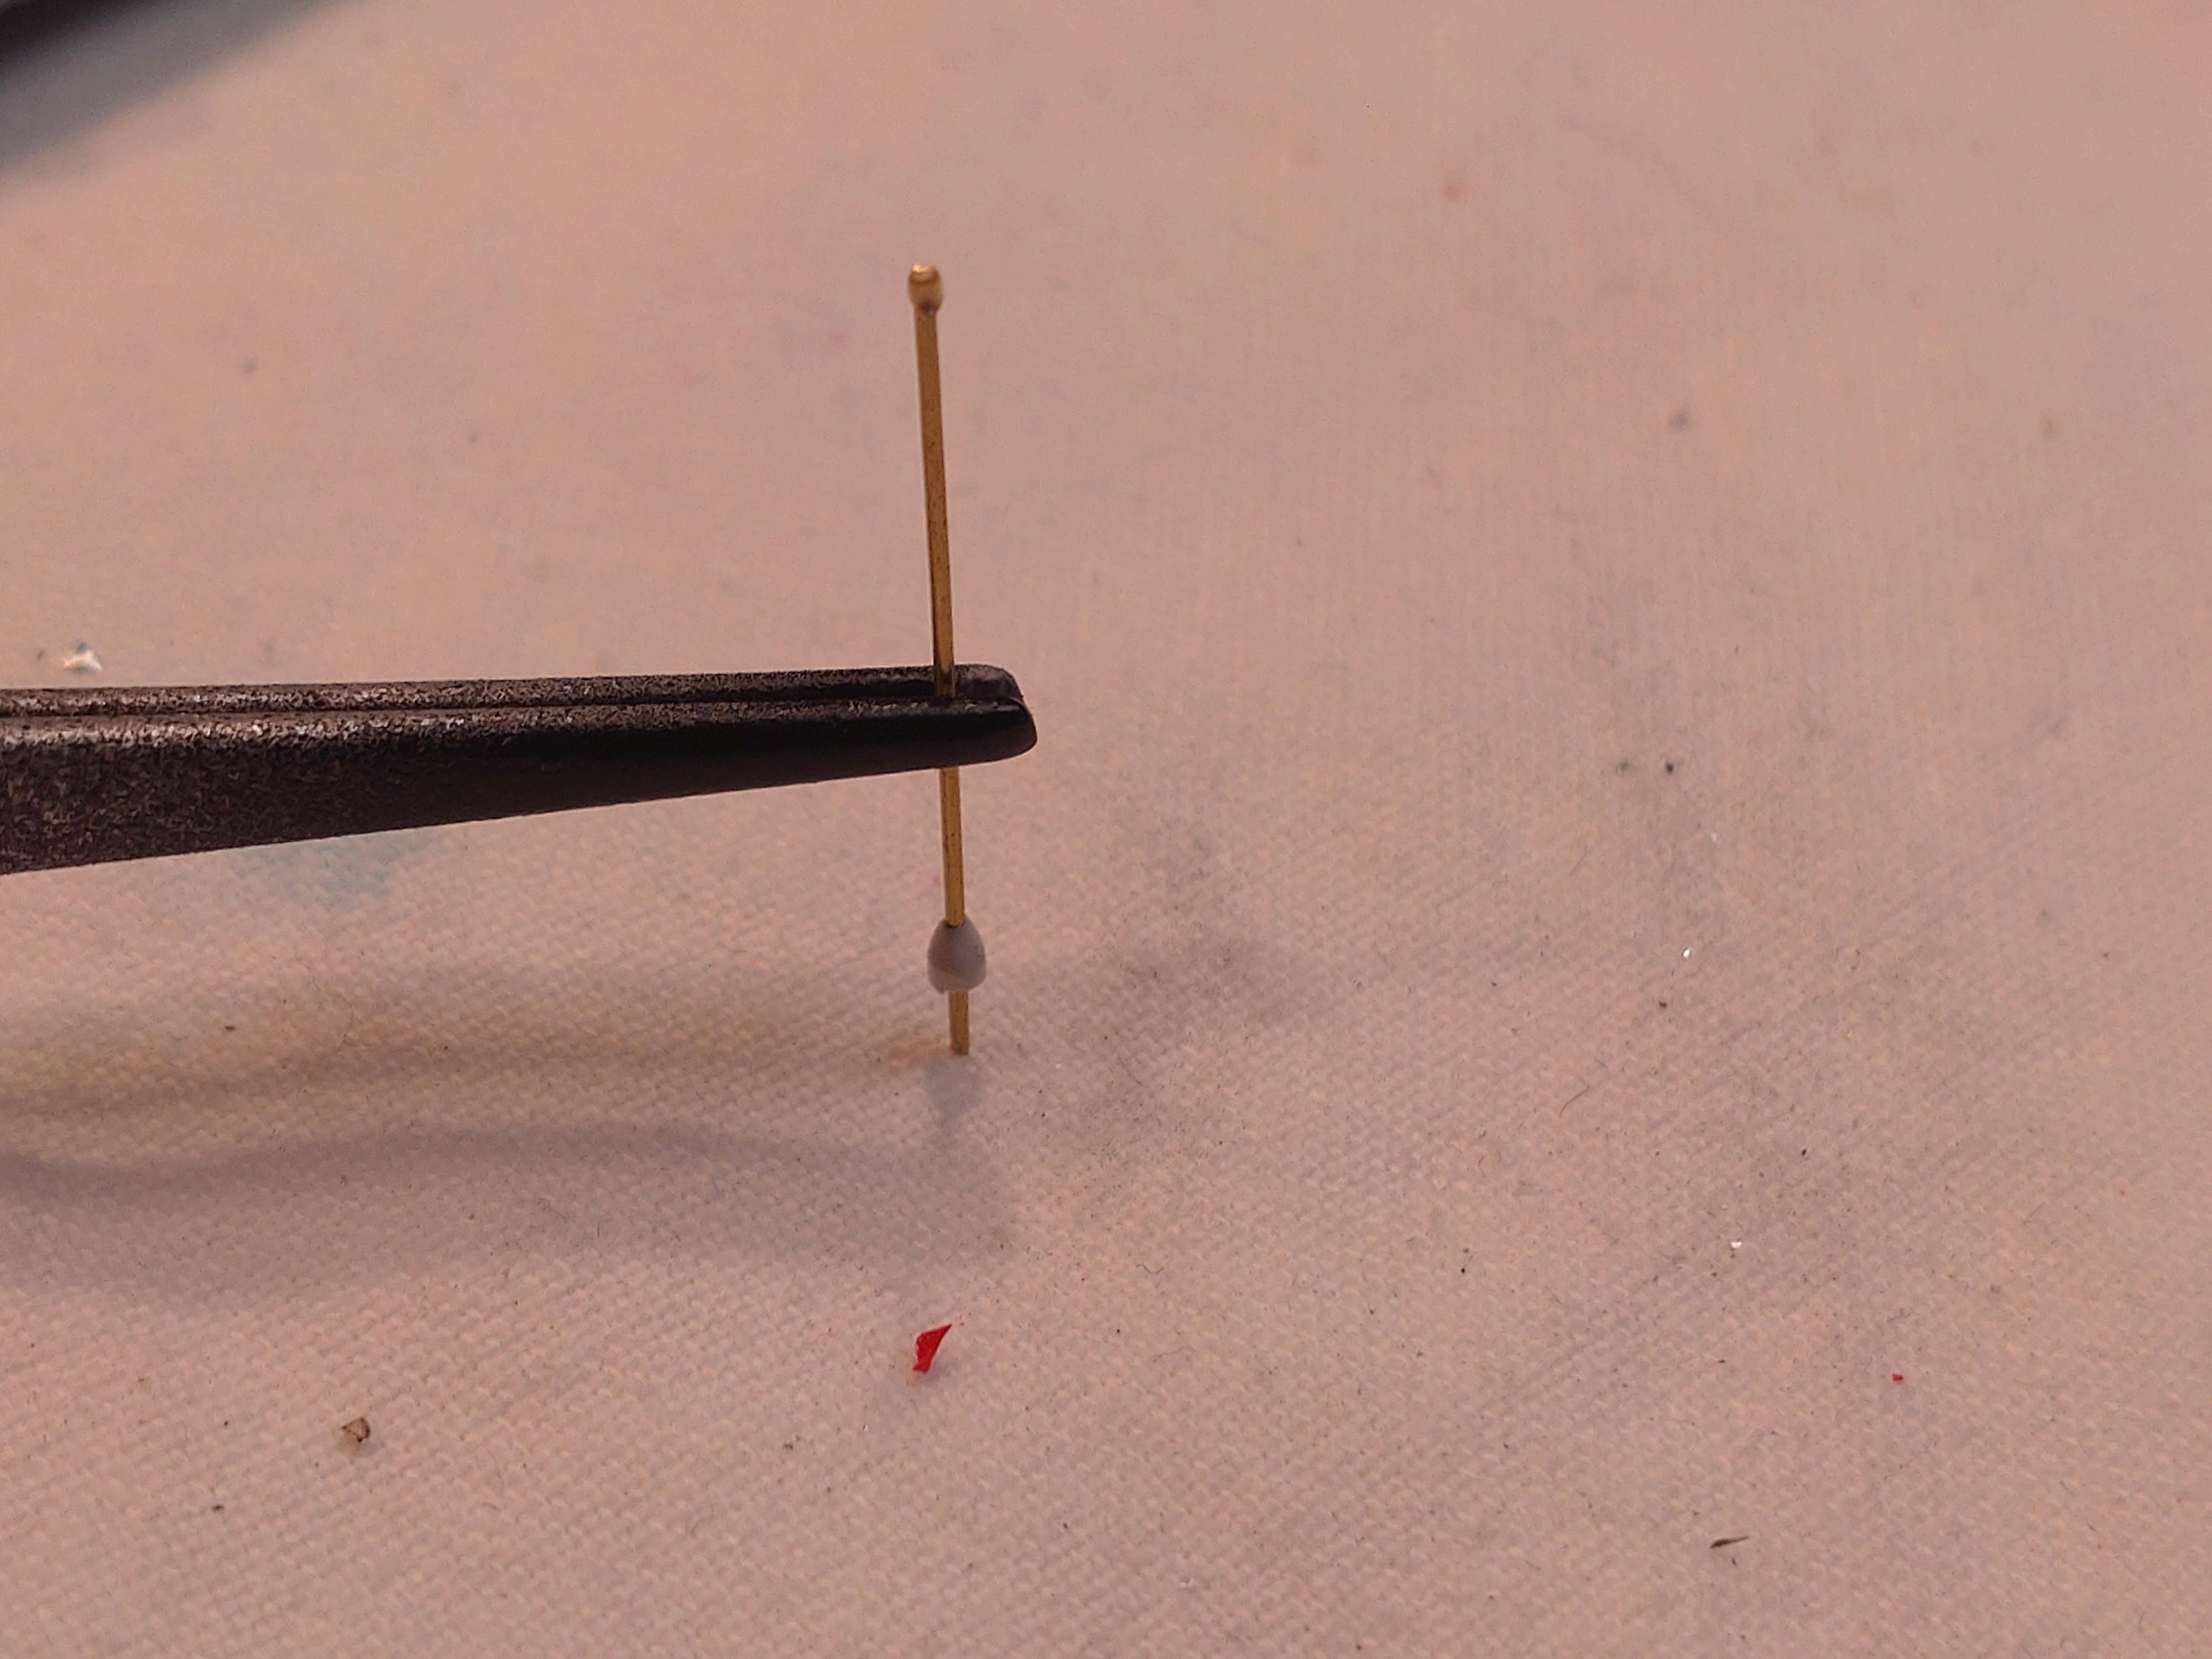
I´ve been keen on building this kit for a while. A school buddy´s dad had one (I´m talking about the the late ´60s) and I remember him always bragging about his dad drag racing it. May be true or not, but the Avanti had the muscle to race. Just got finished with the engine with a mild aging. It was a bit tricky getting some details sorted out. This wasn´t a common car and there are not so many images out there so I did my best to get as much a possible correct. Pls excuse if some lines and cables are not laid out correctly. The double belt drive seems unique to me and made up for some crafting time. I deconstructed the pulley part and after sanding the flywheels flat I added slices of styrene. I hope this dosn´t get too big in the end. Lets see what the first mockup will bring.... With the Paxton compressor connected and grime applied... The belts needed cool nerves and patience. I connect the pulley wheels to the block with 1mm brass wire. That way they can easily take the tension of the synthetic rubber belts. These I cut from a thin rubber mat. I´m happy how the engine turned out. I´ve started with the interior now but first I had to make sure that the doors fit. Of COURSE they didn´t fit?? I have learned to sand off a bit more than necessary to keep some space for the paint. Looks like it will go well. The door panels are attached now and I can go on with the interior. Thanks fir watching!
-
Hello Jim, impressive work on your hotty! Like the road your going on and am looking forward to the progress. I always get envious of you guys with printers! btw - Is that German beer those girls are drinking??
-
Hi Ron, a wonderful challenge and in the end it will be a rewarding beautiful conversion. Like what you doing!?
-
Johan ‘70 Cadillac ElDorado pro touring (low and aggressive)
Andy Oldenburg replied to Steve H's topic in WIP: Model Cars
Hi Steve, Great work on the bumpers? Quality work takes it´s time, so better going sloooow than messing things in a hurry. Take a Zen approach and go to the next step when you feel really good with your results. Am looking forward to the next pics!


.JPG.32a4ff07777f1e717d9e82c0ac141a46.JPG)
.JPG.3113334bc3a36bbc4945fac22b85d79c.JPG)
.JPG.ee77f56a38869302e04722fbe7e41b61.JPG)
.JPG.d22ee0fb24742431020c9b2da15bcfba.JPG)
.JPG.a160e46df0641af64678be54b610fb5e.JPG)
.JPG.d7d2002659a0a8896289e02280575f5f.JPG)
.JPG.41b66c319b740bd4fdc3e95e4e05b951.JPG)
.JPG.d6ac9d6a655219e1dc47728917c4743d.JPG)
.JPG.b24c158603740463e3bbeca9fd91c890.JPG)
.JPG.6eba8d185d07812f30a73e355cabf6fe.JPG)