Andy Oldenburg
-
Posts
345 -
Joined
-
Last visited
Content Type
Profiles
Forums
Events
Gallery
Everything posted by Andy Oldenburg
-
Thanks everybody for your kind response!
-
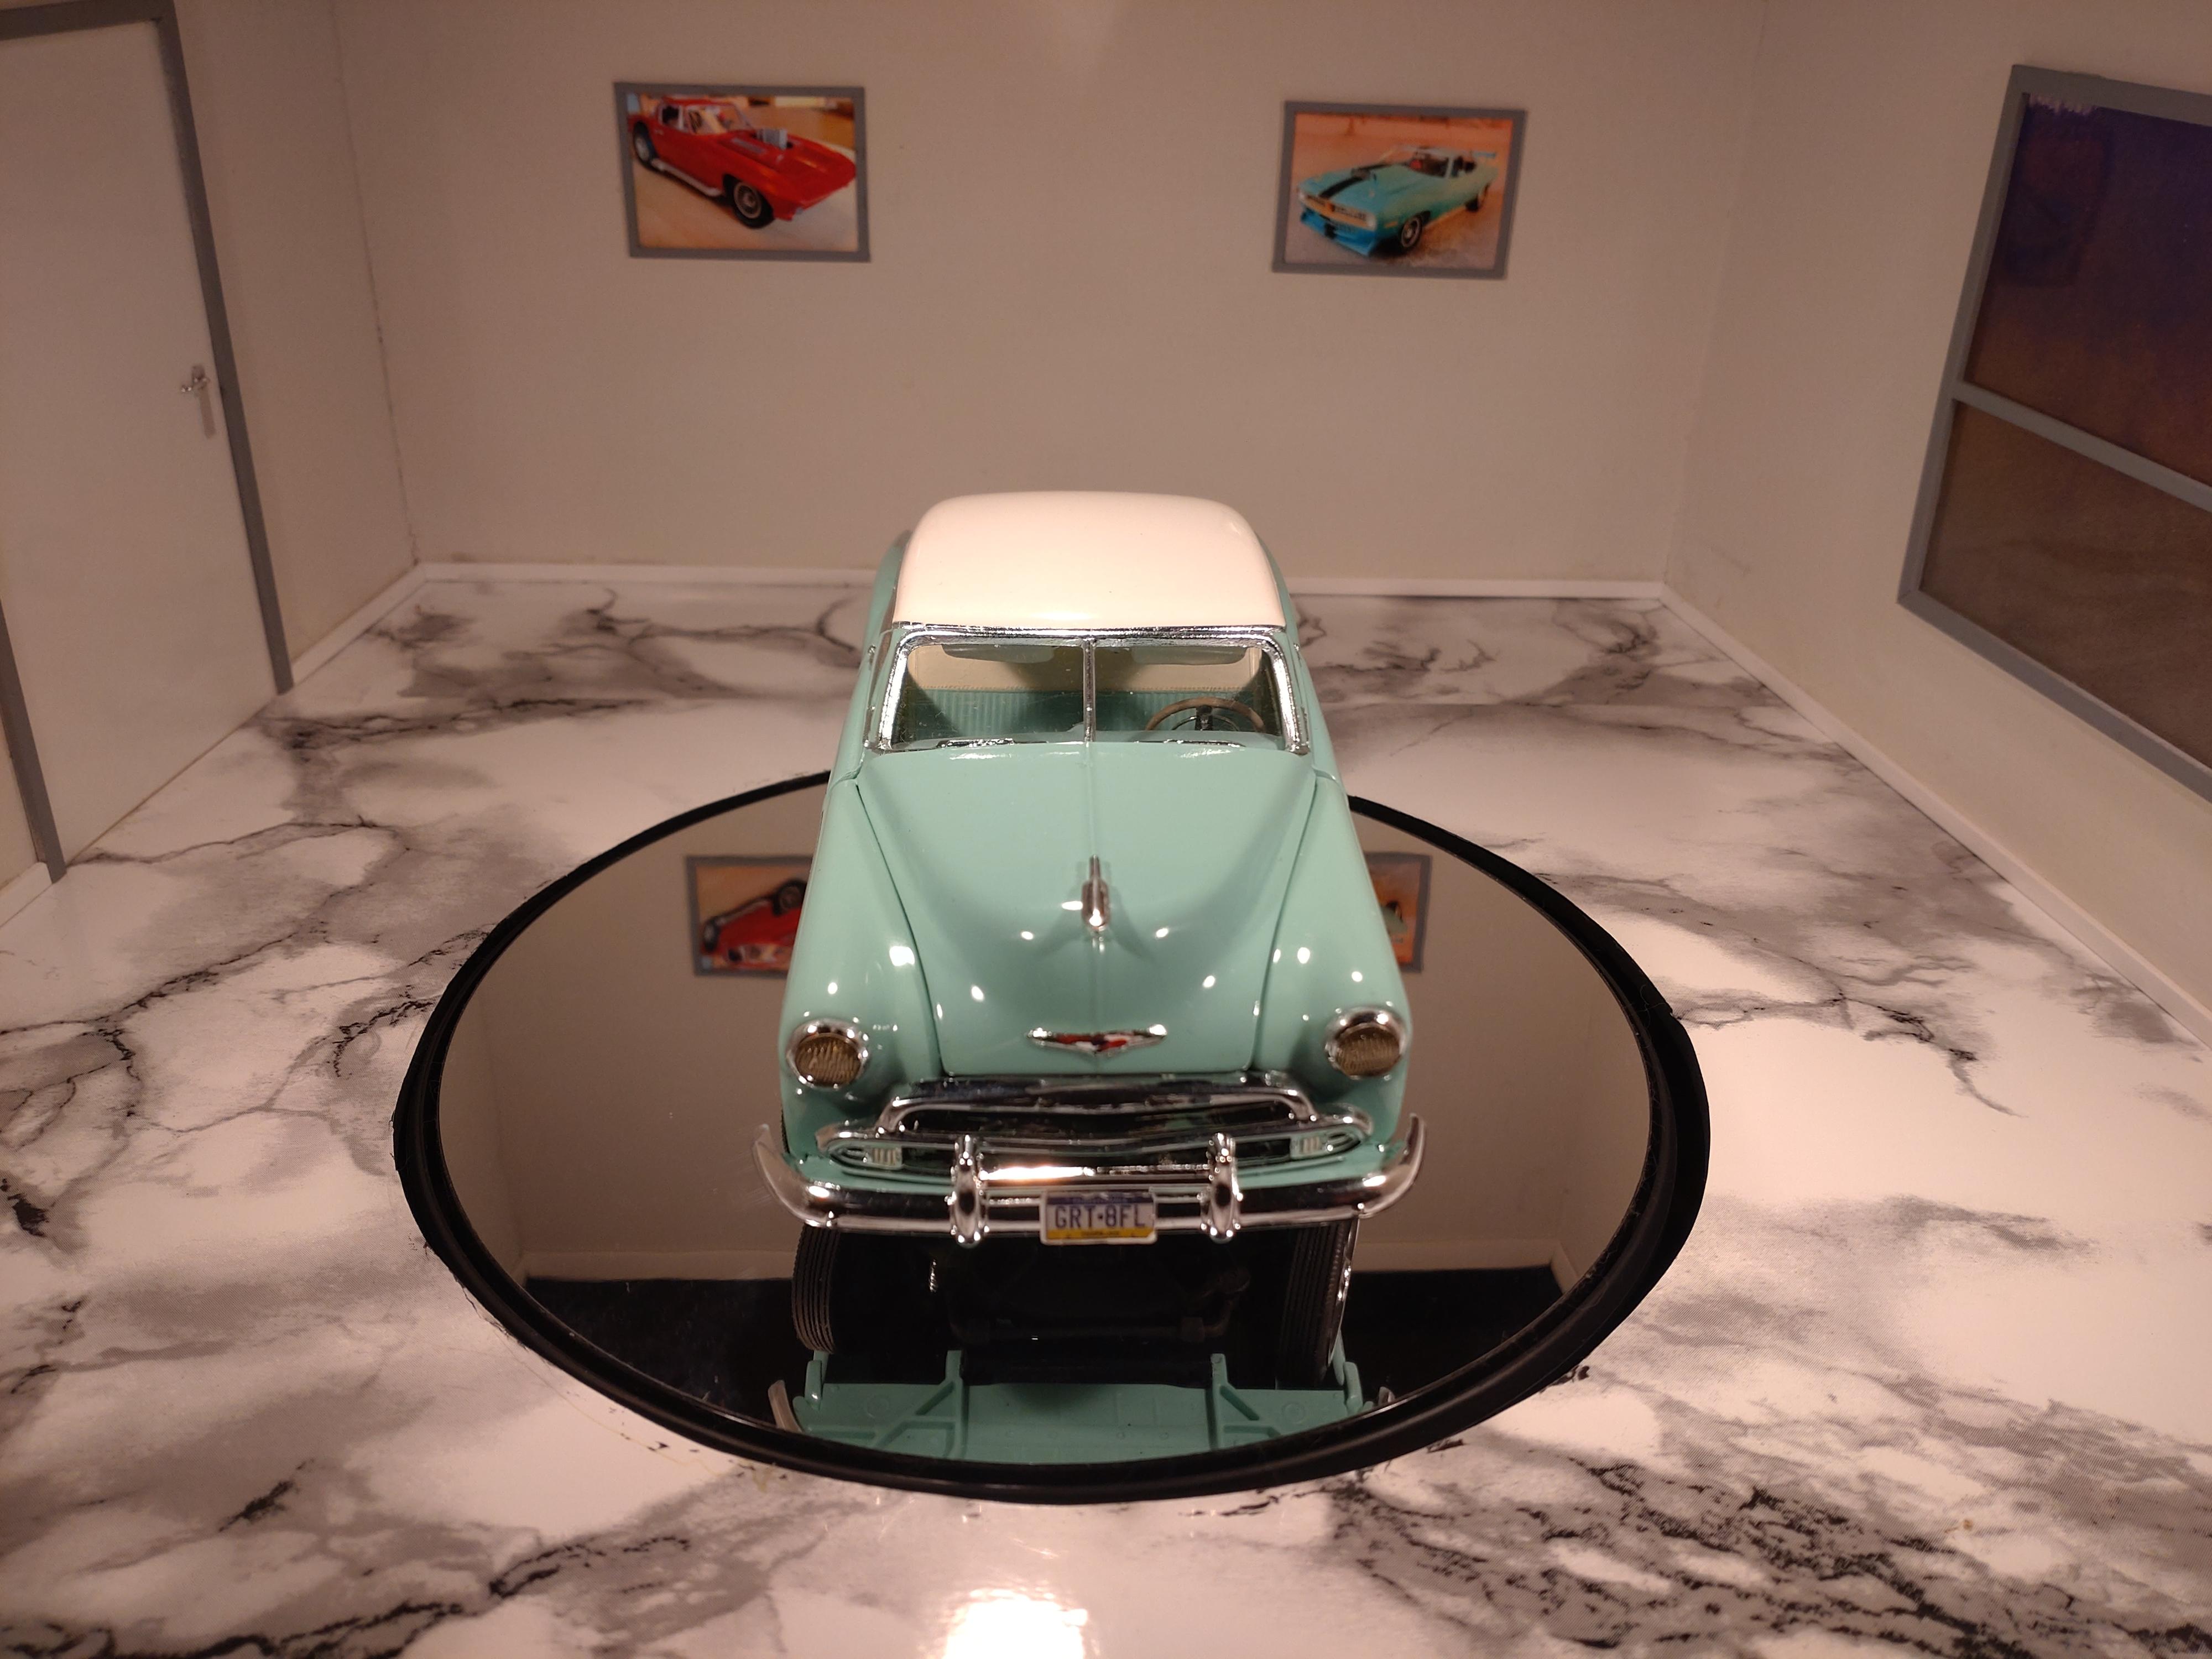
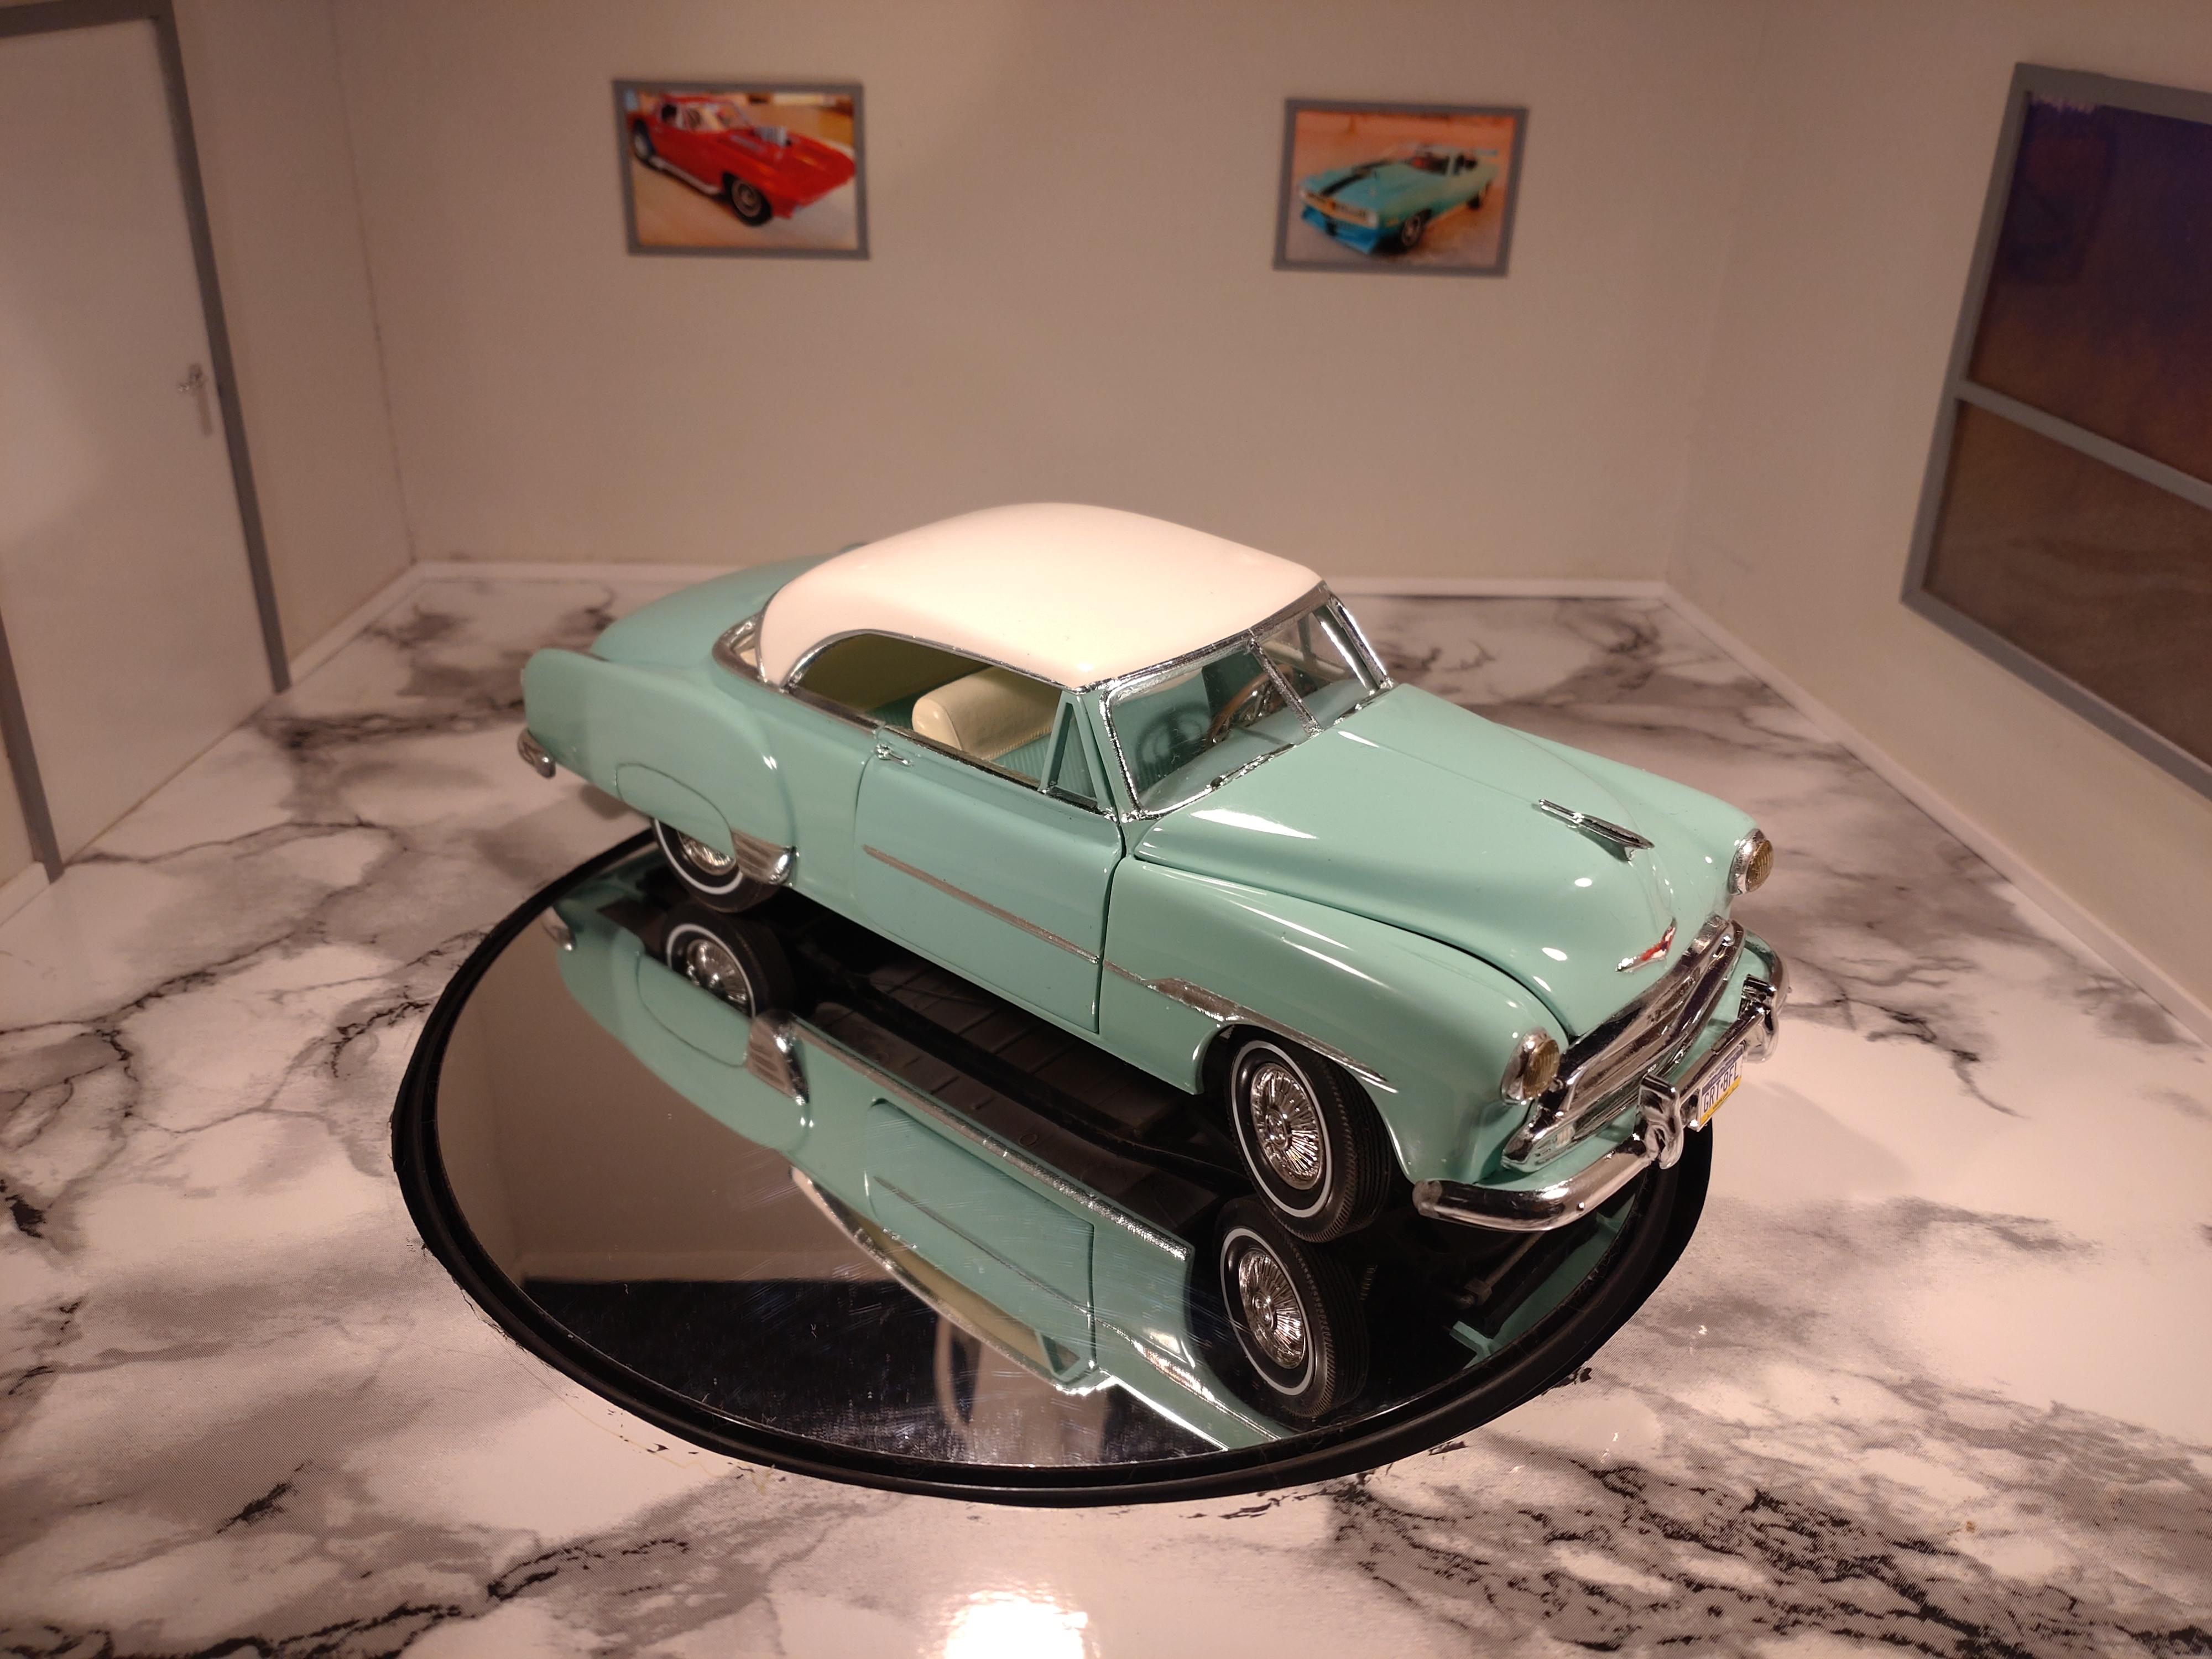
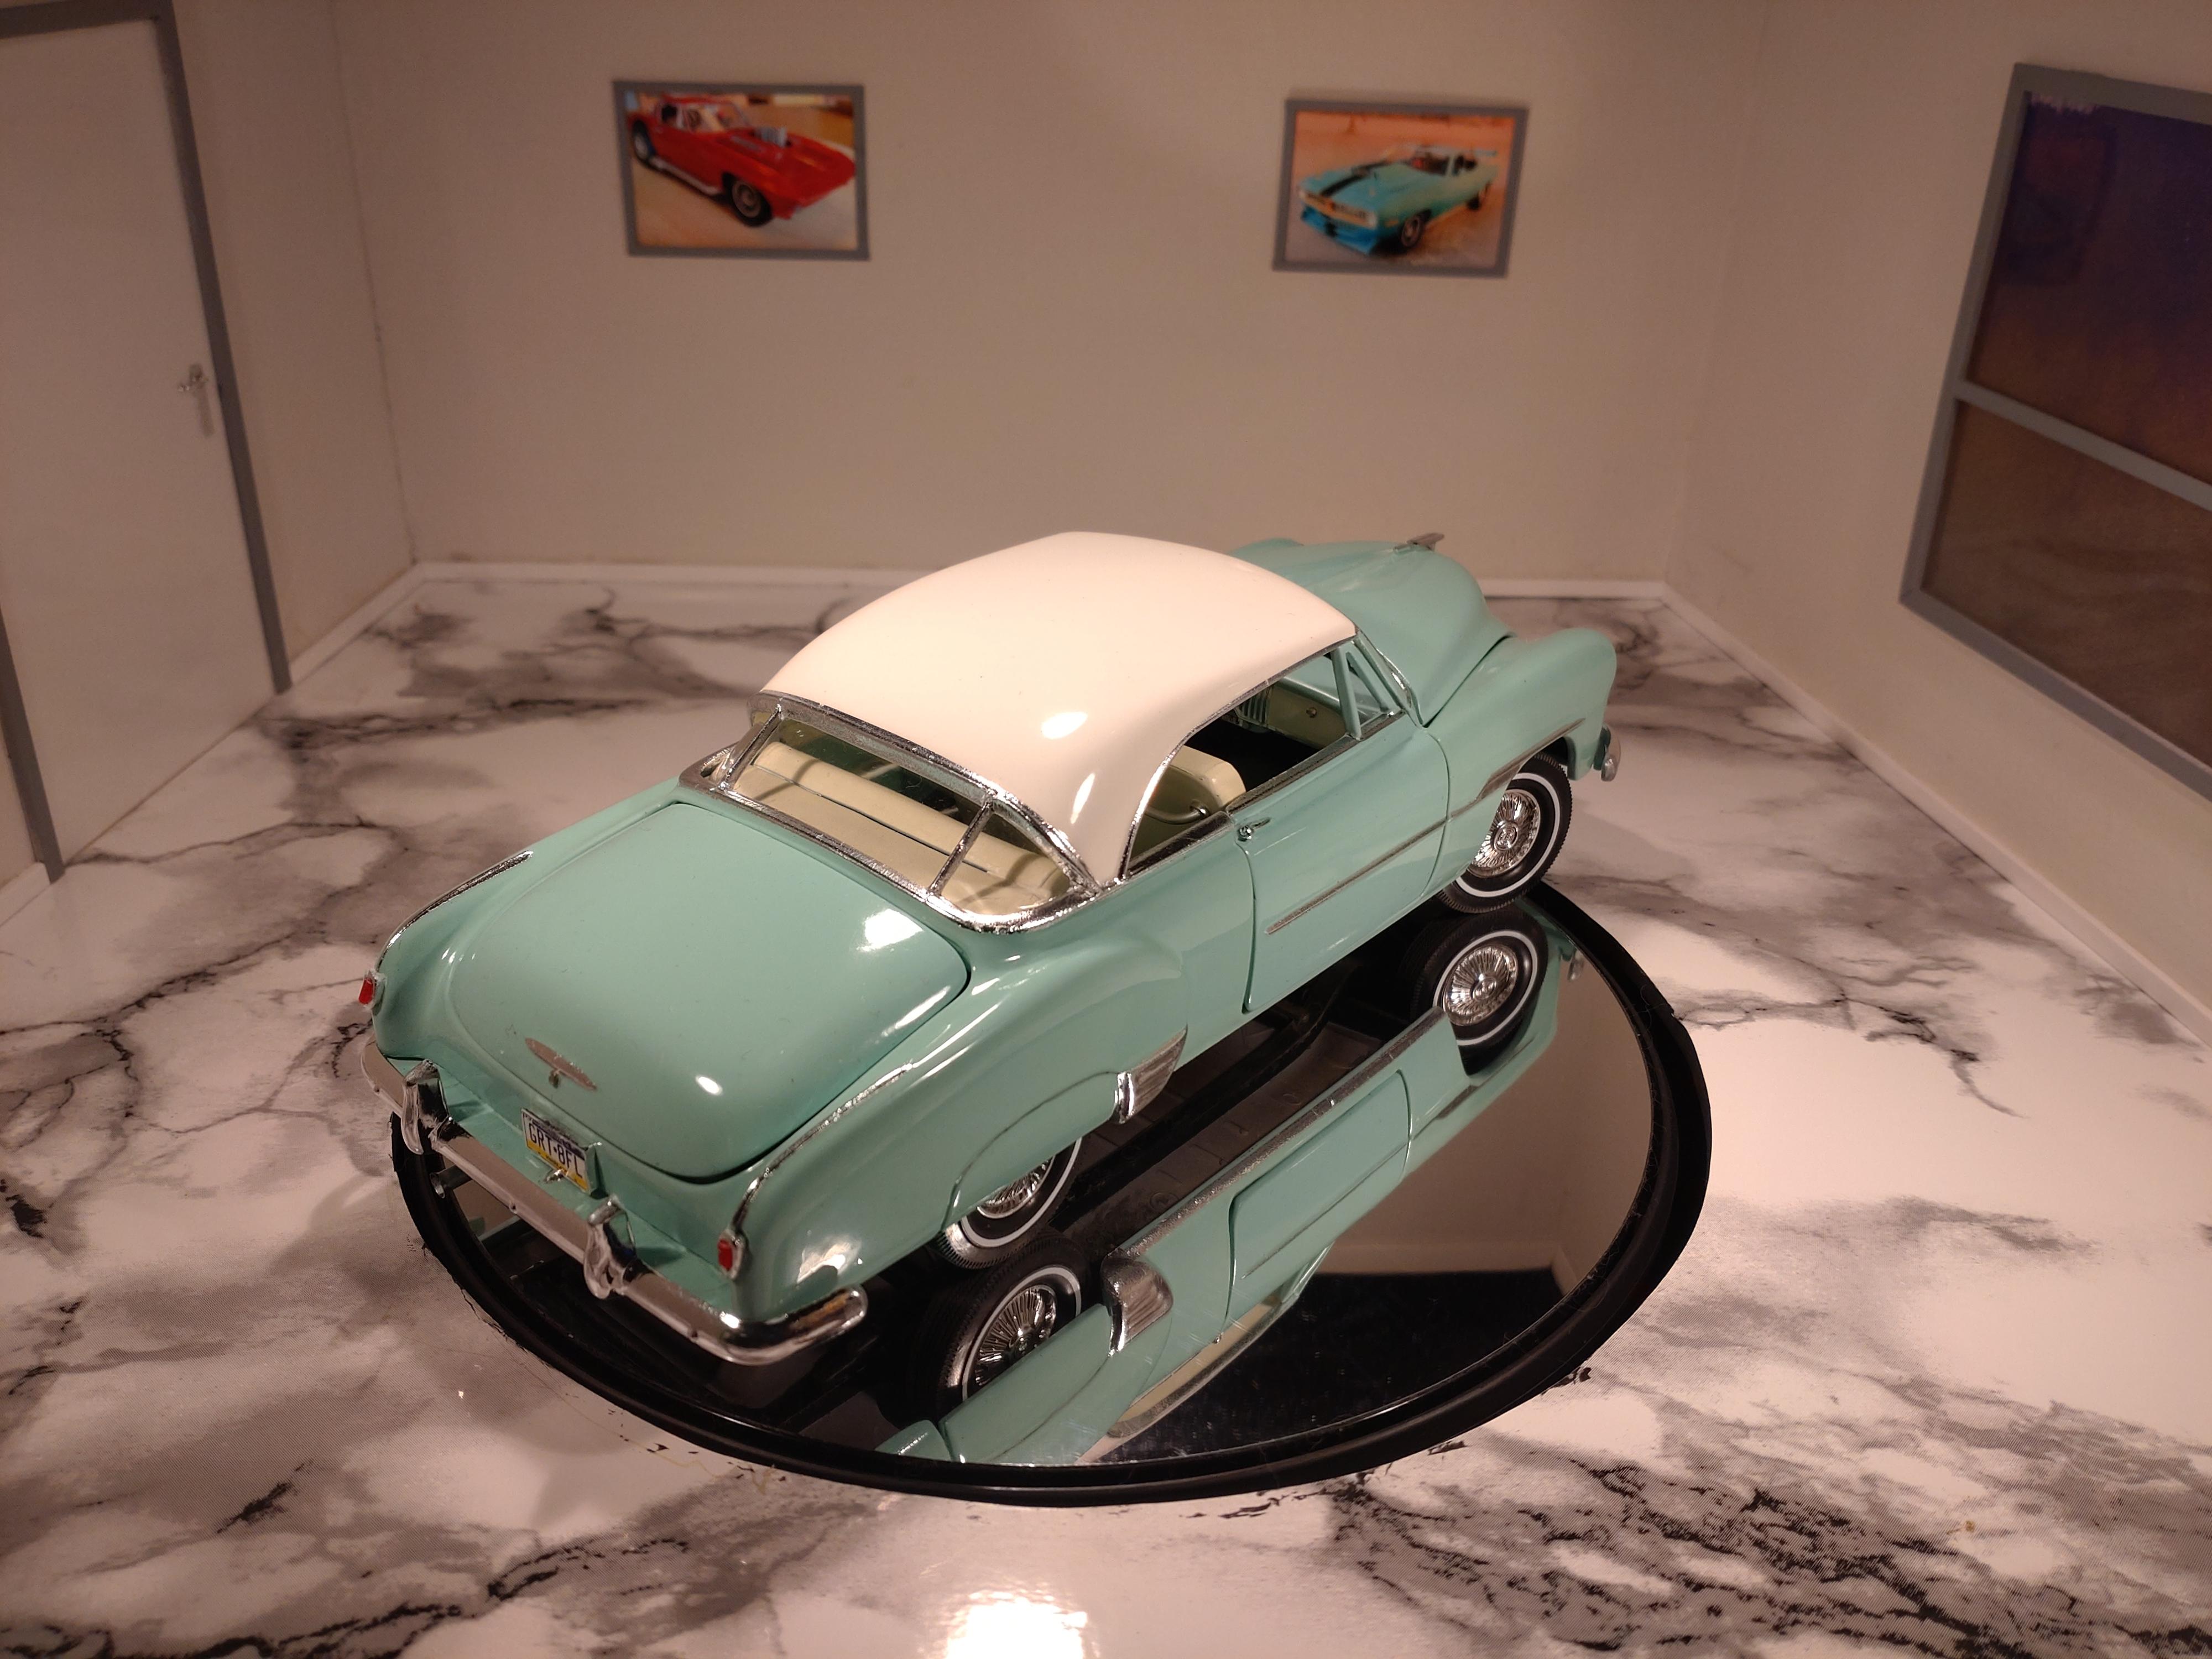
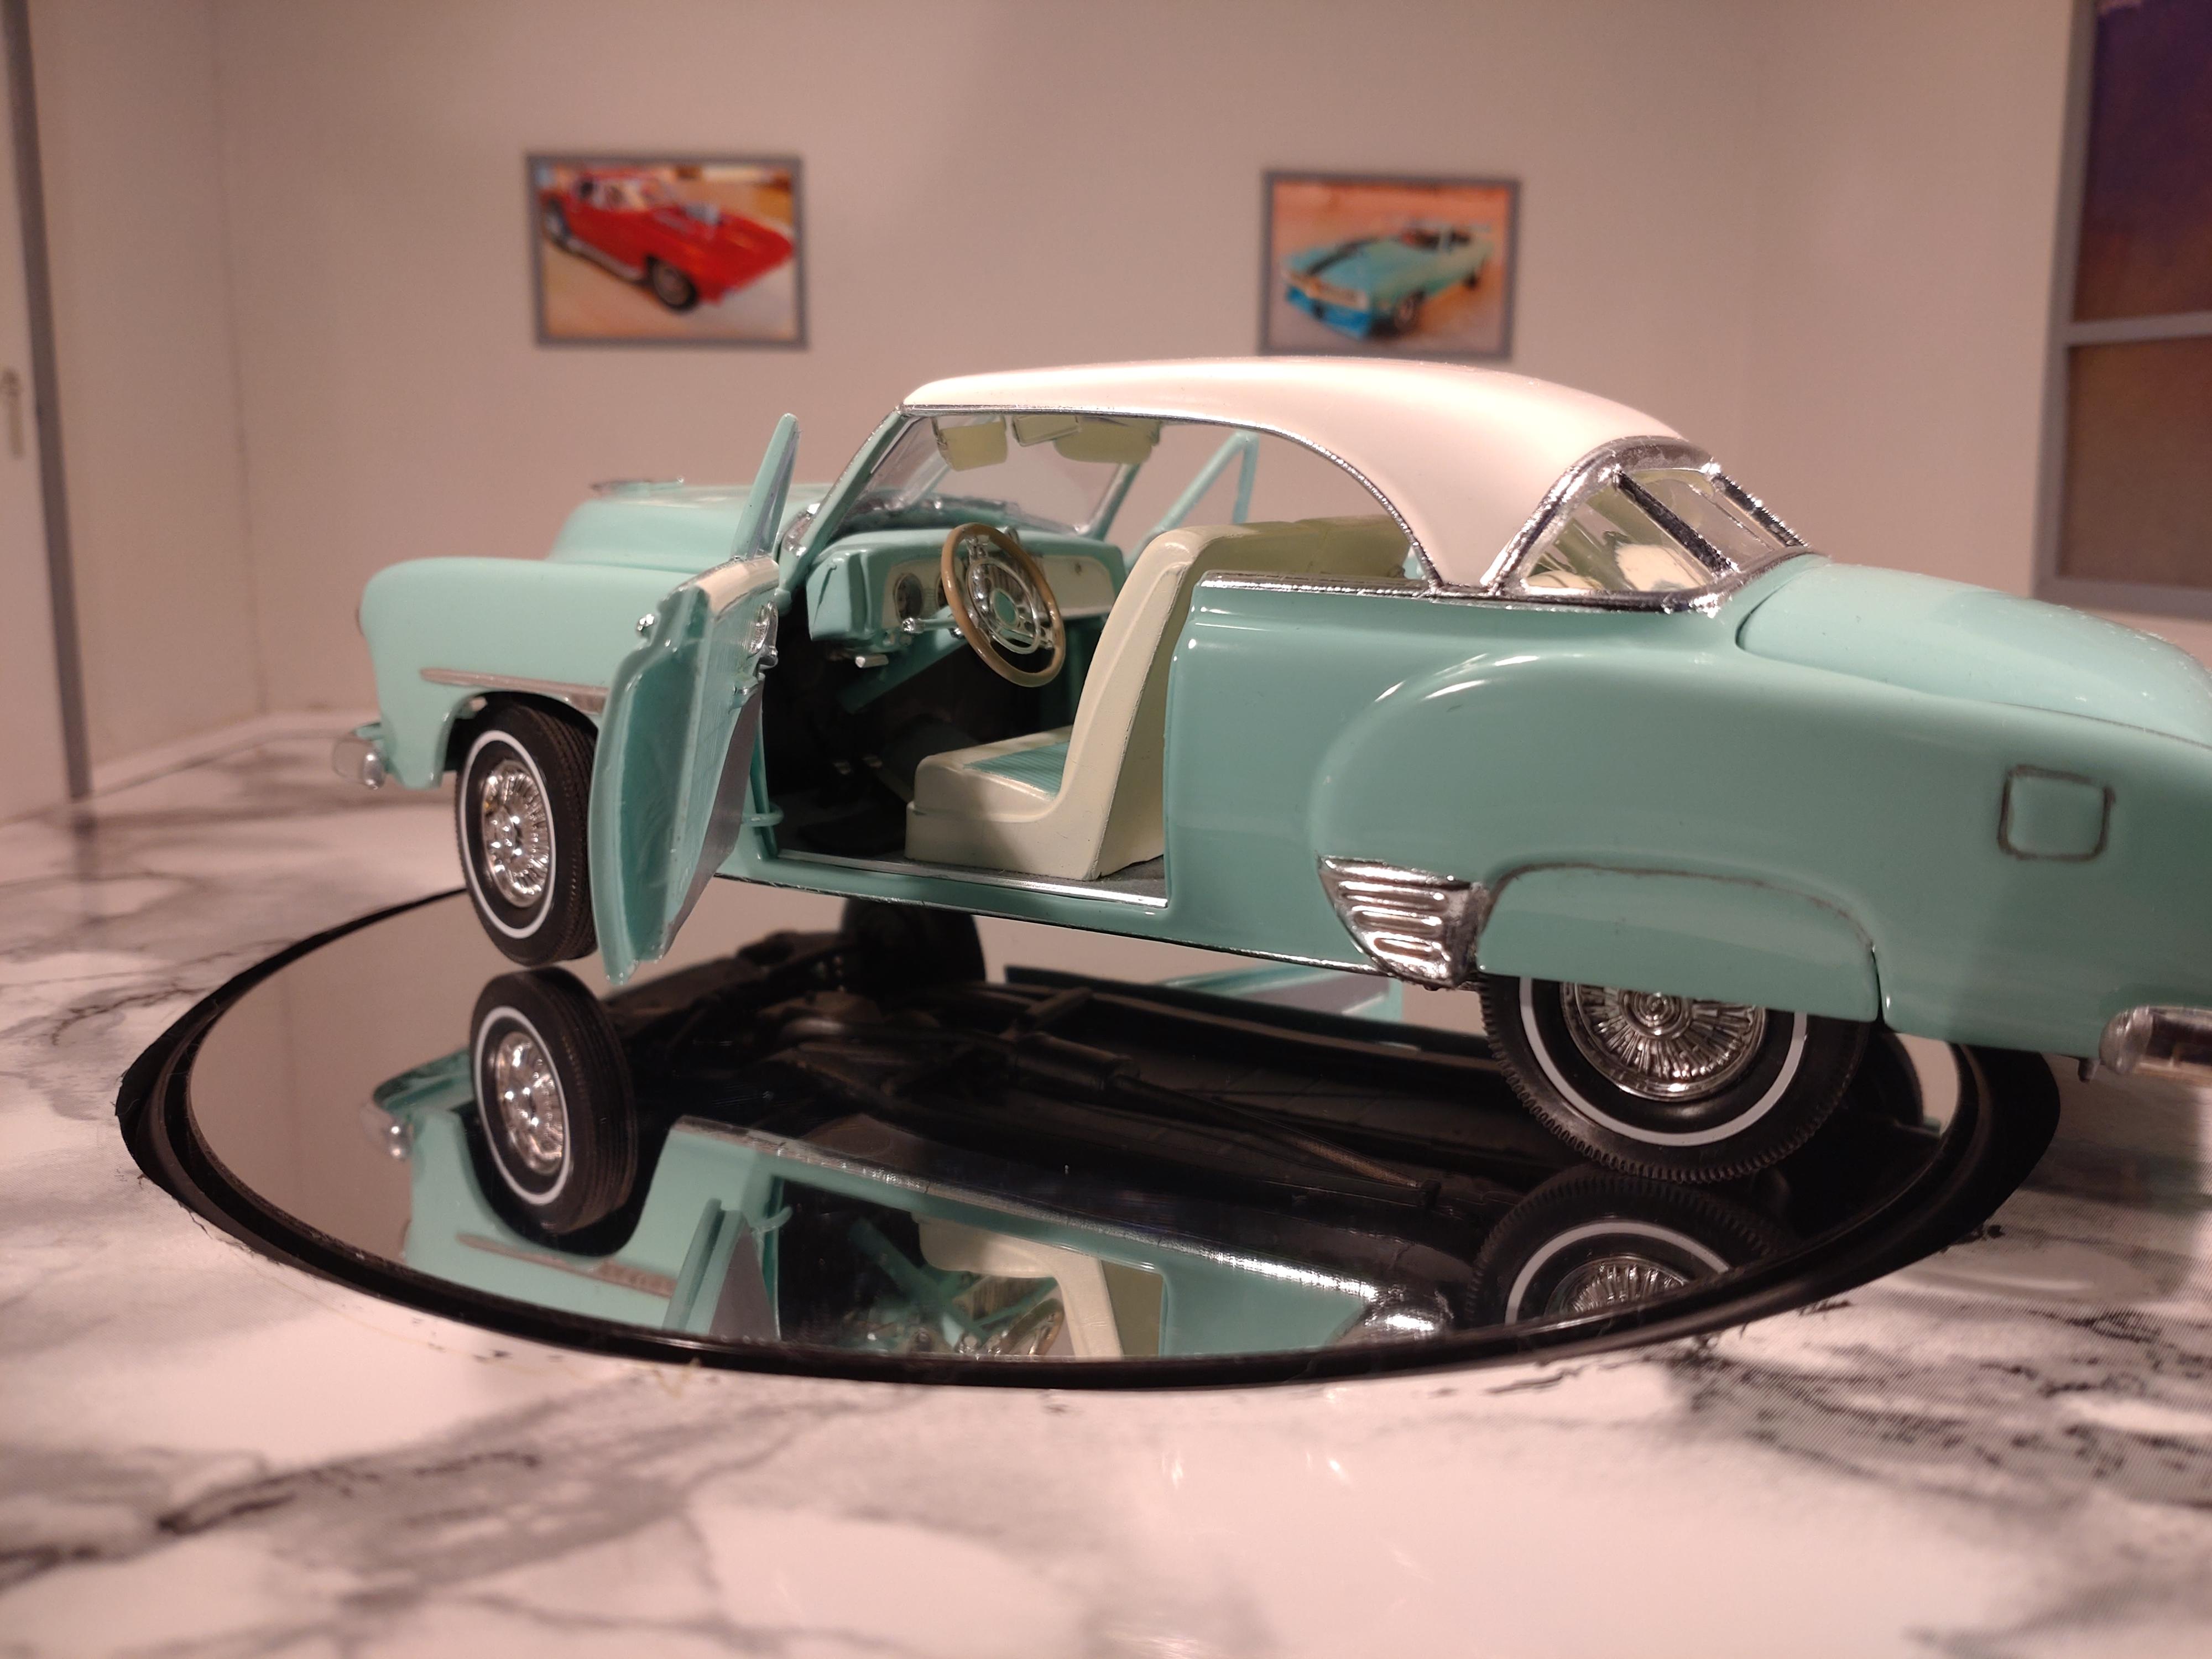
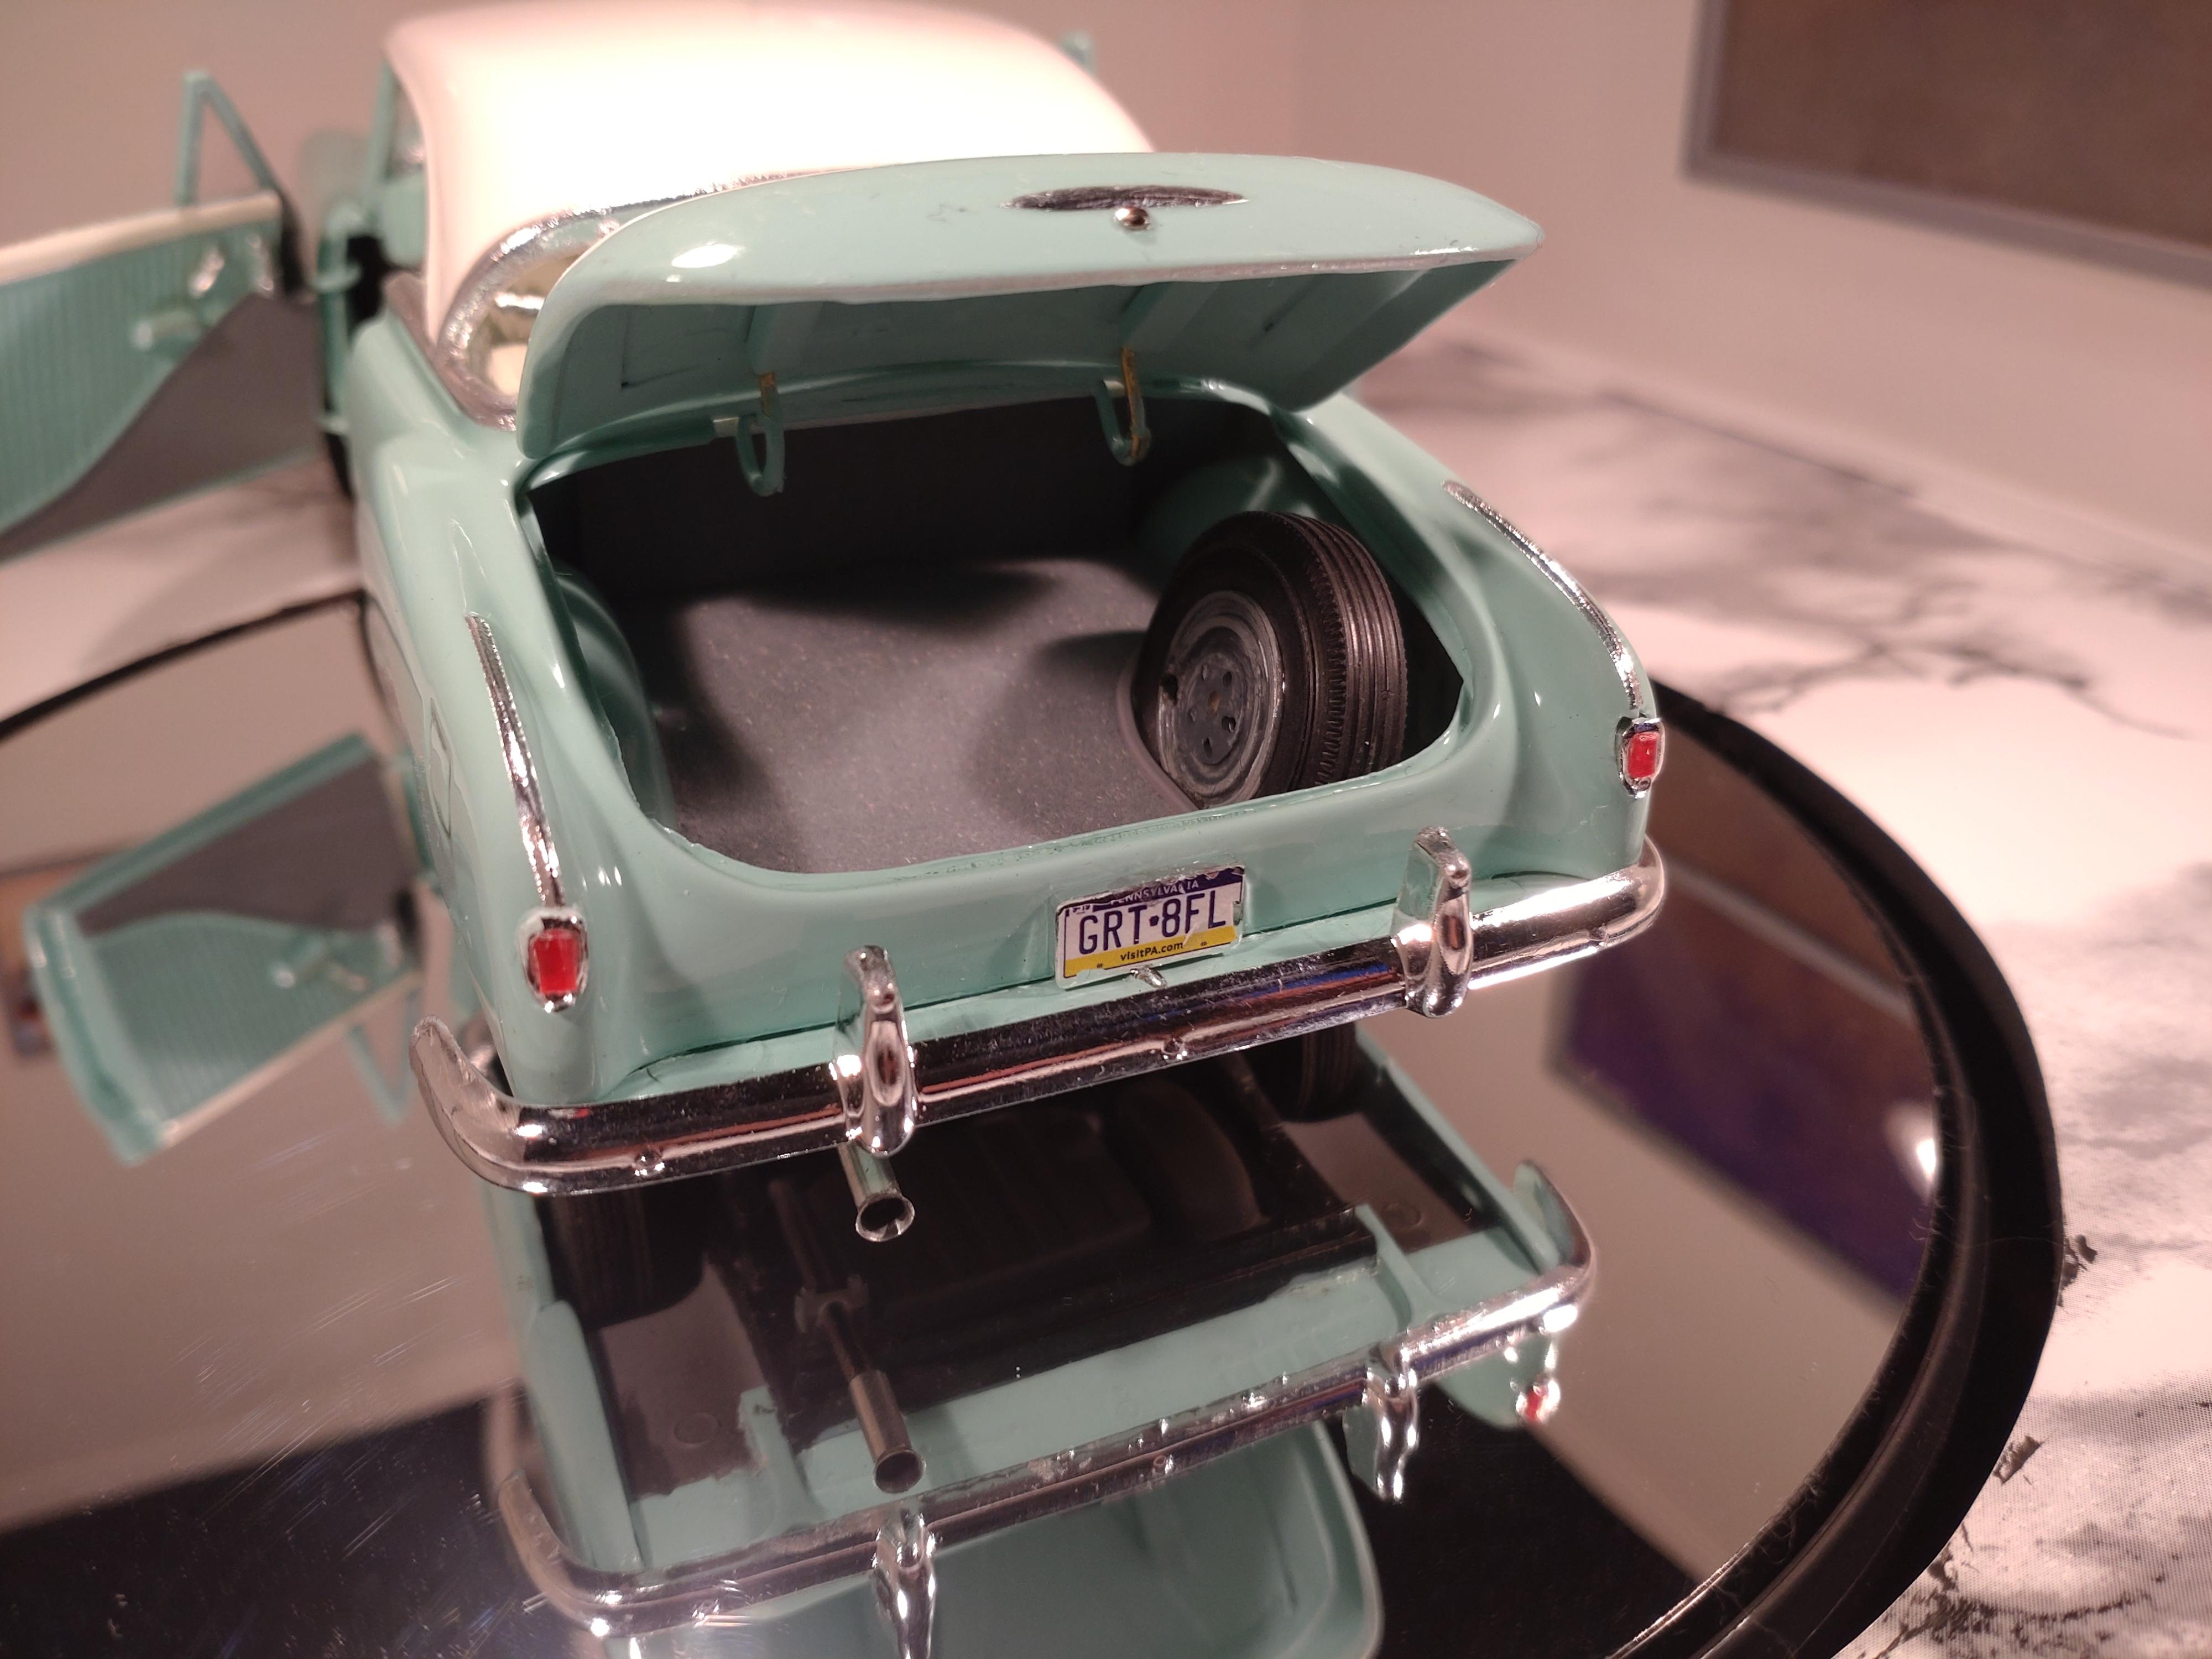
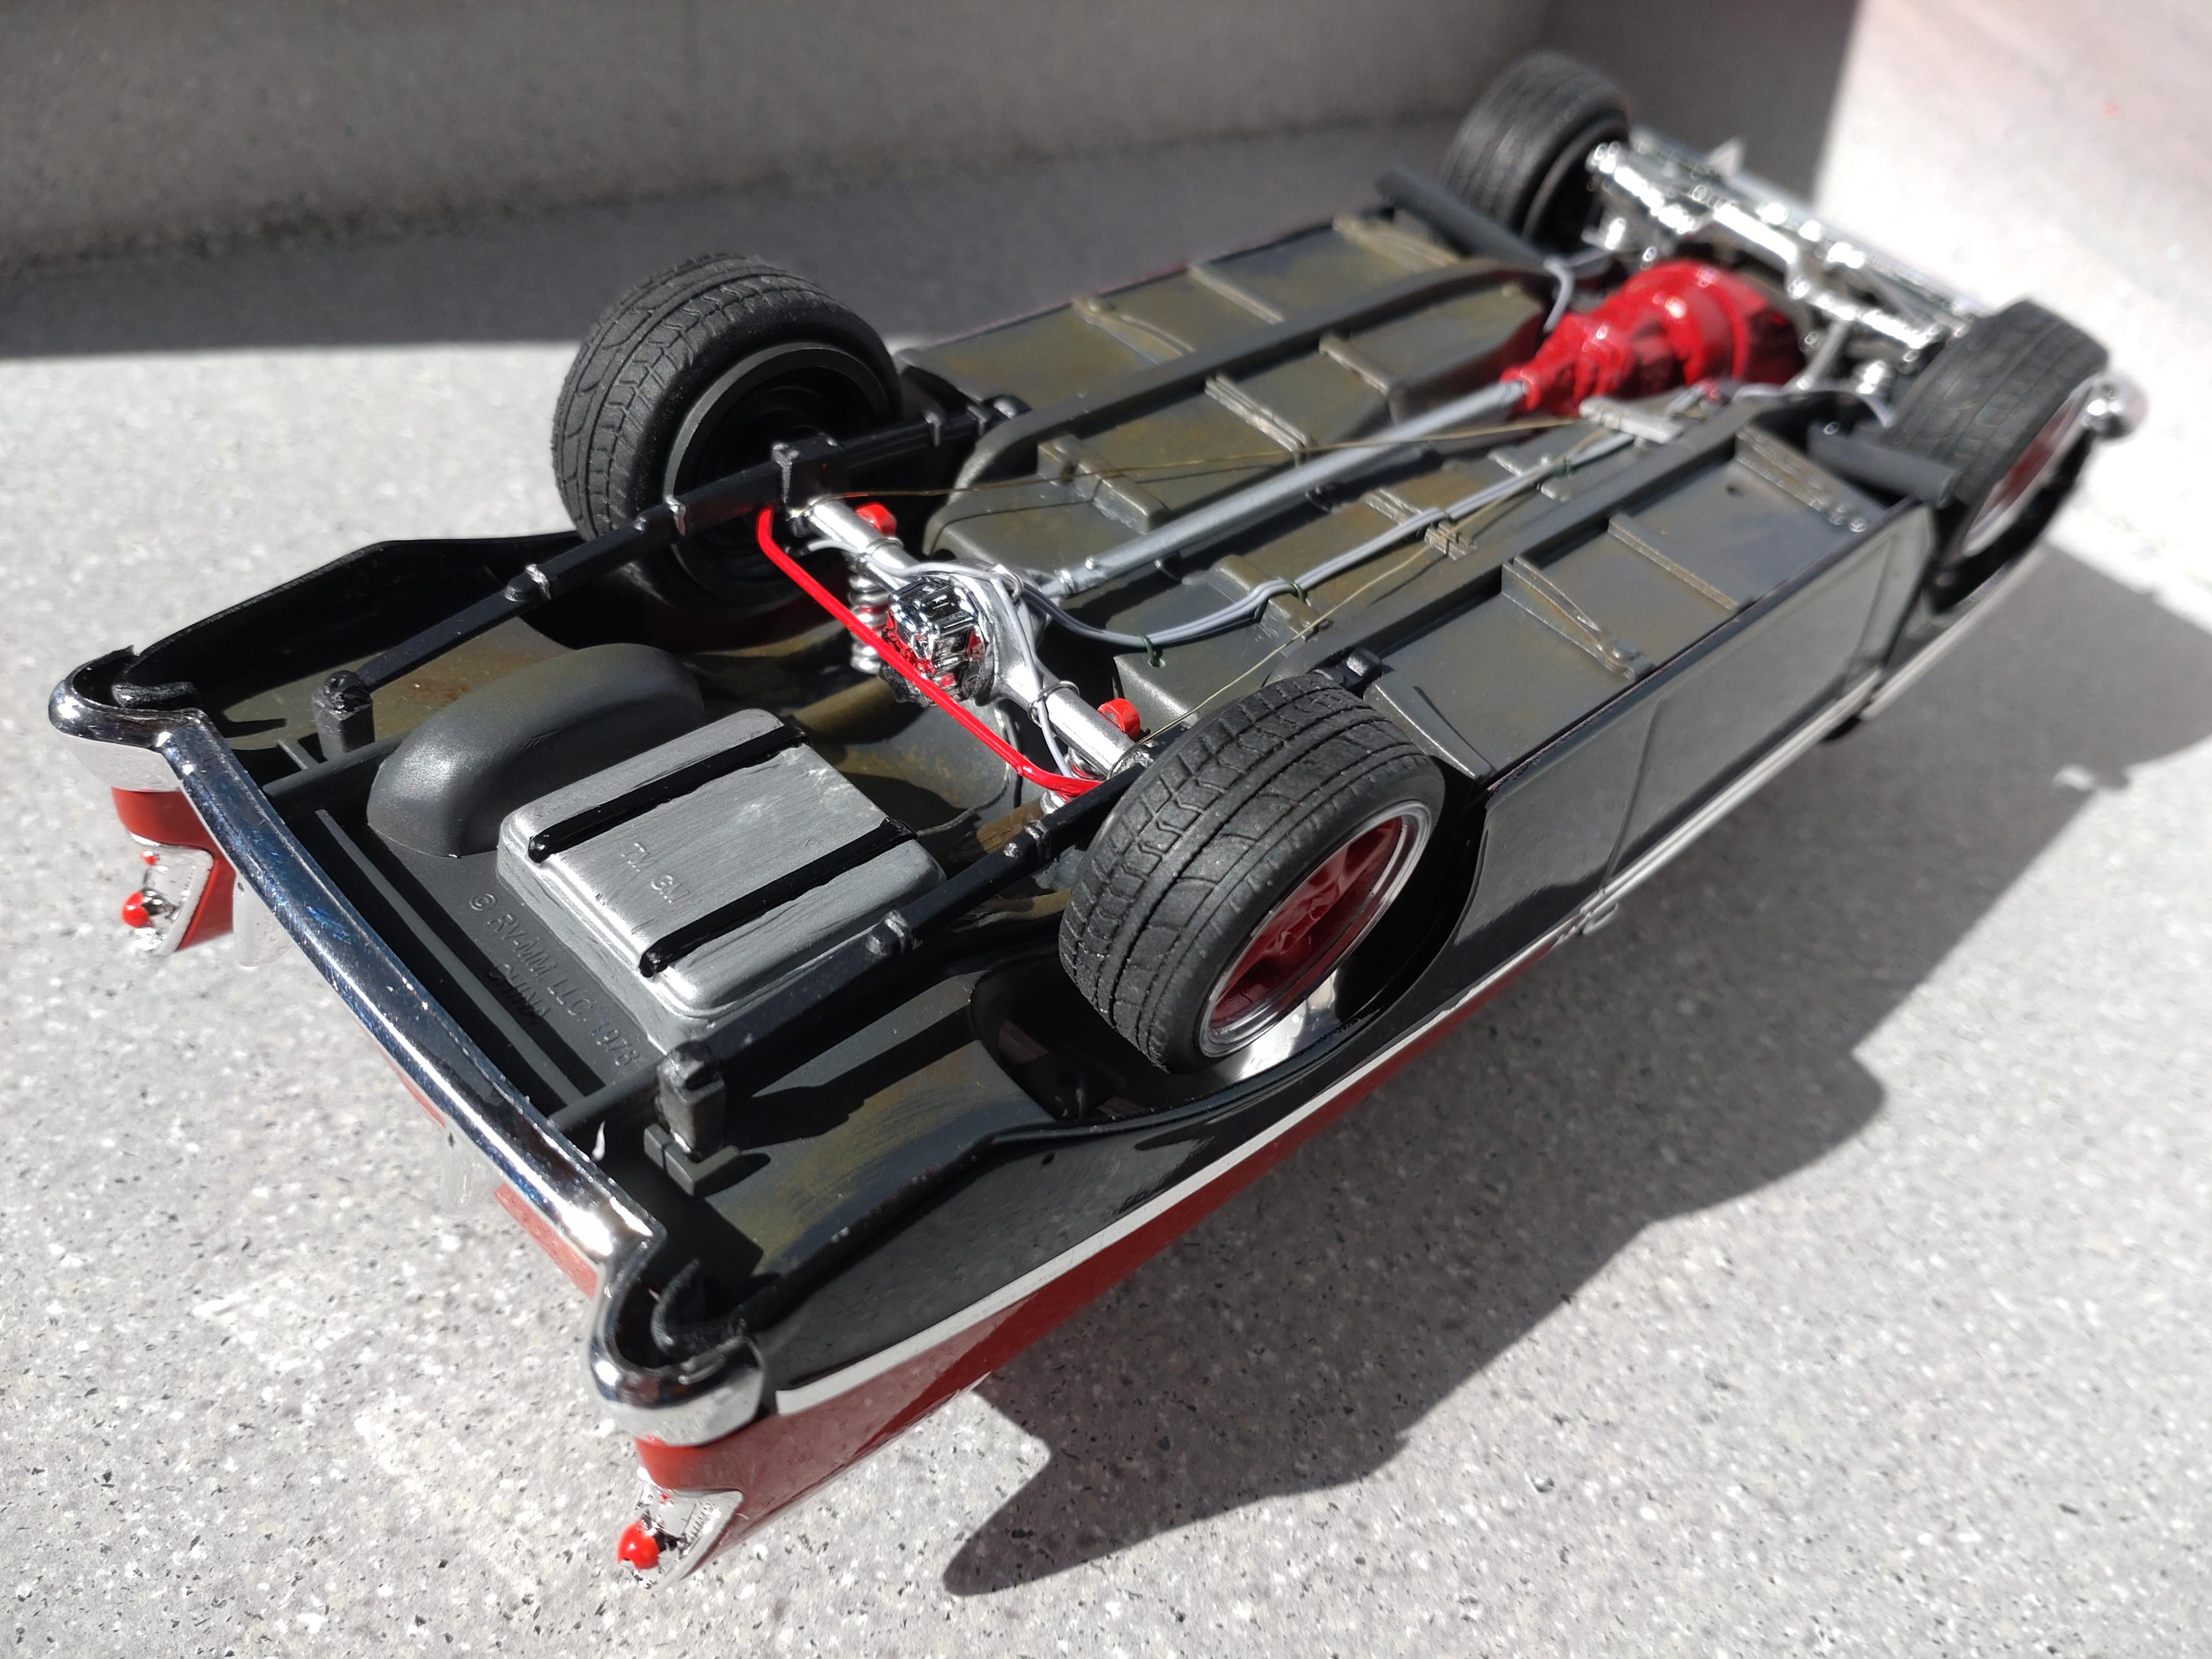
This one took much longer then I had expected. I showed the progress on WIP and can now show the finished build. But it´s my own fault. Again I built a model with opening doors and trunk. Lots of work but also really fun if you can bring up the nerves. This time I wanted to avoid the mistakes I made on my last build, mainly adapting my techniques so that the doors close COMPLETELY and get the gaps a tight as possible. This AMT kit wasn´t that obliging though. Some of the main parts were warped and had to be heat treated a bit to get into shape. The doors and trunk were cut out with a scalpel. To take into account that the paint coats would add up again, I put another strip of 0.5mm styrene under the lips of doors, trunk and bonnet. And it fits! The model is almost completely out of the box, but I did a few alterations. The steering wheel isn´t stock, cause I wanted to give it a classy look. Same with the wheels. The kit wheels and tires just didn´t fit my expectations, so I had to replace them with better tires and nice hub caps. The white paint is Tamiya, the mint green Molotow, topped with 2 coats of crystal clear. The windshield I replaced with thin foil because the window parts were just too thick and didn´t fit correctly either. The hinge work has become a bit of routine, but in the end I do have to go to micro-bending the wires until it fits. The spare wheel in the trunk and the sun visors were a fun extra. This kit comes without detail decals for the dash (lots of flames and brands though, if you are planning a hot rod). I had to do my best without, since I had nothing in my spare box. The spokes on the steering wheel got a drilling treatment and extra rings made of 0.6mm wire. All the knobs are custom. The middle part is bare metal matt alu with a mild wash. The engine received a grimy aging treatment. And many parts just didn´t exist in the kit (fuel pump, decent distributor, brake booster). Fortunately I found many images of this engine as an inspiration. I was informed that this strait 6 cylinder was sturdy, but a messy oil dripper. OK, its an old car, but driven by a passionate owner on sunny days to classic meetings. The undercarriage received a similar weathering with sponge and airbrush. I´m getting really fond of these early ´50s classics. I can recommend this kit for the old fashioned style instructions alone. Or maybe the booklet and kit are really from way back then.... That might explain the low level molding. Thanks for watching!

-
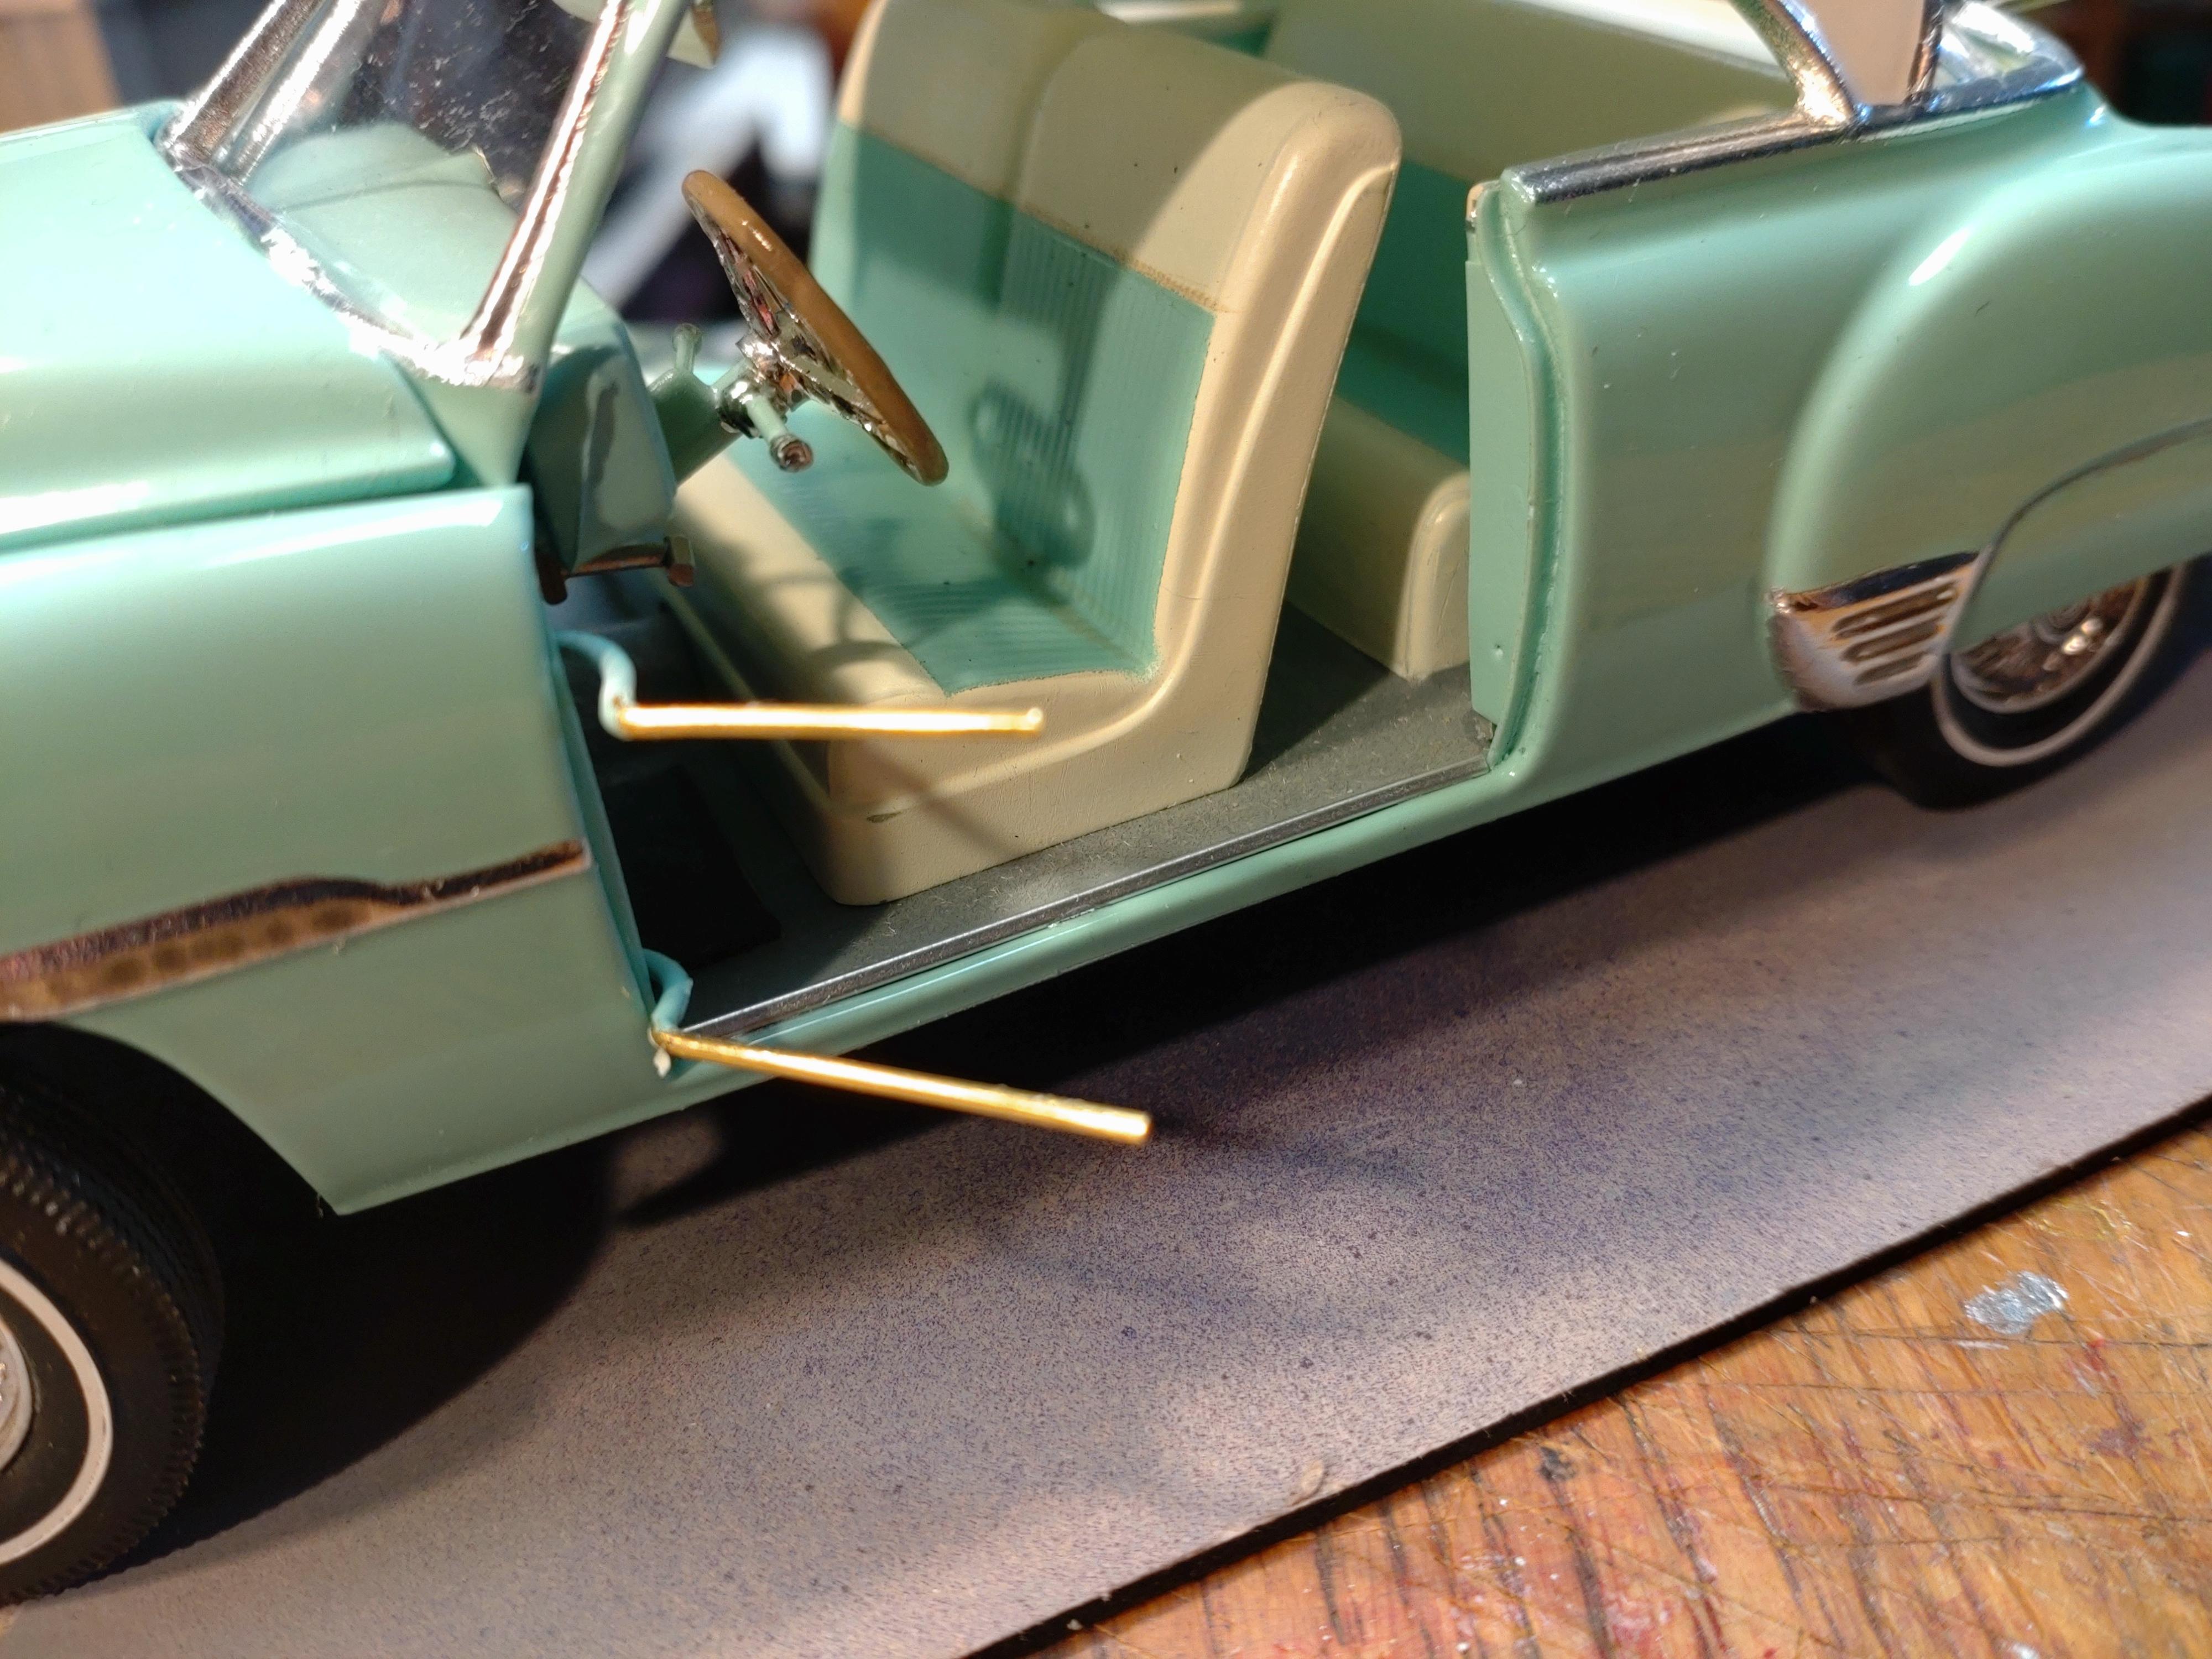
I´m moving on and slowly coming to see the finish line. After getting the undercarriage done I had to get all those loose lines, wires and hoses unraveled and into their final place. A shame that soon much of the engine will be hidden away forever... As I mentioned earlier, some of the bigger parts of this kit are not correctly in shape. I was able to heat treat the floor board flat again, but the inner fenders a crooked too. Oh well, it will turn out fine in the end. But as you can see, the radiator board dosn´t match to the fenders. fortunately this will be hidden when the body drops down. The trunk is flocked like a loose carpet and the spare wheel I cut down to fit and look real. I had a spontaneous fun idea to make sun visors. The visors are 1.5mm sheet and the wires are bent from 0.5mm brass wire. As I expected and experienced before, the rear panel parts would be too long for the doorway. Last time I noticed this AFTER I had glued all the interior parts together. Won´t happen again, so I attached these panels after cutting off the necessary length. The gaps on the rockers and to the back panels are filled and painted to match. Not much left to do now but to attach the doors and trunk. I already know that I will have to do a bit of bending to make them fit correctly. I will introduce the finished ´51 Bel Air on a new "under glass" topic. Hope you liked it so far and thanks for watching!
-
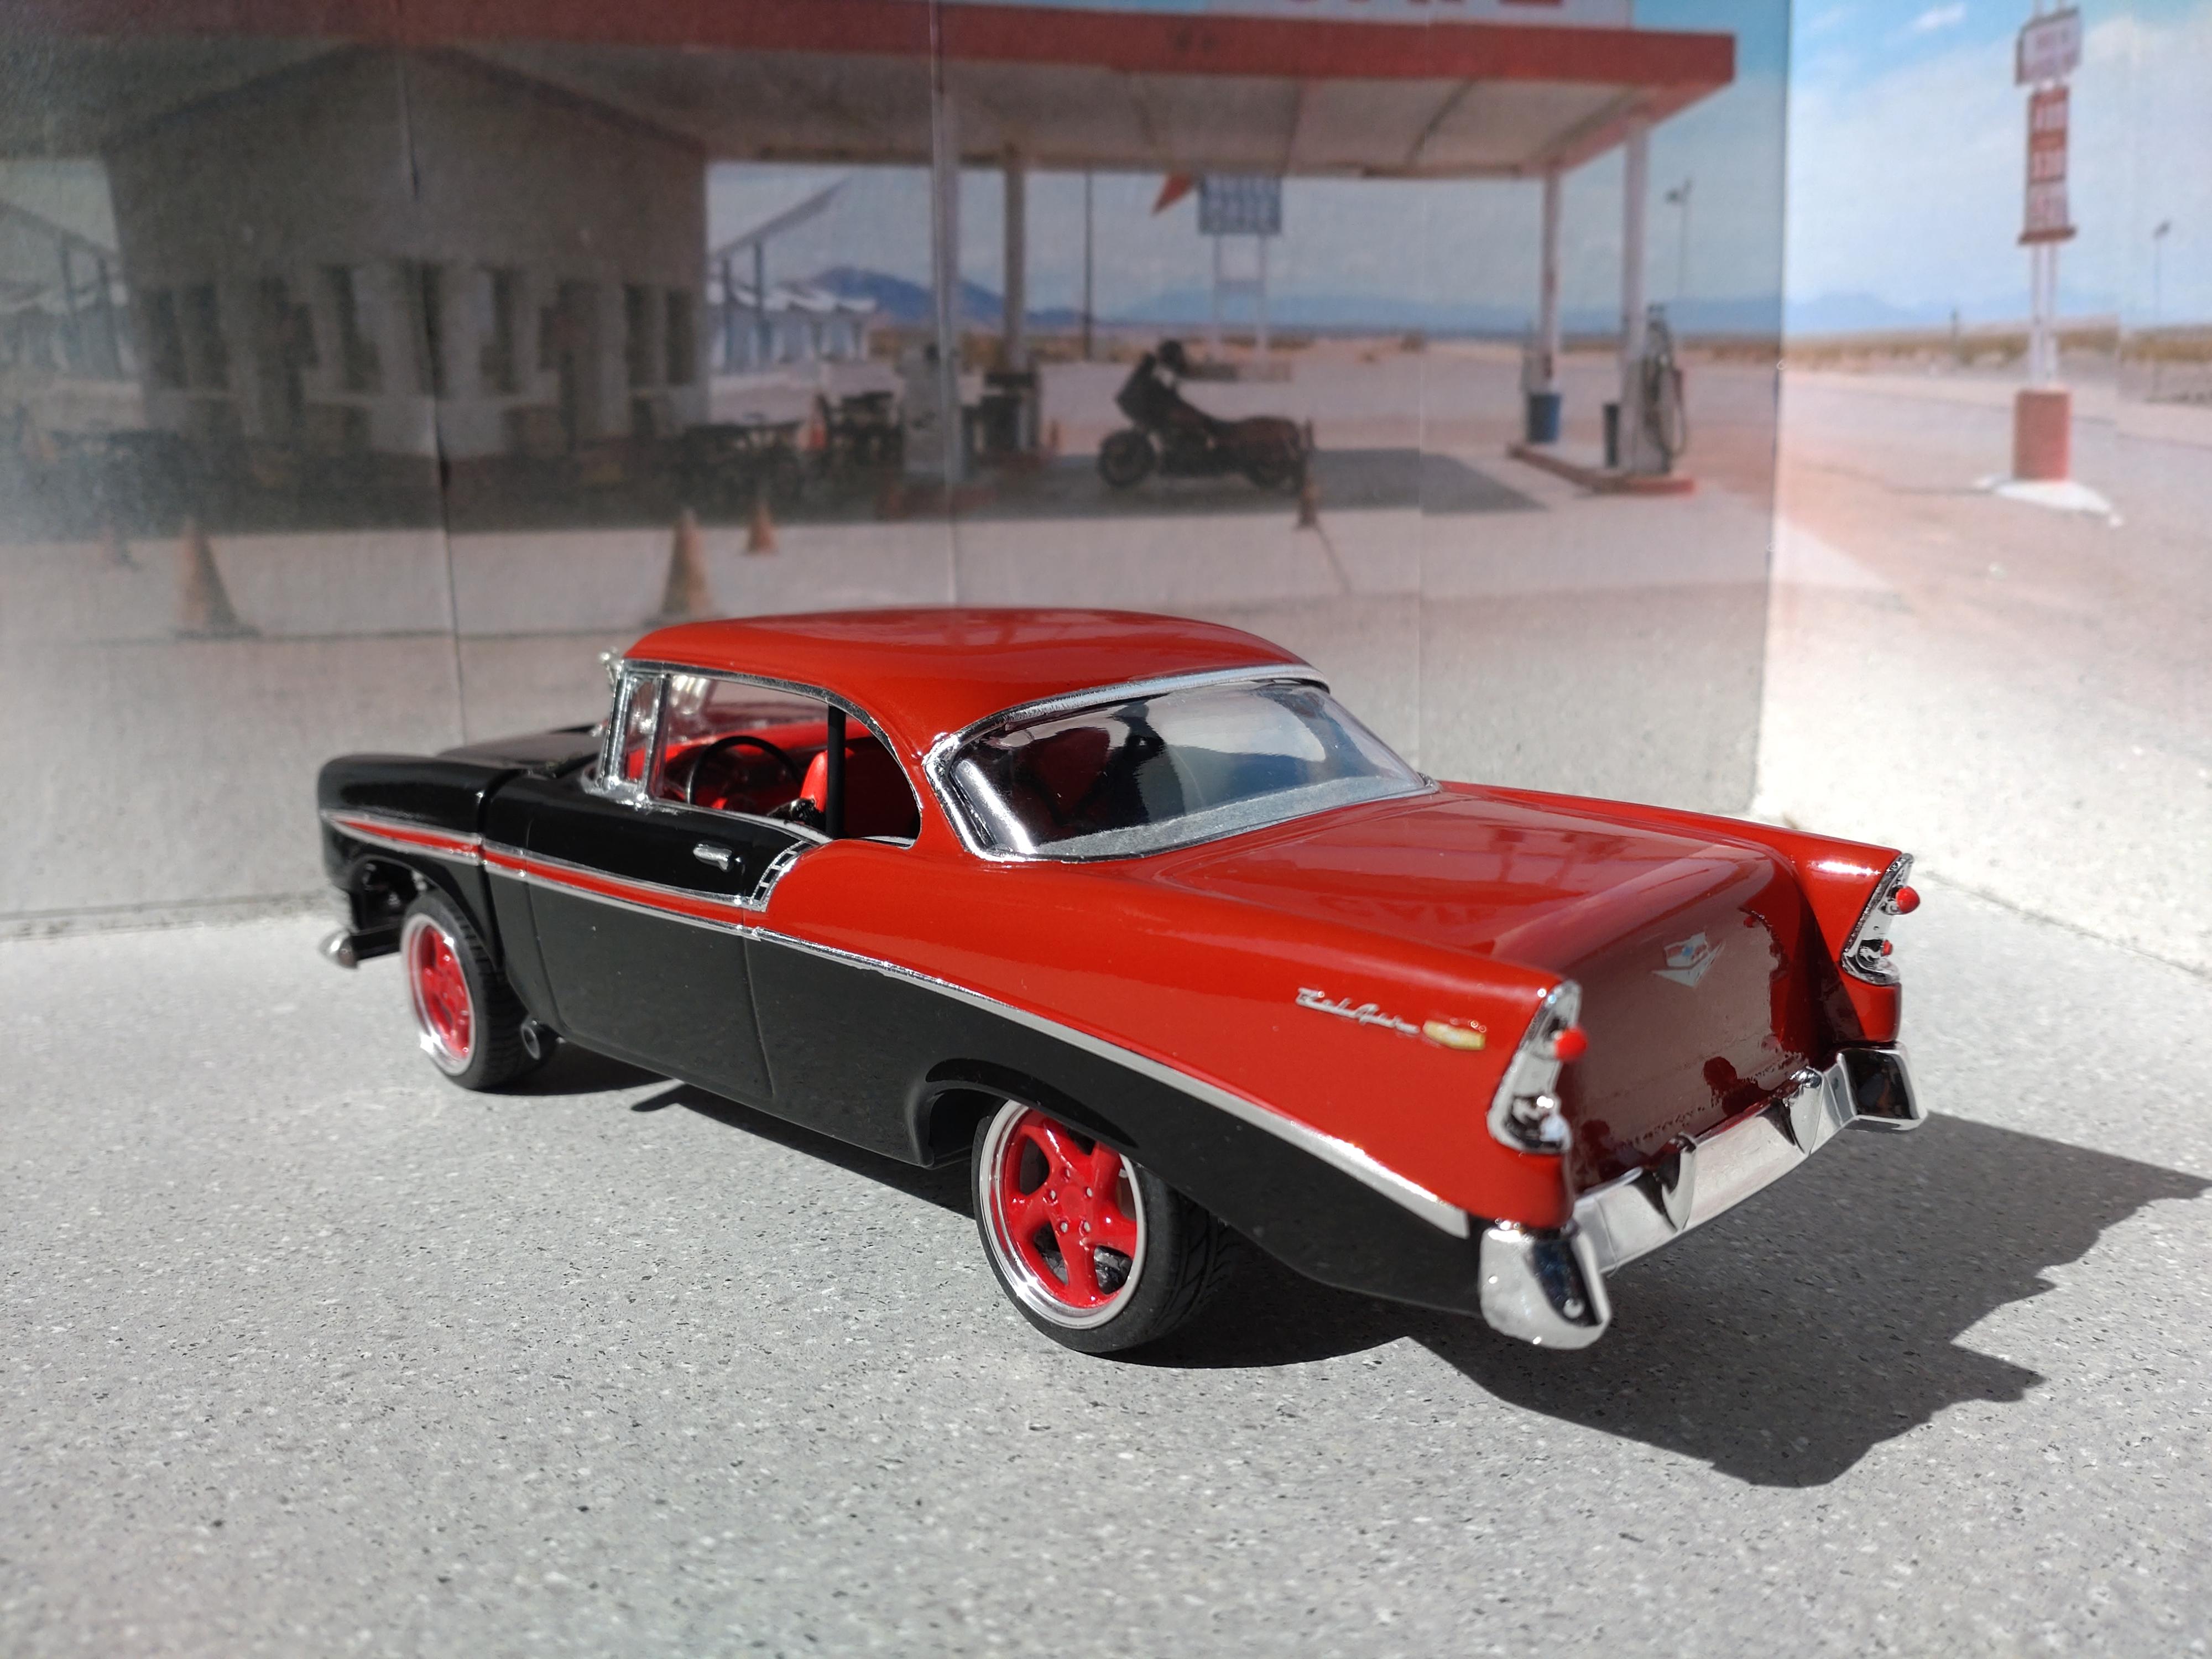
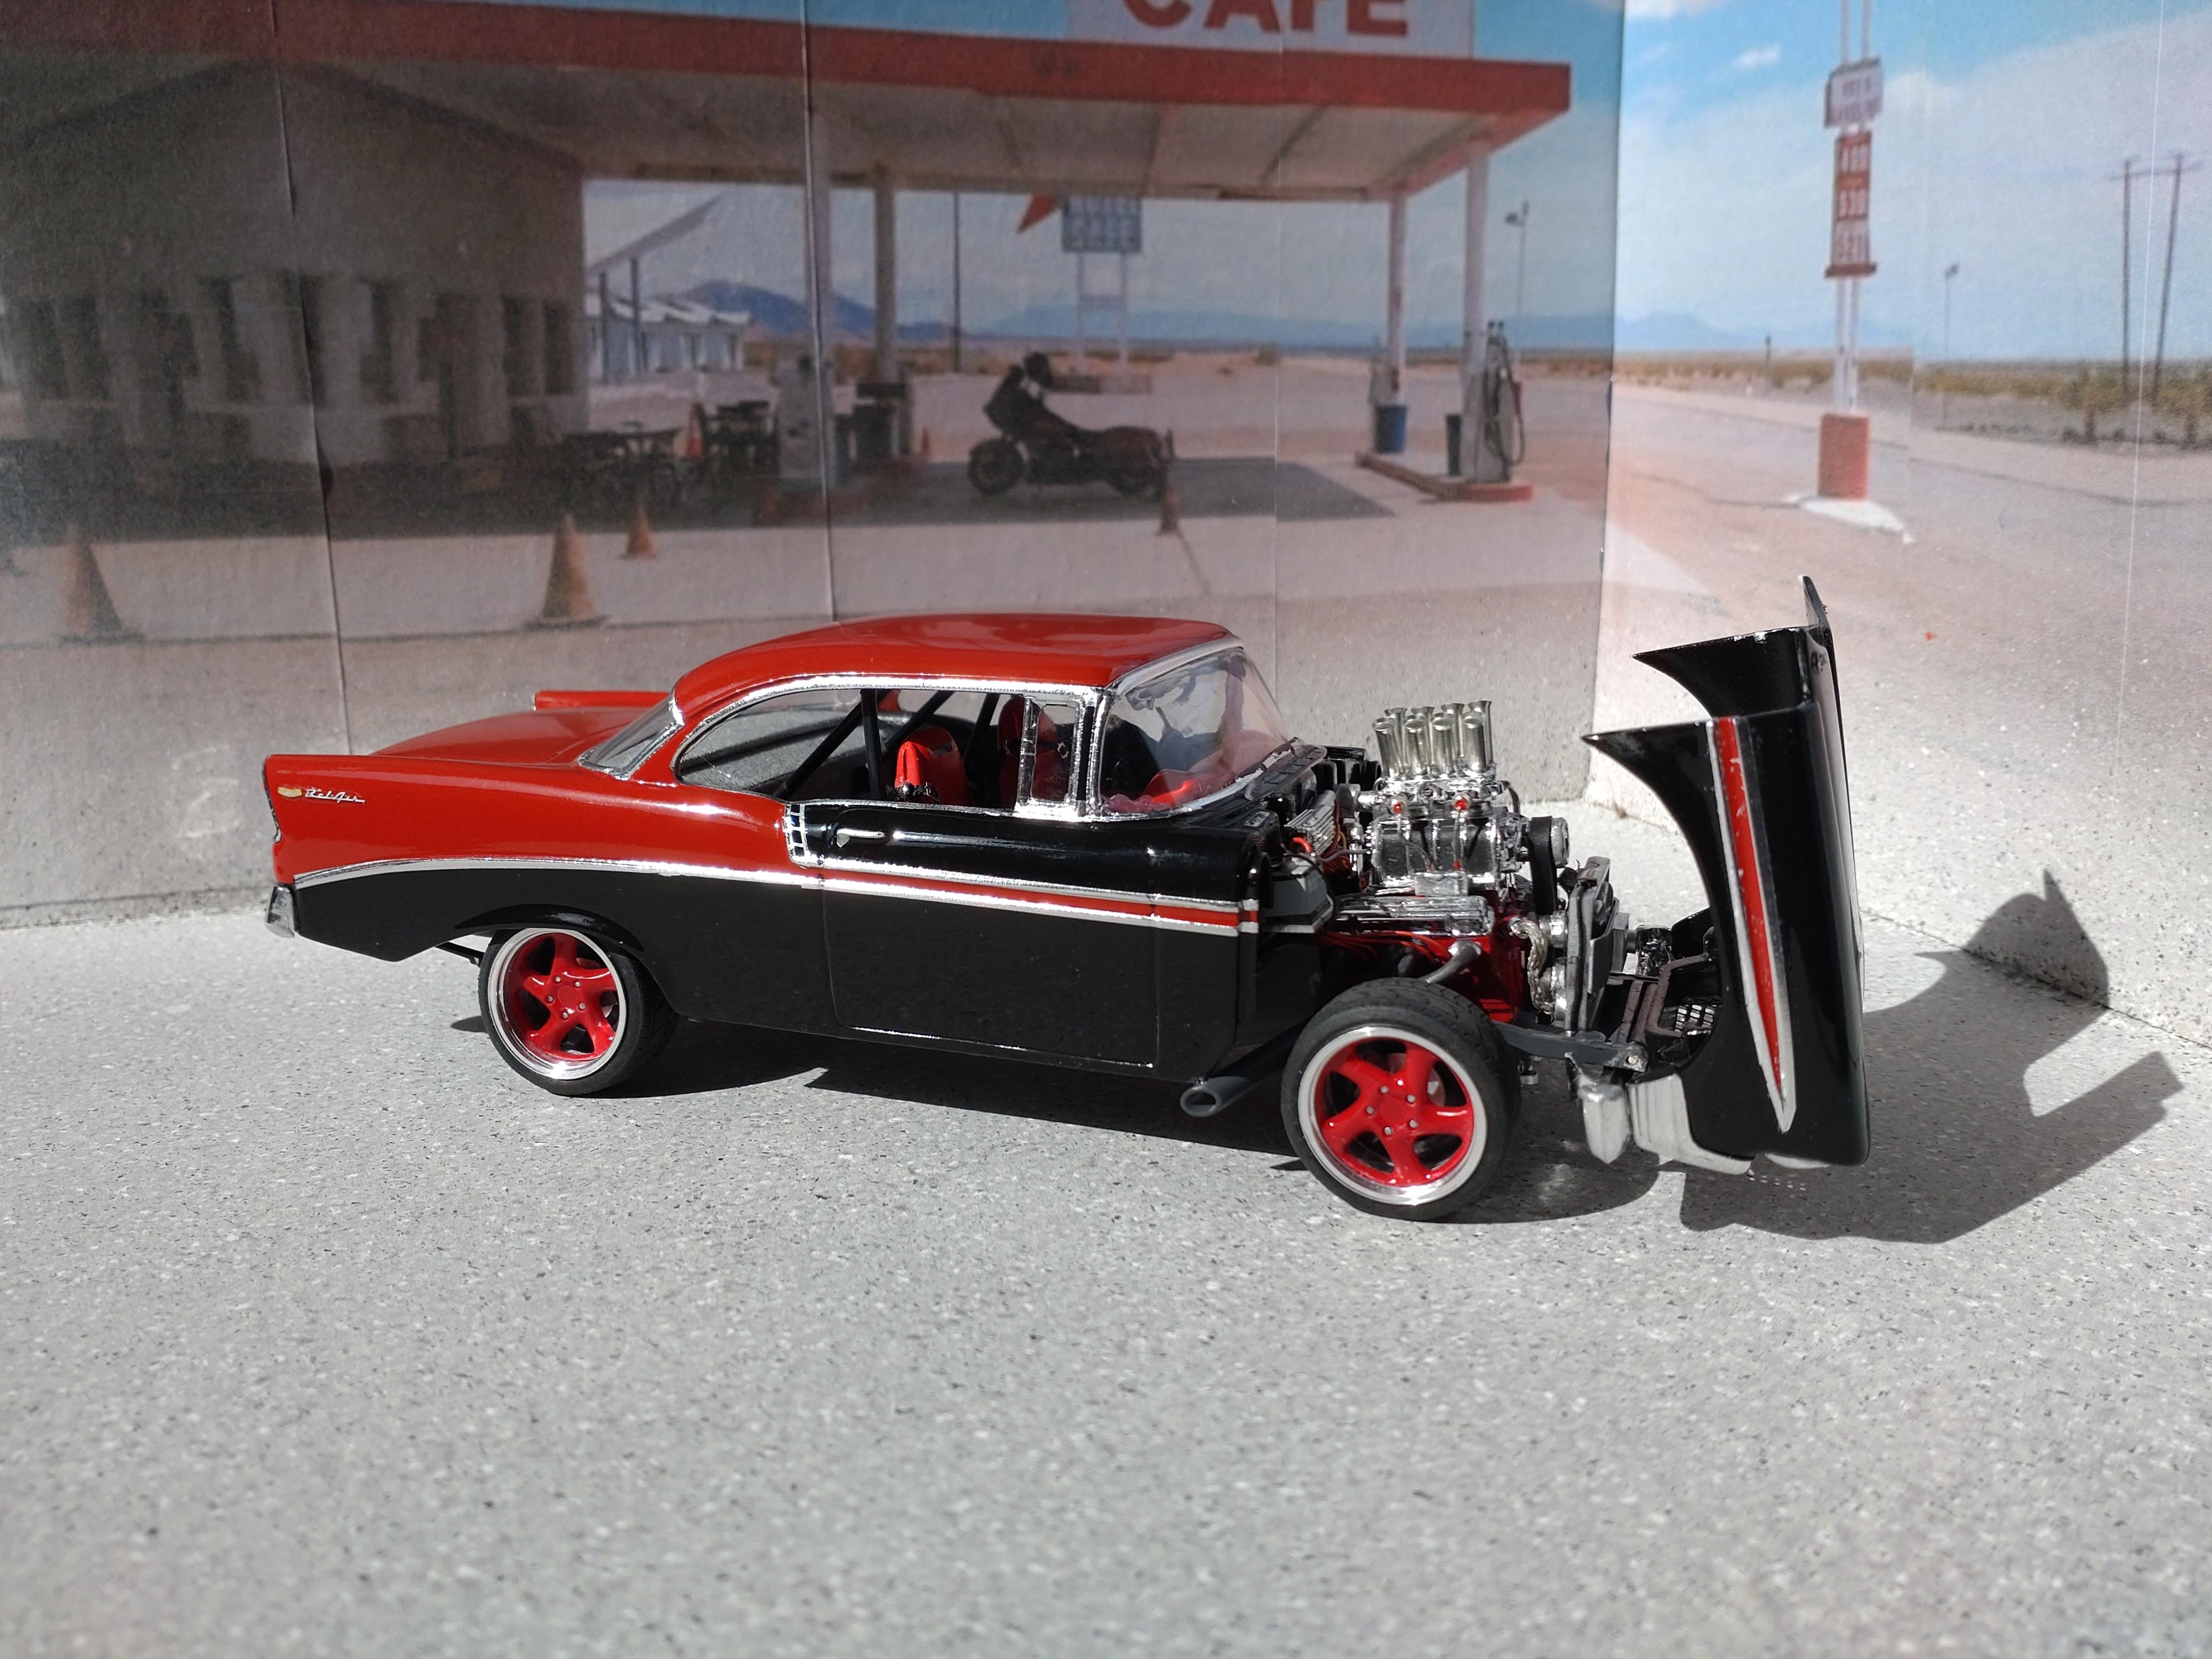
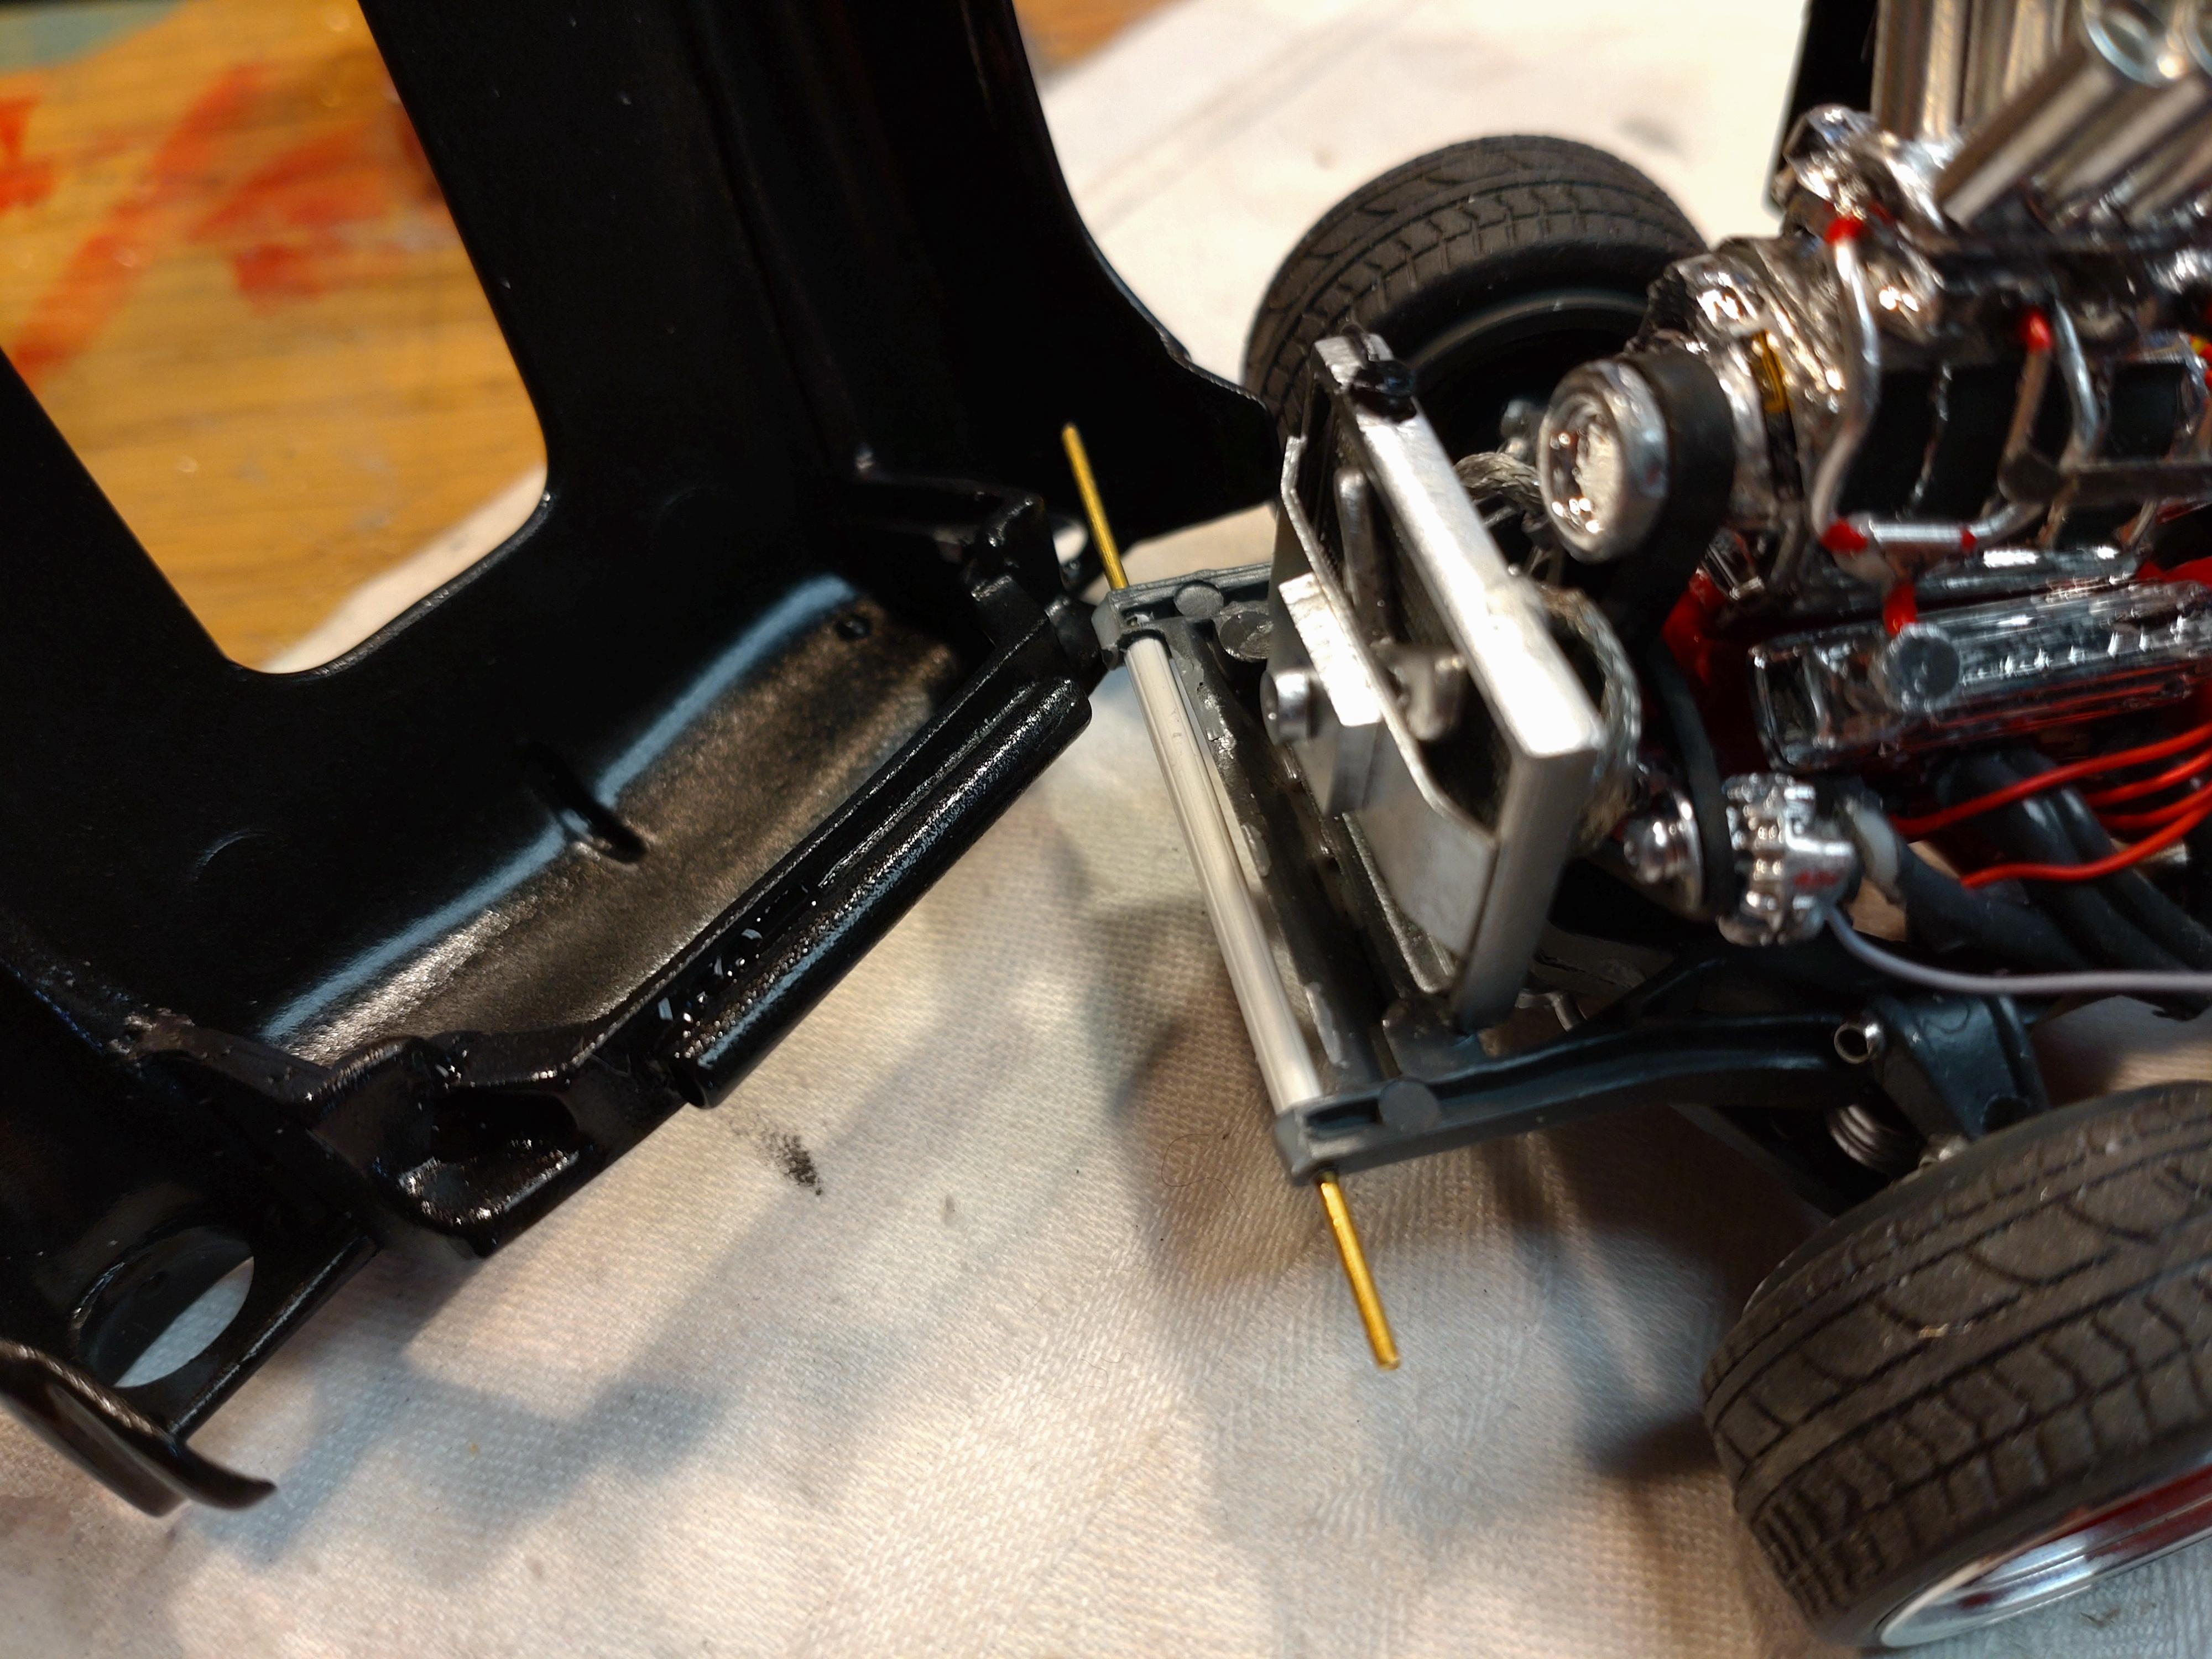
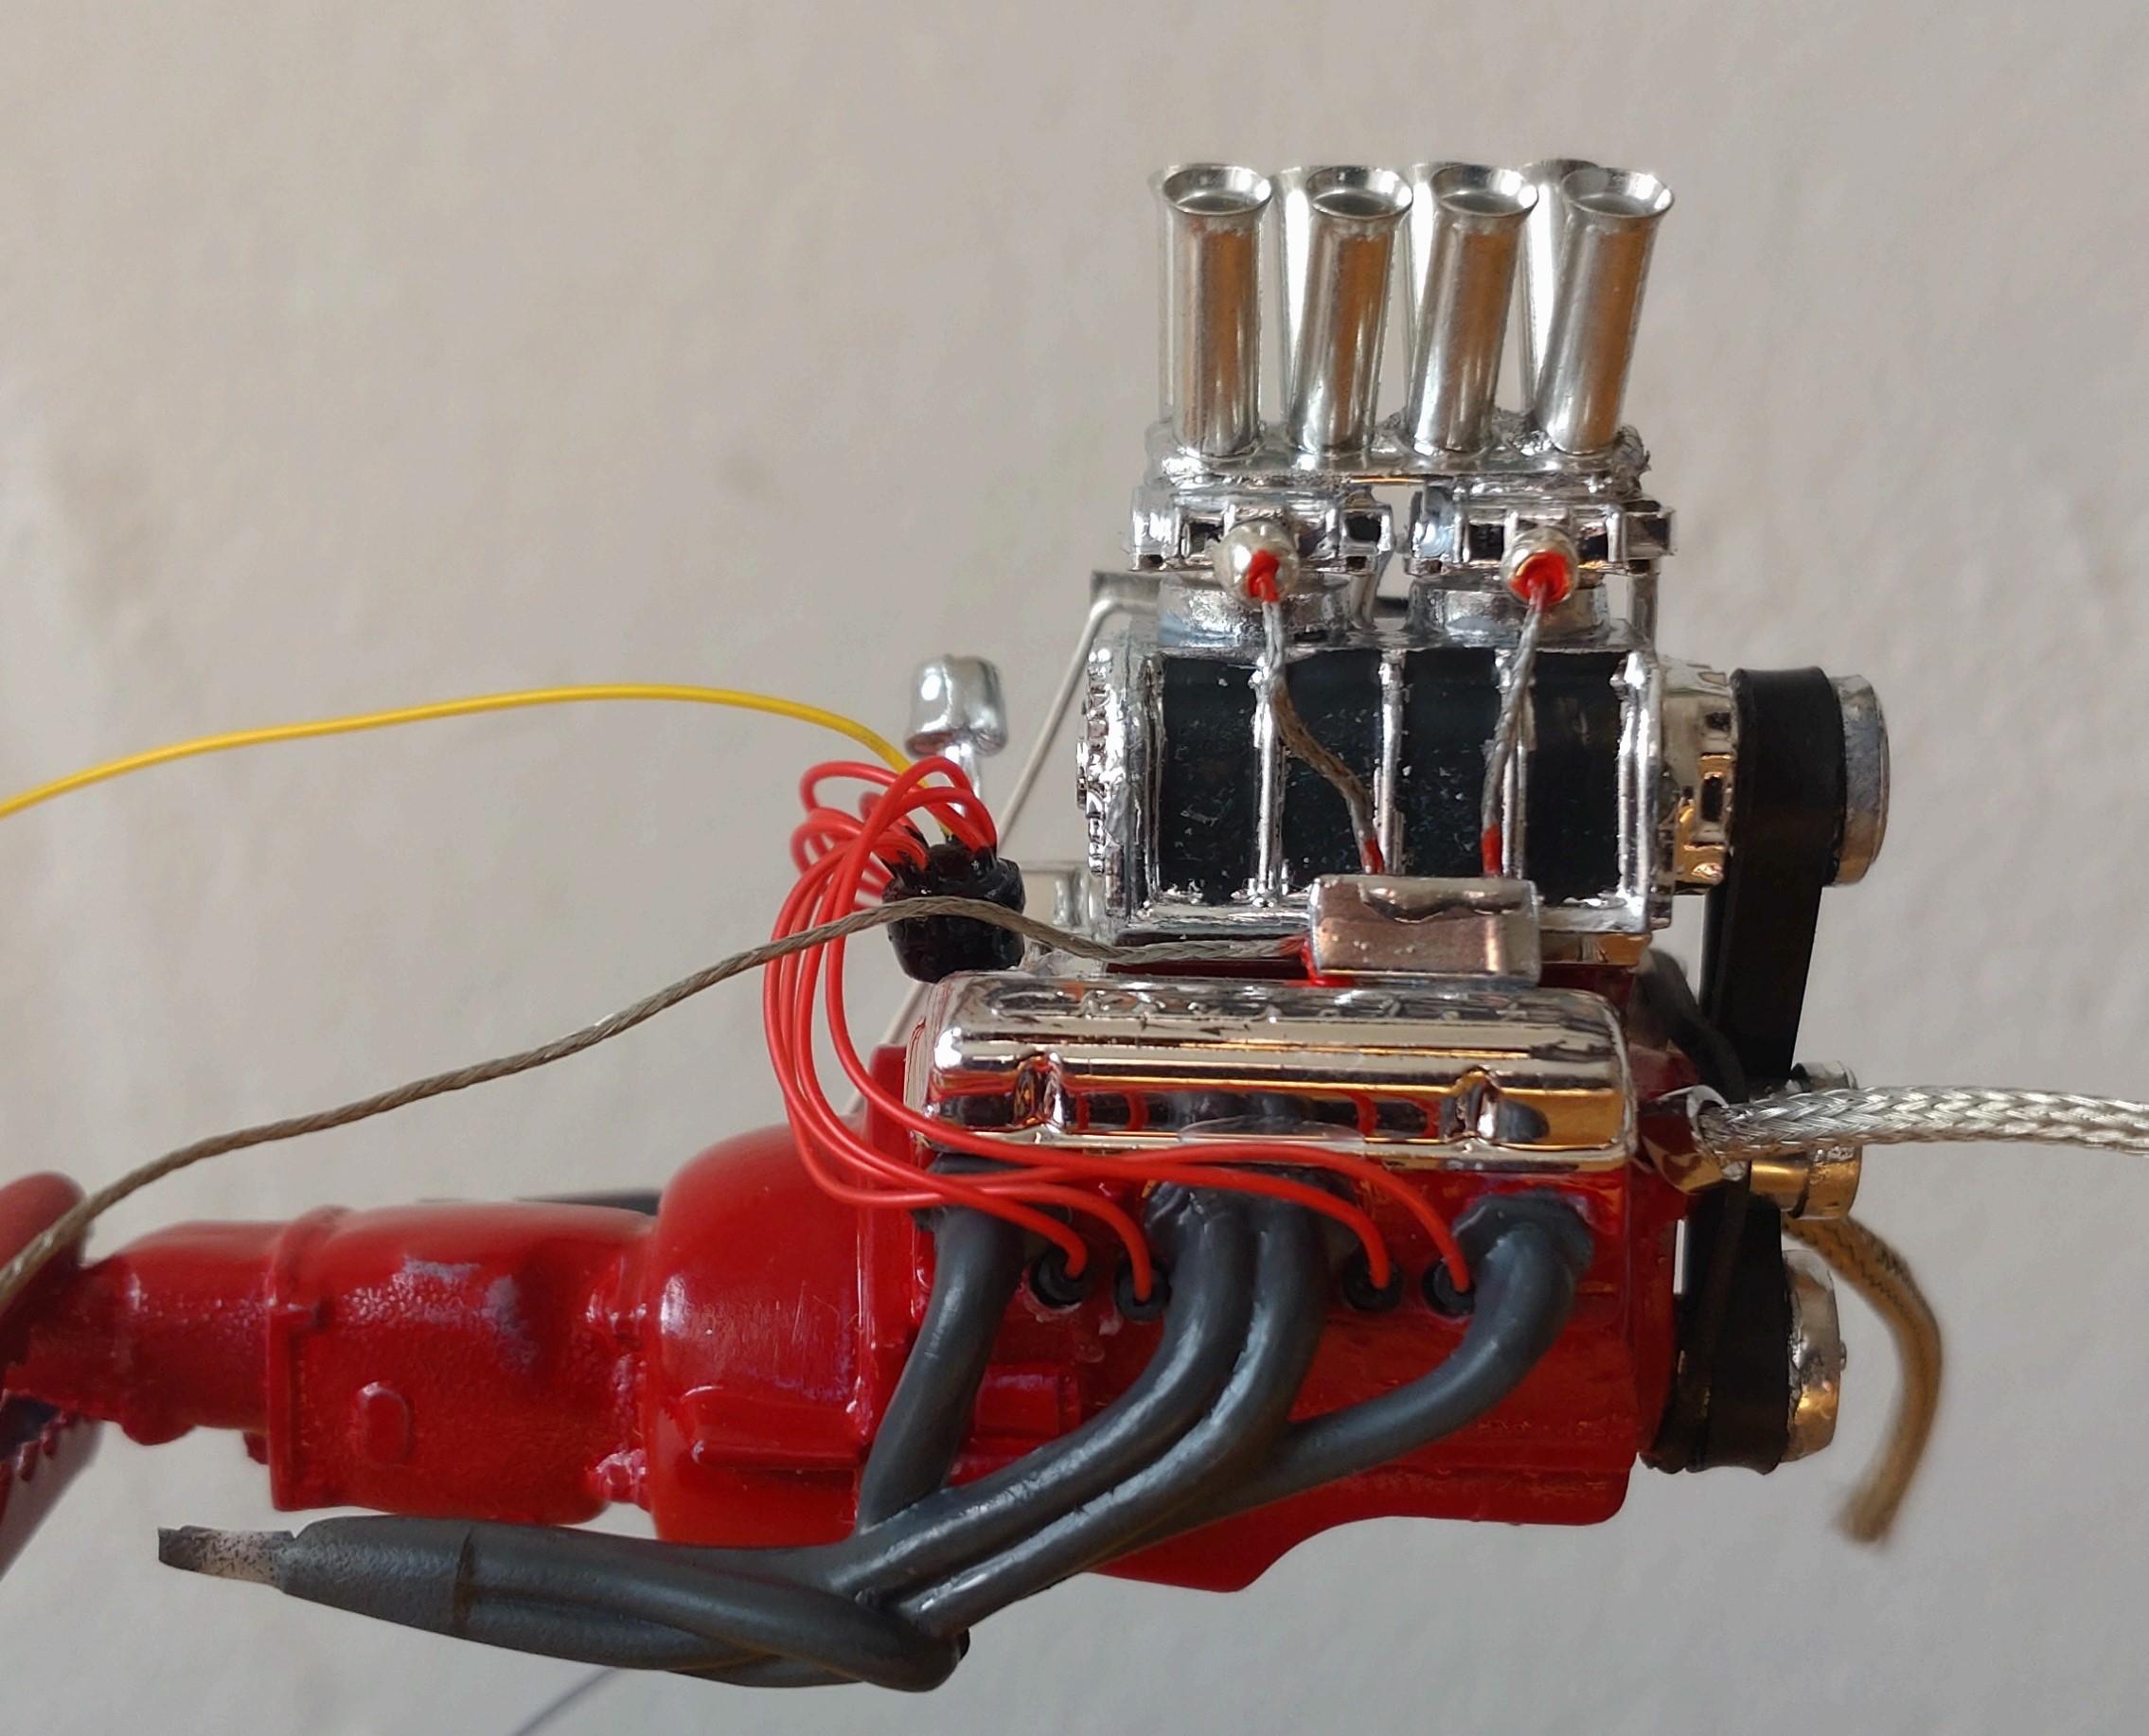
When I was researching for ideas for my Bel Air, I came upon a image of a drag version with a complete tipping front. Radical, and tempting. My plan was to strip everything unneeded for the quarter-mile and I decided to take that challenge. About a year go this was my first real attempt at building a model with a hinge. So this is the result: Paint is Tamiya gloss black, the red is Schmincke Aero Color airbrush acrylic. After the bare metal work I covered all with AK crystal gloss and polished to a shine. I especially love the wheels. They come from a custom model supplier www.scaleproduction.com. The rims are precision turned aluminum, the spokes come ready to paint in resin. Including the rubber tires they cost just 20€. In that room behind the spokes I could place disc brakes. I replaced the plastic grill with metal grid and tossed the fat bumper for a slim one from my parts box. Mind-tangling was finding the sweet-spot to hinge the hood. In the end, the alignment missed by only about a millimeter. The interior was stripped for weight and speed. The back bench gave way for a serious roll bar. For the engine I wanted to try out some radical ideas. Many kit parts I had to replace for that drag feeling and look. Some parts I had to build from scrap, like the brake booster. The ignition distributor is home made. The belts are thin rubber (1 mm). I would rather like thinner material, but am still searching. The undercarriage needed some adapting, since the molded on exhaust system was´t necessary. Meaning grinding and sanding off the pipe and muffler. I gave the suspension more detail and added the brake lines. In real life on a drag strip or cruising, this could be one of my favorites. Thanks for watching!
-
Hi Mark, wicked low rider, nice build!? I like your color choice and the wheels look great! Yes, this model deserves a cabinet.
-
Good job!? Trying to rebuild an original is always a challenge and you hit it. A shame that the hood has a little twist. I guess we have all had that problem before. I wouldn´t try to fix that now that your finished. But one can carefully(!!!) treat that with a heat pistol and bend it to fit on a fresh next model.
-
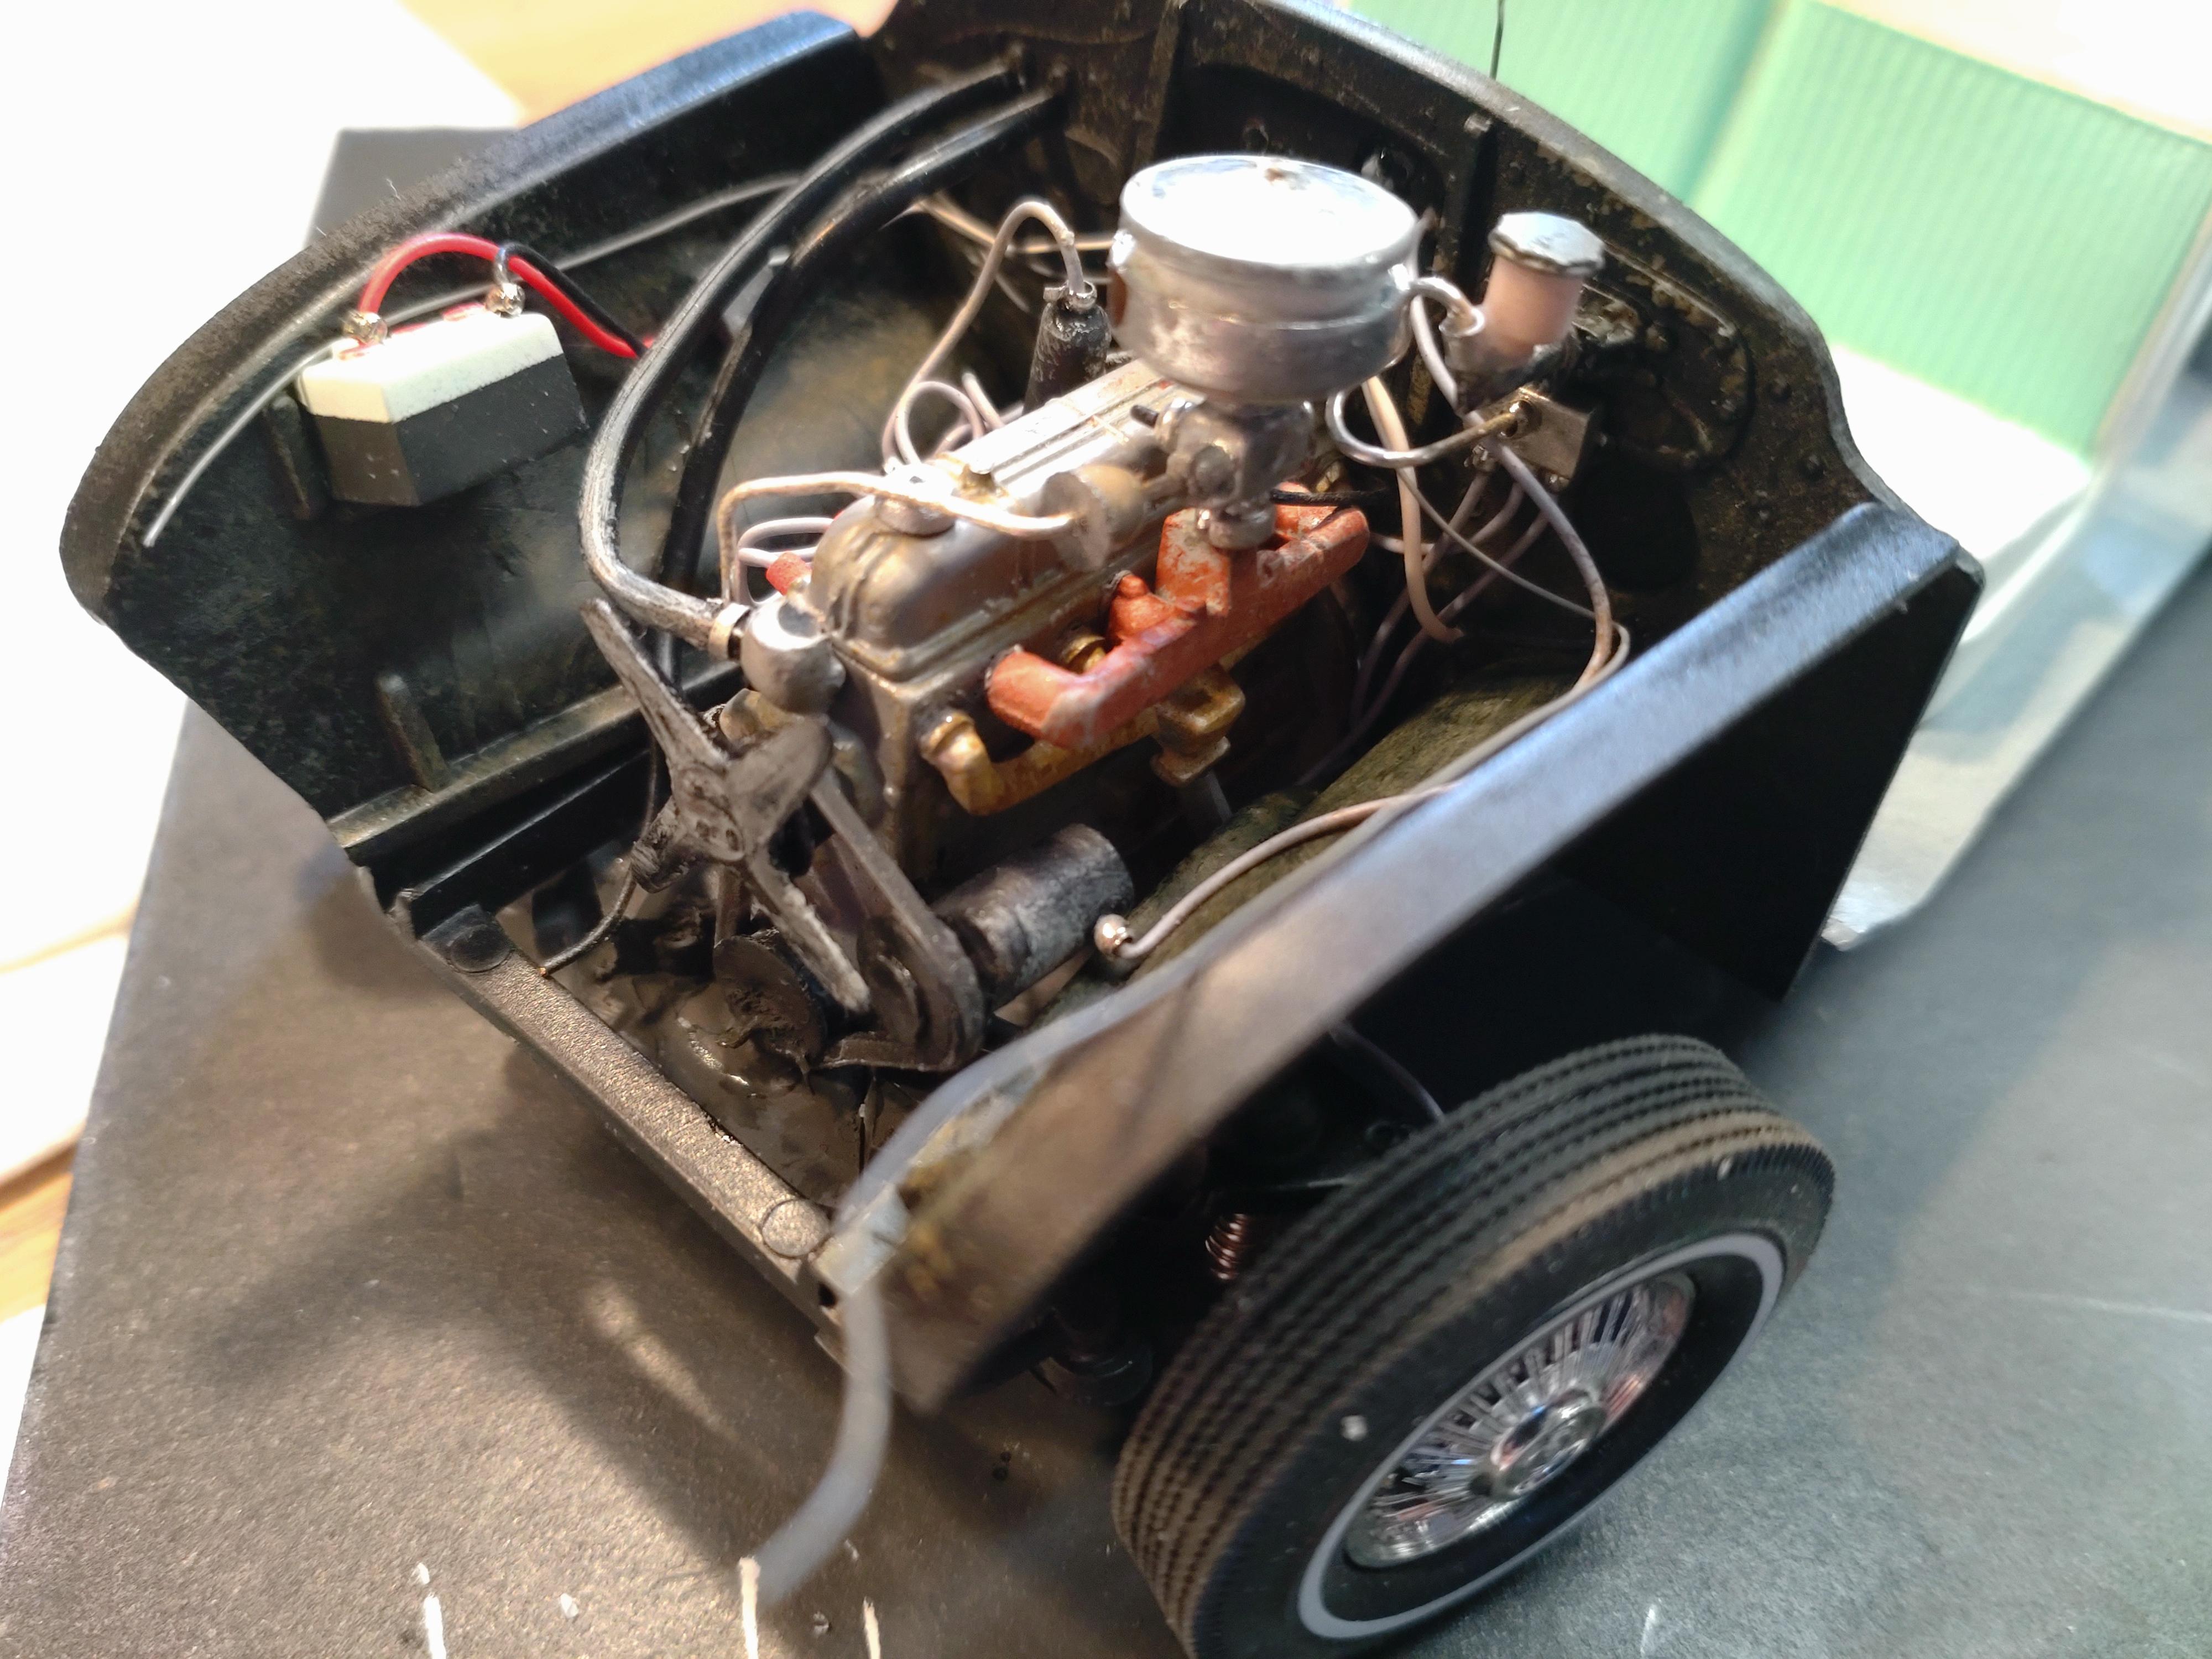
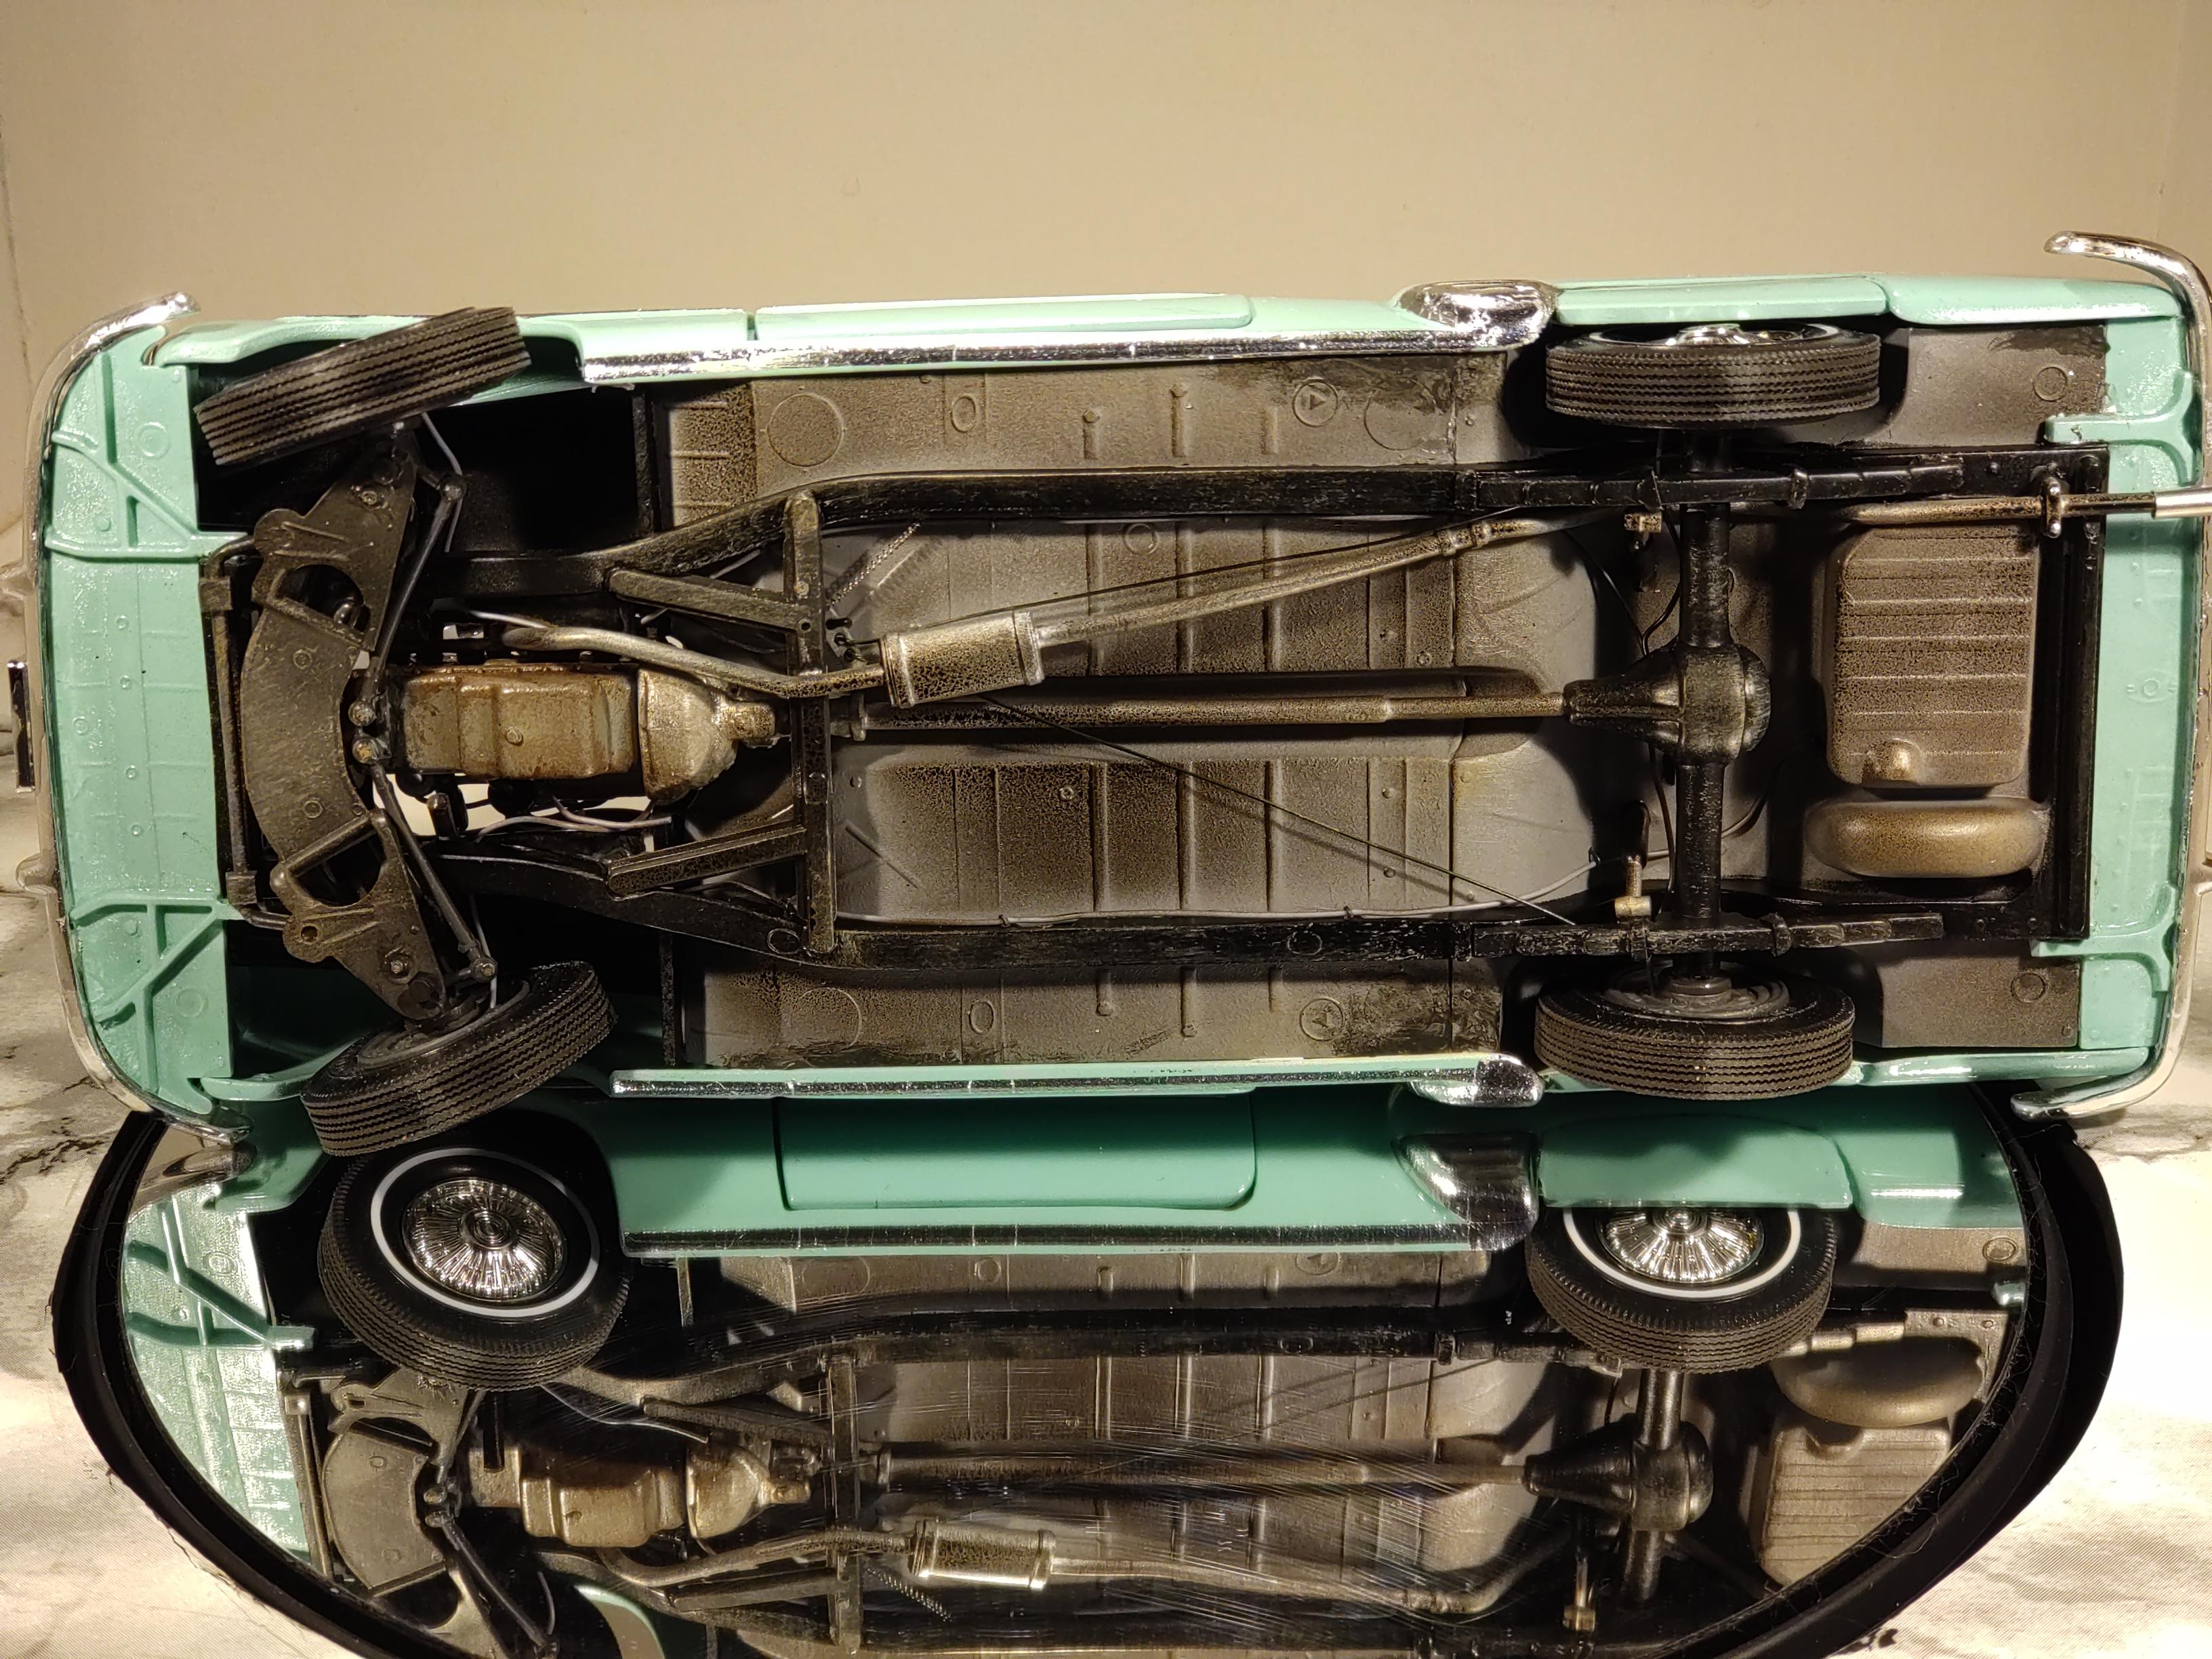
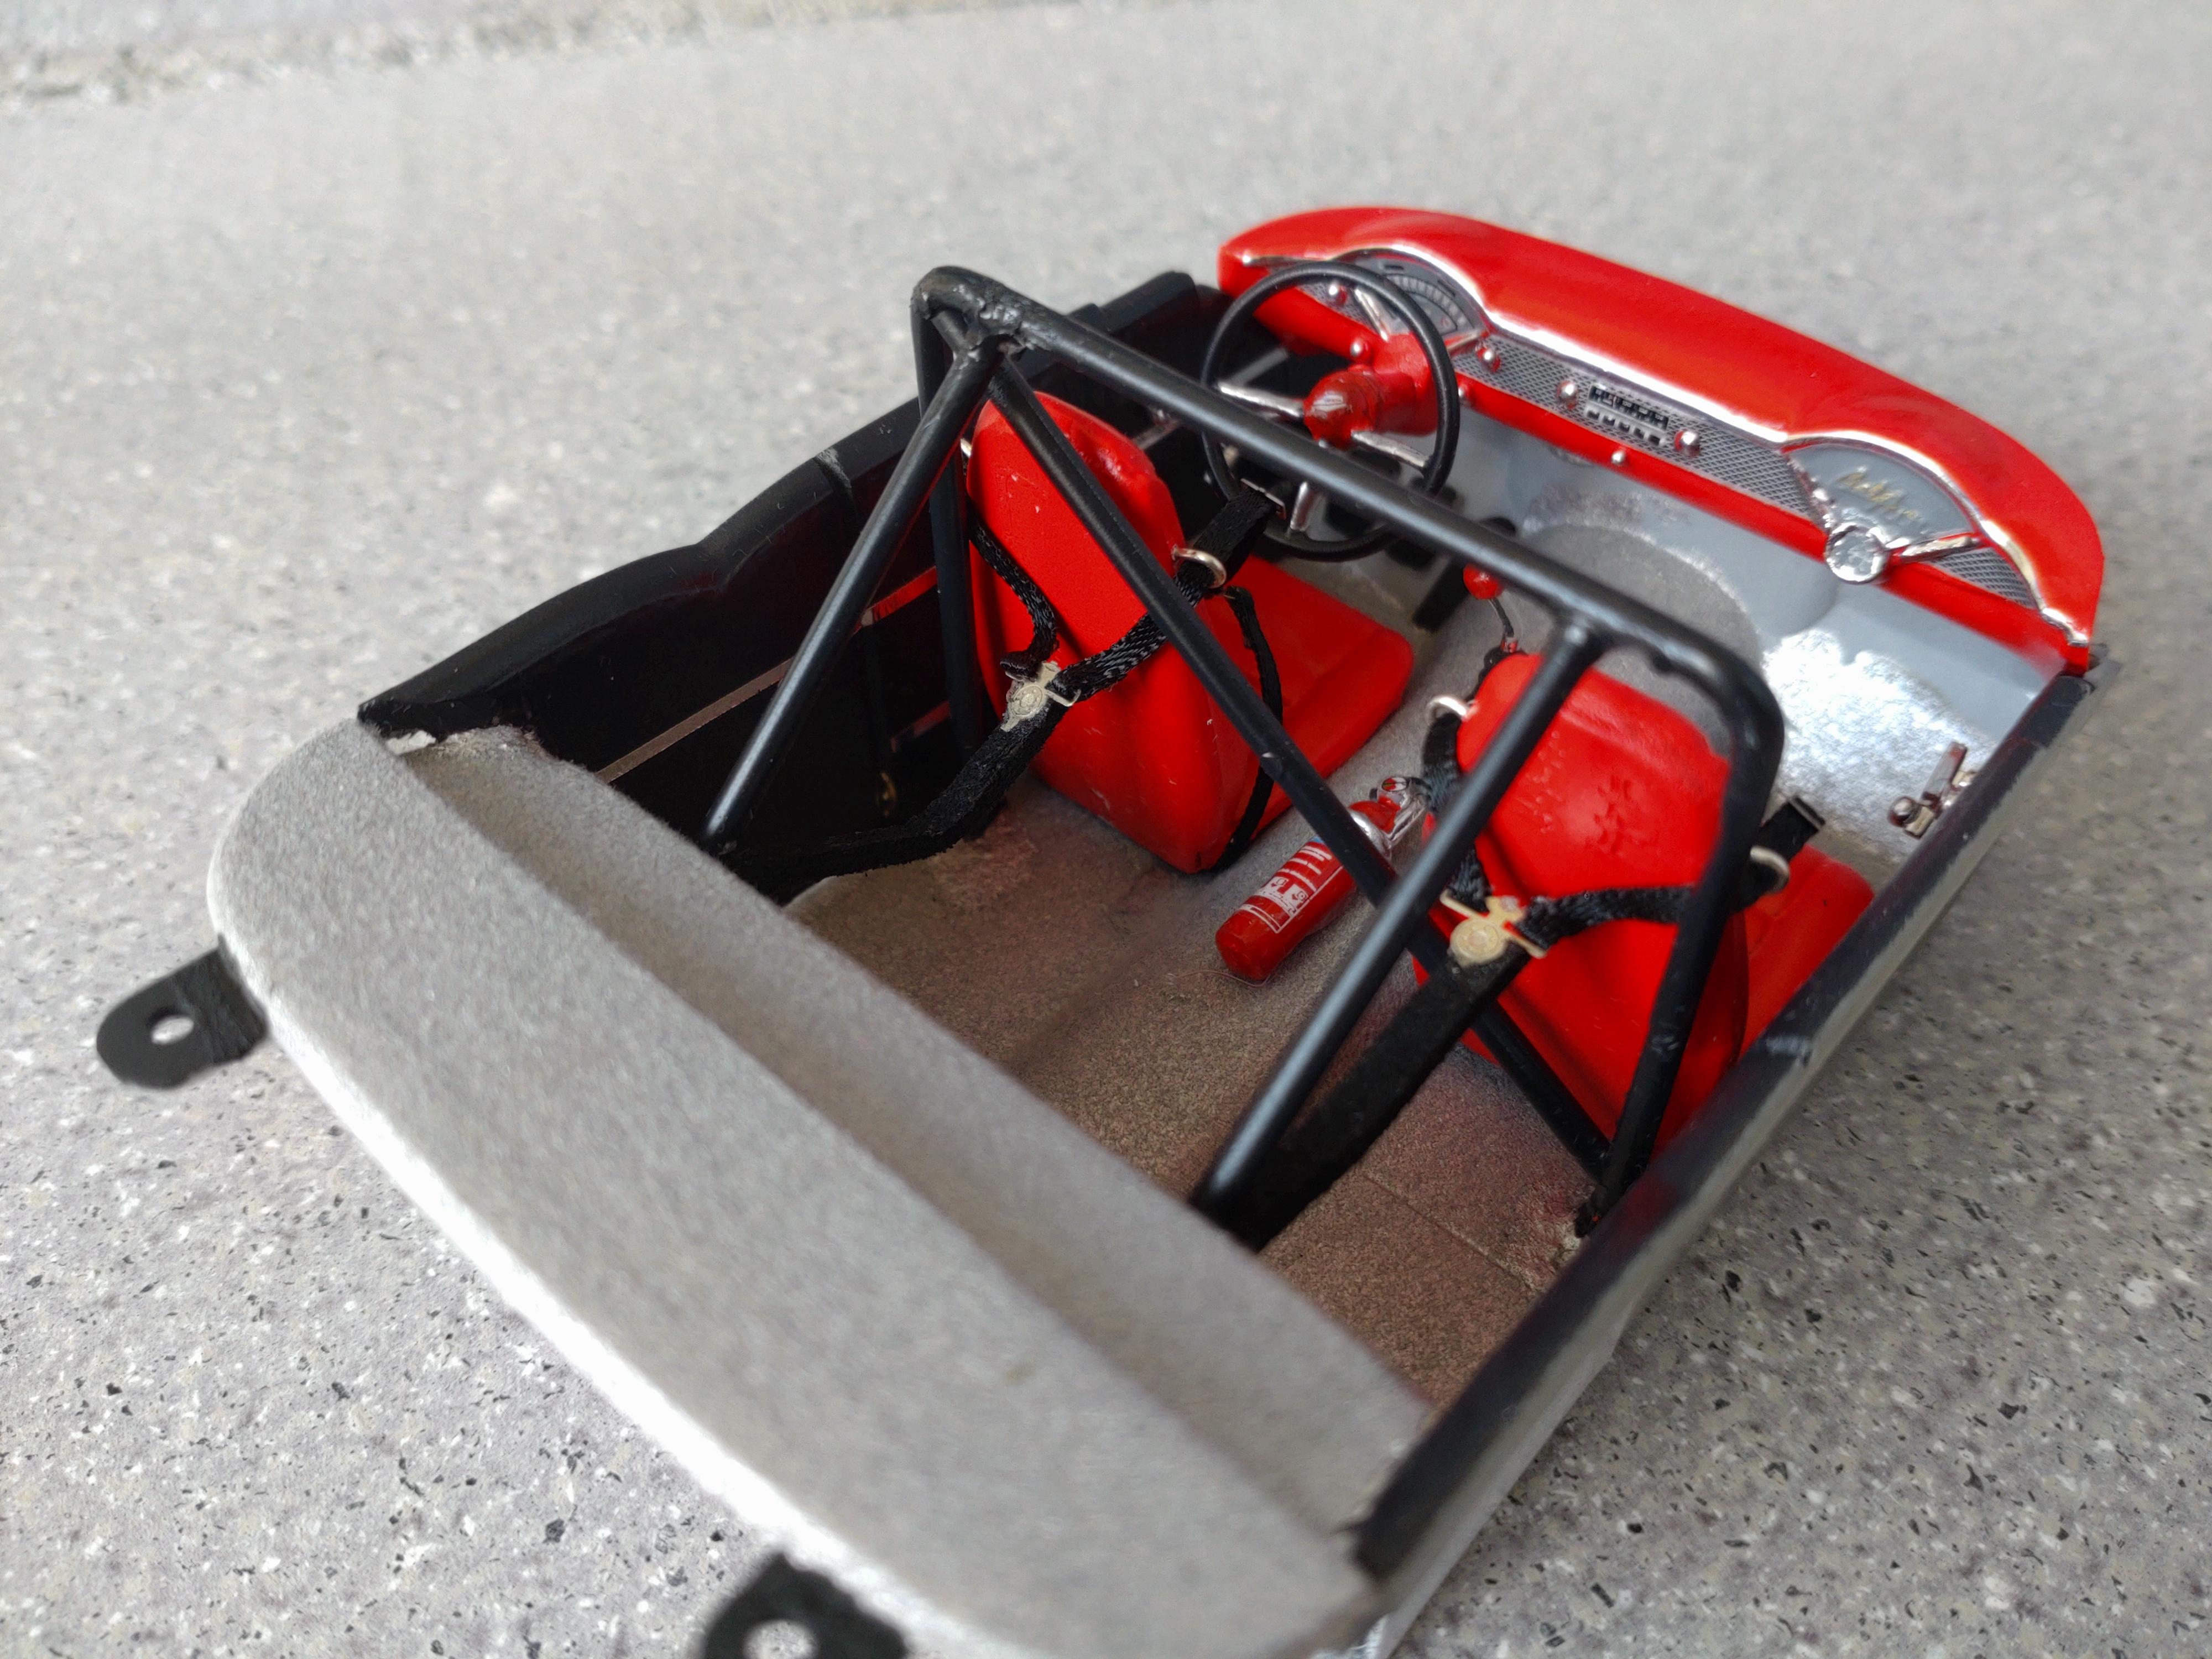
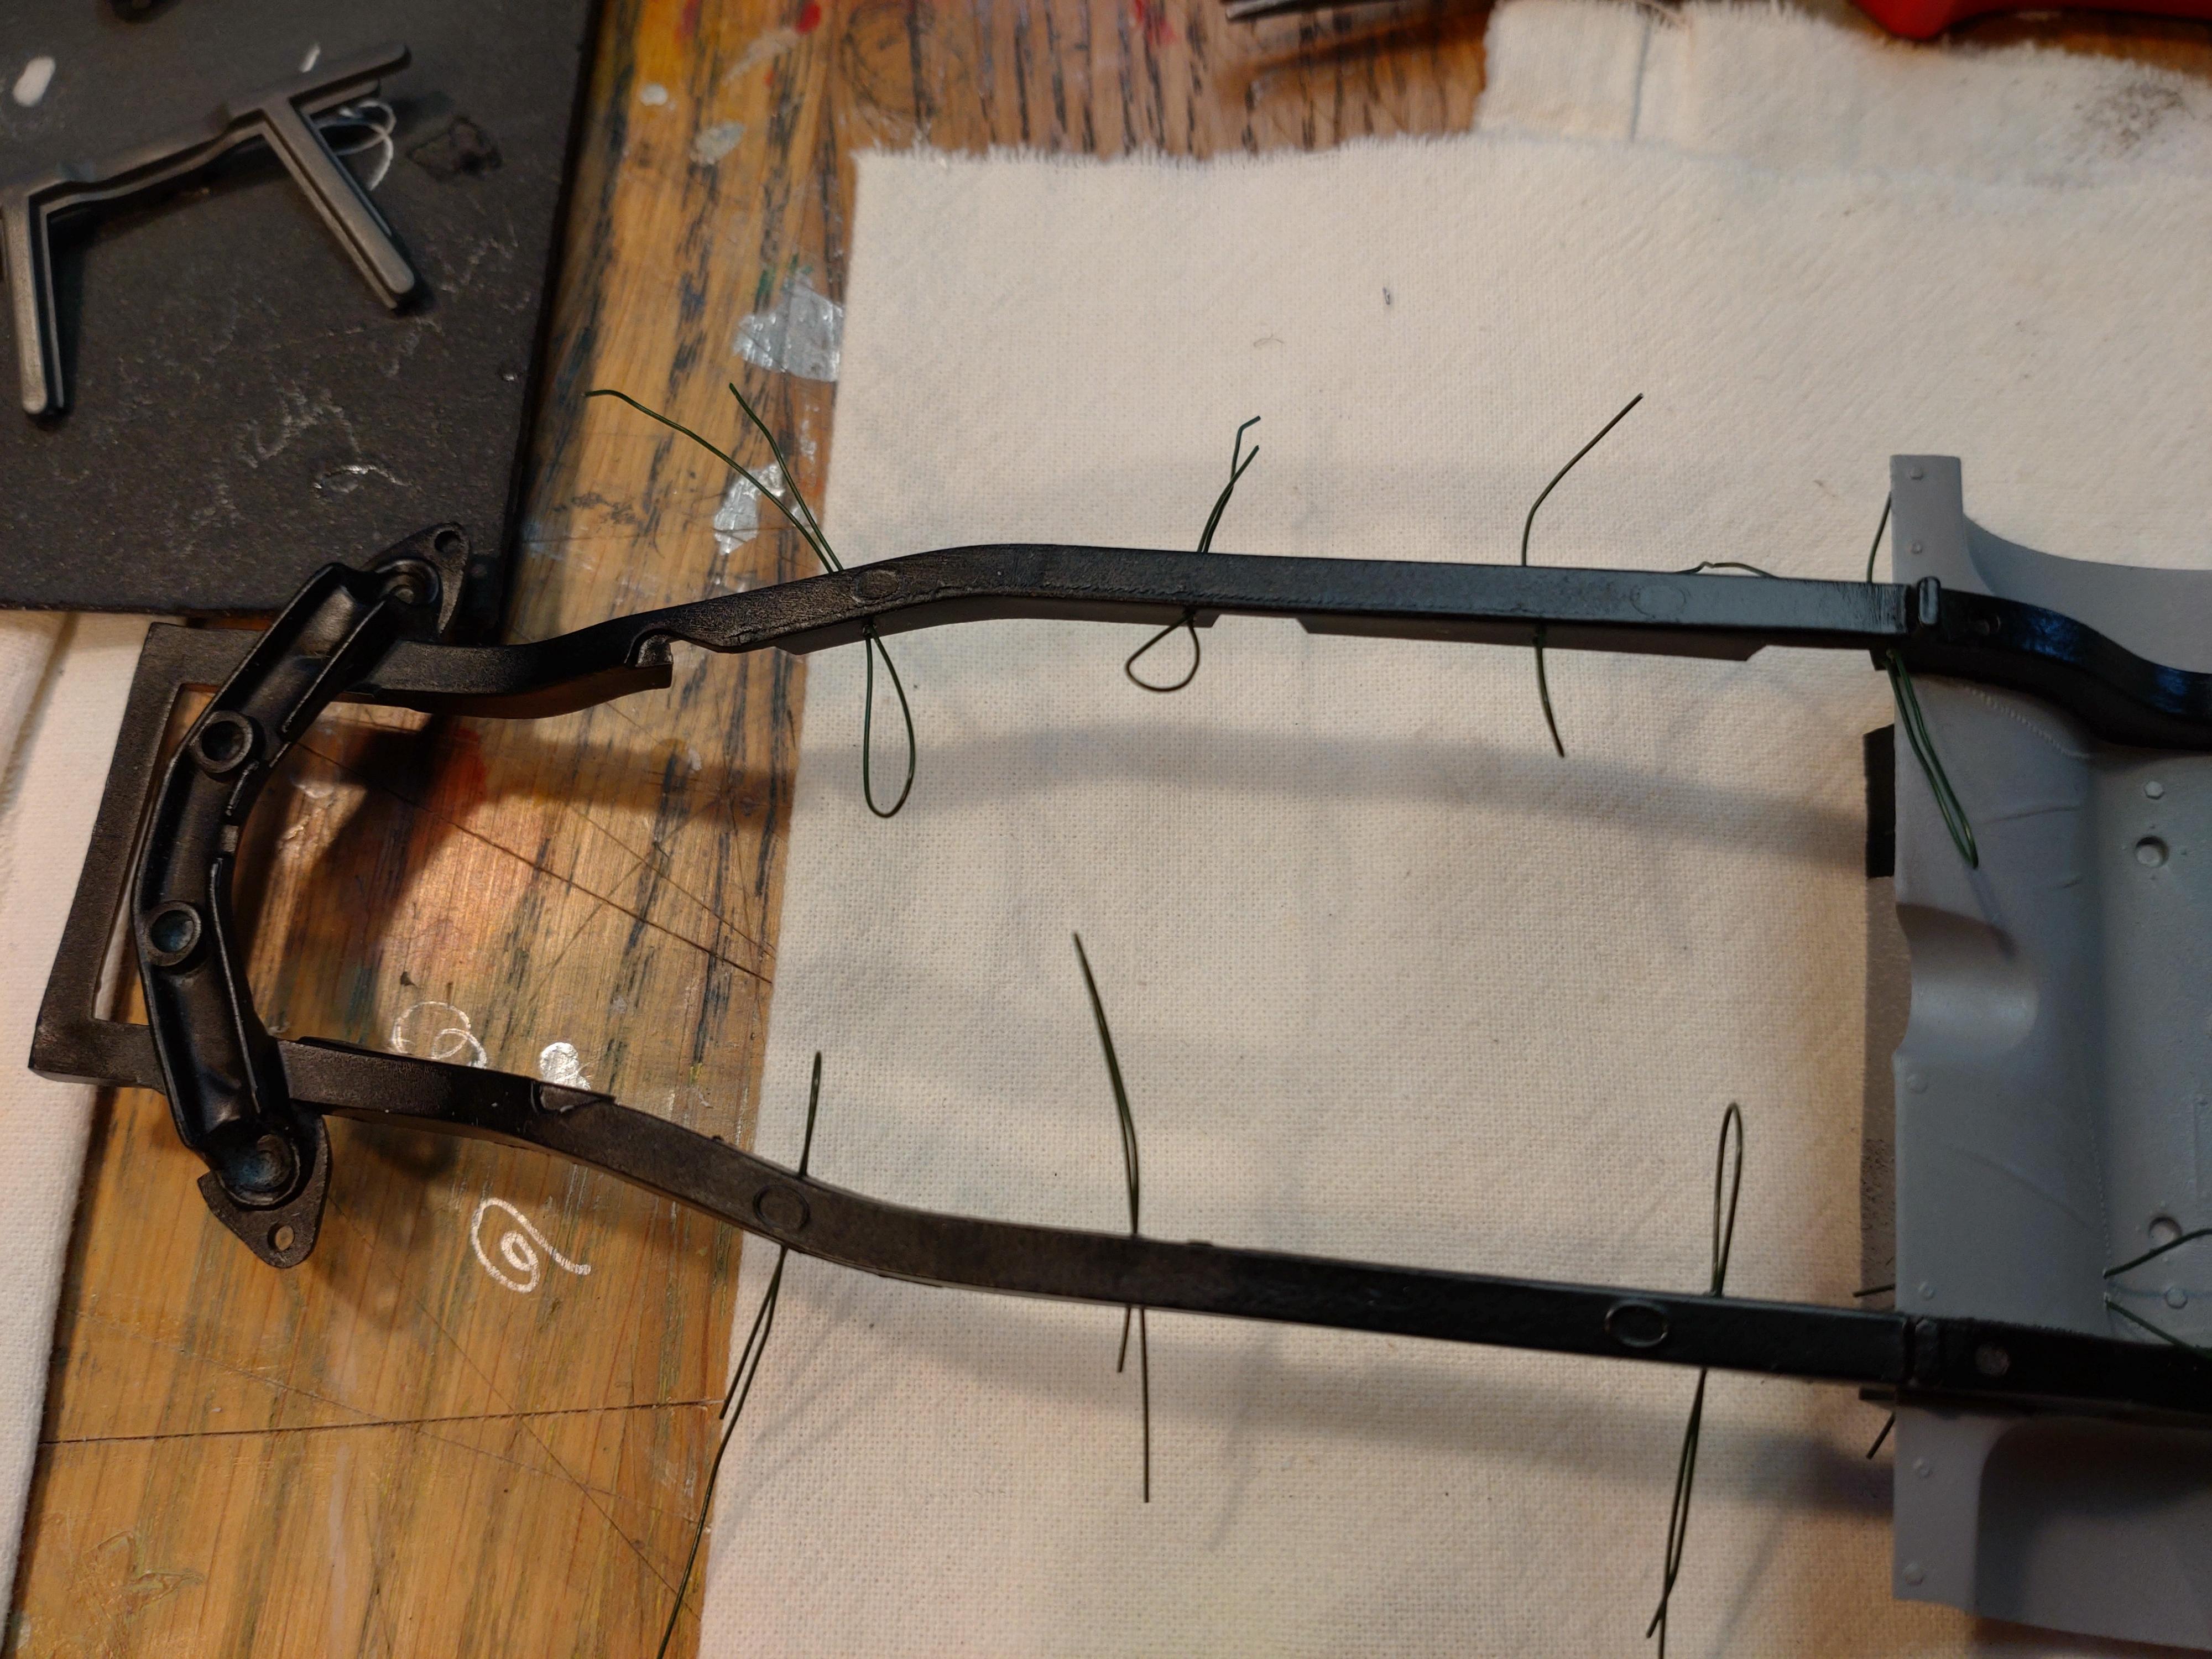
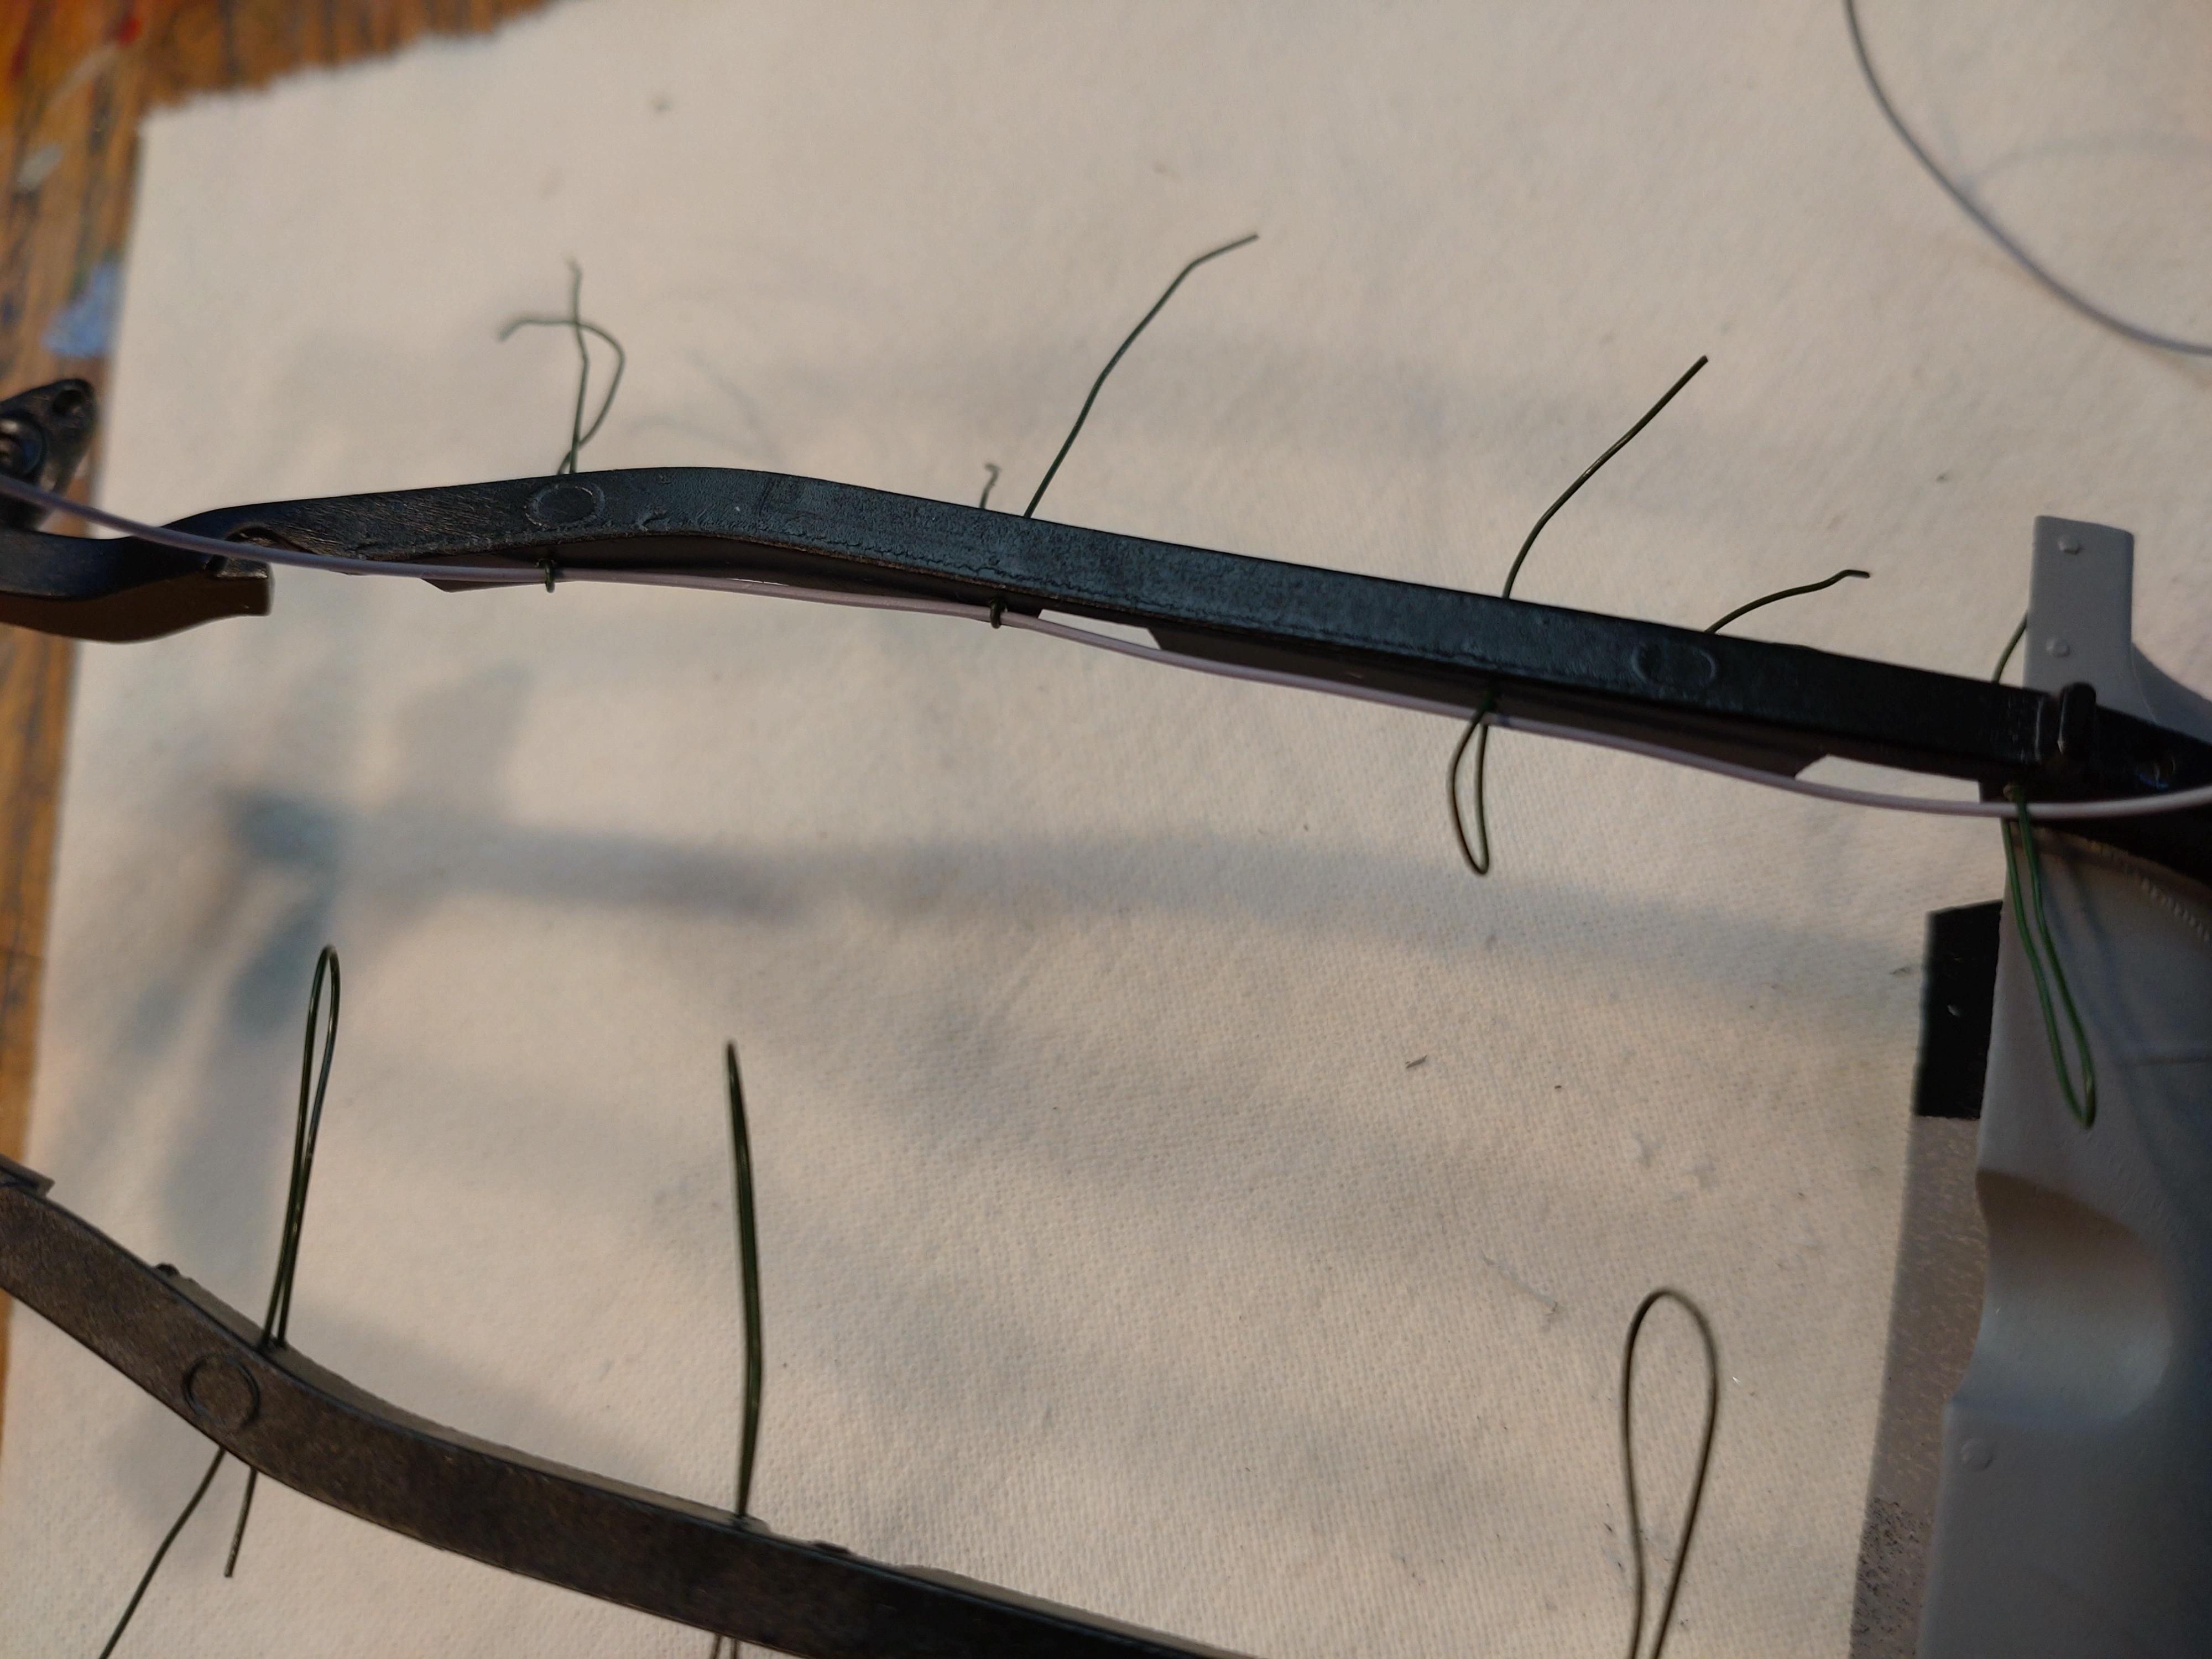
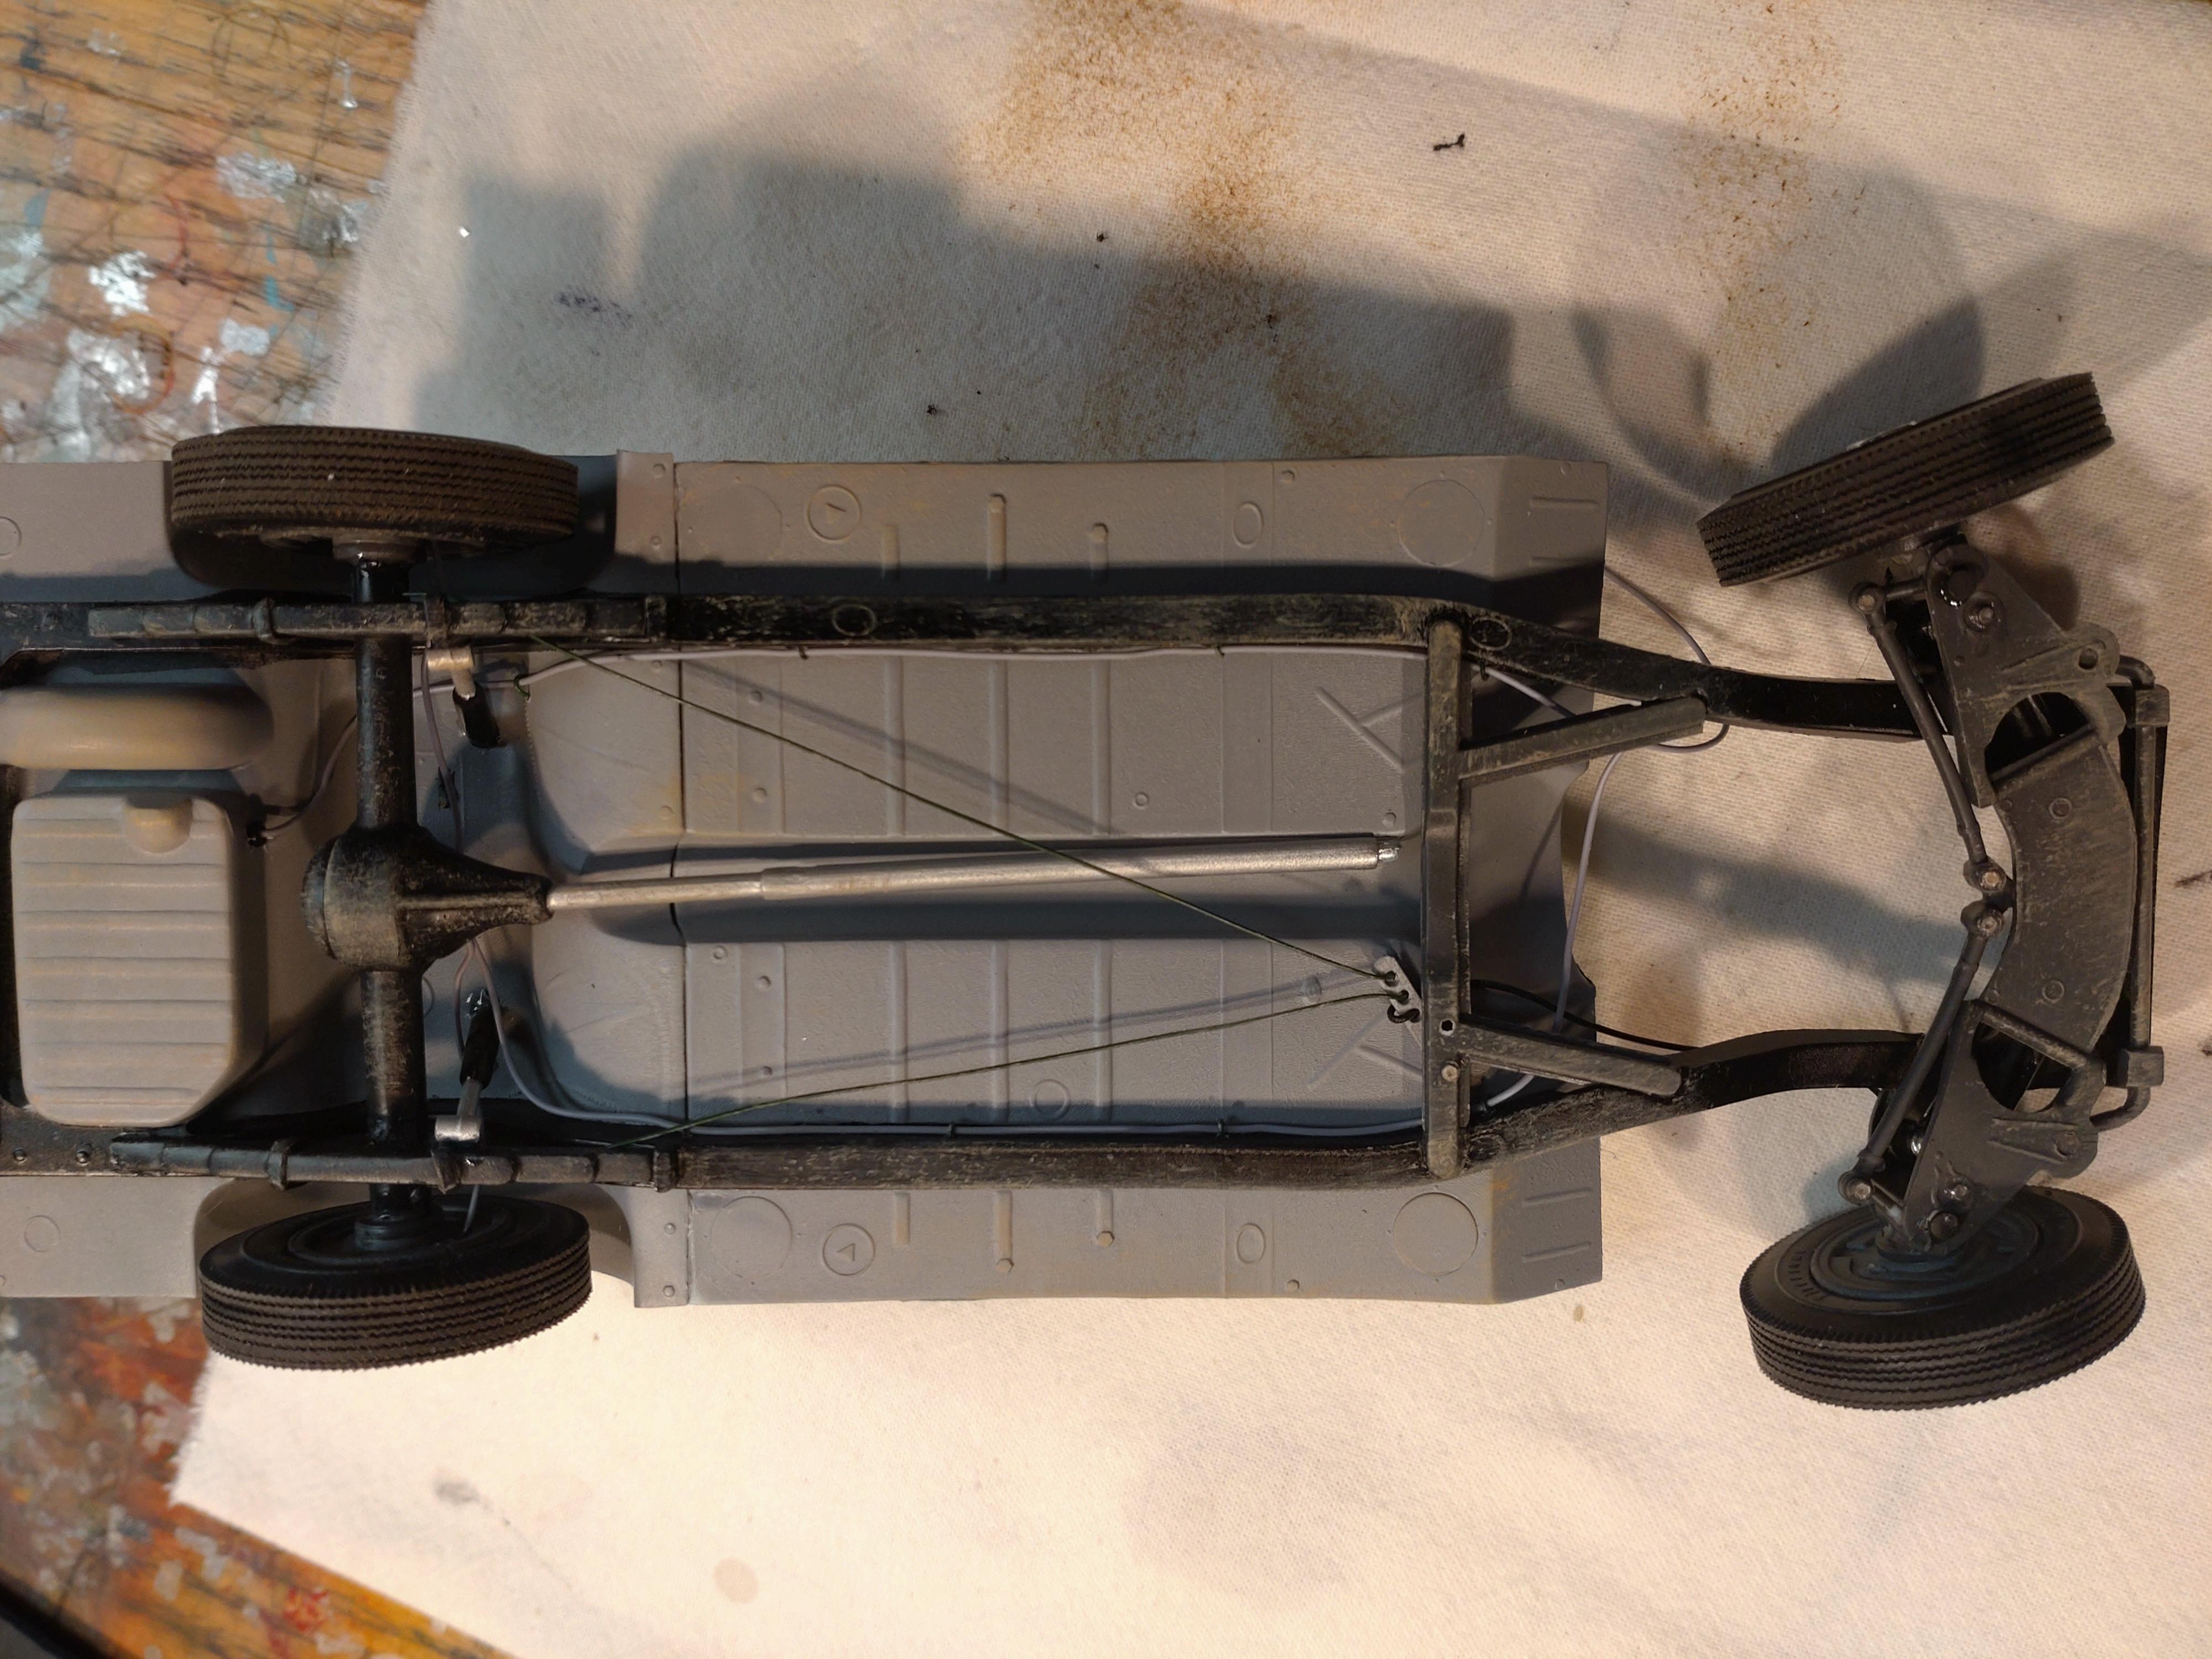
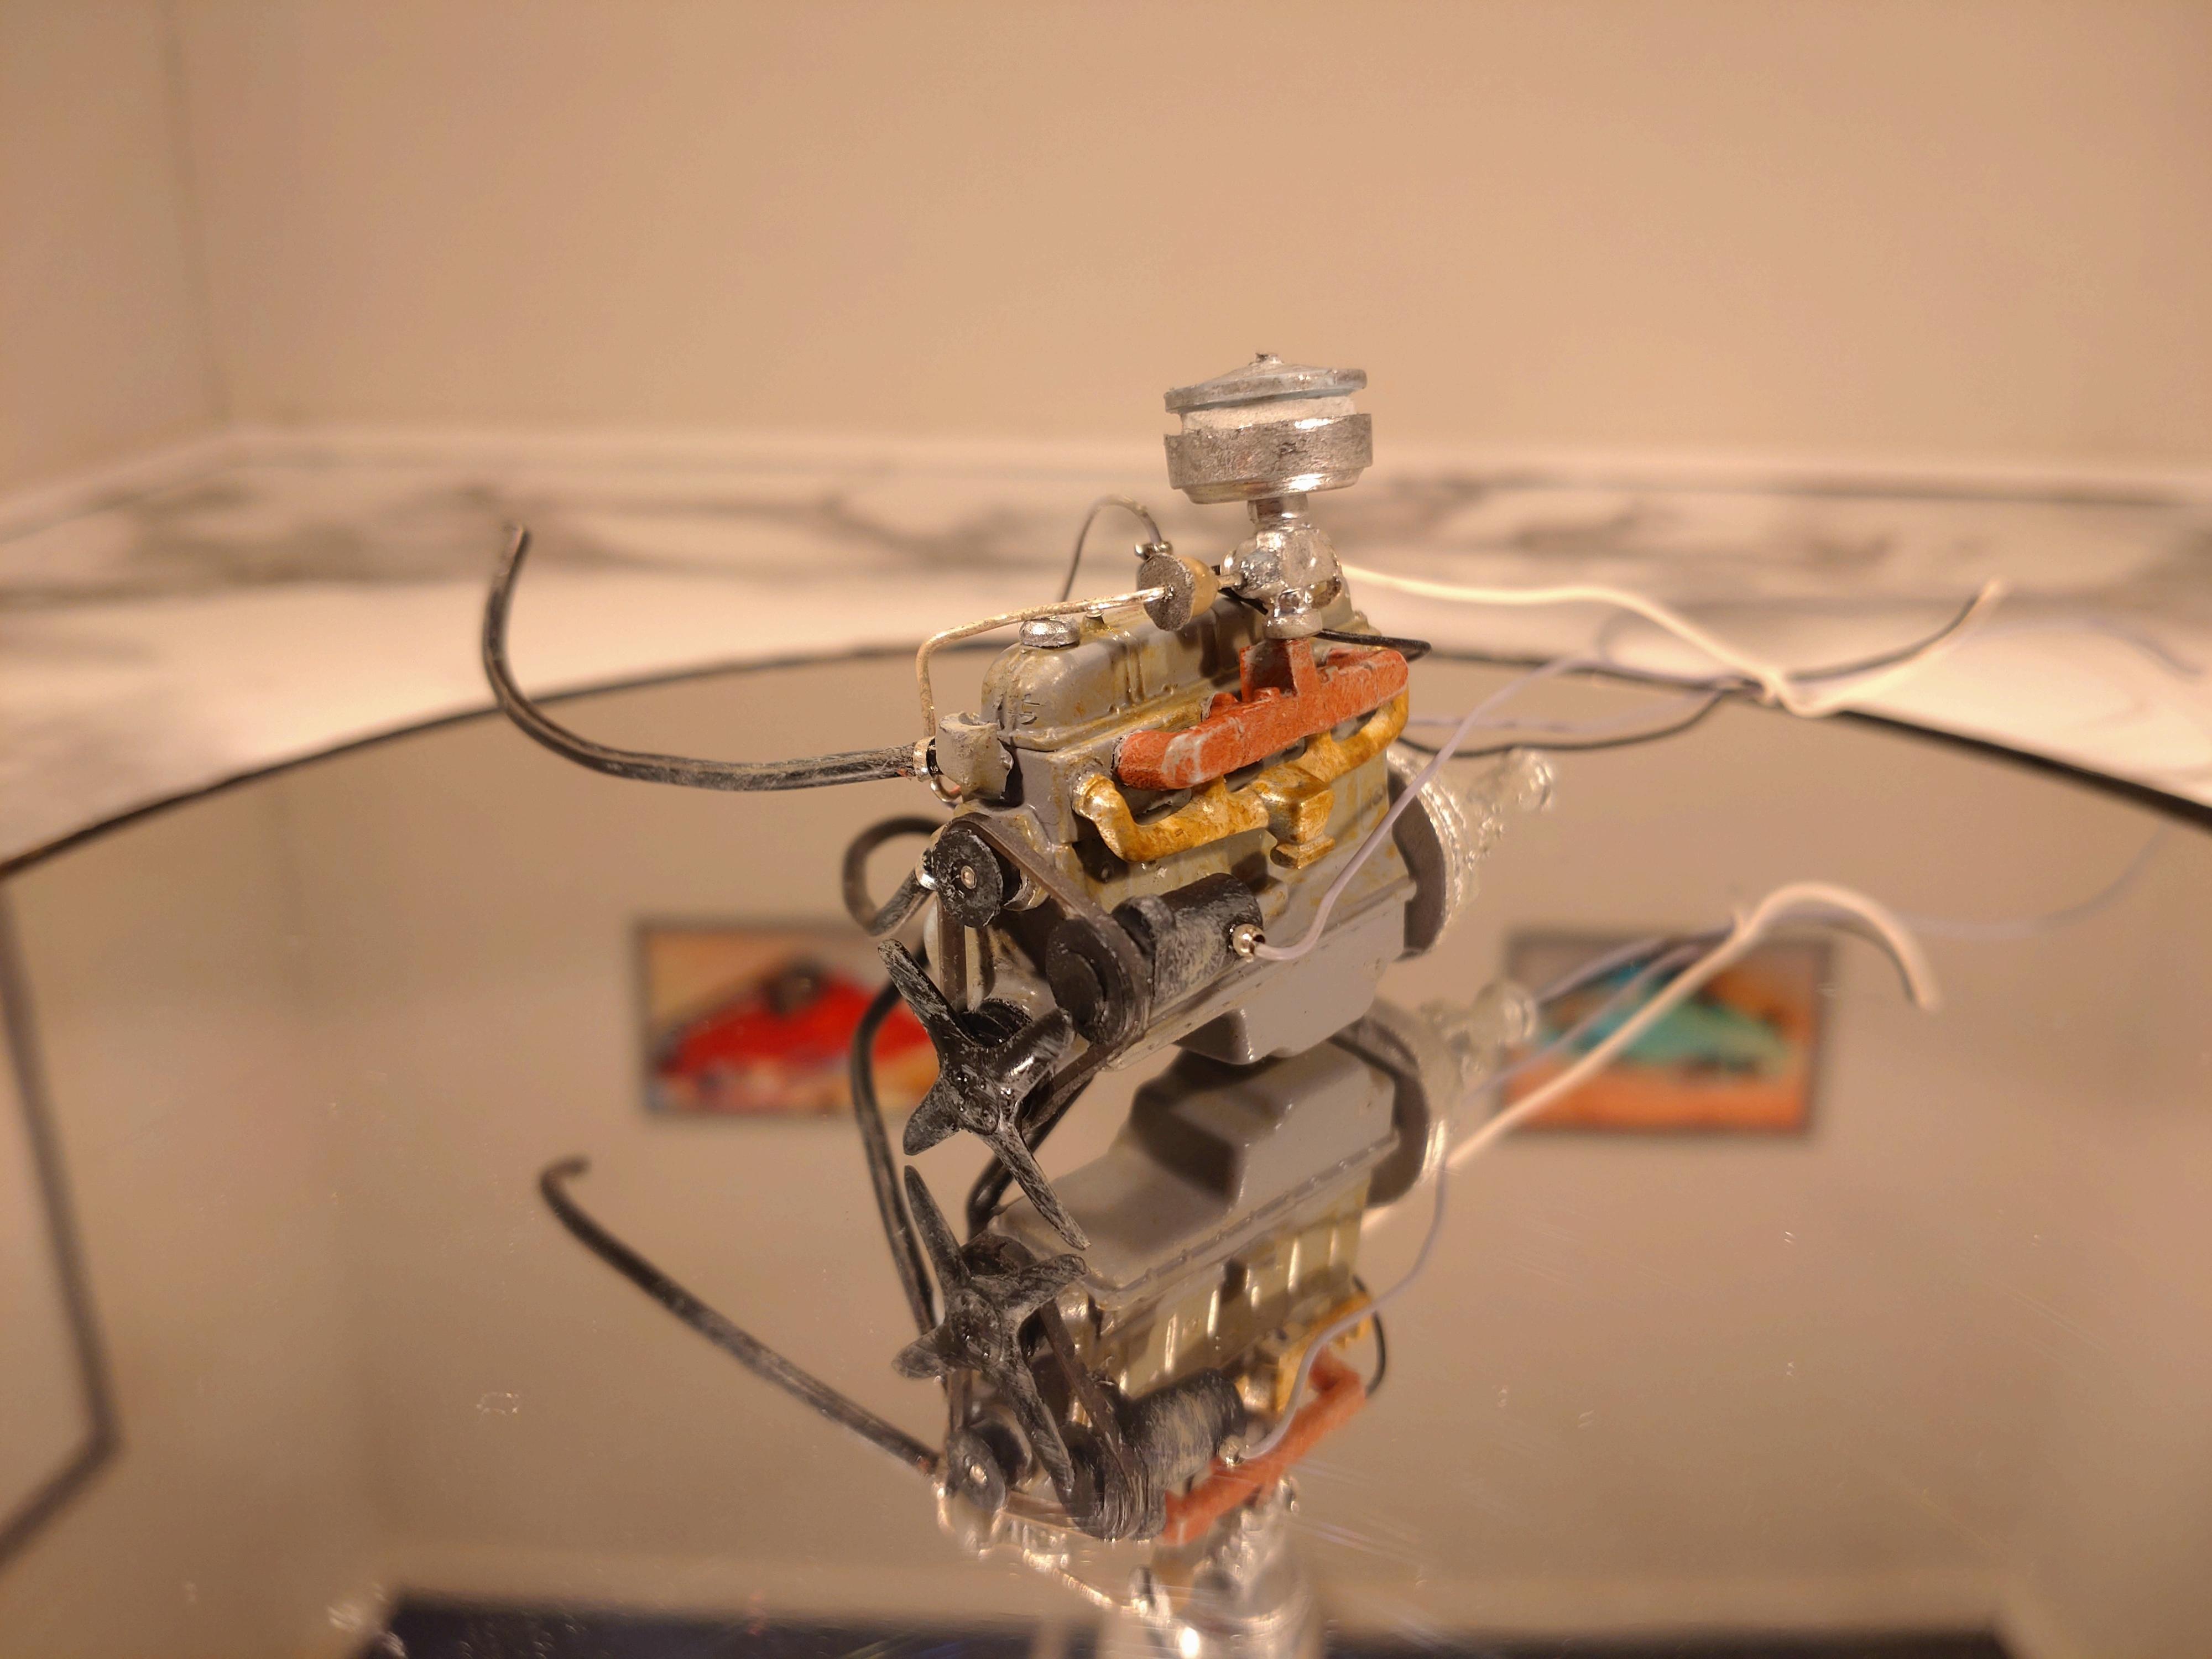
I´m finished with the frame and undercarriage now. I like to add brake and fuel lines and, if possible, also the cables for the parking brakes. Trouble was that there are quite a lot of images of the ´51 Bel Air in the net, but getting reasonably good pics of the bottom side was almost impossible. I did realise that the brake and fuel lines are connected to the frame. For this I was able to use a connecting technique I "developed" a while ago (probably might be others out there with the same idea, but I haven´t seen it yet...). I drill pairs of 0.4mm holes along the frame and thread an loop of 0.3mm wire through them. Pull them tight and bend the ends inside the frame. Works well on the flat undercarriage too, but check out that the wires end up under the seats. After attaching the interior board I could move on with a first step of weathering. My favorite tool for rough weathering is a ripped piece of pillow foam. I can use a flat or a more pointed side, squish it to match my needs, whatever. Just take a small amount of matt paint off the lid and tip it on the surfaces. Have to work fast, because the enamel paint drys quickly with this method. I got the parking brake lines as close to original as I was able. Mostly the setup on cars of this age seem to be the same. I this case I found out where the lever is connected to the frame. Next I finally attached the engine and gave the pan an extra amount of grime. Thanks for the advise guys! I wasn´t finished yet with the weathering though. The undercarriage still looked too clean, so I covered the wheels and gave it a careful work over with my airbrush. One last thing to do was to attach the return spring for the parking brake. Now comes the engine bay. Thanks for watching!
-
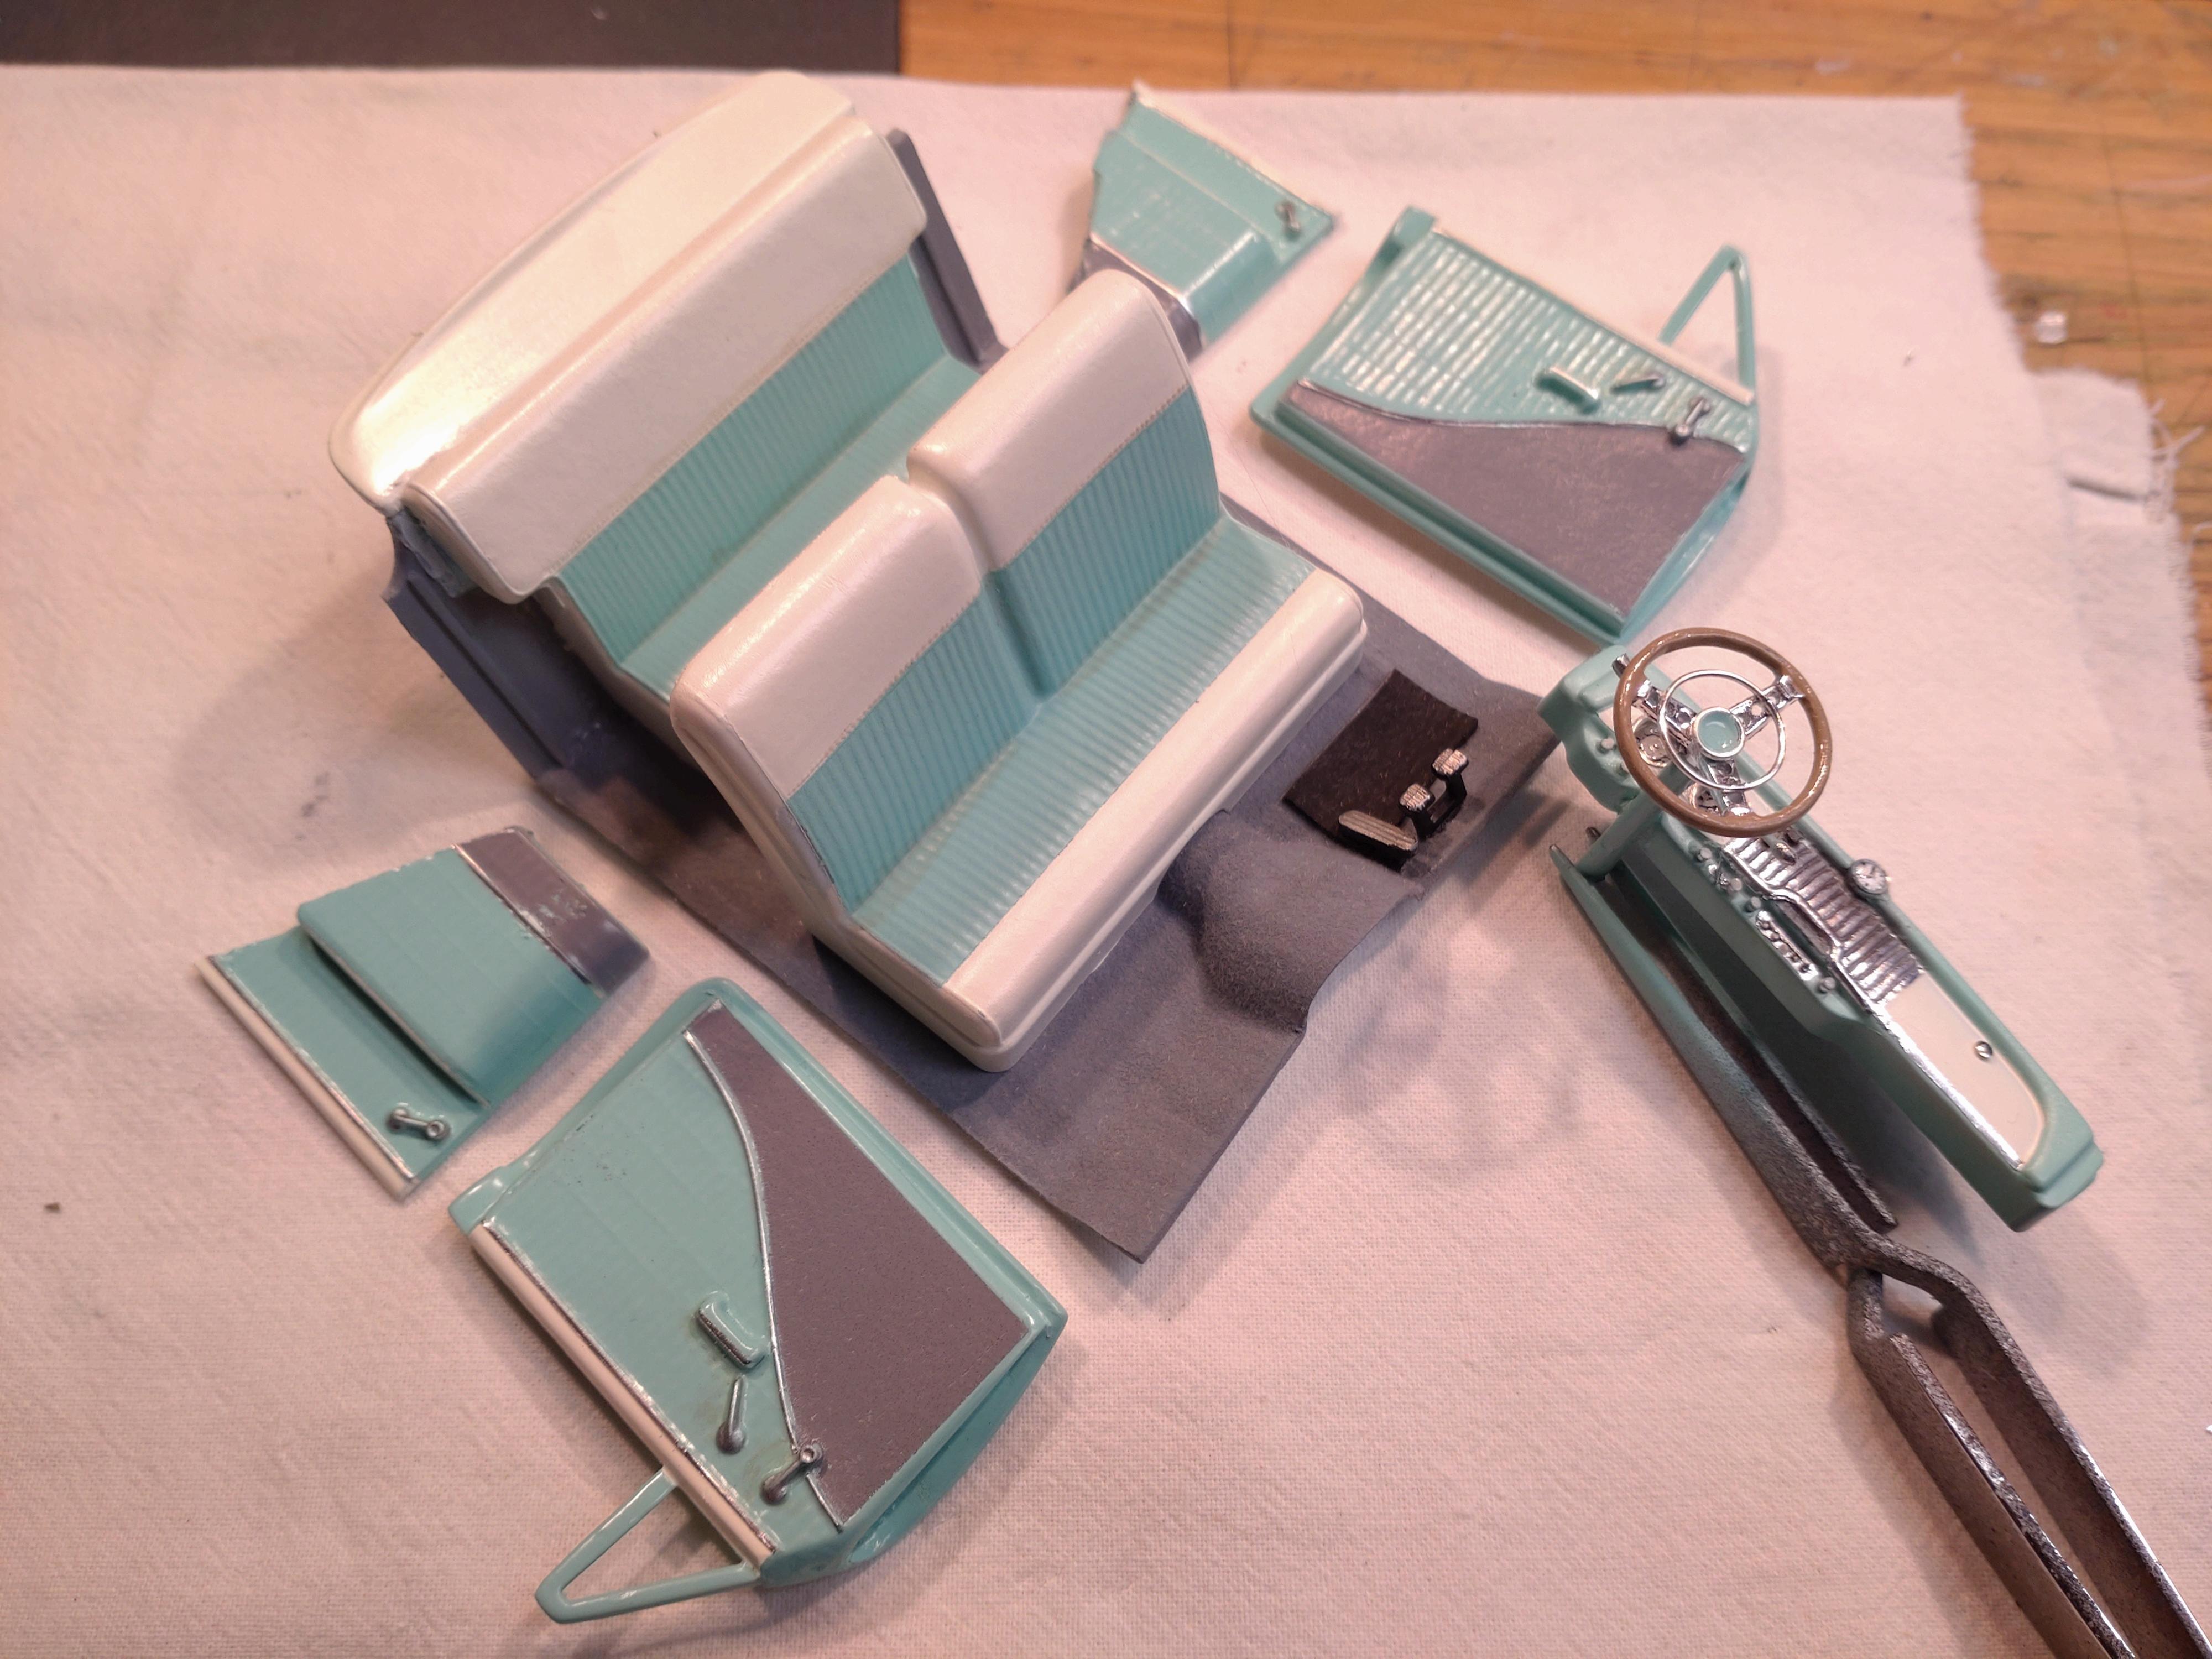
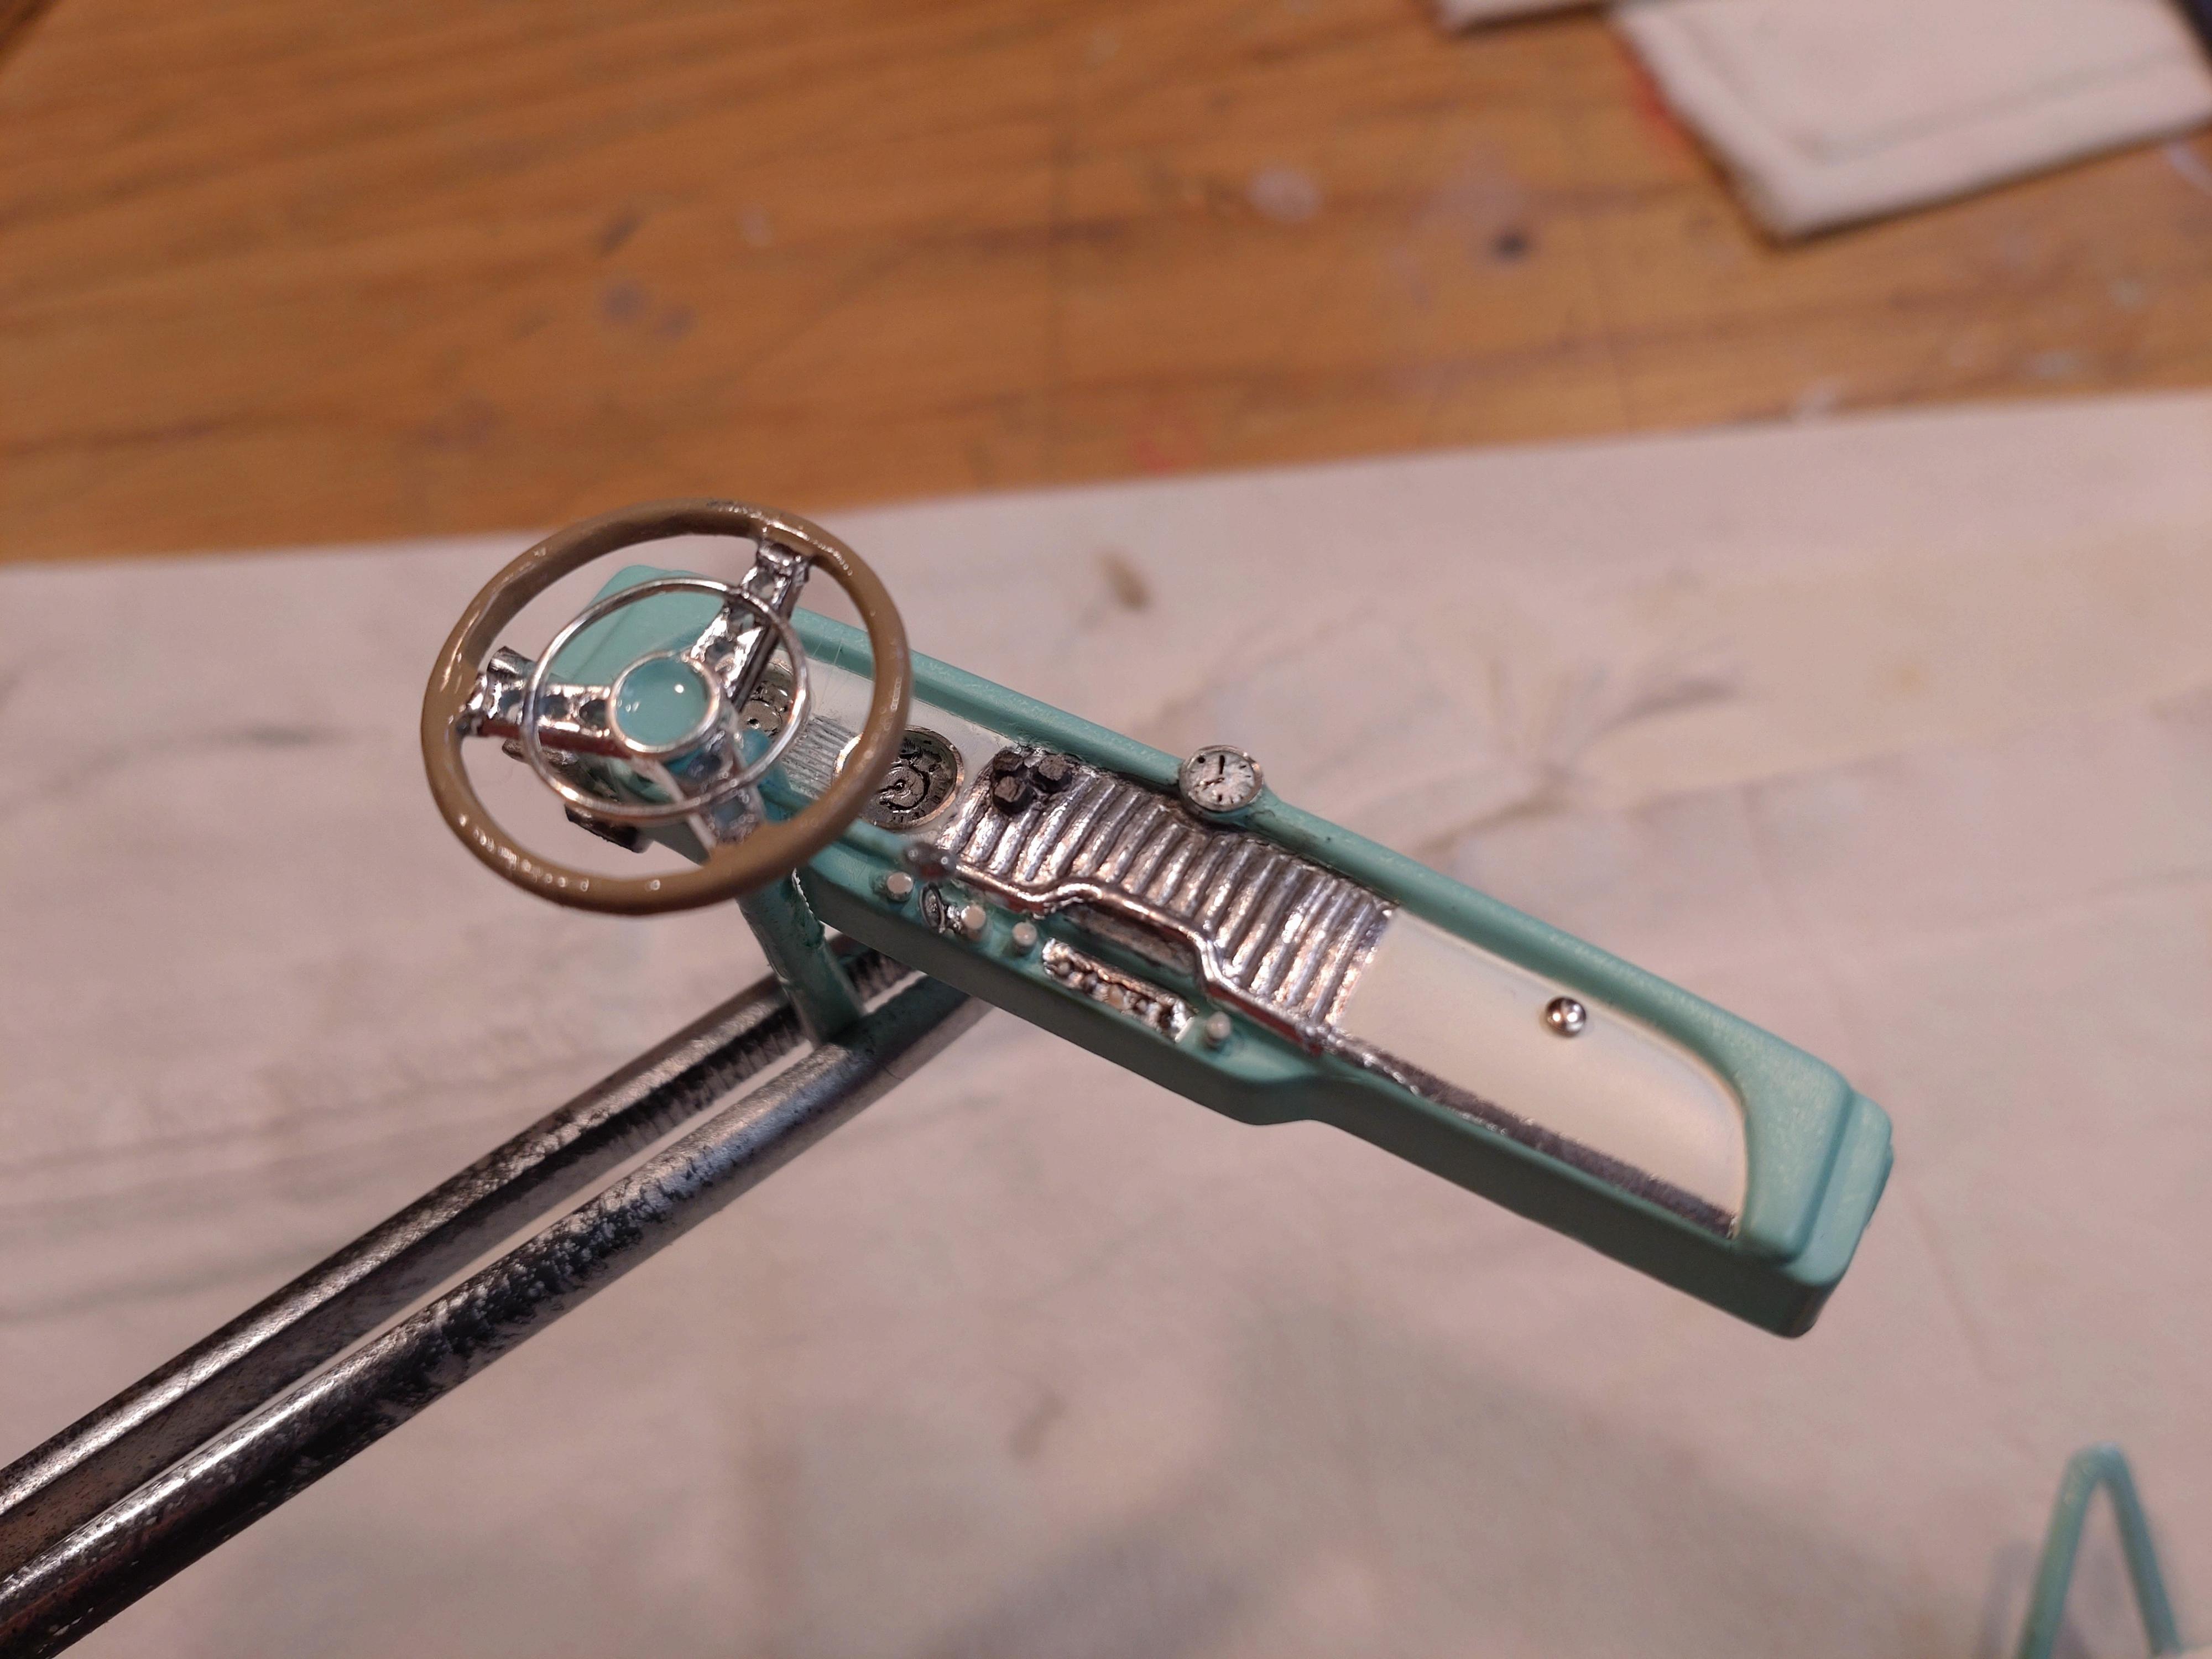
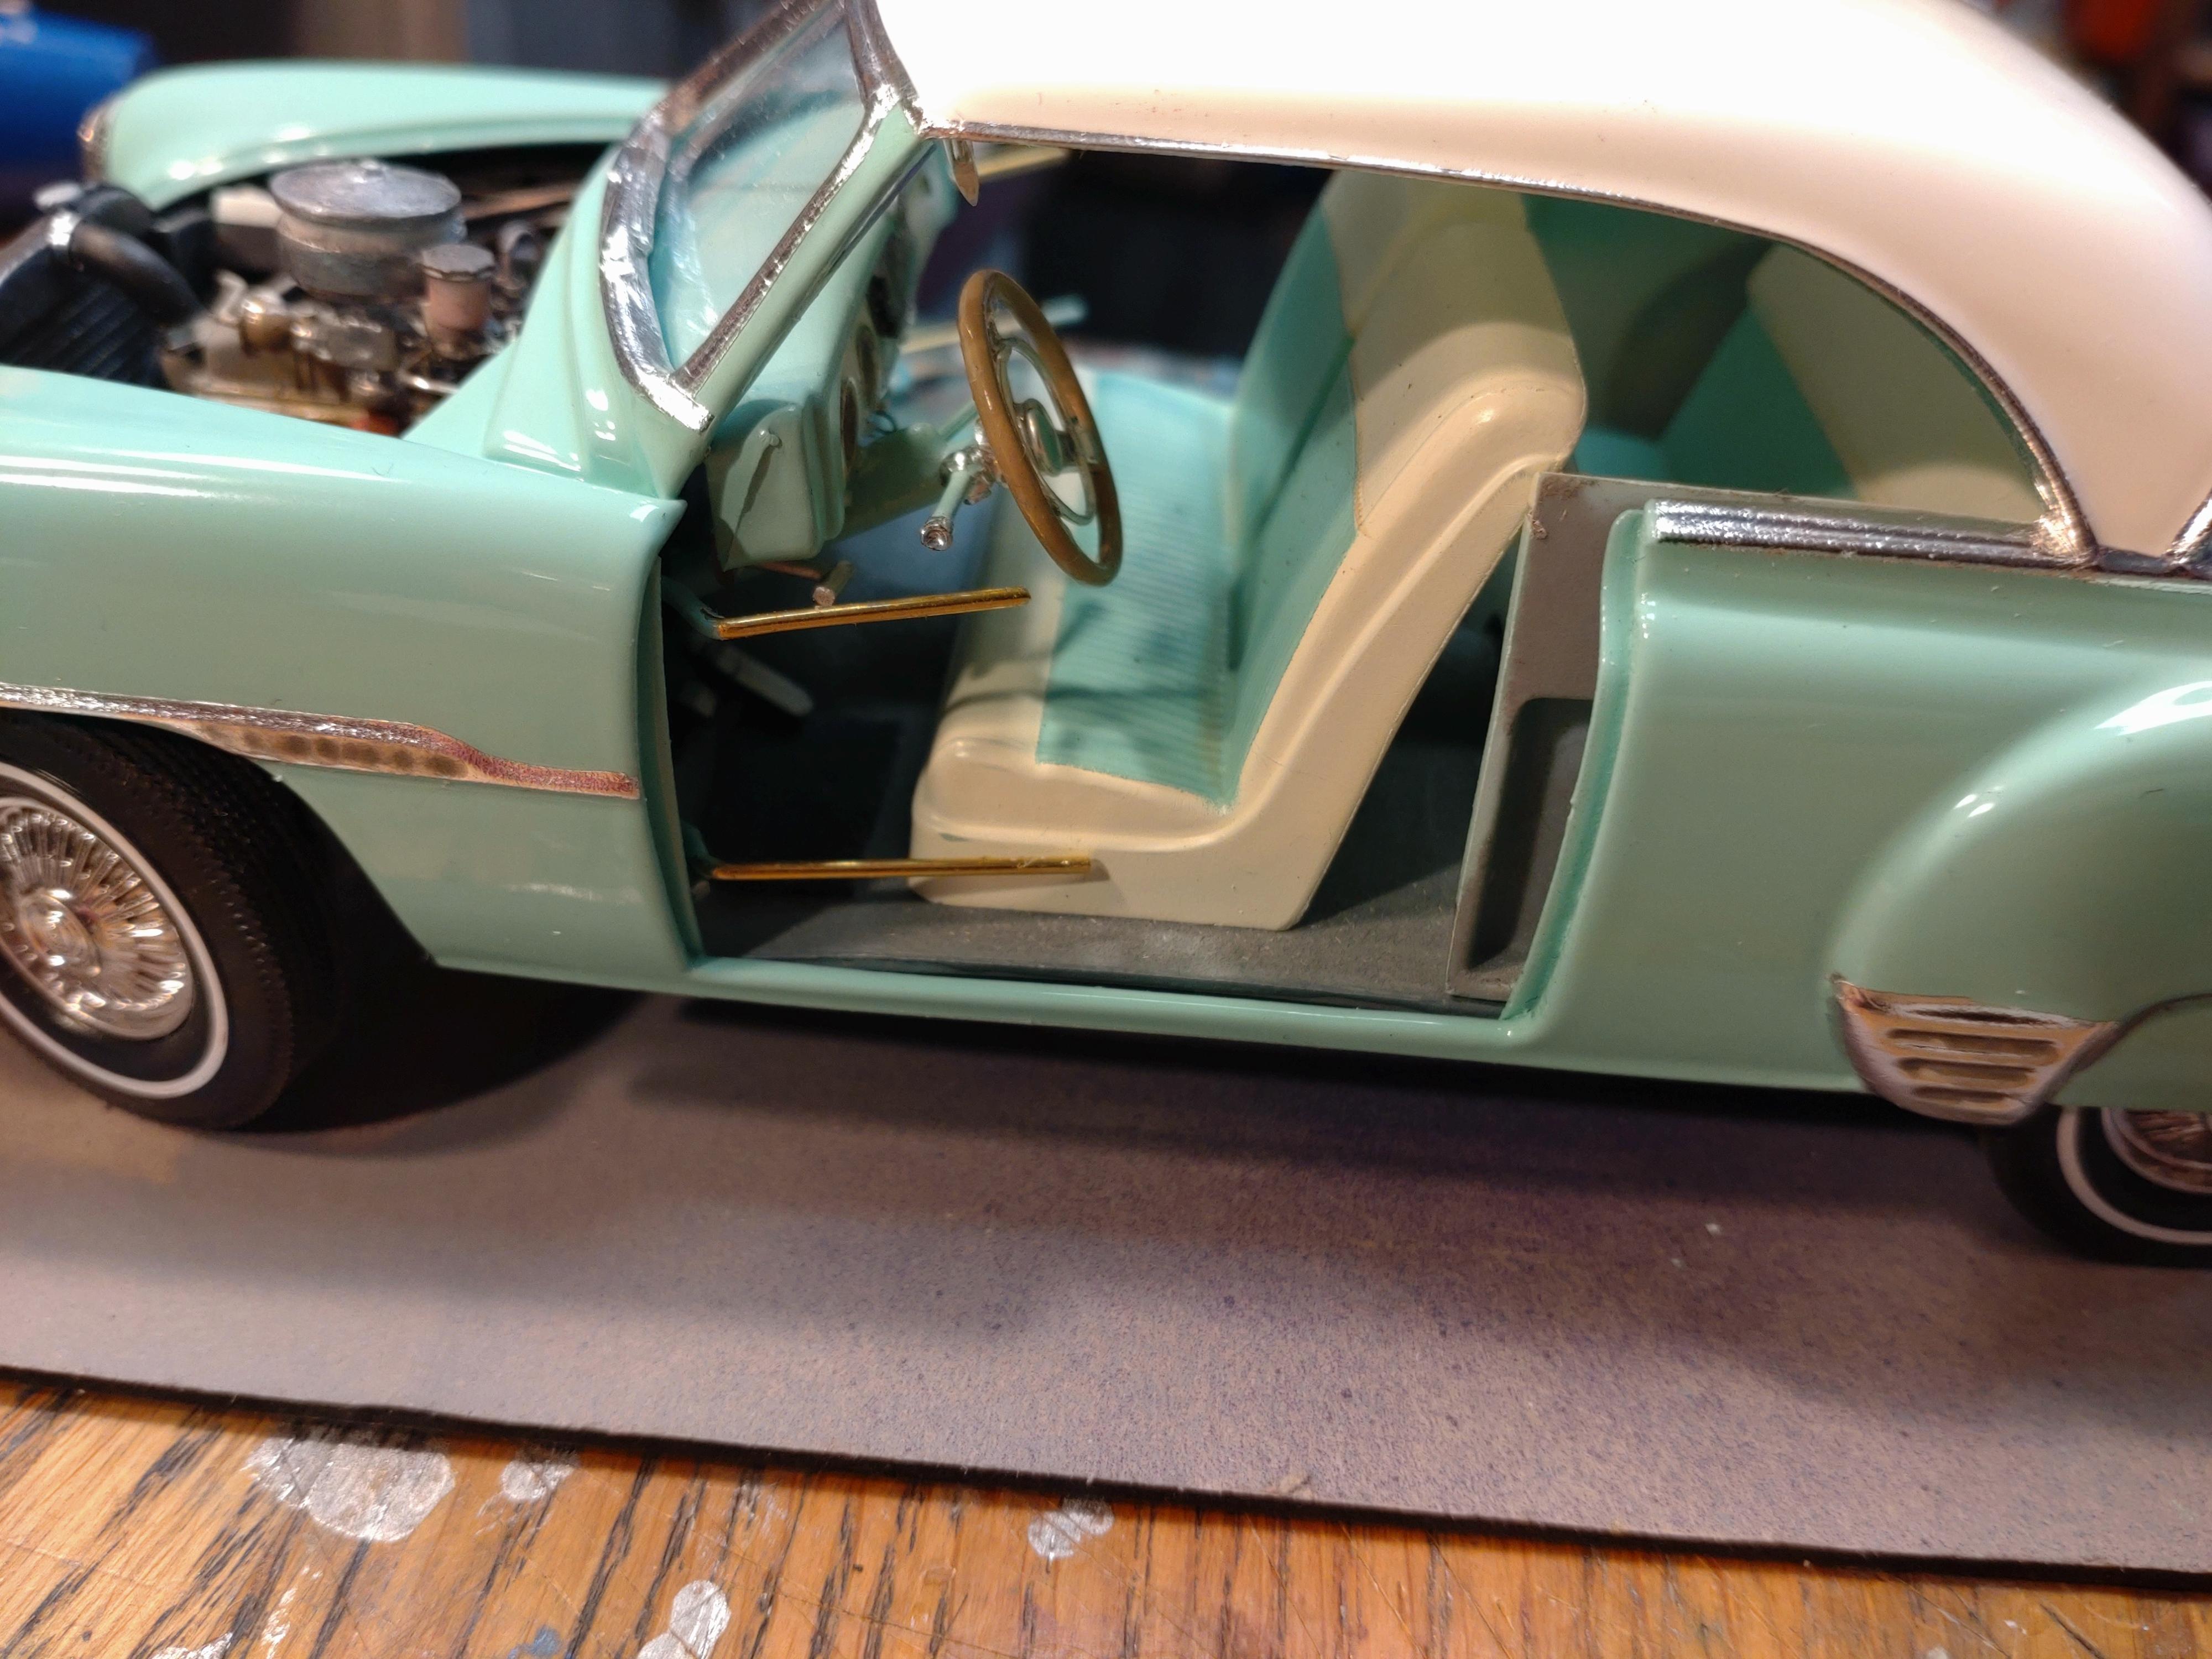
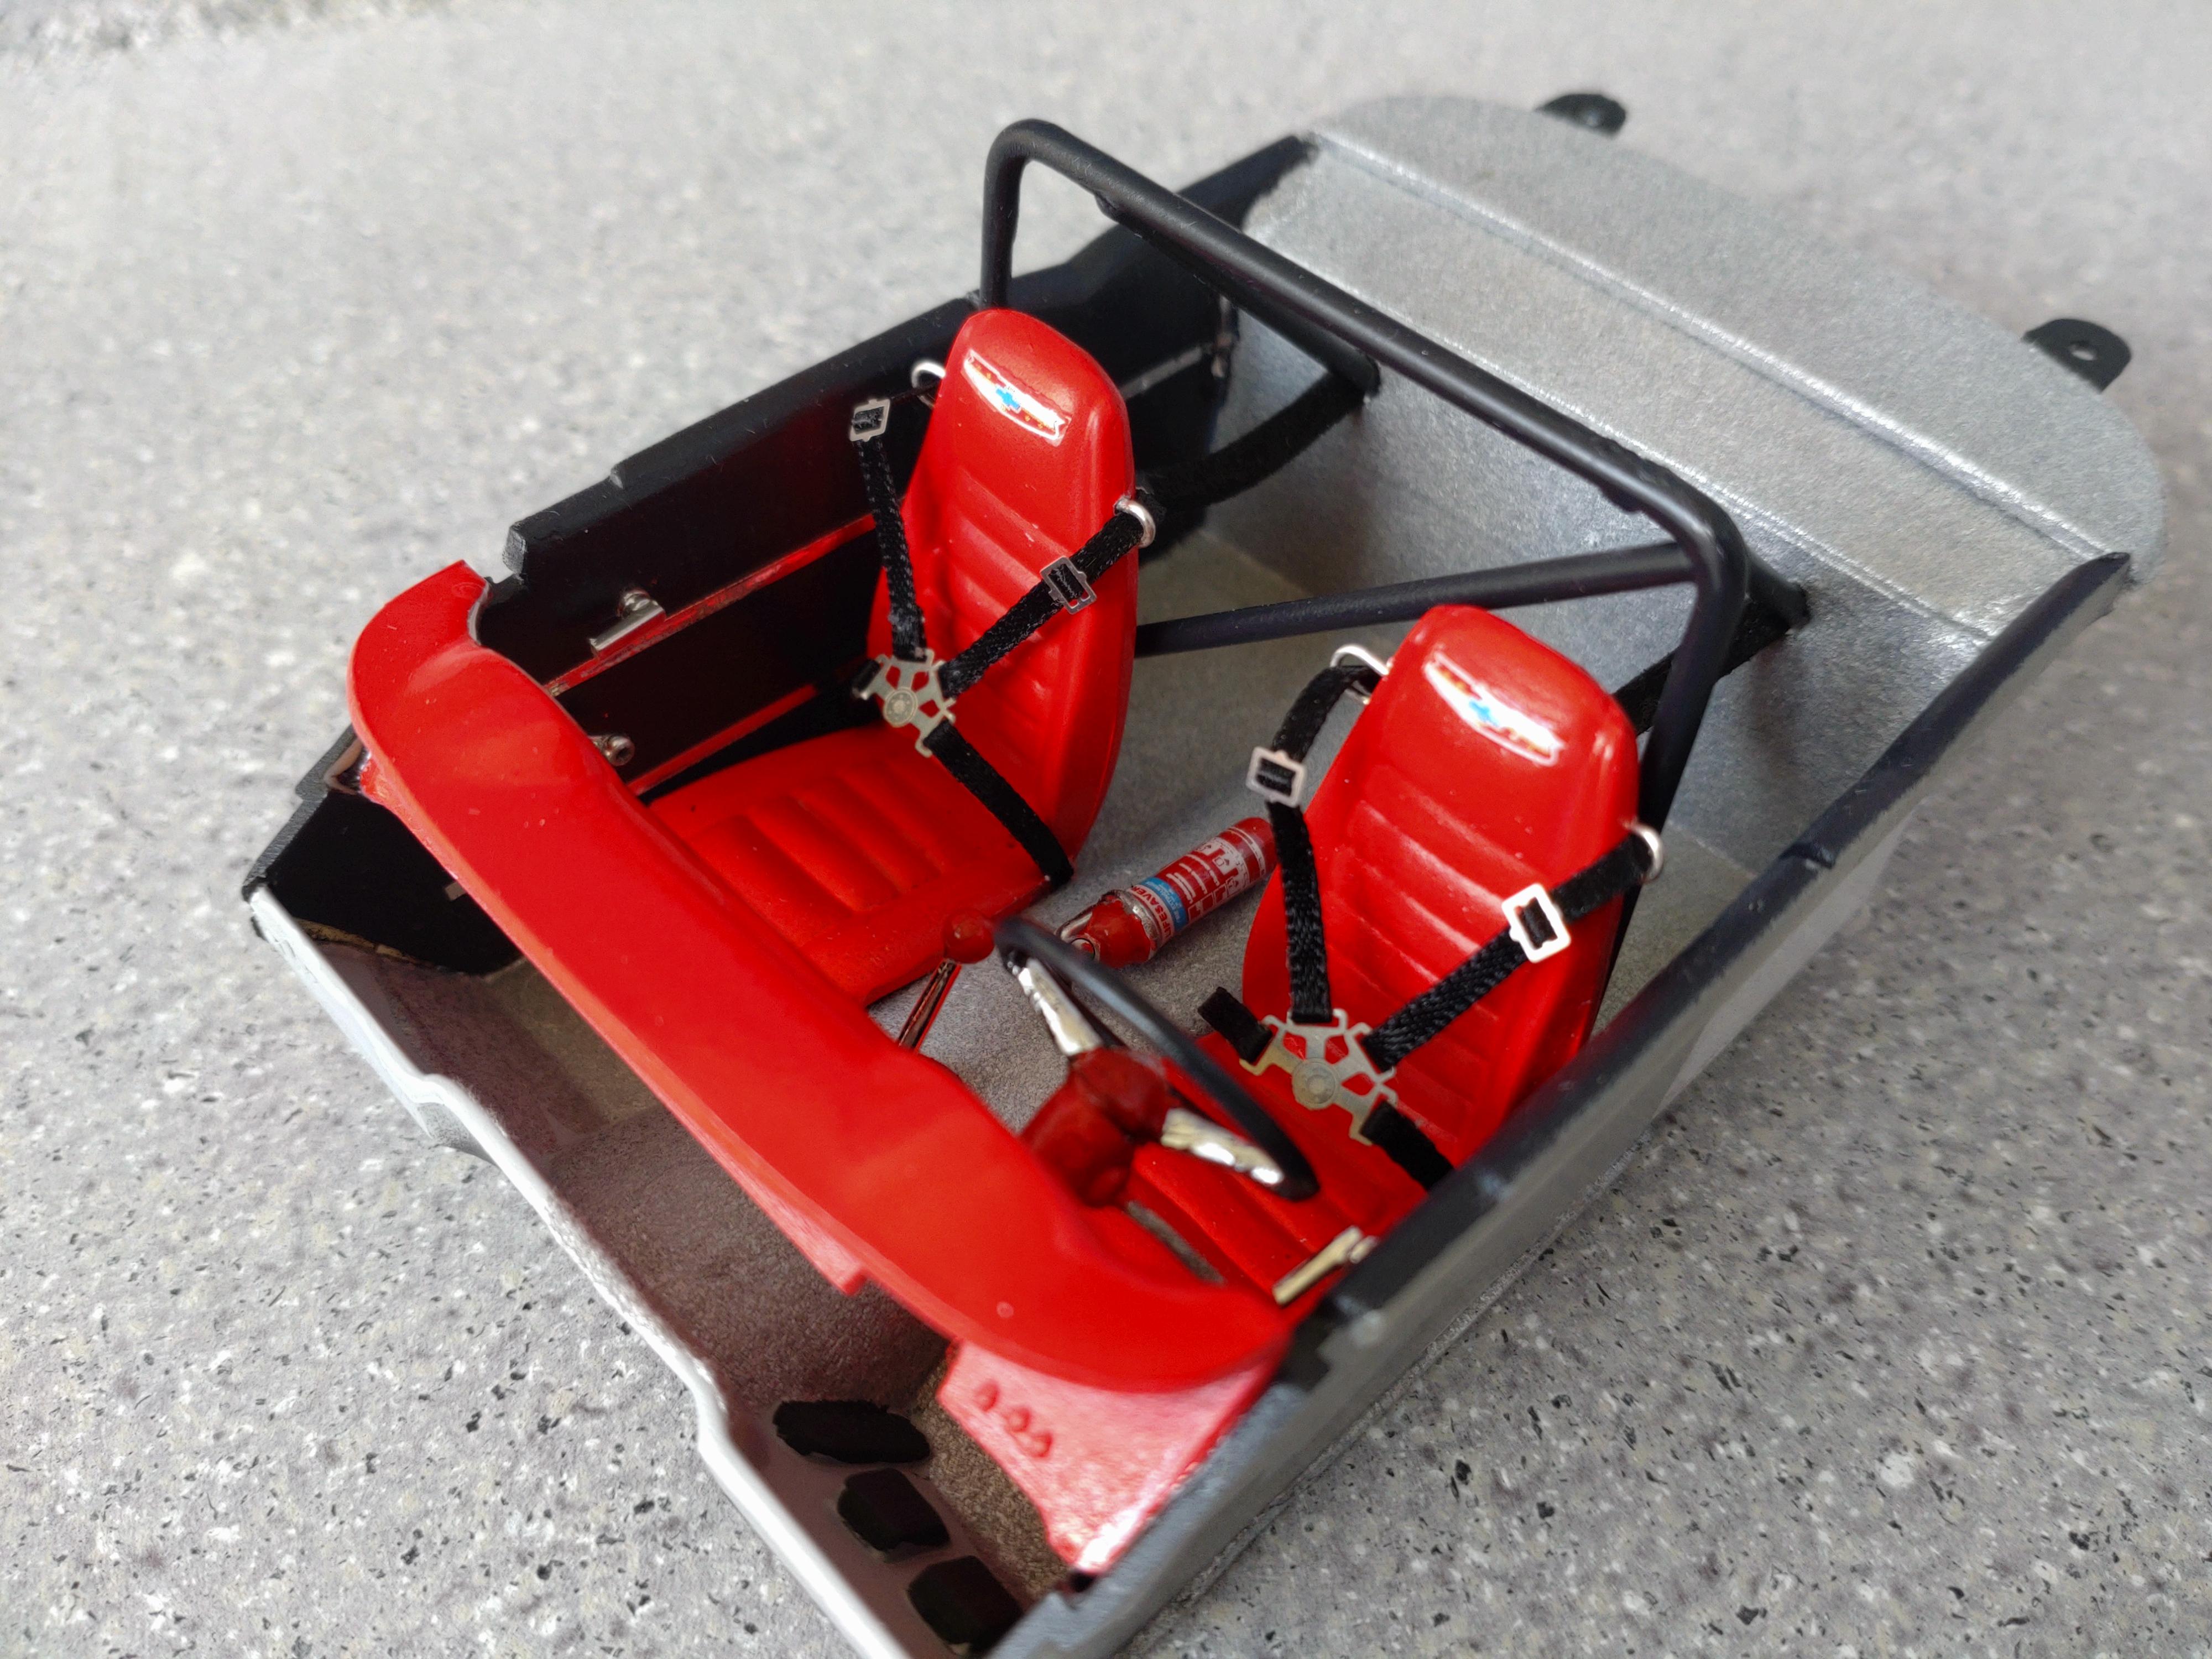
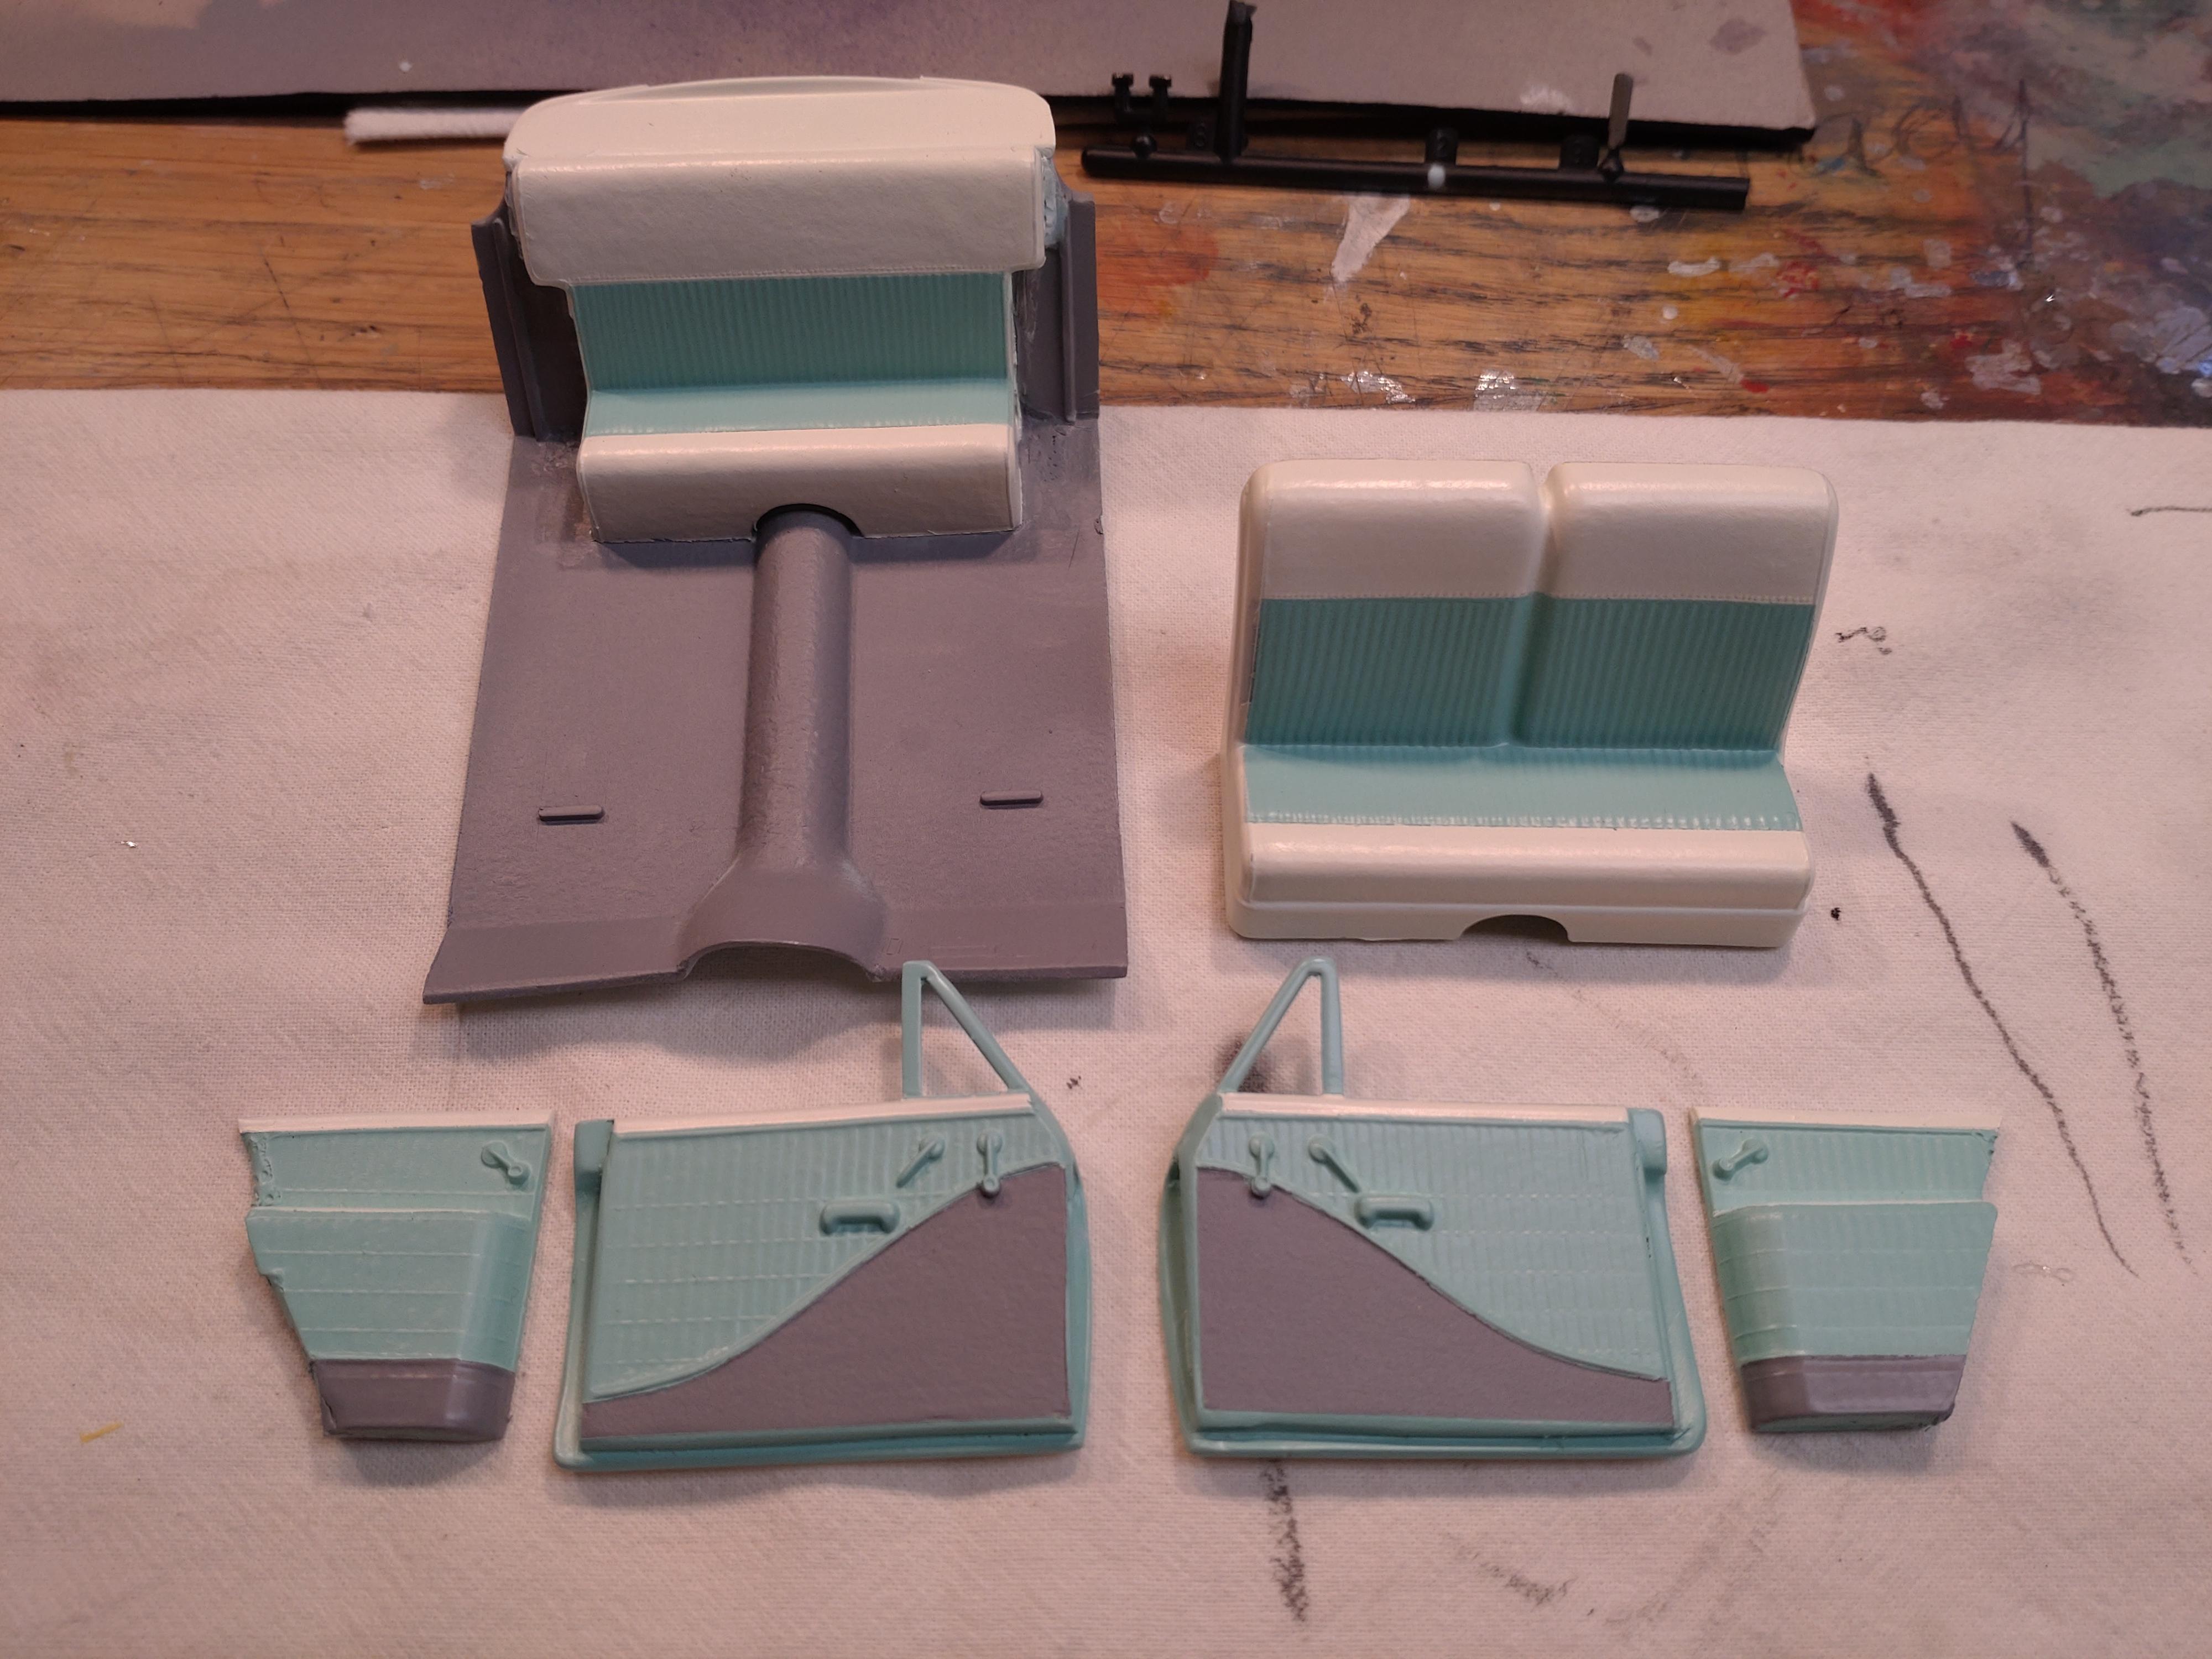
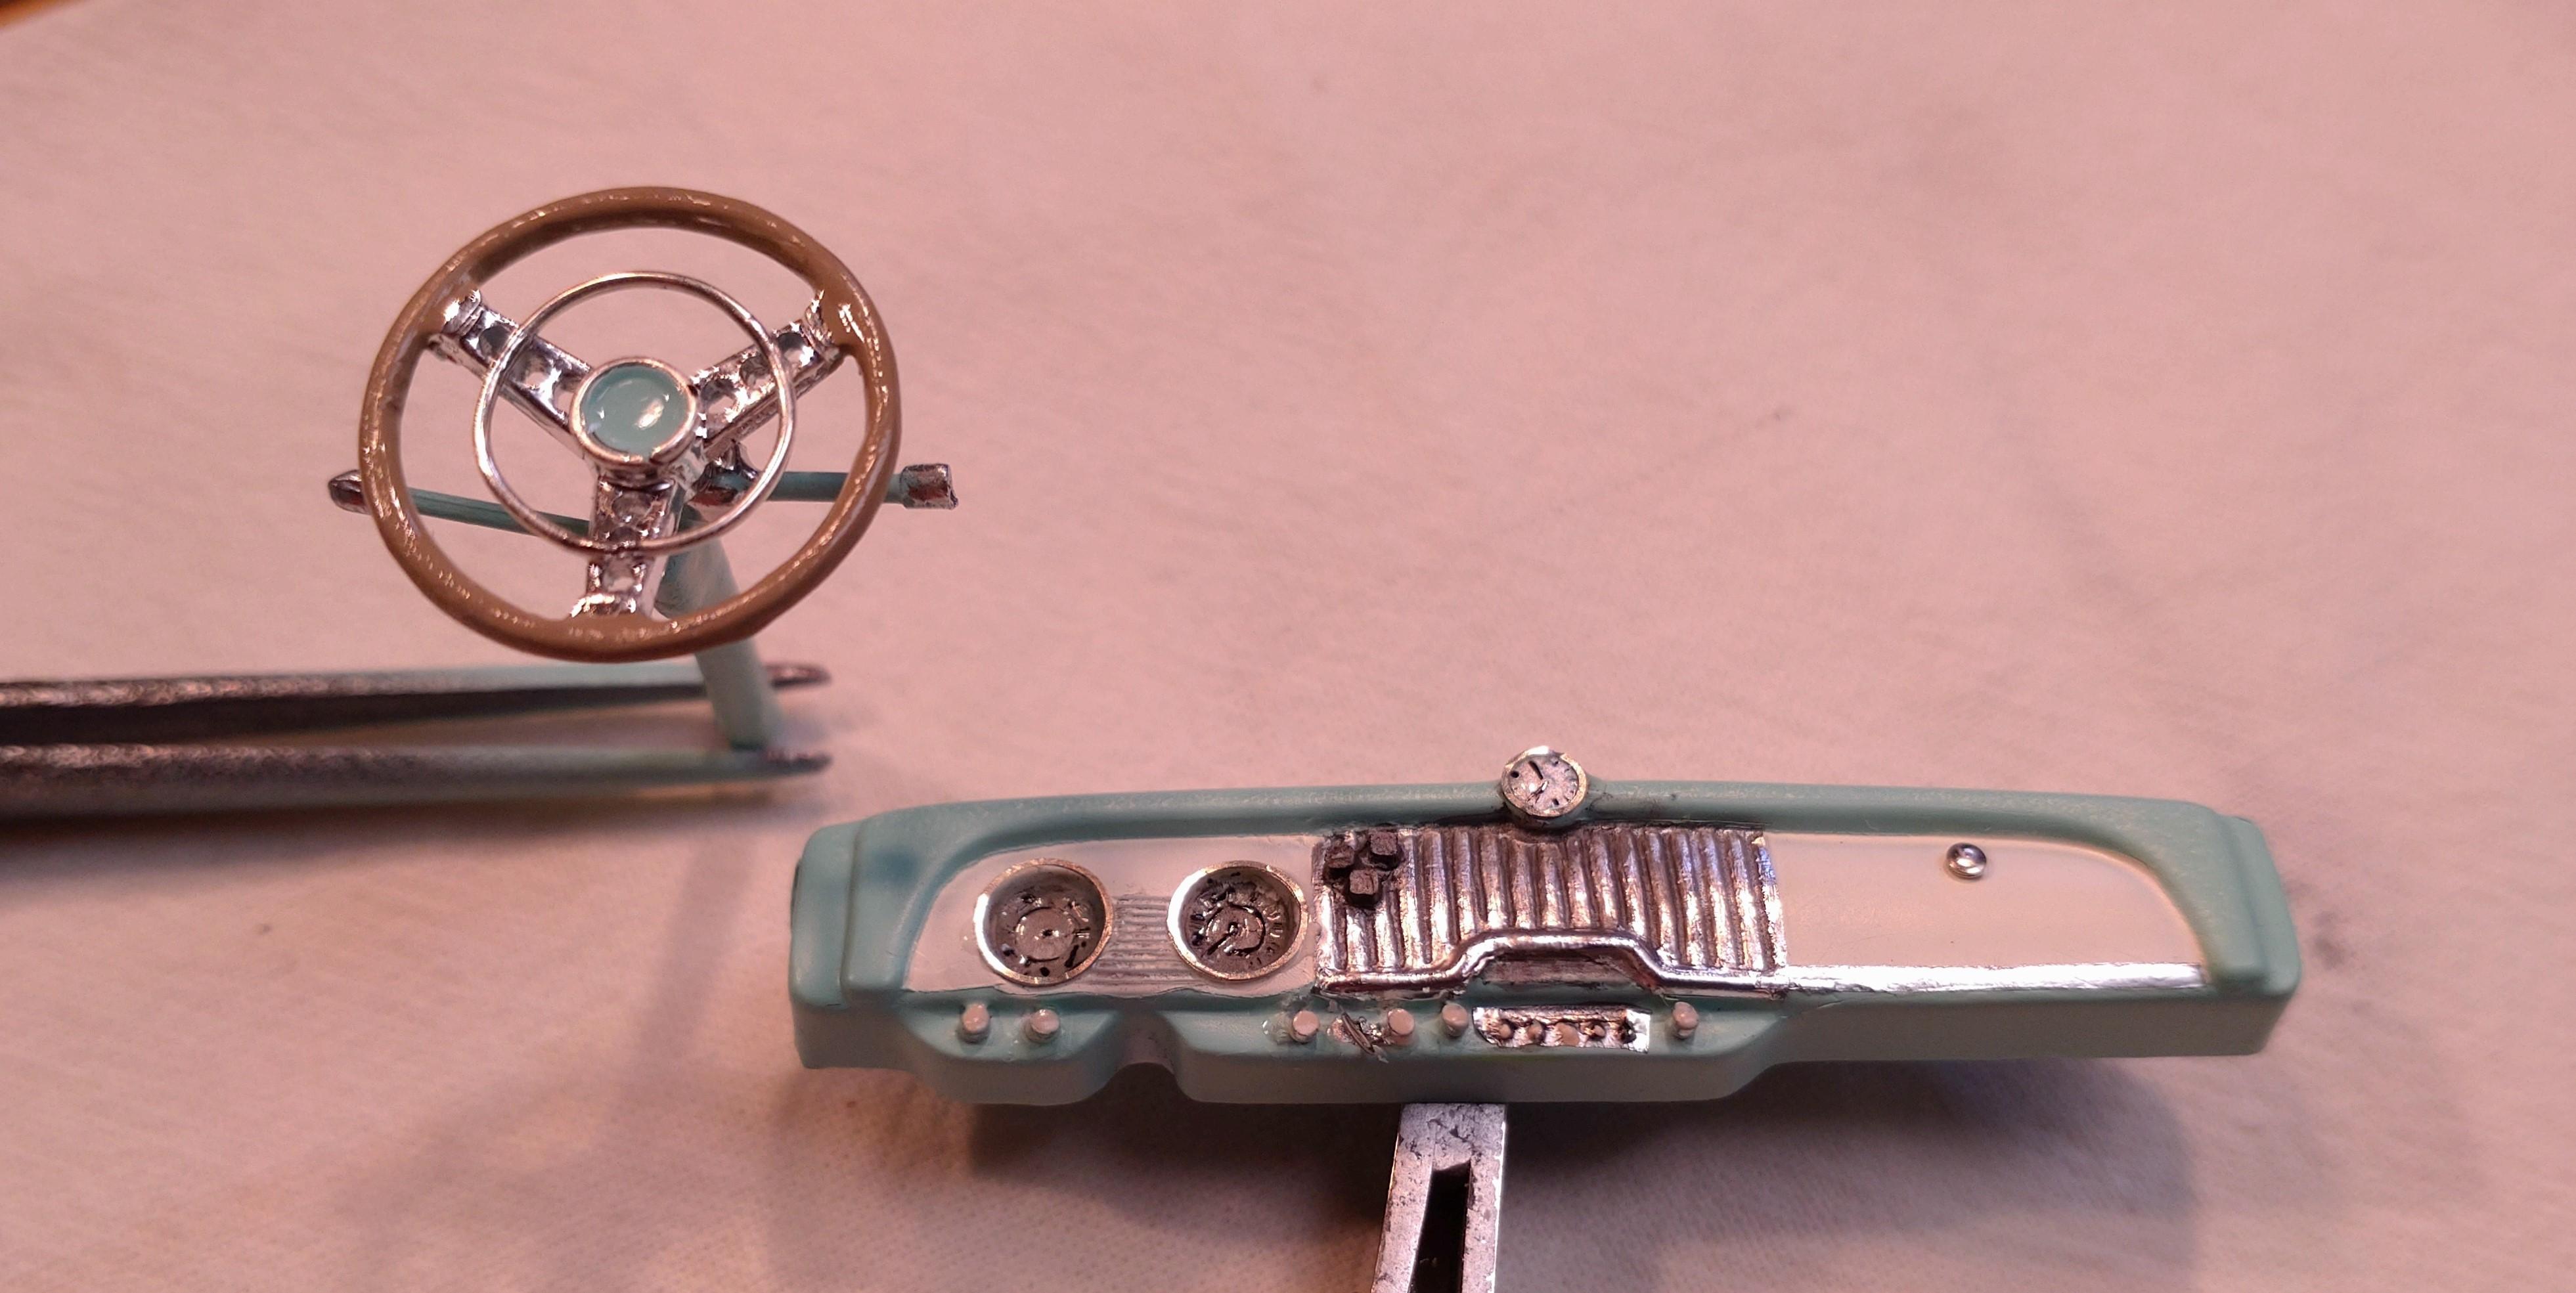
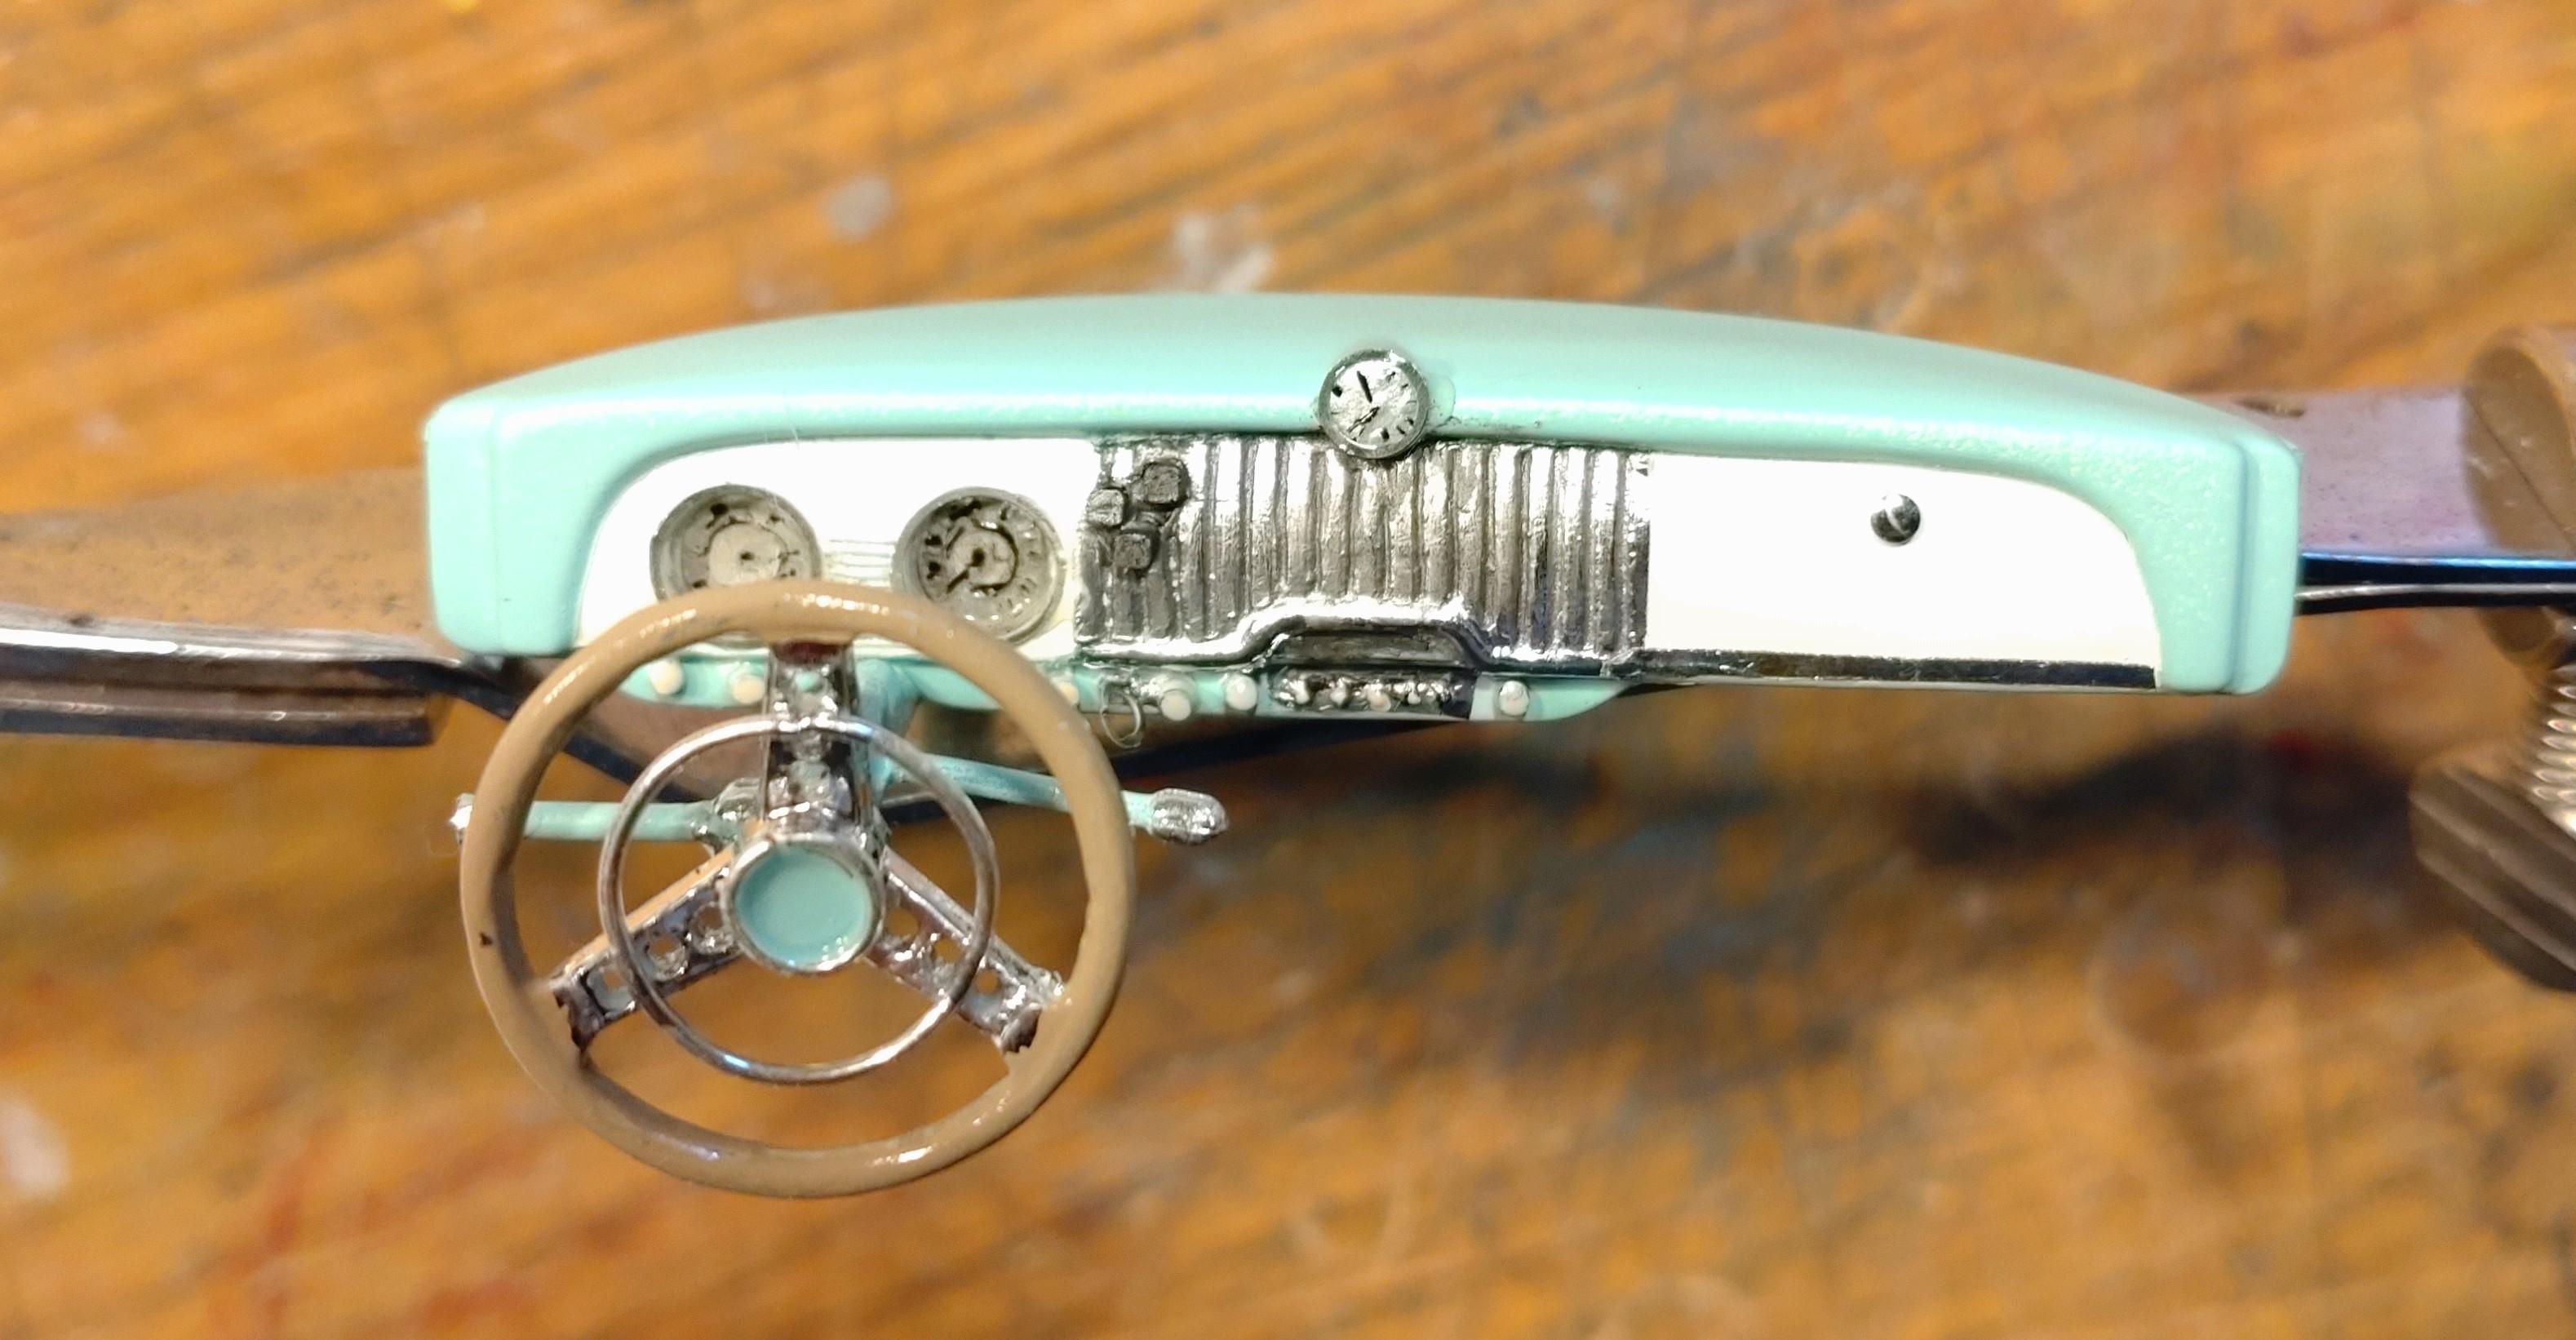
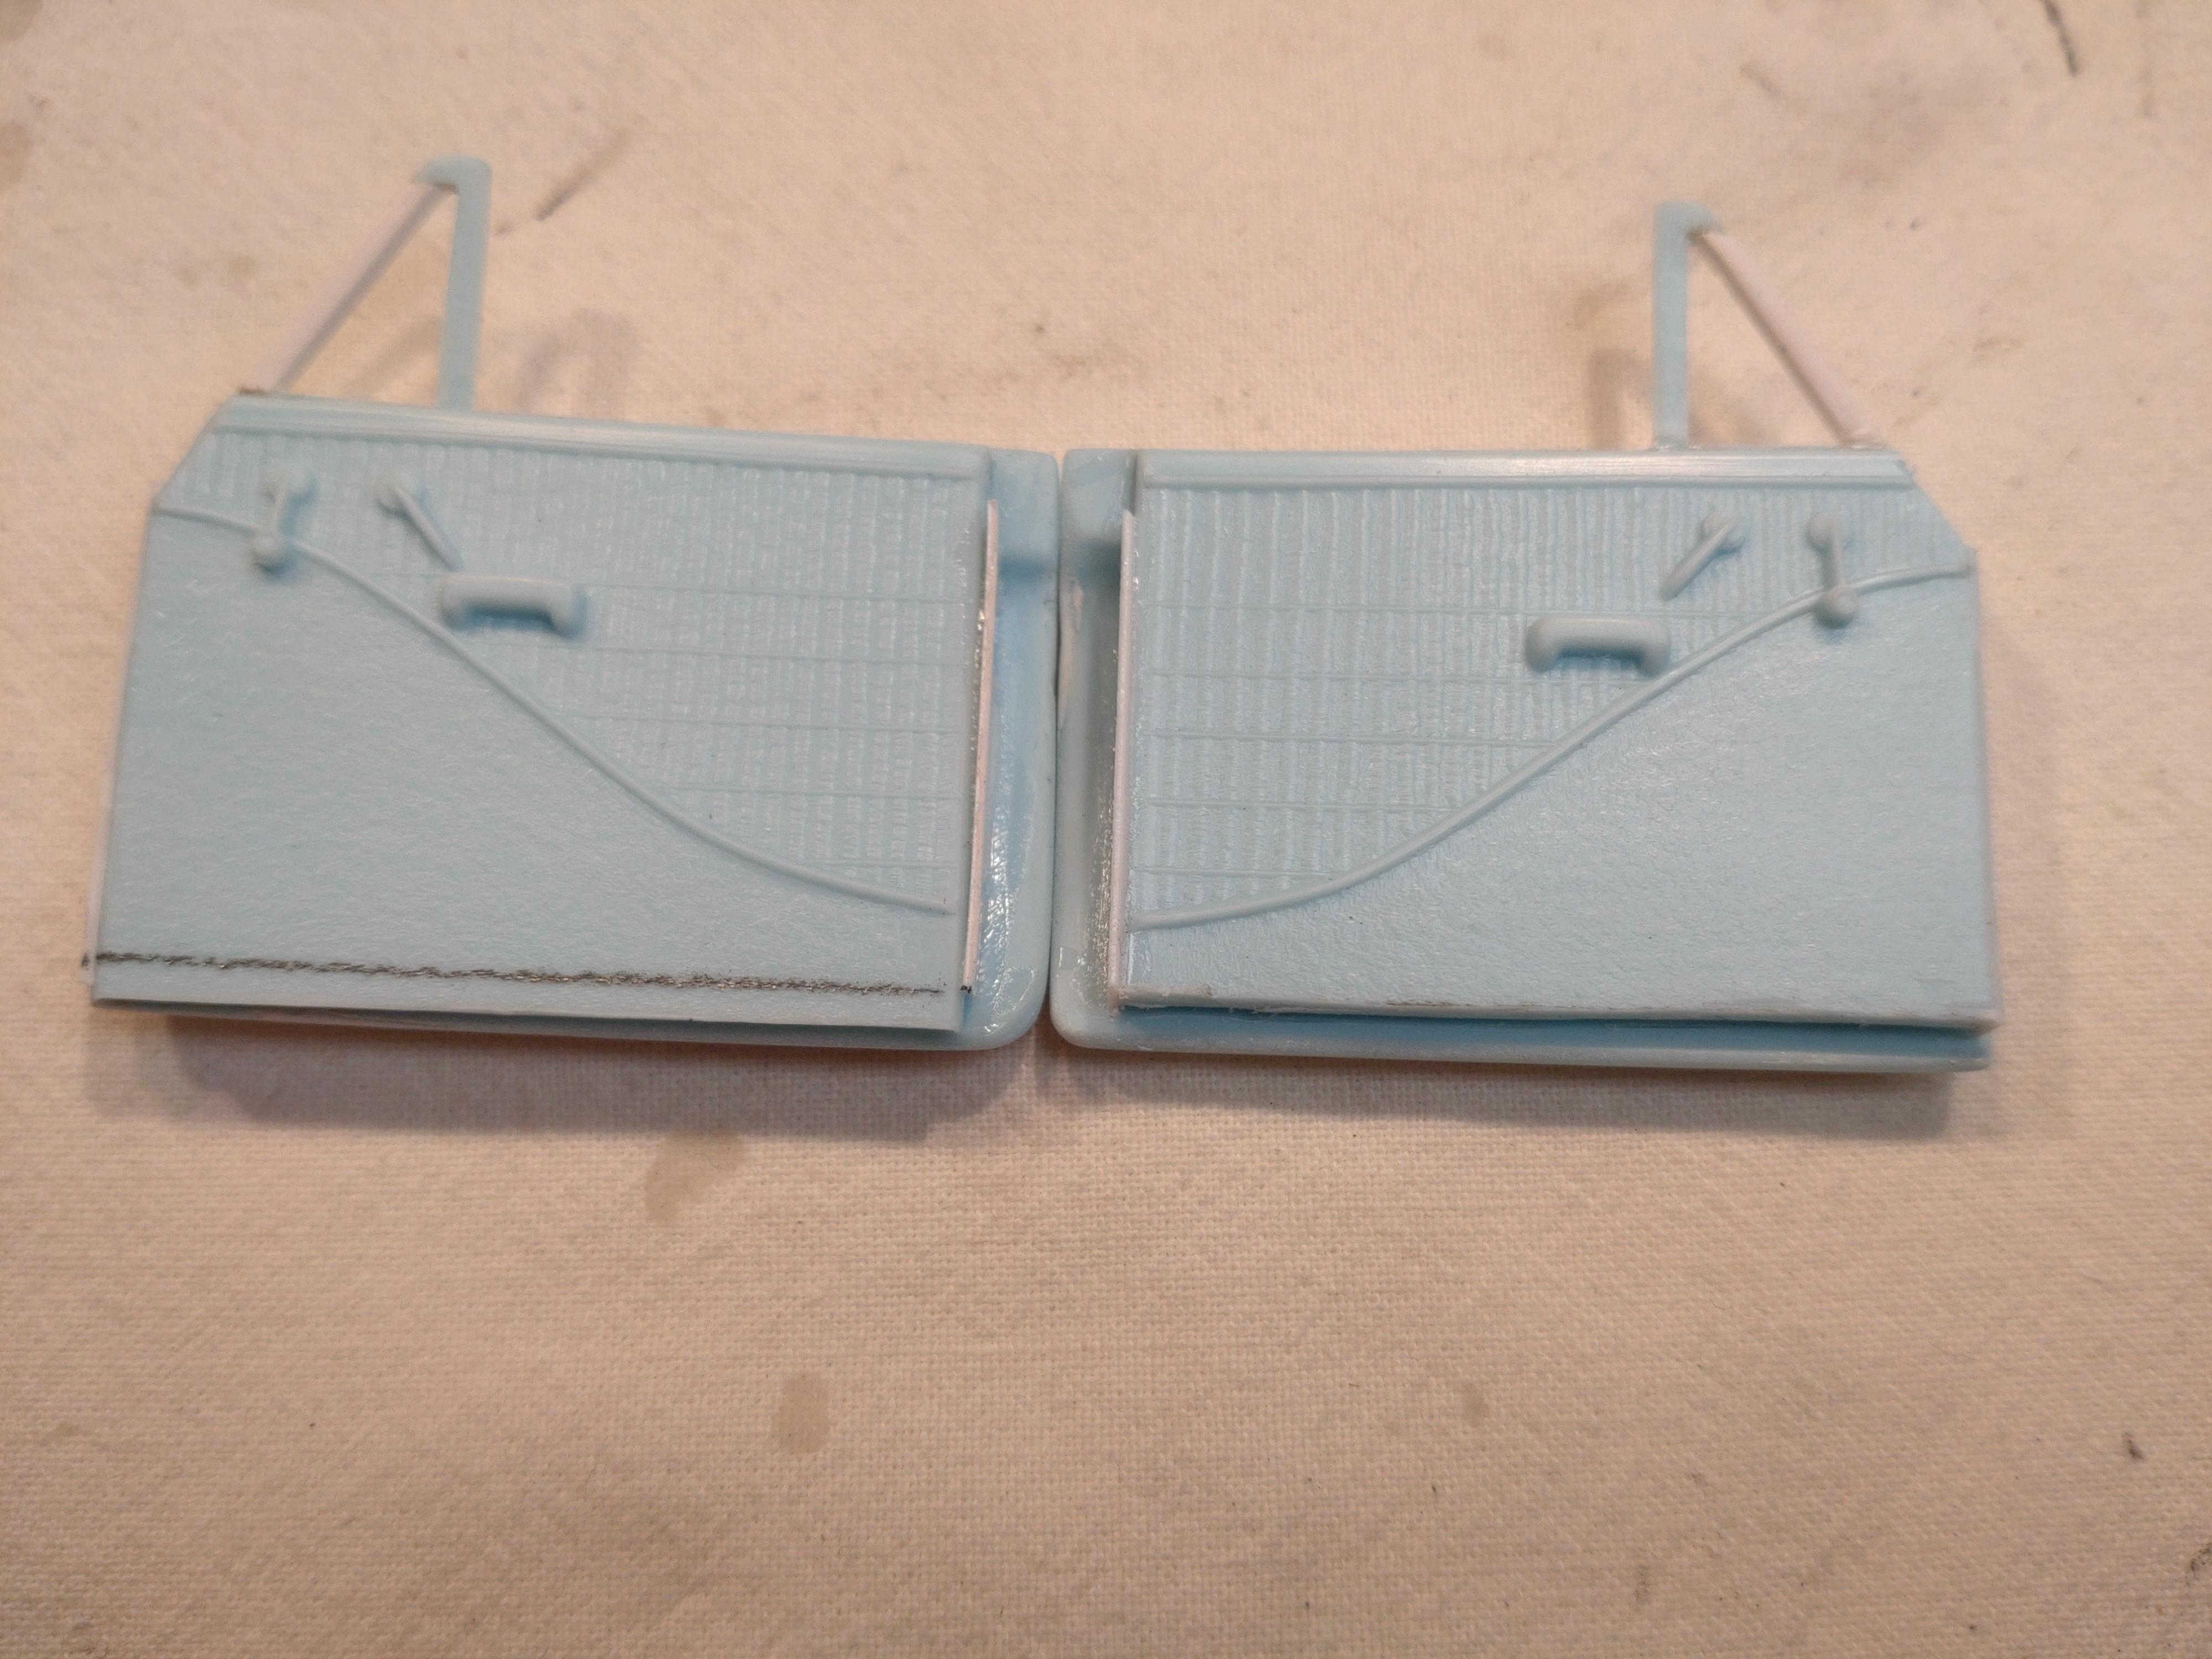
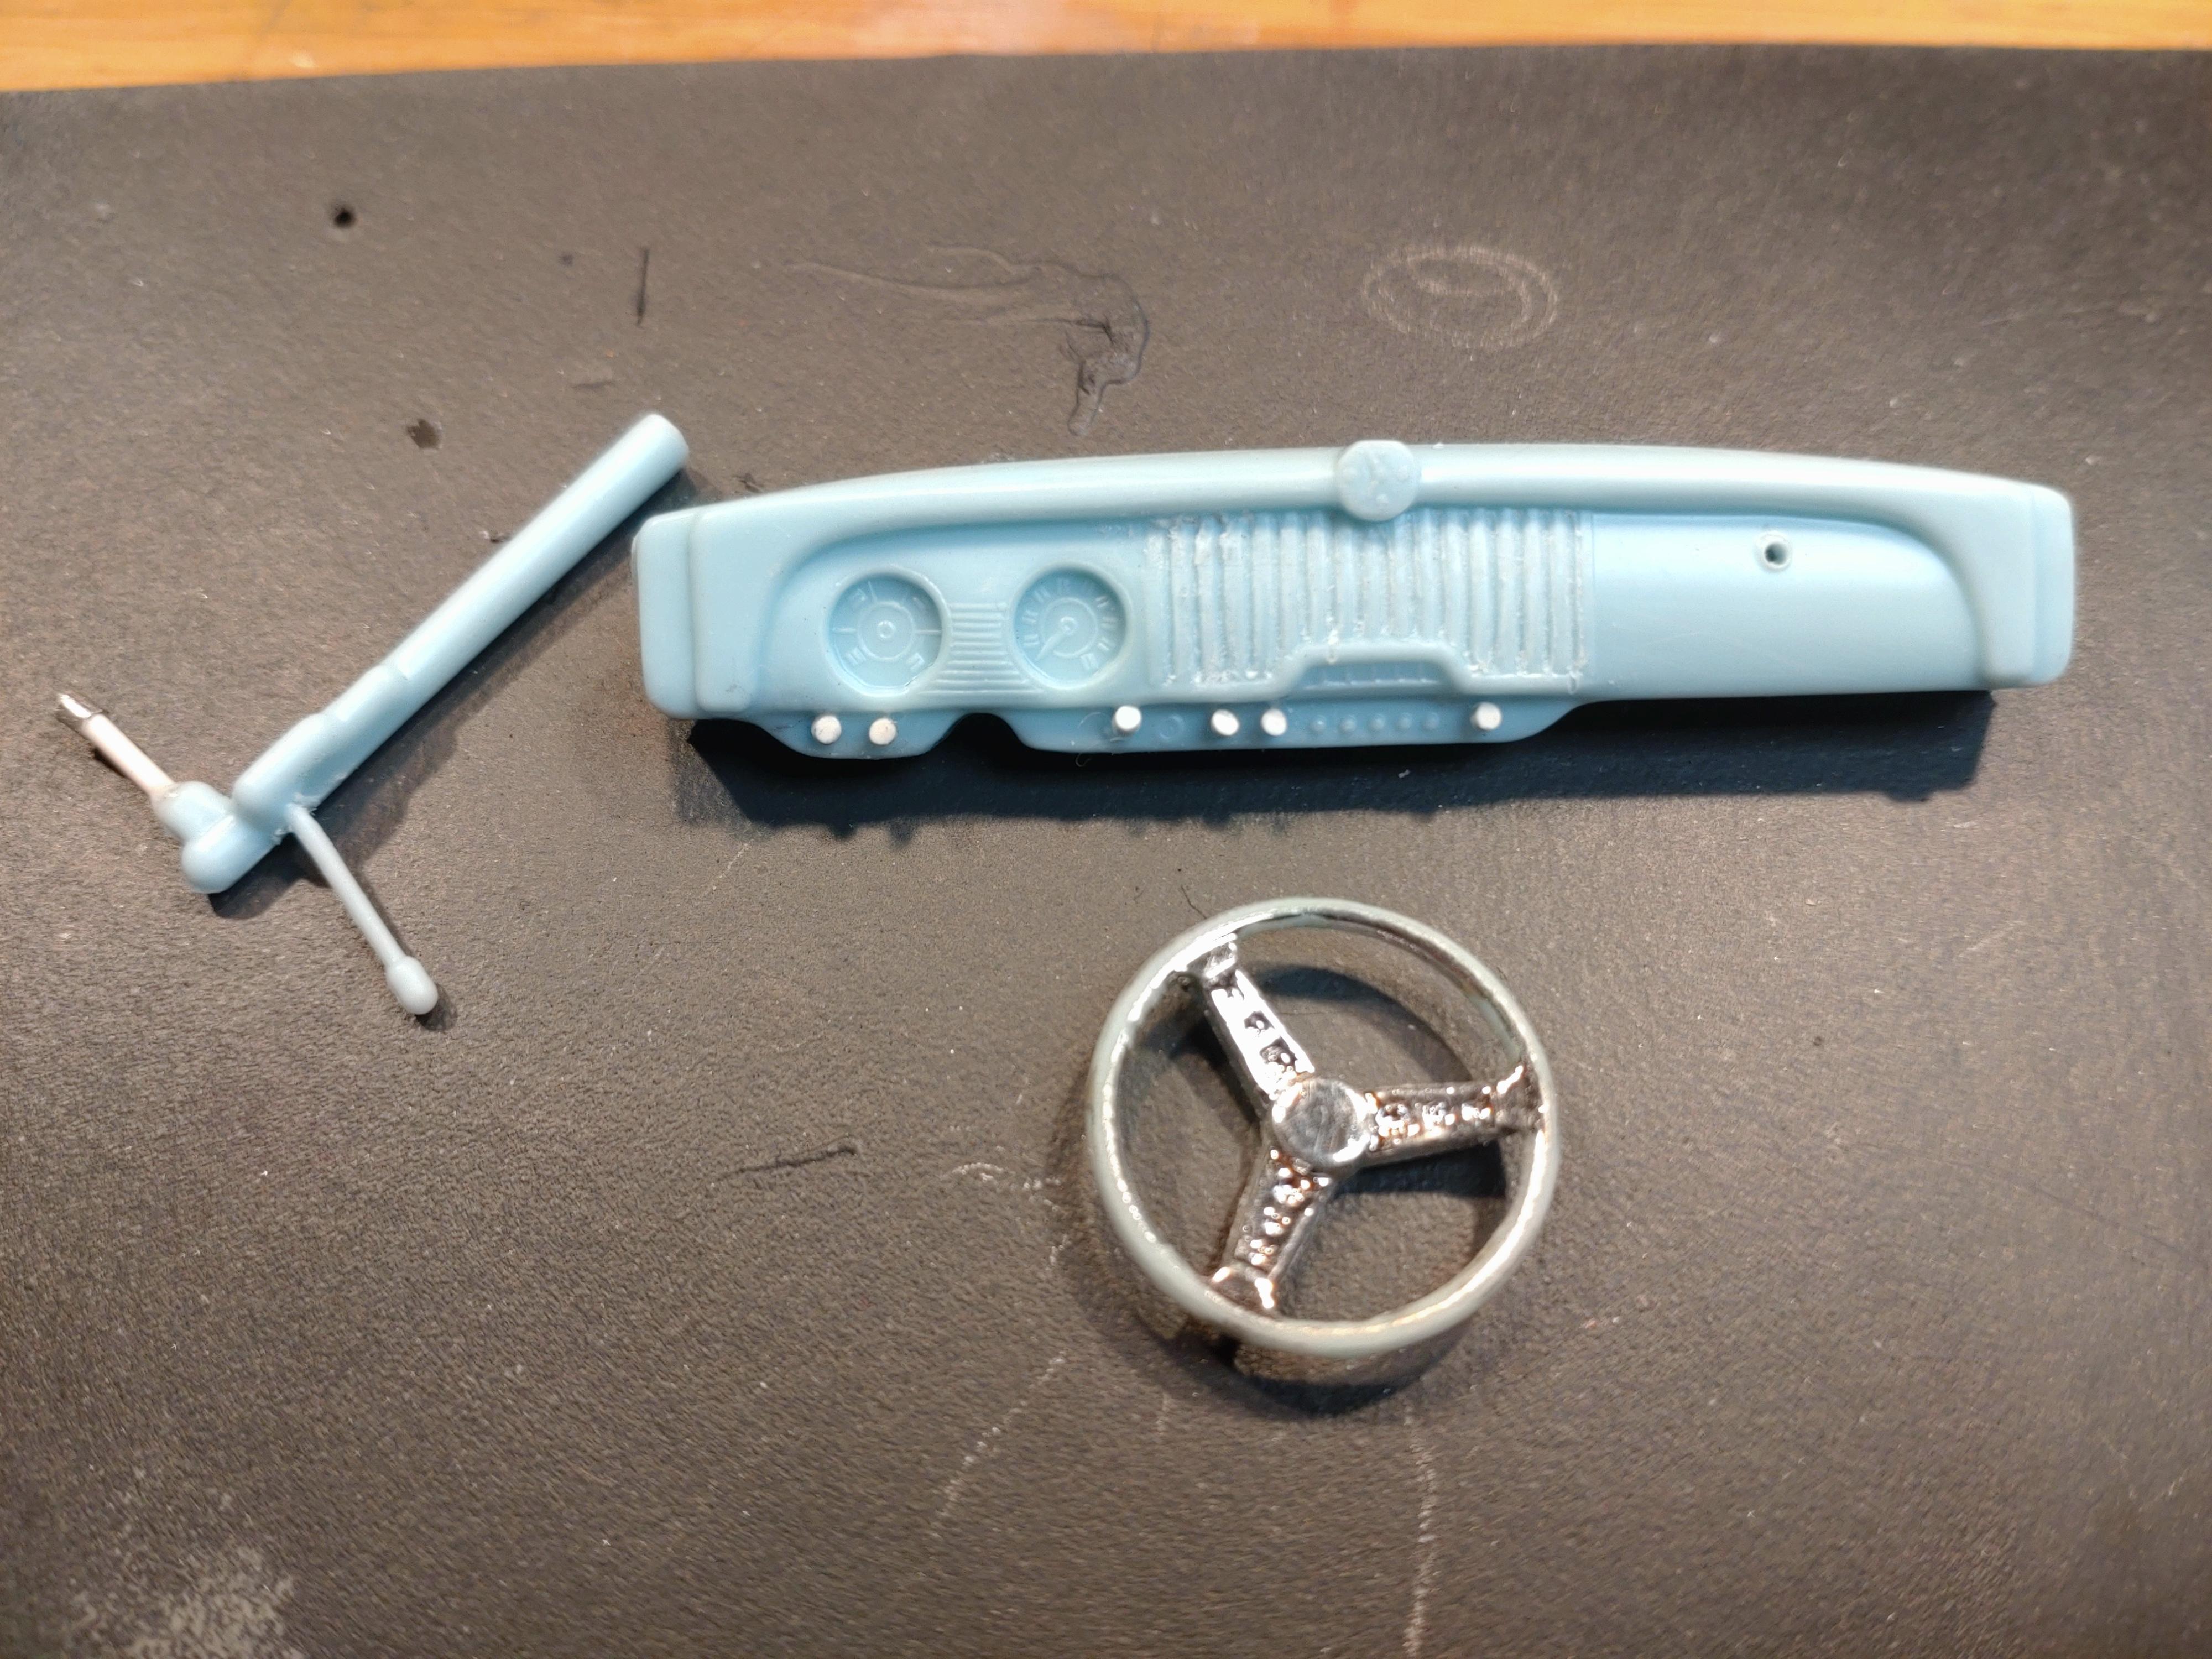
Got the interior finished. The dashboard out of the box was a bit too simple. I had to deepen the slots in the middle part. I´m not sure, but I guess that behind it the loudspeaker is hidden. This I covered with bare metal in matt aluminum and treated the slots with a wash and added the lever buttons. There were no decals in the kit so I did my best drawing the gauges with a fine gel pen, covered it with clear enamel. Same with the clock. The round knobs I cut off from 1mm styrene rod and the glove box button is the head of a sewing pin. The rings around the clock and gauges are photo etched parts. Still have to get some keys for the ring. The steering wheel is not quite stock. I took the sport wheel and pimped it. Drilled holes in the spokes, added a wire ring and enhanced the center with a ring. It looks fine and fits well with the dash. I tried to stay close to the original scheme of the bench upholstery. They were mostly dark with a white or light seat surface. I switched that though to make the interior less dark. Same with the door panels. The fine lines are bare metal aluminum. I don´t cut them on the parts, but cut 1mm strips on the sheet and apply them carefully with fingers, tweezers, toothpick. The cranks and levers are painted with Molotow chrome. I´v gotten tired of accidentally messing the bare metal while handling the parts so I covered the panels with a semi gloss coat. The messy parts at the back and bottom of the rear panels will be hidden after assembly. The panels and the benches received a mild treatment of smudge with a grey/brown wash. After all, it is an old car. The floor is flocked and the drivers floor has a rubber dirt mat. Last I added some rails for the back passengers. So the interior is done. Next comes the undercarriage. Thanks for watching!
-

62 Plymouth Station Wagon: Mighty Mopars Update
Andy Oldenburg replied to BobbyG's topic in WIP: Model Cars
A really cool project Bob, well done!? I know how one can get into a sweat while making a cut-up like this, hoping that everything will fit in the end. Looks good and I´m looking forward to the finished build. -
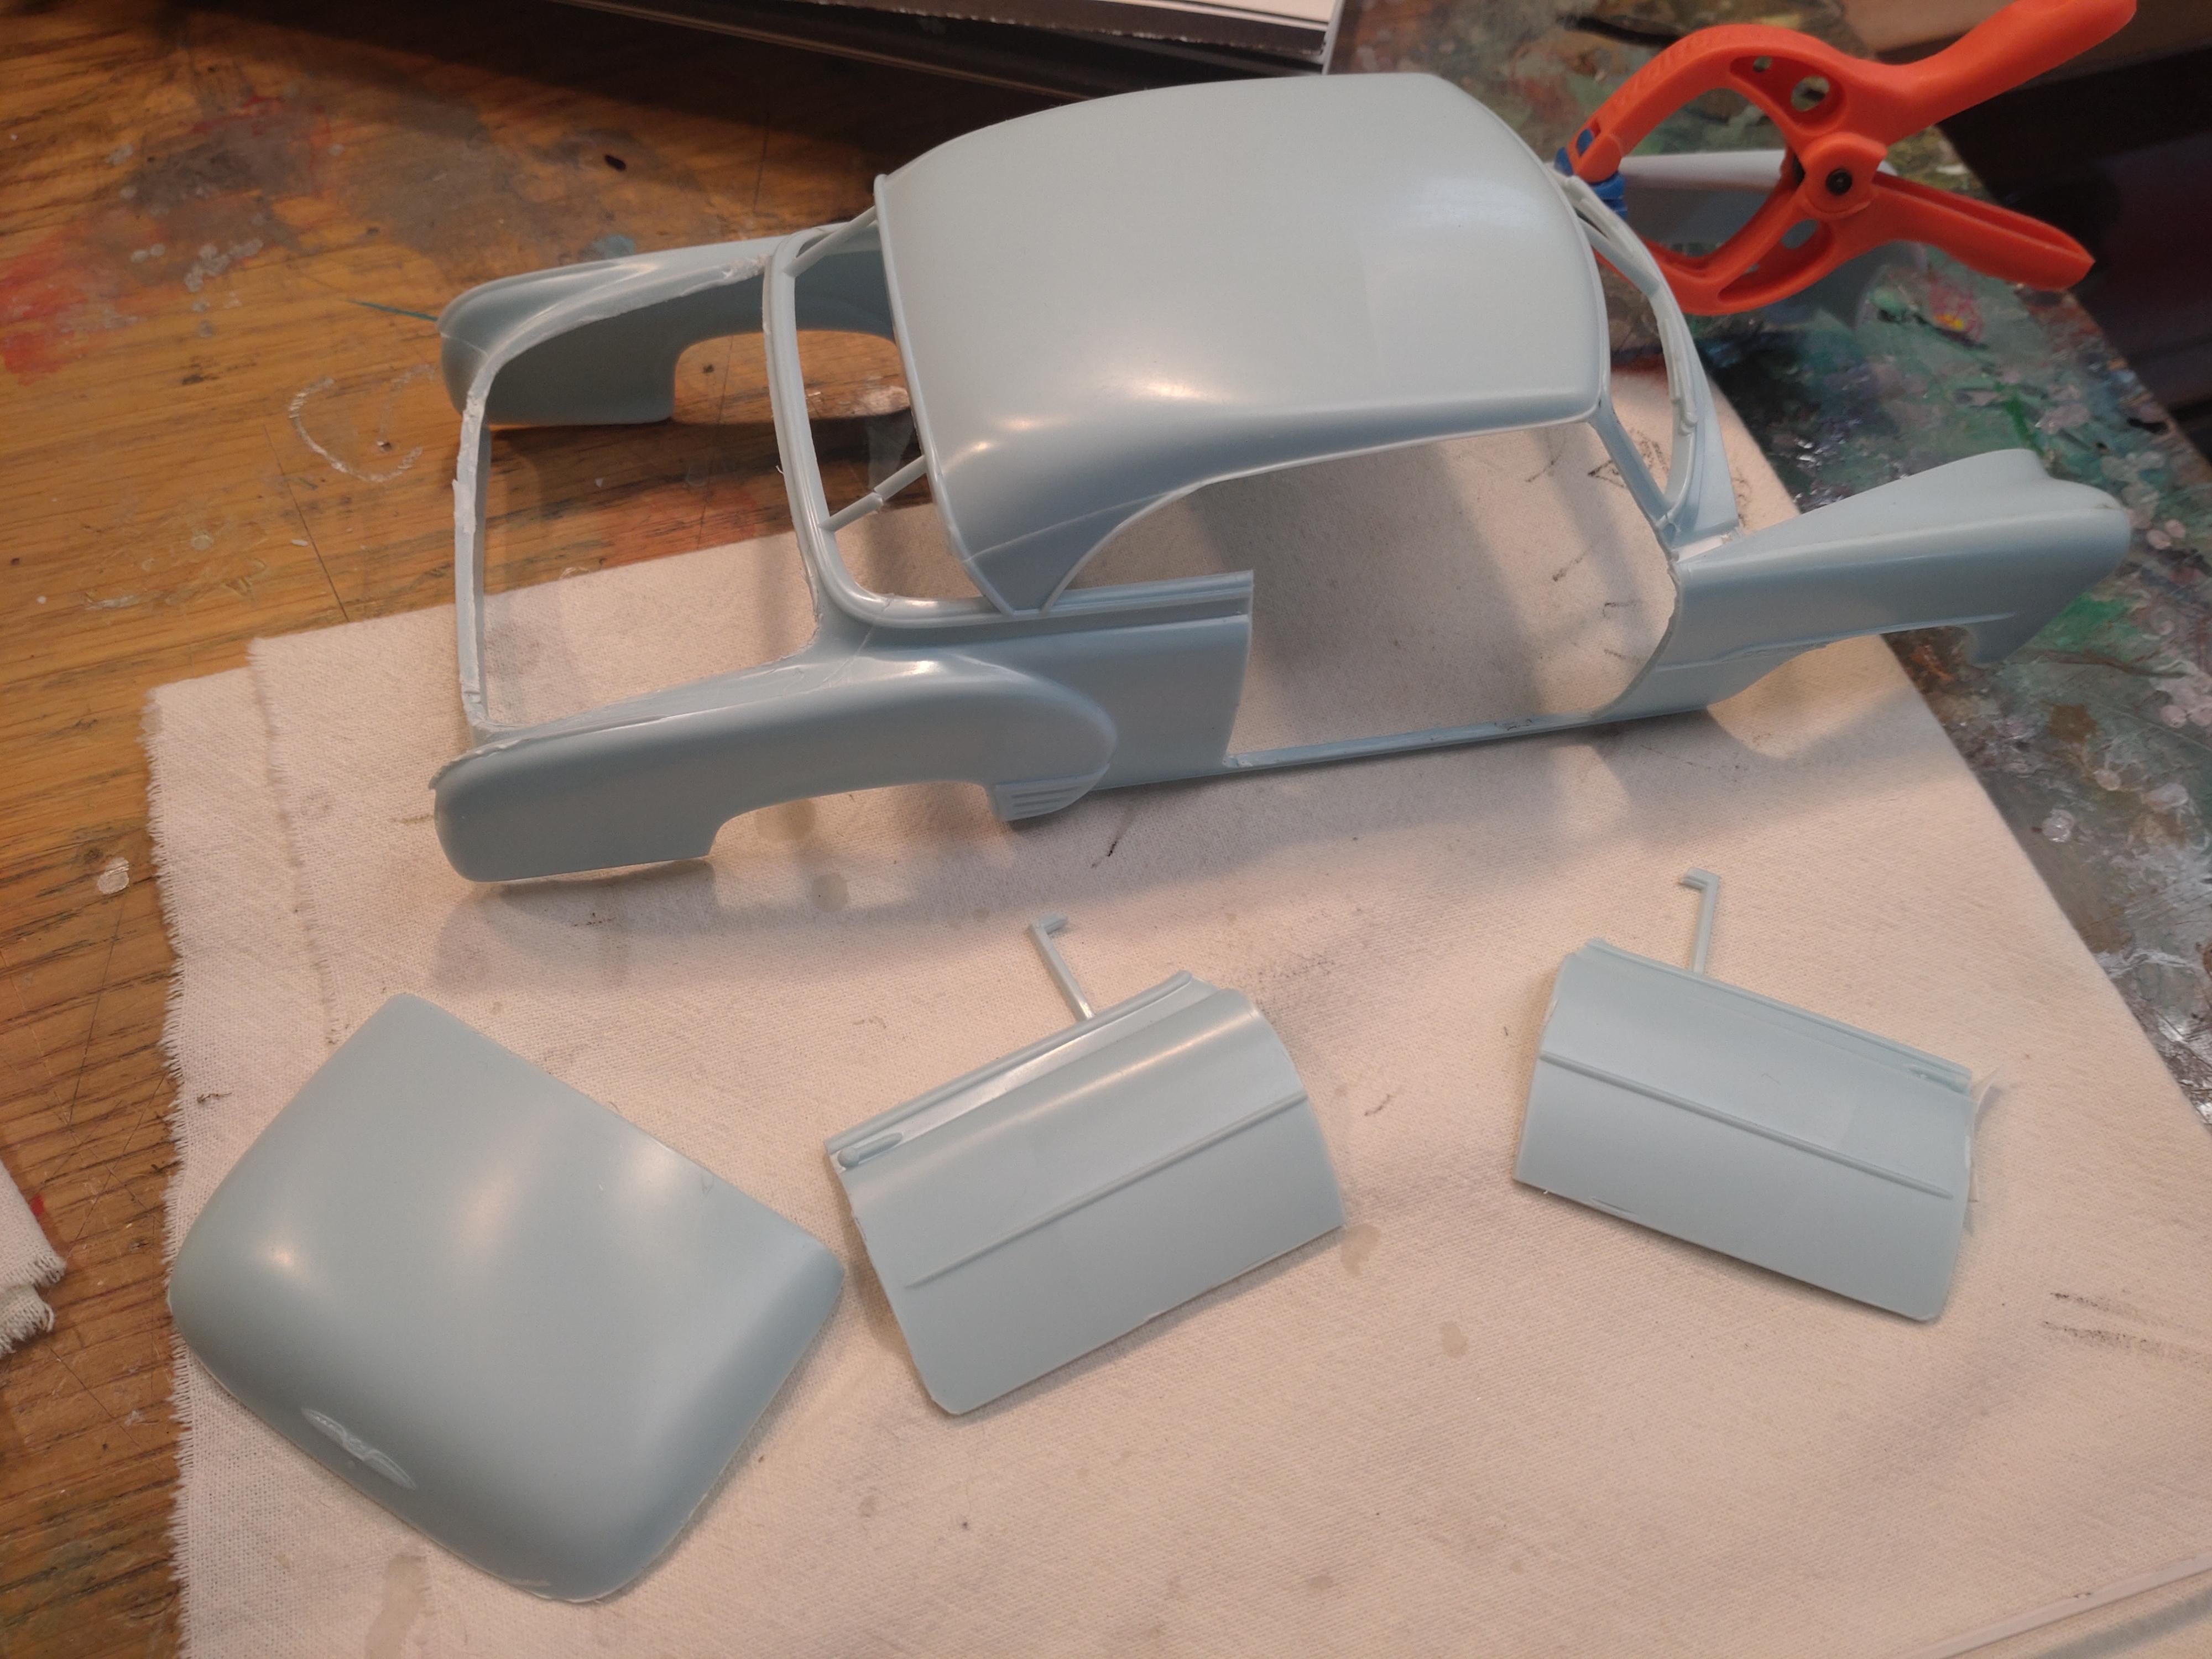
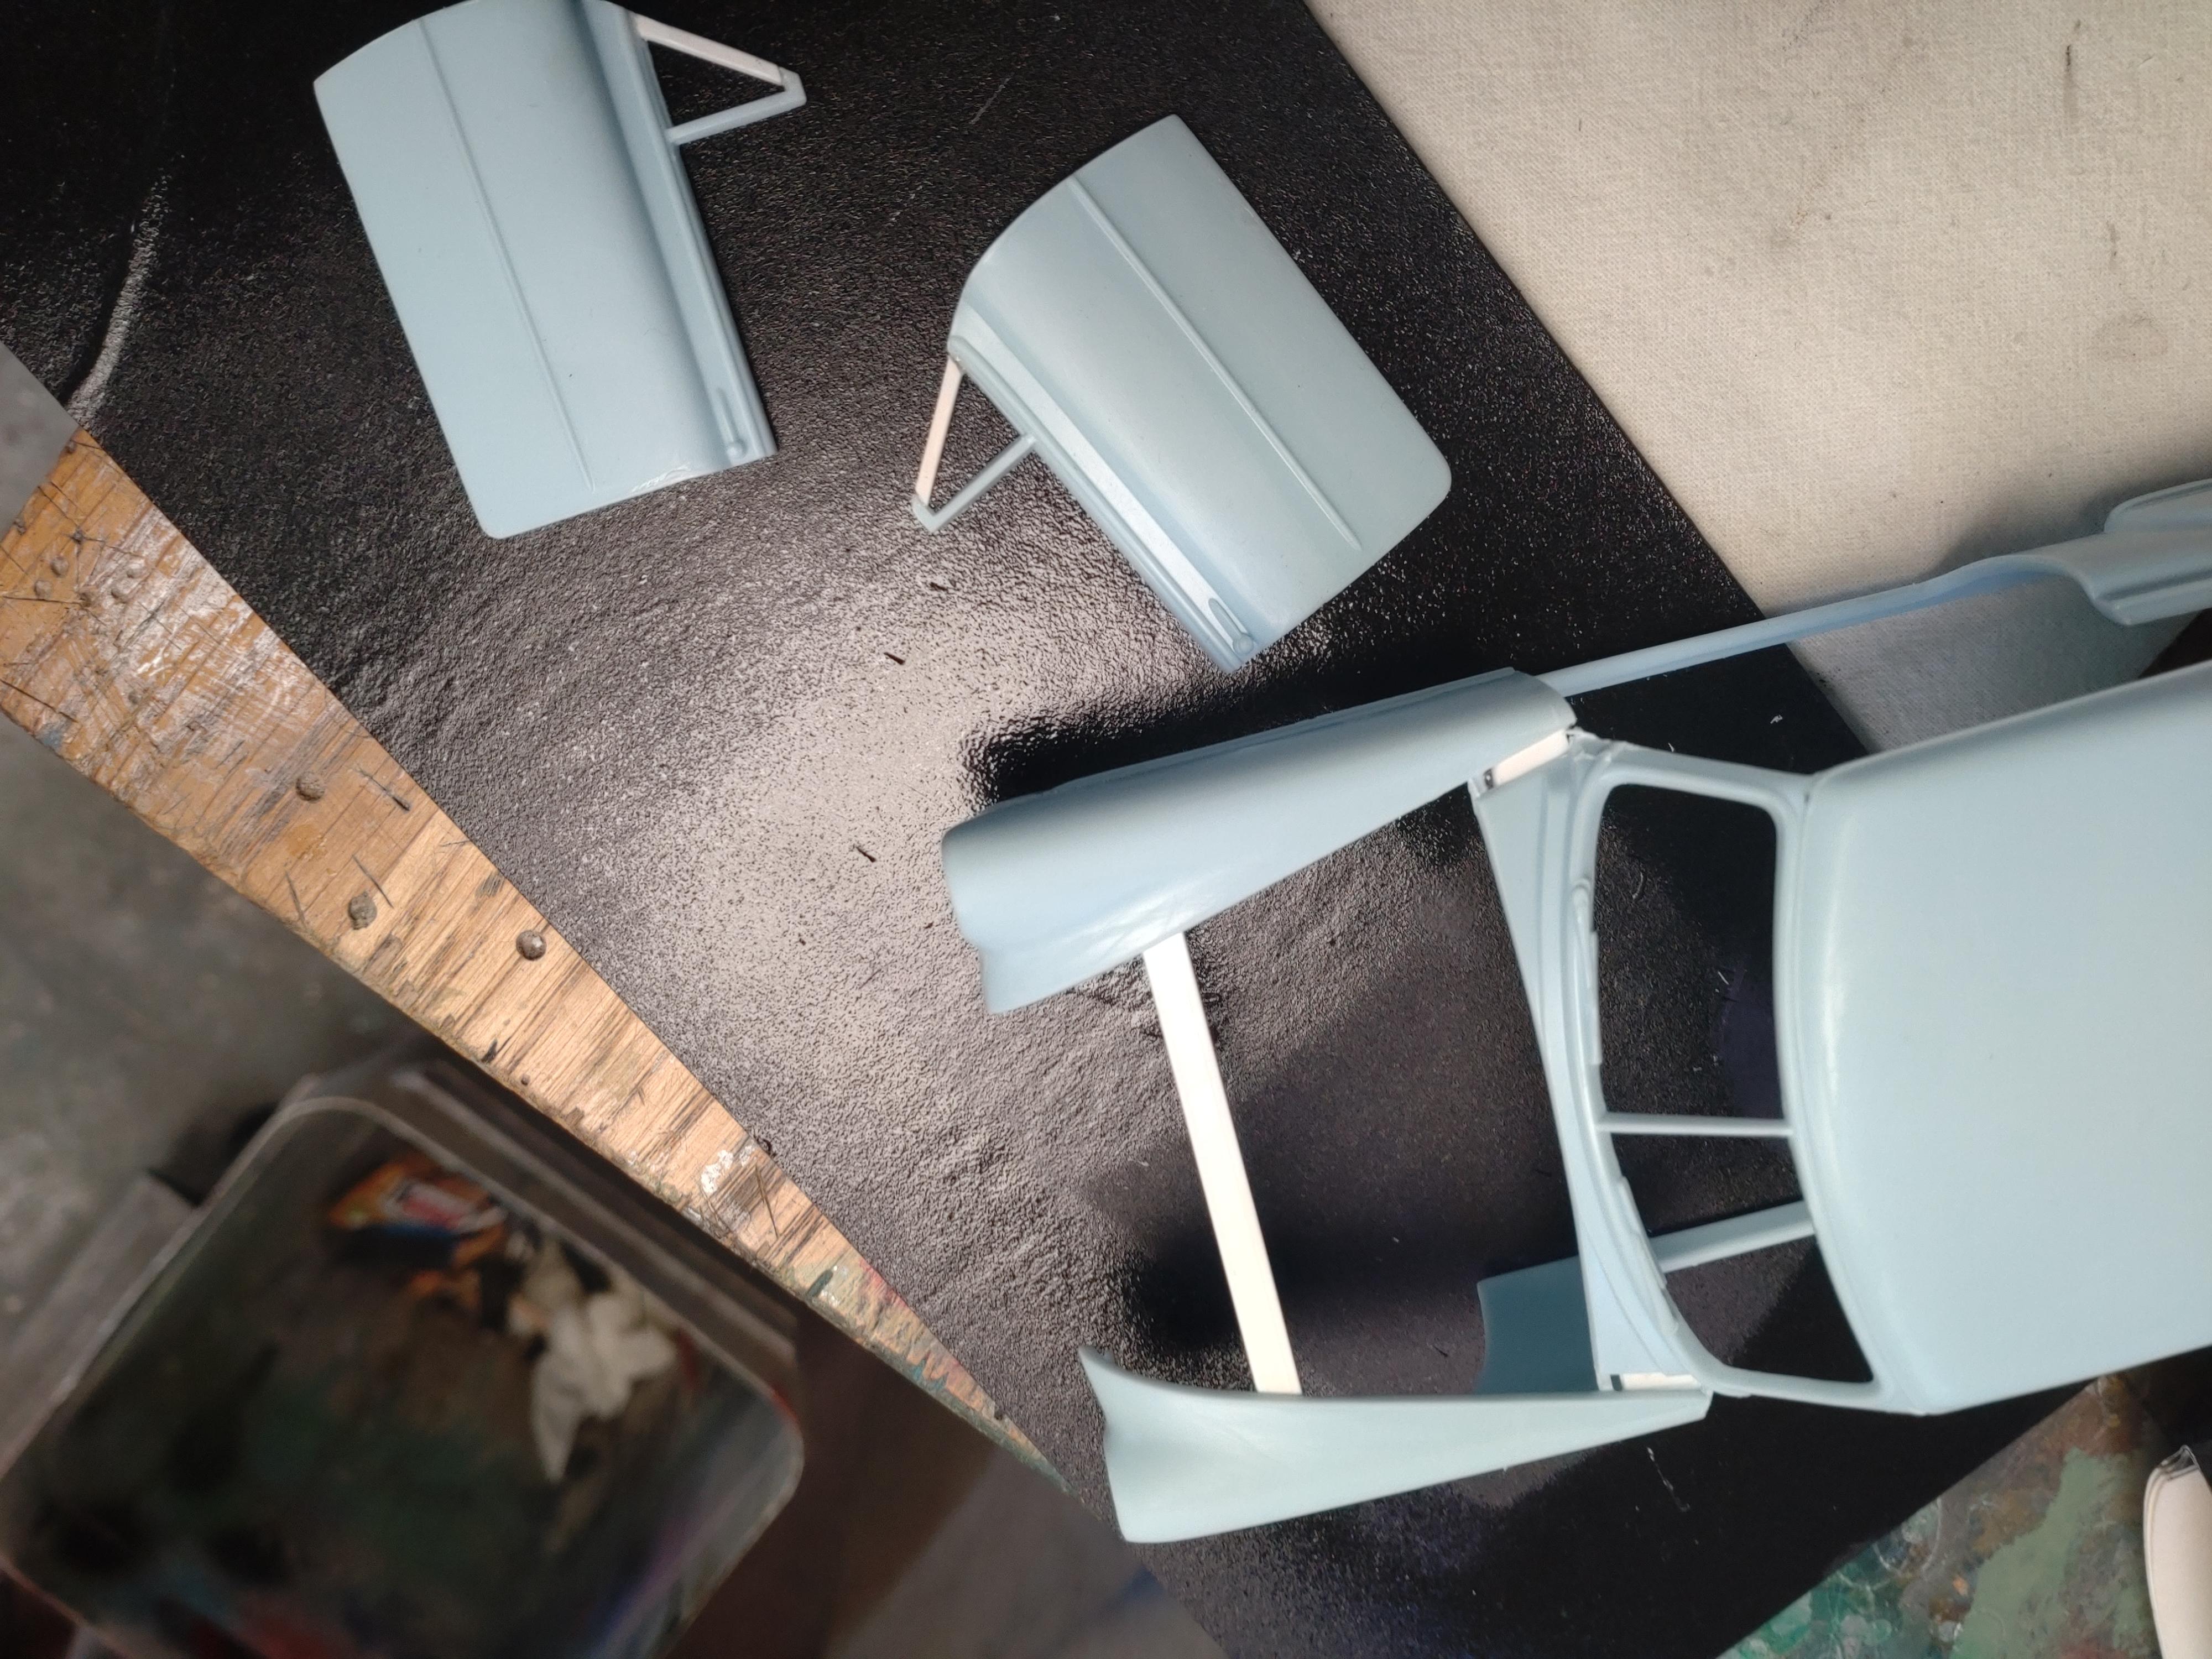
I´m getting on with the doors. Trying to avoid the mistakes I made with my last build. One of them was not cutting the indoor panels small enough so the doors close neatly. Second to make sure that the rear seat panels are mounted far back enough. The bottom of the panels are a bit too long and would hit the rocker, so I shortened them. The empty spaces are filled/covered with 1mm sheet. Then I sanded the edges round and filled the few gaps with putty. Sanding the edges is almost done, now I´ve started the first steps of painting the interior. The panel details are quite good and crisp, so I won´t need to enhance them. Started with the dash and steering wheel and column. I did choose the sport wheel, although I going stock, because the stock wheel in the kit is junk. I will add a few details to the wheel next. I have added proper knobs to the dash. The kit has not dash decals at all? It might be a micro "paint job" for the gauges in the end. This is what the floorboard looks like? I carefully treated it with a heat gun and was able to bend it into shape, hope it will fit later when connecting the big parts.
-
Hey Martin, unfortunately I can´t find any new exclamatory words for the beautiful 300B build of yours. It´s all been said by the others. A PERFECT build for the hall of fame (ha, I found a new expression!). I really hope we will see more of your builds in the future. And you are right about the Moebius kits. The 300B and the Hudson Hornet are really fun builds for a low stress level. I´m planning to build the 300B a second time as a stock. My first was a total reinterpretation. Your build has given me a big nudge!
-
Cool build, very nice details included and a perfect paint color match to this model?
-
Hello Mario, your conversion look beautiful, thumbs up! The garage scene makes a perfect impression.
-
My Class of 2022. . . . . . . I completed 7 for the year.
Andy Oldenburg replied to raisin27's topic in Model Cars
Beautiful builds Mike, well done and perfect craftsmanship? I love that fenced in diorama! Taking the pics outdoors with the trees and the shifting sky, the sharp shadows make the models look like the real thing. You gave me a nudge to what´s missing in my collection of backdrops. -
Johan ‘70 Cadillac ElDorado pro touring (low and aggressive)
Andy Oldenburg replied to Steve H's topic in WIP: Model Cars
Cool project Steve? That lowrider looks awesome, but turning a Caddy into a racer sounds exiting. A stupid question: Did that model ever race? Because it seems to be a too big and heavy model to compete, let alone the poor aerodynamic. Looking forward to the progress! -
Hey guys, I don´t mind a bit about your comments but find them extremely interesting! Imagine what I have learned about the model I´m building right now just through this thread, GREAT! @ Tony, sorry to have kept you up sleepless?
-
Hello Tony, thanks for all that input! You definitely know much more about those ages and this engine than I do. I really learned a lot! And I like how you treated your stovebolt. Considering everyday use and age that looks very much like a greasy old engine to me. I can imagine it in a rusty Bel Air in the to do corner of a shop, waiting for the mechanics to turn it into a driving gem. My concept is a ´51 Bel Air who´s engine cannot disguise its history. But the owner spends many hours and tender loving care to keep the engine clean and running, and much effort to keep the body and chrome shiny. Loves to go cruising on a sunny day and meet his friends at the classic car meetings.?? But your nudge did work! I will give the pan some more oily smudge before i eventually drop it into the bay.?
-
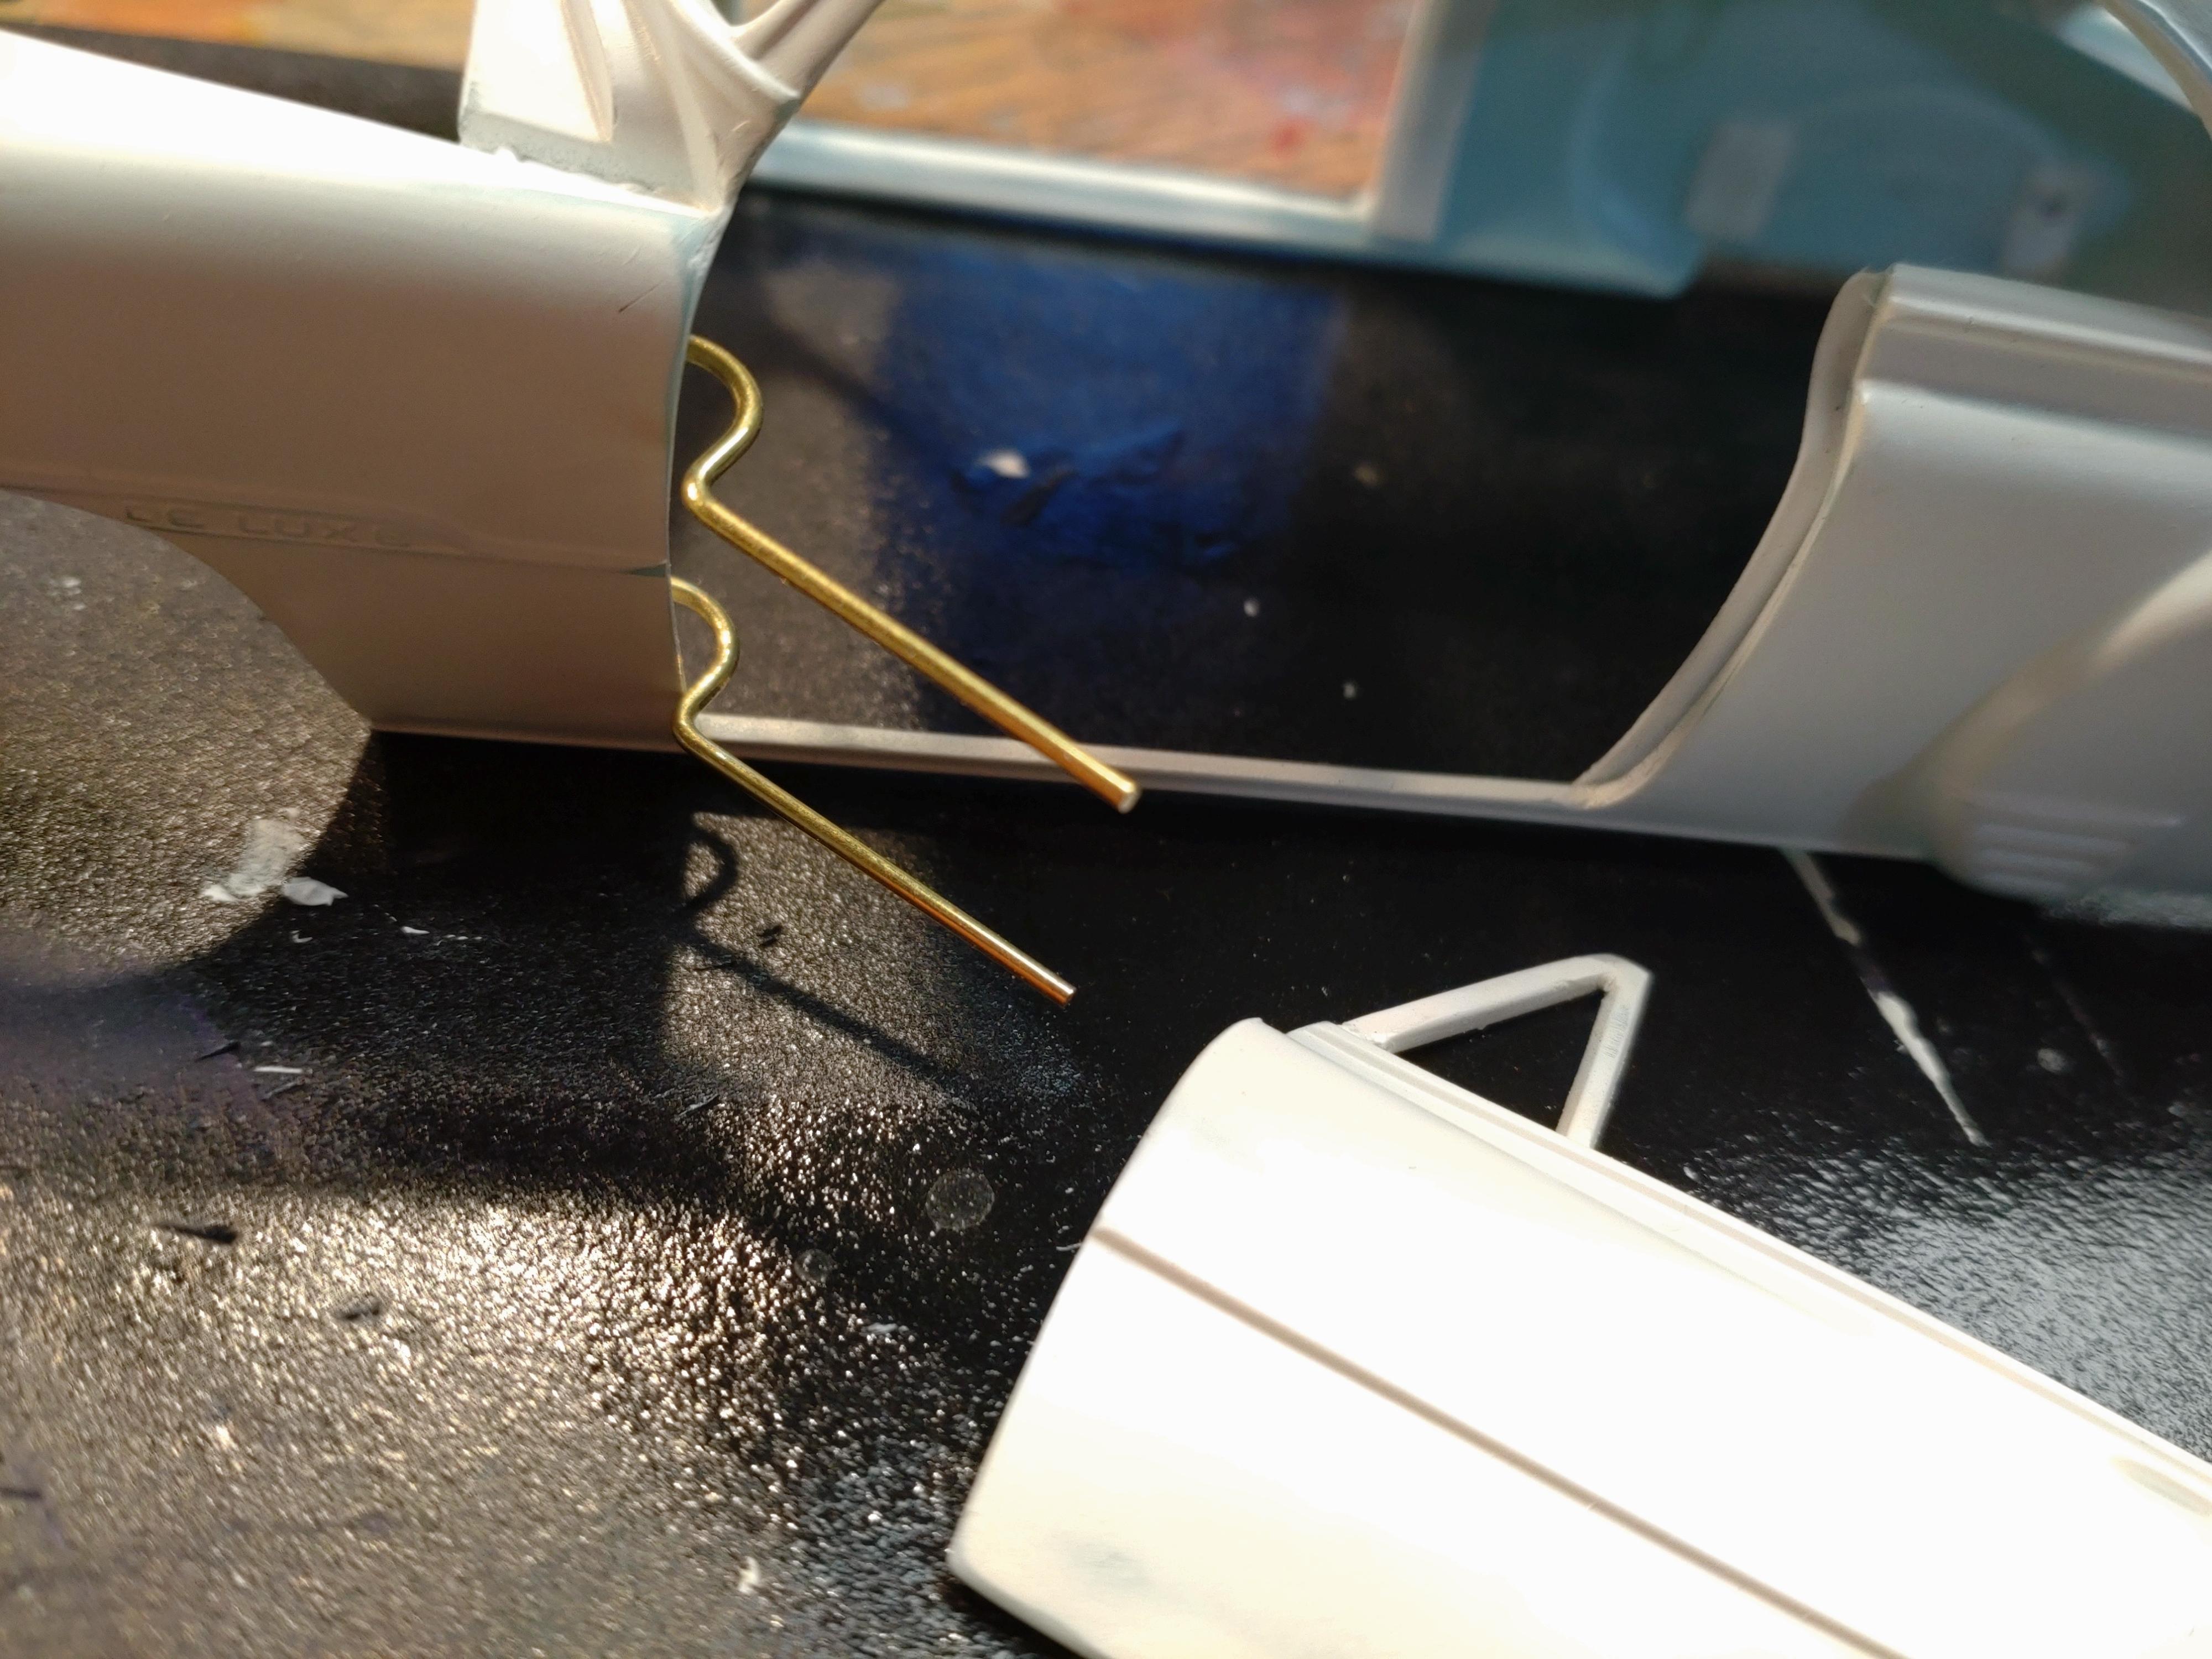
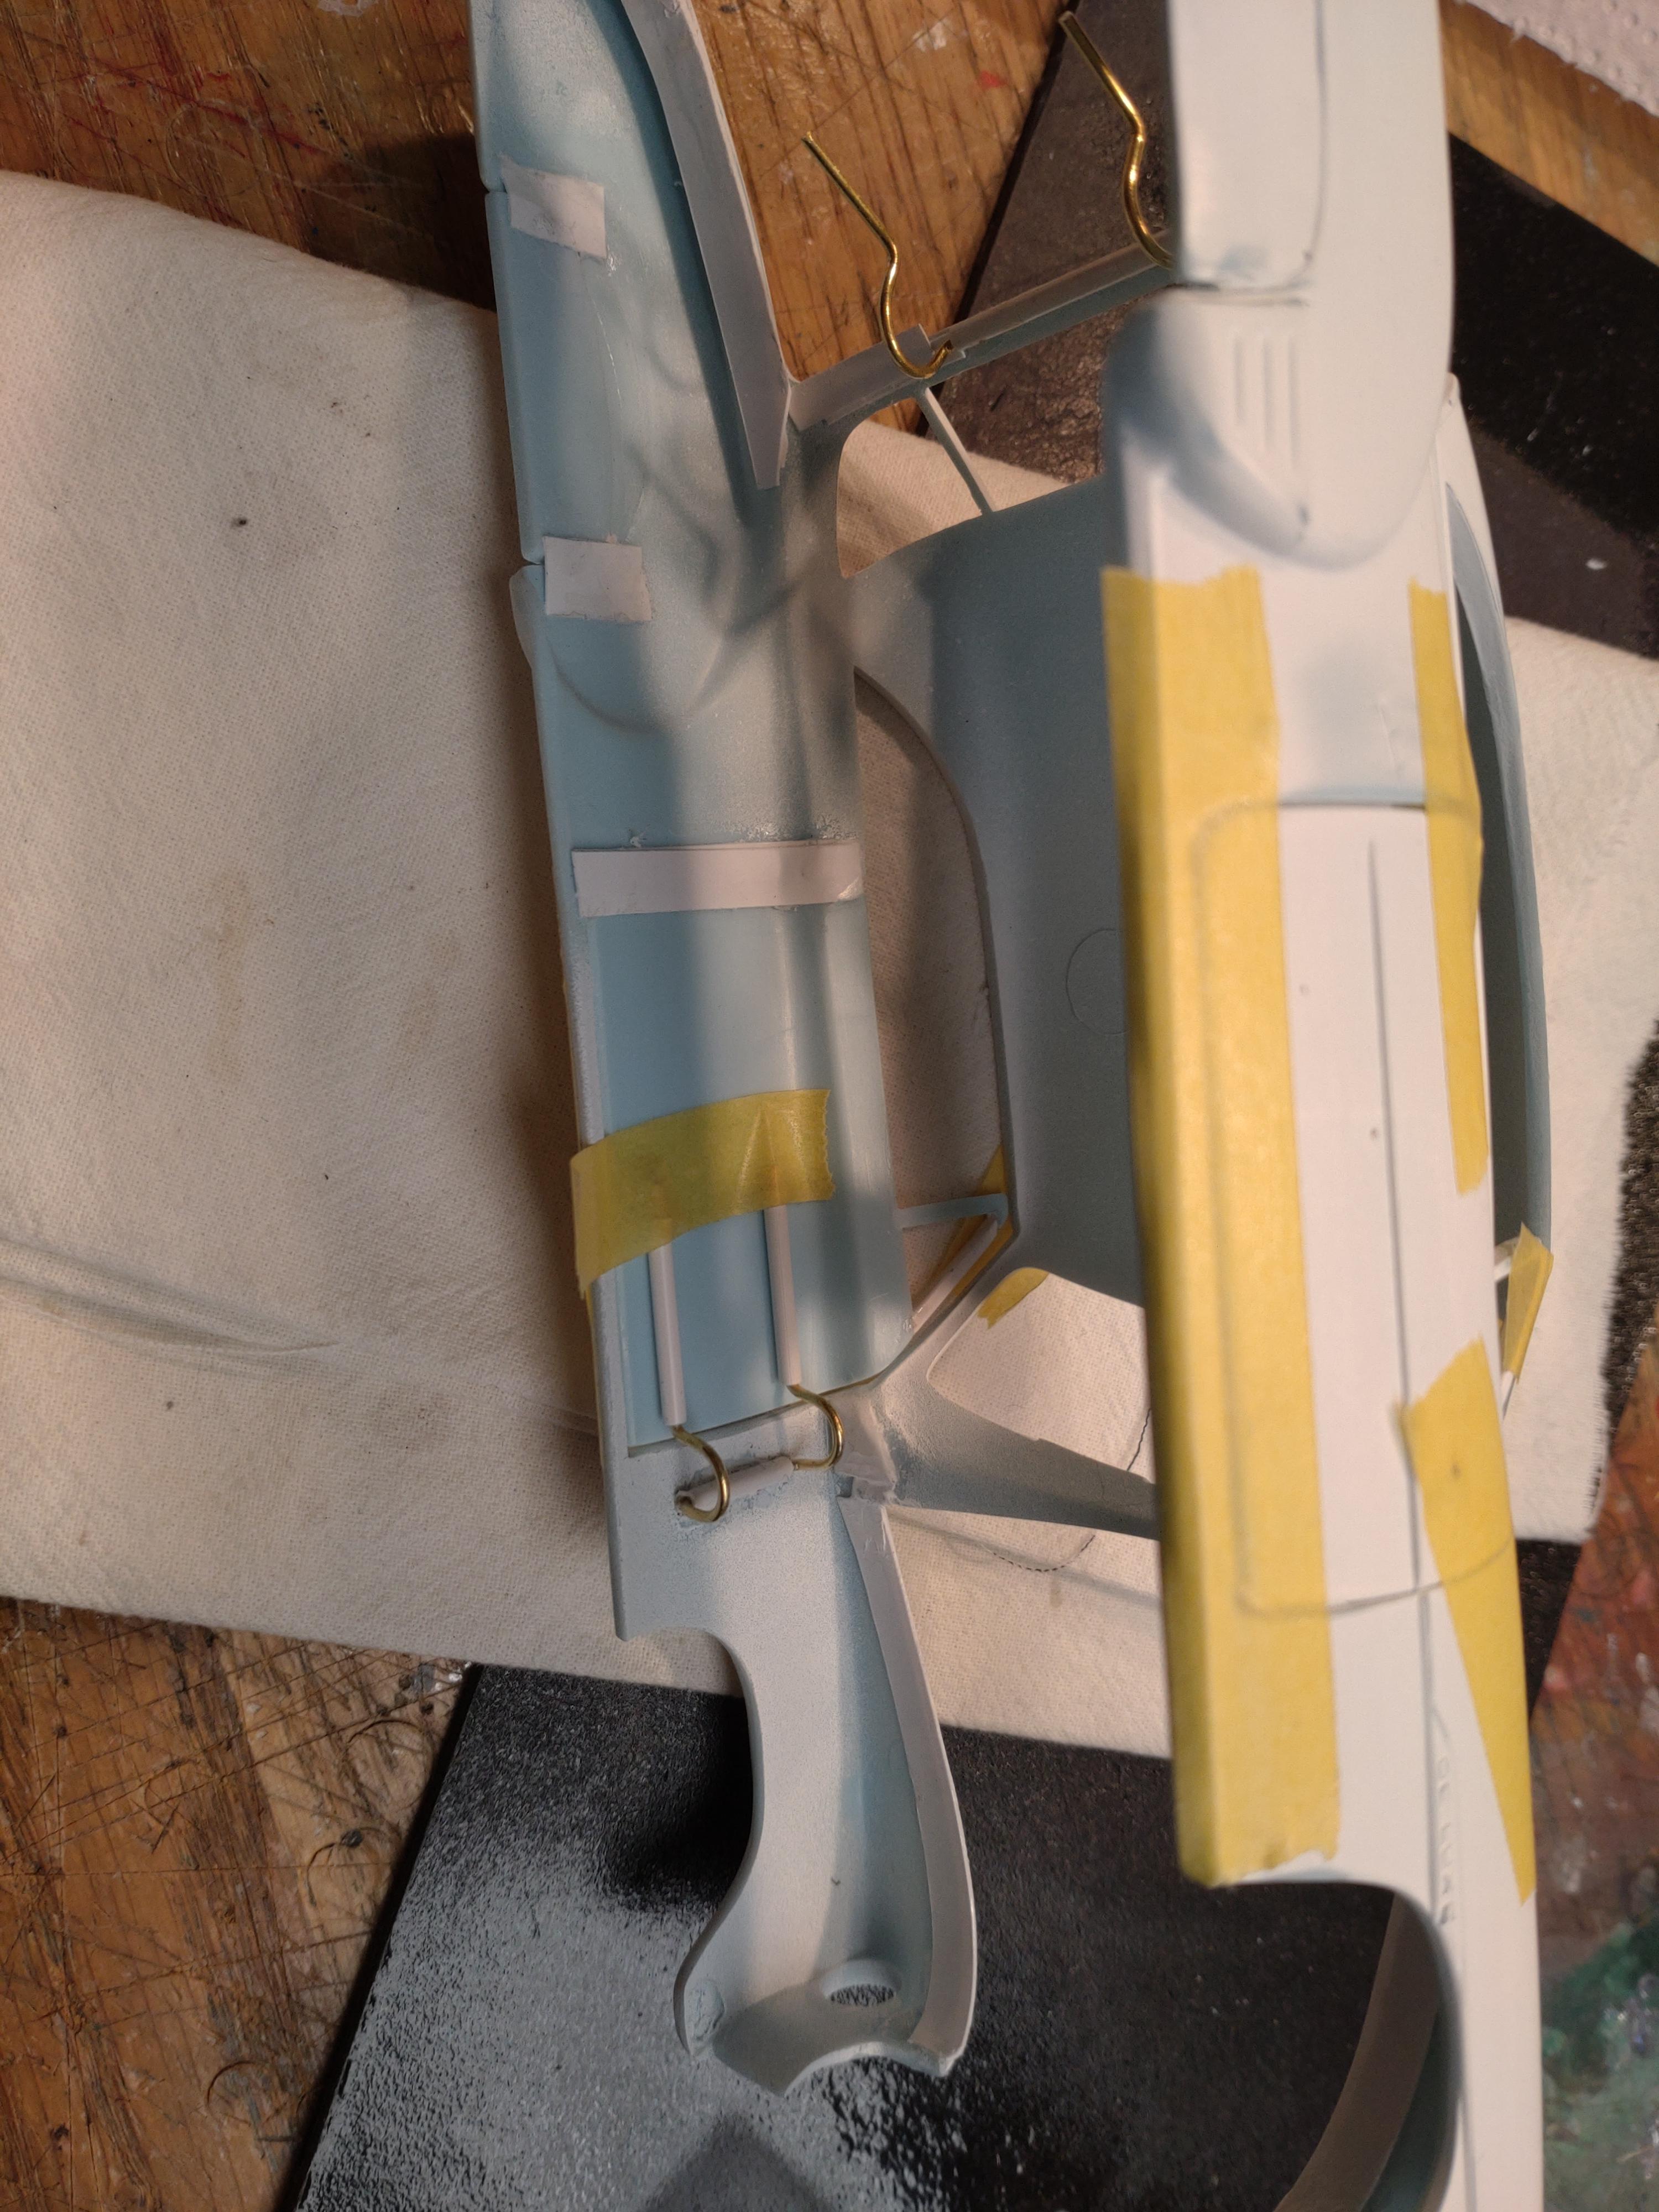
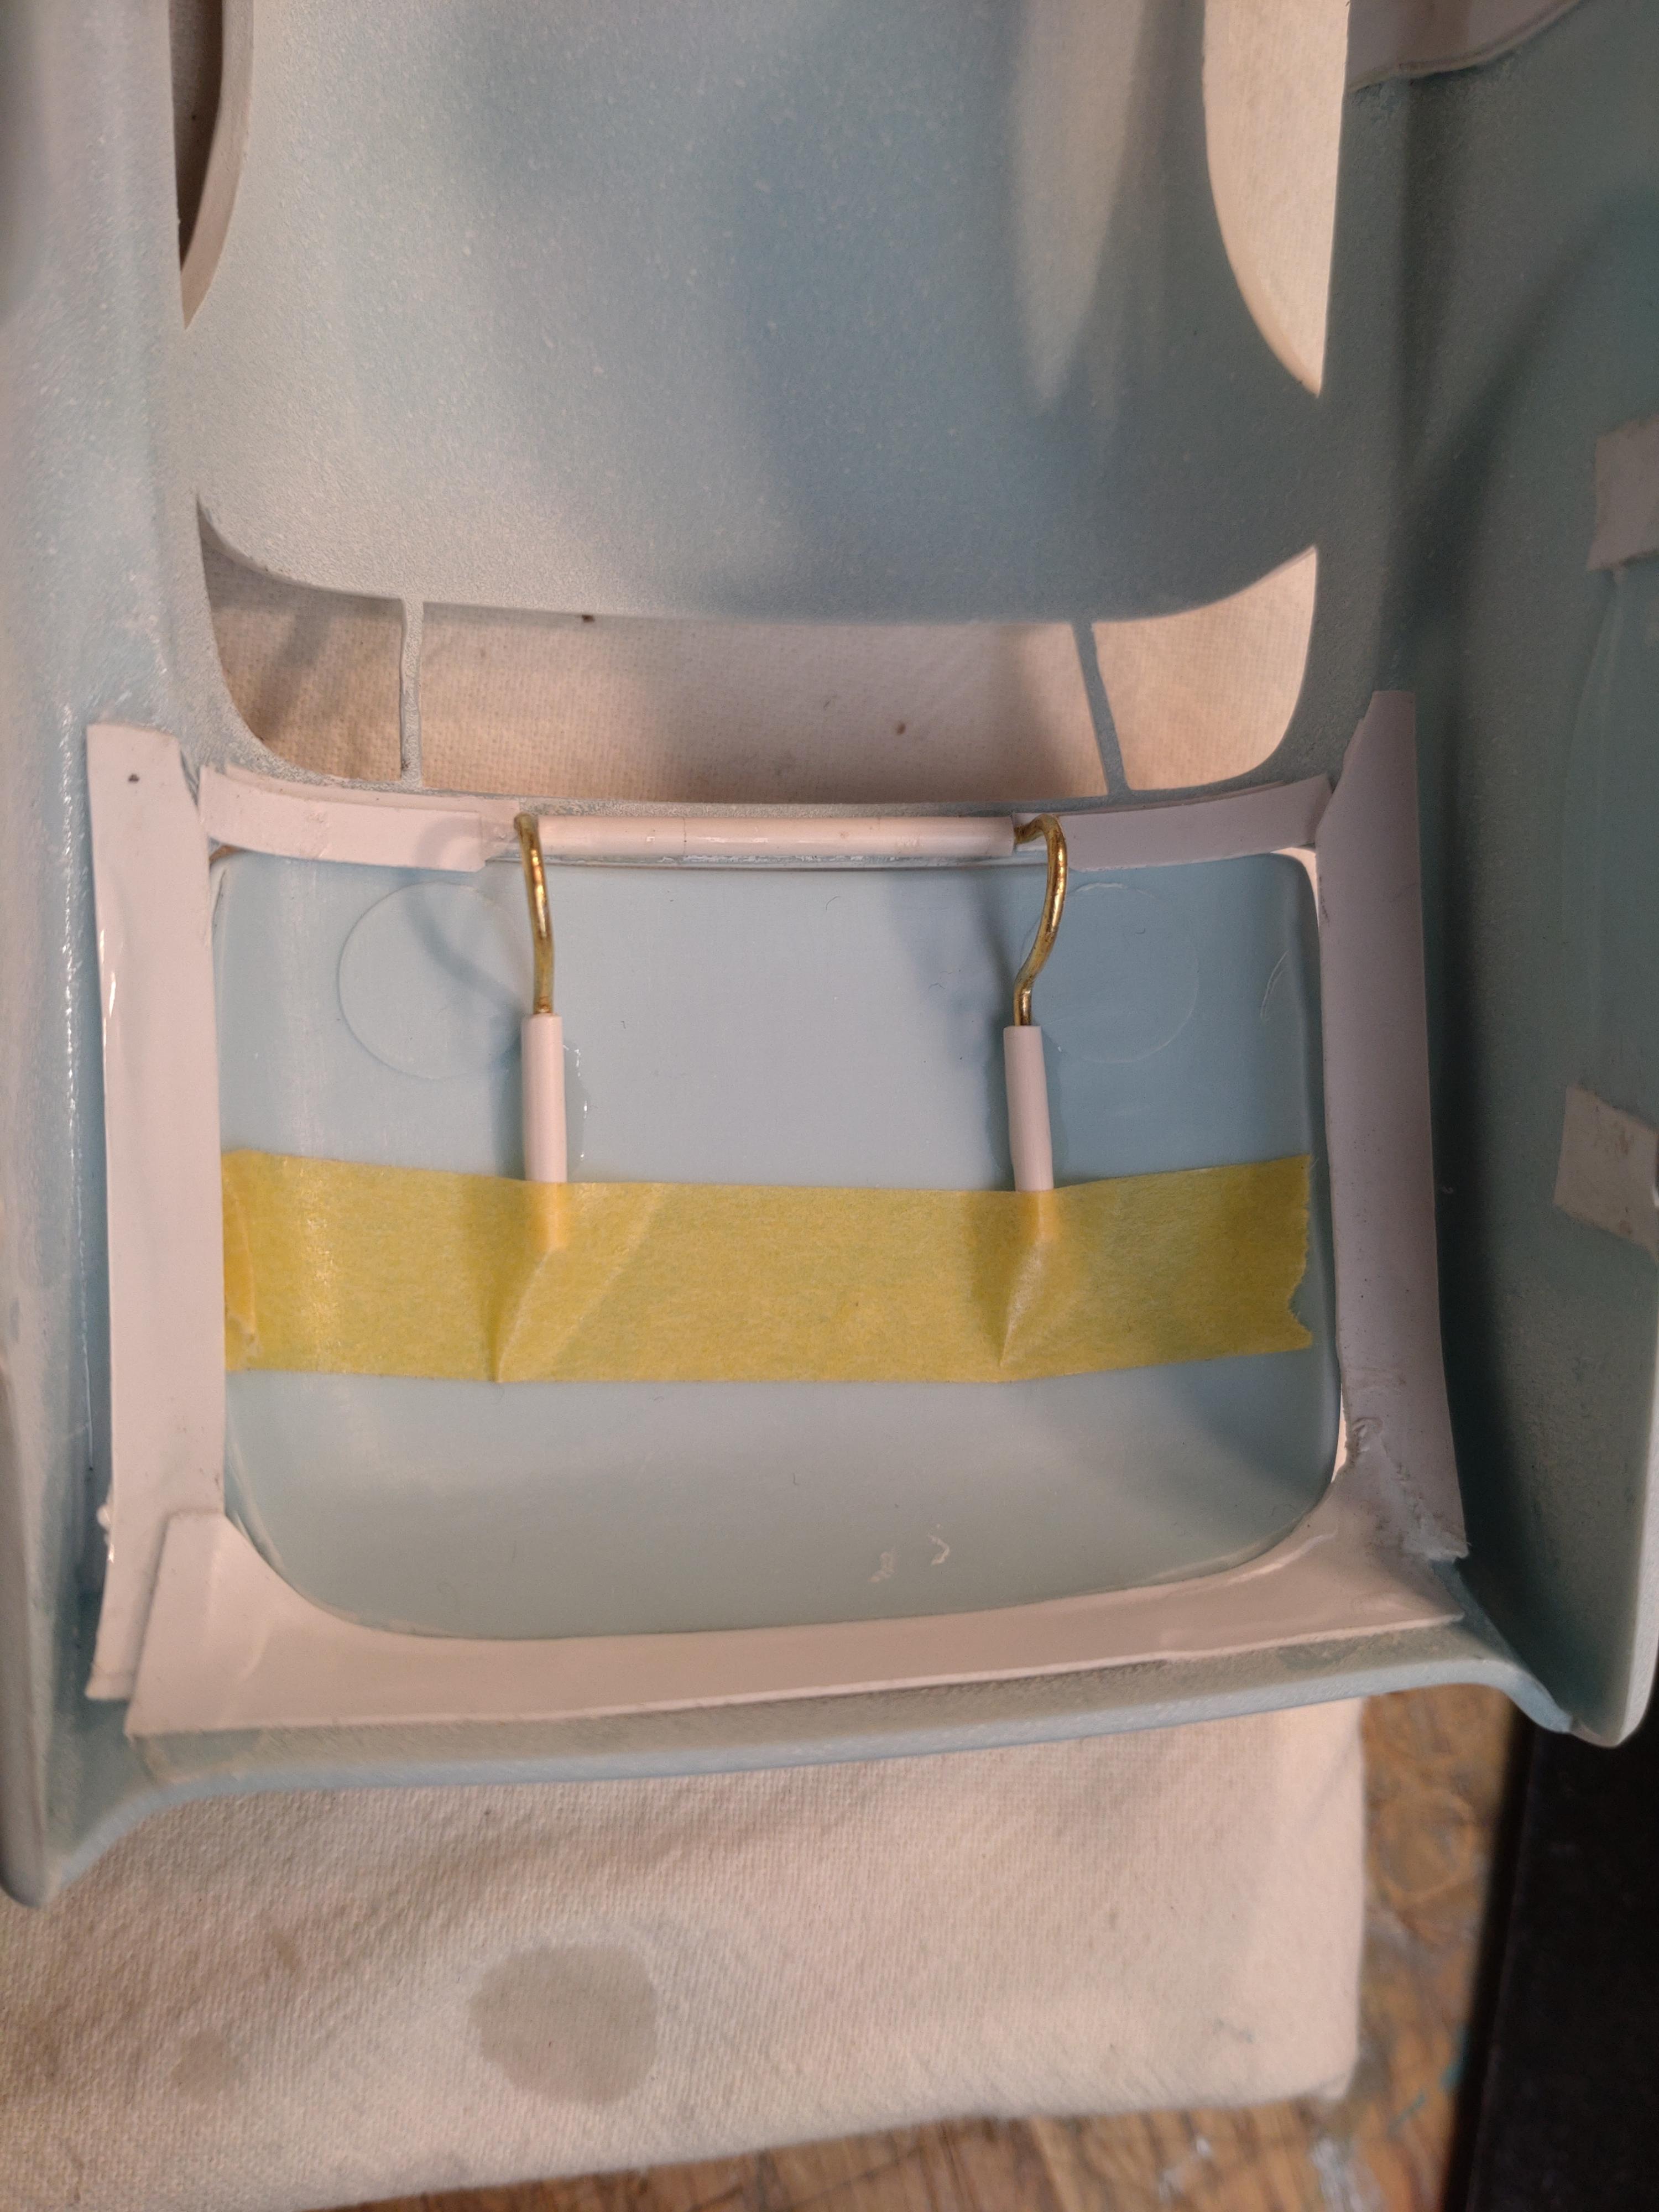
I´ve started with the body. I gotten hooked on hinges and with the knowledge of my last build I hope I will evade certain mistakes. So first I´ve cut up the body. Next a good sanding. There are a few spots that need a bit of putty when I slipped with my scalpel. My first primer coat is a matt white. The windows are missing a piece of frame, no big thing. But the front fenders are making me worry. They both have a heavy twist to the inside so that the bonnet won´t fit correctly. I glued a strut into the fenders to get it into shape, so I can test fit the bonnet. Next step was applying the lips (I think they are called so..) to the door, trunk and bonnet spaces. Last time I didn´t think about the paint layers that would add up. In the end, my doors and trunk wouldn´t close completely. This time I glued a 0.5mm layer of styrene along the edges, BEFORE I attached the lips. Hope that will make it fit and look better. The hinges are attached to the body. The wires are still a bit long, but are easier to handle at the start. I will cut them shorter before I finally connect the doors. If you are thinking of making hinged doors, make it a habit to cut the wires to a slightly different length. It is much easier to slip the doors onto the wires later. Now comes the tricky part of getting the doors into the exact right place. I use a 1mm brass rod for the hinges. Quite stiff, but still soft enough to bend into the correct shape. These wires I insert into 3mm styrene tubes that happen to have a 1mm center. Get the wires aligned to the rockers or else the doors might sag when opened. I slip tubes onto the open pieces for the doors and get the doors and trunk lid into the right place, secured with tape. Now I glue the tubes onto the doors and hope that they will look fine in a few hours, when I have let them dry completely. My next entry will show you how I get the doors into shape with the indoor panels. Thanks you staying tuned!
-
Hey Bruce, wonderful job on the Camaro! Everything looks perfect. Very nice interior and the paint job makes it look like the real thing? You chose just the right set of wheels for this car!
-
Thanks for your kind remarks! Getting all that feedback makes me realize how old some of us already are. I am 62 now and came back to model car building about 2 years ago, after almost 50 years pause. Some of you guys have been building models for decades and have acquired sooo much experience and built hundreds of models. I humbly tip my hat to you! Your response really means a lot to me.
-
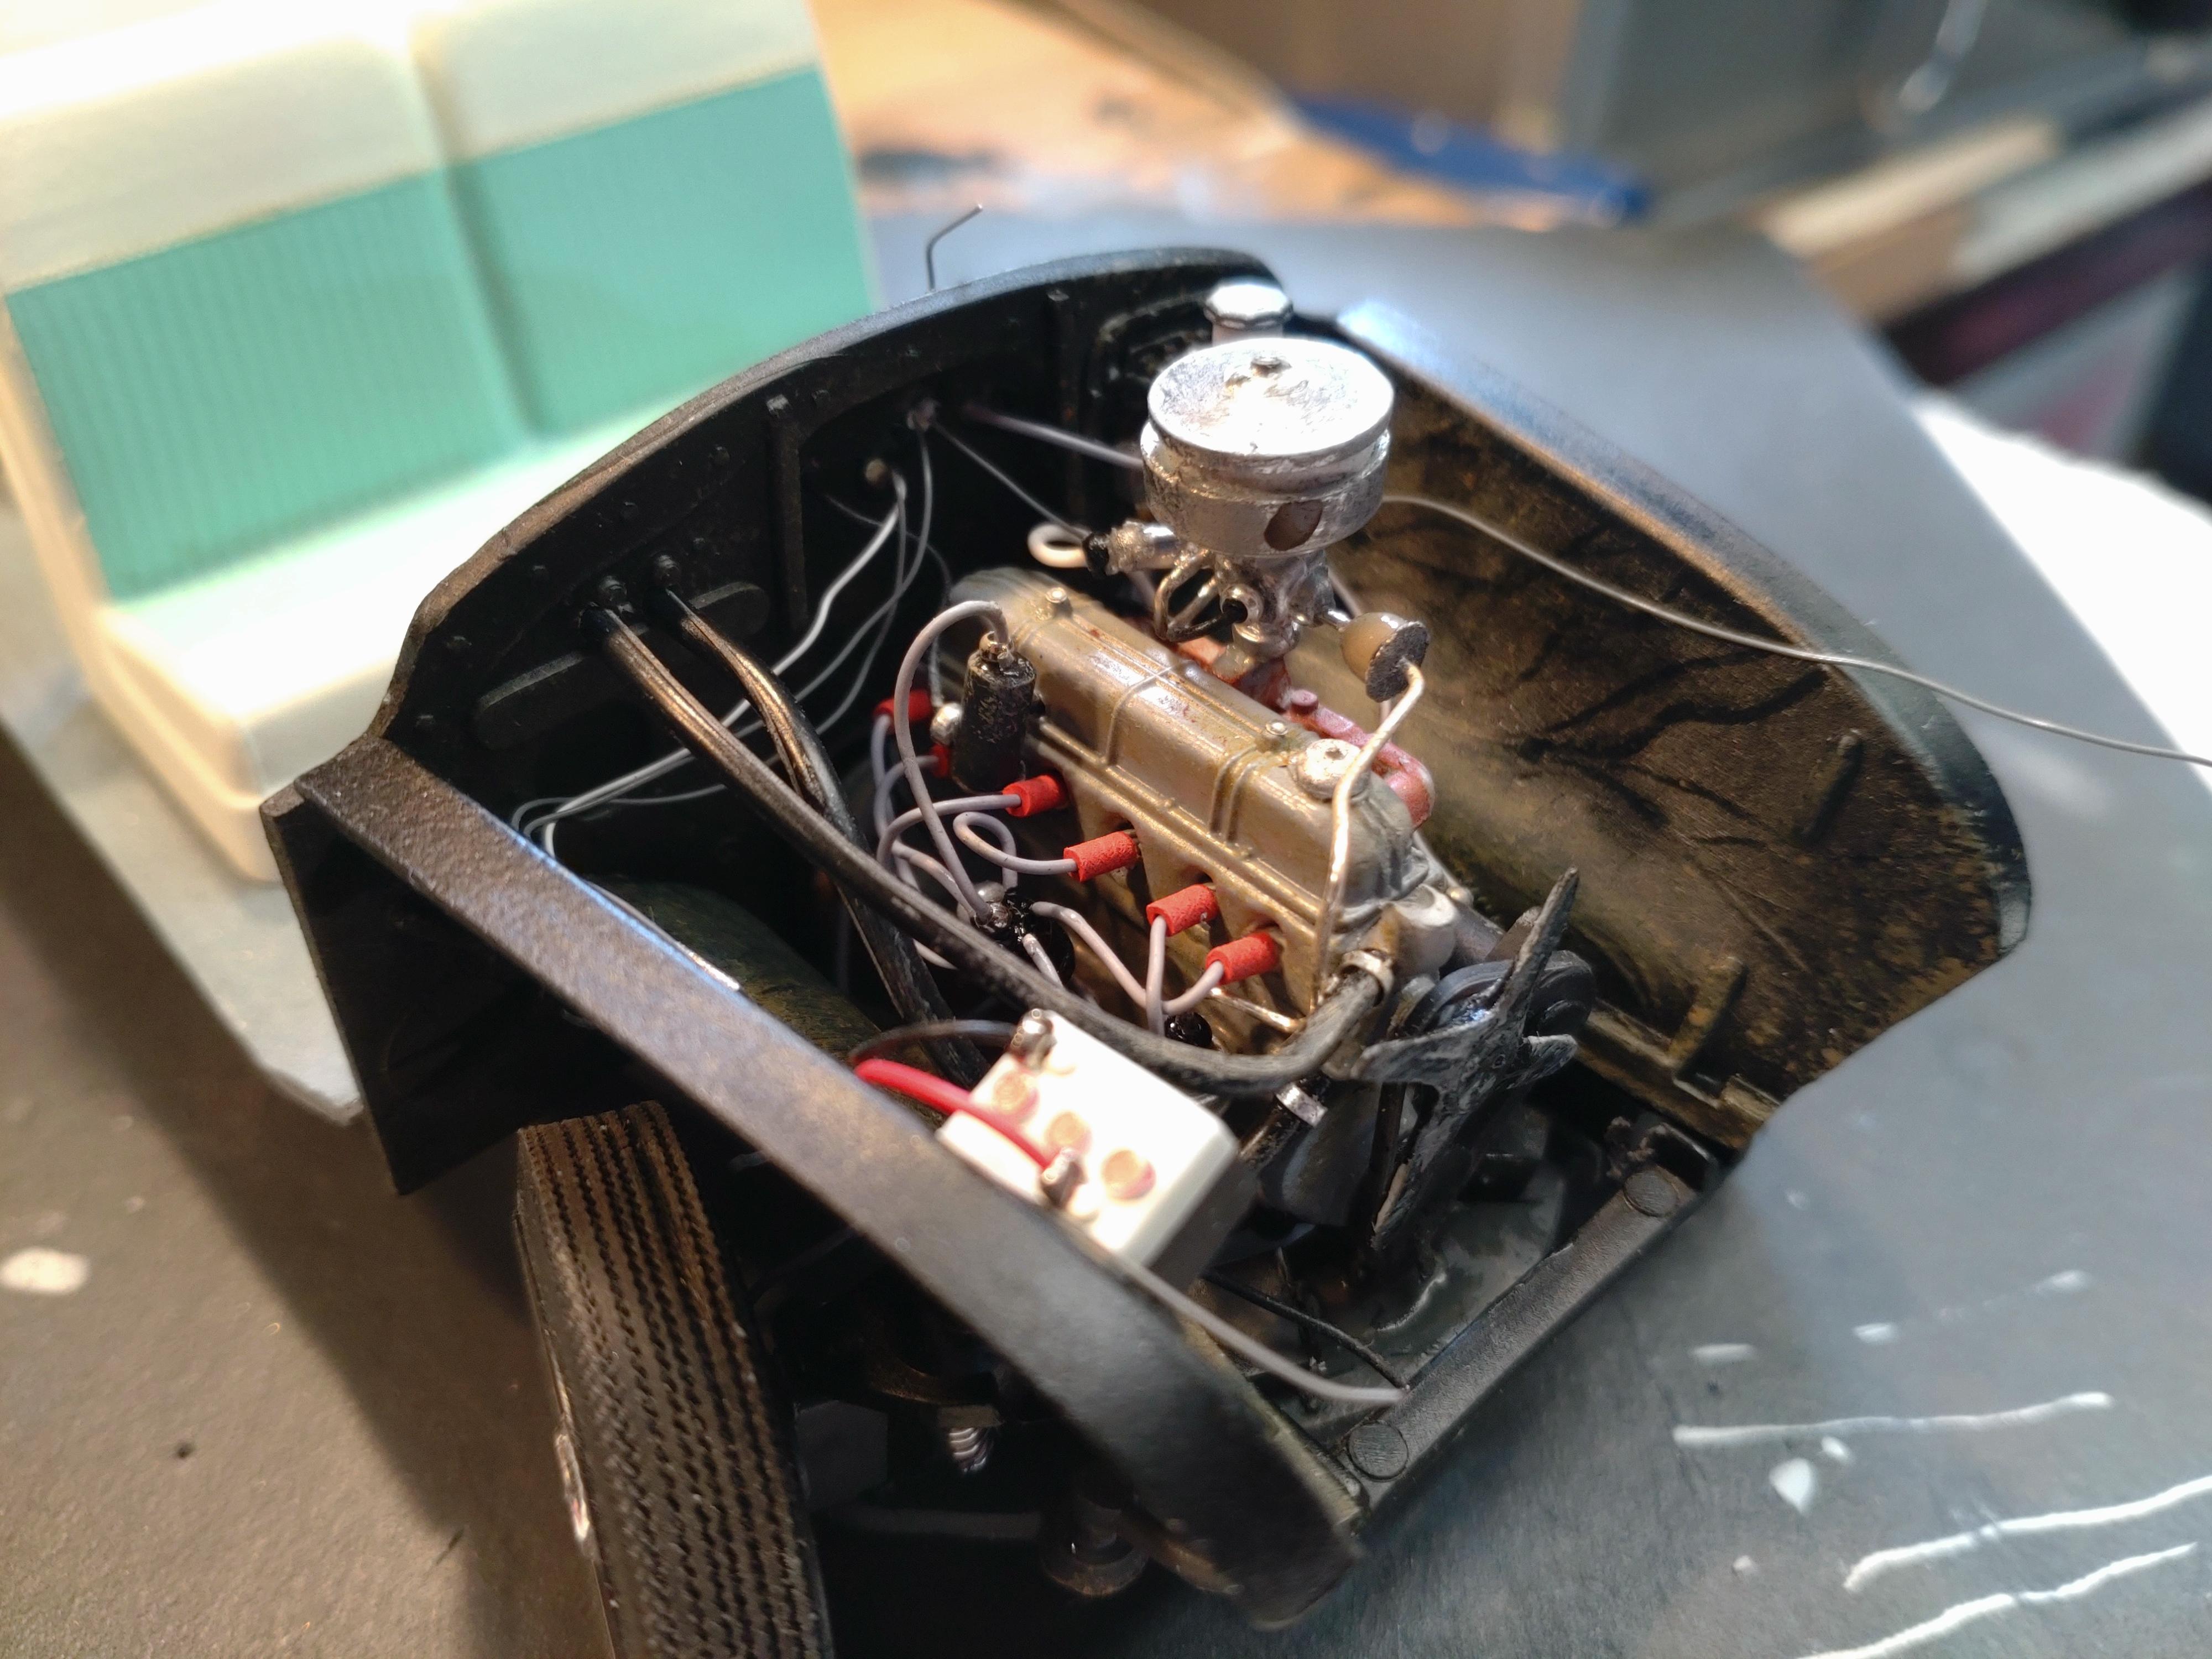
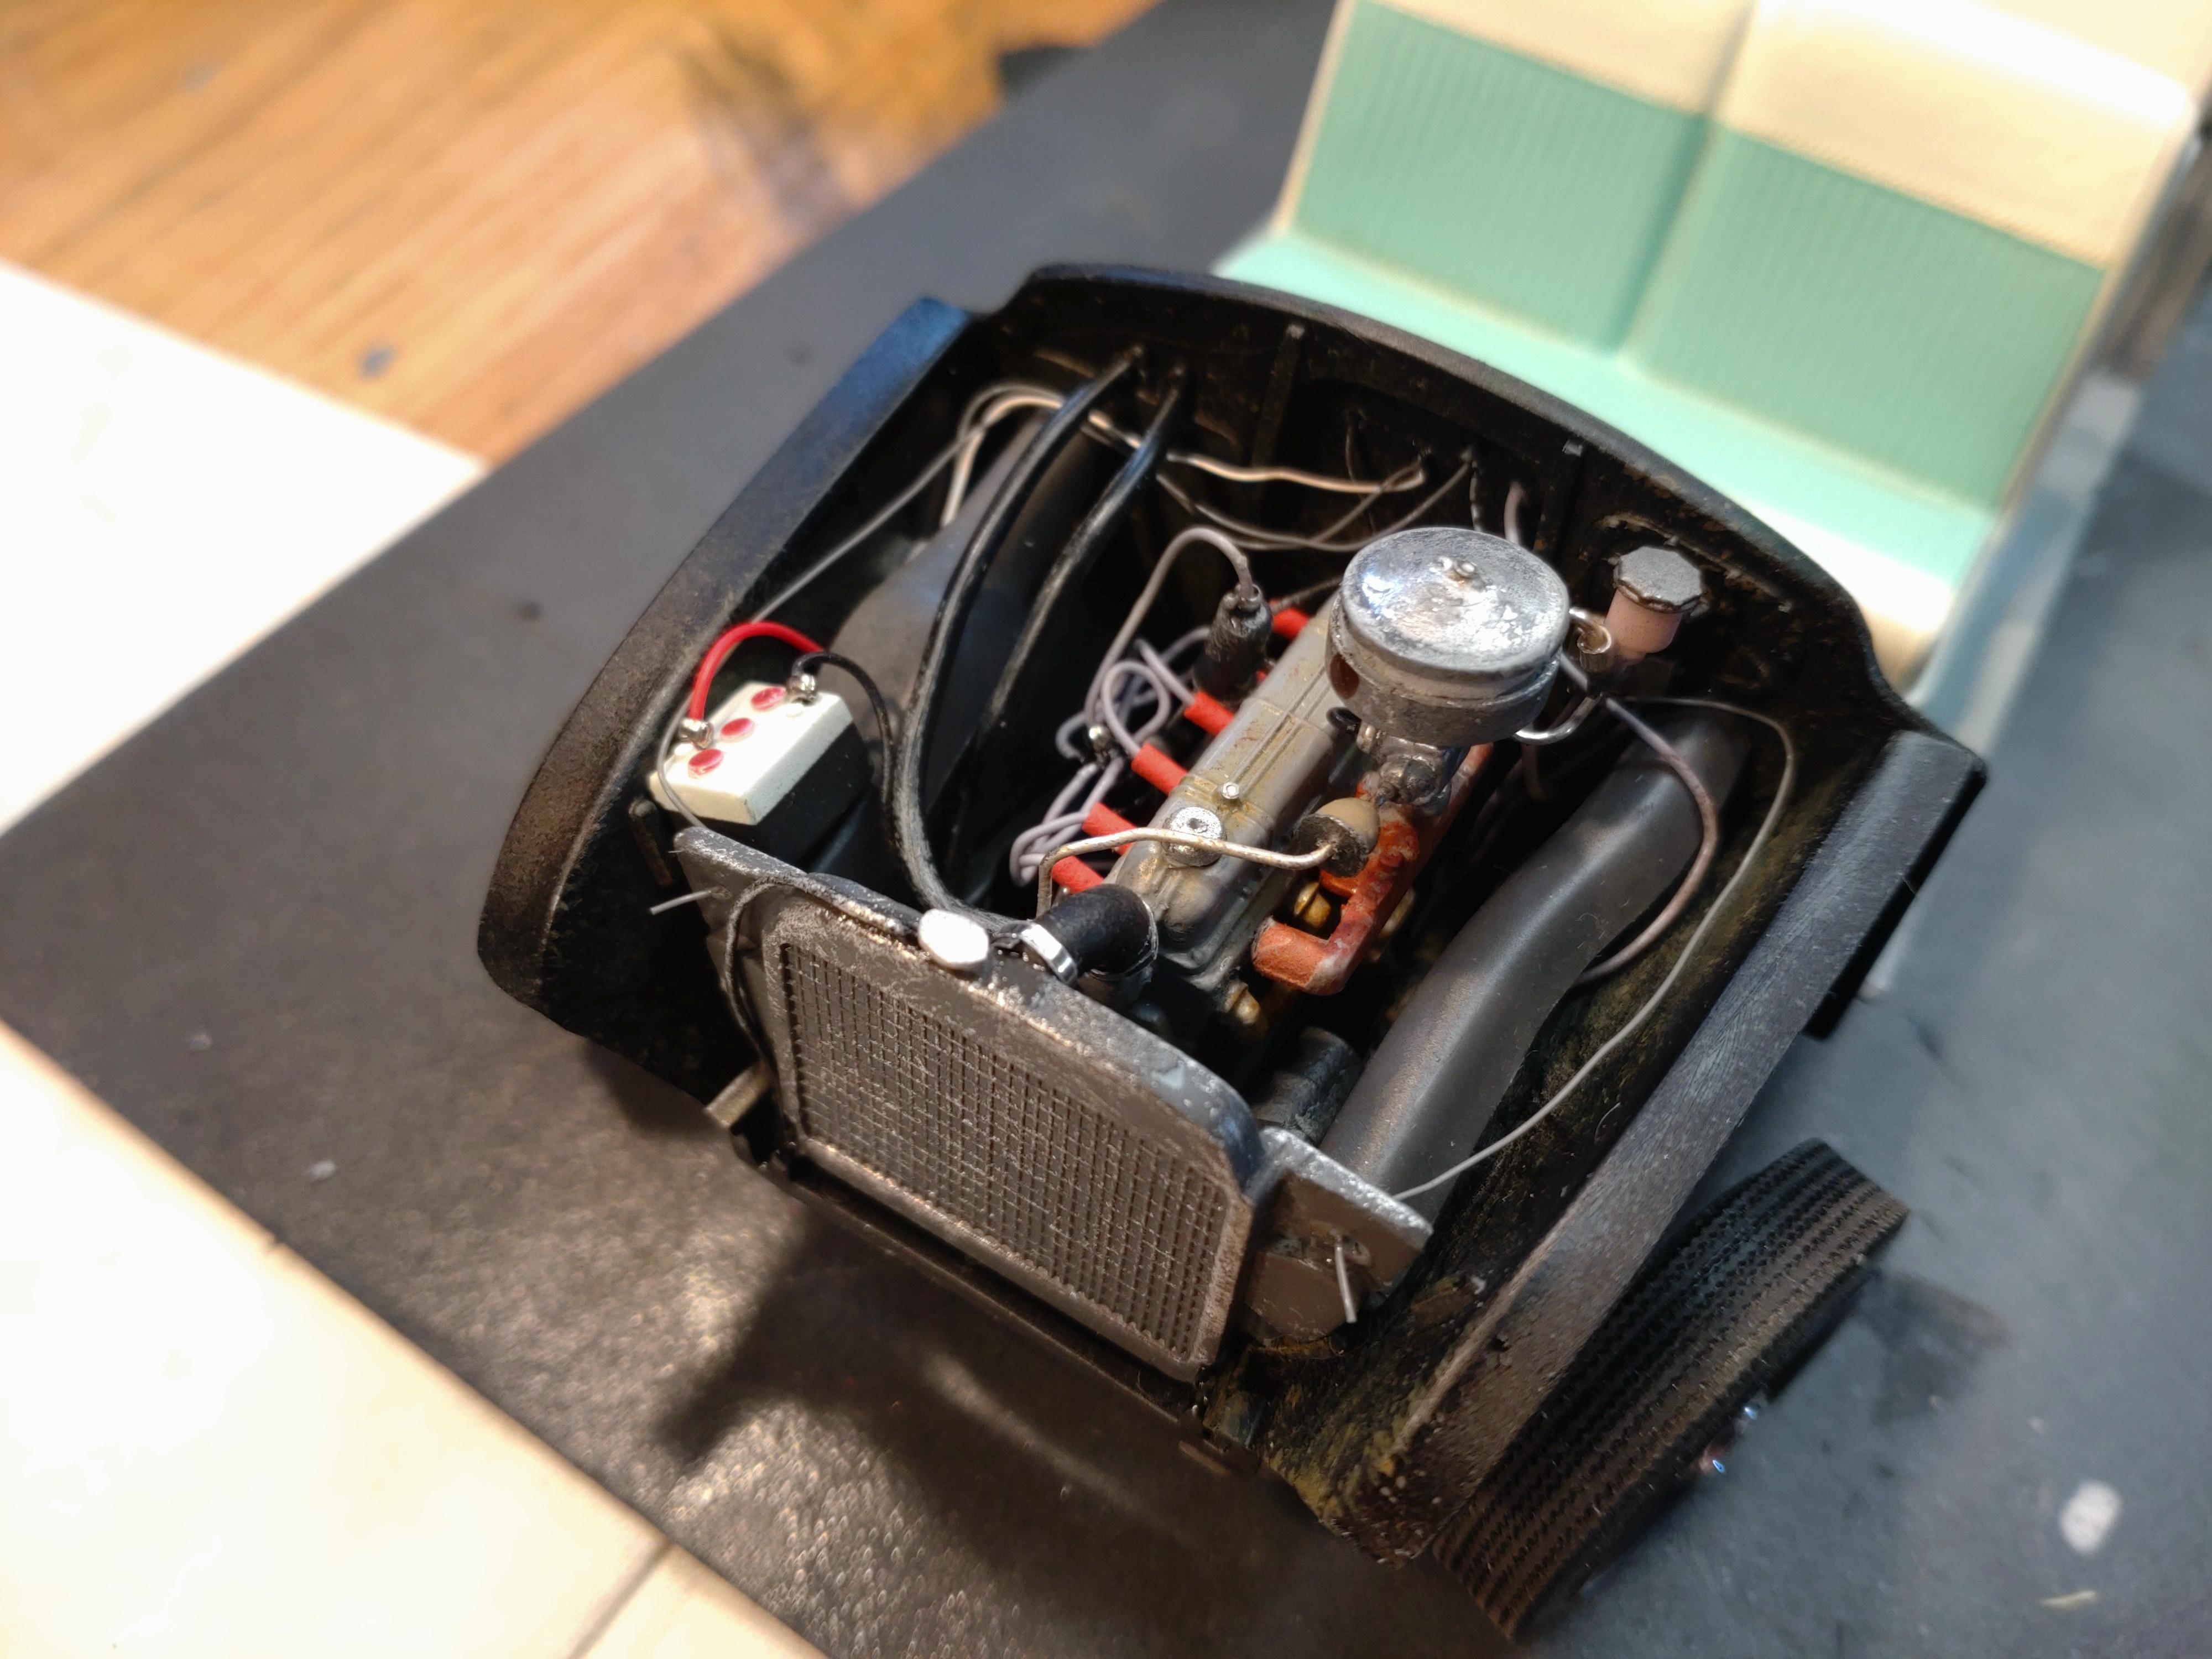
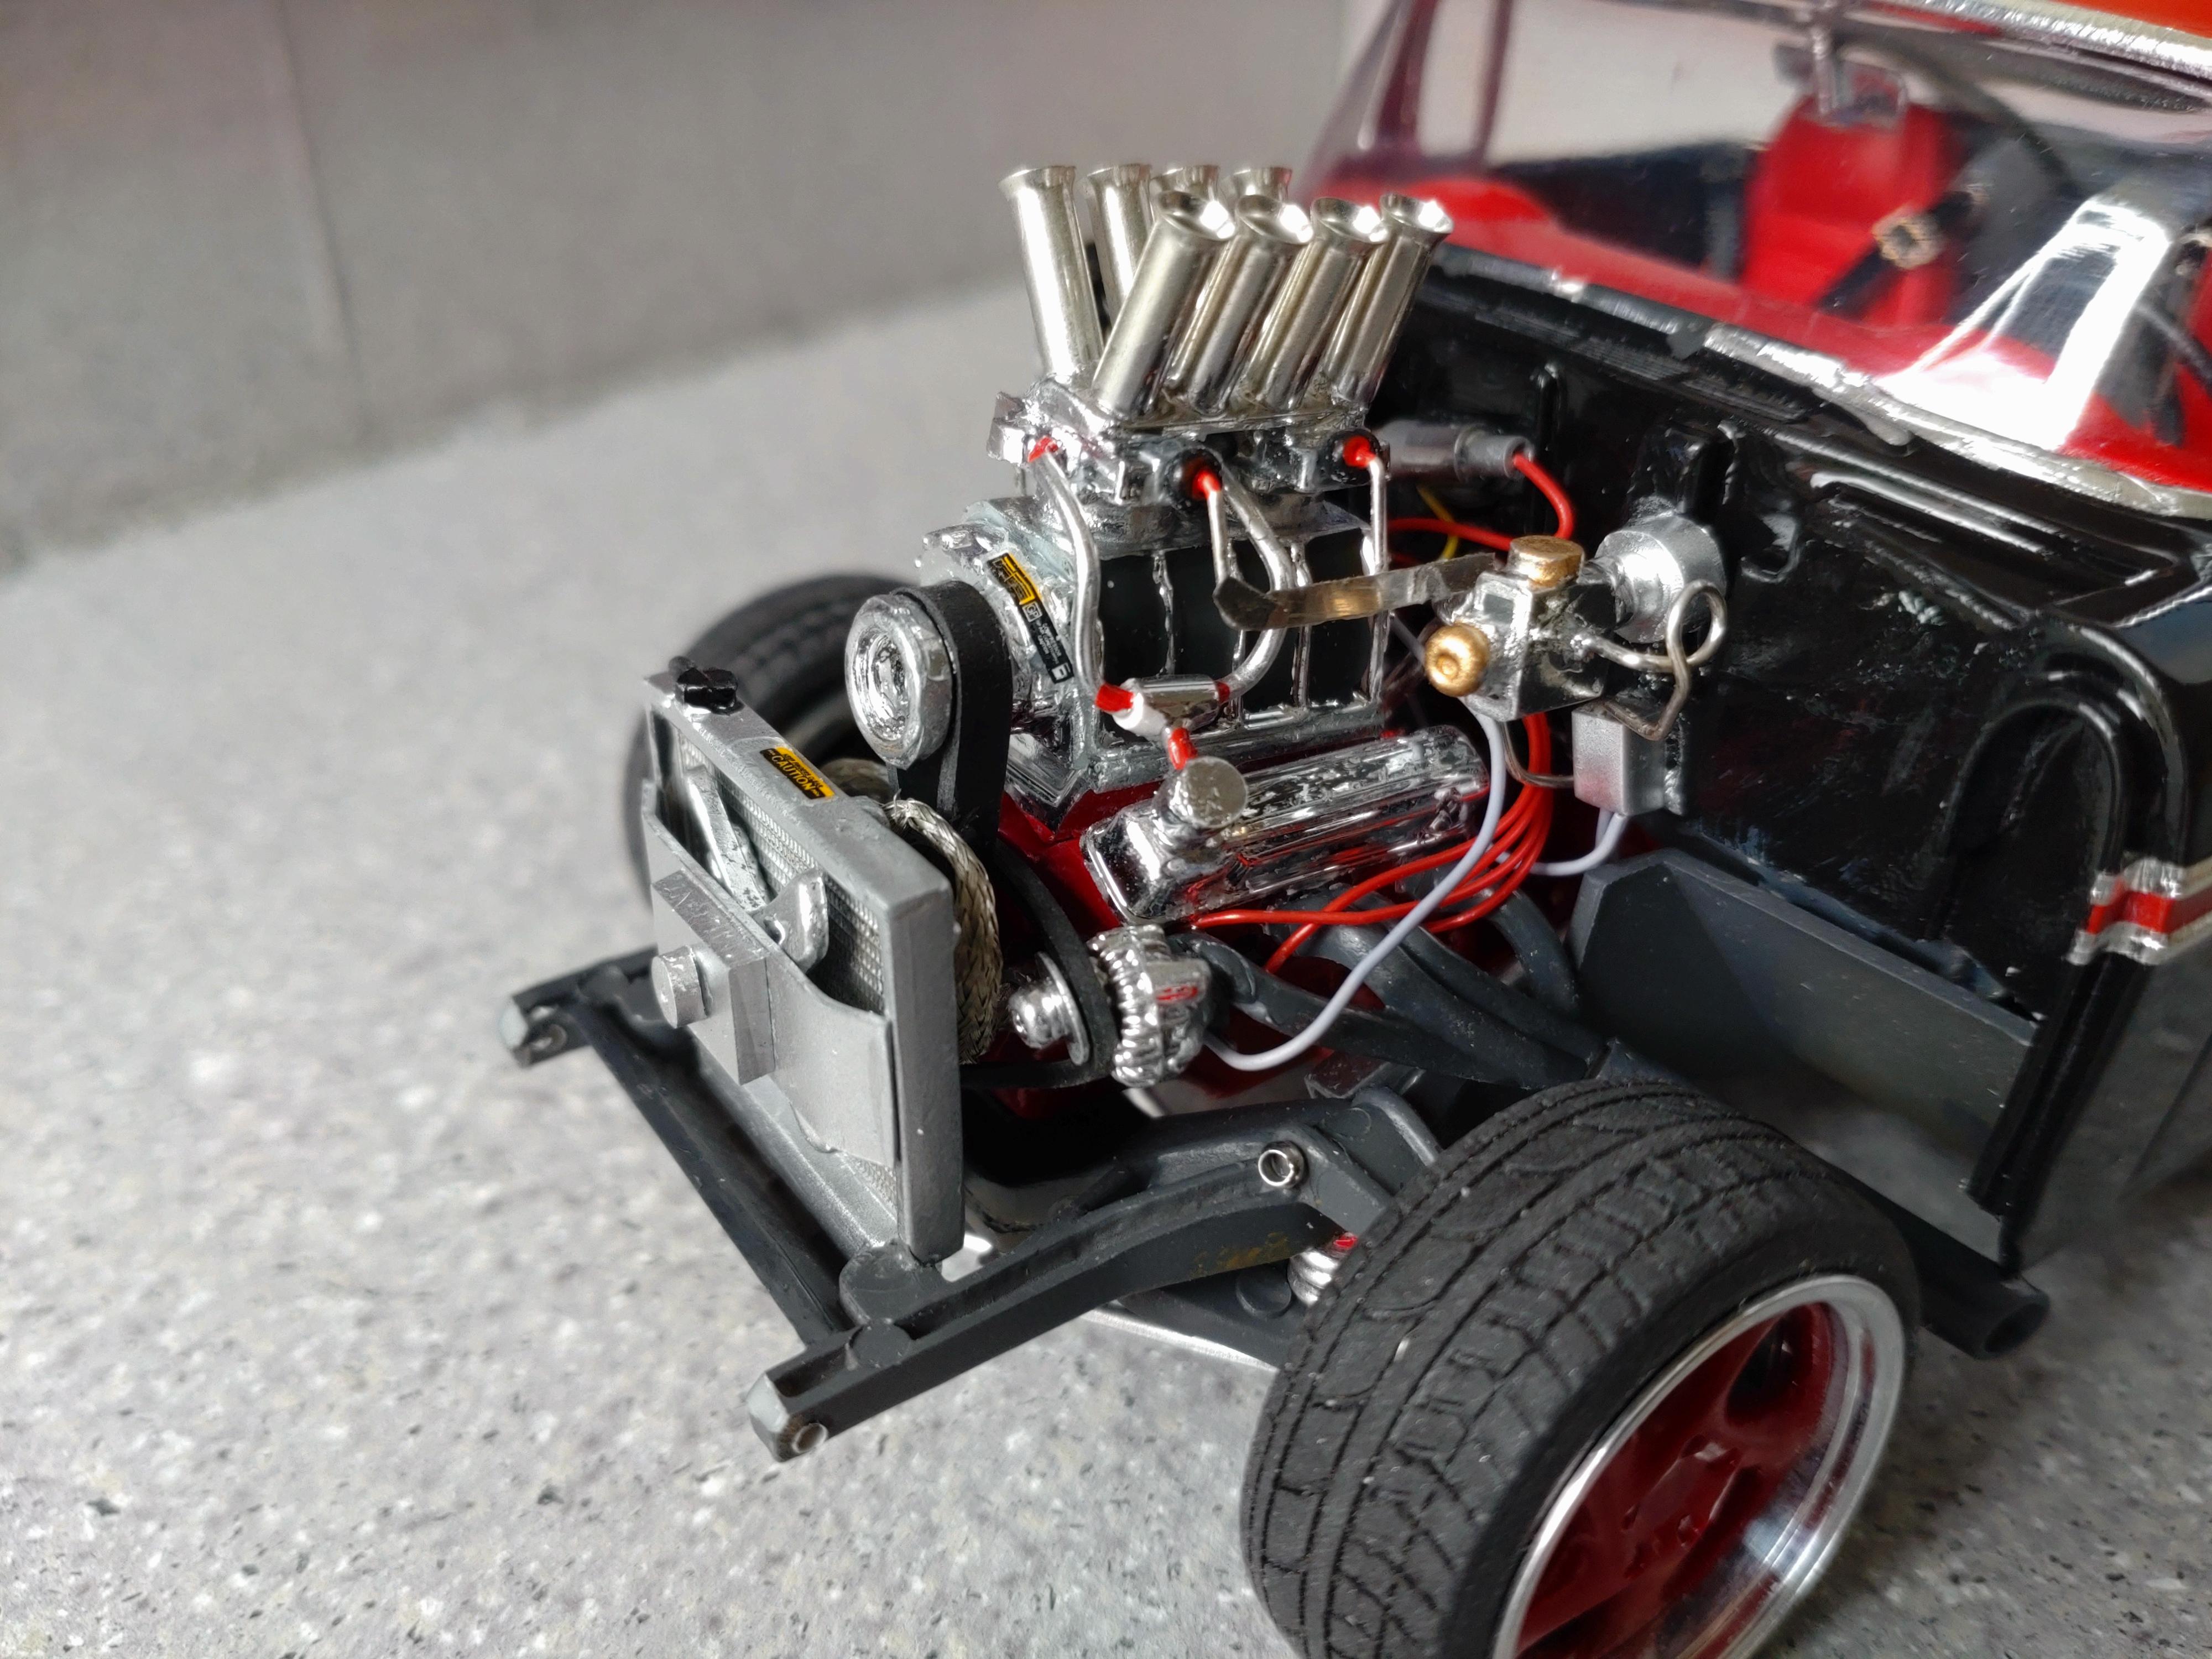
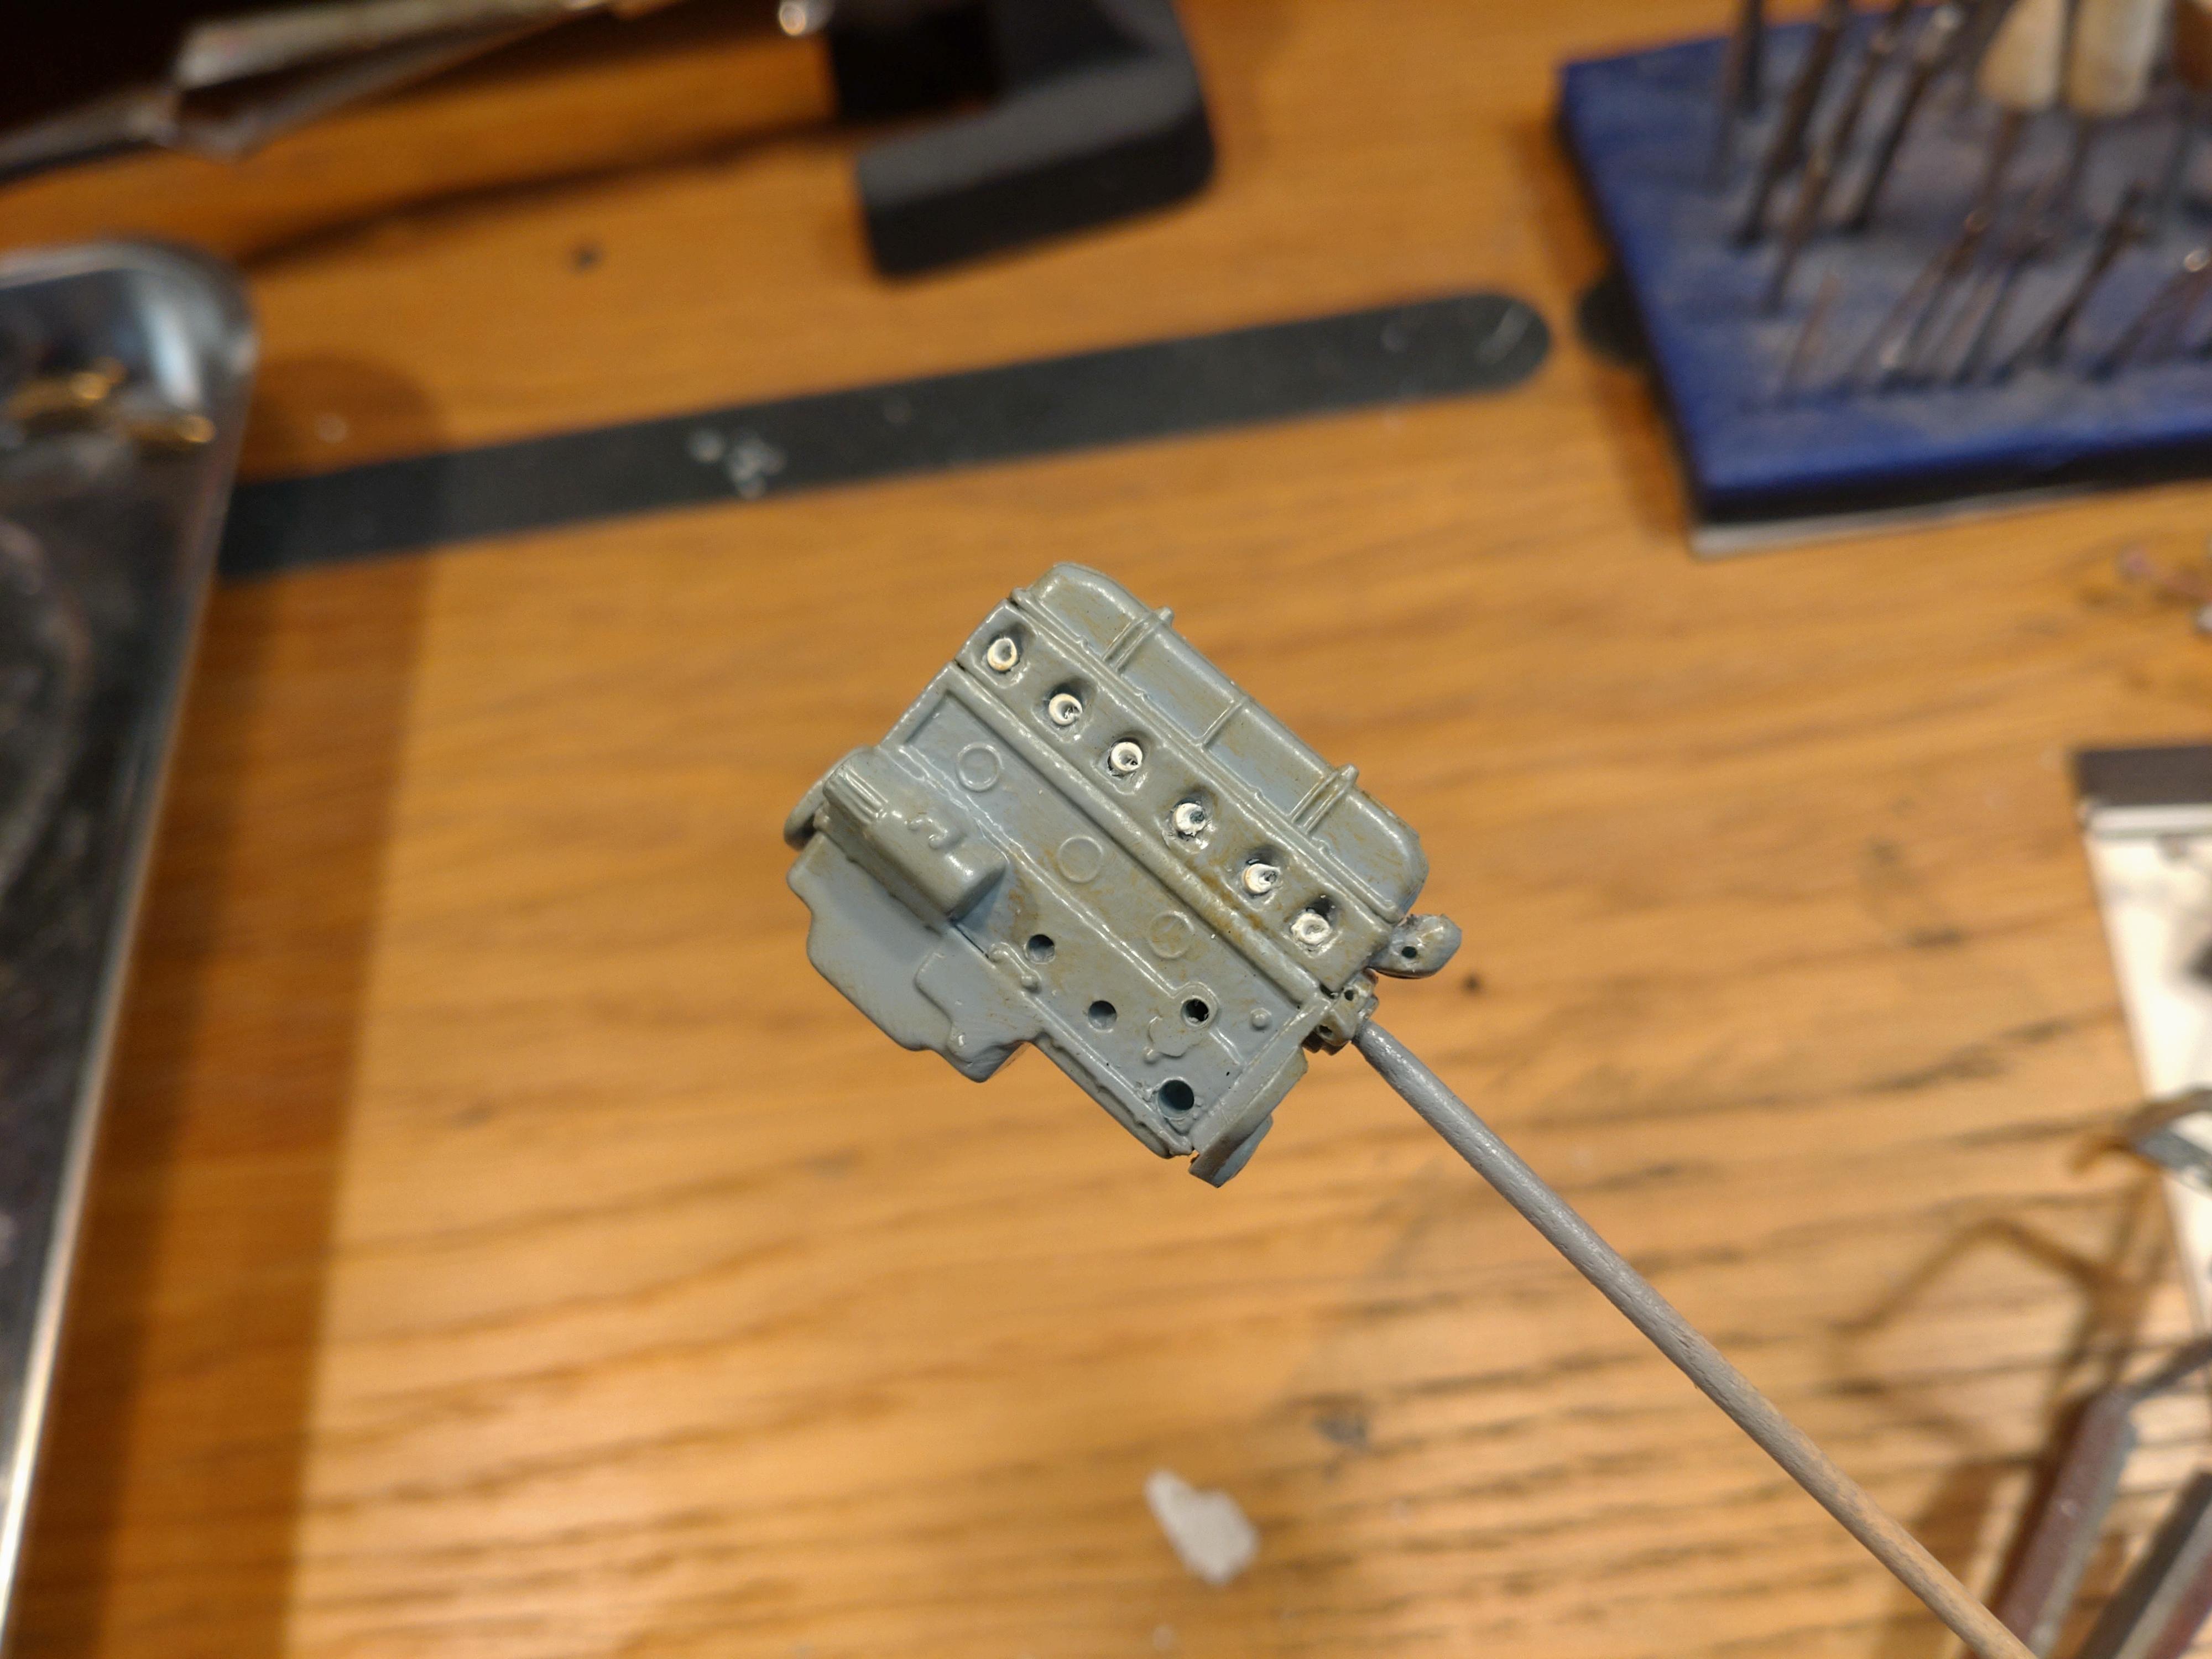
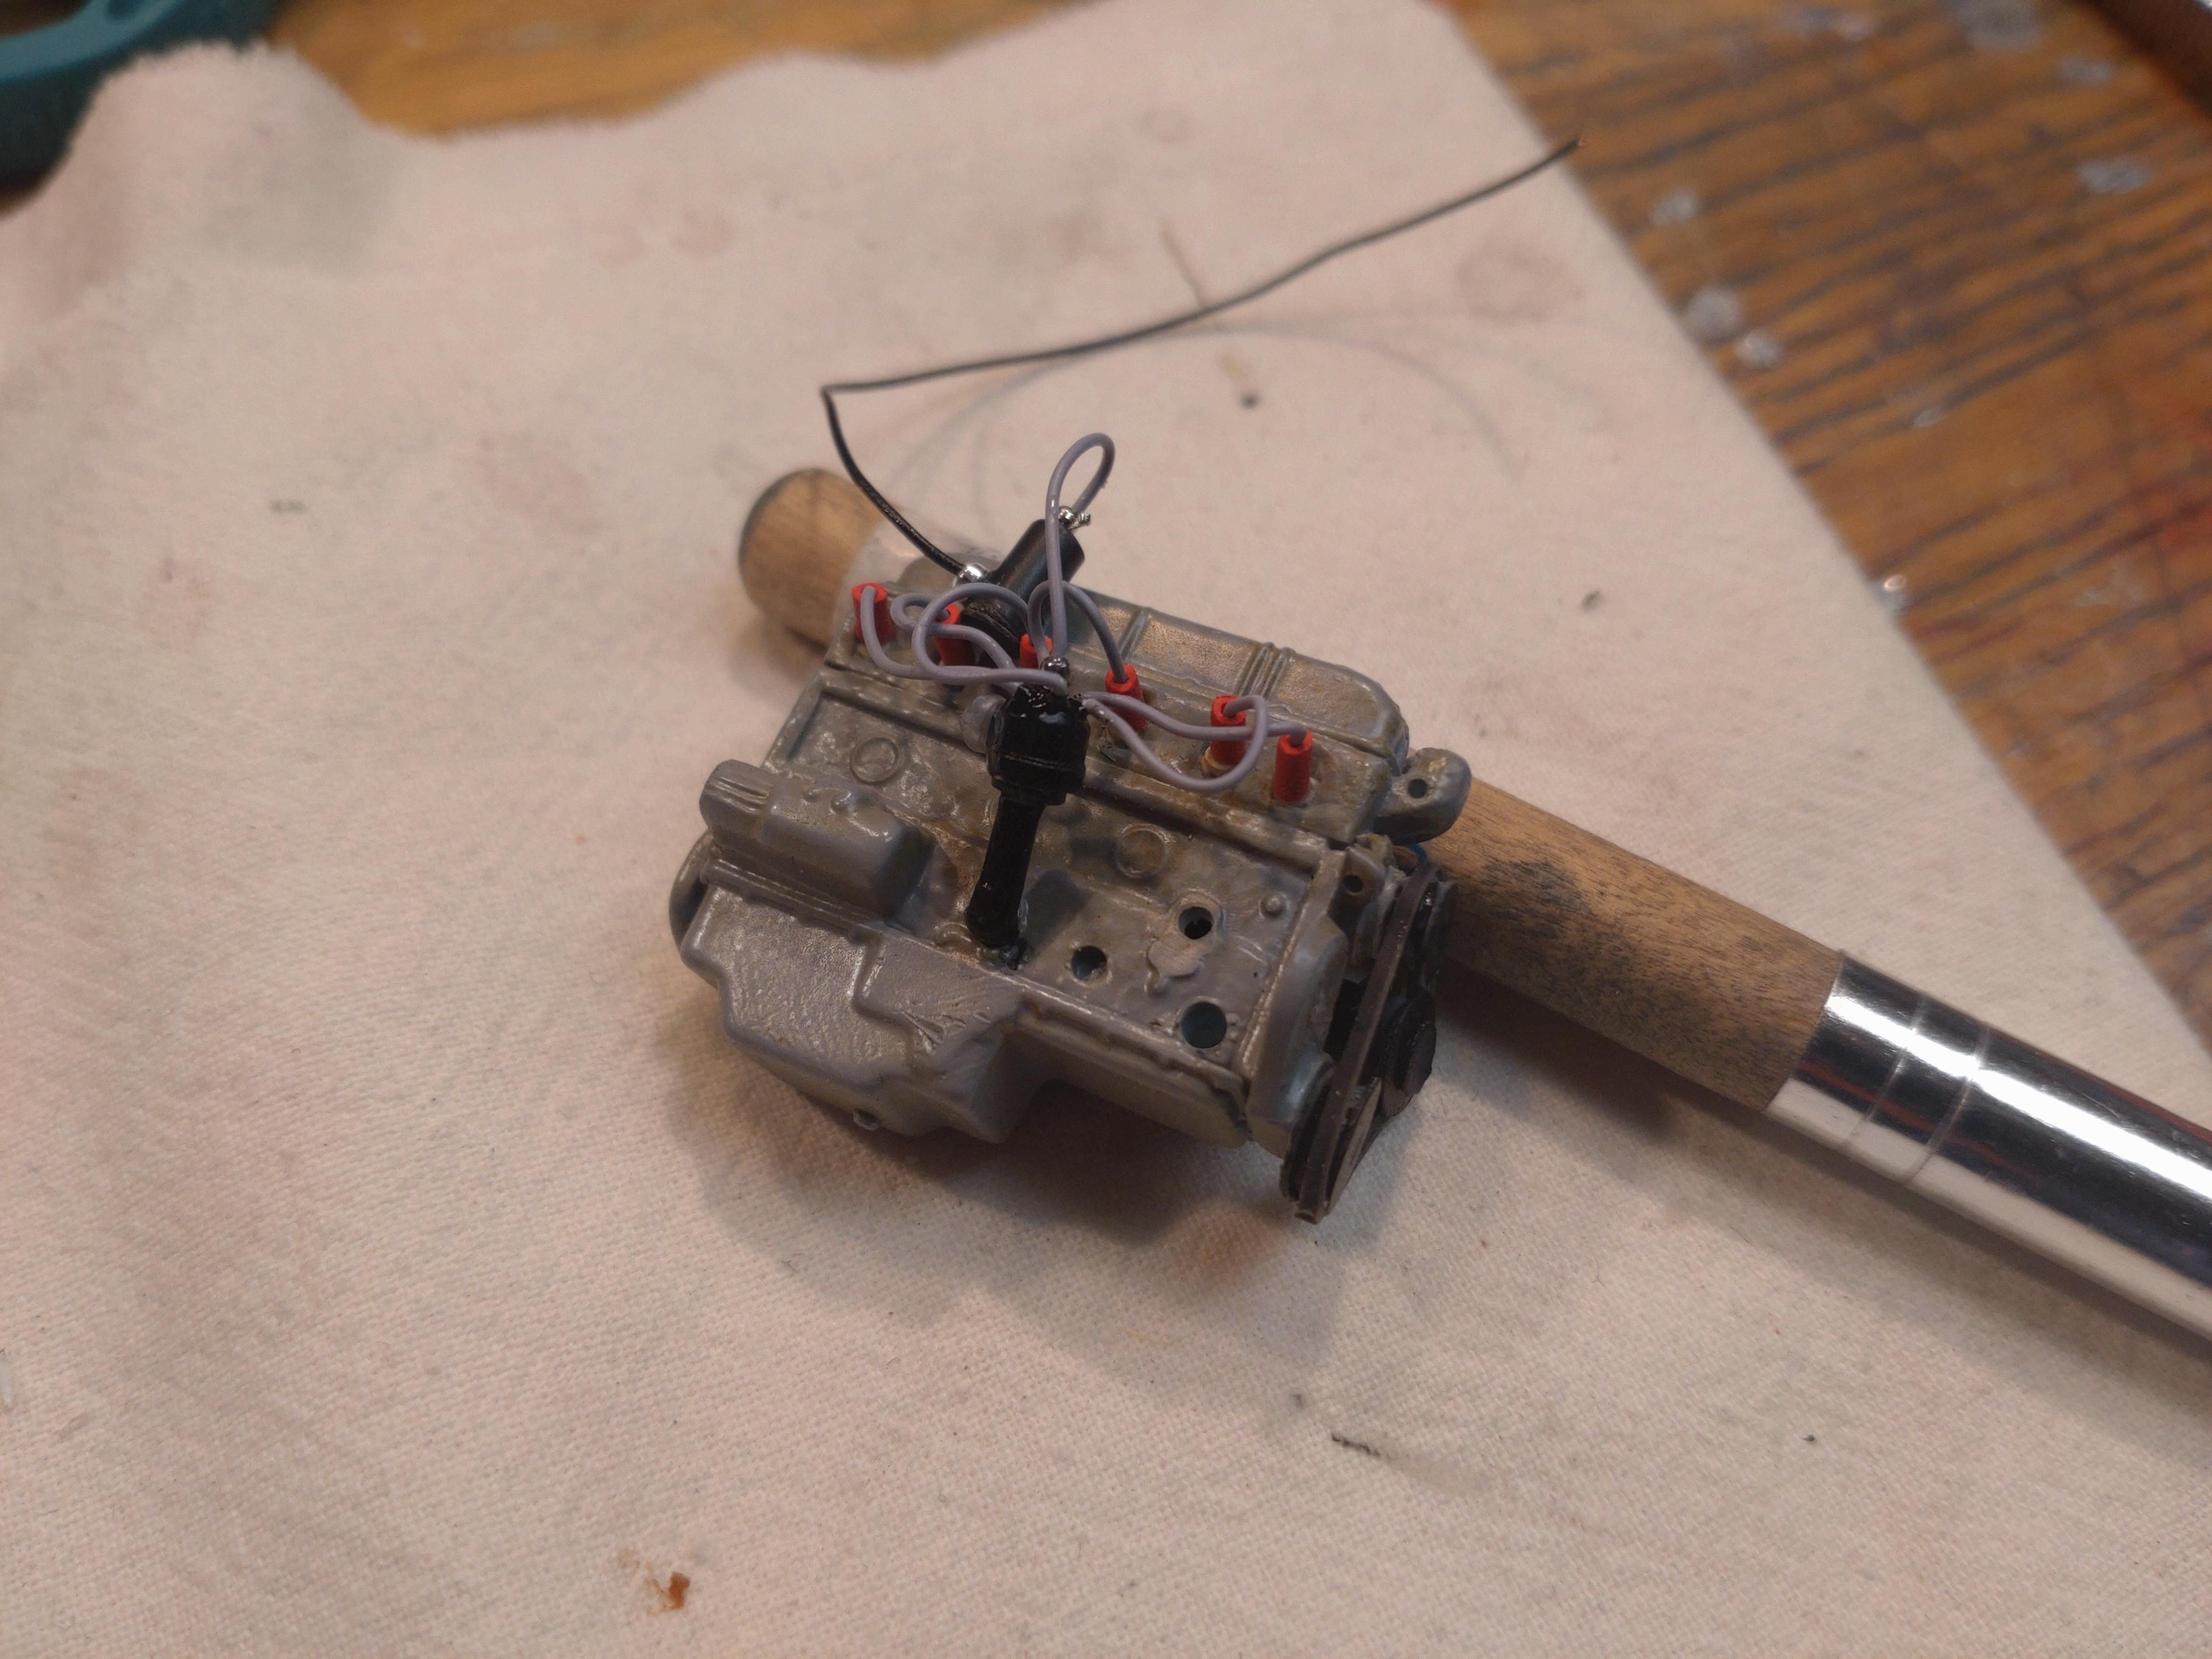
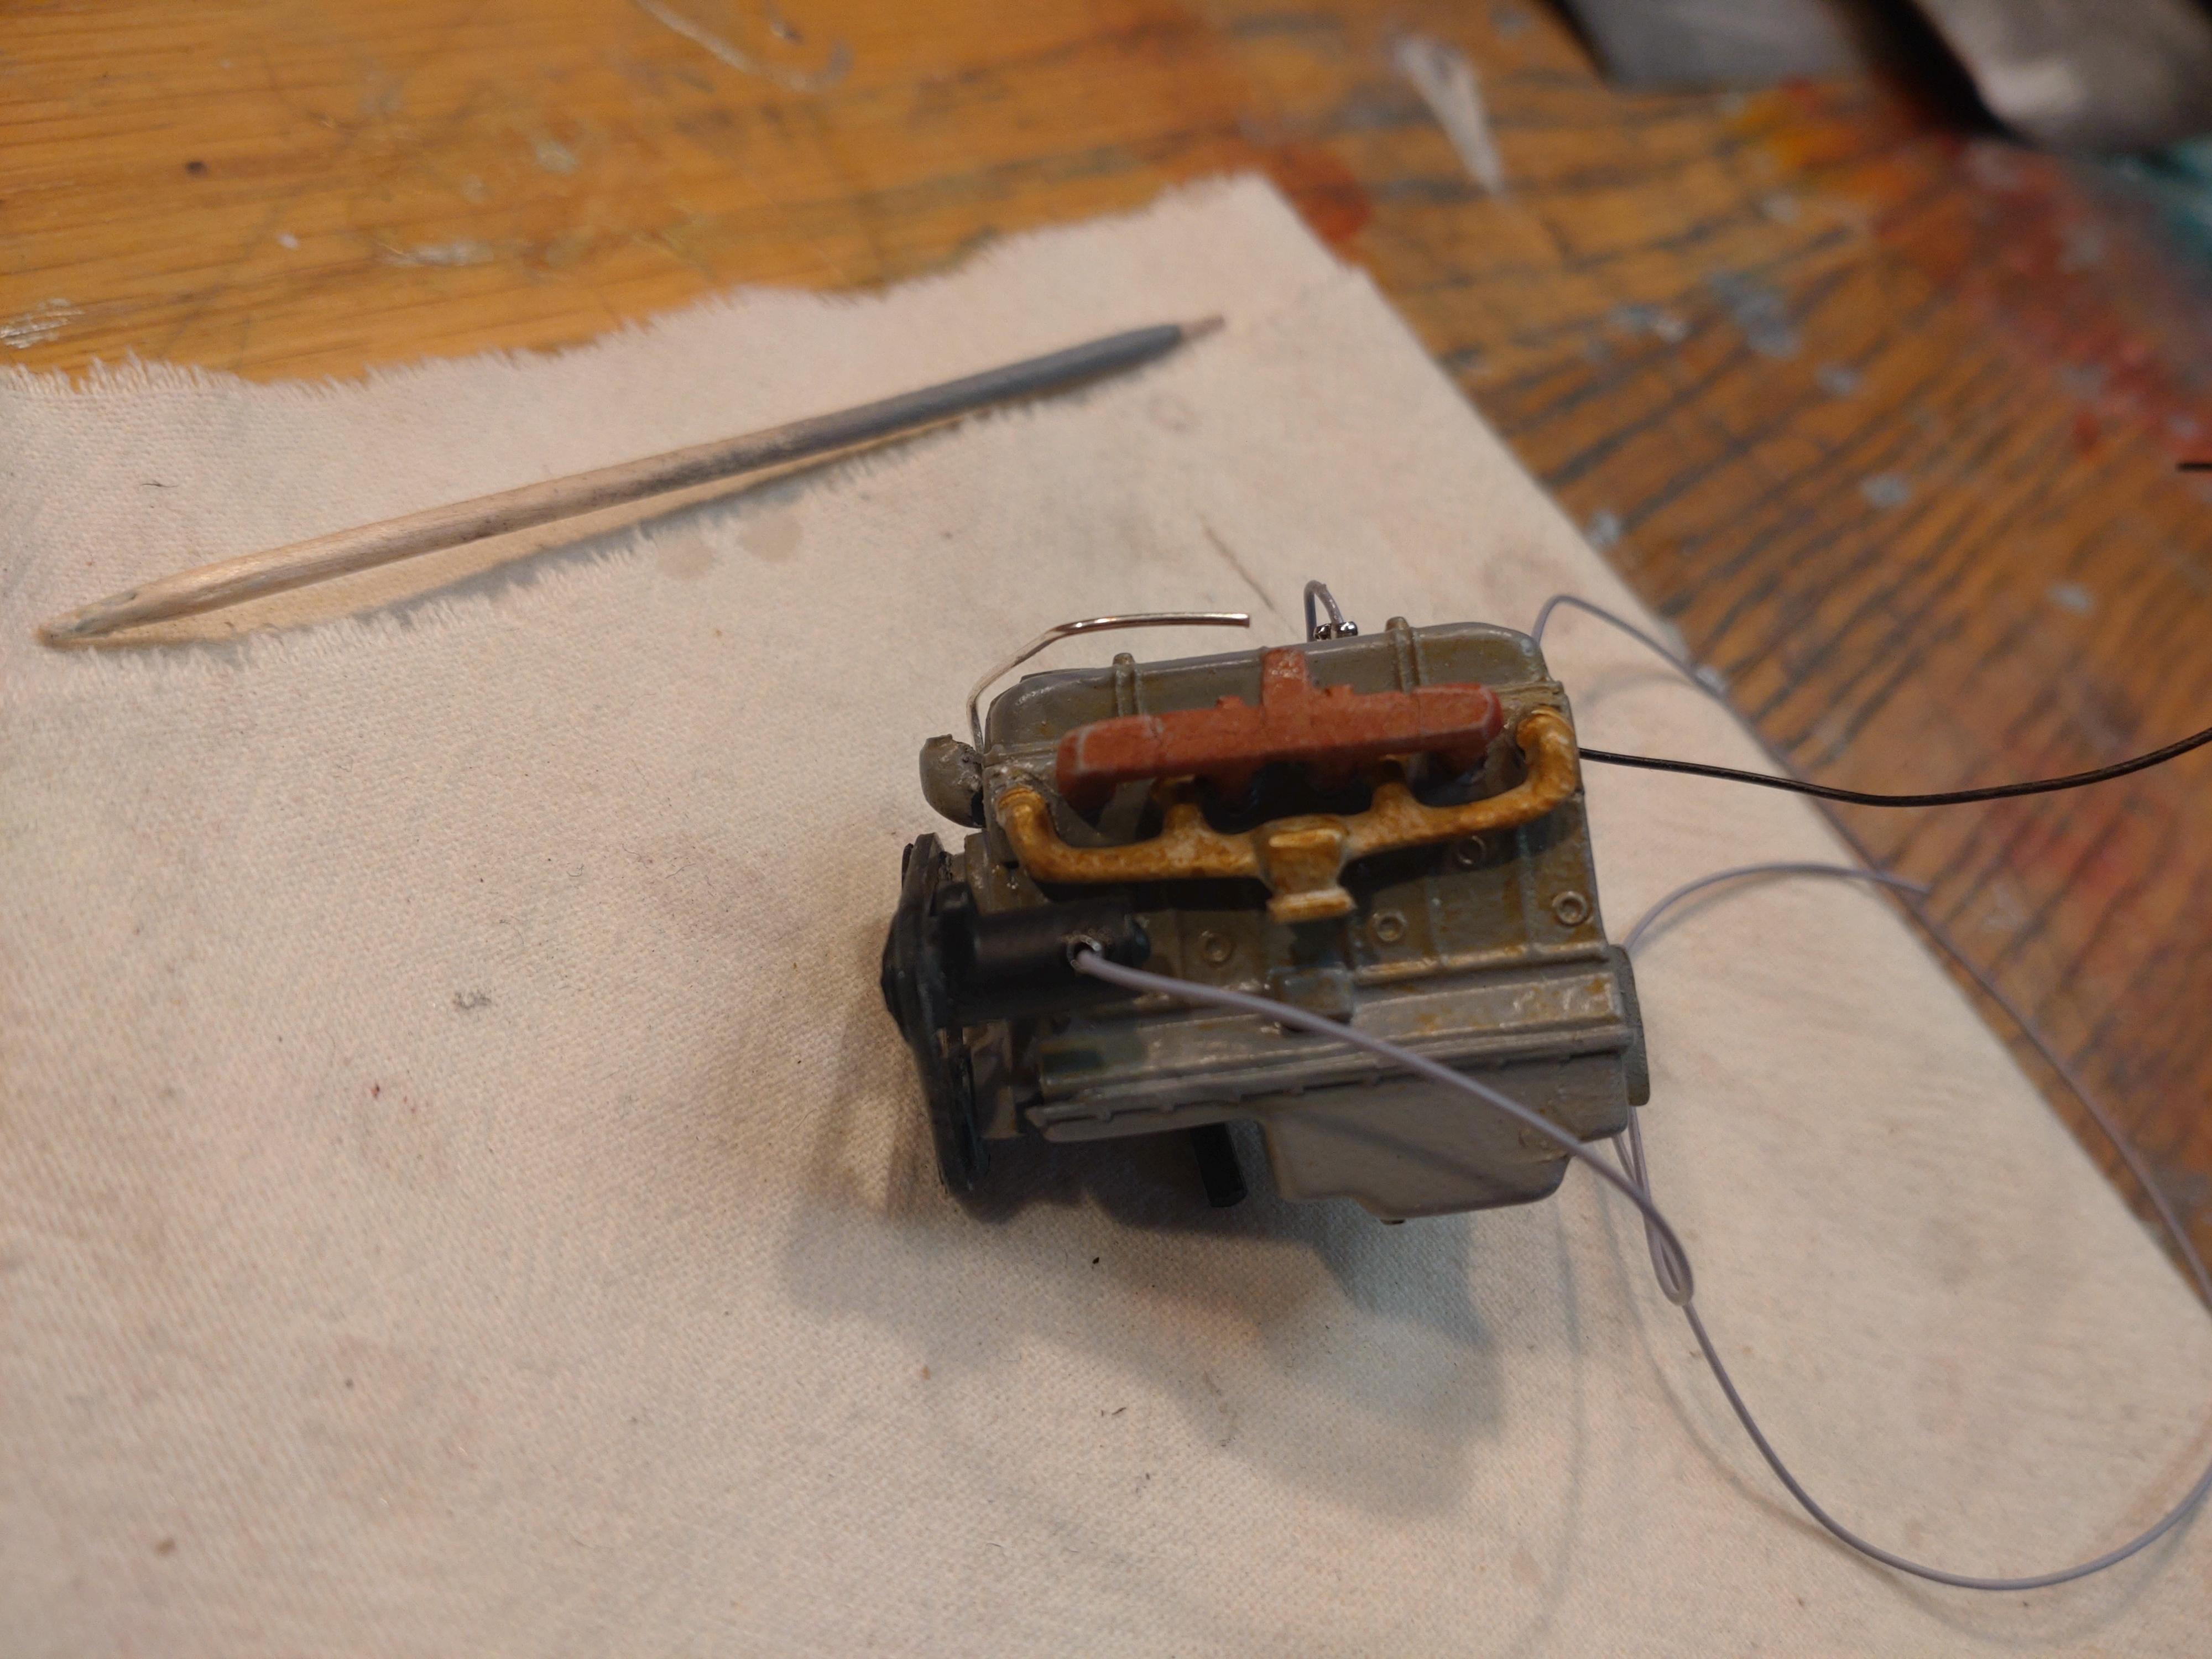
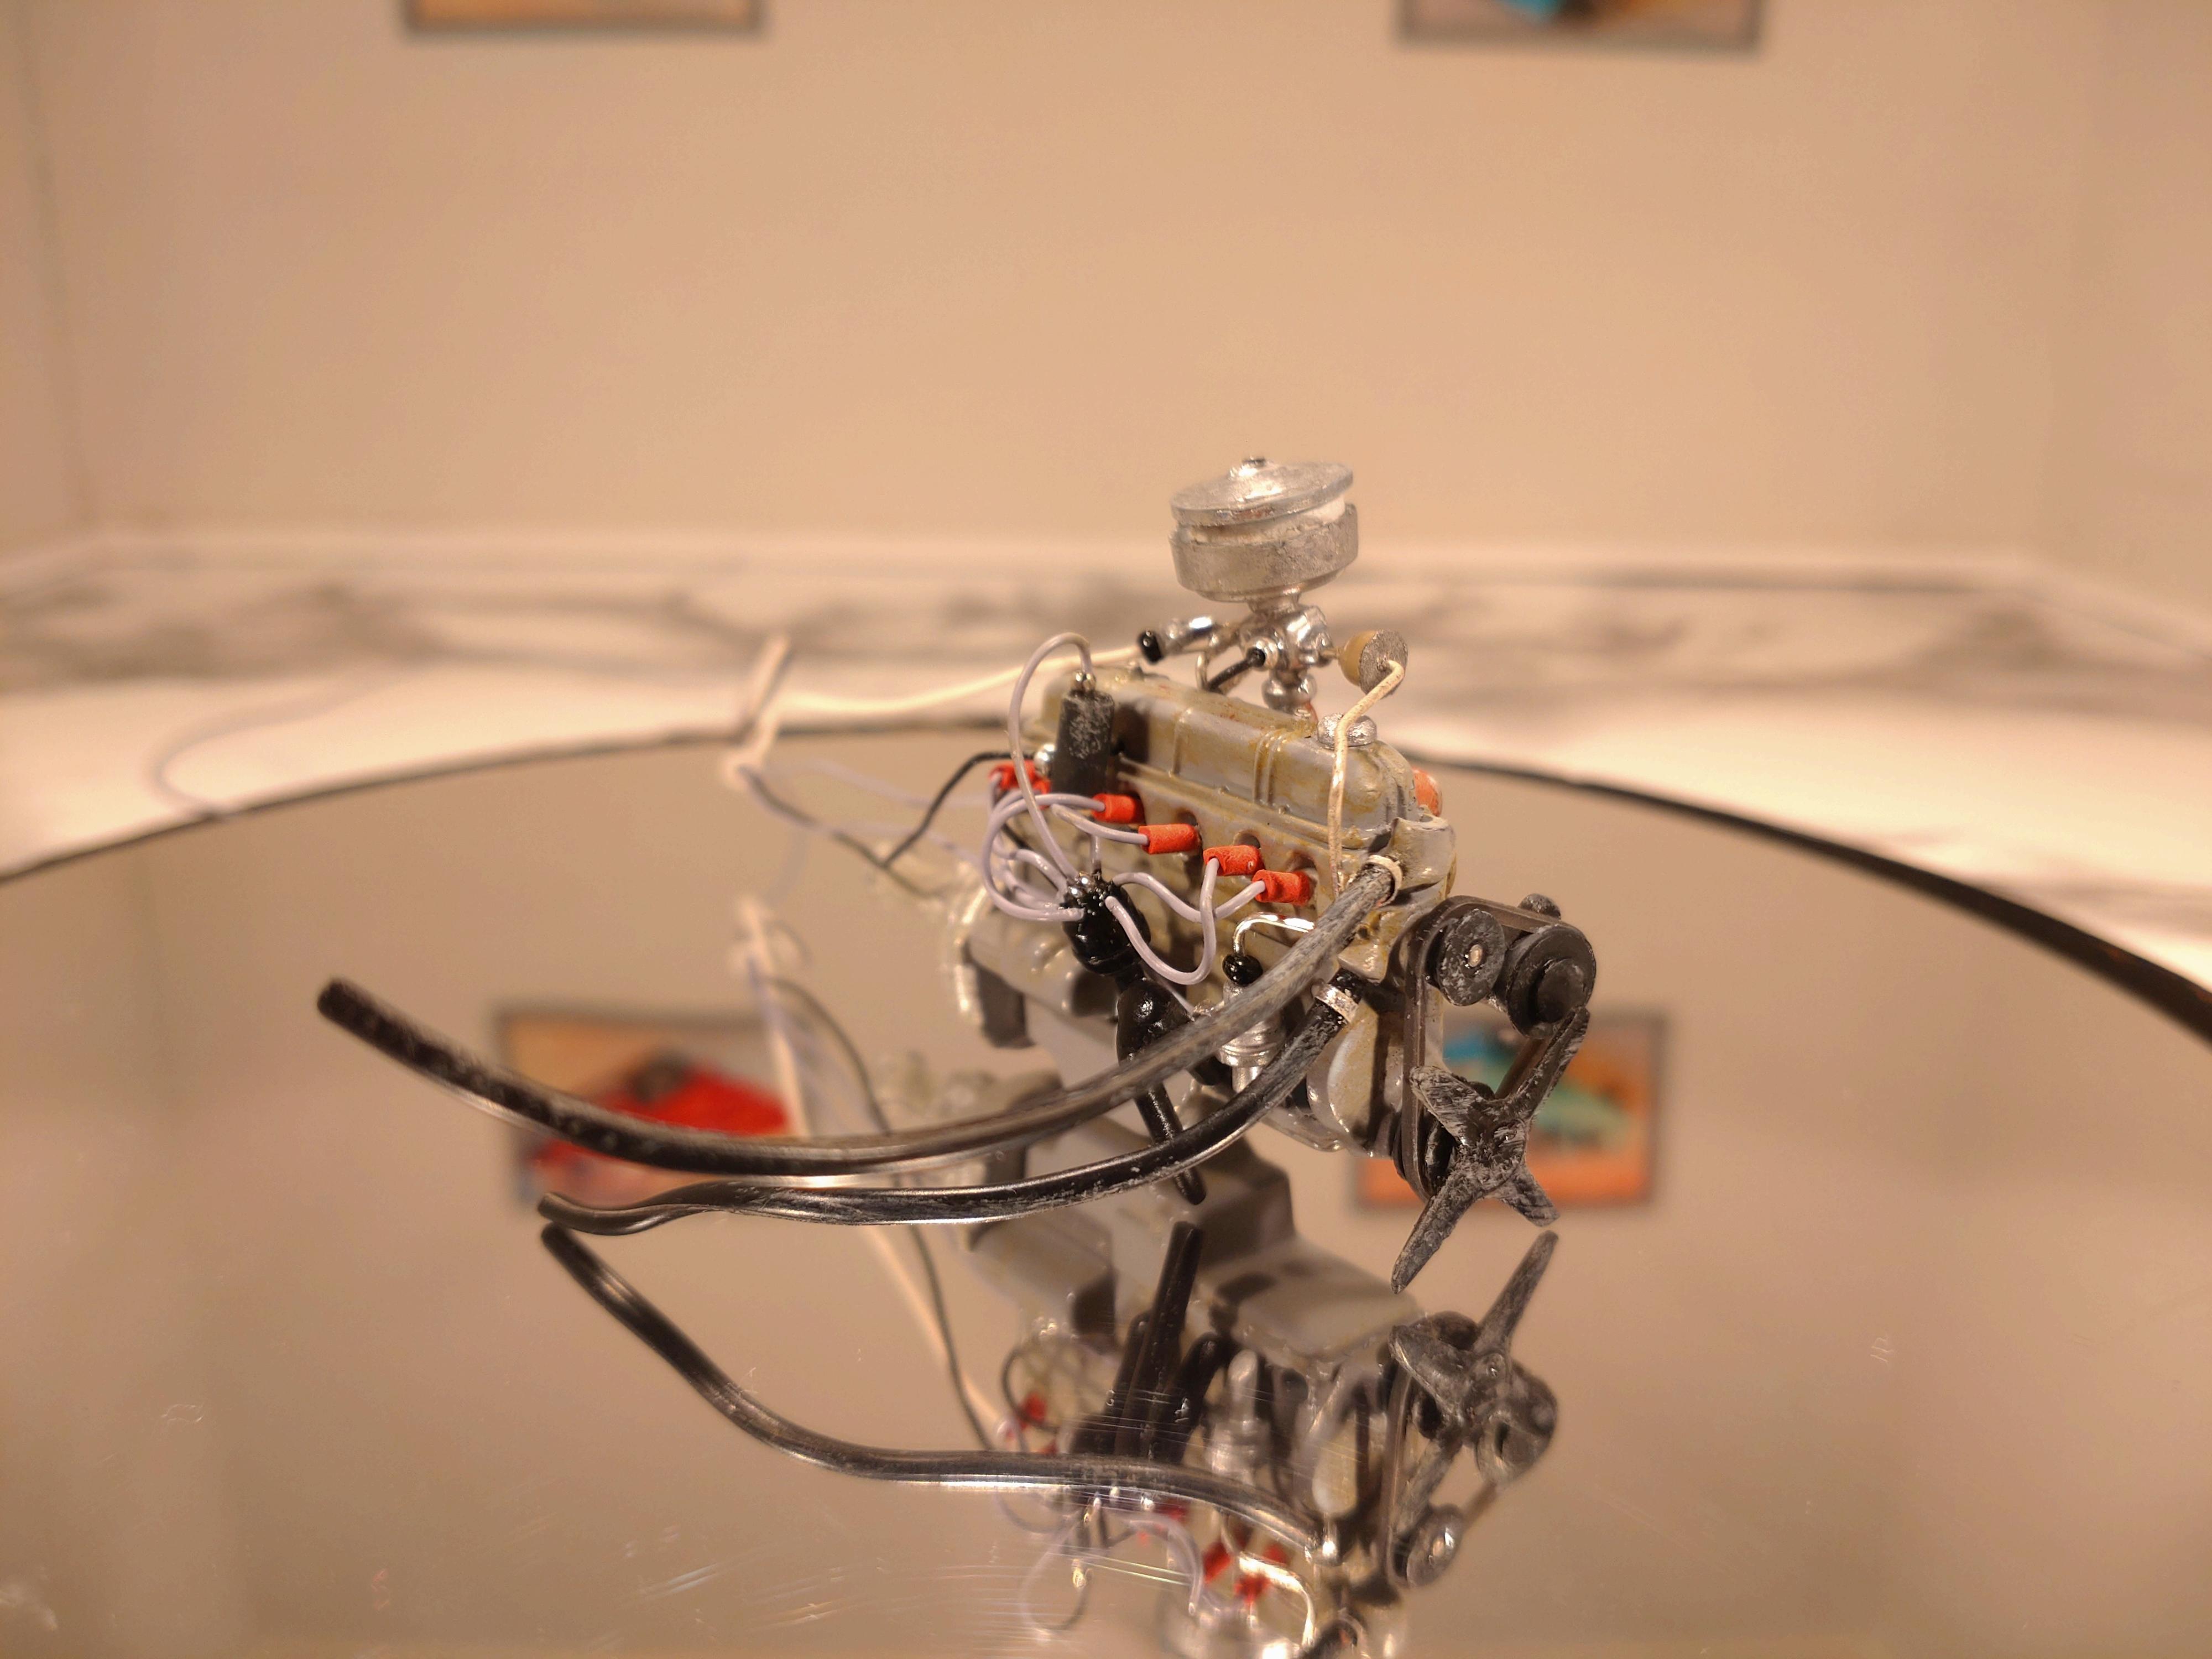
I am getting real fond of the early ´50s and those 6 cylinder blocks. Started this classic Bel Air and have just gotten the engine finished. There are not many images of this car in the net but in those I did find, the engines all had a certain amount of patina. Very few had shiny restored engines, but the real spirit requires a used vintage look. The standard block color was orange, but there were a number of grey blocks built also. Which I like most. Here my block already has the mock spark plugs ( 1.5mm styrene rod) and some dirt of the decades. The pulley part is deconstructed and the wheels are rebuilt with styrene sheet. The alternator is connected with a 1mm brass rod. The distributor is home made with a 4mm aluminum tube filled with 2mm styrene rod. The ignition wires are glued into the gap. The plug boots are shrink tubes reduced to 1.5mm. Plus the coil, which isn´t a part of the kit, made of styrene rod. The fuel pump was only a structure on the block, which I sanded off. I happen to have a pump in my spare box and so adapted it to this engine. Plus the fuel lines to the tank and the carb. Exhaust and intake manifolds both got a good rusting. The original intake I lost while building (must be a black hole under my table...). So I had to cut up the 6x injection manifold for the drag version and carefully build myself a 4x carb manifold. Here the carb is attached, the fuel line got a filter and the throttle cable is attached also. The pulley belt is cut from a 0.8mm thin rubber mat. The filter box has a "filter" made of foam rubber. I added extra hoses for the AC. The radiator hoses will be attached when I drop the engine into the bay. The engine has just the right amount of grime now. Next comes the body, which will be a bit more shiny. Thanks for watching!
-
Revell 1971 Hemi Cuda in Gold Metallic, 1/24 Scale.
Andy Oldenburg replied to Dragonhawk1066's topic in WIP: Model Cars
I love this `Cuda, one of the last real muscle cars. Your work looks very good and I like the effort your putting into the details. That gold will look great with a clear coat and a high shine?? -
62 Plymouth Station Wagon: Mighty Mopars Update
Andy Oldenburg replied to BobbyG's topic in WIP: Model Cars
Wow, so much to discover, great workmanship? Your going the long mile on this build and the results so far are wonderful. Applause! -
you asked what we use for the ignition wires. I have an supplier for 0.5mm wires with just the right feeling to stay put once bent into place. Unfortunately he is here in Europe. I know how hard it is to get an hand on good wires that are not too thick. In the worst case I can recommend slashing an old LAN or HDMI cable. The wires in there are quite thin and match to our scale. Some wires are too colorful but there is enough usable stuff in a cable to last a while.
-
2022: My year in styrene: 10 creations...
Andy Oldenburg replied to Claude Thibodeau's topic in Model Cars
I love em all! Can´t choose a favorite...? Interesting hinges on your bonnets too. Can your show how you did it on the golden hot rod? Would really appreciate it!