Andy Oldenburg
-
Posts
346 -
Joined
-
Last visited
Content Type
Profiles
Forums
Events
Gallery
Everything posted by Andy Oldenburg
-

Johan ‘70 Cadillac ElDorado pro touring (low and aggressive)
Andy Oldenburg replied to Steve H's topic in WIP: Model Cars
Hi Steve, Great work on the bumpers? Quality work takes it´s time, so better going sloooow than messing things in a hurry. Take a Zen approach and go to the next step when you feel really good with your results. Am looking forward to the next pics! -
Happy to see your getting ahead and the looks are good!
-
Bob, you tricked me with the backdrops! Makes your build look even better. Very fine details on the interior and close to real workmanship.?
-
Gustavo, a fine build!?
-
#2 looks the most radical, seem to be printed, so they can take a radical painting too. The chrome wheels would fit well with a dark paint. #3 could look fine with a classic (RT) paint job.
-
Bob, you turned an otherwise "boring" car into a gem! Great work on the modifications and the details.
-
Mike, a wonderful build, perfect choice and execution of your paint job, love it! Very fine details. And of course that outdoor diorama makes it look like the real thing!
-
Well done build, correct color and sharp details. Yup, that distributor gets in the way as soon as you bring in more details. Same with the alternator, but you made it and your ´Vette looks hot!?
-
Now that´s a cool solution for the suspension. Looks like your going into a low ride stance, looking forward for more!?
-
I love what your doing to your bird and even more enjoy the comments and responses! Very entertaining! Your customizing is going into the right direction? Hope to see the final result soon!
-
Fine color choice and a good shine! Looks very close to the era. Interior has some sharp details. Will you give the undercarriage some weathering?
-
I can literally feel the pain of all that senseless work trying to heal the paint job. In the end, you seem to have found the out door of that horror house. The body looks very well now! Your color scheme looks very good and that blue/white interior hits it. I´ve had that rattle can lesson myself and have sworn not to use any DIY rattle cans any more, not even well known brands. It´s not just the quality of the pigments and solvents, it´s also about the nozzle being able to atomize the paint fine enough. My first choice is Tamiya. I do wonder why you spray your parts on the tree. Yes, it is convenient, but it also means sanding "finished" parts and touching up with a brush, meaning spots that look different. You can place toothpicks in most parts with a hole in them and spray all around. No offense, just friendly advice. Looking forward to see the final result. Good luck with your rod!?
-
Your making good progress and I like your color choice. Hope to see more soon?
-
´56 Ford Fairlane Chopped Dropped HOT
Andy Oldenburg replied to Andy Oldenburg's topic in Model Cars
Thank you everyone for your kind response! Yeah, I wish I had this one in real life. -
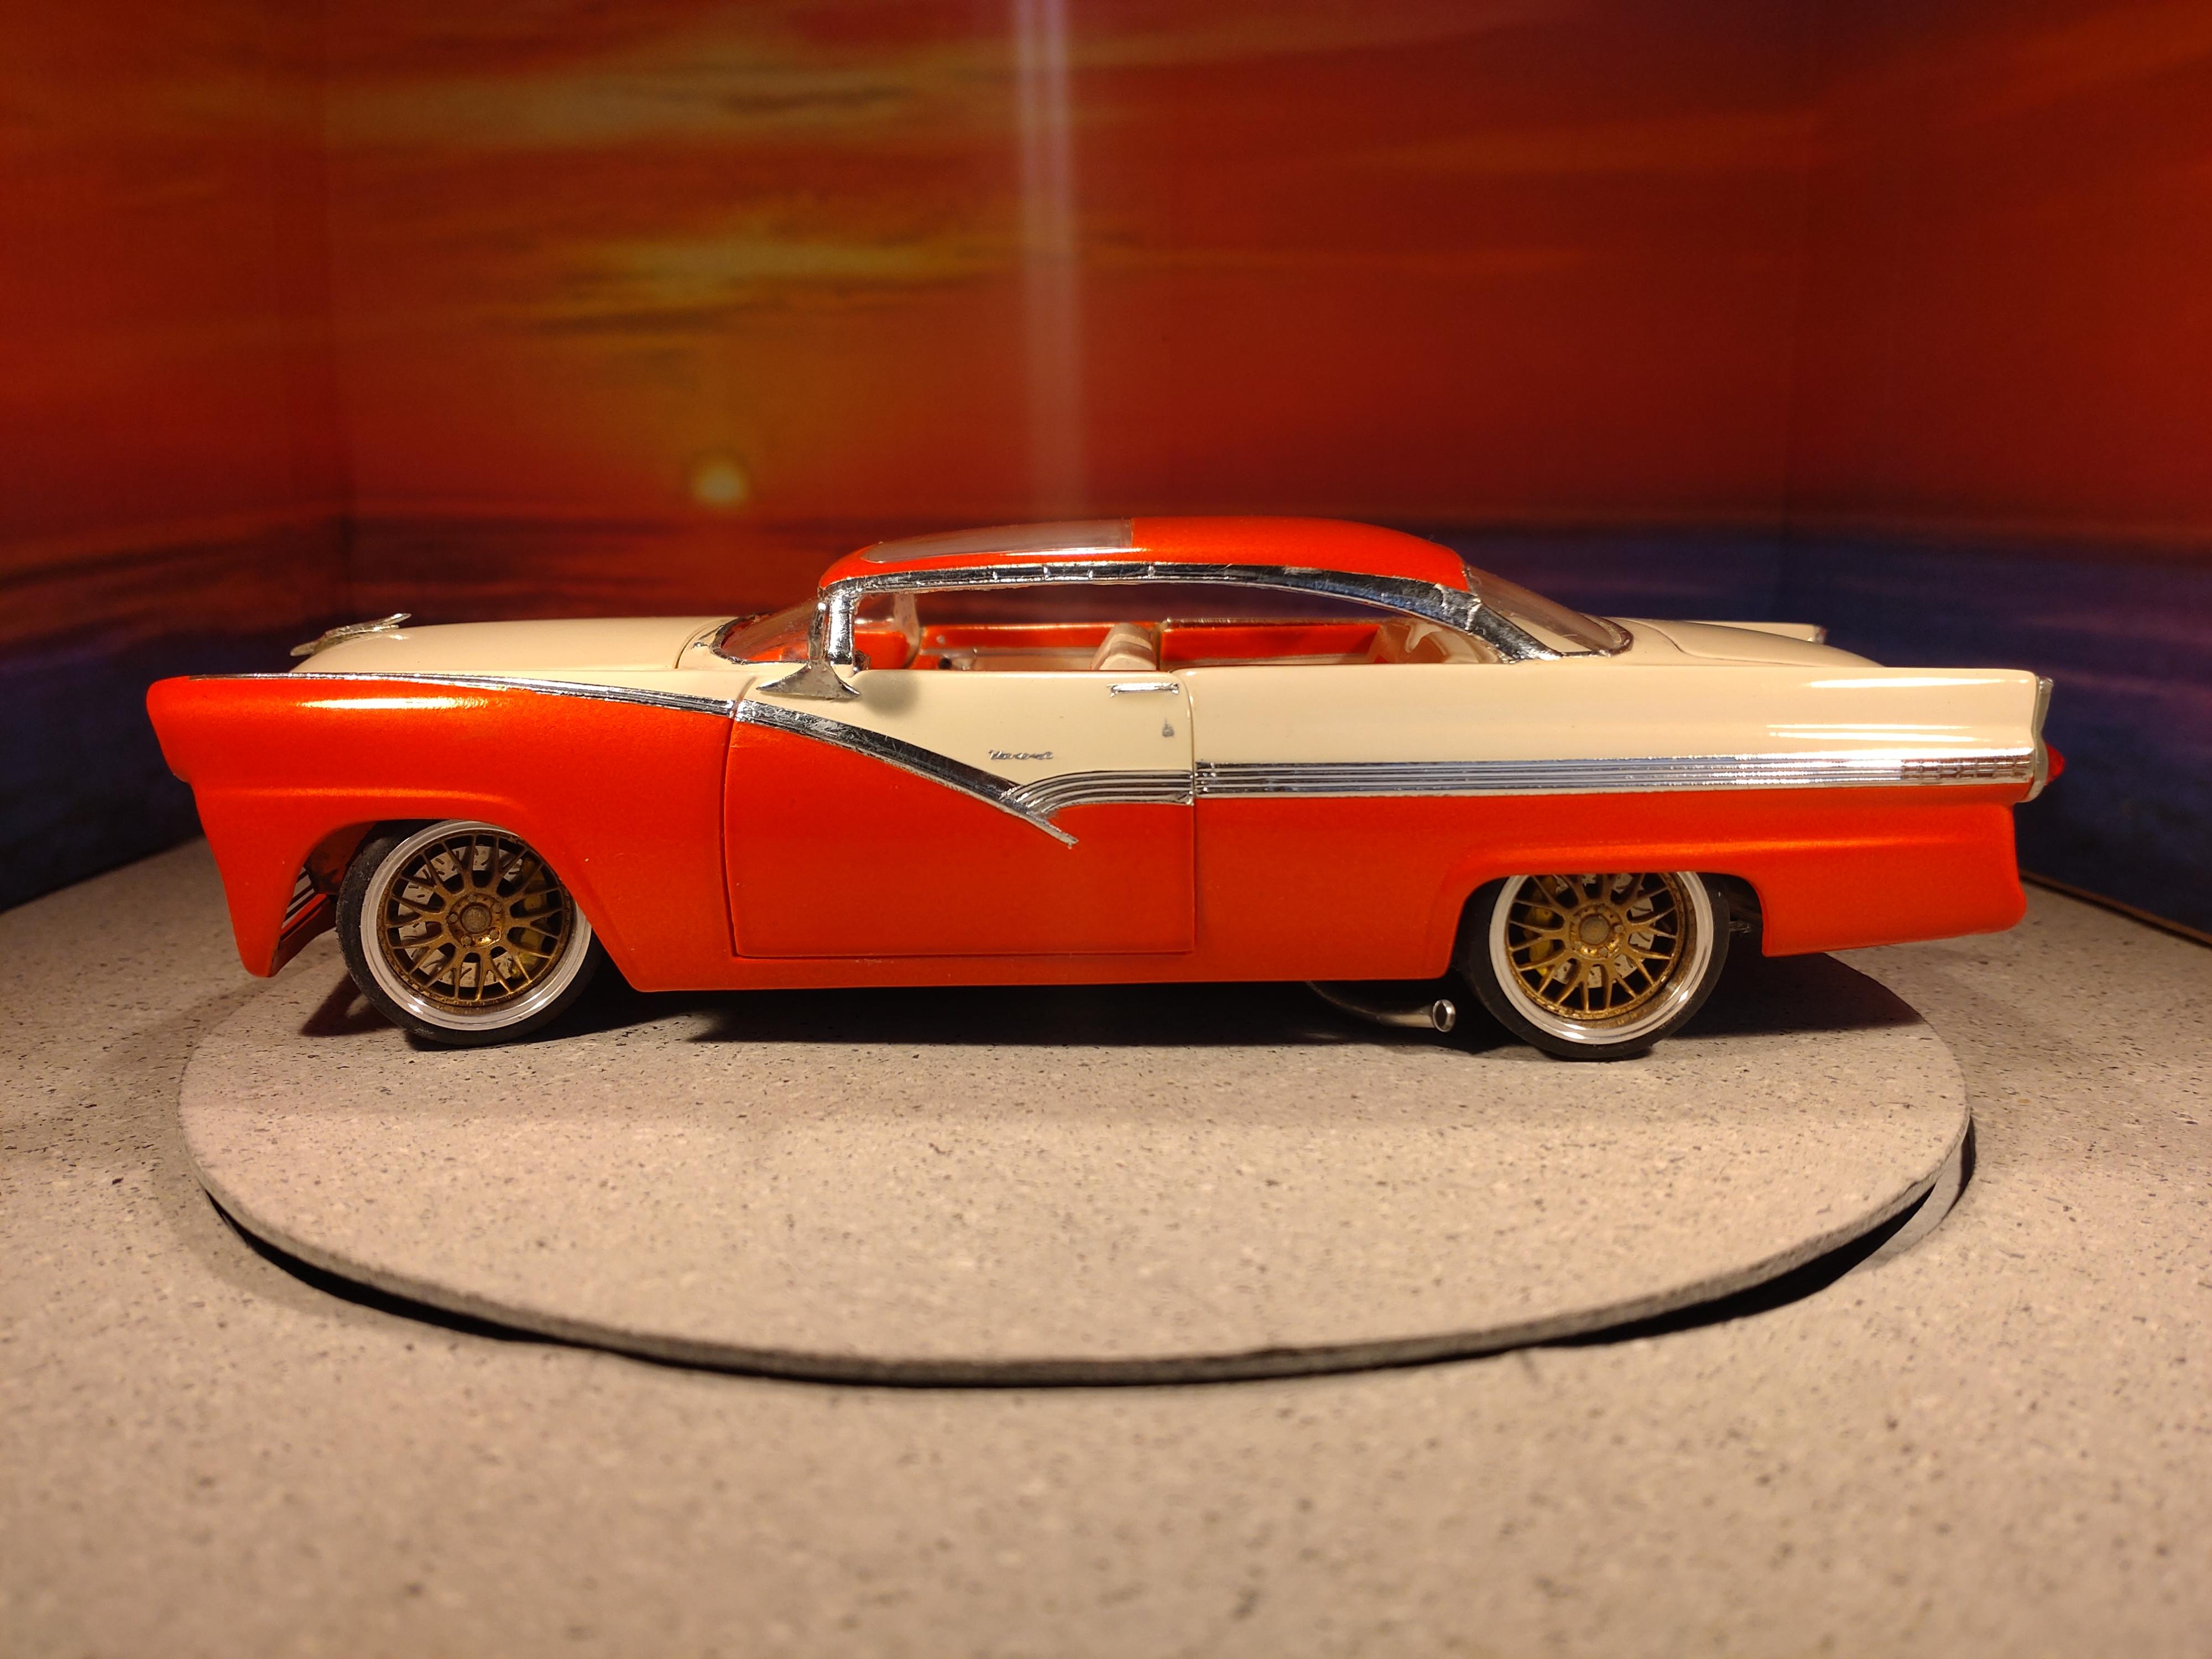
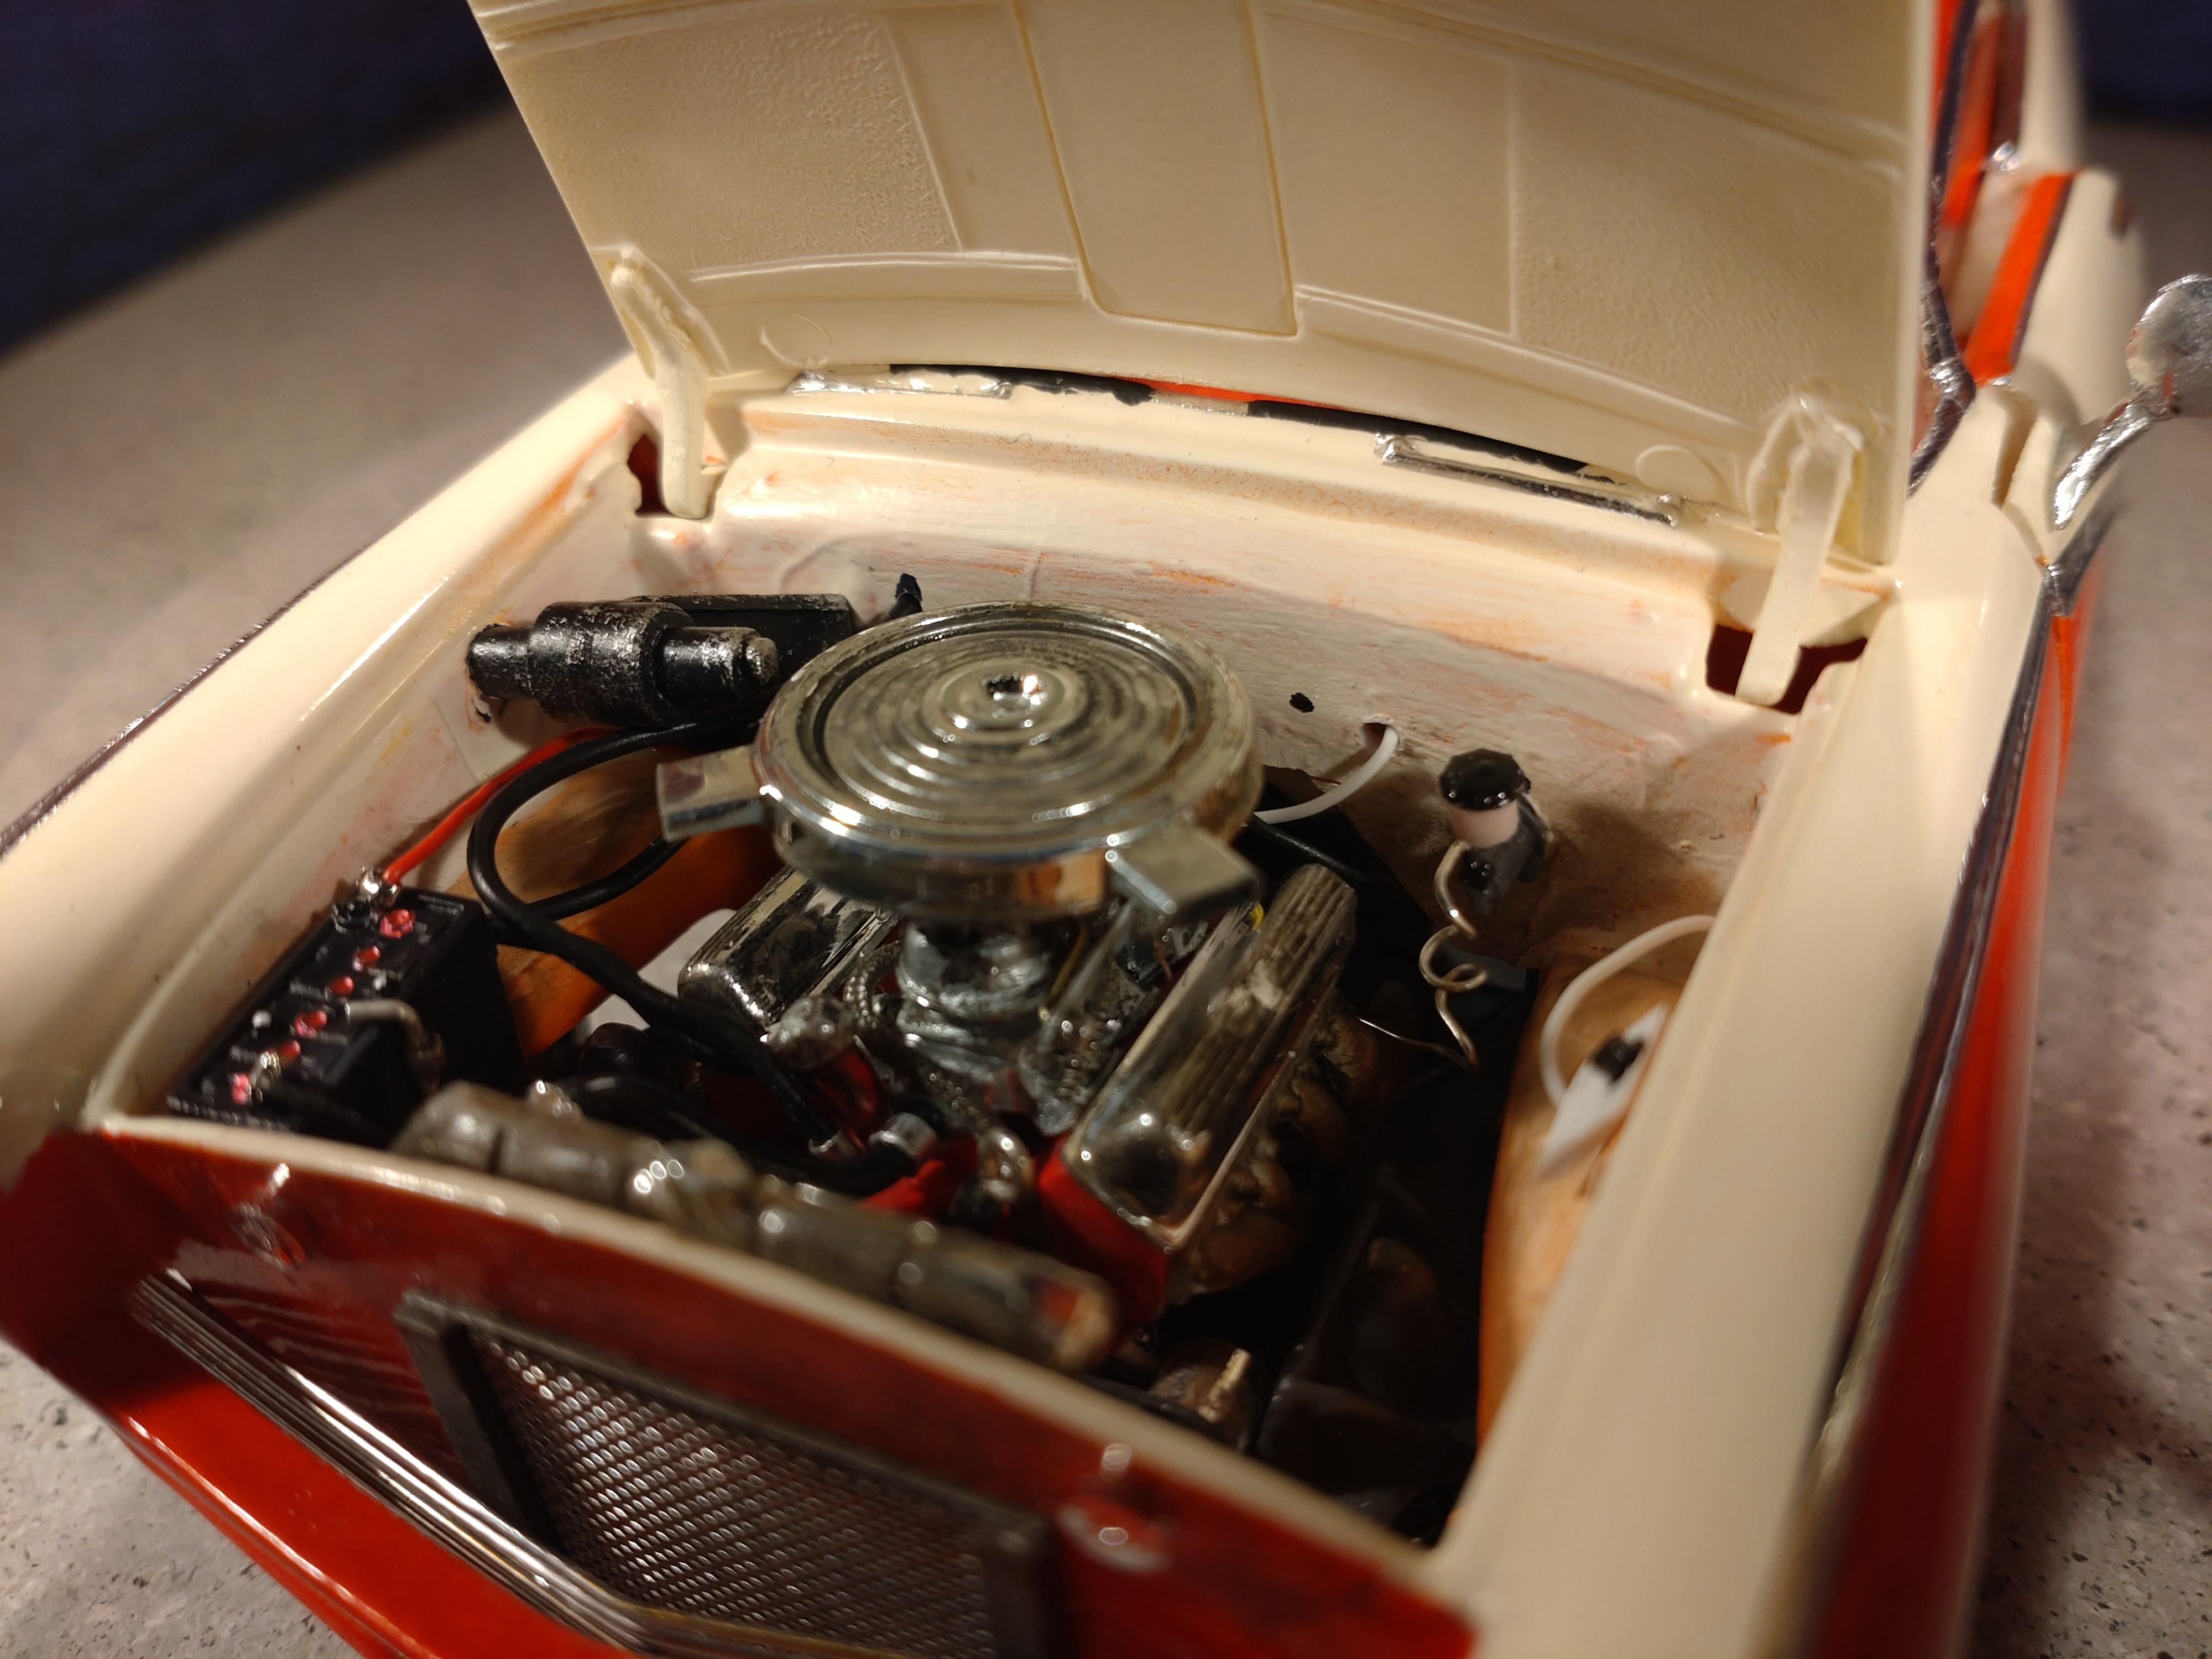
I discovered a ´56 Ford with this color scheme at Volo Cars for sale and it inspired me for my build. I had a few ideas on top and this baby was real fun to build. On the other hand, after doing a Revell kit, switching back to AMT can be quite sobering.... The molds seem to be worn out and the major parts like the dash, the tub and the doors needed some working to fit at all. Several parts just didn´t exist (rear view mirrors, decent decals...). But body and undercarriage were straight. I chopped the roof by 5mm and didn´t have to add any styrene. Even the windows would fit in the end after getting cut shorter. But all the "glass" needed intensive polishing in the end because the were unprotected in the box and totally scratched. I had planned to build this model with opening doors and was happily surprised that AMT had already done that job for me! Although the kit has the option for the Crown Victoria I opted for the "simple" Fairlane version. I just do´t like that heavy fake rollbar. The offwhite is Molotow grafitti spray black line, which I used as a primer. The orange is a mix of Schmicke AERO color acrylic airbrush paint with 20 % metallic fluid. The wheels and disc brakes with the calipers are from Scale Production. I sliced the front wheels (aluminum rims, took a while) to make them fit into the housing and steer. Otherwise just about everything else is from the kit. I did give the engine and the bay a special treatment with extra details, some home made. I really am happy about the grill. those are 0.5mm brass rods. They are placed to the left and right in micro U-shaped brass profiles and super glued. getting the correct angle for the kink was the easiest part. The shine is Molotow chrome pen. All the other chrome is Bare Metal a a few dips of Molotow. Thank you for looking! You can watch the video with this link: https://youtu.be/A7zmomysLZ8

-
Hello Sidney, yes, a very fine build! Color fits well to the era and you did a good job on the details.? Yup, the stance is frustrating, I can believe that. Could be several reasons. Usually there is a bit of space between the tub and the undercarriage. The fit of the dash or the windshield could be a problem. Sometimes one has to grind or sand off a few millimeters. Diamond files come very handy for this, they have different shapes to even get into a half build model. It could also be the firewall, my first choice. Yours looks like it doesn´t fit correctly and keeps the chassis from sliding into place. One could grind/sand/cut small slices off the firewall until it fits correctly. In the end don´t be afraid to alter the stance by setting the wheels into a different position. There are a lot of opportunities to work the suspension to make it fit better. Styrene loves to be cut, drilled and rearranged. Keep up the good work!
-
Hey Steve, one fine ride come to a beautiful finish! I can´t imagine what the problems were, everything turned out perfect (although, an AMT kit... I can guess). The wheels are awesome and the color makes the difference.?
-
I love the continental tail! Very accurate craftsmanship and just the right color. I would like to see more details! I´v put this kit on my shopping list, a have-to-build!
-
What more to that hasn´t been said, but beautiful mild chopping and the color matches perfect!
-
1958 Buick and 1960 Mercury, Heading for NNL North.
Andy Oldenburg replied to StevenGuthmiller's topic in Model Cars
Nah, that´s not fancy at all.... ? Wish I could get to that level of "not fancy". Good luck at the show!? -
My third build is finished, Tamiya VW beetle
Andy Oldenburg replied to Blueberry_no1's topic in Model Cars
Hi Matti, great ideas and a very good build. Keep up your enthusiasm and surprise us with your next model!? -
Hey, Eric! I can´t stop laughing about the plate? You are the first to notice and I never stumbled over that, good grief.....?? OK, I will put a different decal on this one! Thanks for your keen eye?
-
Thanks everyone for watching and your friendly response!?
-
Just finished my first diorama! Asbury, NJ streets!
Andy Oldenburg replied to GlueSniffer's topic in Dioramas
I can´t find words to describe my praise that the others here haven´t used yet. Just beautiful! I have always wanted to start a project like that and now I know much better how to do it. But you have raised the bar very high! Thanks for sharing the step to step pics! -
I can´t get enough of it! Beautiful shop, sooo much details/stuff, must have taken months to build. Then I discovered the "story" and I can´t stop laughing! Wonderful