François
-
Posts
489 -
Joined
-
Last visited
Content Type
Profiles
Forums
Events
Gallery
Everything posted by François
-

Marvel's Hydra coupe 1/12 scale full scratch build
François replied to François's topic in WIP: Model Cars
Hello everyone, I went to another model show yesterday and the results compared to the Toronto show were quite different. The general reception on both the bentley and the hydra was pretty much the same. Very good reviews from the public. But this time, the judges also liked them. I have to say that I sorta shot myself in the foot by putting both cars in the same category which was the large scale. I was basically competing against myself but I really wanted both models next to each other for easier explanations. I also have to say that weren't many entries in this category but they were still very nice. So the hydra won 1st place and the bentley 2nd. The bentley also won best engine and public's choice. I also brought my 1/8 wooden kayak that won 2nd in the scratch-built section. I'll be trying another meet in novembre and this show should be a good test for the Hydra since the theme this year is "movie vehicles". That's pretty much in the Hydra's alley! -
Marvel's Hydra coupe 1/12 scale full scratch build
François replied to François's topic in WIP: Model Cars
I was absolutely not upset, I just didn't understand. No need to be sorry. Althought I think that what I do is pretty decent, I do know that there are many many that are better. -
Marvel's Hydra coupe 1/12 scale full scratch build
François replied to François's topic in WIP: Model Cars
When I say here, I mean actually at my house. Just in case it wasn't clear. -
Marvel's Hydra coupe 1/12 scale full scratch build
François replied to François's topic in WIP: Model Cars
Big Messer. Funny you should link that particular wip. Crazy crank (Thierry) was just here for a visit! Very nice guy and extremely talented. Very nice visit. -
Marvel's Hydra coupe 1/12 scale full scratch build
François replied to François's topic in WIP: Model Cars
Not sure I'm following this new tangent. Bugatti fan, who's jose? Big Messer, are you suggesting I should expose UNDER the table? If so I really need to re evaluate. -
Marvel's Hydra coupe 1/12 scale full scratch build
François replied to François's topic in WIP: Model Cars
Thank you Bob. The public was very interested and impressed and many said that they voted for me in the people's choice but I did not win it. Just wanted to clarify that. All in all, it was a great experience manly due to the appreciation given by all the visitors. -
Marvel's Hydra coupe 1/12 scale full scratch build
François replied to François's topic in WIP: Model Cars
Stef, I was going to reply to your comments but decided against it. I apologize if I've offended any traditional non computerized modelers out there. -
Marvel's Hydra coupe 1/12 scale full scratch build
François replied to François's topic in WIP: Model Cars
Well, I'm back from my very first model show. I know i said that I didn't have any expectations but I lied, I had hopes. After seeing how well my models were received by the public, especially the Hydra Coupe. Everyone who passed by it raved and congratulated me and tge majoritysaid they voted for me it the people'schoice. Most understood the amount of work and research that went into it. I say most because apparently, the judges didn't get that, not even a bit. They apparently do not see beyon a nice paint job applied over a store bought kit. Not one mention! I'm not one to hold a grudge but frankly the judging wasn't up to par. I looked at pretty much all other entries (apparently close to 700) and especially the other entries in the same categories as my models and while many were very nicely done, none were at par. I'm a bit saddened by the lack of professionalism from the judges and the show. My wife told me afterwards that someone asked her if she wanted to be a judge. She's a great gal and very intelligent but knows nothing of model making. If that's how they choose the judging staff, no wonder. People I talked to after the even didn't not understand what happened and unfortunately I could not explain. Now that I've gotten that off my chest, I'll lick my wounds and see if I can do better at another show in mid October. At least the bentley got 3rd place. It's a very small consolation, especially seeing what it was up against. Again, sorry for this ranting but I needed to vent. -
Marvel's Hydra coupe 1/12 scale full scratch build
François replied to François's topic in WIP: Model Cars
Thank you meechum68. You can see how i made the kayak here Wooden 1/8 scale kayak -
Marvel's Hydra coupe 1/12 scale full scratch build
François replied to François's topic in WIP: Model Cars
Thank you everyone! I'll let you all know how the Toronto show turns out. -
Marvel's Hydra coupe 1/12 scale full scratch build
François replied to François's topic in WIP: Model Cars
Hi everyone, I've been busy over the last mounth getting ready for my very first model exposition/competition. It's the Torcan model show near Toronto on septembre 13. I'll be presenting 3 models, the Hydra Coupe, the Bentley blower and a 1/8 scale wooden kayak I scratch built a few years ago. The kayak will naturally be presented in the boating section, but unfortunately, the 2 cars will not be in the same category as I had wished. The bentley will be in the scratch-built section because it's over 75% scratch-built. The hydra being a fictional model, has to be presented in the fictional section, even if it's 100% scratch-built. I would have prefered having them side by side for easier explination if explinations are needed. I guess I'll be running around quite a bit from section to section. I printed 2 little booklet, one for each car with key features, drawings and pictures. I also printed QR codes that will be next to each model. When scanned, these QR code will show either pictures or videos of the model. Lastly, l made a transporter box for the hydra. The model and base being quite huge, I could not find a big enough box for it. I made one out of corrugated plastic, complete with padded forms to secure the model in place. Hopefully, everything will still be in place after the 6hrs or so of travel. I have no expectations whatsoever but hopefully, some will show some interest. Boxed up bentley Boxed up hydra Booklets and QR code The kayak
-
Marvel's Hydra coupe 1/12 scale full scratch build
François replied to François's topic in WIP: Model Cars
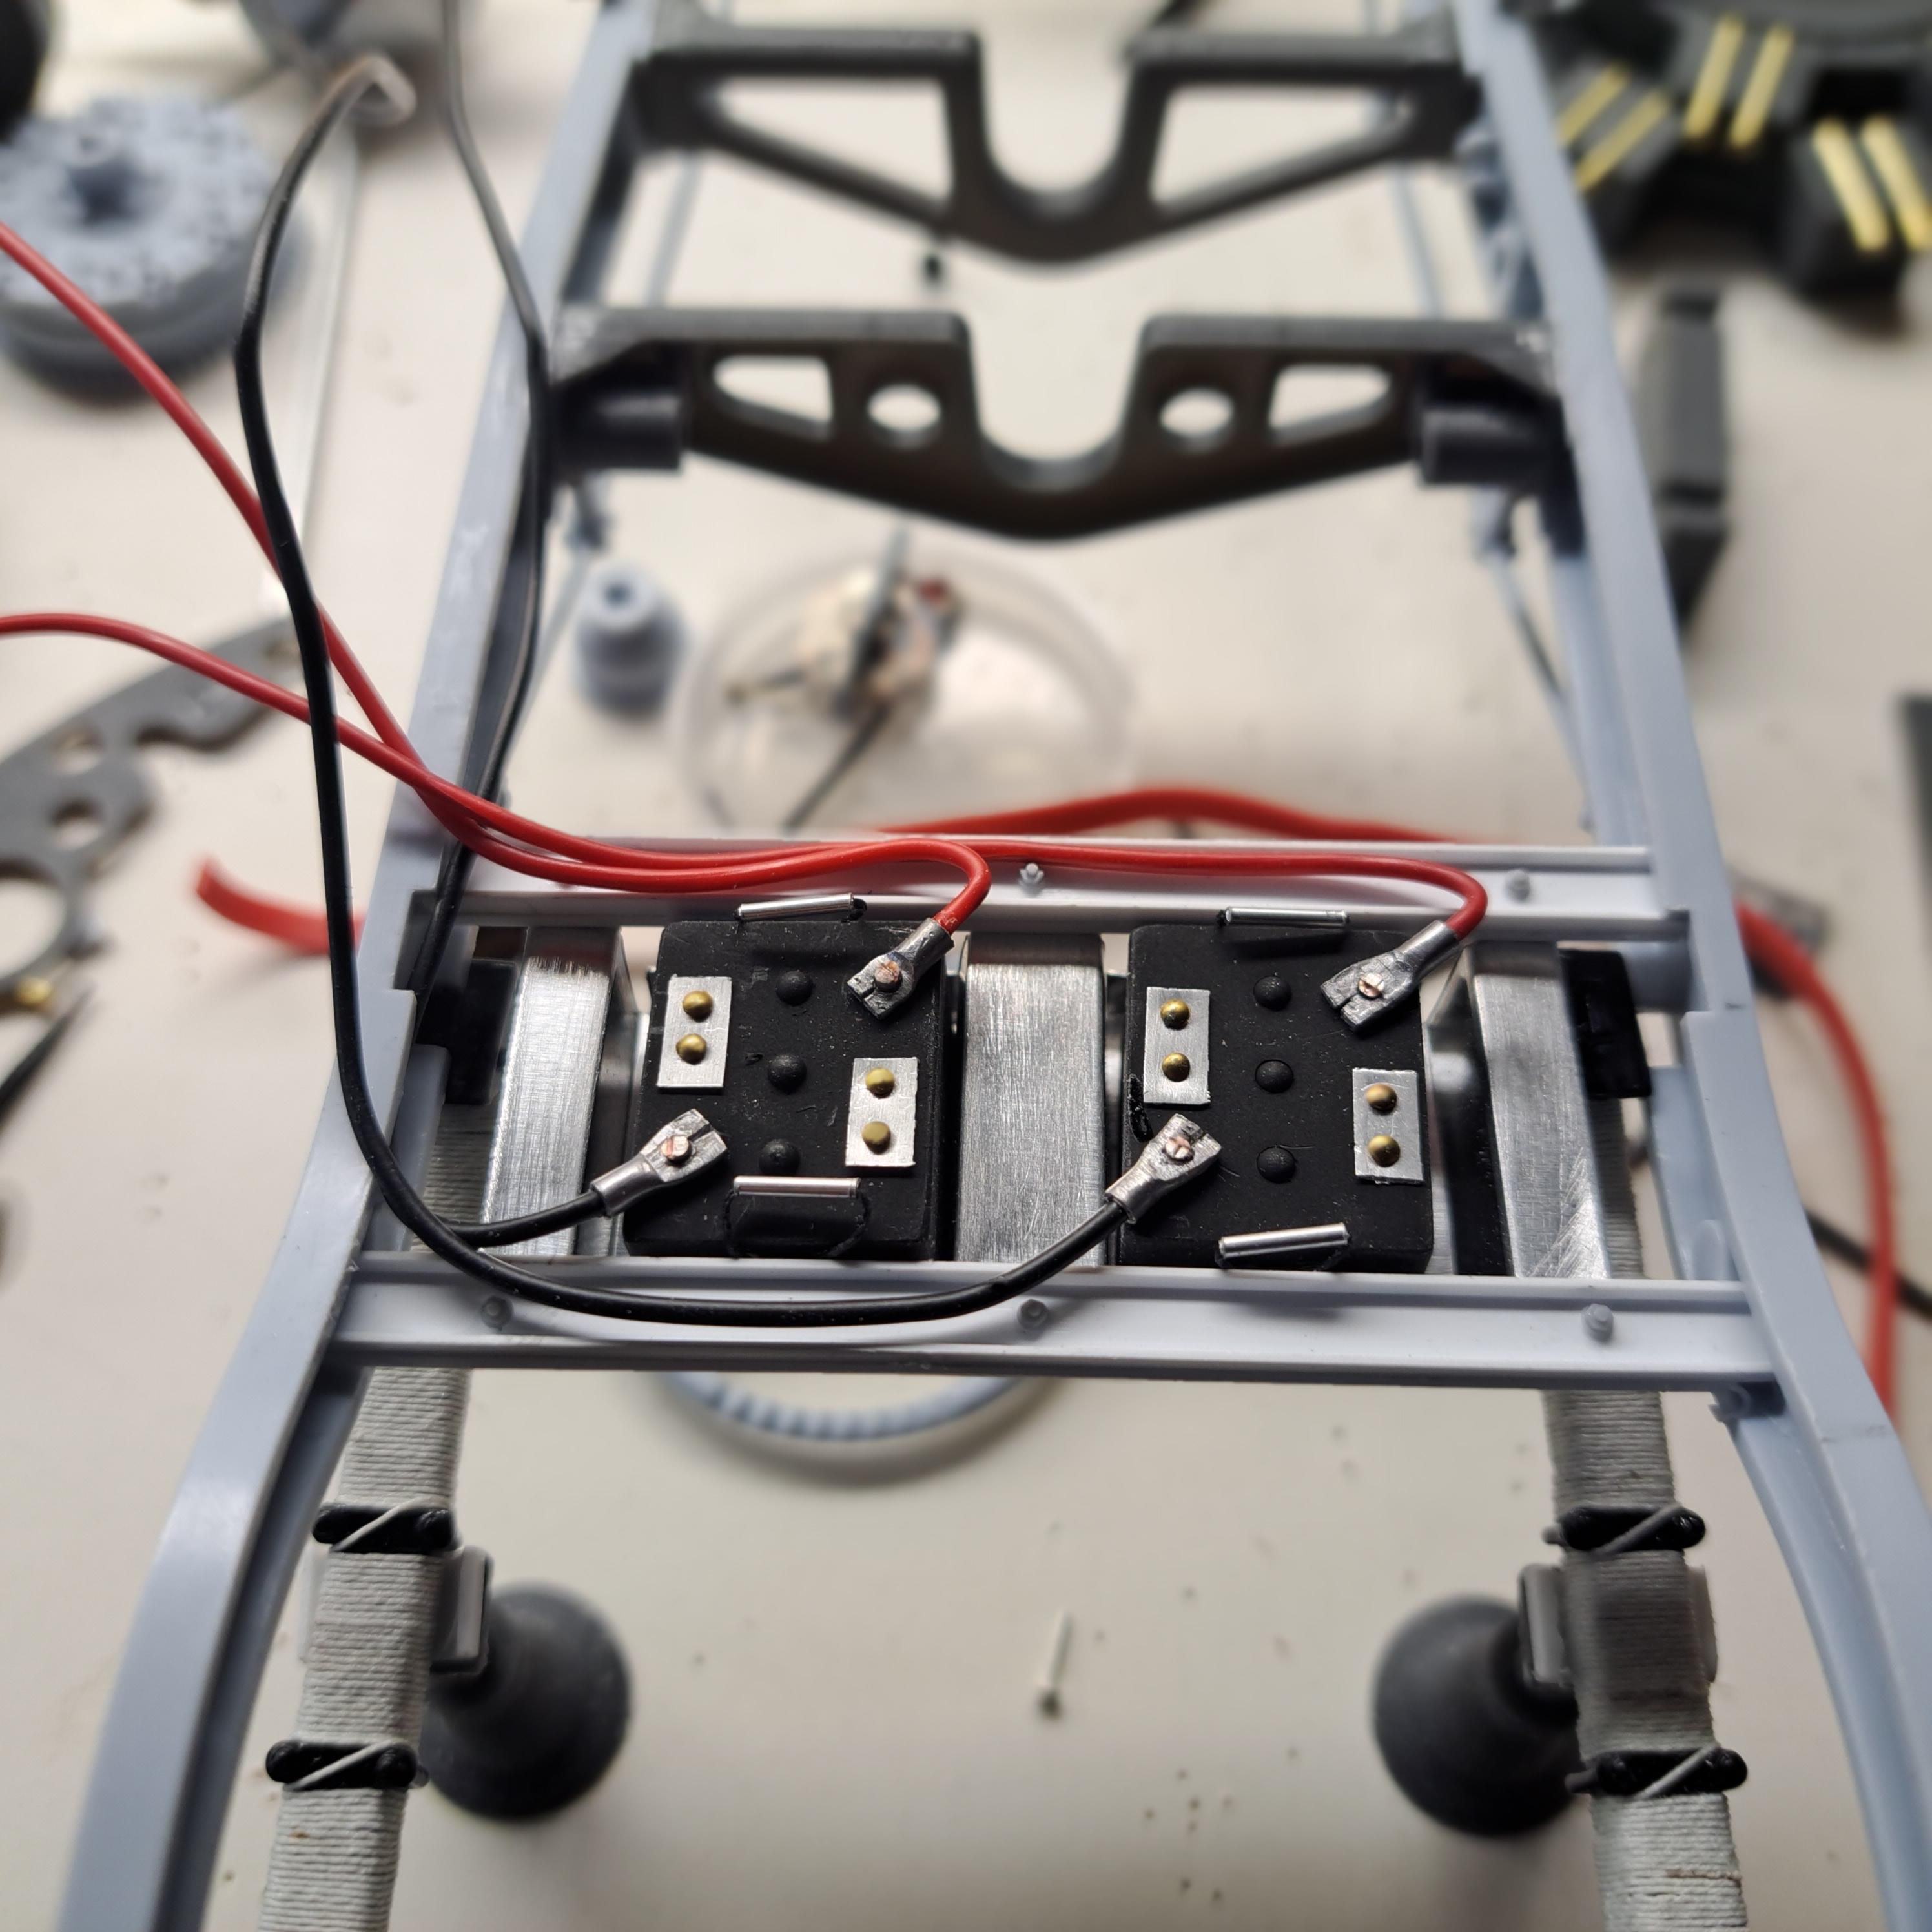
Unatural, I used anycubic's waterwash resin for the entire model. I probably should have used a stronger resin for the crank but it is what it is. The biggest error I did was the gearmotor location. My original design had the gearmotor located at the transmission and was to drive the ring gear which is attached to the crank and is a much sturdier area but it didn't fit. So that's when I decided to hide it in the blower and drive everything from the front on the crank. This brought on two problems, first I had a slight misaligment issue between the gearmotor and crank so I needed to put in a universal joint shaft. Second, all the torq needed to rotate everything was taken by front of the crank which was weaker than the rear. I tried to repair but wasn't able to so now the crank is glued in place. But like I said in my previous post, I have it on video. I've learned alot with this build, if I ever do another motor, I won't make the same mistake. -
Marvel's Hydra coupe 1/12 scale full scratch build
François replied to François's topic in WIP: Model Cars
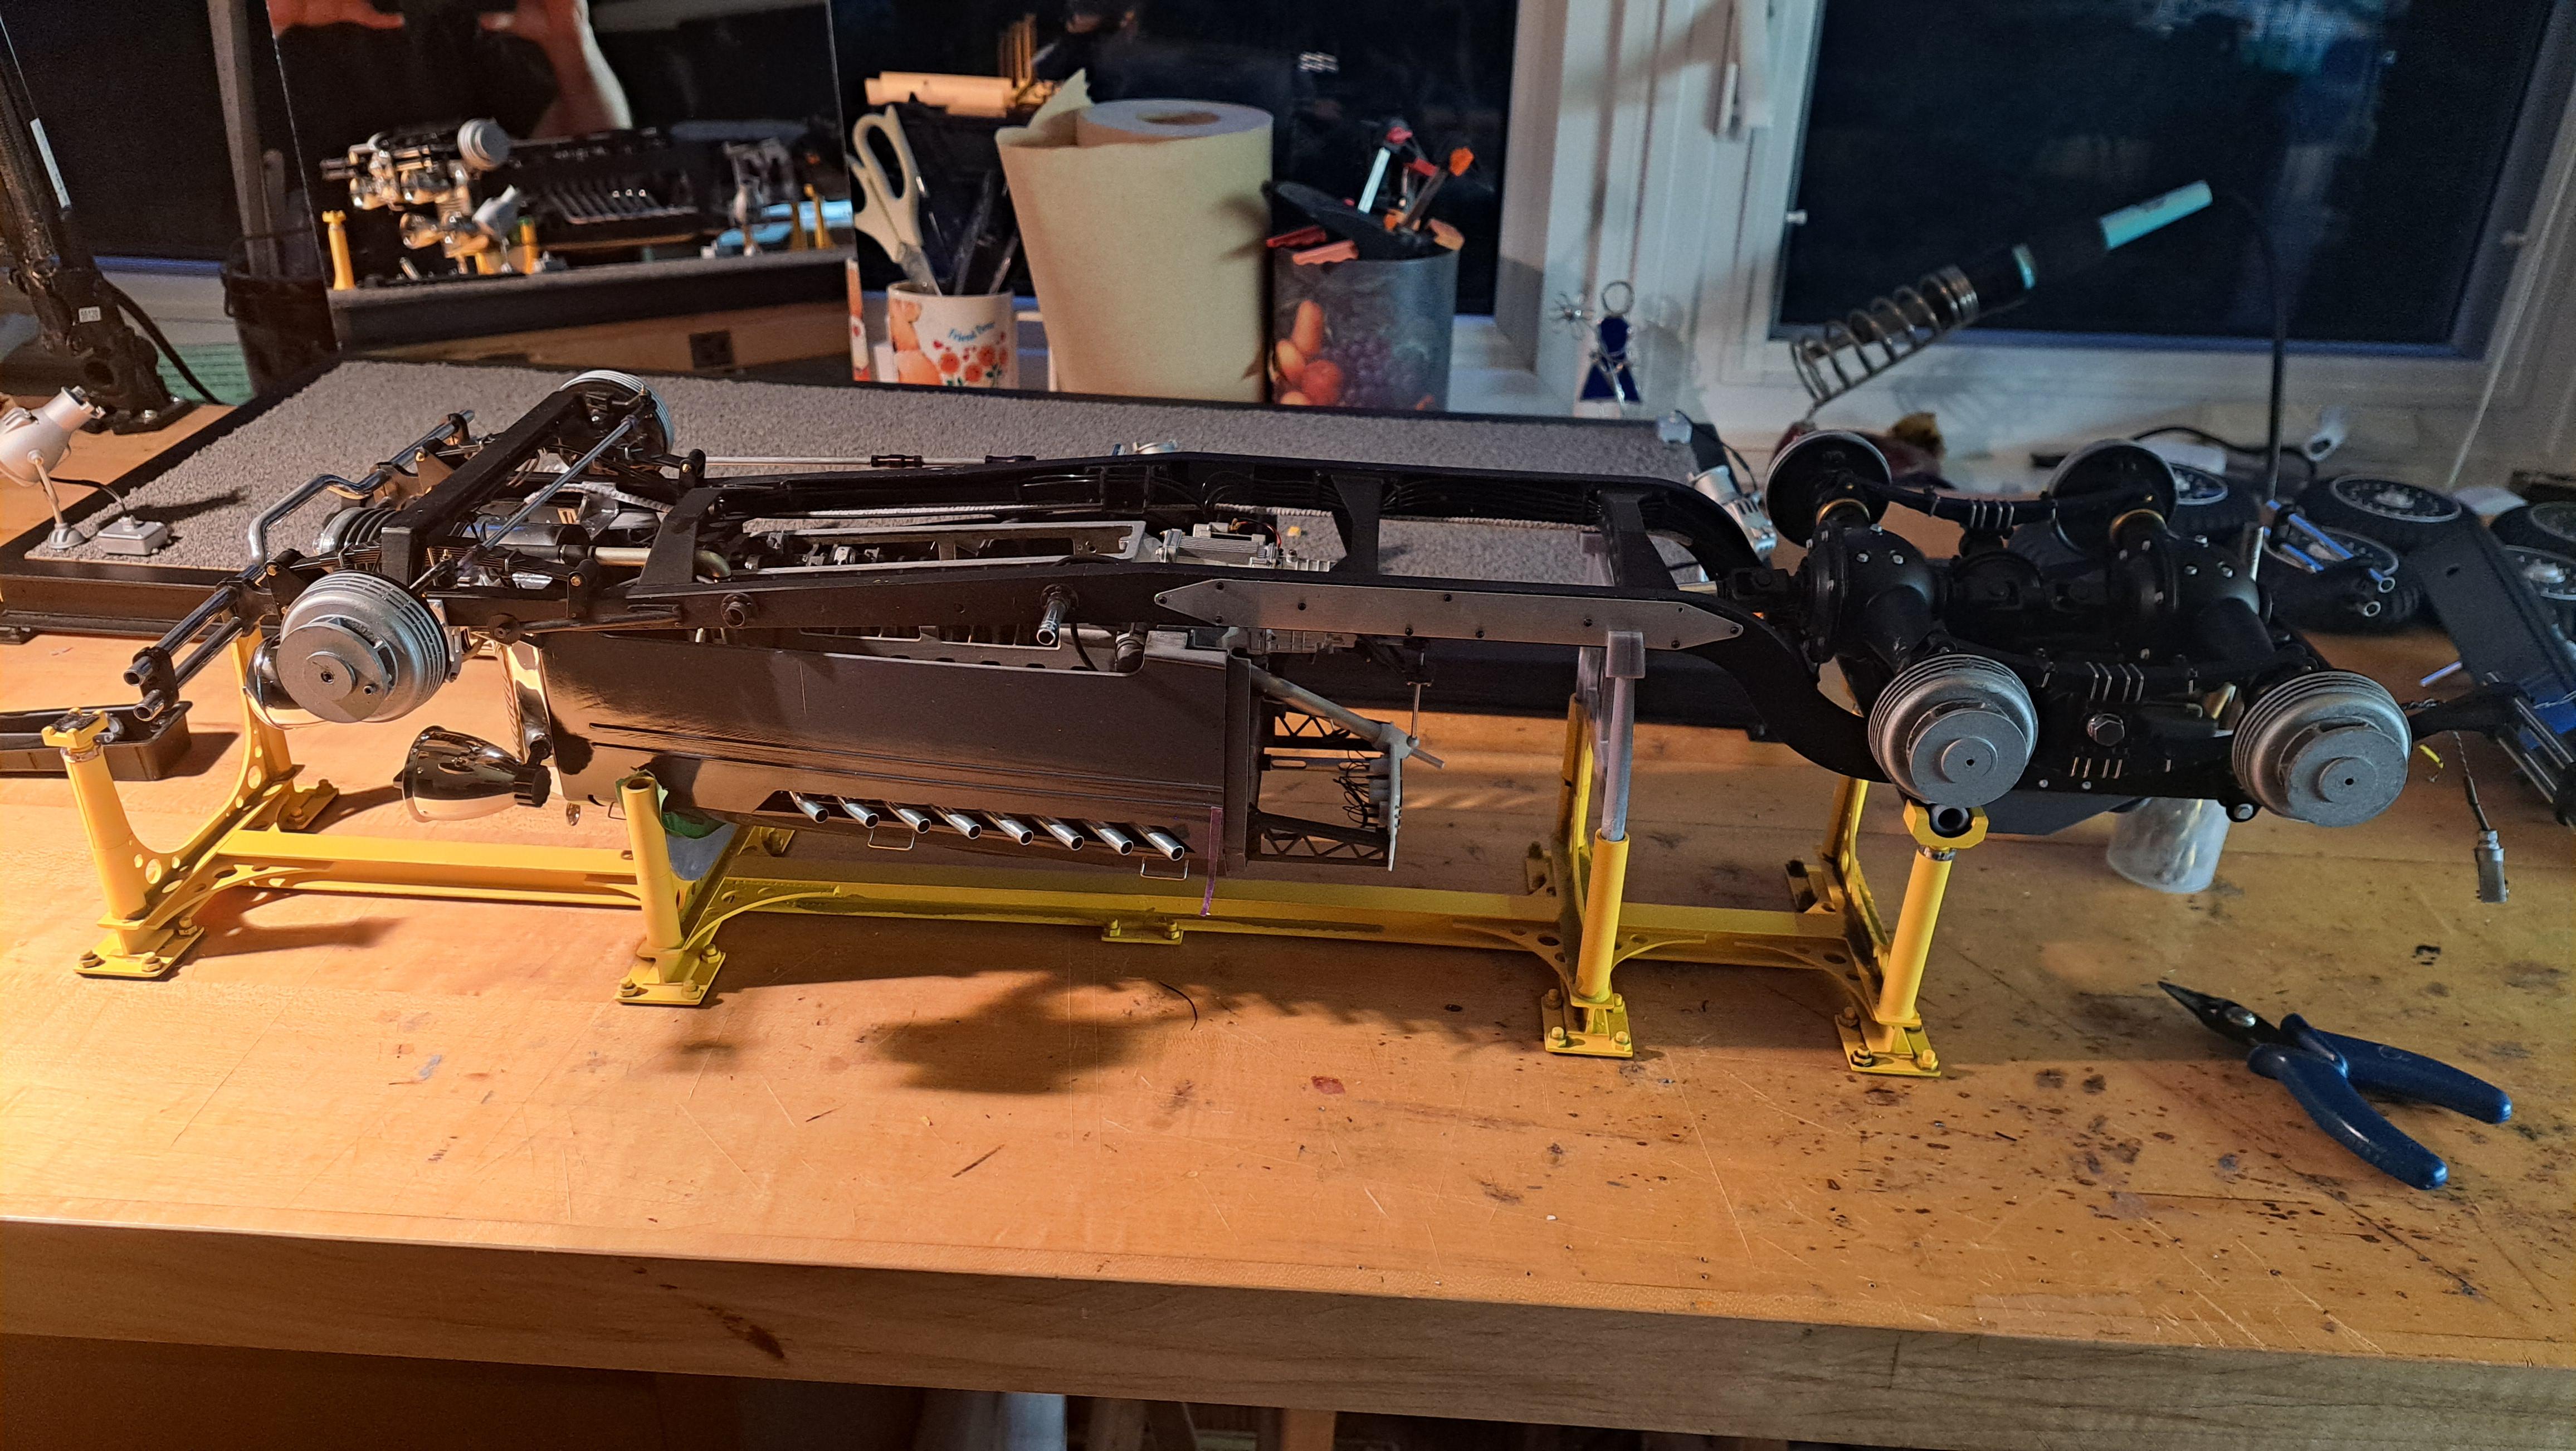
So, the model is complete. The base is done, the lights are connected, all is well. Yes, all is well... until it wasn't. While trying to turn the motor, the crank broke... again. So now the car is in the repair shop. I removed the body, wheels, seats and anything else the is not glued. I temporarely modified the support rack to hold the car upside down and started to analyse the situation. It's not good. The crank shaft broke in 2 places. I'm not sure it's repaireble but I'll try. Best scenario is the I fix everything, worst will be that I glue the broken parts in place and nothing move again. The middle ground would be to link the remaining crank with the gear motor via a straight shaft (no pistons attached to this portion). This would permit rotation of 10 out of 16 pistons plus all of the valve train. I'll see what is possible but I'm not overly confident. I do have a video showing the motor running so at least I have that to prove I was able to pull it off. Here's the situation as of today. Body removed whatever was removable removed Car flip over on temporary cradle Broken crankshaft wish me luck!!
-
Glad I could help. As for the batteries, since my ref car was built in 2019, it only had one battery. I had done the 2 battery set up but decided to make it as my ref car. This is what it looked like
-
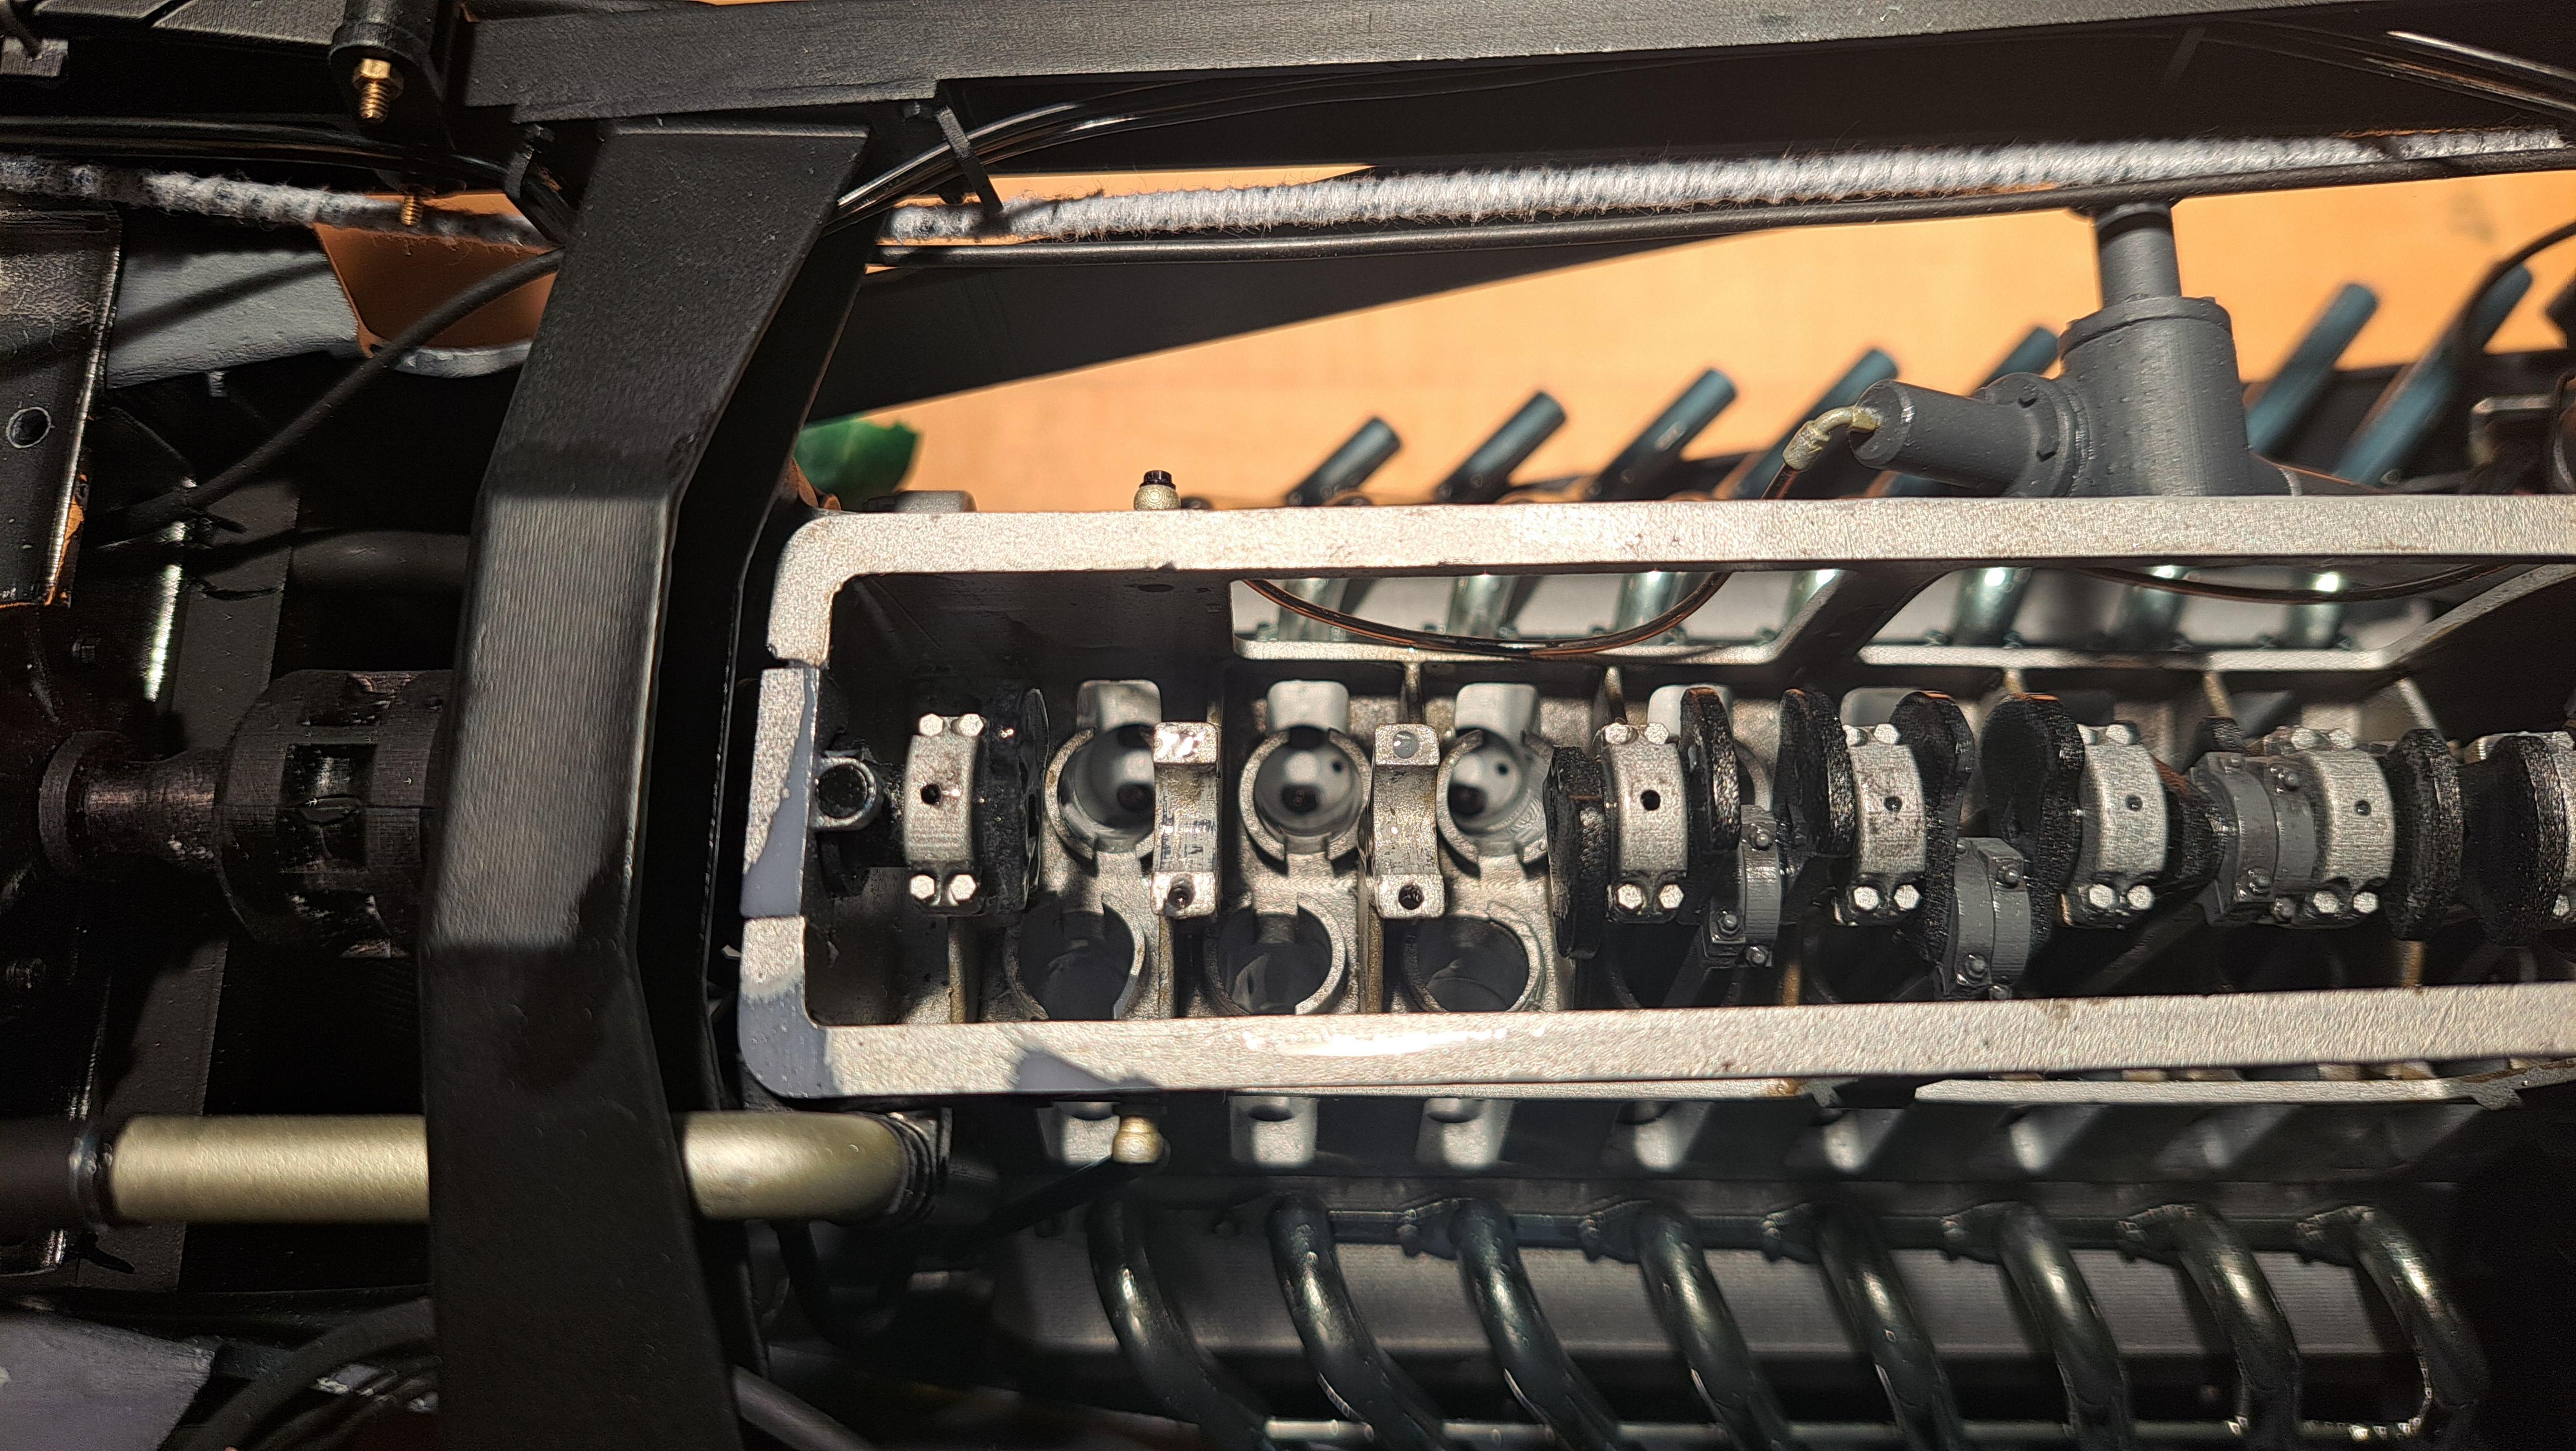
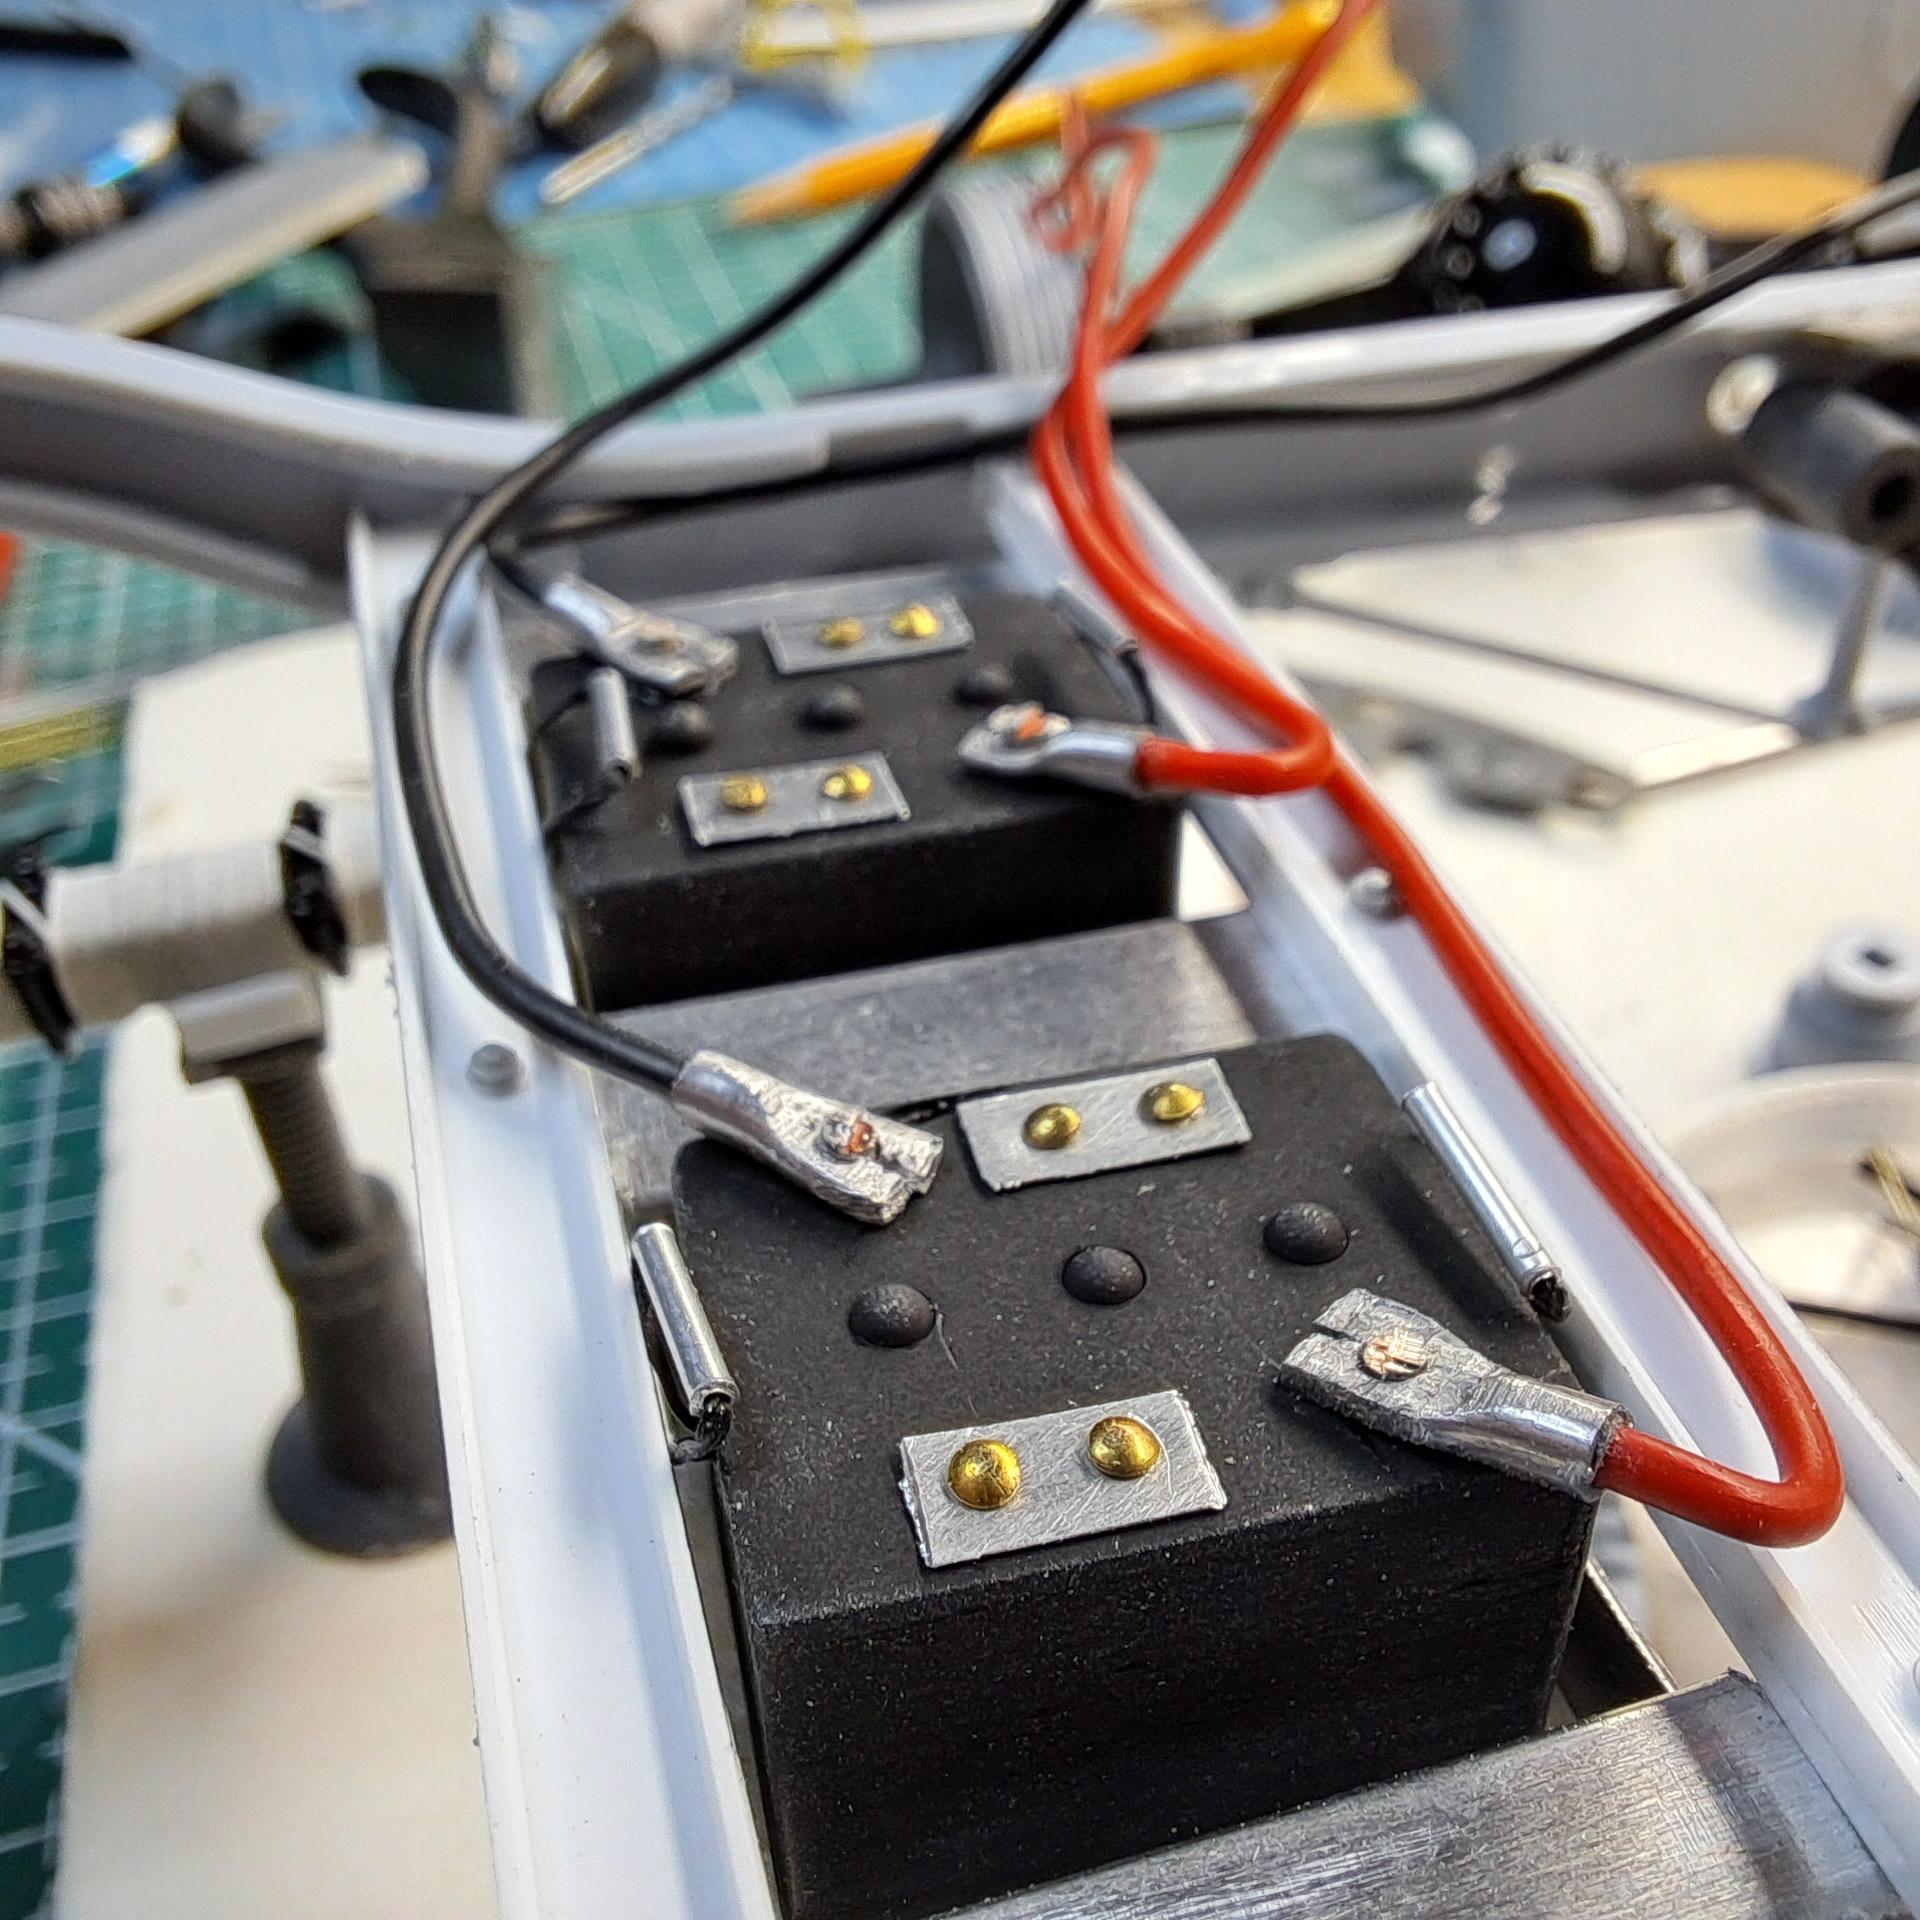
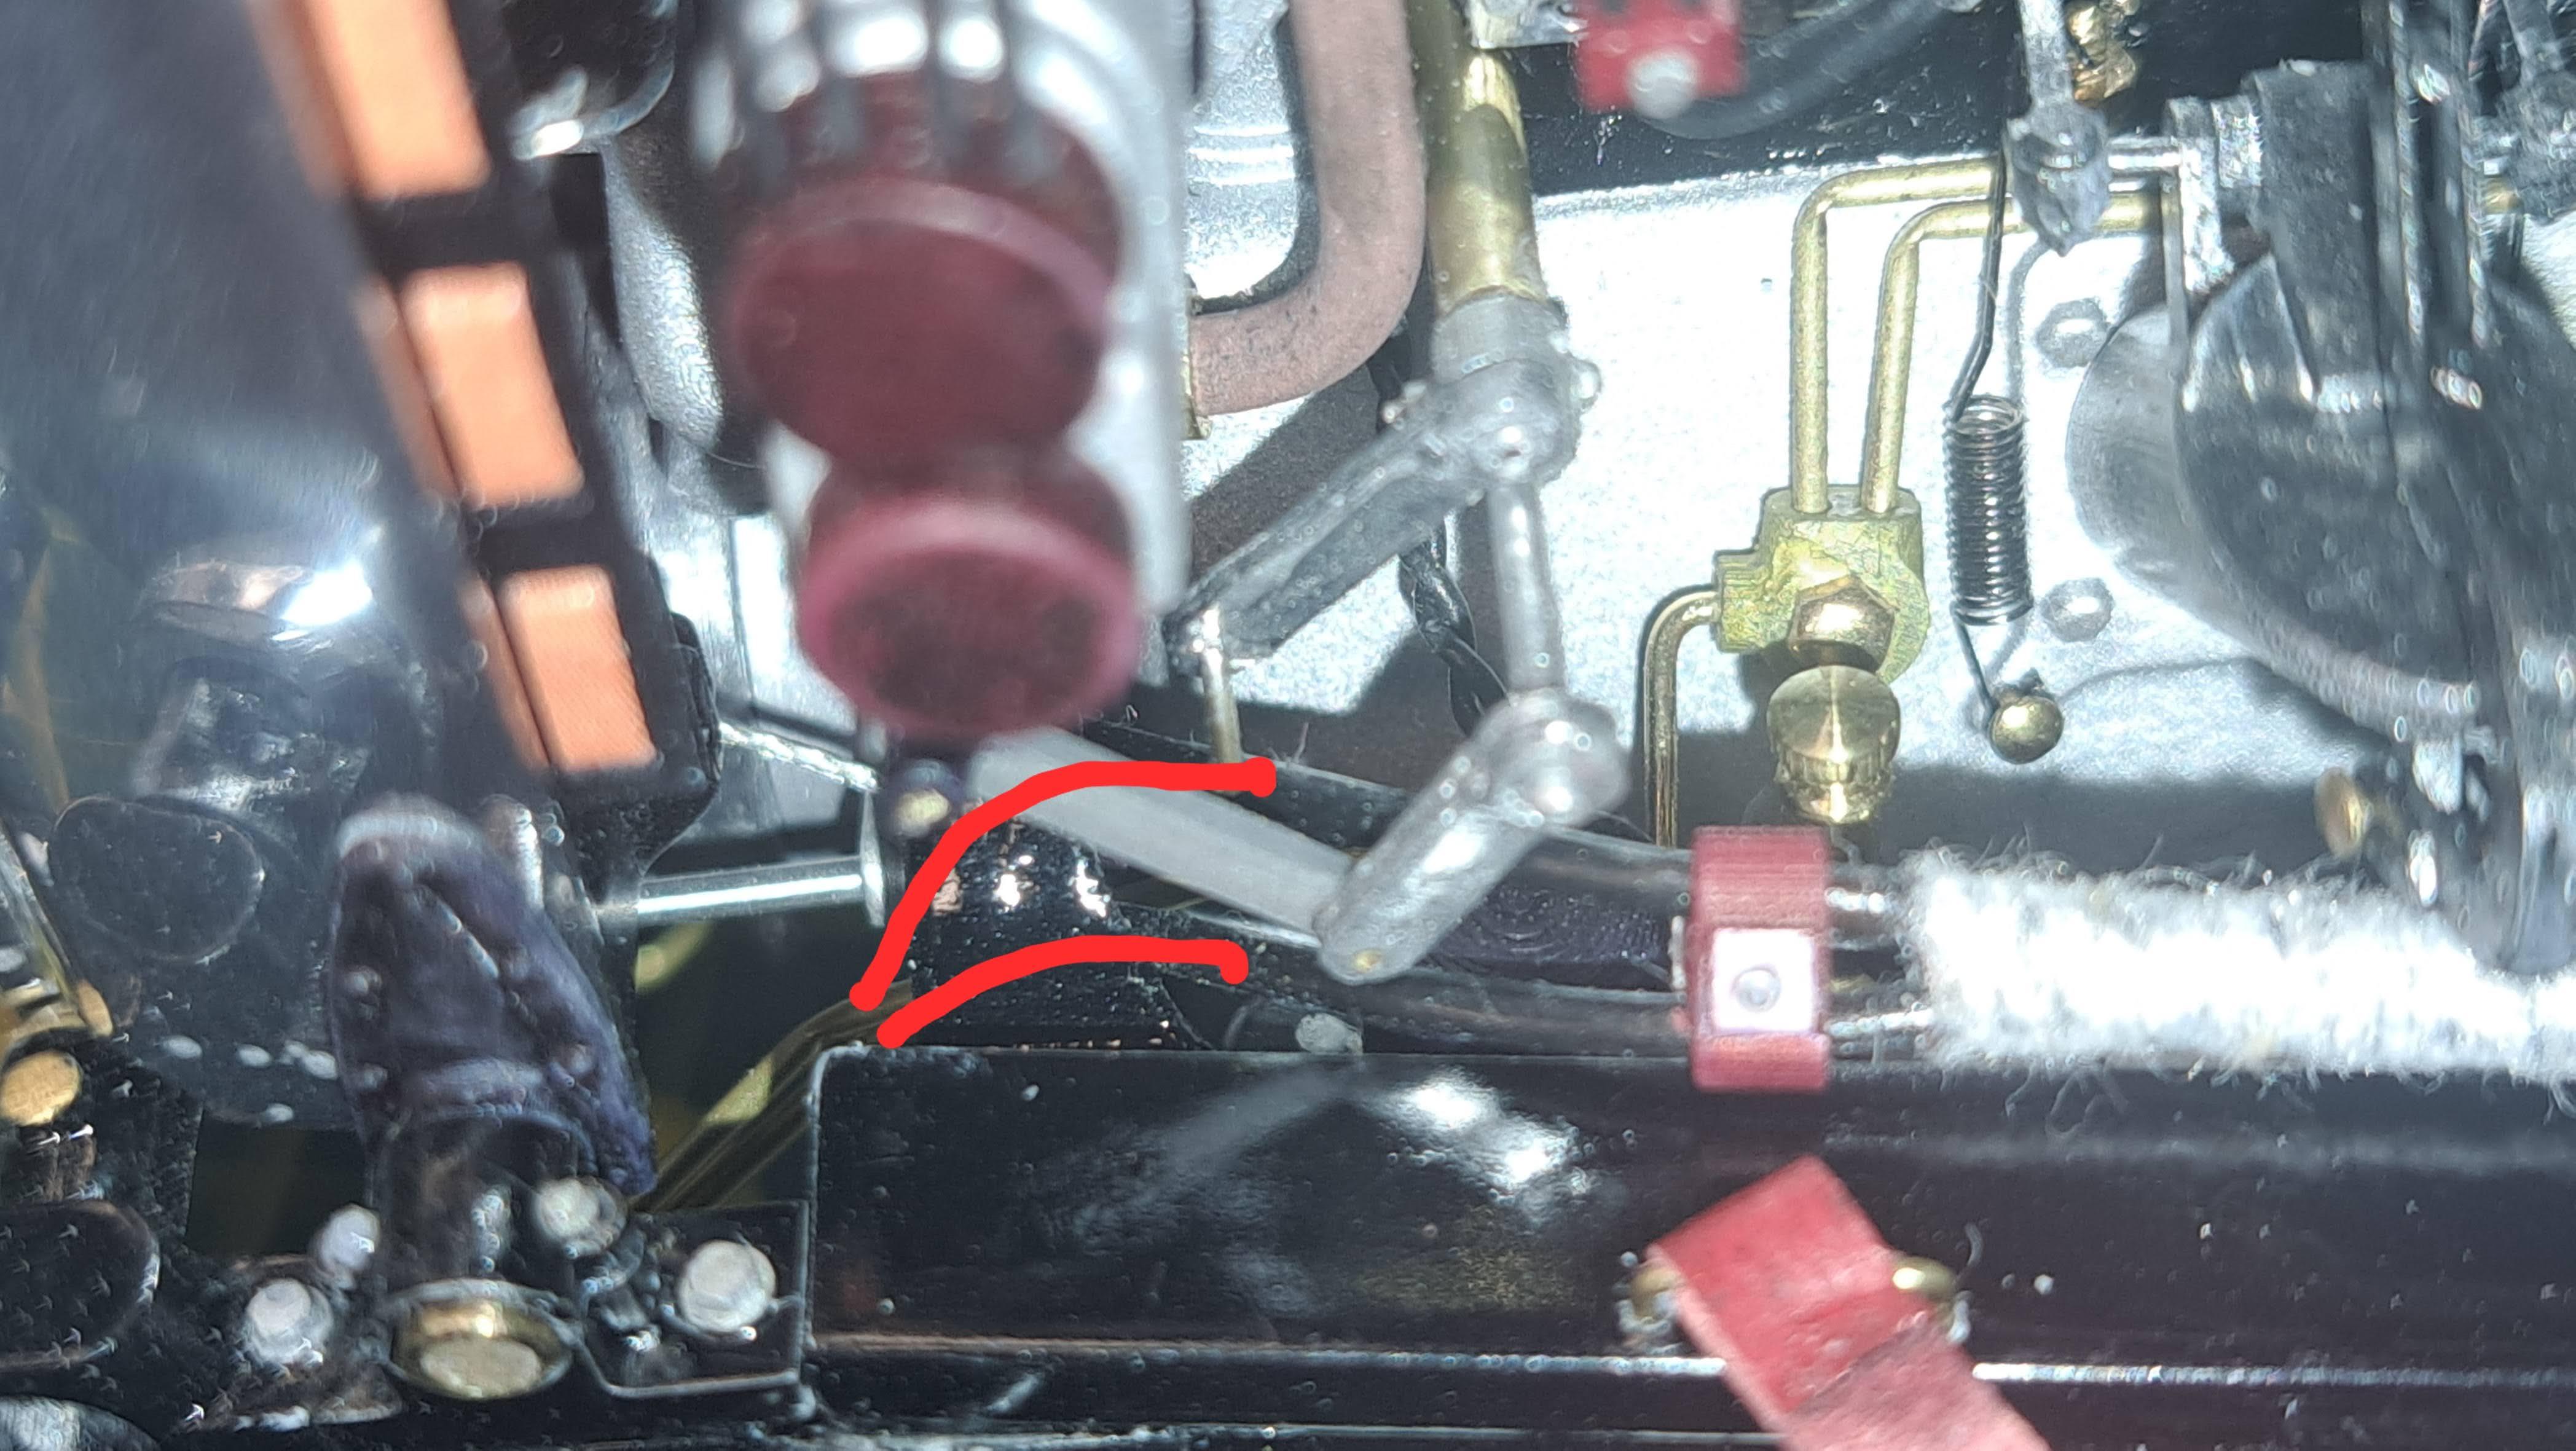
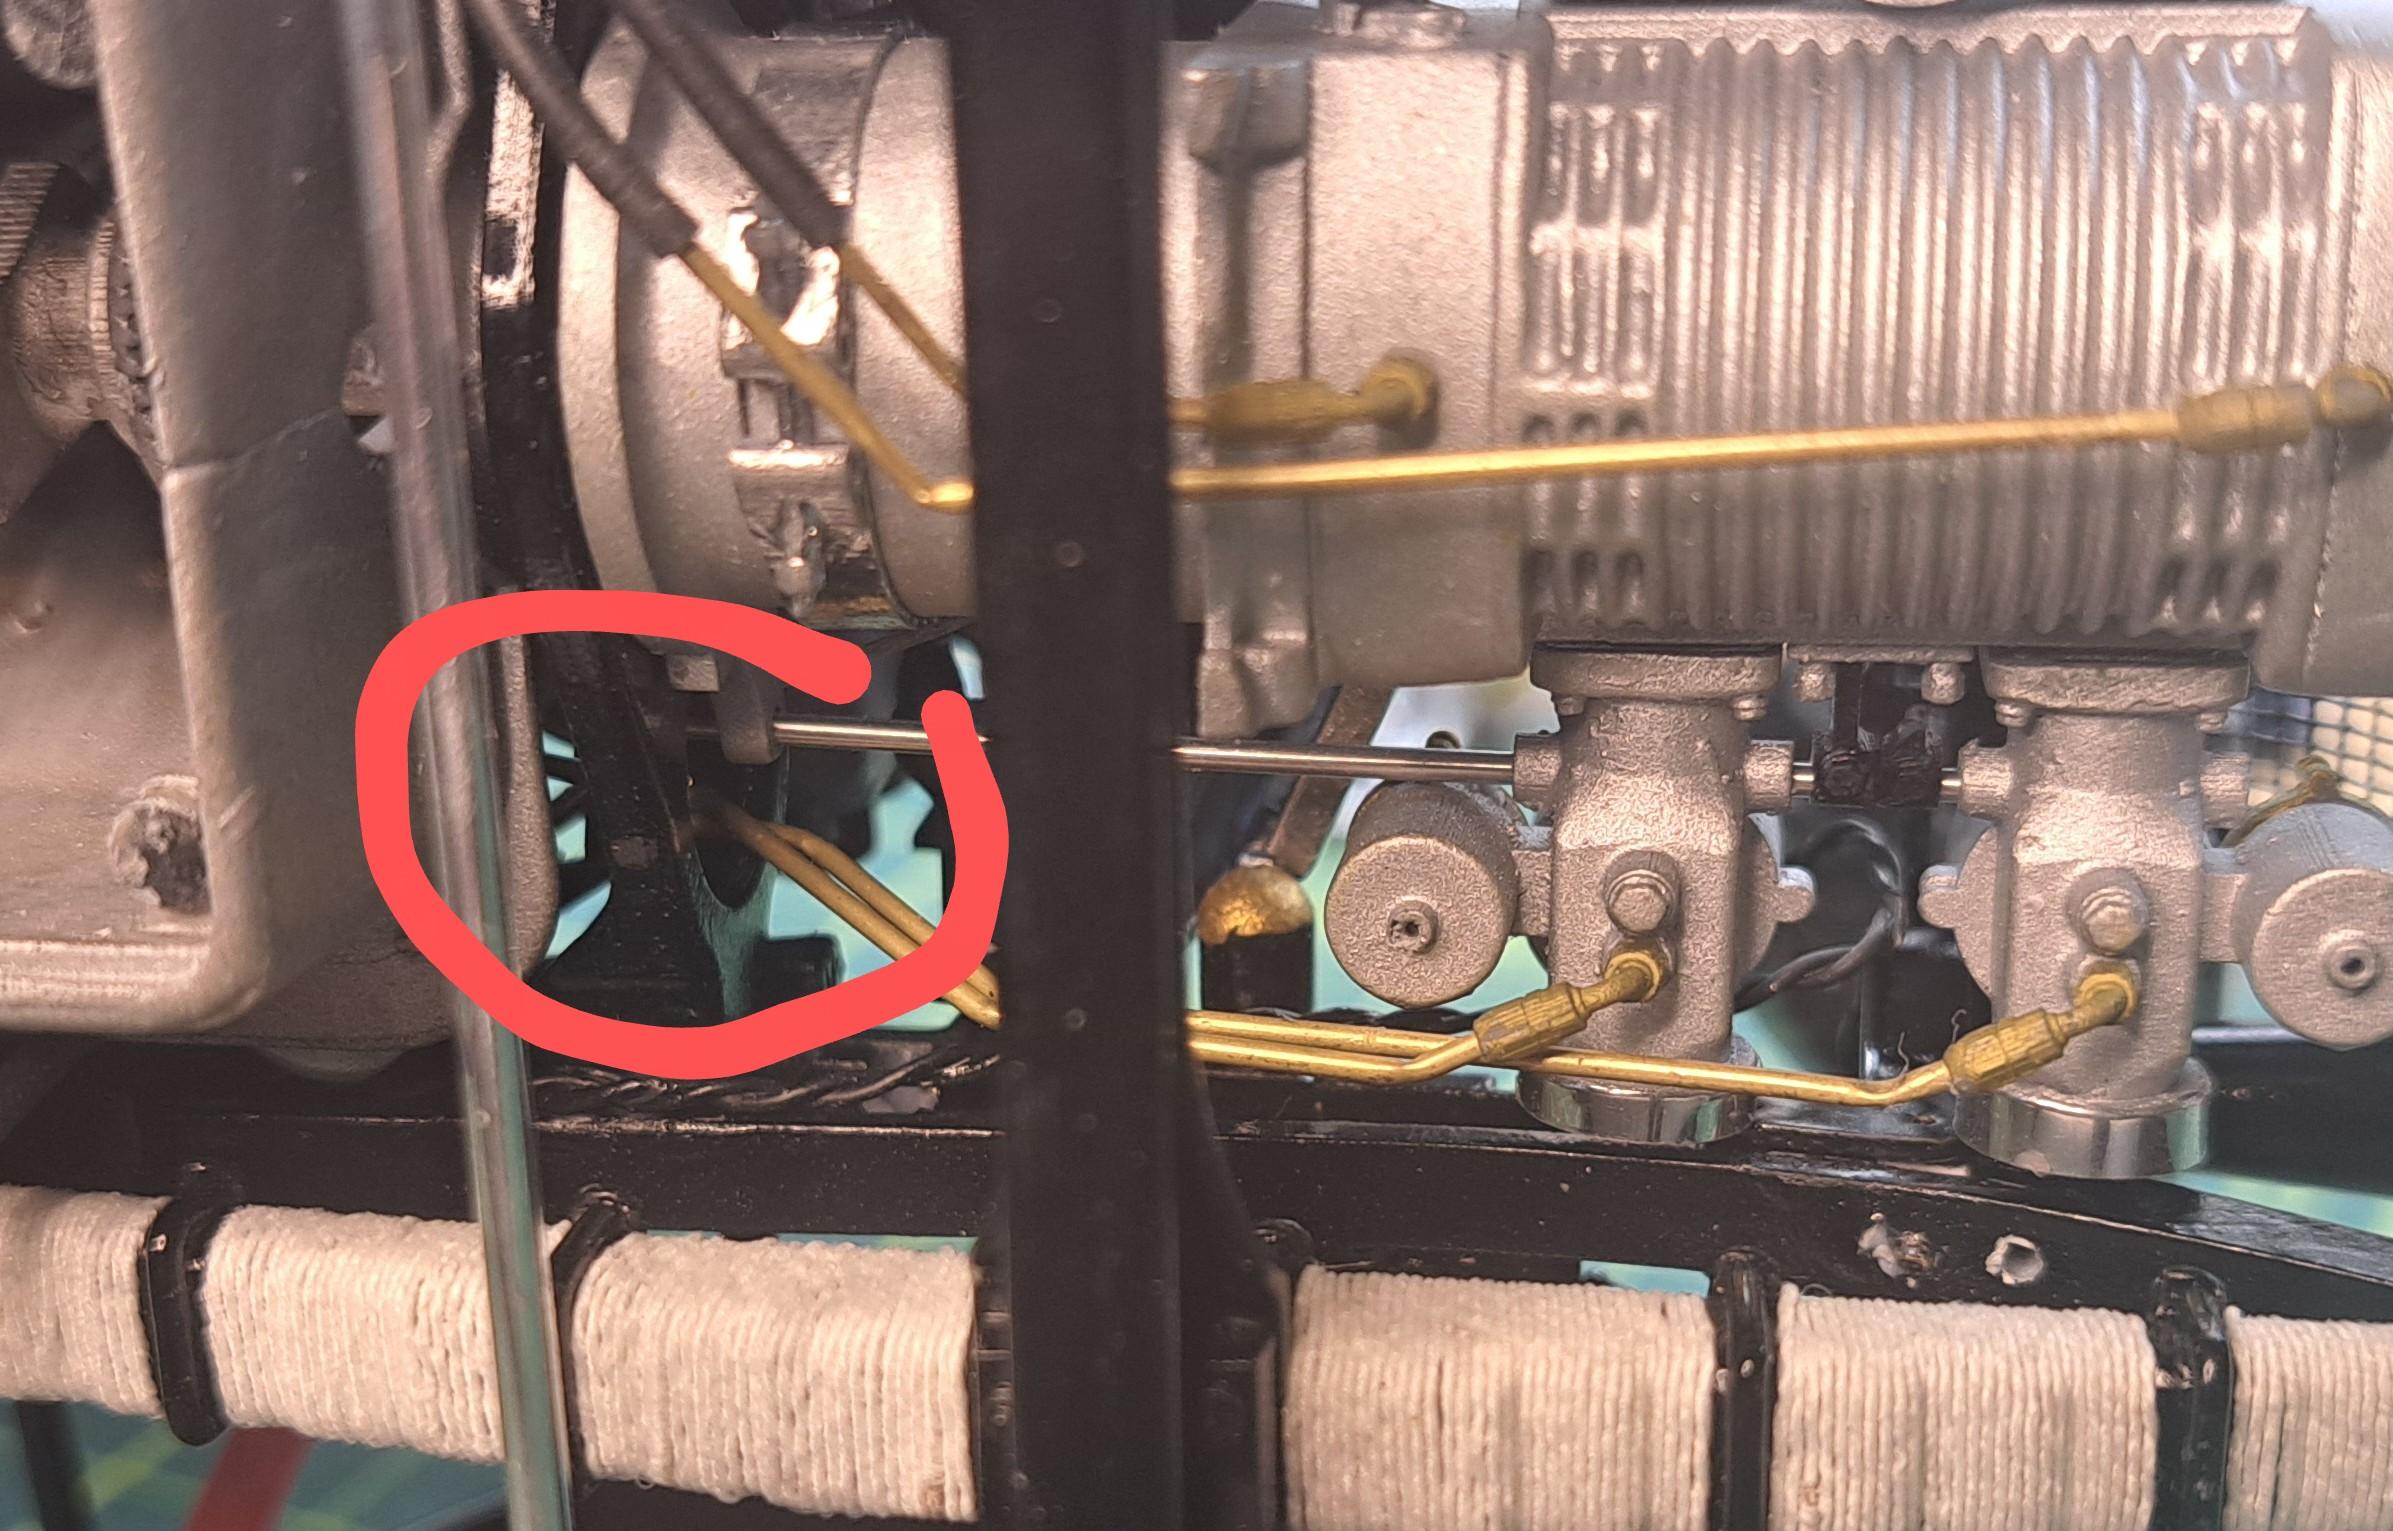
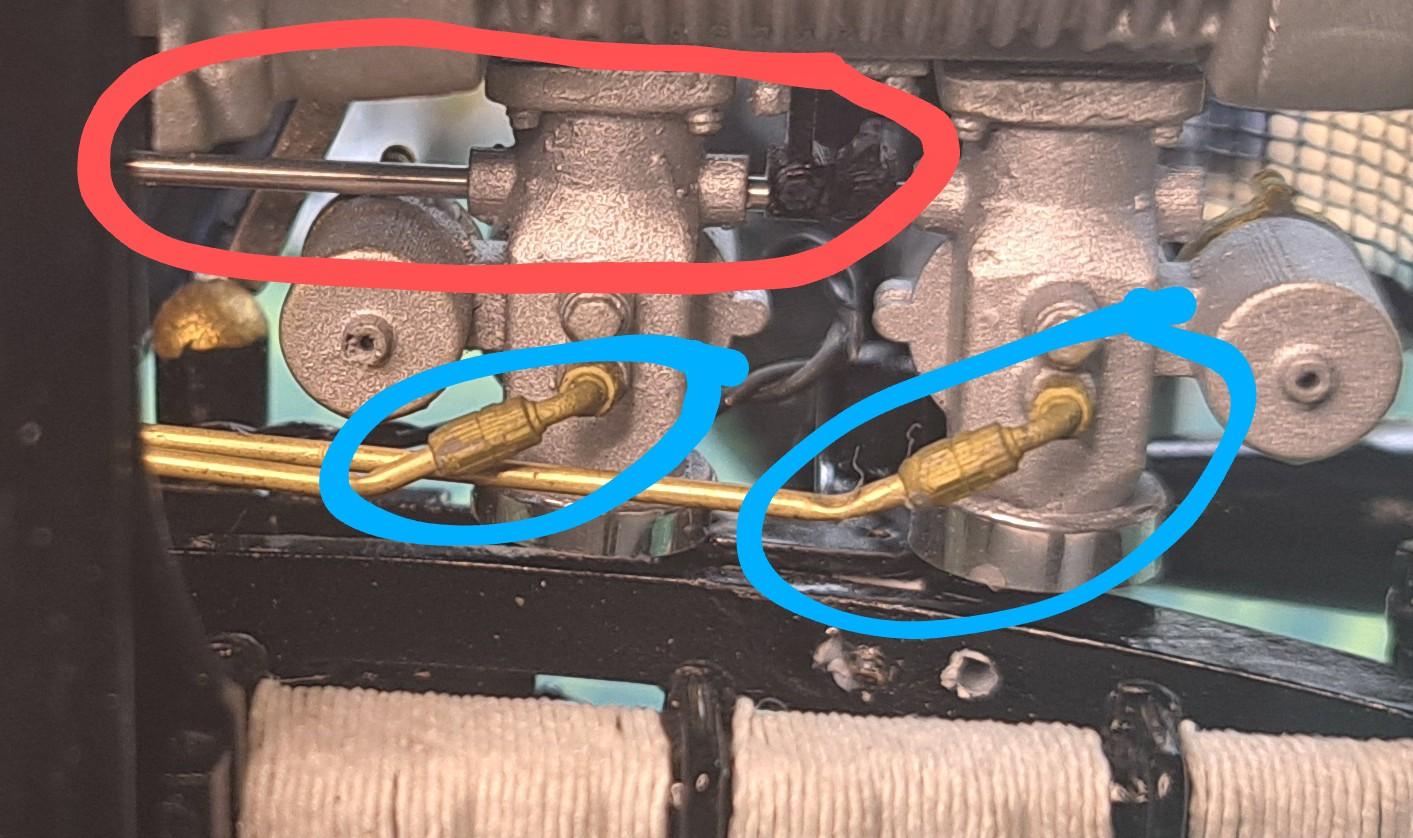
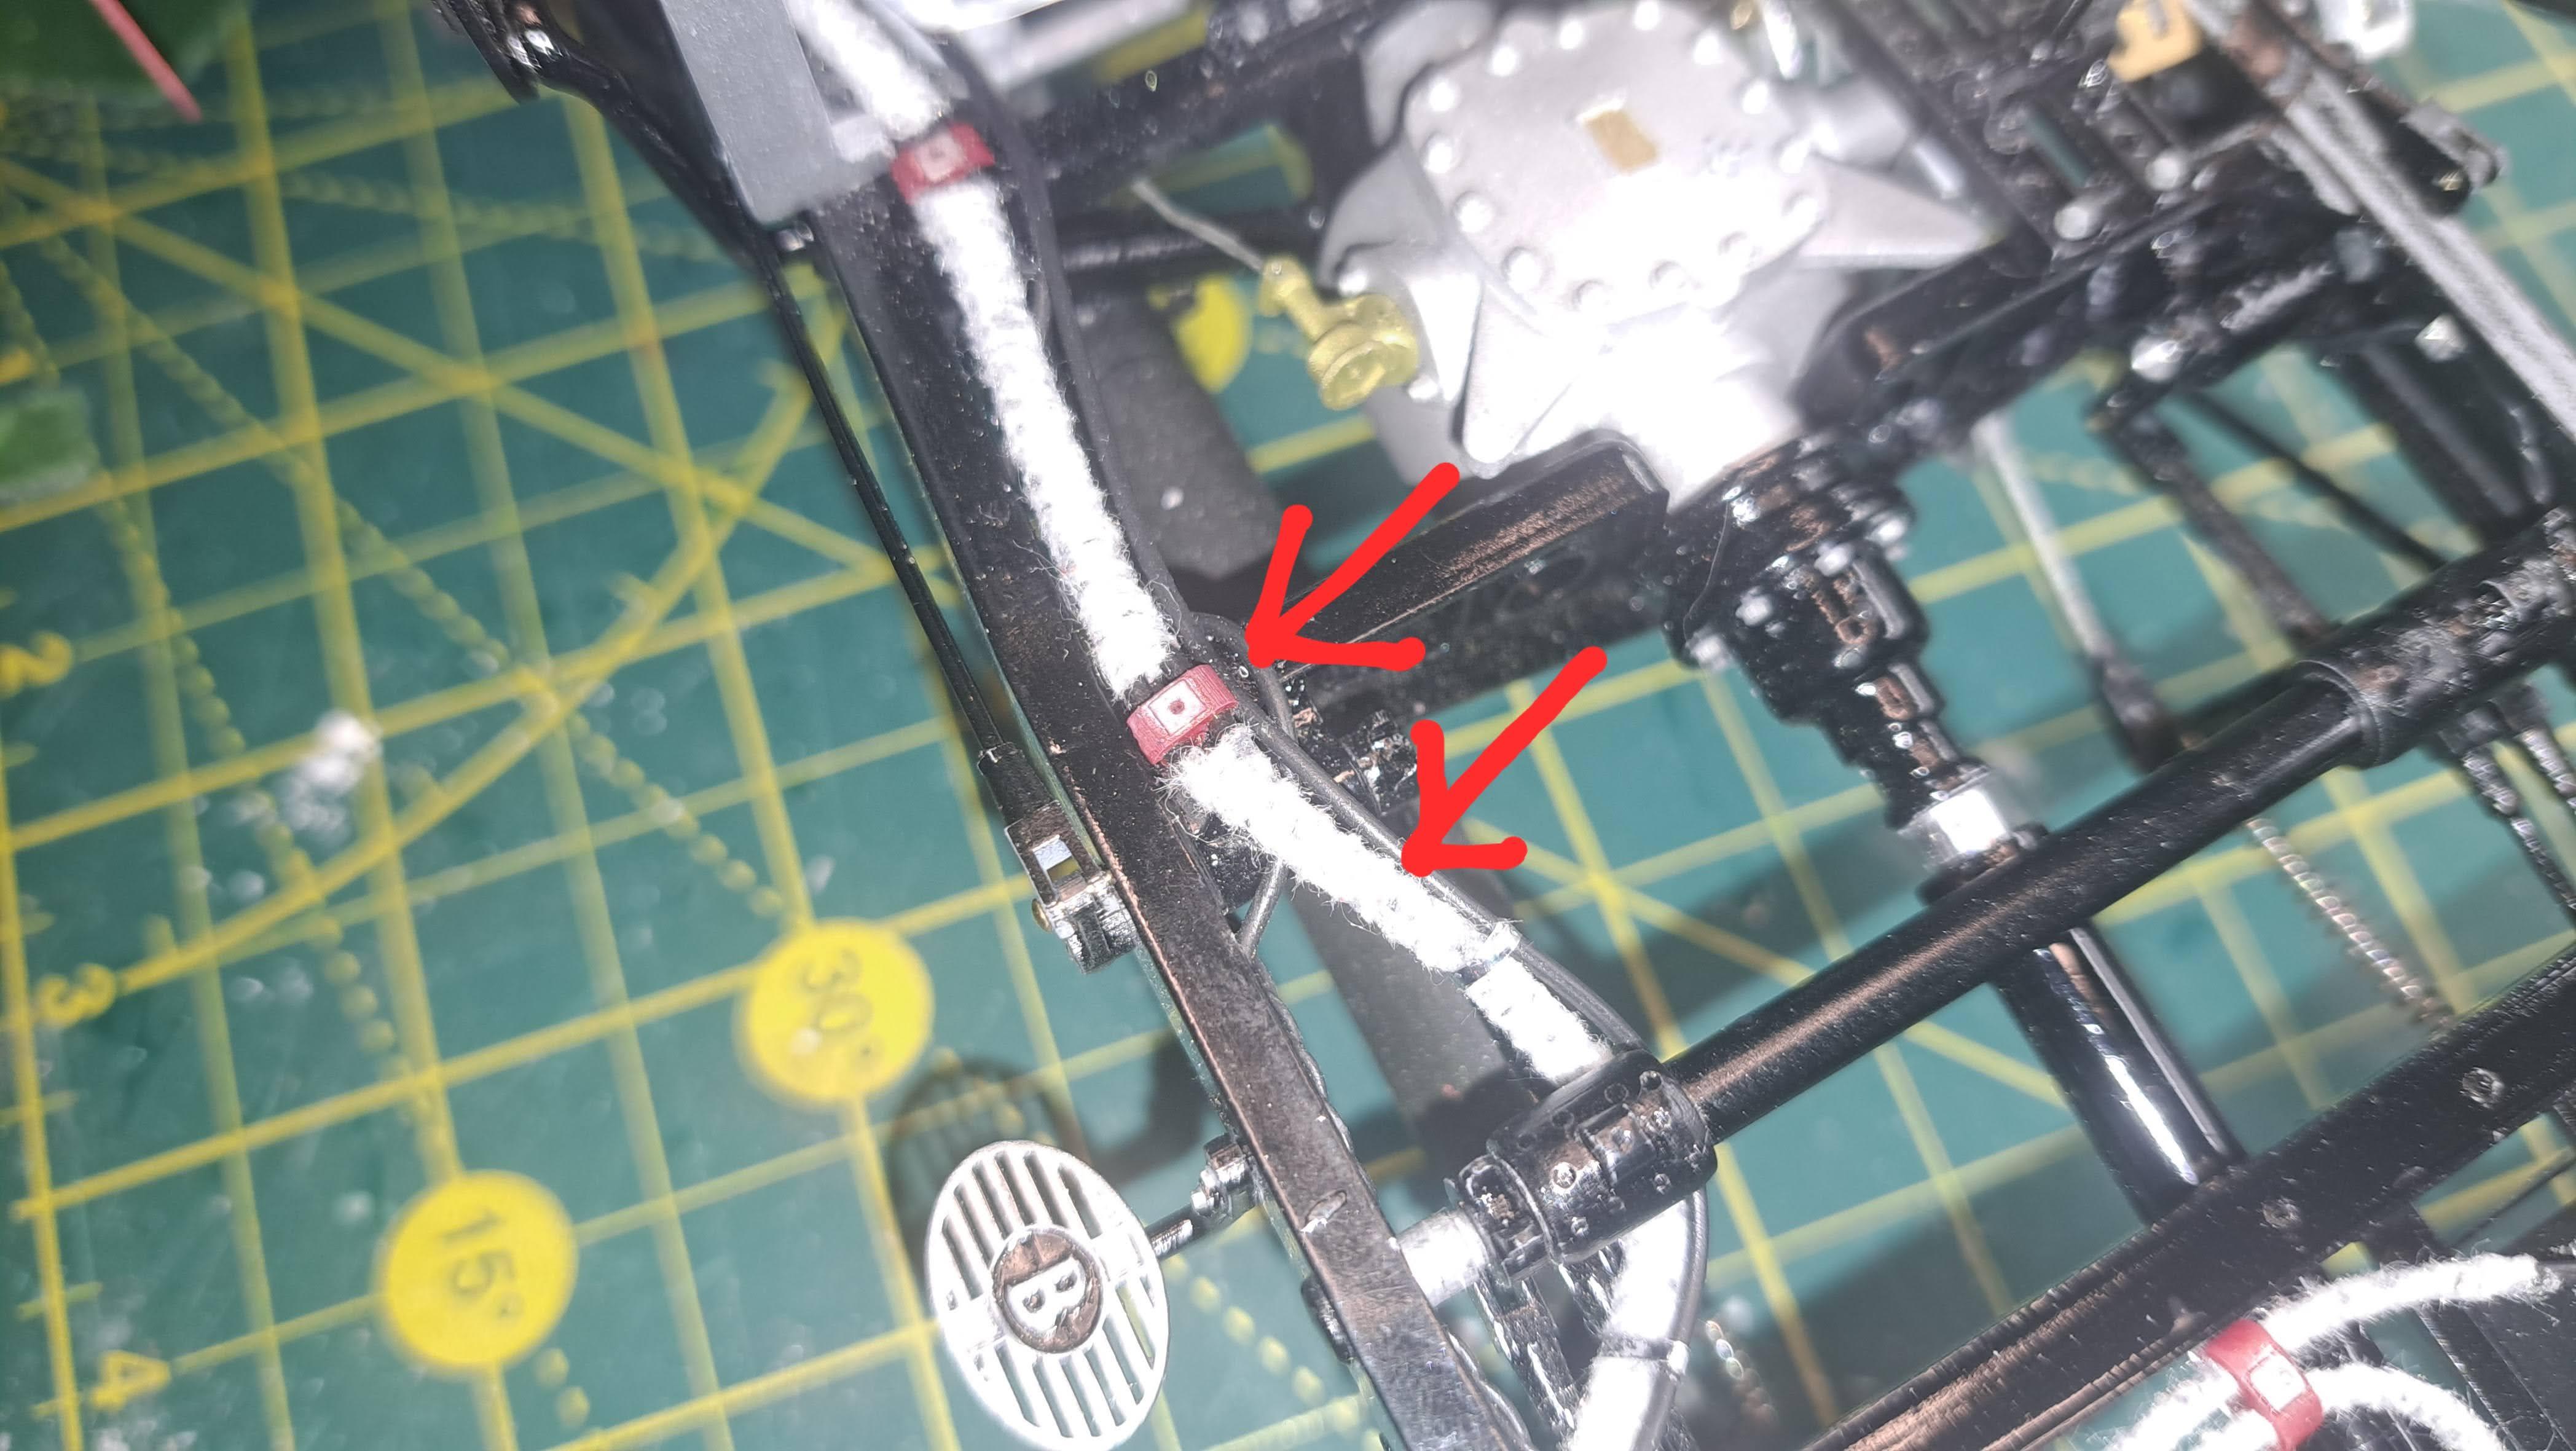
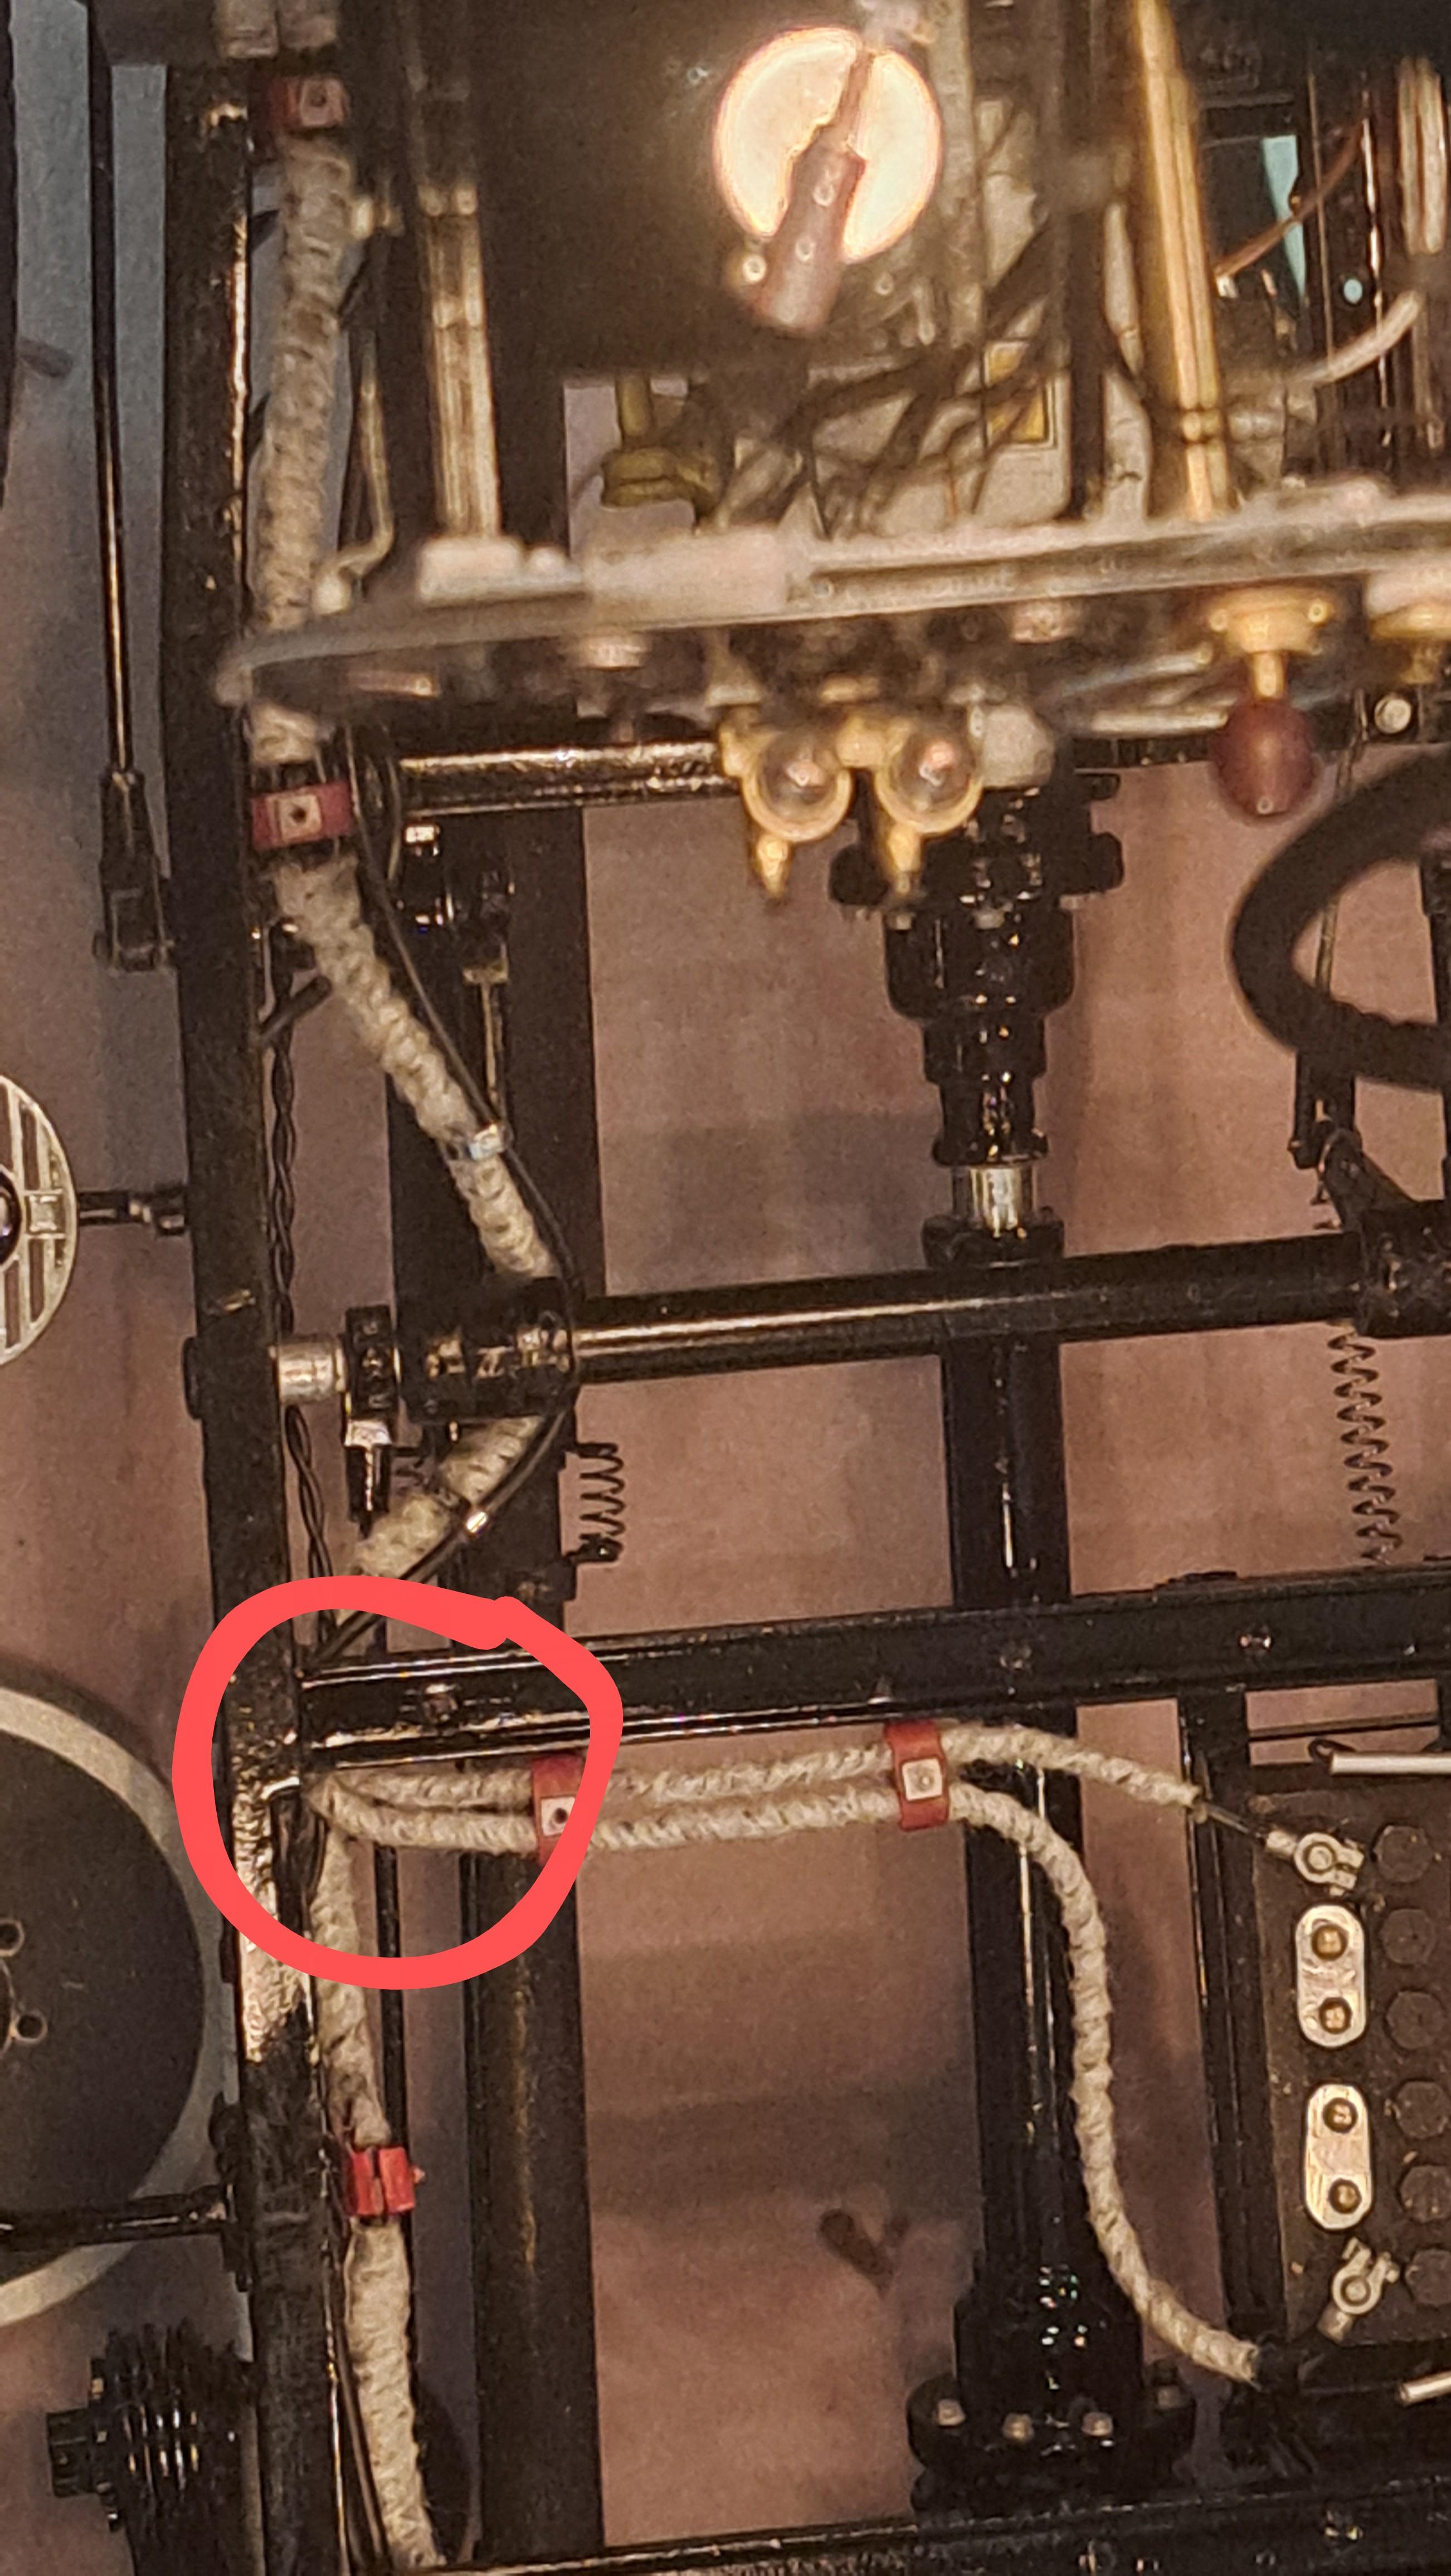
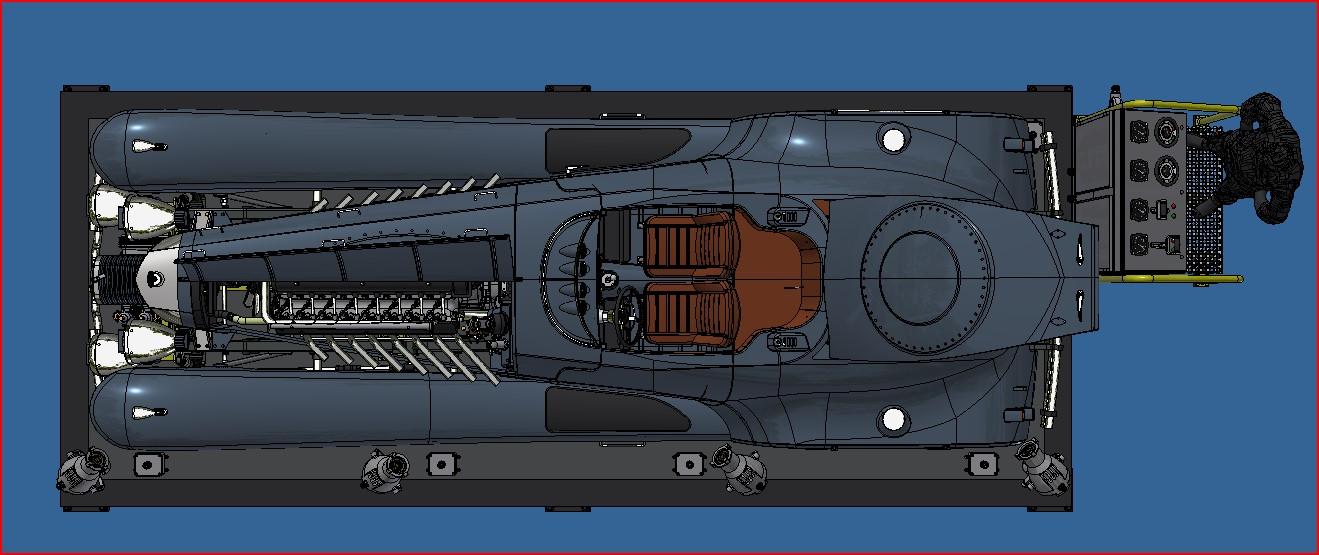
Armando, here's what I found out. As you probably know, most of what I did on this model was not in the kit but rather based on my ref car and the pictures of it that I had. So some features are accurate (the ones I could find pictures of) and some were left to my imagination (when I didn't have any info). And sometimes, I had to do certain thing in order to accommodate my own selfish need. First, the easy to explain one. The 2 fuel lines coming from the fuel pump are hooked up to the 2 brass tubings that are under the carburators. Next, what comes out of the carburators. You have 2 brass tubings circled in bleu (the ones hooked up to the fuel lines) and the other one, circled in red, would be the throttle rod. Let me know if these are the three tubes you are talking about. Next, the battery cables. This is where it get a bit complicated. The 2 battery cables are made to look like the are connected to the starter motor but in reality, they stop at the jonction circled in red The cables connected to the starter are actually real electrical wires hooked up to a miniature gearmotor hidden inside the started housing (that is part of my own selfish need). So the cables you see running alongside the fuel lines are the gearmotor wires and they go all the way to rear of the car and are connected to the control box. Now I imagine that you are not as crazy as me and don't have a hidden gearmotor to energize so from the battery you could go directly to the starter. I'm not sure if this is how it should be but that's how I would do it. Please let me know if this info helps and if you need into other information. I don't know if you have followed my current project but here is the link just in case. It even crazier then the bentley. Good luck with your be bentley ans sent some pictures. 1/12 scale Hydra coupe scratch built
-
Hello Armando, Thank you very much for your interest in my Bentley project. I have to check before answering your questions, I really don't remember so I will get back to you. In the meantime, you could check this link which is my photo album of this project from start to finish, it might help. Bentley blower build album
-
Marvel's Hydra coupe 1/12 scale full scratch build
François replied to François's topic in WIP: Model Cars
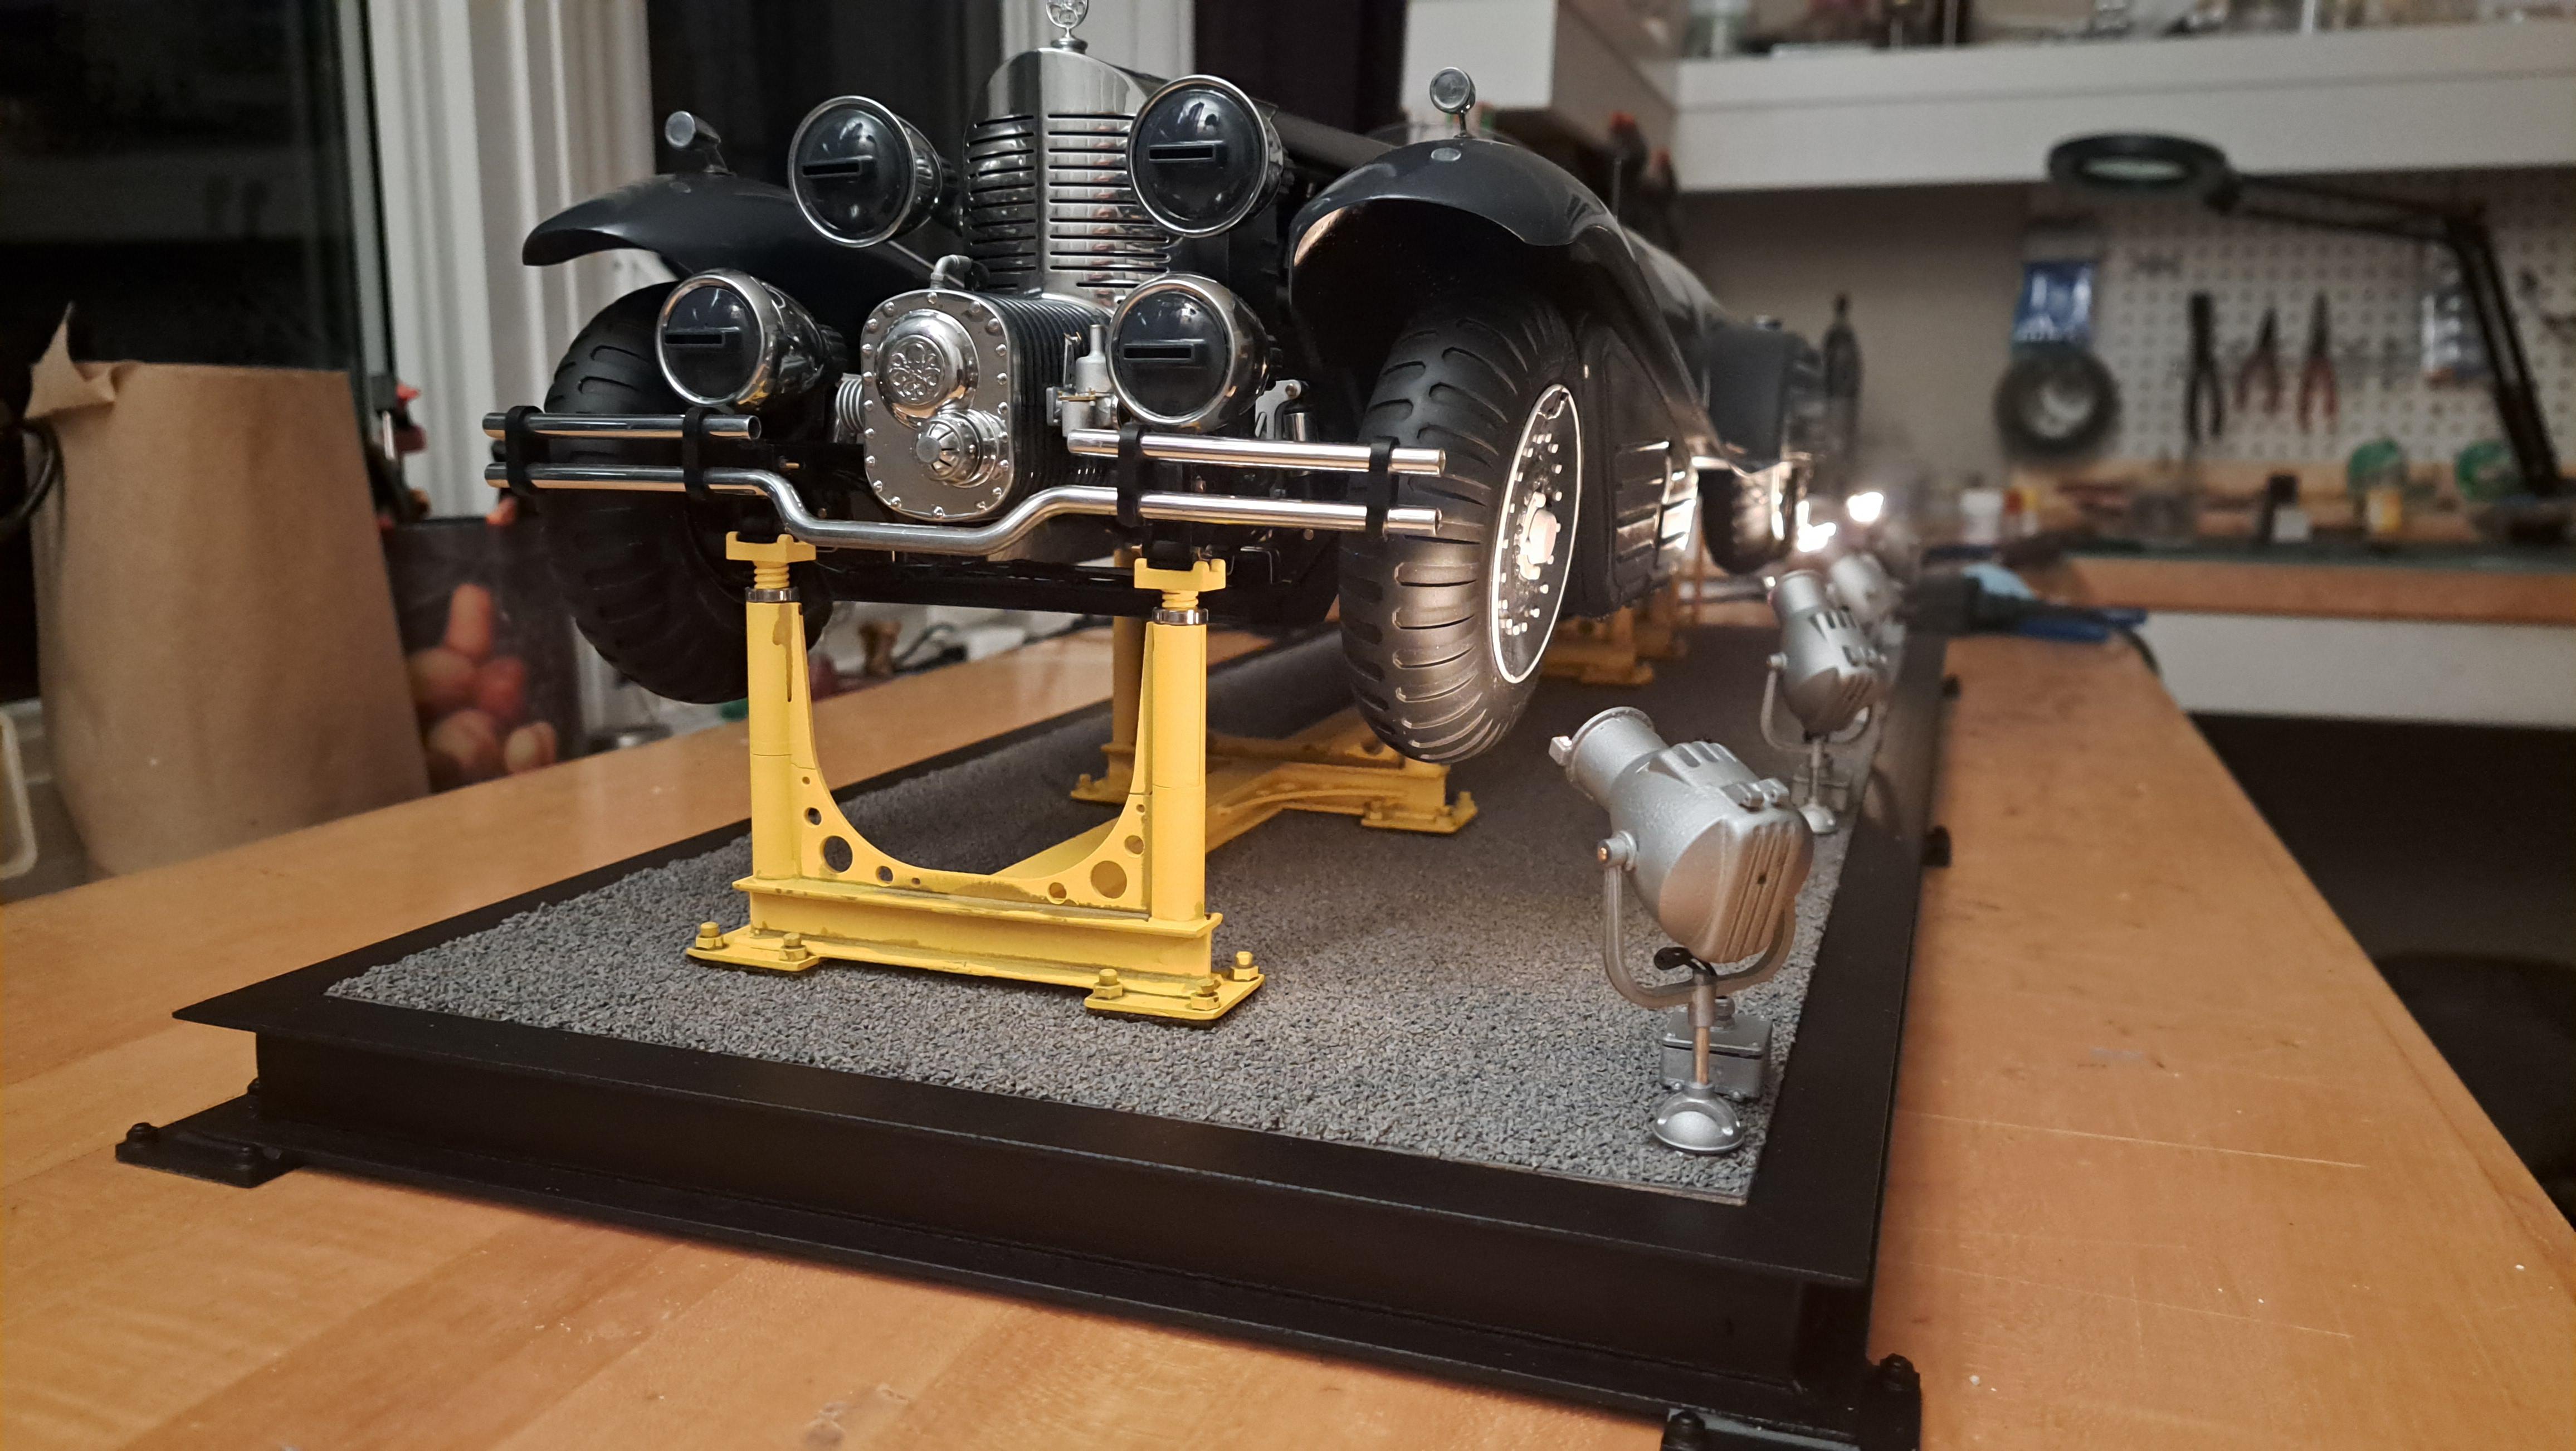
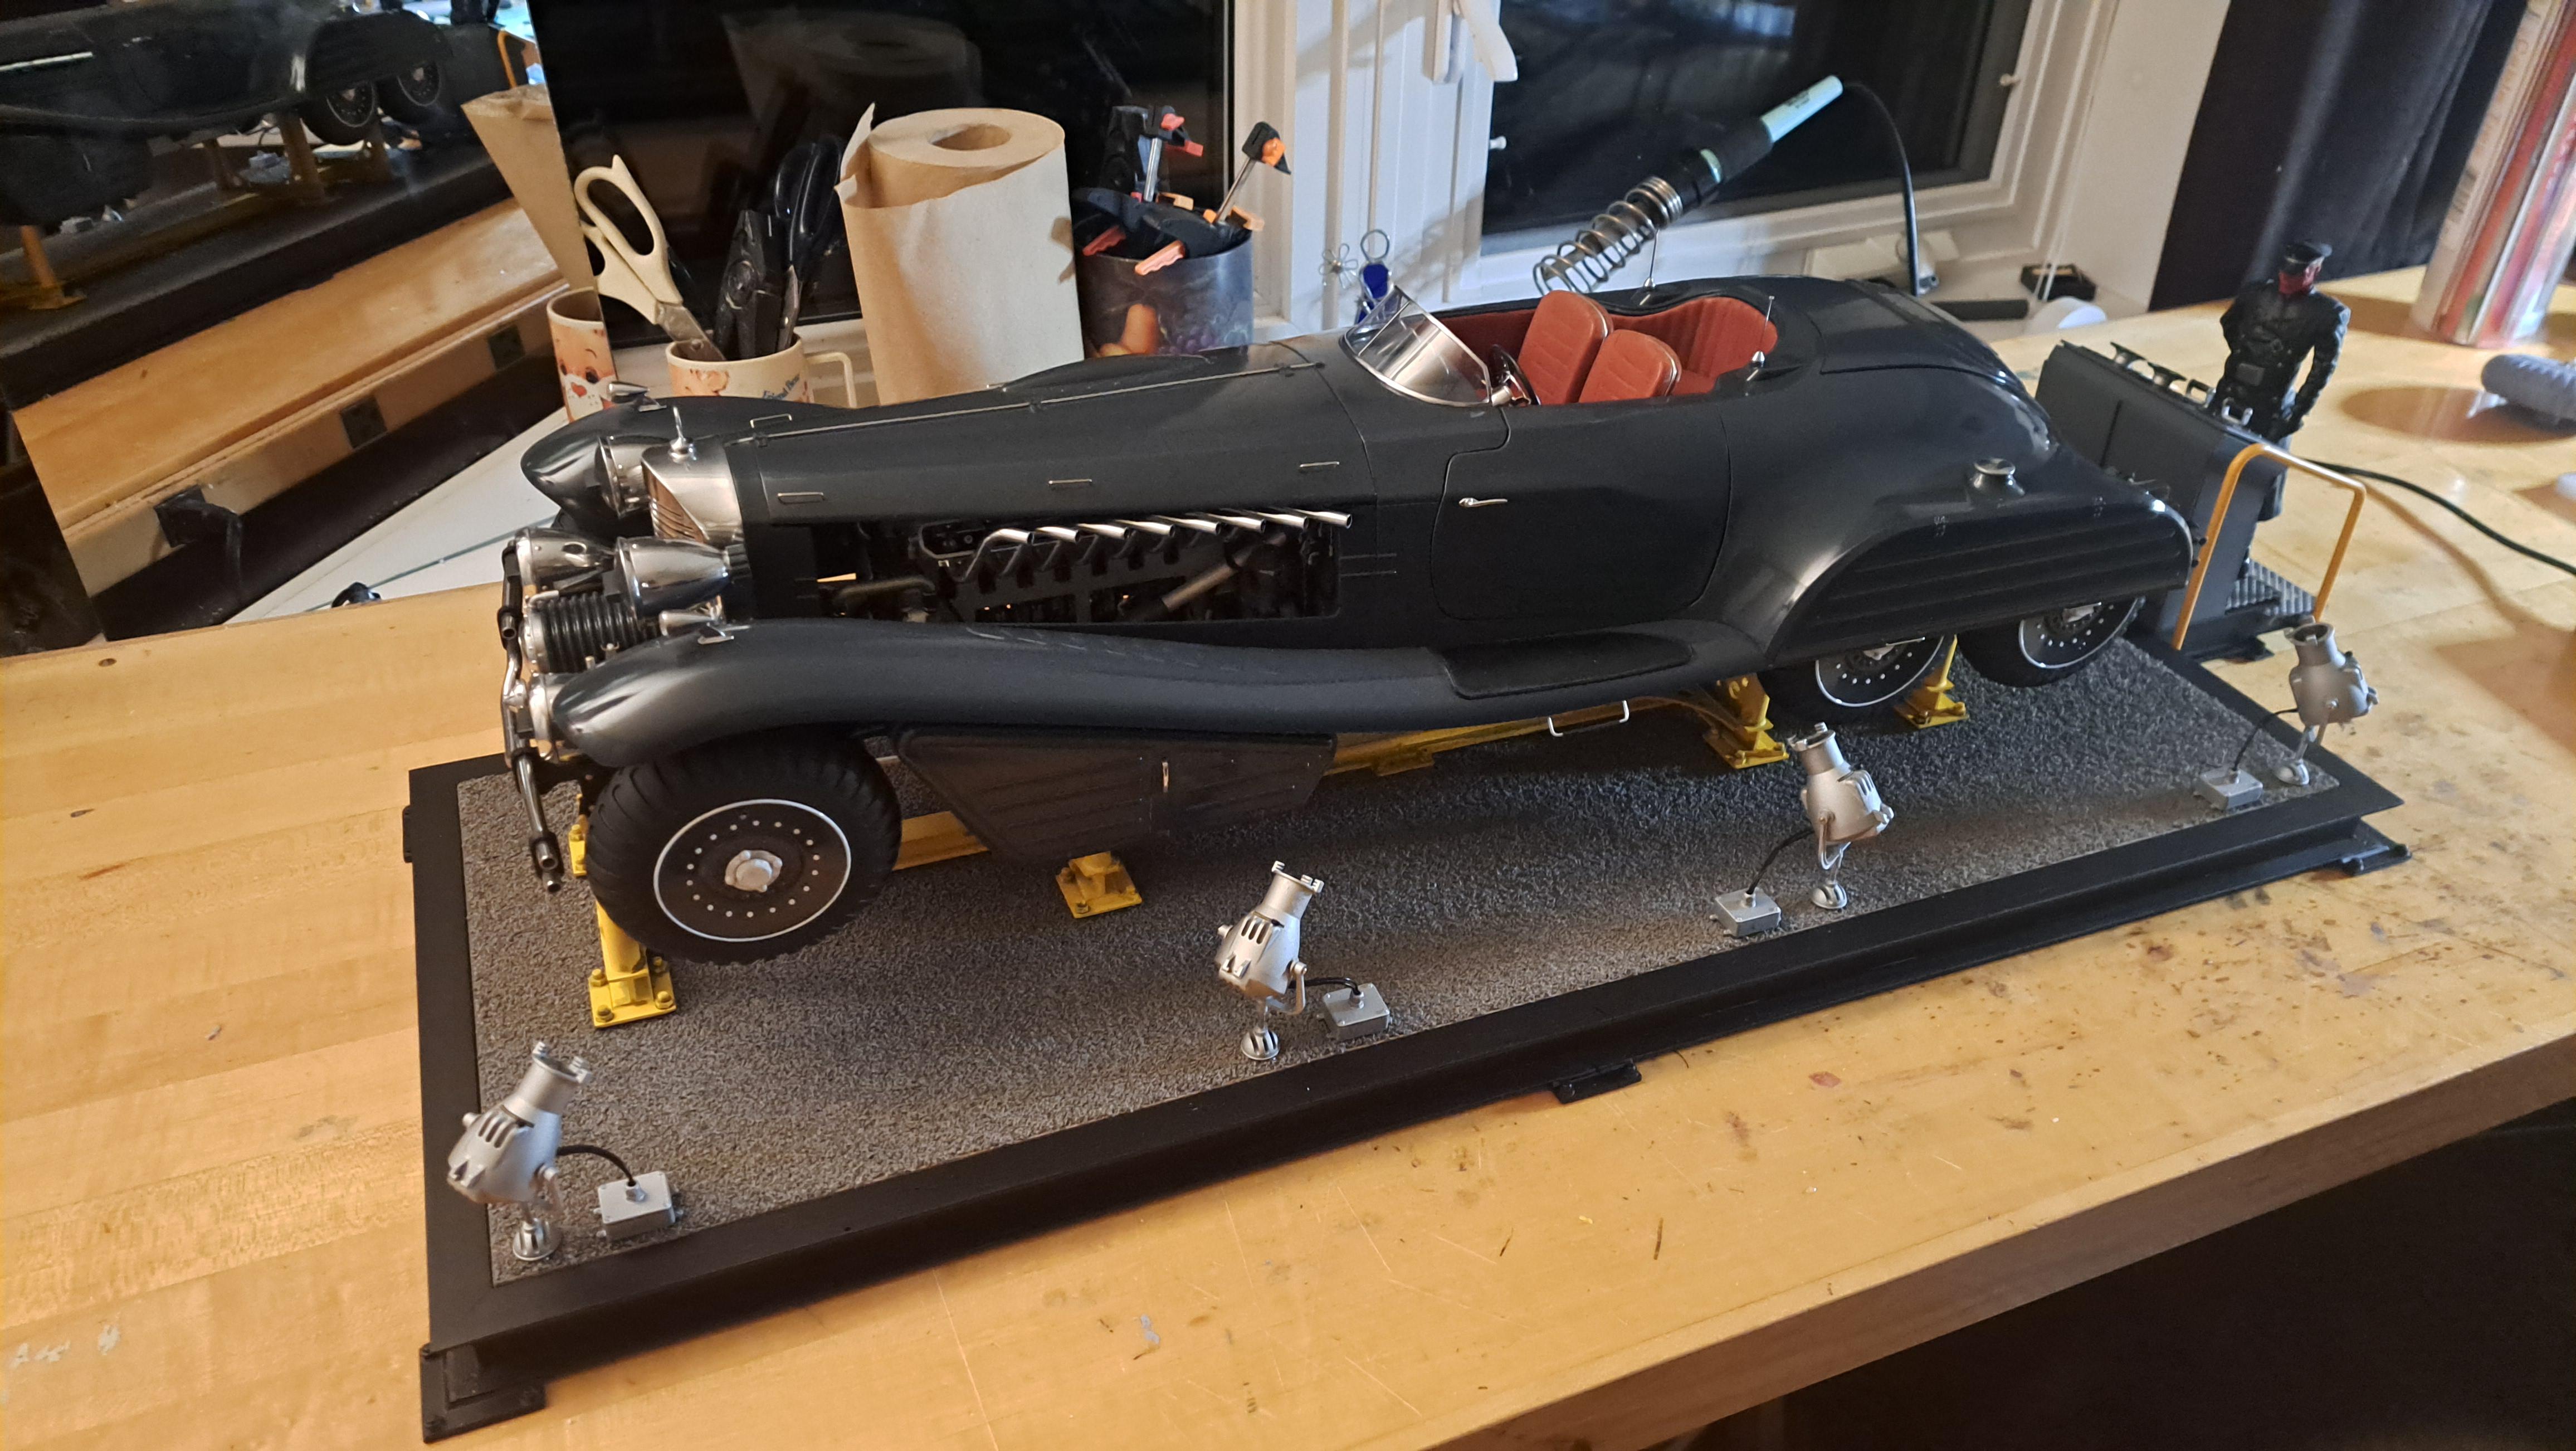
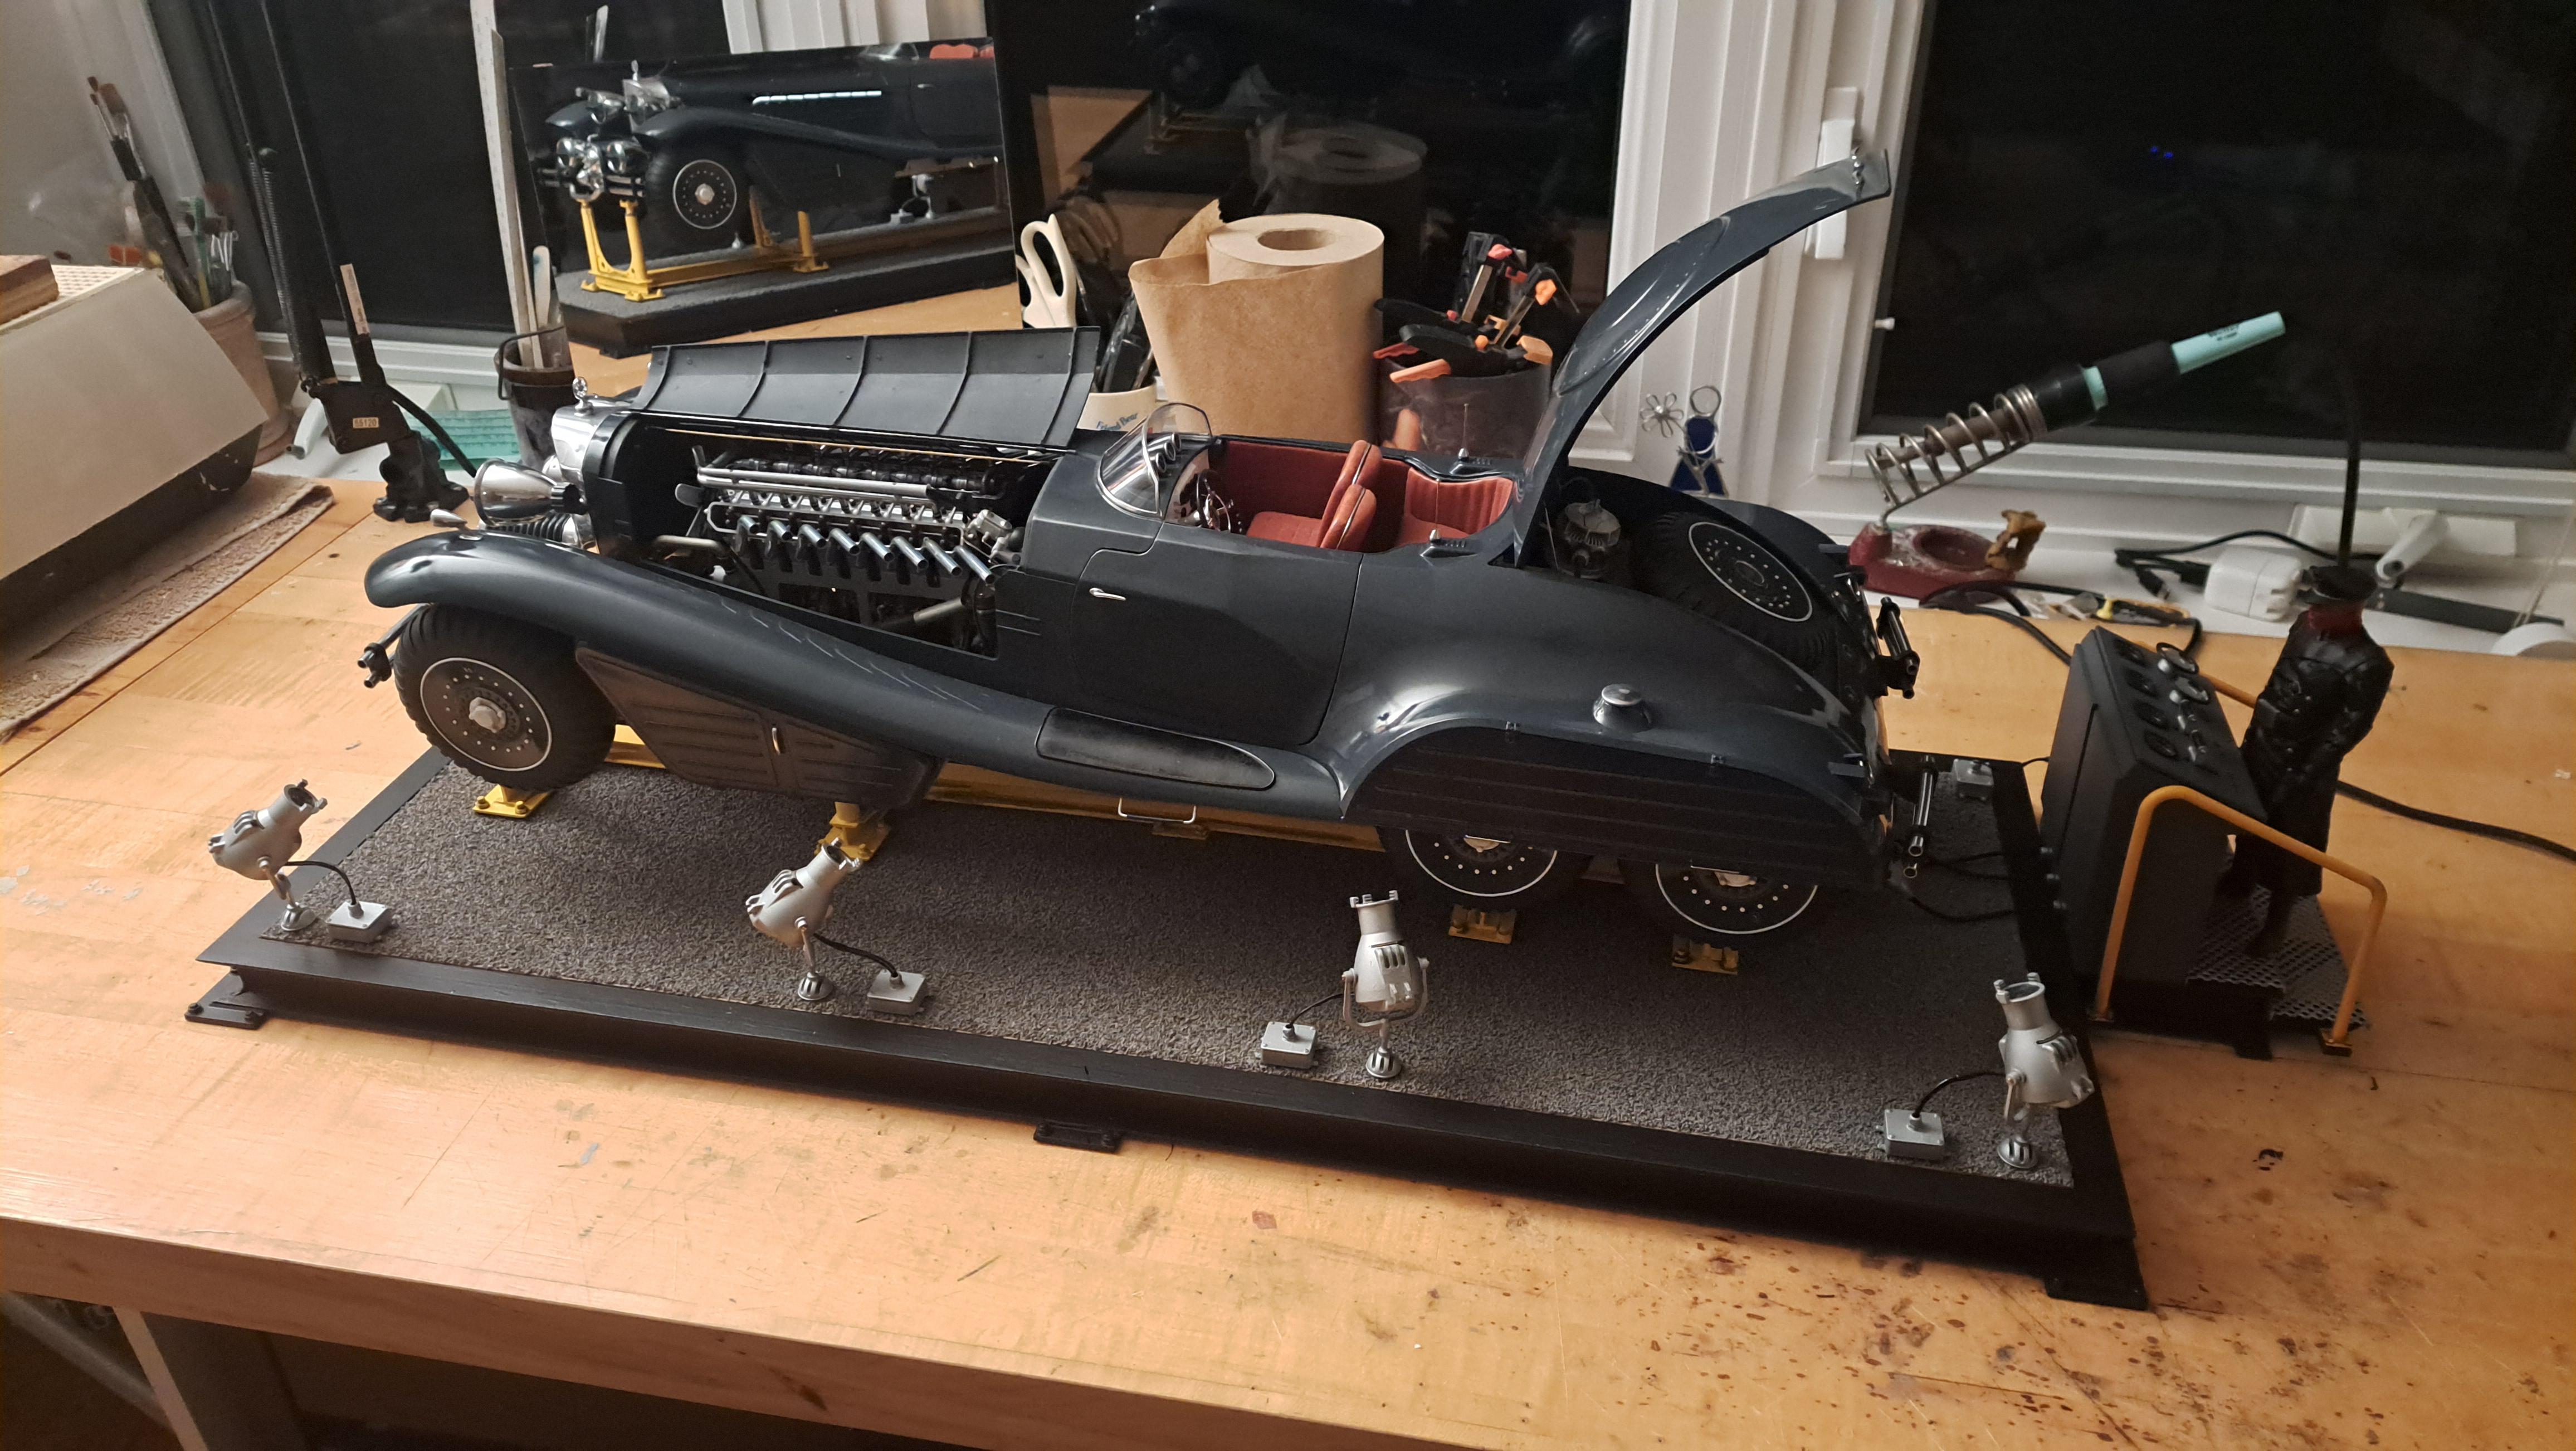
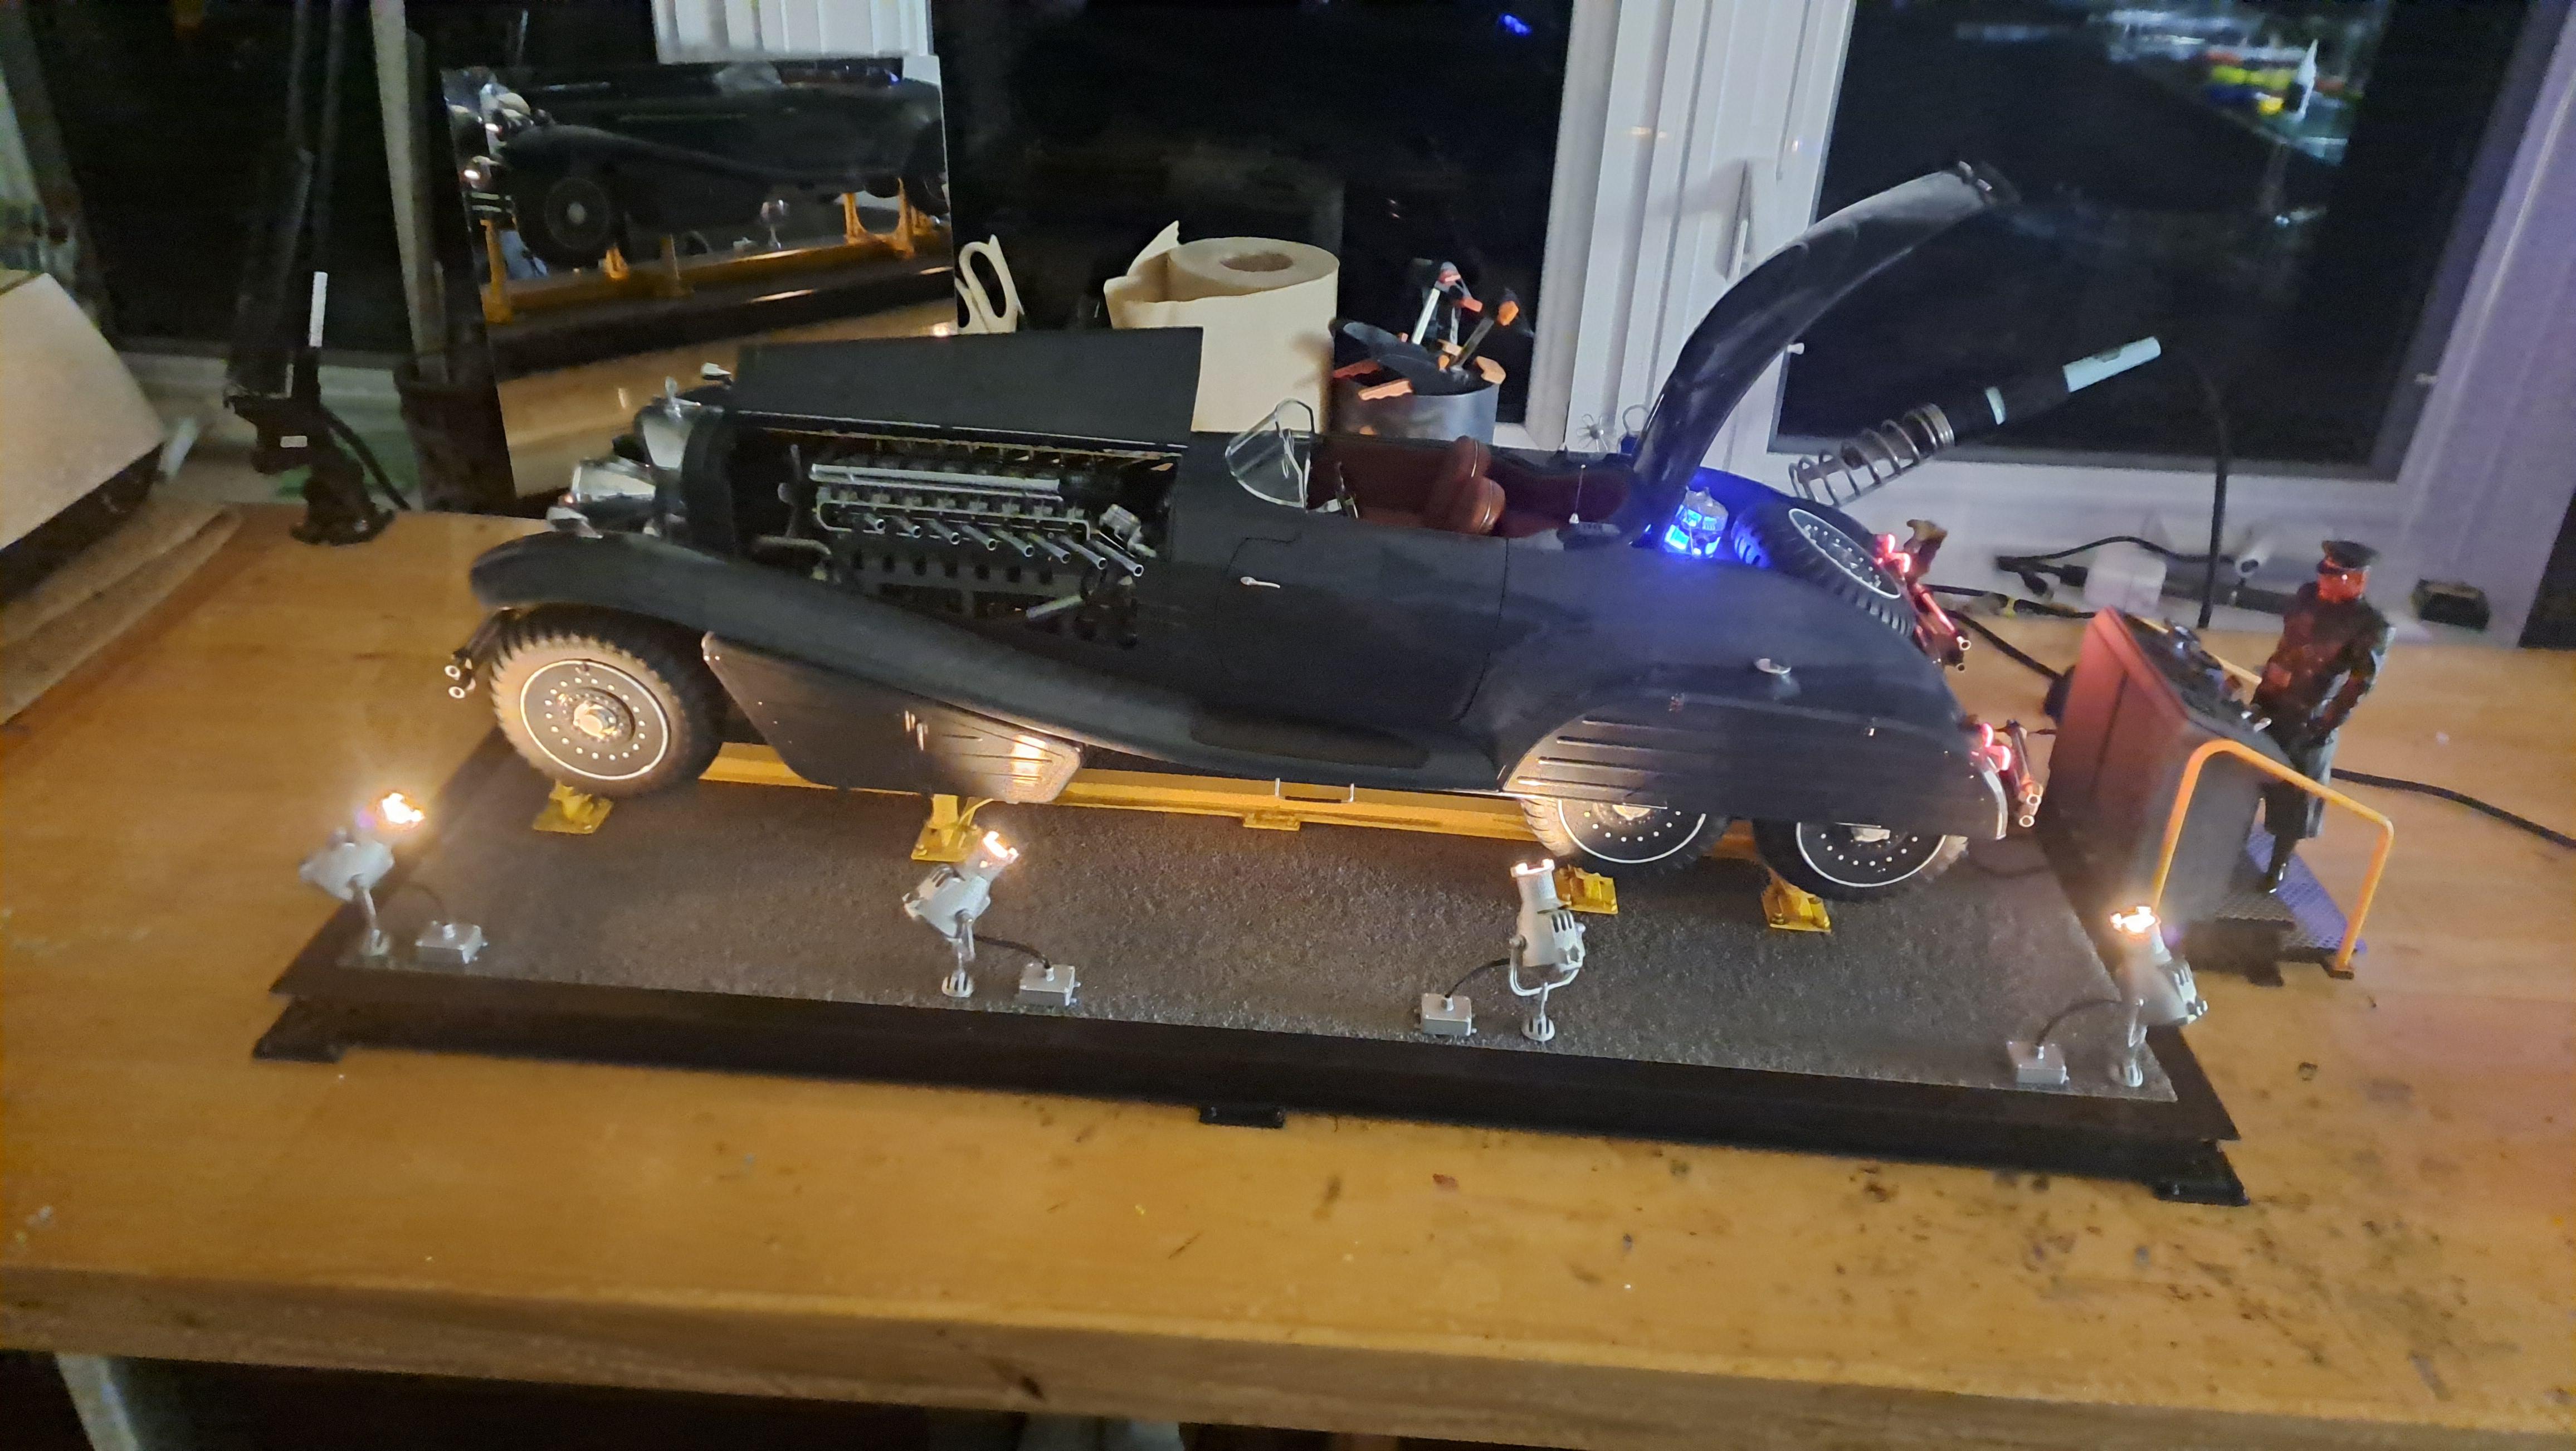
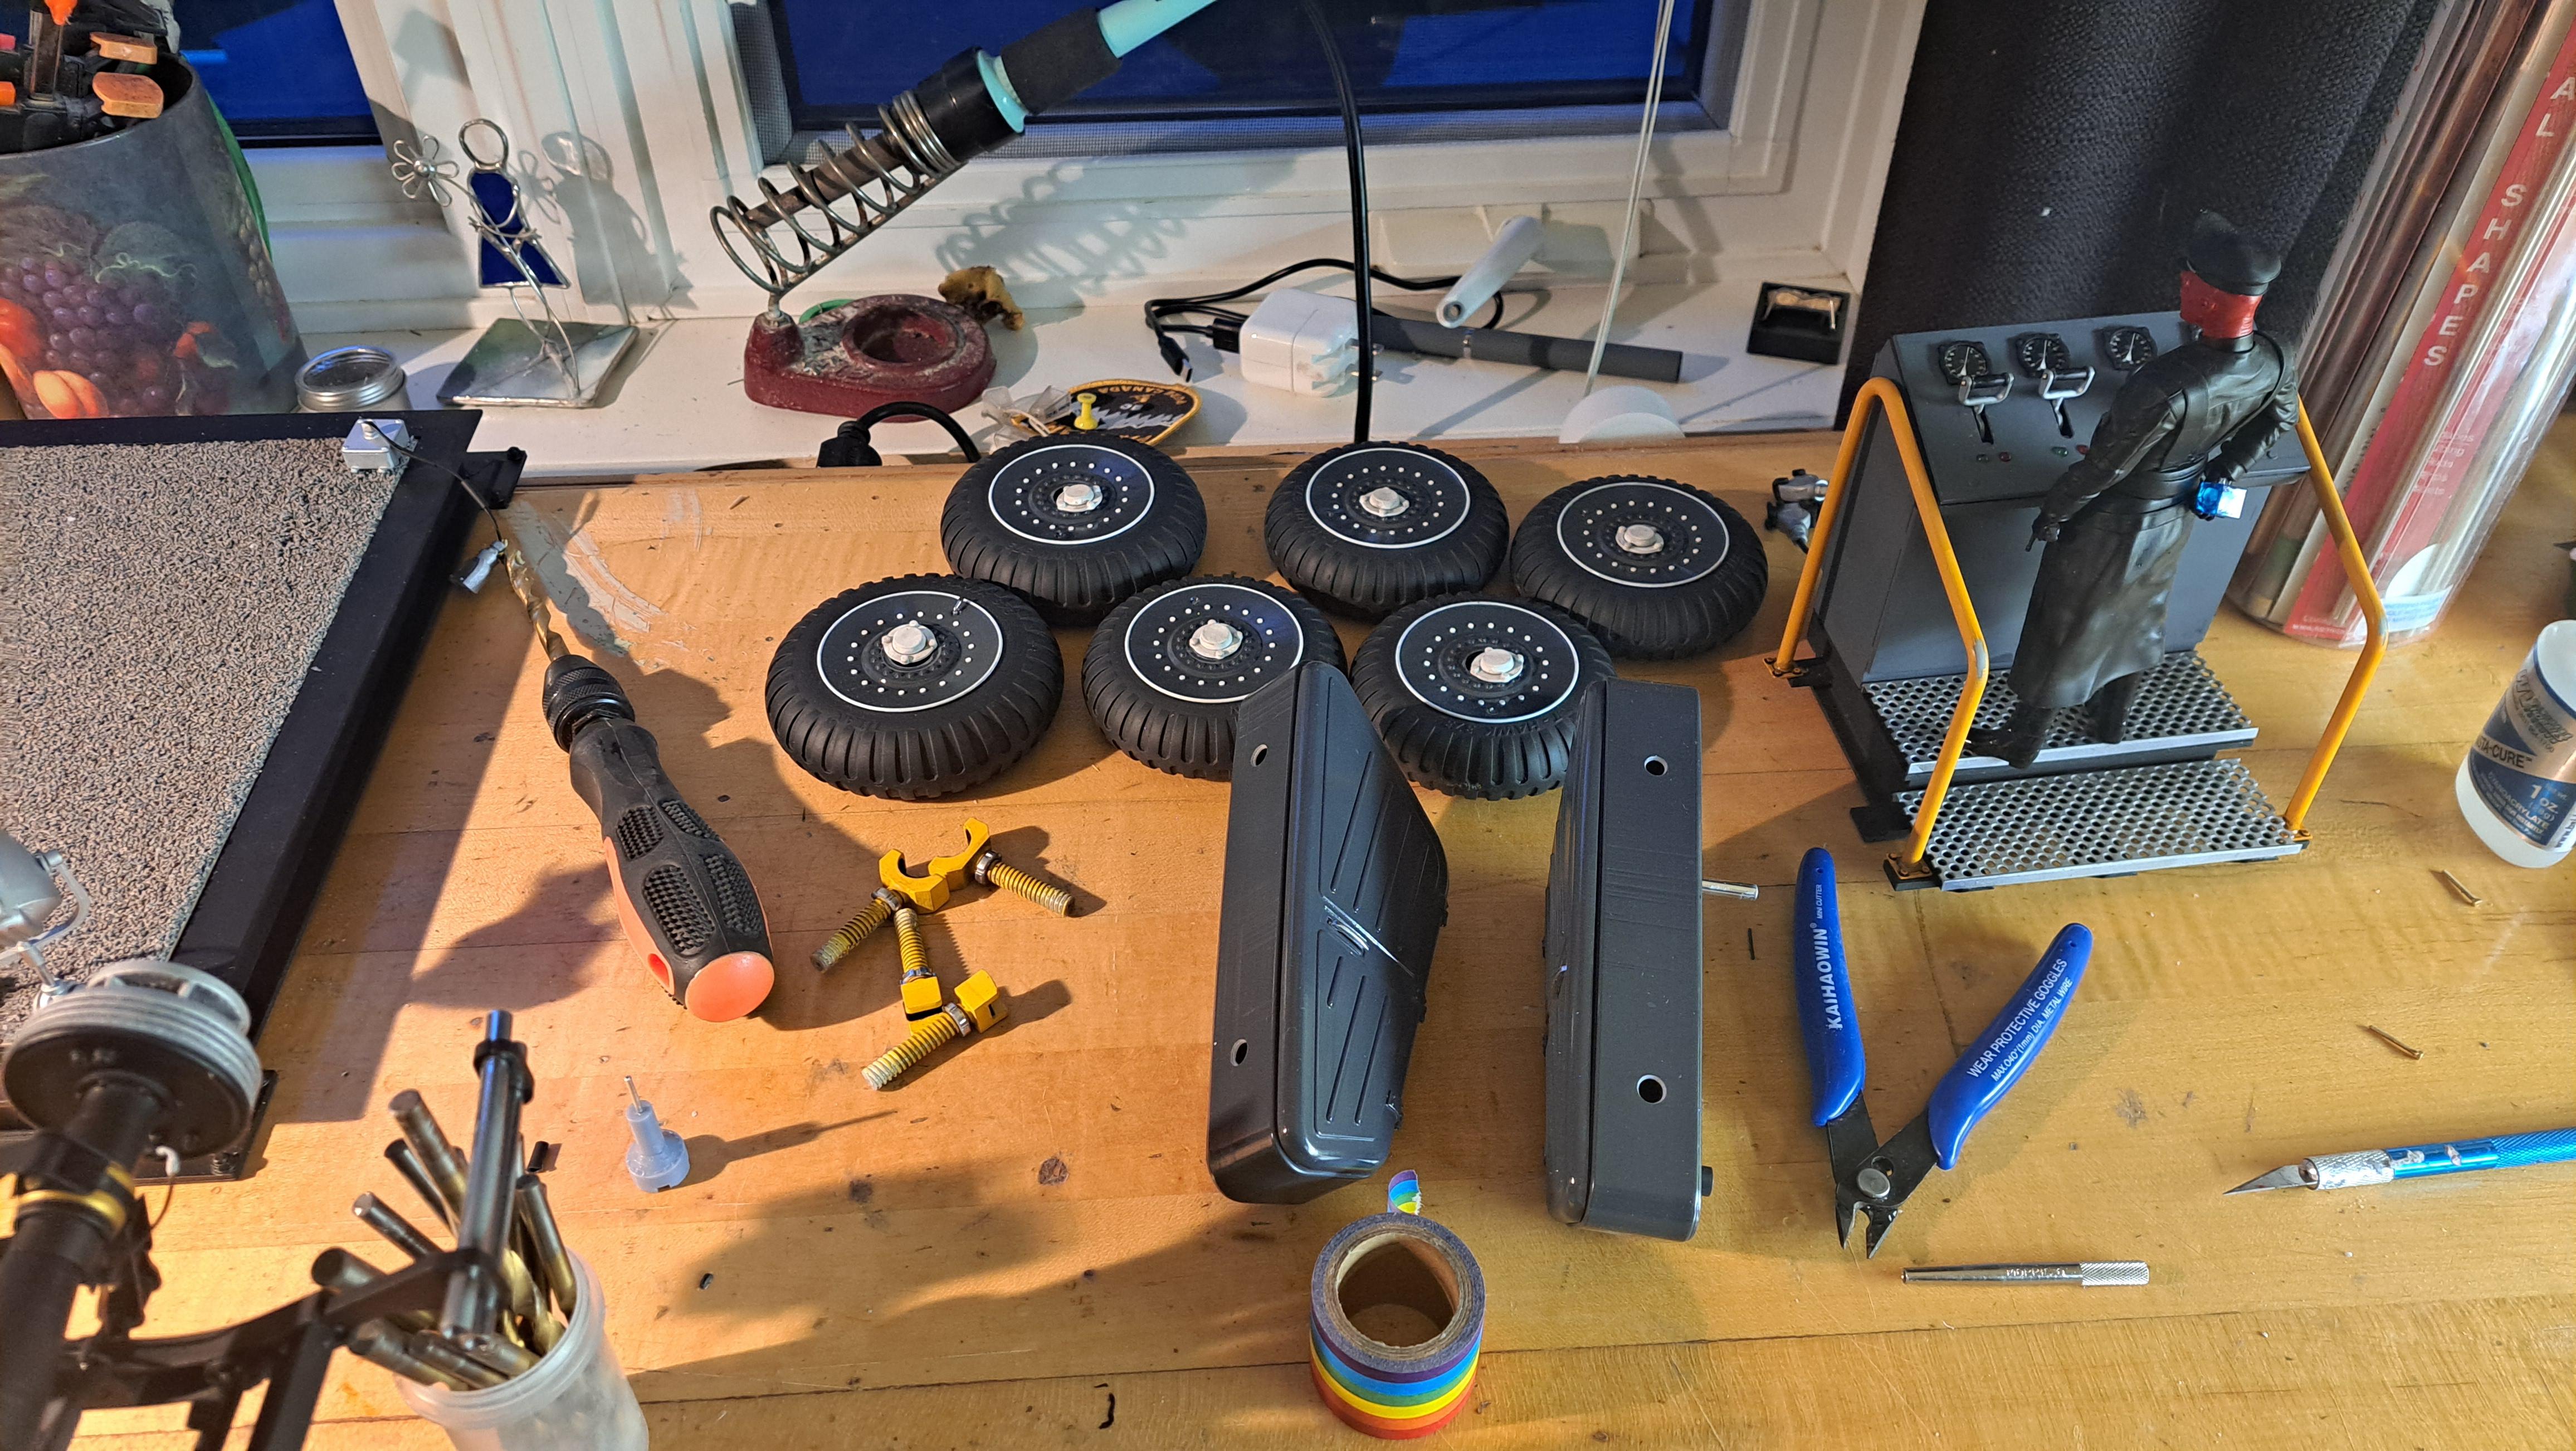
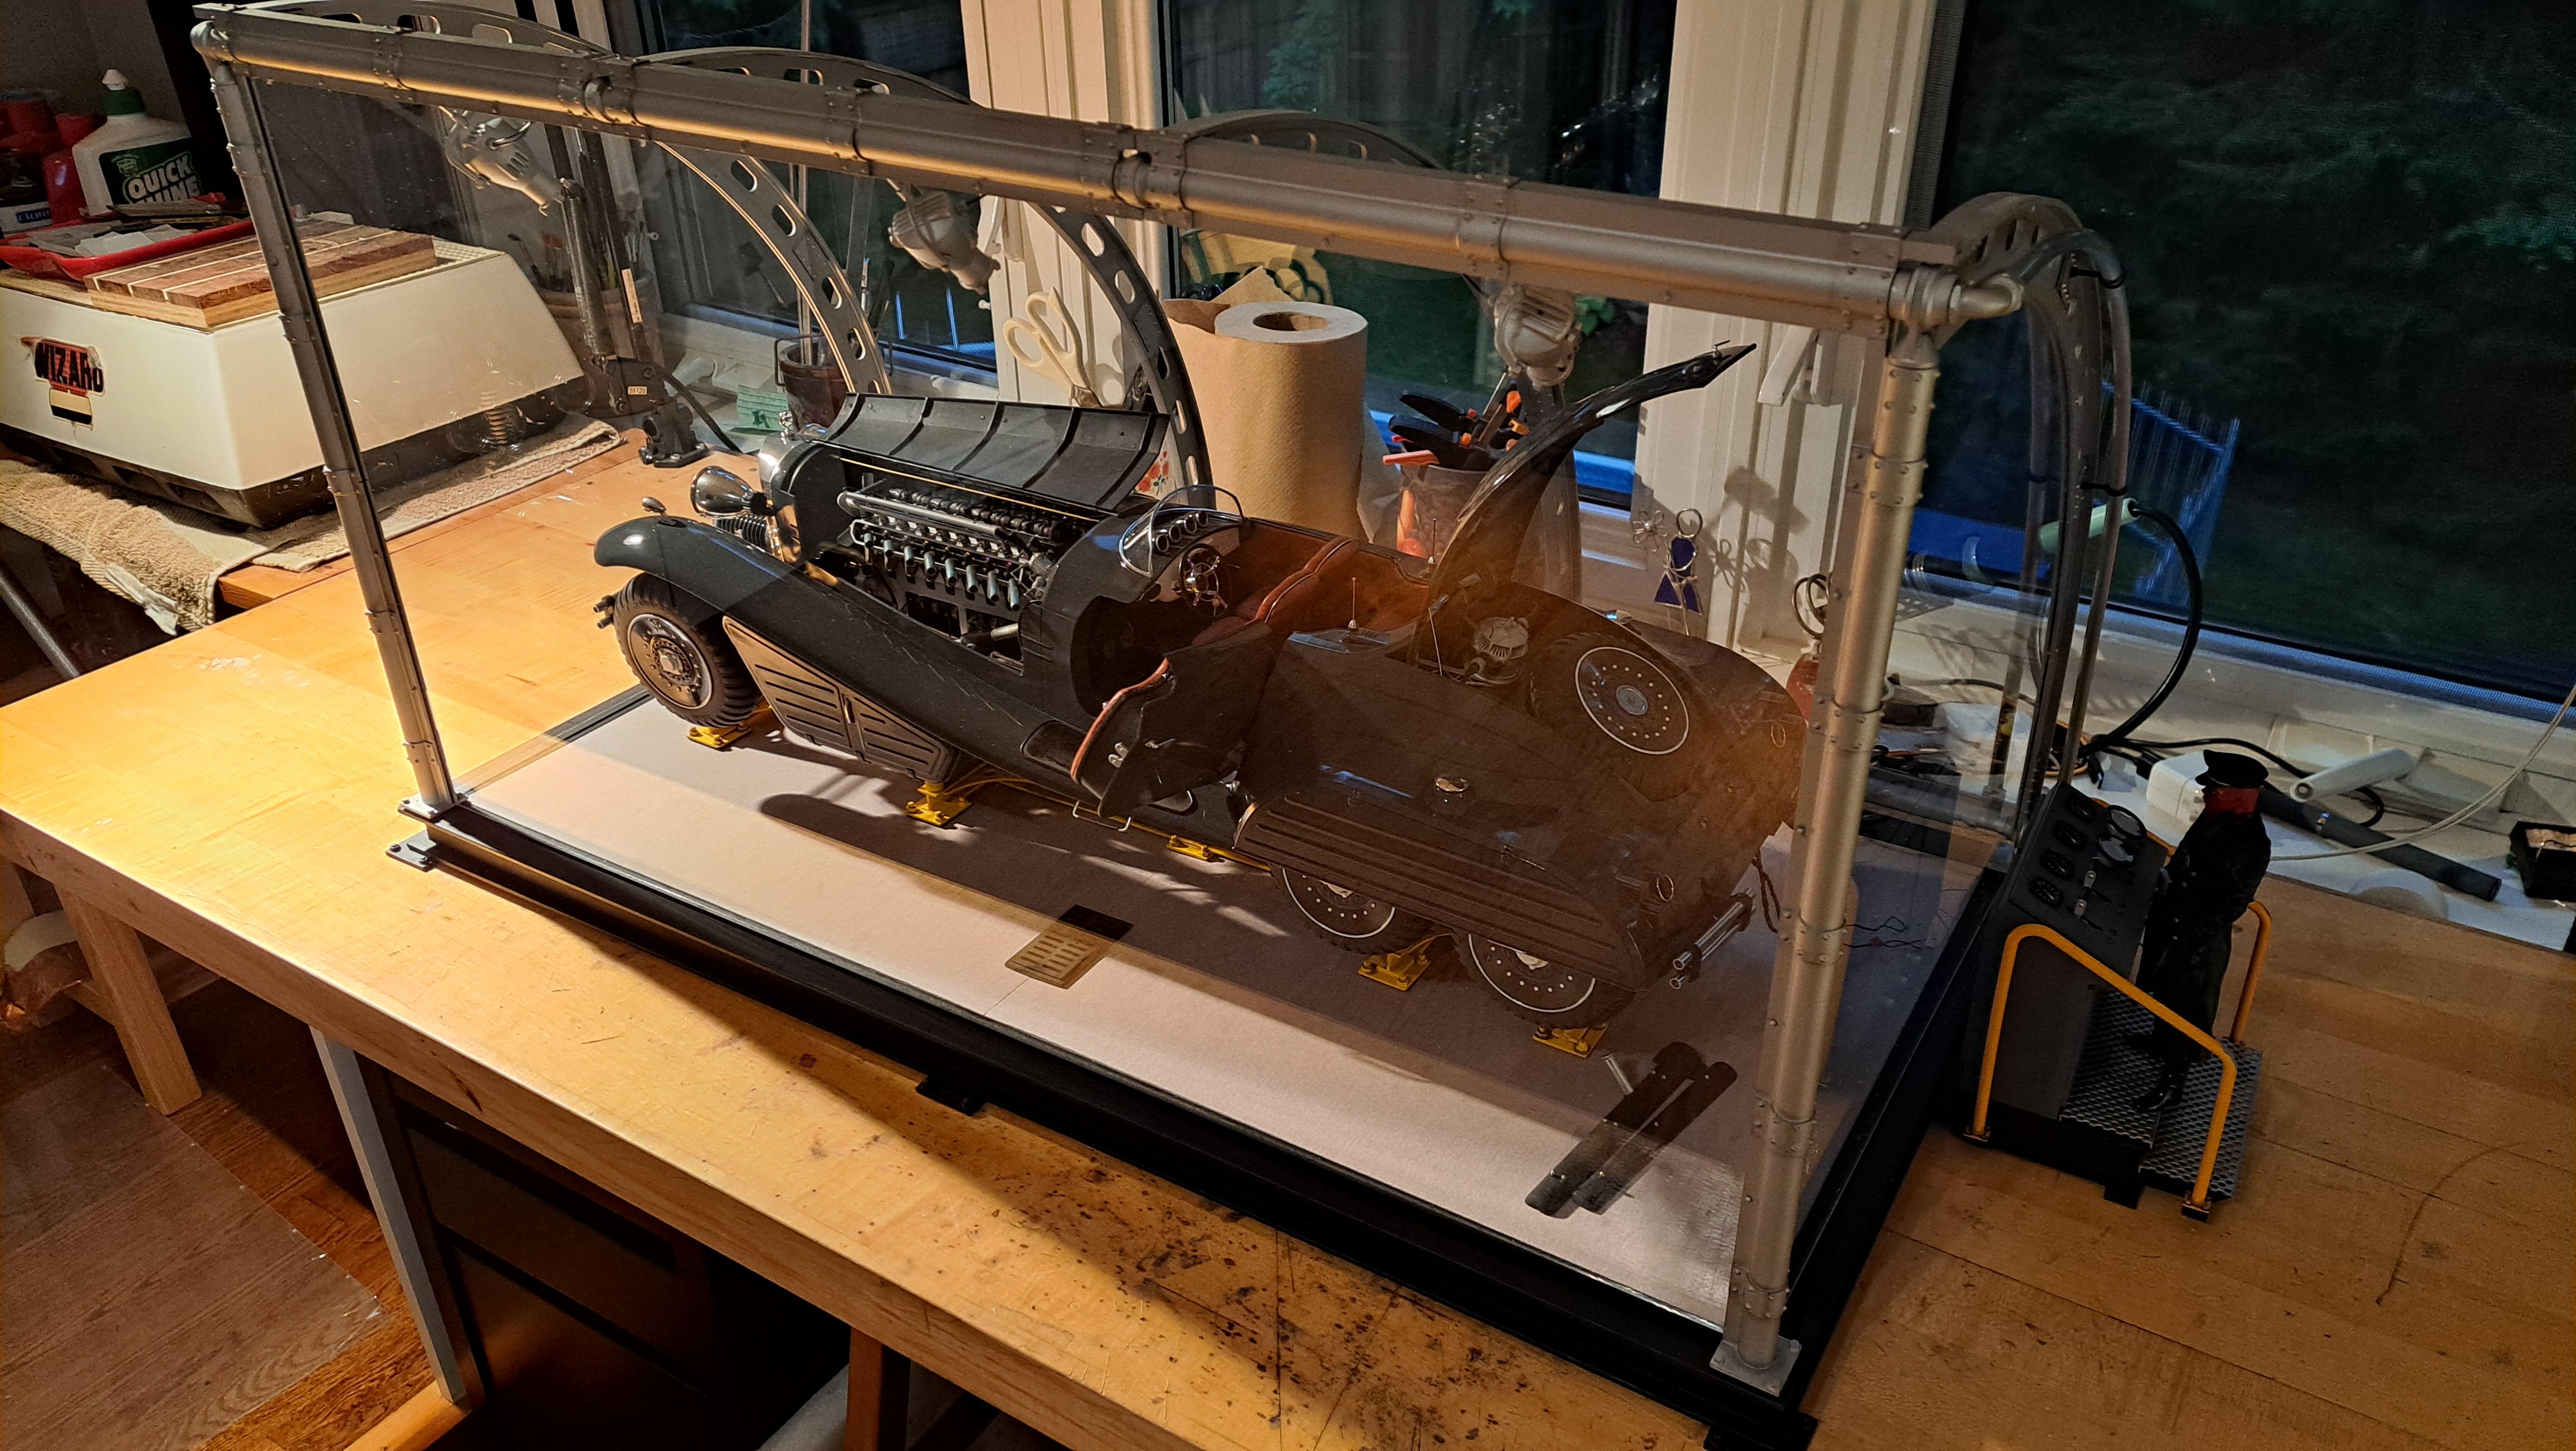
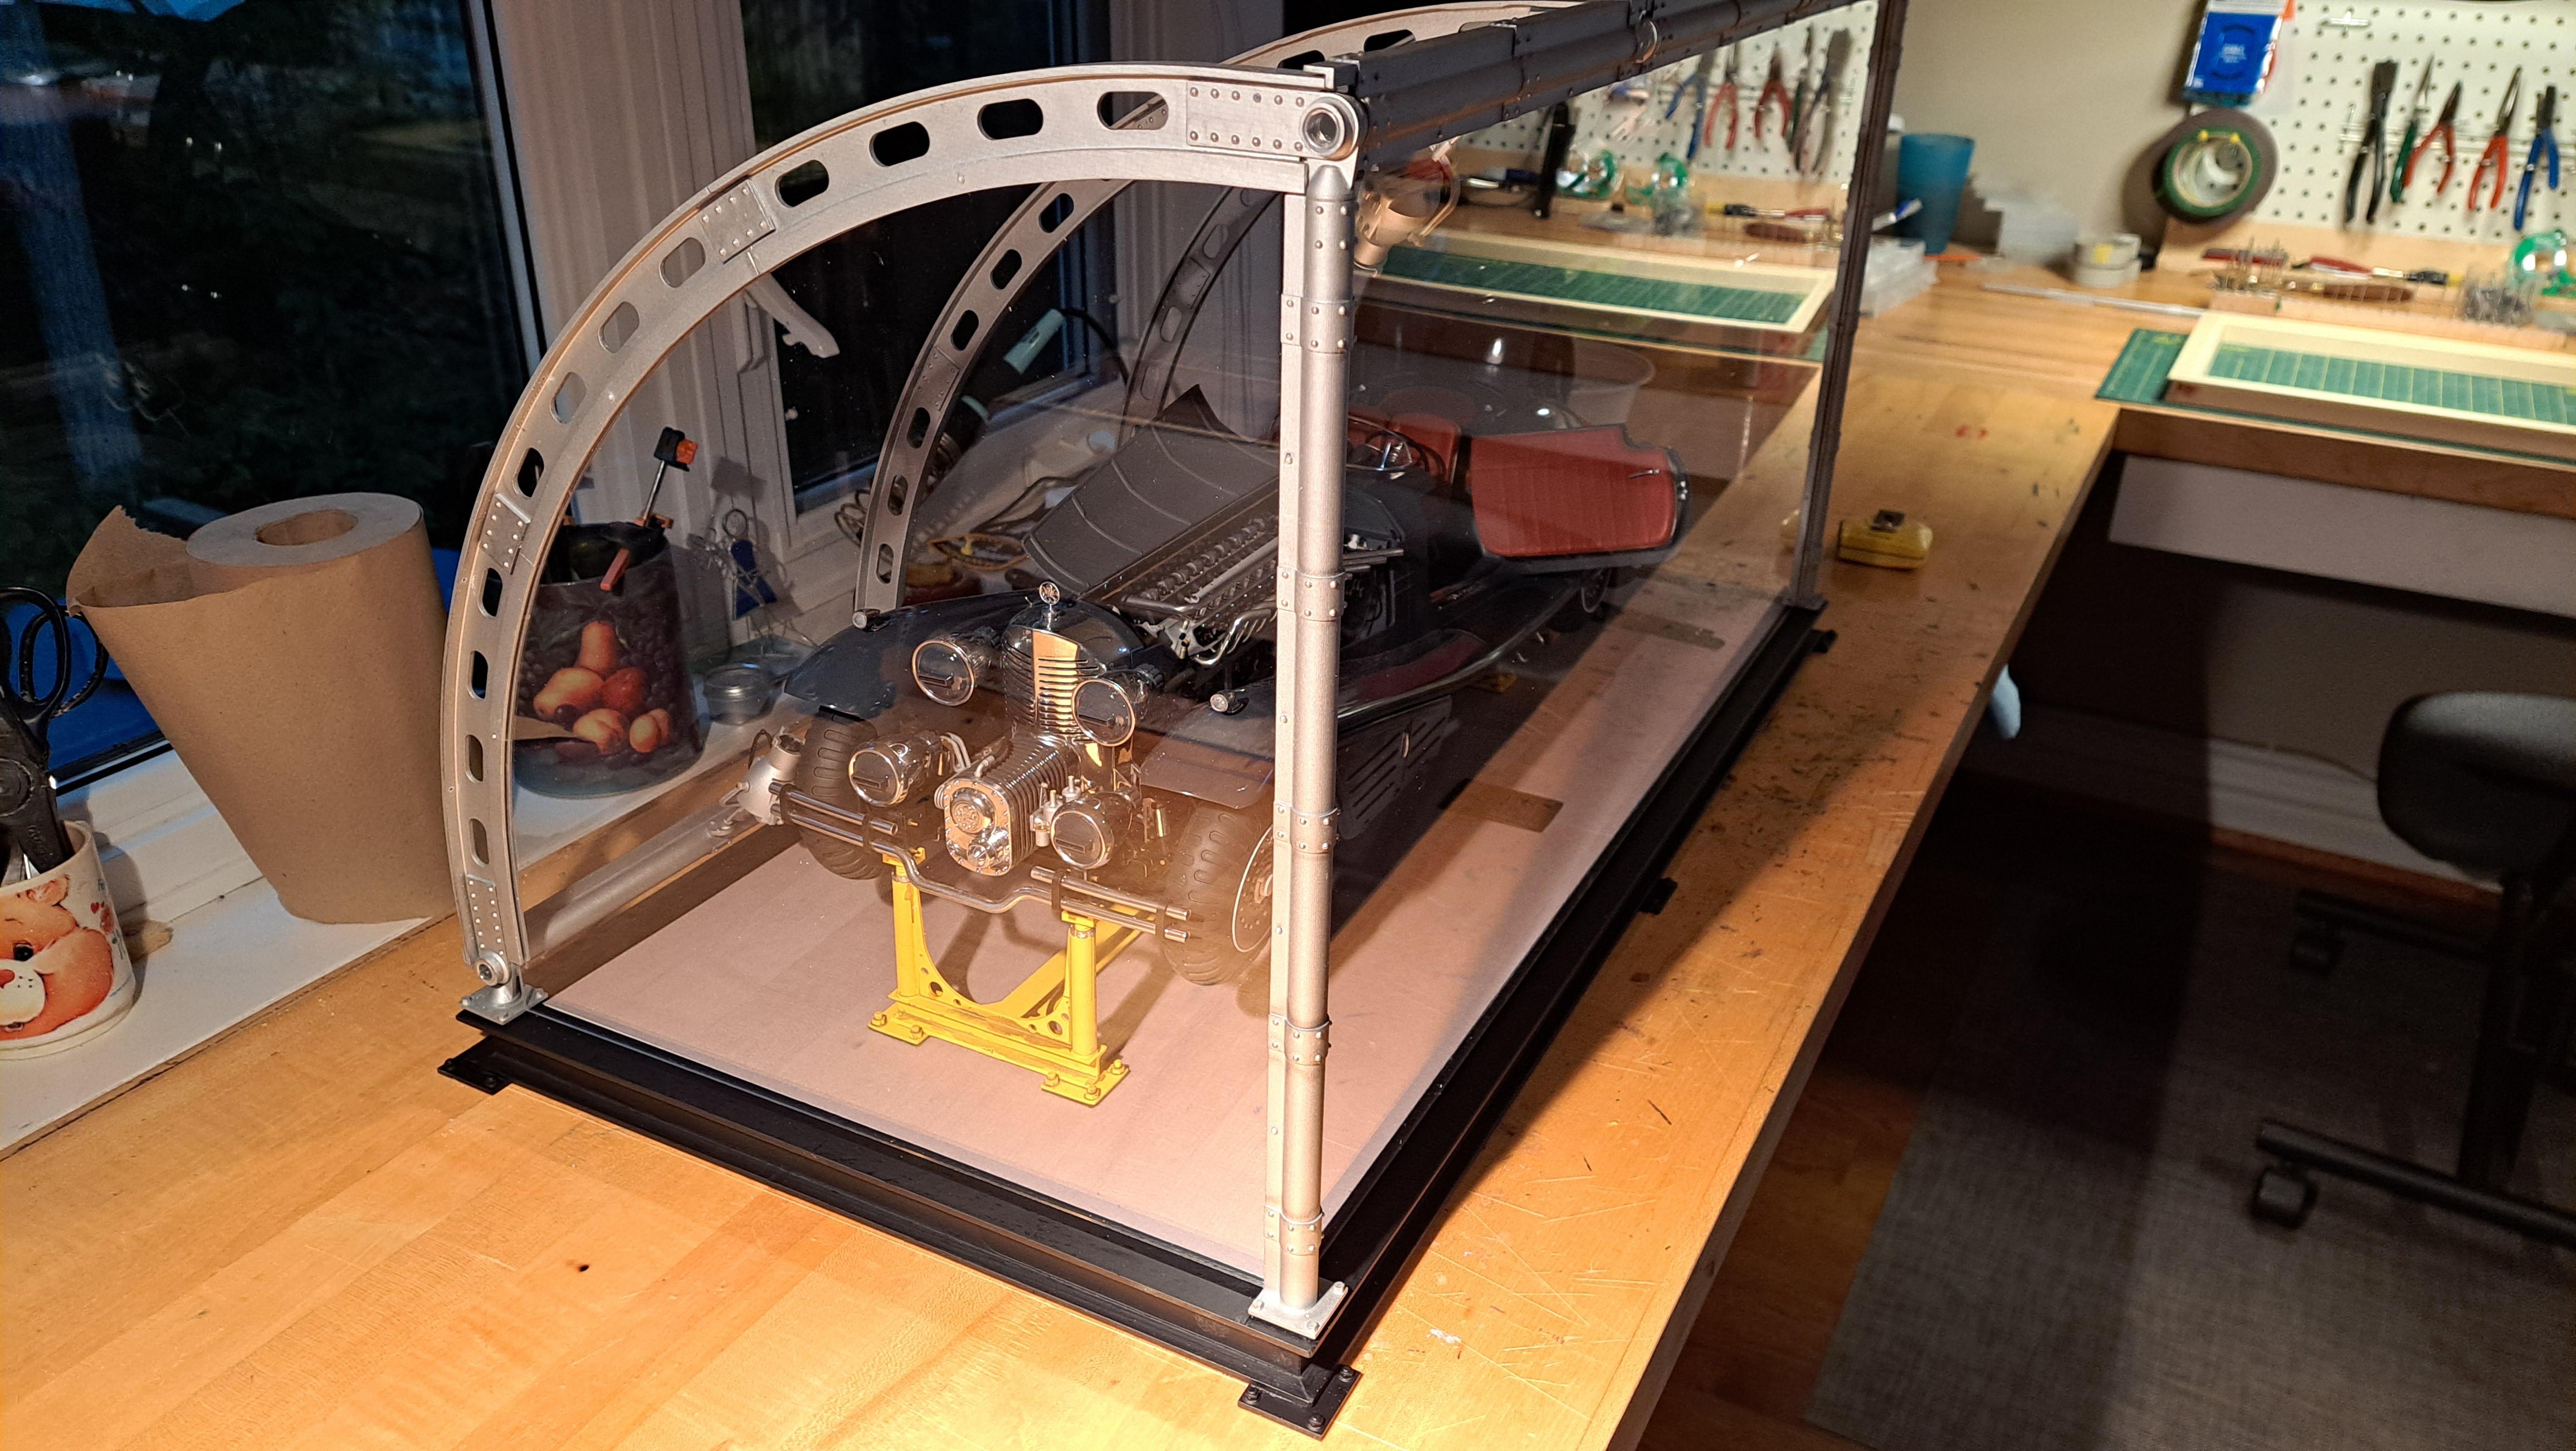
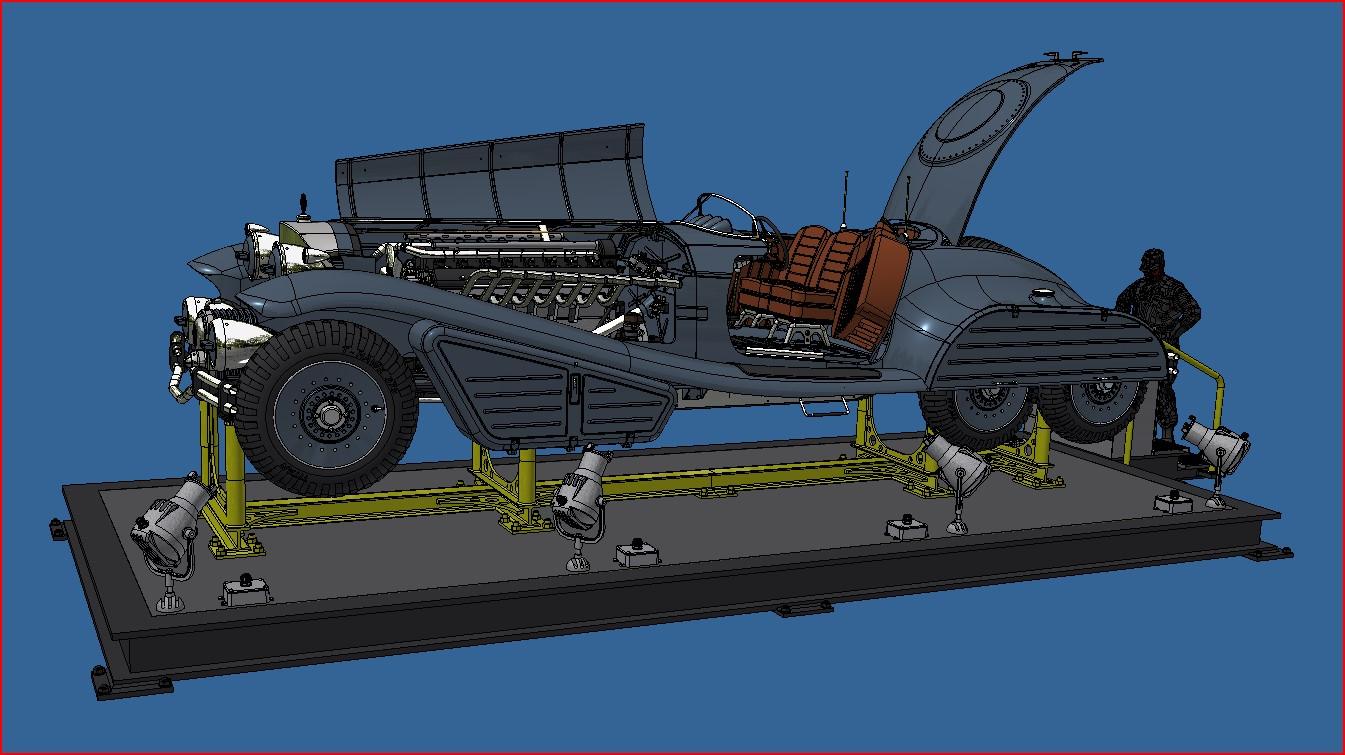
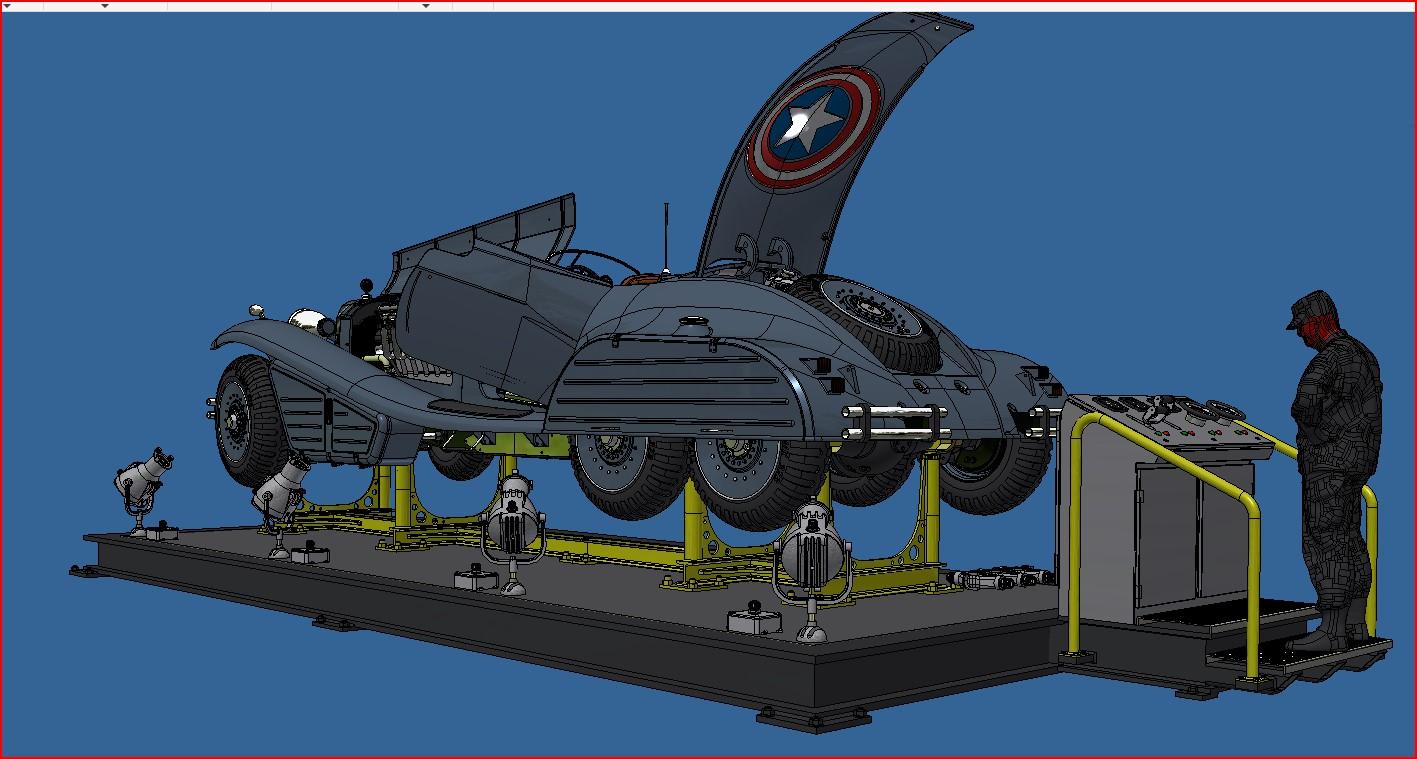
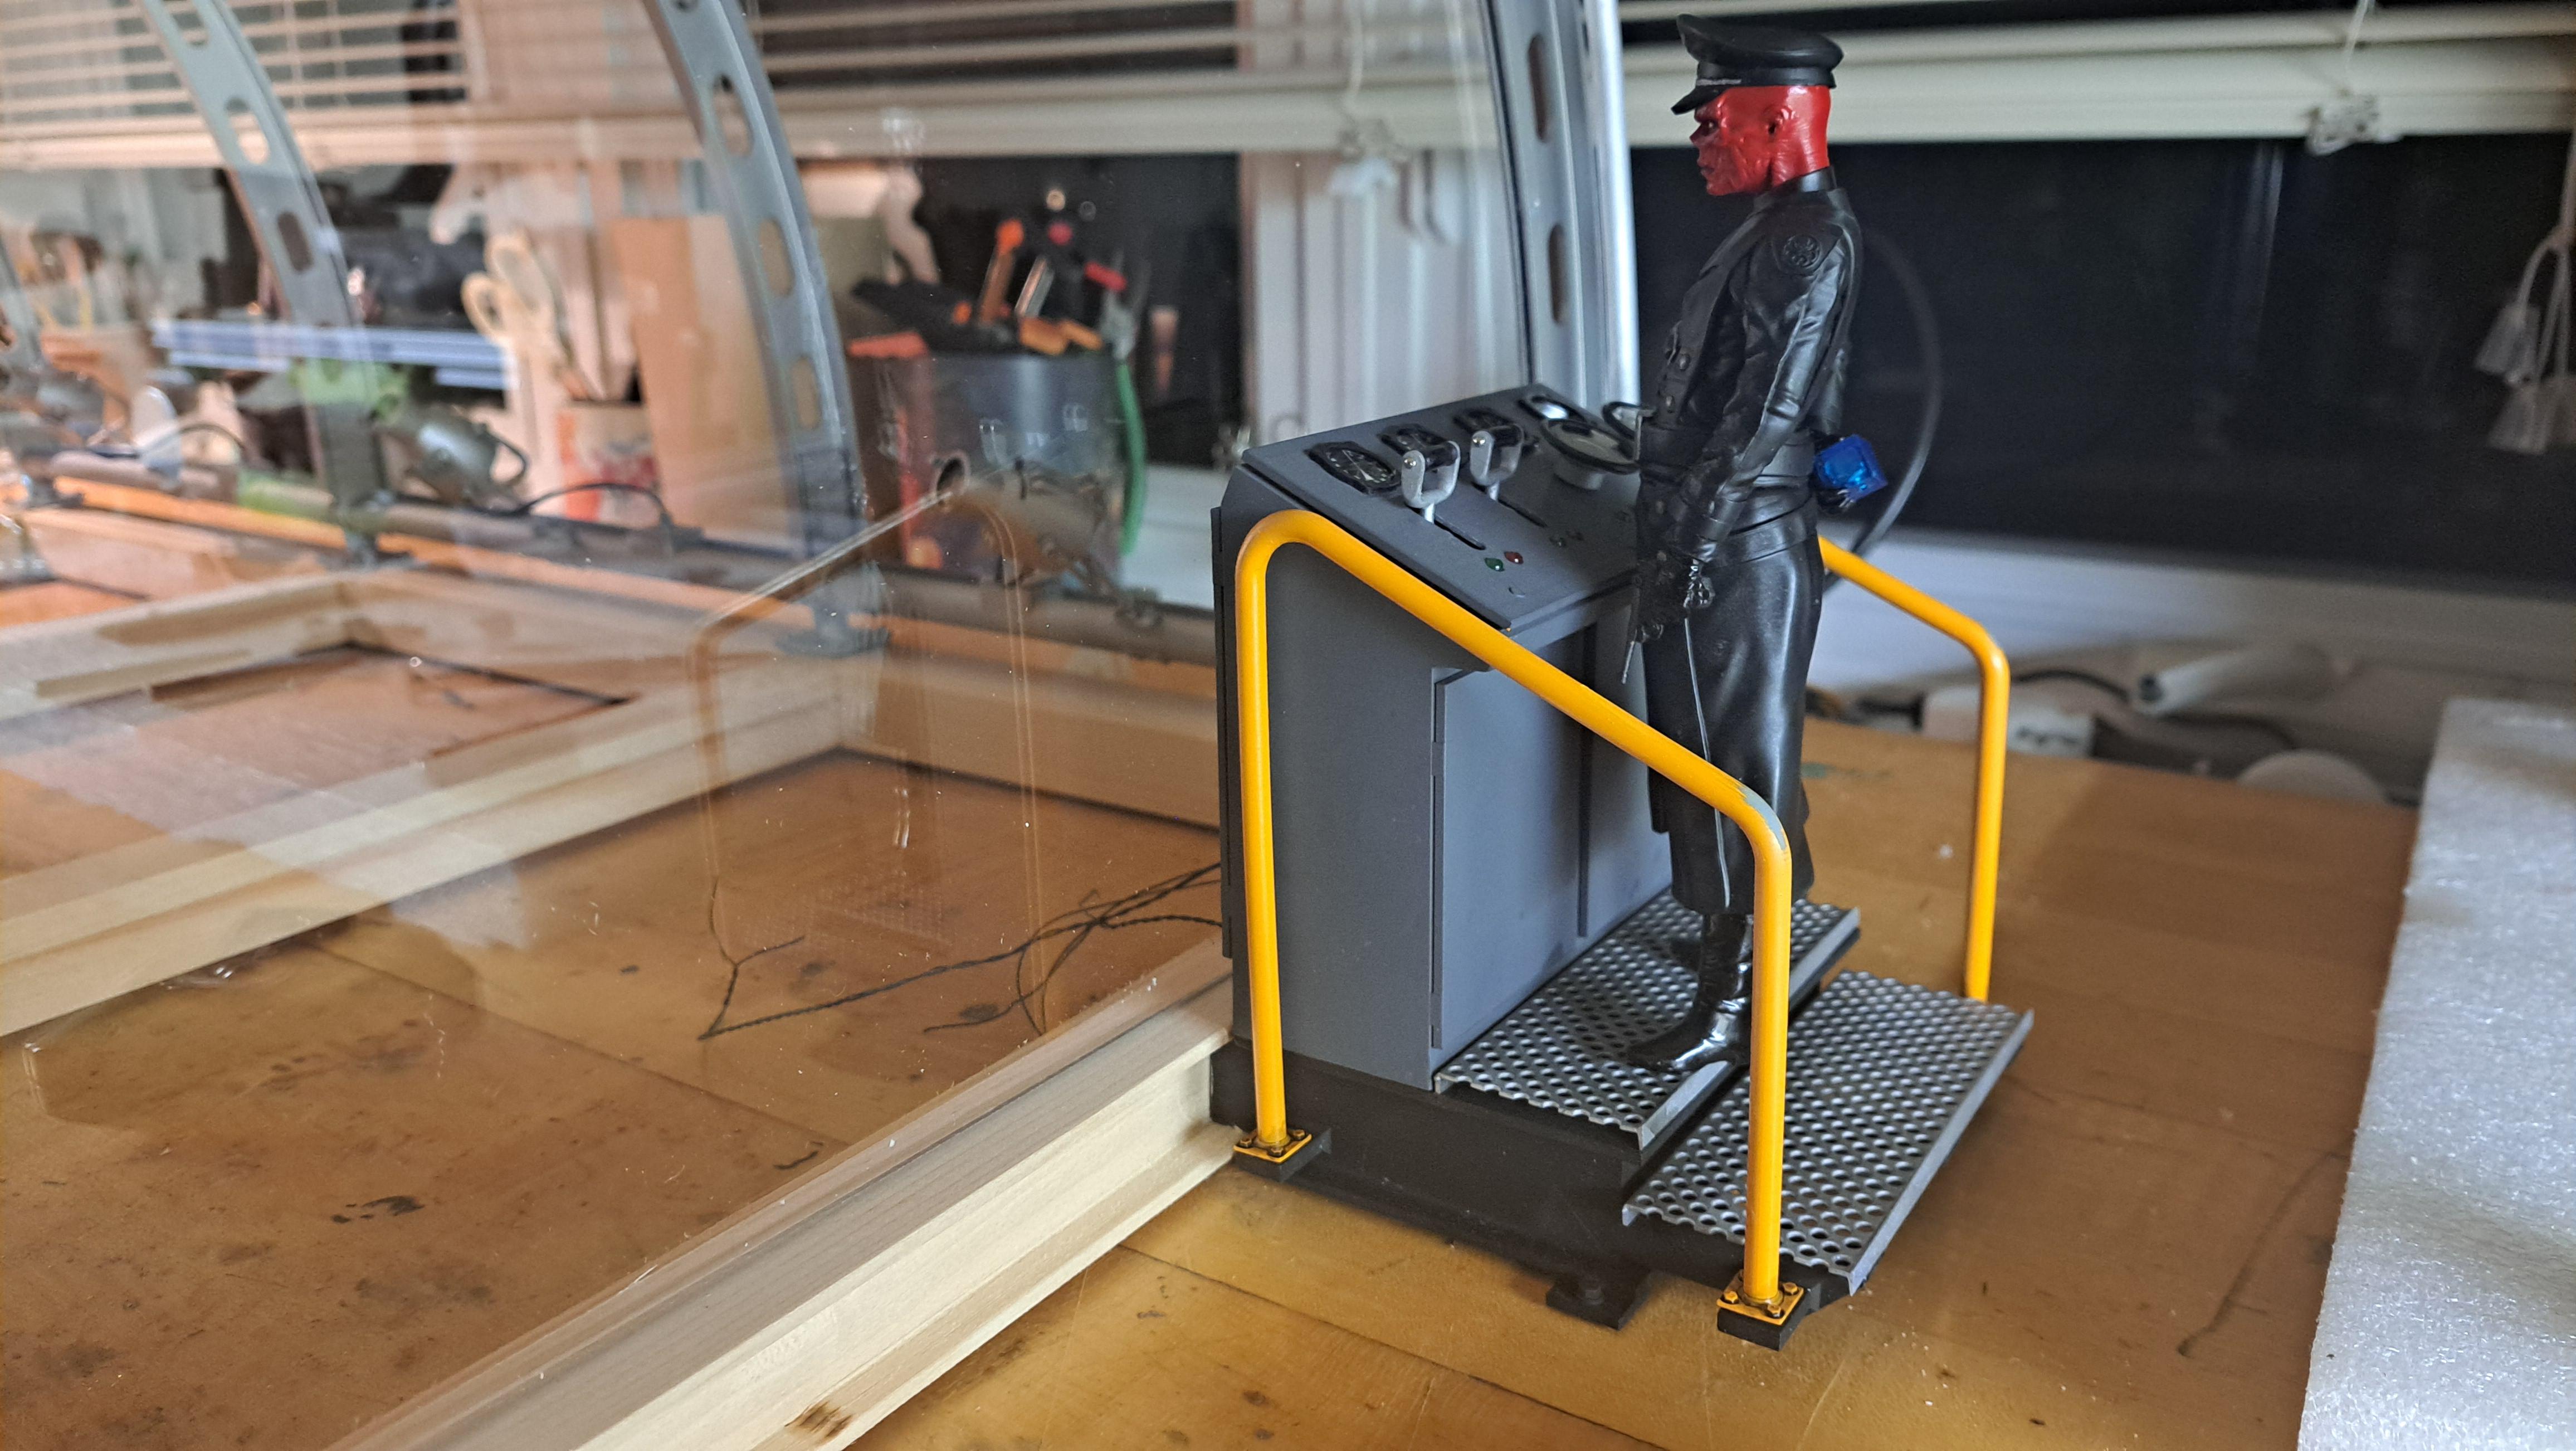
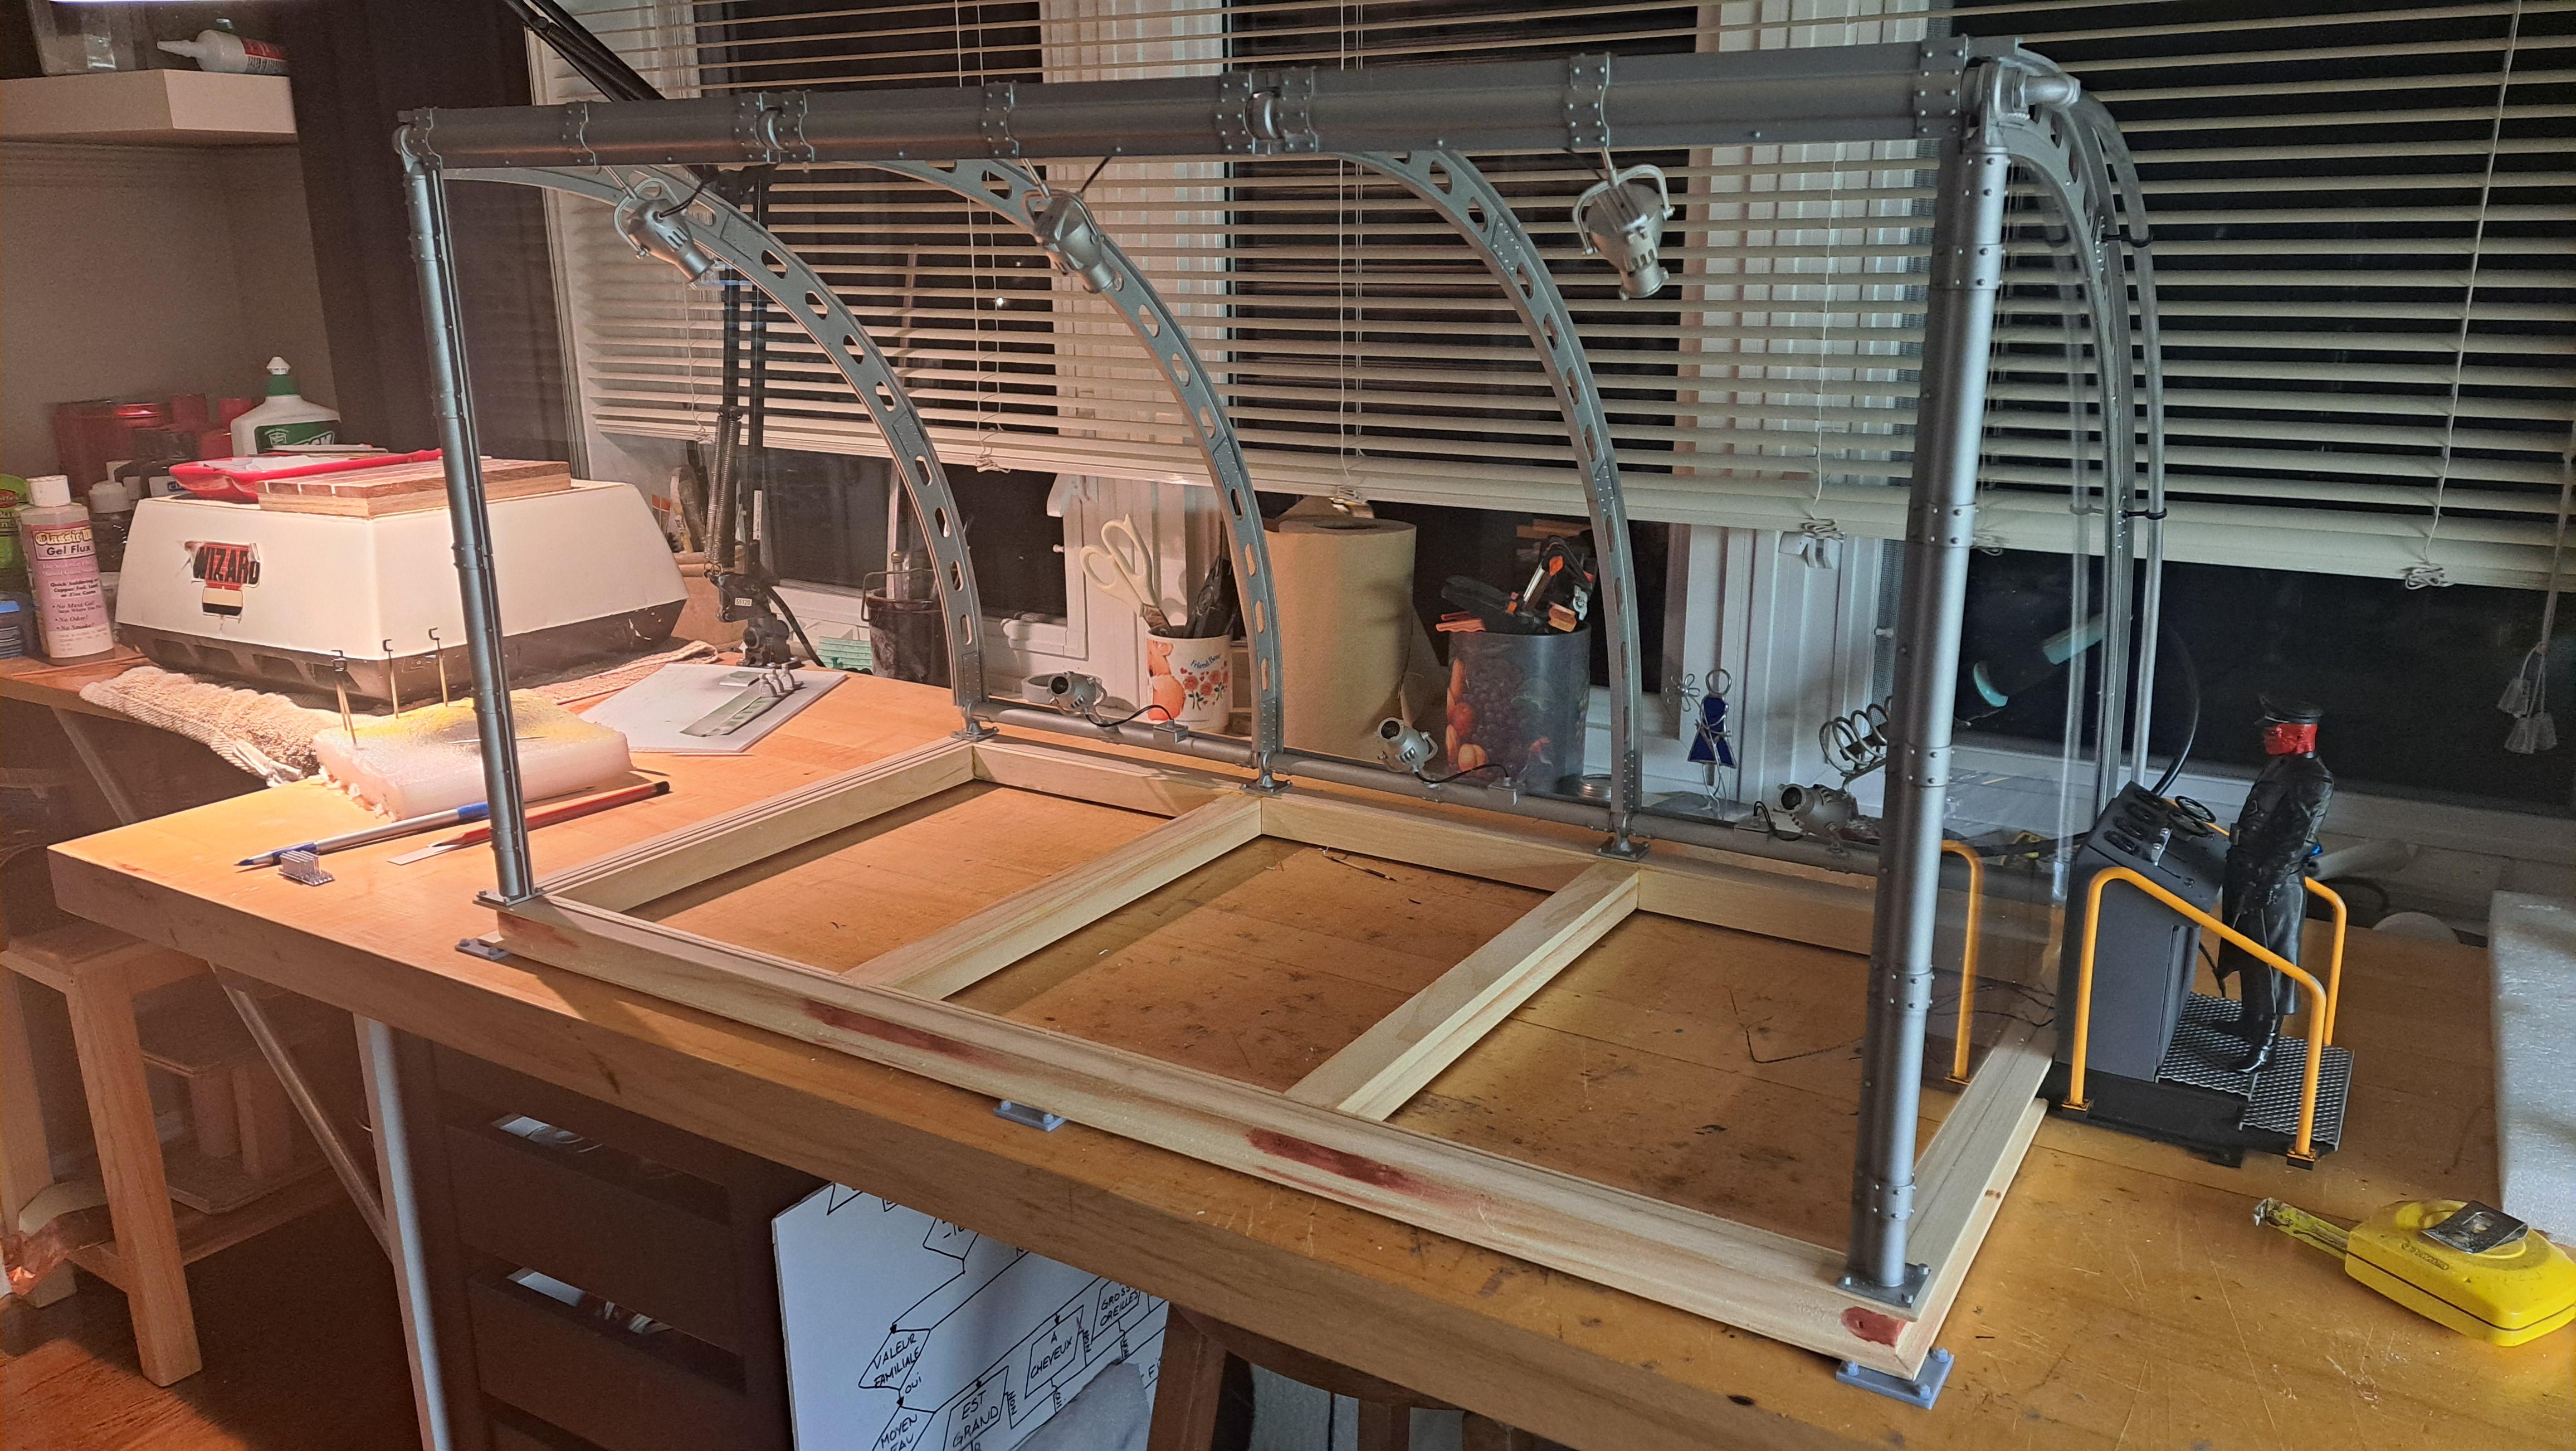
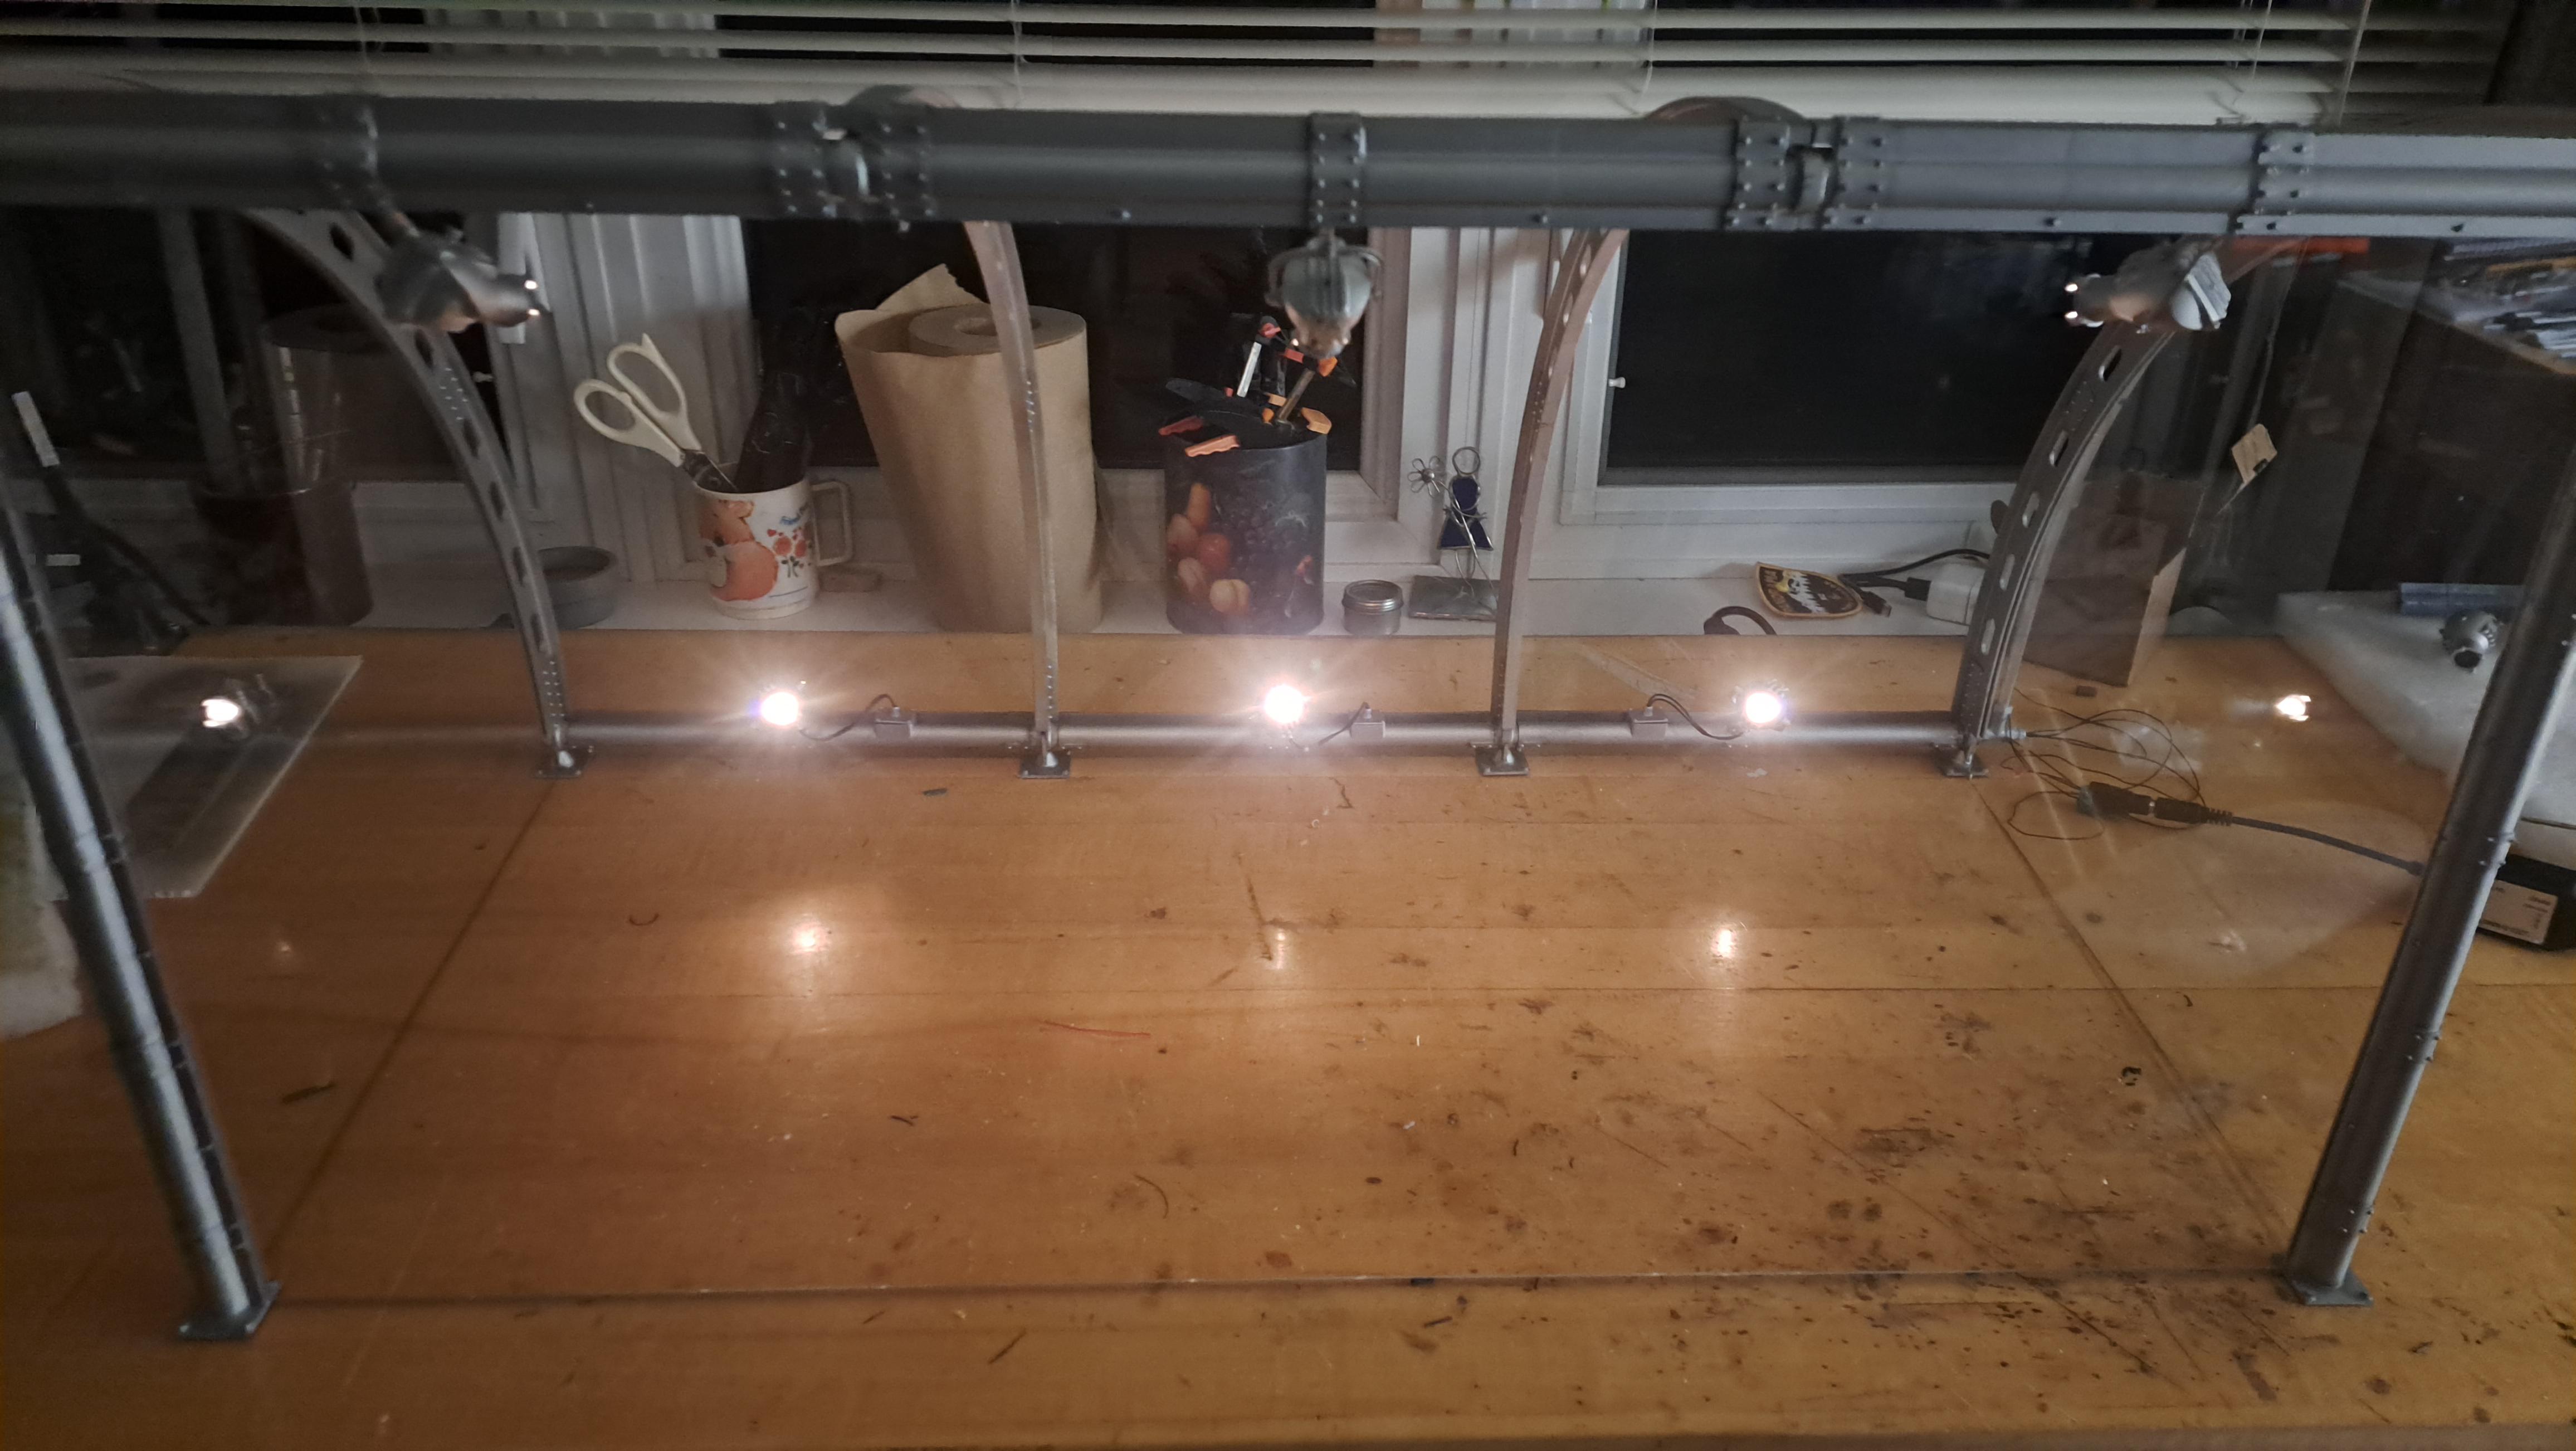
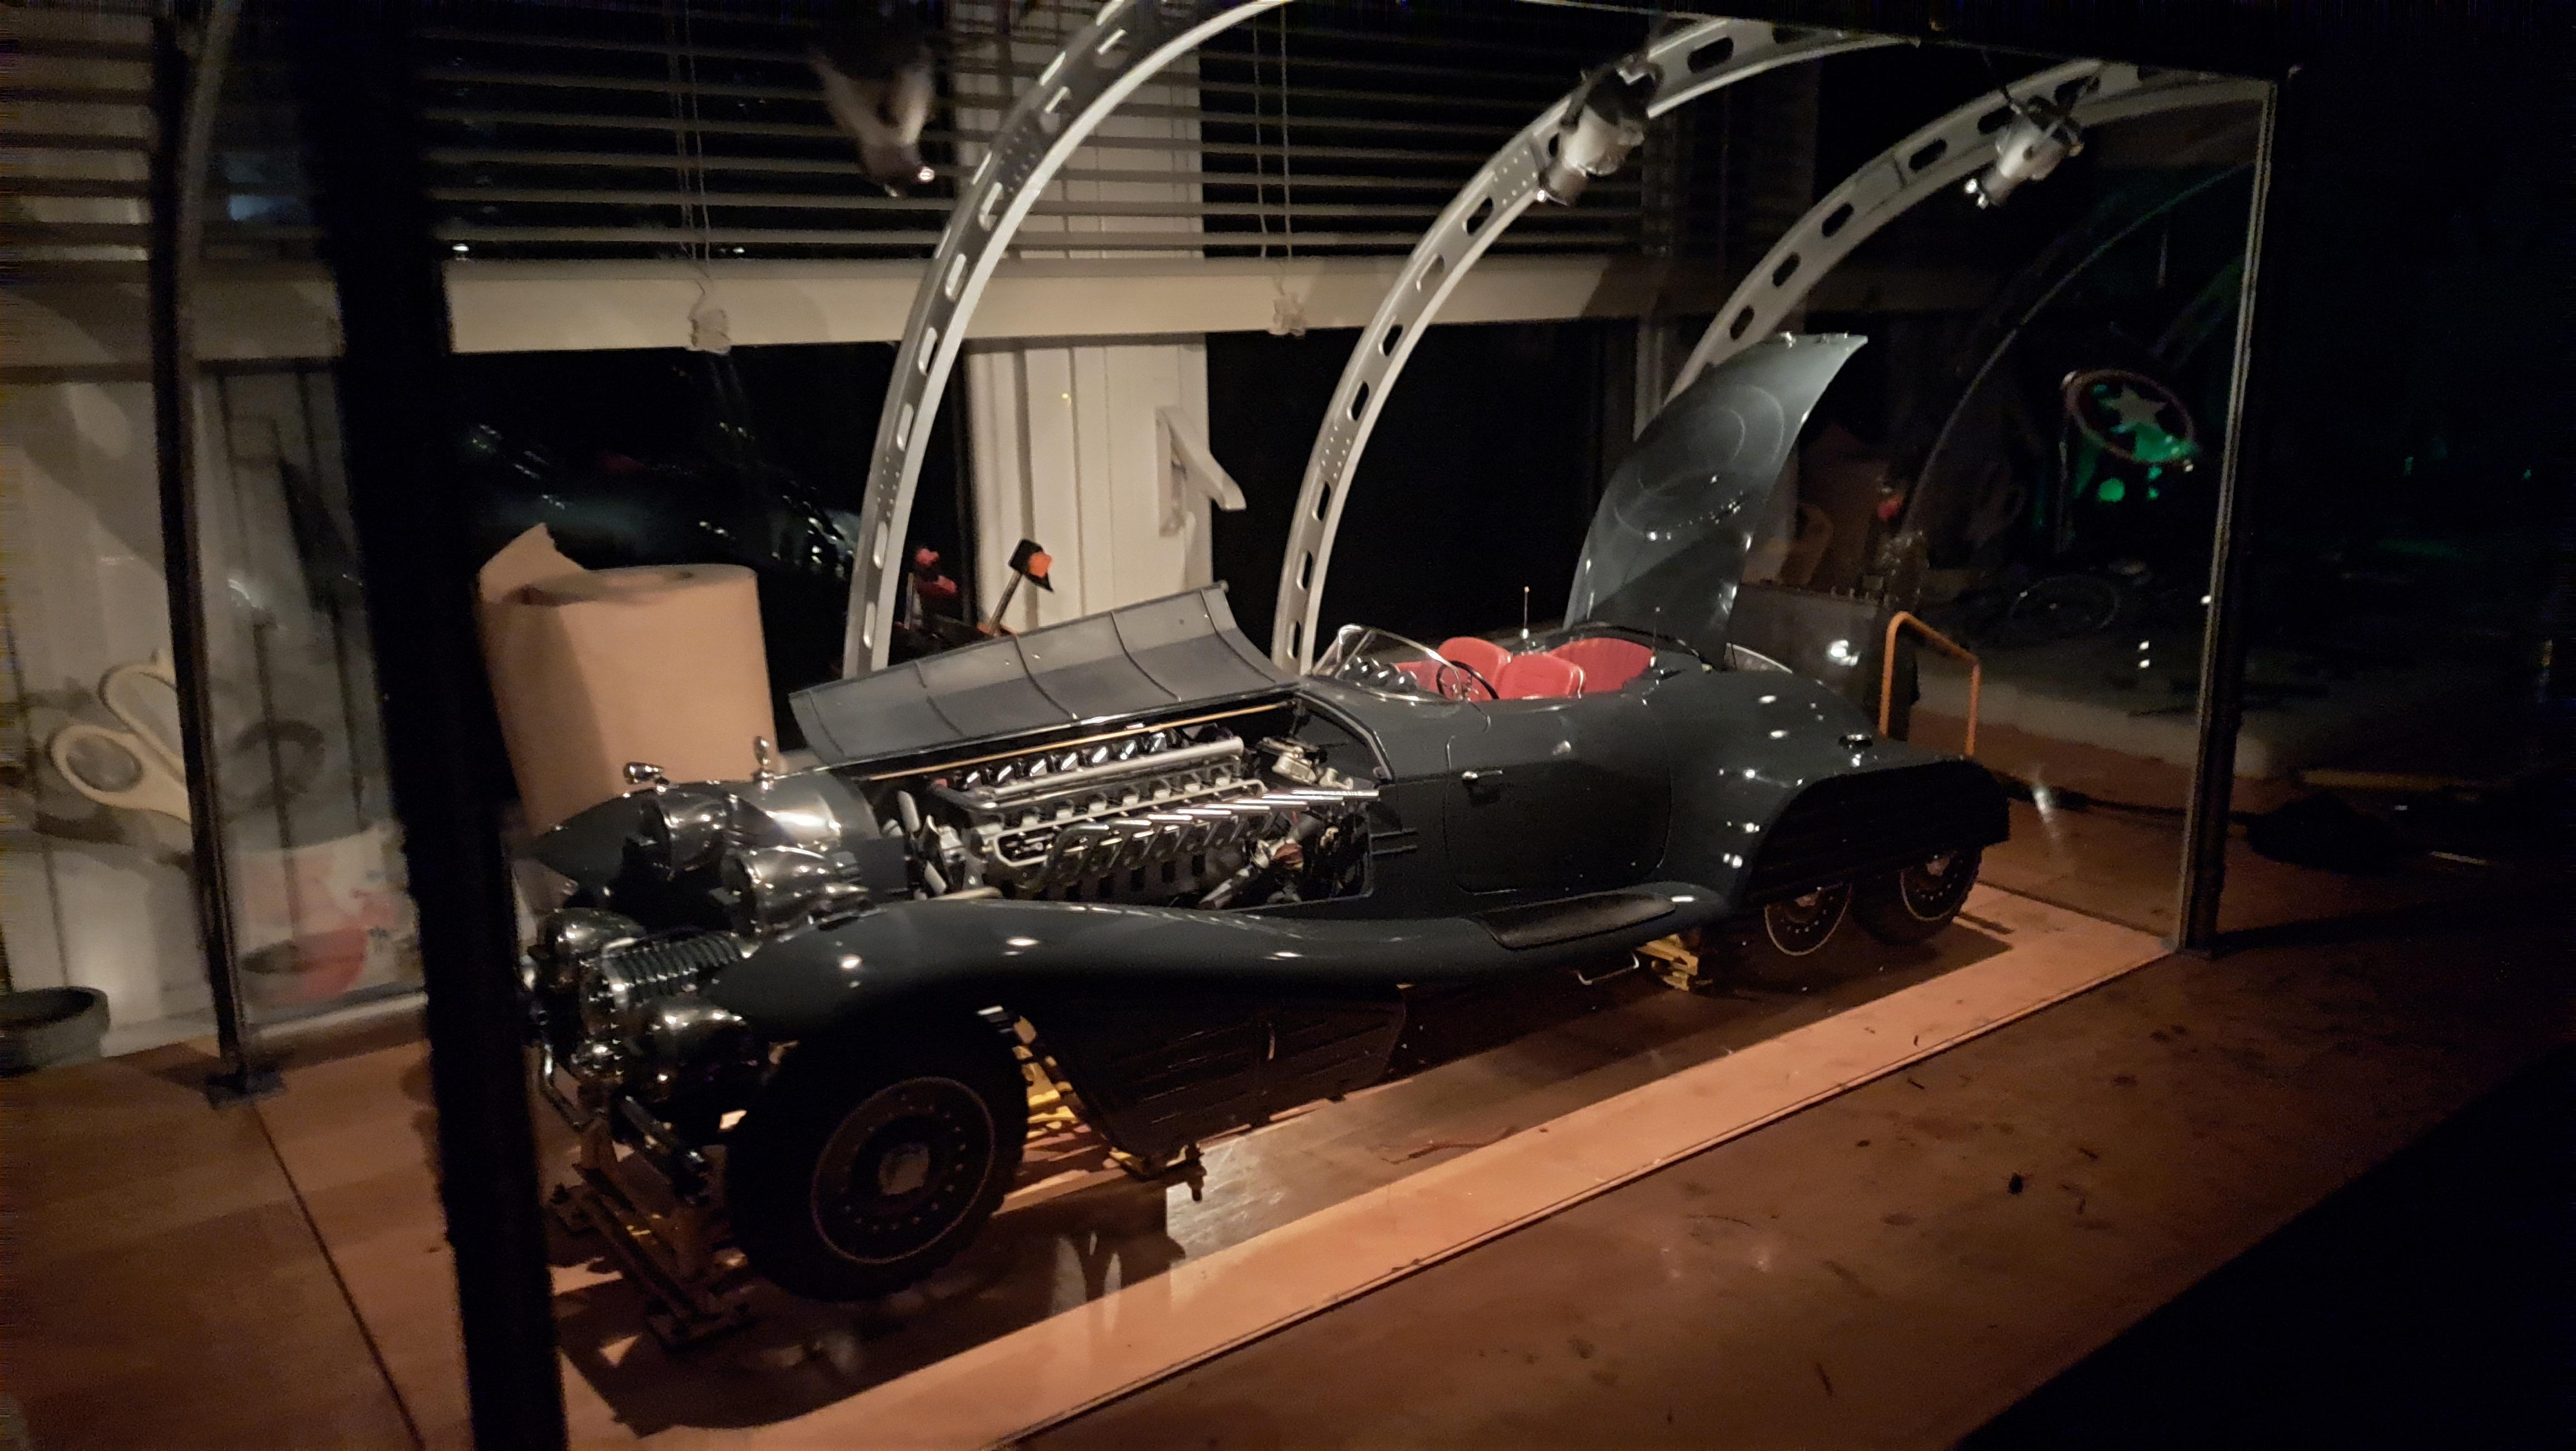
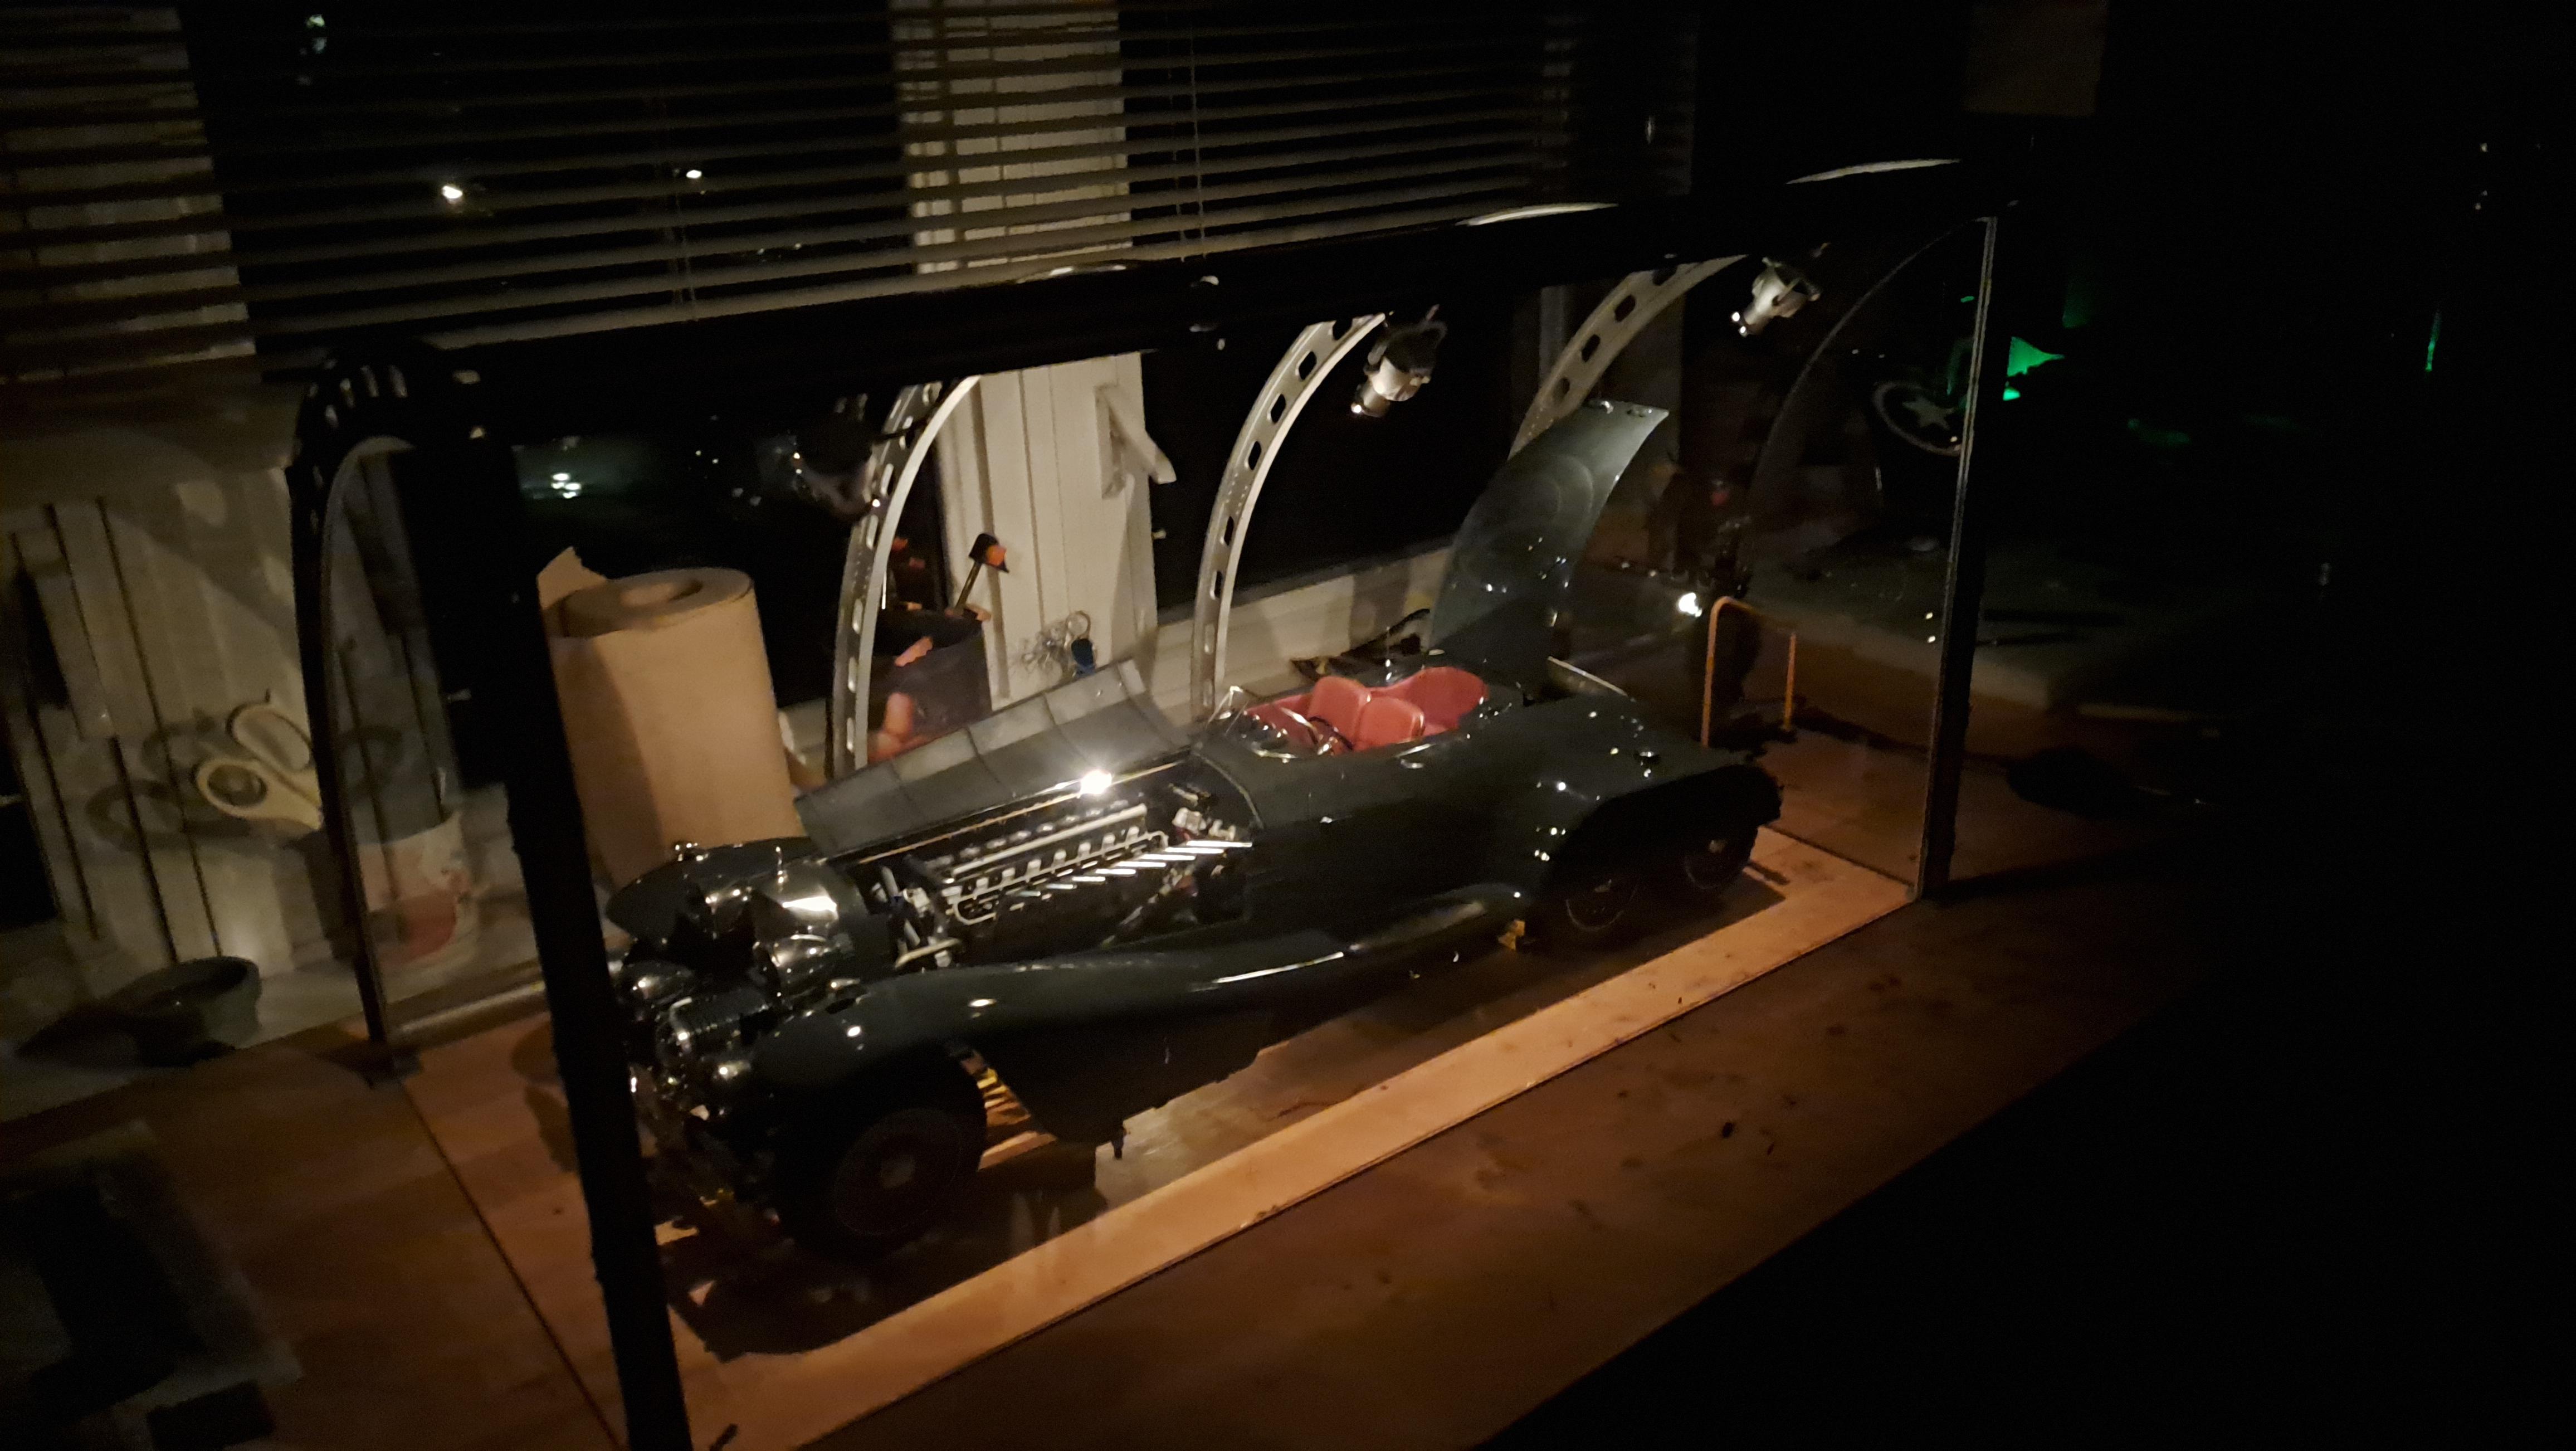
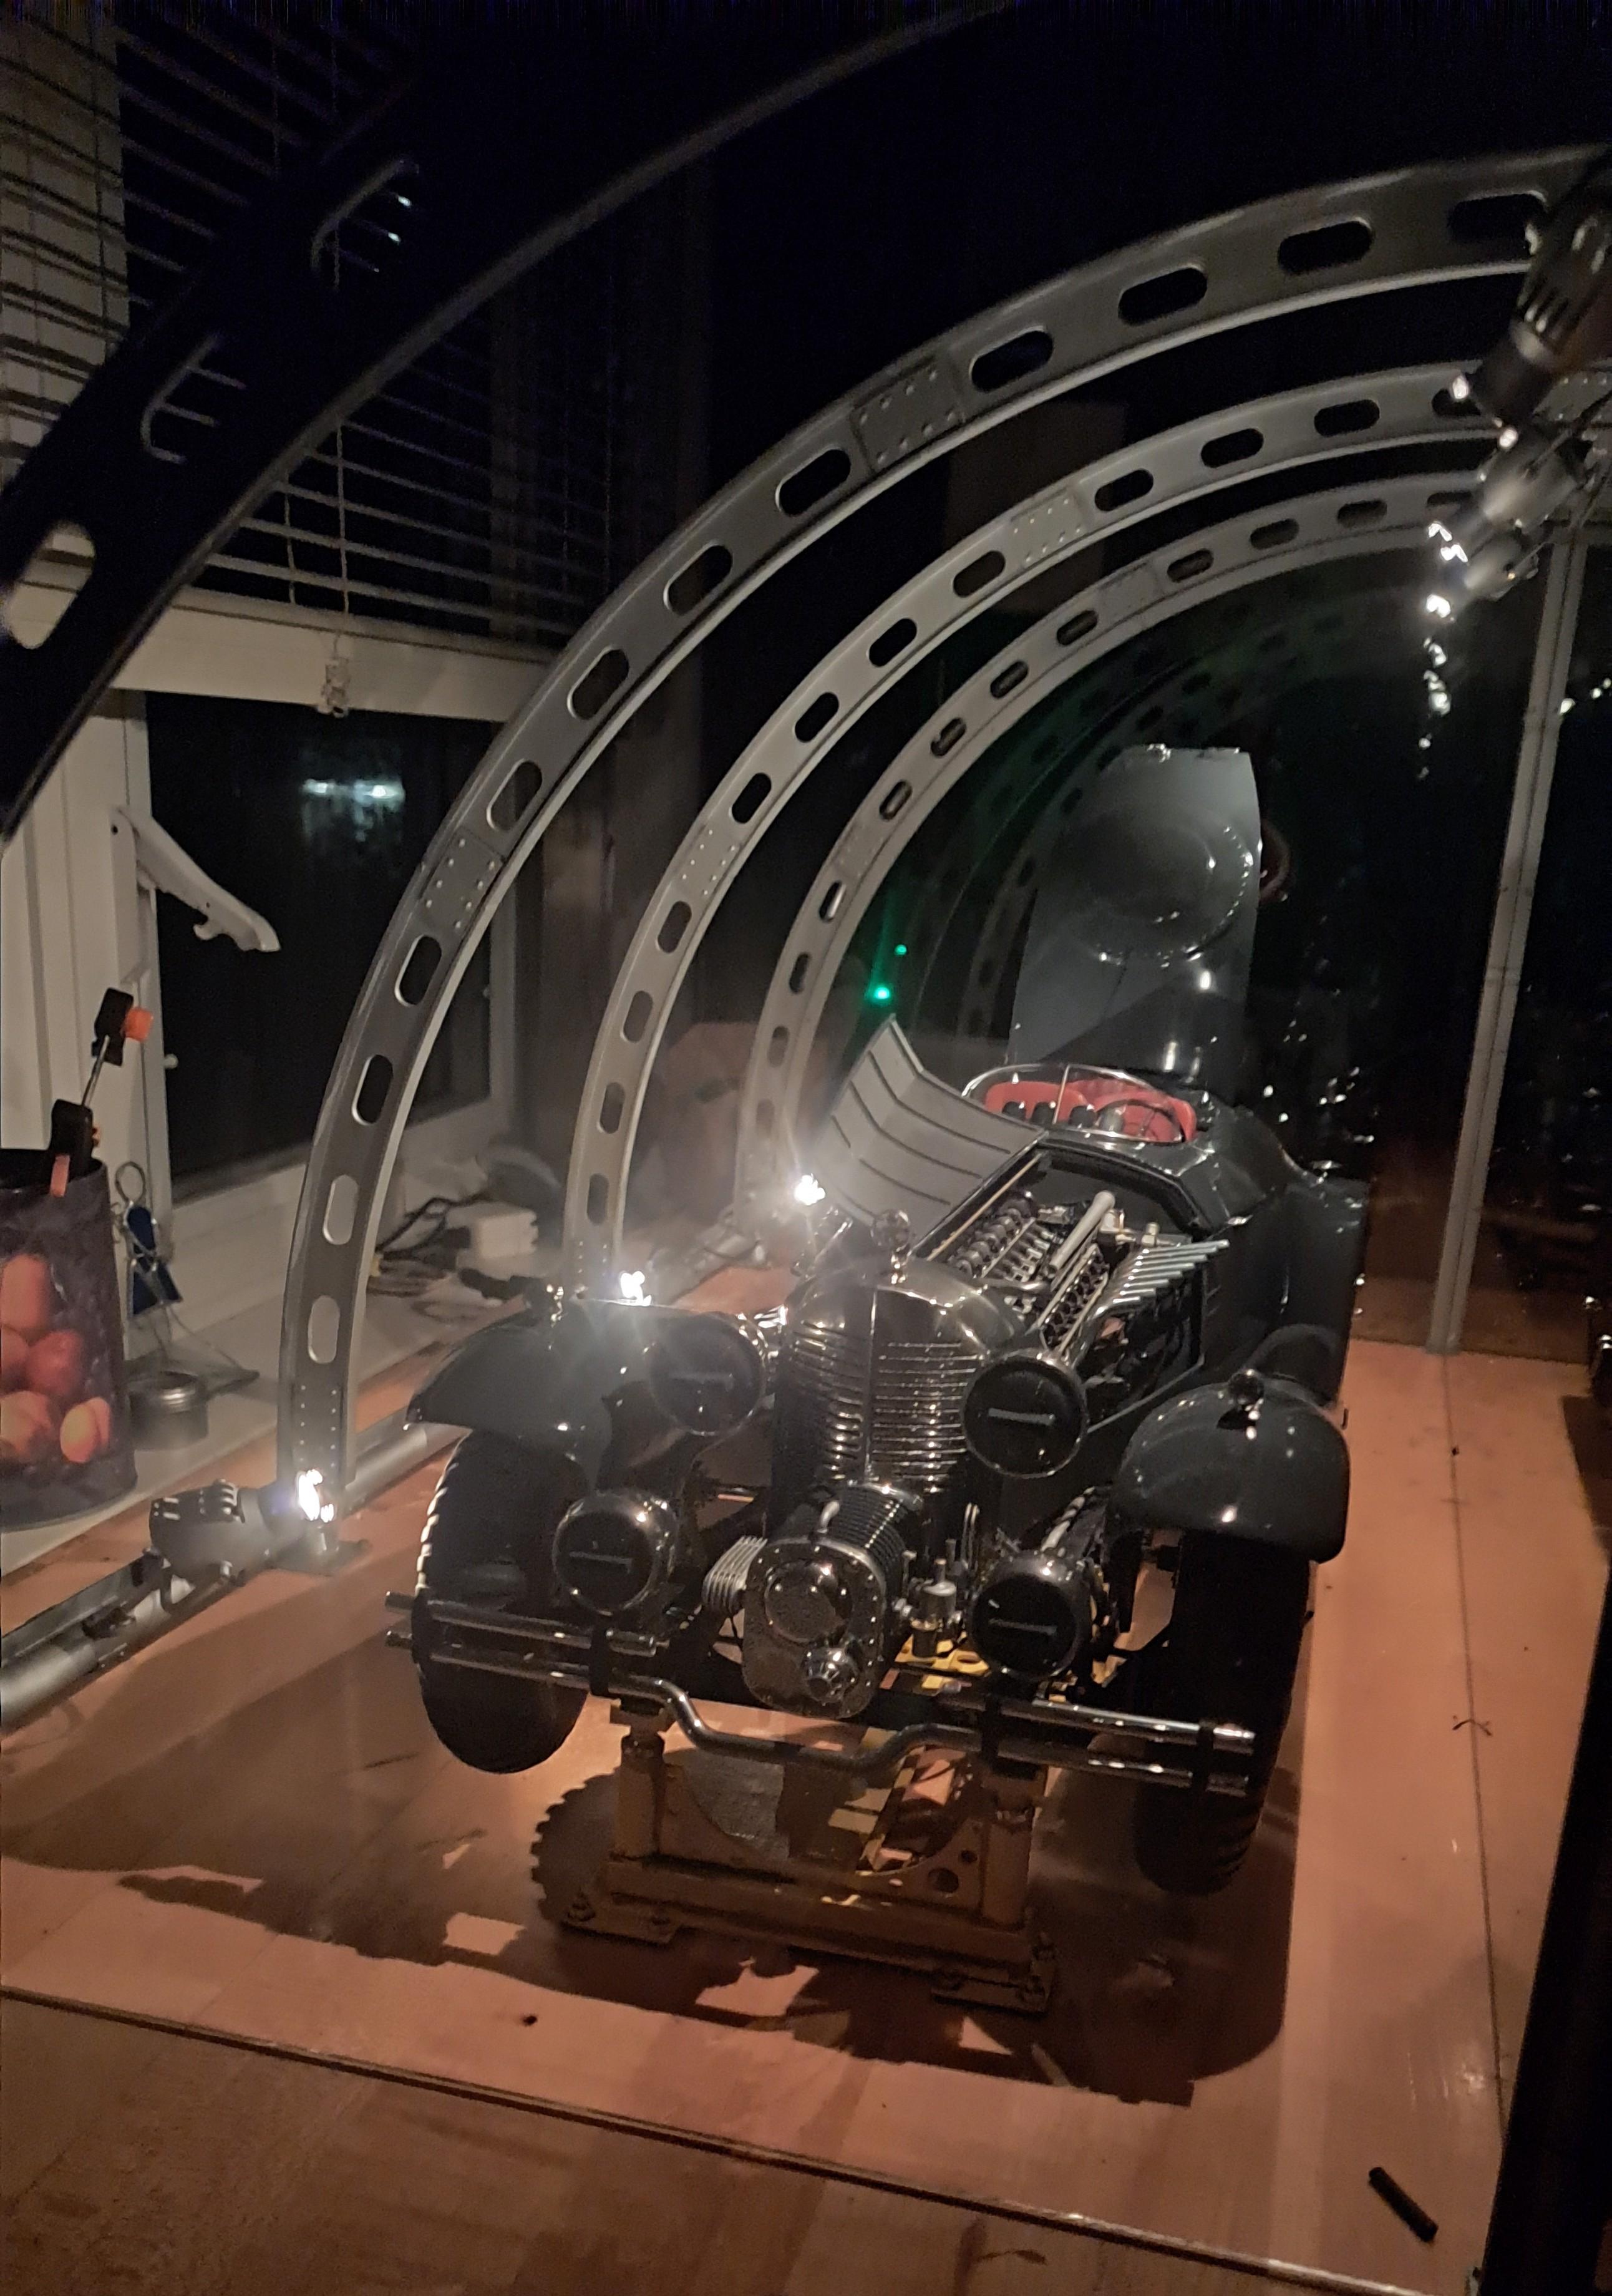
Ok so the base is painted, I raise the car a full inche for a better view of the underside and I but in a grayish floor (a bit like in the bentley's display). And, I don't like it. I don't like it for a 3 reasons. First, it's too big, second, it's too big and third, it's too big. I'm a 'builds first and ask questions later' kinda guy, and the first question I asked myself after completing the didplay was 'where am I going to put this thing'. I didn't have an answer. So in comes plan B. I'll redo the base but much narrower, it has to fit on a 12 inche deep shelf. Instead of overhead lighting, l'll install 4 spot lights on the floor. The grayish cardboard floor will be replaced by a mini graveled surface, I might even try to make some tire tracks in the gravel. Red Skull will still be at the controls, and lastly, there will be no cover as the glare in the plexiglass really bothers me. I wanted to display the car in 'Marvelesque' environment but I think I went overboard with the idea. Here's the completed display case (the too big one). I'll try to find a place for it somewhere, a lot of work went into it and it would be a shame to get rid of it. And here's the proposed plan B
-
Marvel's Hydra coupe 1/12 scale full scratch build
François replied to François's topic in WIP: Model Cars
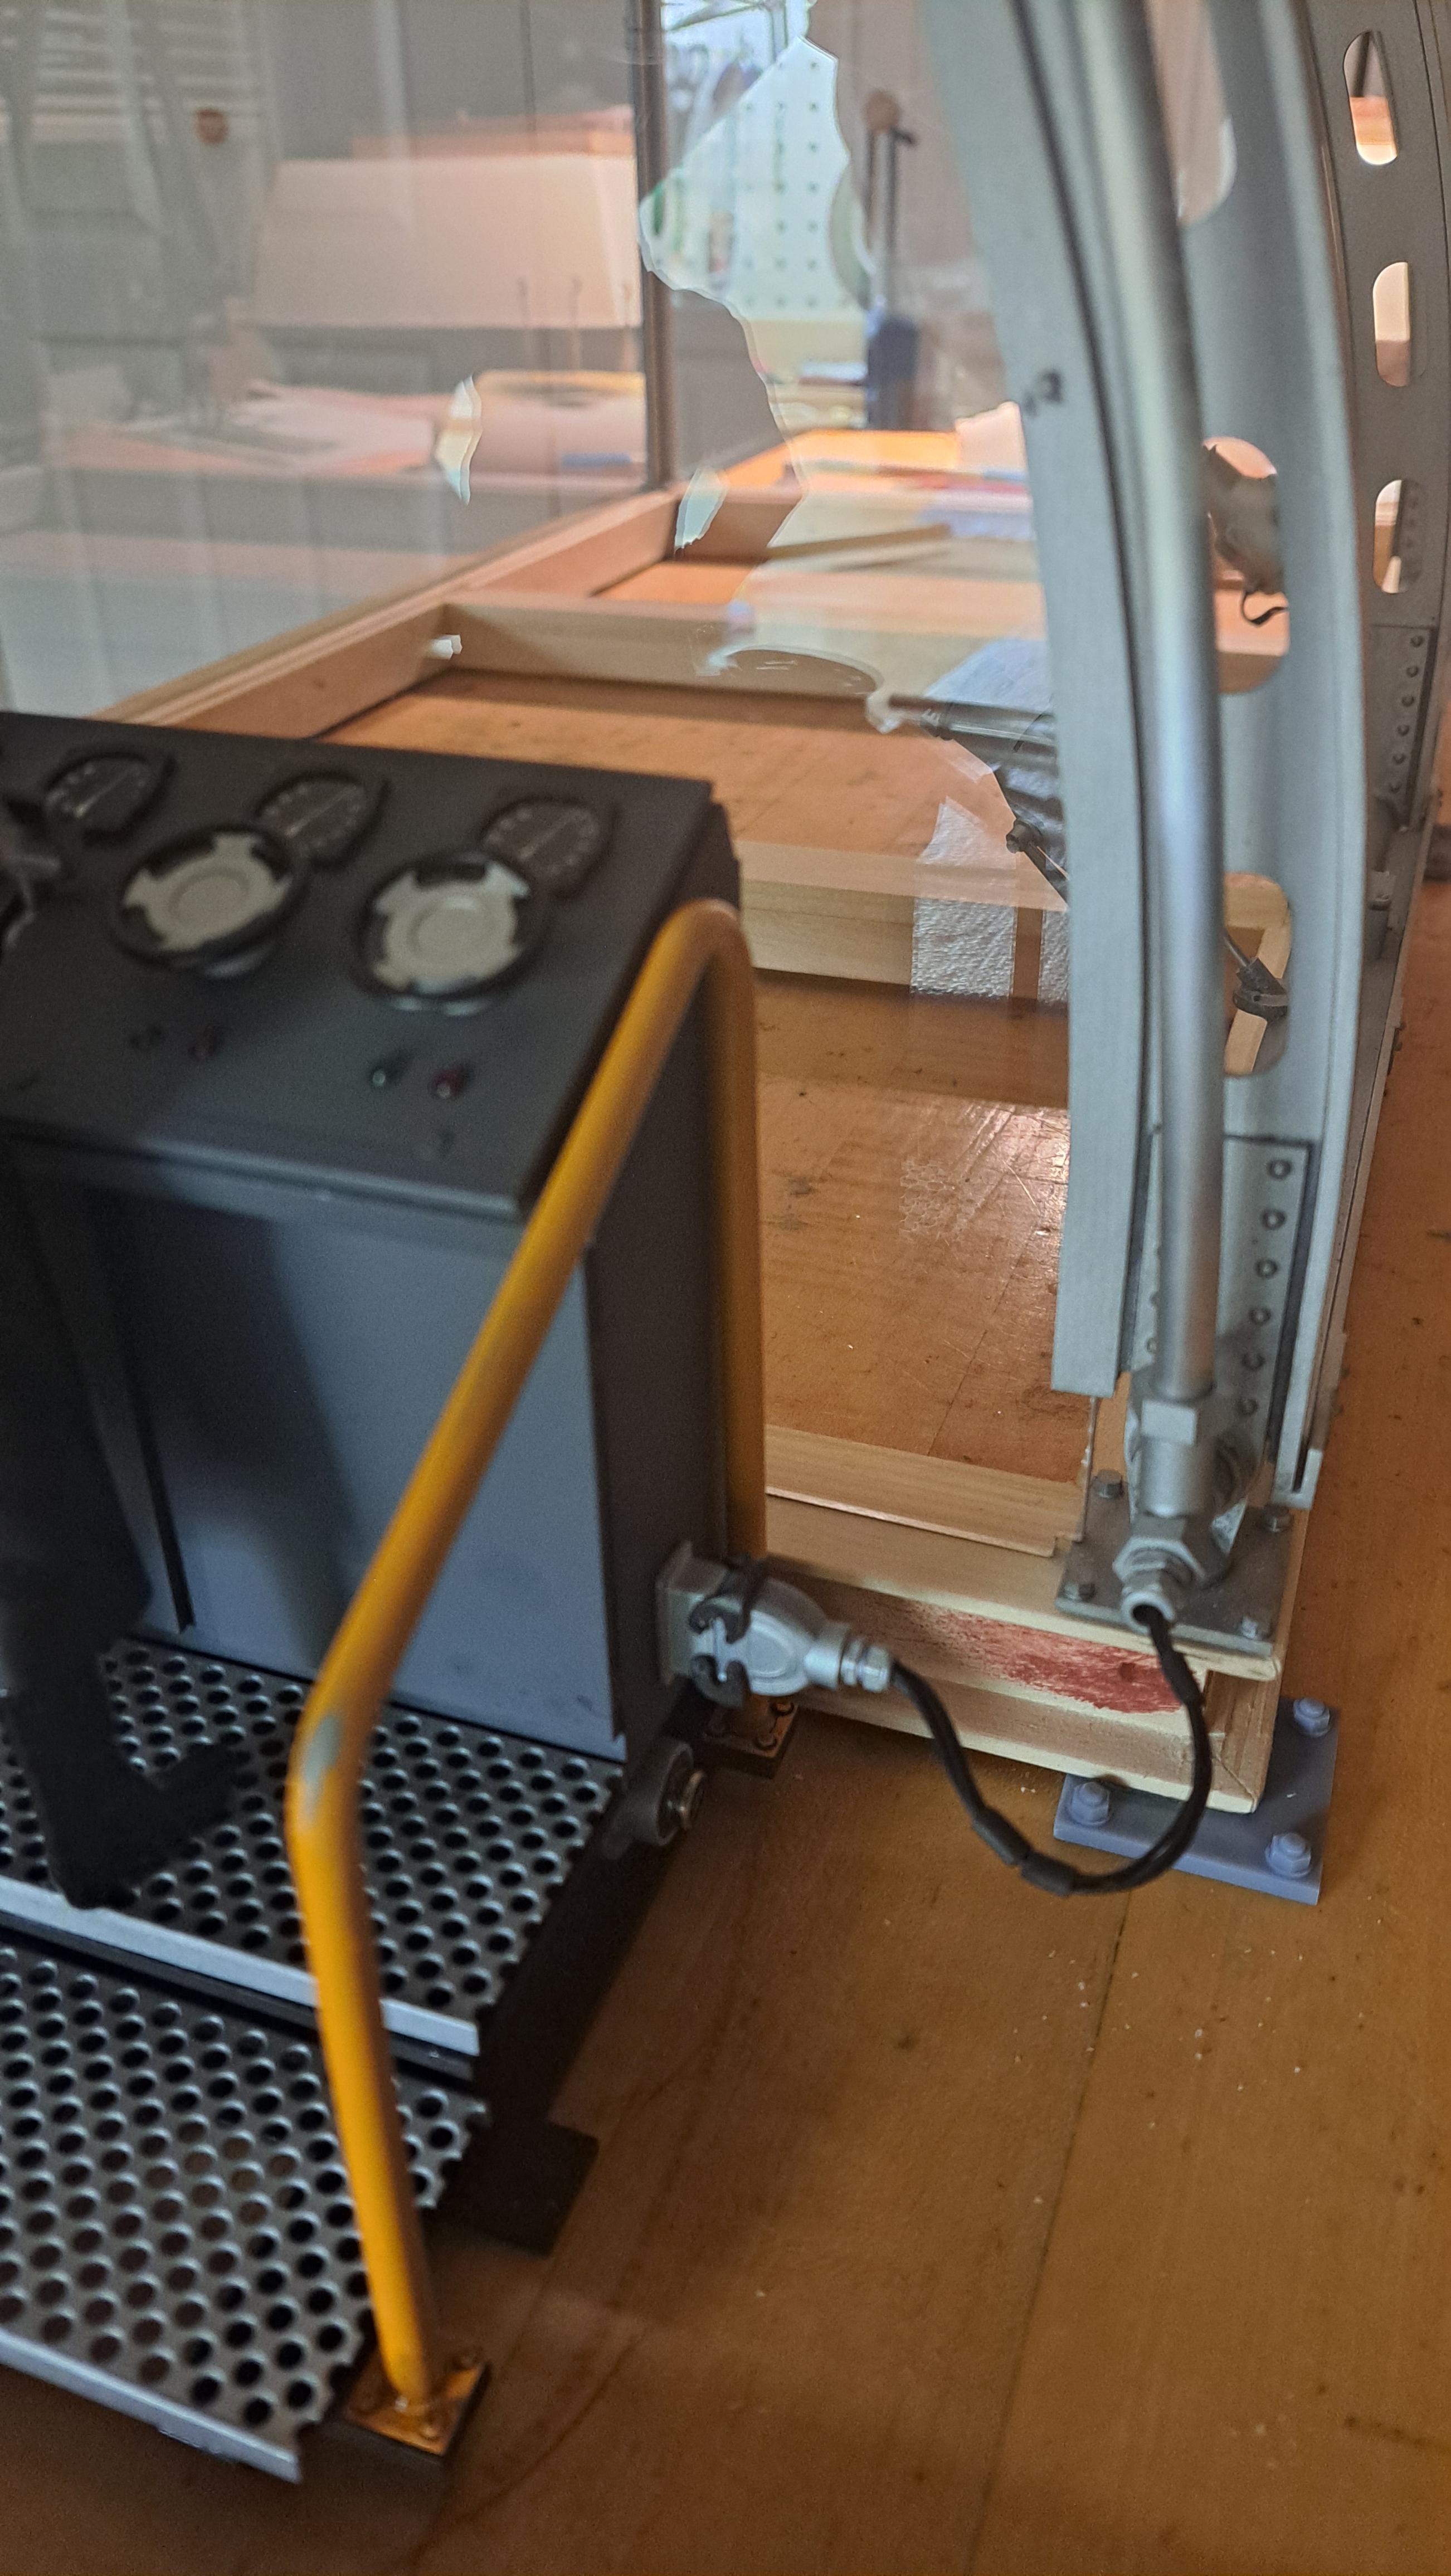
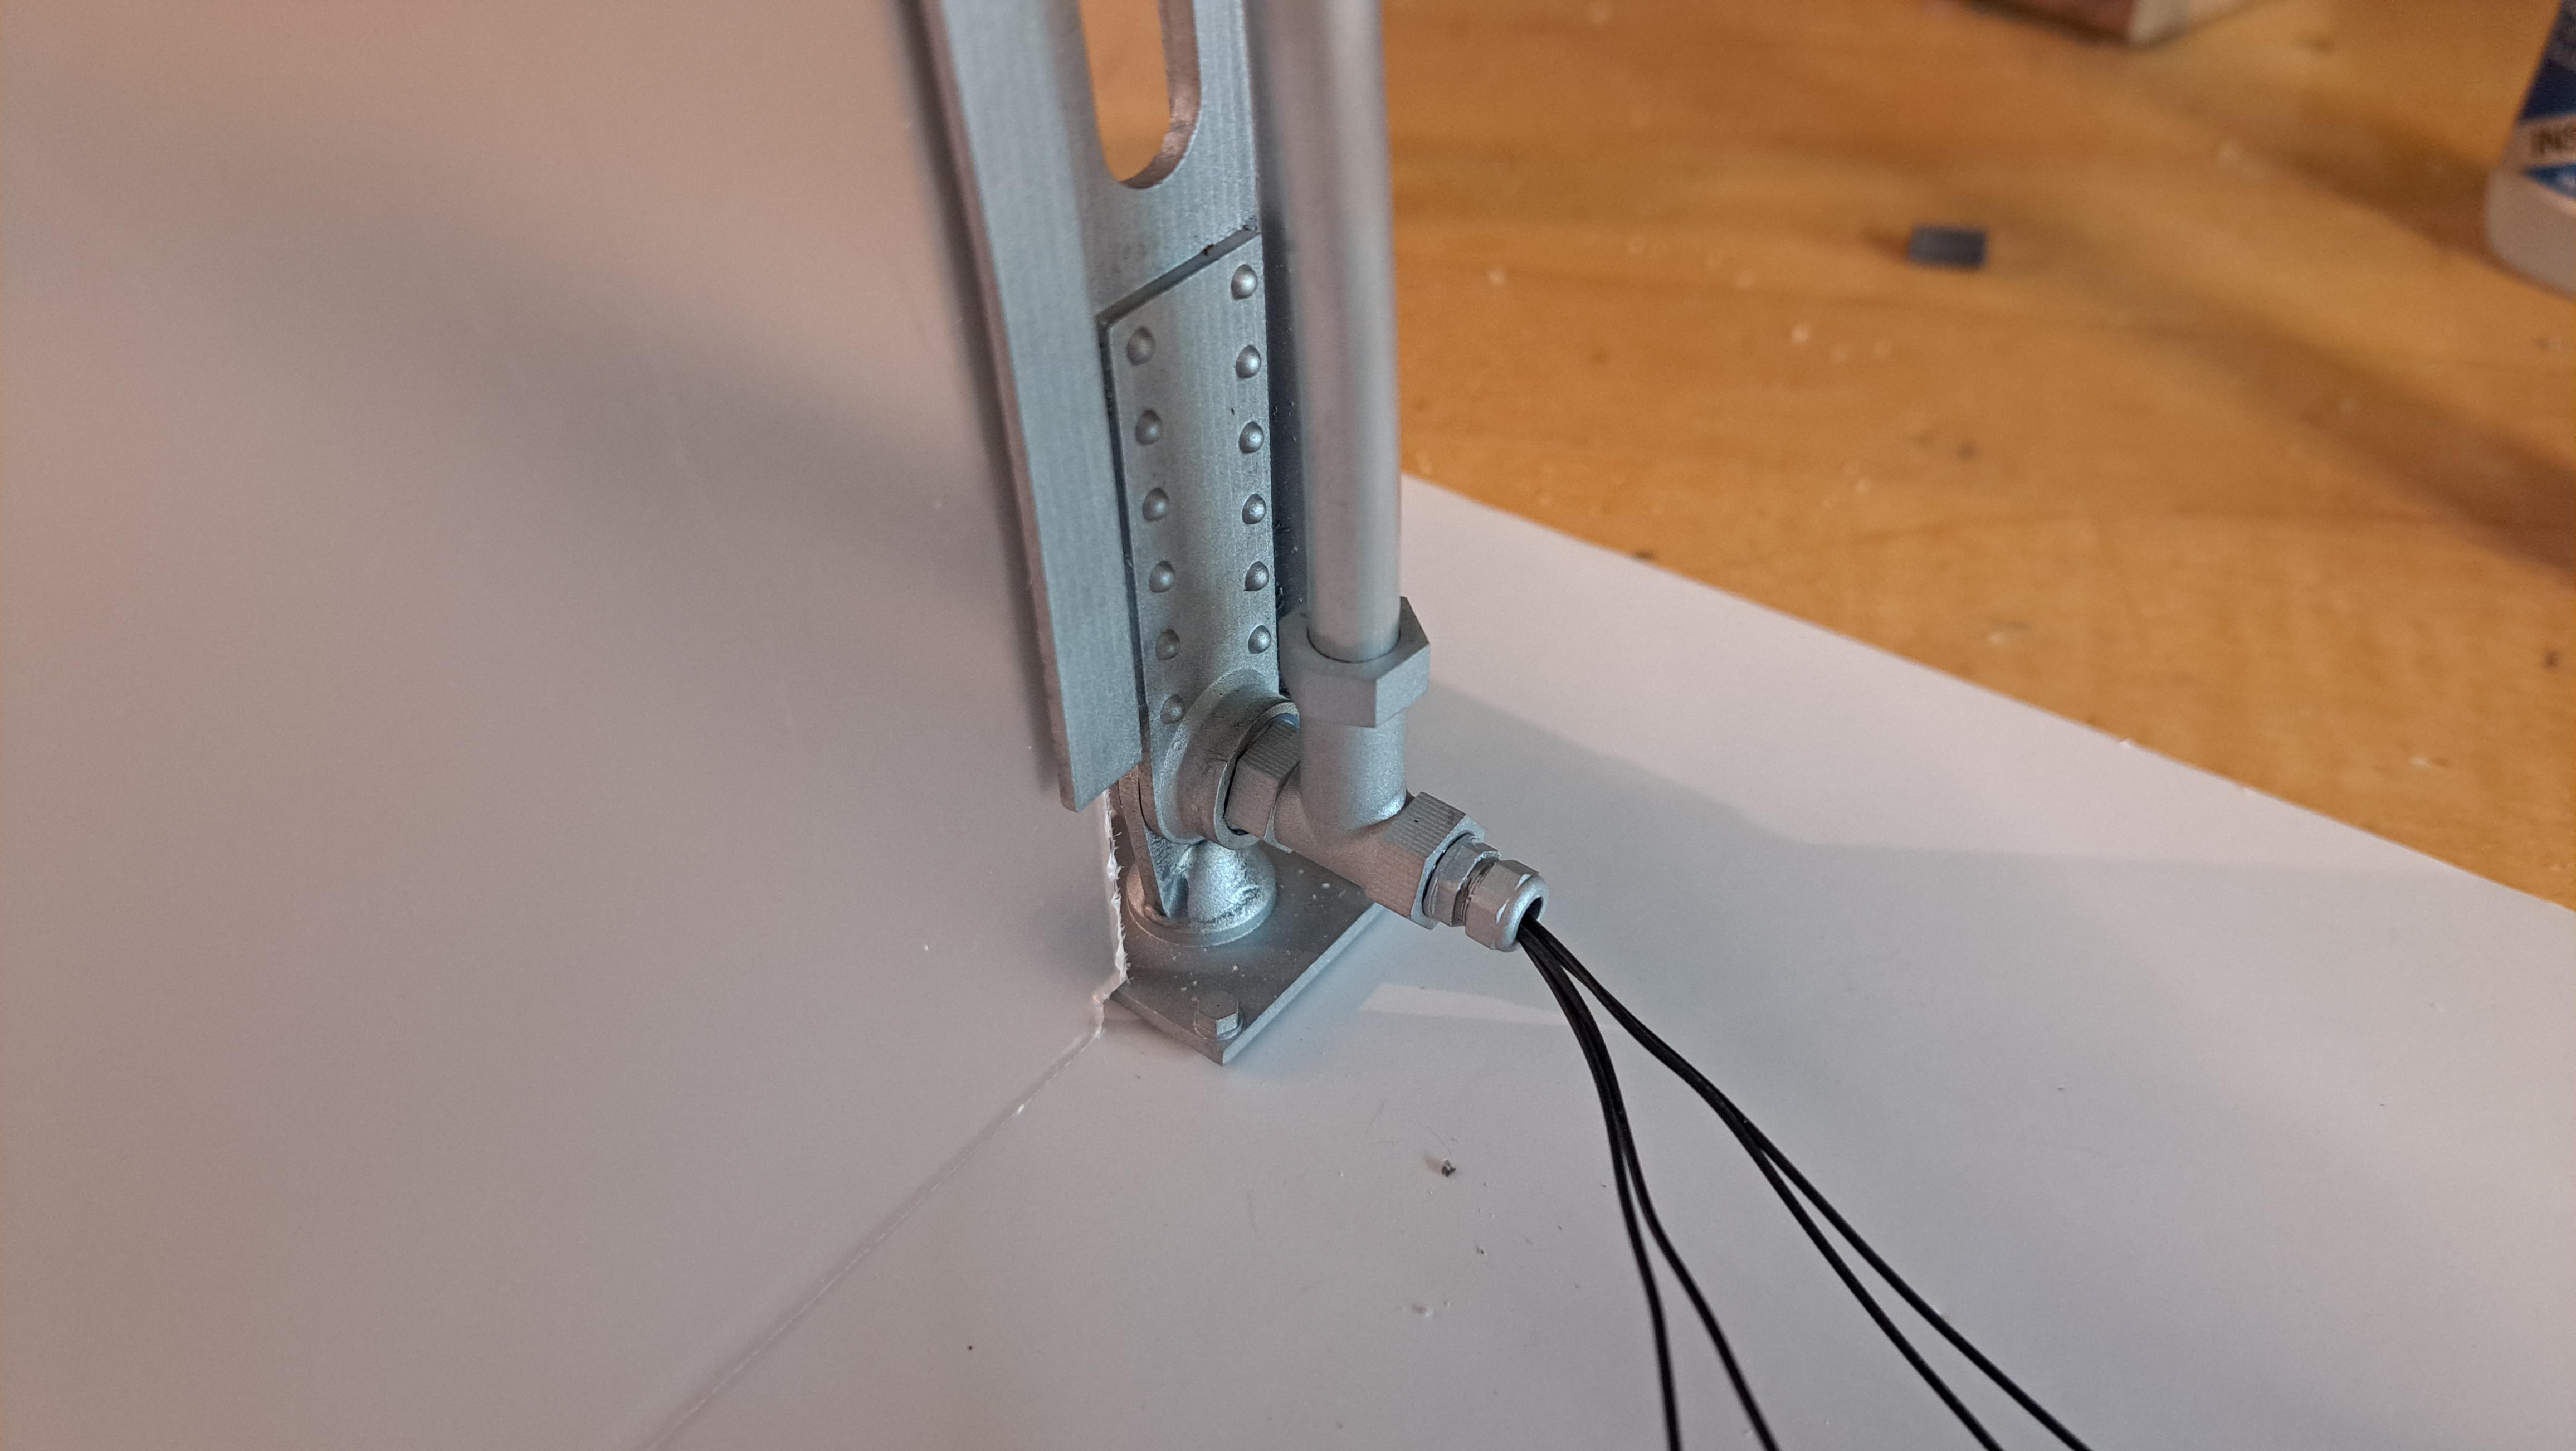
Thank you everyone. The base is done, just need to paint it flat black. And to decide what type of floor to but in. I also installed the quick connect for the lights.
-
Marvel's Hydra coupe 1/12 scale full scratch build
François replied to François's topic in WIP: Model Cars
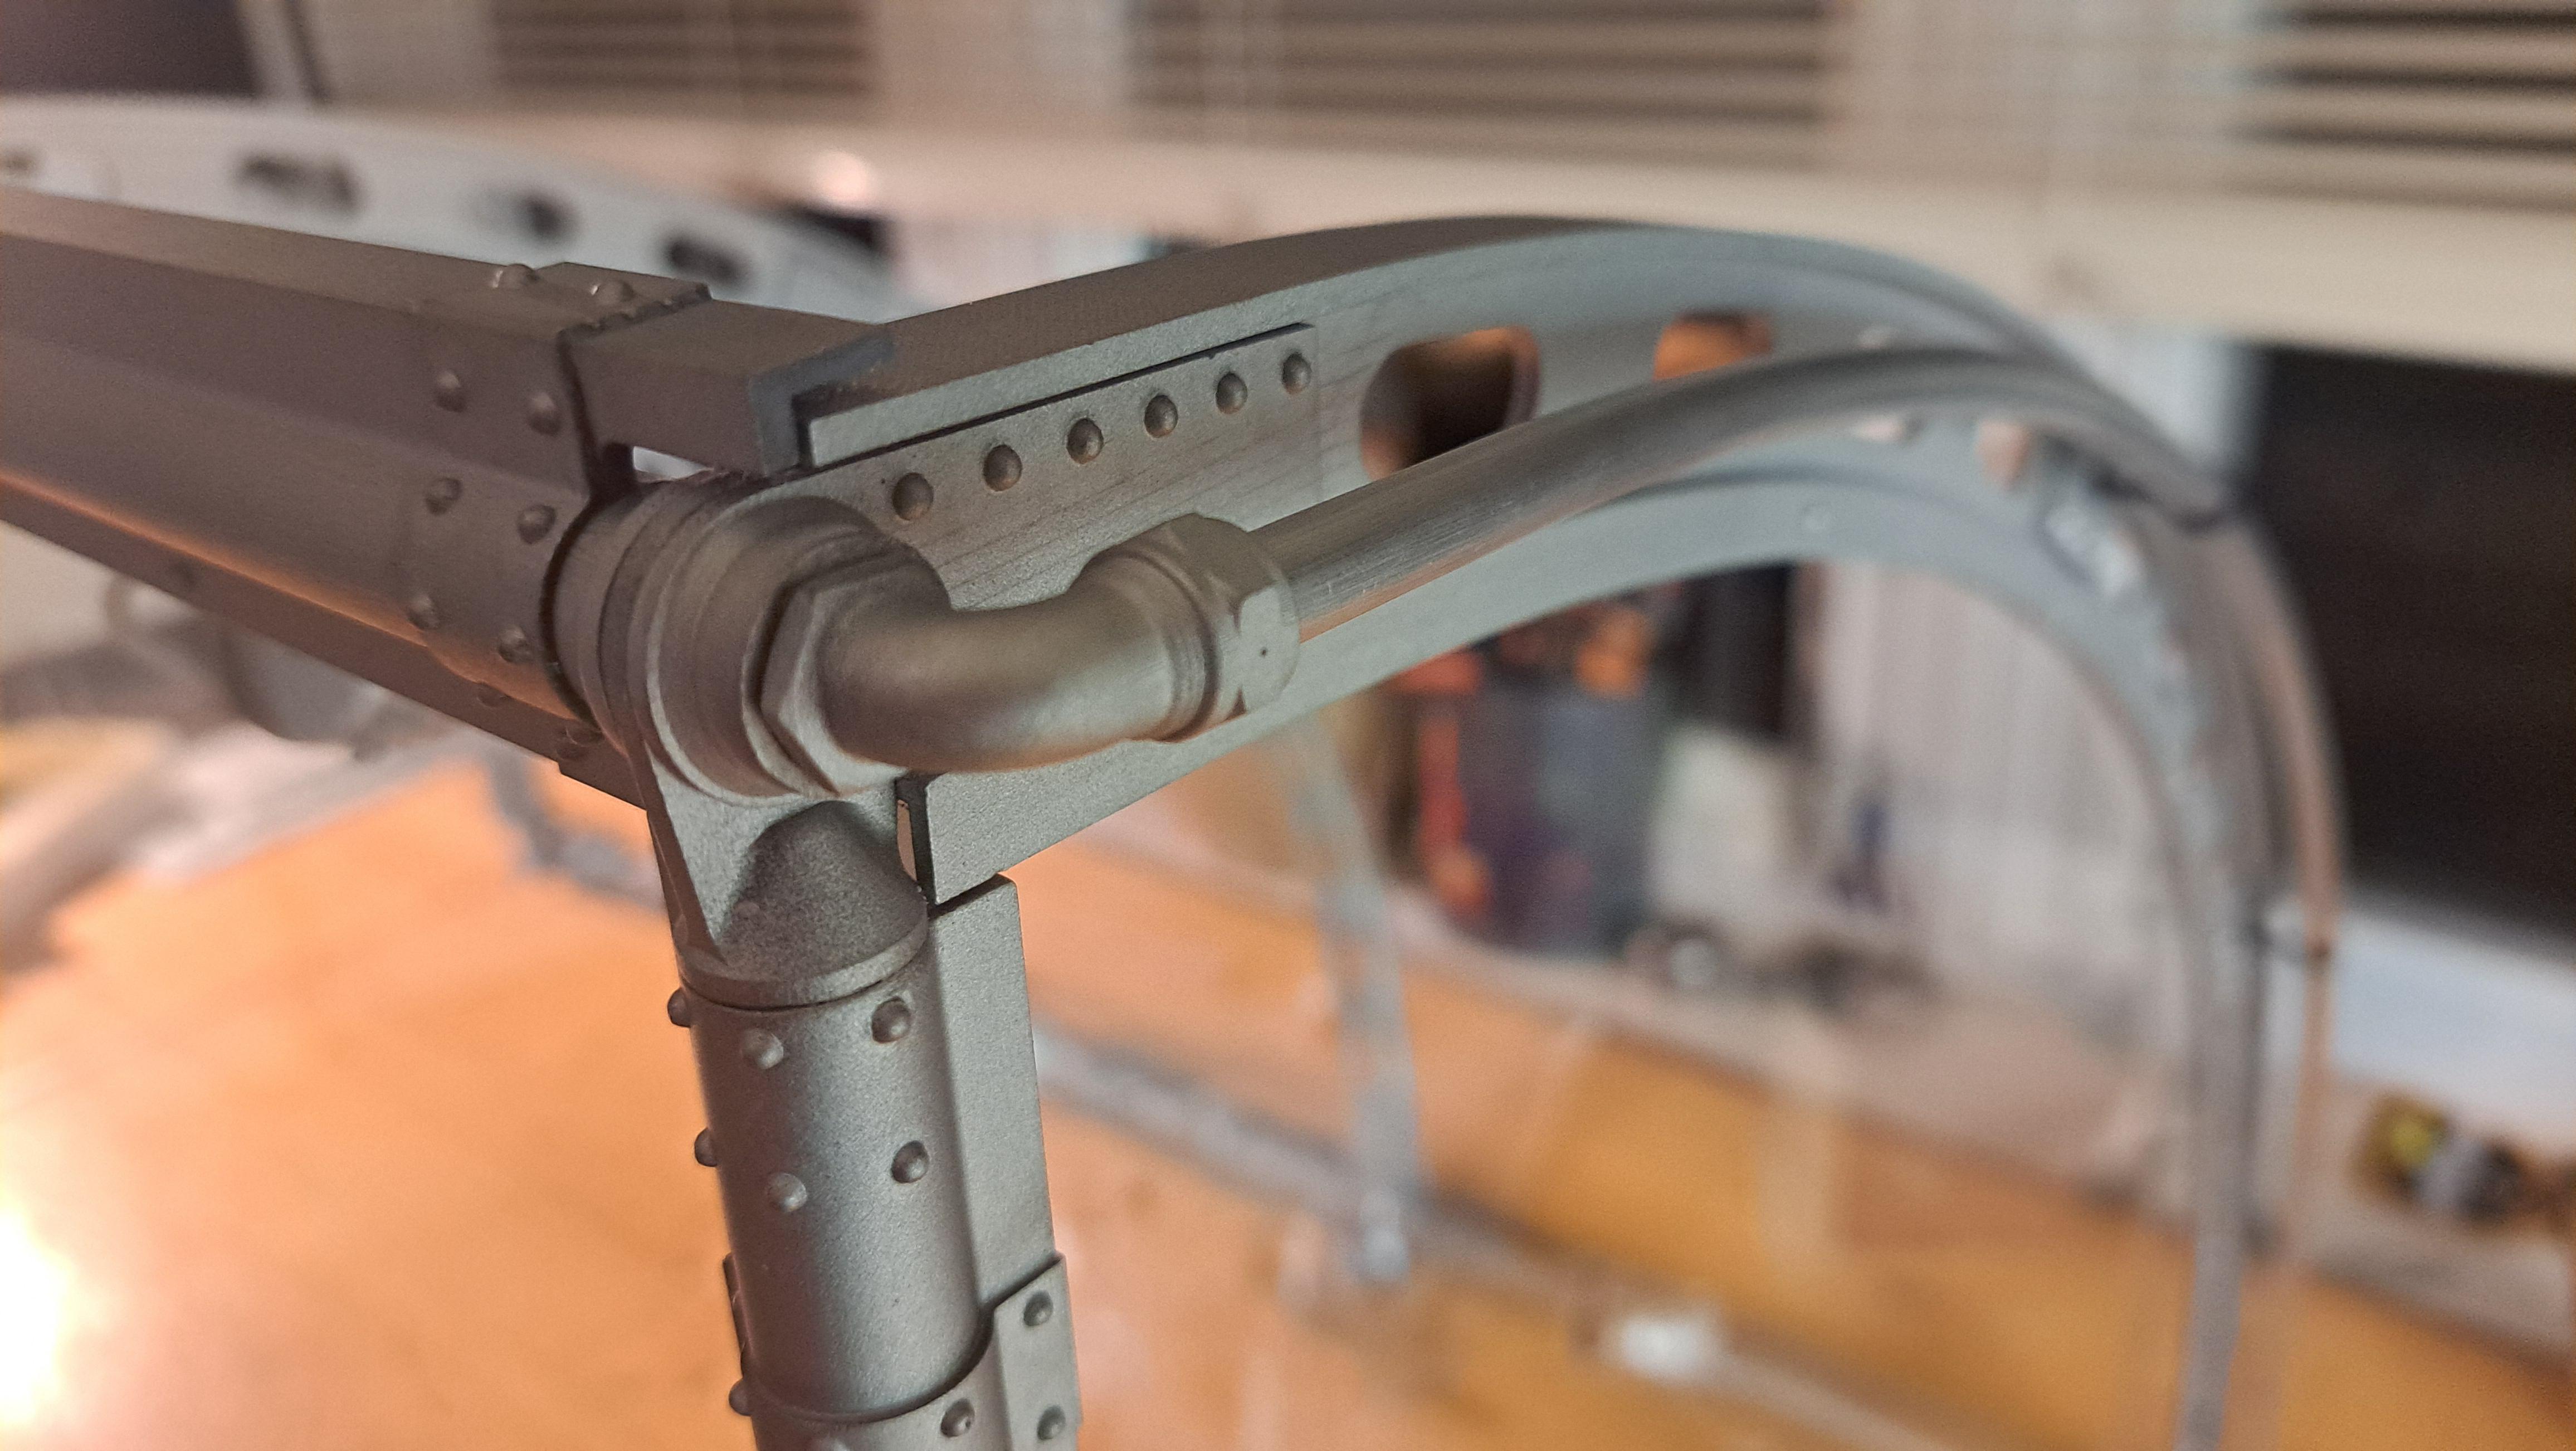
I'm almost done with the display top. Just need to install the top plexiglass. I'm vefy pleased with the result as everything came together nicely and as planned. Wiring the spot lights went as planned also. I still need to make the base and to install all the quick connect plugs. Here are a few pictures of the display top. And with the car
-
Marvel's Hydra coupe 1/12 scale full scratch build
François replied to François's topic in WIP: Model Cars
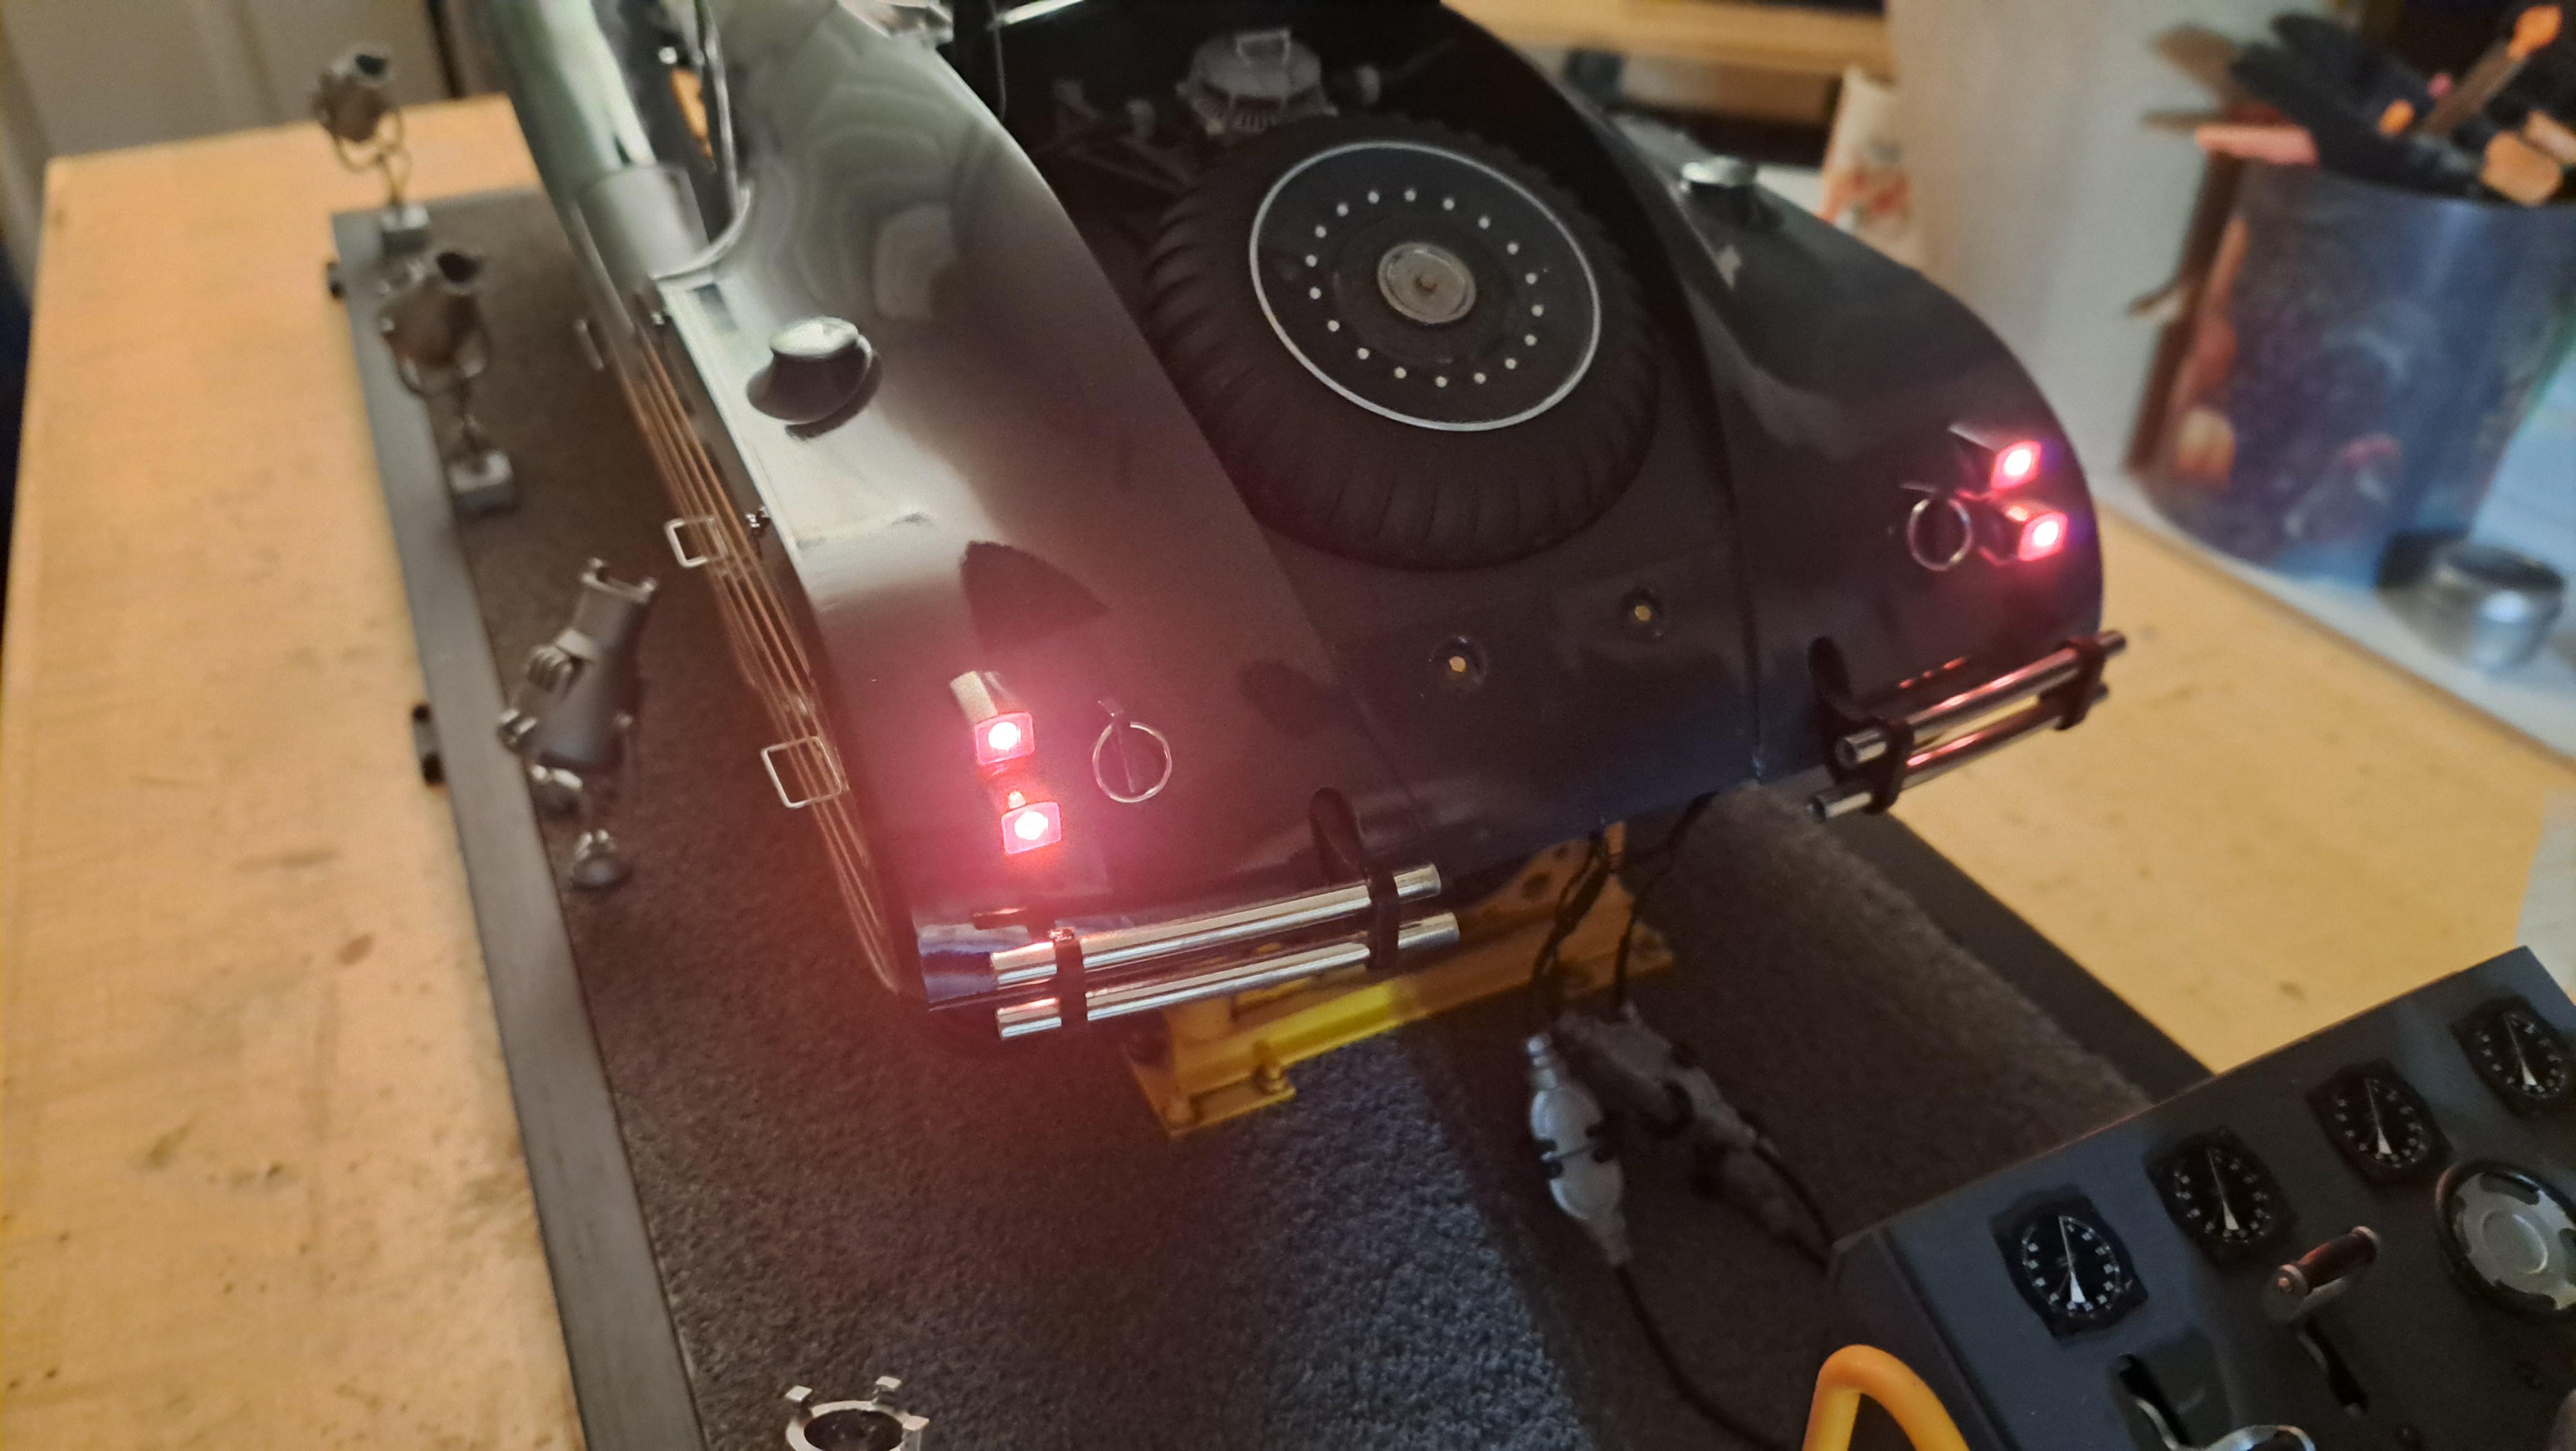
Big John, the lenses are 3d printed in clear resin. -
Marvel's Hydra coupe 1/12 scale full scratch build
François replied to François's topic in WIP: Model Cars
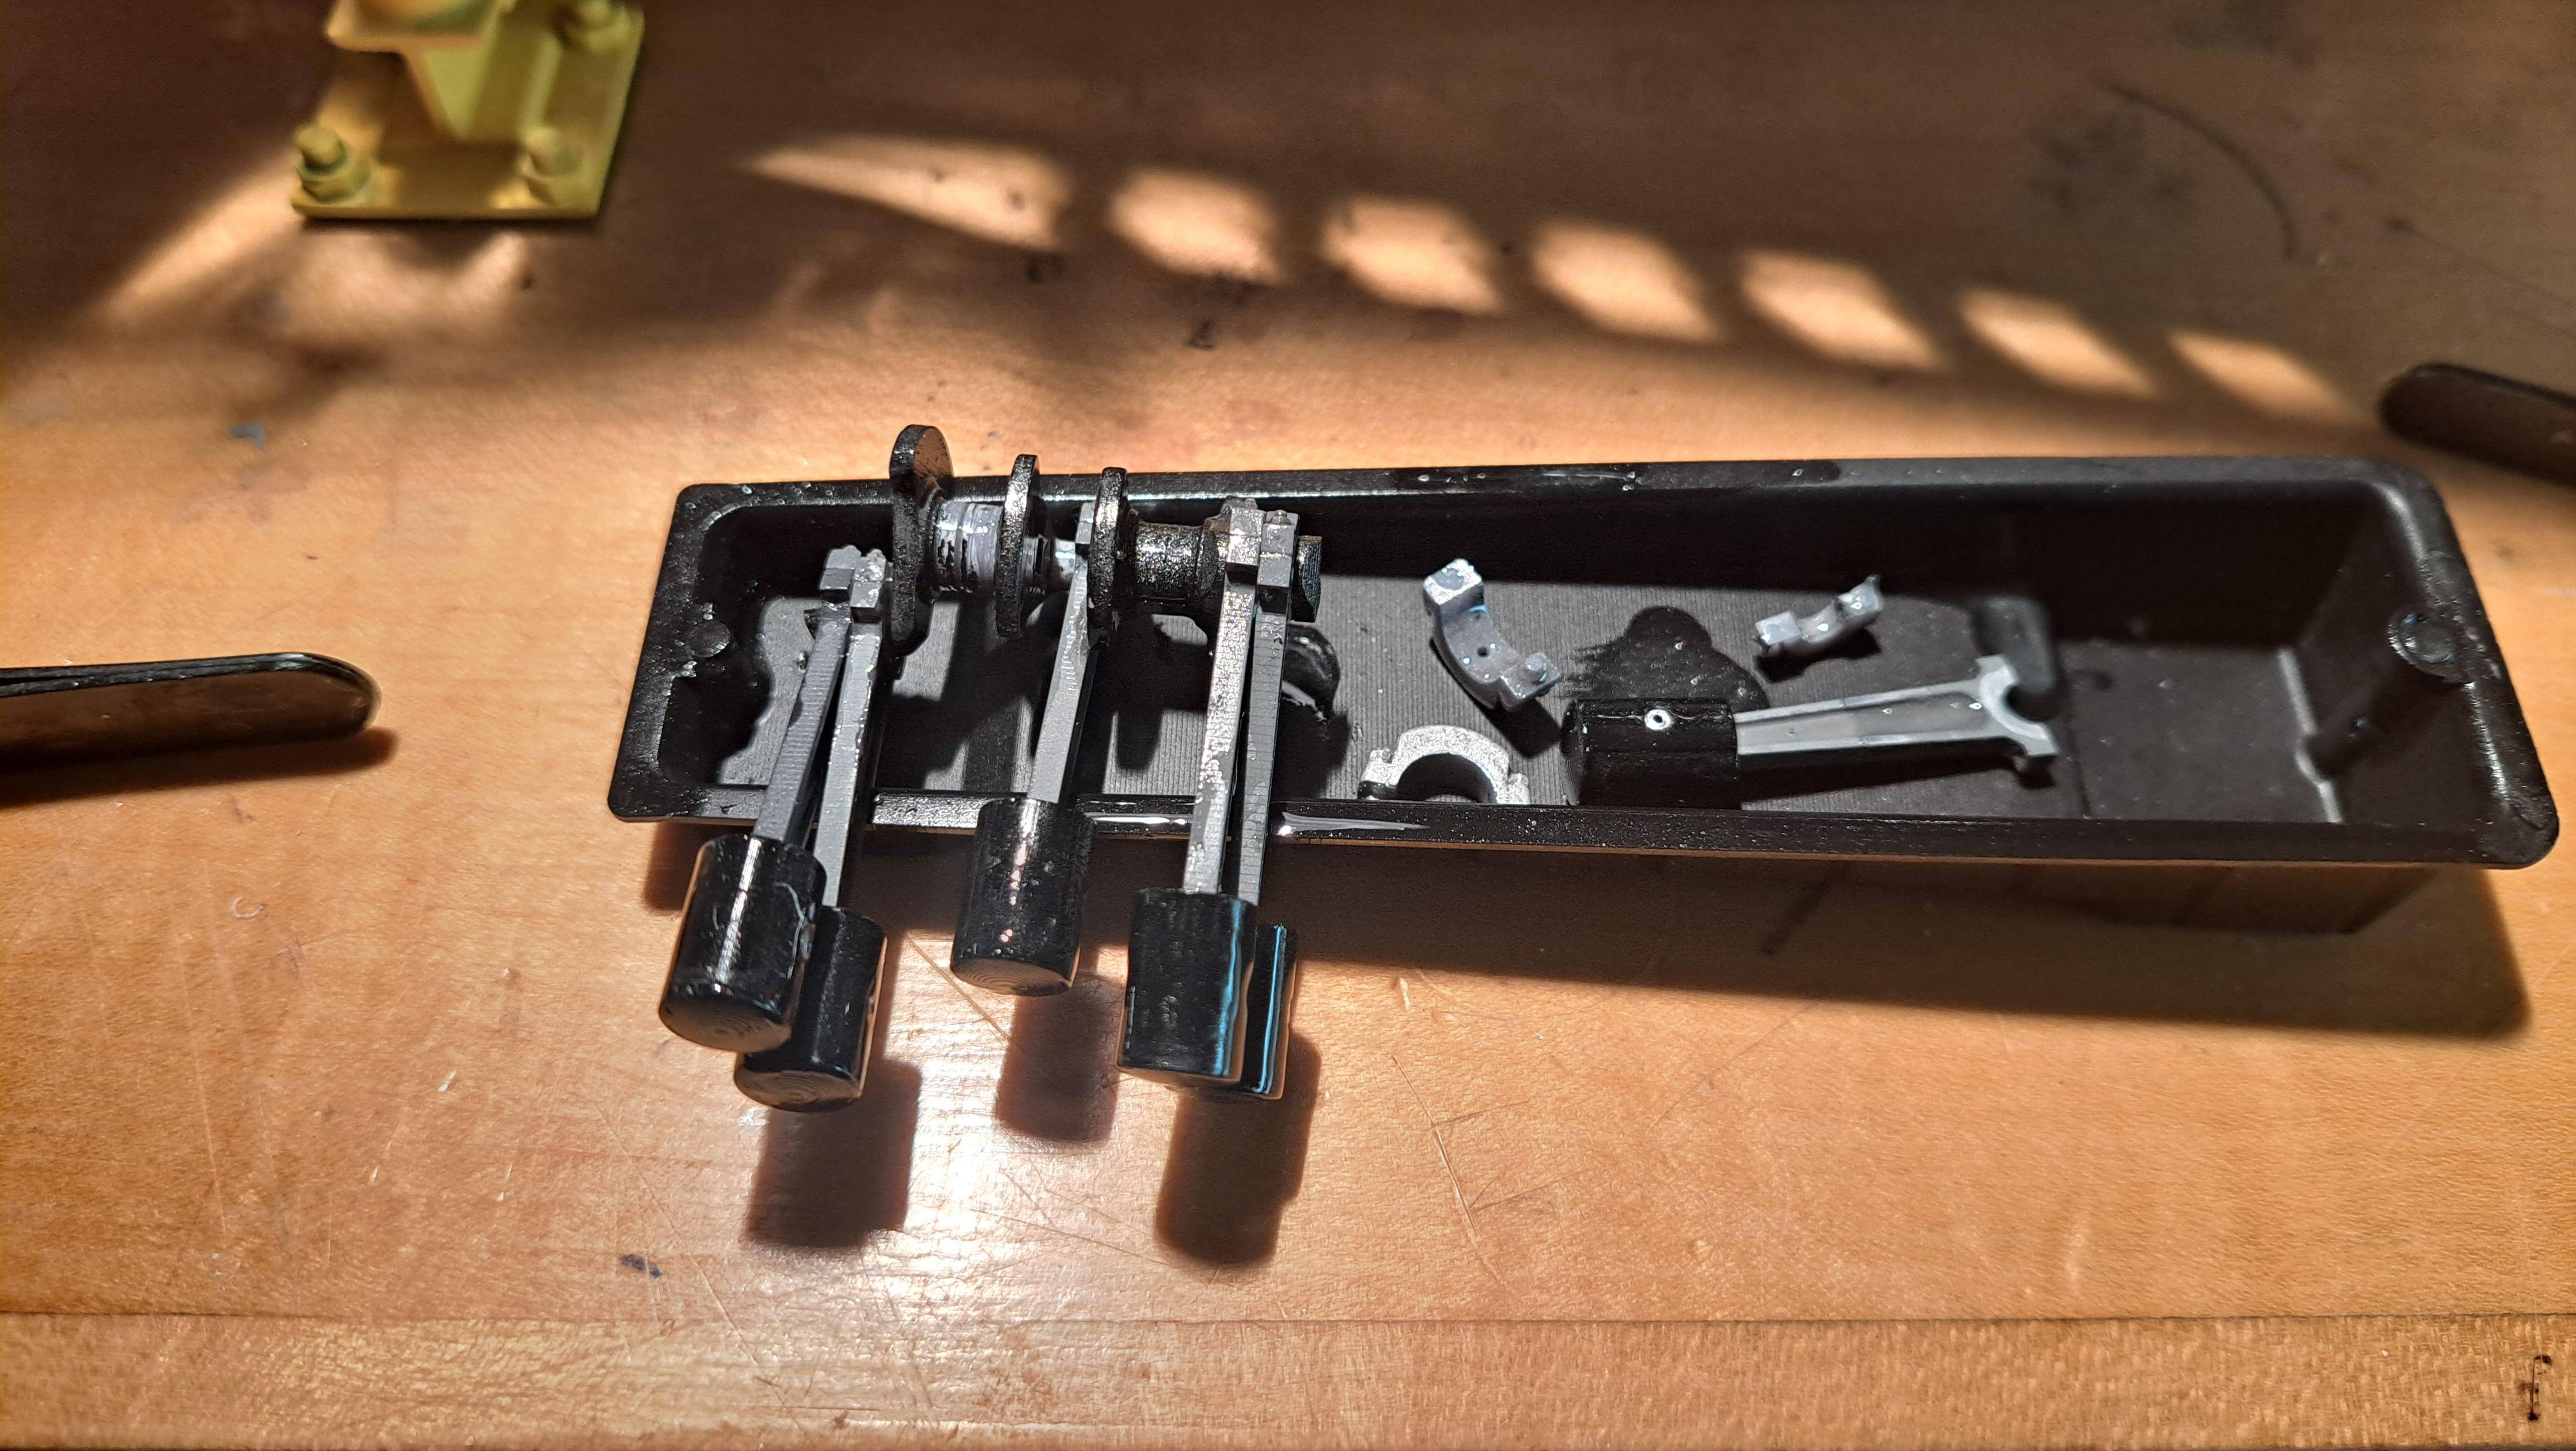
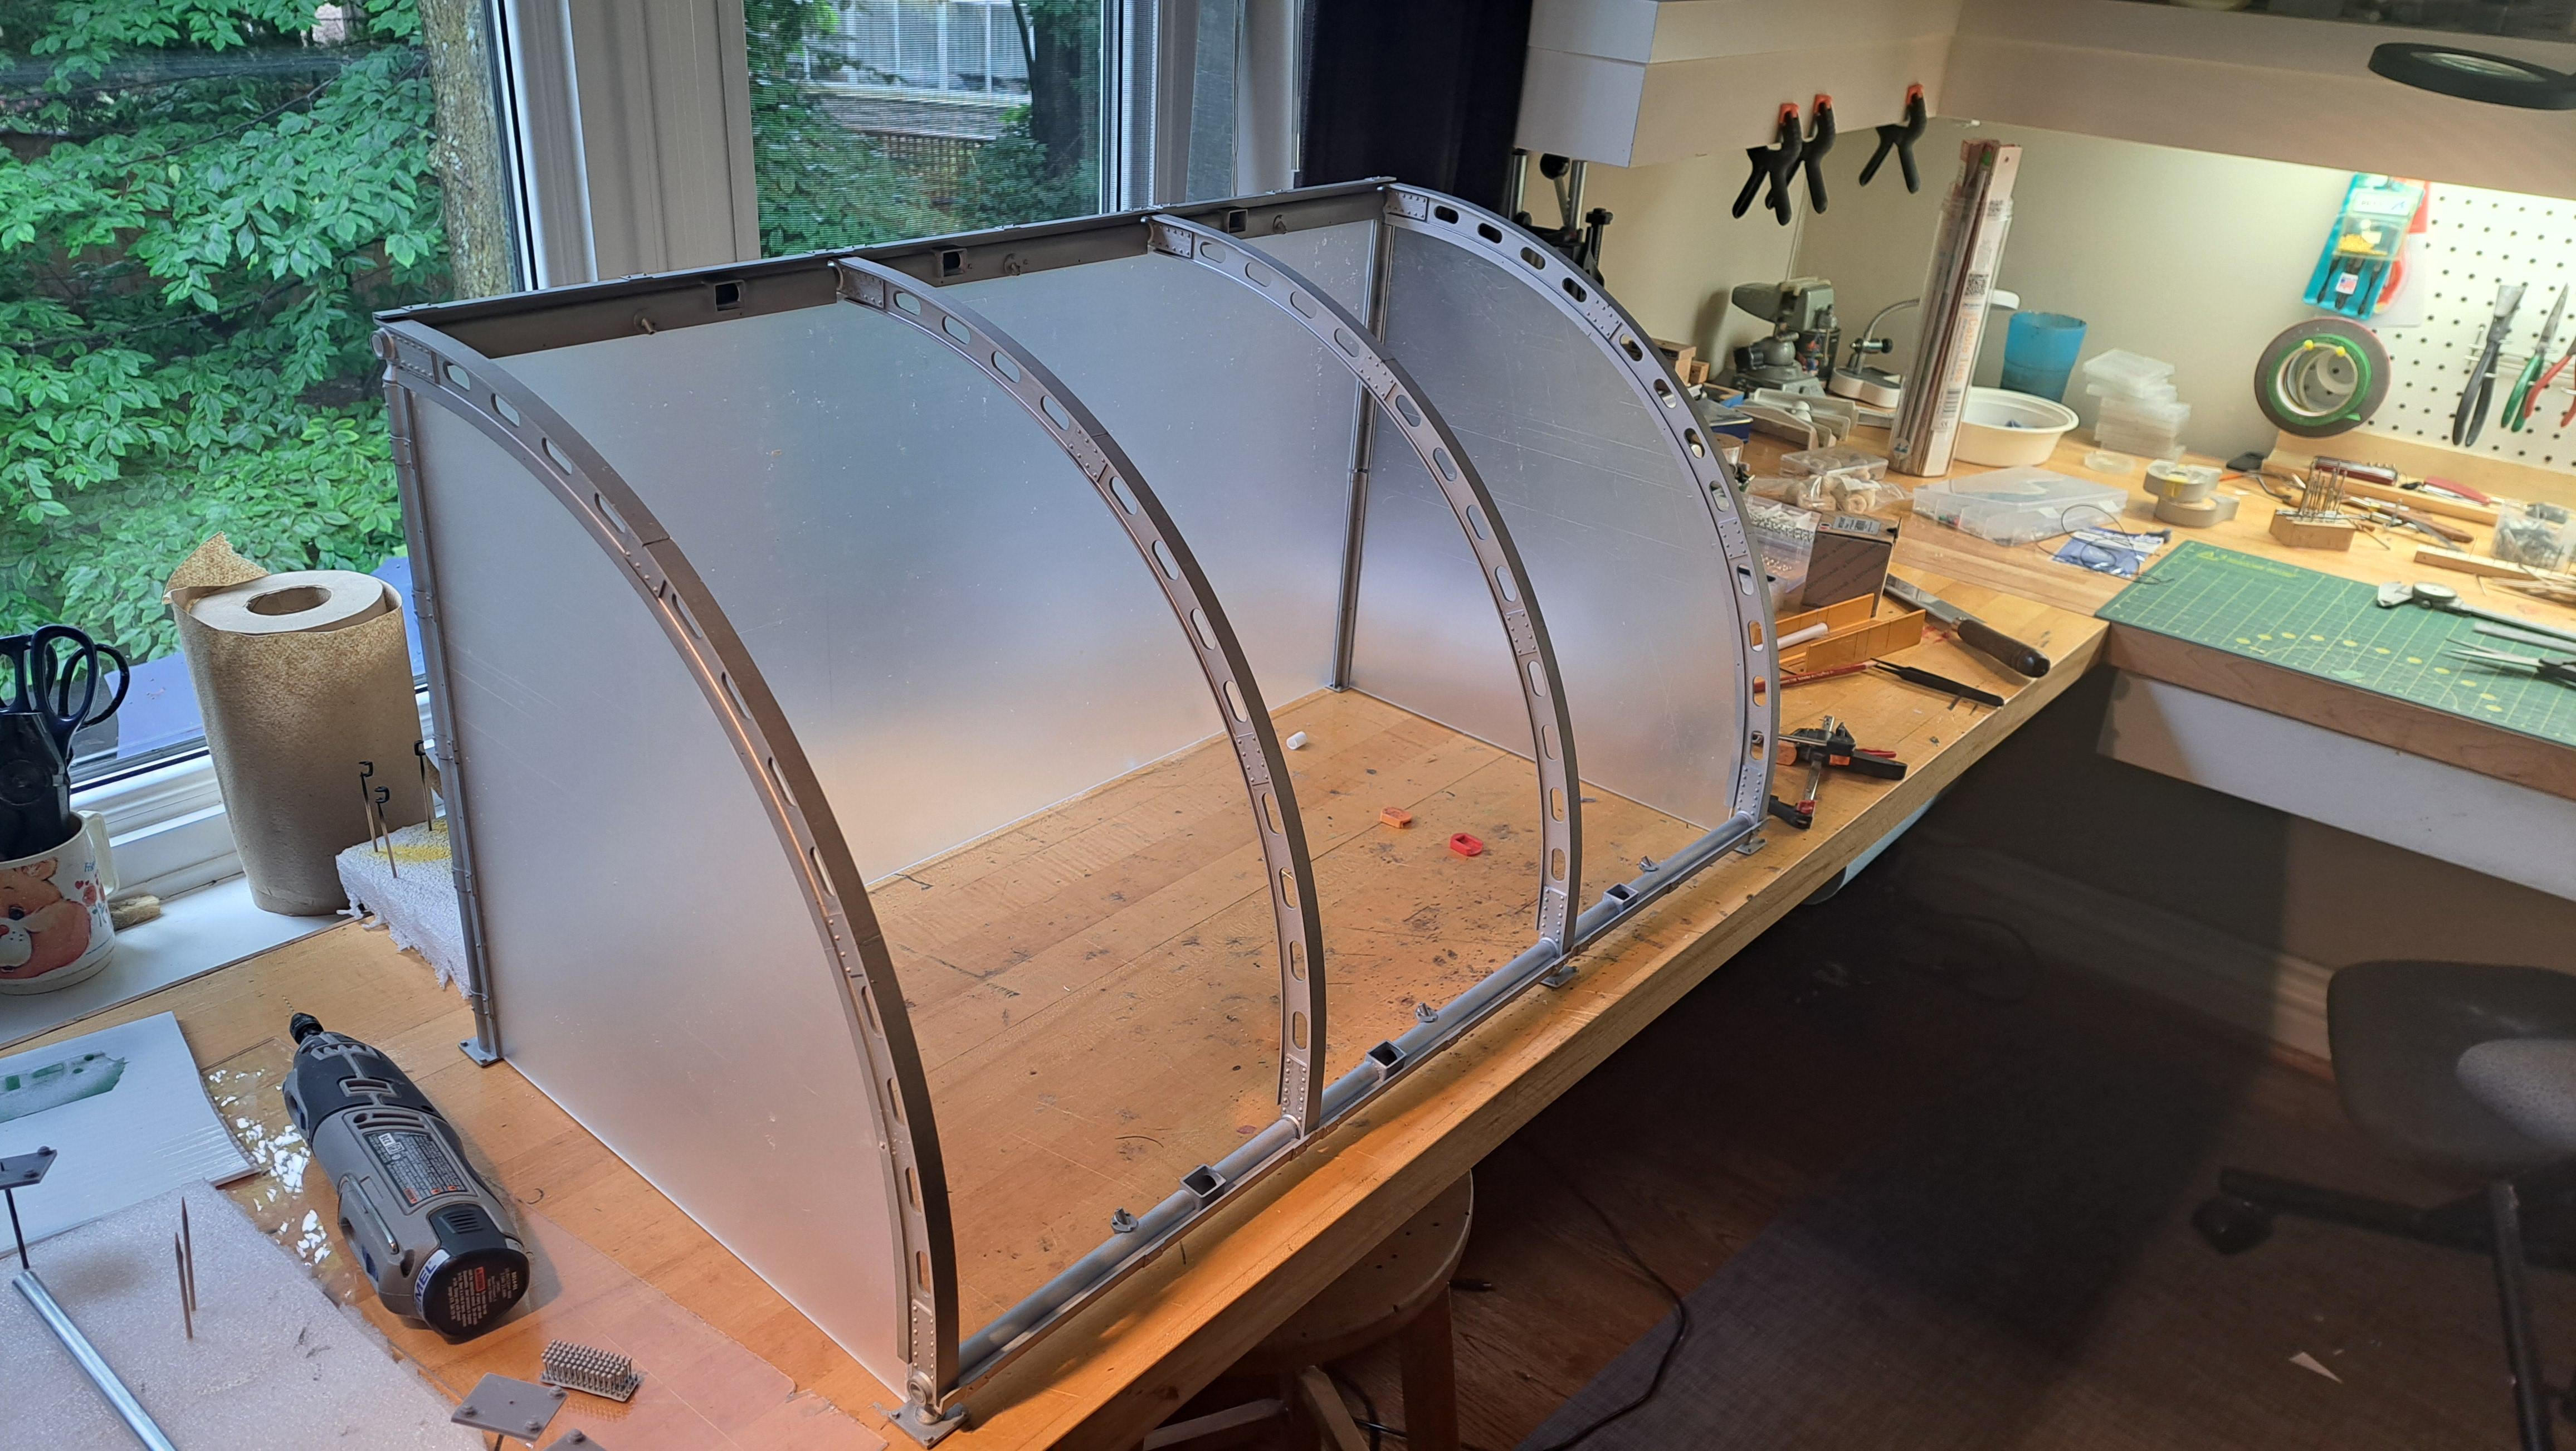
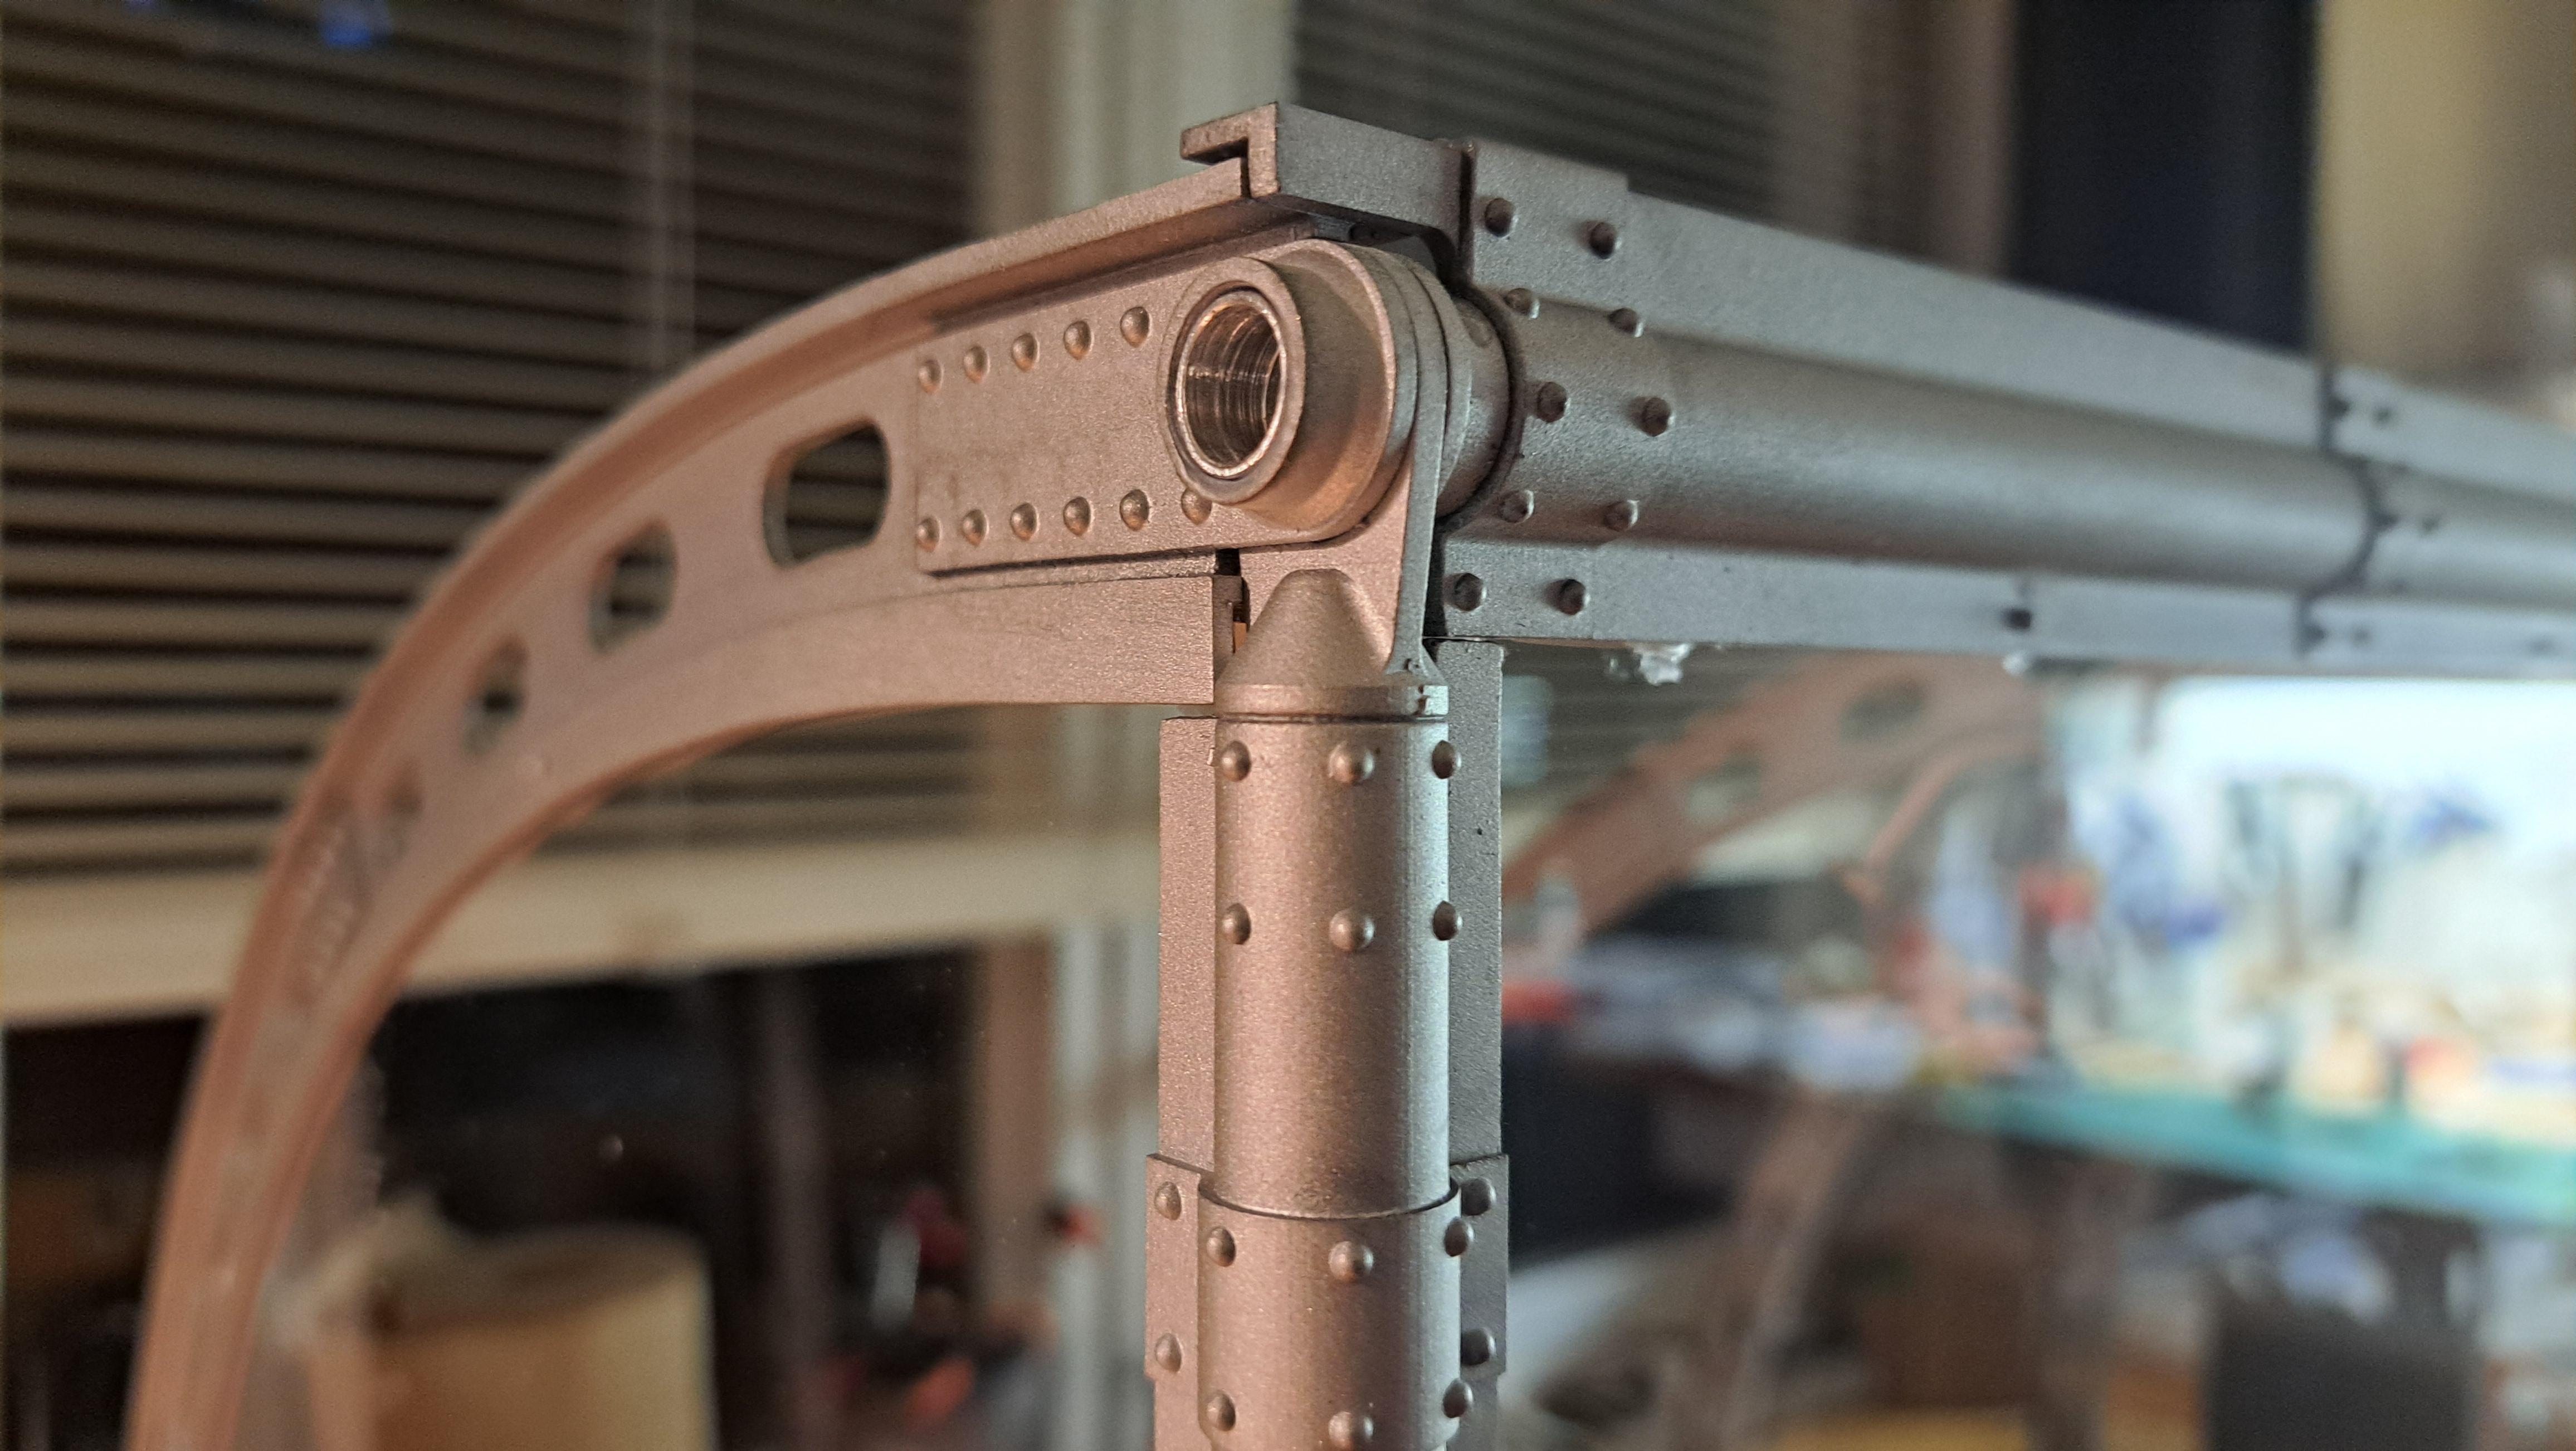
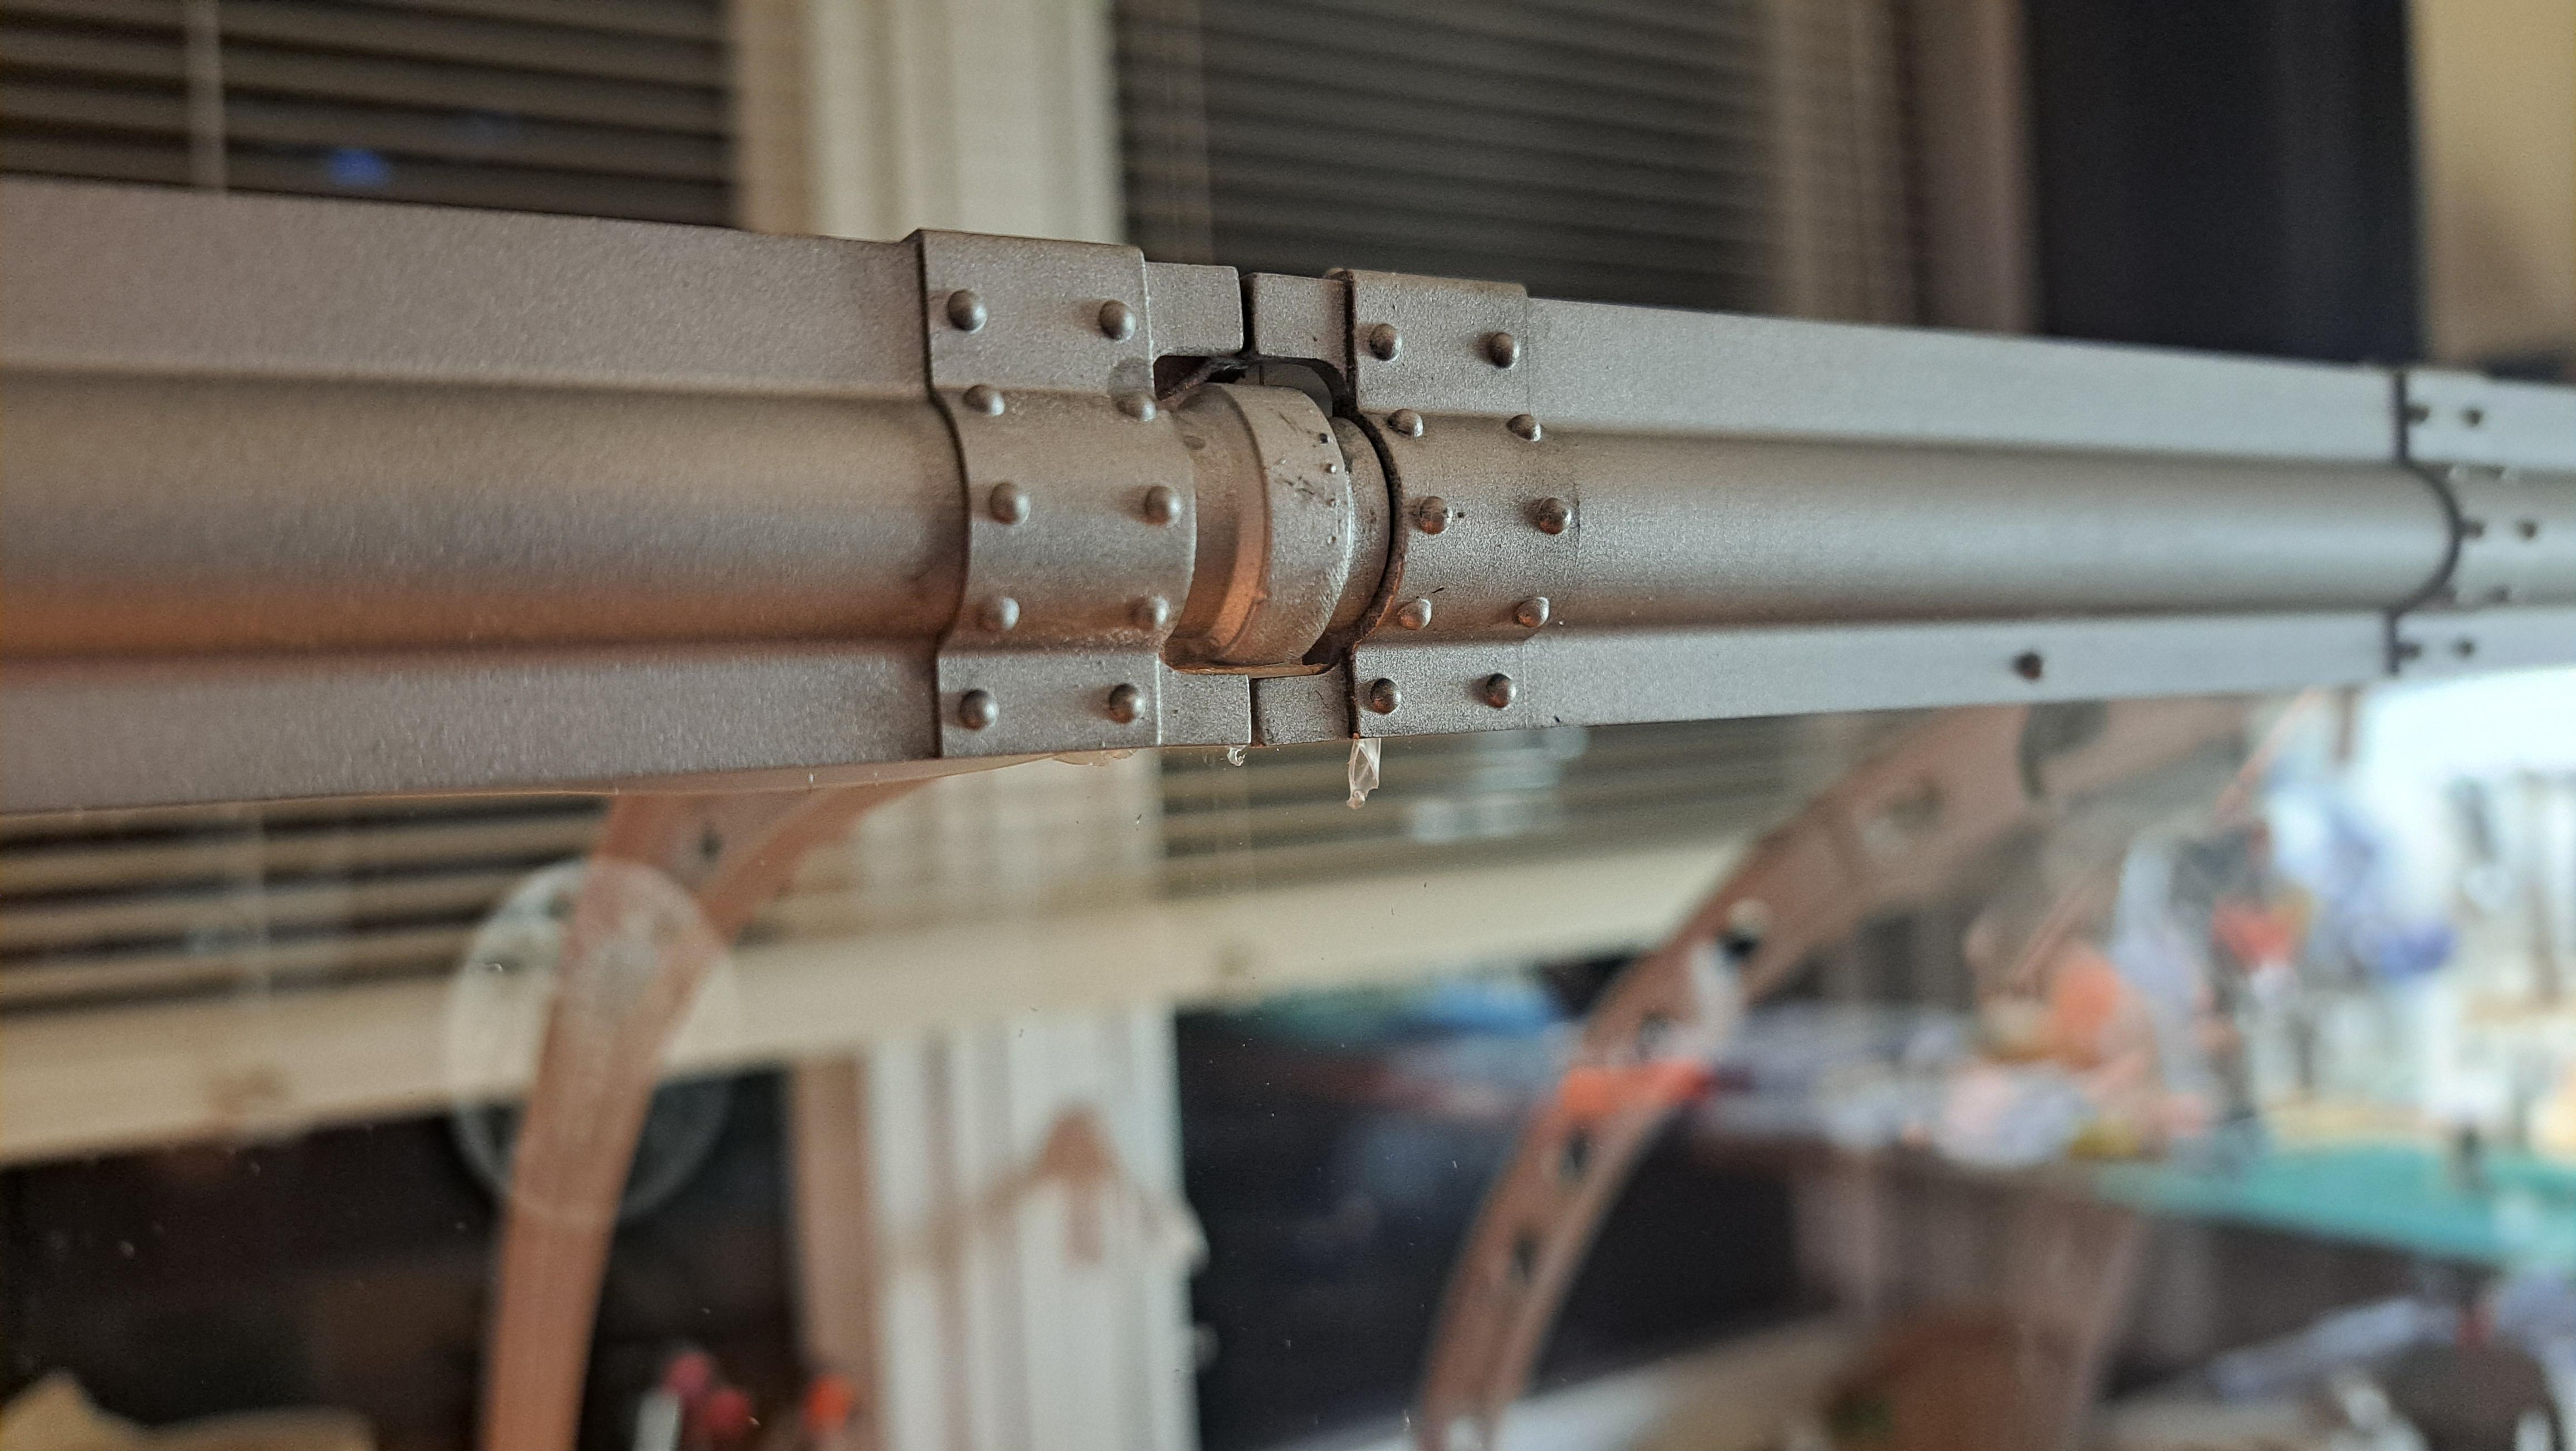
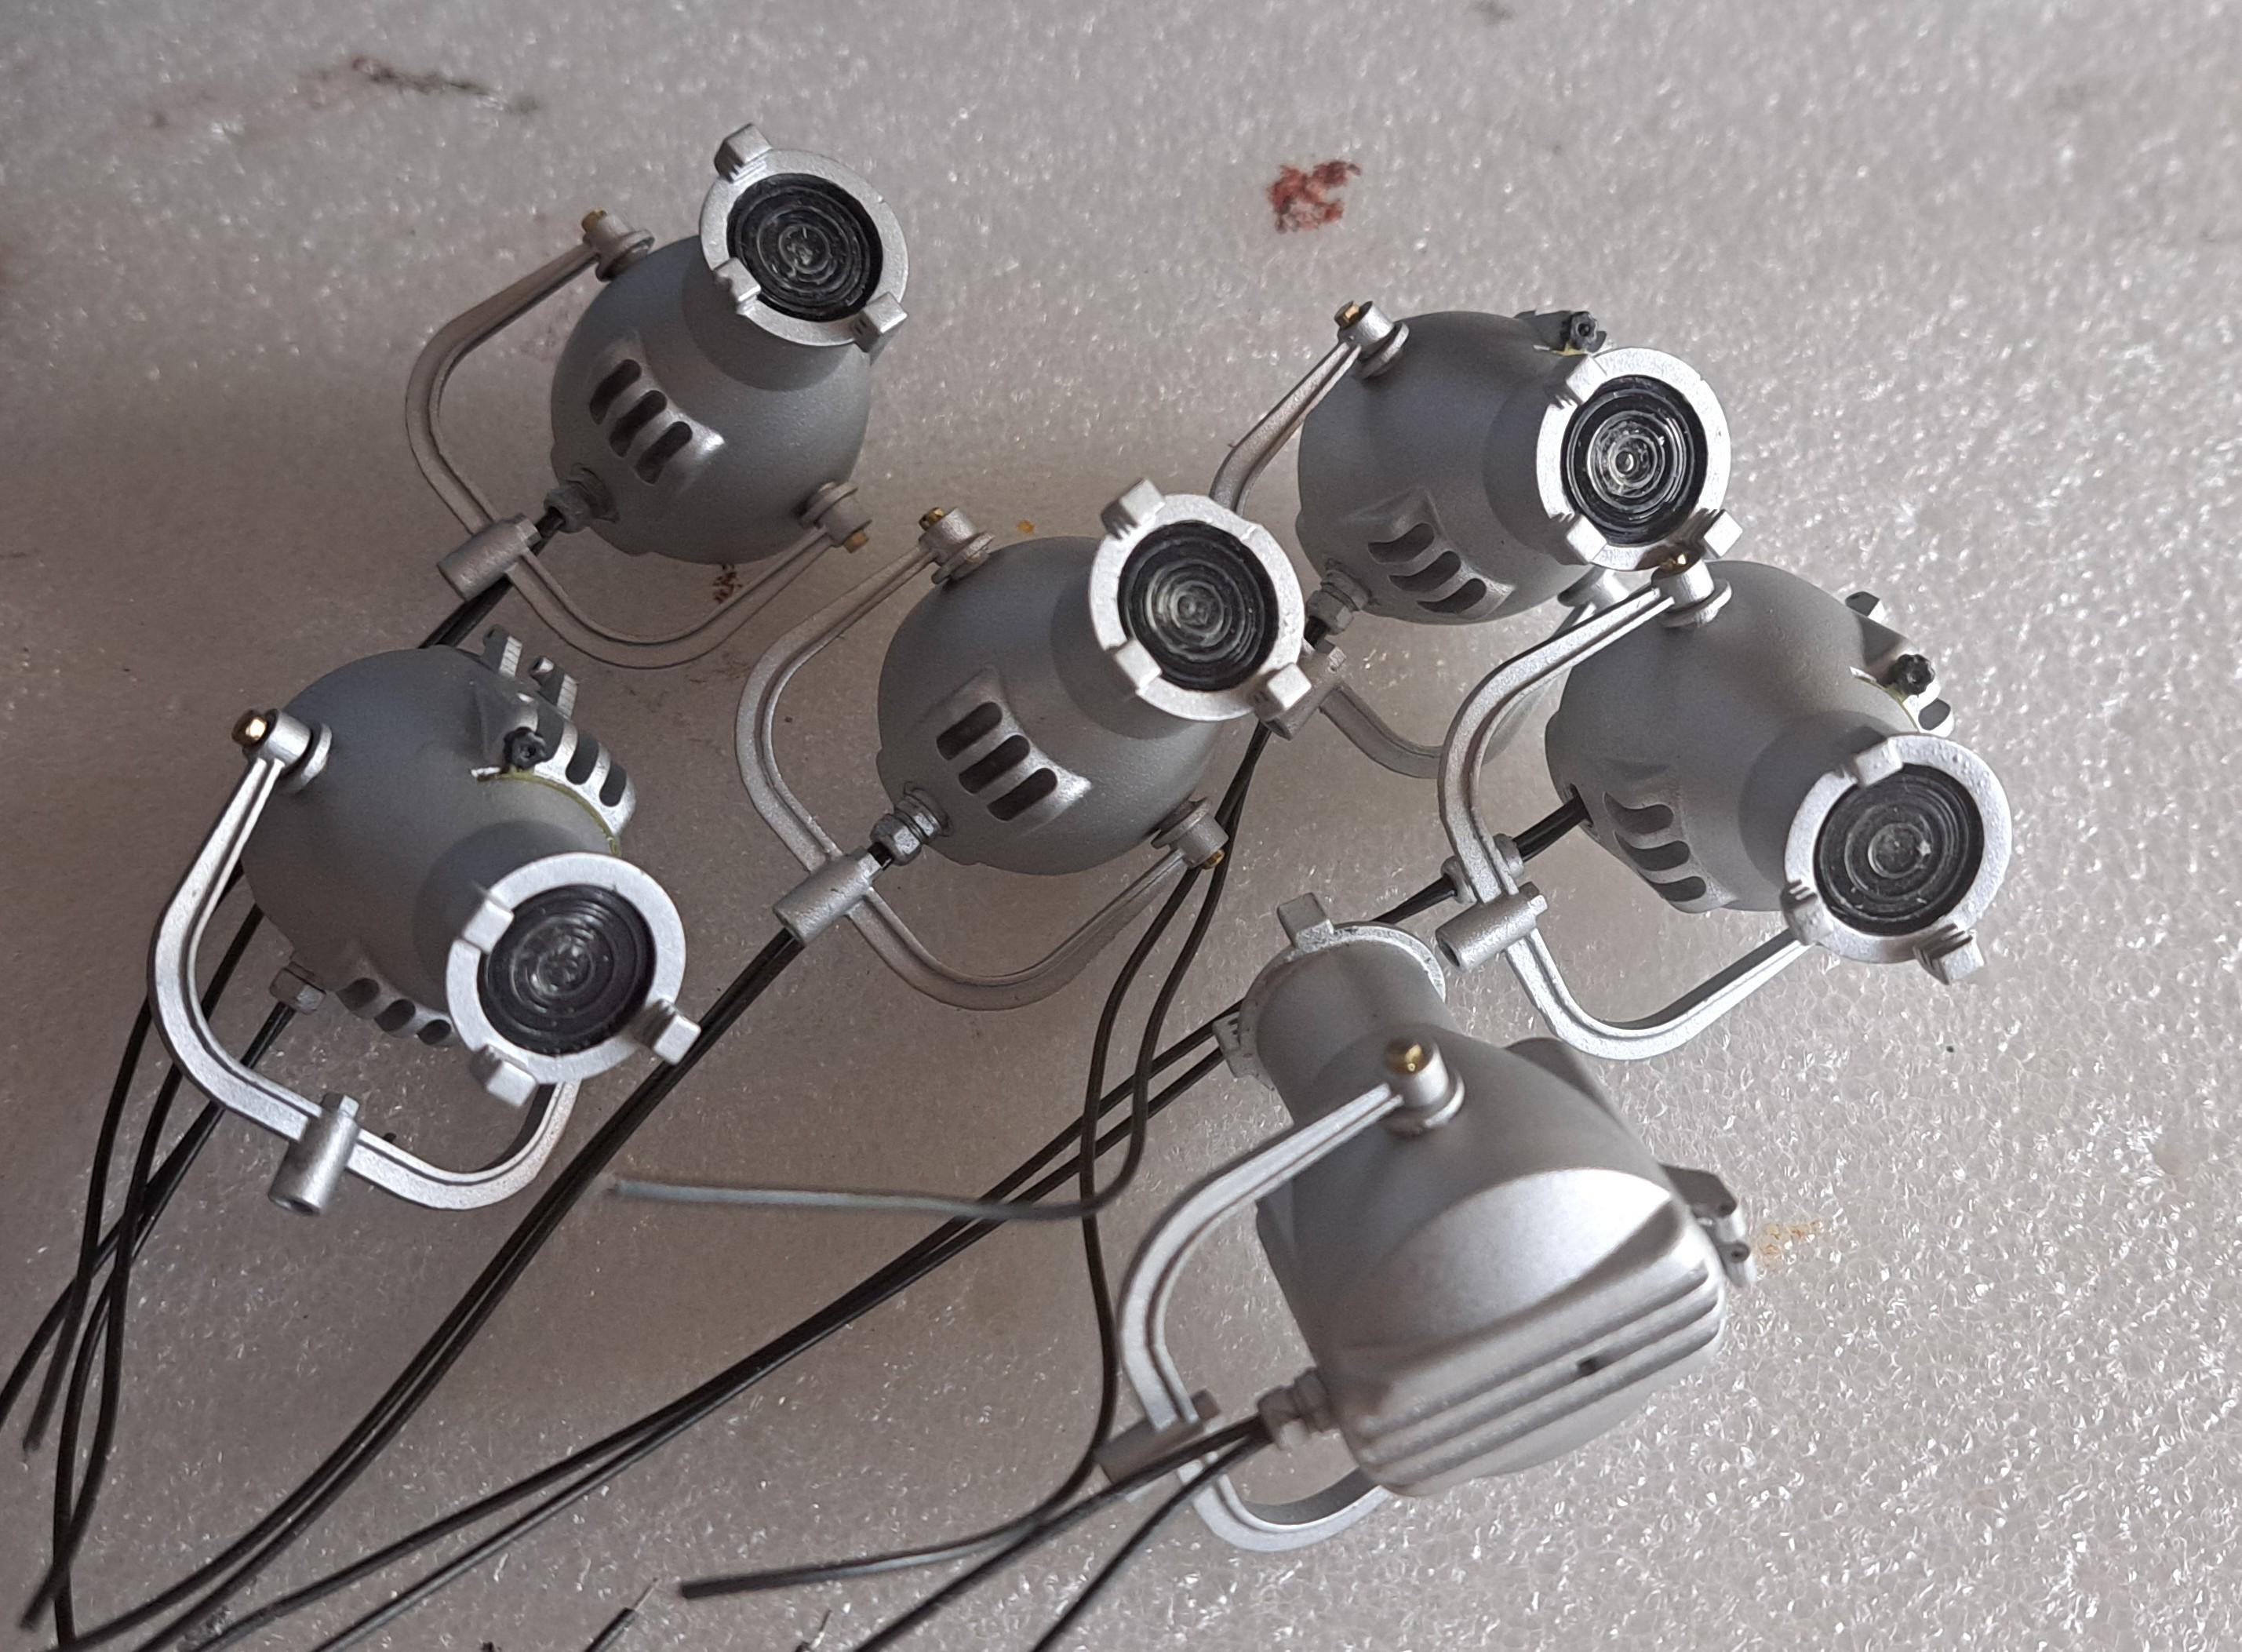
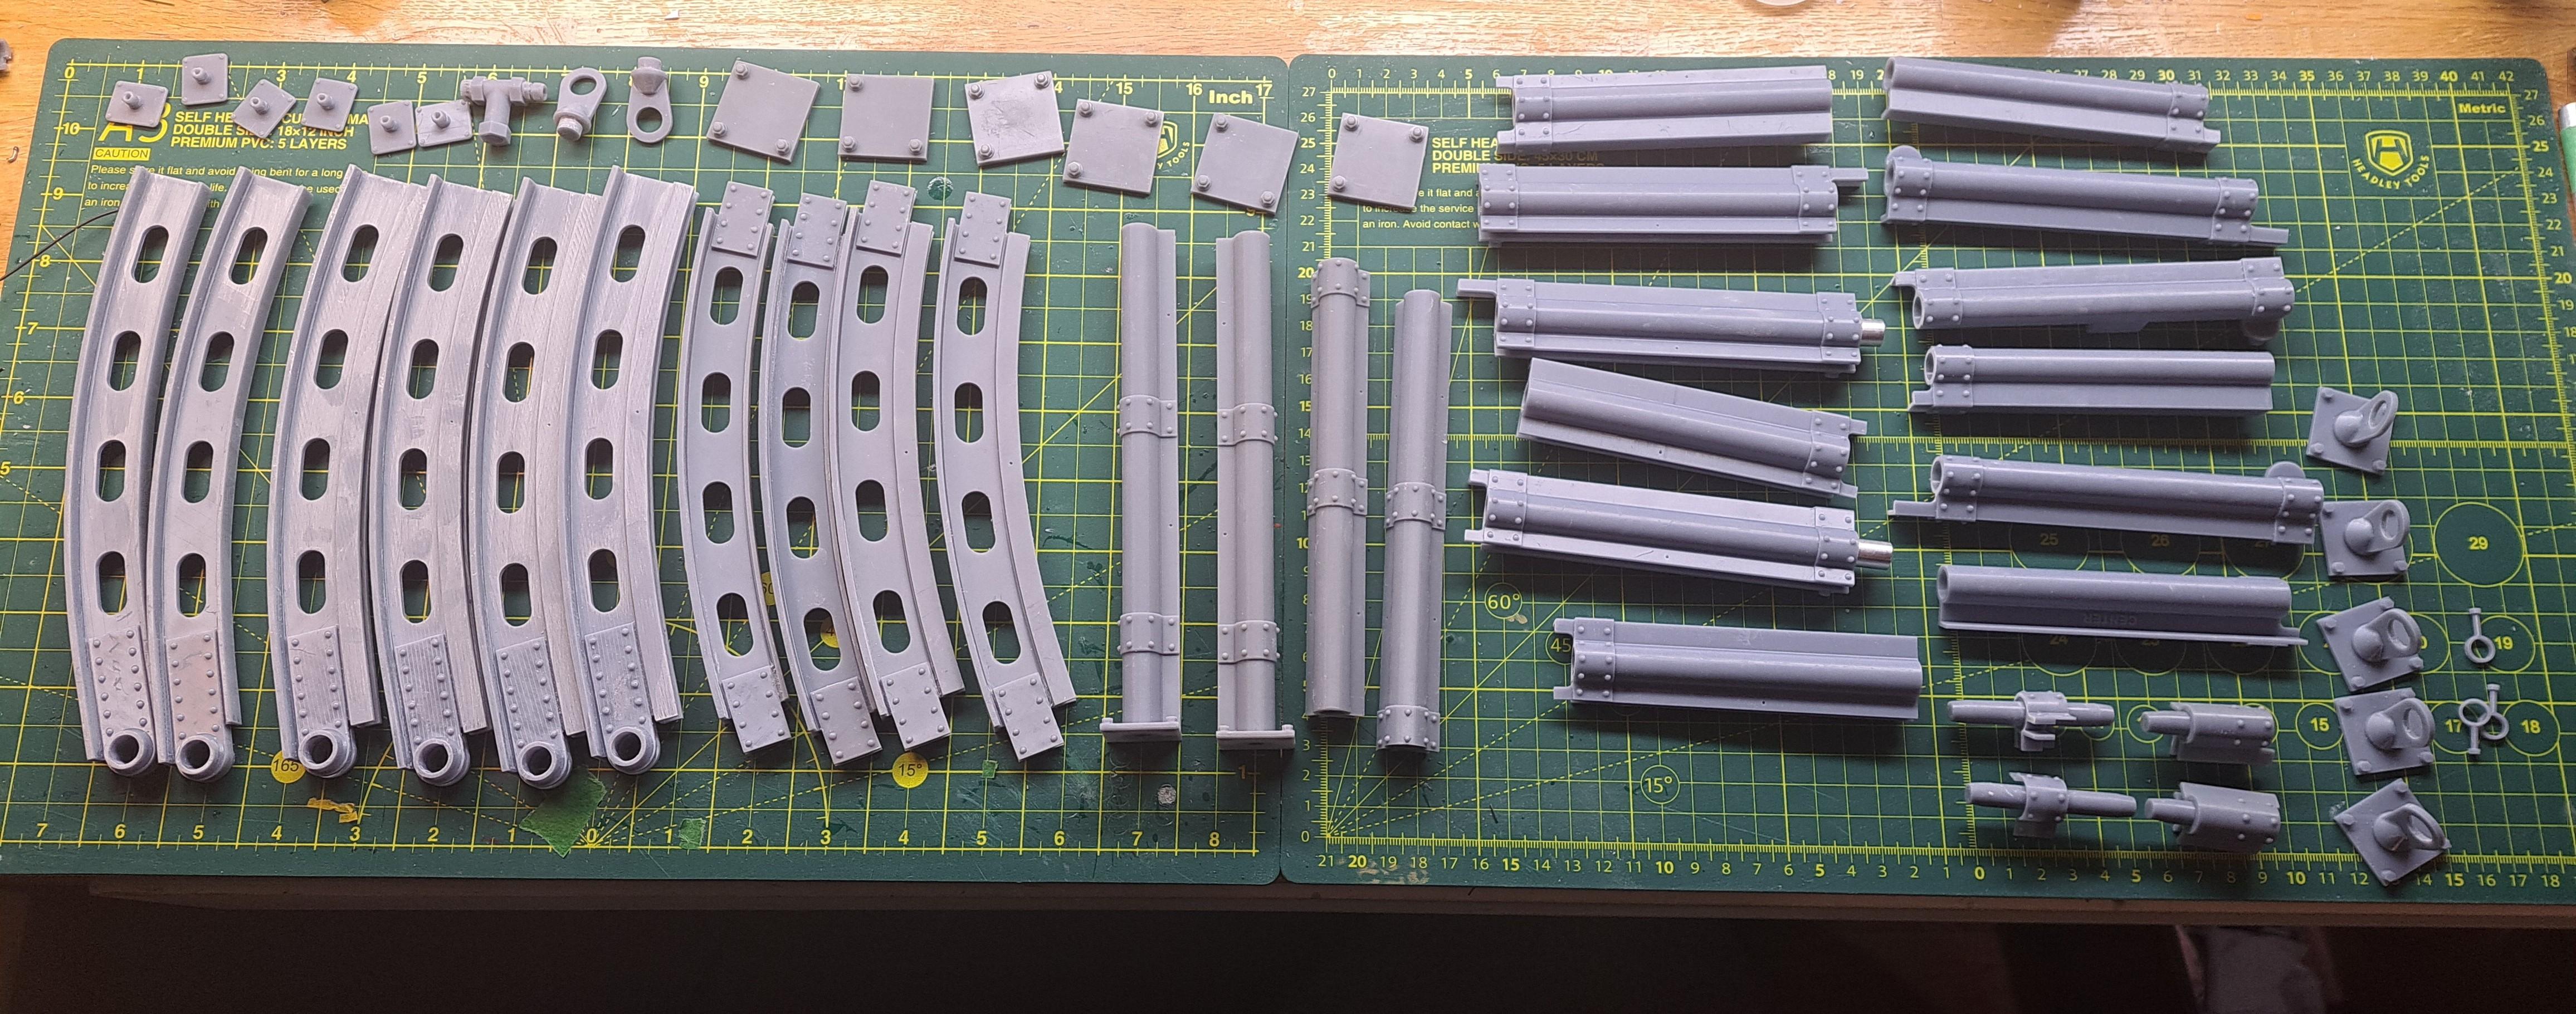
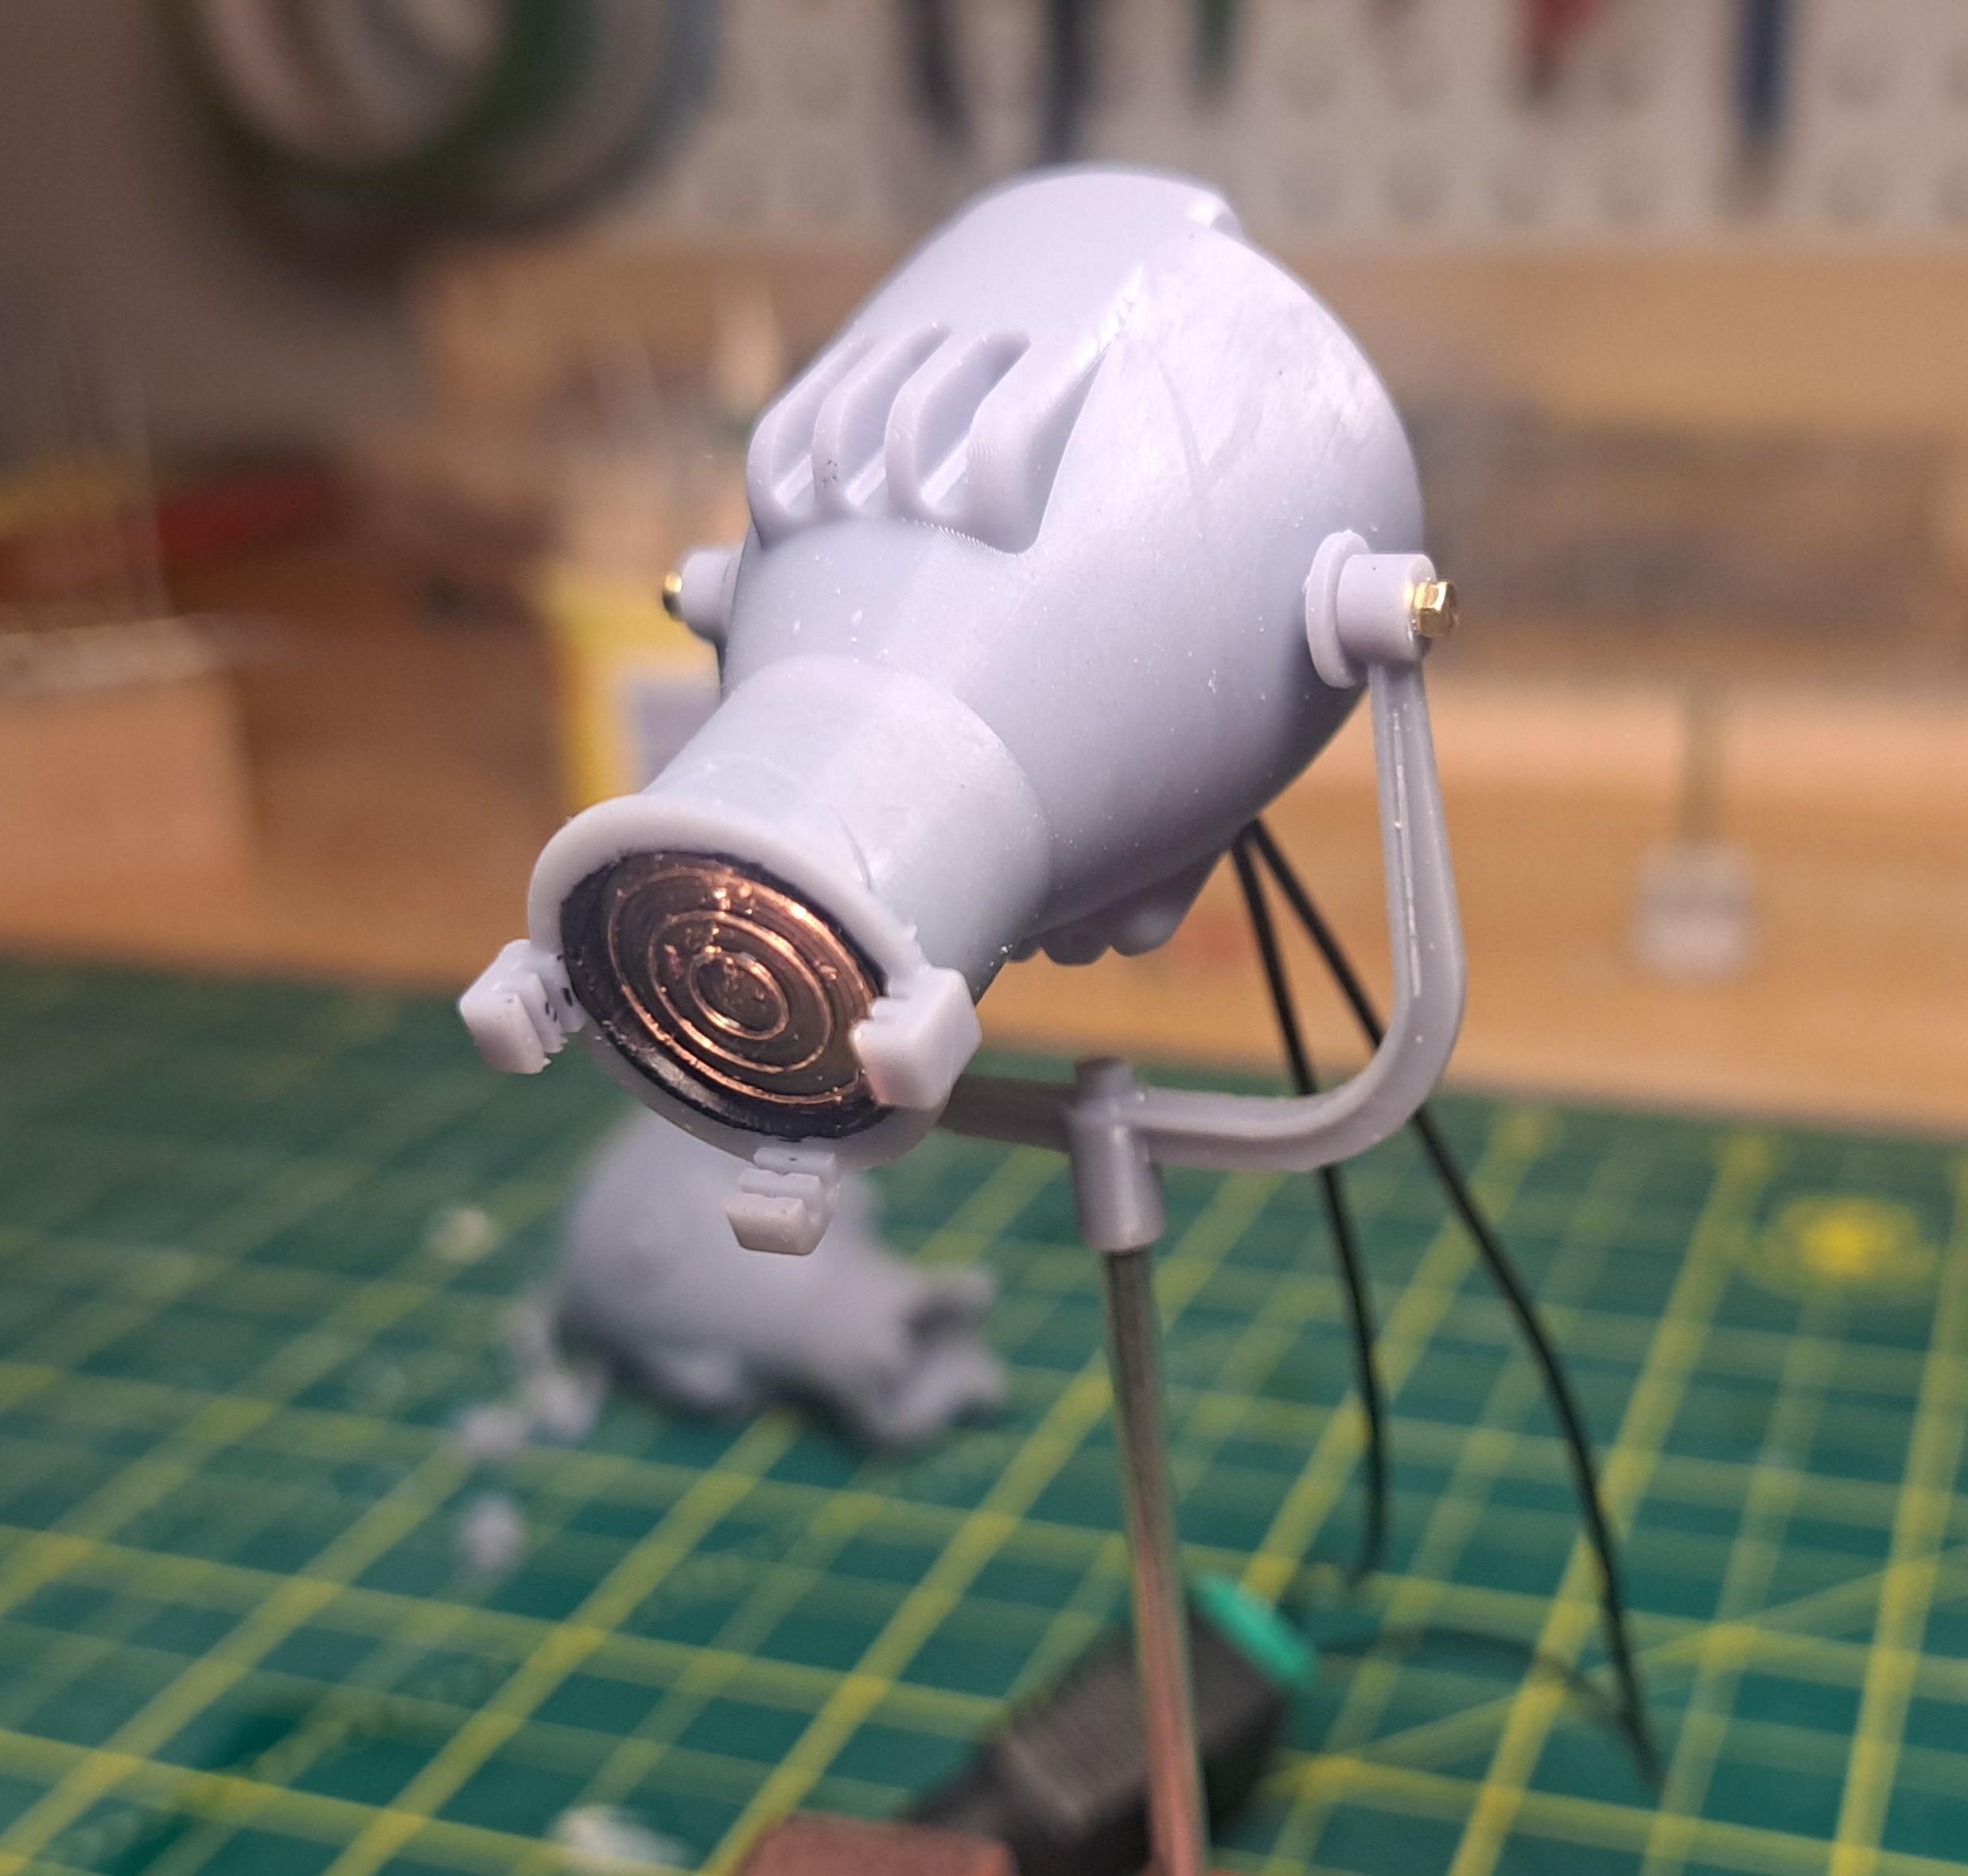
I've been busy with the printer these last few days. All display case parts are printed. It took a total of 4 separate prints at approximately 12hrs per print but every part came out perfect. Next step will be to assemble a few sub assemblies, primer and paint then final assembly and wiring of the 6 spotlights. It wasn't easy to figure out a way to bring all the wires to one corner but I think I found a neat way to do it. I'm waiting for some 1/8 inch thick plexiglass to do the front and sides, the top will be made with 1/32 inch thick plexiglass because it needs to be curved. All printed parts (52 total) needed to make the case. The base will be made from wood shaped to look like an Hbeam structure. Finished spot lights
-
Marvel's Hydra coupe 1/12 scale full scratch build
François replied to François's topic in WIP: Model Cars
Thank you Dragline. But if I may, I would like to clarify a few things. Anybody (the average Joe) can effectively print good quality parts with a high res printer (which have been around for more than 3 years) but, If you don't possess the key ingredients which are a good design background and a profound knowledge of 3d modeling with a cad system, you will have to print other people's creations which may not always be what you want. So yes, 3d printing is very impressive and can open up a hole new way to do miniature modeling but it's really not as easy as one may think and definitely not for everyone. -
Marvel's Hydra coupe 1/12 scale full scratch build
François replied to François's topic in WIP: Model Cars
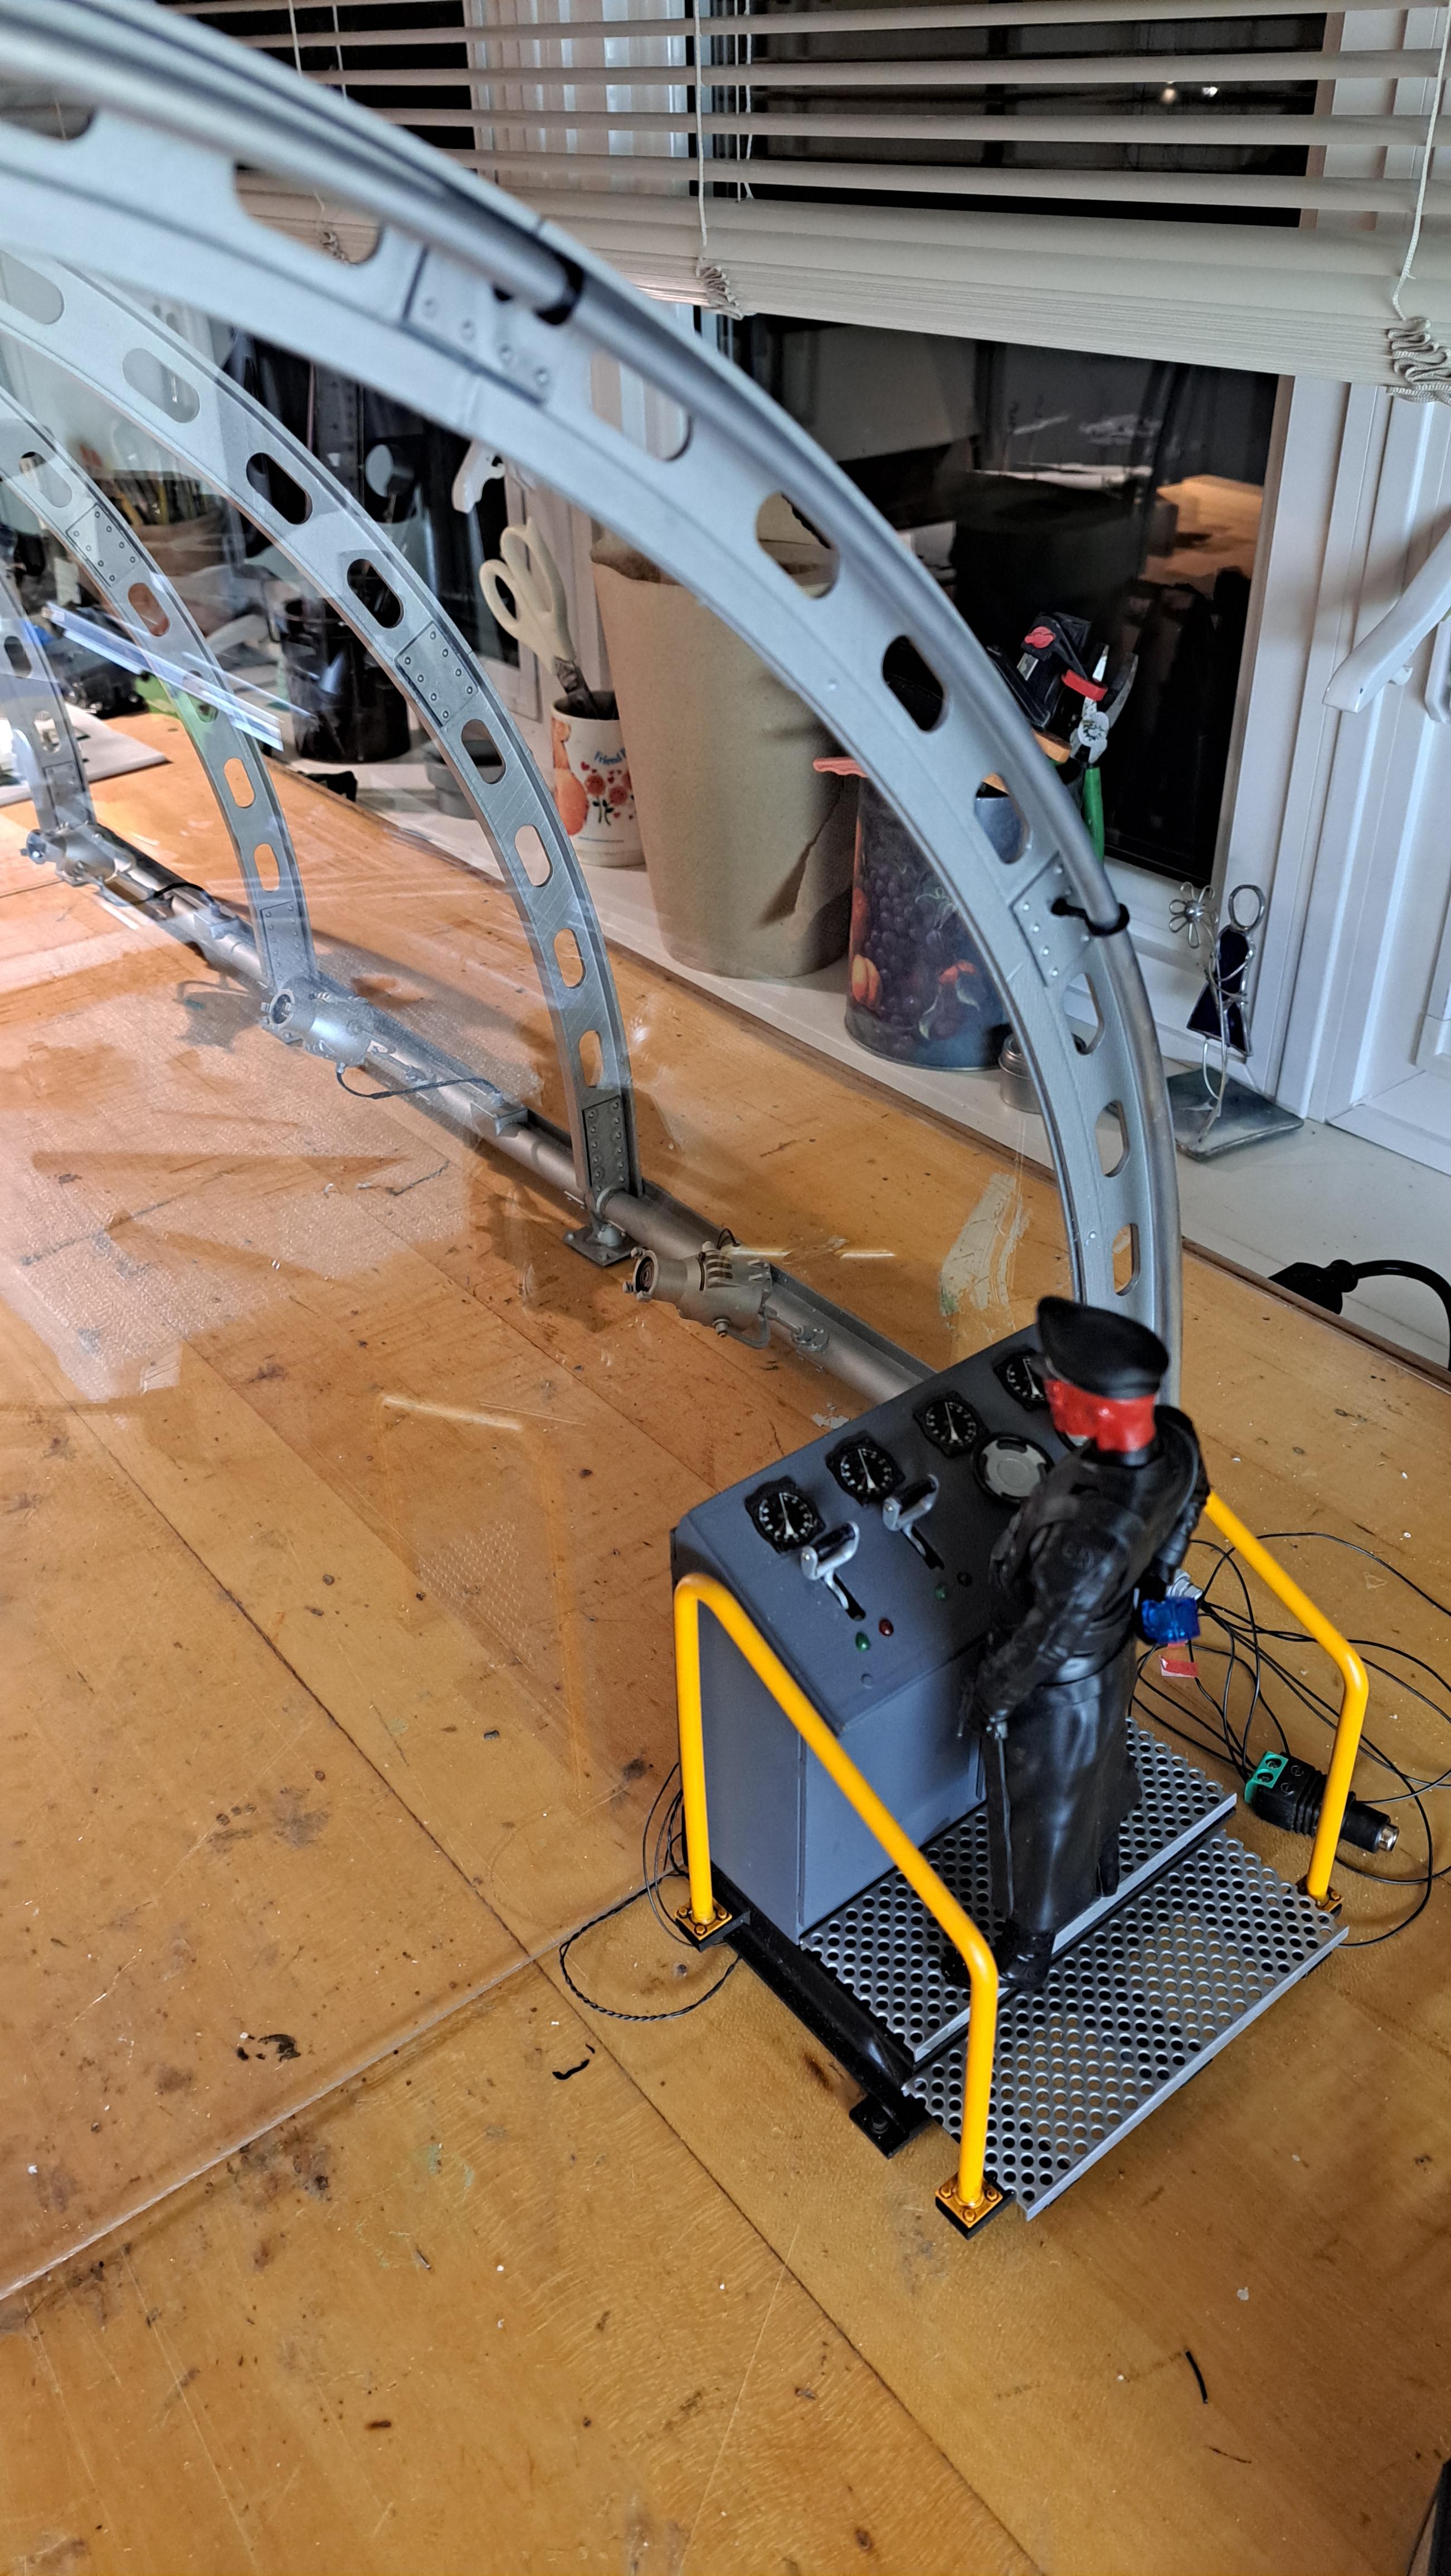
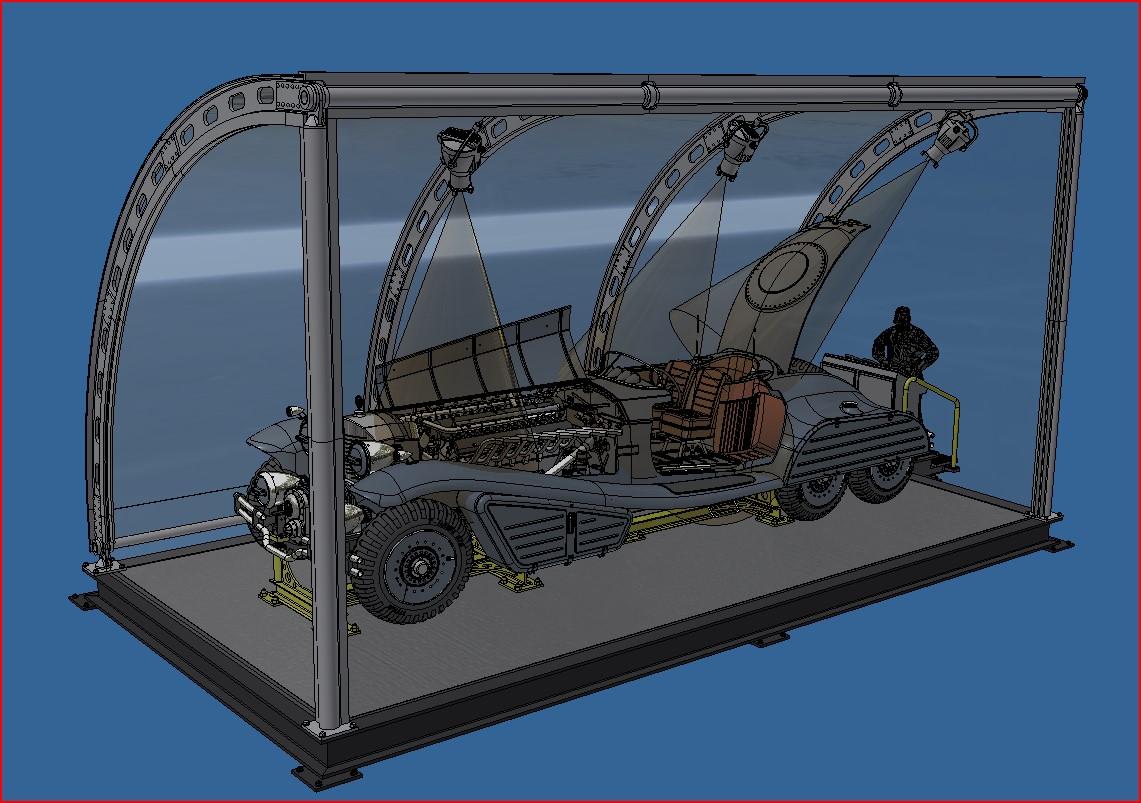
I worked a bit on the enclosure design today. I'm not 100% satisfied but not very far either. I want it to be a bit theatrical, red skull being such a drama queen. I think the shape a gave the enclosure, combined with the theater spot lights gives it a bit of a stage look. The structure is somewhat reminiscent of some structures seen in the Captain America movie. Here's what it looks like so far. The cones represents the light beam although I dought that once finished, the spot lights will give much light. I was thinking of 3 spot lights along the front top rail shining down and 3 along the rear lower rail shining up. The way I made the spot lights, the can be oriented in any direction.
-
Marvel's Hydra coupe 1/12 scale full scratch build
François replied to François's topic in WIP: Model Cars
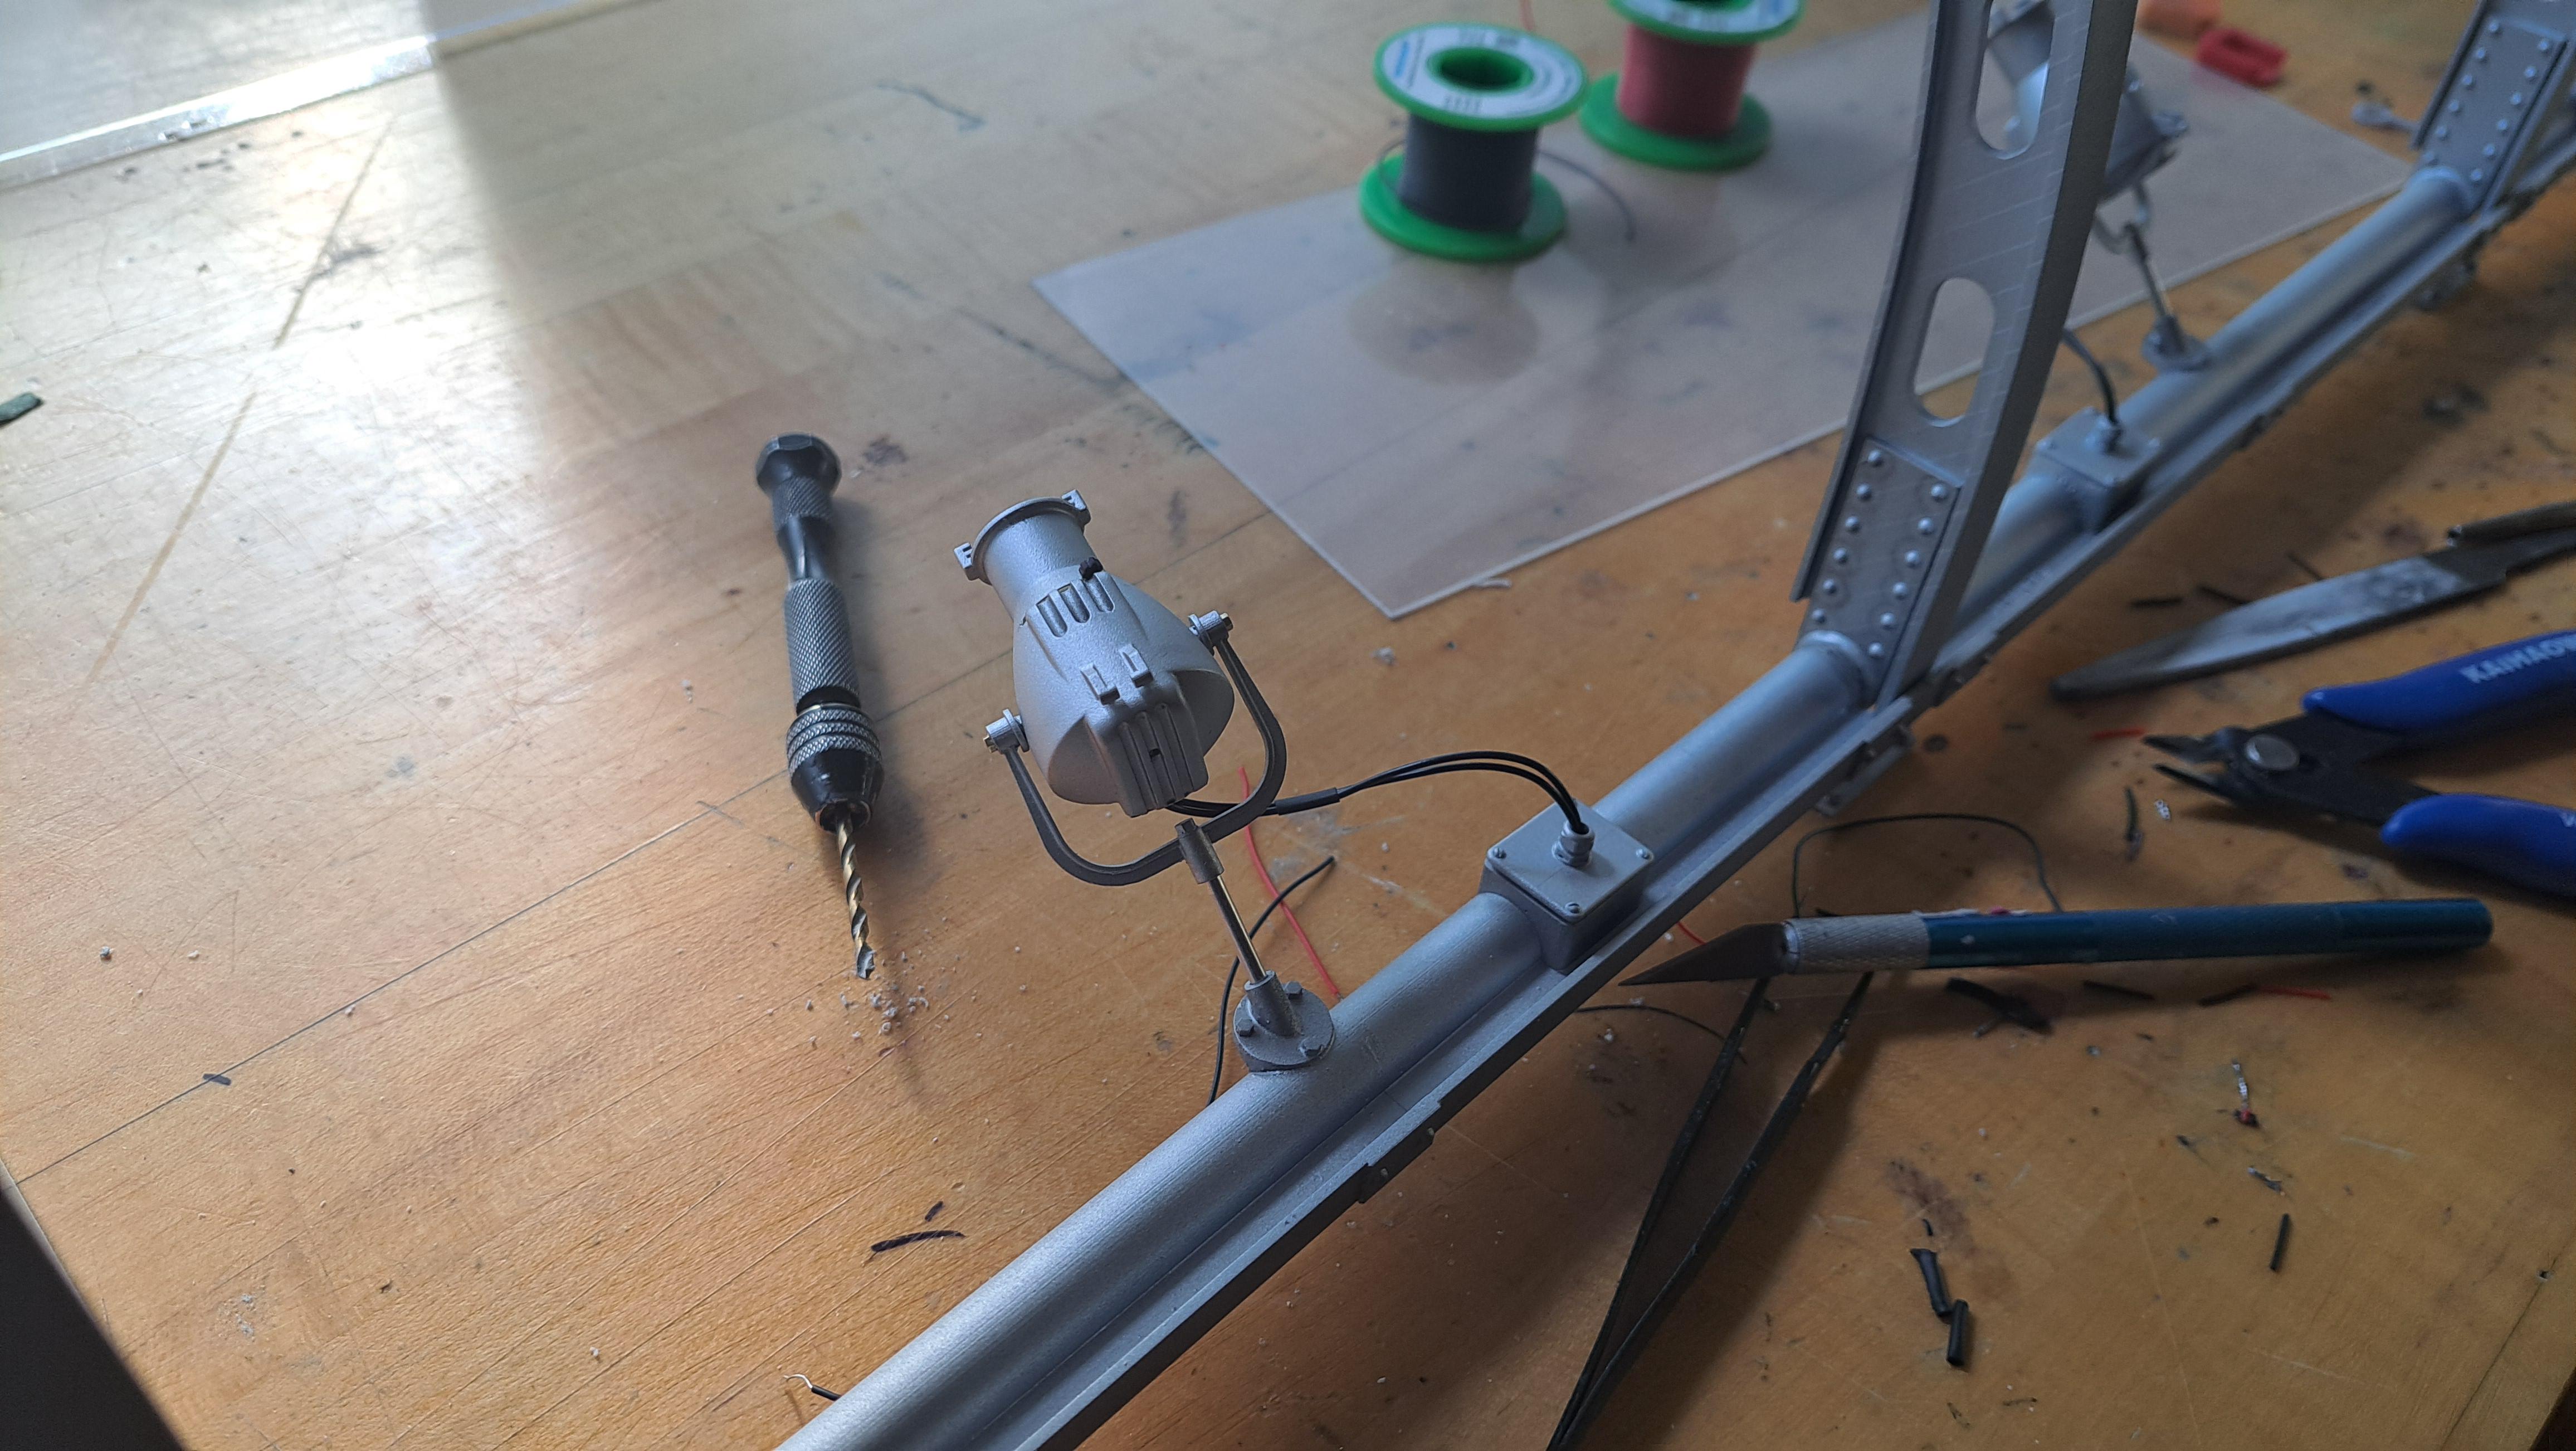
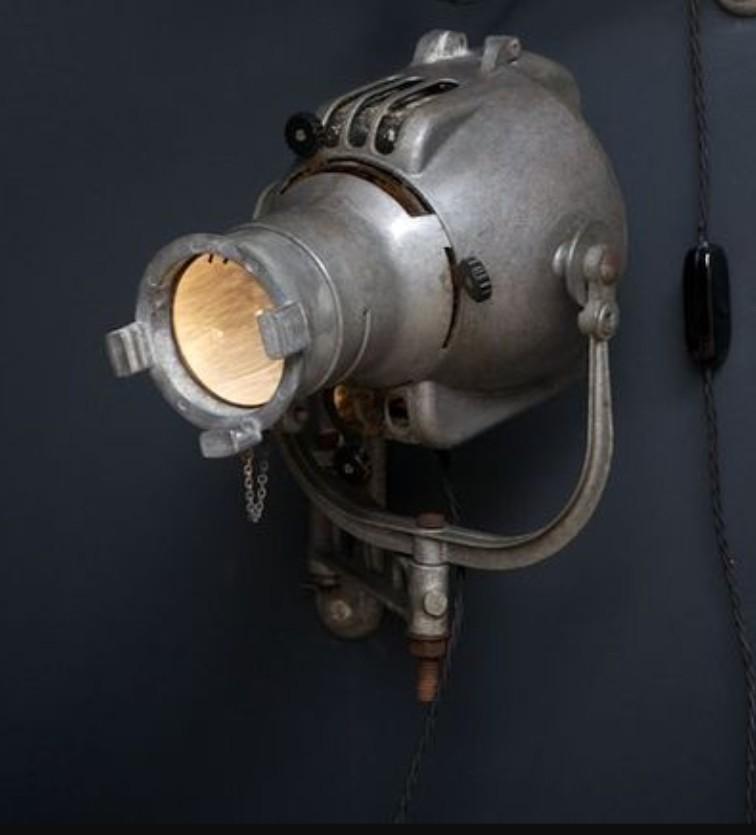
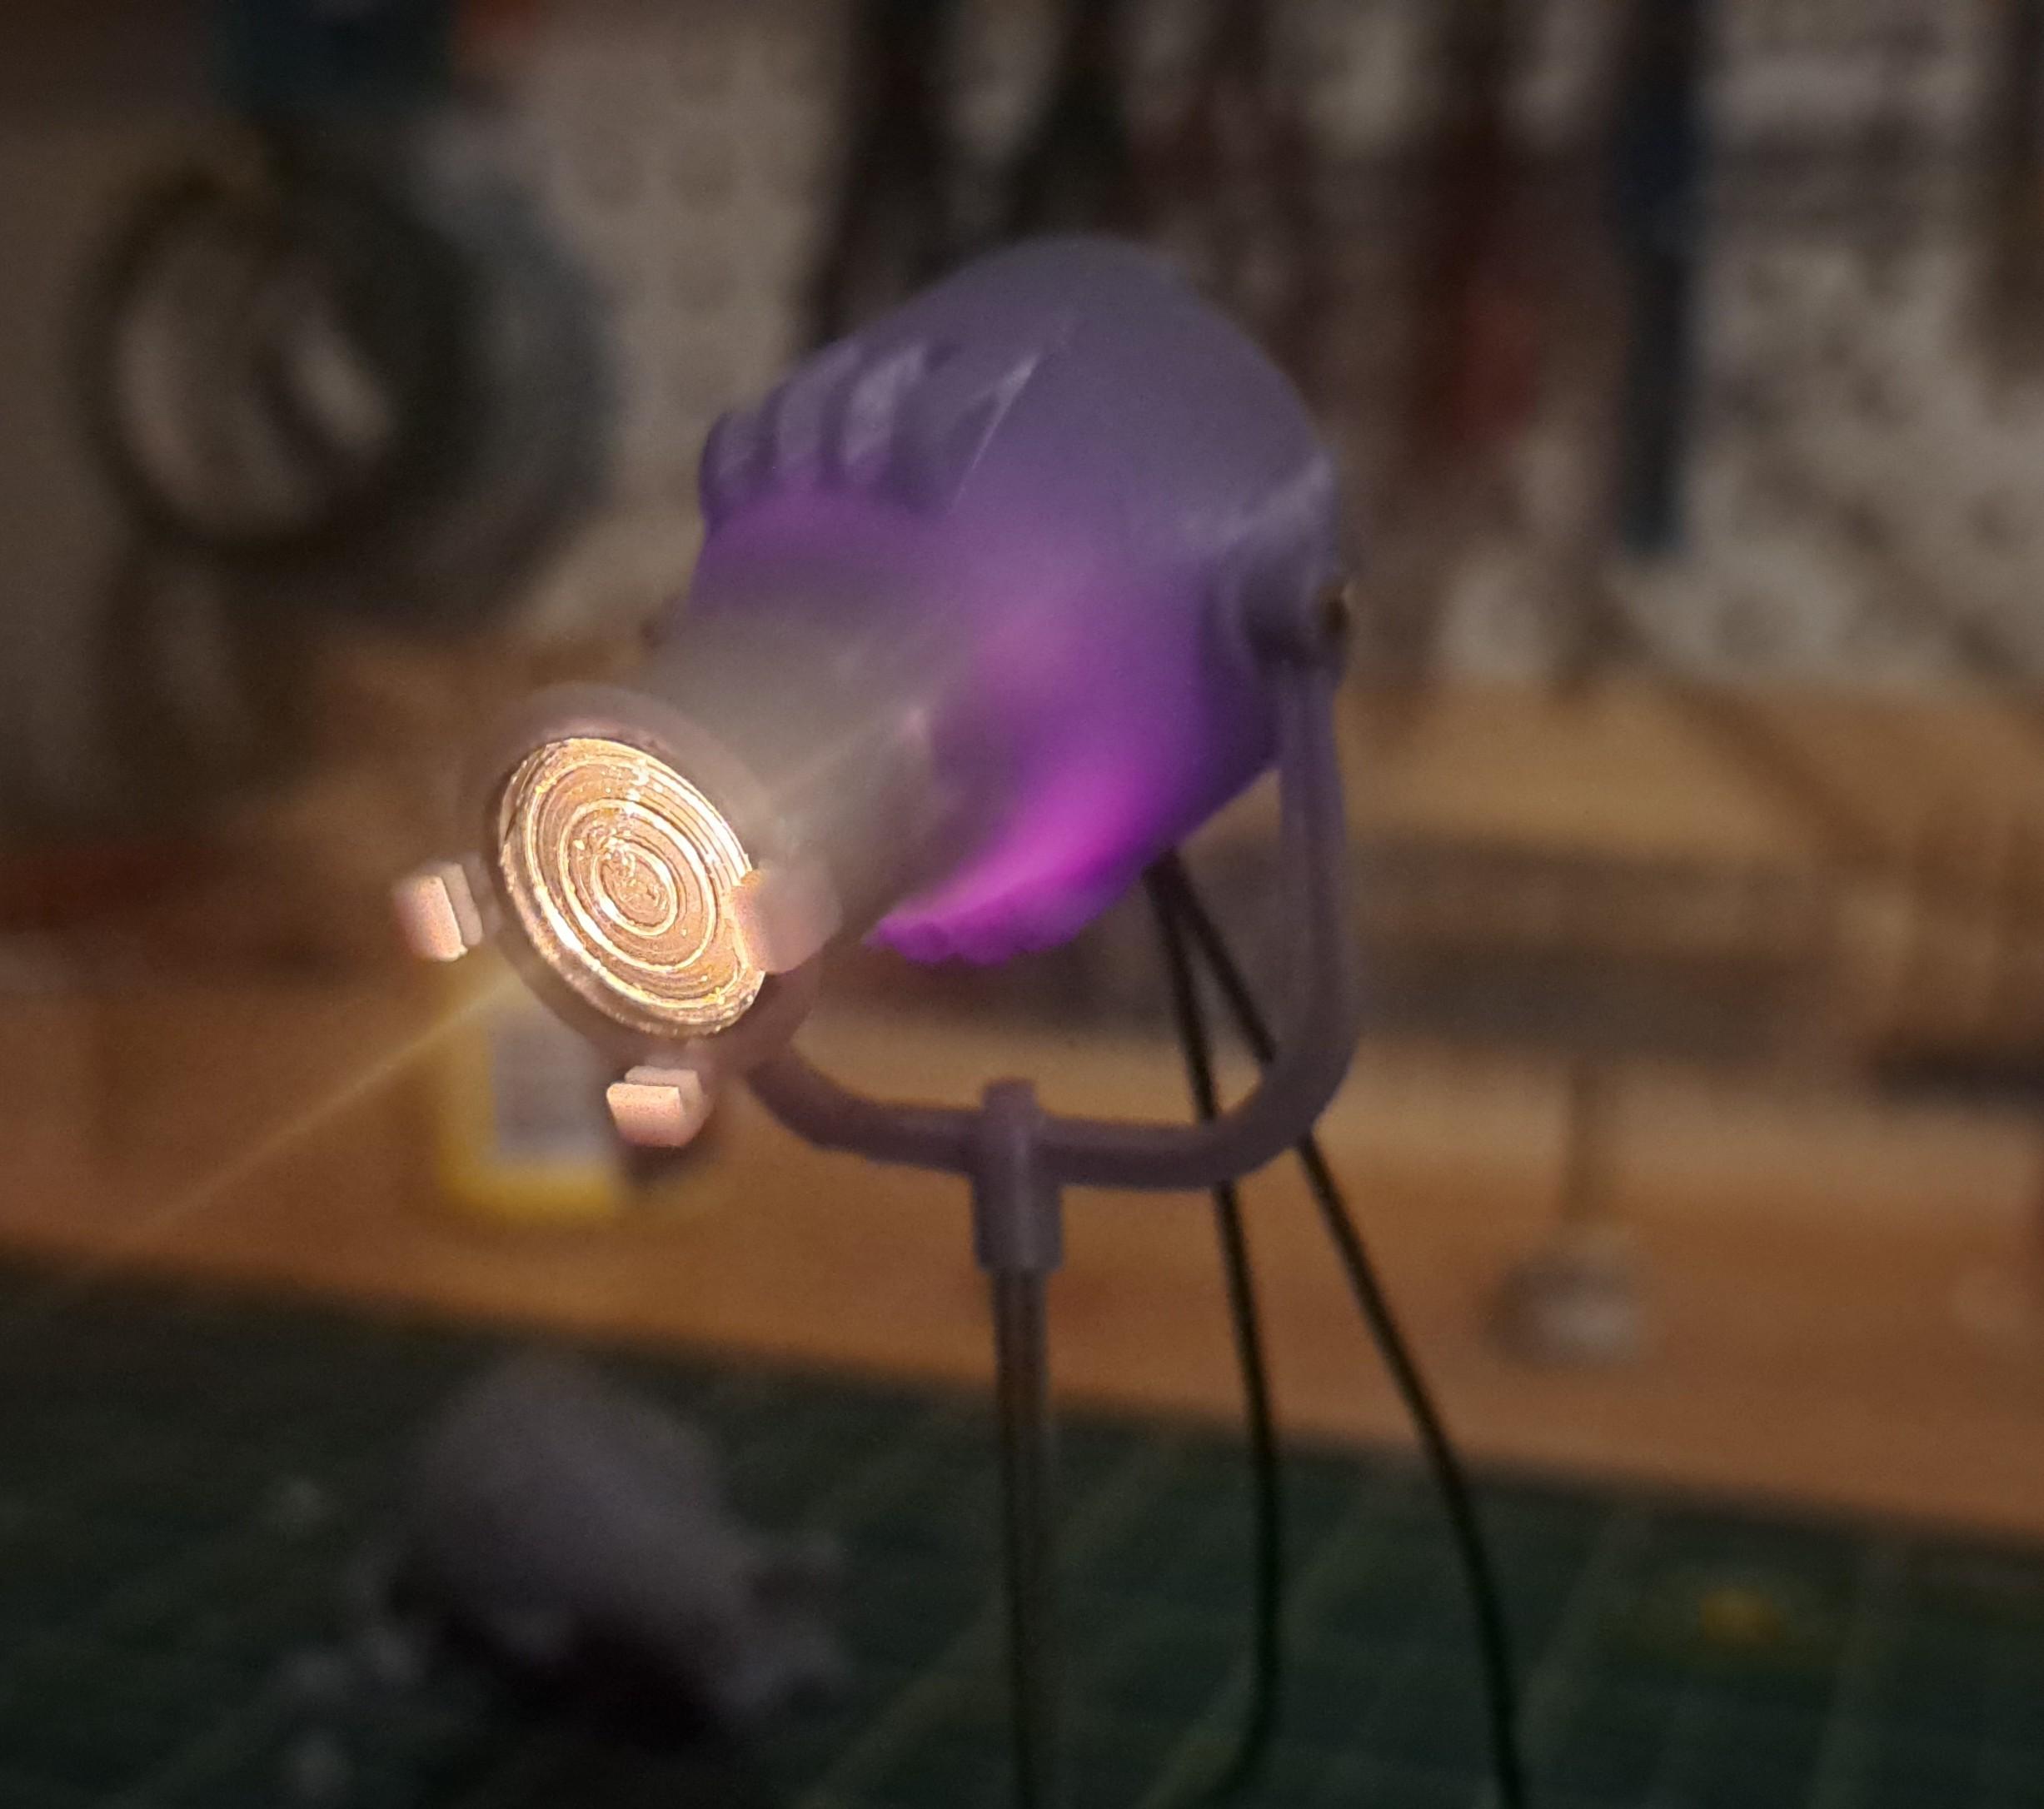
I started to tinker with the spot lights today. Not quite there yet but not that far. I was able to find an old instruction booklet with a few dimensions on this old stage lamp so, althought I printed it a bit larger than 1/12 (closer to 1/8) scale, the proportions are ok. The goal My lamp so far
-
Marvel's Hydra coupe 1/12 scale full scratch build
François replied to François's topic in WIP: Model Cars
Yes it does