François
-
Posts
489 -
Joined
-
Last visited
Content Type
Profiles
Forums
Events
Gallery
Everything posted by François
-

Tigercat 880E longer 1/48 scale
François replied to François's topic in WIP: Model Trucks: Big Rigs and Heavy Equipment
Thank you everyone, I'm going back to the project I was on prior to this one. If you haven't seen it yet, here's the link. -
Tigercat 880E longer 1/48 scale
François replied to François's topic in WIP: Model Trucks: Big Rigs and Heavy Equipment
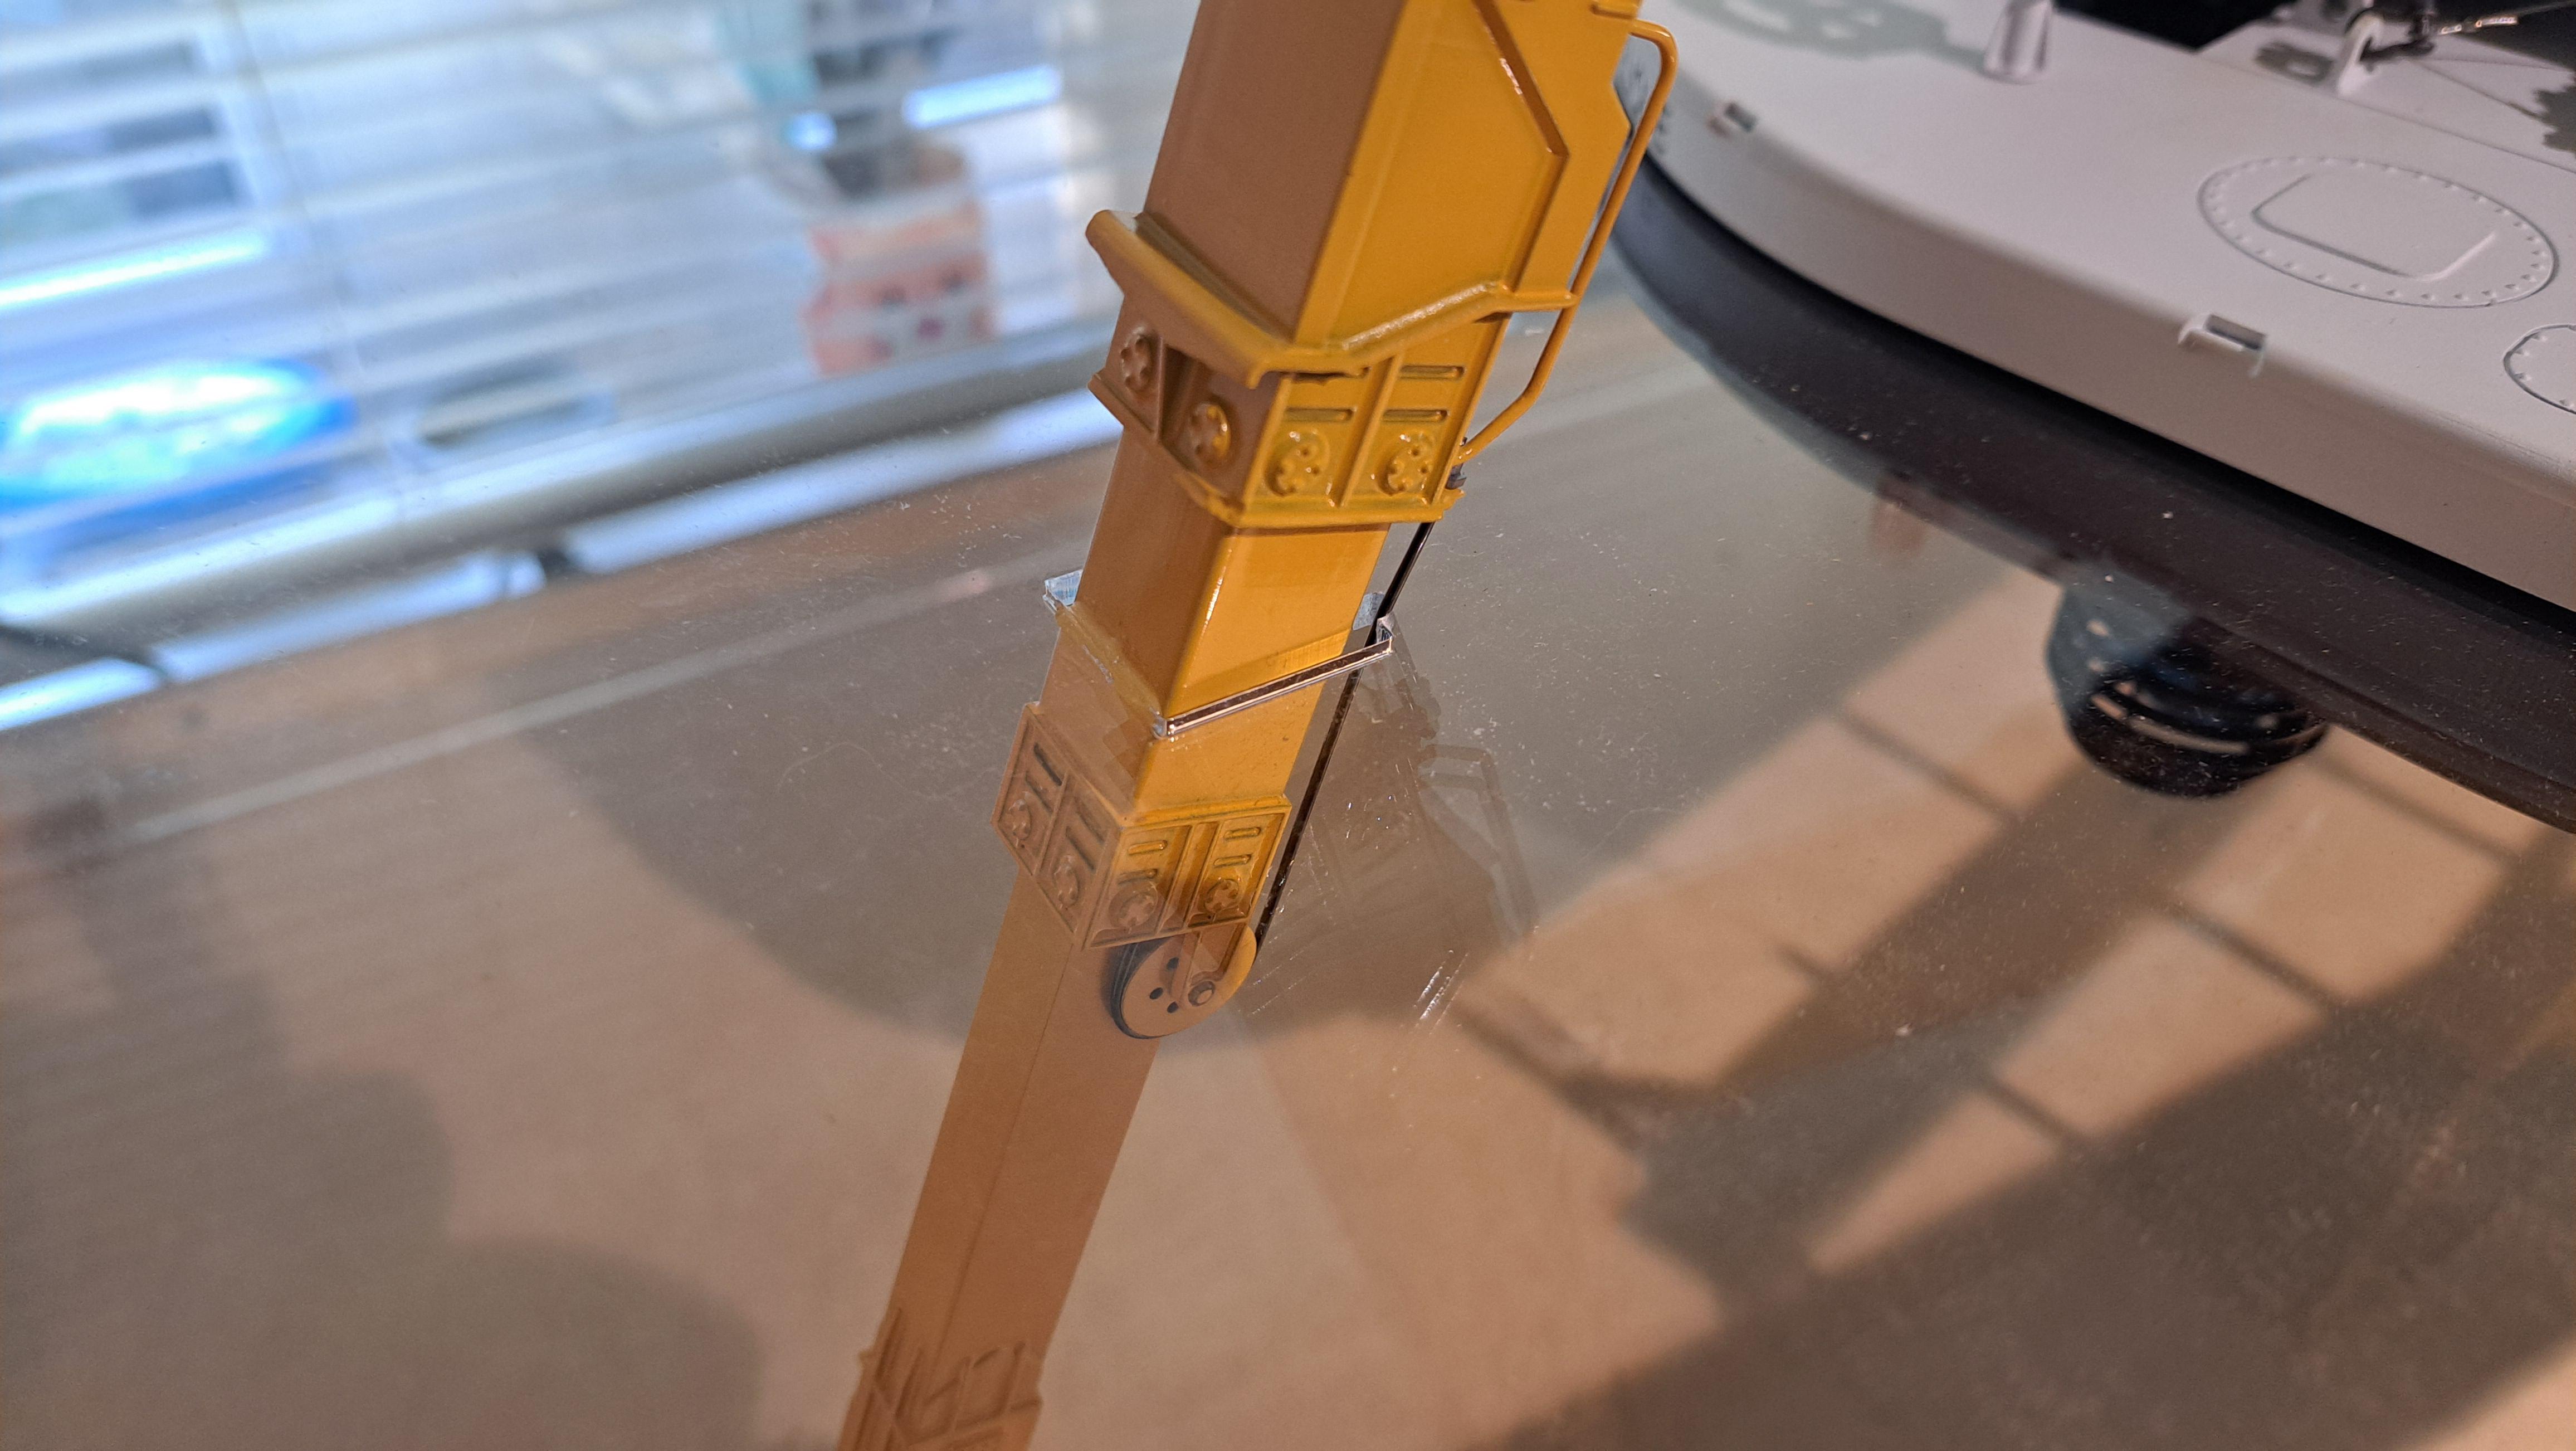
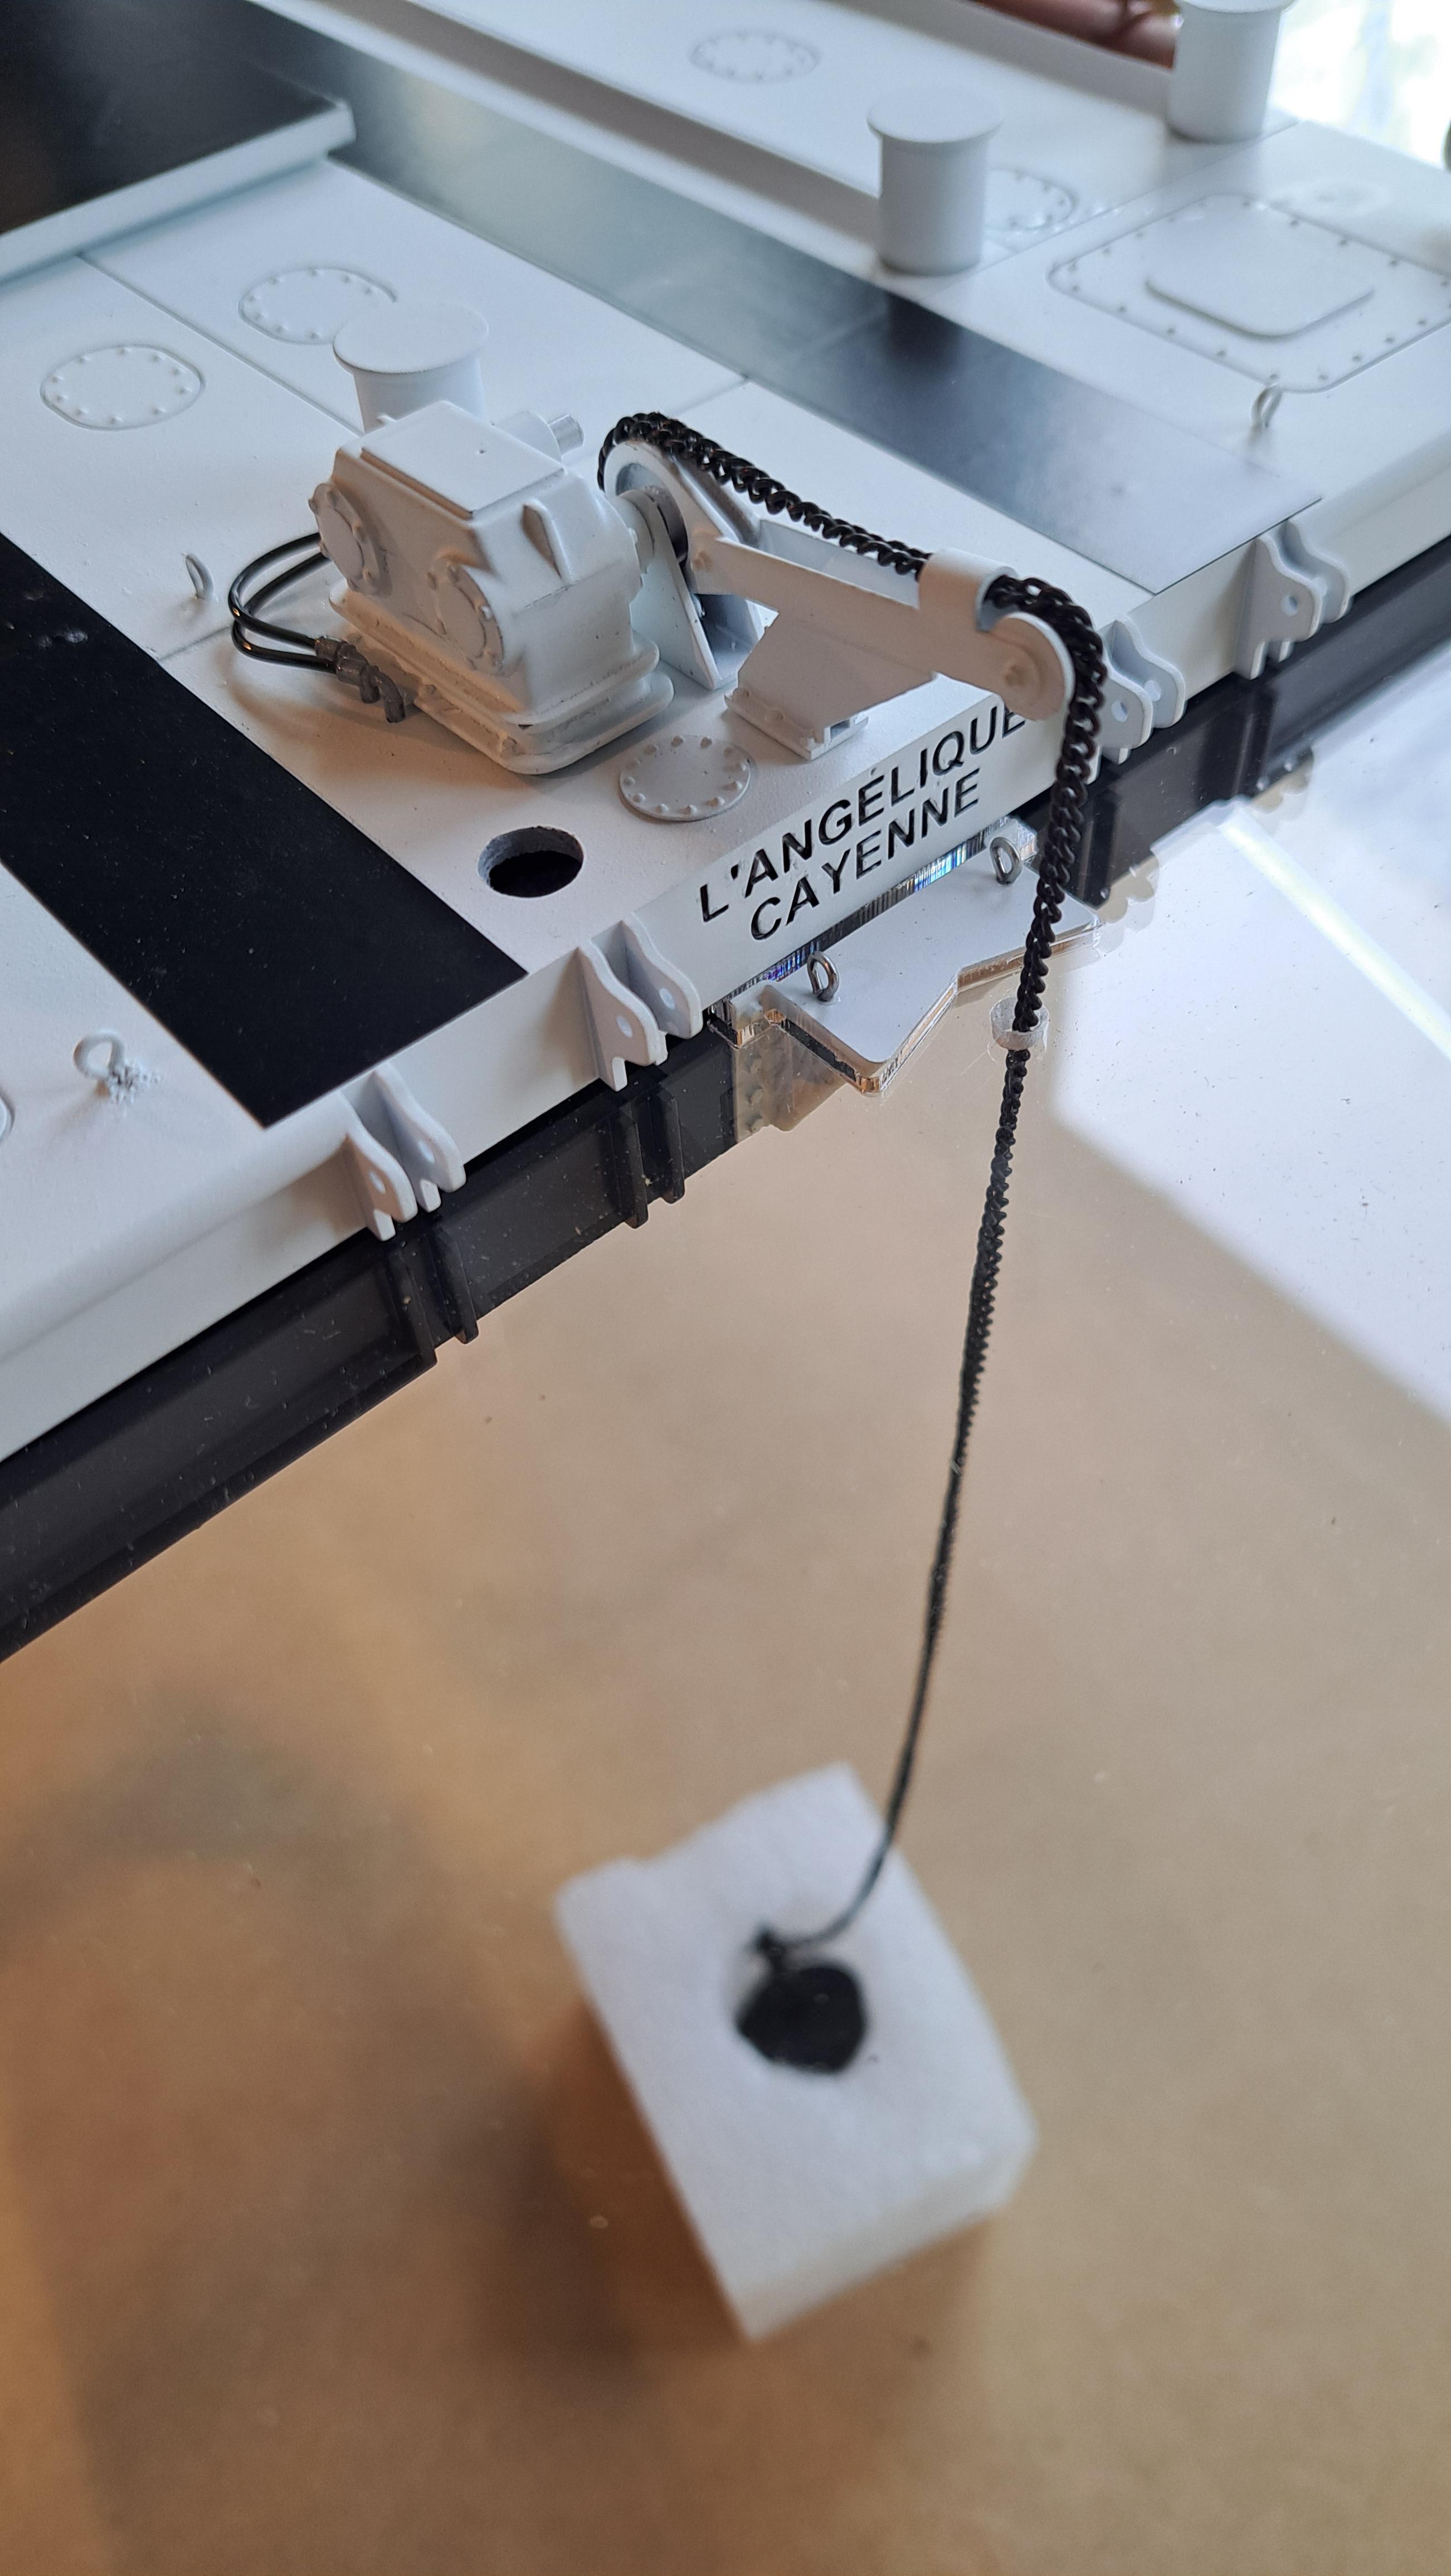
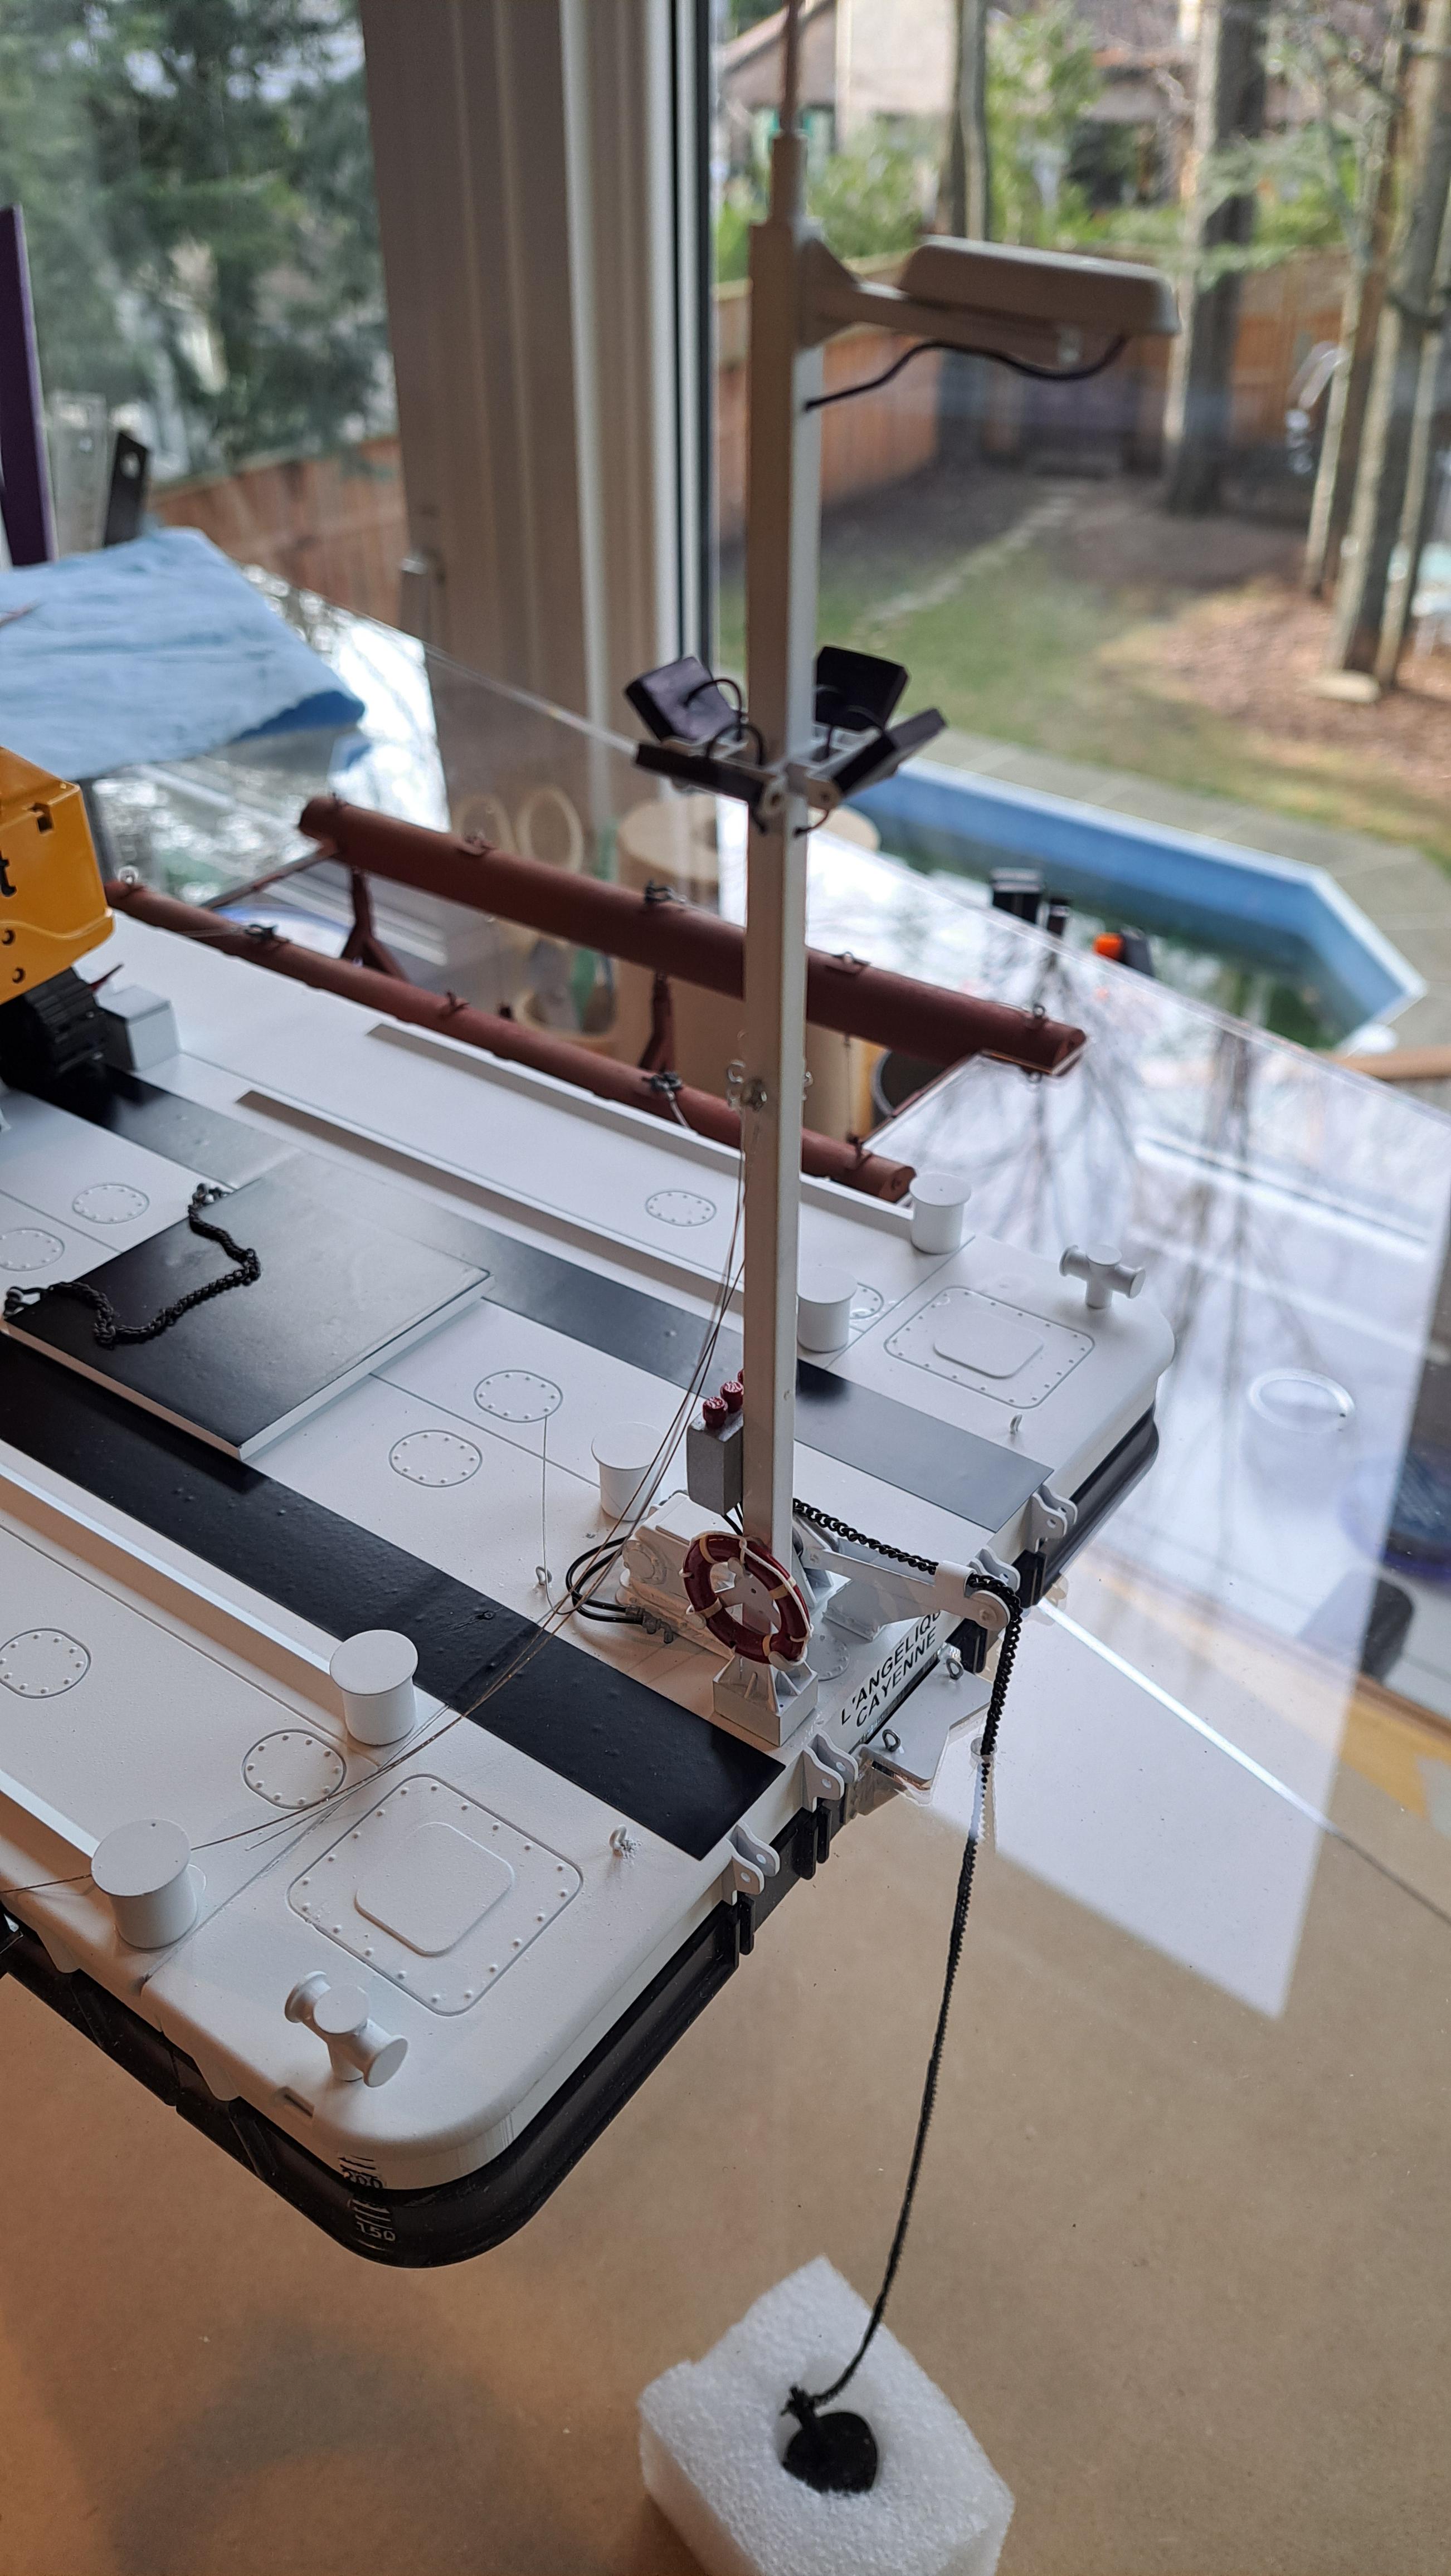
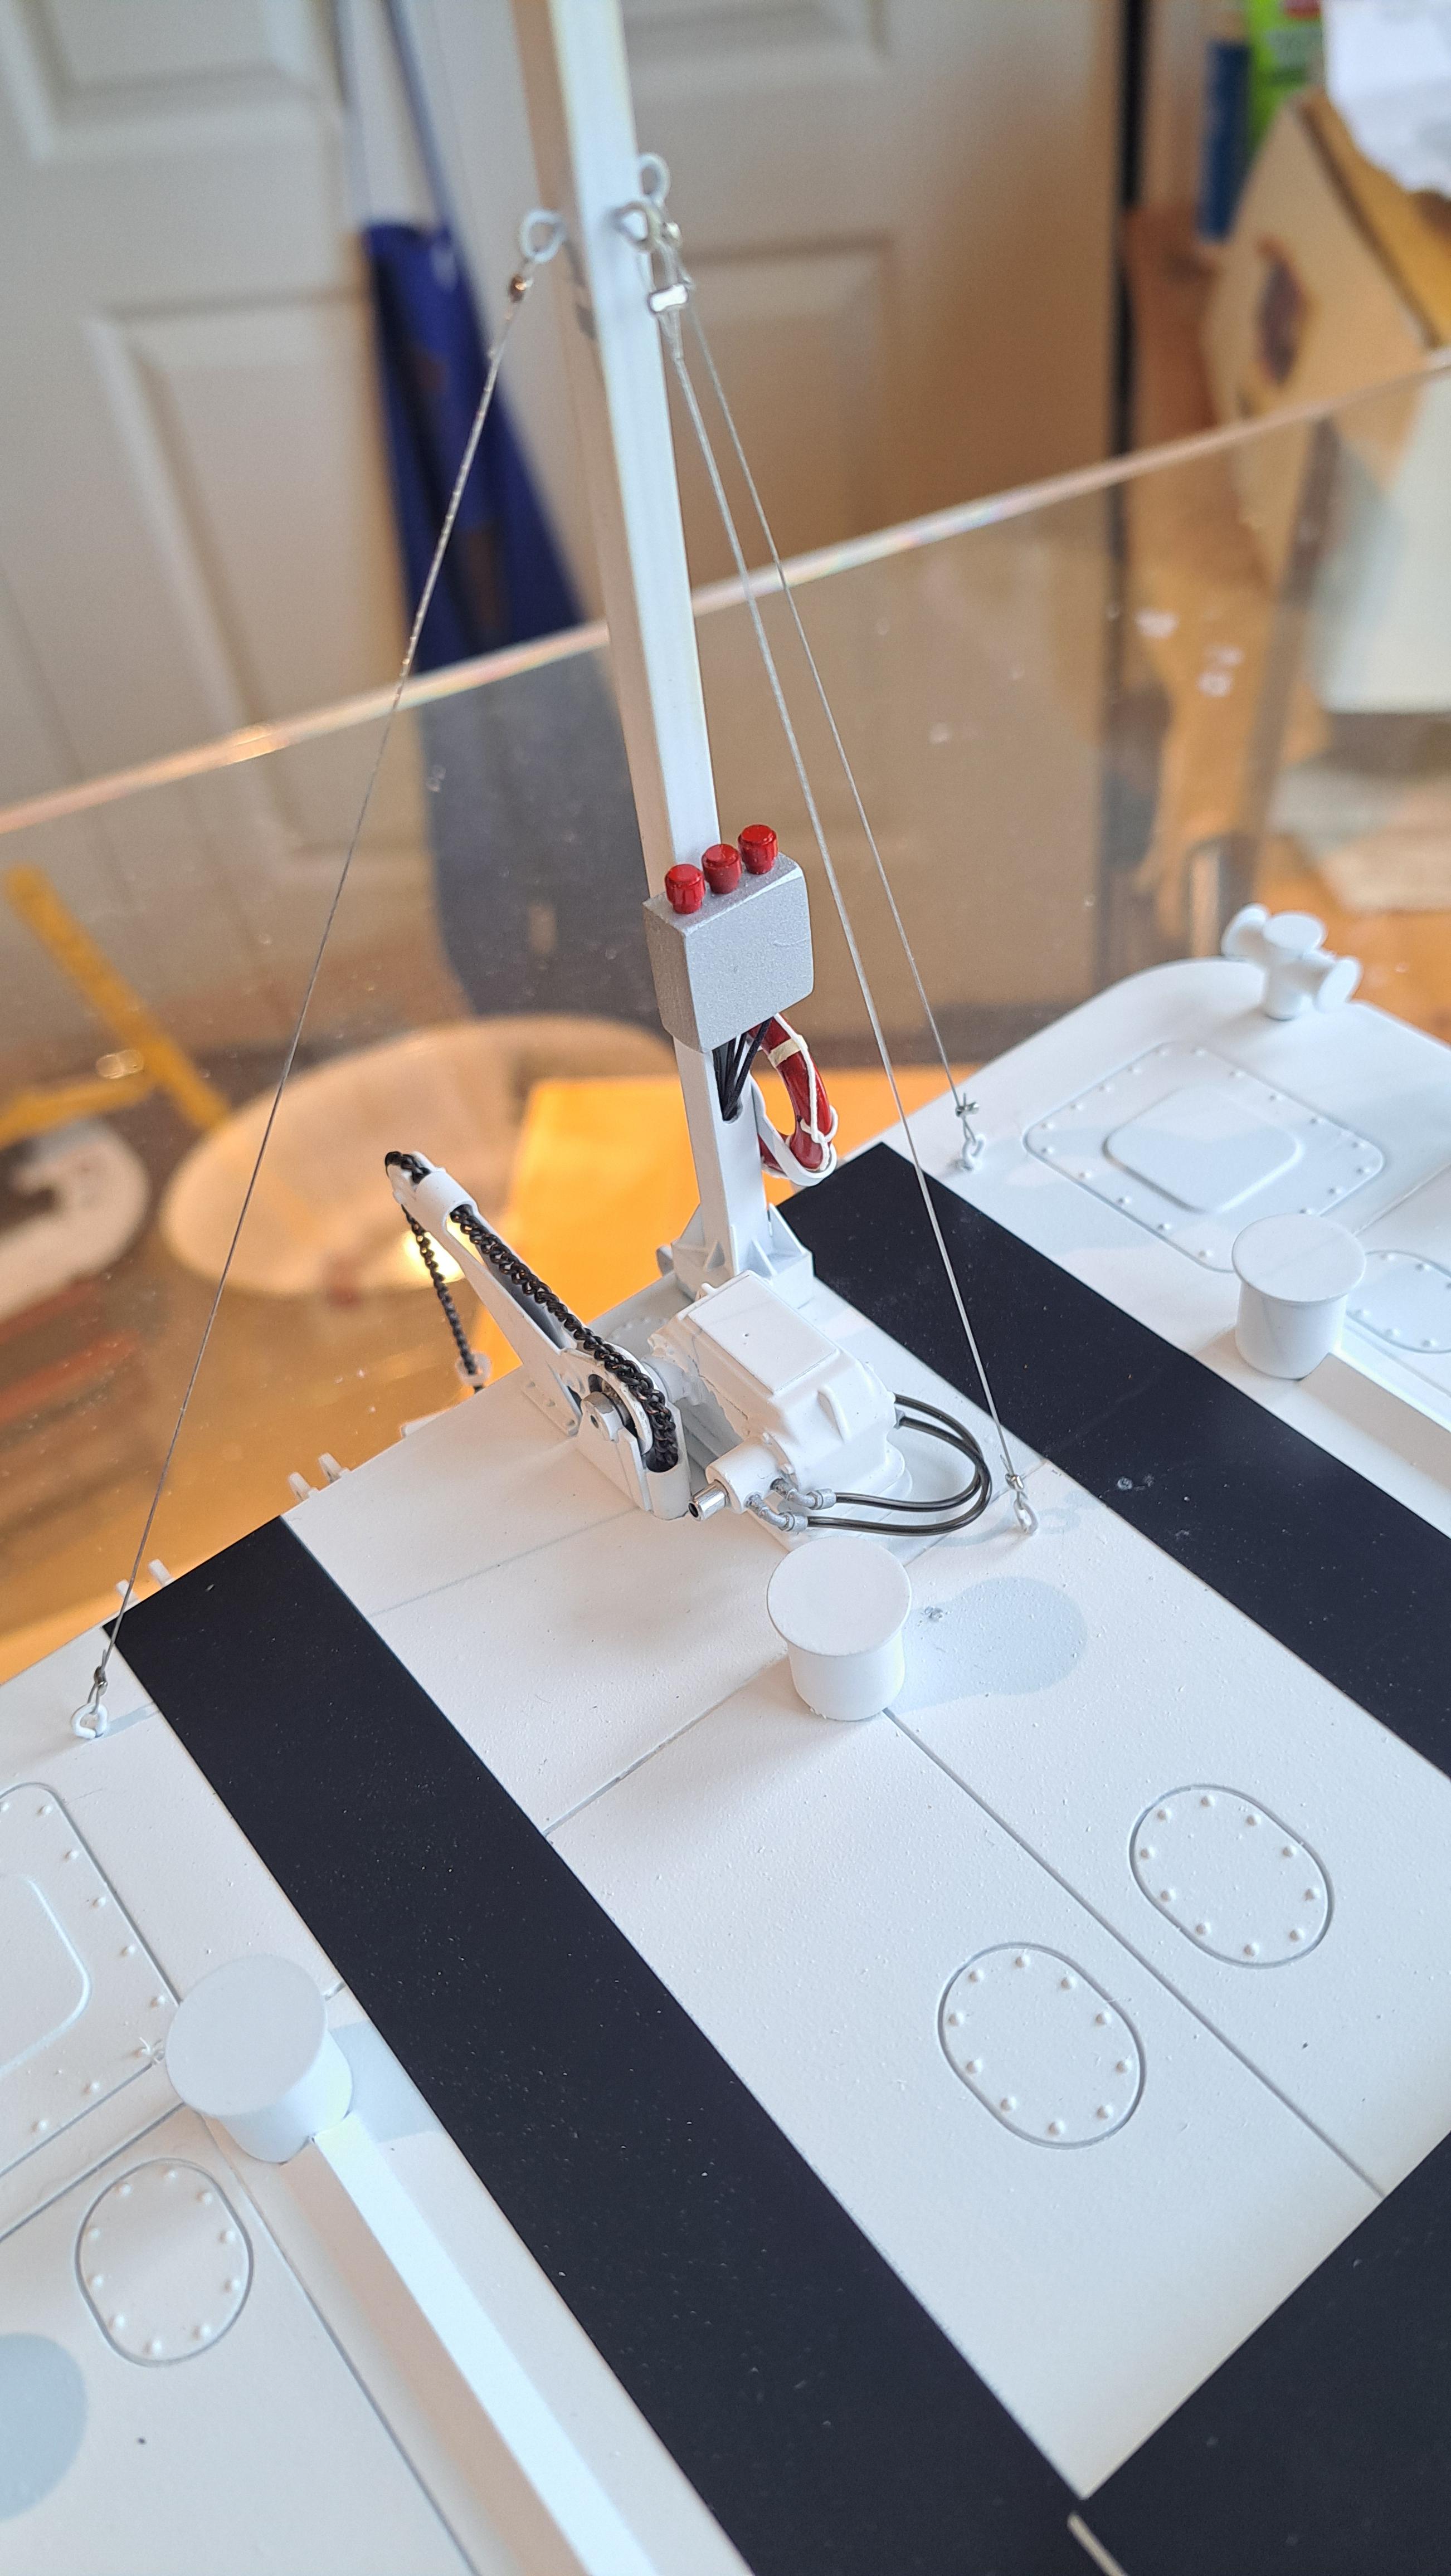
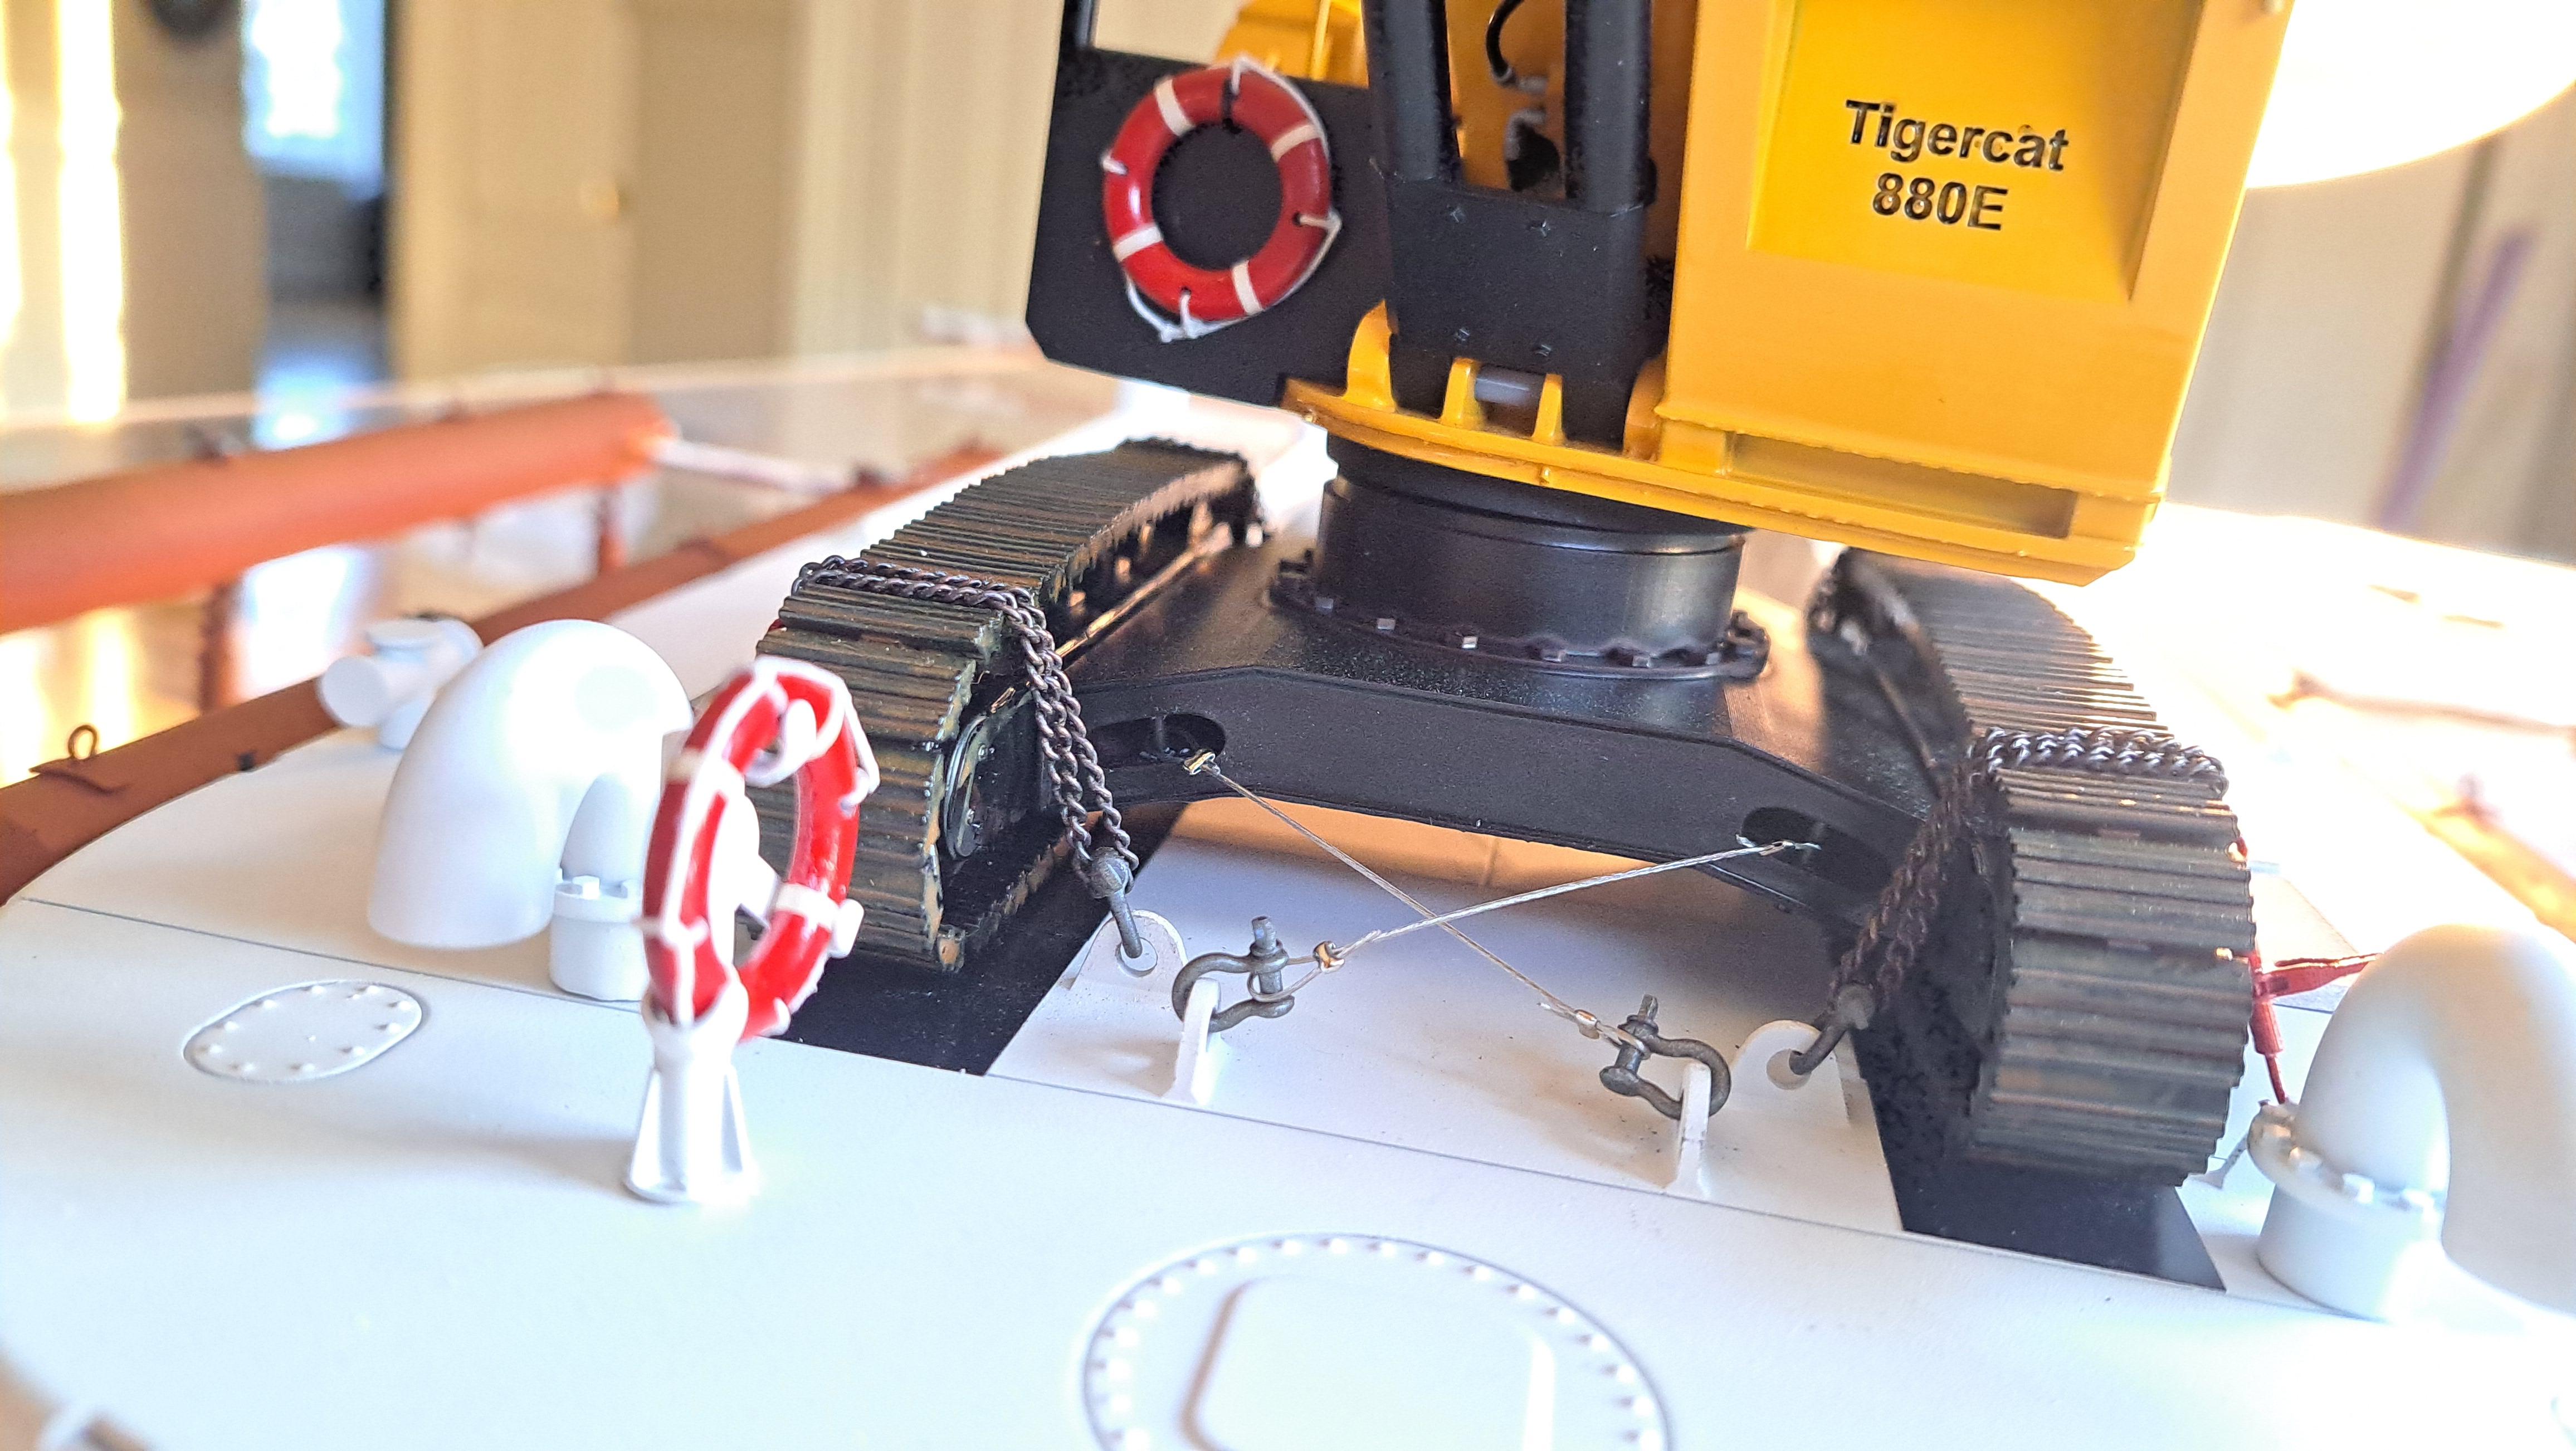
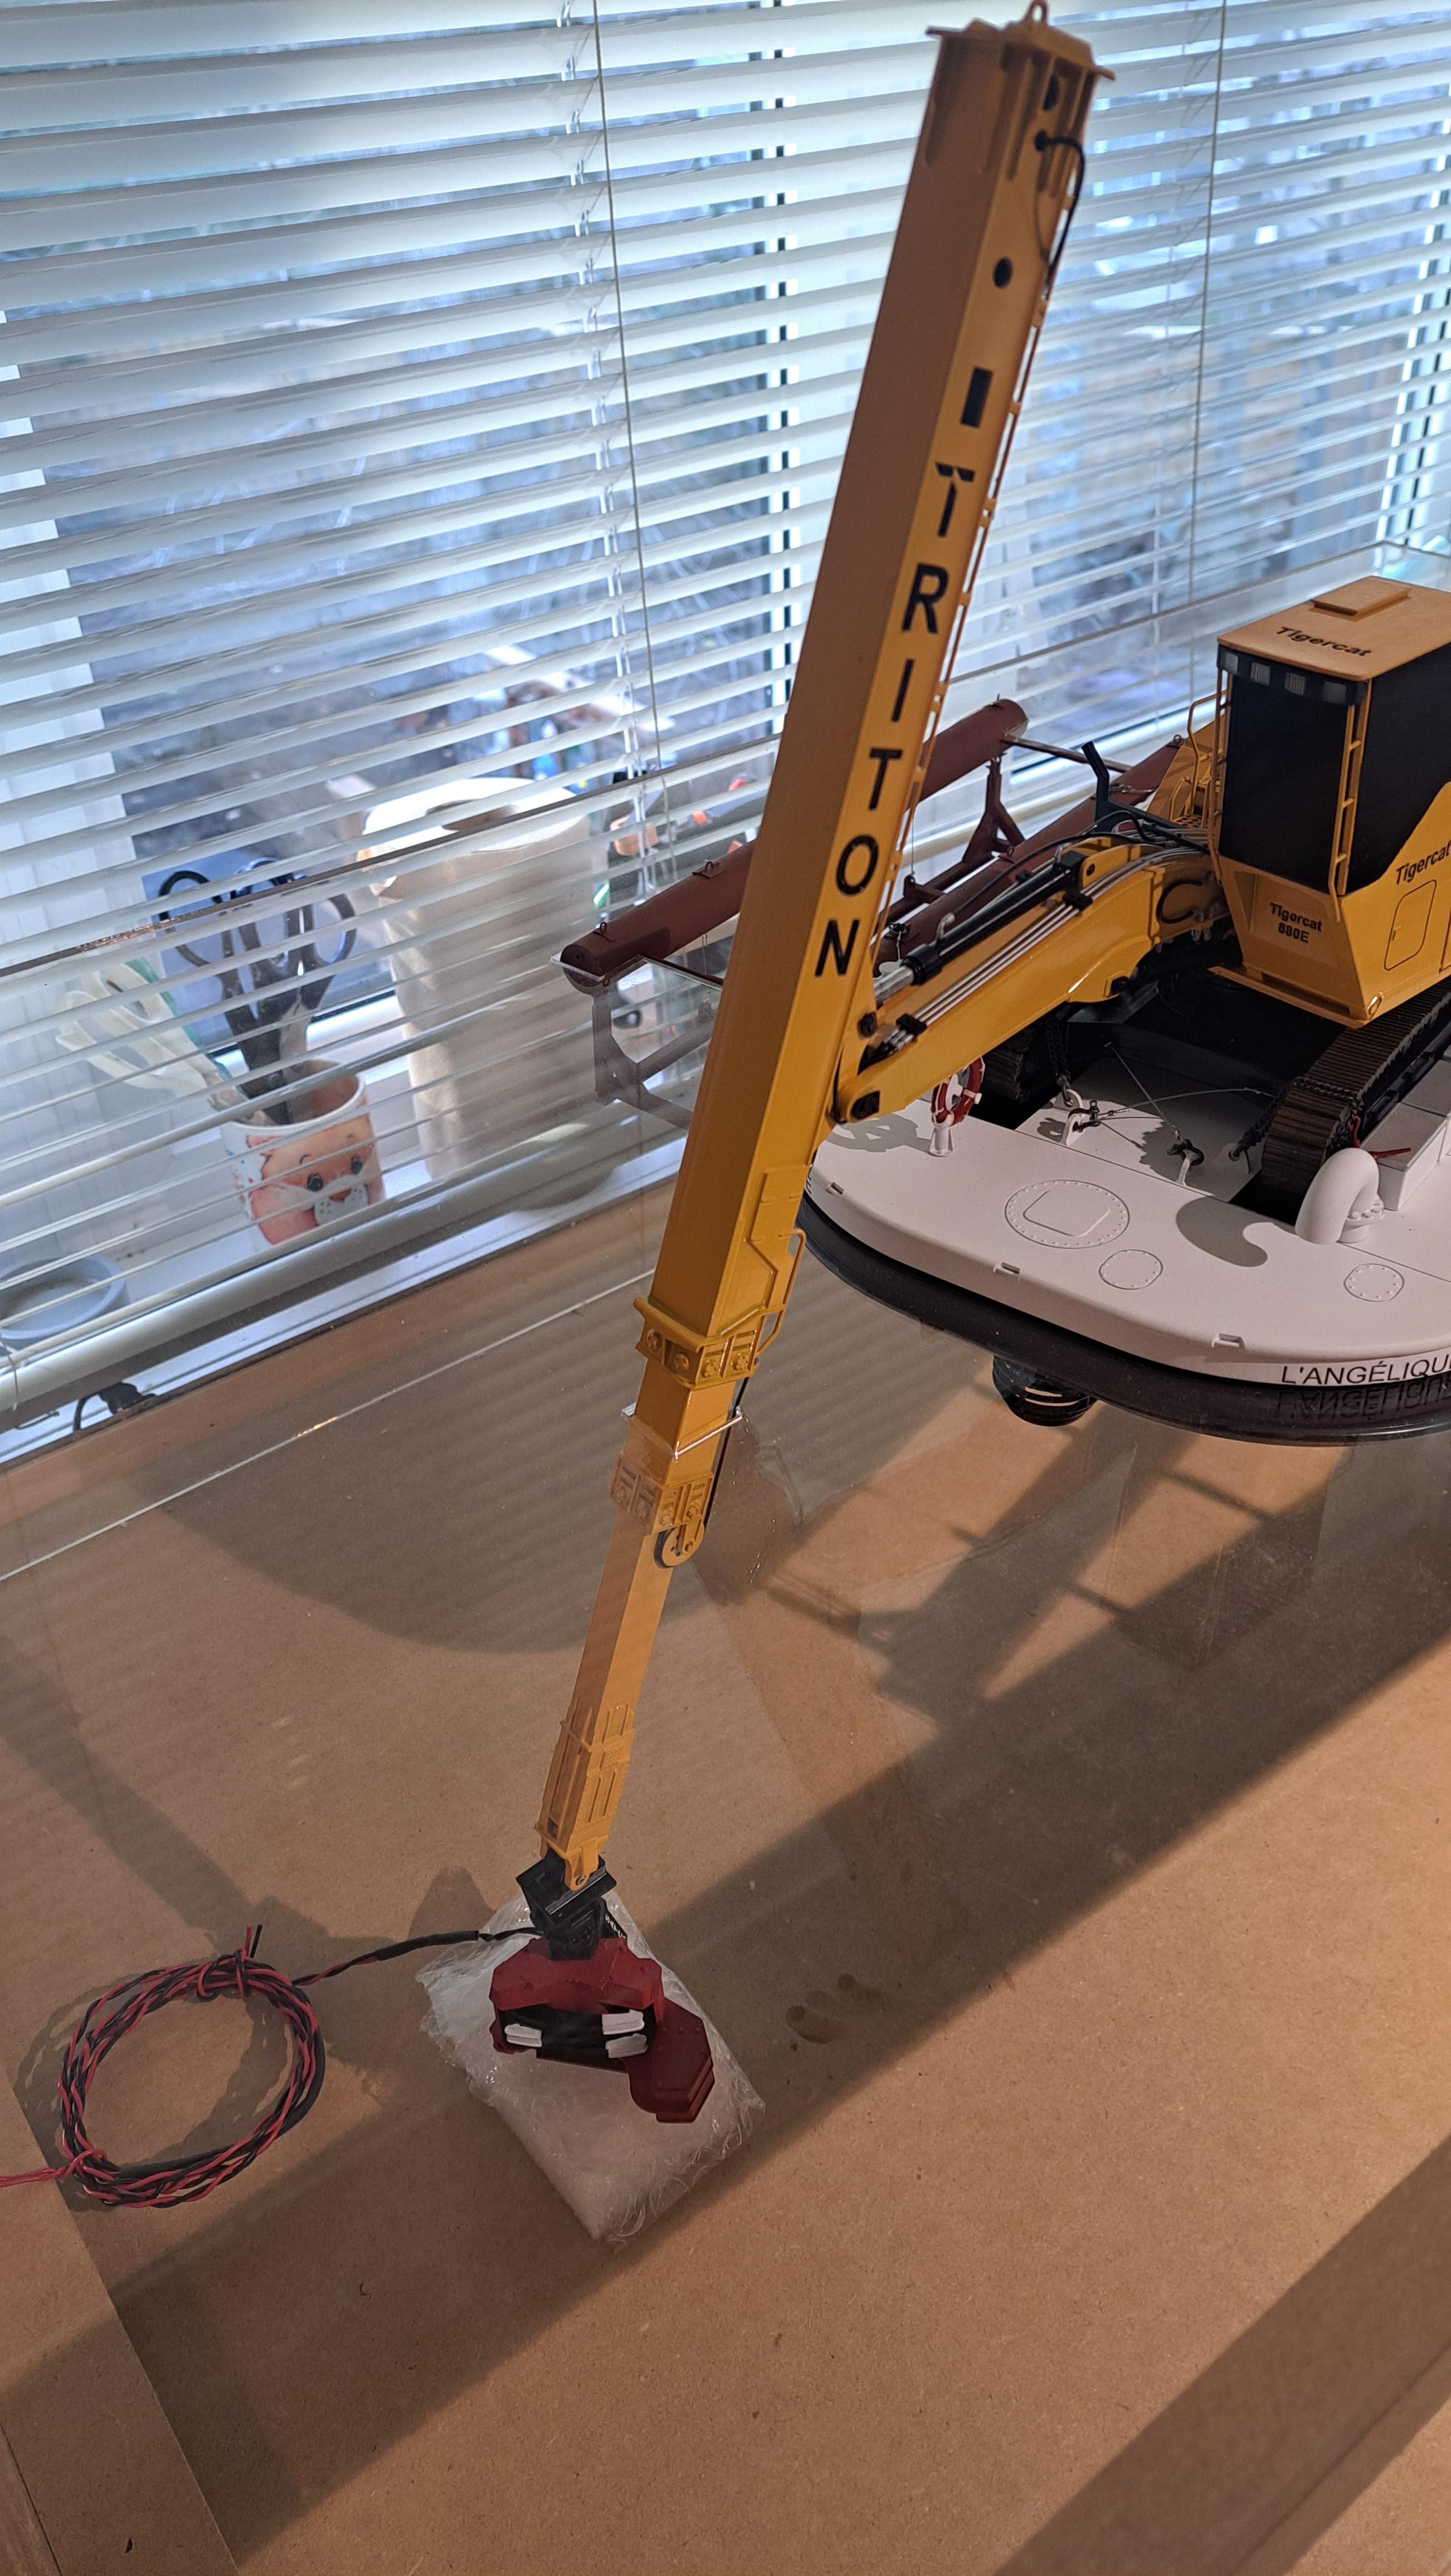
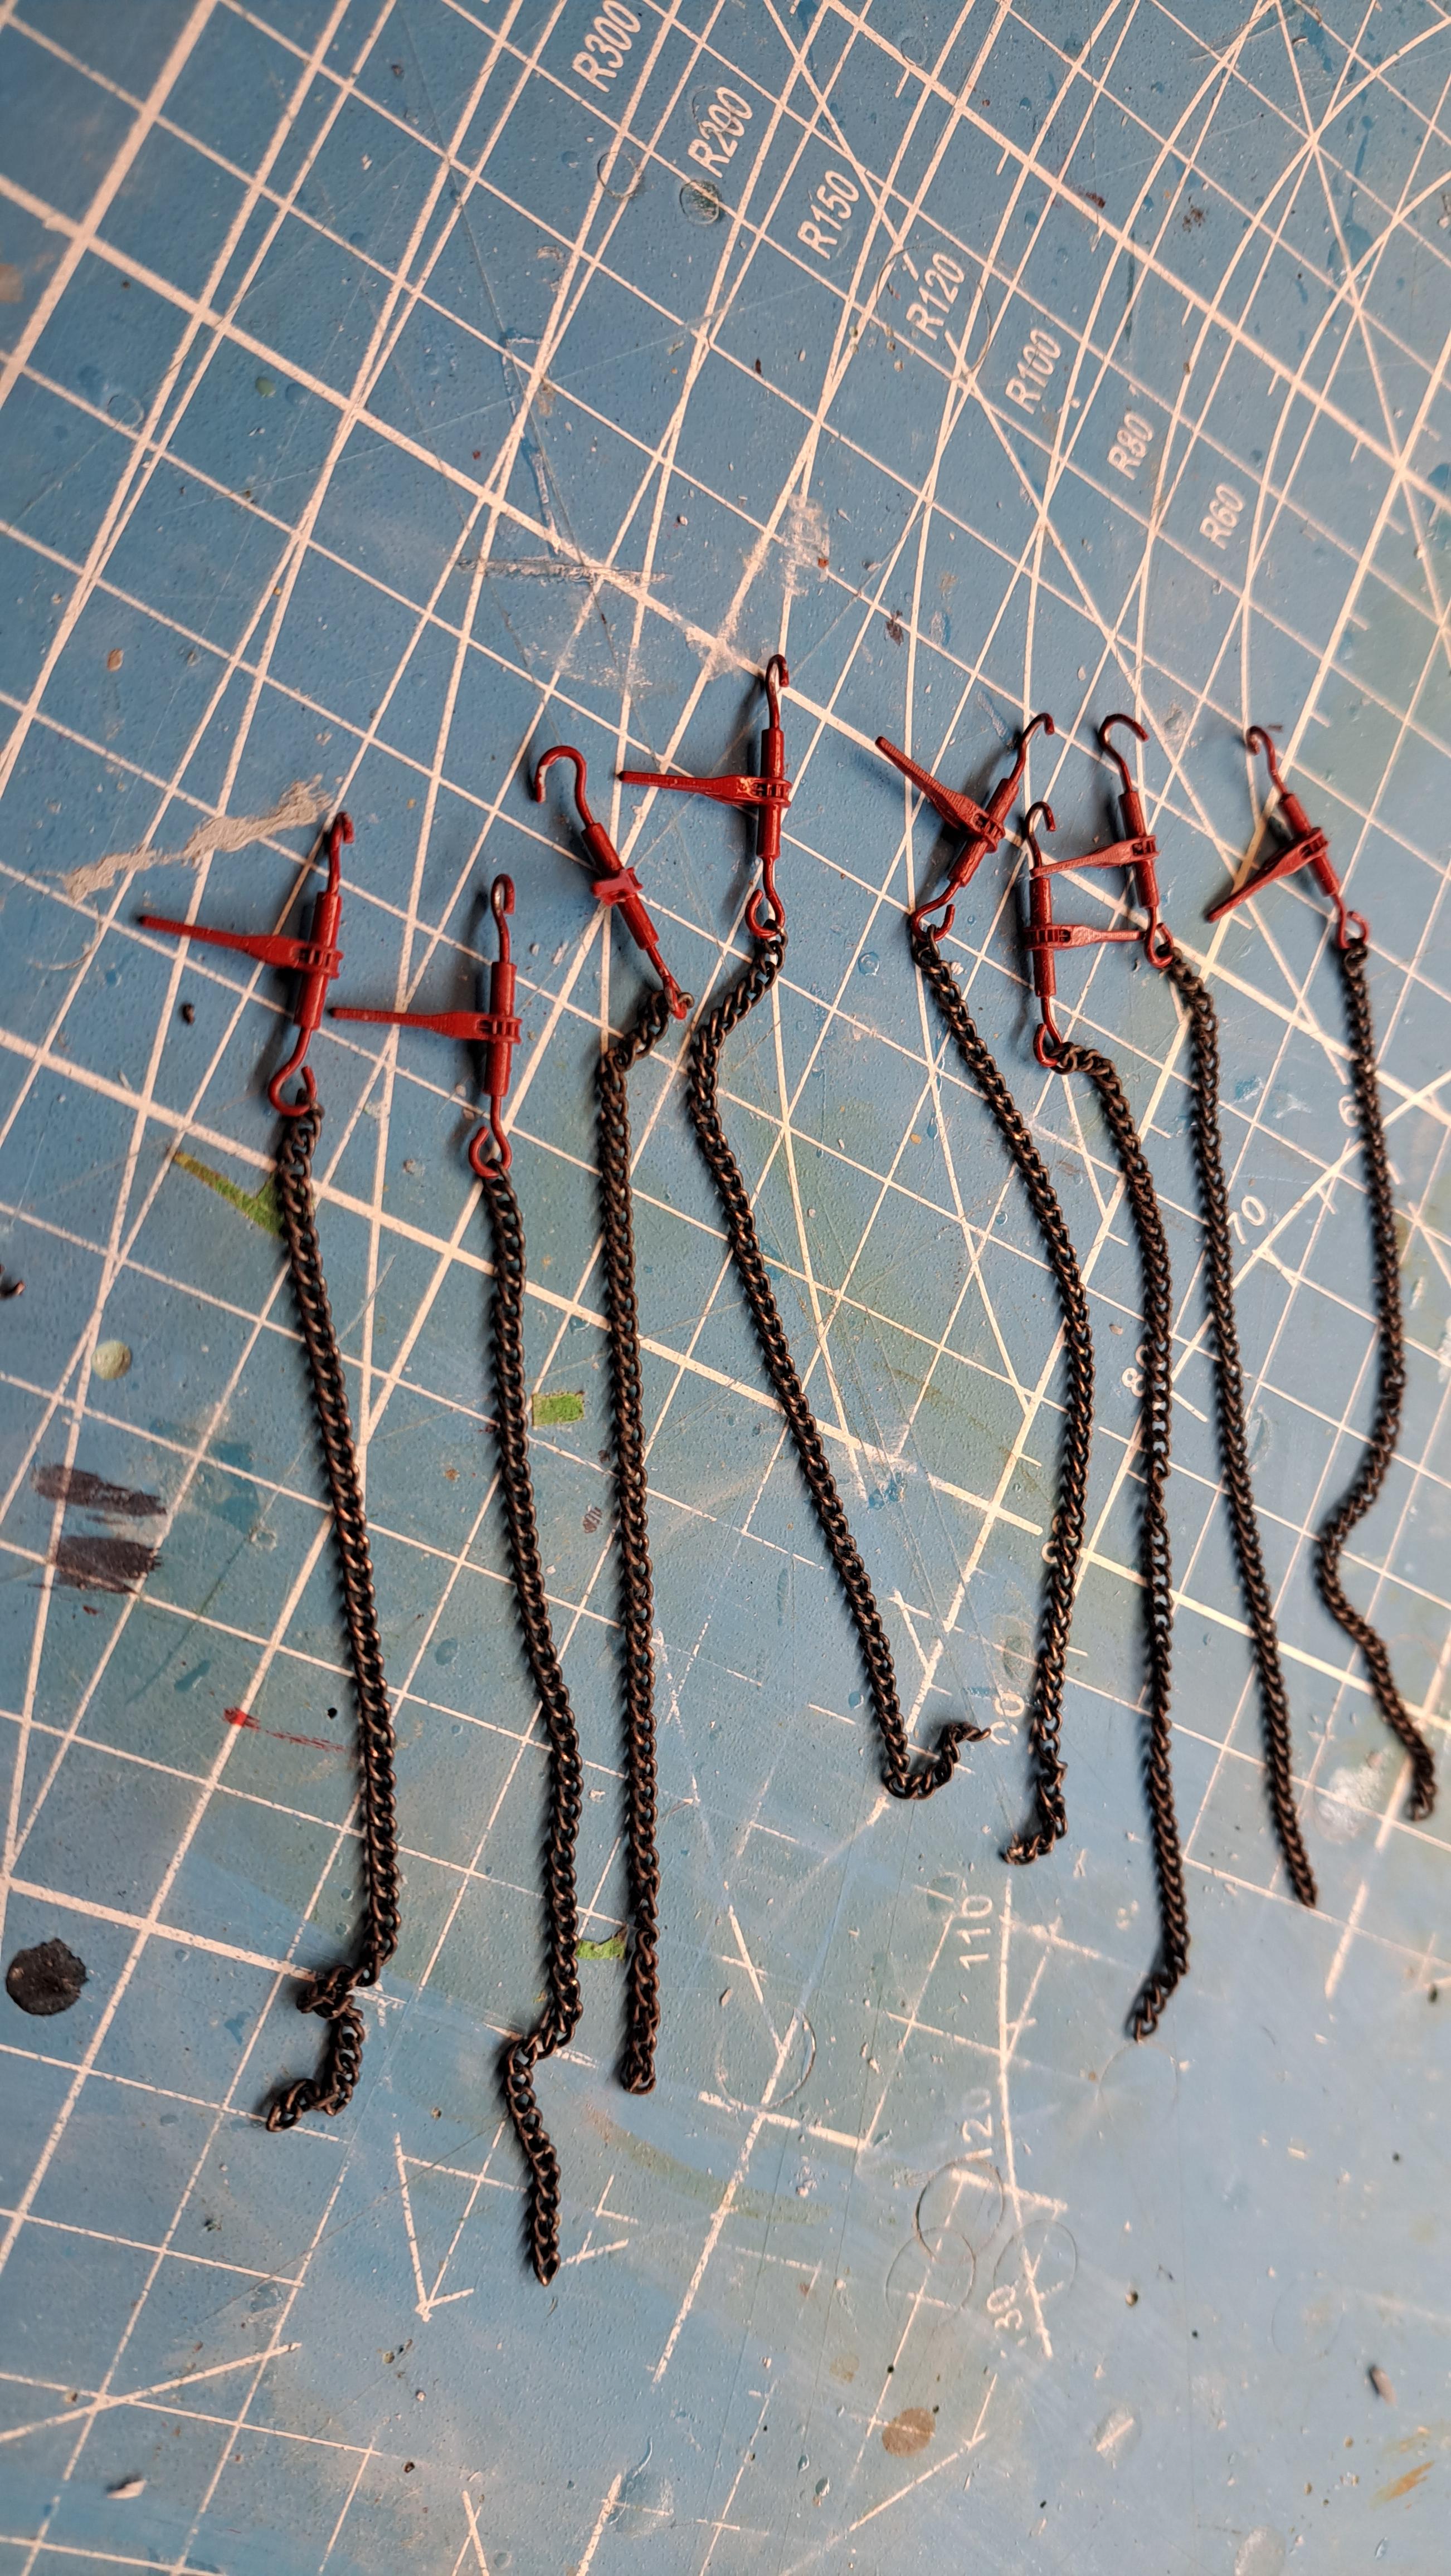
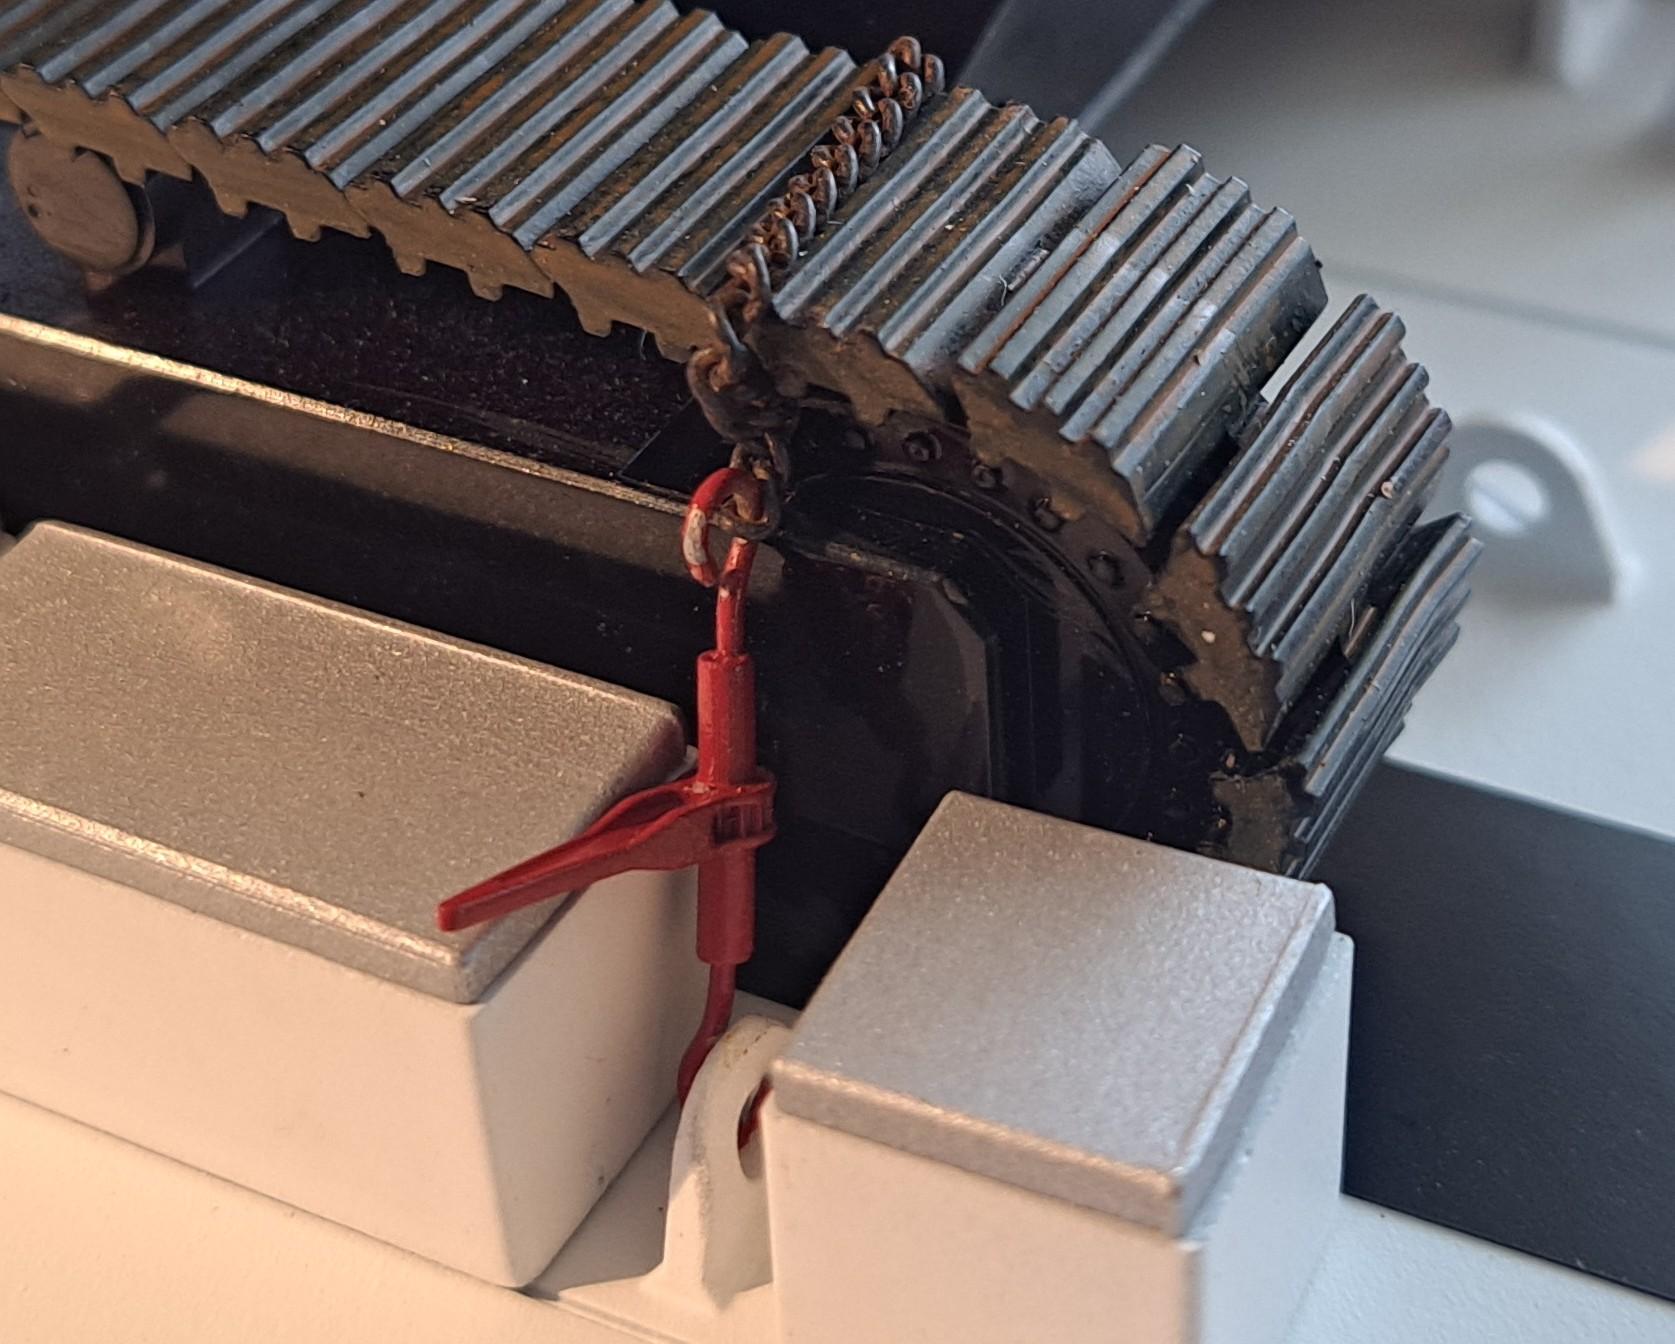
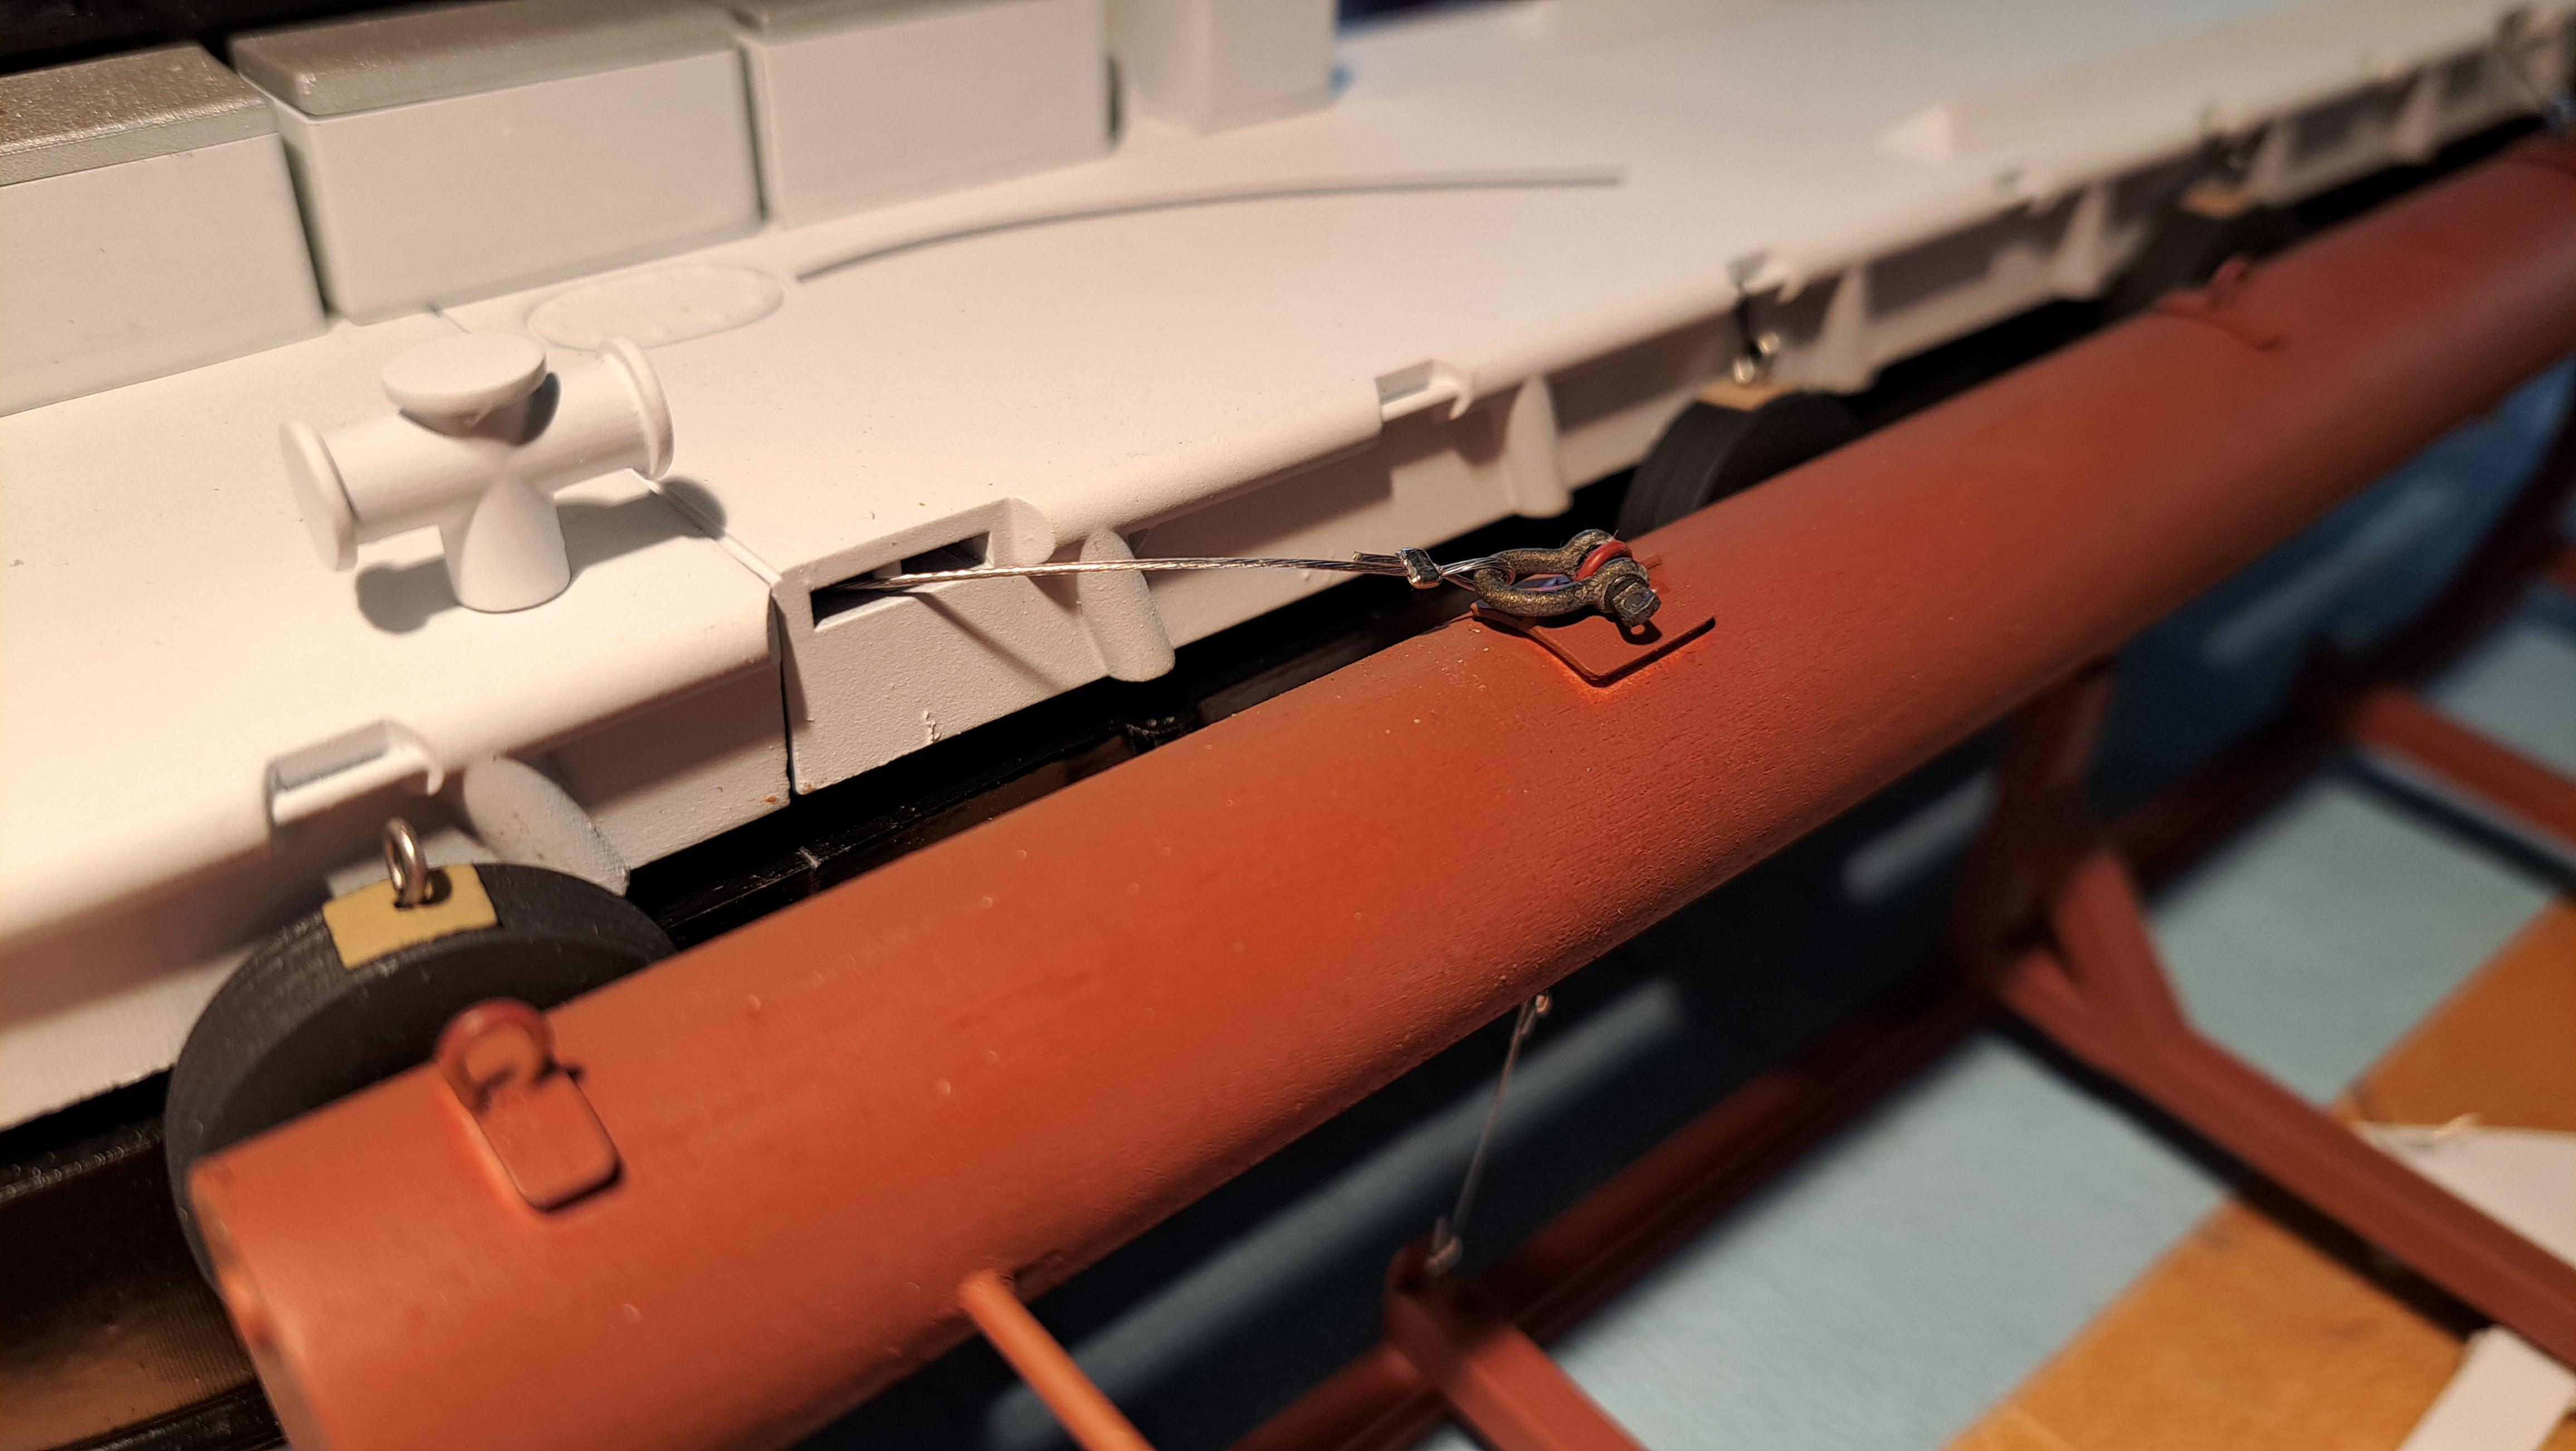
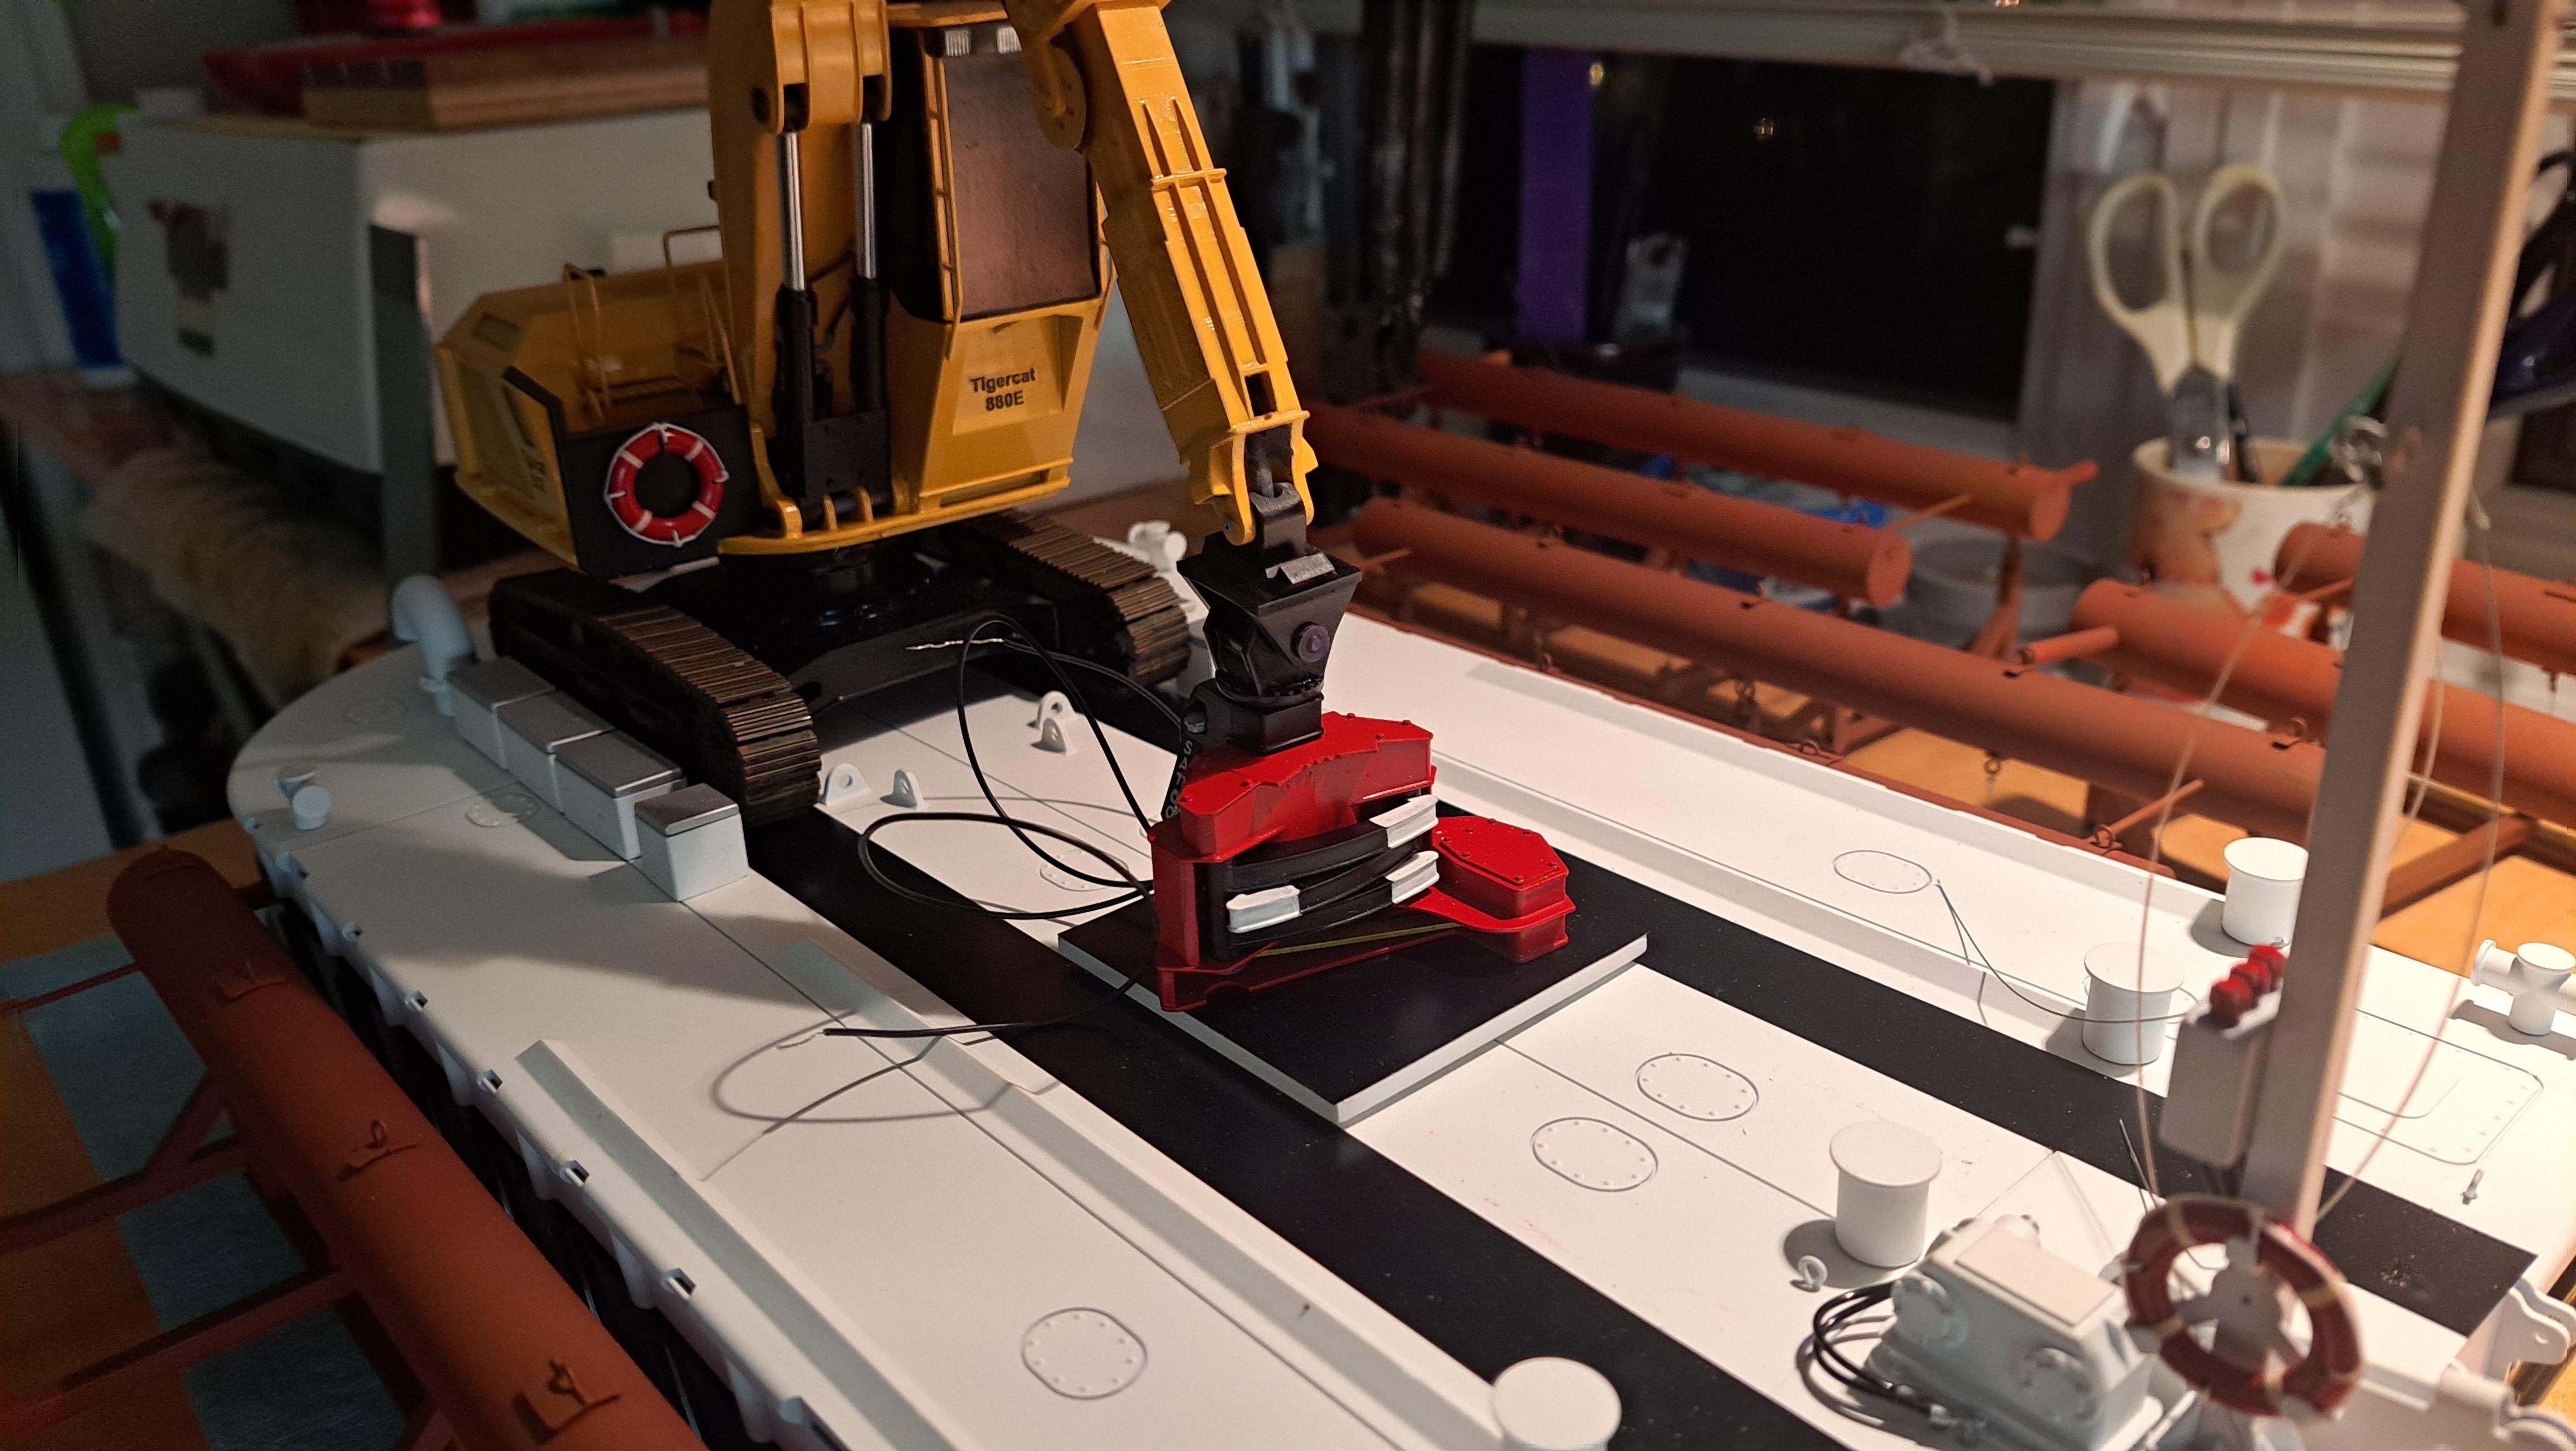
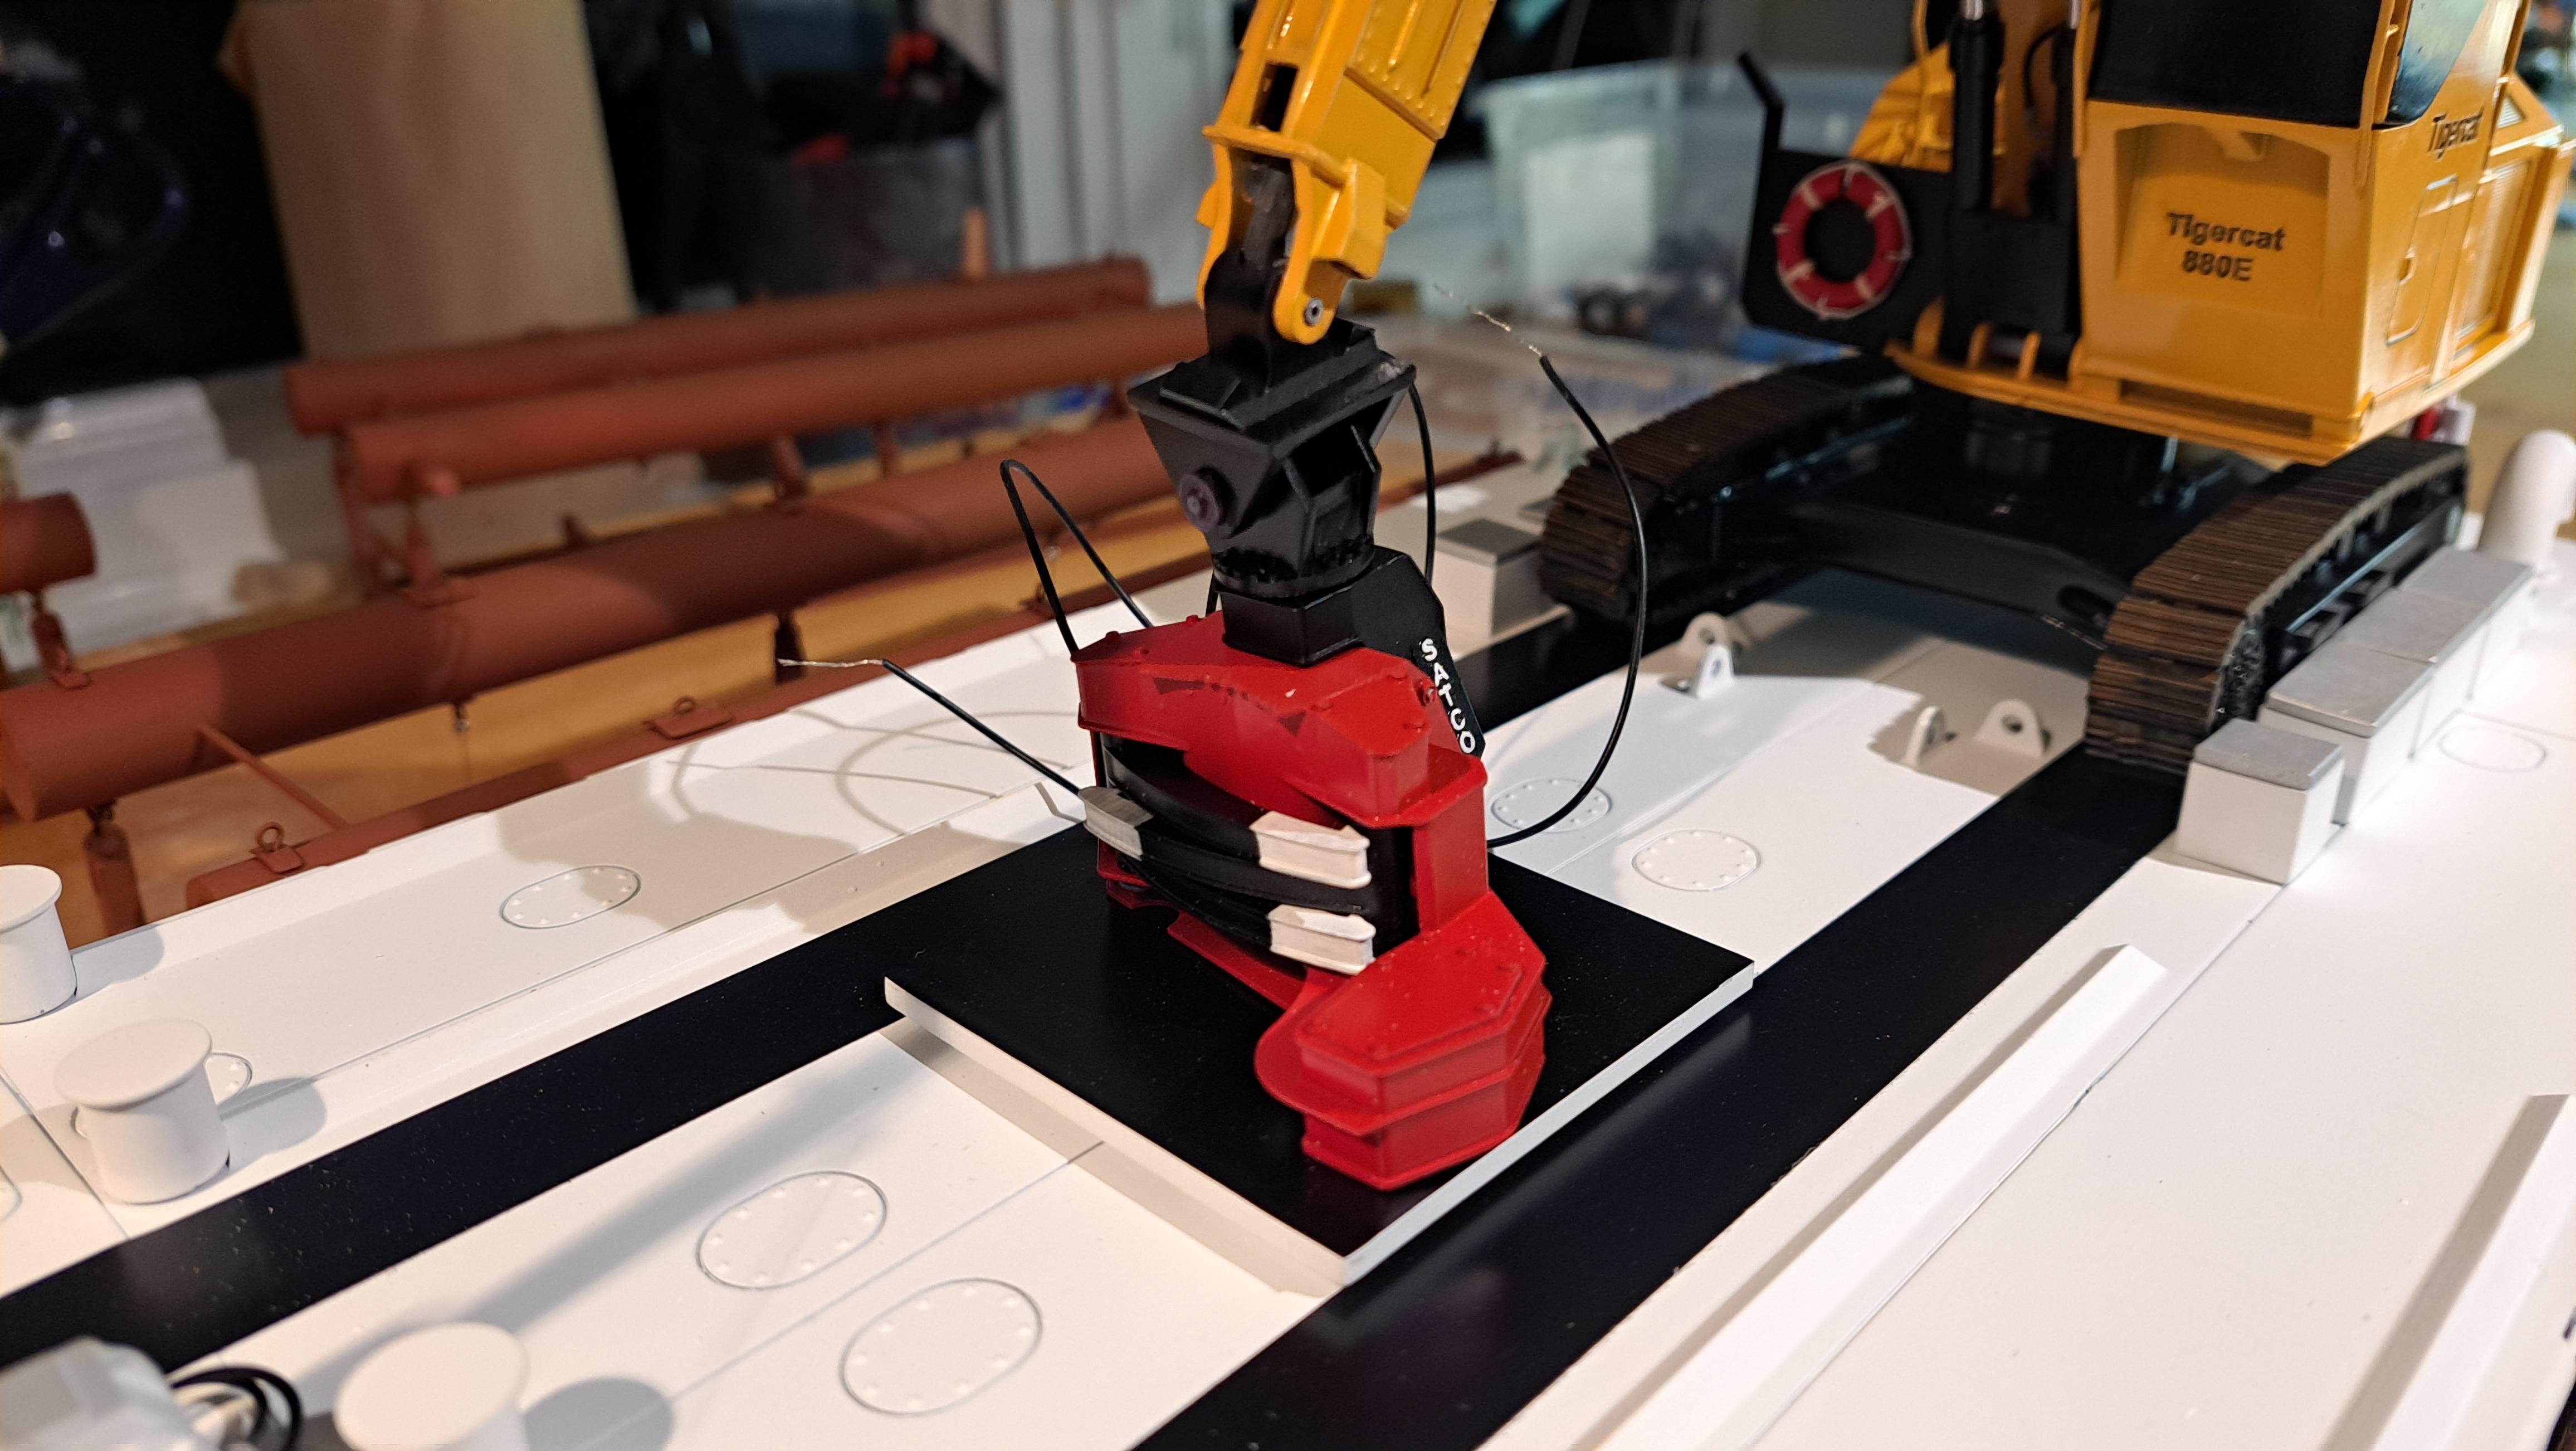
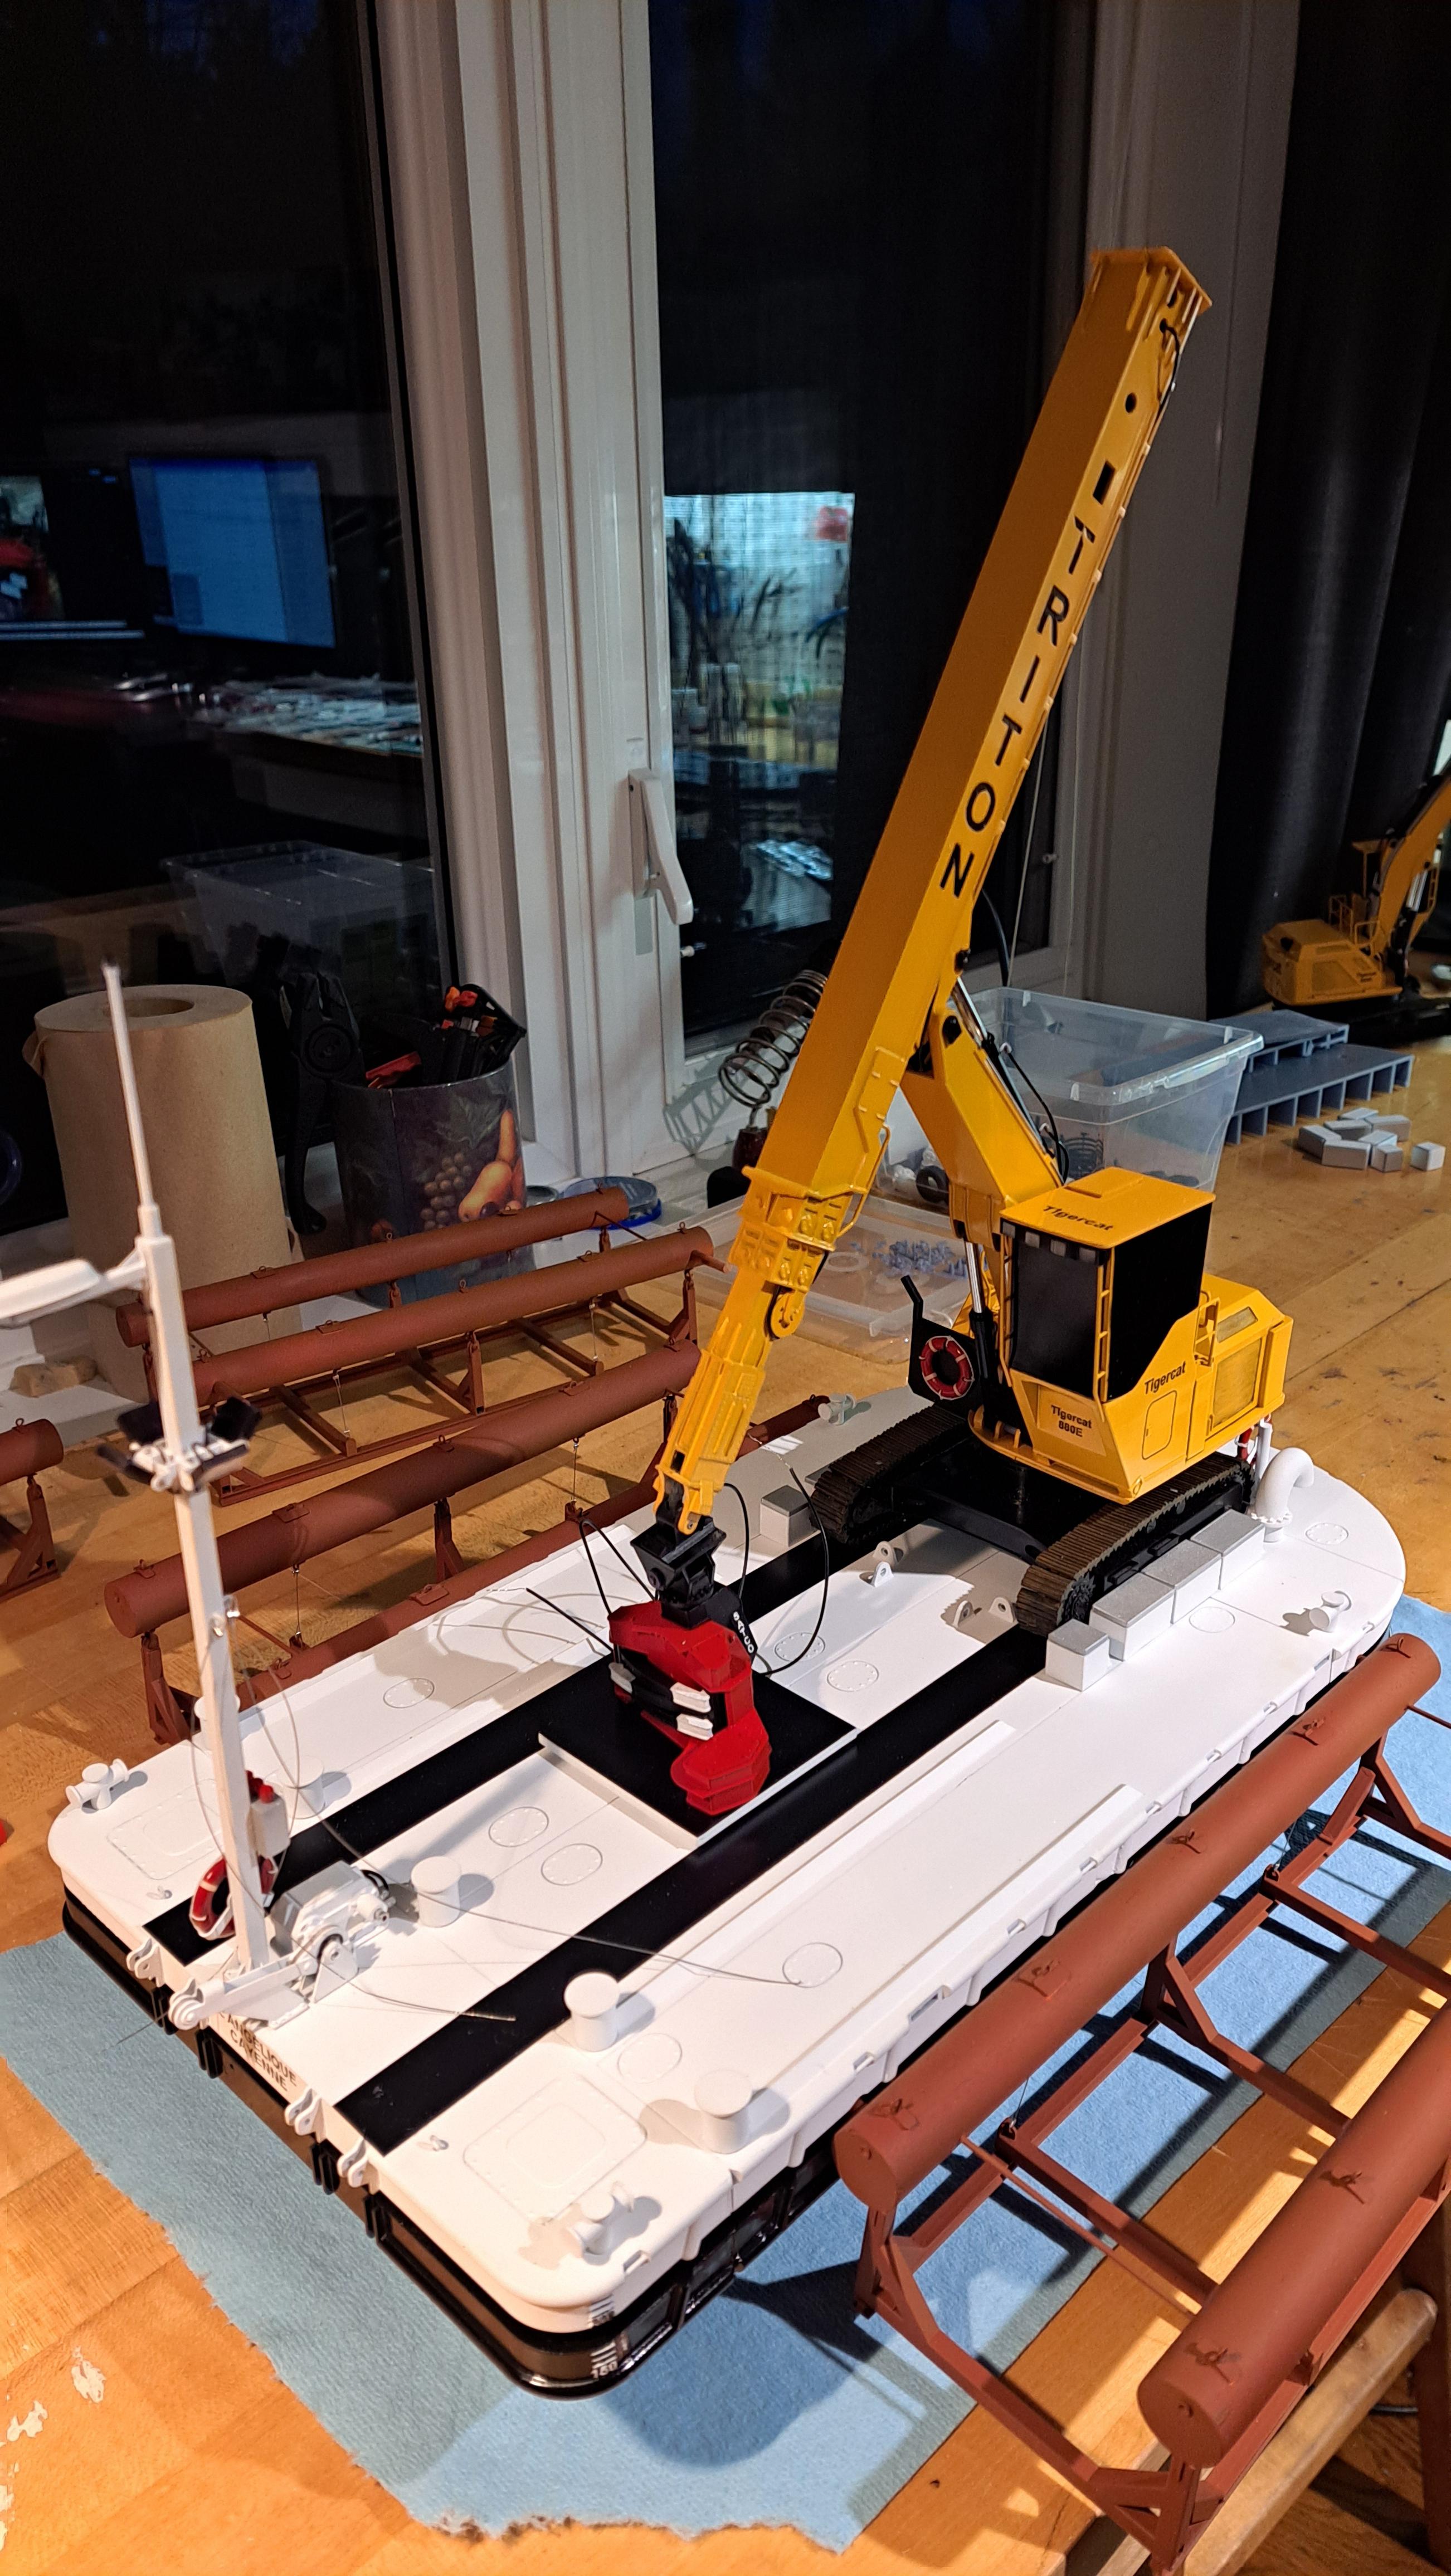
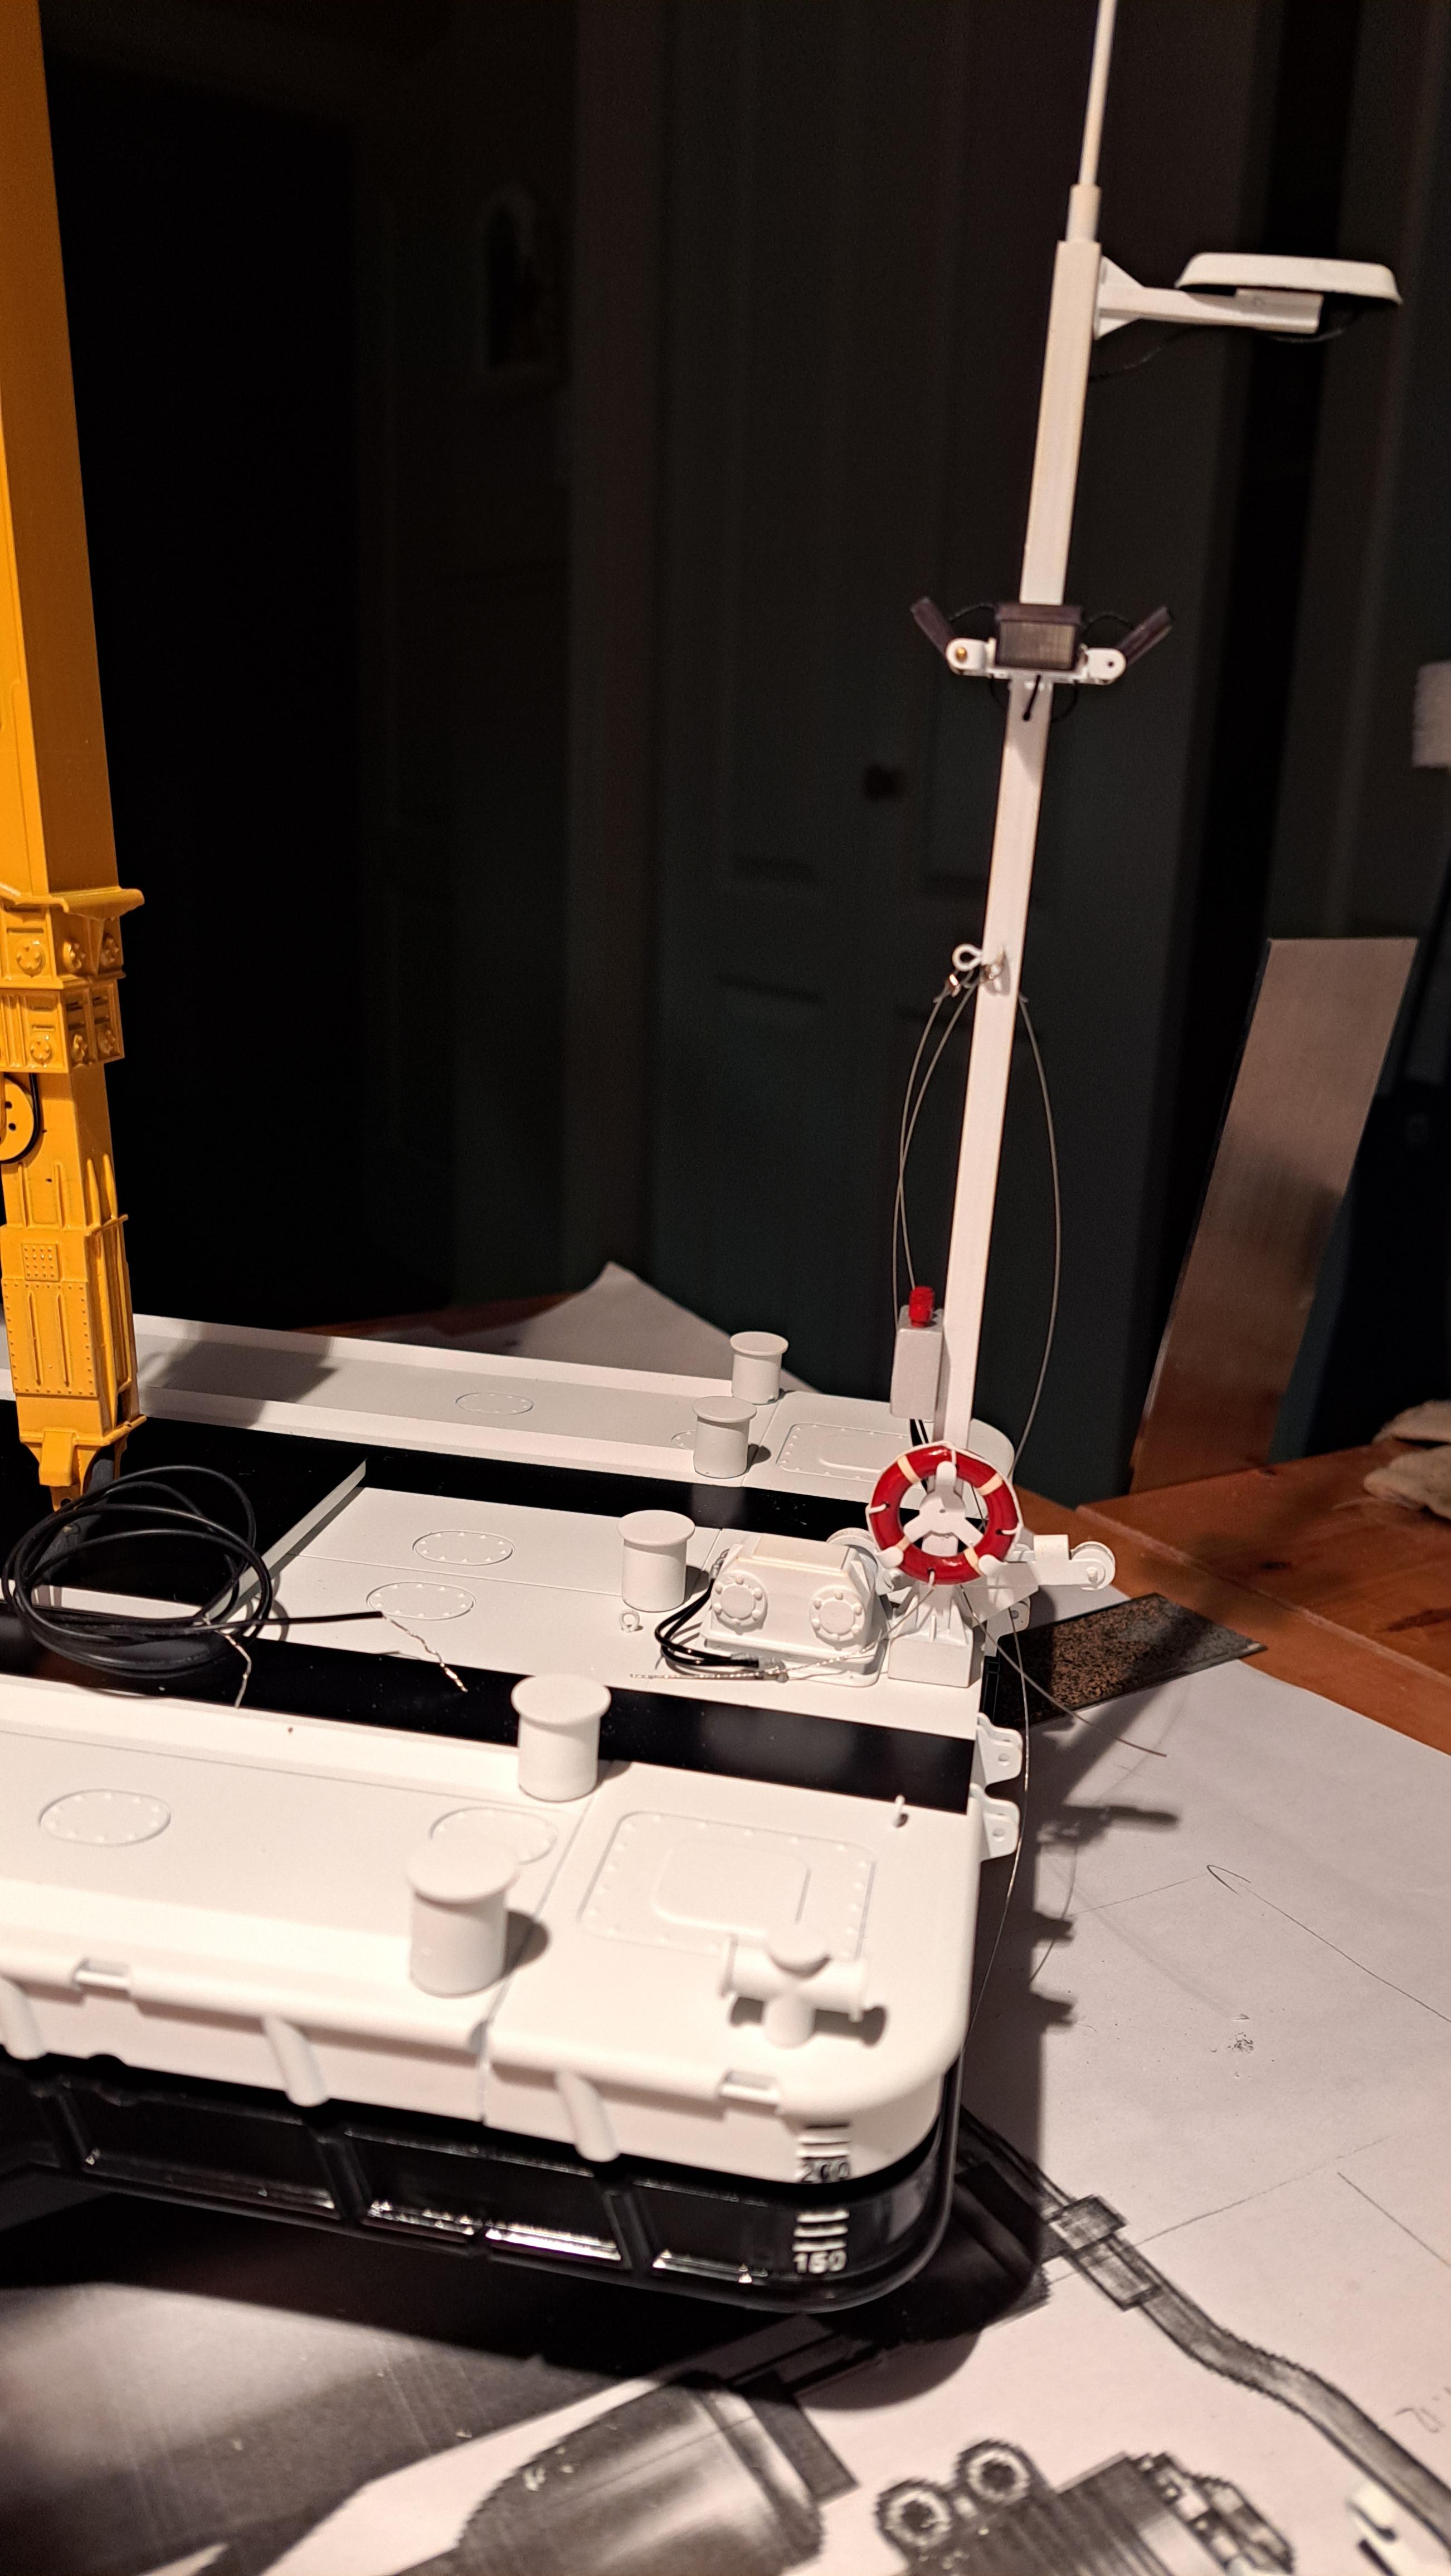
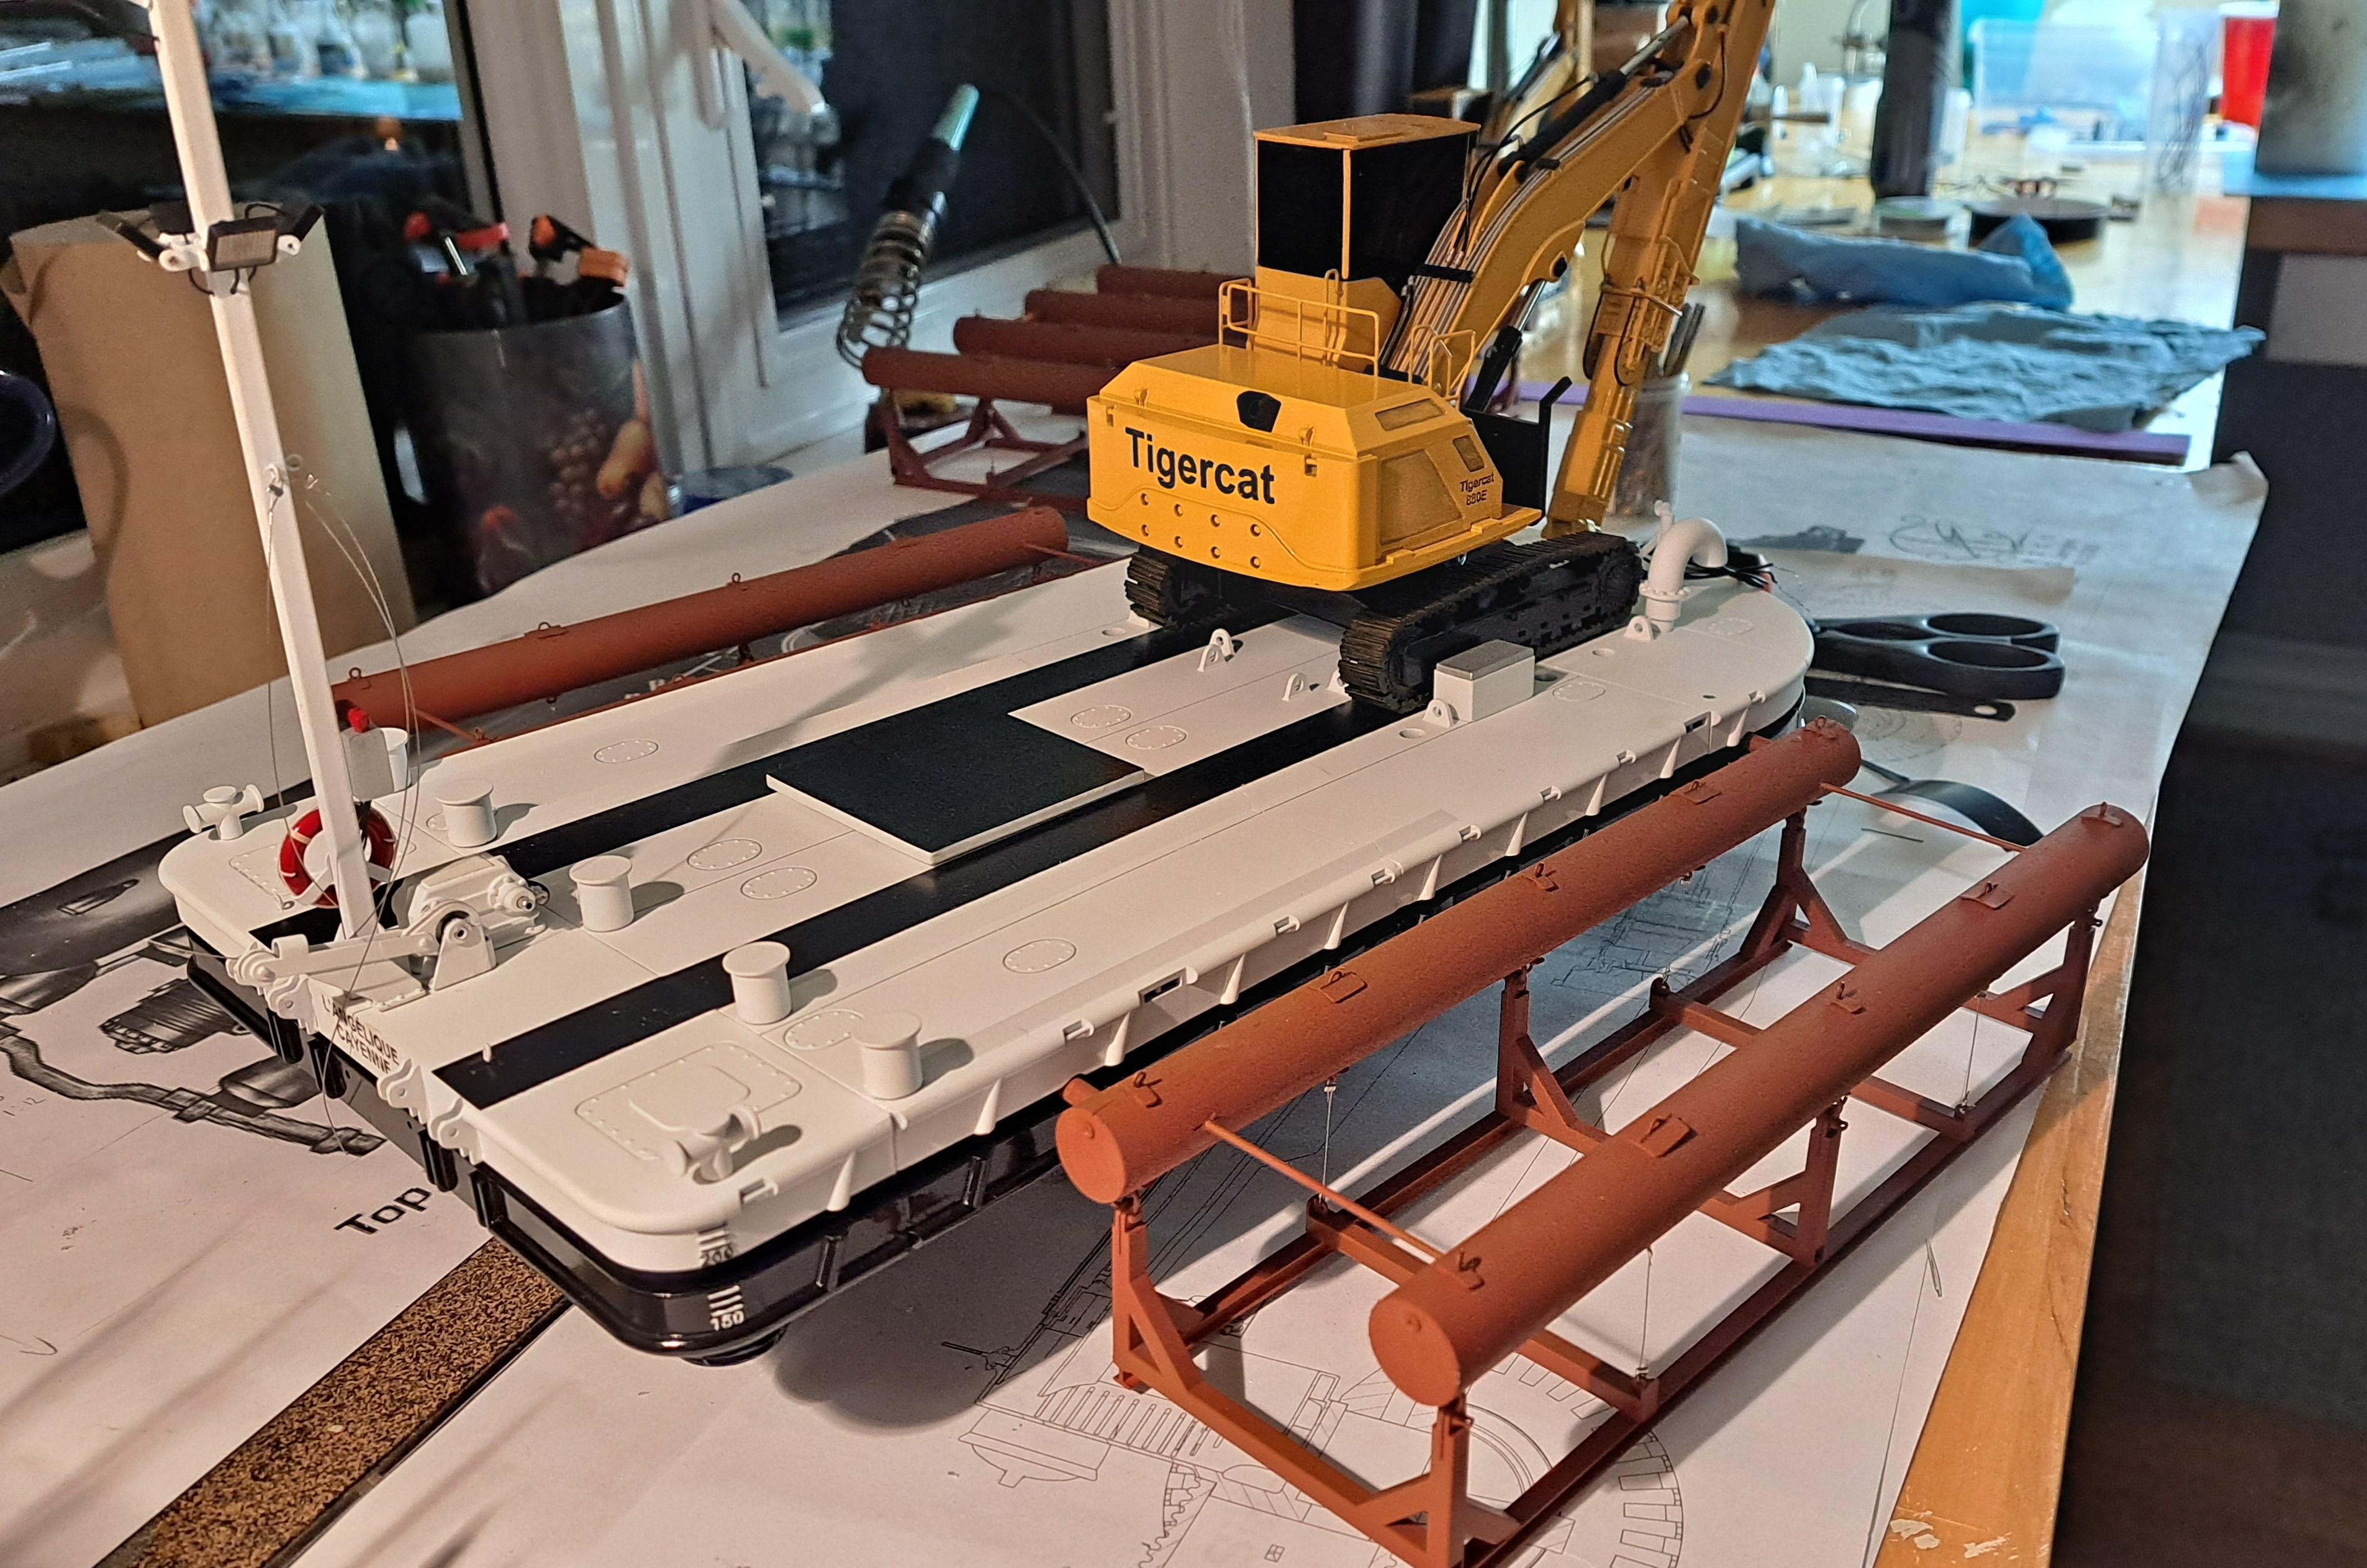
So, my part in this project is done. Tomorrow, I'll be tranfering it to the diorama guy. Here are some pictures showing a bit how everything came together. The inner plexiglass with laser cut openings mounted in a temporary frame Bottom half screwed in place Anchor deflector installed Both bunks in place Top half screwed from underneath thru bottom and plexiglass thus locking the bunks in place Tigercat glued onto the top surface Firts chain ratchet binder installed Both binder and cross braking cable installed at one end (same was installed at other end of Tigercat) Tool boxes, front vent and front buoy installed Anchor chain glued in place Mast glued in place And 3 retaining cables attached Triton arm inserted thru plexiglass and glued in place (all pivots were also glued to eliminate any movement and rigidity the assembly) And finally, the harvesting hand was installed after passing the cab lights wires thru A few shots of the completed models And a video 20241114_154217.mp4 Hope you enjoyed following this build half as much as l enjoyed making it.
-
Tigercat 880E longer 1/48 scale
François replied to François's topic in WIP: Model Trucks: Big Rigs and Heavy Equipment
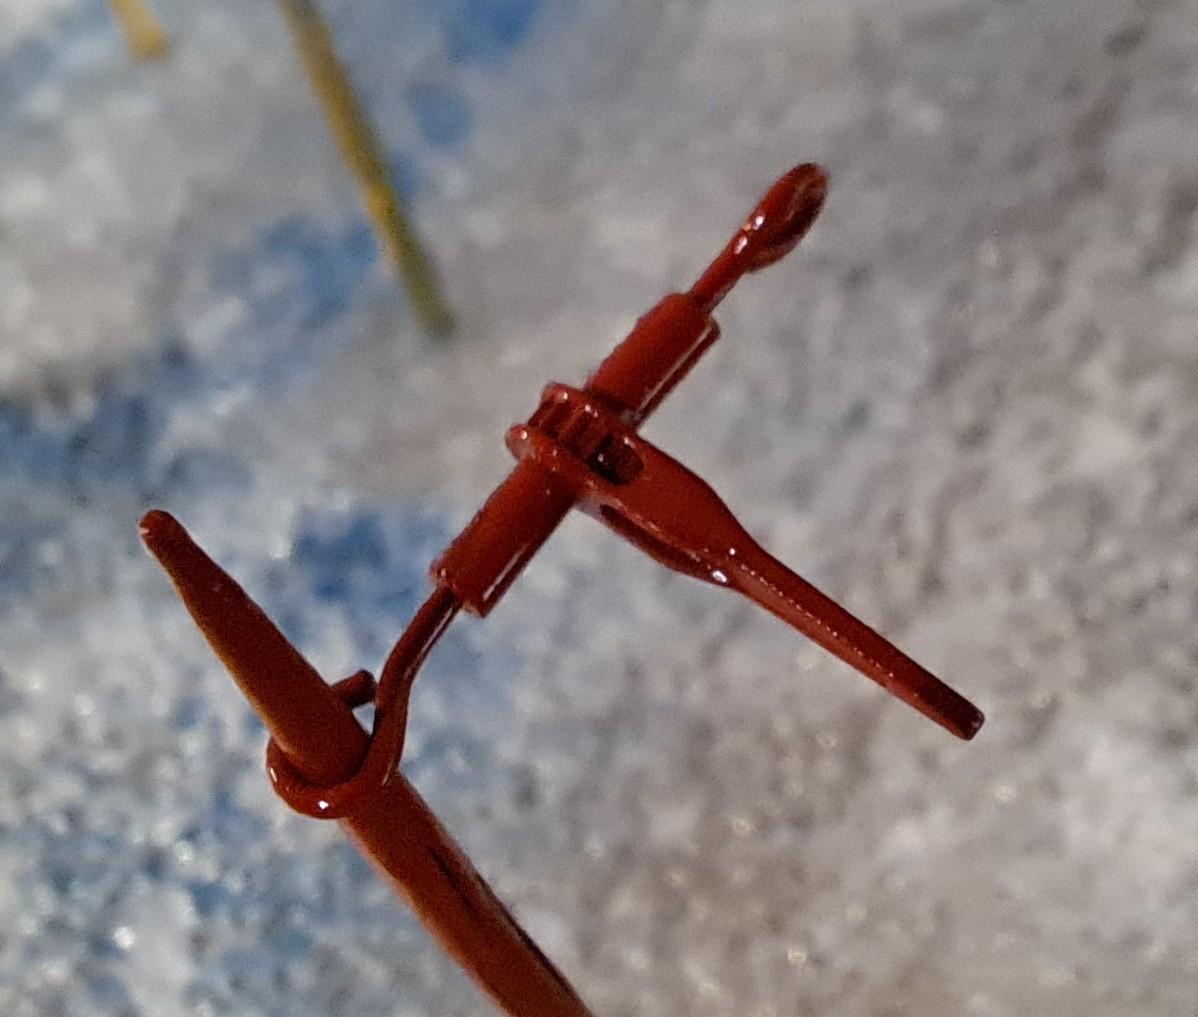
Both models are done, next step is to install then on their respective plexiglass lake surface and finish installing all the accessories. And some last minutes details Chain ratchet binders Bunks anchor cable
-
Tigercat 880E longer 1/48 scale
François replied to François's topic in WIP: Model Trucks: Big Rigs and Heavy Equipment
Thank you everyone ! They will both be displayed in a separate case. The display case is two fold. There's an inner plexiglass boxe with the top surface being the lake water with the barge sitting on it and the bottom surface representing the lake bed. There will be a bunch of trees, the ones in front of the barge will be full length (still uncut) and the trees behind and under the barge will be cut (tree stumps). The harvester hand will be grapping a tree in front as if it is about to cut it. Over all of this, there will be a full display case to protect everything. My job will end once the barge is installed on the lake surface and all accessories including the Tigercat are glued in place. I will then pass the 'baton' to a diorama specialist to complete the setup (trees, lake bed...) -
Tigercat 880E longer 1/48 scale
François replied to François's topic in WIP: Model Trucks: Big Rigs and Heavy Equipment
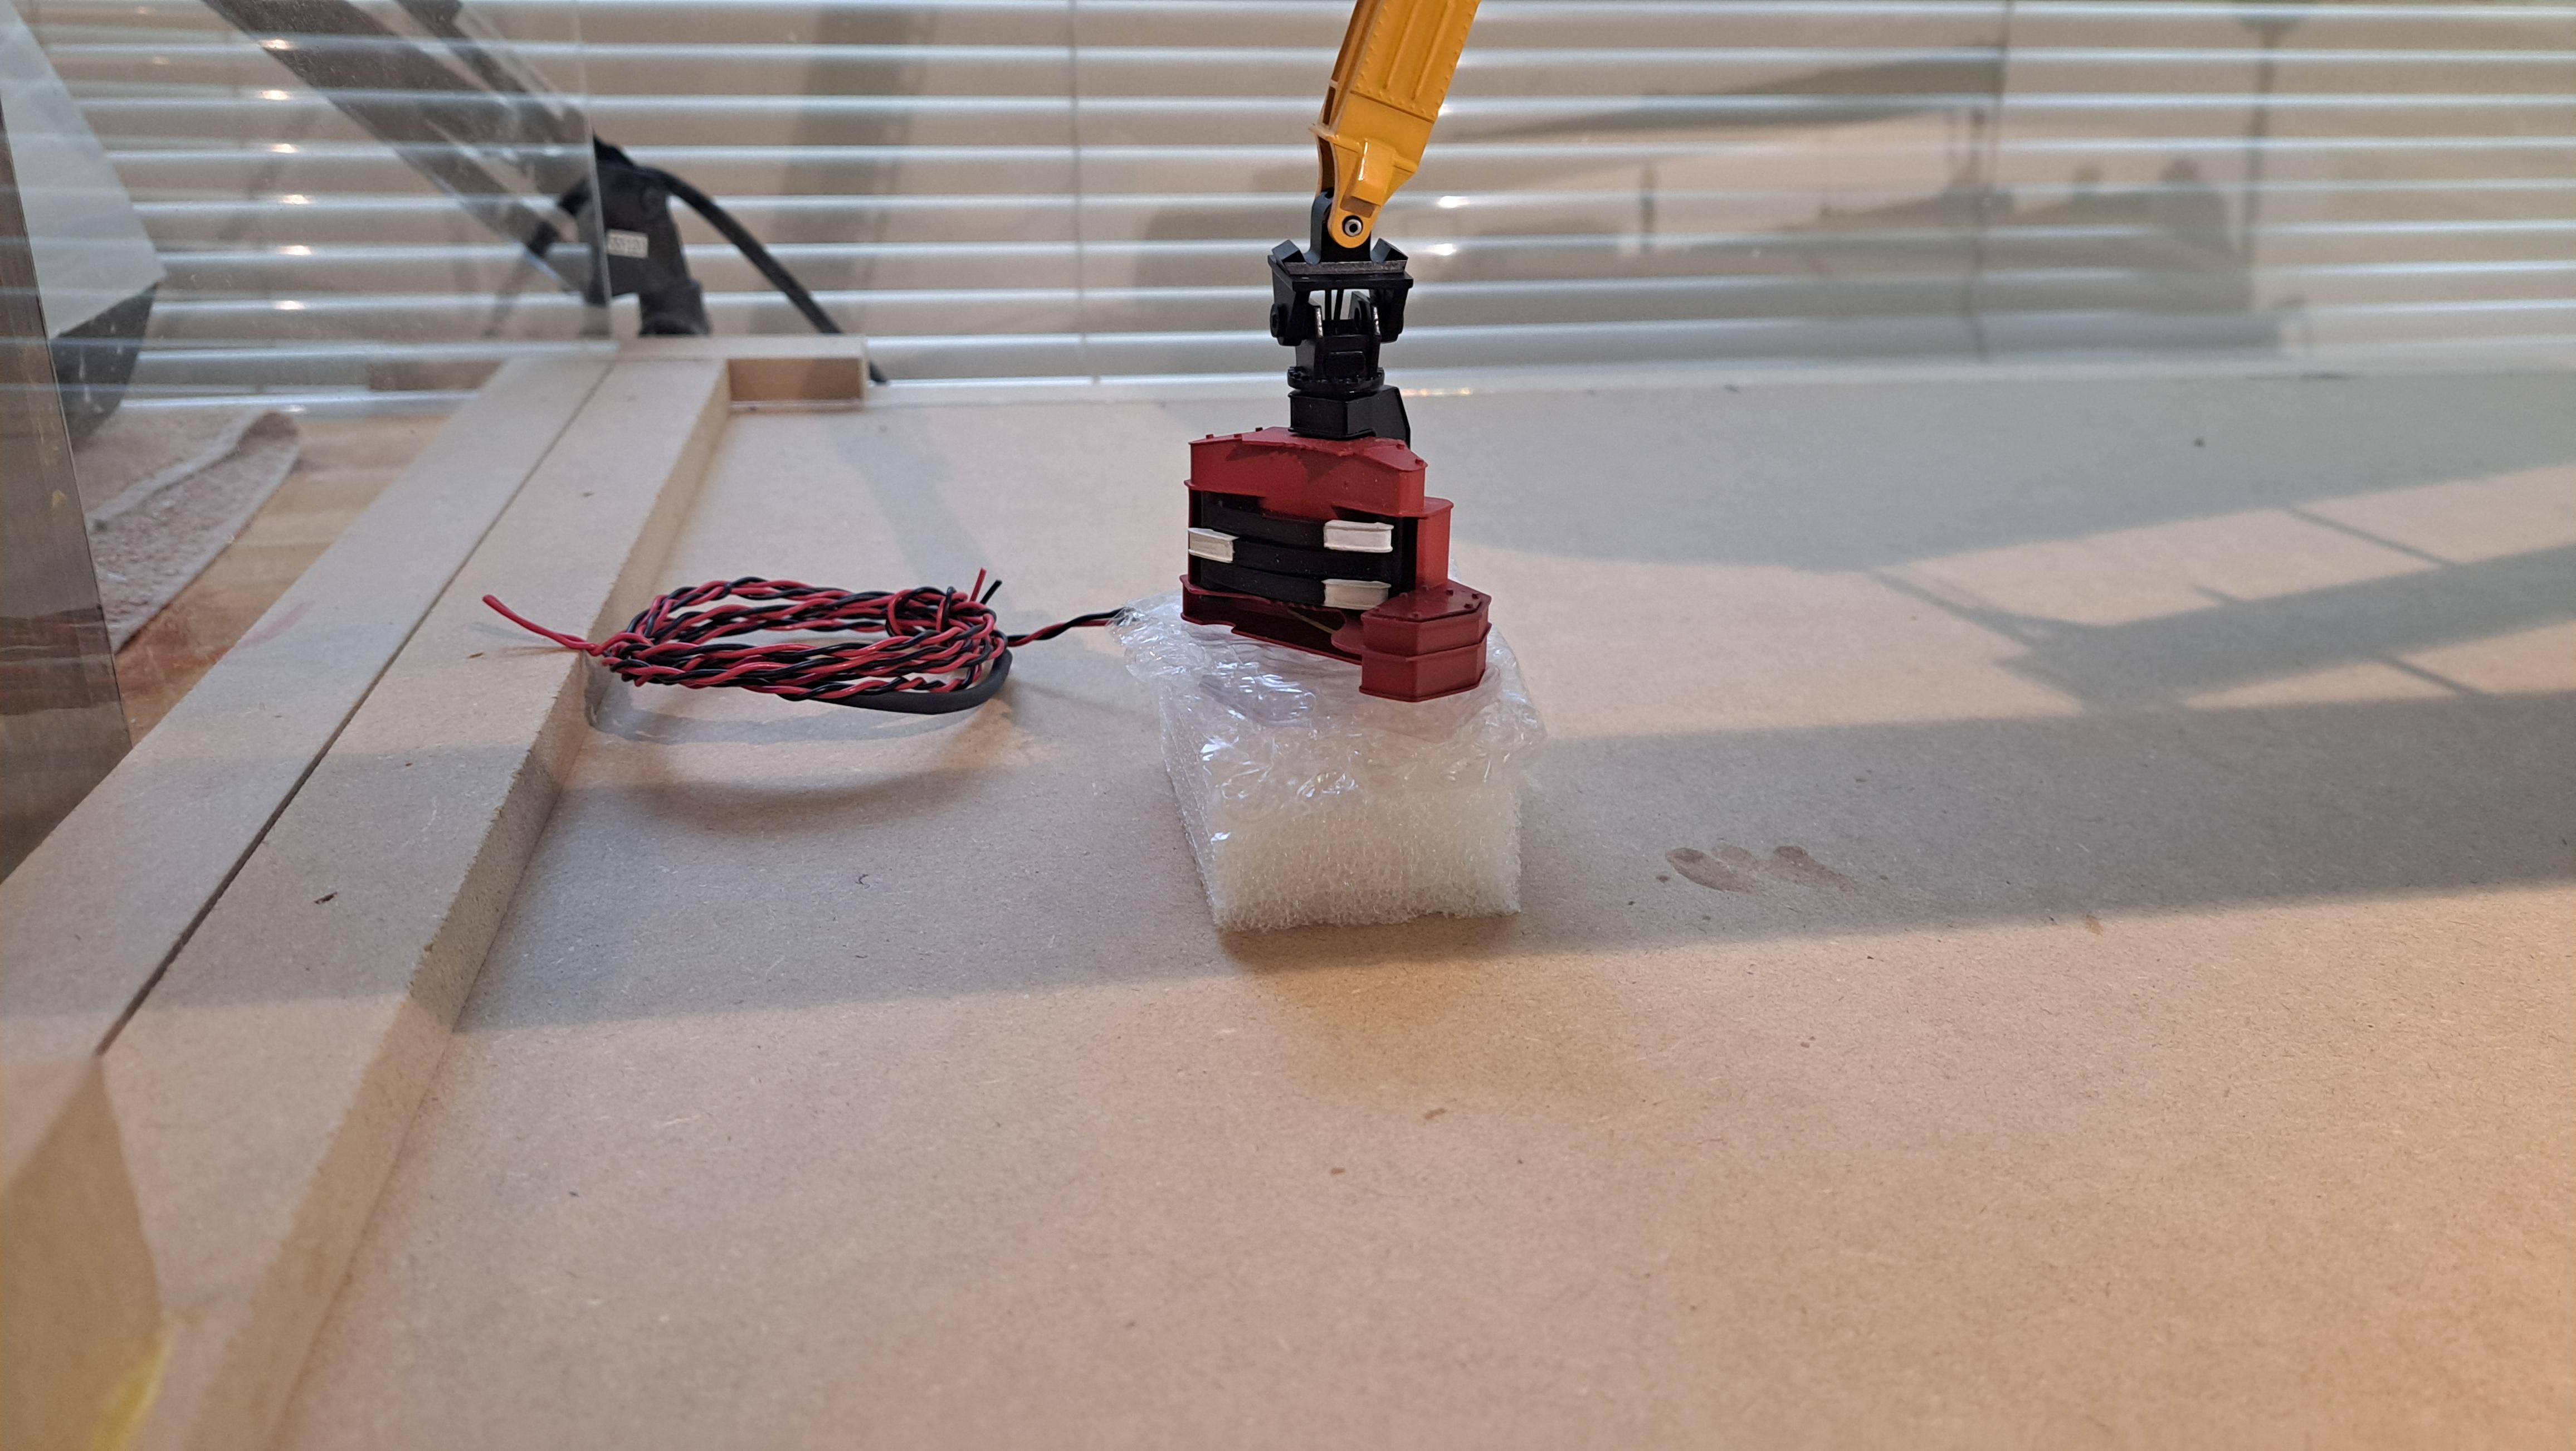
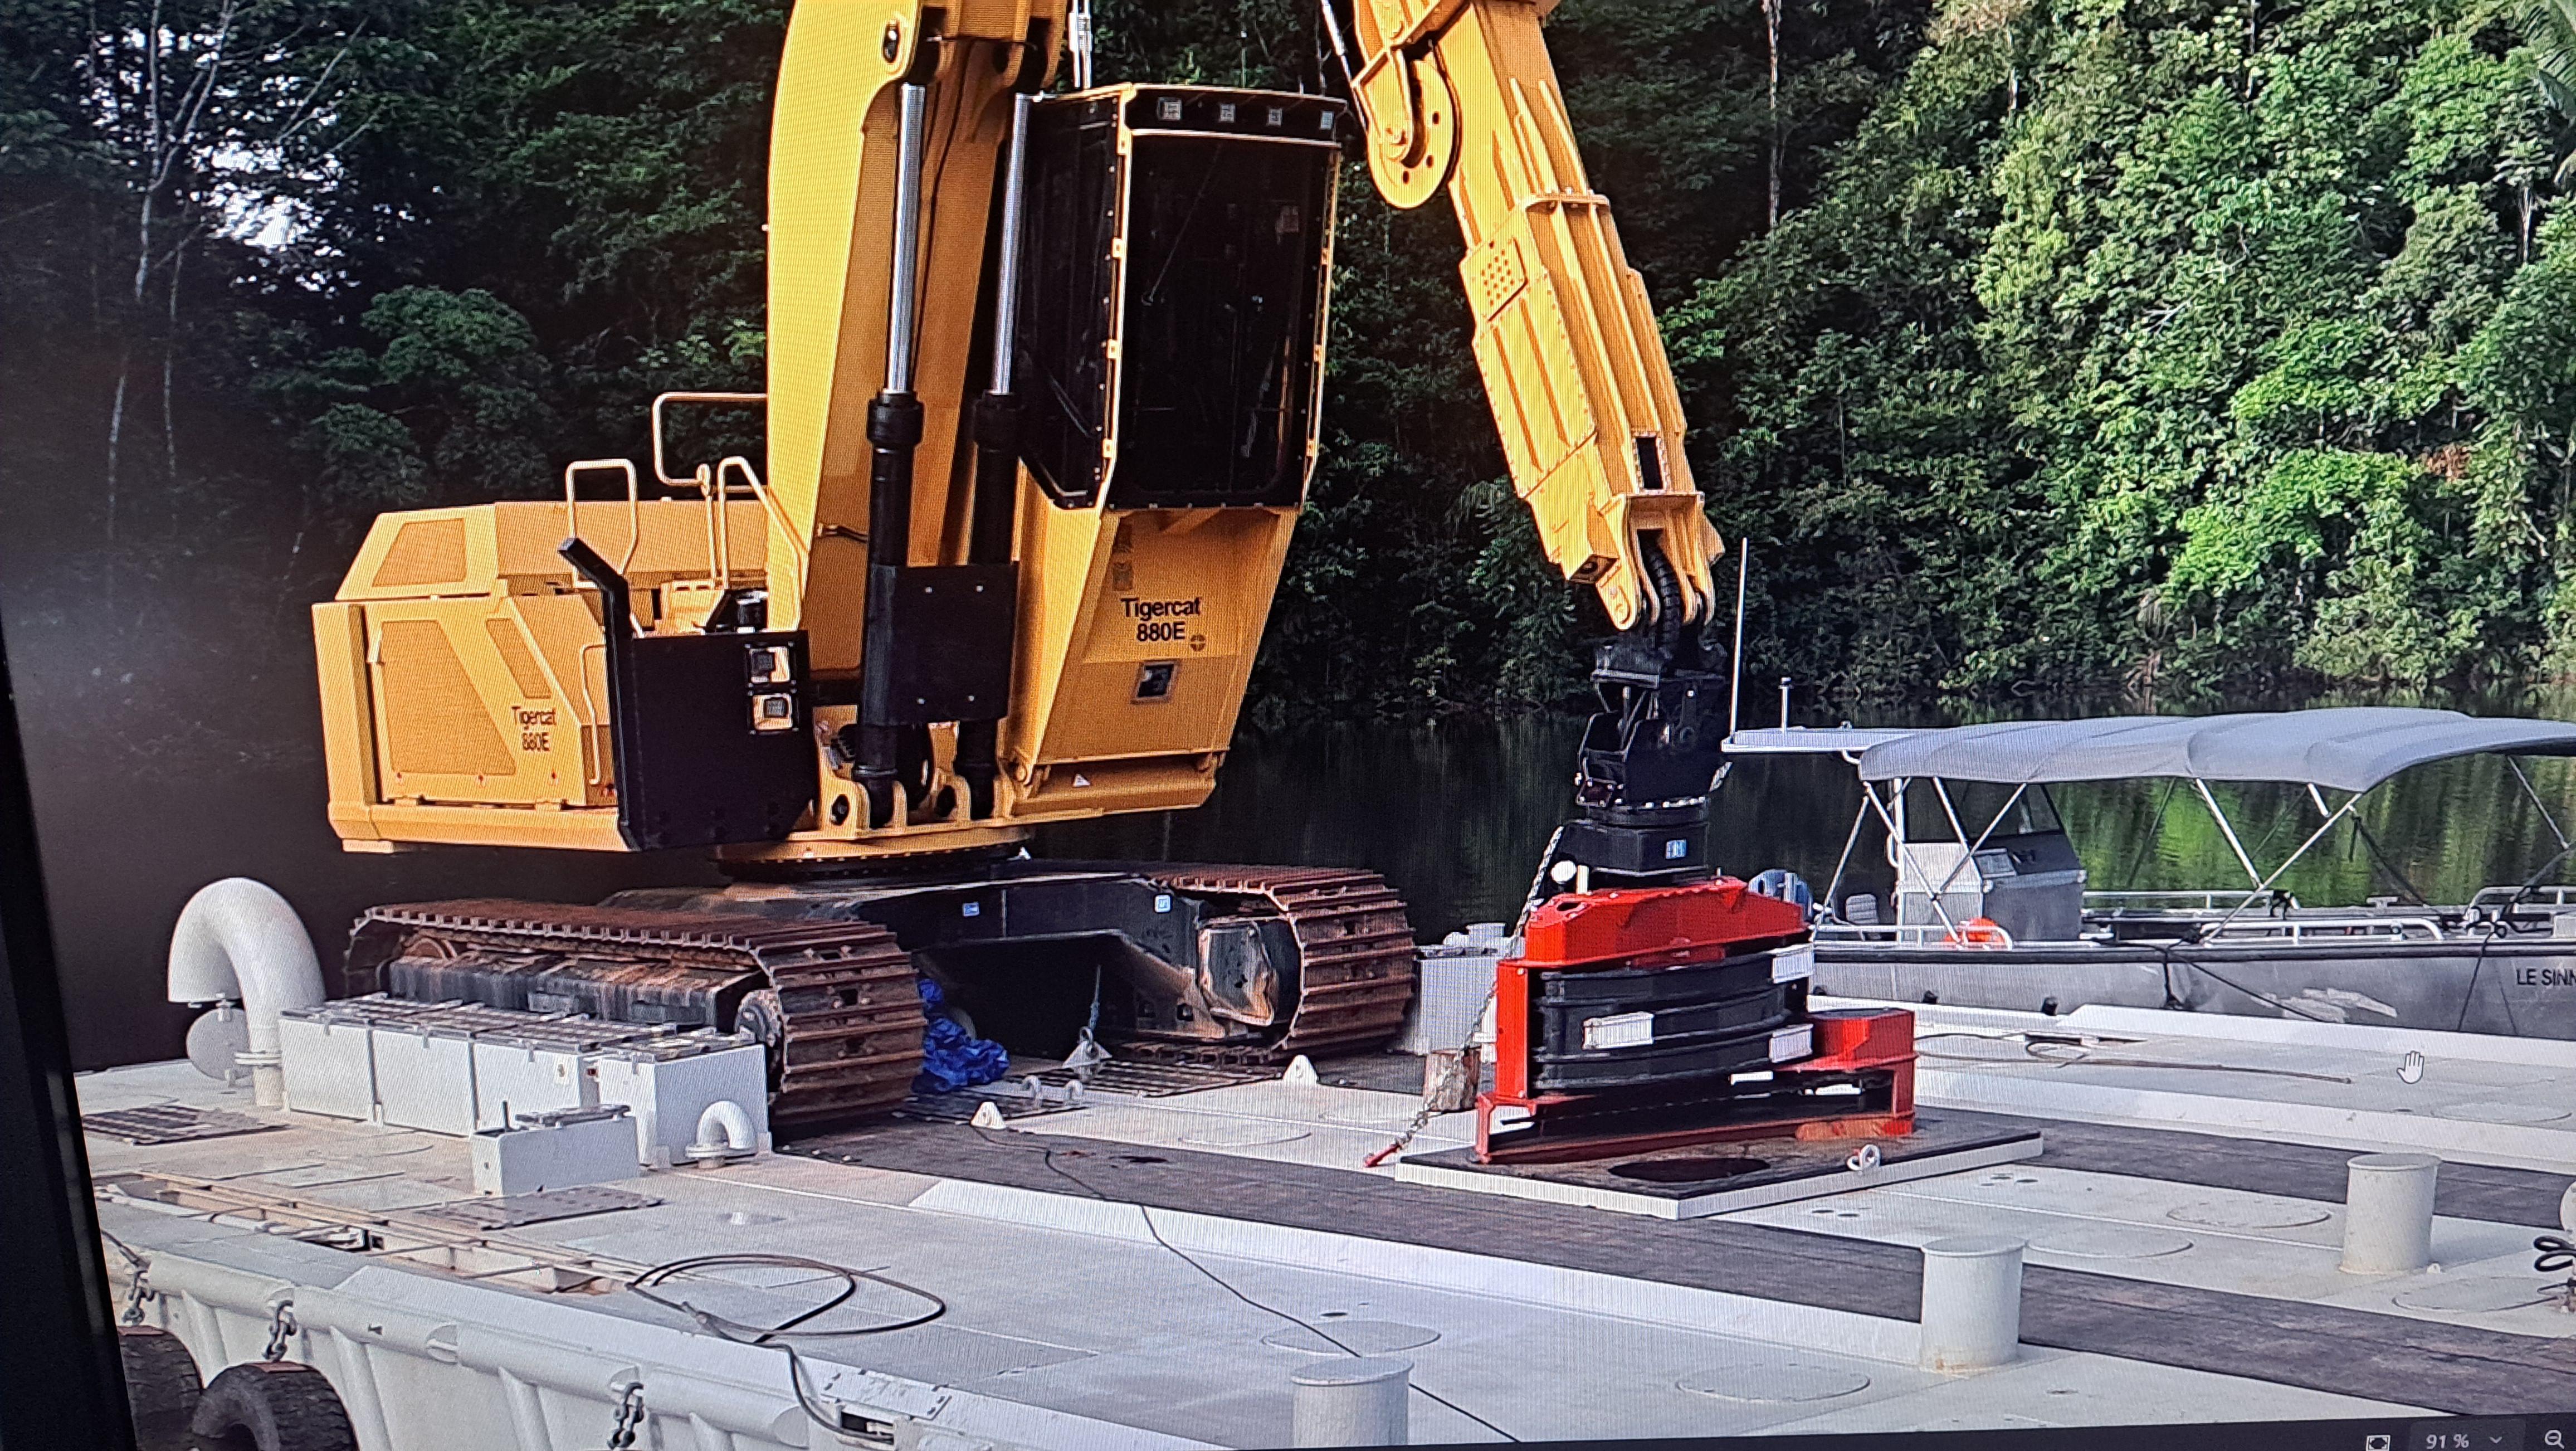
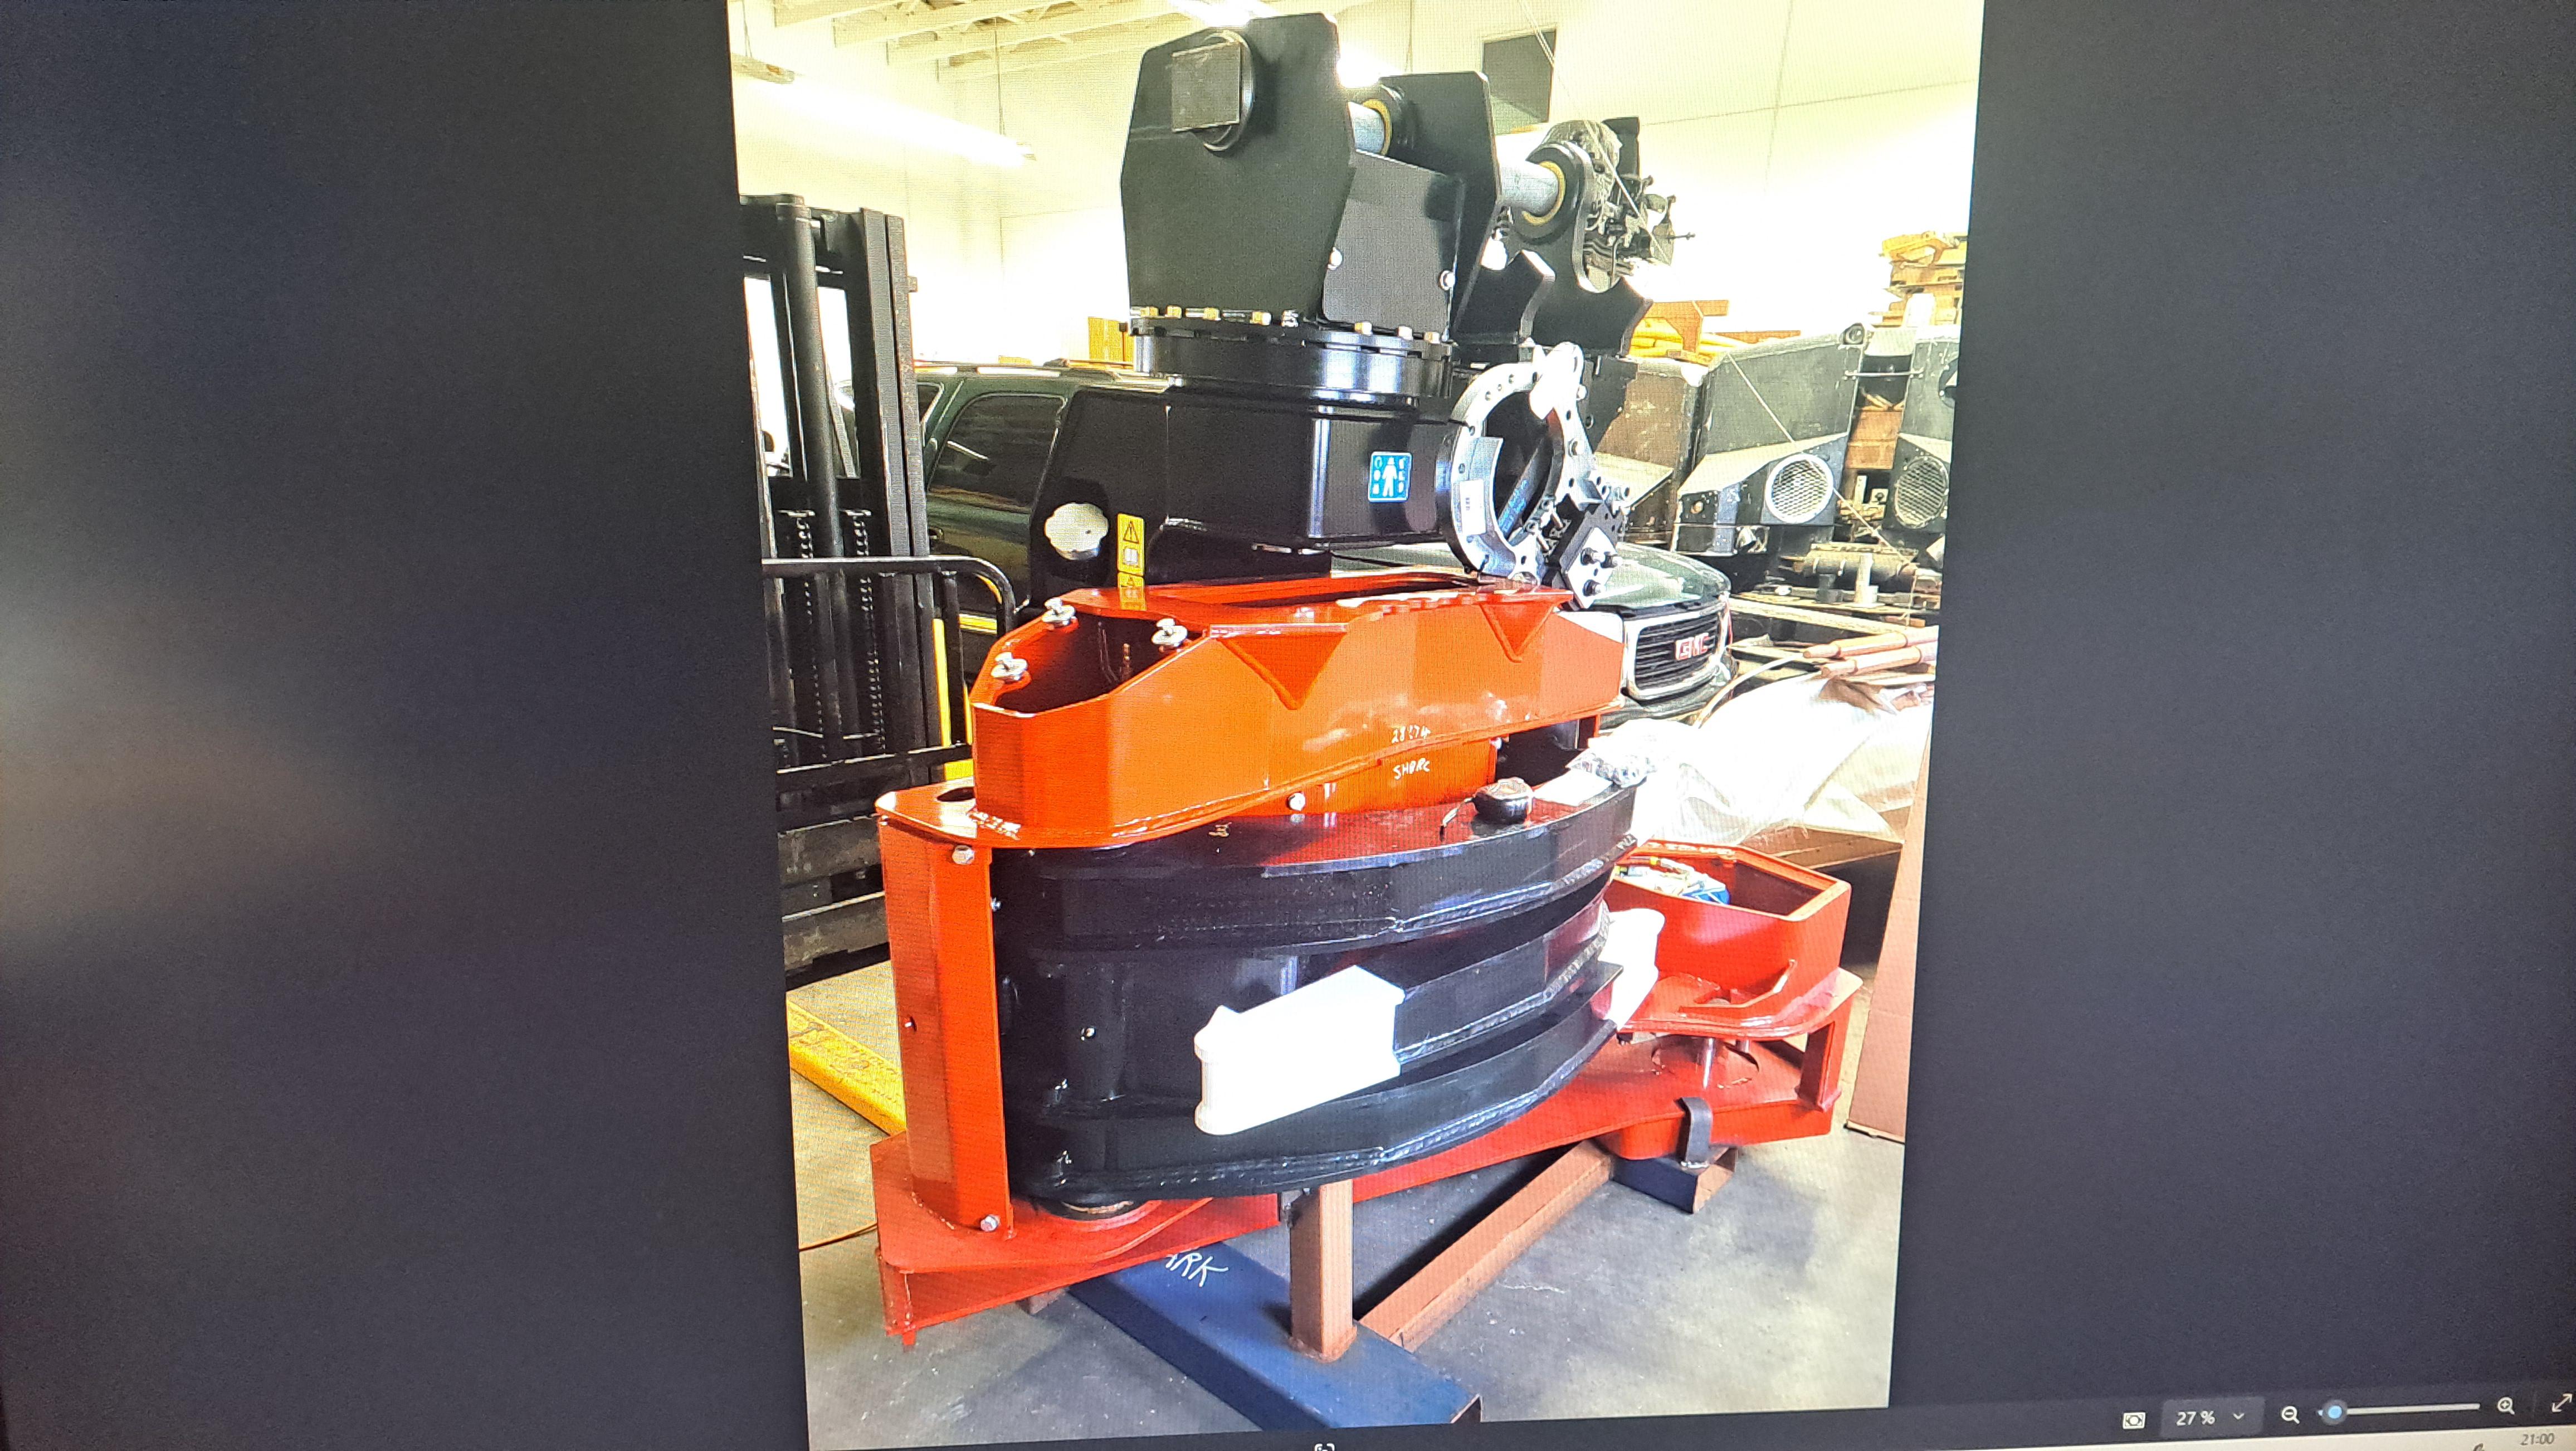
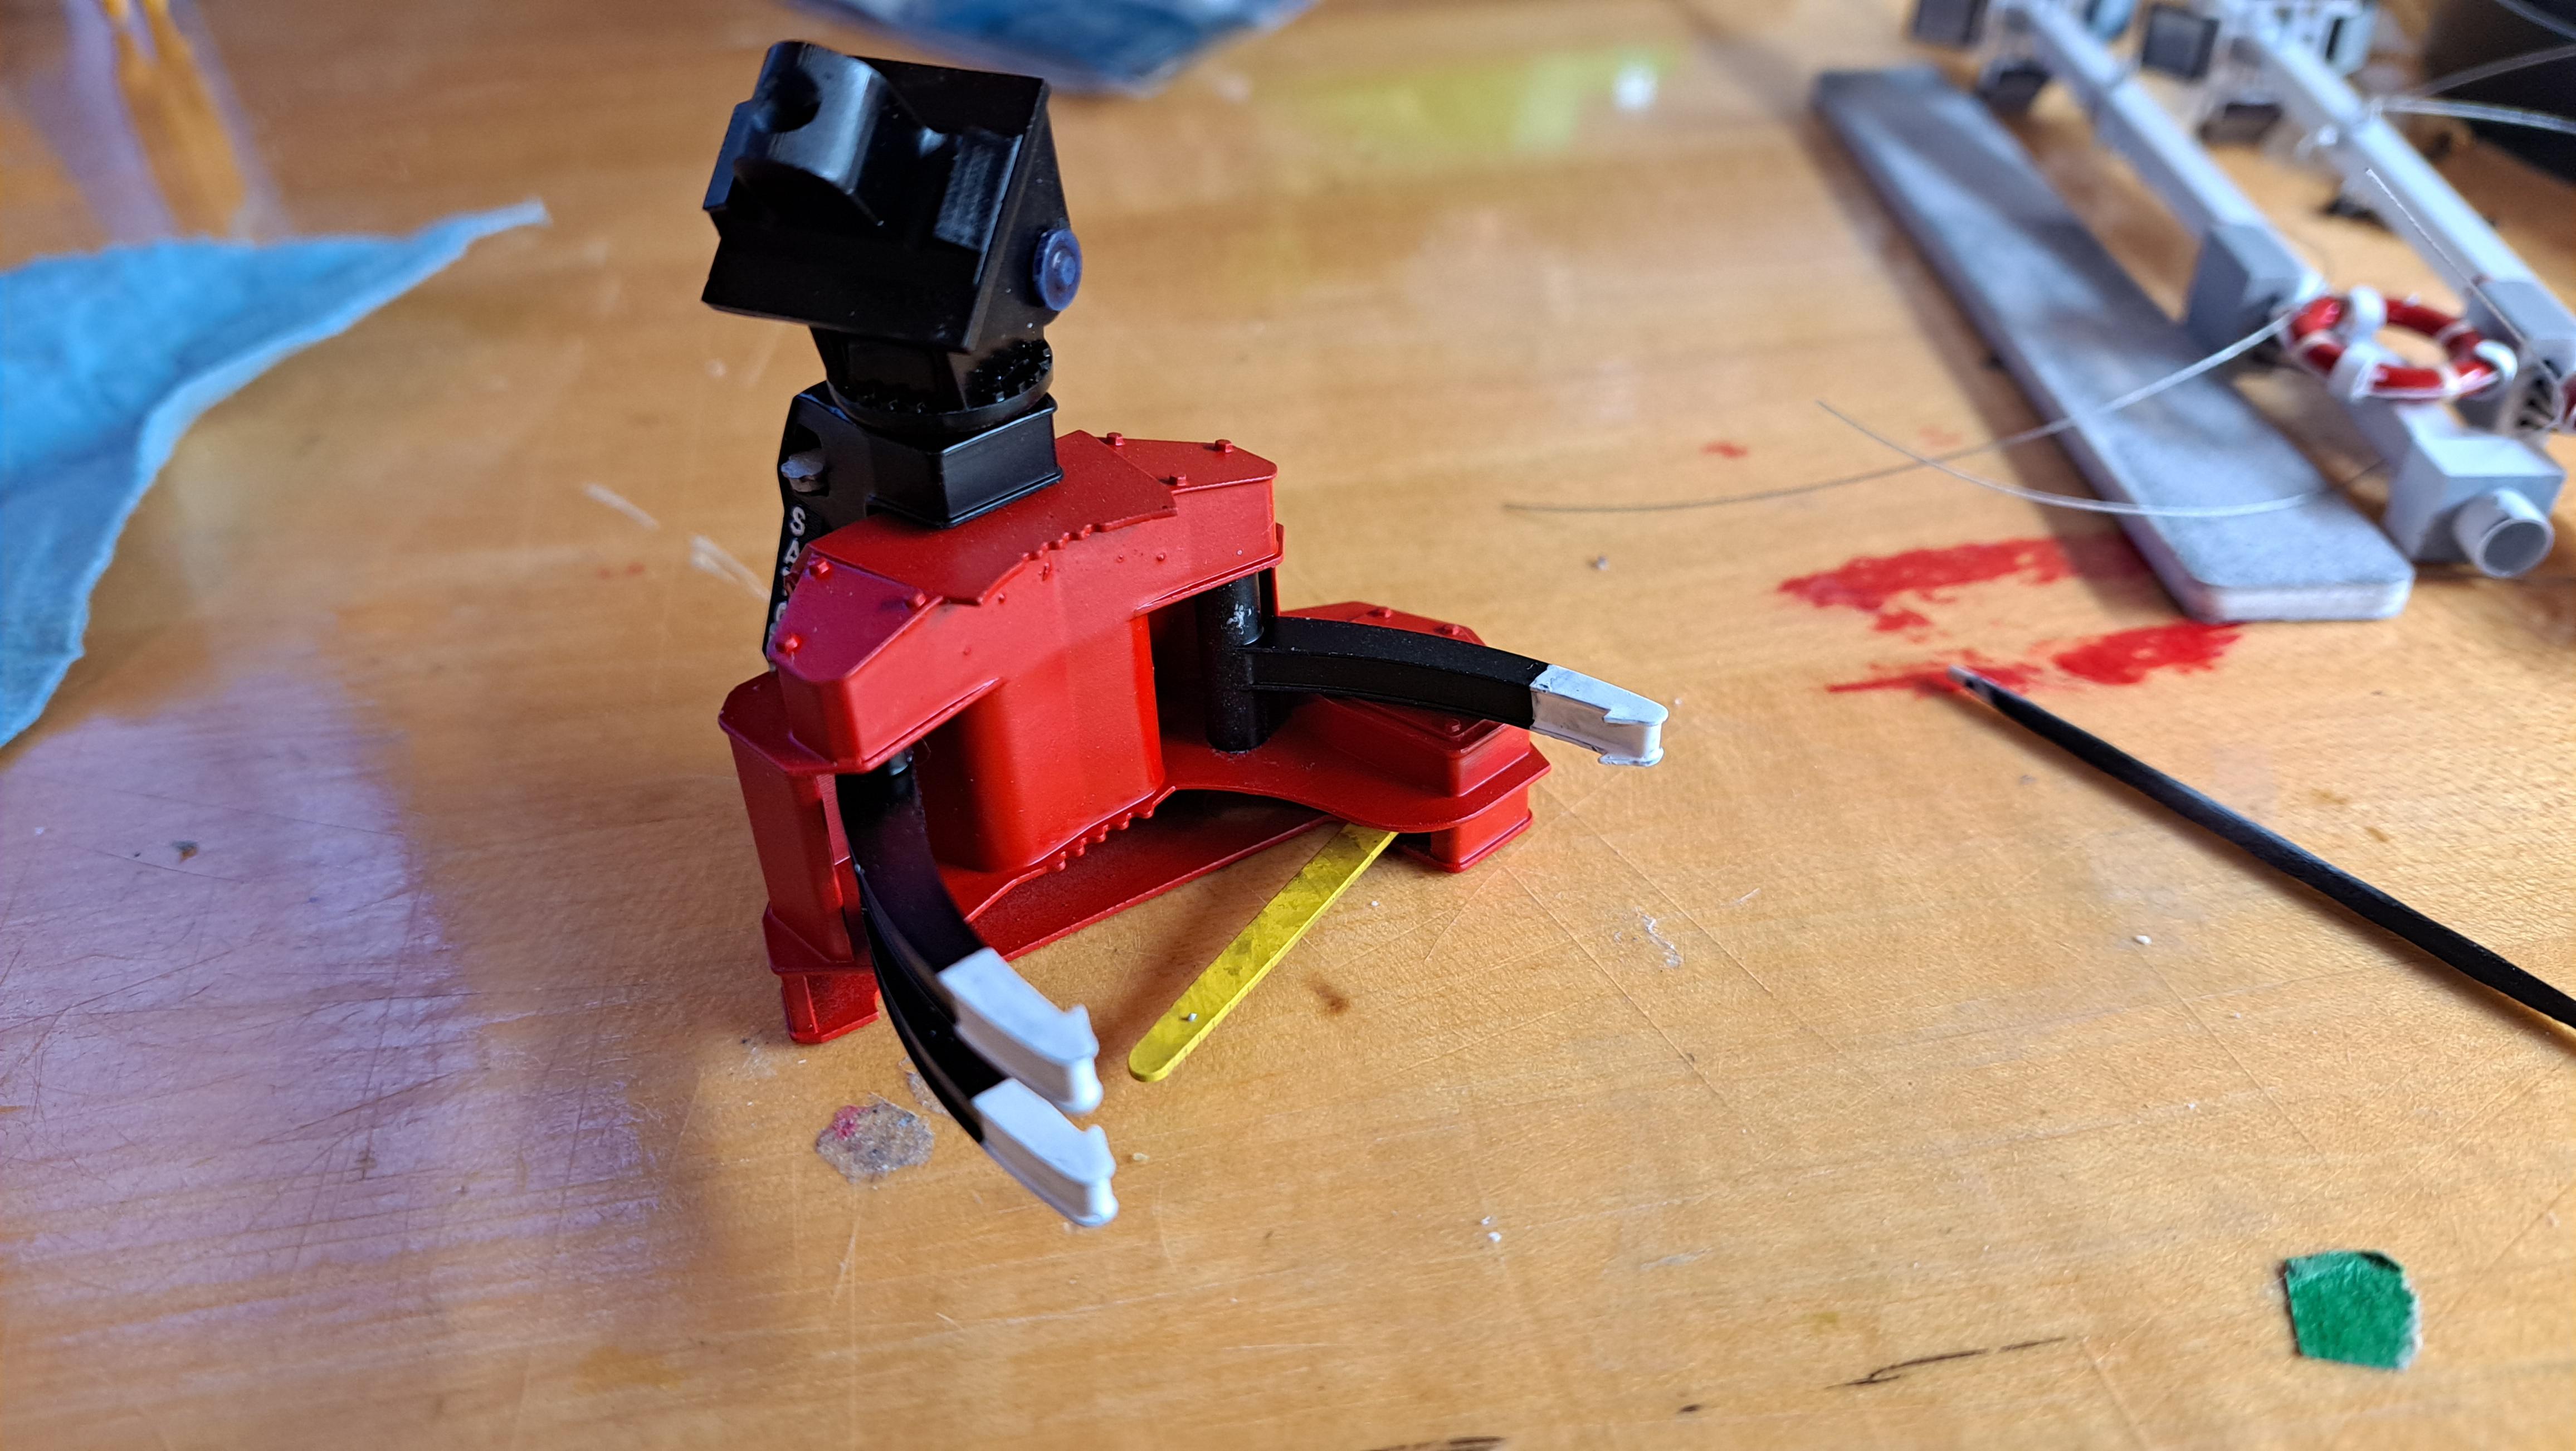
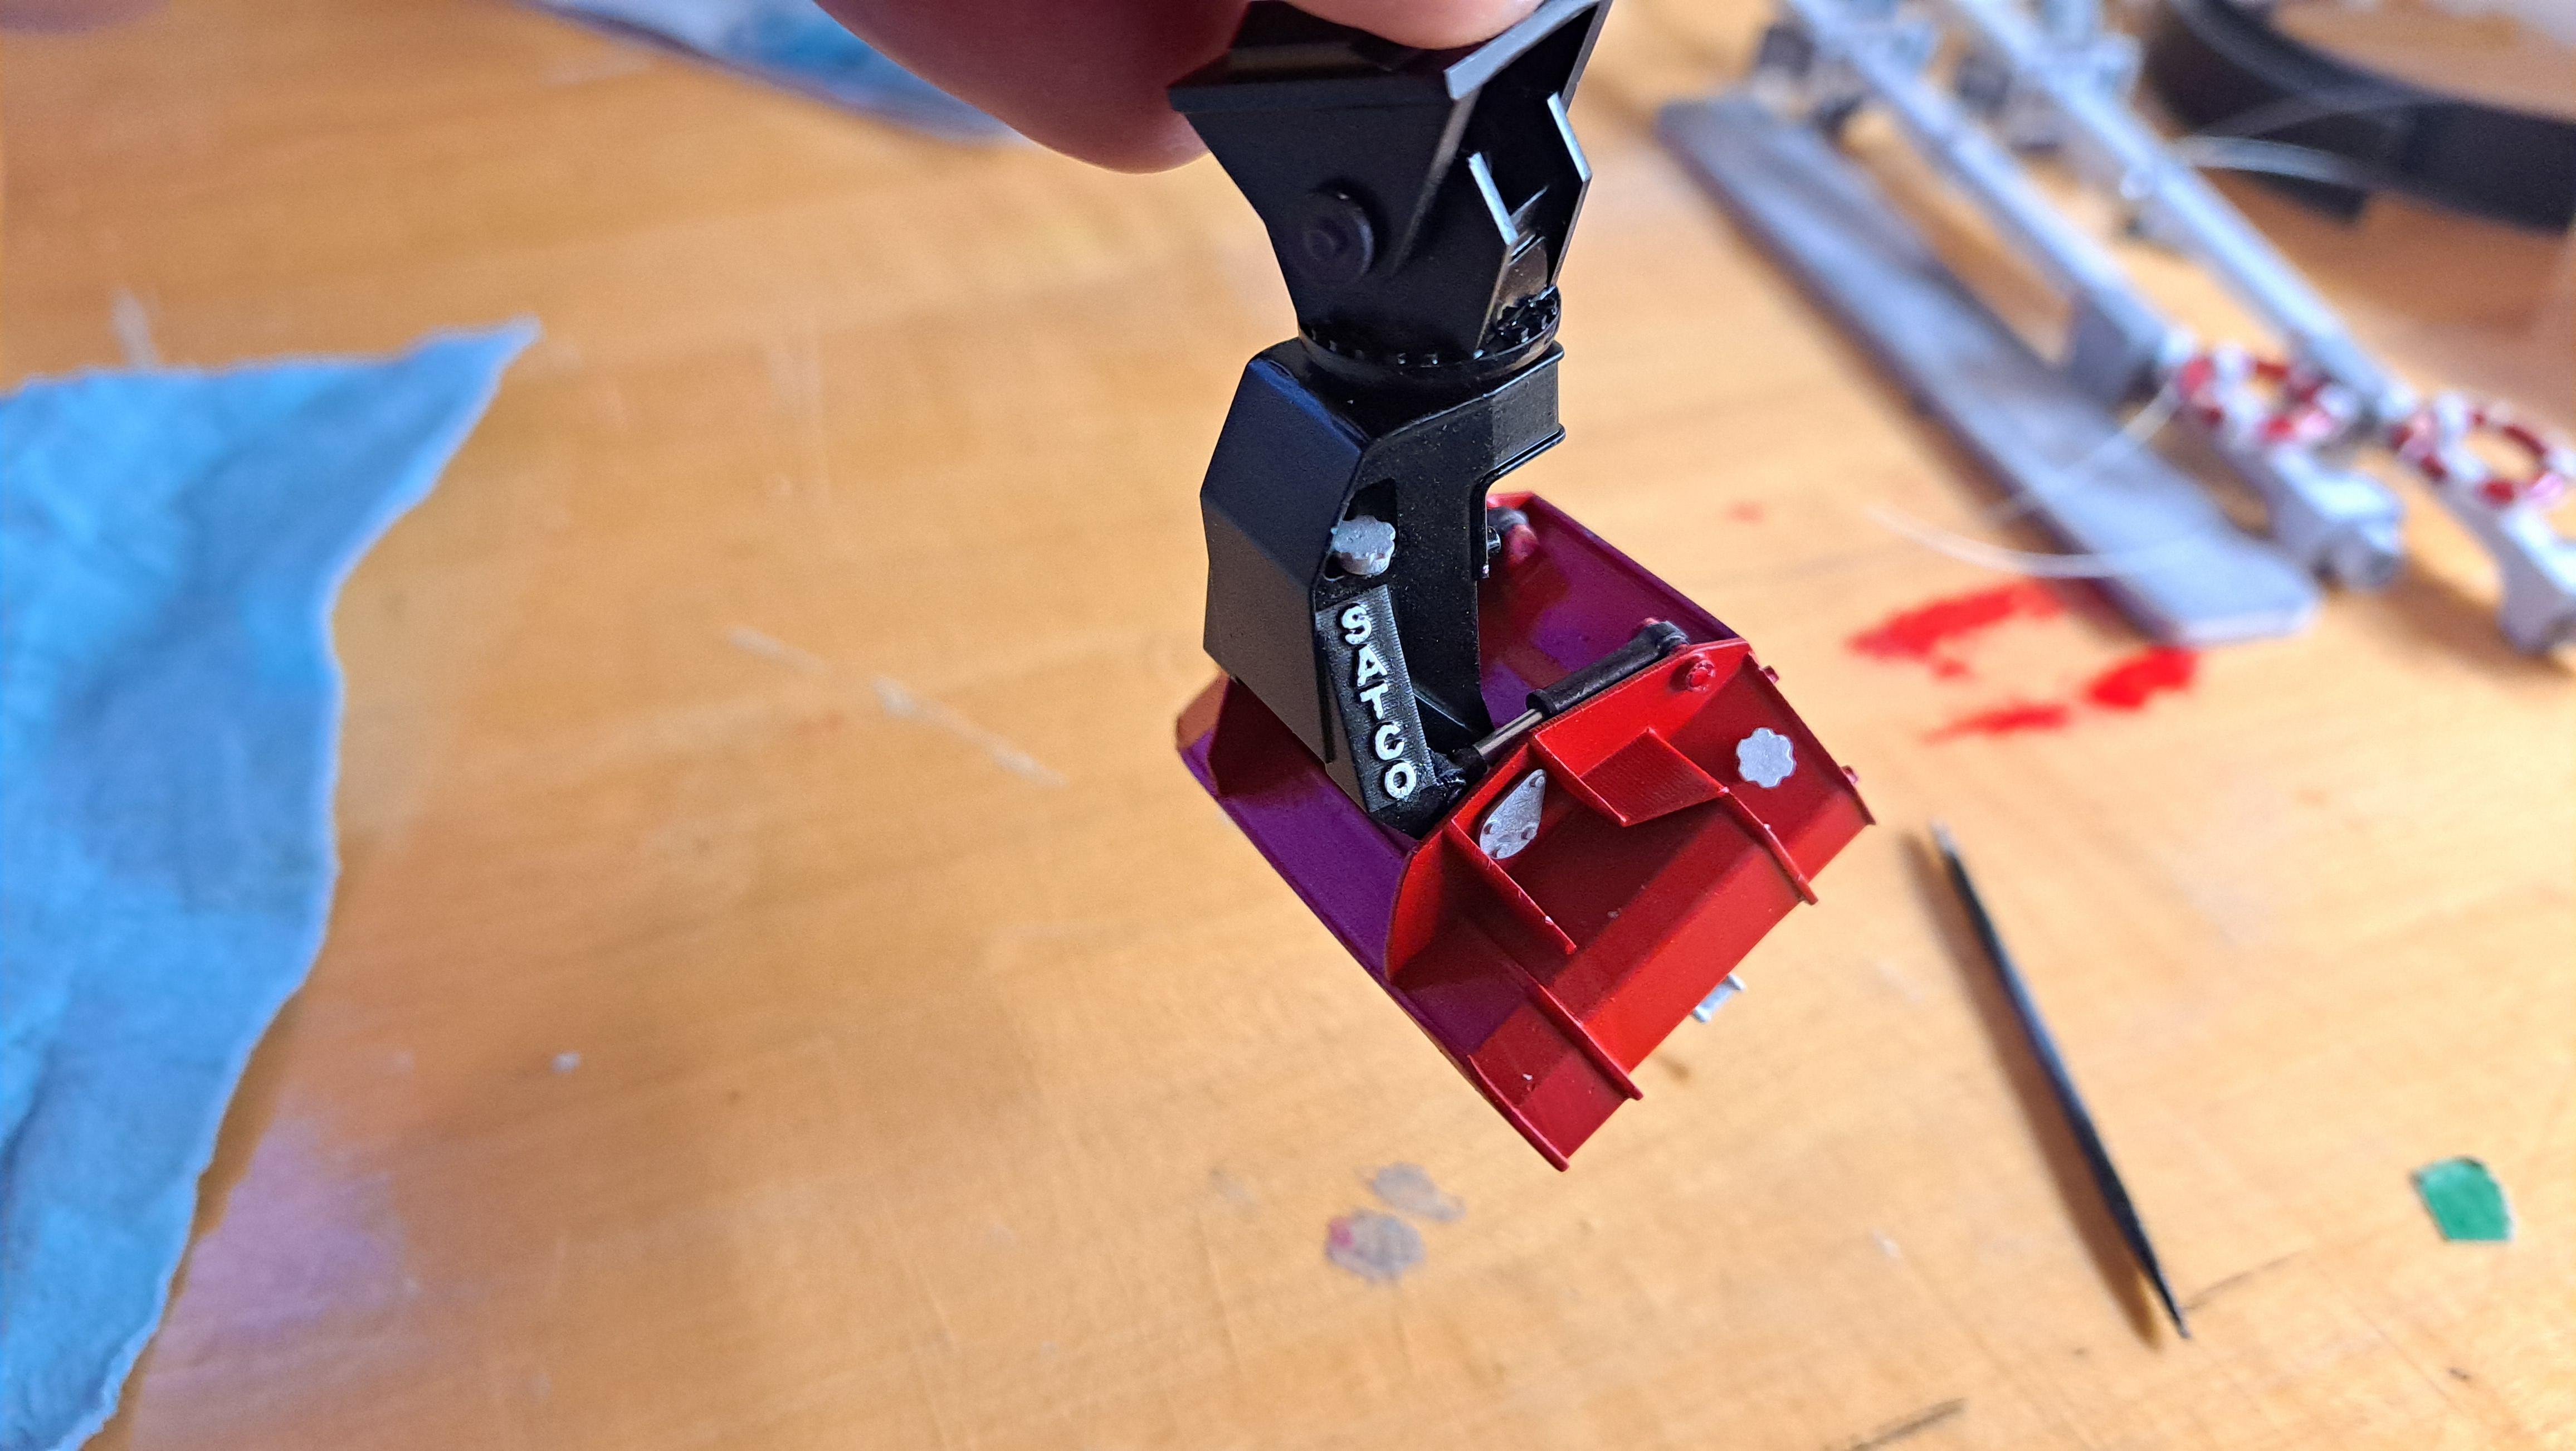
I 3d modeled printed and assembled the harvester head, that's the part that goes underwater and cuts the trees. Again, not much info, a few pictures, the owners manual and 1 dimension. I think it came out good.
-
Tigercat 880E longer 1/48 scale
François replied to François's topic in WIP: Model Trucks: Big Rigs and Heavy Equipment
Did some assembly today. I think it will look pretty good!!
-
Tigercat 880E longer 1/48 scale
François replied to François's topic in WIP: Model Trucks: Big Rigs and Heavy Equipment
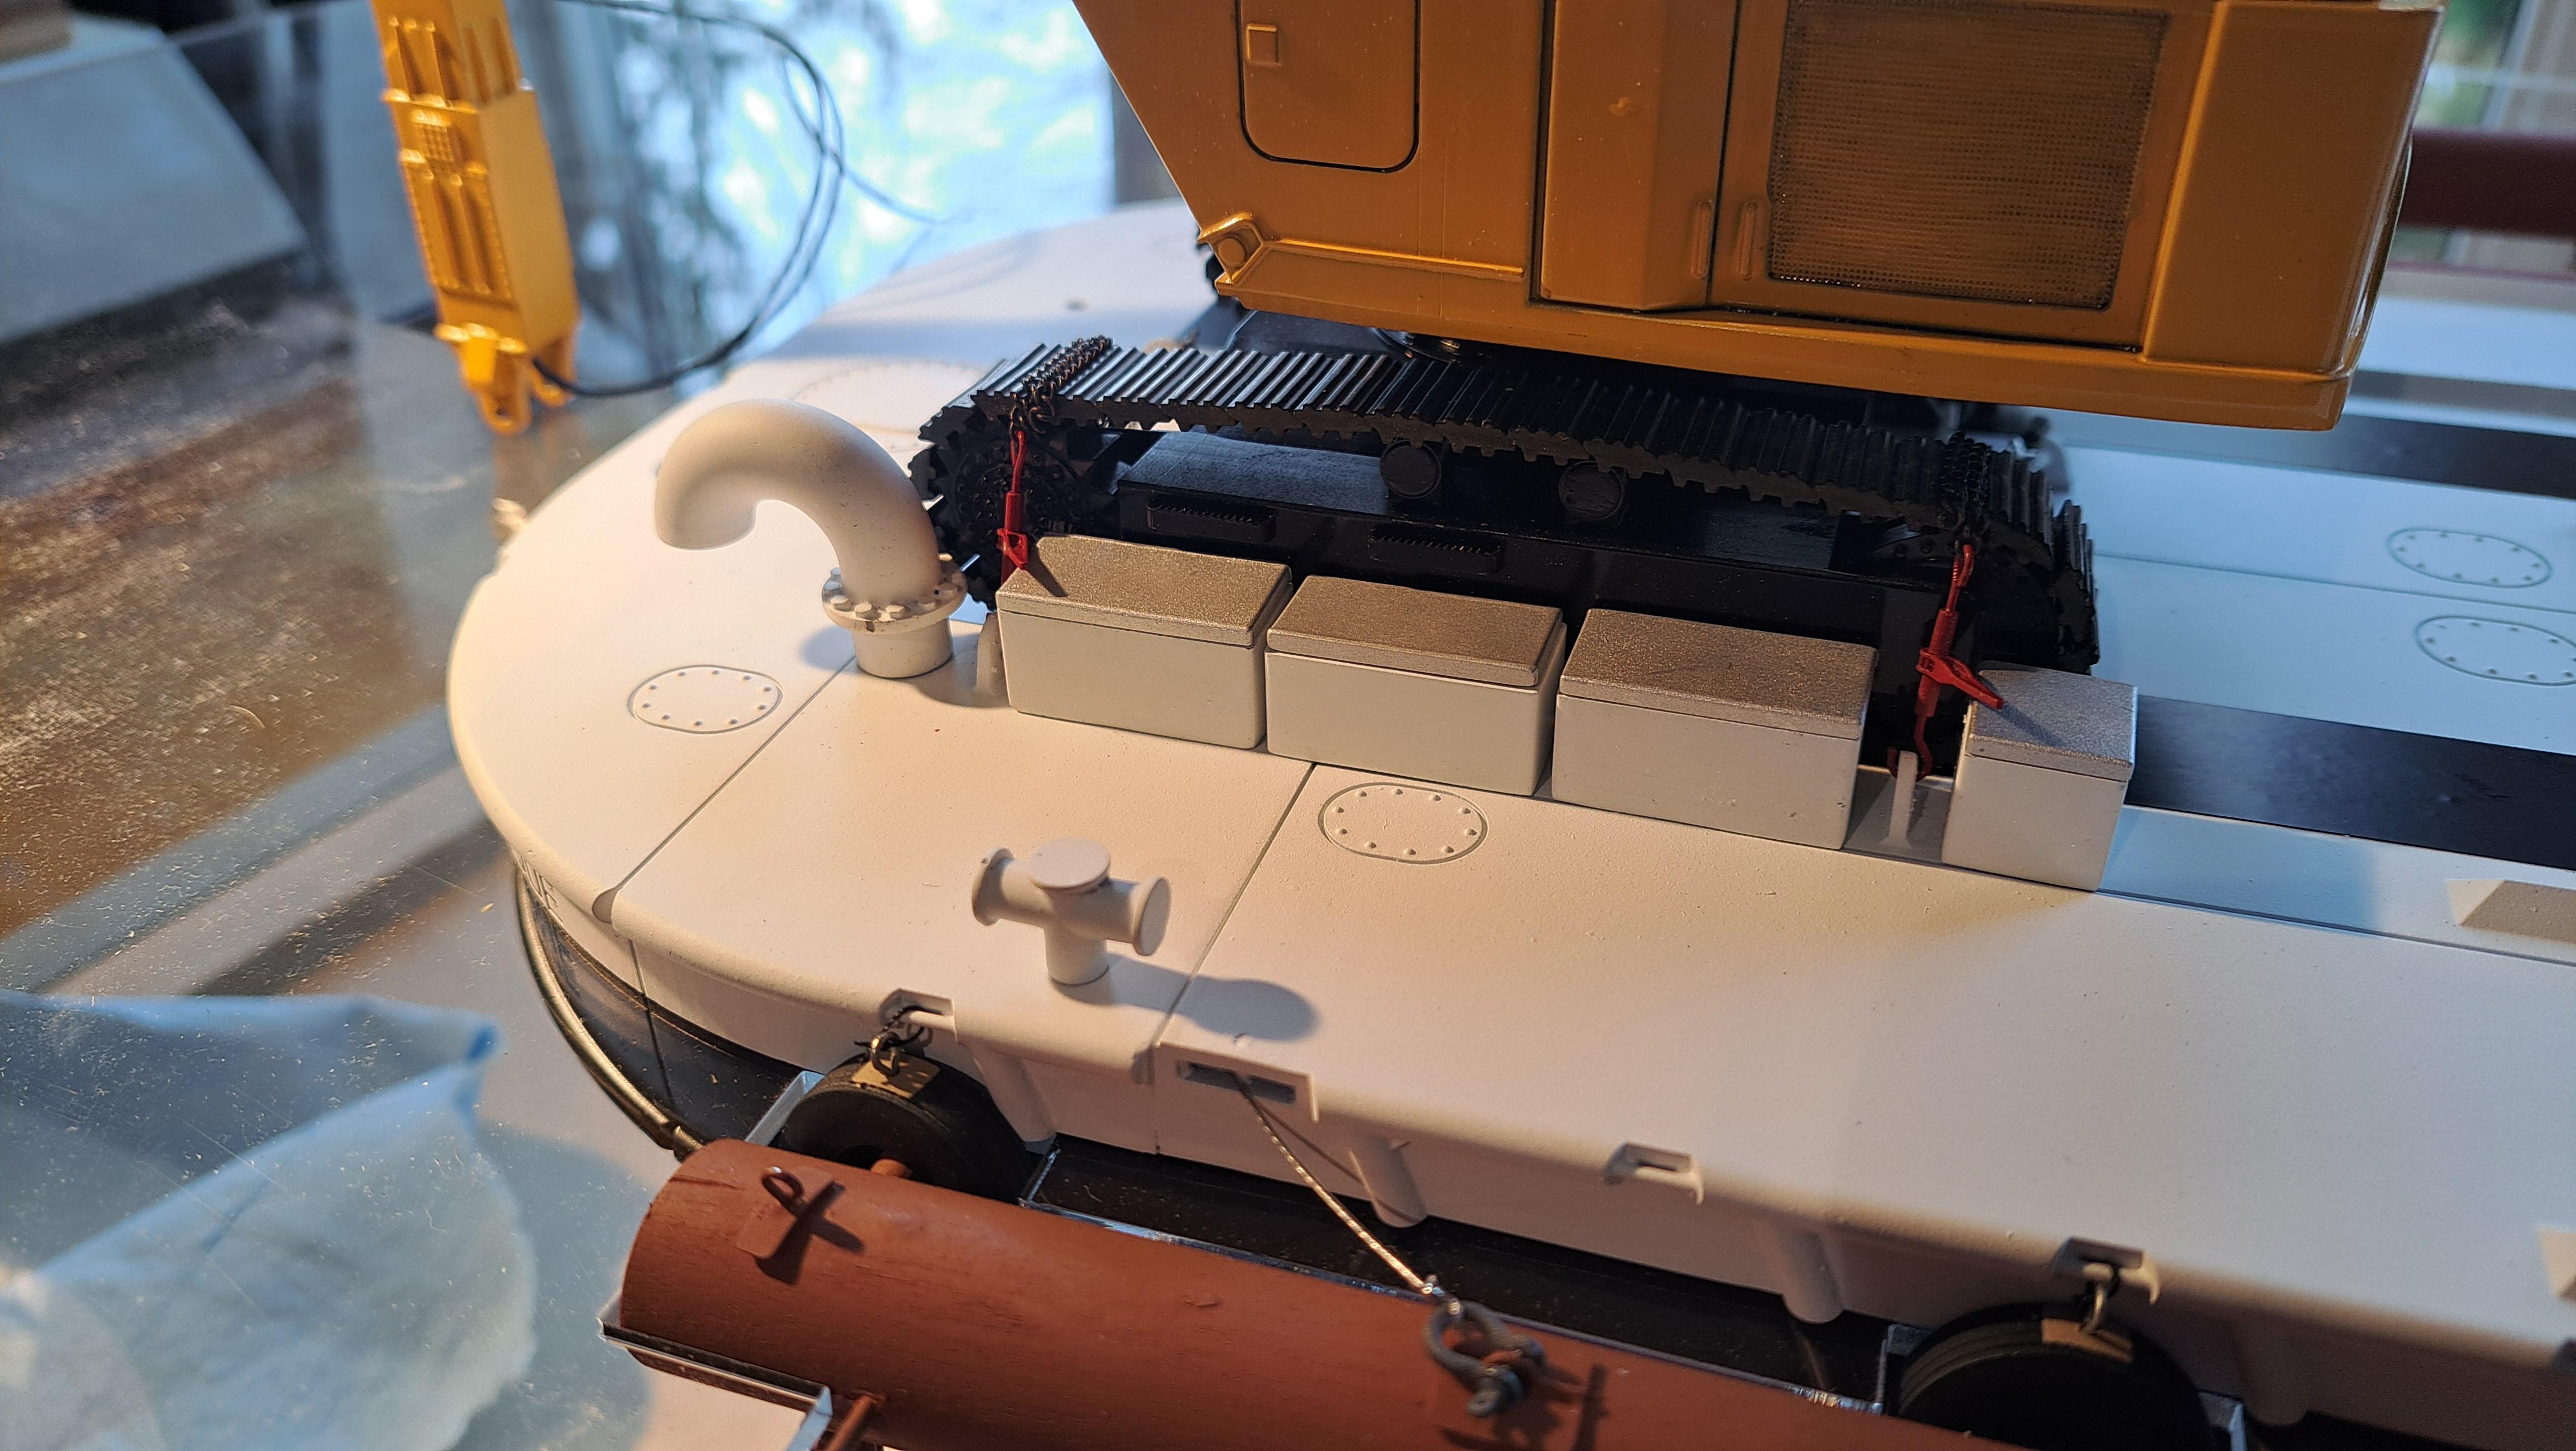
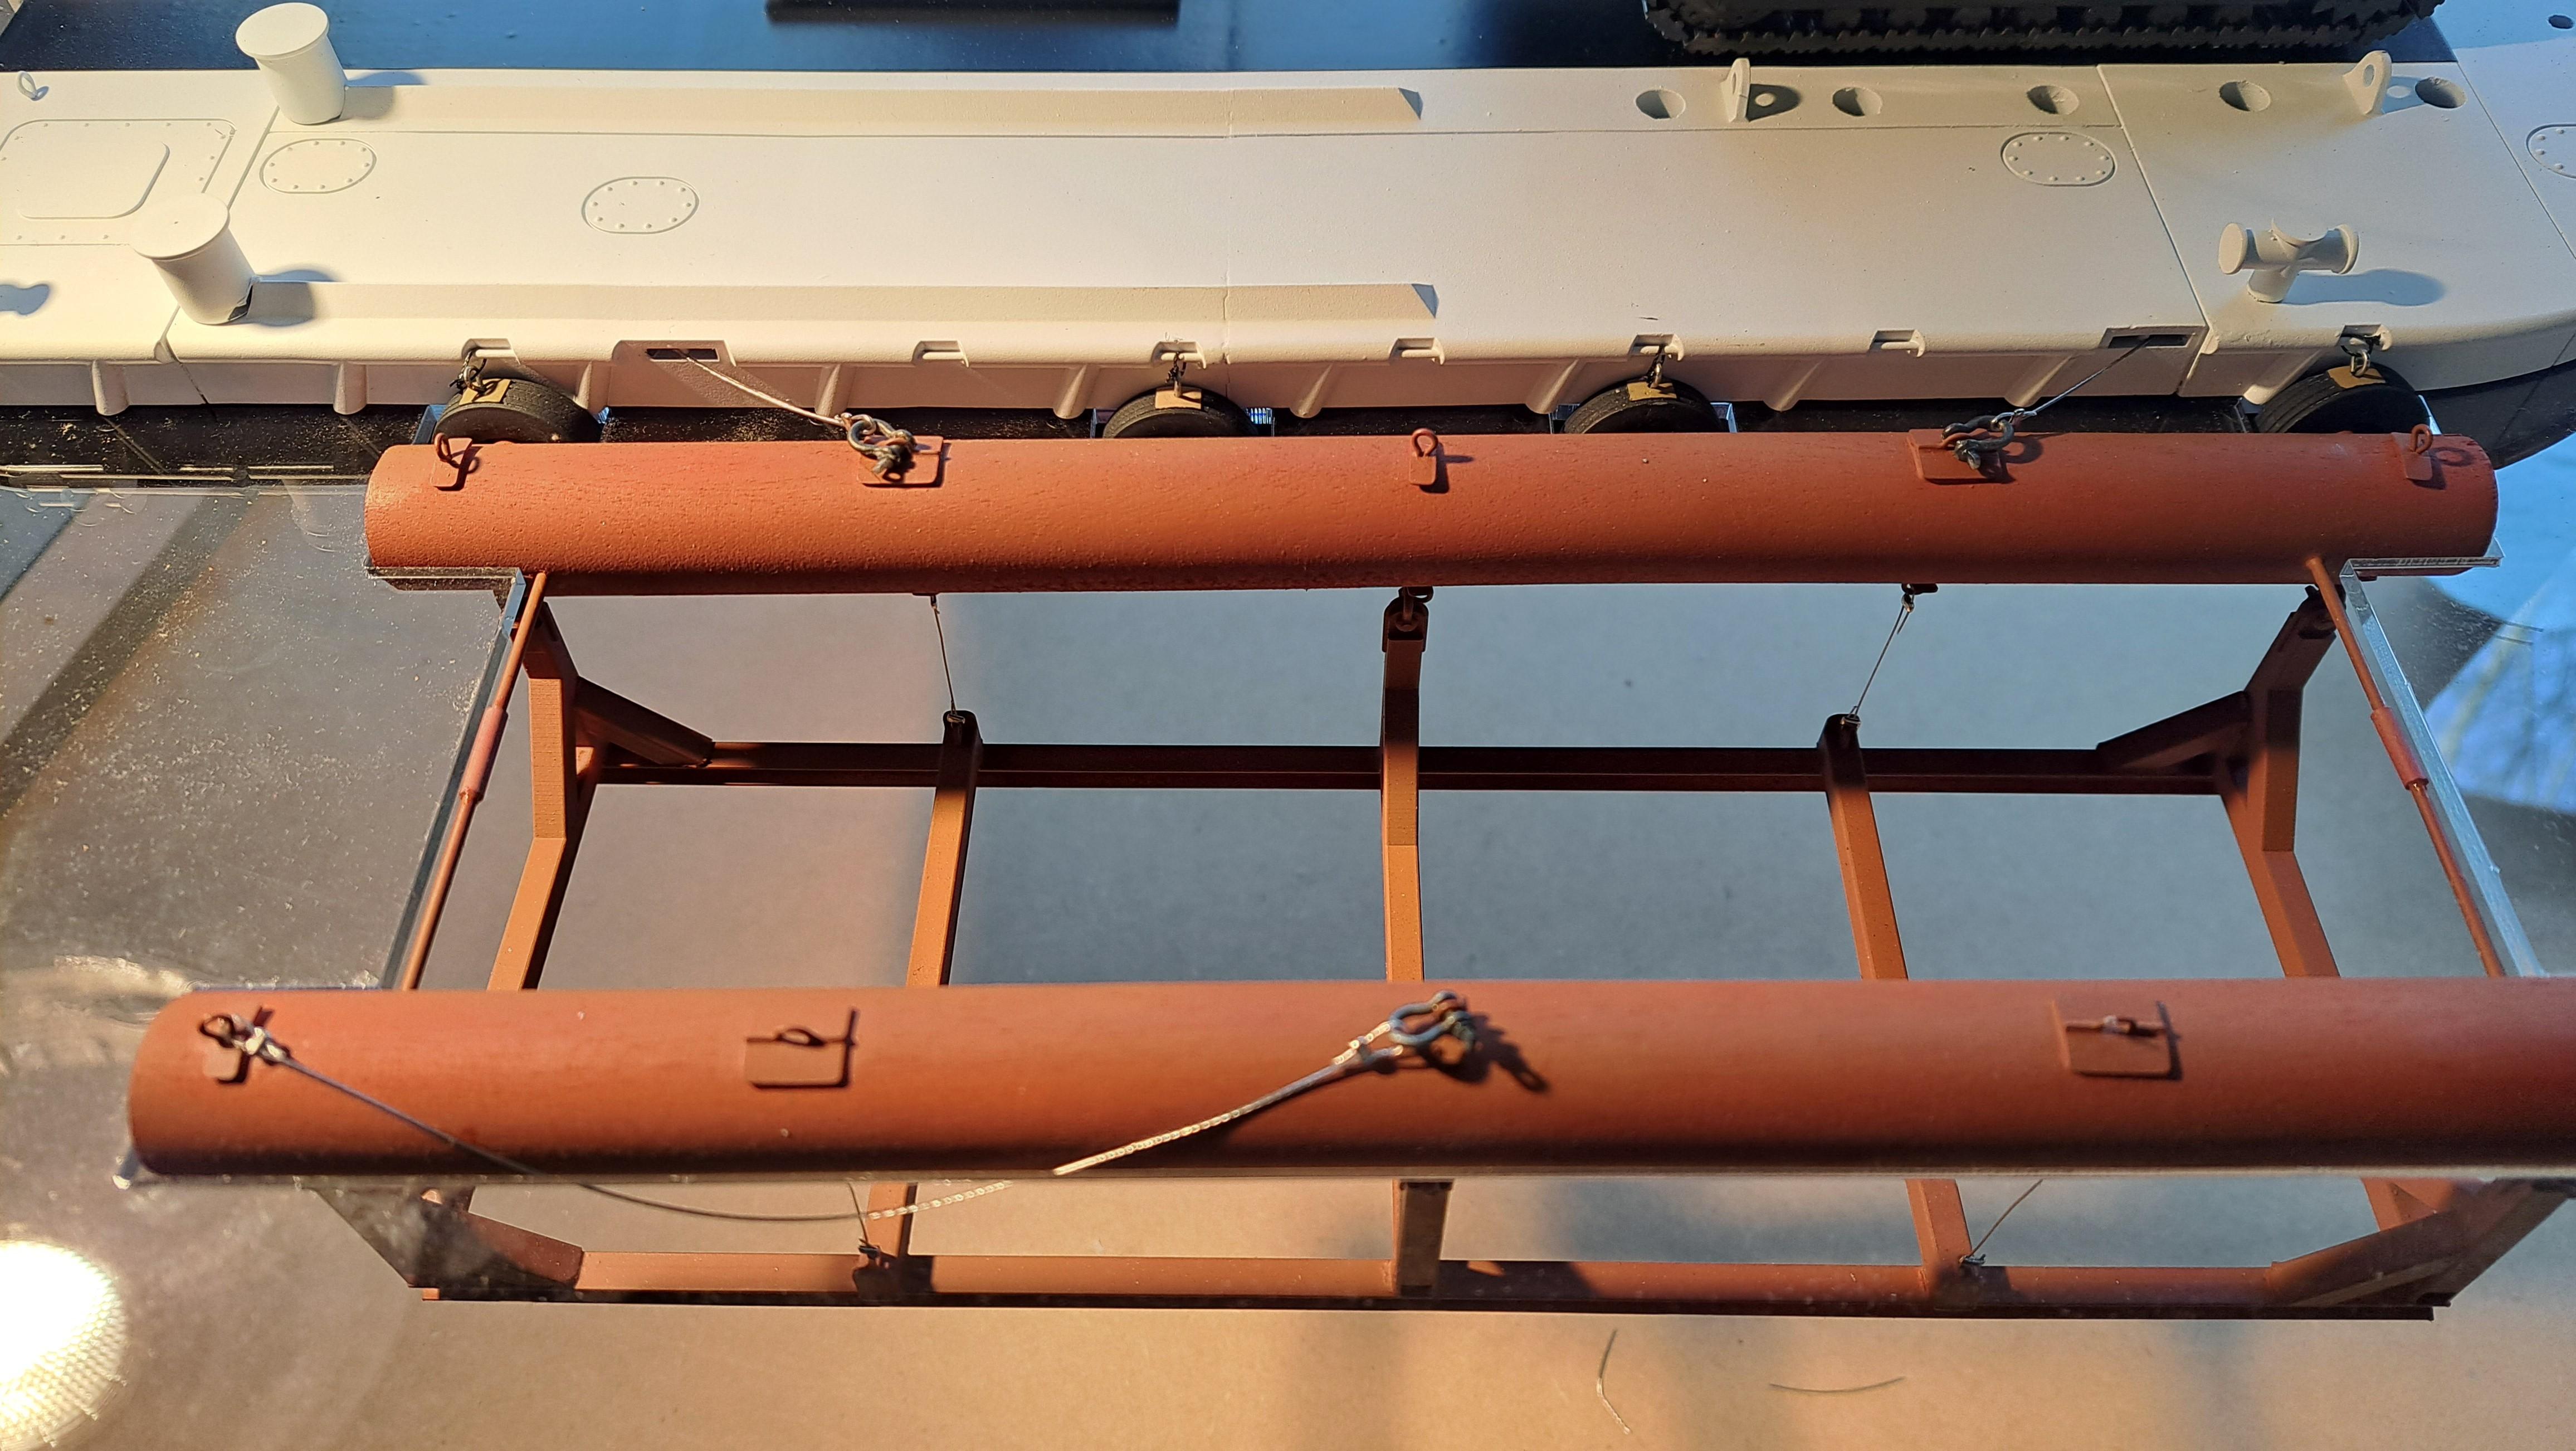
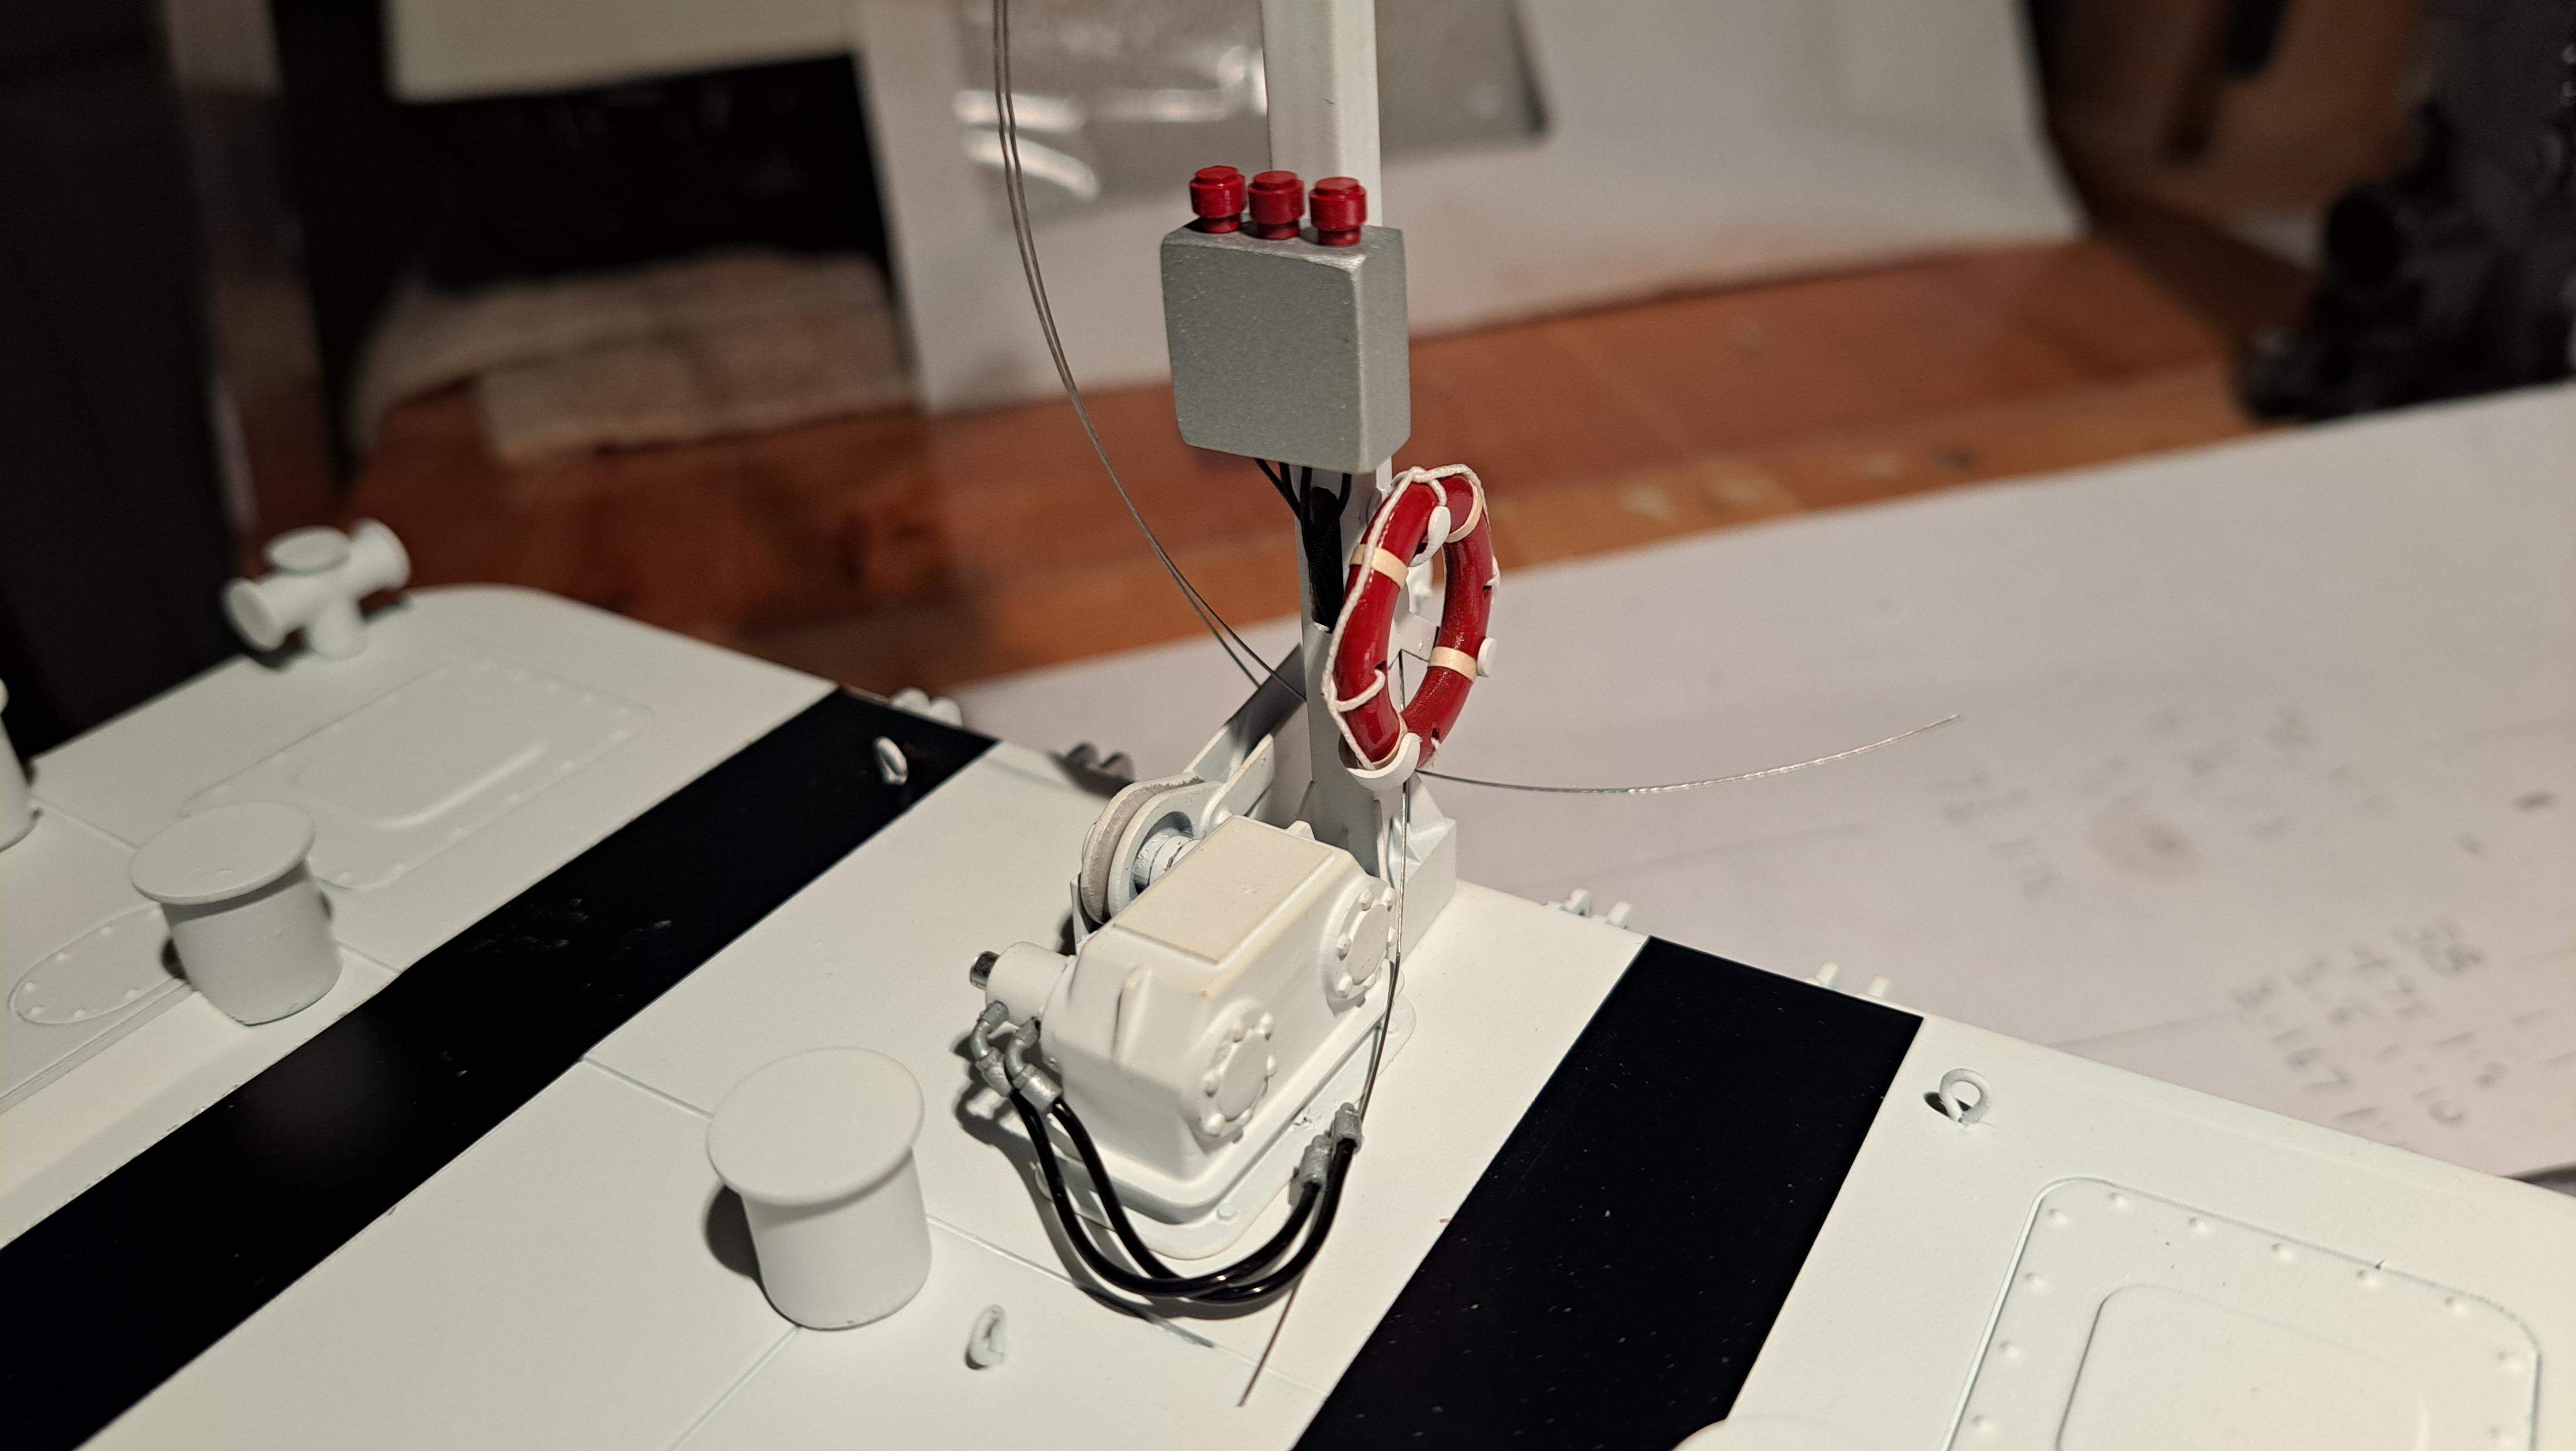
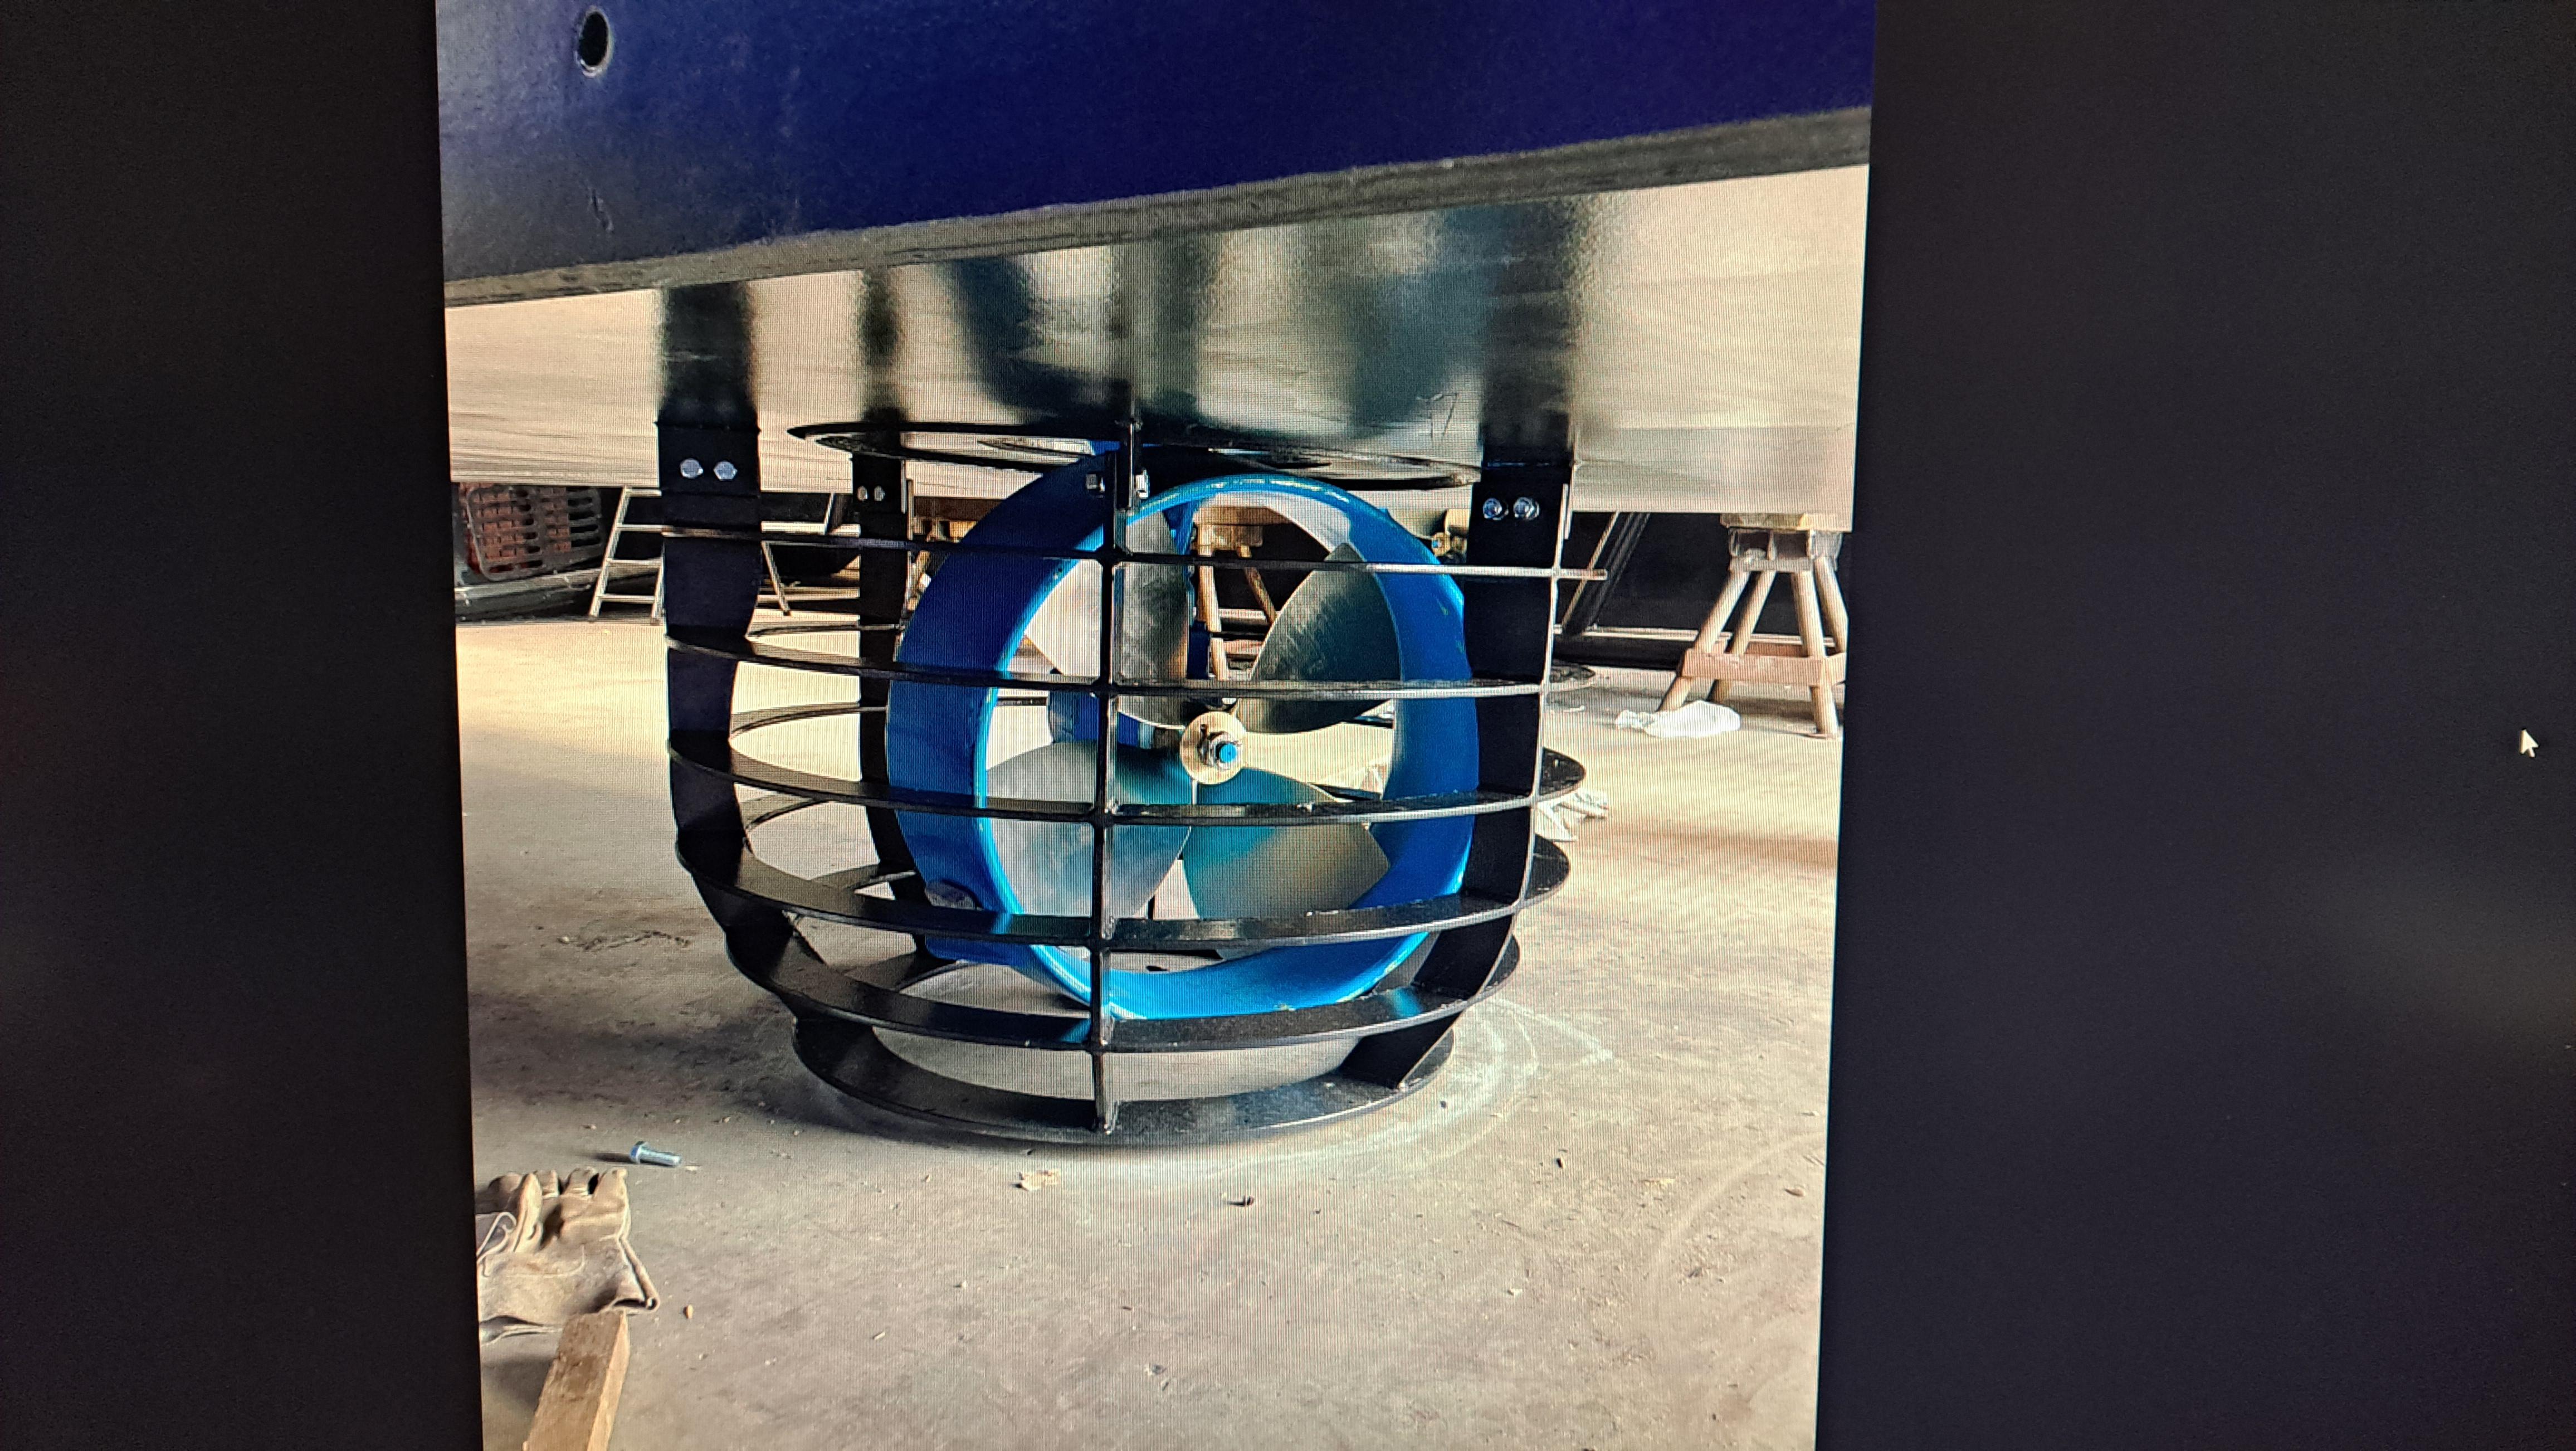
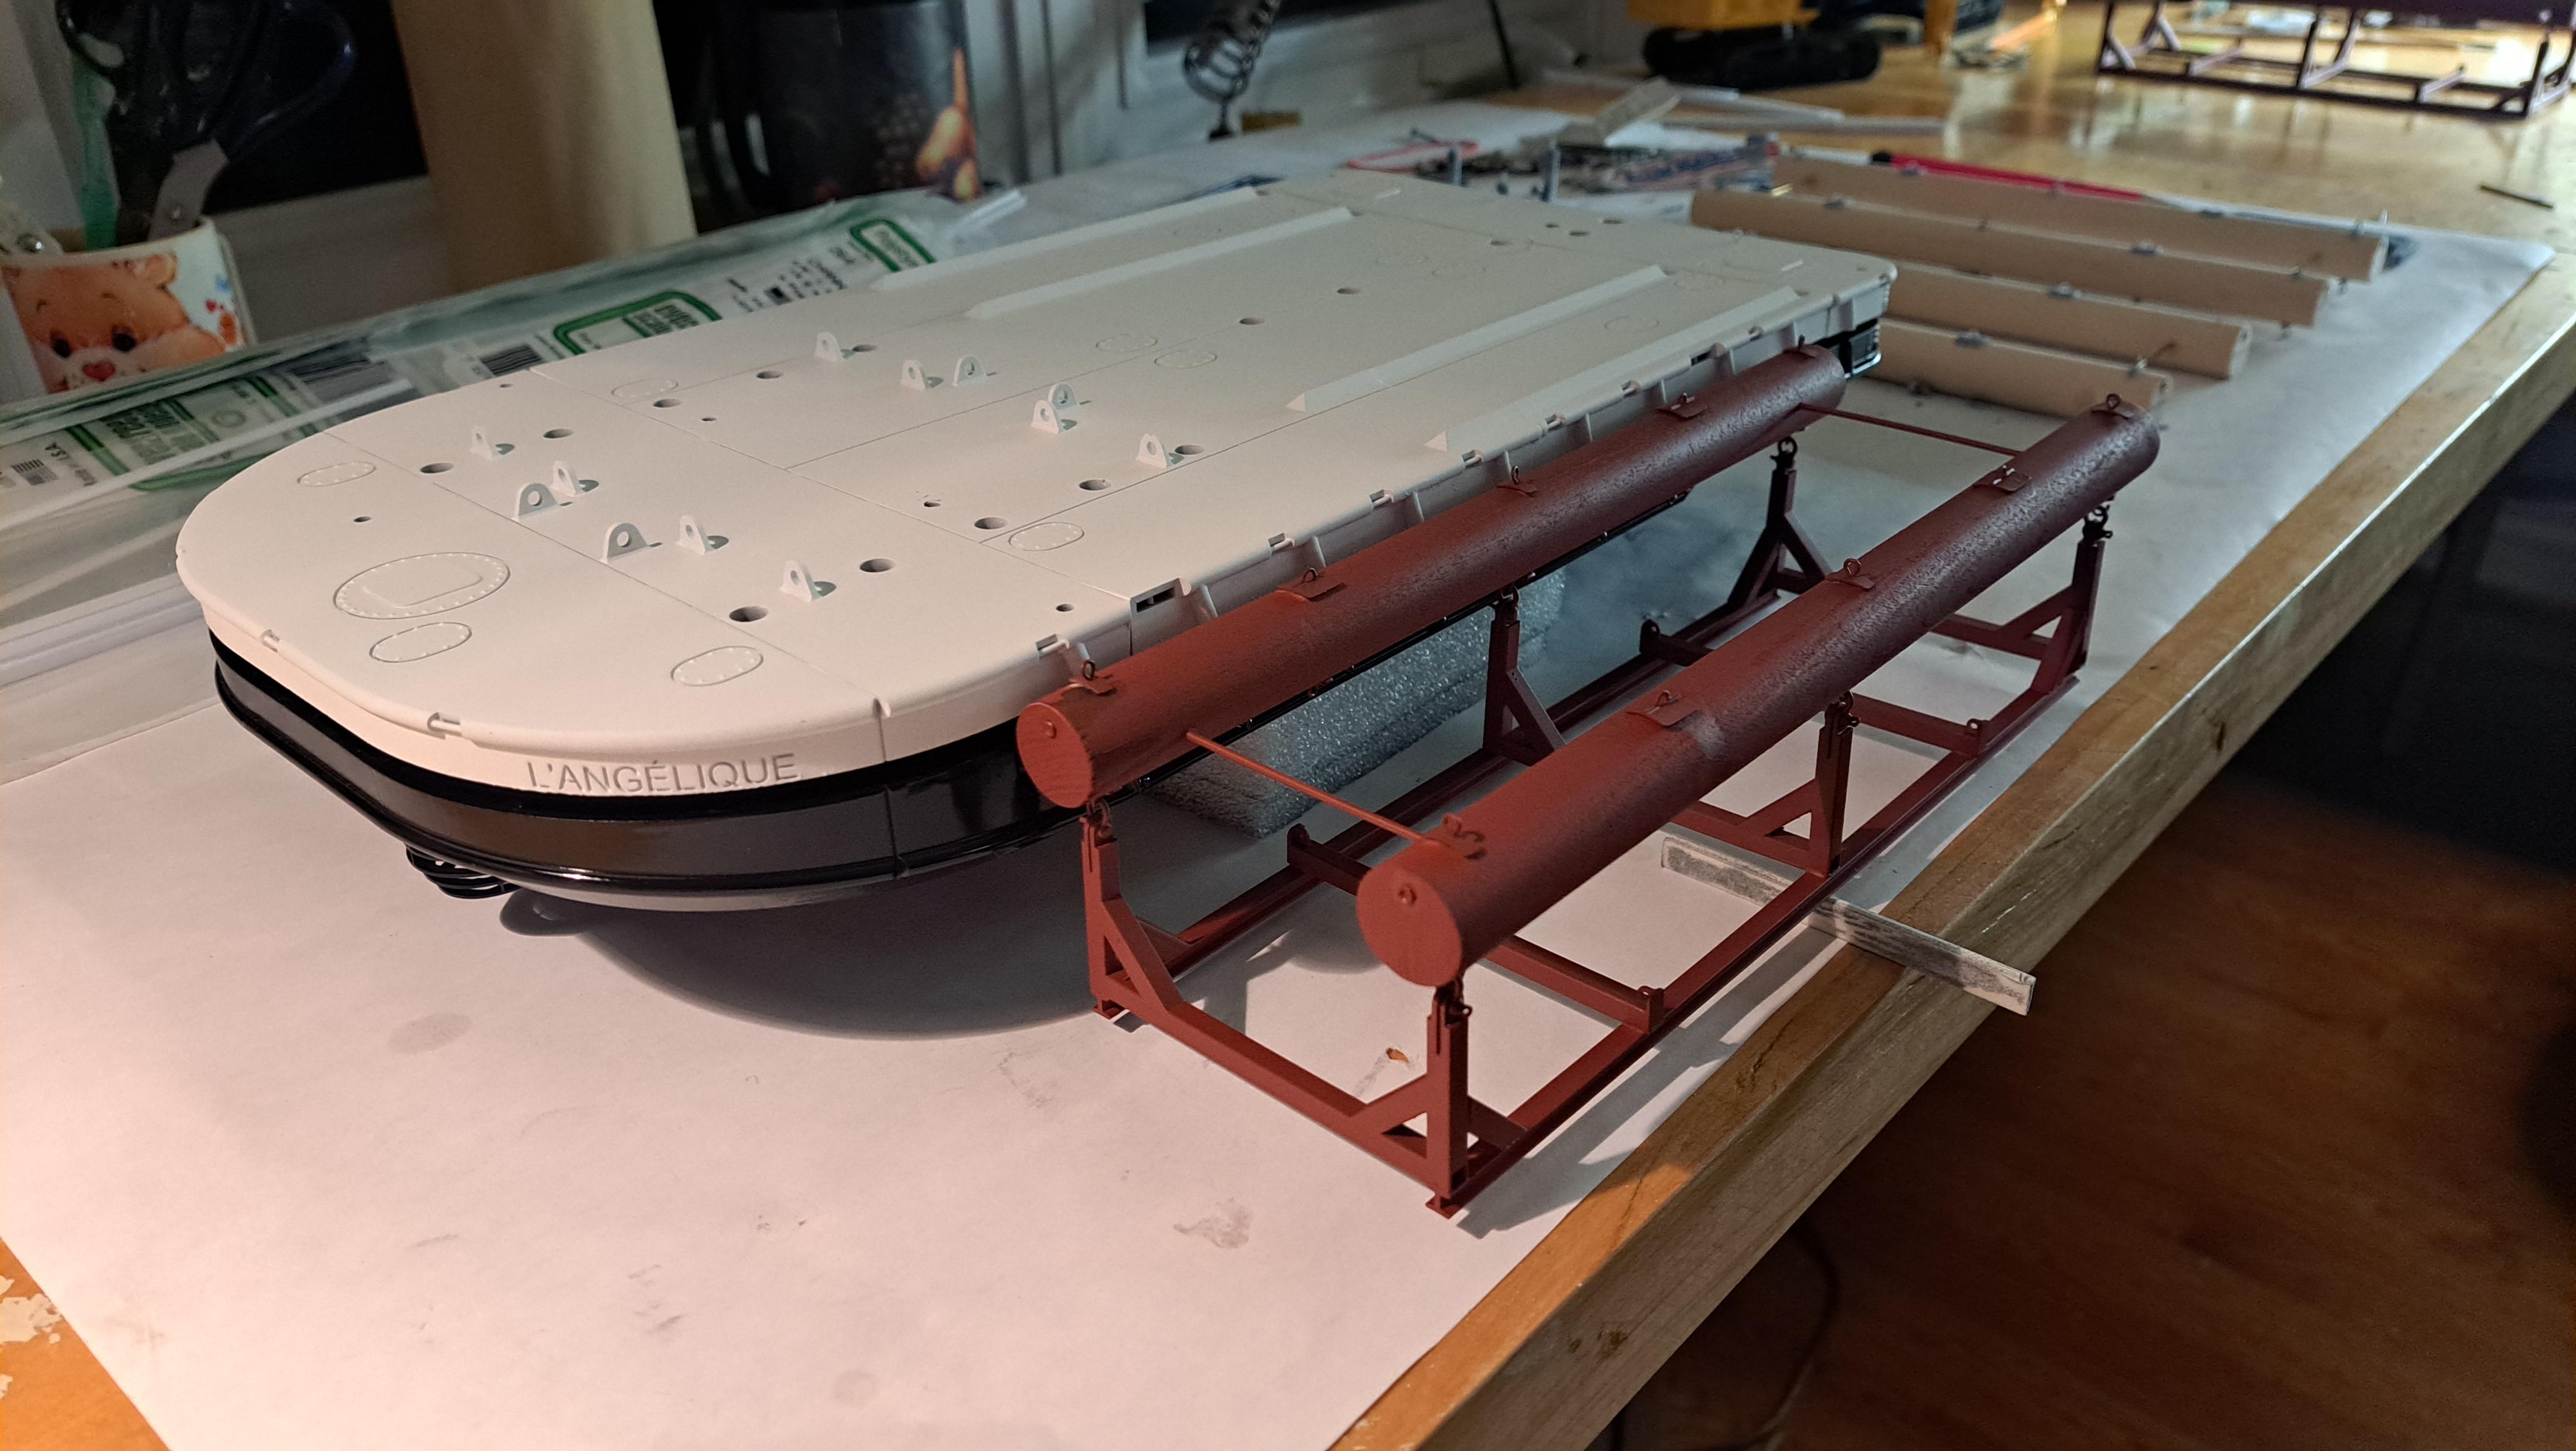
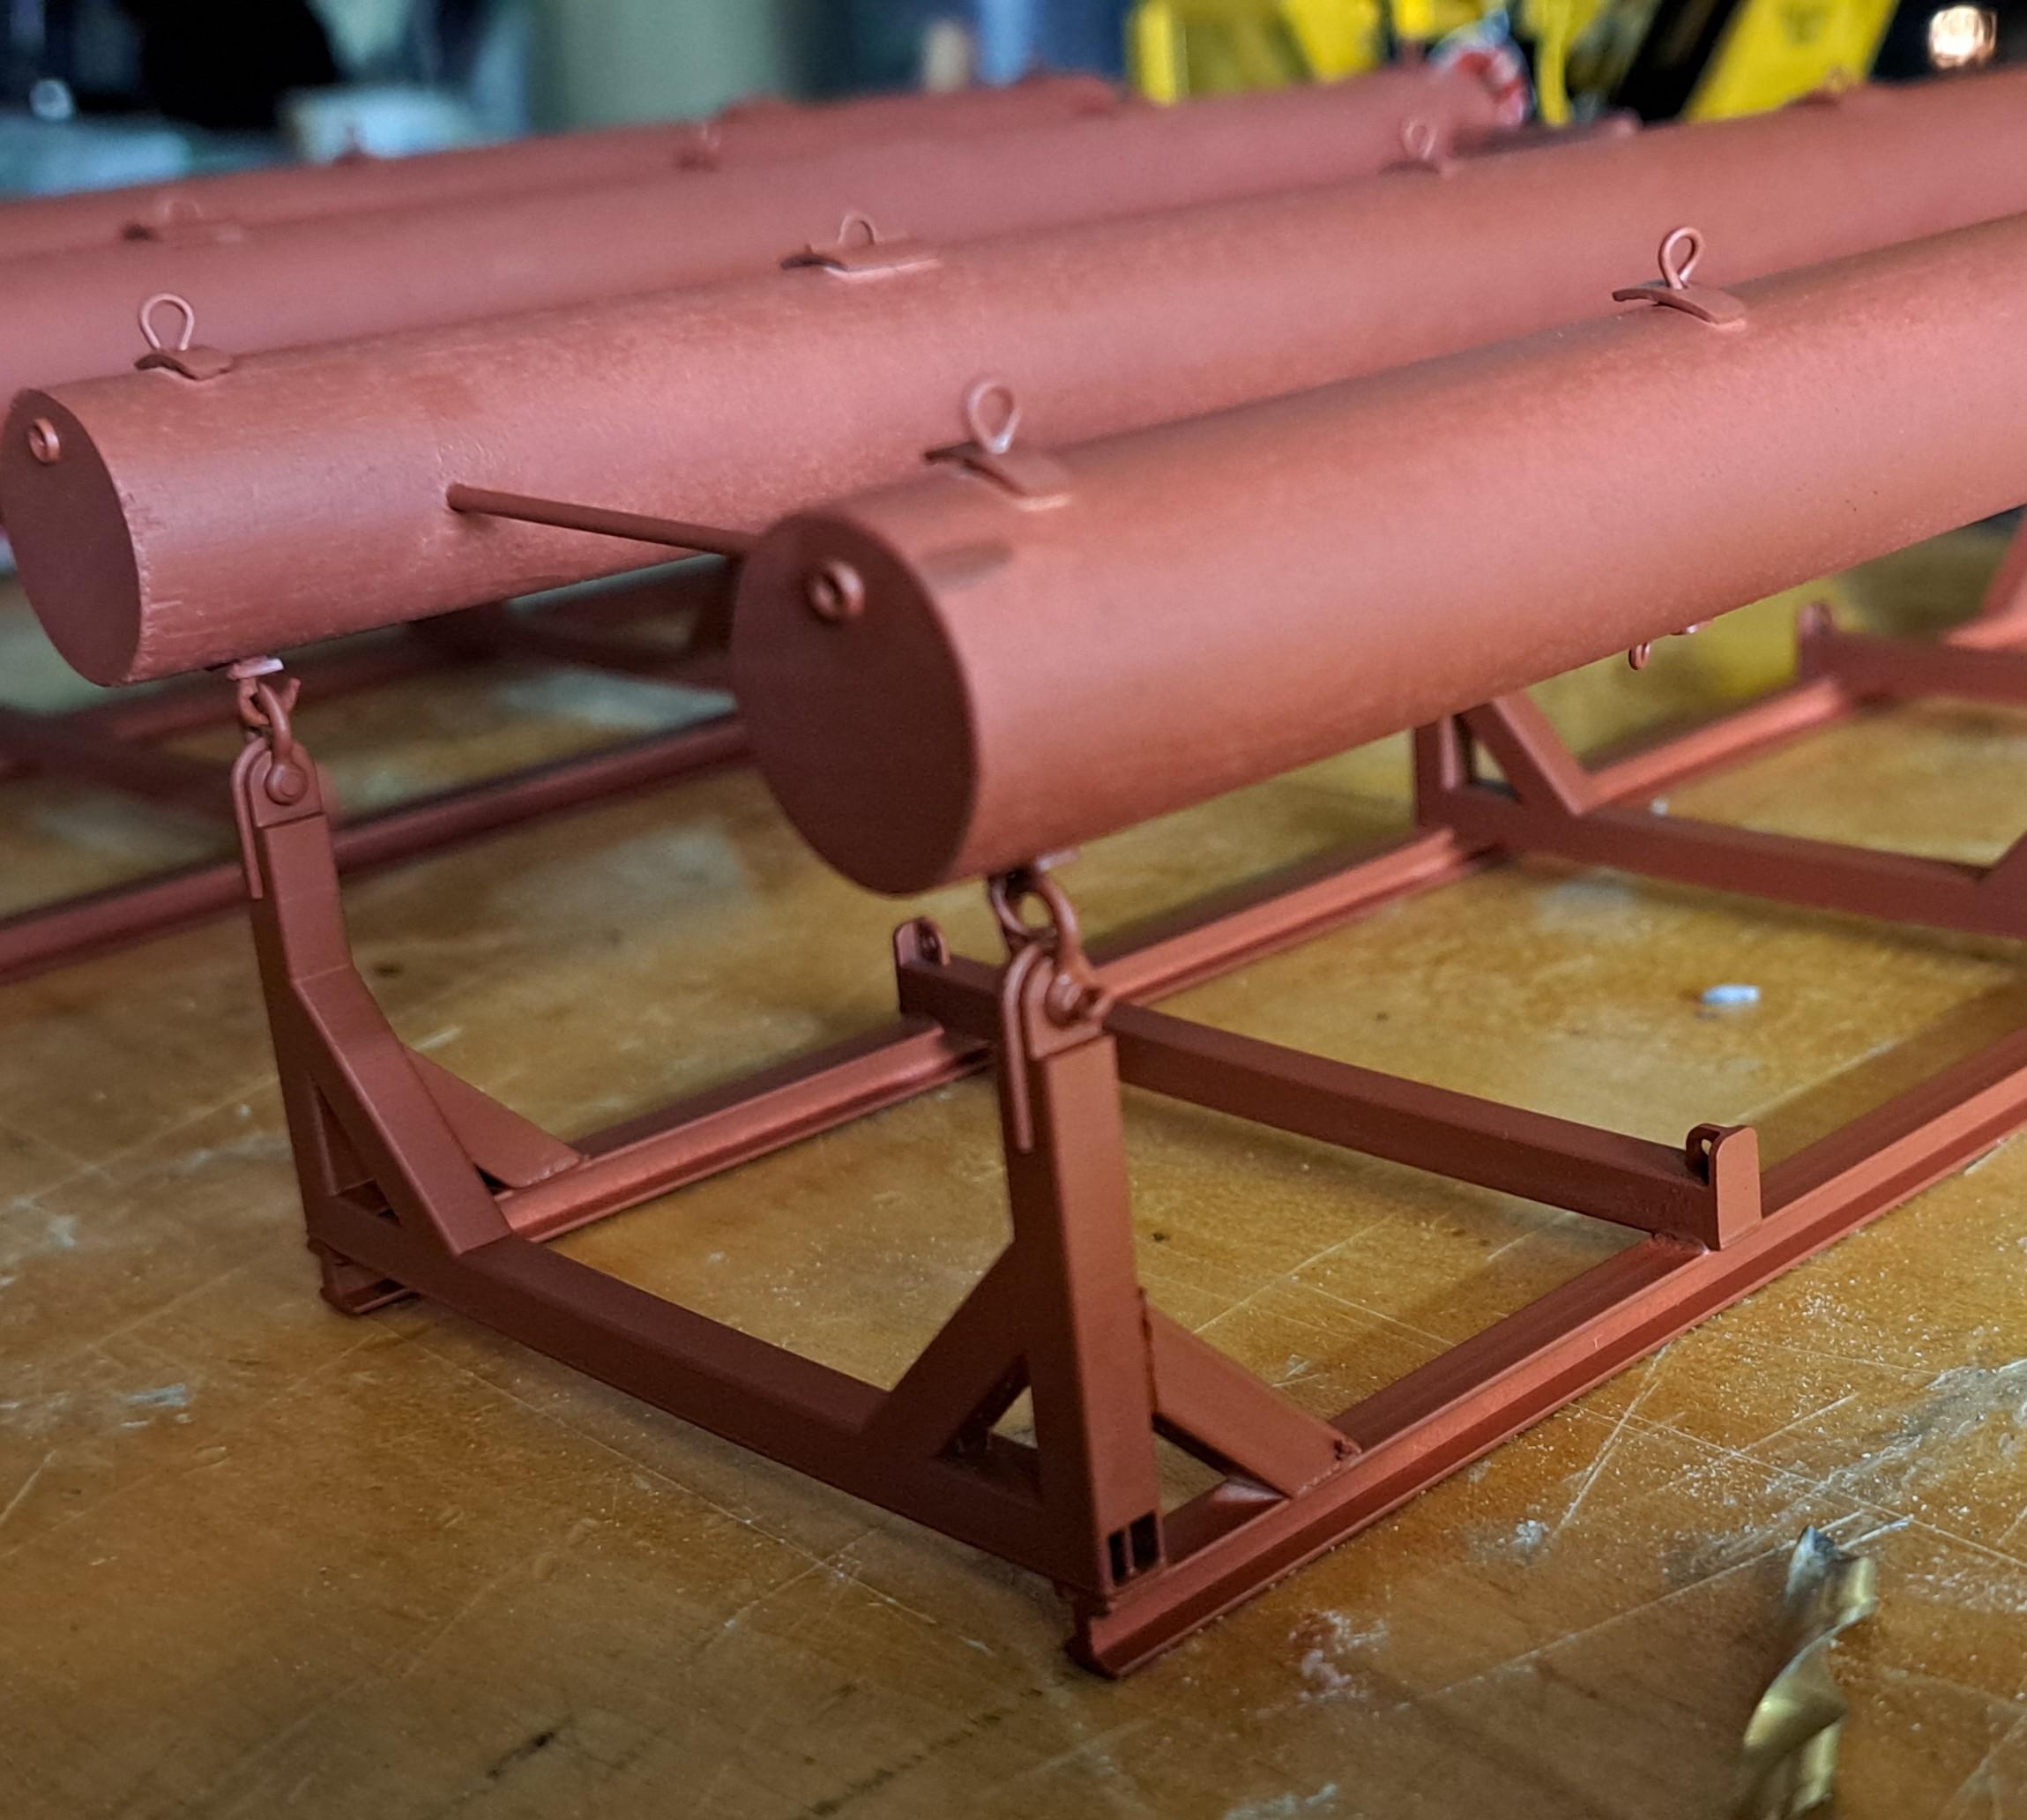
Yep, 2 full models. I have the first barge all painted and ready for detailing and final assembly. I've also made 2 bunks (2 per barge). These are submerged steel structures that receive the trees once they are cut. From what I can see on the pictures I have, the bunks are just painted with red oxyde primer ( or something that looks like it) and are very rusty. So I primed mine with a red primer and will try to rust them up a bit. Here are some pictures of the barge fabrication. Painted bottom section My version of the engine And the real thing Top deck accessories painted and ready for assembly engines ready for assembly A chain ratchet binder (that's a toothpick holding it) Top deck painted, ready for detailing with black panel edger And a few details Top and bottom test fitted (the gap between the 2 is for the plexiglass more details The bunks fab first pair primed and ready for rusting Test fit of bunks and barge A speaking peek at the end result
-
Tigercat 880E longer 1/48 scale
François replied to François's topic in WIP: Model Trucks: Big Rigs and Heavy Equipment
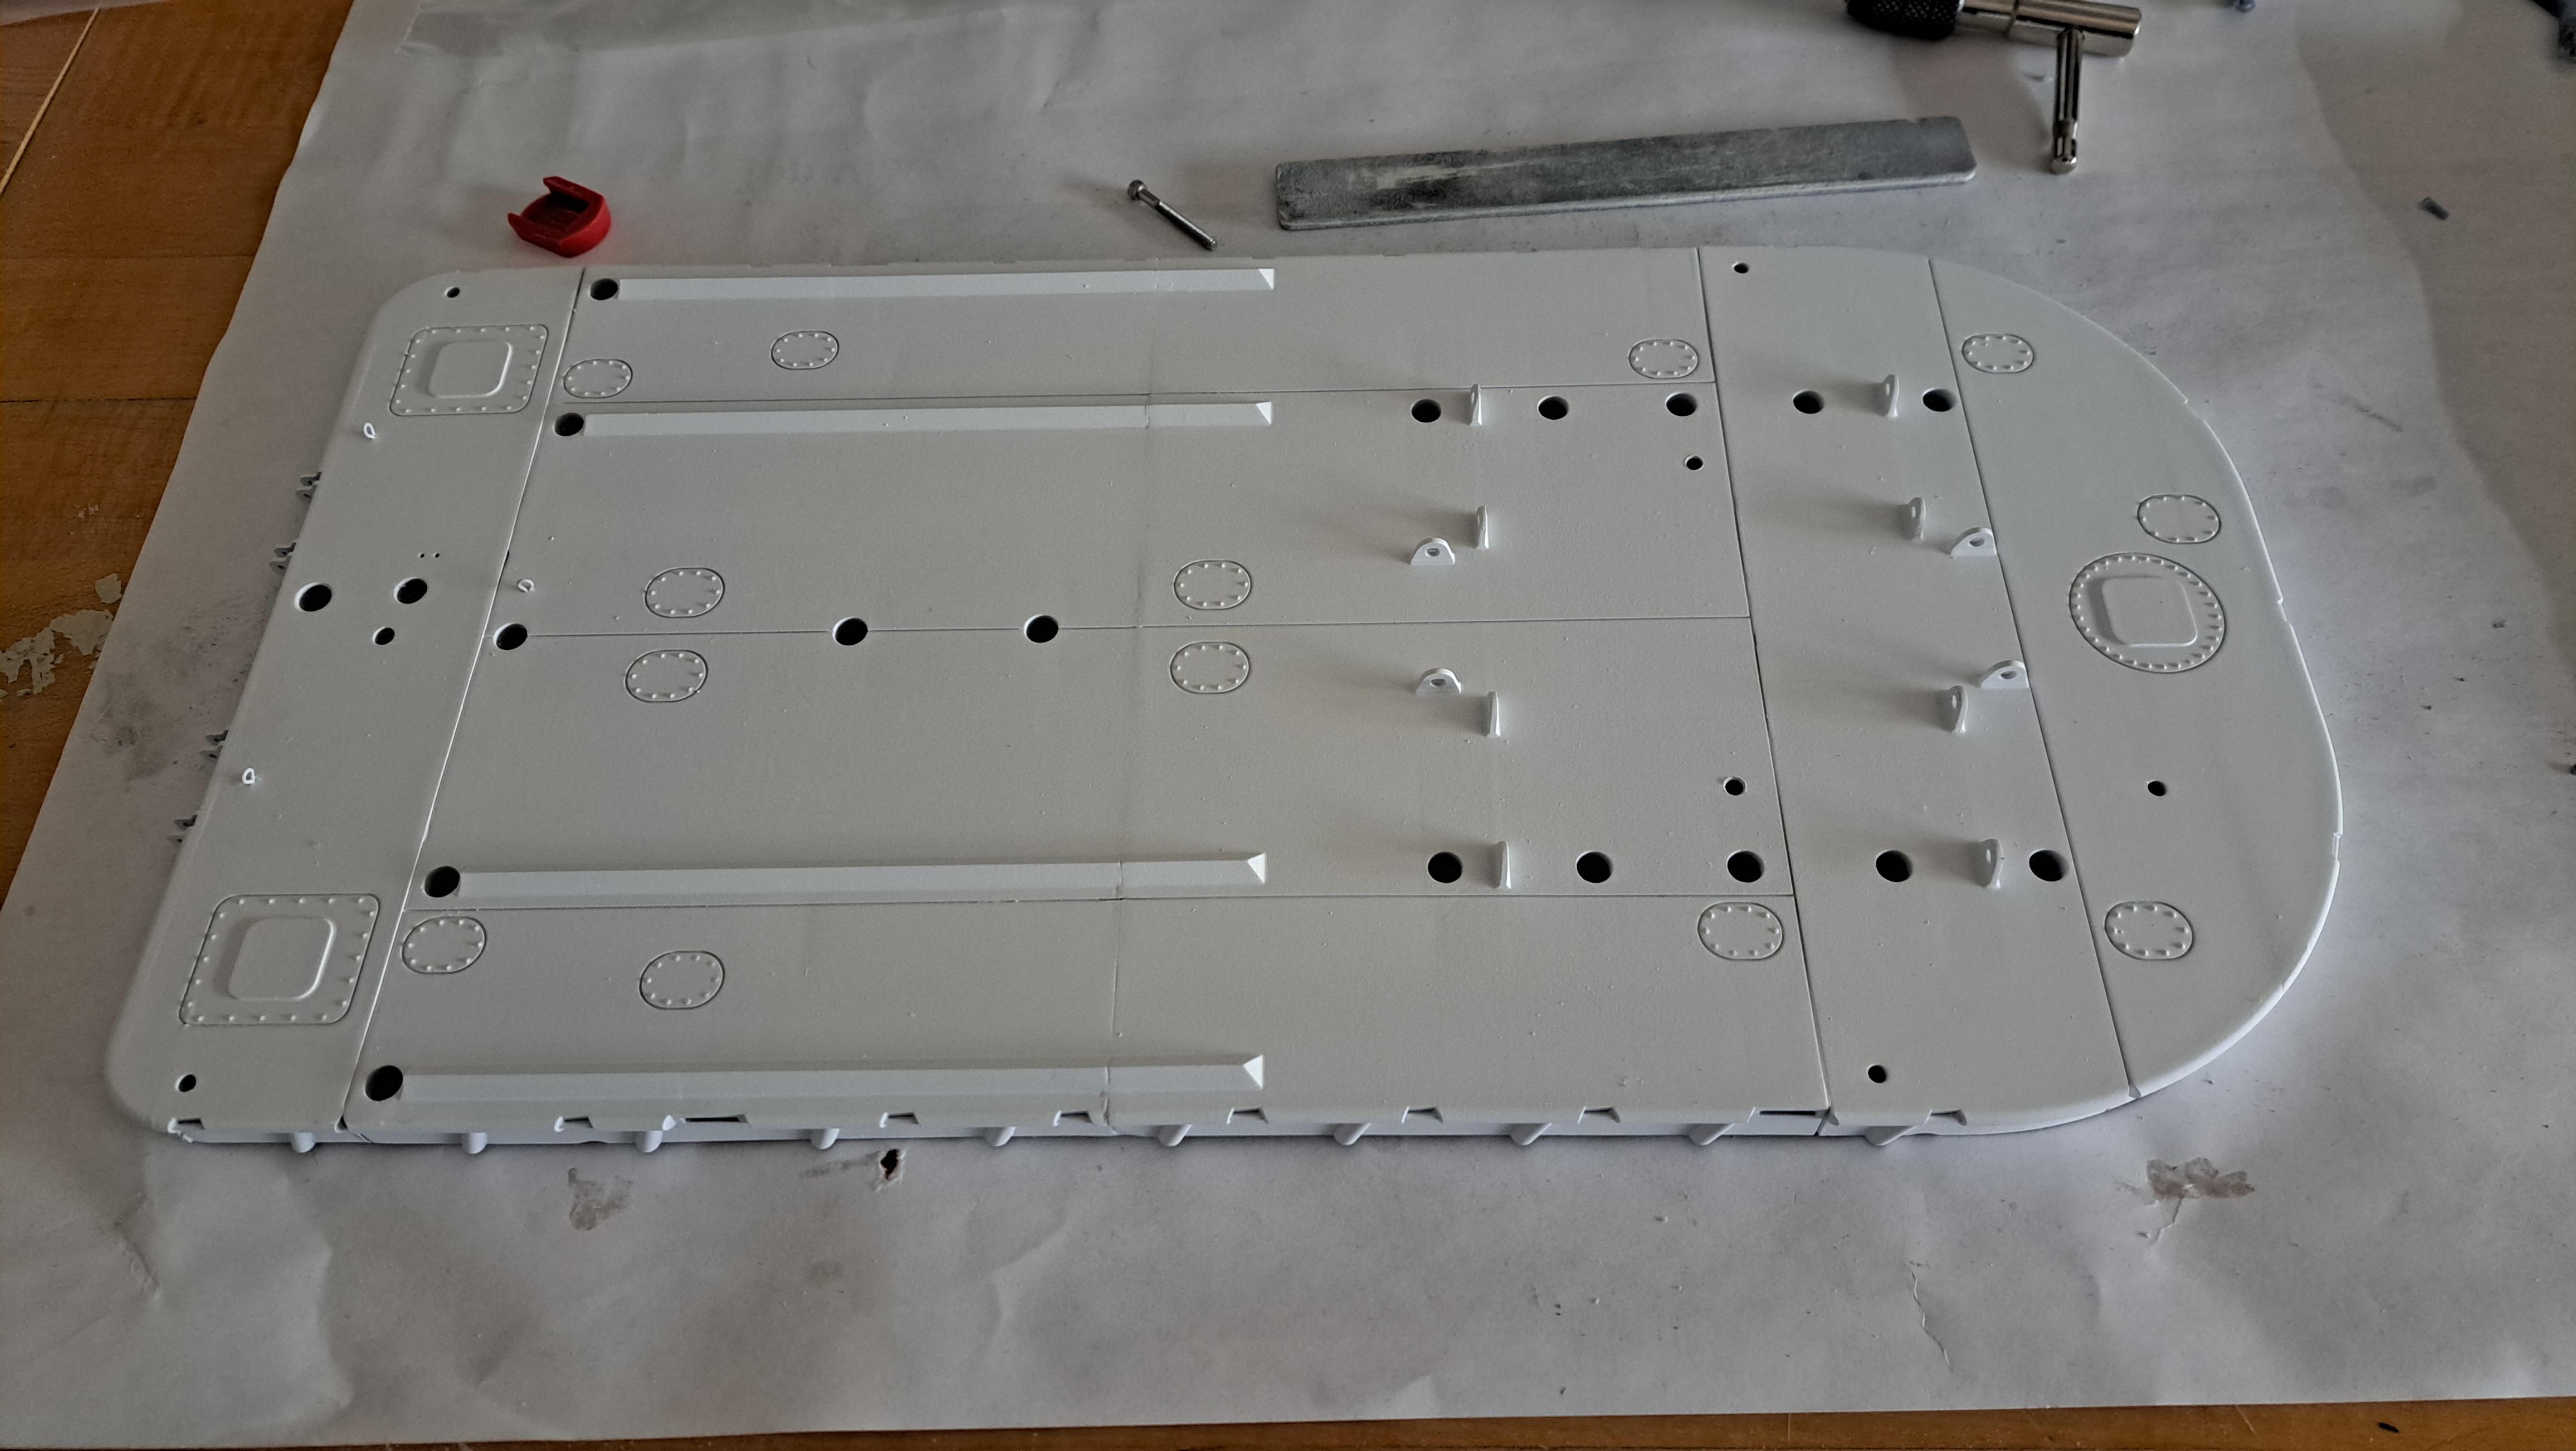
Now that the 2 Tigercats are done, I started printing 1 of the 2 barges. It's a fairly complex print. The barge measures 15 3/4 LG x 8 wide so printing in 1 piece is naturally out of the question. The plaform itself is made of 8 parts, 4 top deck and 4 bottom deck. The reason to separate top and bottom is that there will be a 1/8 thick plexiglass sheet between the 2 to simulate the water surface. There is also a ton of add on parts such as cleats, tool boxes, propeller assemblies, communication mast, anchor, a bunch of chain binders, buoys with buoy brackets, tire bumpers... Here are some pictures of what has been printed so far. and here's what it will look like
-
Tigercat 880E longer 1/48 scale
François replied to François's topic in WIP: Model Trucks: Big Rigs and Heavy Equipment
So both harvester are done. Just need to make the cutting heads to go at the end of each arms. I also added some led lights on 1 of the 2.
-
Tigercat 880E longer 1/48 scale
François replied to François's topic in WIP: Model Trucks: Big Rigs and Heavy Equipment
I'm still waiting on some info for the barge so in the meantime, I'm making good progress on the assembly of the harvester. It's a first for me to design, fabricate and assemble 2 of the same model at the same time. It's quite fun!
-
Tigercat 880E longer 1/48 scale
François replied to François's topic in WIP: Model Trucks: Big Rigs and Heavy Equipment
I'm almost done with the 3d modeling of the barge on which sits the harvester. The Tigercat is being painted and assy will start soon. Here's what I have to reproduce. And here my 3d model so far. Everything was 3d modeled from just a few pictures here are the telescopic boom parts, they are very intricate but came out of the printer looking very nice And here are some pictures of the painted parts
-
Tigercat 880E longer 1/48 scale
François replied to François's topic in WIP: Model Trucks: Big Rigs and Heavy Equipment
Printed the main body and cab, I'm just about ready to paint. Here are a few shots of what it will look like. Naturally, every part will be painted separately.
-
Marvel's Hydra coupe 1/12 scale full scratch build
François replied to François's topic in WIP: Model Cars
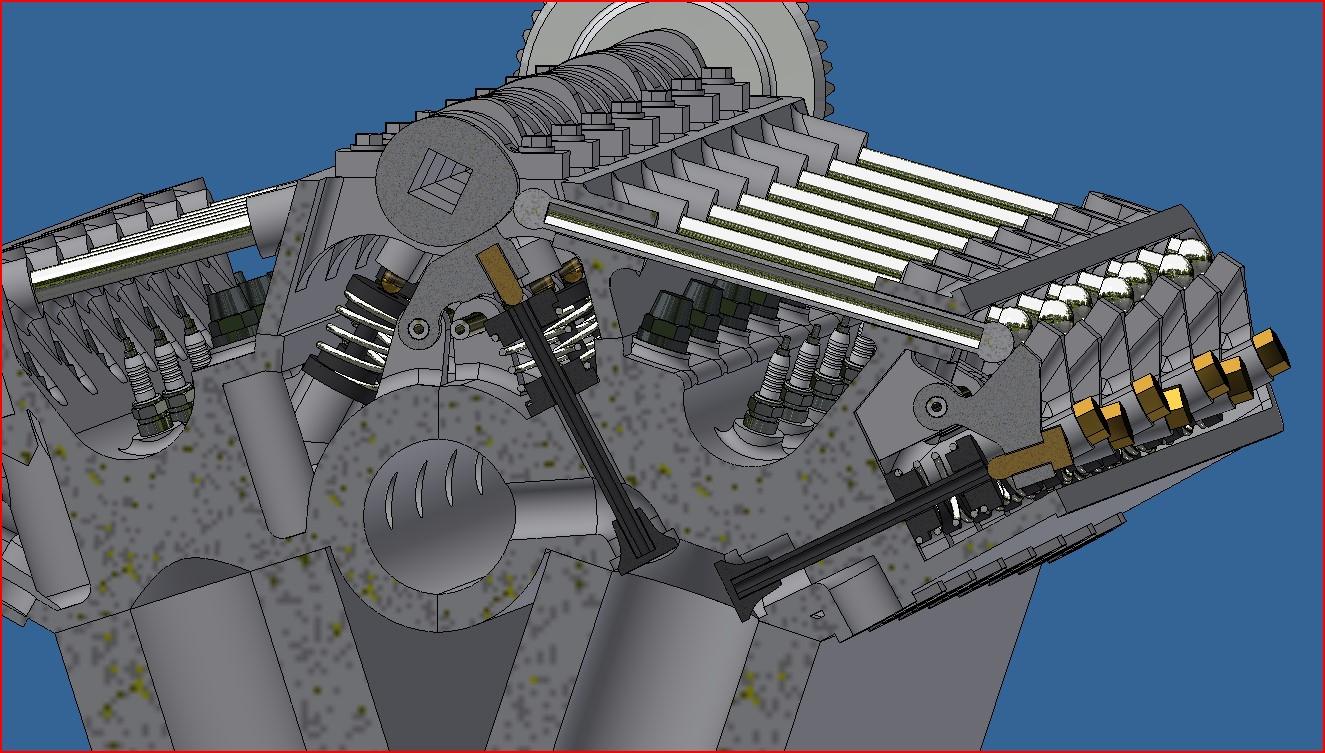
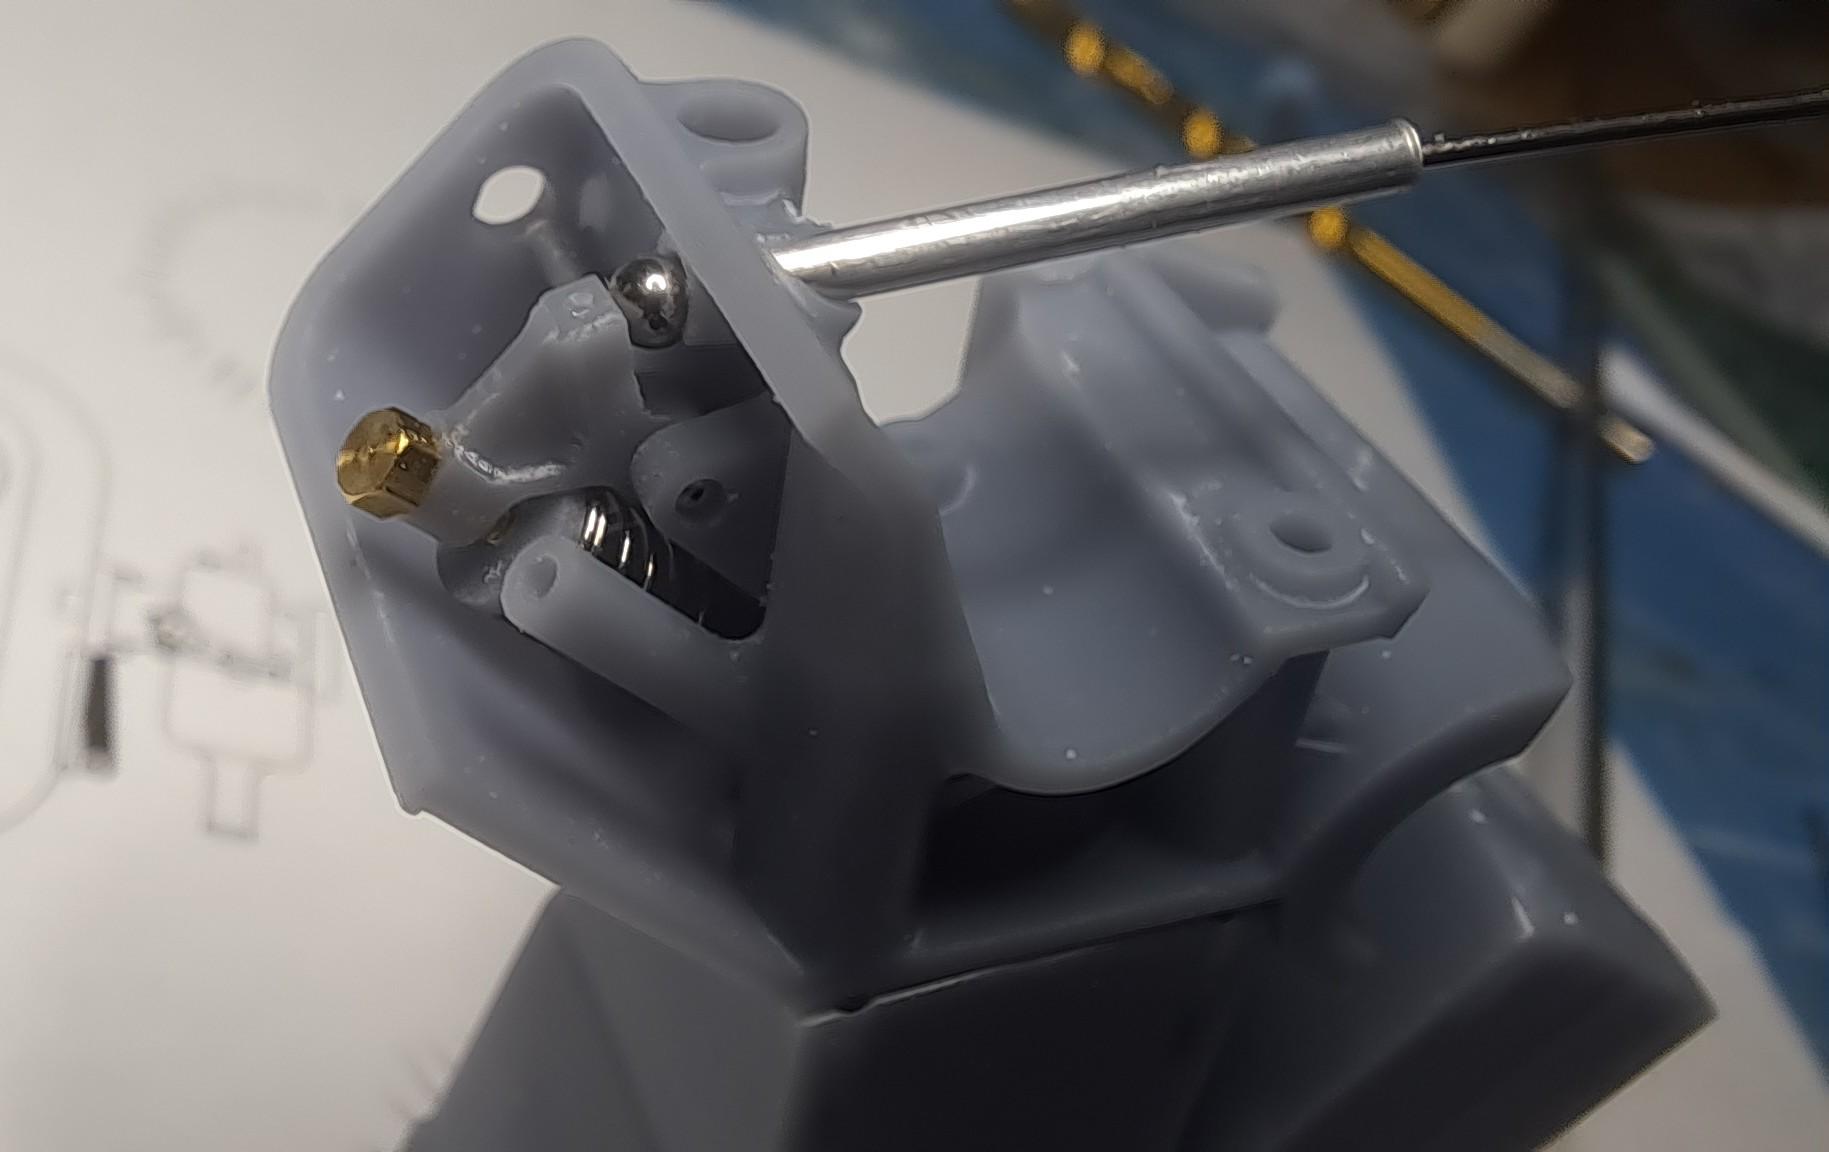
I made another test print to see if the valves could be actuated via the camshaft. It appears that they can but I only put in 4 valves. I'm a long way from having 32 working valves. The test did show me where I need to make design modifications. All in all, I'm happy with the result and it was really fun to do but still not sure if it will go into the final engine. 20241016_202242.mp4 20241016_202303.mp4
-
Marvel's Hydra coupe 1/12 scale full scratch build
François replied to François's topic in WIP: Model Cars
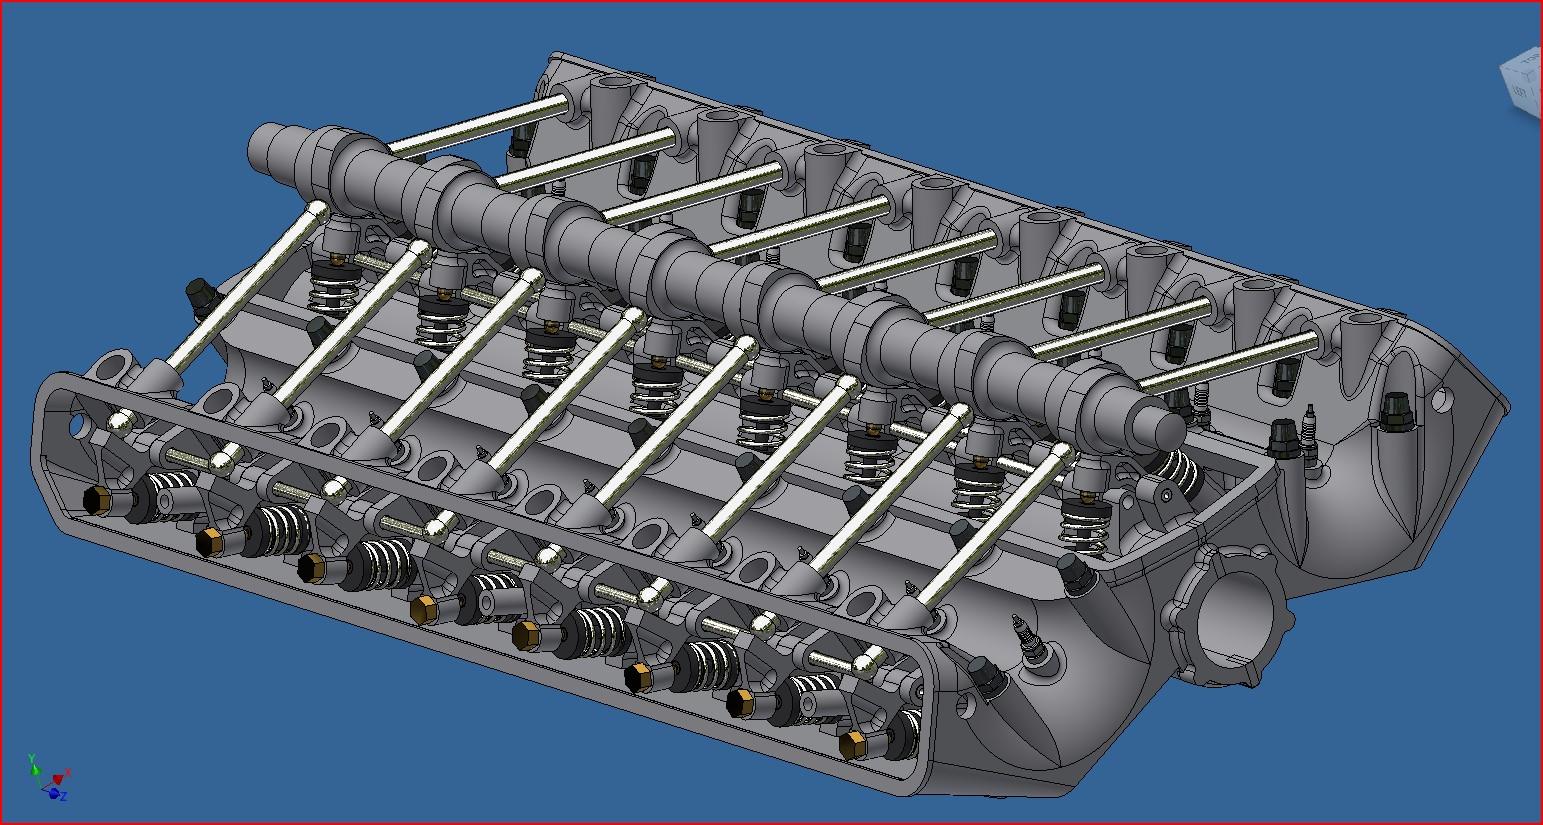
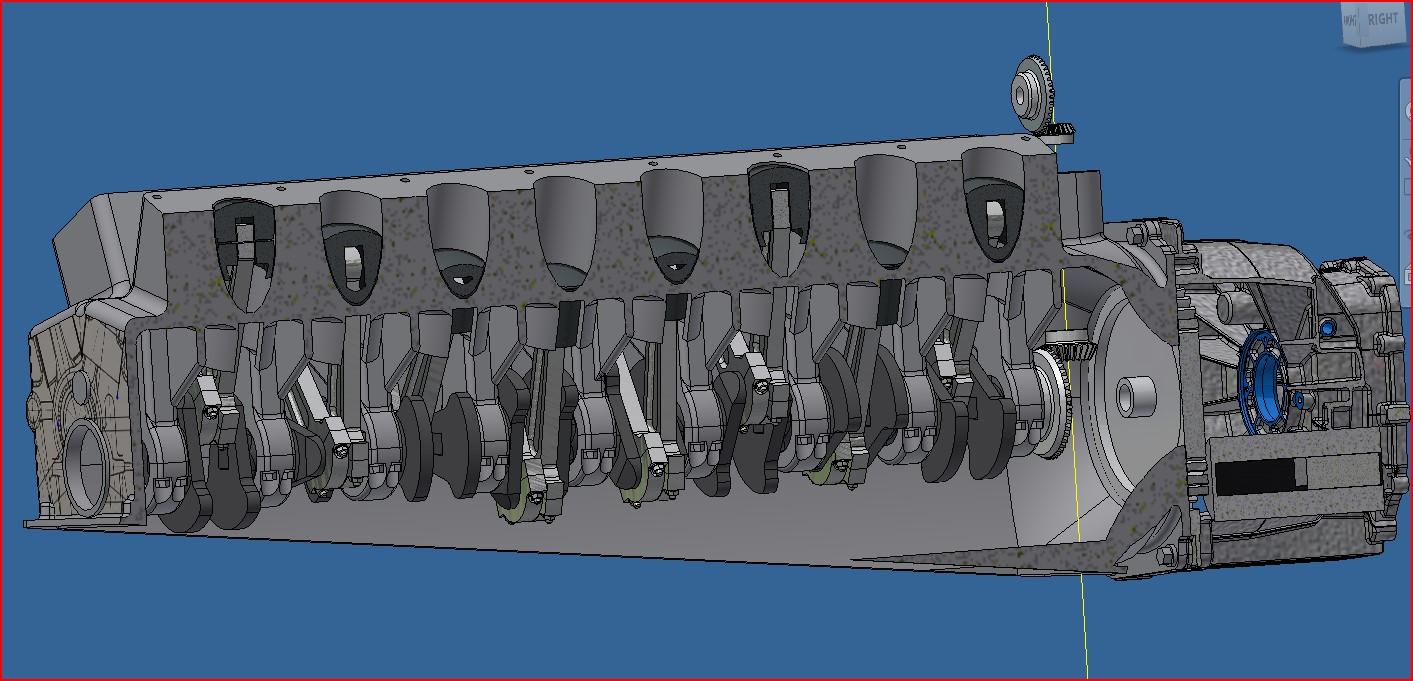
Ok, so the valve train is all done and it's a thing of beauty! And it works! Well at least in Inventor it works... This is one complicated system. It's one thing to reproduce it with todays design tools but imagine doing this back in the 30's. These guys were good. I did print a few test parts and I do have one working valve/rocker. Up next is the camshaft drive which I will base the design on the Bentley's. Here are some pictures, screen shots and videos of the finish valve system. test valve and rocker arm Test piston and crank the full valve train in motion 20241015_201447.mp4 And test valve and rocker arm in motion 20241015_201844.mp4
-
Tigercat 880E longer 1/48 scale
François replied to François's topic in WIP: Model Trucks: Big Rigs and Heavy Equipment
Many things. The environnent is very important, -controled temperature ( 20 to 25 °c), I use a small space header during winter -good ventilation ( especially if using alcool washable resin) I only use water washable resin, a lot less smelly and results are good. -get a cleaning/ curing station, it's worth the extra $ -be very patient at first, it can take many tries to get your setting right -get a good slicer (I use the free Lychee version), doesn't have to be the slicer that comes with the printer. -all is in the support size and location. There will always be a "sacrificial" face on the part, the one that gets printed first because it usually the portion with the most support. I'm still learning after 1 year of pretty intensif use so be patient. -buy according to your present and futur neads. I should have bought a bigger printer but a year ago, I didn't know I would be printing such large parts as the ones on my Hydra Coupe projet. Hope this helps! -
Tigercat 880E longer 1/48 scale
François replied to François's topic in WIP: Model Trucks: Big Rigs and Heavy Equipment
Jurgen, I also have an Ender 3 but seldom use it since I got the resin printer. At 12k resolution, the results are enormously better than anything a wire printer can give you. Printer prices have gone down alot, it would be worth every penny. -
Tigercat 880E longer 1/48 scale
François replied to François's topic in WIP: Model Trucks: Big Rigs and Heavy Equipment
Thank you everyone. Minimal clean up to do. And depending on how I oriented the part in the slicer, a bit of sanding on curved surfaces. I use the Anycubic photon m5s. If you like this one, check out my other current build, all custom 3d modeled and printed. https://www.modelcarsmag.com/forums/topic/193597-marvels-hydra-coupe-112-scale-full-scratch-build/ -
Tigercat 880E longer 1/48 scale
François replied to François's topic in WIP: Model Trucks: Big Rigs and Heavy Equipment
Thank you BK9300 It should make a nice model with a few moving parts. -
Hello everyone I was asked to 3d model and print a pair of Tigercat logger with a custom arm at 1/48 scale. I wasn't given the green light yet but I decided to go ahead and start the project anyway. Worst case scenario, I'll have a couple of nice loggers to add to my collection. I'm not used to work at such small scale but this logger is a big machine so it will still be a good size model. Here are a few shots of the 3d model And a few of some of the printed parts
-
Marvel's Hydra coupe 1/12 scale full scratch build
François replied to François's topic in WIP: Model Cars
Thank you everyone. Big John, the design is strongly based on the Auto Union V16 engine. But, like stated before, aside from a few pictures there's very little info on the engine. So I did get very creative. I have most of the rockers done, still need to do the cam shaft. I'll post some pictures tomorrow. I'm test printing a partial bloc and head with a couple of pistons and valves to see if everything fits. Working pistons is a given, I'm getting pretty good at making these work at 1/12 scale but a working valve train is another ball game. Even though the car and it's engine are massive, they are still at 1/12 scale so the valves, rockers and cam shaft are relatively small. If I pull this of, it might be a first at this scale !! -
Marvel's Hydra coupe 1/12 scale full scratch build
François replied to François's topic in WIP: Model Cars
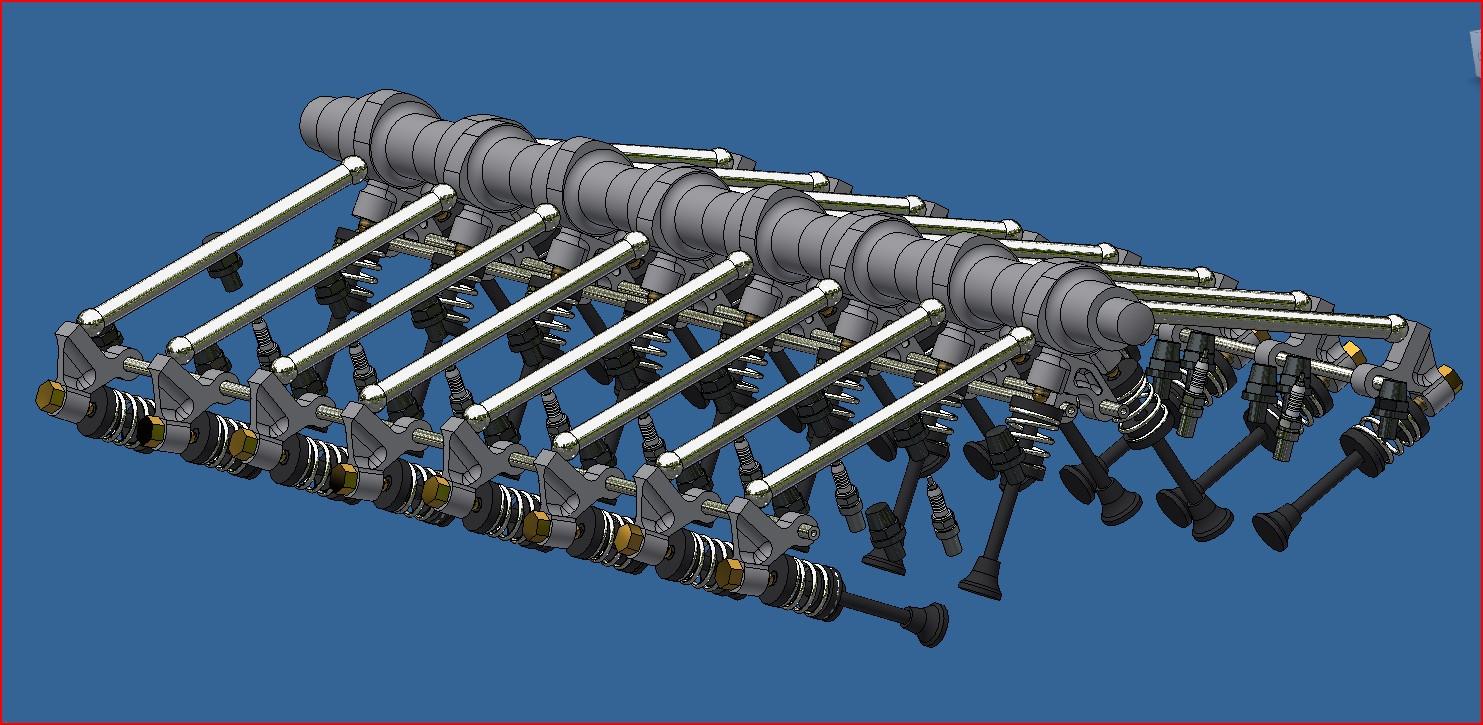
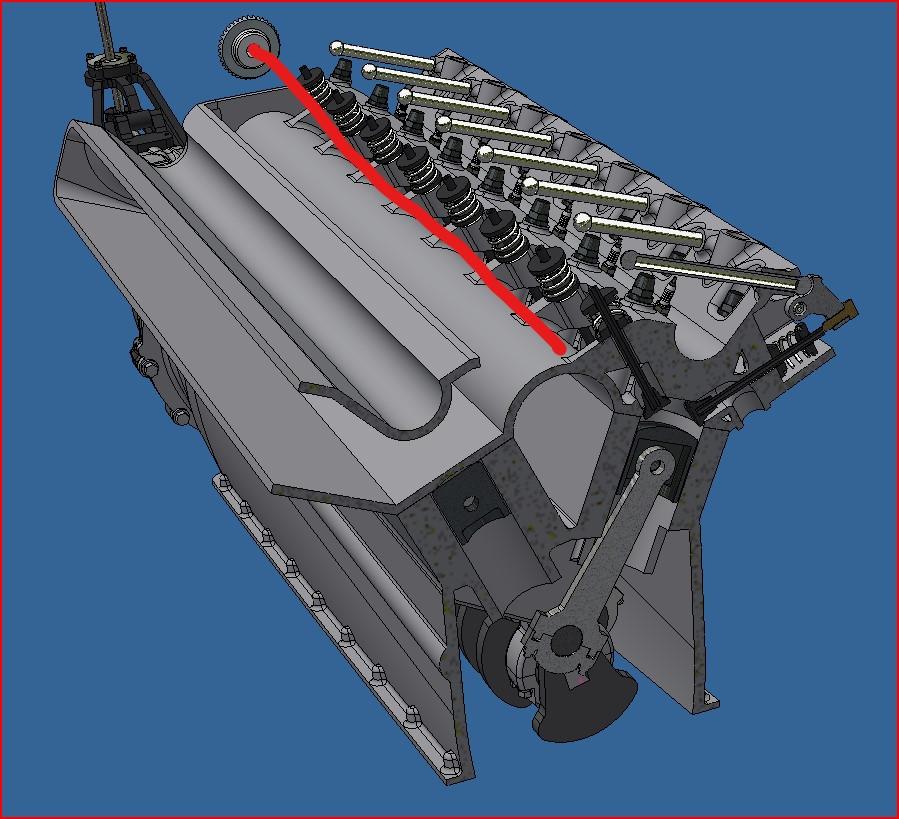
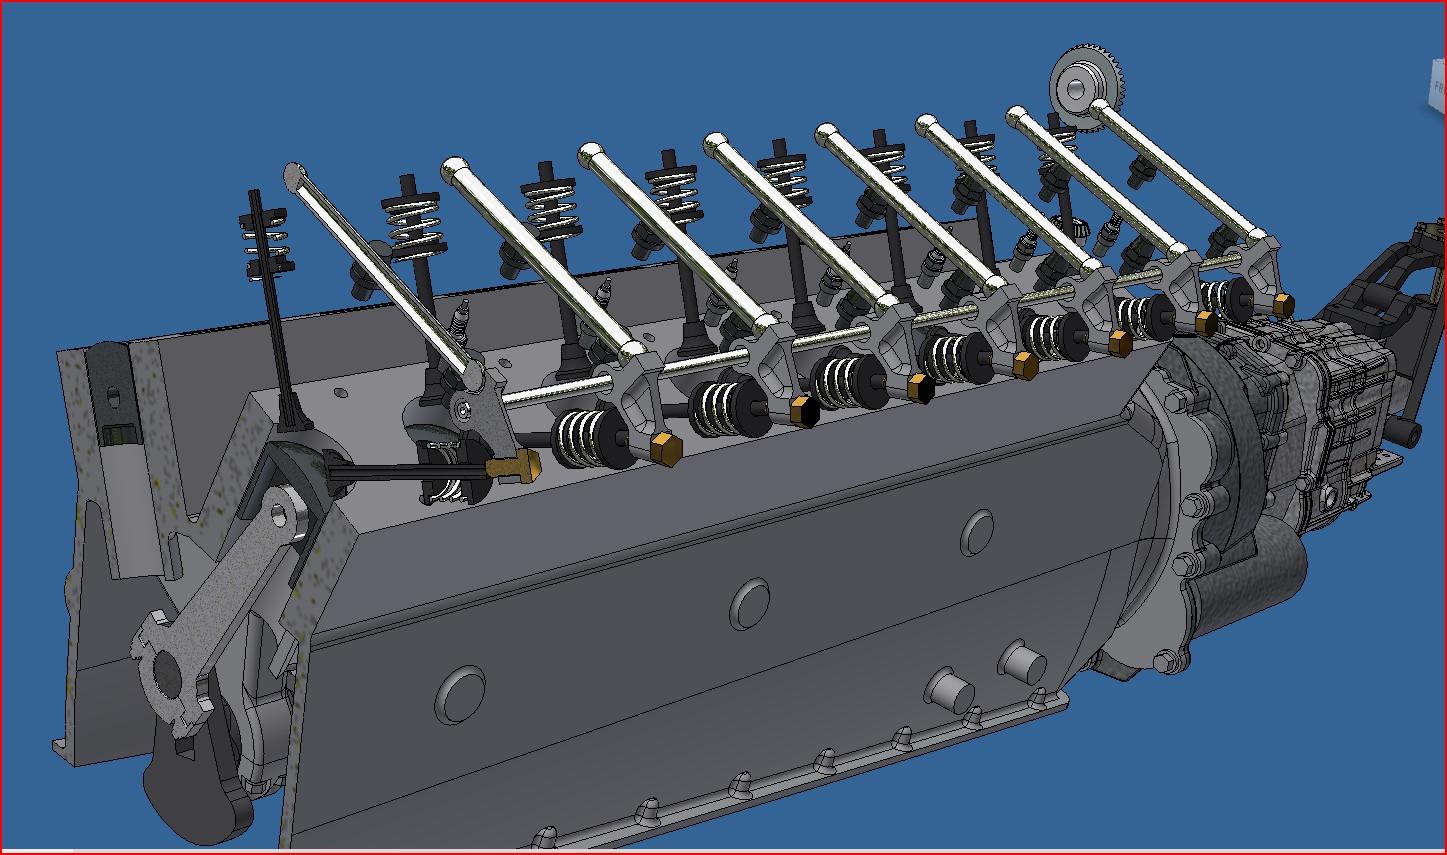
Made some progress on the valve train today. It's a fairly complicated system. The cam shaft is located on top in the center, between the 2 heads. Each head has a set of 8 rockers actuating the outside valves (exhaust). These rockers are actuated via 8 horizontal rods( or close to horizontal) going towards the cam shaft, not too sure exactly how these rods are moved but I suspect that they are directly in contact with the cam shaft. And positionned just beneat the cam shaft there will be another 16 rockers, 8 to activate the the left side intake valves and 8 for the right side valves. My goal is to try and have working valves but really not sure I'll be able to. I will print every part so at worst it will be static. Here is a cross cut of my ref engine where you can see the valves, rockers and horizontal rods. And here's where I'm at. The red line would be the cam shaft.
-
Marvel's Hydra coupe 1/12 scale full scratch build
François replied to François's topic in WIP: Model Cars
Grabcad do have nice 3d models but unfortunately they don't seem to have a V16 that fit my needs and they are stactic. I wan't mine to have rotating parts. -
Marvel's Hydra coupe 1/12 scale full scratch build
François replied to François's topic in WIP: Model Cars
Did a bit more work on the V16 engine. That is a lot of pistons! It will be fun to watch if ever I'm able to pull this off and have a running engine. Like I said before, there's very little info on the Auto Union V16 so to get a somewhat realistic firing sequence, I found a little youtube that explains the sequence for the new Bugatti V16. 20241004_220959.mp4 20241004_221107.mp4 20241004_221107.mp4
-
Marvel's Hydra coupe 1/12 scale full scratch build
François replied to François's topic in WIP: Model Cars
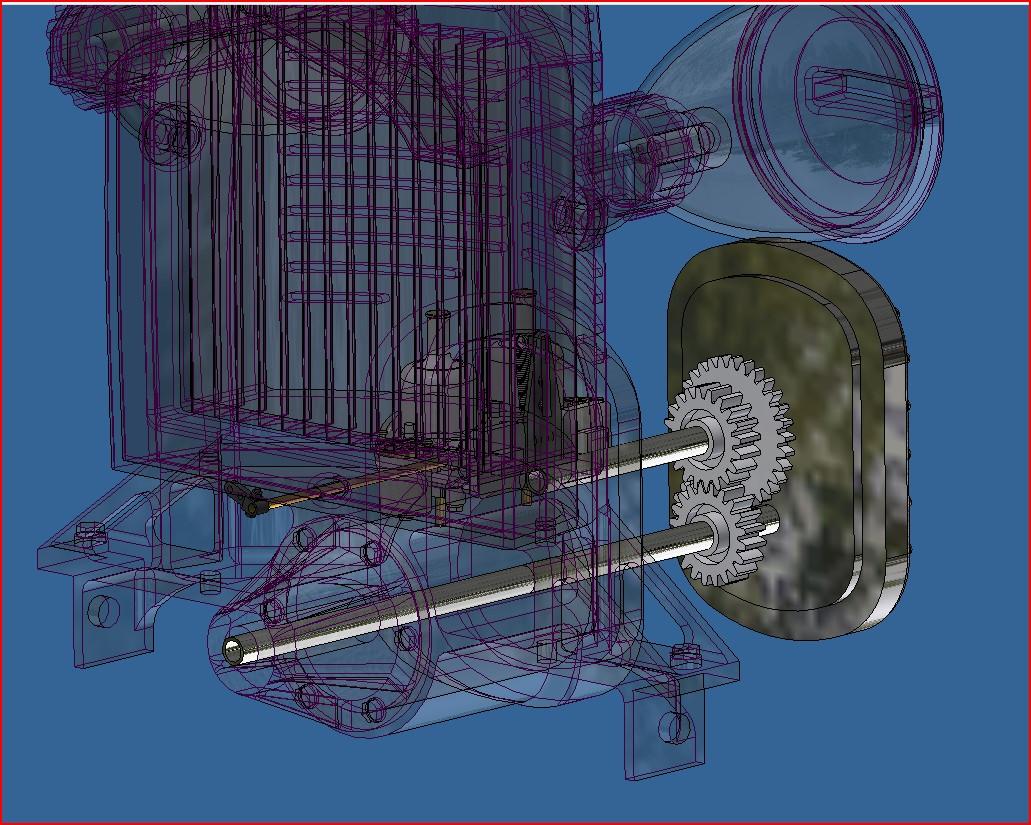
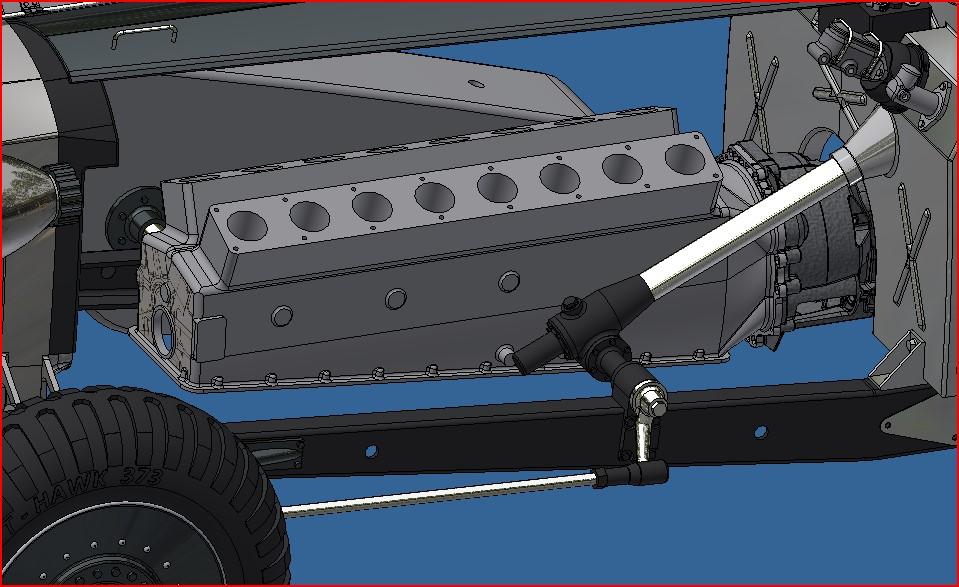
The 3d model is slowly progressing. I started the v16 engine bloc. I'm basing the design on the Auto Union type C engine but like pretty much everything else on this project, documentation very limited. All I have are a few pictures of a totaly assembled engine so the dimensions and inner parts will all have to come from my imagination ( no problem there, that's even more). I inserted a few bentley pistons and conrod just to have a better feel. Should be ok. Block in car Block with bentley parts in just for fun 20241002_220801.mp4 I also finished the radiator assembly which includes the radiator cowling, rad core and blower. Speaking of the blower, there's a schene in the movie where you can see the blower being activated. And when activated, the blower's front dome starts to spin. I would like to reproduce this and have it spin while the engine runs. Now the easy way to do this is to simply have the dome in line and coupled with the crank. But that whould be boring. What I did instead is to slightly offset the dome from the crank and added a few gears to speed up the dome's rotation in relation to the crank. I was able to get a 2.5:1 speep up ratio. Here's the dome on the prop car And here is mine With a few gears added And the completed radiator
-
Marvel's Hydra coupe 1/12 scale full scratch build
François replied to François's topic in WIP: Model Cars
Big John, At 17.5 inche diameter (scaled up), the steering wheel is not all that small. But I'll admit that for a car that size it should probablly be bigger, I'm limited by the doors. At least it's bigger than the Bentley's which I find enormous for the size of the car. I might follow your advice and add some hydro fiiting and line somewhere.