François
-
Posts
489 -
Joined
-
Last visited
Content Type
Profiles
Forums
Events
Gallery
Everything posted by François
-

Marvel's Hydra coupe 1/12 scale full scratch build
François replied to François's topic in WIP: Model Cars
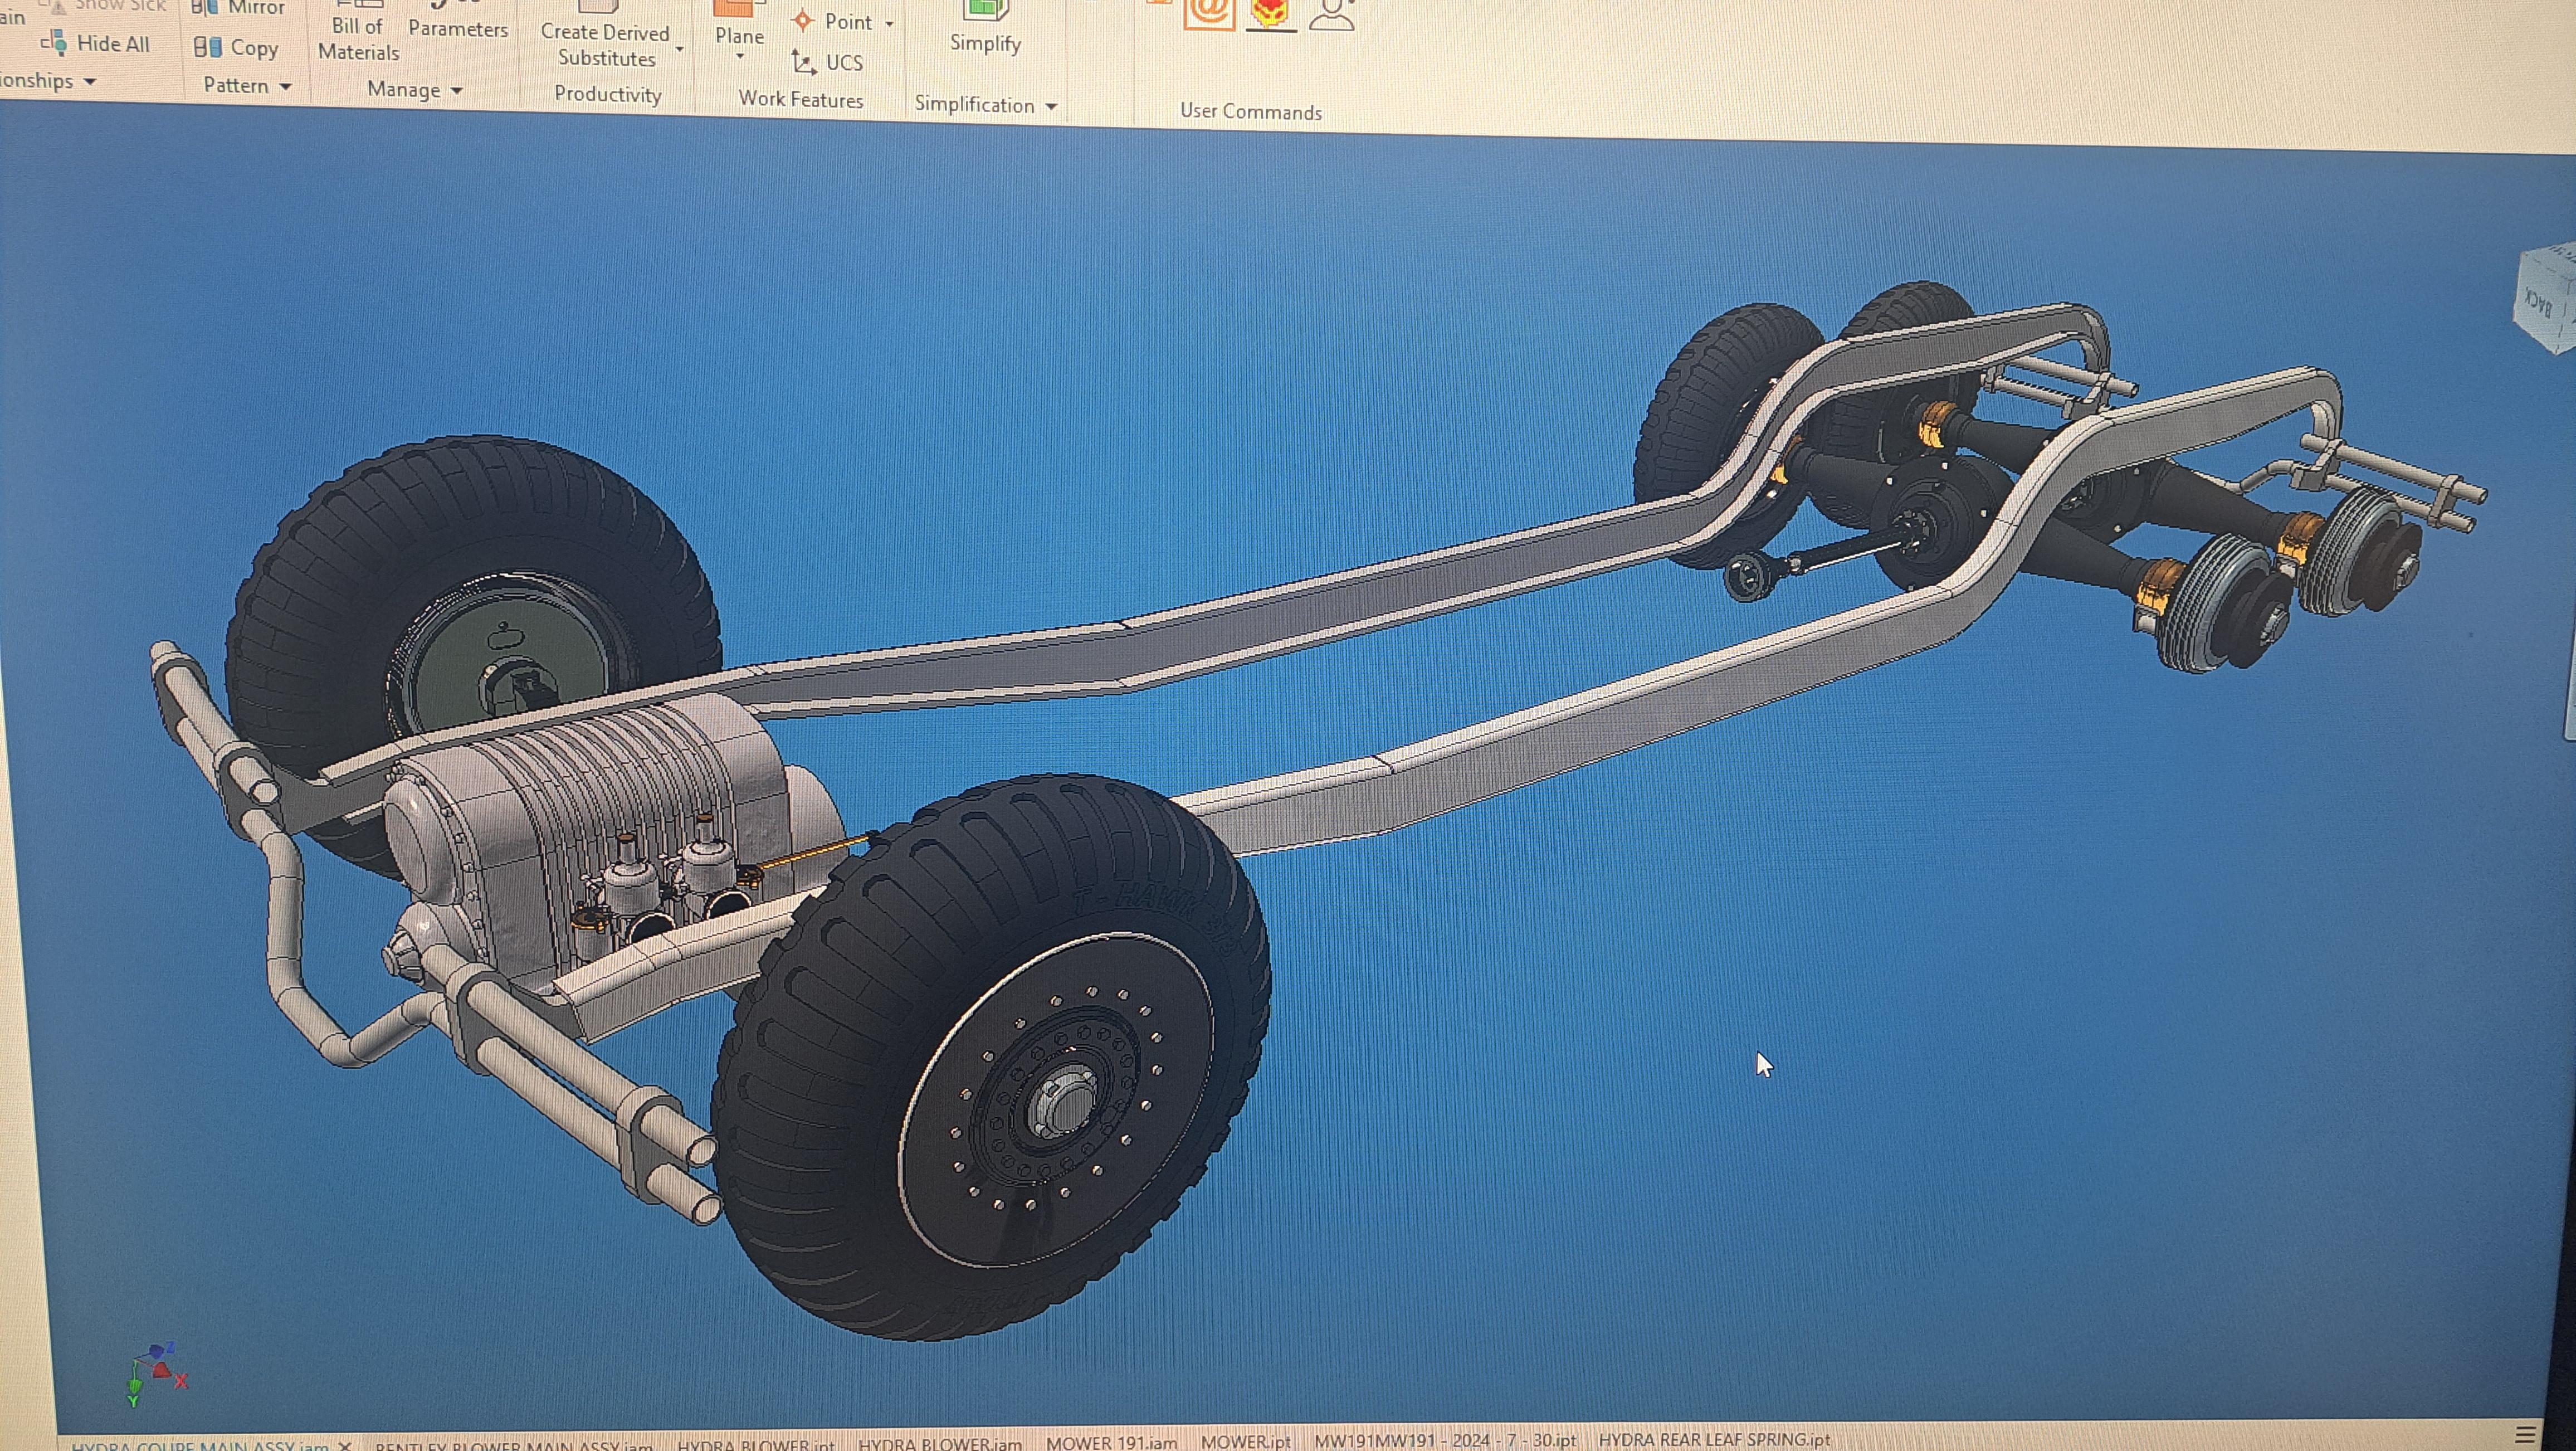
I assembled the differentiel I printed and so far so good. I had to tweak a few things like adding a compression spring to maintain a proper contact between the crown gear and pinion and modifying a few parts for better printing but aside from that, everything went together as planned and the diff works well. I also decided to design proper universal joints for the drive shafts. You can see the compression spring on the left side of the crown gear 20240808_220653.mp4 And the u-joints
-
Marvel's Hydra coupe 1/12 scale full scratch build
François replied to François's topic in WIP: Model Cars
Thank you everyone for the nice words. Bugatti fan, Inventor is a professionnel 3000$ plus/year 3d cad software. A far cry from free. And even at that price, it's still a mid level tool. It used to be a lot more affordable but as it evolved, so did the price. I guess the same will eventualy happen with Fusion. I still have a license for it thru the company I used to work for. I'm very lucky to be able to use it althougt not sure how long that will last. The day I'm cut off, I'll have to fall back on the free version of fusion or some other free software. Inventor is not perfect for this type of designing, but I've been using it for so long that I can work around it and make it do pretty much what I want. -
Marvel's Hydra coupe 1/12 scale full scratch build
François replied to François's topic in WIP: Model Cars
I printed a first batch of parts for one of the differentiel. I'm pretty happy with the result. Still need to tweak a few parts in order to have proper mating surfaces but all in all, it's a good print.
-
Marvel's Hydra coupe 1/12 scale full scratch build
François replied to François's topic in WIP: Model Cars
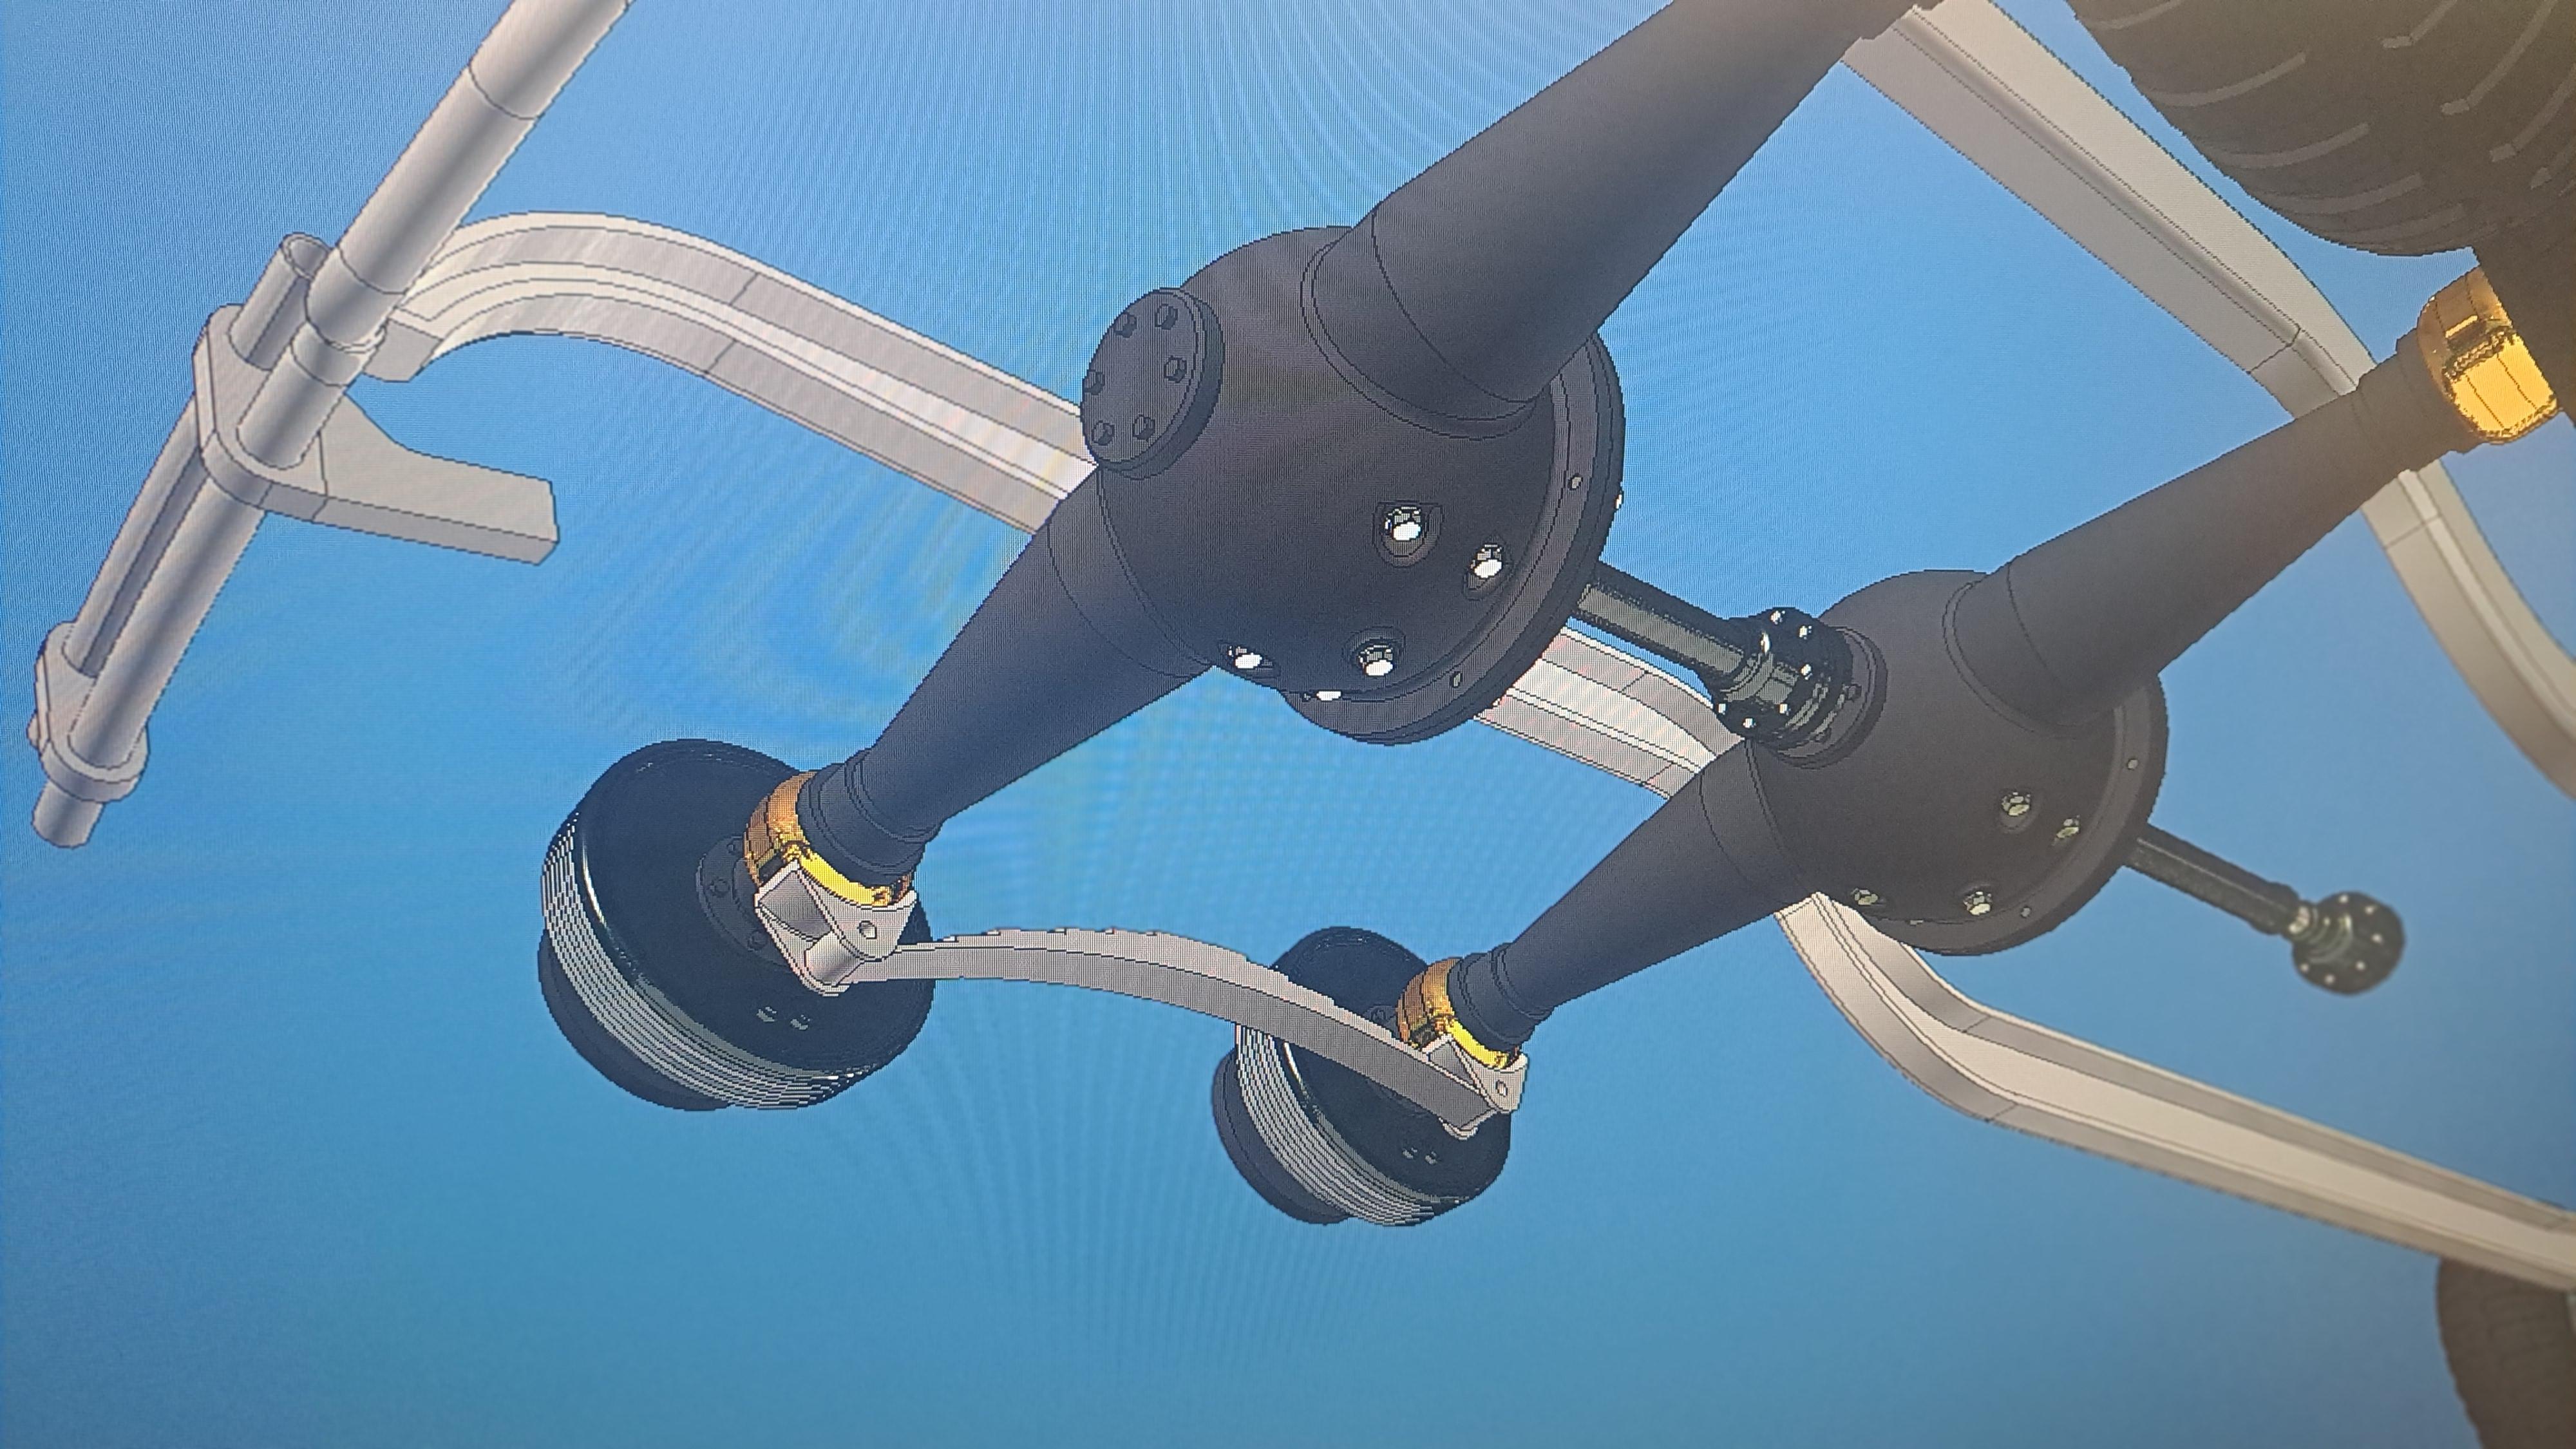
A bit more done on the rear end. I added what I think are torq arms, all the ubolts for the leafsprings are there as are the 4 hanger posts with the hanger brackets. I believe that the 4 hanger brackets should be made out of a flexible material or maybe even a strap so that the complete bogie assembly can pivot by it's center. I'll figure something out. Torq arms Hangers With tires and wheels
-
Marvel's Hydra coupe 1/12 scale full scratch build
François replied to François's topic in WIP: Model Cars
Thanks Dave, it is a cool project! At least it is on the screen... -
Marvel's Hydra coupe 1/12 scale full scratch build
François replied to François's topic in WIP: Model Cars
Big John, I decided to go with a full scratch built on this one and keep the rolls for my intended restoration project. I'm doing the Hydra at 1/12 and it will still be a huge model, over 24 inches long. The 1/8 scale of the rolls was just too big. -
Marvel's Hydra coupe 1/12 scale full scratch build
François replied to François's topic in WIP: Model Cars
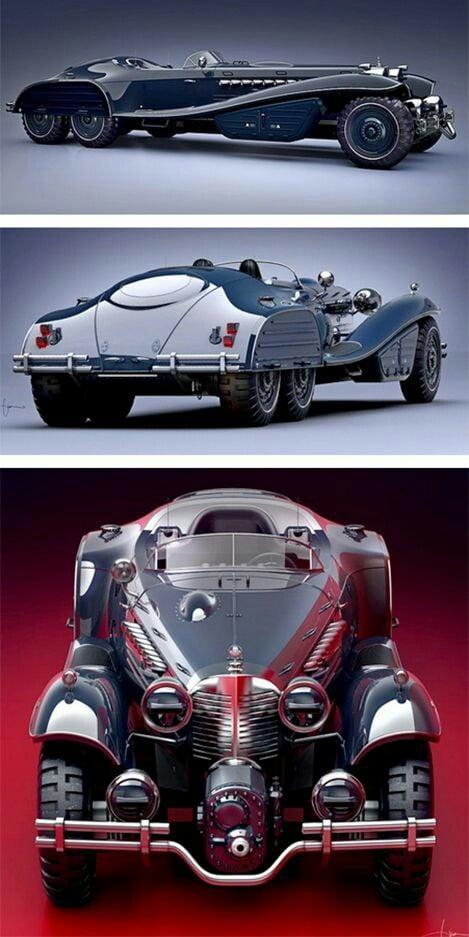
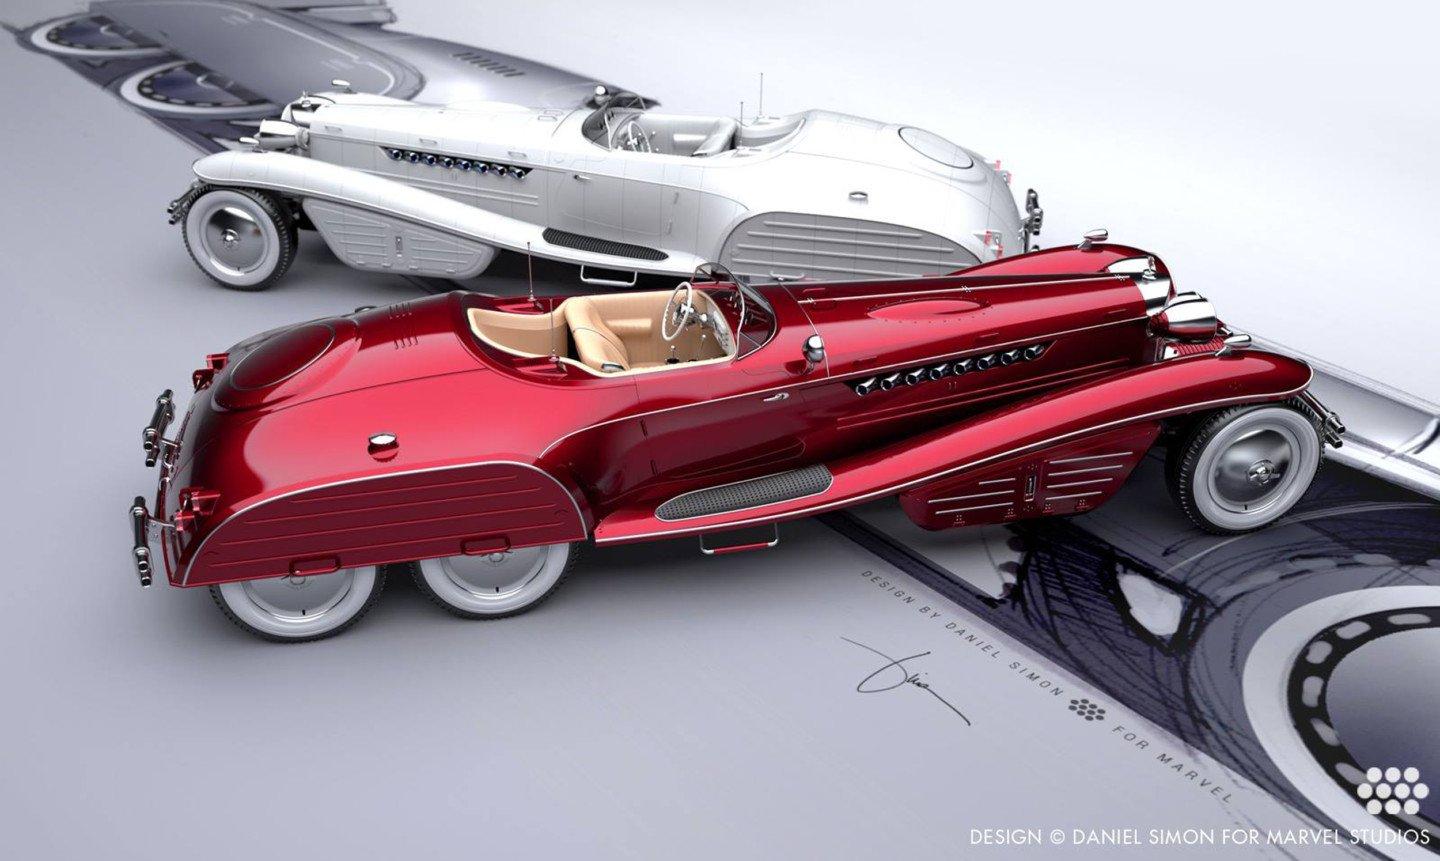
Hi Bugatti fan, glad to see you're on board for this one also. Effectively, the Hydra car designer, a guy named Daniel Simon, found inspiration for his design in Hitler's car (the Mercedes G4) among others. He also found inspiration in the Bentley for the blower. Unfortunately, everything stopper at the inspiration stage. The car does have 6 wheels and a blower but under the body work, it's an ordinary truck frame with a v8 and the blower is just for show. Let's not forget this was a movie prop. In one of the pictures I found, you can even see some piping held in place with C-clamps. But that's what makes this project so interesting to me, I want to make what's under the bodywork as close to what it could have been if this had been a real car. And since it does not exist, that's where my designed skills come into action. Fun times ahead!! As for the cad software I use, it has always been Inventor. I did download fusion but never used it. I'm just too used to Inventor. I do want to try out Rhino, I was told it's a great tool for designing free forms like car's bodywork. -
Marvel's Hydra coupe 1/12 scale full scratch build
François replied to François's topic in WIP: Model Cars
Thank you all! BK9300, I use Inventor. -
Marvel's Hydra coupe 1/12 scale full scratch build
François replied to François's topic in WIP: Model Cars
Made a little more progress on the rear suspension today. Started the central pivot assy on which the rear bogie is attached. I have to say that I'm really enjoying this. I have very little info to base my design on so I'm basically winging it as a go along. I was a machine designer for over 35 years so designing stuff from the ground up was pretty much my way of life. But what's so refreshing with model making and this projet in particular is that contrary to the machines a used to design, this doesn't have to make sense or work. It just needs to look good. And the best thing of all, it just needs to please me (and you). So nice...
-
Marvel's Hydra coupe 1/12 scale full scratch build
François replied to François's topic in WIP: Model Cars
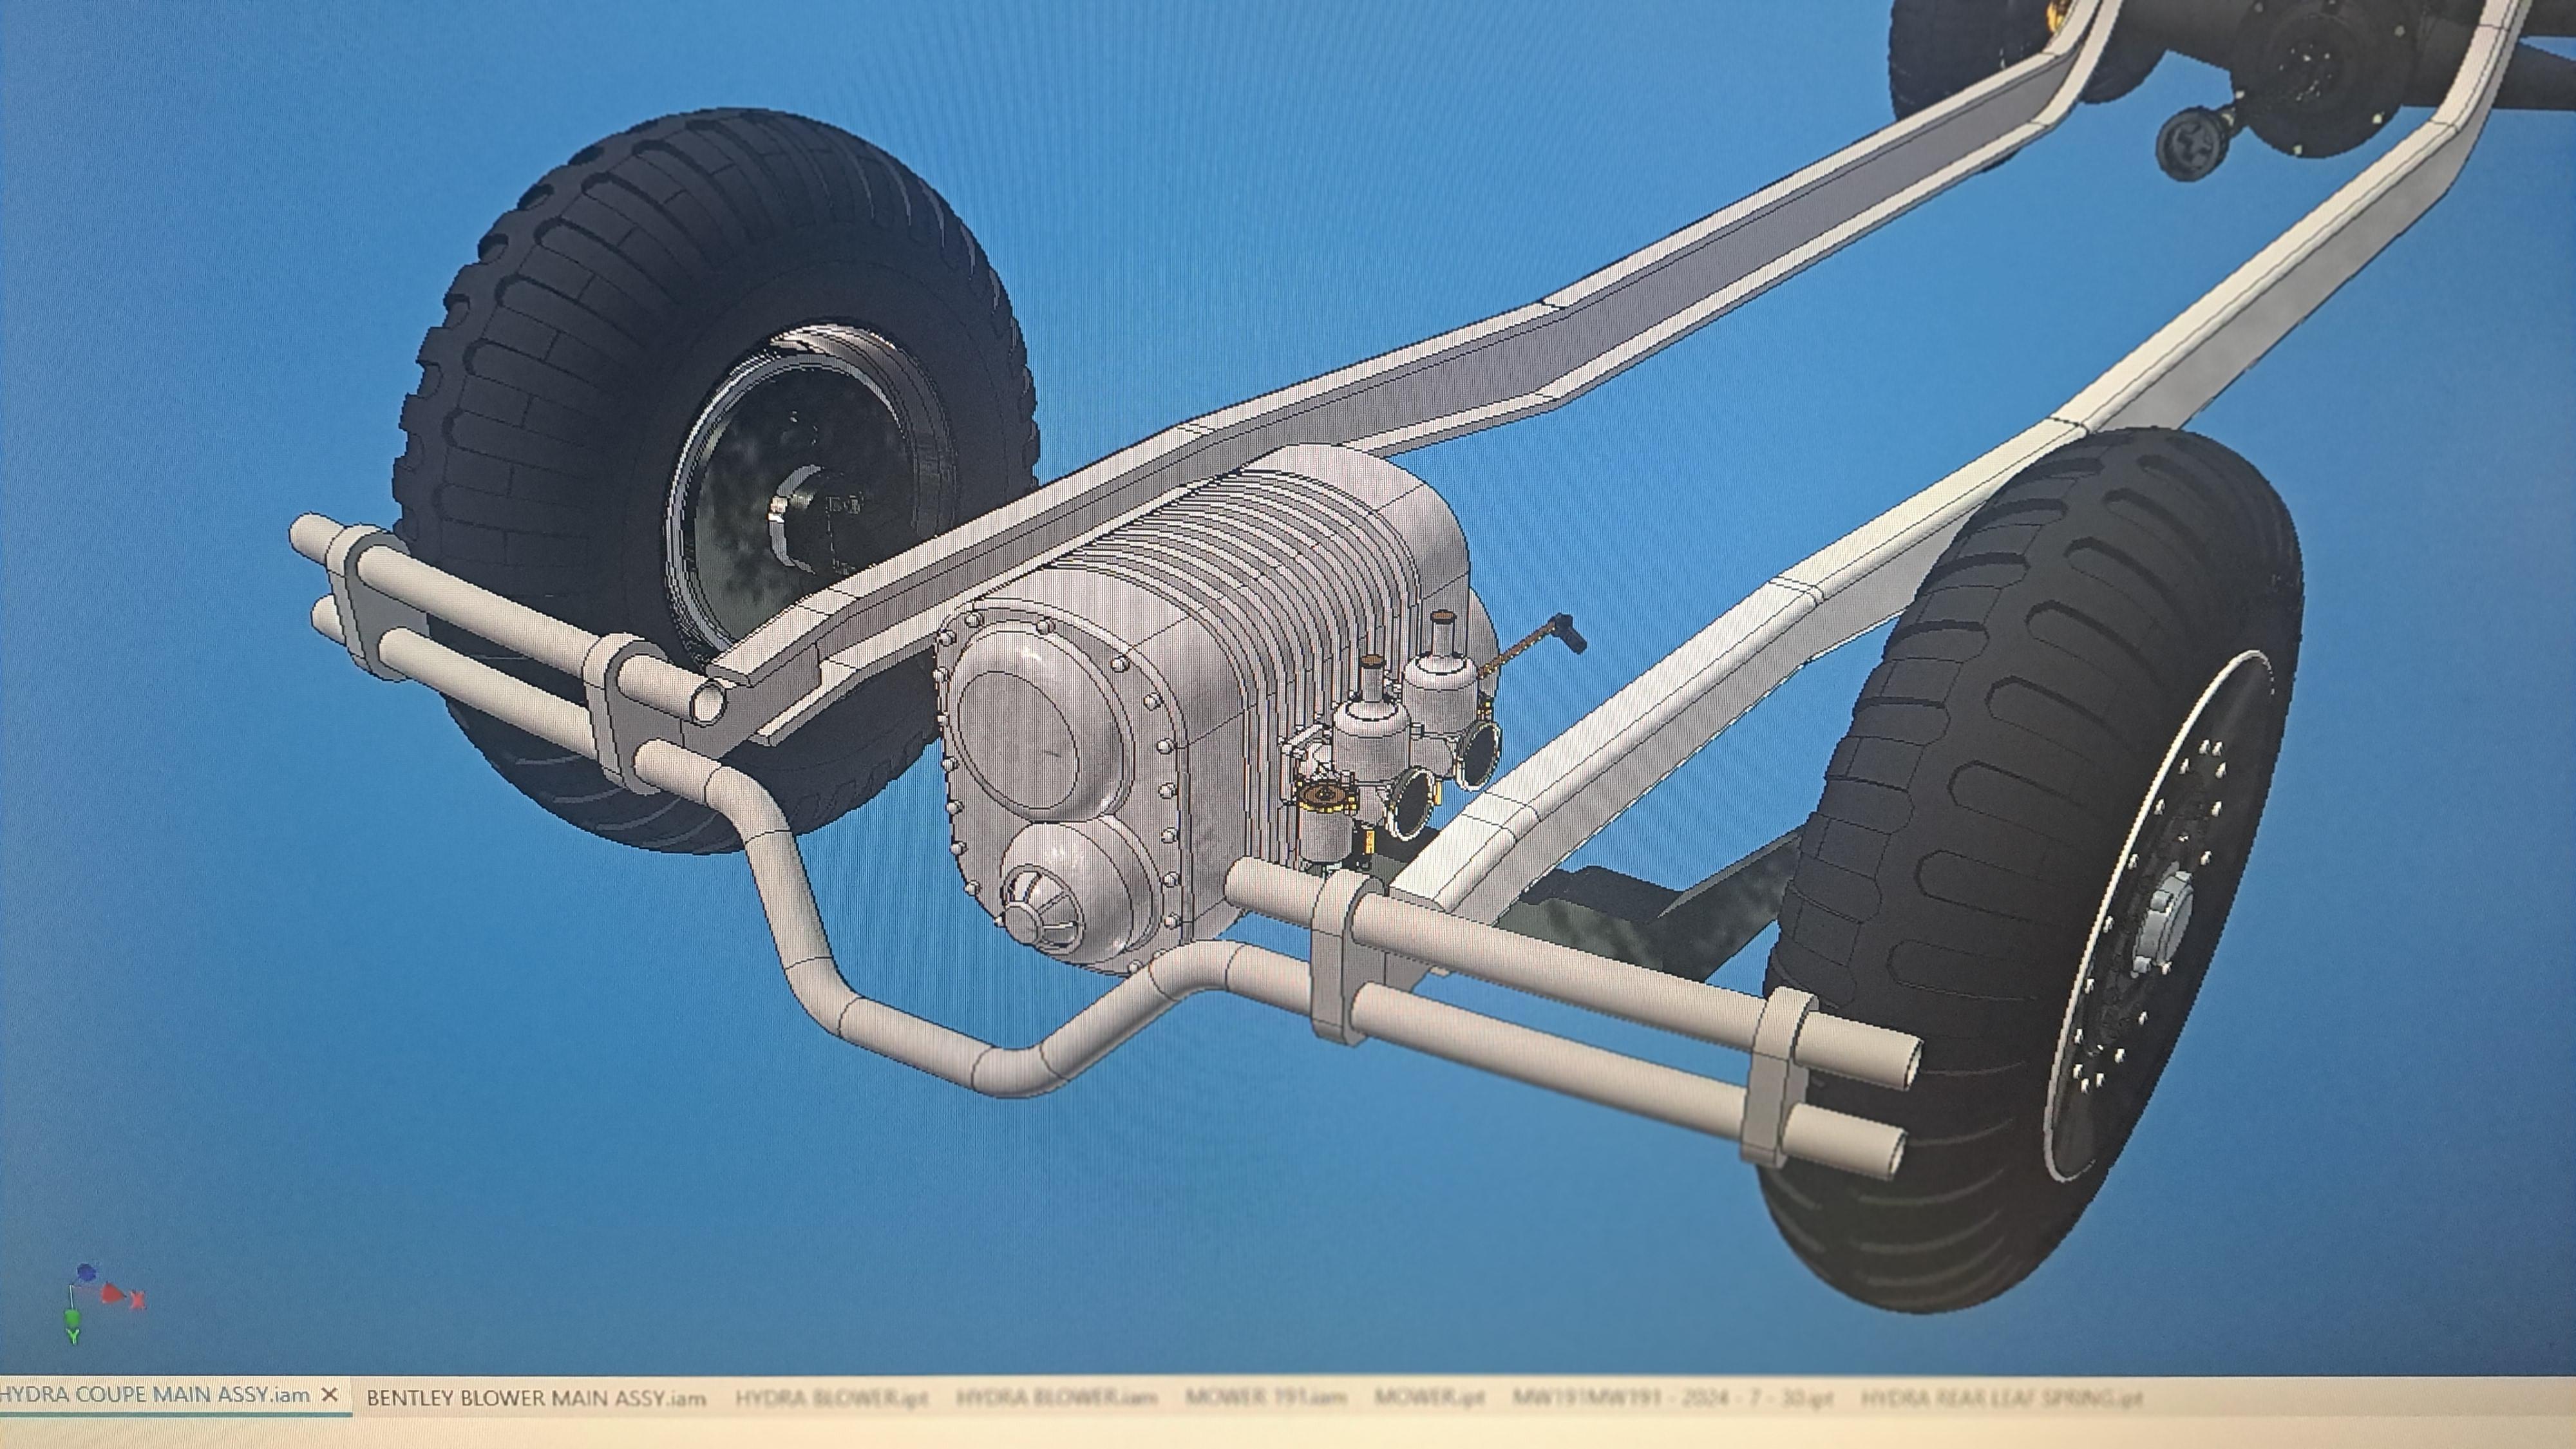
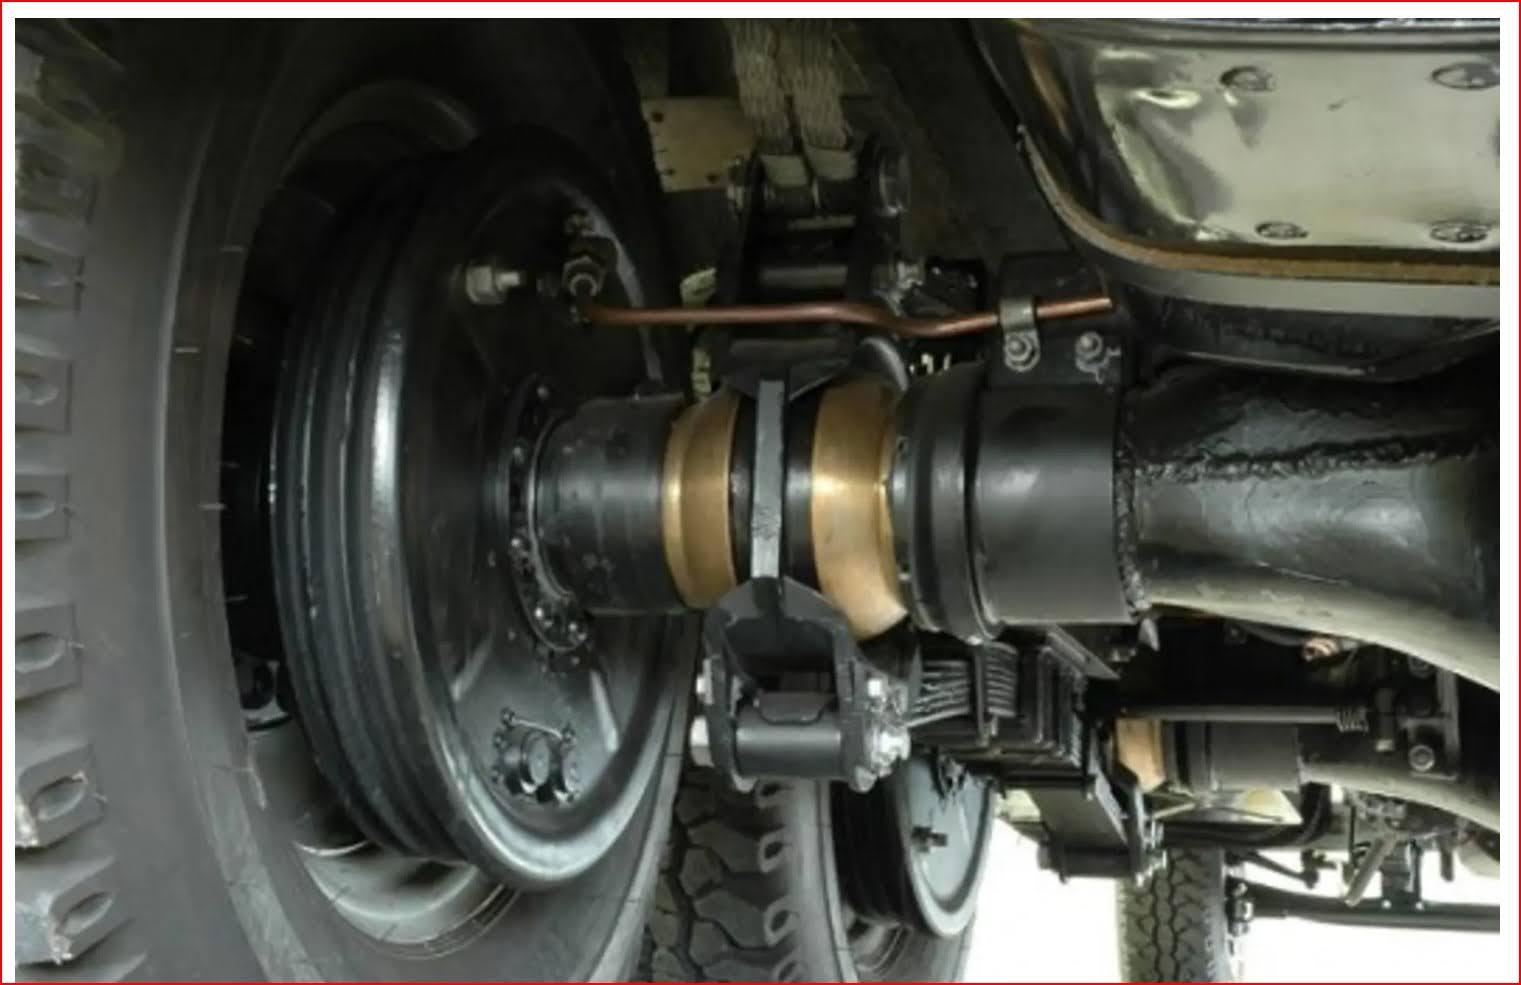
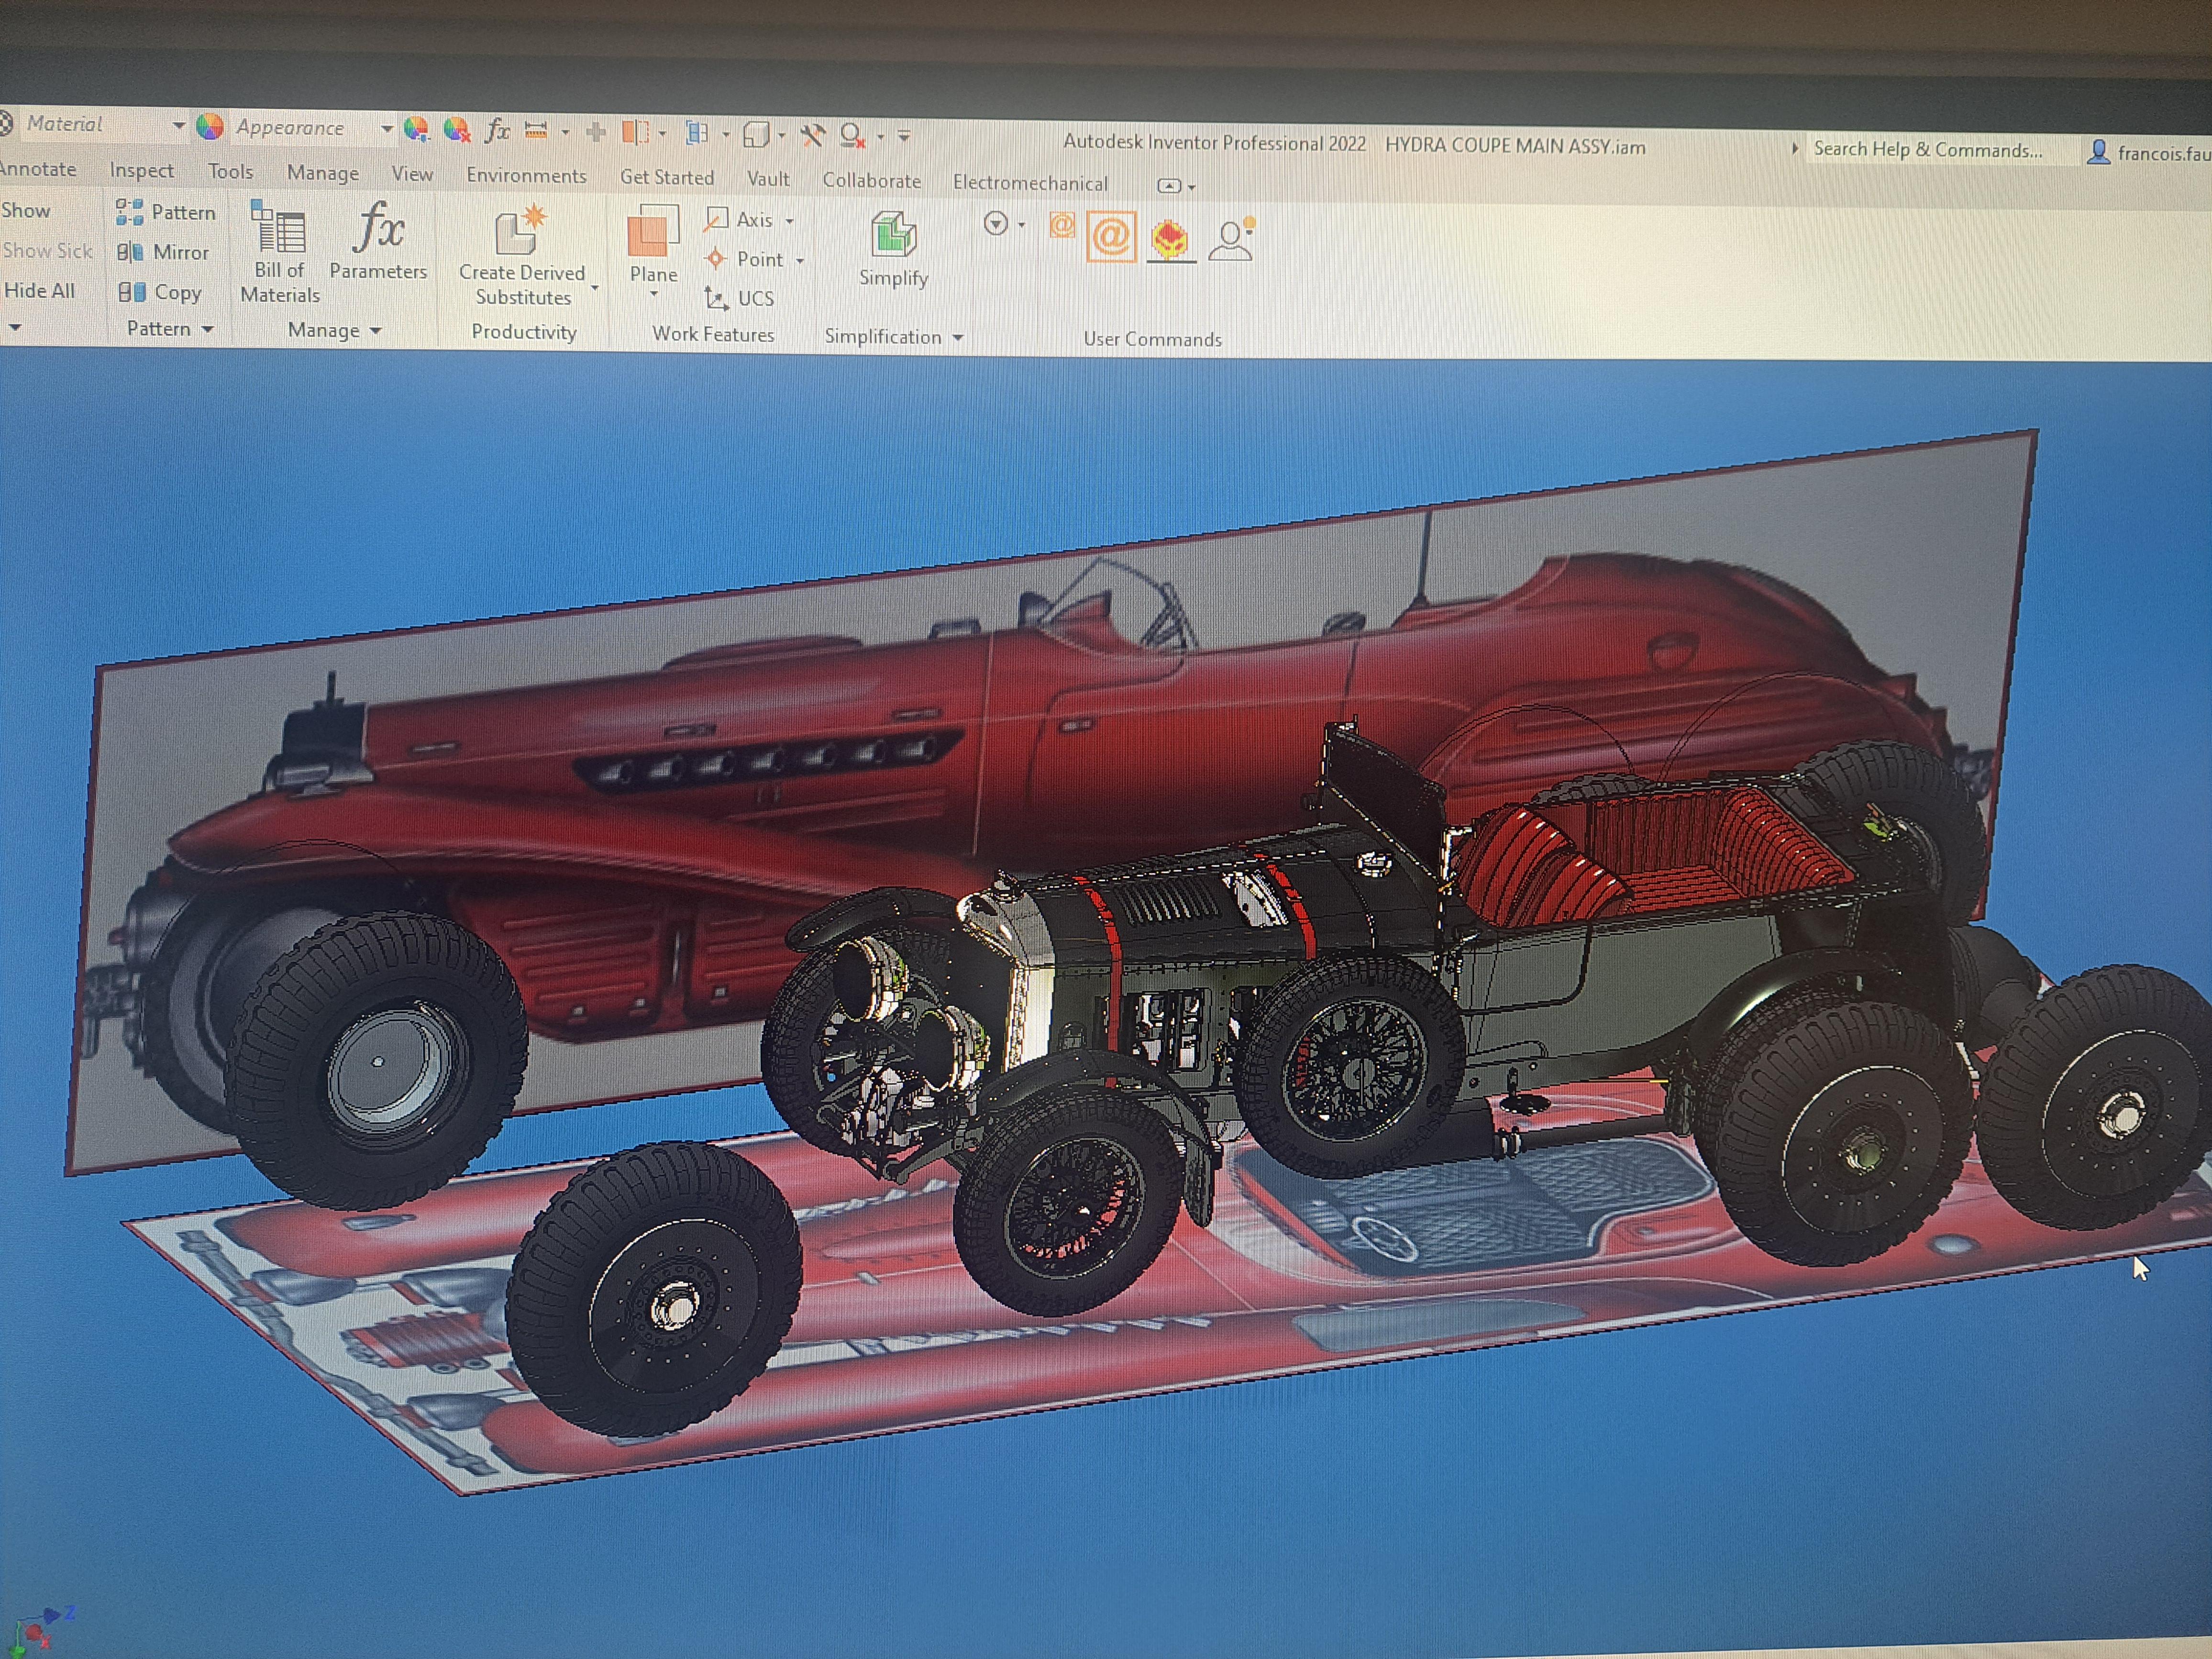
I started work on the frame. At close to 24 inches long, it will need to be printed in at least 3 sections. Printing will definatly be a challenge unless I get a bigger printer. I also modeled the blower and front bumper. And started the rear suspension. The rear end is based on the 1930's Mercedes G4. It's a complicated suspension system to reproduce when all you have are 2 pictures. Frame Blower and bumper Real blower and bumper rear suspension embryo G4 rear suspension
-
Marvel's Hydra coupe 1/12 scale full scratch build
François replied to François's topic in WIP: Model Cars
I did a bit more work on the drive train and aside from a few bolts, fittings and brackets, it's pretty much done. I should be able to drive all 4 wheels from the drive shaft. I inserted a top and side view of the complete car so I can better see if the parts I'll draw up have the right shape and proportions. Like I said yesterday, this car is a movie prop, it doesn't really exist so no dimensions to be found. All I have are 2 printed artist drawings that I can mesure off. Last thing I did today was to insert the Bentley in the Hydra assembly just to better see how big this model will be. Both car are the same scale !!
-
Marvel's Hydra coupe 1/12 scale full scratch build
François replied to François's topic in WIP: Model Cars
Ace, this is what the web says: "It is technically a roadster, despite being referred to as a coupé. This is because the vehicle started out as a coupé, and Schmidt did not want to rename it after it was converted into a roadster." kind of a strange explanation considering that Schmidt is a movie charactor... oh well, the car is still nice... -
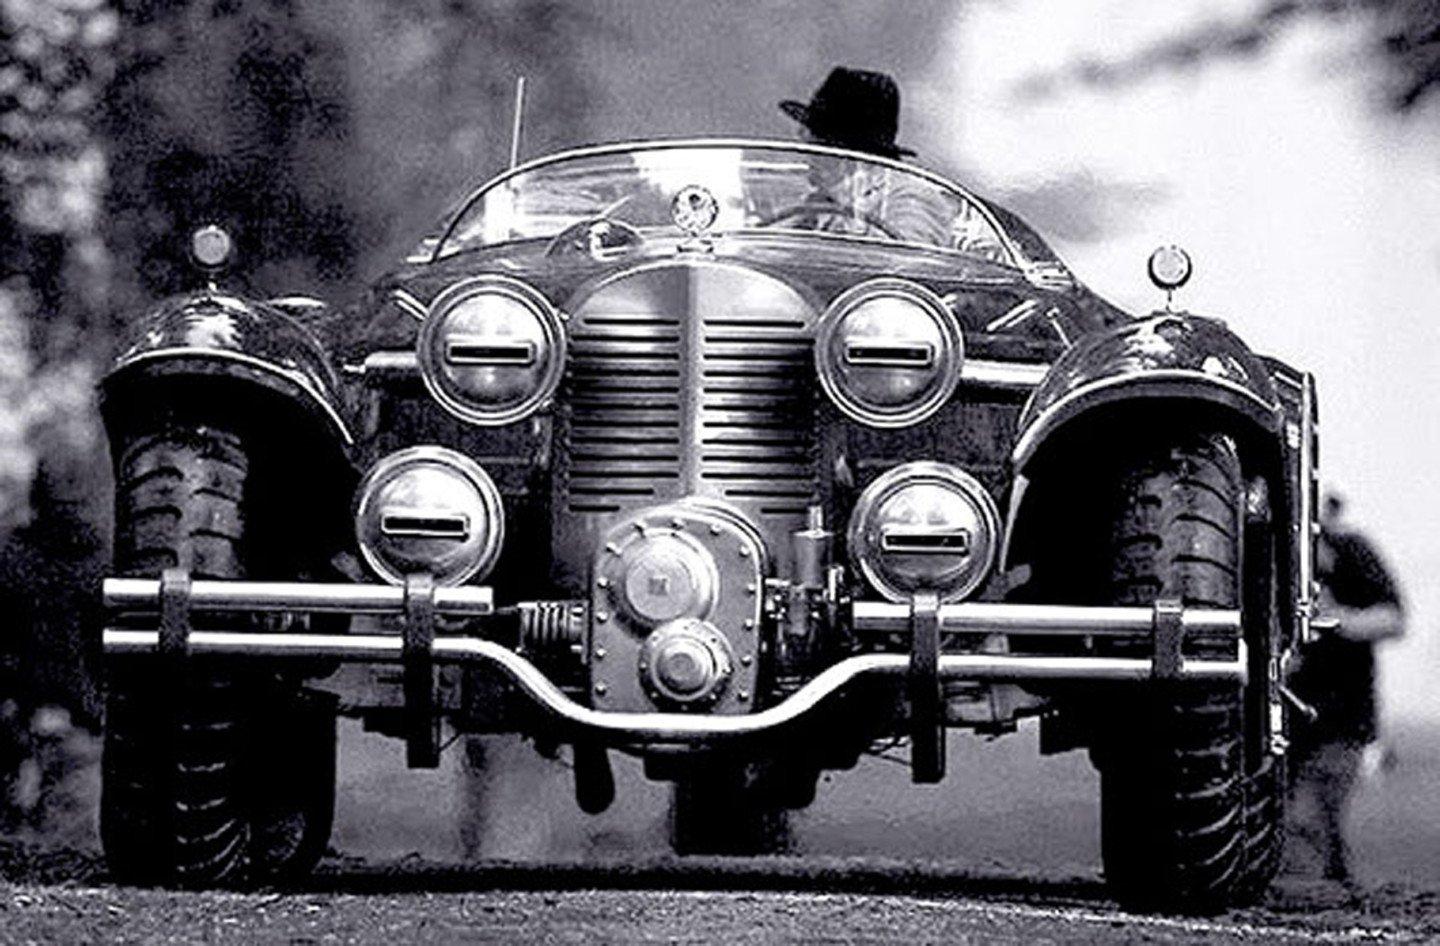
Hi all, I finaly started my next project. As mentionned in my Pocher Rolls Royce restoration wip, I wanted to transform the Rolls into the Hydra Coupe. But the Rolls being a 1/8 scale model, the would make the Hydra at over 36 inches long. A bit much. So I decided to leave the Rolls and it's restoration for later and will be making the Hydra in a more reasonable 1/12 scale. A scale that I know and like very much. It will still be a huge model at a little over 24 inches long and 8 inches wide. But it should be more manageable. Another plus is that I can use some parts from my bentley project as references since it's also 1/12. This model will be 100% scratch built or rather 3d printed. Some aluminium and brass will be used here and there along with leather for the seats but otherwise, it will be made of printable resin. Like on the Bentley, I would like to have a working engine and drive train. The difficulty will be to find the info since this car doesn't really exist other then as a movie prop. All I have are a few pictures. I also know that the rear drive train is based on the 1940 (or about) Mercedes G4. I did find some info on that. But otherwise, I'll be using some major 'modelers leeway ' to create most parts. I don't intent to do as much details as I did on the Bentley but, then again, I might get carried away. So the first step is to design the 3d model before printing anything. So far, I've got the tires and wheels done plus I started the rear drive. Being a 6 wheeler, it has 2 differentiels and 2 drive shafts. Plus a pretty funky suspension system. For those of you that have no idea what the Hydra coupe is and as a reminder for the others, here's what I'm aiming for Here's the G4 drive train and here's what been done so far boy, do l have a long ways to go!
-
Thank you! Big John, l like to thing that the miror is more a water spill from the radiator. Less harmfull... as long as it's not prestone!! The spill is just a first test, the shape is wrong.
-
I played around a bit wirh the case floor. I found a light gray cardboard to act as tla concrete floor, I added a few oil stains (it's a british car, they leak) and some tire tracks. I also added a cast iron floor grate. The idea with the grate is to have a water puddle under the radiator/engine block area that will drain towards it. The water will be made with a very thin flexible plastic miror. I'll position the puddle so that the engine can be seen without the need for a full mirored floor. The puddle in the pictures is only a test, but the rest is pretty much final. I also finished the lighting control panel, I used a hand wheel in lieu of a knob to ajust the intensity. Many thanks to LaughingIndian and big John for the inspiration. 20240704_161918.mp4 Nameplate not fixed yet
-
Thanks for the feedback, I do like the idea of the greyish floor with a few tire marks and a small miror under the engine to show the rotating crank shaft. I'll play around with it a bit. I added a turntable under the case and passed the lighting feedwire thru the center so it can easy rotate a few turns. I also made a second electrical box to house the lighting potentiometer. Should be cool. Pictures to come later this week.
-
I'm pretty close to having the final setup in the display case. I've positionned the car and the boby in a way that I think shows them off properly. My only concern being, is it too busy. I'm not sure about the mirored floor. I'm exposing on August 4th at my local hobby shop it' not an official meet, it's more of a combo model car/ real antique car day. So I'll bring the Triumph Tr6 along with a few model. I'll be able to see how the bentley in it's display case is received.
-
Thank you absmiami. Every good word that you all have said means a lot. I really would like to expose somewhere but I just don't know where. There are very few model shows in Canada and close to none in Québec. Going south would be an option. Salted and buttered the pop corn?
-
I completed the display case today and with that done, this build is now 100% finished. I just need to decide how to position the car in the case. My original idea was to display the body on the cart I made so the all the mechanics I added on the frame could be visible. I have to test both configuration and see which is best. For now, the body is on the frame and it sure looks good. Here are a few pictures. This was my original idea the real case with body on frame All window panels riveted And to finish it off, a little video 20240624_202341~2.mp4
-
I did a bit of work on the display case lights. A lot of wiring to do but so far so good. I first tested my connections to make sure that all 6 lights were functional after parallel hook up. Then I started the final wiring with soldered connections. In lieu of shrink tubes to cover the exposed wires (not enough space) I poored some transparent glue in the jonction boxe to cover the wires and keep then from moving.
-
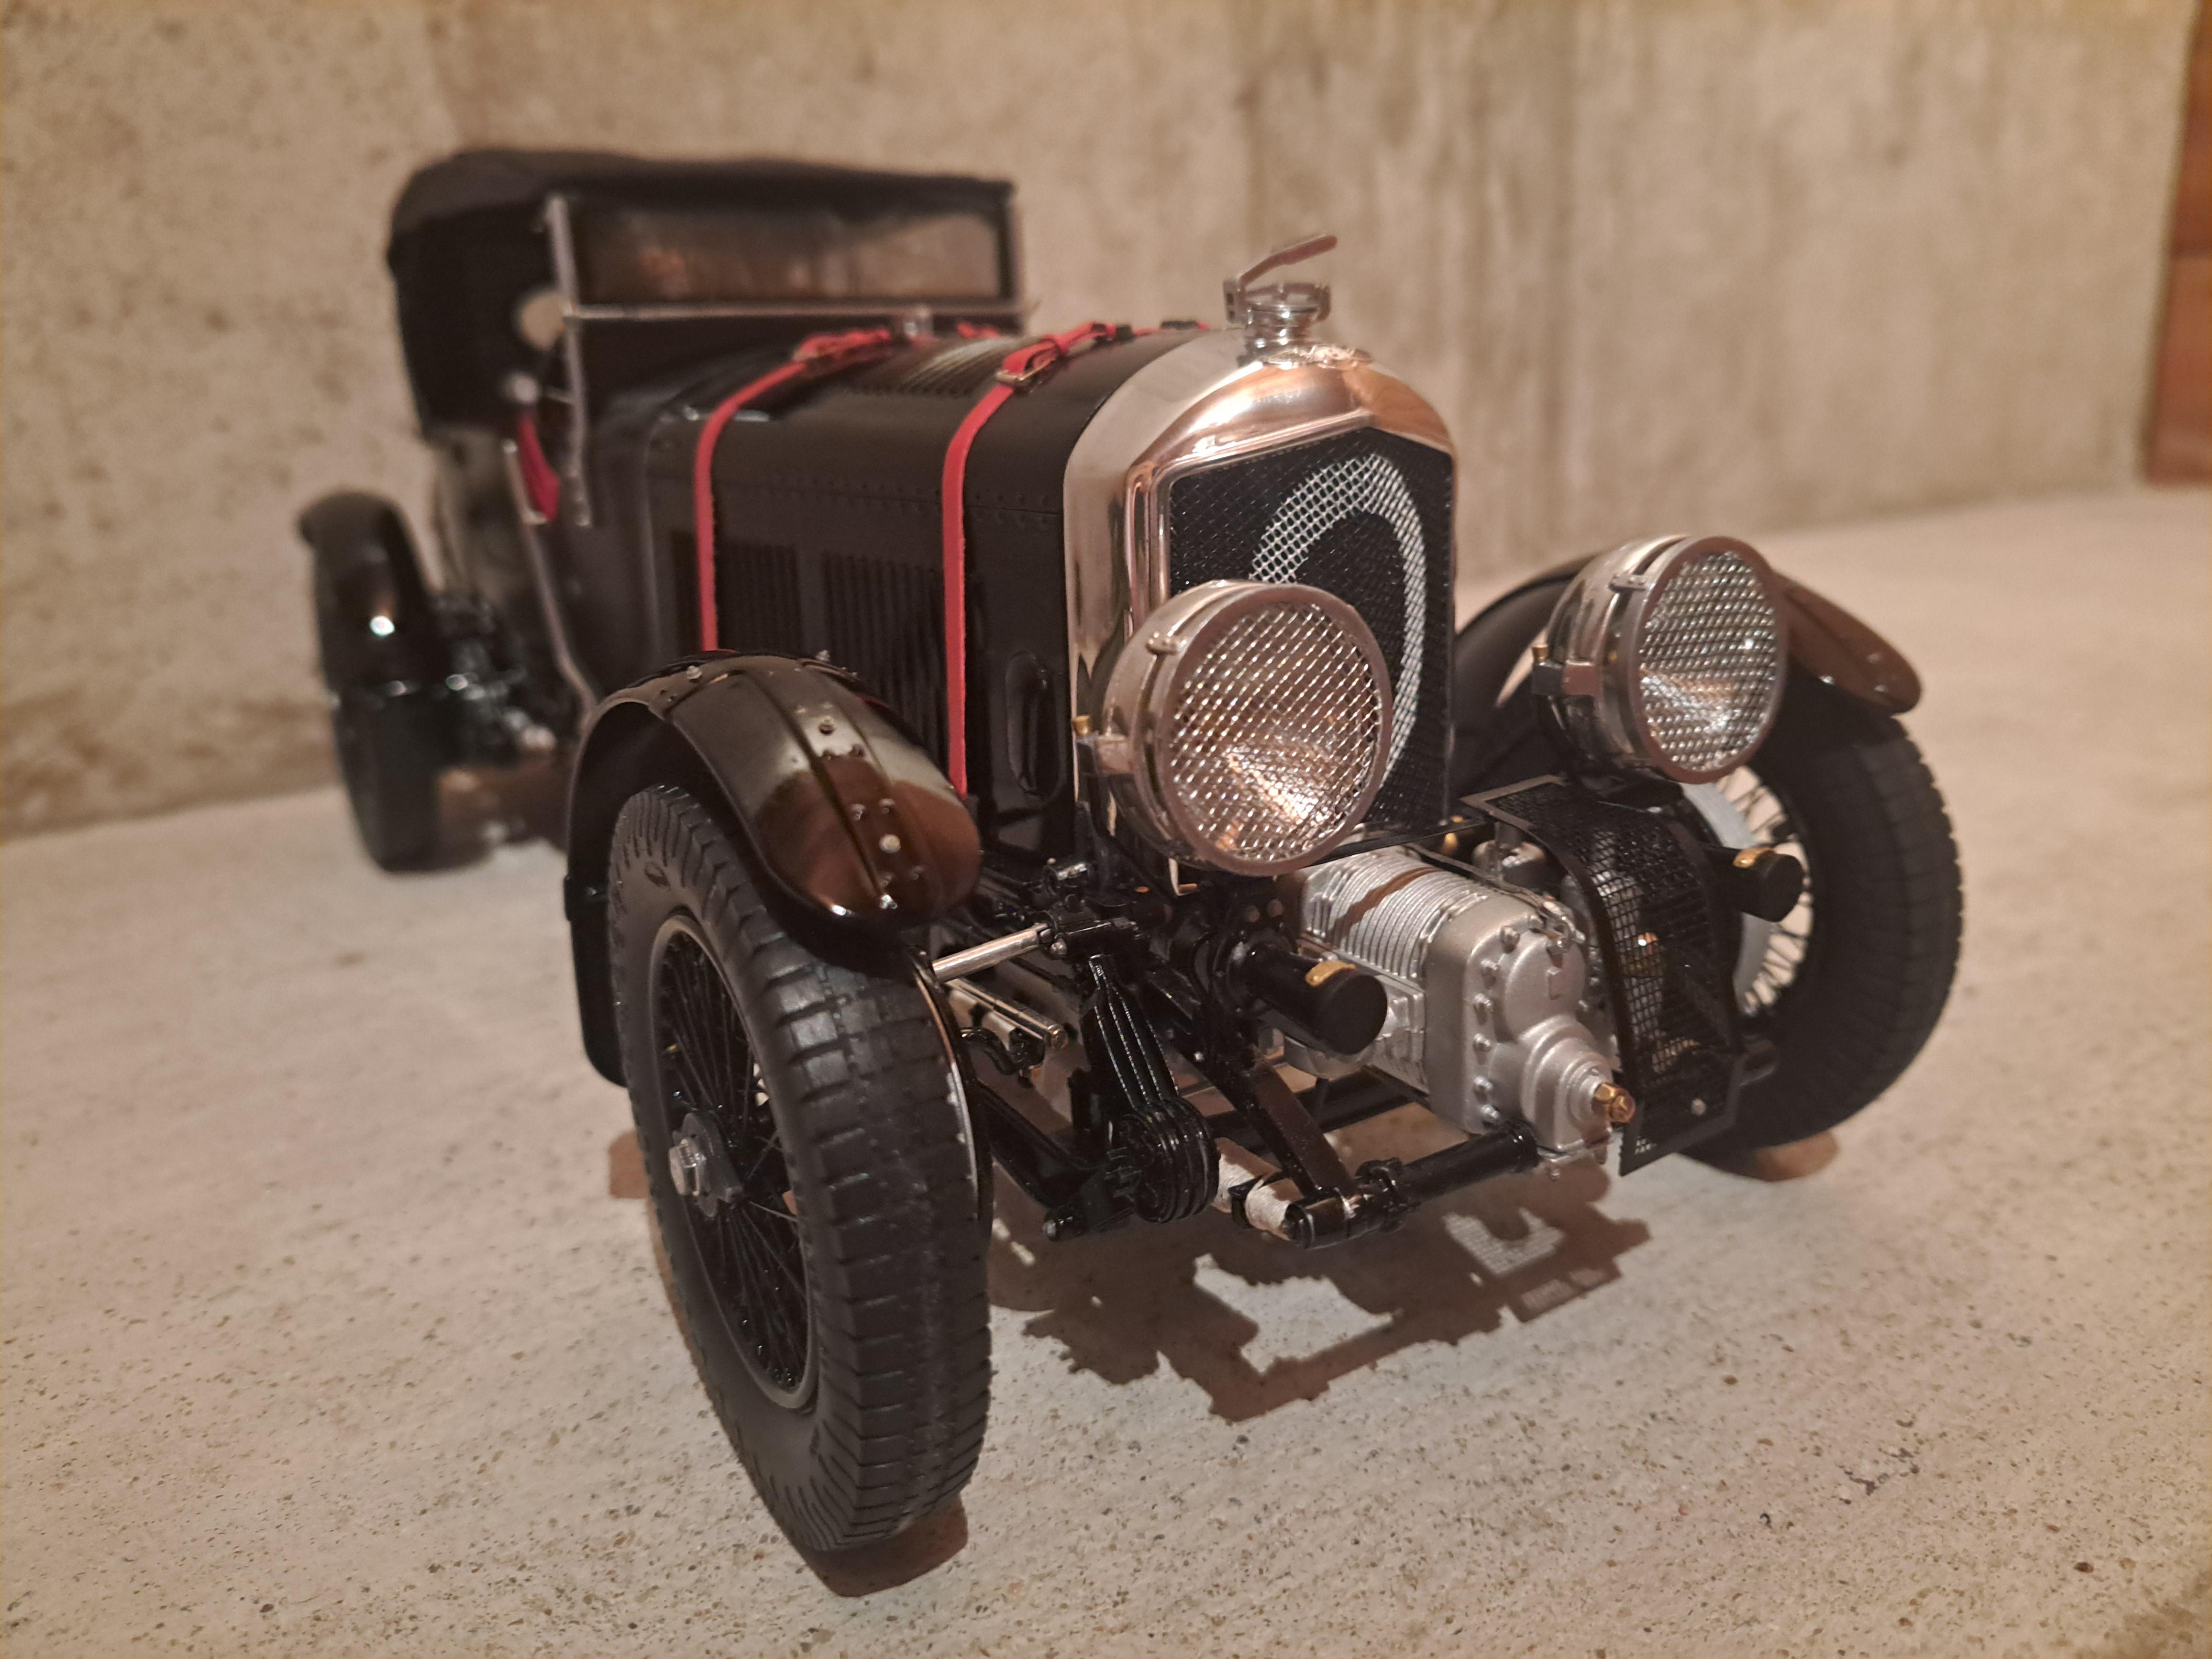
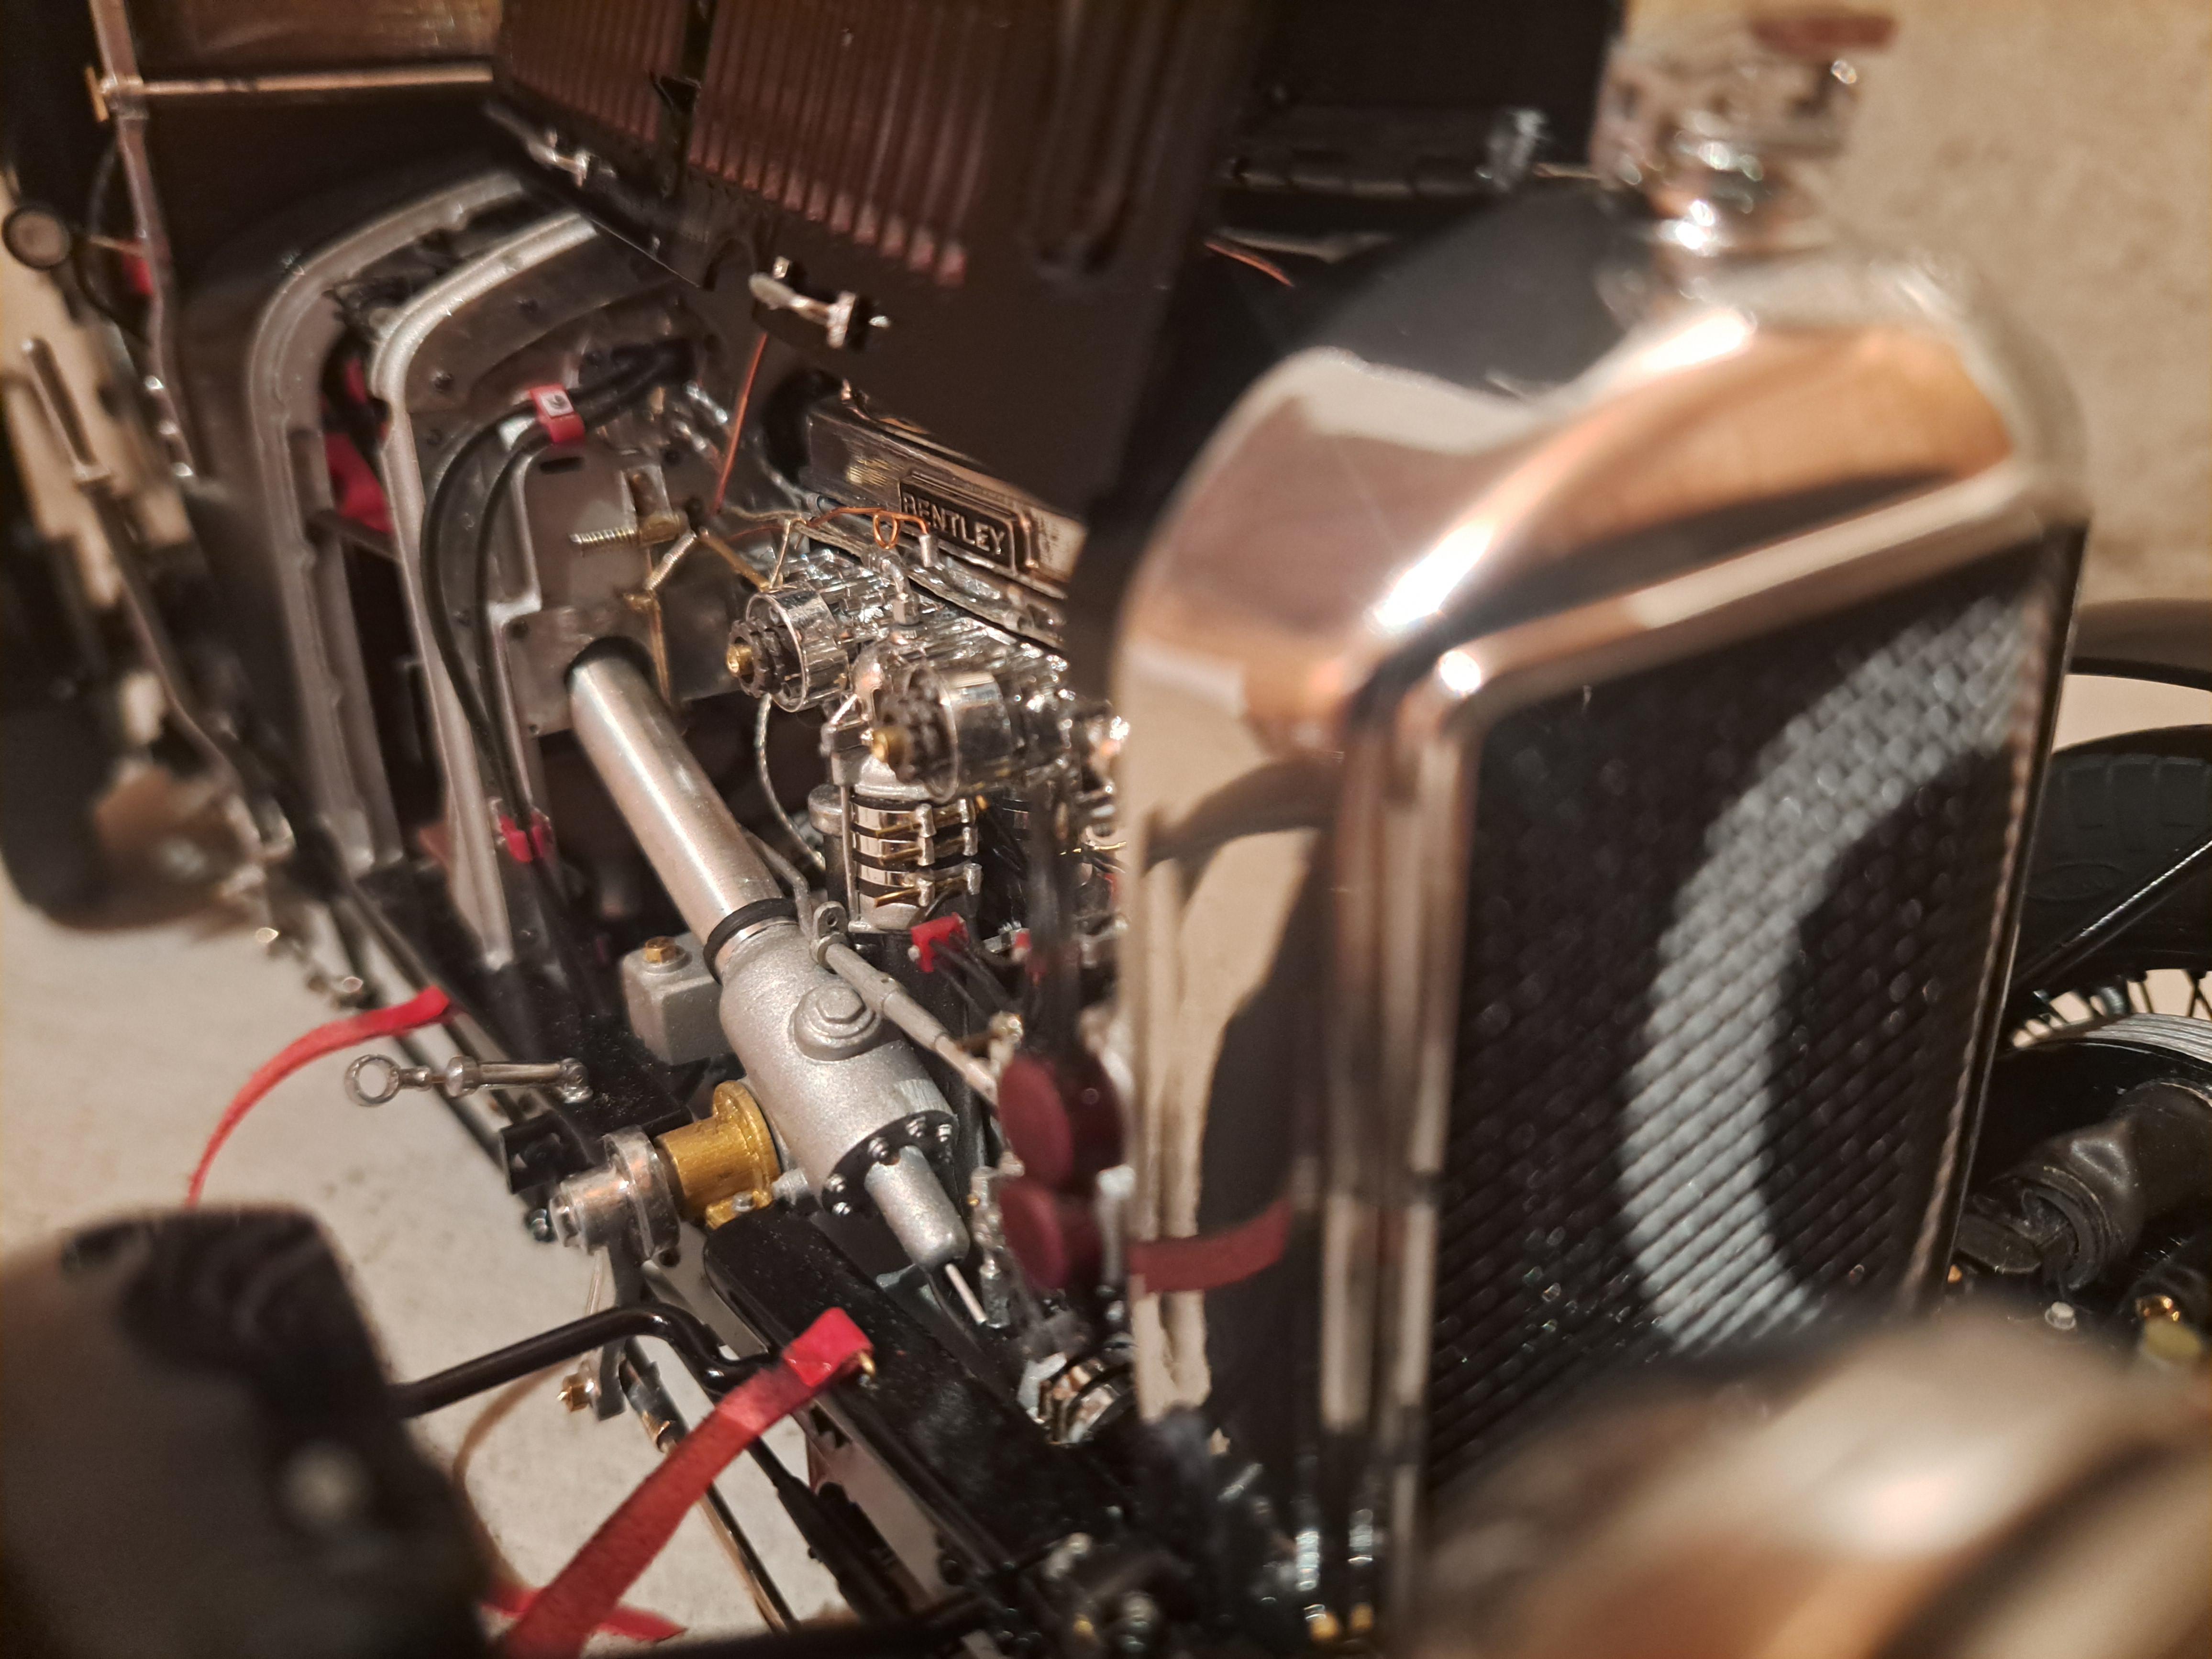
Took some pictures of the finished model. I'm definatly better at making models than photography but still, I think some are good. Interior With top up Motor And next to another 1/12 scale model (at least until I finish the display case) Voilà !!
-
Bugatti fan, you're probably right about scratch building most of it. I might be able to use the wheel hubs, brake linkage, steering mecanism, the frame that would need to be stretched, motor ( which I would need to transform into a V12, reprint the block and 1 new head). The motor should actually be a V16, I'll see when and if I get there. It would certainly be a massive build, both literally and figuratively.
-
I finaly got around to making my web site. I'm no web designer so it's simple but I think all necessary info is présent. www.3designmodels.com
-
Hello all, I just wanted to do a little update on this futur project. I've been scratching my head as to what direction this restoration should take. Partiel or full resto? Moderate or extreme add ons? Keep the rolls stock or venture in some modifications ? Well, I think I found what I would like to do. You see, I'm a big fan of Marvel films. And this summer, I decided to watch them all while I do my rowing every morning (less boring that way). The first one (when taken cronologicaly) is Captain America. And that's when my idea came. I'll try to transform the Rolls into Red Skull's Hydra coupe. Witch is this. You have to admit there is a certain resemblance (with a lot of imagination) It would requier massive modifications, at 1/8 scale, the Hydra car would be over 3 feet long and 1 foot wide. Not sure if I would bring it to that size but I would certainly go the 6 wheel route with the extra long hood and super cool rear end. This car being nothing more than a movie prop, I feel I could do just about whatever I want without offending too many people. More to come...
-
Well, the dashboard is done and with it, so is this build. Took me a little over 1 year but I think it was well worth the effort. I still need to finish the display case and to do a good dusting of the model. I'll eventually take some nicer pictures of the complete setup but until then, here are a few shots of the finished dashboard. Vs the real thing Vs the real thing thank you for following my build, hope you enjoyed it.