Firebuilder
-
Posts
211 -
Joined
-
Last visited
Content Type
Profiles
Forums
Events
Gallery
Everything posted by Firebuilder
-
Fire investigation unit
Firebuilder replied to Firebuilder's topic in WIP: Model Trucks: Big Rigs and Heavy Equipment
Thank you, I have tried multiple ways of taping and agree the thinner tape has many bleed through issues. Have not been able to make any further progress, bench time has been limited. Hope to get back to it this week. -
Fire investigation unit
Firebuilder replied to Firebuilder's topic in WIP: Model Trucks: Big Rigs and Heavy Equipment
I used the amt ALF fenders. I cut them in half , lengthwise right at the spot where the chrome inserts go, then used the outer edge of the fender. It was almost a perfect fit. Just needed to do a little sanding on the body wheel opening to match the fender flare. -
A&N Freightliner Wrecker
Firebuilder replied to Model Builders Mafia's topic in Model Trucks: Big Rigs and Heavy Equipment
Nice built great color and details -
Diamond Reo/Montone dump body
Firebuilder replied to Scott Eriksen's topic in WIP: Model Trucks: Big Rigs and Heavy Equipment
Nice build choice Scott , they have so many different types of trucks/ equipment that you could spend a lifetime building their fleet and not run out of options. -
Peterbilt 379 RV
Firebuilder replied to vincen47's topic in WIP: Model Trucks: Big Rigs and Heavy Equipment
Amazing attention to detail! Great looking motor, wow -
Fire investigation unit
Firebuilder replied to Firebuilder's topic in WIP: Model Trucks: Big Rigs and Heavy Equipment
I would have preferred a decal, it would have been much easier. And you are right the wheel wells made it more difficult to line things up. For the cab I didn’t glue on the fender extensions making it easier to run the tape across the opening. The box on the other hand I had glued the Fender extensions on prior to paint which made it much harder to line it all up. I should have put more thought into that ! I wish I could have done it with decals, it would have saved a lot of time, and like you said, you could take them off and re apply. With the paint it would be a project in itself to remove them. Some of the bleed through did come off with polishing compound. It is amazing that to my eye things look pretty good, but then once a photo is taken and posted here, the flaws really show up so much more! Too bad I don’t have the eyesight I had 50 years ago. -
Amazing! Great detail and wood working!!
-
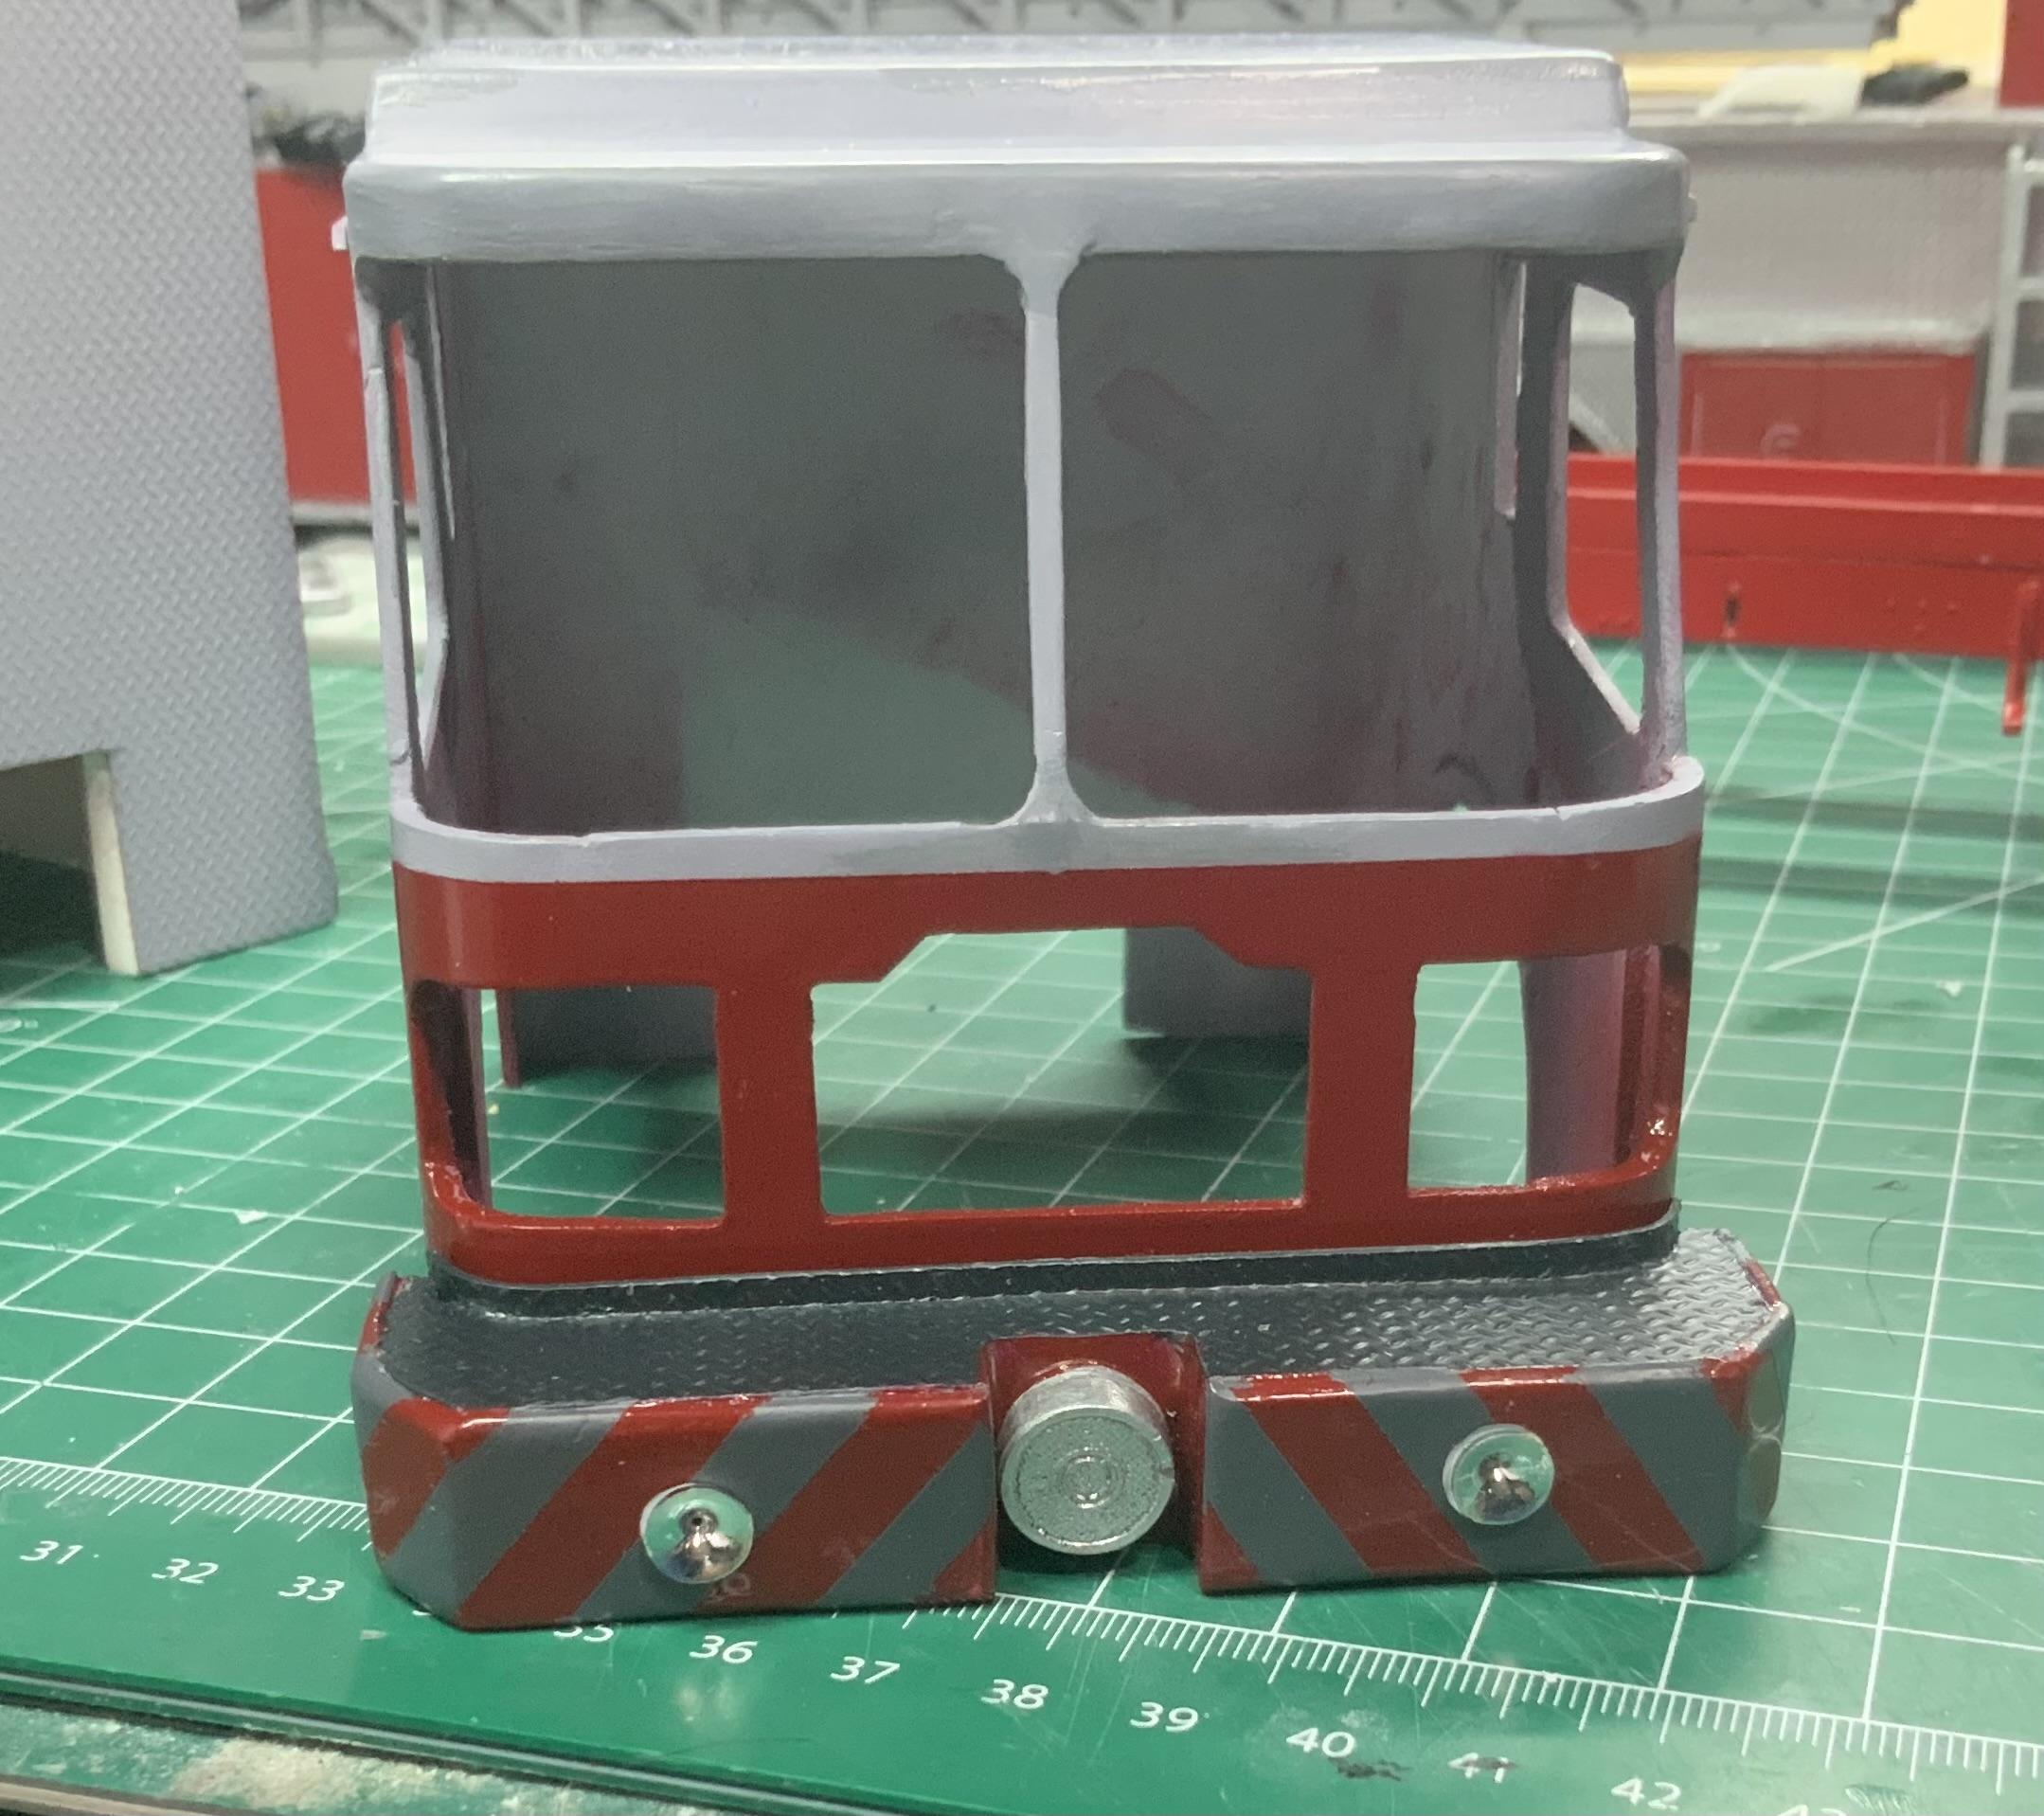
Fire investigation unit
Firebuilder replied to Firebuilder's topic in WIP: Model Trucks: Big Rigs and Heavy Equipment
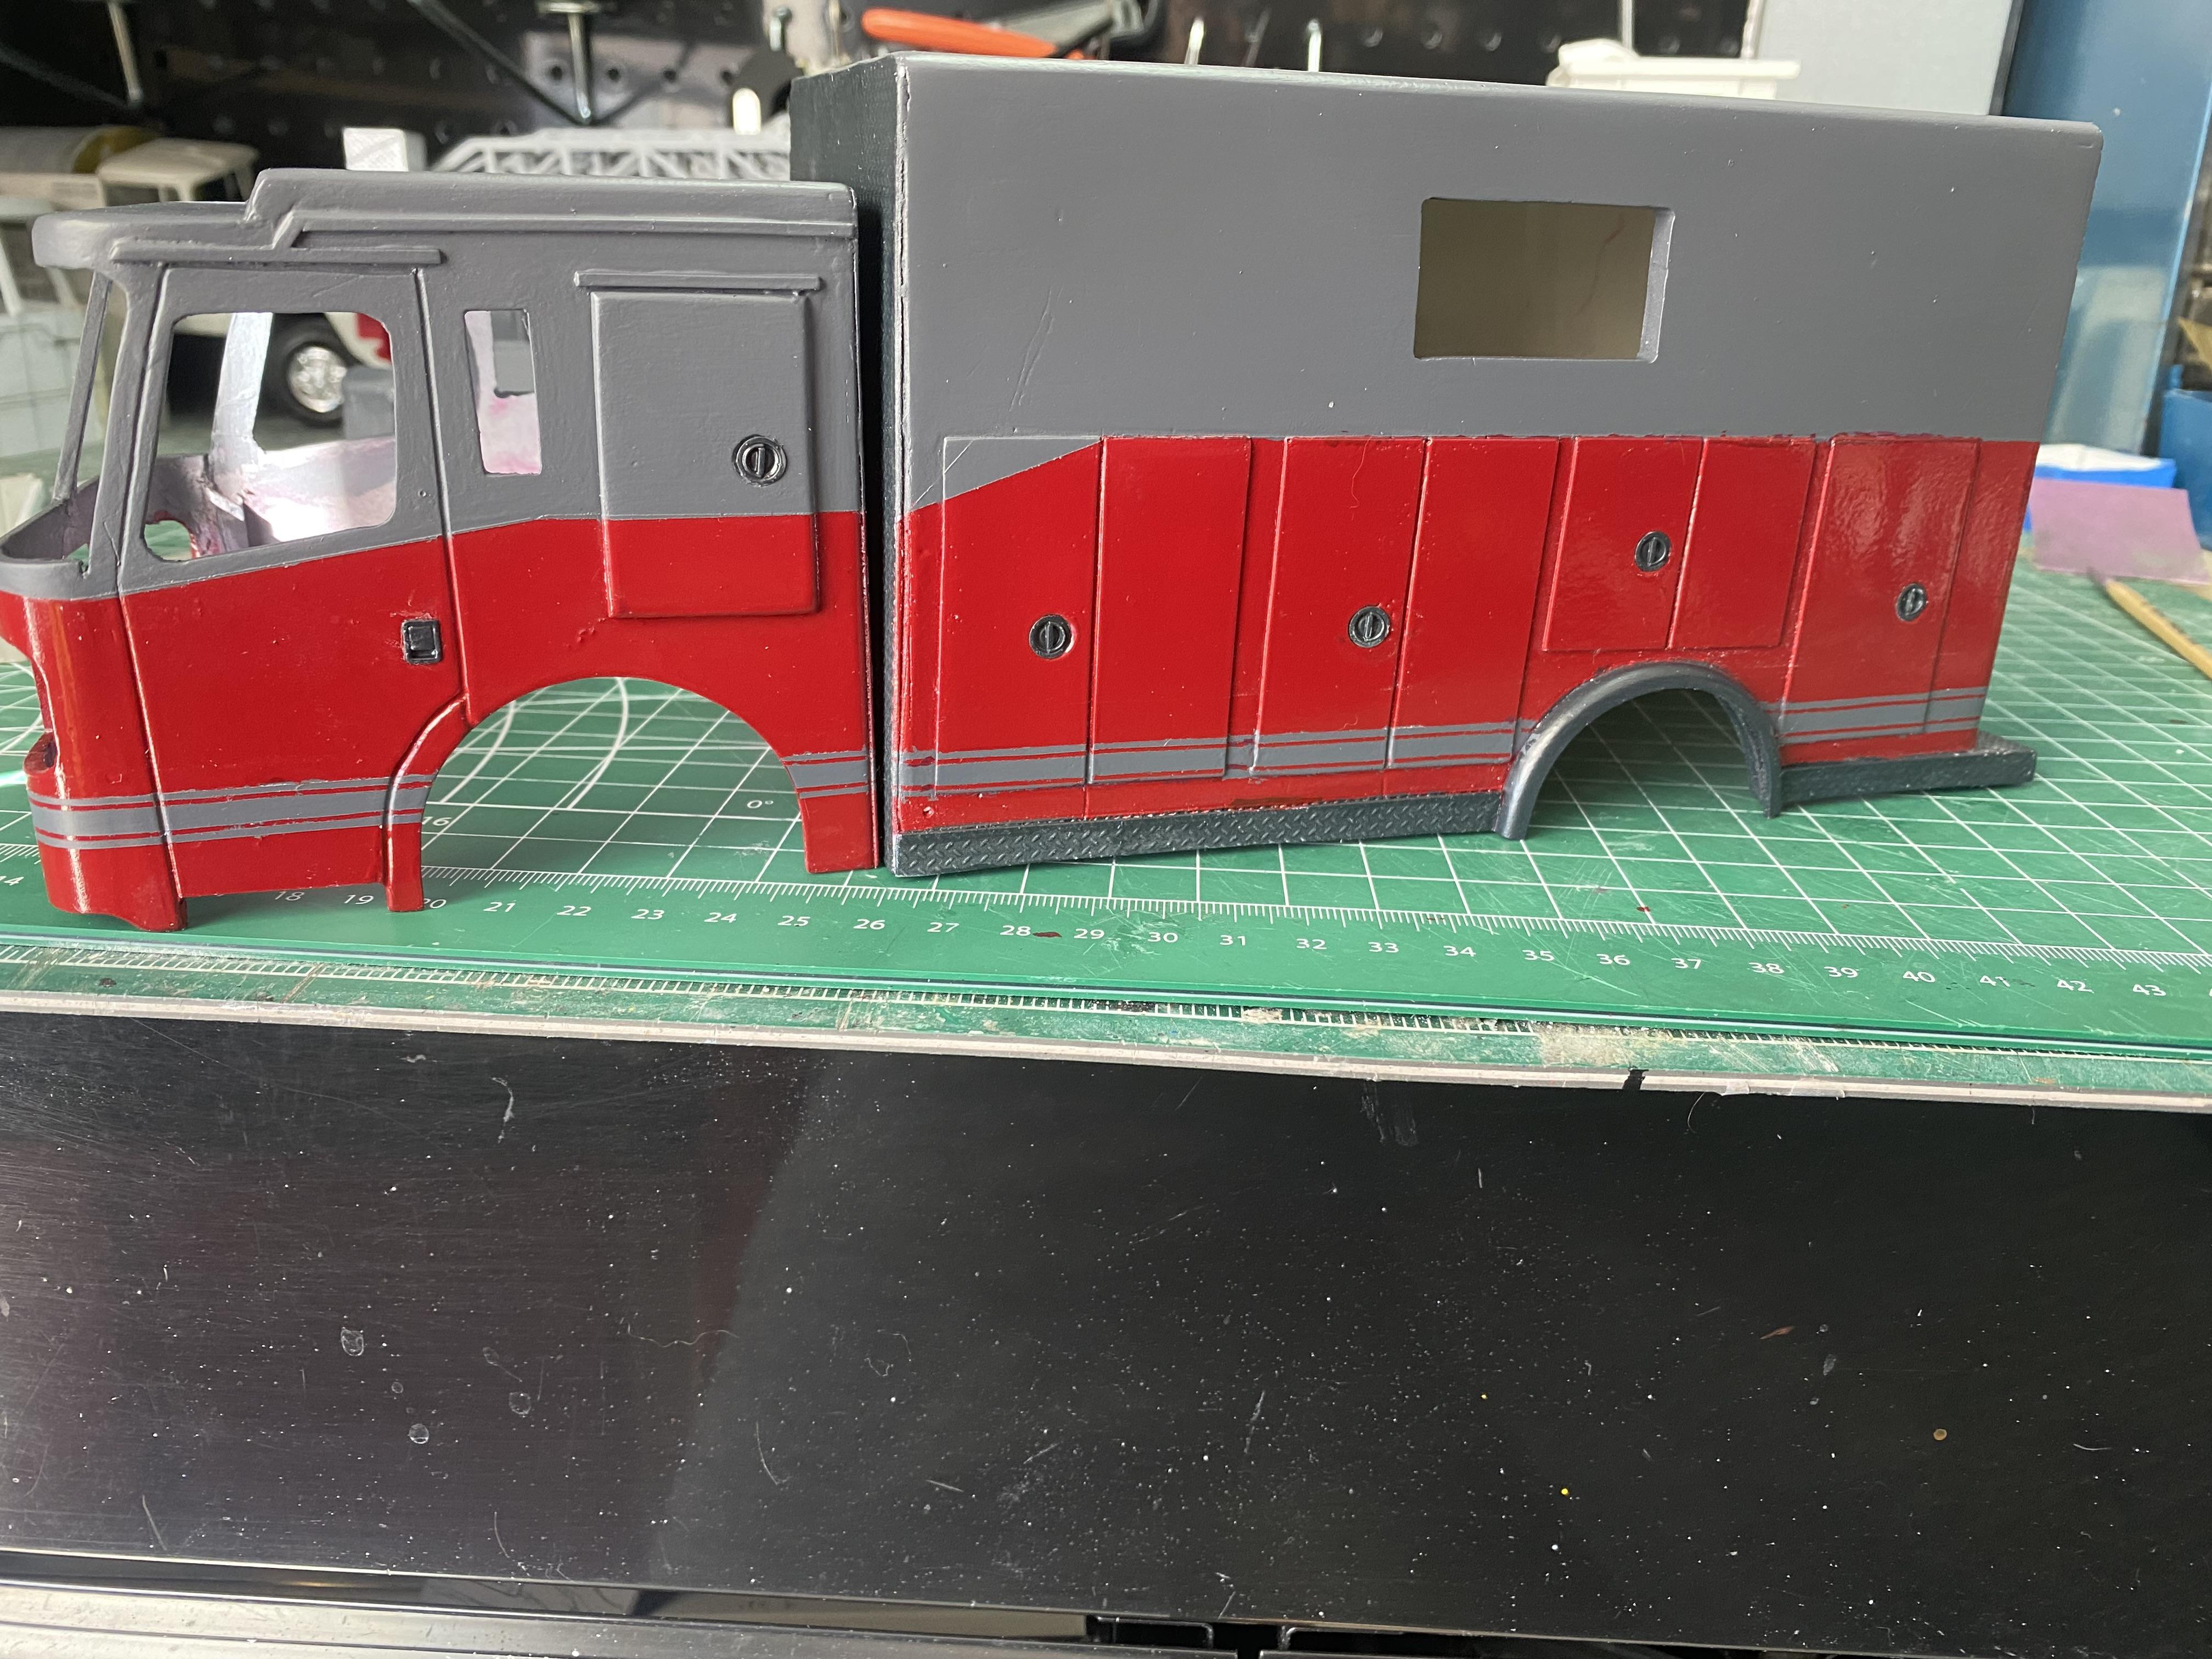
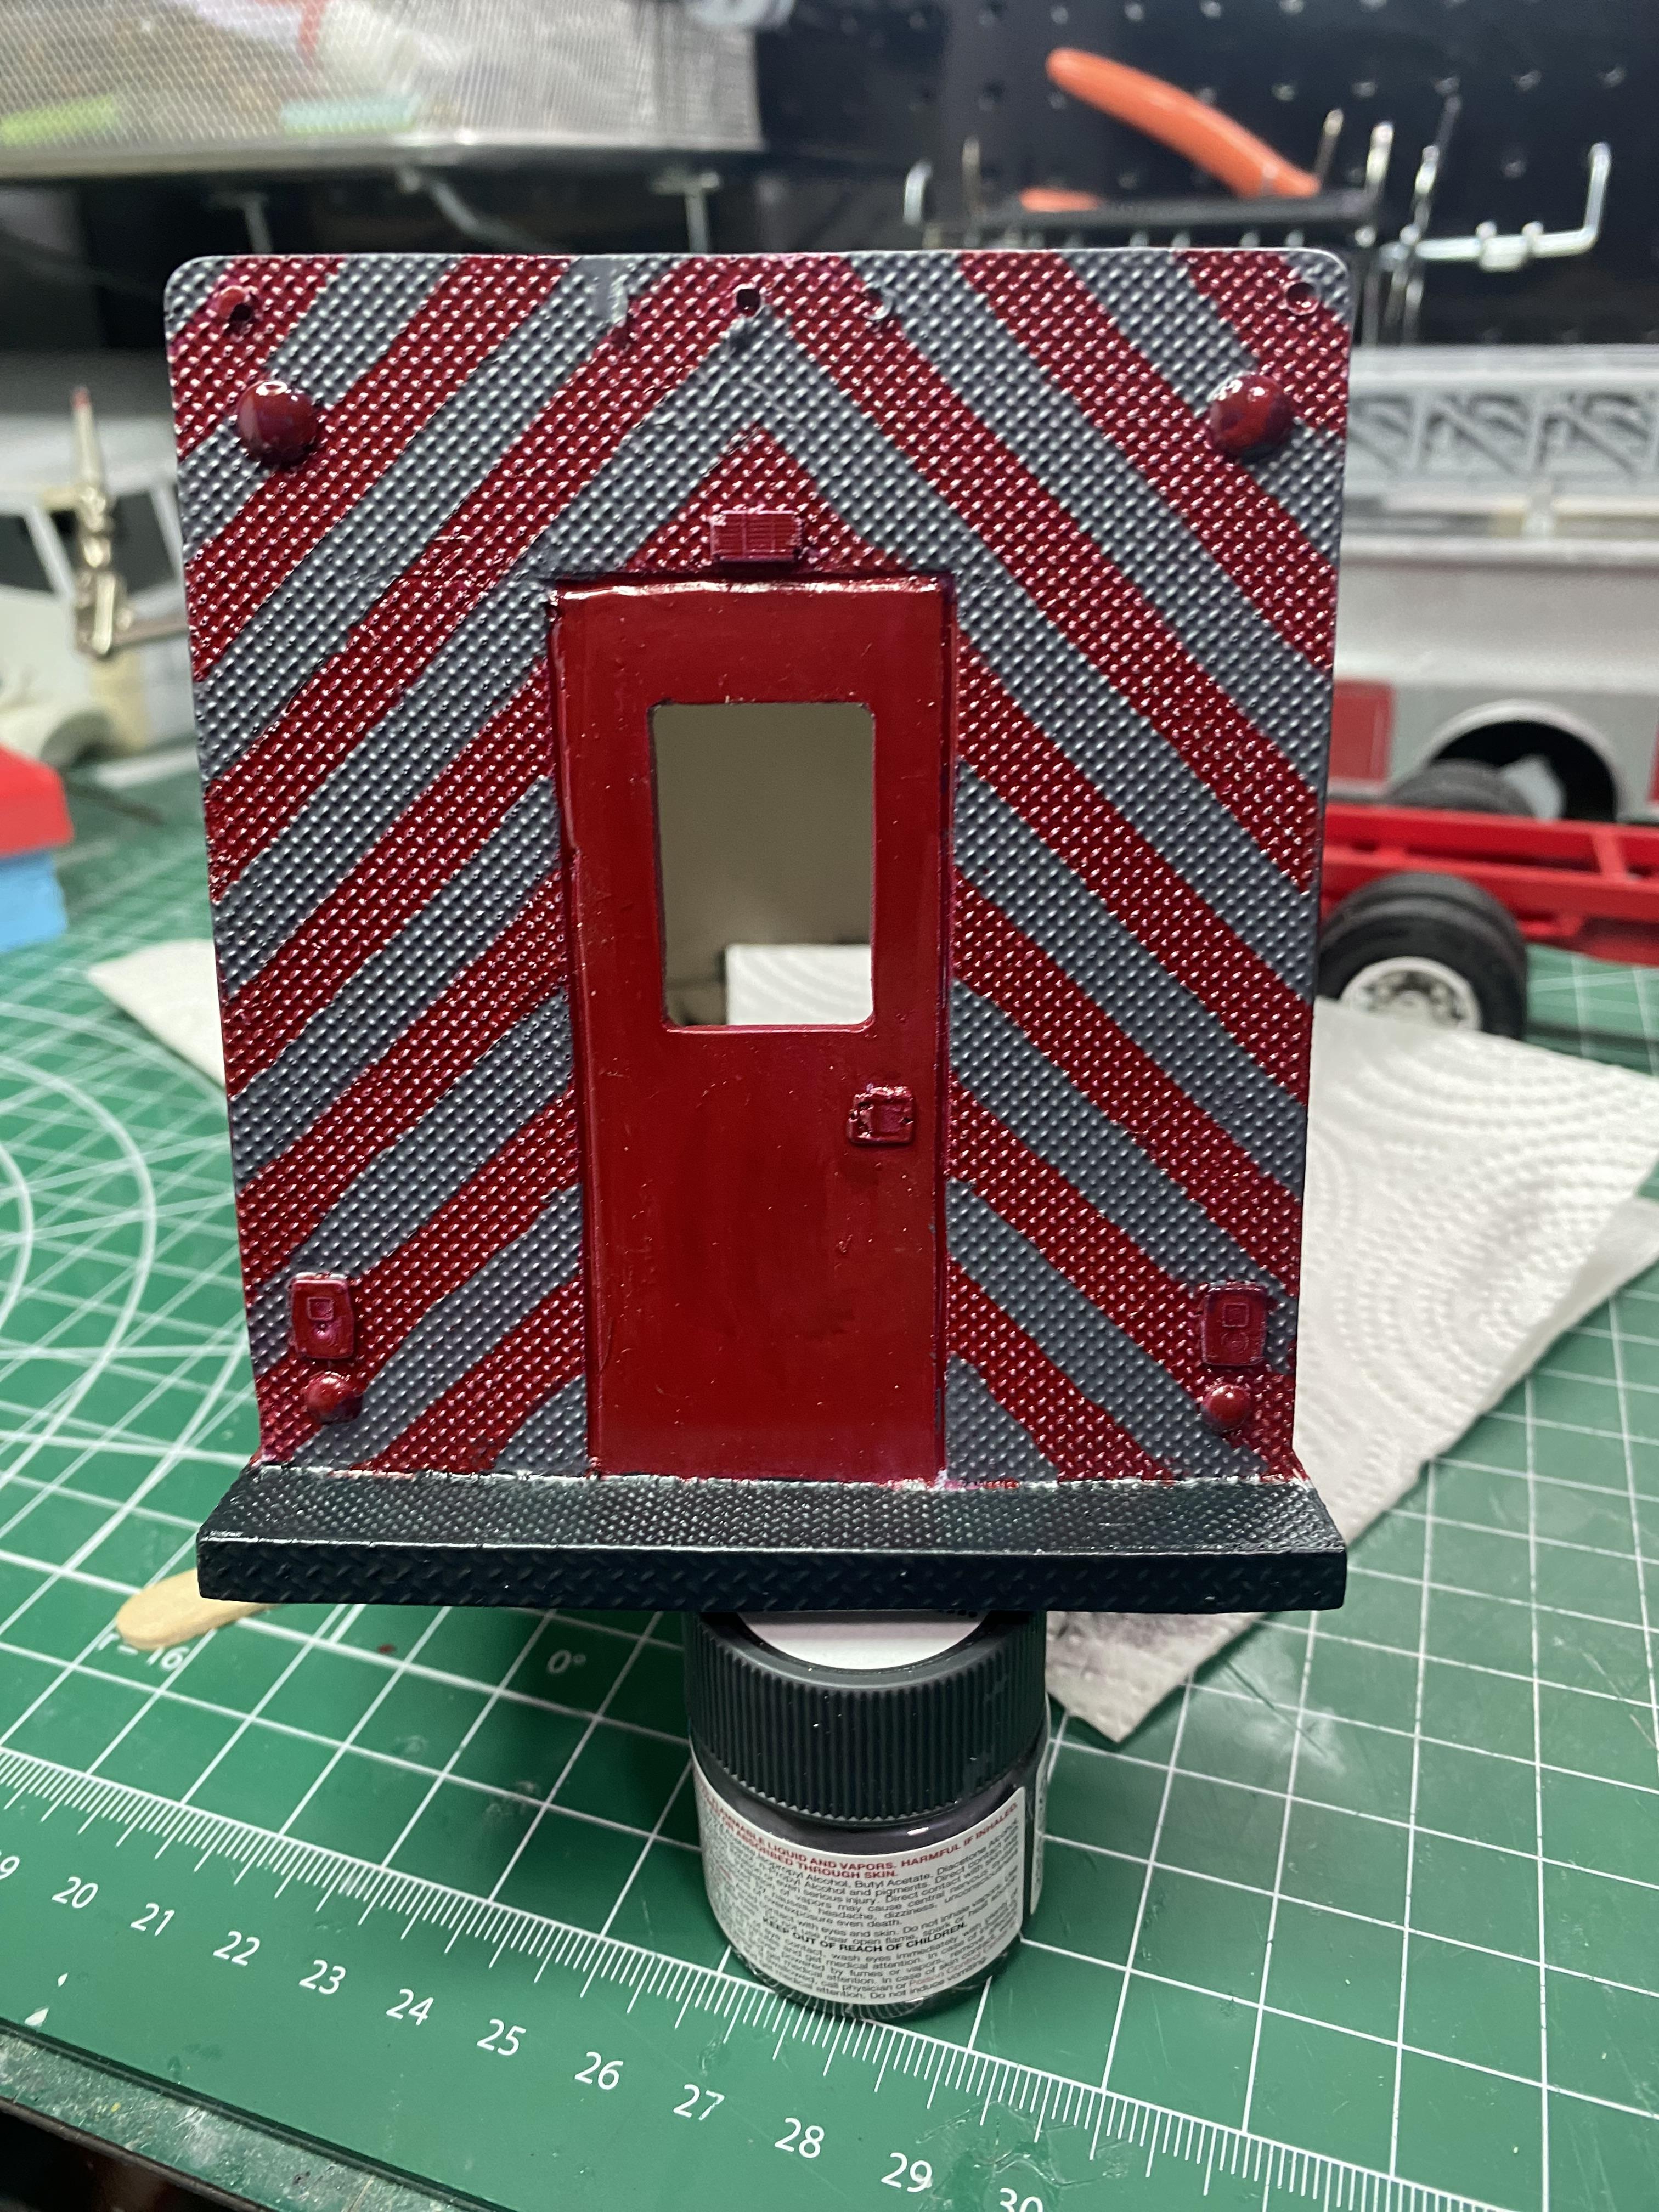
After a lot of taping , the stripes were hand painted. There was minor bleed through. The 1/64 wide tape was a real pain to keep straight.
-
That is huge , with a tractor you will need a big shelf! Looks good so far.
-
Fire investigation unit
Firebuilder replied to Firebuilder's topic in WIP: Model Trucks: Big Rigs and Heavy Equipment
Your decals look great. It is good you have the alps printer and the skills to use it ! I don’t think I can pull off letting like that with my ink jet printer. -
Fire investigation unit
Firebuilder replied to Firebuilder's topic in WIP: Model Trucks: Big Rigs and Heavy Equipment
Thank you, it sure does take a lot of time, there is a lot of redoing things that seem right at first, then once in place………….. you see the fit is just not right. the work part is relaxing and keeps me busy. Dom -
379 Peterbilt (Last Ride)
Firebuilder replied to J.B. Customs's topic in Model Trucks: Big Rigs and Heavy Equipment
Nicely done, a great tribute to your father! -
Fire investigation unit
Firebuilder replied to Firebuilder's topic in WIP: Model Trucks: Big Rigs and Heavy Equipment
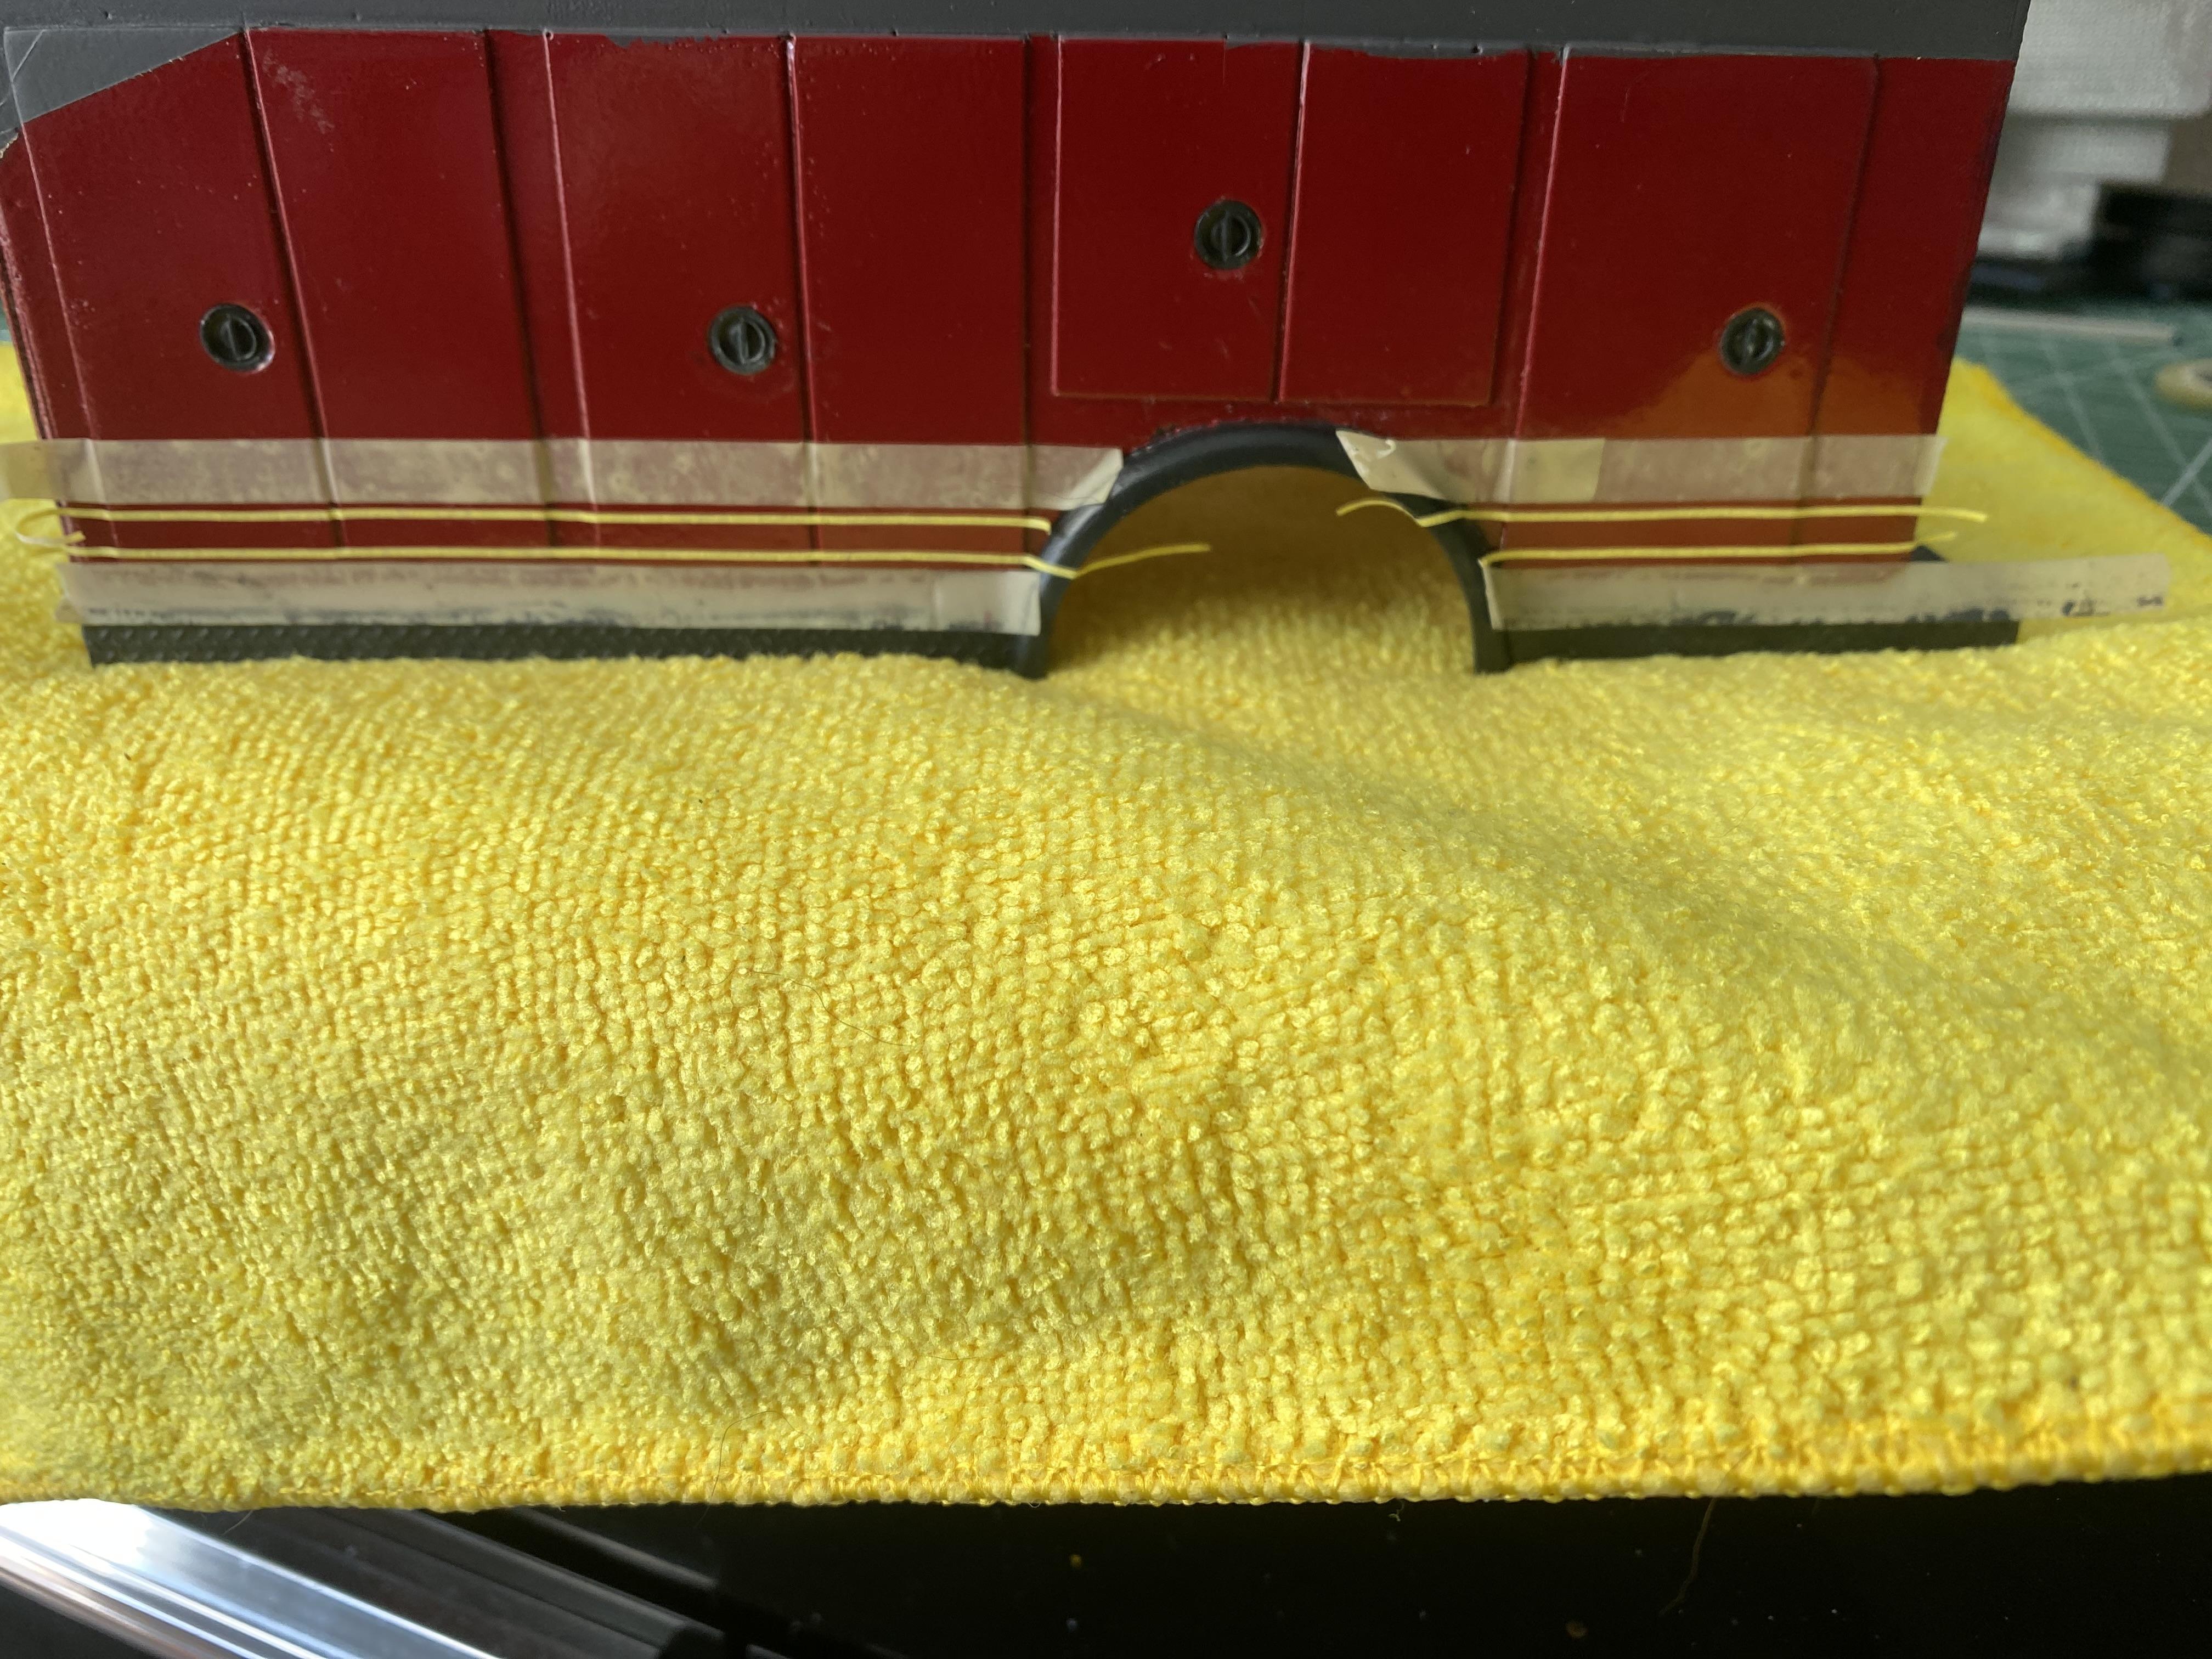
Scott, thank you. And I would not want to try this on a real rig! I leave that to professionals like you . It took a while to tape this and get it all to look even. I was worried the grey paint would bleed under the tape due to the tread plate , but luckily it was only minor in a couple of spots and a quick touch up of the red was easy enough. -
Fire investigation unit
Firebuilder replied to Firebuilder's topic in WIP: Model Trucks: Big Rigs and Heavy Equipment
Aaron , Nice looking decals, my computer skills are limited, wouldn’t even know where to start to make the stripes and emblems like you have done . Can the letters be made with a shadow effect with micro soft word? -
Fire investigation unit
Firebuilder replied to Firebuilder's topic in WIP: Model Trucks: Big Rigs and Heavy Equipment
Thank you -
1941 Chevy Truck
Firebuilder replied to Zippi's topic in Model Trucks: Pickups, Vans, SUVs, Light Commercial
Nice build, great color and details -
Fire investigation unit
Firebuilder replied to Firebuilder's topic in WIP: Model Trucks: Big Rigs and Heavy Equipment
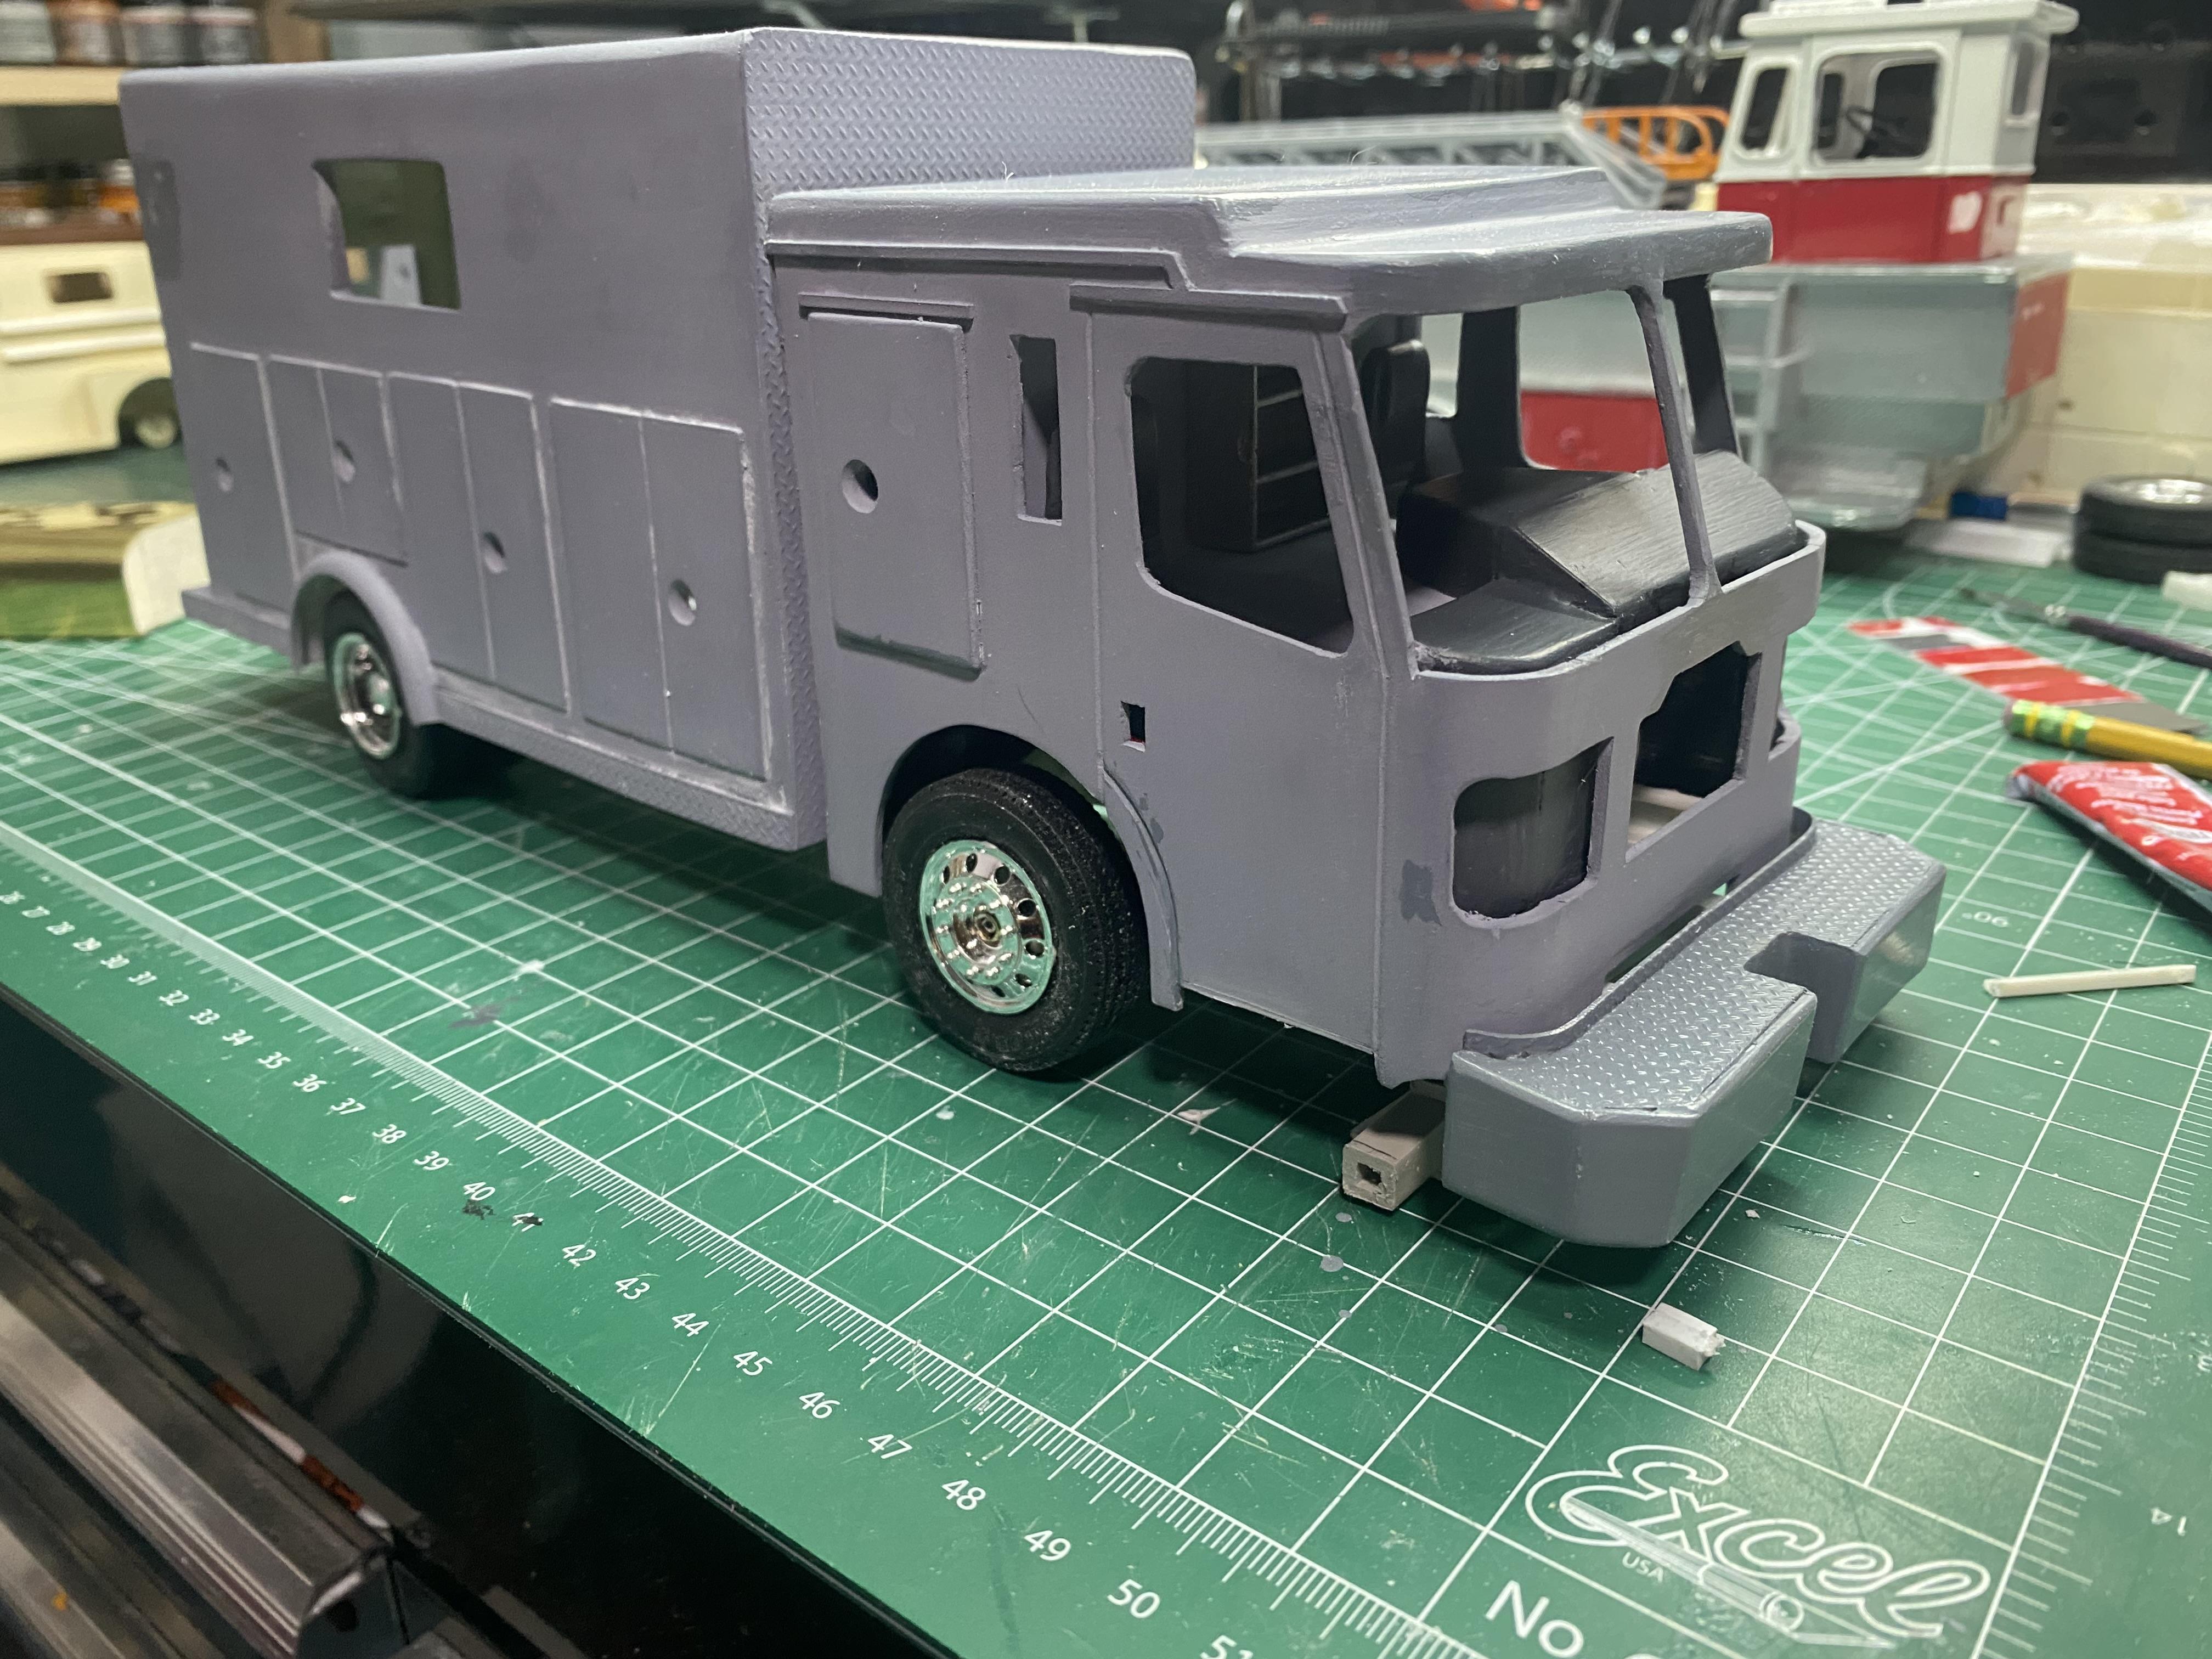
thank you, the resin casting is new for me, but it is working out great so far. Had a few issues at first, but now got the process working. I don’t have the capability to print decals, and there are very few online , so I am stuck with what I can find. -
Fire investigation unit
Firebuilder replied to Firebuilder's topic in WIP: Model Trucks: Big Rigs and Heavy Equipment
Thank you -
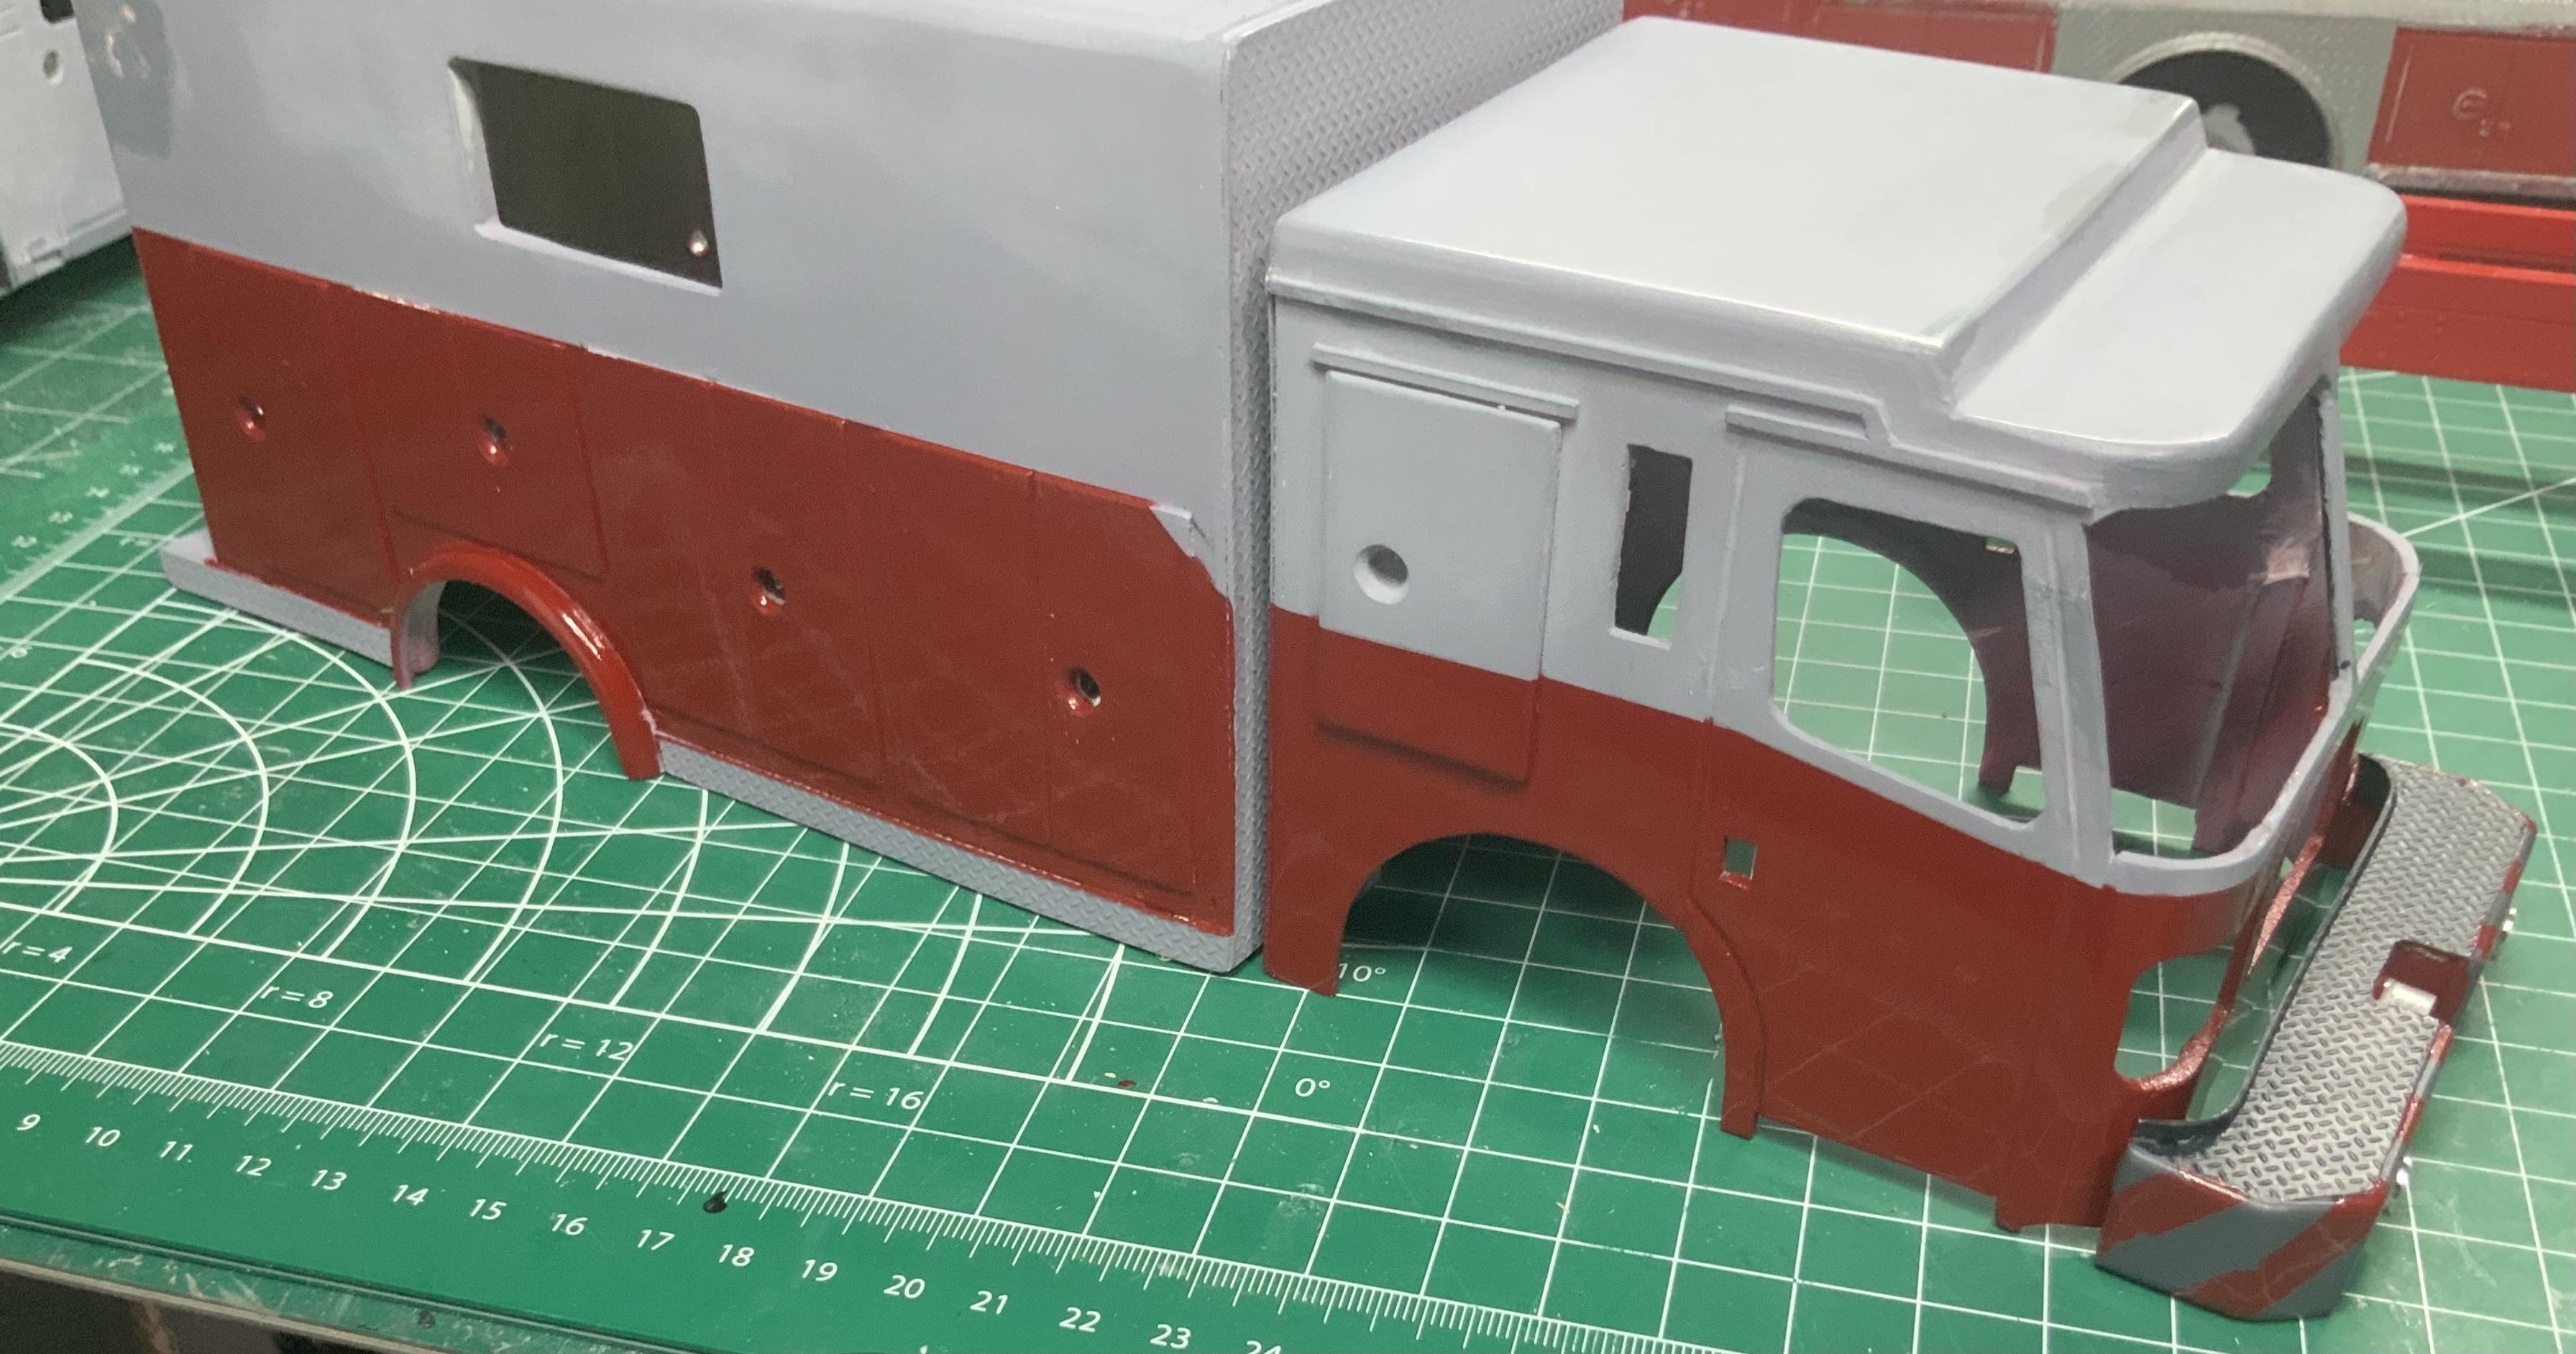
Fire investigation unit
Firebuilder replied to Firebuilder's topic in WIP: Model Trucks: Big Rigs and Heavy Equipment
The rear of the box chevrons have been painted, the cab had first coat of the grey completed .
-
Fire investigation unit
Firebuilder replied to Firebuilder's topic in WIP: Model Trucks: Big Rigs and Heavy Equipment
Thank you Gary -
Looks great Charlie , amazing work!
-
1/32 Mack F700
Firebuilder replied to The Brush's topic in WIP: Model Trucks: Big Rigs and Heavy Equipment
Looks good, different use of the CF fire cab. I like that -
IH Transtar II Eagle
Firebuilder replied to Scott Eriksen's topic in WIP: Model Trucks: Big Rigs and Heavy Equipment
Very nice work. Does the dehydrator make the paint any harder then just letting it air dry for several days? It may be a new technique I have to learn about. -
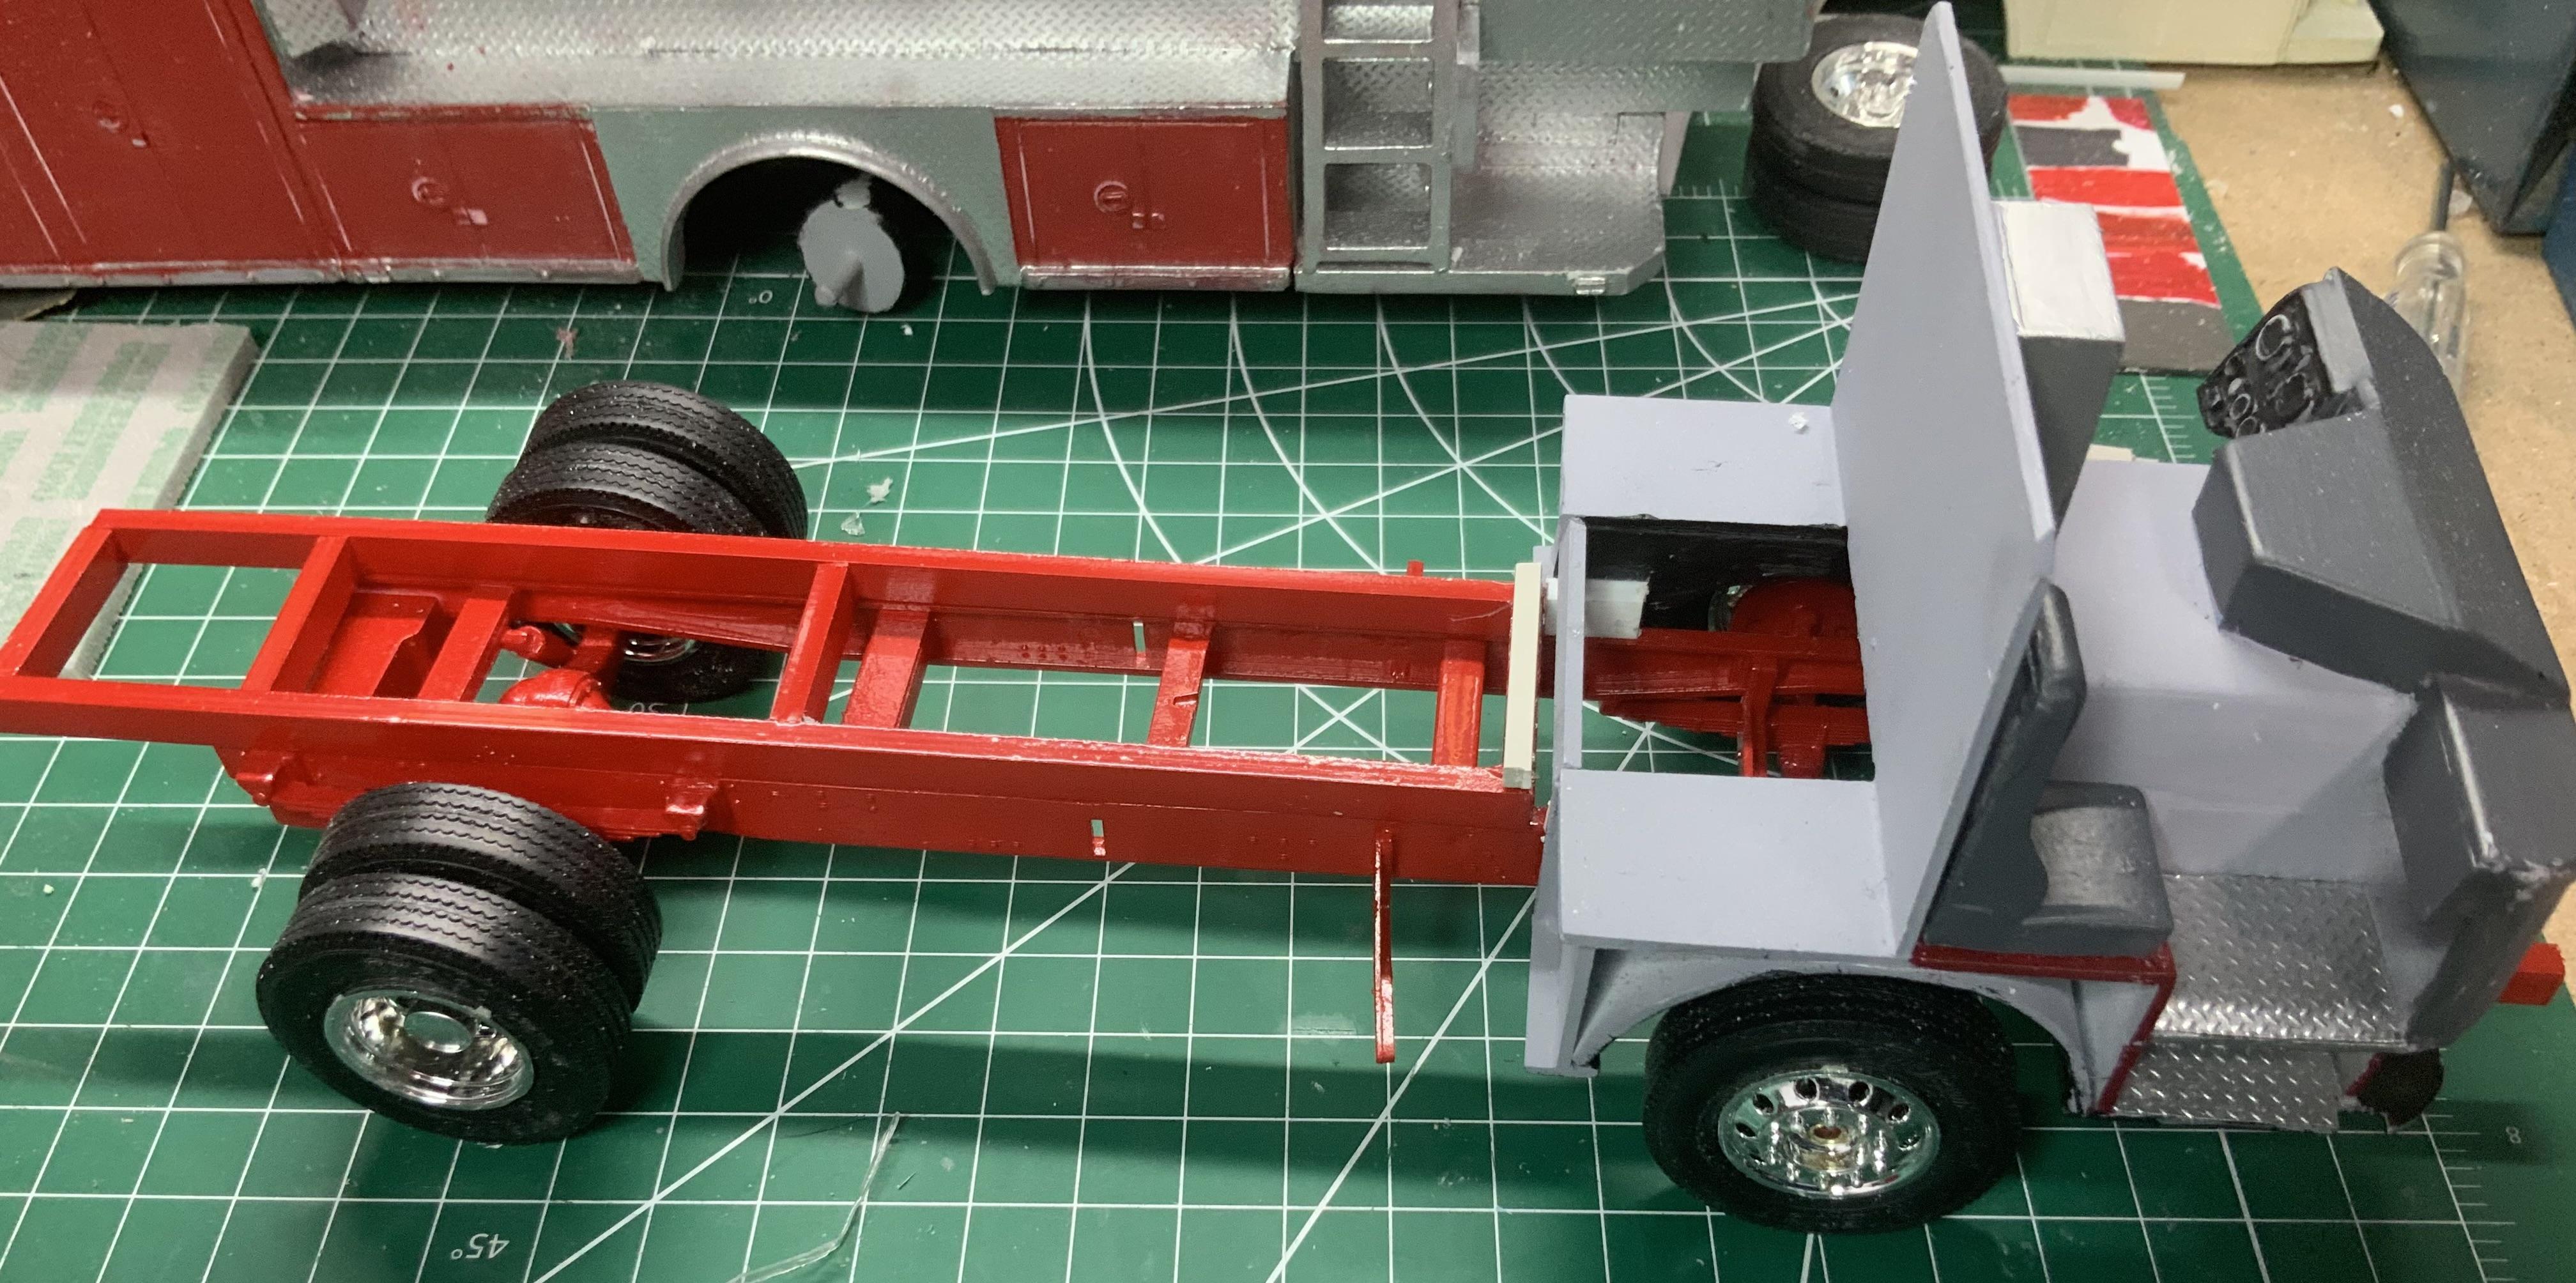
Fire investigation unit
Firebuilder replied to Firebuilder's topic in WIP: Model Trucks: Big Rigs and Heavy Equipment
The front bumper is done, and some paint on the lower half of cab and body. Then the top halves will be painted grey like on the bumper chevrons. The chassis still need some detailing, but is painted.
-
IH Transtar II Eagle
Firebuilder replied to Scott Eriksen's topic in WIP: Model Trucks: Big Rigs and Heavy Equipment
I like the motor detail, right down to the wires and labels. I have never done that to the motors, just build them from kit. Maybe after seeing so many details on here I should start doing this in the future.