Ajay
-
Posts
363 -
Joined
-
Last visited
Content Type
Profiles
Forums
Events
Gallery
Everything posted by Ajay
-
Thanks Ken I swapped the brake rotors for some smaller Fujimi ones Regards Andy
-
Finished this one off and happy to report that I had a bit better luck with the lambo doors than on the SRT8. OOB except for Aoshima Fabulous Various rims - I didn't bother with the engine palte but did install the trunk ICE - speakers were changed to one's from Pegasus. All in all an enjoyable build despie it's die-cast origins - at least I saved on glue !. Thanks for looking Andy
-
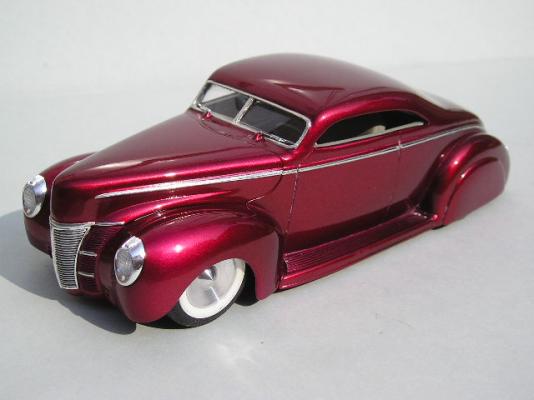
Weather ok today so sprayed it up this afternoon with Zero Paints Dodge 2006 Plum Crazy Pearl - as it's a basecoat it dries matt but to give you and idea of the final colour I sprayed some clear over the basecoat on a scrap body. Thanks for looking Andy
-
Hi Dennis - they're the custom rims from the California Wheels Chevelle Thanks Andy
-
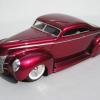
Just a quick update - smoothed out the body by removing the GTX badges, rocker cover moulding, rain gutters, hood pins, door/trunk locks & wheel arch chrome trim. The hood scoop, marker lights and front badge recess have all been filled using Tamiya expoxy putty. Weather permitting, hope to spray the colour coat tomorrow. Thanks for looking Andy
-
Thanks for the feedback - much apppreciated Cheers Andy
-
Just at the very early stages but thought i'd post a quick pic. It'll be similar in style to my black Charger - deleted marker lights etc for a smooth look and lowered stance. Rims are from the California wheels Chevelle & I'll probably update the engine & interior slightly. Colour will be 06 Plum Crazy Pearl. Thanks for looking Andy
-
Pretty much except for the rims - in the end I didn't add the engine plate as the detail is minimal. I didn't add the trunk speakers etc as the end of the trunk fouled the rear window glass and I was scared of the paint chipping. Thanks for the comments Guys Andy
-
Got round to finishing this one off today The kit went together nicely although if I was to build it again I'd be tempted to follow Zoom Zoom MX5 & glue the doors closed before spraying it to get a flush fit & even gaps around the scissor doors. Thanks for looking Andy
-
Just a couple of pics of the completed interior Thanks for looking Andy
-
Just a couple of pics of the completed interior Thanks for looking Andy
-
Just a quick update with the paint polished out - I still have to do the trunk :- . The custom grille is the optional one from the kit - not sure which one I'll use although I think I prefer the stock one. Also made a start on the interior :- Cheers Andy
-
Made a start on the interior toady - the inserts are Tamiya Neutral Grey (XF-53) & the rest is automotive satin black mixed with some white primer to lighten it a bit. Thanks for looking Andy
-
After a period of car building inactivity over the winter I'm on a bit of a roll at the moment. This is the Revell Uptown kit with Aoshima Fabulous Various MB5 20inchers. Clears a bit thick in places but should polish out ok. Thanks for looking Andy
-
I originally intended this one it as a quick build without the engine but I had a rumage around in the spares box last night and came up with these: I think the carbs are from Replicas & Minatures - not sure where the "trumpets" came from(posiibly Sakatsu). Obviously the builder got some cash for his birthday and decided to spend spent it on the engine as opposed to a bodykit ! Cheers Andy
-
As it's a nice day thought I'd take the opportunity to take an outdoor shot I still need to fine tune the hinge to bring the leading edge of the door nearer the body. Thanks for looking Andy
-
This which is the recent Aoshima release of the Toyota Corolla Levin - the owners on a tight budget so the only mods are a respray, c/f bonnet and change of wheels & tyres. Thanks for looking Andy
-
Hi Jody The larger pulley was an inner wheel from (I think) the AMT 56 Ford Victoria Kit sprayed with Alclad Chrome - I added a Hoppin Hydros bullet centre cap. For the front one I cut down a bullet centre hubcap I had lying in the spares box - don't remember where it came from - sorry !. Cheers Andy
-
Thanks Zeb I'm from Wolverhampton (near Birmingham in the Midlands) - I usually use automotive acrylic touch up paint from Halfords (a UK parts store) either straight from the can or via my ancient Badger 200 airbrush. For clear I've recently started using Mr Hobby Super Clear gloss rubbed out with Micro Mesh polishing cloths and finished off with Tamiya rubbing compound & The Treatment wax. Cheers Andy
-
Thanks Scott - it's the Revell Uptown kit with working scissor doors. Cheers Andy
-
Thanks Steve The rims are just resting on the chassis plate at the moment - the suspension is very simplified (metal rod axle) so it won't sit quite as low as in the pic when it's finished but it'll be lower than stock. Cheers Andy
-
Getting towards the end of February and this is my 1st car wip of 2007 - a combination of building Revell choppers, winter weather and a lack of motivation !. This & the Cadillac STS-V arrived from Model Roundup and fired me up again. I haven't done much so far except spray it Volkswagen Canyon Red Pearl & polish out the clear. I've ditched the kit rims (nice but too big imo) and replaced them with Aoshima Fabulous Various MB-5's. Interior will most probably be black with red inserts - thanks for looking & sorry for the crappy night-time pics. Andy
-
Hi Tom I used 3/16th Thanks
-
Thanks Lyle They are the R&M ones (I messed up the kit rear) but I shortened them slightly. Regards Andy.
-
This ones based on "Aces Wild" with the following additions: Front forks extended with aluminium tubing Scratchbuilt tank Replicas & Minatures fenders,spark plugs,carb, aircleaner & shut off valve. Fuel/oil lines etc & drive belt pulleys added Handlebars from brass rod Seat narrowed & covered in Model Factory Hiro self adhesive "leather" Paint is Tamiya Mica Blue Thanks for looking