Ajay
-
Posts
363 -
Joined
-
Last visited
Content Type
Profiles
Forums
Events
Gallery
Everything posted by Ajay
-
Thanks for the feedback guys - it's much appreciated - just hope I get get this one finished without an mishaps. Got round to adding the last few details on the engine - namely the coil, starter motor and fuel line for the carbs. Think that's the engine done now apart from the radiator hoses - so I'm off to chop up the interior next - should be fun !. Thanks for looking Andy
-
Thanks Raul The pulley's are actually the resin ones included with the R&M blower. As for the throttle linkage - I'm a bit reluctant as the last time I tried to add linkages I ended up with a blob of superglue and the carbs are pretty small (excuses excuses) Cheers Andy
-
Thanks Jodie In the last one I just took a quick pic with the body & frame losely placed together so I didn't bother adding the suspension - in reality it will sit a bit higher. Cheers Andy
-
As the weather forecast for the Easter break over here is pretty dire (snow tomorrow) I've spent today working on the engine. I had considered using Alclad chrome for the blower, heads and pulleys but have had problems in the past with the paint rubbing off when the parts are handled. In the end I decided to use Zero fine metallic silver base instead. The recesses in the blower & heads were painted with Humrol enamel No 56 to try & give a polished effect to the raised areas. I need to add a coil and the fuel lines to the carbs- not sure if I'll add throttle linkages as they'll be a bit fiddly and I'm not sure my eyes are up to it !. Anyway here's the pics : Thanks for looking Andy
-
Thanks for the suggestions on the fan & generator guys. I haven't made much progess although I've now solved the fan problem. Although Norm includes an option for a fan belt pulley in the blower kit it became apparent from mocking up the engine that due to the chanelling & chopped grille the fan sat way too high above the grille so an electric fan it is. I've used a MCG p/e one as it's a bit more detailed than the kit fan. Hopefully I'll be able to make a bit more progress over the Easter holiday. Thanks for looking Andy
-
Spent some frustrating time over the weekend tying to figure out a way to overcome the problem of the radiator hoses. On a normal height radiator the water hose outlets on the rad are higher then the ones on the heads which means that the hoses clear the fan belts. With the chopped grill the difference in height is reduced significantly so the hoses foul the fanbelts - try as I might I just couldn't get the proposed set up to work. So I've had to change the heads to front outlet ones and move the radiator outlets outwards in an attempt to get the required clearance. I've roughly mocked it up in the attached pics, as I want to be absolutley sure that everything fits before painting, and it seems to work - the fanbelts will be "tighter" when they're finally assembled. There may still be a problem with clearance on the distributor but I can fix that by extending the distributor shaft slightly so it clears the hoses. I've still got to figure out where & how to mount the generator. Thanks for the interest guys - it's keeping me going with trying to iron out the problems. Cheers Andy
-
No problem Dale - feel free Thanks Andy
-
Hi Richard You're quite right of course - I hadn't thought things through properly - I'll reinstate the water pump pulley and try and find a suitable one for the generator. Appreciate the info. Thanks Andy
-
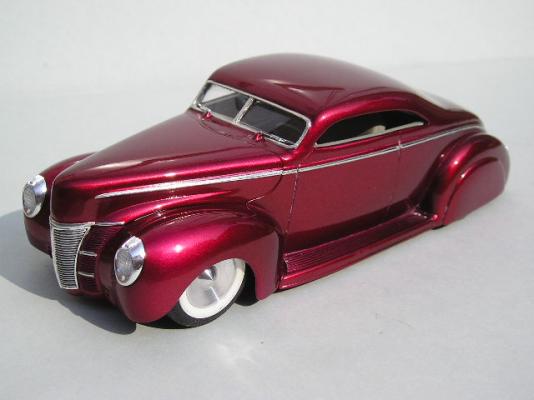
I seem to have a thing for rods & Kustoms at the moment so I've stared on this one again. I've always had a soft spot for the Buick sidetrim/headlight combination so as both are offered in resin from Replicas & Minatures I thought why not. So far I've added the lights & trim, filled in the hole for the frenched rear lights and deepened the fender skirts with plastic card so they run level with the bottom of the body as opposed to the "kick up" in the kit skirt. The orange colour is just filler primer and not an abortive attempt at a Gene Whitfield fade paint job !. Thanks for looking Andy
-
One thing that bothered me when I was building up the engine was the lack of a generator so I went back to Norm's instruction leaflet for the blower and found the following "A third option would be to use a generator mounted on the driver's side head as an idler pulley". Had a look in the spares box for something suitable and came up with the one pictured which I think is from the R-M 50 Ford pick-up. Luckily it includes a moulded in mounting bracket which saves me having to scratchbuildi one - sometimes (but not often) things just drop into place !. I'll have to make a blanking plate for the hole where the "spare" pulley is. Anyway here's some pics of the engine primered and tacked together - should look cool once the dual drive belts are added. Thanks for looking Andy
-
Hi Jody It's a resin S.CO.T blower from Norm @ Replicas & Minatures - part number is FH-90 - as with all Norms stuff it's very nicely done. Cheers Andy
-
With the suspension sorted I spent some time today working on the engine. For simplicities sake I've used the basic flathead block & engine mounts from the new Revell 32 Sedan As the Z'd frame makes the engine sit higher than stock I've had to shorten the front mounts, and to get the engine to sit level modify the rear mount and enlarge the transmission tunnel. I've added a R & M front cover with side mounted distributor and drilled out the munting points for all the pulleys. I tried various carbs and aircleaners but I think I'll go with the R&M's ones pictured as they're quite small and stop it from looking too cartoonish. The finned heads are from Model Car Garage. Because if the changes to the frame I've had to keep mocking the engine up to check alignments & ground clearance etc but I think I've ironed out most of the issues now. Interior will be the next headache as it'll have to be reduced in height. This one's certainly turning into one of the more involved projects I've done for a while !. Thanks for looking Andy
-
Thanks for the comments guys - I haven't made a great deal of progress on this one as I've been busy with the chopped & chanelled 32, however I've had a change of heart on the engine - I'm going to use this 4 Weber set up with the stock Ford Motorsport valve covers. IMO it looks better as it has a bit more height to it and looks more aggressive than the previous arrangement. Cheers Andy
-
Well after rooting around in my spares box the only suitable engine I've managed to come up with is the 302 from the R-M 32 Ford 3 window . To make it fit the AMT frame was fairly straightforward - just a case of removing the existing mounts and replacing them with the R-M engine mounts slightly shortened. The engine will be OOB except for the air cleaner and valve covers which are from the Model Car Garage Edelbrock engine dress up kit (MGC-2250). As the stock fanbelt assembly is too wide I've replaced the pulleys with ones from Replicas & Minatures - still got to figure out a bracket to hold the altenator. Sorry for the pic quality - they're sharp on my computer but "fuzzy" when I upload them. Thanks for looking Andy
-
Thanks Mike I'm pretty sure the part numbers for the Chrome T's are PGH1274 for the fronts & PGH2301 for the rears (19" & 23" respectively) Cheers Andy
-
Been considering the colour ut colour for this one - I'm thinking matt black with lime green wheels, engine block and perhaps scallops - something along the lines of this RM chopper I built towards the back end of 2006 . Not entirely original but I reckon it would suit the syle of the car. Thanks for the interest guys Cheers Andy
-
This is another project that's been on & off the bench a few times - at the moment I seem to have a thing for hot rods so it's been dusted off and is back on the workbench again. It's the AMT Model A Roadster on the AMT Phantom Vickie frame together wth a Model Car Garage resin tracknose & Pegasus rims. It may just end up as a kerbside due to space limitations with the hood - sorry the pics not the best. Thanks for looking Andy
-
Just a small update on the suspension. I had some Replicas & Minatures finned brake drums lying around in the spares box and thought they would be in keeping with the look I was aiming for so these have now been grafted onto the front & rear axles. I had to widen the track of the rear axle with sprue so that the rear tyres didn't foul the lowered body and used the metal axle pins from the RM 29 P/U superglued to the inside of the brake drum to accept the mounting point on the rims. For the front suspension the drums have been drilled out so that the mounting point on the rim fits inside the drum. and just a couple of pics with the suspension & wheels blu tacked together showing the final stance. Still lots to do - so much for it being a quick project to get rid of modellers block !. Thanks for looking Andy
-
Thanks for the reply It's actually a Model Car Garage one (MCG-203 - "32 Ford 6in chopped Horizontal bars grille & resin surround") Cheers Andy
-
Just a quick mock up of the engine - should make for an interesting view through the windscreen when the carbs are added ! Now the hard work begins Thanks for looking Andy
-
Thanks for the interest guys - spent today trying to figure out the front & rear suspension (in the original pic it was just resting on the front axle) - the frames been "z'd" front and rear and the front crossmember raised slightly in the frame slightly in an attempt to get it down in the weeds - I'd like it lower but I think this as about as low as it will go. Thanks for looking Andy PS/ Dub - I'm thinking on using a Replicas & Minatures S.CO.T blower on the flattie.
-
I've got a bit of "modellers block" at the moment (a combination of being busy at work and the winter weather - maybe it's Seasonal Affective Disorder !) and I keep picking kits up, looking at them and then putting them away again ! - I'm sure you've all been there at one time or another. Anyway delving into the "started but never finished" pile I came across a 32 body that I'd chopped awhile back & looking at it again the germ of an idea started to grow - here's a very rough mock-up. There's still a heck of lot more to do but hopefully I'll find the motivation to stick with it. Thanks for looking Andy
-
A recent Aoshima release that I brought purely because it was something a bit different from the norm in being a big sedan breathed on by the Impul tuning house. To be honest the kit was a bit of a disappointment (buying online means you can't open the box and llok at the contents) as it's obviously a re-issue of an elderly motorised kit as opposed to a new tooling although it comes with an engine insert and Recaro front seats. The only changes from box stock are a slight lowering job and BBS rims with SAS Advan tyres - the colour is Zero Paints Le Mans Sunset. Anyway on to the pics : Thanks for looking Andy
-
Managed to make some progress on this one over the holiday. The bodies been sprayed Zero Nissan Le Mans sunset & chrome trim covered with Bare Metal Foil. I managed to pick up a VIP kit which included BBS rims which I think are more in keeping with the car being uprated by the Impul tuning house. Also nearly finished the engine - I haven't added all the plumbing just the plug wires - a couple of areas need touching up. Thanks for looking - sorry for the quality of the pics. Andy
-
Here's my two Daily driver: Rover 220 Coupe and my baby - 64 Ford Consul Capri Cheers Andy