
Ajay
-
Posts
363 -
Joined
-
Last visited
Content Type
Profiles
Forums
Events
Gallery
Everything posted by Ajay
-
Thanks Ed - it's the Revell kit
-
Not a bumper year for me as I completed these 5 in the first half of the year and then developed modellers block for the following 6 months . I guess my new years resolution should be to build something !!. Thanks for looking & Happy New Year.
-
Thanks for the feedback guys Nick the rims are Yayoi slicks - they were available as a seperate wheel set from Aoshima which included the stretchwall tyres. Cheers all Andy
-
Thanks Actually thinking about it it's not strictly oob as I changed the rims for a different set that were available as a seperate wheel set awhile back - the stretchwall tyres are included in both the kit & the wheel set. Cheers Andy
-
Just an OOB build of the Aoshima Junichi Nomura kit in their Shakotan Boogie series Thanks for looking Andy
-
Just a quick OOB build. Kit : Fujimi Nostalgic Racer Series Paint : Zero Lamborghini Candy Blue Pearl Wheels : Fujimi 17" BBS rims with Aoshima Advan A3 stretchwall tyres Thanks for looking Andy
-
Finally got round to finishing this one off - Kit : Hasegawa Nissan Fairlady Z432R Paint : Zero Lamborghini Candy Blue Rims : Aoshima Impul Gran'z with XS Tuning tyres Mods: Front spoiler modified from Aoshima Jun Prelude kit Side mirrors from Aoshima Trueno Lowered by attacking the chassis with a razor saw ! and using metal rod axles Drivers harness (you'll have to trust me as you can't see it in the pics) Thanks for looking Andy
-
Mike it's not that bad as nearly all the trim comes chromed (although some of it seemed to rub off easily with handling (I should have been patient and added it last) - the only parts I had to BMF were the front & rear windshield surrounds and the roof sidetrim. Thanks for the kind words guys Regards Andy
-
Managed to finish this one off - went together without any major problems - it's pretty much OOB except for Pegasus rims, a bit of added engine detail and a lowering job. Thanks for looking
-
Thanks Ron Yup 49 today and still playing with plastic
-
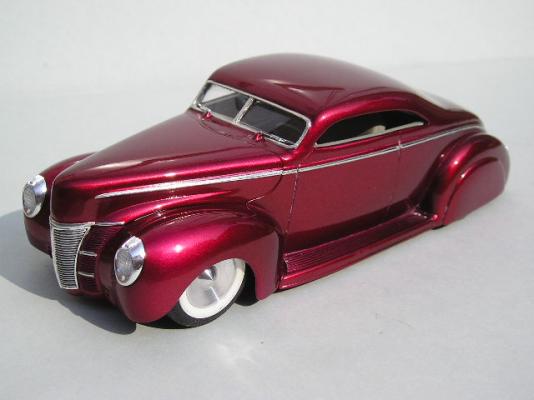
I've made a start on this one which is the recent Revell plastic release of their die-cast model. So far everythings gone together ok bodywise - a lot of trim is already chromed and fits into recesses in the body (saving some Bare Metal Foil work !). The colour is Ford Radiant Red with Zero 1 pack clear - I'll be using the optional kit supplied rear skirts (pictured) & conti kit. Wheels are from Pegasus. At the moment I haven't started on the suspension so the body is just resting on the rim. Thanks for looking Andy
-
Thanks for the replies guys - I have to be honest and say that I'm not building as quickly or as much as I have done over the last couple of years. I'm finding that I'm not as driven to complete stuff as I was & just do a bit of modelling when I feel like it. Consequently there's not much progress to report on this one except for spraying the headlights with Alclad and deciding on the wheel choice. The whitewalls are from the Galaxie 46/48 Chevy Fleetline kit together with the Revell steelies stripped of chrome and sprayed body colour - the Dodge Lancer hubcaps are resin items from the spares box (possibly from The Modelhaus ? - I've had them ages). I've also sprayed the interior panels up in white & purple & made a start on the engine but haven't taken pics as yet. Thanks for looking Andy
-
How's everyones gas prices?
Ajay replied to forthlin's topic in General Automotive Talk (Trucks and Cars)
Look on the bright side guys - at least you're not paying around $10 a gallon like here in the U.K. (and most of that is tax which goes to the Govt.) -
Kind of got sidetracked on this one by other builds but I've dragged it out of the box again - the interiors been completed together with most of the external bits & pieces - just need to find some suitable door mirrors. After a quick mock up the ride height is too high using the kit suspension so I think I'll have to ditch it & go the metal axle route to get it as low as in the pics. I'll finish it eventually !. Thanks for looking Andy
-
Made a bit of progress on this one. It's been sprayed in Zero Paints Dodge Plum Crazy Pearl and the Zero pre-thinned clear been polished out with Micro-Mesh & Tamiya polishing compound. I've also added the Bare Metal foil to the windows & side trim. Thanks for looking. Andy
-
Thanks for the replies guys- much appreciated Cheers Andyj
-
Thanks Brian It's the S.C.o.T blower from Replicas & Minatures Cheers Andy
-
I started this one as a quick build to get over modellers block but it became complicated as channelling the body over the Z'd frame threw up a whole heap of associated problems - 2 months down the line it's finally finished ! Thanks for looking. Andy
-
Thanks for the interest guys - 2 months on one project is way past my normal build time but hopefully I should have it finished next weekend. Cheers Andy
-
Early on the in the build I decided to add some scallops to break up the black on the body so I spent some time this morning masking up with Tamiya tape. and despite there being 3 inches of snow this morning ! braved the cold in the garage and airbrushed them Tamiya Candy Lime Green. I've swapped the headlights to the smaller ones as imo they're visually more more balanced with the chopped grill. Thanks for looking Andy
-
Phew - getting close to completion now - this ones certainly suffered from the "make one alteration & cause yourself several others" syndrome but the chassis went together without any major headaches. Just a few small bits & pieces left to do - still got to add the scallops to the body. Thanks for looking Andy On relection I think I might swap the headlights for the smaller ones in the kit
-
To be honest it's been a few years since I chopped the top so I don't recall which putty I used at that time - it may have been regular auto body repair filler. Best thing I can suggest is to try & fill any gaps with sheet plastic - it provides strength and reduces the amount of putty required with less chance of the putty subsequently cracking (apologies if I'm "teaching granny how to suck eggs" here). These days I tend to use Tamiya Epoxy Putty (quick type) followed by regular auto knifing putty to fill the sanding scratches. Hope above helps Regards Andy
-
Last update for a while as it's back to work tomorrow after the Easter break. Interior's all together now (although not alot of it will be seen once it's inside the body). Thanks for looking Andy
-
Just an update on a few bits & peices - the lower interior panel shows the amount that had to be trimed to accomodate the body rake . Thanks for looking Andy
-
Think I've sorted out the interior in terms of fitment - I had to take an angled peice out of the bottom of the door panels to follow the raked body but after a dry run it seems to fit ok. As you won't be able to see much through the windows I'm just going with the stock interior plus seat from the AMT Vickie kit (as it's not as tall as the stock seat) and painting it black. I still need to raise the tunnel to get some clearance on the transmission. Thanks for looking Andy