
Ron Hamilton
-
Posts
4,465 -
Joined
-
Last visited
Content Type
Profiles
Forums
Events
Gallery
Everything posted by Ron Hamilton
-
Abra Cadabra!!! You worked magic on that one!! Beautiful work, as usual, Cruz.
-
I restyled the Impala SS interior into a Caprice Trim Level Interior(or something close to it). Also, I decided that the car would be equipped with the following items from the factory: Sport Steering Wheel Tilt Steering Column Strato Back Bench Seat w/Center Arm Rest Turbo 400 Transmission w/Column Shift I also added the wood grain trim to the doors and the dashboard. While it is not exactly like the 1966 Caprice interior, it is very close.
-
Unfortunately, I will not be having this body cast, as The Modelhaus has a pretty decent '66 Caprice Hardtop in their line. I did this one, becaue I thought that I had the skills to pull it off. Time will tell. Hold judgement until the finished product is presented.
-
I have been working on the 1966 Caprice Hardtop. I have reworked the roof to my satisfaction, as well as adding the rocker panel mouldings. I have decided to paint the car with Model Car World Marina Blue Metallic Lacquer with a Black Vinyl Roof and Interior, done with Testors' Acryl. I Bare-Metaled the body, and added black pin stripes. I mocked up the body on the chassis to see how everything looks, and I like what I see. I have decided to use the Chevrolet Mag Style Wheelcovers and Whitewalls. I still have to add the scripts and do a little touch up to the body. The upholstery pattern on the seats and door panels have been done, but I still have to do the finish work on the interior, chassis and engine. Looks like I have another couple of weeks on this one at the most. Thanks for all of the positive comments on this build. I am really enjoying this one.
-
Beautiful work, Bob.
-
I like what I see!!!
-
Very Nice.
-
Looks good to me.
-
Absolutely georgeous!!!
-
Extended the kit roof, modified the side windows, and extended the trunk lid and backlight area using sheet plastic and putty. I appreciate the comments concerning casting the body, but it is not good enough for that. Everything was "eyeballed" and no exact measurements were used.
-
I was able to get a little more done on the Caprice Coupe conversion of the Revell 1966 Impala SS. I installed the roof drip and vinyl roof mouldings, as well as cutting in the backlight and attendant mouldings. I have done the tail lamps, and I am still working on the interior set up. I plan to wet sand the primer today to smooth out the base for the first color coat. I still have not decided what color to paint it.
-
Tom, That one is breathtaking, to say the least. I have a '67 300 I built a few years back, that I am gong to disassemble, strip, and re-paint, as I have never been satisfied with the finish. After looking at yours, I may just have to do a color change too. It is now Dark Turquoise with a white interior. I am now leaning towards Turbine Bronze.
-
Work Started on '60 Chevy Pickup Annual & trailer
Ron Hamilton replied to impcon's topic in WIP: Model Cars
Gary, You made a great score with that one. As one who has restored several old builds, you can save that tailgate, but it is going to tave several hours of tedious work, but the results will be well worth it. I am going through the same thing with my '63 Ford F100 restoration. I cannot wait to see the finished model. -
Bill, I have laid out the rear window, and plan to cut it in today. I found a couple of good photos of a '66 Caprice Hardtop for some more details I am going to add. I may do a '65 and '66 4-Door Hardtop if I get this one right.
-
Thank John for the offer. I have several sets already.
-
I am in the midst of converting Revell's new 1966 Impala into a Caprice 2-Door Hardtop. I have always wanted to do this car, and when the kit came out, I said to myself "Why Not" It was quite a bit of work to rework the roof panel and deck lid. I have to fix the various niks and scrathes in the body, cut the rear window in, Make up the rear window mouldings, as well as finishing off the interior area where the rear window was installed. I am also "reupholstering" the interior to the Caprice Upholstery Pattern. It will not be absolutely perfect, but it should come out pretty good.
-
Nice job. I built mine to reflect my Dad's car in 1960. I scratchbuilt the correct interior, and added a better looking set of 8-lugs from The Modelhaus. In my opinion, the kit was not all that bad, but it was too expensive for the subject matter, and Trumpeter went too far with some of its "engineering" and parts count to justify the price.
-
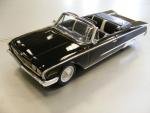
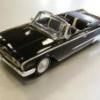
Do you mean like this???? I built this one about 10 years ago, and I have another one to do.
-
I'll be there, sellin' off some old kits.
-
As I write this post, I just got my Revell '66 Chevy Impala SS Hardtop kit. I have not opened it yet, but I will write a review of the kit, comparing it to the original AMT '66 Chevy Impala SS Hardtop, and the Monogram '65 Chevy Impala SS Hardtop. I was not pleased with the way Monogram handled the roof on the '65, particularly with the rear window. We will see. I will give you an honest opinion, from my point of view.
-
Par excellence mon ami!!!!
-
1969 camaro street/strip machine......off to the paint booth!!
Ron Hamilton replied to Jeff Sauber's topic in WIP: Model Cars
Lookin' good, Jeff. -
Beautiful build!!! That one should sell a lot of the Jada kits.
-
I like the Resin '64 Cutlass. I have a couple of the plastic ones in the collection. I am considering using an AMT '66 442 kit for the chassis, floorboard, underhood and drivetrain to do a more detailed car. I know you will do this build justice, just as you did the Merc.
-
Maryland did not use the 1965 Dodge Polara as a cruiser. I have another car in mind for the Maryland State Police Cruiser.