
Ron Hamilton
-
Posts
4,465 -
Joined
-
Last visited
Content Type
Profiles
Forums
Events
Gallery
Everything posted by Ron Hamilton
-
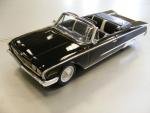
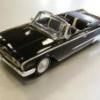
1965 Dodge Polara Sedan Thanks to Copcarbuilder for getting me off of my duff, and getting this project going. Several years ago, I purchased a MPC 1965 Dodge Custom 880 Convertible from a friend at a NNL. He was apologtic that the windshield frame was busted, and he had no idea where to get a replacement. I looked at this, and had the idea to do a CHP cruiser out of it. I have seen a couple of them done, using the roof from the JoHan 1968 Plymouth Fury Police cruiser. I was not satisfied with the roof on the conversion, so I put it off until I could figure out how to do a more accurate roof. There is not a lot of information on the web about a '65 Dodge Polara Sedan, but I have been able to find a few photos of the 1965 Dodge Polara Sedan in CHP livery, and a set of photos of a Civillian Polara Sedan. I started the project by removing the roof from the Plymouth. I removed the roof drip mouldings, changed the angle of the sail panels, rear quarter window, and backlight profile to mirror the 1965 Dodge Polara. Once I was satisfied with the roof, I grafted it to the Dodge body. Also, I removed the upper body side moulding from the body, and replaced it with a faint charachter line, and added body side mouldings to the lower body. I filled in the two door line, and scribed in the four door lines and front fender separation line. I primered it to see where I am with the body. I have some more sanding to do at the characher lines in the front fenders, as well as cleaning up some of the joints. Next, I am going to modify the tail light panel to the Polara specifiaction from the Custom 880 finned piece, and re-do the interior to the Polara specs.
-
Excellent build!!!!
-
I plan to do a "Replica Stock" '73 Duster 340 with mine.
-
Tom, I'm going to start calling you "The Magician", as you work magic on every model you post. Beautiful build.
-
Hey Bill, Show them a picture of the Green Hornet.
-
please remove this one.
-
When I started on this one , I was disappointed that Revell did not include a proper grille for a 442 version. Fortunately, I had just purchased a busted up Johan promo from Spotlight Hobbies. I did a test fit of the grille and tail lights and they actually fit. I did not care for the moulded in headlamps, so I carefully did a grille swap, and it worked. I could have done it as a '72 by painting the grille argent, with black paint trim, but in my research, the '71 was the final year of the red front fender liners being included with the W30 package, and the factory installation of the W27 Aluminum Rear Axle and Cover, which was included in the Revell kit. The power train was painted to depict the Oldsmobile 455 V8, as used in the W30 Option package, with the aluminum intake manifold, with the 4-speed transmission, which is one of the options in the kit. I wanted to build this model quickly, so I selected a 1971 type color combination, Red, with the White W30 stripe package, and a White interior, trimmed in black. I used Testors' lacquer for the exterior, and Various Testors' Acryl and metalizer paints for the rest. I wanted to build what I call a "Day Two" car, back in the day, so I went into my wheel and tire collection, and selected a set of Cragar S/S wheels, mounted on white lettered Goodyear Polyglas GT Tires, with a set of 15" x 6" wheels on the front, and 15" x 8" wheels on the back, with a set of L-60 tires. The interior was painted with Flat White, trimmed in "Aircraft Interior Black". I used embossing powder for the carpet and the lower door panels. The kit woodgrain decals was suplimented with Bare Metal foil and aluminum paint. A white ball tops the 4-speed shifter. Believe it or not, I was able to get this one built in 2 1/2 days, not including painting the body. The reason for this is that I had just finished my Hurst Olds Hardtop the week before, so I remembered how the kit went together. So now I have my '71 442 Convertible. I am very happy with this build.
-
Lovin' it!!!!
-
 Making the Cutlass Supreme Hardtop From the time I saw this kit, I was determined that I would build one as a Cutlass Supreme Hardtop Coupe with the Hurst/Olds Package. I planned the conversion using another available kit for the roof structure. I used my knowledge about GM cars form the period, and came up with the conclusion that they used the same basic roof for the Cutlass Supreme, Monte Carlo, and Grand Prix, with the major difference being the sail panels and rear window. Cutting up a MPC '69 through '72 Grand Prix would have been fiscal suicide, as those kits are "gold", plus they have moulded in vinyl roofs and "halo" vinyl roof mouldings, so the more common AMT '70 Monte Carlo was the appropriate candidate, as it had a clean top, and I could get one relatively cheap. I cut the whole roof off of the Monte Carlo past the bottoms of the pillars and sail panels so that I had some material to work with. The big difference between the Cutlass Supreme and the Monte Carlo roof is the sail panel, and rear window profile. The Cutlass Supreme has virtually no curvature to it, while the Monte Carlo has a concave rear window. Here is a good side profile shot of a '72 Cutlass Supreme (I want to do one like this one too) Using that photo, I planned out the modifications to the convertible body. I cut the windshield frame from the chromed part that mounts to the Revell body, and attached it to the body. I removed the drip mouldings, as well as the rear window mouldings, as I had to modify the side window profile, as well as the rear window angle with sheet plastic and putty. I referenced the roof fit to the body using the windshield pillars as a guide. I trimmed the bottom of the sail panels bit by bit until I was satisfied with the angle of the roof panel in reference to the body before I attached it permanently. I glued the windshield pillars to the body first, then the modified sail pillars to the body second, after a final trimming. I modified the tulip panel a couple of times with sheet plastic. Once I was satisfied with the work, I puttied and finished the joints prior to the primer stage. I used the Monte Carlo windshield, carefully trimmed at the bottom to fit the Revell windshield wiper base. Once I was satisfied with the work, I added the roof drip mouldings and the rear window mouldings. I made up a rear window moulding as a piece of "c" channel out of 3 pieces of plastic rod, so that the rear window could slip in. the moulding across the tulip panel was a straight piece of plastic strip. All was glued to the roof, and cleaned up. I found several detail photos of a Hurst Olds Hardtop on the web in order to place the vinyl roof mouldings. I ahnd painted the vinyl roof with Flat White paint in a "stipple" pattern to simulate the vinyl used by Hurst on this conversion. This is what I was aiming for in this conversion. I learned quite a bit doing this conversion. Is it perfect? No, but if I were in better physical shape, I could have done better. As I built it for myself and not for a competitive event, I did not bother with any interior modifications other than the package shelf. If I were doing a contest build, I would have removed the dog legs from the interior, widened the rear seat, and finished the inside of the body a little better. The only problem I have encountered in doing that was the final fit between the interior tub and the body. I am very happy with the way the model came out.
 -
I finally finished this one last Friday night. A special thanks to Marcos Cruz for his detail suggestions, Len Carsner and Bill Coulter for their buildups on this forum, and to Revell for having the guts to bring out this kit. Several people asked about the roof. It came from the AMT Monte Carlo, as well as it's windshield glass, trimmed to fit. The sail panels and rear window area had to be "finessed", and a new rear window had to be made from sheet acetate. I hope to have the '71 442 Convertible completed this week.
-
I finally finished the '72 Hurst Olds Hardtop!!!! Thank you Revell for such a fine kit.
-
Very nice, Marcos. Are we going to display ours together at the MAMA meeting next week? Mine may be finished by then.
-
AMT '71 Duster, MPC Vegas. They are the old MPC solid Goodyear "Polyglas GT" tires. I had to search the parts box for those. They fit the kit's rims perfectly. I white lettered them with a white gel pen.
-
The inner part of the grille frame is painted too, so all you would have to do is to add the filler piece.
-
It's getting close on the coupe now. I am doing the engine as a W30 455. Thanks to Cruz for alerting me about the body color filler panels beween the grille and bumpers. Once I get the coupe finished, I would like to start on the convertible, which I am doing as a '71 442 W30/4-speed, with the W27 aluminum rear axle housing and cover, and the red fender liners. The interior will be white trimmed in black, and for the exterior color, I am leaning towards red, with the white stripes.
-
We are getting closer to the end of this one. Last weekend, I rubbed the paint out, added the kit decals, added the Vinyl Roof, Bare Metaled the car, painted and detailed the interior, and got it up on it's wheels to see where we are on this one. I painted the Vinyl roof on with flat white acrylic. The wheels were detailed with gold paint and the kit decals, and I used a set of old MPC Goodyear Polyglas GT Tires, which I highlited with a gel pen. I still have to detail several aspects of the build, work over the engine, and touch up several areas of this one before I call it finished. Maybe two or three more modeling sessions, and I can go to the next project. Let me know what you think.
-
I restored a very ratty '71 into this. And I am doing this phantom '76 Convertible.
-
It is the 1974 Impala Sport Coupe with the "Spirit of America" package. My mom bought one on Memorial Day, 1974.
-
I have not touched the grille on mine yet. I rubbed the paint out on the body, Bare Metaled, and decaled it over the weekend. I have to do the vinyl roof. One thing though Cruz, the Hurst Olds had a black grille as part of its package. I have found in my research that a lot of the cars posted on the web are clones of the real thing, which lack a few details. I found a set of tires for it that will work for the kit for white letters. I will post the pics later on my post. Good luck Cruz.
-
That is one of my favorites, Bill.
-
You did that kit justice!!! Beautiful!!!
-
I did a little work on the Hurst Olds Hardtop. In looking at the body compared to the latest reference photographs I have, The vinyl roof mouldings were wrong, and the rear window was too short. So I removed the mouldings, and enlarged the rear window. I also made up new mouldings for the rear window. Finding an accurate photograph of a '72 Hurst Olds Hardtop is not very easy, as there are quite a few innacurate clones out there. I found a picture which I feel is representative of what was being sold as a Hurst Olds Hardtop, as well as an old Motor Trend Magazine Article about the car. Hurst did the vinyl roof mouldings in a different manner than what the factory did in their vinyl roof applications, to accomodate the deck lid stripes. This is what I hope to end up with. Let me know what you think.
-
M.A.M.A. "Christmas Party" soon!!!!
Ron Hamilton replied to cruz's topic in Model Club News and Announcements
I'll be there. -
Incredible!!!!
-
I hope we're done now!!
Ron Hamilton replied to MrObsessive's topic in General Automotive Talk (Trucks and Cars)
At the first blizzard, I measured 31" in front of my house. About 5 years ago, my brother-in-law talked me into going to Sears to buy a snow blower, which was on sale. It is a big, heavy rascal (31" swath with a 9 h.p. motor). Well, I used it three times in those years until the December snow. Needless to say, it has come in pretty handy. I am sick of this snow. Come on spring.
