
Ron Hamilton
-
Posts
4,465 -
Joined
-
Last visited
Content Type
Profiles
Forums
Events
Gallery
Everything posted by Ron Hamilton
-
Test shot Pics Revell '70 AAR 'Cuda
Ron Hamilton replied to MrObsessive's topic in Car Kit News & Reviews
Hey Bill, While I concur with you concerning the faults of the kit, does the real car look all that good? A lot of what we see is in the first dimension such as photographs. I tend to think a little more in 3-d like you. We do have a good eye for proportion, angles, so forth and so on. This thing is fixable without a lot of effort or expense, just a little skill. Truthfully, this one may be our last shot at a decent '70 Cuda, as AMT/Ertl has pulled the plug on theirs, and no other manufacturer has made such an attempt. My days of spending mega bucks on a model car is over. I can work this boy over to even satisfy you. I have already planned the fixes based on our conversations about the shortcomings of this kit. Remember, the effort we put forth to build a replica stock car is a lot more than most put into customs or race cars. By the way the sail panels are short on the real thing too. I have looked at hundreds of these cars trying to figure out how to correct the '71, and this one is easier. By the way, you're right about the bean counters. -
Test shot Pics Revell '70 AAR 'Cuda
Ron Hamilton replied to MrObsessive's topic in Car Kit News & Reviews
1970 Plymouth AAR Cuda Revell Kit # 2875 ½4 Scale Modified Reissue I have been building model cars about 45 years, and I have never seen a kit so maligned before it was released for sale as this one. With the advent of the internet, there were a lot of negative opinions vented on the various model message boards, as well as word of mouth at several model club meetings around the world. A lot of the opinions were based on a test shot of the kit at the NNL East this past March, which was displayed with other upcoming kits from this manufacturer. Revell promised us a “newly tooled†body for this kit, and we were waiting with baited breath. Revell did do a new body for this kit, but they did not take the route that most of us had hoped they would. I did not see the model in person until I bought this kit, but I did see photos taken at the NNL East. From the various photos I saw, I too thought this kit looked a little “cartoonishâ€, as compared to the real car. Part of my bias came from the first iteration of this kit from this manufacturer. We were promised a state of the art new tool of this automobile, and what we got was..., well, needless to say I was quite disappointed in what I saw when I opened this kit. It was one of the few kits I bought, that I gave away soon after I bought it, it was that bad. One of modelers who was present at the NNL East had a conversation with one of the officials from Revell, who told him, and I am paraphrasing what I read, basically, what you see here, is what you’re going to get in the new kit. Honestly, I was not expecting much from this kit, but I thought I would give it a fair shot in a review. First of all, I took the body out of the box, and made comparisons of it with a couple of other ‘70 Cudas I have in scale. The first is an original MPC ‘70 Cuda that I have, as well as a Franklin Mint ’70 Cuda Convertible. I am basing my opinions using the two aforementioned models as a guide, as well as several photographs of the real car from the book “Challenger and Cuda- Mopar’s Factory Muscle Carsâ€, by Robert Genat. This is the best book about these cars I have ever seen, and is a valuable resource material for researching these cars. In looking this kit over, it is not too bad proportion wise. While there are some problems with the rear quarter panels, this one is far better than the previous ‘70 Plymouth AAR Cuda offering from this manufacturer, and it looks better to me that any of the ‘71 Cuda iterations from this manufacturer. In my opinion, there is too much of an arch on the upper rear quarter panel and the bottom looks to be about 1/8" too short. Along with that, the sail panels looks a little shallow, effectively shortening the roof . These three items make the car have a “hiked up†look in the back end, as well as making the deck area look too long. While these aspects of the body proportioning is unacceptable to some modelers, it will not deter other modelers from building an outstanding example from this kit. I did not compare this model with the Monogram ‘71 Cuda, because in my opinion, that kit has its own issues with certain proportions in its body, which affects it’s appearance. It is obvious that Revell based this kit on the ‘70 Challenger T/A tool, instead of the ‘71 Cuda tool, so some proportion problems would obviously be evident. First of all the Challenger has a wheelbase 2" longer on the real car, but about 1/16" in ½4 scale. Looks to me that the extra wheelbase was hidden, as the wheelbase on this car matches my Franklin Mint model perfectly. The wheel openings are a little larger on the kit than the Franklin Mint, and the rear fender issues were based on the comparison with the same car. Other than that, the car looks spot-on to me. These cars had short roofs, and the narrow sail panels really accentuate that fact, so the kit may not be off too much in that respect. Now Revell did make one glaring omission in this kit, that can be easily corrected. The ‘70 Challenger T/A and the “70 AAR Cuda and tires on the rear of the car that was two sizes larger than the fronts, and this feature was omitted from my kit. My Challenger T/A kit had the staggered tires, but not this kit. I looked the rest of the kit over, and it should go together quite easily. I’m a little picky, so I am going to correct the rear quarters to what I think they should be, get the right rear tires from my parts box, and build my interpretation of a ‘70 AAR Cuda from this kit. I will be buying more to build other variations of a ‘70 Plymouth Barracuda, with a little kitbashing, parts box raiding, and scratch-building skills. I’m sure the aftermarket will make items for this kit, as a lot of the Model Car Garage’s’71 Hemi Cuda PHOTO ETCH Set will work with this kit. Have an open mind about this kit.. No model kit is perfect, and this one came out as a pleasant surprise. I recommend it. Ron Hamilton -
Test shot Pics Revell '70 AAR 'Cuda
Ron Hamilton replied to MrObsessive's topic in Car Kit News & Reviews
I will have an extensive review of this kit in a few days after I look it over. -
I'm old enough to remember a lot of the JoHan kits when they were new, and I have built quite a few of them. I have even been fortunate enough to amass a nice collection of unbuilt Johan kits to build in my old age. While I agree that JoHan had some of the most beautiful bodies with the crispest detail, they did take quite a few short cuts over the years, such as the short interior tubs up until 1964, and short, long cars, such as the early 60's Cadillacs and Chryslers. Towards the end of the line on the mid to late '70's, the detail started going away, especially with the interiors. Even with that, my JoHan collection is among the most prized items in my collection. Beware of old Johan model kits and promos, in that the plastic is very brittle, and will crack very easy. I found that out when polishing out a couple of them. While I applaud Okey Spaulding's efforts to revitalize the JoHan brand, it seems to me that there were some unforseen obstacles, as well as some unfortunate happenings what went on during the transfer of ownership, not counting the unusable and missing tools. I wish he could have brought back more of the kits, as I bought a few of the kits from "the new JoHan". Fortunately some reputable resin casters have repopped some of the old JoHan kits, that would otherwise be gone forever. I may never build my Johans, as they are steadilly appreciating in value. NOT! I bought them to build, and some day I will build my '70 Cadillac Coupe De Ville, my '66 Olds Toronado, and my '68 Plymouth Fury Convertible, among others.
-
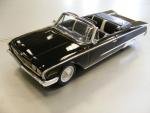
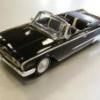
My absolute favorite car!!! In the words of Franco, "What's behind me is not important!"
-
Need a good Photoetch source
Ron Hamilton replied to ubermodel's topic in General Automotive Talk (Trucks and Cars)
Those are excellent!!!! Once you're up and running, I will be a good customer. RH -
2006 Dodge Magnum SRT-8-----Update 7/7/07
Ron Hamilton replied to MrObsessive's topic in WIP: Model Cars
Hey Bill, Come on down! I have a couple of SRT8 Chargers that you can get all the engine detail shots you want. I may let you drive one!!! Ron -
Saturday, I got a semi-painted, but unbuilt VW Scirocco. I hate the red plastic, but I will seal it, after I strip off the paint.
-
That is one beautiful model James. I love that black, with the red stripe and white with plaid interior. I'm glad I built my Lucerne Blue one, as it is prominitely one of the stars of my collection (thanks for the insapirational picture). I bought up a bunch of the '71 Charger kits, as they are wonderful basis kits for just about any Mopar from that era. I have a mint, unbuilt '73 Charger, that may be combined with the '71 to do a '73 SE with a 440 engine in triple black, with a sunroof. I also have one of the elusive AAR '70 Chrysler 300 resin kits. I figure that I can stretch and widen the chassis and underhood area to make a detailed 300. (Would you believe I just thought of this project as I wrote this?) One of these days. One of these days.
-
1970 Chevrolet Camaro - Dale Jr. inspired
Ron Hamilton replied to Marc @ MPC Motorsports's topic in WIP: Model Cars
Roll on Yellow Camaro!!! -
Another semi grail found
Ron Hamilton replied to ismaelg's topic in General Automotive Talk (Trucks and Cars)
I remember seeing a blue one when I was in High School. I was in an Exotic car showroom, and it was in the shop. Until I stepped back from it I didn't realize I was looking at one of my all time favorites. I built a yellow Fujimi kit of this car, and I still have 3 more to go (2 spyders, and 1 more coupe from Fujimi). A red Spyder is in my future plans. -
I have some. The black undercoat must be perfect for it to work.
-
I built this one from the Model Car World Resin Transkit for the Revell 1965 Impala SS, as a Street Machine with Cragar SS mags, Dark Green Lacquer, a Model Car Garage steering wheel column mounted Sun Tach, and various photetch pieces finish the car.
-
I have always wished that Cadillac would have continued the rear drive full-sized coupe after 1984, So I decided to build my own once Revell released this kit. I painted it with Testors'1995 Chevrolet Dark Cherry Lacquer, with a silver pearl urethane trim like the factory, and a Dark Cherry Cabriolet Roof.. The interior was too plain, so I upgraded it to the "d'elegance" pillowback trim in light gray"leather". I used a set of Detail Master 100 spoke photoetched wire wheels, mounted on a set of "Vogue" Tyres.
-
1975 Chevy Blazer -RC2 (AMT/Ertl) A790 - 1/25 Scale 42 Pieces and Decals, Straight Reissue It's very interesting that the model companies are going into their "vaults" to re-tool and re-issue kits that have been out of their lines for over a decade. Over the past couple of years, the modeling community has gotten re-issues of the 1971 Chevy K-5 Blazer, and the 1978 Ford Bronco from AMT/Ertl. A big thanks goes out to Dave Burkett for having the foresight to market these kits. The 1975 Chevy Blazer kit is one of the old tools which languished in the RC2 archives for years, finally re-released to us hungry modelers. This kit was in the MPC line as one of their "Super Snap" model kits. Assembling one of these kits negated the use of any glue, as the assemblies were snap, or press fit. Simplicity is the key. Normally, I would not even consider such a kit to build, as it has very little challenge to me, as it was a curbside (No under-hood detail), but recently, curbside kits have come very appealing, in that the build time is short, the fit problems are minimal, and the subject matter is fantastic. I cannot remember the last time that a 1975 Chevrolet K-5 Blazer was available in a 1/25 scale kit form. In examining this kit, this vehicle represents a 1975 Chevrolet K-5 Blazer 4x4, in the "Custom Deluxe" (base) trim level, with a few factory options (hardtop and chromed bumpers), aftermarket items (custom steering wheel, chromed push bar, sunroof, chromed wagon wheels and oversized tires) and emergency vehicle equipment (Bar light, fog/driving lights, whip CB radio antenna) added for interest. In looking at this kit, I was a little disappointed, in that the vehicle represents a mildly modified “emergency†vehicle. A little modification and kit-bashing is in order if I wanted to build a "Replica Stock" off of the dealership's lot vehicle. The rolling stock consists of a set of aftermarket, chromed Wagon Style Steel wheels, mounted on what represents a set of worn two-piece Goodyear 33" Tires. Curiously, the tires are body colored hard plastic, so the modeler must paint them in order for them to look a little realistic. On the real vehicle, the front brakes are disc type, and the rear tires are drum, neither of which are represented, even though the inner half of the kit tires are closed in. The wheel/tire assembly snaps onto a one piece front and rear drive axle assembly, which in turn press fit into machined holes in the well engraved chassis plate. The interior assembly consists of a pair of two-piece front bucket seats, and a two-piece rear bench seat, which press fit onto the bosses on the floorboard of the one-piece interior tub. An aftermarket custom steering wheel/column mounts into the dashboard, which snaps into a slot in the interior tub. The interior finish is finished up with the insertion of a chromed 4-wheel drive lever. The body assembly consists of a one-piece body with the hardtop, and the hood molded in. The one-piece "glass" unit consists of the windshield, rear quarter windows, a tailgate window, and an after market sunroof, which mounts into the body. The sunroof opening is molded open, along with holes for the side view mirrors, CB radio antenna, and the roof mounted bar light. I wish that the manufacturer would have allowed the modeler to open these holes up themselves by flashing them over. The chromed rear bumper mounts on pegs at the rear of the body, as does the chromed headlamps/grille and the chromed front bumper/push bar combination. The roof mounted driving lights, the side view mirrors, and 5-piece bar light assembly round out the assembly. A set of optional fictitious emergency vehicle decals finish off the model. The model seems to have the right look of the 1975 Chevy Blazer, and with a little body-work (seam removal and hole filling), careful assembly and a good paint job will a pretty nice shelf model. The Replica Stock builder, and the more adventurous modeler will do a little research on the real car, go to their parts box, kit bash, and add a few aftermarket items to make this one pop. Thank you RC2 for reissuing this kit. Ron Hamilton
-
http://images1.snapfish.com/348%3A%3B%3A%3...%3C69%3B9nu0mrj
-
work the windows Bill!!! work the windows!
-
-
I had it planned out since the kit was issued. The engine is the 440-4bbl out of the '71 Charger Kit. The Charger sacrificed its underhood area, chassis, and interior for this one.
-
MPC 1966 Pontiac Bonneville
-
The BIG CAR CHALLENGE!!!
Ron Hamilton replied to Ron Hamilton's topic in General Automotive Talk (Trucks and Cars)
THE BIG CAR CHALLENGE is one week away!!! -
James Testor sent me a photo of a car, which was my inspiration. When I decided th build this one, I combined mine with the '71 Charger R/T Kit. I drilled out the molded in headlamps and added clear lenses. I detailed the kit wheels, and added a set of 60 series Polyglas GTs Here's the Charger interior tub, combinedwith the seats from the Road Runner Here it is all mocked up, ready for paint I painted it B-5 Blue, with a Bright Blue interior, Keith Marks' White Stripes, detail Master Hood Pins
-
1968 Barracuda Formula S Fastback, converted from a '69, using parts from a derelict '68 glue bomb. I'm leaning towards Turbine Bronze with the black side stripes and interior. 1968 GTO Hardtop, using chassis from MPC '69 442 The GTO will get a vinyl roof, and maybe a set of red lines on Rally I or Rally II wheels, instead of the 5-spoke/Polyglas GT combo. The color is up in the air, but it will be a '68 Pontiac hue, with a black vinyl roof, lower body pin stripes, and GTO letters..
-
-
The company went out of business I believe.