
Ron Hamilton
-
Posts
4,465 -
Joined
-
Last visited
Content Type
Profiles
Forums
Events
Gallery
Everything posted by Ron Hamilton
-
This one started as a builtup I got off of ebay. A very good friend of mine has a one to one red '68 hardtop currently being restored. It took everything for me not to do this one in red, so I decided to do it as if I owned the car instead. I used the MPC '69 442 kit for its chassis and underhood area. The body needed a slight bit of work, where I filled in a sink on the right front fender fron the original firewall, and I added a set of vinyl roof mouldings. The vinyl roof is masking tape, painted with the same paint used to paint the car (Tamiya Dark Blue), with a clear flat lacuer overcoat. The GTO crests and rear fender decals are from the Last Detail GTO sheet, and a set of Keith Mark's GTO set. The wheels are detail painted resin Pontiac Rally II's with a set of Chromed Trim Rings from a set of Parts Box Chevy Rally Wheel Rims and the tires are Resin Firestone Wide Ovals from Replicas and miniatures. The engine and transmission came from the Revell '68 Firebird, which will eventually end up as a Sprint with the OHC6 and Resin Flat Hood From Perry's, but thats a project for the future. I had one of these when I was 11 years old as one of my xmas gifts. It never got built, as it was a "short shot" where half of the front fenders was damaged beyond repair, and I didn't have the skill to fix it. This build more than made up for that one.
-
That is so sweet!
-
1958 Chevrolet Biscayne
Ron Hamilton replied to Ron Hamilton's topic in Car Aftermarket / Resin / 3D Printed
Art, You did a wonderful job on the Master. I may do the '59 to go with this one. I already have the color combination picked out for it, as well as theme, and the powertrain combination. RH -
And you thought I didn't know my way around a sheet of Bare Metal.
-
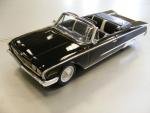
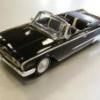
When the AMT '60 Ford Starliner coupe came out, I had planned to build it as a convertible, as a replica of my uncle's car. I was planning to scratchbuild the interior panels, but in a conversation with Norm Veber of Replicas and Miniatures Co. of MD, he advised me that he was developing a transkit of the Sunliner. In the mean time, Model Car garage had also developed a photoetch set for the 60 Ford. Armed with these items, I started my project. My uncle's car had a set of full wheelcovers and a set of skirts, neither was available in the AMT kit. So I scratchbuilt the skirts, and found an accurate '60 Ford wheelcover from the Hubley '60 Ford Sedan. Both of which are now in Replicas and Miniature's line. I painted it with Model Master Black Lacquer, with a Black and White interior, just like my uncle's car. All in all, I am pleased with this build.

-
No. I did the tires from the kit myself with a bow compass. The '66 Riviera tres are too narrow for this application. Ron
-
I modified this one from an original 1971 AMT kit, using the roof and trunk section from a derelict '68 T-bird. I filled the quarter windows in to replicate the "Town Landau" roof. The interior was modified to replicate the leather Brougham Interior trim, in the "Ginger" color. The wheels are the Optional "Finned" wheelcovers, from the Modelhaus. I plan to re-"Bare Metal" the project and Rub the finish out further to enhance it, as I am not satisfied with this one, yet.
-
I purchased this one from Bandit Resins. The kit seems to be going together pretty easy. This one is designed to be a transkit for the old AMT '58 Impala Hardtop kit. The paint is MCW Sierra Gold, and the interior will be painted with a coordinating color. The engine will be a surprise. I still have a ways to go on this one, but it is going along pretty good.
-
Here is one of the latest models I am working on, a modification of Revell's latest AAR cuda, as a Barracuda Gran Coupe, done in a Replica Stock '70's style off of the showroom floor. I made my own flat hood, modifying the kit part. I also modified the seats, to reflect the "Gran Coupe" leather interior option, as well as added the seams and mouldings to replicate a vinyl roof. I also worked on the rear fenders to elininate some of the "hippiness" on this kit. The wheel and tire combination is going to be the 1970 double white stripes mounted on a set of road wheels. The paint will be a common '70 color combination, but not one that would be expected on a '70 Barracuda model. The engine will probably be a 383 4-bbl, with a Torqueflite.
-
Modelhaus 1970 Ford Country Sedan
Ron Hamilton replied to MrObsessive's topic in Car Aftermarket / Resin / 3D Printed
I plan to buy one of those myself. I'm going to combine the kit with some LTD Pieces to do a '70 Country Squire to go with my '67 Caprice Wagon. Those wheelcovers are the '68 through '71 Finned Wheelcovers, originally found in the '70 Ford LTD 4-Door Hardtop, in the AMT Motor City Stocker Series. A friend of mine's parents ahd a Light Blue '69 Country Squire. Mine is going to be Black, of course, with a black interior.
-
Feb. Mama Meeting Pics
Ron Hamilton replied to Lyle Willits's topic in Model Club News and Announcements
That one was a labor of love. You know I have a soft spot for '65 Chevies. I have one of each in scale, either built, or waiting to be built. My next '65 Chevy may be a Nova SS, a Corvair Corsa Coupe, or a Impala SS 2 Door Hardtop. The first car I owned was a '65 Chevelle Malibu 2-door hardtop. -
January Mama Meeting
Ron Hamilton replied to Lyle Willits's topic in Model Club News and Announcements
Bill, It's Harold Bradford's work. We missed you. Ron -
I saw this car today, and it is drop dead gorgeous.
-
I was working on the Revell '56 Ford Pickup, and I decided to glue th doors shut. The fit was horrible when I sat the doors in their frames. Maybe one day, I'll find this one and finish it to my satisfaction.
-
Mike, I had one of the MPC Fastbacks back in 1967. Even though the kit was not as well proprtioned as the AMT kit (which I had too), it had a lot of character. I liked it so much that I found an unbuilt one, which I intend to paint like the one I did back in 1967 (Light Yellow with a Black Interior), using only the kit parts, and no extra detailing other than Bare Metal Foil. Your resurrection may get my juices flowing to do this one. Ron
-
Mike, I love the fact that you have the knack to bring such derelicts back from the grave. A lot of your builds give me the inspiration to get to work. I really like the Ventura and the Mustang . RH
-
You're always welcome at my house, but not the model room. rh
-
Model Cars Best Of
Ron Hamilton replied to Gregg's topic in General Automotive Talk (Trucks and Cars)
A few models come to mind for me: 1) Larry Boothe's '57 Thunderbird 2) Bill Geary's '58 Impala Convertible 3) Lyle Willits' '66 Chevelle Convertible 4) Irv Arter's '56 Mercury 5) Matt Guiffoyle's '59 Dodge Custom Royal Convertible Ron Hamilton -
I told you to run!!!
-
Truly remarkable, Lyle. Sorry I couldn't make the meeting.
-
I've been lucky. AFX has always gotten my orders out in a timely manner, and yes, I have one of those '71 Demon bodies, and no, I will not sell it now.
-
Test shot Pics Revell '70 AAR 'Cuda
Ron Hamilton replied to MrObsessive's topic in Car Kit News & Reviews
I built one from an original MPC '70 'cuda as a 440 car, utilizing a shortened AMT '71 Charger R/T Chassis and underhood structure like I did the GTX. Even though that one was not "perfect" either, it is better than the "new" Revell Body. Now it looks to me that this one may be offered by a certain resin caster in the future, you have to ask yourself two questions. 1) What will be the quality of the resin body you get, as I have gotten a few that has needed a lot of work, just to prepare it for paint. If the master, mould, or quality of resin is not right, then money will be thrown away. 2) The cost factor. Around $50, plus a donor kit, plus other incidentals such as chroming, wheels/tires/detail parts. I was fortunate enough to find an unpainted, white one to work with. The chassis was junk, but the '71 Charger bits worked fine, and I was happy with the result. I'm sorry that I am not able to download the photo of the finished model to this forum, as my photo hosting site is not compatible. I did try. -
Test shot Pics Revell '70 AAR 'Cuda
Ron Hamilton replied to MrObsessive's topic in Car Kit News & Reviews
Not to start a flame war, remember, No model car is perfect out of the box. Even in this world of CAD drawings, a lot of them are still off. They all need a little "massaging". Especially a lot of the newer releases. I am willing to bet that I could "pick apart" most of the new releases by the model manufacturers on subjects I am familiar with. Granted this one needs more than most. I'm waiting for one of us brilliant modelers to correct this kit instead of complaining about it. The wonderful thing about the marketplace is, if you don't like it, don't buy it. I'm not completely satisfied by the resultant kit either, but all of us have seen worse, even by the so-called "premier" model car companies. I am no means a "rivet counter", but I know what looks good, and this kit holds much more promise than any currently available kit of this subject on the market. Perfect? No. Don't get me wrong, I am not a Revell apologist, as there have been some decisions made by this company I will never agree with, and a better job could have been done with this offering, but I do not see this one as being such a dog as some other kits I have seen of other subjects. A lot of the criticism is being leveled at this kit by those who are relying on photographs and word of mouth. Some of these people have not had their hands on the actual kit, nor have they seen one built by an "accomplished" modeler in person. Let's reserve judgement until we see some of these on the tables at the club meetings, NNL's, contests, and on the message boards. Personally, I will take great joy in "straightening" out this one to the best of my ability, and showing my work off. Go for it.


