
Ron Hamilton
-
Posts
4,465 -
Joined
-
Last visited
Content Type
Profiles
Forums
Events
Gallery
Everything posted by Ron Hamilton
-
Didn't you tell me you were installing power windows and seat in this one? I can't wait to see it work.
-
I LOVE that Javelin, and the Marlin doesn't look too bad either. I followed the build of the Javelin, and your work really paid off. I was able to get my hands on a '68 promo, and a '74 unbuilt kit. The '68 Promo needs re-doing, as the paint had a big blemish on it, and I do not really care for the color (Green). I grew up near an AMC dealership when I was a kit, and I had a fond appreciation for those cars. If I can get my hands on a dilapidated Marlin (all I need is the roof and deck lid), I may try my hand at the Tarpon, as I have a ratty, but restorable '65 American Hardtop. I was going to do it as a convertible (there was one I passed on my way home from work), but that Tarpon is saying "Build Me!"
-
Great Job on the Fairlane. Great minds do think alike. When I restored my '67 Fairlane, I drilled out the headlamps and used clear lenses. I really like that car. It captures the bracket racing flavor of the 60's and '70's excellently. Ron
-
1950 Caddy "Purple Haze" finished 5/1/08
Ron Hamilton replied to Irvin Arter Jr.'s topic in Model Cars
coooool! -
New Revell 1968 Charger R/T kit is Released
Ron Hamilton replied to fury3's topic in Car Kit News & Reviews
I got my kit today, and it is as nice as I expected. A full review may come later. -
Harold, I like the work you're doing with the Lincoln. The finished car should be outstanding. I bought a case of the '62 T-Birds cheap, and I intend to do a few projects using that kit as a basis myself. I'm considering a 1961 Continental Sedan, a '60 T-Bird Convertible, or a '65 T-Bird Convertible (resurrection) using that chassis, and using the 430, and Lincoln Transmission for the Lincoln, or '60 T-Bird, or a FE Motor for the '65. At the present time, I am finishing up a couple of projects I hope to have done by the M.A.M.A. Mid Atlantic NNL in a couple of weeks.
-
‘70 Ford Mustang Mach1 Revell Kit #4203 1 2/4 Scale Modified Reissue 134 Pieces plus Decals The new Revell-Monogram Company has done it again. This company seems to want to cater to us “Baby Boomers†with either reissues, or new tools of significant automotive subjects that would normally appeal to modelers in this demographic. Even though I am not officially a “Ford Guyâ€, I am impressed that this company saw fit to reissue their ‘70 Mustang Sportsroof kit, this time with parts newly tooled to build an accurate ‘70 Mach 1, which was probably the best selling version of this car. I am also impressed by the way the manufacturer accomplished this, by adding extra parts to their ‘70 Boss 302 kit, and including the “newly tooled†parts in the same box, so the builder could choose which version they would build. A ‘70 Mach 1 has not been available in kit form from a major manufacturer in the American market since AMT marketed the annual kit for the 1970 model year. I took a hard look at my AMT ‘70 Mustang Mach 1 kit, and the new Revell kit is superior in every way. In comparison, the old AMT tool looks “toy-like†in comparison to the Revell tool. From the proportions of the body, to the interior, to the engine, to the wheels and tires, it would take a ton of scratch-building and body work to make the old AMT kit look half as acceptable as this new kit from Revell. I tried to find fault with this one, and while it is not “perfectâ€, it is damned good. According to the directions, the kit has enough parts to build either a Replica Stock Mach 1, a Replica Stock Boss 302, or a Custom Boss 302. I can take this a little further, in that a “Standard “ ‘70 Mustang Sportsroof can also be done, by mixing and matching the appropriate kit parts. There are two separate engine assemblies in this kit, a 351 “Cleveland†4-Barrel V8, and a Boss 302 V8, with either a 4-barrel carburator, or the rare Autolite 4100 in-line carburator with it’s attendant parts. These engines are excellent examples of each, needing only proper paint, aftermarket products, and building skill to do a contest quality example. The 351 Cleveland engine cannot be built as a Factory Stock engine, as a set of “Ford Motorsport†Aluminum valve covers are included in the kit, whereas the factory issued this engine with a set of “Powered by Ford†stamped steel valve covers. Maybe the aftermarket can come through for us for this part. The chassis is a simple affair, with a well engraved front suspension moulded in, a separate dual exhaust system, staggered rear shock absorbers and a separate rear axle/leaf spring system. Proper detail painting and aftermarket products will make this one stand out. If the modeler wanted poseable steering, a lot of scratch-building will be required as the front suspension is moulded as a single unit. There are two basic interior assemblies, one being correct, and the second not correct, but workable. The first version is the “Mach 1" interior, which is correct for this car. There are separate door panels, which represents the “Mach 1" and the “Decor Group†interior, with the proper upholstery pattern and the panel for the wood grained insert, which is represented by a decal. The second interior tub has the “Decor Group†interior front and rear seats, with the “Standard†door panels, which is not a correct combination. A “Decor Group†interior could be accomplished by swapping out either the door panels from the “Mach 1" interior to the “Boss 302 tub, or the whole rear seat area by swapping the “Decor Group†rear seat and interior tub to the “Mach 1" front tub. Both versions use the same dashboard, which is well engraved, with decals representing the woodgrain and the gages, as well as the Hurst 4-speed shifter with “T†handle, and the “Rim Blow†steering wheel. The two-piece front bucket seats for both versions are well proportioned, and with the proper upholstery pattern engraved in it for the version as intended. Each interior tub had the center console and rear seat moulded into the floor. The pedals are also moulded into the interior floor, which in my opinion detracts from an otherwise fine interior tub. The bottom side of the interior tub is engraved like the chassis of the real car. Nice touch. Each version has its own radiator unit, the Boss 302 Version adding a separate oil cooler. The rear view mirror mounts into the glass unit which mounts into the body. The head lamp and tail lamp lenses are clear. The outboard mounted front shocks mount into the front fender wells, after the area is painted. The export brace is also included, and is to be attached to the shock towers. There is also a separate battery in the underhood area, which the has the firewall and its components moulded to it. A very simplistic approach, which needs a little work and detail painting to be credible. There are two rear tail treatments for this kit. The first is the “Mach 1" treatment, which has a patterned center insert, which is to be painted black, and the “Boss 302"/ “Standard†treatment, which is to be left body color. The tail lamps are moulded clear, so they must be tinted red, before they are mounted in the tail light bezels on the rear bumper, which should have flat black flowed into the recess in the bezels on both sides. Each version has its specific gas cap, the one for the “Boss 302/Standard†should have a black wash added for clarity. Separate chrome back-up lights, which need to be detailed, are also furnished. On the face of the rear deck lid, there are M-U-S-T-A-N-G letters engraved onto it. These letters should be removed, and replaced with the proper decal if the Mach 1 is the version being built. A separate rear spoiler, and optional well engraved rear window louvers are included. There is a front body panel, where the grille mounts. There are two front grille/headlamp units. The “Mach 1" unit with its fog lamps and specific grill treatment is included, as well as the “Boss 302"/ “Standard†unit. Do your research and paint the unit properly for clarity. A separate front license plate, and front spoiler is also included for this assembly, which must be carefully mounted to the front of the body before painting and mounting the appropriate grille and spoiler. There are two sets of wheels and tires included. The first is a set of “Sport Wheel Covers†mounted on black, no-name F70-14 ‘70 series bias ply tires, which are new to this kit, and are meant to be used with the “Mach 1", and could work with the standard version. White letters or a “Pin White-wall†could be added to the tires for added clarity. The second is a set of 15" x 7" “Magnum 500 wheels†mounted on black, no-name ‘60 series radial ply tires, which are meant to be used with the “Boss 302" version. They were often seen on the “Mach 1" version also. A set of white letter decals would dress these tires up nicely. Both sets of wheels need the appropriate detail painting for accuracy. Curiously, there is no brake detail on the wheel backs. The tire manufacturers should allow the model kit makers to put their brands on model tires at no cost. It’s free advertisement, and the kit tires look too toy-like without them. Two separate hoods are included. The first is a hood with a “non functional†scoop on it meant for the Mach 1. There is an opening in this hood , which should be filled in with a piece of sheet plastic underneath after the scoop is installed. The stripe decal should be installed and mounted on the hood before the scoop, which should be painted flat black by the way, is installed.. Twist type hood pins are also included for this hood. The second hood is a flat hood, which is meant to be used with the “Boss 302" has it’s own decals unique to that model. For this hood, there is a custom hood scoop, which is to be meant to used with the Autolite 4100 inline carburator system, after the appropriate hole is cut out. A “Standard†Mustang could use either hood, without striping of course. There is a moulding engraved on the front edge of the hood, which should be chromed. The body of this kit, which by the way, is the best rendition of a ‘70 Mustang “Sports Roof†in scale, is not perfect. I find that the rear quarter windows are cut a little short, and look triangular. The real car has a flat area of about 3 ½ inches across the top, and this is not represented on this kit. Curiously, the annual AMT kit had rear quarter windows that were too wide, and the original MPC kit didn’t have pillar posts. It’s up to the modeler to deal with this issue, as most will just leave it alone. Dual sport mirrors with separate mirror faces are included. Curiously, the body lines depicting the fender to cowl panel separation is not there. For the “Mach 1", the lower ribbed mouldings are represented by separate chrome parts, which attach to the lower door panels. The recesses should be painted with a deep flat charcoal, with only the fins, lettering, and the upper edge moulding left chrome. Each version has the appropriate stripes and emblems rendered as decals. All in all, I really like this kit, and plan to buy a few more for various versions of the Mustang Sportsroof, one being a “R†Code sleeper with a 428 Cobra Jet, which can be sourced from the Revell ‘69 Shelby GT 500, or the ‘69 Mustang Mach 1 kit. If I were the kit planner, I would have included a shaker scoop, hood, and 428 Cobra Jet from the Revell ‘69 Mach 1, along with the appropriate decals. Keith Marks does a comprehensive decal set for the Mach1and the Boss 302 in Black and White, as well as the rare regional “ Twister Specialâ€. Now if we can get some decent photo-etch for this kit. Highly recommended. Ron Hamilton
-
1969 Thunderbird, Or "how I Burned Through Five Kits"
Ron Hamilton replied to Harold's topic in Model Cars
You know I like that one. As a collector of T-Birds, I have an unbuilt-original '69, which will be a Town Landau. It will be a while before I do this one. The next one will probably be a black '67 Hardtop, with a red interior. I saw it at Fords at Carlisle, and I have to do that one. -
I posted this one before, but in light of the "gas crunch", I downsized to a Malibu Wagon, with a 327/300/Powerglide. Not quite the kick of the Impala, but pretty respectable. This one was converted from the Revell Street Machine, using parts I either mastered, or sourced and are now available from Replicas and Miniatures Co. of MD in a transkit. The paint is Model Car World '66 Chevrolet Aztec Bronze Lacquer, and features the Model Car Garage Photoetch Set, and Satco Firestone Supremes.
-
One of my favorite cars is the 1965 Chevrolet. The Revell-Monogram kits of the '65 Chevy are pretty nice, even though I have yet to build one straight out of the box. One of which I did was the Modelhaus Resin transkit for the Impala Station Wagon. I did mine as a 396/350 Turbo 400 loaded wagon. I painted it with a custom mixed Orange Pearl Lacquer, with a Red-Orange "Flip-Flop" top coat, as I liked the color. Also, I used the MCG Photoetch set. It's a little hard to see, but I had the entire dash chromed for better detail. The steering wheel rim came from Replicas and Miniatures, and it is real wood. The wheels are the wire wheels from the Revell 1964 Impala Lowrider Kit, and the tires are Satco Firestone Deluxe Champion Pin-Whites. I should have added a trailer hitch, as this would have been quite a tow vehicle. This is one I will never let go.
-
Psssst...wanna See More Of Jada's Shelby Gt500?
Ron Hamilton replied to Zoom Zoom's topic in Car Kit News & Reviews
Is it plastic or diecast? Did you strip and paint this one, or is it moulded in white?? Ron -
Go get 'em Bill. That one is looking good so far. Ron
-
That is sooo sharp Cruz.
-
1958 Biscayne, Part 2
Ron Hamilton replied to Ron Hamilton's topic in Car Aftermarket / Resin / 3D Printed
Art, That's the way the factory did it. From the photos I have been able to find, these cars are pretty accurate, except for the hash marks on the front fenders, and the fender ornaments on the two tone green one. The Biscayne didn't come from the factory with those in 1958 from the Info I have. Now have you ever known me to not do my research??? Ron -
I think the "Desperado" box art car on the original AMT '67 Fairlane was one of the best one's I have seen also. On the contrary, the original kit was a replica of the GT version of the 1967 Ford Fairlane, which did not have the lower side mouldings like what is in the photograph in your post. The side mouldings came on the "500" and the "XL". Keith Marks has a pretty comprehensive '67 Fairlane decal set in his line, with the side mouldings included. When I built mine, I was going to do it as an XL, but installing the body line was not all that hard, so I took the plunge. Maybe on the next one, I may do an XL as a convertible to be different.
-
This one was a conversion from an AMT 1966 Mercury Park Lane hardtop. I removed the body side moulding and Park Lane emblems. I had to re-shape the entire deck lid area and built up a tulip panel to mount the convertible top boot. The sun-visors are hand made, and the boot is a '66 Ford item from The Modelhaus. The paint is Model Car World '66 Mercury Candy Apple Red enamel, with a white interior and boot. The wheels are kit parts, while the tires are Satco Firestone Deluxe Champions.
-
I started this one with a built-up, unpainted '67 Fairlane off of ebay. There was no stock seats, but a lot of what I needed was there. As you can see, it was pretty clean, and wasn't much of a glue-bomb. The hood was missing, and the interior was a race type. I was able to find a hood on ebay, and I got a set of seats cast from my mint, unbuilt original kit. Anyone familiar with this will note that AMT forgot to include the lower sculture on the body, so I cut it in, using the '66 body as a guide. I drilled out the cast in headlamps, and installed clear lenses. The styled steel wheels came from the original '66 Mustang Convertible kit, via The Modelhaus, as these are the most accurate set of these wheels available in scale. I mounted them on a set of original AMT Firestone Supreme red lines. The steering wheel came from the latest issue AMT '67 Mustang, as the kit wheel did not have the "Flower Pot" horn button. I replicated the '67 Brittany Blue paint with Testors' Lacquer, with a two tone blue interior. The stripes are a combination of Keith Marks' GT emblems, and AMT '66 Fairlane GT stripes in white. I have wanted one of these for a long time, and I finally got it done.
-
Well, I got some chrome on this one, as well as a polish job. This was not an easy one to Bare-Metal. that's for sure. I also changed the wheels to a set of Torque Thrusts. I still have to detail them with grayish spokes, and wheel caps.. The interior paint is next, as I have to custom mix the colors according to the 1958 Chevrolet Biscayne interior info. Instead of a exact replica stock, I'm doing this one as a mid 60's street machine, adding a custom steering wheel, gages under the dash, and a steering column mounted tachometer. The engine will be a surprise.
-
"1990" Cadillac Fleetwood Brougham D'elegance Coupe
Ron Hamilton replied to Ron Hamilton's topic in Model Cars
The tires are from the parts box. I used a bow compass to do the "Vogue" stripes. -
Bob, It looks wonderful, but you overlooked one thing. The "A" pillars on the '71-'76 GM cars were stainless. Not covered with vinyl material, as moulded in the kit. By the way, this is what I have planned for my '74. My mom had one when I was in high school.
-
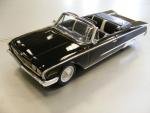
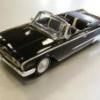
Smp 1961 Imperial Convertible Resurrection. Part One
Ron Hamilton replied to Ron Hamilton's topic in Model Cars
I'm so sorry all, but i put this under the wrong catagory. -
Smp 1961 Imperial Convertible Resurrection. Part One
Ron Hamilton replied to Ron Hamilton's topic in Model Cars
It took a little time, but I got it cleaned up. I was able to repair the windshield frame, and polish out the windshield. It was pretty complete, except I needed a convertible boot, tail lamp bezels, lowering blocks, Tires, Wheelcovers, wheelbacks, and axles. I have everything I need thanks to Replicas and Miniatures and the Modelhaus. It's in primer now, and I have a '61 Imperial color chart. After I started on this one, It really grew on me. I'm diggin' those crazy fins. I promise I will finish it this year. Hopefully by the time the Mid-Atlantic NNL comes around this May. -
Have you ever built a model of a car that was truly ugly in your mind? The '61 Imperial is that car to me. I was roaming around Carlisle at one of the shows a few years abck, and one of the vendors offered me this for sale. I have the '61 Lincoln Convertible in my collection, and I was wondering what was in this box. I was curious, so I had to open the box, and this is what I found, a SMP 1961 Imperial Crown Convertible. Yes, this boy was kind of rough, and filthy dirty, but it was workable. The windshield frame was cracked in the normal place, and the glass was very cloudy, and I cannot tell you what this goo was on the hood and front fenders. Take a look at the next post for the next phase.
-
That's very nice!!!
-
When Revell brought out the Lowrider Version of the Cadillac Fleetwood Coupe, I was overjoyed, as my Dad's last car was a 1981 Cadillac Coupe de Ville. Now this car is a Phantom, but I liked it anyway. Of course I had to make it as to what I thought Cadillac would have done if they marketed such a car. In doing this one, I raised it up close to a replica stock stance. The apint is Testors Model Master GM Dark Cherry Lacquer, leaving the Cabriolet Roof un-polished to simulate a vinyl roof. I redid the interior to replicate the Brougham d'Elegance trim package, using pieces of the diamond tufted bench seats from the AMT '62 Catalina Custom as pillow back seats. I painted it with various acrylic gray paint to match the 1989 Cadillac Gray Leather interior. The wire wheels are Detail Master 100 Spokes with Model Car Garage Cadillac Crests. The tires are Michelin Radials, with Vogue White walls painted on with a bow compass. A little detail painting, and some Bare Metal Foil, and there you have it.