Mj-Styro
-
Posts
524 -
Joined
-
Last visited
Content Type
Profiles
Forums
Events
Gallery
Everything posted by Mj-Styro
-
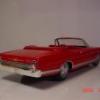
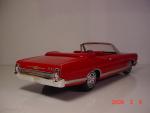
Body mocked up.didnt wanna strip the chrome off the wheels (came from another camaro kit) addded valve stems and polly glass GT hollow tires.... Theres a nick in the rear wheel well lip i didnt catch so i have left it alone.........
-
Next up is the engine! It was horrible!!! the guys got it tore down and rebuilt it! so shes a fresh 350! (looks like a 396 tho LOL) but im calling it a 350.... Here i got the engine all apart and cleaned up to almost new again! next up was to paint everything, and the chrome is alittle worn so i redid the valve covers.....
-
Finished this one last week,started it earlyer in the week. Scratch built tow bar....... The Original Lindberg kits body was horrible!!!! used an older amt body for the build.... I radiused the rear wheel well openings and also moved the rear end forward just a tad......... Ran out of clear window maker glue so i havent been able to add the final pieces.....( i have a new bottle but no clue to were it went at the moment)
-
Continued................ Sizing it up see what needs to be done now. Heres the driver side Attatched.....
-
OK to the before pics!! You also note that the rear wheels have been enlarged, and also the taillight holes were filed out to make one big opening........ What i will be doing is grafting a whole rear clip (from USA1 Camaro f/c body).
-
Missing afew pieces i will add at a later date........( have a rear bumper,rear spoiler and head lites coming and will add them later)Air cleaner and side mirriors have been installed........ But shes shaping up! AMT 1972 Nova Engine and exhaust........wired,soon heater hose's (thats been drilled out already)
-
I was pushing the lacquers!~! but i managed to pull off the second color for the V/top........ Here ya go! Oh i manage to get the trunk lines and door lines back in before color.......
-
They are from the '70 Impala kit amt.....modifyed the backs....... THANKS GUYS!!!!!!!!!!!!!!!!!! its something different!! and i was able to follow it thu!! and did acouple other styles! thoguth it was kool and it sure was a heck of alot of fun!! I'll have to do more of them this year.............
-
AWESOME JEFF!!!!!!!!!!!!!!!!!!!!!!!!!!!stunning!!!!!!!!!!!!!!! And yes that used to be the nash bridges car,even had it paint yellow! but he needed one badly!!! so he got it
-
Needs Taillites and i have an idea,just have to find the kit or make my own...........sorta stumped on them....but i will fiqure it out. Heres a Engine shot
-
WOW i cant believe it!! I followed thru and Finished this build!! Before you bust my chops about this and that Just remember i am only pleasing myself and with hopes it will fit in,so please remember that.............with that said! onto the pics!!! Also you will have to settle for in door pictures its raining out doors! LOL
-
I tried to add every little bit of detail i could!! Lastminute details was giving the wheels and the brite engine works a little dull look1 like years of use! I hope i got it!! let me know what ya think!!! I used my own brew black wash system! hope you like LOL
-
Fiqured i needed to get better pics of this or atleast more pics of it.........
-
Thanks Goerge!! I like my ragtops! but to get a falcon in ahard top you pay alot for it so i did one for myself this go around..........
-
-
No it wasnt. just something thought up..............
-
Its cool! One thing tho we can get away with is the fact that its in scale LOL..........but i do understand.......
-
Out door shots takin today! and all i can say is WOW!!!!!!!!!!! Have a look see..........The slight weathering doesnt show up to badly!.......... Just waiting on some pieces, so i can get them added and call it done.......
-
Thanks for the exsption(sp) to the rule truely dont see enoug of these cars!!! why i try to leabe it as close to the original as i could. then added a few bells and wistles........... Again thank you.........
-
I would but i am having trouble seeing now, have to take my glass's off when i go to build and my fingers lately have been cramping up........its a bear!! but i will deal with it slowly......... Thanks!!
-
grabbed some out door pics and wanted to share them.........
-
Continued....................... Also the taillights are 67 (resin) that i filled the lens area with clear window maker because i didnt have the lens,and painted them Kiln red
-
Well lets see ( Good question too) got it on Tuesday of last week, and Saturday morning i started the repairs.........by Sunday night she was done..... Here's a run down of what i did............ got the A-pillers repaired using acouple different sizes of sheet strips,put the drip rail back in,cut out the rear 1/4 panel (lower) grafted in a new one,Seeings how i was able to save the body i left it as a drag car and next step was to remove the rear inner fender wells,and Graft new wheel tubs in i made from a pill bottle. Next up was to fix the spindles as it sat either way to high or to low,so i cut out a section of a T- on the sprue tree and adjusted the height from there and mounted the kit coils on top of the new spindle.........Made a roll bar inside and also since the seat (back) was out i made alittle sorta kid of webbing and ran the angled bar thru that to the roll bar.............then just alot of detailing....... the engine i built years ago and it was never painted,so i went in and detailed painted everything....... Grabbed some parts from the ole-parts pale for extras........nothing fancy in side just painted nothing detailed....... except for the steering wheel.....which came from the 32 ford revell.......grant steering wheel i believe.....most pricey piece on the car LOL......... Found a set of mufflers and lead pipes so i heated them up and bent them to fit and made the tail pipe out of plastic rod and angle cut a alum tubing for the tip......... Next up was to make glass for the whole car (couldnt get any to fit),and everything went pretty well.........the windshield i had to heat slightly on the edges to give it a curve some what which really helped out on the installing (worked on the second try that is) LOL There ya go the run down! Pretty mazing now that you think of it eh? LOL( Alot of times things go unnoticed and with out saying what i did it gets over looked so i did a quick run down on what i did......) Oh the front wheels are cragars that i put in my lathe and cut the outer ring off so i could mate the amt wheel center to the revell outer ring to use front runners on the front, the rear tires are hollow Nascar tires (which to me make the best set of slicks once they are cleaned up and sanded on) I'll high light the parts done with pictures...
-
Just a weekend bracket car, with no thrills or frills.........cheapo wekend toy........ I was able to save the paint and most of the decals.....something i picked up last week,and decided to see if i could fix the damage it had.......The repairs were made but the paint didnt match which is ok,because of the type of car it is it works out perfect......... I put in mini tubs,and built a roll bar for it,redid the spindles up front (to make it sit alittle lower)........ Heres acouple Finished pics........ Heres a before pic
-
Its kool!!!!!!!!!! And no i didnt find the mark either, so i winged it on the other build ( i will be posting later tonight..........) THANKS!