

peekay
-
Posts
4,431 -
Joined
-
Last visited
Content Type
Profiles
Forums
Events
Gallery
Everything posted by peekay
-
Thanks Bernard, but it looks to me like you could do either - different years or international regulations maybe? Given the choice I prefer the whole piece amber, works more harmoniously with the fender. In fact you'll hardly find two identical cars and the kit includes a couple of rear lighting variants too (as you already know, I'm sure). A couple of years ago I saw a PURPLE Daytona on a Zürich Autobahn!
-
Looking good - you don't see that kit too often.
-
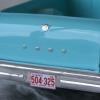
It's taken much longer than I anticipated to get to the next stage but the interior/inner fender assembly is now attached to the chassis. There were various fit problems, mainly the exhaust headers interfering with the inner fenders. I had to grind, trim and refit repeatedly, with bits falling off as I did so. They are now wrongly aligned and will not meet the exhaust pipes when they go on but I'm calling it done. (I've seen other builders on the net get this right so it's me, not Fujimi.) I attached the assemblys with wire rather than glue, in case I have to pull it apart again, but also to help lower the front a bit. The glass in the kit is one piece but didn't offer a clear view of the interior so I cut out the door windows, seperating back from front. I then did something stupid - I used 2 part epoxy and must have inadvertently mixed part A with part A, instead of B. Anyway, it never set and it was quite difficult to save the situation. I then attached the rear piece with double-sided and normal cellotape. I've done this before and it works quite well but you need quality, clear tape - I use Scotch Crystal. You might have noticed that the interior is also held together with this tape. This allows for some flex while attaching the body and is removeable if necessary. Did some other detailing: BMF matt under the hood and aliminium exhaust tips. The blue tape stripe on the headlight glass will be painted to match the body - luckily Humbrol has a metallic colour which will only need minimal adjustment to match the Sikkens lacquer. Next up is detailing and attaching the body - if all goes according to plan, which, of course, it never does.
-
Beautiful - clean and precise work throughout.
-
 For me too, the best build-up of that kit I've seen - and very nostalgic.
 -
Incredible craftsmanship!
-
The concept, the workmanship, the results - all amazing! I also admire your ability to overcome the obstacles.
-
JJ Yelley's 02 USAC Sprinter
peekay replied to Old Sprinter's topic in WIP: Other Racing: Road Racing, Land Speed Racers
Incredible! It's obviously not a kit - no kit was ever that well made! -
Such nice paint and foil, everything just right, all in 24 hours - amazing!
-
Fireball Roberts '57 Ford
peekay replied to Scottnkat's topic in WIP: Stock Cars (NASCAR, Super Stock, Late Model, etc.)
Looks great! -
1964 Rex White Mercury
peekay replied to MarkJ's topic in WIP: Stock Cars (NASCAR, Super Stock, Late Model, etc.)
A real beauty. -
I like it too!
-
My thoughts exactly. Well done.
-
Nice work! Good period colours and precise paint detailing.
-
Very nice work!
-
Nice clean rod Tom, great colour too.
-
I like it! Uncomplicated, very clean build and great colours.
-
I'm not into modern cars but that's really nicely done. Realistic paint finishes throughout.
-
Niko, I virtually never look at the Nascar section so I missed this. Really nice work throughout!
-
Nice work - the added trim and two-tone really set it apart.
-
I really like that - quick build or not, it turned out great. It shows NO sign of having been done in a hurry. I would have spent all day just getting the BMF that nice.
-
Looking forward to this one Richard - my sort of model. I've got an X-EL 59 that's currently getting a similar treatment but in pink and charcoal.
-
Extraordinary! Some of the detail looks like it was lifted from a 19th century oil painting.
-
Sonny, thanks so much but it looks like I'll have the indicators soon. I'll keep your generous offer in mind though. Yes, it's an amazing kit alright but it's taking me an age to get it done - I'm more of a Johan/AMT builder otherwise. I'm at the stage now where for every part I attach, another falls off. I'm also looking forward to seeing this one finished!
-
Nice job on one of my favourite Fords.