
gseeds
-
Posts
1,082 -
Joined
-
Last visited
Content Type
Profiles
Forums
Events
Gallery
Everything posted by gseeds
-
thanks guys, when i get a little time,ill whip up a tutorial, its very easy to do.
-
vintage 1958 impala 60's 70's style lowrider,mile custom
gseeds replied to gseeds's topic in Model Cars
thanks guys, yea the 58 has always been one of my fav's. -
thanks guys !
-
hey bob whats up buddy? hope all is well !!
-
thanks greg, cant wait to see your caddy.
-
thanks, when i was in high school my buddy had a 66 just like this ,always liked it.
-
thanks guys, no update yet but soon i hope!
-
wow! one word,.....cool !!
-
wow !!!!!!!!!!!!! ive aways love 57's and this one is Beautiful !!!! nice job !
-
-
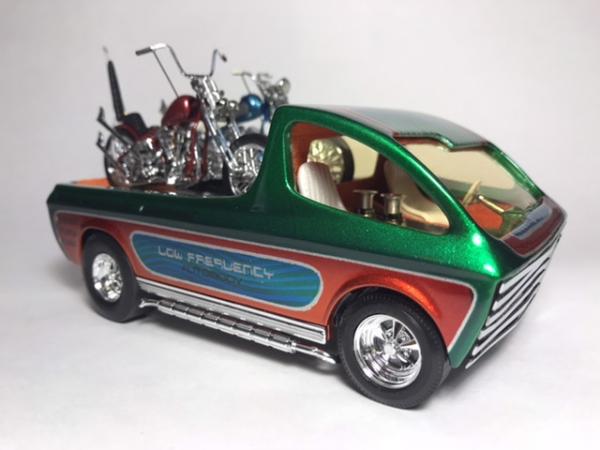
heres one im working on now, preatty clean vintage kit i got off Ebay, got doors and trunk and hood opened and hinged,new motor from revell parts pak, wired and plumbed,still to go is a full interior and trunk with pescos pumps,colors are HOK pearl white, candy pink and candy red and cleared. will post more as i go,thanks for looking. old motor and engine bay new motor and engine bay.
-
how bout a silver metal flake ? if you do paint it spit down the top half of the body,you may need to add a 3rd color to seperate the 1st two colors, maybe something thin between the bottom and top color, if that makes any since ??
-
-
i guess you could use shelf paper grampa, but ive got plenny BMF laying arould, and im sure most of the modelers here have some on their bench, and i bet most dont have shelf paper or mineral spirits ready at their finger tips,like you old timers, and who wants to deal with adhesive sticky models? what im trying to do give a simple and fast answer to the question " how do you do your flames and can you show me " i did see a few people asking for help,but did'nt see your how to, you welcome to post one, maybe some out there would like to see how to do the same with sticky shelf paper, i would.
-
wow !!! thats very cool !! super detail !!! like everything about it, nice job !!!!
-
way cool john, looks like prefect paint and love the carpet !!!!
-
thanks bob, hope so ,that would be great !!!
-
thanks for looking !!!
-
heres somthing the guys here online would ask me from time to time to do, had a little time today ,so i shot some photos,the round brass tube i use is stock #1251,same that i use for my hinges,and can be got at the hobby store,the putty i use is evercoat polyester glazing putty,and can be got at automotive paint stores,and maybe some parts stores,,everything else is just hoddy stuff i think most of us already have. frist you need to decide where you want your antennas,draw and cut a shape like this in the plastic,i like to stagger them,one higher than the other. i also like to thin the back side of the model where the antennas will go,makes it easyer to cut the plastic from the outside of the car,be careful not to thin to much. next mark the tube where you need to cut it,and cut at an angle. place the two tubes in the slots you have cut. and glue from back side. next will need to mold the tubes in ,i use this putty, you can also use CA glue but the putty sands a lot nicer. this what it looks like puttyed up.i like to put small brass wire in the holes so they dont filled full of putty,pull out when done puttying. molded ,sanded and shaped. primered , sand and paint. there, its that easy, if anyone still has Q's just ask, ill try to help you out. good luck.
-
this for the guys that want to know the basic's of custom paint,some of the guys here are past this,but others will find this helpful { i hope }. Ok this is a very simple flame design that you can take as far as you want, its not prefect but youll get the idea, after a good wash and primer i sanded the car with 800 grit sand paper {wet}, gave it a base color of house of kolor sunrise pearl,after it dryed,i used bare metal foil as a mask, after laying it on the area i want flamed,i then I draw on some flames,with a sharpie pen,then i take my number 11 blade and cut along the draw lines,and peel back the area i want color on, remember to cut very carefully and only cut only the foil not the paint below,mask off all others areas you dont want paint,ad color of you choice,then peel and un mask and clear,there you have a fast and easy way of flaming, i would start with a bigger flame,like whats on this car,then with a little practice move on to the smaller tigther flames, i couldnt stop with just the flames i had to add a few fades,then three coats of automovtive nason clear, have fun,good luck.
-
not sure if this is what your looking for ,but i posted this up for a few guys that were asking me to do a how to, so i whipped this one up, hope it helps with some of you Q's,gary. this for the guys that want to know the basic's of custom paint,some of the guys here are past this,but others will find this helpful { i hope }. Ok this is a very simple flame design that you can take as far as you want, its not prefect but youll get the idea, after a good wash and primer i sanded the car with 800 grit sand paper {wet}, gave it a base color of house of kolor sunrise pearl,after it dryed,i used bare metal foil as a mask, after laying it on the area i want flamed,i then I draw on some flames,with a sharpie pen,then i take my number 11 blade and cut along the draw lines,and peel back the area i want color on, remember to cut very carefully and only cut only the foil not the paint below,mask off all others areas you dont want paint,ad color of you choice,then peel and un mask and clear,there you have a fast and easy way of flaming, i would start with a bigger flame,like whats on this car,then with a little practice move on to the smaller tigther flames, i couldnt stop with just the flames i had to add a few fades,then three coats of automovtive nason clear, have fun,good luck.
-
I need pointers on painting flames/graphics
gseeds replied to randx0's topic in Tips, Tricks, and Tutorials
not sure if this is what your looking for ,but i posted this up for a few guys that were asking me to do a how to, so i whipped this one up, hope it helps with some of you Q's,gary. this for the guys that want to know the basic's of custom paint,some of the guys here are past this,but others will find this helpful { i hope }. Ok this is a very simple flame design that you can take as far as you want, its not prefect but youll get the idea, after a good wash and primer i sanded the car with 800 grit sand paper {wet}, gave it a base color of house of kolor sunrise pearl,after it dryed,i used bare metal foil as a mask, after laying it on the area i want flamed,i then I draw on some flames,with a sharpie pen,then i take my number 11 blade and cut along the draw lines,and peel back the area i want color on, remember to cut very carefully and only cut only the foil not the paint below,mask off all others areas you dont want paint,ad color of you choice,then peel and un mask and clear,there you have a fast and easy way of flaming, i would start with a bigger flame,like whats on this car,then with a little practice move on to the smaller tigther flames, i couldnt stop with just the flames i had to add a few fades,then three coats of automovtive nason clear, have fun,good luck. -
thanks john,glad you like, man i spend so much time looking at your post that i dont get anything of mine done !! lol, man your models just blow my mind!!!and i love how they look so real, way cool bro !!!
-
thanks , the colors are srayed on 1stm then masked off and black sprayed over the top, when time permits ill do a how to.
-
thanks dave and all the others, when i get a little time ill do a how to ,it's very simple.