

sjordan2
-
Posts
7,675 -
Joined
-
Last visited
Content Type
Profiles
Forums
Events
Gallery
Posts posted by sjordan2
-
-
Sure sounds cool, but the images don't appear to be showing.
Same here. Maybe from an old Photobucket account?
-
If you're looking for detailed photo reference for classic sports cars, racers or other collectibles (not so much for muscle cars), Fantasy Junction has posted very detailed galleries over the years. Search in Google Images for Fantasy Junction (car name and model); their galleries will show cars shot against a red brick wall. Here are typical entries for Mercedes Gullwings:
-
For nuts-and-bolts photo reference for the Gullwing, look at ALL the Gullwings shown here against a red brick wall at Fantasy Junction. Details will vary in scope.
fantasy junction mercedes gullwing 300 sl
-
Wow Skip that is some awesome info! Any suggestions on how to Google for these images? I tried so hard to no avail. Thanks for posting these. I may or may not be able to change these. Depends on how strong the glue is...
I have just about everything you need in my files (I'm a Gullwing fanatic and have all their manuals, plus hundreds or thousands of downloaded images of cars and parts). Just let me know what you want info on. In most cases, I use Google Images – Mercedes Gullwing (part), but Google isn't always good about that.

-
Further note: The kit includes radio speakers but no radio or antenna. Leave out the speakers or contact me for how to build a simple Becker radio. The mounting piece is unique to the Gullwing. Essentially, you just print this out (about a hair over 1/4" wide at the top) to fit and use straight pins for the knobs. Or use a 1/24 PE radio and make the mounting frame. It hangs down under the bottom center of the dash.
-
Spectacular in every detail. Great photos.
-
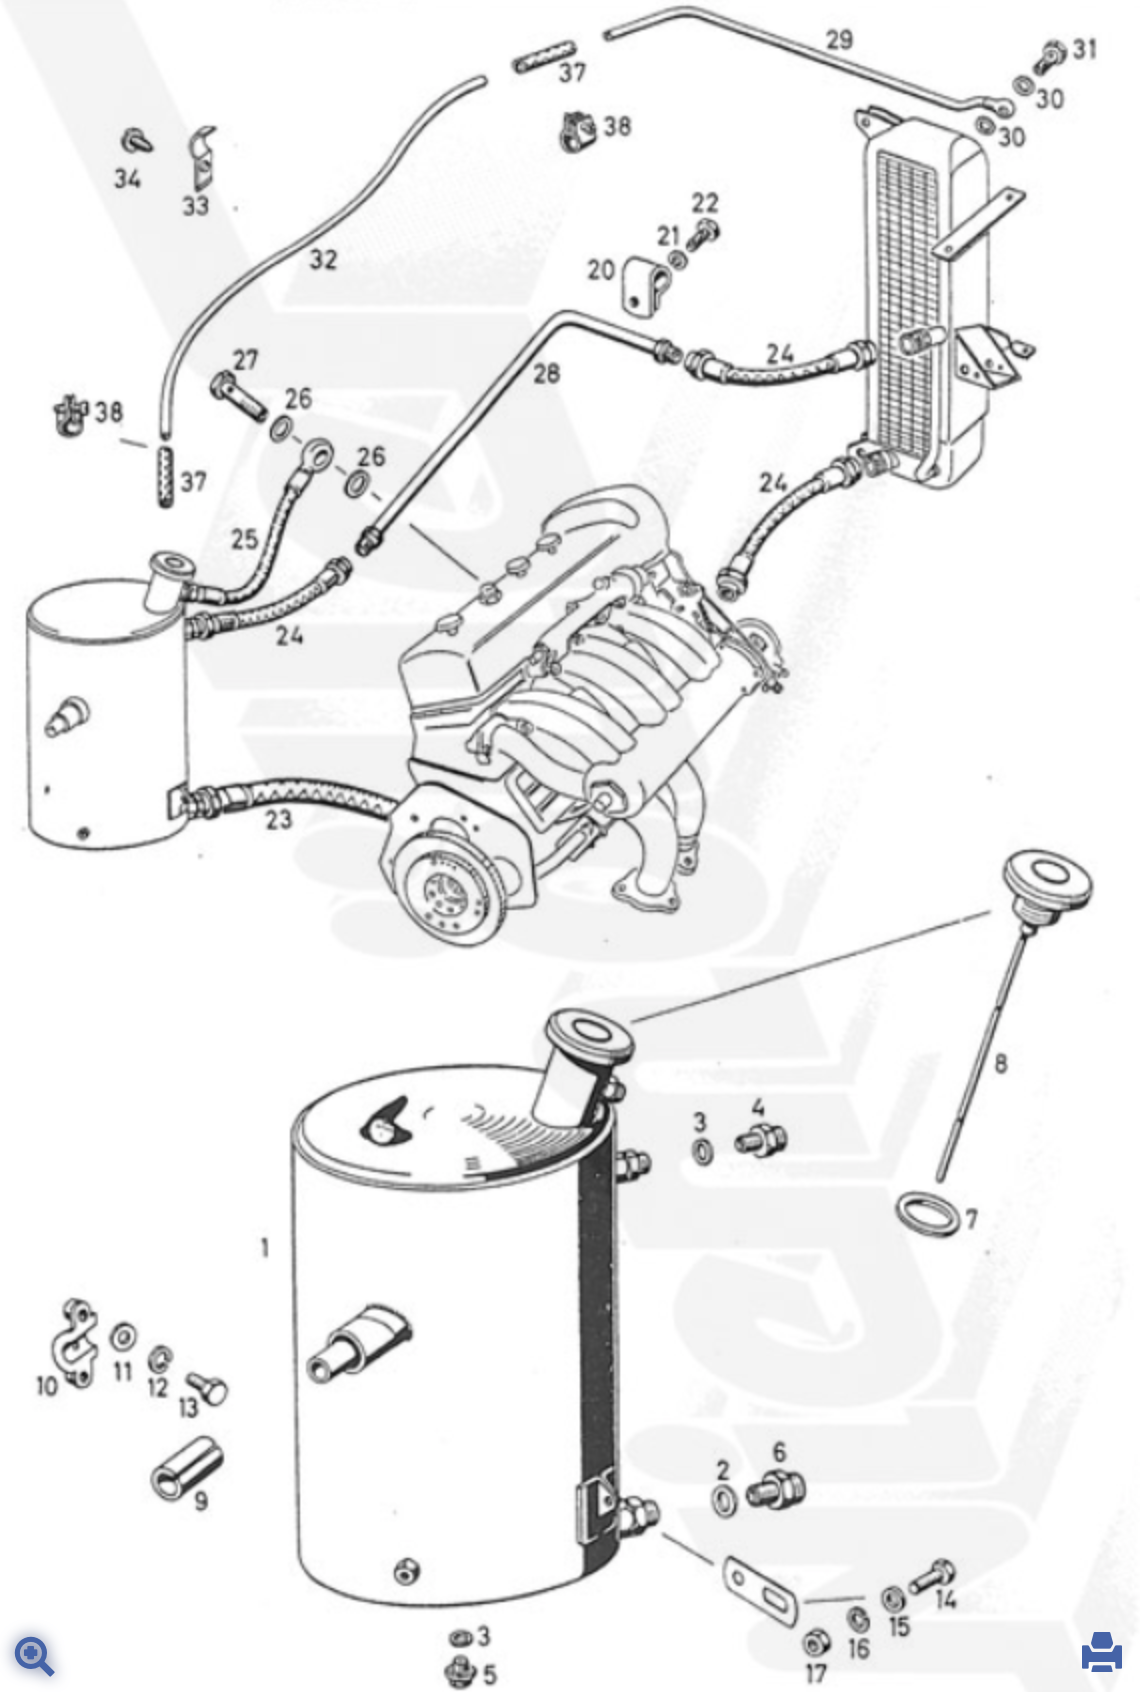
As you can see from my prior post, you've put the oil hose in the wrong position. It should attach to the oil tank filler neck; the place where you attached it to the tank should go out toward the front with tubing, and be attached to the oil cooler to the right of the radiator. And your hose is about twice as thick as it ought to be. NOTE: The fittings on the oil tank that seem to go toward the back of the car, as seen in the diagram, go to a vacuum unit inside the cowling, which is not included as a kit part. You might also consider cutting a piece of rod to use as a cap for the filler neck.
-
The picture I posted shows the distributor . The spark plug wires pass though the bar on the side of the valve cover. They then split to the plugs see photo above from post
Depending how wonky you want to get, you should run wires from the distributor into the spark plug wires loom, and a wire from the back of the loom to the nose of the coil..
-
Love it, beautiful work. Especially the "air conditioner."
-
Here's the chart for above = you'll want to run the parts names through an online translator.
-
The picture I posted shows the distributor . The spark plug wires pass though the bar on the side of the valve cover. They then split to the plugs see photo above from post
Quite right, so it doesn't matter if you get the wires matching., though you might want to add a wire out the back of the loom to go into the nose of the coil (coil should point to the outside of the car). One minor thing – the heat shield under the intake manifold is a separate part, usually shinier than the pipes, so it could use a little differentiation in finish and separation. As for the braided hose, there are three. One (part 25), runs from the valve cover to the oil tank filler neck. Another (part 24) runs into and out of the oil cooler mounted on the right side of the radiator.
-
Another masterpiece. The dashboard is unbelievable, especially at this scale.
-
Digging those scarves....definitely getting one for the fall season
On a more serious note, I am fixing up Harry's Jaguar SS100
one of the front light supports is broken. I don't want to mess with his kit too much and this part fits and is stable
So do I go all out and modify this to fix it or just leave it as is???
I'd let the buyer fix the SS headlights. Most people around here can handle it.
-
Beautiful work.
-
I recently received my purchase of Harry's Rolls-Royce shooting brake, profiled in his book. Keeps him alive for me.
-
-
Can't find a way.
-
I've seen similar paints discussed here but I don't remember this particular one. Pricey ($199/small can) but it looks pretty good.
-
-
Reminds me of the Alfa T33 Stradale.
-
-
Spectacular in every detail. I have a Franklin Mint cabriolet die cast that's very nice, but nothing close to what you've done.
-
Harry P built a few. You may find his posts on this forum. Occre brand comes to mind.
-
Absolutely magnificent. How did you handle the thicker bar grid under the main radiator mesh? I'd love to see what you would do with the 1/16 1928 SS and the 1/16 540K.


![url], on Flickr](http://www.modelcarsmag.com/forums/applications/core/interface/js/spacer.png)


Mercedes 300SL - Tamiya
in WIP: Model Cars
Posted · Edited by sjordan2
The only really big deal with the Italeri roadster kit is the shape of the windshield, which is off, and the wheels/tires are a bit large, otherwise it's extremely accurate. Any issues are exactly the same between the 1/24 and 1/16 versions. The biggest problem with Italeri is that they've used the same basic body based on the roadster for their Gullwing, and the real bodies are NOT the same. The roadster is very faithful, but it differs from the Gullwing with a wider grille and more pronounced fender curves, which they wrongly used for the Gullwing. The EntexTestors/etc. Gullwing versions have much more accurate bodies.In short, the Italeri roadster is as good as it gets except for the windshield. The Italeri Gullwing doesn't make the cut.