empinut
Members-
Posts
168 -
Joined
-
Last visited
Content Type
Profiles
Forums
Events
Gallery
Everything posted by empinut
-
Thanks Tom, Ray,Jouko and Richard. Tom, I only have 25 kits in my built/unbuilt stash, and I feel the need to finish 2 to 3 more per year. Most of the 25 are vw, no surprise. Jouka, I had that resin Doka in my "shopping cart" a few times, but decided to use kits already in my stash to make my own. I also started a Binz crew cab just to be different. If your not into body work, the resin kit is a great start. Thanks
-
Thanks Tony, Ron and Tom. Ron, I like your convert deck lid. Is that a 69 or 70? My first bug was a 1969 with dual kadrons back in 1980 when living in SoCal. Tom, maybe with the new ROG vw's we may see some new variants? Thanks
-
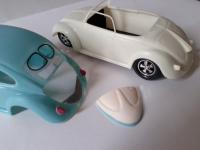
Thought I would finish a custom crew cab bus that I started a while ago. body work was done and I painted a metallic blue/green. Found a flaw in the paint so I may re-spray. Roof panel and bumpers will be bright white. The crew cab is custom because there are no extra doors and no side gates. Not very practical, but smooths out the look. I converted the cabin to the rare walk through option so the rearseat could be accessed. This was supposed to be a quick build, but I could not leave well enough alone. The chassis pan was massaged and detailed and the front beam is a detailed unit from the revell Calf roller bus. The arms were flipped and the beam raised in the chassis to dump the stance. The wheel wells were raised for clearance. The rear beam and trailing arms were lowered. The hasegawa unit was shaved down and smoothed out to make it look more realistic, plus an extra trans unit was added to the top of the flat bottom unit. I added the top end or made the "short block" into a "long block"! I may have to open up the engine compartment door now? Wheels are wide 5 old school Rostyle sprintstar custom made from old Revell custom 56 chevy rims.
-
Working on the inner panels and headliner. I have a plan to make working semaphore turn signals...crossing my fingers it works. I thinned out and drilled/filed openings in a spare Hasegawa window insert to make the headliner. Had to cut it into 6 pieces to make it work best once I thinned it out. More work to make the B pillar and door panels plus smoothing out the headliner pieces together. The instrument pod insert is from a Hasegawa 1/24 scale Kubelwagen. close enough.
-
Thanks Jason. I used the pan from the Tamiya beetle. I know it is not correct, there is just too much work to get the chassis to be a perfect T3 considering the side panels are designed to be used for the Tamiya Beetle kit and the very uneven inner surface of the resin body (similar to a Jimmy Flintstone kit). I have over 100 hours in the body as it stands...but that could be my limited skills. The engine with pancake style front fan was scratchbuilt even though the lid does not open. See pics on my fotki labeled empinut and in the earlier posts on this thread. Body was sprayed Tamiya intermediate blue with clear coat as it goes on semi gloss. almost looks like VW dove blue!
-
Having issues with size. Just too big? color and clear went on today.
-
stance is set. color goes on today!
-
oops, sorry bout that! I unlocked the folder. Nope it's not "bosco". Back to password hacking school for you! I grew up on Hershey syrup chocolate milk.
-
the ugly stuff update... Cleaned up the quarter windows and added semaphore openings. Think I am ok with the outside body, but will revisit after working on the chassis. Thought my original attempt at the rear lights were out of scale, this is v2. Spent a bunch of time on the rear inner panels taking into consideration the hinges I used for the rear lid and other parts I want to use: 1942(?) Kubelwagen center tunnel, long block, front beam (narrowed). Hasegawa pan is great to work with as the rear compartment tin is separate. Tamiya engine compartment inner panels are a good start for all scale VW engine compartment detailing. Fujimi 356 trannny with front and rear mount grafted on. Trying to keep it all old school. Awesome king/link pin detail on the front beam from Hasegawa. You can see my method for narrowing a scale front beam. Next...convert an extra Hasegawa T1 window insert into the inner bracing that is present on a beetle's body, cutting out the door and window areas. thanks
-
Got some quality time on the bench, think I fixed the quarter windows. Pics later when primer dries. Eugene....nice custom lowered 1/1 bug...do you miss it? I rebuilt a 64.5 type 3 notchback S with sunroof in the mid eighties in SoCal with the help of legends like Gene Berg. It had original sprint stars (no remakes then!) and one of the last imported German made, brand new engine cases for the bottom end. I'll post pics with my AirTrax notch that is almost done. Wish I never sold it!!!! John, thanks for the kind words. Chris, thanks for questions on IMC beetle. That is kit has the best box art! Jason, thanks. The hasegawa beetles are nice but seem just a tad large for 1/24 if you place the gunze oval next to it. Or maybe the gunze is smallish? The hasegawa has its own issues but they are a little easier to overcome. Taking off the engine lid with minimal damage is a bear. Mike, thanks. Not mad, just want to keep the topic on track. I love the talk of all vw's! Thanks for the SAMBA jump, I have been a follower since day one. Scott, thanks. You ought to do a kit review in the other section on the arii/ls split window. The engraving looks nice, but I have never seen one close up. There are some cool 1/32 race and stock Porsche parts out there now to customize this "outcast" size.
-
How would these questions relate to this split window post? Chances of their existence are not very high based on comments on various boards by people in the know that have been posted. If they were around they might have been used? Years ago bob paeth told me it was 1963 based. The kit is easily found daily on eBay. Are you looking to build one or convert it to a split window?. I built one pictured in my fotki...empinut....it was not an easy kit to build. Nice front fenders, hood, roof skin and chassis pan engraving, but wrong rear wheel well openings, doors, quarter windows and "butterdish" engine/tranny detail. Headlights were way off but inside mirror, pedal cluster, door handles and dash are nice.
-
Primer update. lots of massaging, followed by Tamiya white primer. I am ok with the front windshield, rear split window and vents, but need more work on the side windows. Door windows have been reduced enough, but I need to shape them, adding that "roll - in" type of edge. Not happy with quarter windows, I added material to make them smaller, but the body size is still too big. Will add material and start over. Also next, fill the fender turn signal holes and make B pillar semaphores. Test fitted the early, split bumpers mastered by Guido of ScaleKraft back in the day.
-
Thanks. Crab leg Fuch's on the front are handmade, you can see how on a tutorial I made that is located on my fotki labeled empinut. The best Fuchs to start with for the center section are the Revell pink 68 beetle that was issued in 1987. This is the very first Revell issue with Fuchs and the mold is very tight. The subsequent reissues ...the pink sedan in 1994 and the turquoise convert show wear on the molds as the chrome shows the sink marks. The 1987 issue shows no sink marks. The Heb in the picture has the later issue with the sink marks. I have been stockpiling the non-sink mark Fuchs. I'll show my progress soon. The rim hoops for the front are from the Polar Light funny car front rims with the center ground out. I blackened them with ink pens found in the art dept. Here is a split update. Finished installing the rear vent slats, added an extra row. Rear 'W' decklid adjusted for fitment and temporarily taped from the inside. Front window and door windows have been downsized. Working on downsizing quarter windows next.
-
Thanks for the encouragement guys....this model is challenging me at every turn! I think I just found the correct size glass to fit the back window. I am testing, trimming as we speak. The 62 Chevy impala front windshield will fit the front with some trimming. I don't have vacuform capabilities. Pics later today, I've been working on the split window bug. The BRM rims are from my stash, originally cast by Dennis Chung years ago. The newer BRM's from Japan for sale are roughly about $18-$20 with the same amount for shipping using the current yen conversion. Picture courtesy of The SAMBA.
-
Worked on the engine vents, half way done. Added "rubber" to bottom of taillights that are sized down from the out of scale Pyro Beetle. They are not permanently glued on yet. Used permanent marker to outline split window "rubber". Working on adding more material to the "W" decklid to make it fit better. Cast by a fellow VW nut. May or may not use this chassis that has a lowered and narrowed front beam, custom made "crableg" fuchs.
-
Thanks Bill. I'm an "eyeball engineer" kind of guy so if you know of more big picture differences (like the window height) that are really obvious, let me know. I'm following pics from SAMBA and Hot VW's and other VW blogs to pick up on the differences. I already added material to the top of the windshield and worked on the roof slope above it. The side windows still need the material added, I just took off the wing windows. Hey I grew up in the 70's in California...wing windows were always the 1st thing to come off after the hubcaps and oil bath air cleaner! I had this extra Hasegawa body laying around and did not want to buy a Gunze (getting pricey!) because that kit has its own issues...front windshield/rubber thing, bottom of all 4 fenders are off, etc. This isn't supposed to be perfection, just as close as I can get with my skillset. Thanks Wayne, the glass was not easy to work with, I used an extra Gunze oval window glass insert I had in my parts bin as a guide to mark the Hasegawa window then drilled dozens of tiny pinholes to open it up. The vent grille is next. If anything goes haywire I'm bailing. Not sure if I can get all 20 vents on each side...I may have to cheat on a few. Don't hold it against me. It would probably be a lot easier to just start with the Gunze kit.
-
I waited to start this until I heard what the new ROG VW releases would be. Now that we know they are not going to be a split window or oval window, I am moving forward with this project. Based on a 1/24 1966 beetle from Hasegawa. note...why couldn't ROG just take the plans from the 1/16 split window and downsize to 1/24? duh.
-
Revell Germany VW Beetle 1500 (Limousine and Cabriolet)
empinut replied to Luc Janssens's topic in Car Kit News & Reviews
Thanks for posting this Luc! You saved me a bunch of money. My personal opinion...This kit is so disappointing on many different levels.....subject matter ( why this year/model?)...why all of the soft engraving (looks like a diecast).....why does the engine look like a toy ( half of the crank pulley is missing)???? I'm sure the huge investment was researched in advance for return on investment, but I just don't get it. Look at any vw magazine on line or in print from USA, France, UK, etc and you will see a very distinct pattern...... Split windows are HOT. Resto cal is hot. Vw coach builds are hot. Calif. Look is hot. Vintage semi-rat rods are hot. Vintage speed equipment from the fifties and sixties is hot. These 2 kits are none of those things. The first sign that these kits would be weak are the overly photoshopped press pictures. Minichamps vw's of these same subjects look better to me. I'll back up my rant with a new project i have started in addition to the type 34 Ghia I am working on. Buy these kits if you want, don't let me stop you, but I have no interest even as a VW NUT and there are no parts that I could use on other projects shown so far. I have a bunch of vw projects going on my fotki....empinut. Flame on. Cheers -
Dash update Added photoetch details and gauges from the parts box. Changed mind on exterior color....lower body will be medium blue like on dash in between the dash pads, roof will be dark blue or black.
-
Thanks John. This is an AirTrax kit, one of the original pops....I think Tapani has cleaned up the newer ones. Lots of work lining up the door panels, rear parcel tray, and dash. That's the nature of working with one off resin kits. The roof will stay the bright white, I am debating on the second color. Maybe a Tamiya AS light blue or light grey with a clear coat. I also have the AirTrax type 3 notchback and that one is in metallic black so I am staying away from black on the razor type 34.
-
Finished the interior. Working on the dash and body right now, pics to follow. Showing the Body how I last left it....had to walk away from it due to the intense prep work, pin hole filling and small trim additions. Body has been re-primered and coated with Tamiya Racing white, but I am in the process of finding the right windows and getting the attachment guides correct. 3 different reds are hard to pick up in the pic....faux fabric red on back deck and carpet, flat red on plastic arm rest of doorpanel and map holders, gloss red for seats and door panel inserts. Finally decided on BRM rims. with a 3-4 inch lowering job. I made up a type 3 engine with the fan attached to the front, but the hood does not open due to the heavy, non-consistent thickness of the Resin body.
-
I agree with what has been said....my 2 cents worth..... I think it totally depends on your building abilities and skill level. If you have masters level skills, especially in making little fidgety parts fit correctly after spending major time cleaning up the complicated sprue attachment points, I would recommend Fujimi. Otherwise... Tamiya regular kits are great for medium to high skill level, but there is a lot of detail painting and masking. Tamiya snap kits and Monogram/Testors are great for beginning to medium skill level and look great when finished. I just bought a Tamiya 959 to raid the detailed complete engine and dual Turbo setup!
-
Binz crew cab
empinut replied to empinut's topic in WIP: Model Trucks: Pickups, Vans, SUVs, Light Commercial
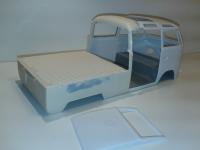
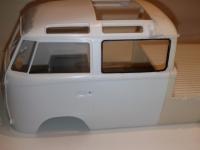
Update: about 5 hours spent mating the 4 chopped up pieces from the 23 window and the pick up, finishing the barndoor roof, matching up the driver side window and filling various holes and vents to back date the project. No filler has been used yet, just superglue and scrap plastic to fill small gaps and holes. Tamiya brush on primer is new to me but I love using it now to check for small gaps and holes as it dries quick. Still undecided on whether or not to keep the sunroof and skylites. -
Thanks for the kind words! If you need any vw detailing help, just send me a msg. My 2 favorite resources that I use...thesamba.com and kustomcoachwerks.com


