

Jeff Sauber
-
Posts
878 -
Joined
-
Last visited
Content Type
Profiles
Forums
Events
Gallery
Everything posted by Jeff Sauber
-
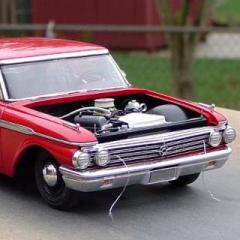
I tried to model the car the way it looked in 2004-2006 seasons....Dave Heitz currently owns the 1:1 race car and it resides in North Carolina. The car is now for sale for around $90,000 due to lack of sponsership. Theres a few differences between the model and the 1:1 version, since I had limited reference photos to work from, but overall it's fairly close.
-
The clear vent tubing is actually fuel line from a radio controlled airplane....Any well stocked hobby store should have some in various diameters. It's nice and flexible and easy to work with.
-
-
A few outdoor pics.....
-
-
-
-
A few updated pics.....
-
I've never been to this show before, and I kinda doubt I'll get there this year either....I'm currently dealing with some serious medical issues....
-
For the zip ties, I just cut and used small strips of aluminum tape. It's wasy to work with, and if you ever want to go back and re-route some of the plumbing and cables and such, the tape is easy to cut off and remove. I have some new pics on the way. I have made a few additional upgrades and changes to the model. I'll try and upload them when I get some time.
-
Yeah, the pro-gas chevette is pretty cool. There was a guy who used to race one at my local track with twin holly 850's and a 671 blower sticking out of the hood. It was fast and was real squirrely going down the track. Scary to watch, and likely even scarier to drive....It think it ran like 8.80's-9.00's in the quarter.
-
yes, you are correct. The reply is a bit hidden...Didn't see it at all till you pointed it out.. If it was a snake I would of gotten bit!!
-
I see where you asked the question of the revell civic kit being used, but I didn't see any typed responses by builder indicating that............ but yes, it's a civic with stang clips added...
-
Beautiful job on the model, but the overall design isn't really my cup of tea... It's a little too stubby for my tastes...... Kinda looks like a mid 70's honda civic or an early 80's chevy chevette with a mustang front and rear clip...
-
I think what Casey was refering to was that you left off the inner A pillar structural bracing as well as the inner door bracing, which is why the car looks a little weird with no structural support in those areas. Even with the doors in the open postition, there would still be an "inner A pillar" surrounding the windsheild area, otherwise there's no material or support bracing to "rivet" or secure the sides of the front "lexan" or "glass".
-
Time Attack/Circuit Racer Mitsubishi Evo V
Jeff Sauber replied to GTmike400's topic in WIP: Model Cars
Hey Cliff, these guys basically all know each other.....They all hang around the southern acme club and nnl show and whatnot, and like to solder stuff and spin stuff around on lathes and other fancy equipment and the like. Perhaps "the scrapster" should have used some smiley emoticons to help show that he was just screwing around... -
Thanks, yeah I like fiddling around with metal stuff in between my plastic and resin models, but cutting plastic and resin is alot easier than trimming metal... It's ashame that a 40 chevy or pontiac isn't offered in plastic.....These things have a ton of potential.
-
Here's my take on the Jada diecast '40 Pontiac. Nothing too serious, but it was fun reworking this hunk of metal and adding on some of my own extras. I stripped the original "factory paint" with easy off oven cleaner, smoothed out all the body work and imperfections, carefully carved out some small channels for the Bare metal foil trim work, and added a set of scratchbuilt fender skirts made from sheet styrene. The intake manifold was scratchbuilt from aluminum and plastic as well as some rubber hose fuel lines. The body color is duplicolor deep blue metallic, and the roof is white pearl. The wheels are from pegasus and are the 24" lightning series.
-
Yeah, they are very neat cars....A friend of mine used to have one back in highschool. It was a fun car to drive. He eventually had it running 10.90's at the track. As the years went by, unfortunately, I lost contact with him however. This model is sort of based on that particular car.
-
I tried to lighten up some old photos of this amx I built a while ago...The camera was crappy at the time and the original pics were pretty dark, so hoprfully these are a tad bit better. I'm in the process of reworking my photobucket albums, so I thought this was a good time to re-share a few images.
-
Nice bodywork, that's looking very sharp!!
-
photobucket problems
Jeff Sauber replied to crazyjim's topic in General Automotive Talk (Trucks and Cars)
Jim, no problems for me, I just logged in on the bucket as I'm typing this.....Seems everything is ok.. It's a little slow in loading, but other than that, it appears to be working ok. -
Thanks for the comments guys....The hex rod I used for the A/N fittings was .040.........060.......080. I drilled out the centers of different sized pieces of rod first, then shaped the tapers of each fiting with a sanding stick, and then finally cut them off like sausages by rolling them back and forth under a hobby knife. And finally, I set all the pre-cut fittings on a piece of tape and lightly apply the spray paints. Silver base coat, followed by transparent reds and blues....
-
Battle of the Spray Chrome - Alclad vs. SpazStix
Jeff Sauber replied to larrygre's topic in Tips, Tricks, and Tutorials
Here's a car that features a mixing of various "chromes" polished aluminum, and stainless.... For this project I used duplicolor spray can chrome, bmf, billet aluminum rod, stainless steel tubing and actual chrome plating...That's an entire soup of mixed metals....LOL. If done right, mixing it up a bit isn't all that disasterous...I think the mix and match routine came out pretty well on this hunk of junk... -
Battle of the Spray Chrome - Alclad vs. SpazStix
Jeff Sauber replied to larrygre's topic in Tips, Tricks, and Tutorials
I agree. These various chrome paints are great for smaller stuff like bezels, small trim pieces, engine parts, and other minor details, but for big bumpers and other "large surface area" parts, [especially those with lots of crevices and crannies and such], Chrome plating is the only way to go....You're just not going to be able to beat the look of chrome plating, no matter what brand of paints are being used.