

Jeff Sauber
-
Posts
878 -
Joined
-
Last visited
Content Type
Profiles
Forums
Events
Gallery
Everything posted by Jeff Sauber
-
I like it....Nice clean work!! Very cool. I've always liked that kit.....I think I still have an unopened copy in my stash somehwere....
-
1969 camaro street/strip machine......off to the paint booth!!
Jeff Sauber replied to Jeff Sauber's topic in WIP: Model Cars
I've gotten a bit further along with the underside...I did some detail painting and more adjusting. I should have the chassis pan finished up by tomorrow, and then I'll move on to the engine bay. I rotated the pics around to give the image the feel of looking at the car as if it was up on a lift.....Thought I'd try something different rather than the typical lying flat on the table routine...More to come -
1969 camaro street/strip machine......off to the paint booth!!
Jeff Sauber replied to Jeff Sauber's topic in WIP: Model Cars
Another small update today.....Been getting a little more done with the chassis and some real nice photoetch from the model car garage... Next up will be the driveshaft saftey loop... -
1969 camaro street/strip machine......off to the paint booth!!
Jeff Sauber replied to Jeff Sauber's topic in WIP: Model Cars
Thanks...Yeah, I always thought that one day I'd just grab another camaro or GTO and start again with a 1:1 project. Unfortunately, even one in rough condition these days are fairly expensive..I don't even see all that many out on the road anymore. Back in the 80's these things were a dime a dozen. Now they are becoming few and far between. -
Lookin good, man. Love those details. excellent craftsmanship.
-
Nice clean work, looks great!!
-
1969 camaro street/strip machine......off to the paint booth!!
Jeff Sauber replied to Jeff Sauber's topic in WIP: Model Cars
Small update....I finished up on the grill by adding on the chrome surround trim. [now I just need to add on the photoetched grill emblem]. I also scratchbuilt a pair of race style mufflers similar to the one's on my 1:1 version. I also reworked the rear suspension a bit more..Don't worry about the excessive front wheel camber...everything is loosely mocked up and is just laying in position. I'll have it all adjusted at final assembly time. -
Very nice work. Great looking replica!! Love the details.
-
Nice work, and nice photos.
-
Awesome work!! Beautiful little trucks. Very nice.
-
1969 camaro street/strip machine......off to the paint booth!!
Jeff Sauber replied to Jeff Sauber's topic in WIP: Model Cars
Robert, the rear tires are from the AMT'70 Baldwin camaro. They are the mickey Thompson "indy" tires. They are pretty close in design to the old Pro trac tires I used run on my 1:1 Camaro. -
Thanks, Jeff!! Yeah...I might play with it a bit more, but the two front mounting tabs for the exhaust pipes are right under the cross-members that are in front of and behind the mufflers.. There really isn't much room to change things without making the pipe too short to then reach the header. You know how it is...fix one problem, create two more... Later,
-
That looks sharp!! Nice clean work and a cool subject. Well done.
-
Great detailing. Everything looks really clean. Nice!! Raul, is there anyway you can re-configure the exhuast just a tad to try get a little clearance between the air tank and the muffler? A couple of mild bends in the pipes might help fix things a bit. In any case, great chassis!
-
1969 camaro street/strip machine......off to the paint booth!!
Jeff Sauber replied to Jeff Sauber's topic in WIP: Model Cars
Thanks, Cruz. I'm going to try and make it to the show this year. I didn't get there last year, but hopefully my schedule will be better this year. I've always liked the MAMA NNL. Lots of great work on display there. -
other forums?
Jeff Sauber replied to hellonwheelz3's topic in General Automotive Talk (Trucks and Cars)
This is the best Automotive modeling forum. I've been to just about all of them and this one is the most user friendly, and most mature. Some of the best builders in the hobby also hang out here. The mods are also good and will warn you before implementing the IP ban.. I've been on some forums where the ban hammer drops swiftly and without warning......LOL Seriously though, If your into model cars you're in the right place. If your an old school customs builder you should check out the Trak forum. Theres a good bunch of folks over there as well as tons of talent. If you can deal with a message board type of format, you may want to check out Spotlight hobbies....Theres some good builders that are regulars over there, and you can post pics as well. -
1969 camaro street/strip machine......off to the paint booth!!
Jeff Sauber replied to Jeff Sauber's topic in WIP: Model Cars
Thanks for the tip......Yeah, I was looking at the tailights earlier today and thought that they looked a little heavy and thick compared to the 1:1 units. There are two styles that are included...[standard & RS]. Neither set fits too well in the body in my particular sample. Are the 1/24 version going to fit or will I have to hog out the openings a bit? I may try sanding down the edges of the set that came in the kit. Theres a good bit of material to remove in order to get them to fit properly into the body slots....That could help with the overall appearance since they look way too thick to begin with.... Jeff -
This is a very inspirational buildup. Don't worry about the kit's short commings. The tooling issues are not your fault. You've done an outstanding and remarkable job on this car. In fact, after seeing this model, I'm going to get myself a copy of this kit and have a go at it. Yes, there are some substantial body accuracy issues but let's keep the blame pointed at the guys who work in the tooling department....LOL, and not the builders who are working with what comes in the box. Sure, the body issues could be fixed and corrected, but who the hell wants to spend that much time fixing something that they shouldn't have to. Listen, the model looks superb. This is the best version I've seen of this kit.
-
1969 camaro street/strip machine......off to the paint booth!!
Jeff Sauber replied to Jeff Sauber's topic in WIP: Model Cars
Thanks for all the comments guys.......Here's the grill opened up. It was a real pest to do with the dremel. The part started to get real brittle as I kept shaving off plastic from the backside. I broke out a few teeth, but went and replaced them with some small strip styrene. It took about 2 hours or so and lots of trimming and sanding to get it all cleaned up and ready for primer/paint. I think it was worth the extra effort......the unopened grill looked a bit heavy and thick. More to come, Thanks for looking. -
1969 camaro street/strip machine......off to the paint booth!!
Jeff Sauber replied to Jeff Sauber's topic in WIP: Model Cars
Yeah, these old 69's were alot of fun. I purchased the car after working at Giant foods for a year or two. It was bascially a grandma car with a 2 speed powerglide [column shift] and a 307 sbc. It wasn't long however, till I saved up more cash and started with the big block 396/Muncie 22 transplant...I built up most of it in my driveway and garage with the help of a few buddies and a neighbor who was a great welder. I finally had it running low 12's before I sold it to guy in Virginia. I'm not sure what ultimately became of the car, although I heard in the mid 90's that it had been back-halfed and was running in the 10's and had a new owner who was racing it up at Mason Dixon Dragway... Man, I miss that car....An old friend of mine recently came across a few pics we took of it back in the day... guess that's why I decided to get back to my 1/25 version last week..... I'll keep the updates comming. The Revell kit is pretty much right on the money with accuracy. The chassis is a tight fit, but this kit really reminds me of My 1:1. I like the engraving and tooling. I'll be opening up the grill slots with a dremel later tonight. -
1969 camaro street/strip machine......off to the paint booth!!
Jeff Sauber replied to Jeff Sauber's topic in WIP: Model Cars
Hey Nick, I'm hanging in there. I've had some re-occuring issues with Lyme disease that I picked up back in 1999. I've been getting back to the bench a little here and there, but I'm working at a slow pace. I've got like 5 or 6 projects I really need to finish up on....Jeff -
1969 camaro street/strip machine......off to the paint booth!!
Jeff Sauber replied to Jeff Sauber's topic in WIP: Model Cars
-
1969 camaro street/strip machine......off to the paint booth!!
Jeff Sauber replied to Jeff Sauber's topic in WIP: Model Cars
-
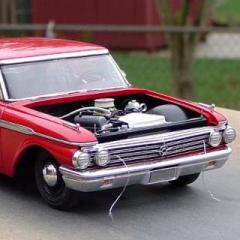
I haven't gotten much workbench time in these days since I've been dealing with a few medical issues, but I've been fiddling around on this camaro project on my good days. It's based on my 1:1 car that I built back in the mid-80's. I no longer own the real one, so I though it was finally time to get started on the "mini-me" version. Lot's of work still ahead on the motor and rest of the car, but here's where I have things as of now...I had to re-engineer the rear suspension in order to accomodate the L-60-15 tires. The shock mounts have also been re-located. No tubbing was neccessary once everything was repositioned. My 1:1 wasn't tubbed and the L-60 fit just fine although on hard launches the sidewall rubbed a tad bit on the fender lip.....
-
Two BIG thumbs up!!.............Nice work, Cruz. Very nice!!