

Jeff Sauber
-
Posts
878 -
Joined
-
Last visited
Content Type
Profiles
Forums
Events
Gallery
Everything posted by Jeff Sauber
-
1969 camaro street/strip machine......off to the paint booth!!
Jeff Sauber replied to Jeff Sauber's topic in WIP: Model Cars
Thanks Nick, fortunately, my Camaro seats were just satin black with black belts, so it was easy to do them in scale. Some of those multi colored seat patterns on various other cars, can be a real pain to mask off and paint properly.. -
Great work!! Thats a sweet looking land barge......Nice!!
-
1969 camaro street/strip machine......off to the paint booth!!
Jeff Sauber replied to Jeff Sauber's topic in WIP: Model Cars
Small update today... Just finished up on the seats. Pieced together a harness for the driver's side from my scrap PE stash, and then added some photo-reduced logos...Nothing too fancy. Next up will be putting all the subassemblies together as well as adding in the remaining details to complete the interior. -
I just flowed a little black and gray enamel wash mix into the re-scribed panels lines with a small brush....the capillary action did the rest...Then wiped away the excess with q-tips.
-
LOL, nah, this was the just the cuda convertible with the yellow car on the box art. If this was a more serious kit with better tooling, I would have loved to do a full out replica stocker with opening panels and the works, but this sucker just needed too much work to make it worthwhile. It's a neat little car anyhow....I did enjoy the majority of the buildup time.
-
Nice work.....Thats a sharp looking bird.
-
I've decided to get out the popcorn and a cold one......Sadly, there's not much else to do with this thread, except sit back and watch it go crashing into the mountain ridge and explode into a million little smoldering tidbits... You can't squeeze blood from turnips.
-
Super cool, Nice work!! I like the engine choice. Usually everyone just goes with the typical hemi.
-
Take some flat black or semi gloss black enamel, and put a few drops of paint in an old testors little bottle cap or the like...Then add some thinner..[mineral spirits for instance] and mix until you have a thinned almost "milk like" consistancy. Then take a brush and gently run the "wash" over the wheel covers and let it flow into the reccesses of the wheel cover chrome a little at a time. Wait a bit to see how how things settle down and repeat if neccesary, []thickening or thinning the mixture until you have nice even coverage.] Then after things have dried up, gently wipe off the raised areas and you'll have a set of wheel covers that really have nice depth and detail..[Try it on an old scrap wheel first if you'd like to get a feel for the process before hitting the good model].
-
That's a good looking Bonny, nice clean work. If you flow a thinned black wash over the wheel covers, it'll really bring out the engraving and make em pop. Beautiful car either way though. 2 Thumbs up!!
-
Things seem to be deteriorating once again... Nick, I think we've done all we can do here. It's up to you as to how far you want to improve on your building efforts. Stop bickering back and forth and spend the time following Mark's clinics and practicing at the work bench. [bill Geary has also given a good seminar with the '49 mercury buildup]. We can lead you to a few good watering holes, but we can't make you drink.......It's up to you where you decide go from here. I hope you make the right choices. [Your models will improve greatly if you do choose to follow the advice many have given forth here.]
-
Thanks guys... Yeah it's ashame that Revell didn't tool this thing up a little better and make the kit more appealing. Alot of the parts are crude and need much attention. The fitment on a few things was also questionable. The out of box stance on my sample was terrible. I had to do alot of tweeking and modifying to get it acceptable. Another annoying thing was the fact that the inner door panel lines don't match up to outer door lines. They are WAY off!! and would need substantial re-scribing/adjusting. I'm assuming that the hard top version is even more inaccurate with the roof issues and all?
-
Imagine how much fun that thing would be with a big block 427-4 speed under the hood.
-
Separated at birth?
Jeff Sauber replied to Darin Bastedo's topic in General Automotive Talk (Trucks and Cars)
MikeMc Sam Elliott -
I don't think a new exacto and a sheet of foil is going to help much here...Nick needs to follow along with Mark's tutorial to try and get a better understanding of the essential basics.....The foil stuff can come later. Body prep and paint work development is what Nick should really be focusing on...
-
Nice looking Vette...
-
The suspension components are looking good.....Love all the extra work going into this one...Great work!!
-
1969 camaro street/strip machine......off to the paint booth!!
Jeff Sauber replied to Jeff Sauber's topic in WIP: Model Cars
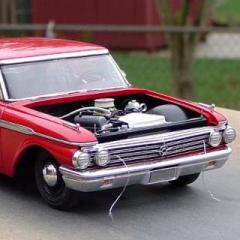
Thanks for the tips, Tim. I may very well use your suggestions. The dry run mockup are getting tedious at this point with all the extra detailing, and sooner or later I'm bound to break something and ruin the progress. I was hoping to drop the core support in from above, but things are very tight and some of the plumbing is getting hung on the frame..On the other hand, if you attach the core support as per the instructions, it ends up getting hung up on the inner grill opening and inner fenders and twisted all to hell. Removing the lower front valance may be the best option.......Jeff -
1969 camaro street/strip machine......off to the paint booth!!
Jeff Sauber replied to Jeff Sauber's topic in WIP: Model Cars
Art, these are the two bits I used..I nearly wrecked the grill a couple of times because of the rate the plastic was being removed...Make extra sure you go very slowly and check your work often. It's very easy to burn through everything if you're not carefull. One of the reasons it may have been so tough for me was I used a single speed tool..You're likely better off using a multi speed version and setting it to the slowest speed for better control... I scratchbuilt the coil from 2 different sizes of evergreen rod and aluminum sheet [for the hold down bracket]. The coil that comes with the kit isn't bad though. You can drill it out and wire it if you'd like. Mine unfortunately got misplaced, so I had to go the scratchbuilding route instead. -
Thanks for the comments guys..... Lee, the belt details are made from evergreen strip, adhesive fabric, and some buckles shaped with hand files and a pin vise,using thin aluminum sheet.. The gauges are made with photo reduced faces [using my printer], and the trim rings are 26 gauge wire. Harry, I would have used a silly hello kitty AV as well, but I found that cool kustom instead.
-
That looks great.....super clean work! Very nice.
-
I have another kit here that I may do some thing like that with...A low profile Pro touring car would be very cool. For this build I wanted to see what all the fuss was about this kit. There's certainly alot of correcting needed in order to make a faithfull representation of a good replica stock version, but to the casual eye, it does look like a Cuda the way it is.. The engine parts are crude and blocky...especially the carbs, and front cover/water pump..If I get to building another, I'll give it a much better mill. The chassis pan is also subpar and could use a replacement.
-
I finally got around to cleaning up and organizing some of my Photobucket albums, and wanted to share this Revell Cuda. I think I posted this here before, but here's some new pics I took with better lighting. I built this kit pretty much right from the box and added a little extra detail throughout. This kit get's no love from the general modeling community and it does have some shortcommings and inaccuracies, but on the other hand it isn't the most hatefull kit I've ever built. It did need some tweeking and adjusting, but it's not a bad looking little car when finished. Model car garage even makes a PE set for it, [although I didn't use it on this particular buildup.] I didn't bother to re-configure some of the inaccuracies such as the incorrect front valance panel line location, too far apart headlights, and several other tooling issues, although I did rework the stance, and shortened the driving light stalks. Here's how my version turned out...
-
*
-
Pro Tech has the best scale braided line on the market as far as I'm concerened....I wouldn't think of using anything else.