MrObsessive
-
Posts
9,785 -
Joined
-
Last visited
Content Type
Profiles
Forums
Events
Gallery
Everything posted by MrObsessive
-
 For scale conversions, there are free apps you can download right to your phone. On my laptop, I like this one. No ads, no frills, just a simple converter for any scale.
 -
Somewhere out there on video was Don trying to promote his "business". Years ago someone gave me this vid to watch, so I had a friend of mine over that also knew Don, and we watched this together. The video had us laughing so hard, we were literally gasping for breath! ? He tried to wipe the camera lens at one point with his hand after he licked it...........SMEARED the thing to heck! What sent us REALLY over the edge was a part of the video where a news reporter comes on to do a story about RR. At one point she says-----"Don Theune, who used to be a Chippendale Dancer....." My friend and I looked at each other and go WHAAAAT???? We literally lost it laughing then! I don't know what ever happened to the vid----I tried to find it on YT and it's not there. Someone out there has a VHS copy of this "comedy"! It was the hardest laugh watching that thing I think I've ever had!
-
Never Say Never about old kits. "New Era Modeling"
MrObsessive replied to stavanzer's topic in Car Kit News & Reviews
Most designers need certain views to do a car, namely orthographic of the side, front and rear, and maybe the top. If there are good pics out there for them to go by, it probably can be done. The designer is a fellow by the name of "BrunoMCardoso" on CGTrader. I already converted several files of his to print, and they're very good, as well as the files themselves are very reasonably priced. -
Never Say Never about old kits. "New Era Modeling"
MrObsessive replied to stavanzer's topic in Car Kit News & Reviews
Let's not forget the accuracy, or lack thereof for a particular file. If Revell is having trouble as it is in getting plastic molds correct as far as body shape and details, there's no guarantee that because it's a 3D file, that will be correct. One will still need to know the software, and know-how of what it takes to correct errors and make changes (sometimes drastic). I've bought files that were rather pricey, only to see where corrections needed to be made, while others were dirt cheap and needed nothing. Yes, that's correct about the future of printing........I don't ever see this being Plug-N-Play as there's just way too many variables when it comes to printing. From the machine standpoint, file design and format (some are MUCH worse than others), user know-how----lots of things that can make printing not for the faint of heart. -
Never Say Never about old kits. "New Era Modeling"
MrObsessive replied to stavanzer's topic in Car Kit News & Reviews
It runs the gamut.........the Opel file he charged $10 to create it, then it was another $40 to get the completed files. There's another file out there I want created, and this particular designer is charging $180. Now that is covering no doubt multiple formats. Not just .obj, but Vray, .stl, 3DSMAX, etc........ -
Never Say Never about old kits. "New Era Modeling"
MrObsessive replied to stavanzer's topic in Car Kit News & Reviews
All of those you listed there Brian, if there isn't going to be a kit made, there's definitely files out there that can be converted for print, as I have a number of those. If the file isn't available, there are designers that will create the file for you------that's how I got this '67 Opel Kadett done......I hired a designer to make the file for me.
-
Never Say Never about old kits. "New Era Modeling"
MrObsessive replied to stavanzer's topic in Car Kit News & Reviews
You can thank 3D printing for making a lot of this possible. Some poo-pooed this 5-6 years ago as they thought it wouldn't catch on, but I had mentioned here then that this would be the next big wave to hit the hobby, and it certainly has. If there's a file for it, a particular car can be made, or tooling restored back to what they want it to be. Stay tuned----I see a lot of good stuff heading our way! -
My Future 3D WIP's (LOTS of pics)
MrObsessive replied to MrObsessive's topic in Car Aftermarket / Resin / 3D Printed
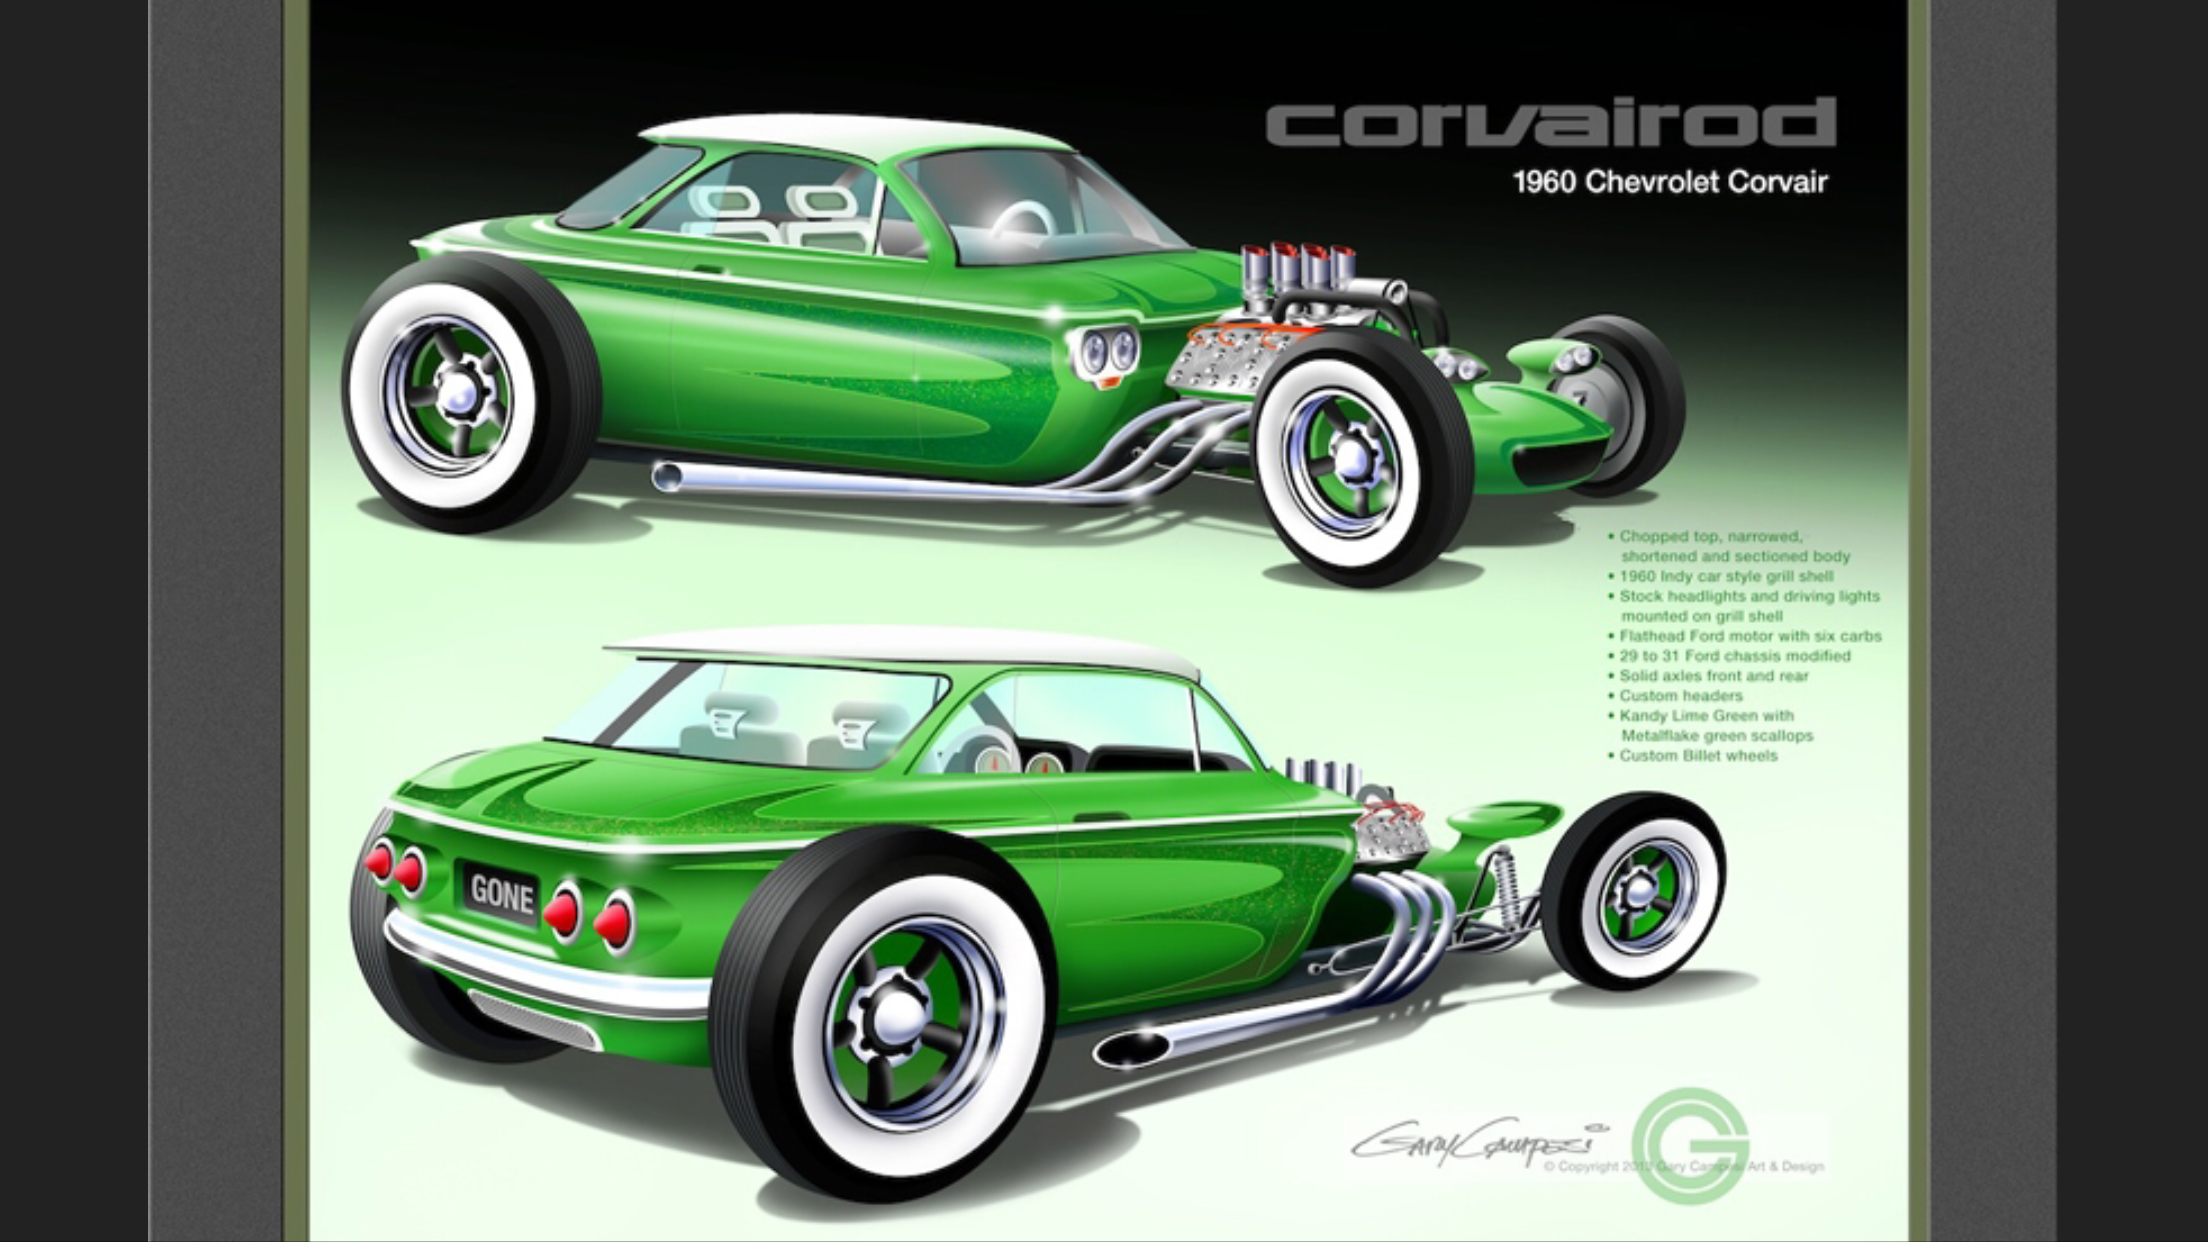
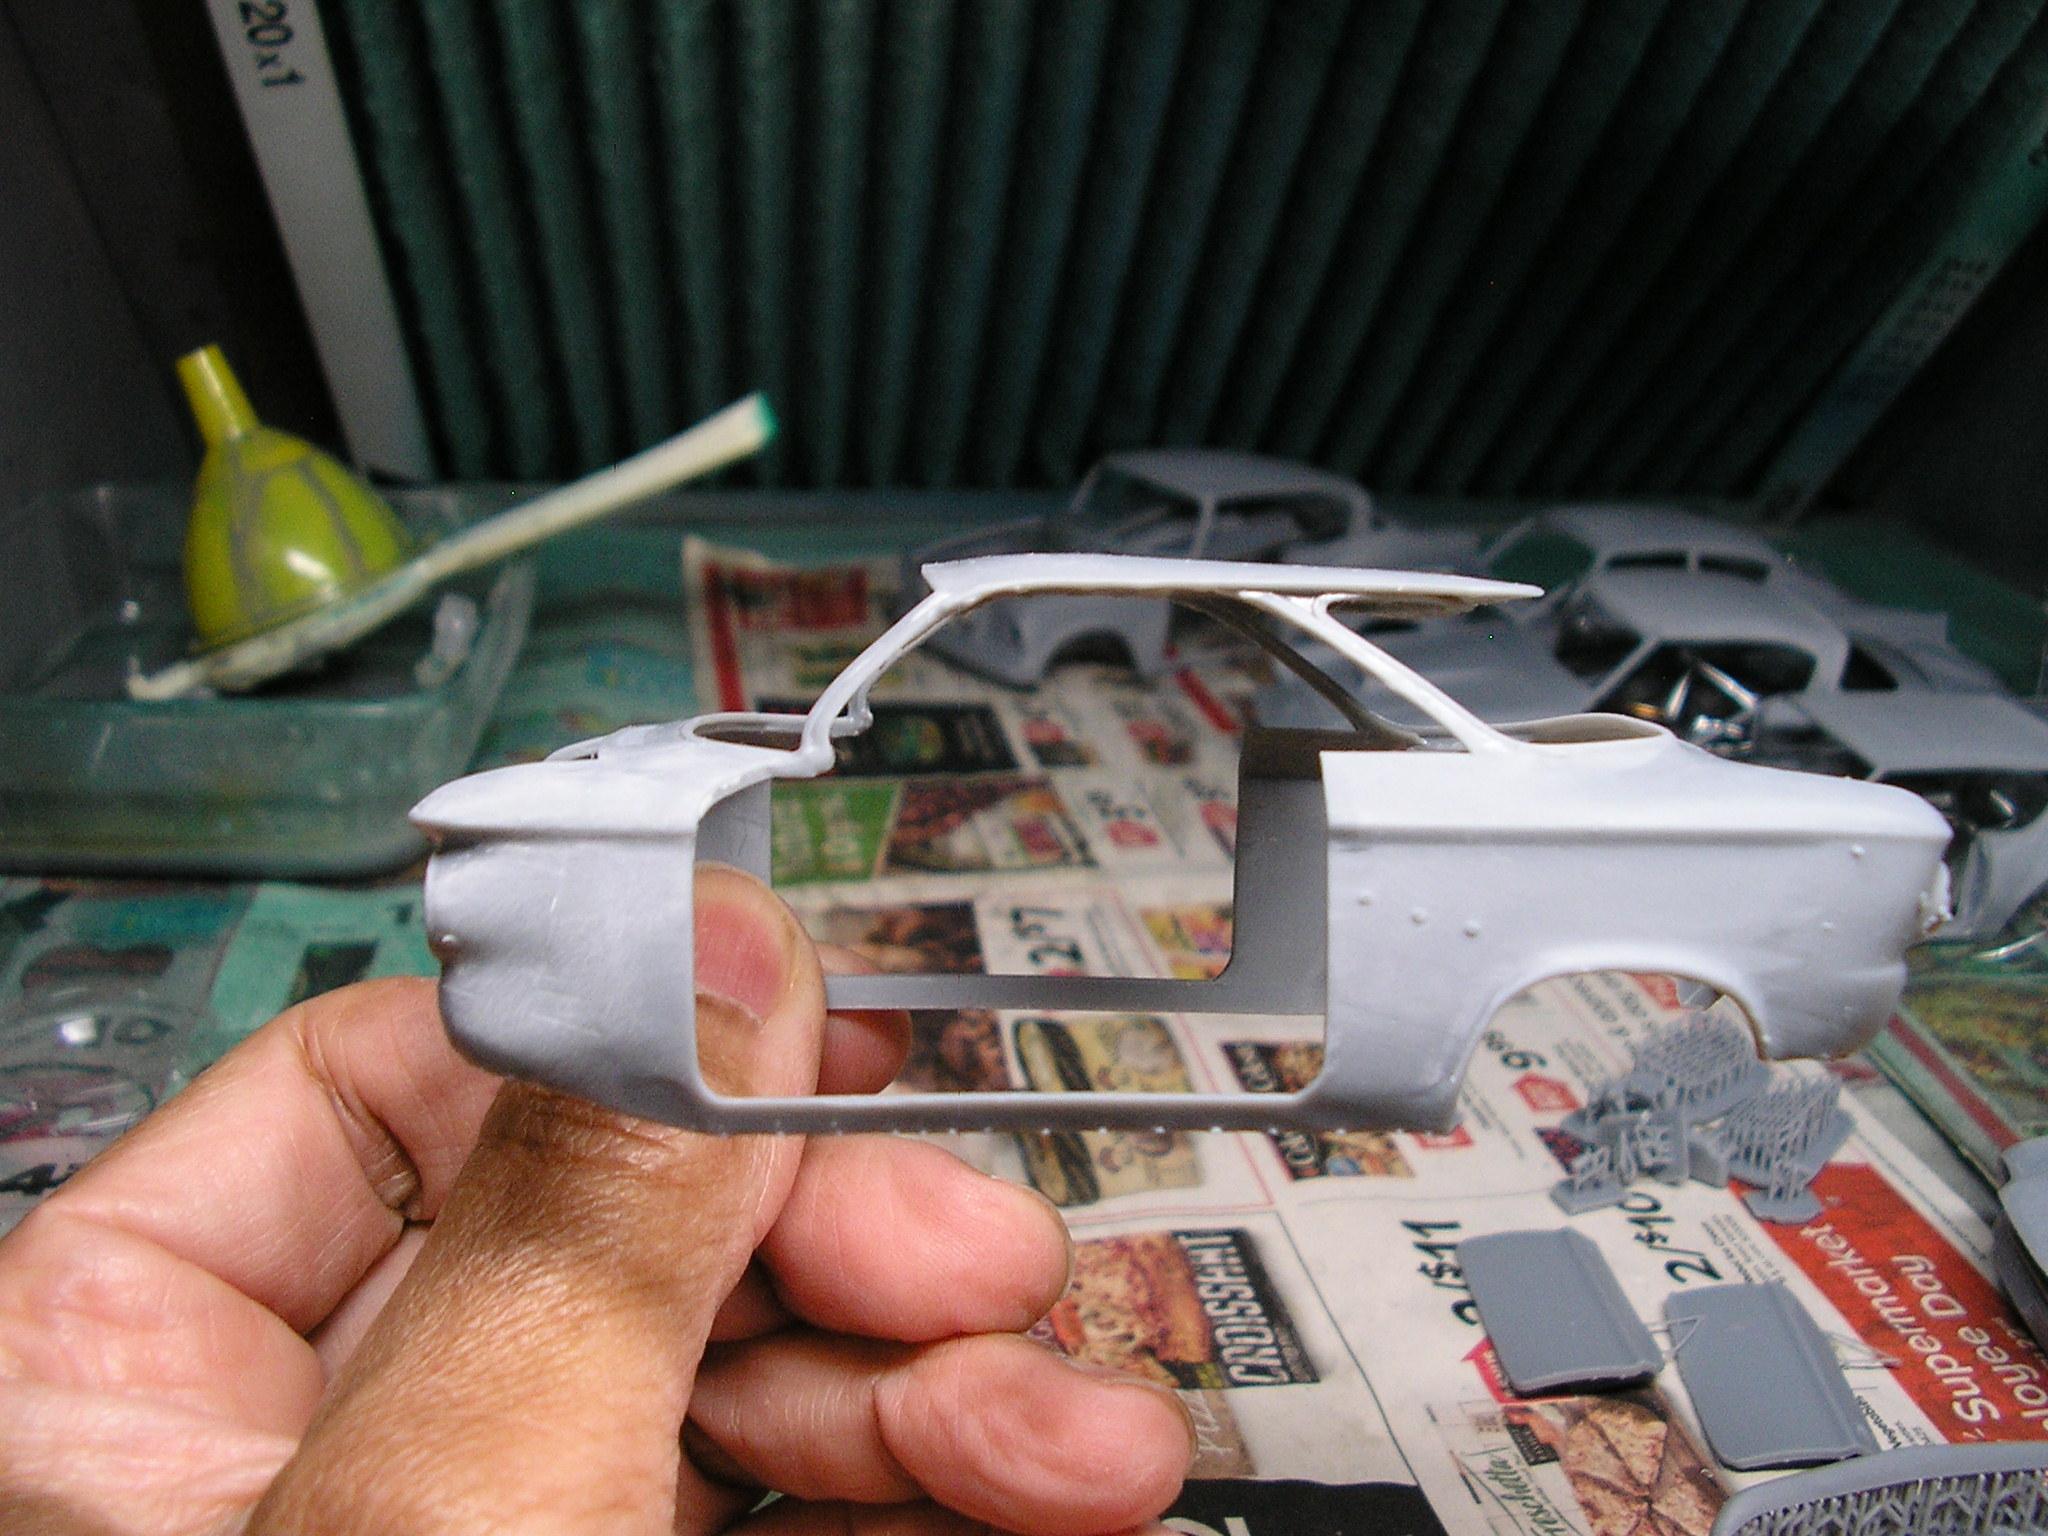
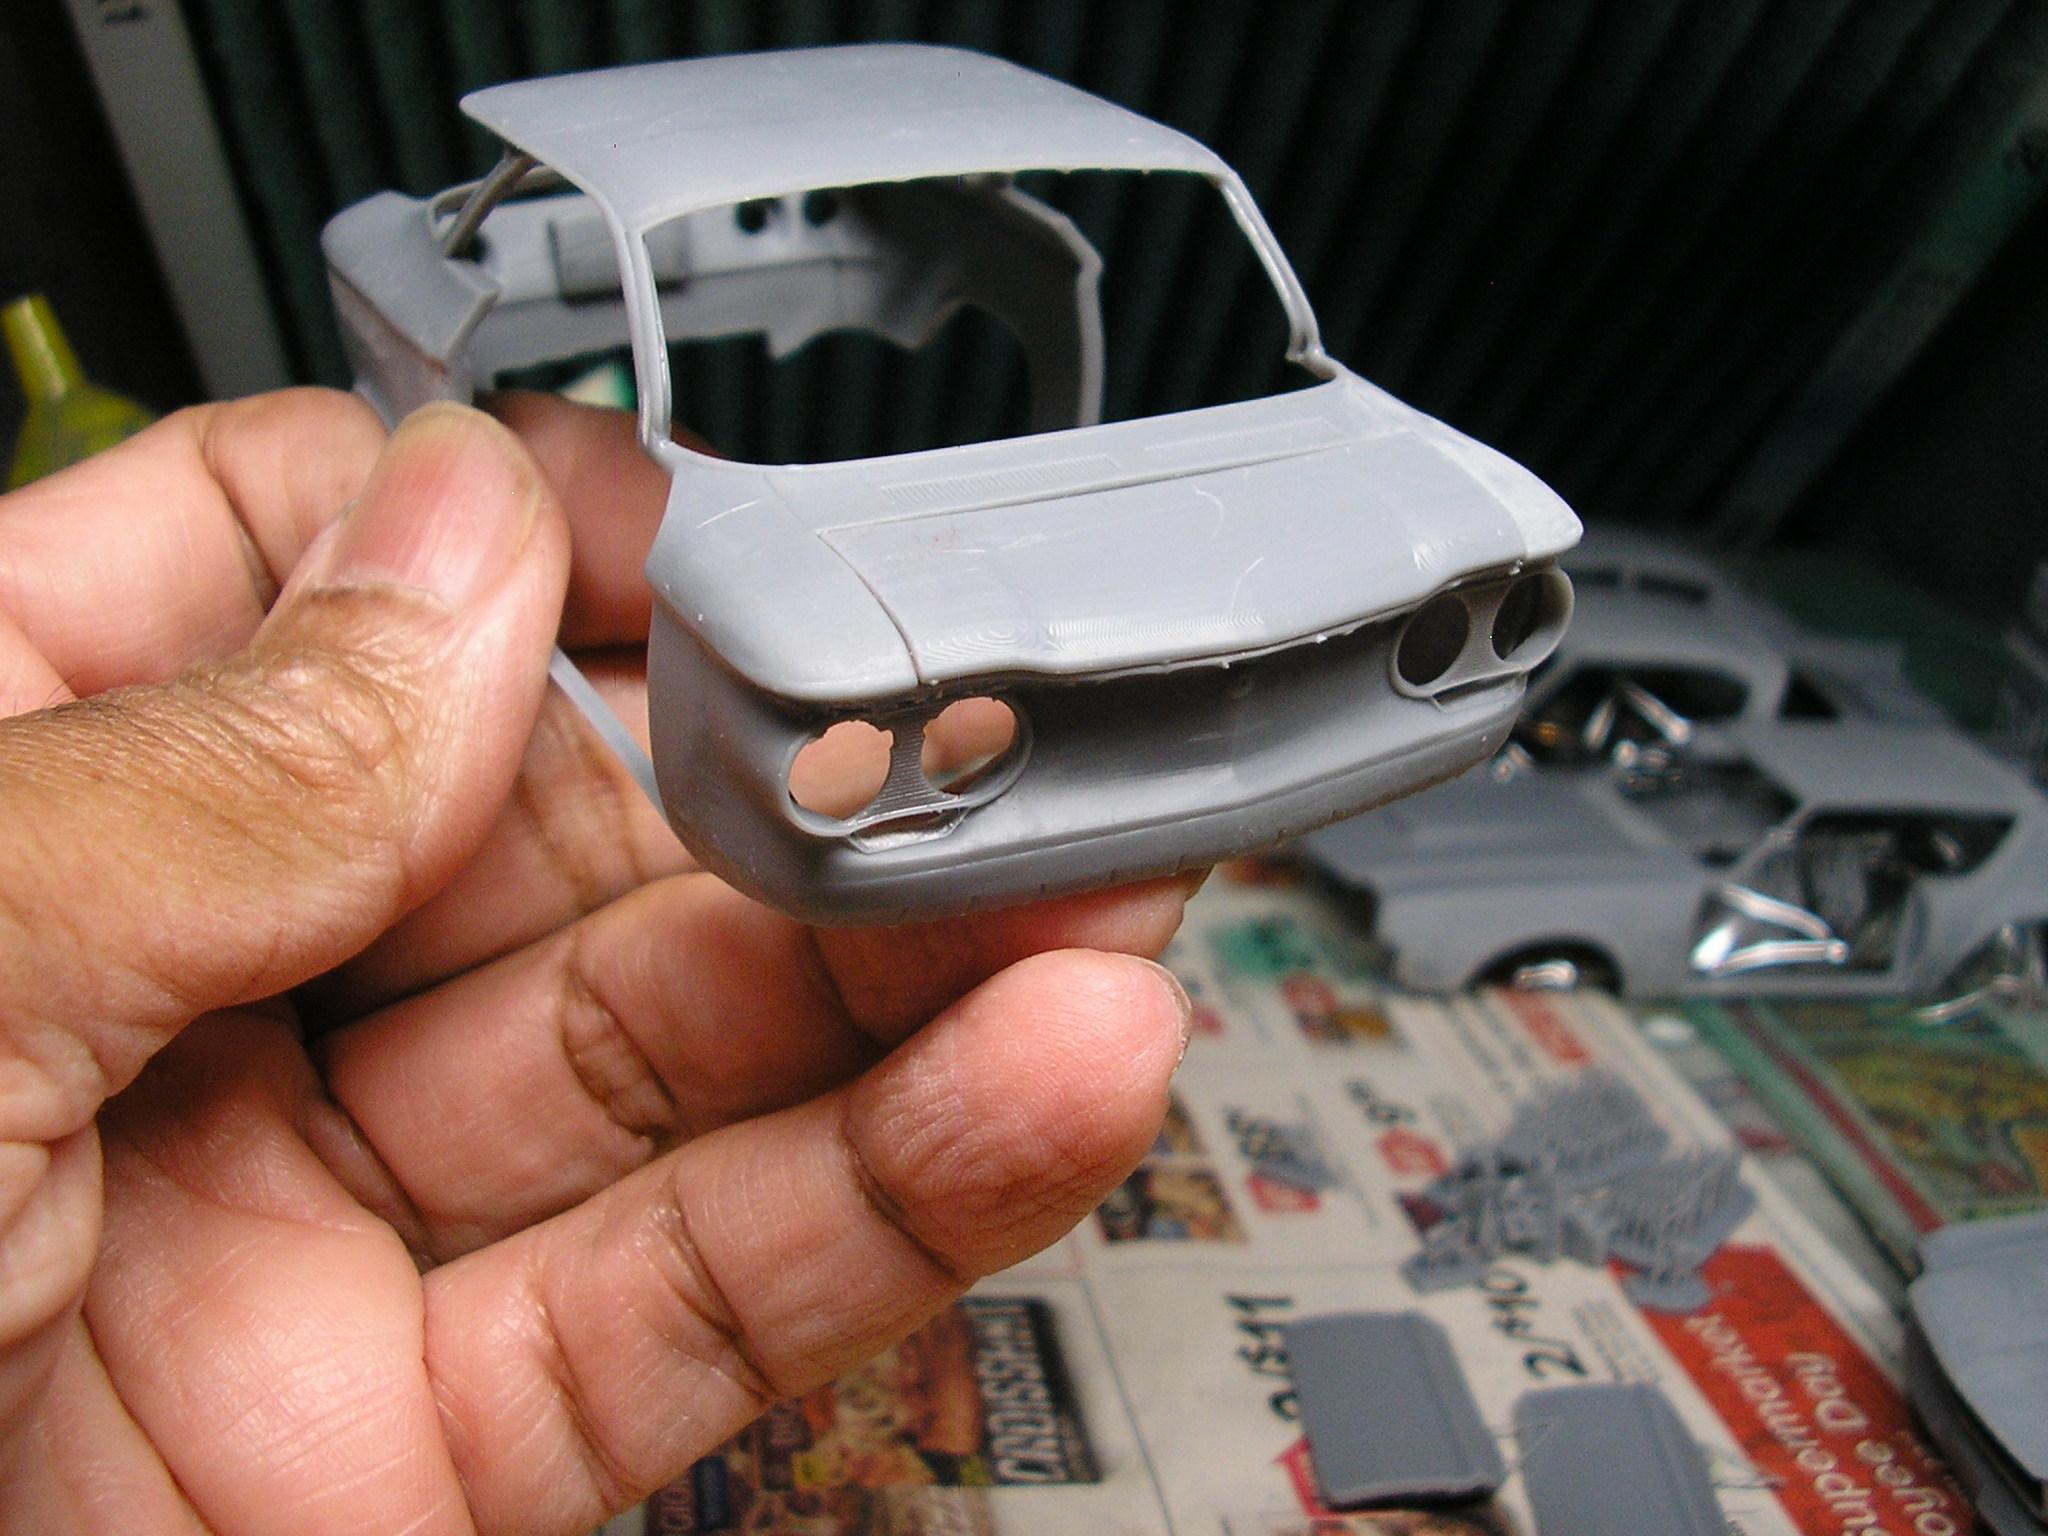
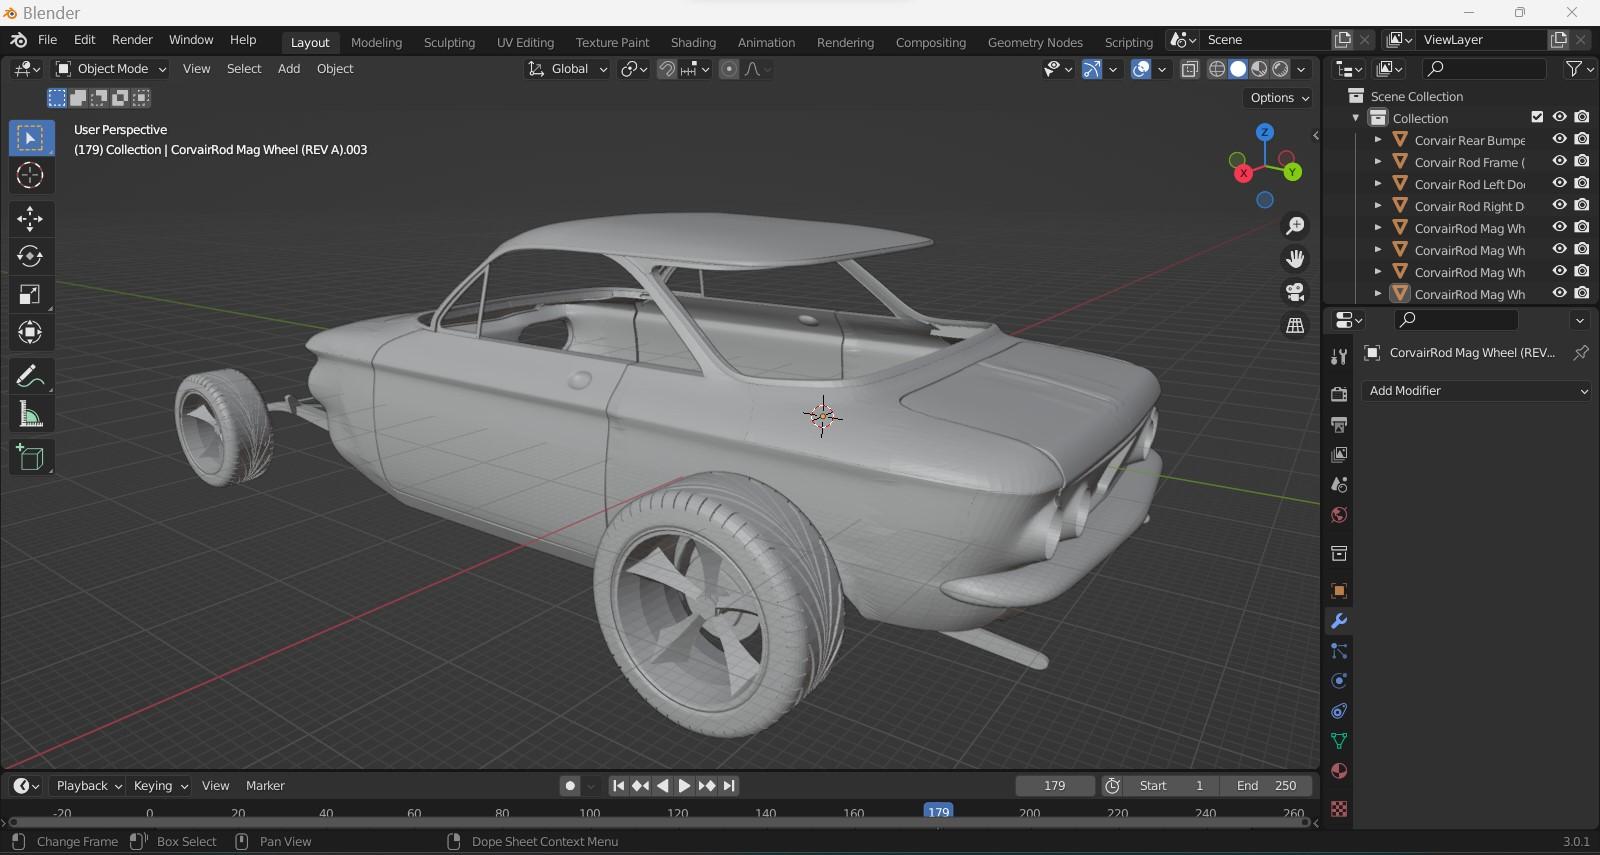
Here's a car I just printed a couple days ago, and while I'm not a street rod guy in the least, I couldn't help but go and create this car using 3D files of a 1960 Corvair sedan I have. Here's the illustration by Gary Campesi who BTW does some VERY good work with his very imaginative cars he puts out. I noticed this CorvaiRod IMMEDIATELY the moment I saw it. The file I cut, section, scaled and narrowed to get what you see that follows............. After I was through with it............ ? The left door will need a little rework on the bottom, or I may go ahead and print it again as I have things to do yet such as the bucks for the glass, a street rod frame I have a file for, and even a Corvair engine in case I want to print that. Here's what I cobbled together as a possible wheel choice and engine placement when I had the files in Blender. I don't think I'll go with those tires though........I like the tires I see in Gary's illustration much better. The engine will more than likely get either a multi carb setup, or fuel injection. We'll have to see..........
-
My Future 3D WIP's (LOTS of pics)
MrObsessive replied to MrObsessive's topic in Car Aftermarket / Resin / 3D Printed
Russell, the final file I did for this one was here............some subtle changes I did before I printed it. ?? The car shown here was what I based my file on---I didn't care for the 3/4 rear view, particularly the rear window so I did my own take on what the car might have looked like with some changes. Airtrax did a resin for that one (I think a '78), but those are not really my cup of tea. I have files for the later one (early '80's), but it's not been a priority to convert the files just yet to be printable.
-
My Future 3D WIP's (LOTS of pics)
MrObsessive replied to MrObsessive's topic in Car Aftermarket / Resin / 3D Printed
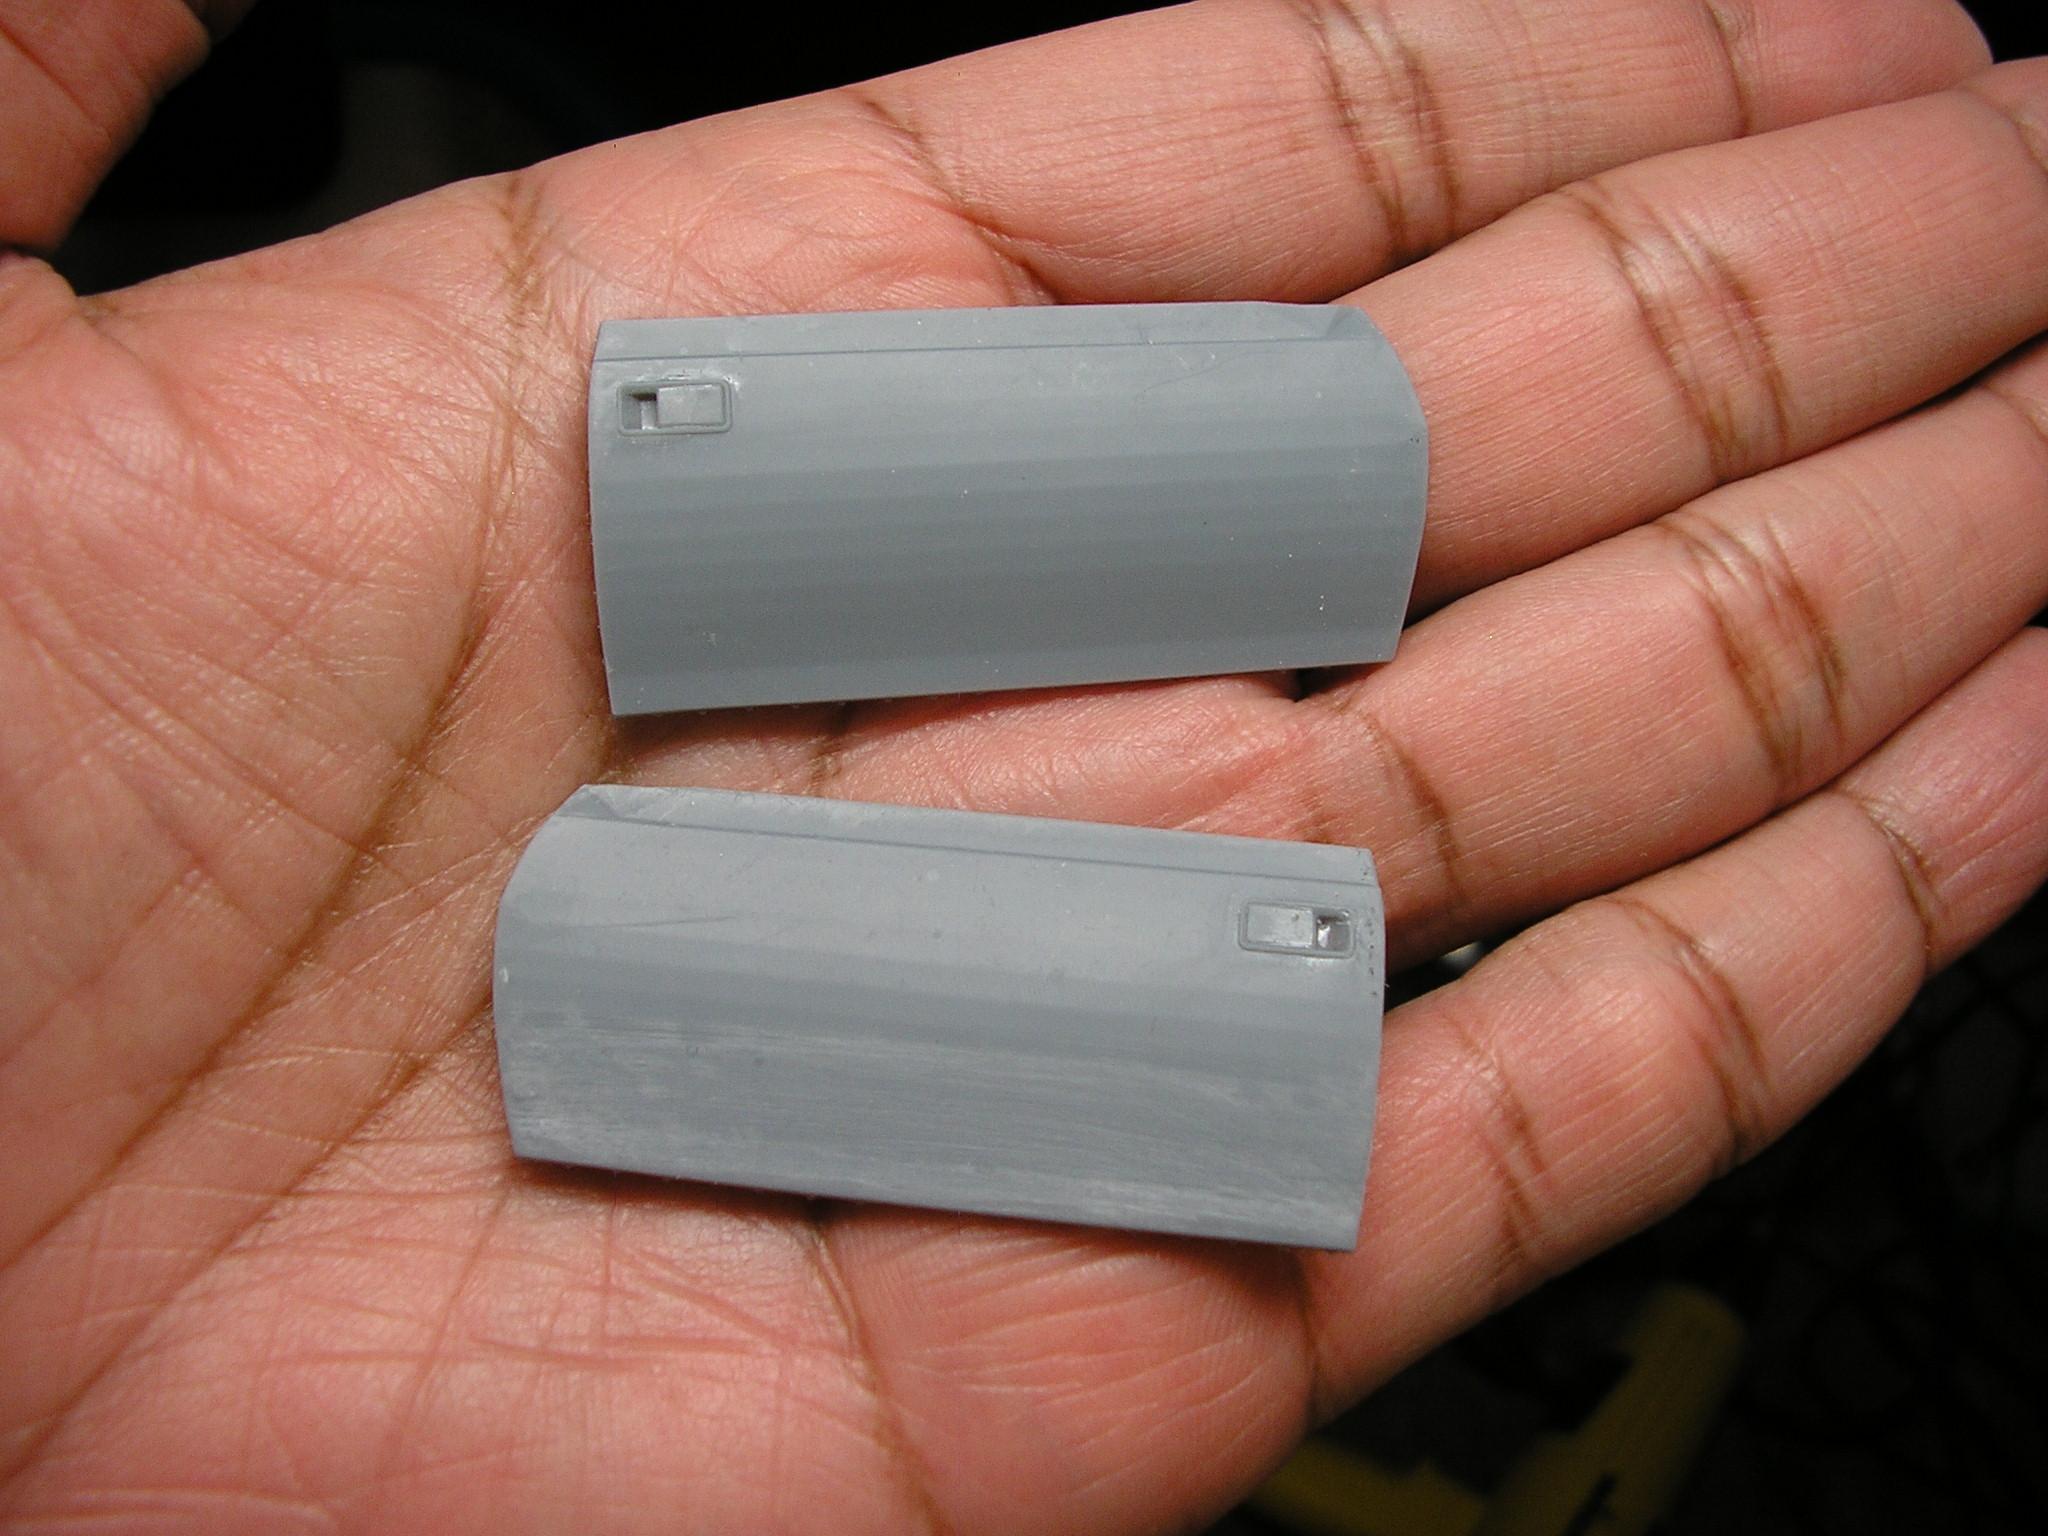
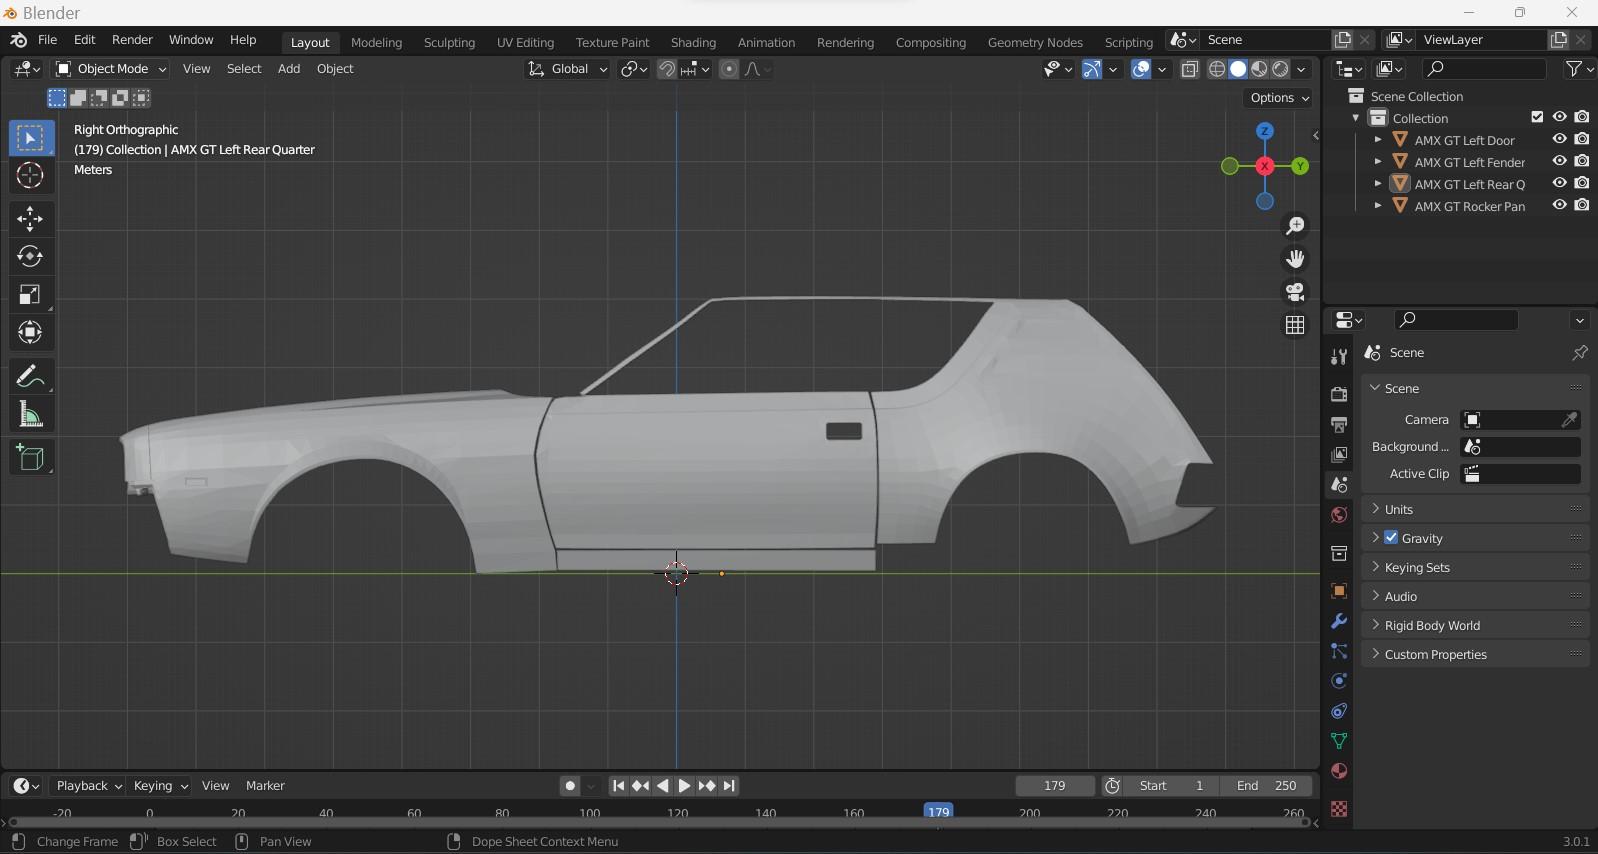
This was one of the tougher files I had to make. At one point, I had to completely redo the file as the back end of this '68 AMX GT to my eyes was just too wide. Well, it turned out the rear quarters which came from a '73 Gremlin video game file, I didn't have them rotated to be horizontal quite straight, so the whole back end came out "flared outwards". So, after a lot of realigning body parts and then getting the model in the slicer, I printed it last evening. It turned out pretty well with a few minor issues (always happens), and it's another car I can 'bout guarantee I'd never see anywhere if I hadn't created it. Here are some pics of the printed car. I don't know when I'd get around to building it...........my next car after I finish the Shelby Green Hornet (soon), will be a '64 Pontiac Banshee convertible I printed months ago. For some reason, the fender end cap turned out to be a short shot. I did create this part of the fender as a separate file, so later on I'll reprint it, and see if I can replace the broken off piece. The car off the build plate and all cleaned and spiffed up a bit.
-
Les, if you haven't done this, I'd give this a try. In your original package for the printer, they may have given you a large 80 grit sanding disc. What may be happening is your build plate is too smooth for the resin to "bite" into and stay adhered to the plate. If you scuff up the plate (on a flat surface), this will give the plate some teeth so that the resin will perhaps better adhere in its initial buildup phase. I remember having this issue with the first smaller printer I got from Phrozen where prints/supports would not adhere in the first couple tries. After I scuffed the heck out of the plate I had no more issue. The newest ones from them (including the larger printer I got) have a much coarser surface as they may have got quite a few complaints about the plates being too smooth. See if that works................ ??
-
Les, did you Z axis the build plate before you started? In other words, it's recommended by most printers that you level out or "Z axis" the print area before you get started. If the plate is not fully bottomed out properly, that will affect adhesion for the supports to get a good grip in the beginning. You'd have to check your specs on how to do that for your printer-----it can vary from brand to brand. Also, you may want to use the resin that they recommend (you may have been doing this), and switch from the washable kind. I get folks asking me to try this or that all the time, but I like to stick with what works, and that's been Phrozen's Aqua Gray 4K resin which I've had zero issues with.
-
Wow, sorry to hear that. When I'm printing, I like my support density somewhere around 65-70% for most items. Bodies and such I have medium supports----smaller parts like hood, doors, and trunk I'll use the lighter supports. I don't know which setup/slicer you're using, but you want to check also your Bottom Exposure Time. This is the time when your build plate is bottoming out for the first time, to establish a "foundation" or base for your supports. I have mine set at 30-40 seconds. You don't want to go beyond that as that can lead to LCD damage before its time.
-
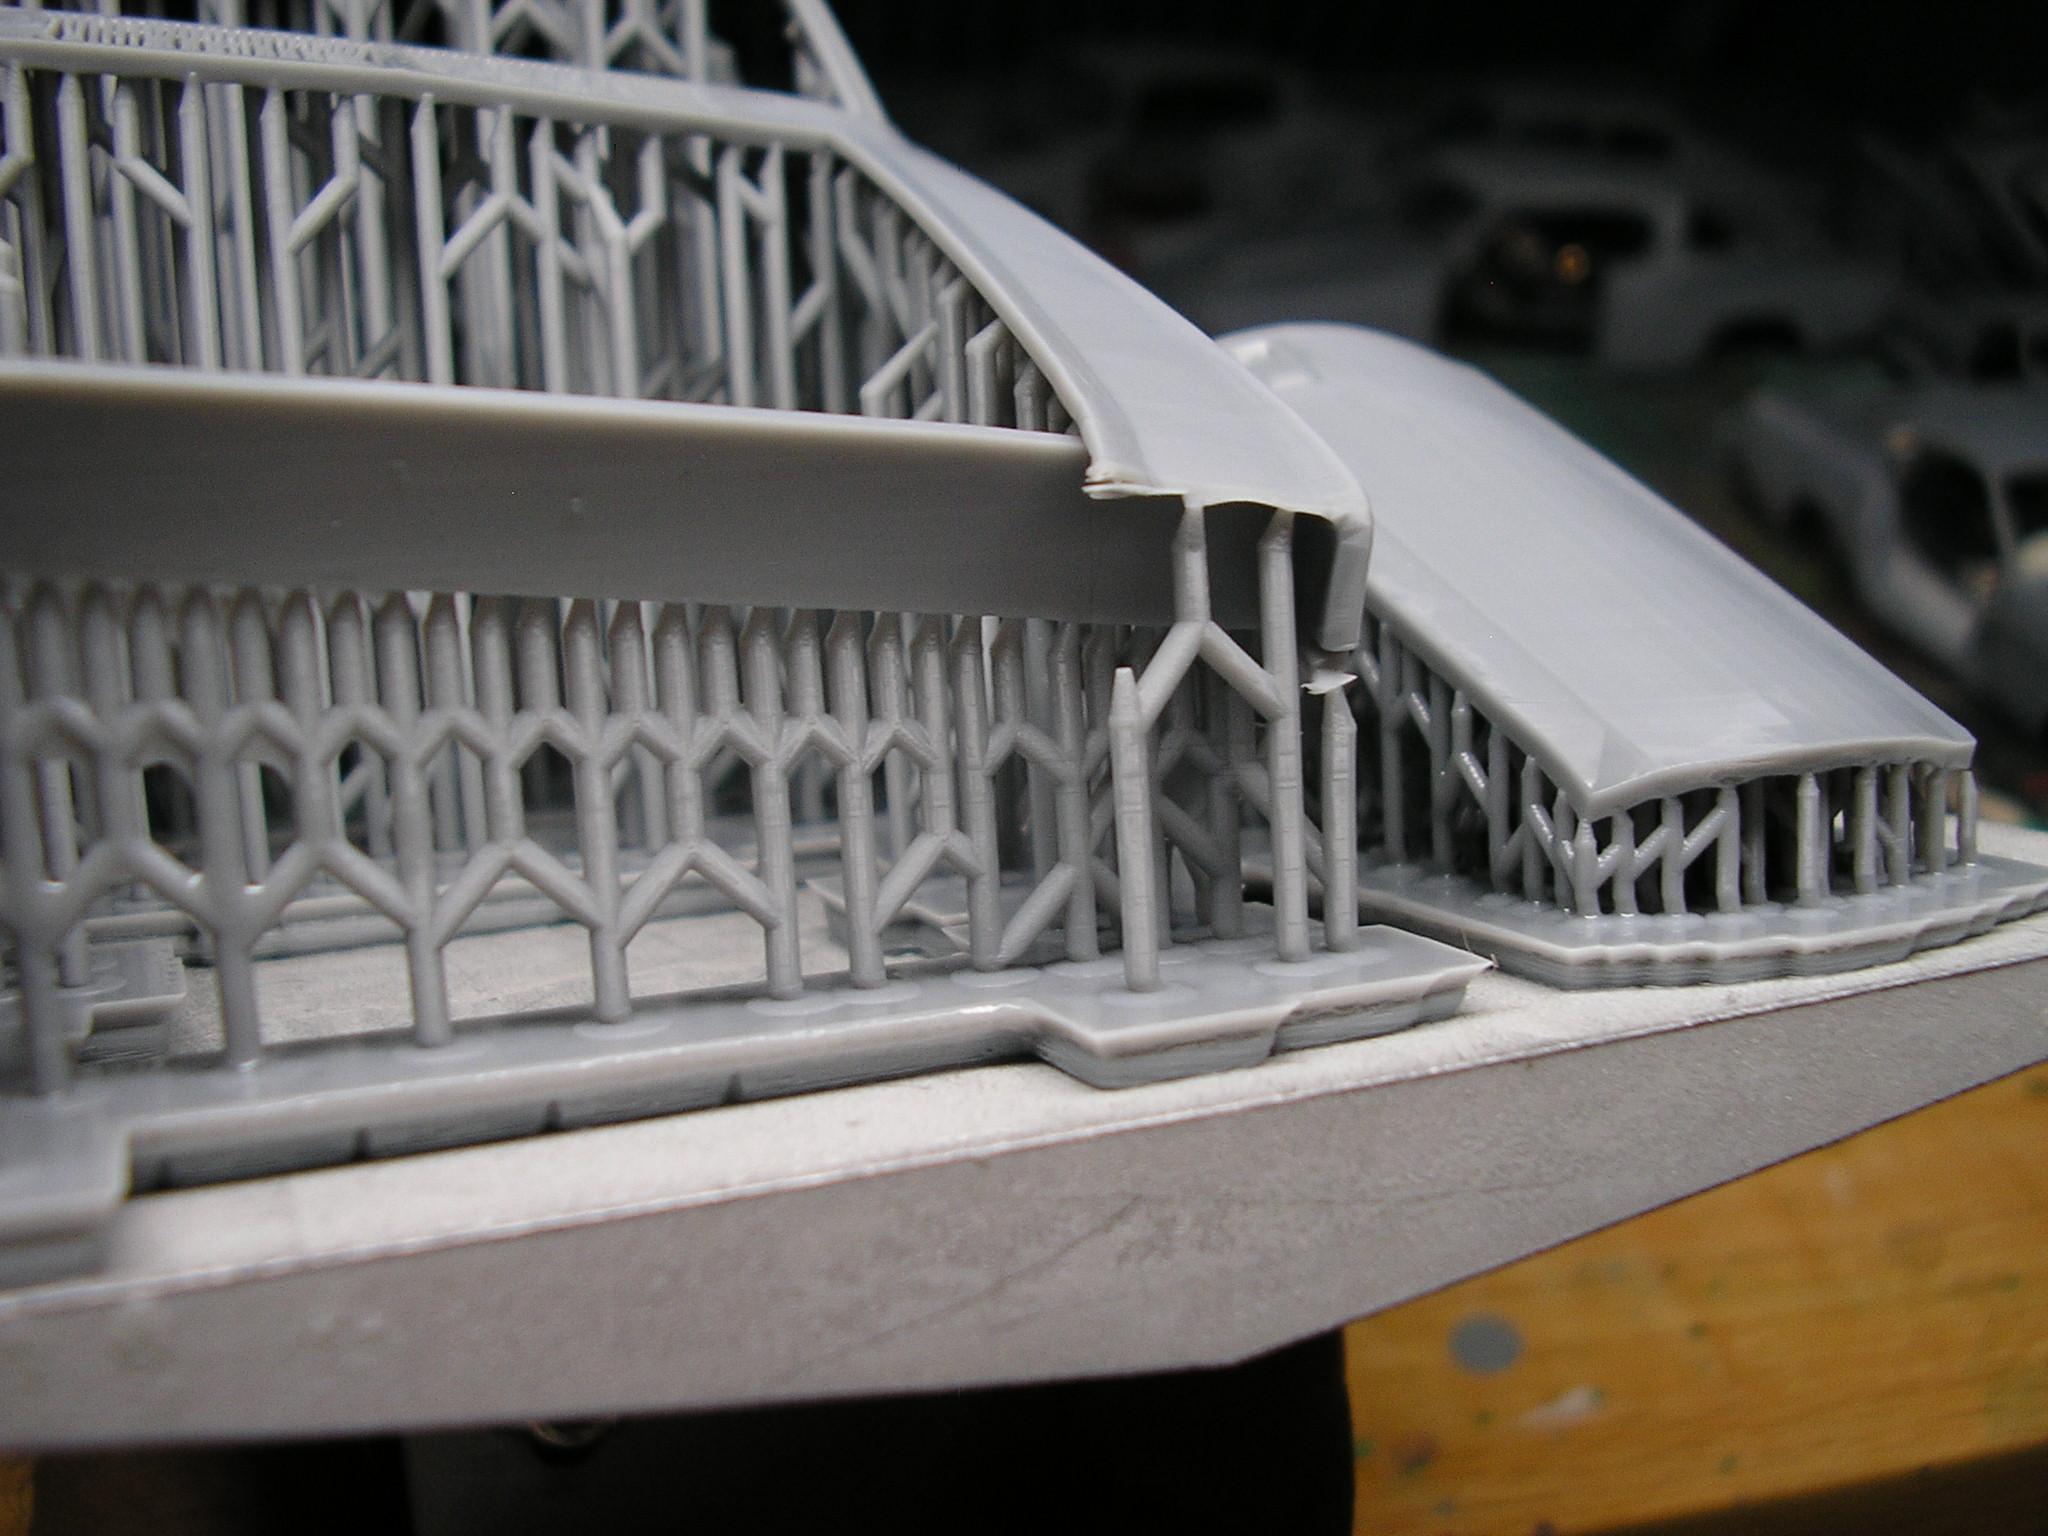
Jim, sorry it's taken a bit to get back to you. Just got over recently an eight day stay in the hospital, and was pretty much out of it health wise since the beginning of the month. I print at an angle because you want as less mass lying horizontal against the surface of the vat as possible. More mass = more issues with suction forces creating a distortion where it's not wanted ie: roof, fenders, flatter panels, etc. Of course, the higher the angle, the longer the print will take as that's adding to the number of layers. Sometimes, printing at an angle is a necessity due to the size of the model. The Opel didn't need as much tilt as say a 1970 Buick Riviera I printed months ago. Still, you want to tilt your model on both axes, to reduce the suction forces.
-
You betcha! That, and also the CAD software programs such as Fusion 360, Blender, etc. Those can get very RAM hoggish especially when it comes to design work you're doing on a large size file for example. I've 12GB of RAM on my laptop, and I still had Blender crash on me with no warning right in the middle of an important step. ?
-
My Future 3D WIP's (LOTS of pics)
MrObsessive replied to MrObsessive's topic in Car Aftermarket / Resin / 3D Printed
I owned both a '76 Hornet and a '69 AMX at the same time years ago, but I can remember inside the interior was definitely narrower in the Hornet than the AMX. Checking the windshield part numbers would be interesting, but I suspect the Hornet/Gremlin will turn out a bit narrower. Even with the files I have, there's a definite difference in the width as I had to widen the roof section on the Gremlin file considerably to be at the same point on the Y Axis in the program to meet with the AMX parts. I did scale both files (entire car) to be the same size in their respective lengths in 1/25 scale, but the Gremlin still turned up too narrow. -
My Future 3D WIP's (LOTS of pics)
MrObsessive replied to MrObsessive's topic in Car Aftermarket / Resin / 3D Printed
One particularly tricky part of this file is getting the correct width of the car. I didn't want to make it Gremlin narrow like the production car, so I kept it AMX wide as I'm quite sure the concept was just as wide as the production AMX. Still some work to do before I decide to print it. Gotta work on those front fenders, particularly the headlight area, as that's not quite right as I'm seeing it. -
My Future 3D WIP's (LOTS of pics)
MrObsessive replied to MrObsessive's topic in Car Aftermarket / Resin / 3D Printed
Curt the same as the one you're looking at------a Phrozen Sonic Mighty 4K. -
My Future 3D WIP's (LOTS of pics)
MrObsessive replied to MrObsessive's topic in Car Aftermarket / Resin / 3D Printed
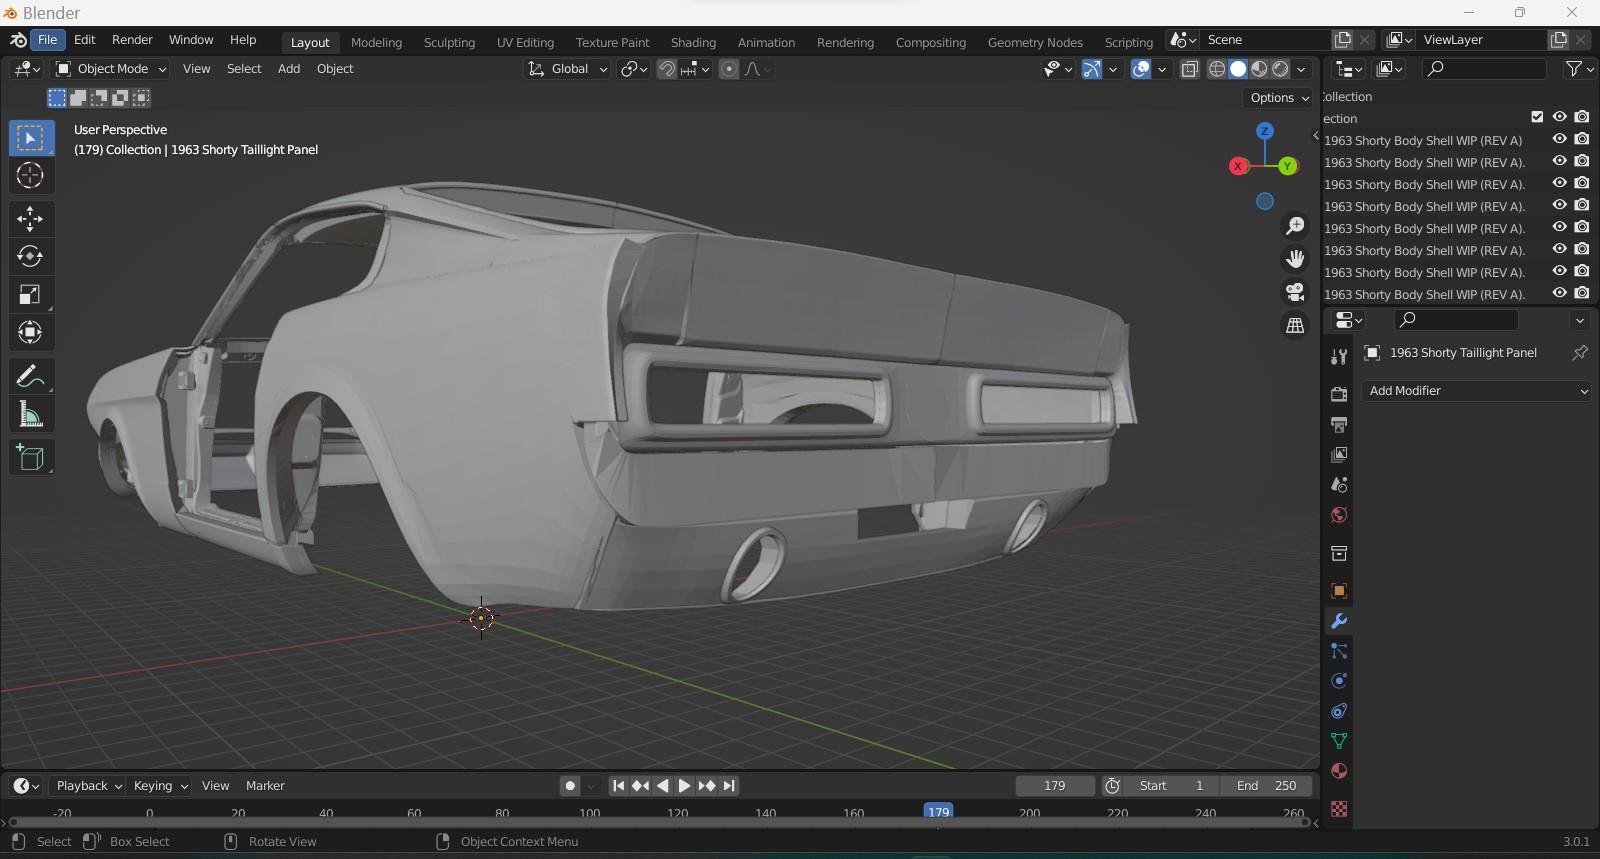
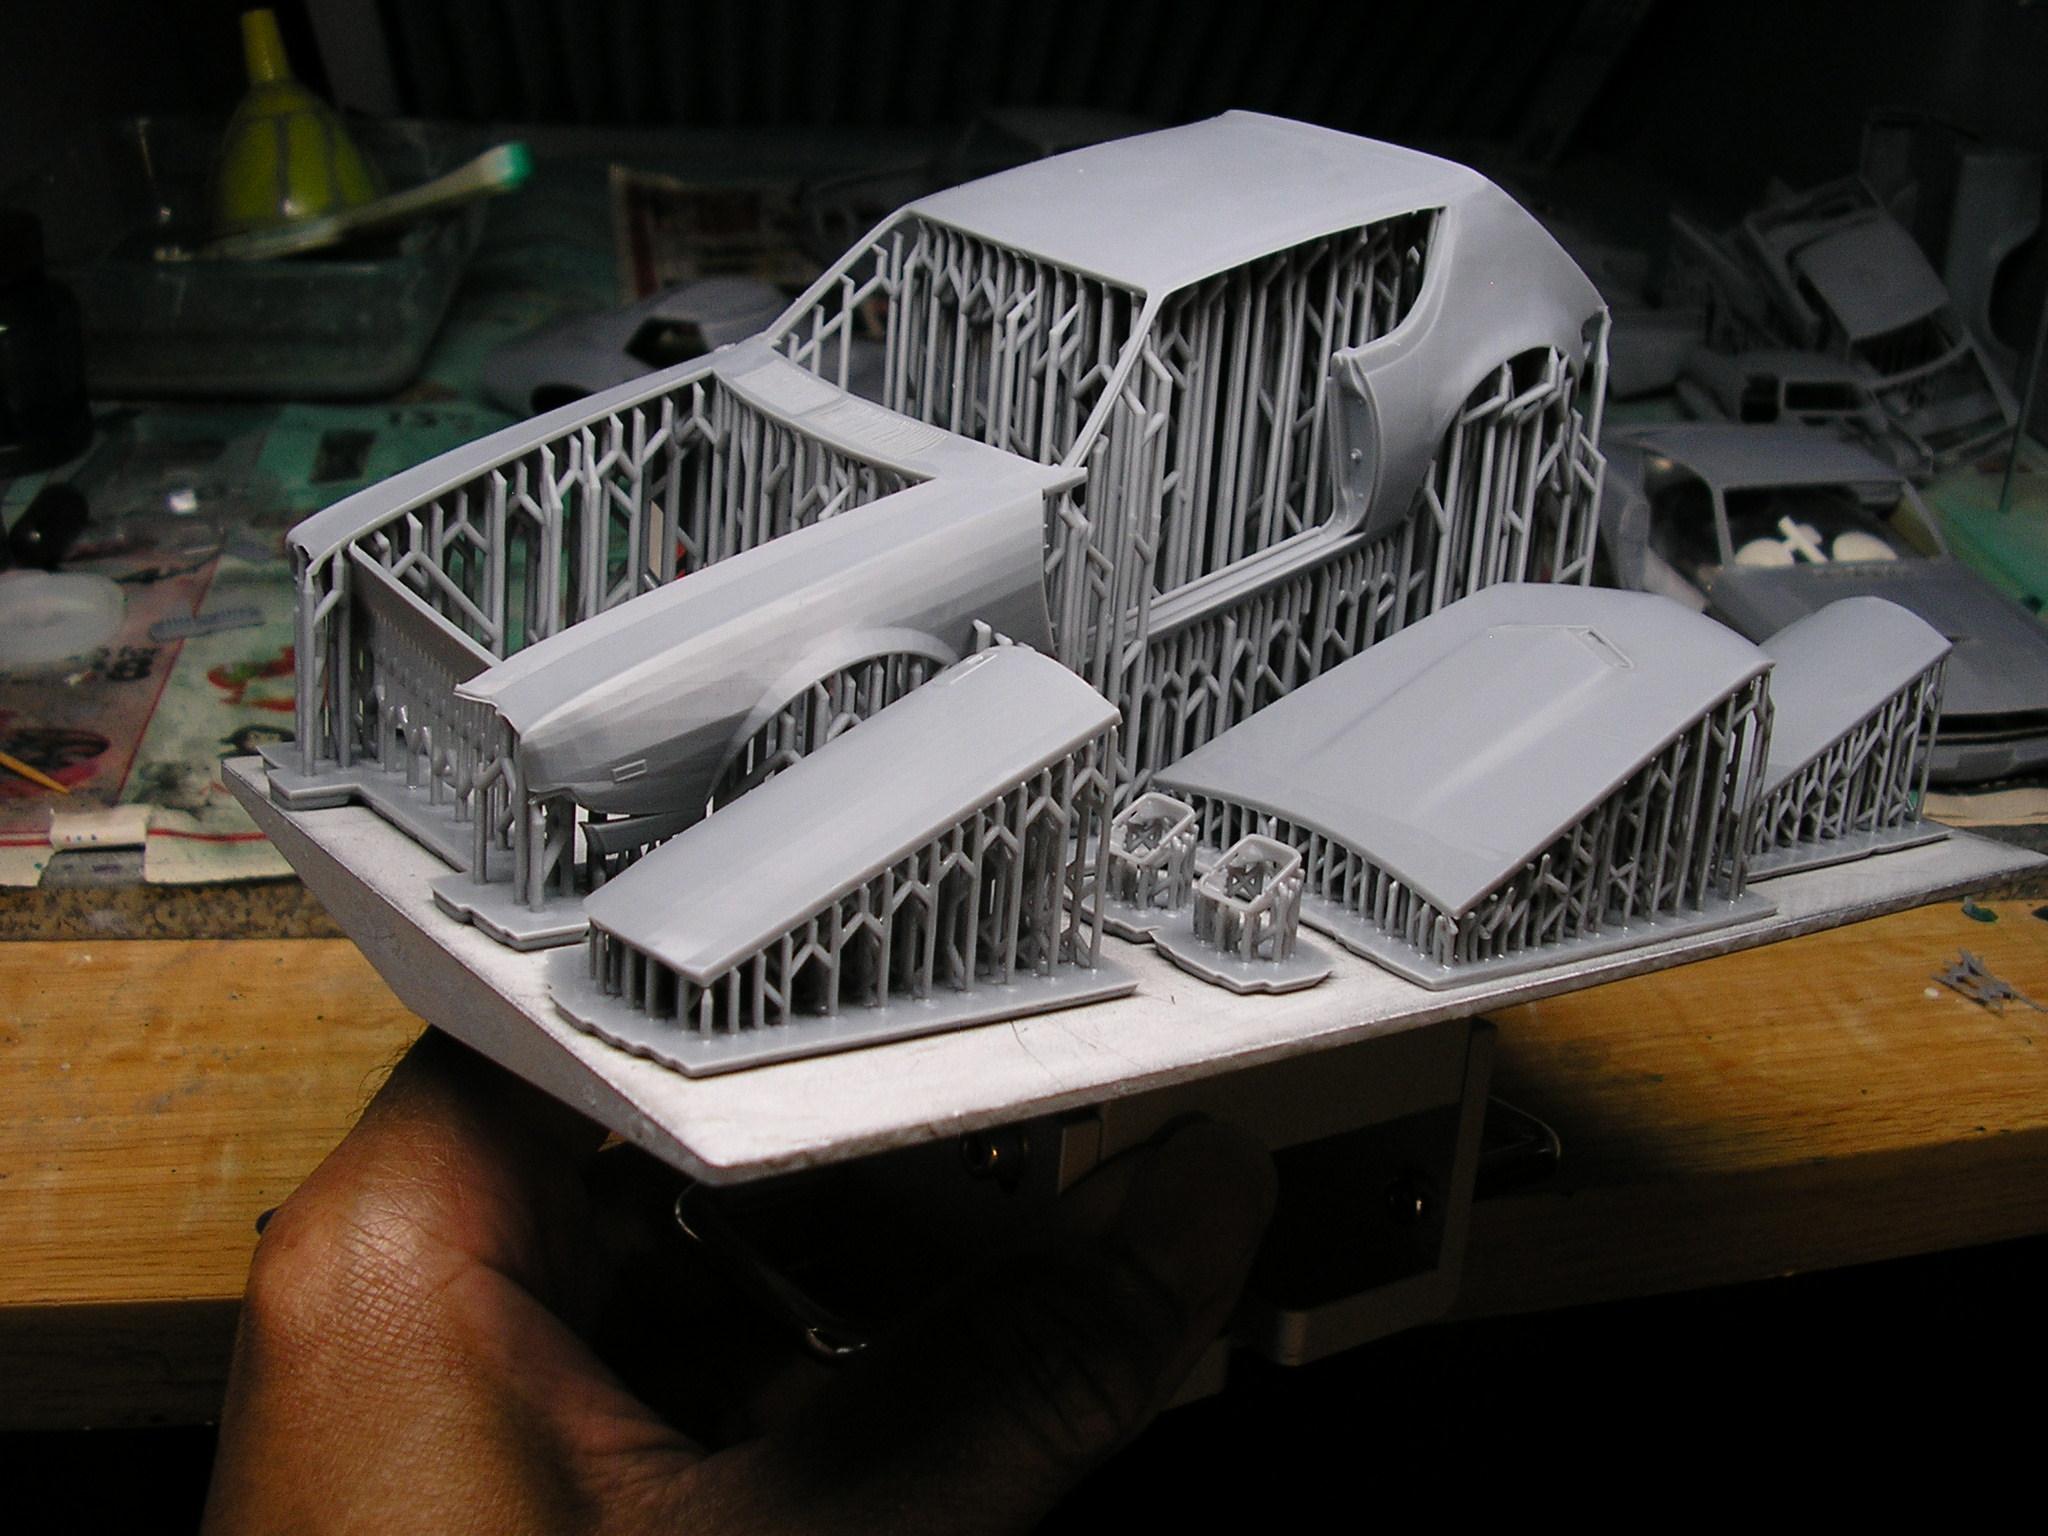
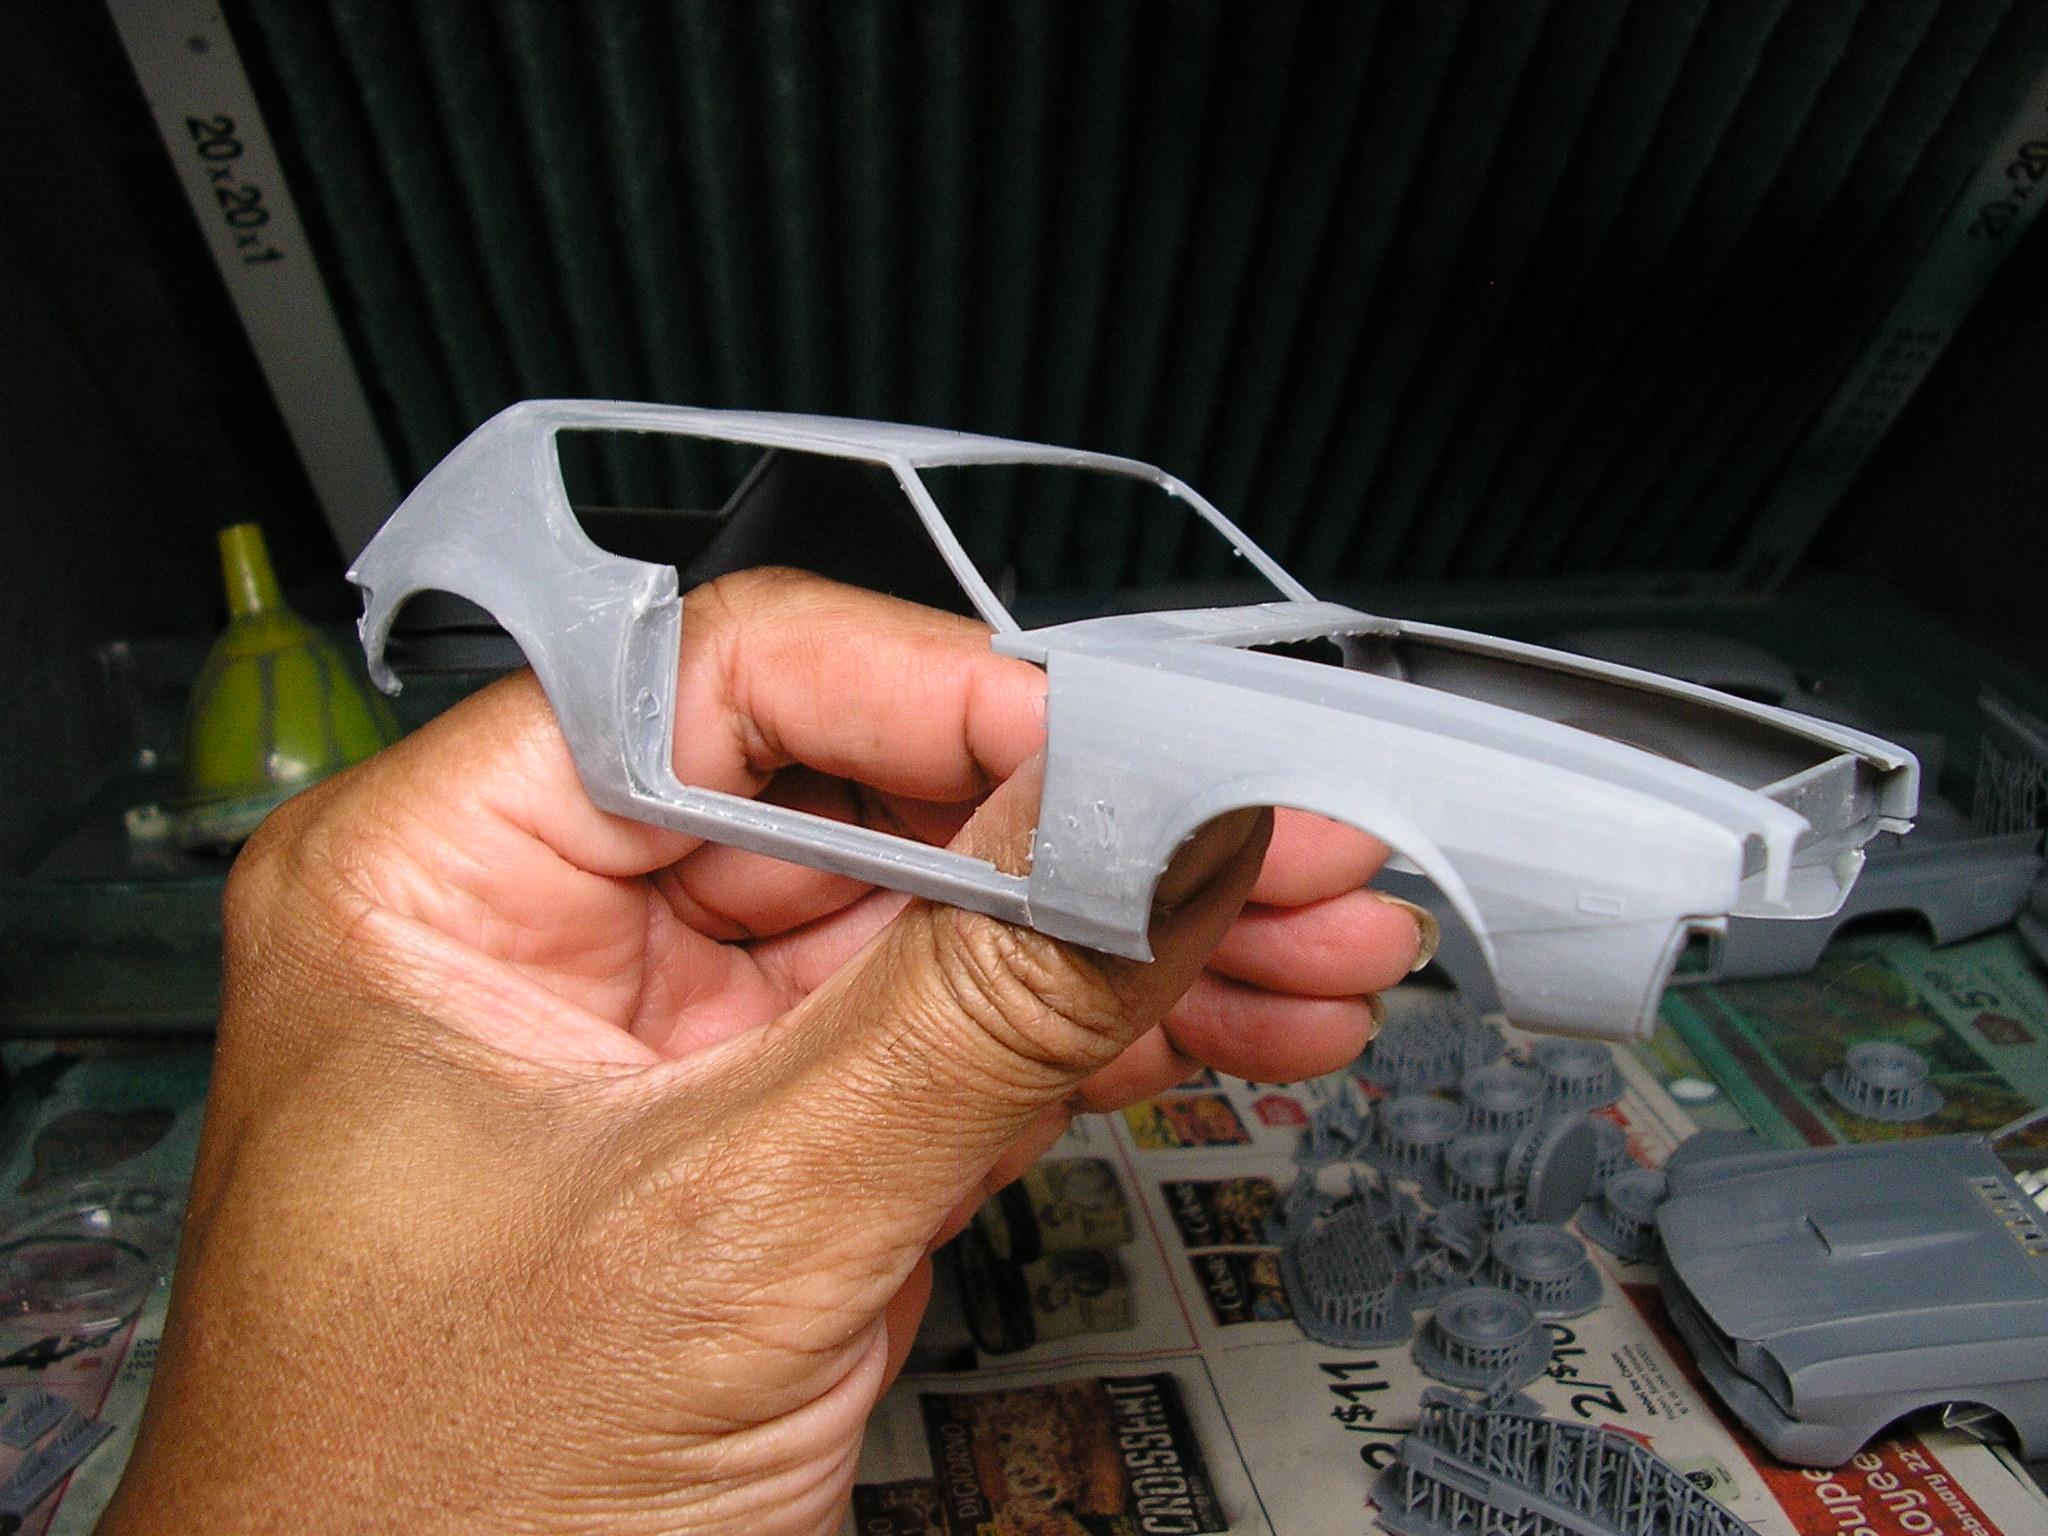
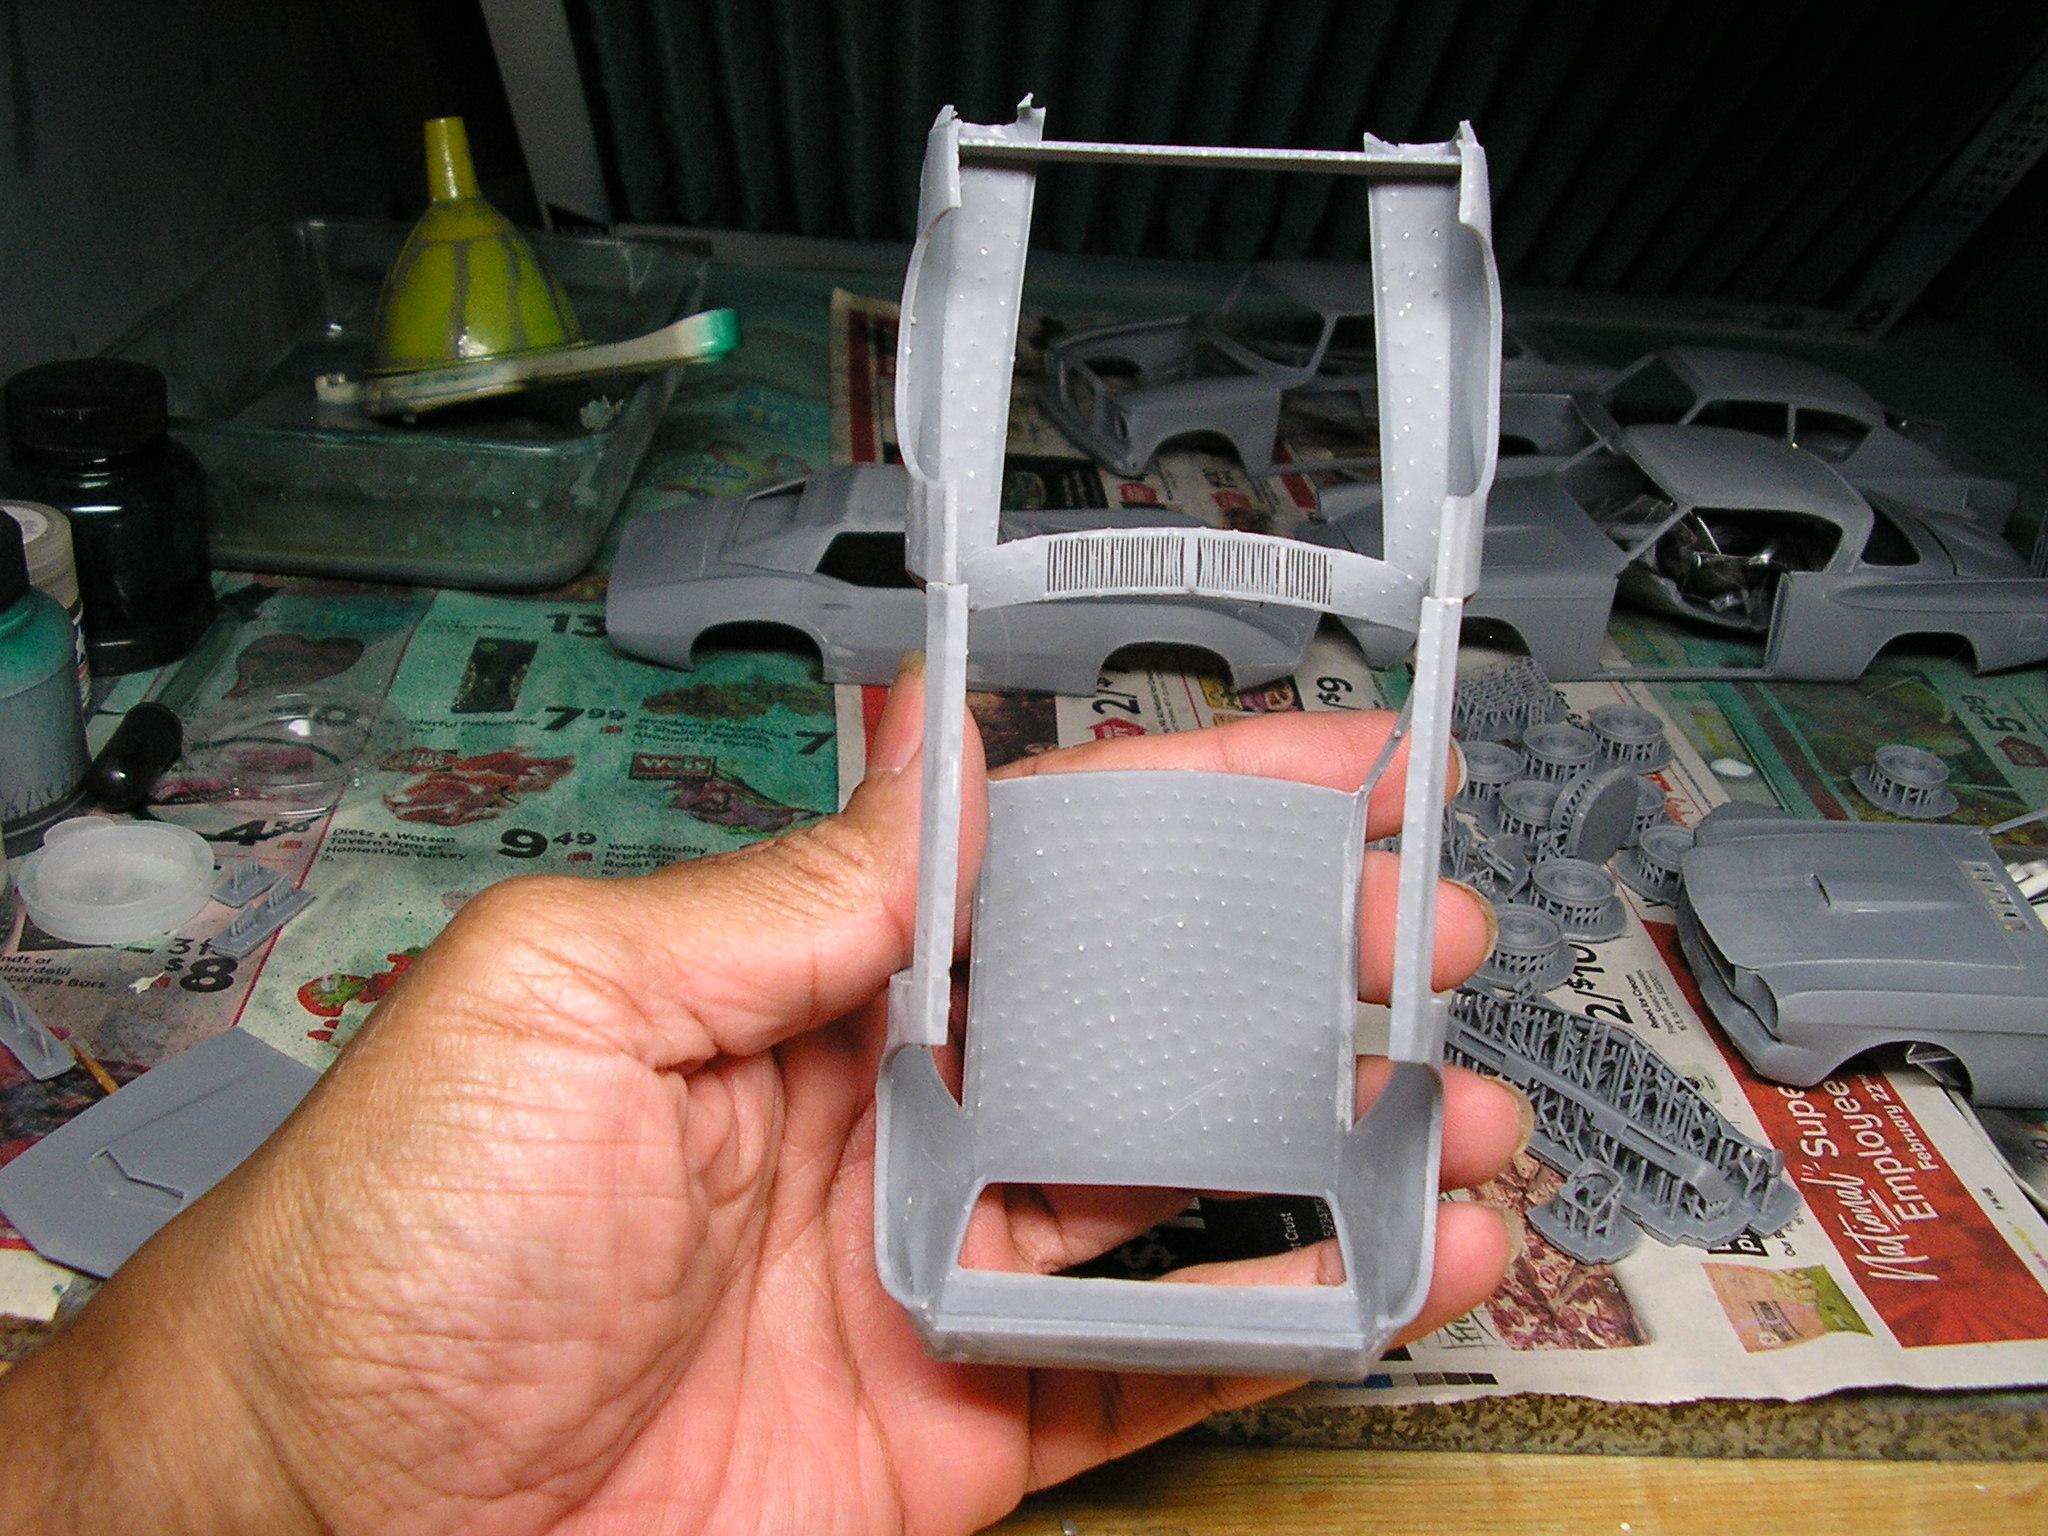
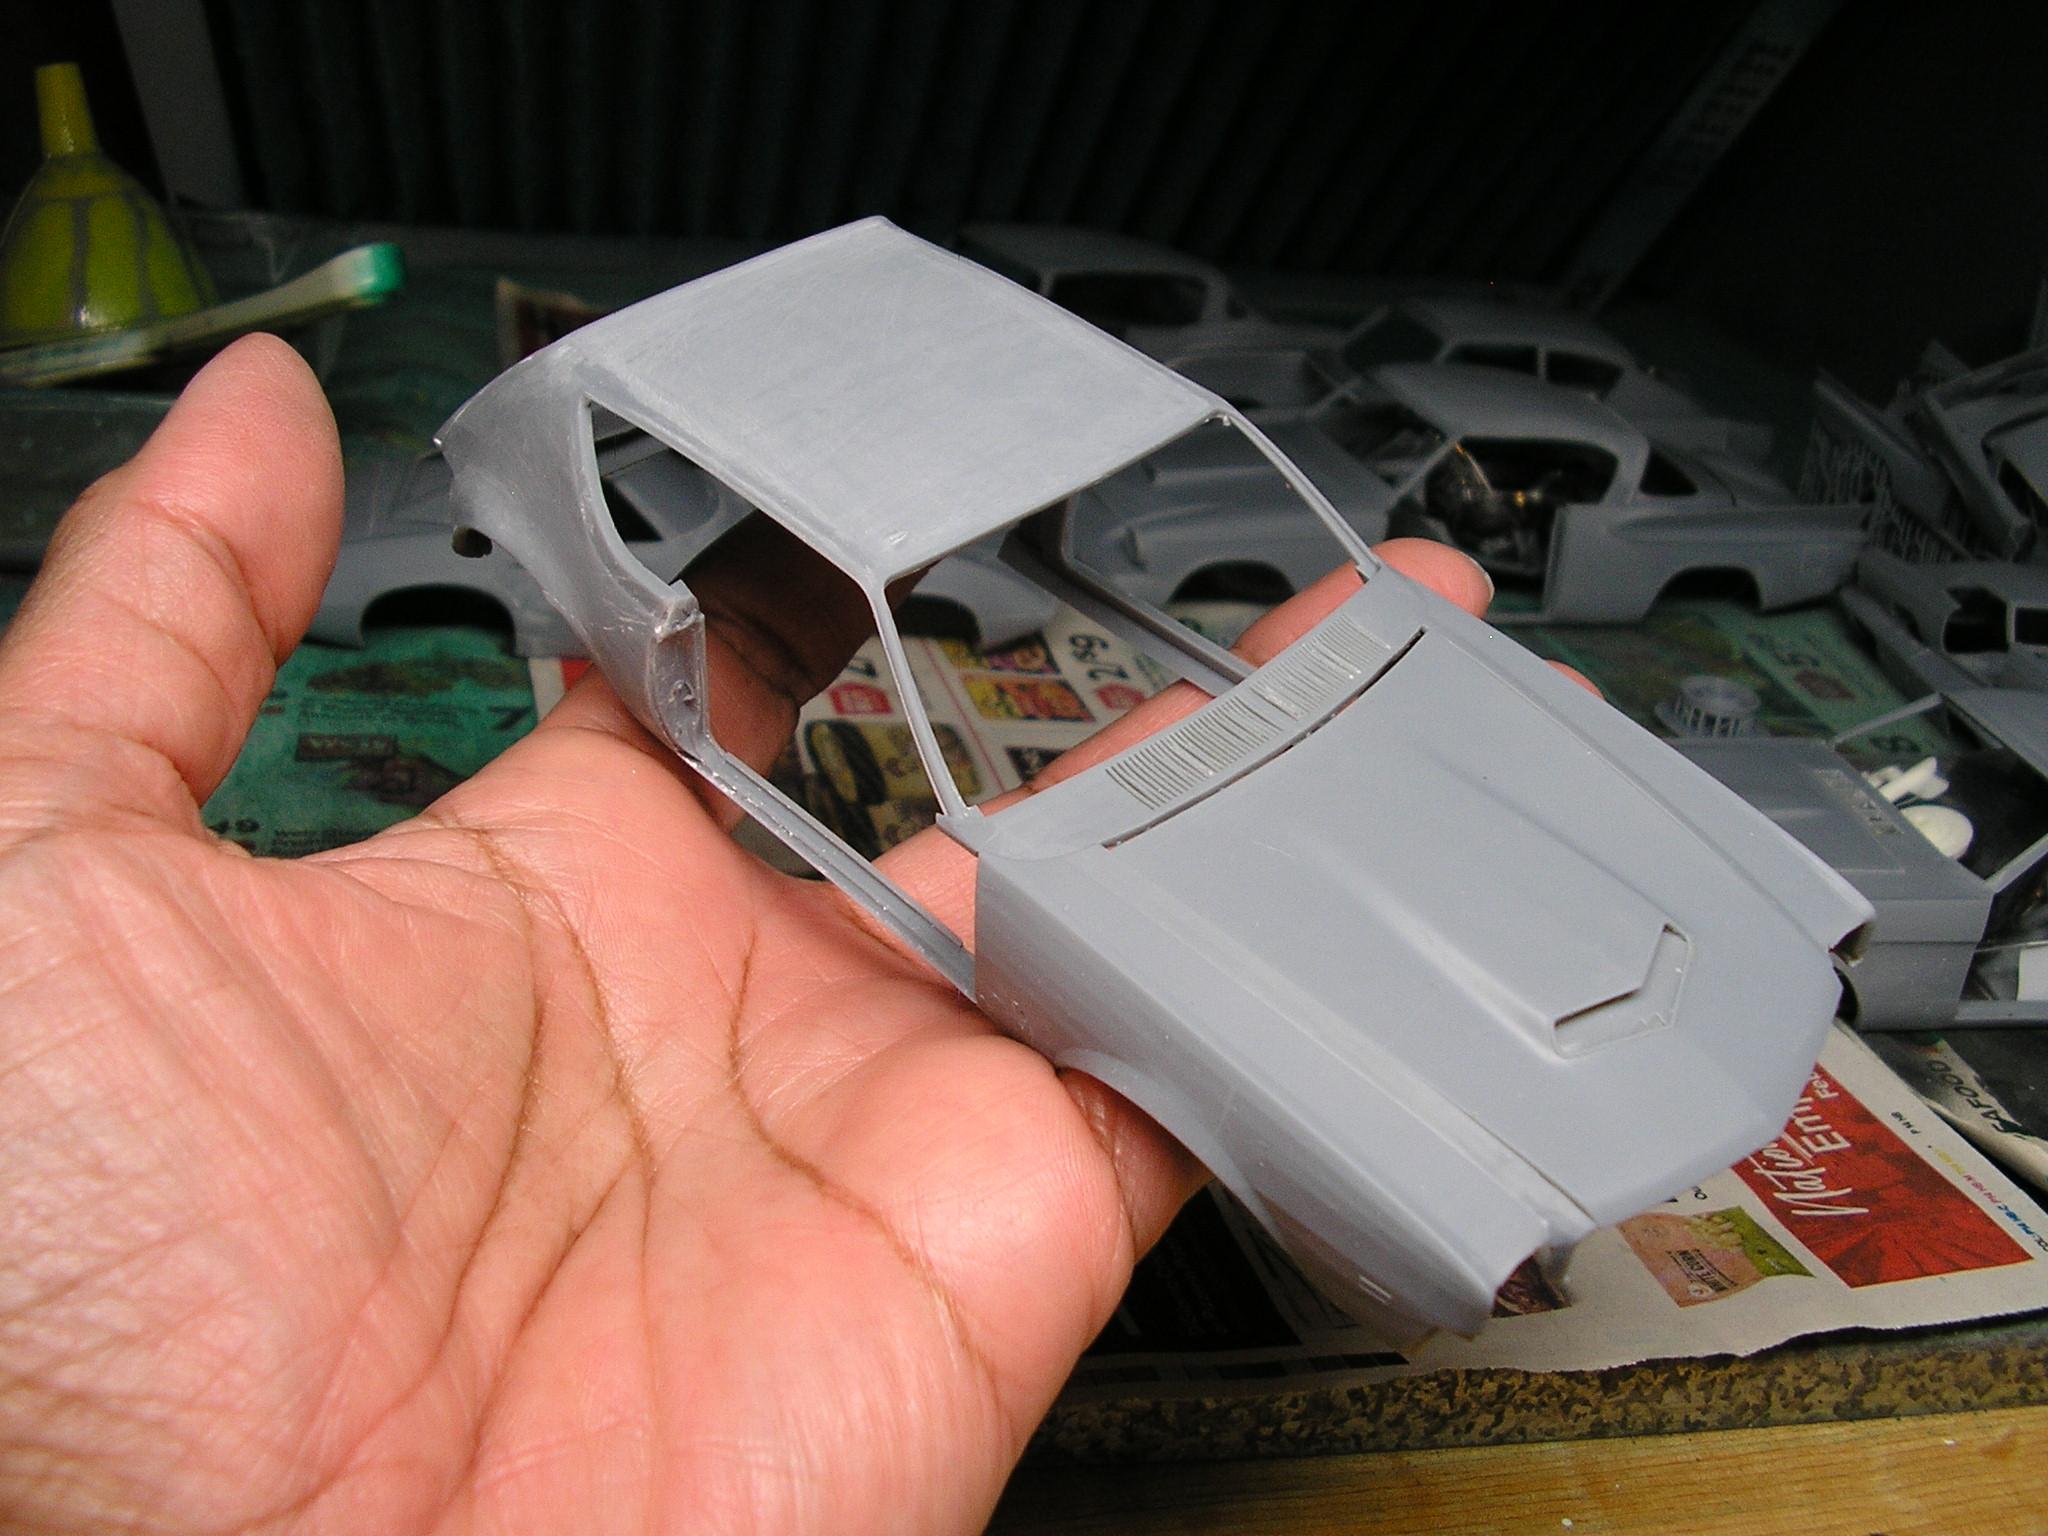
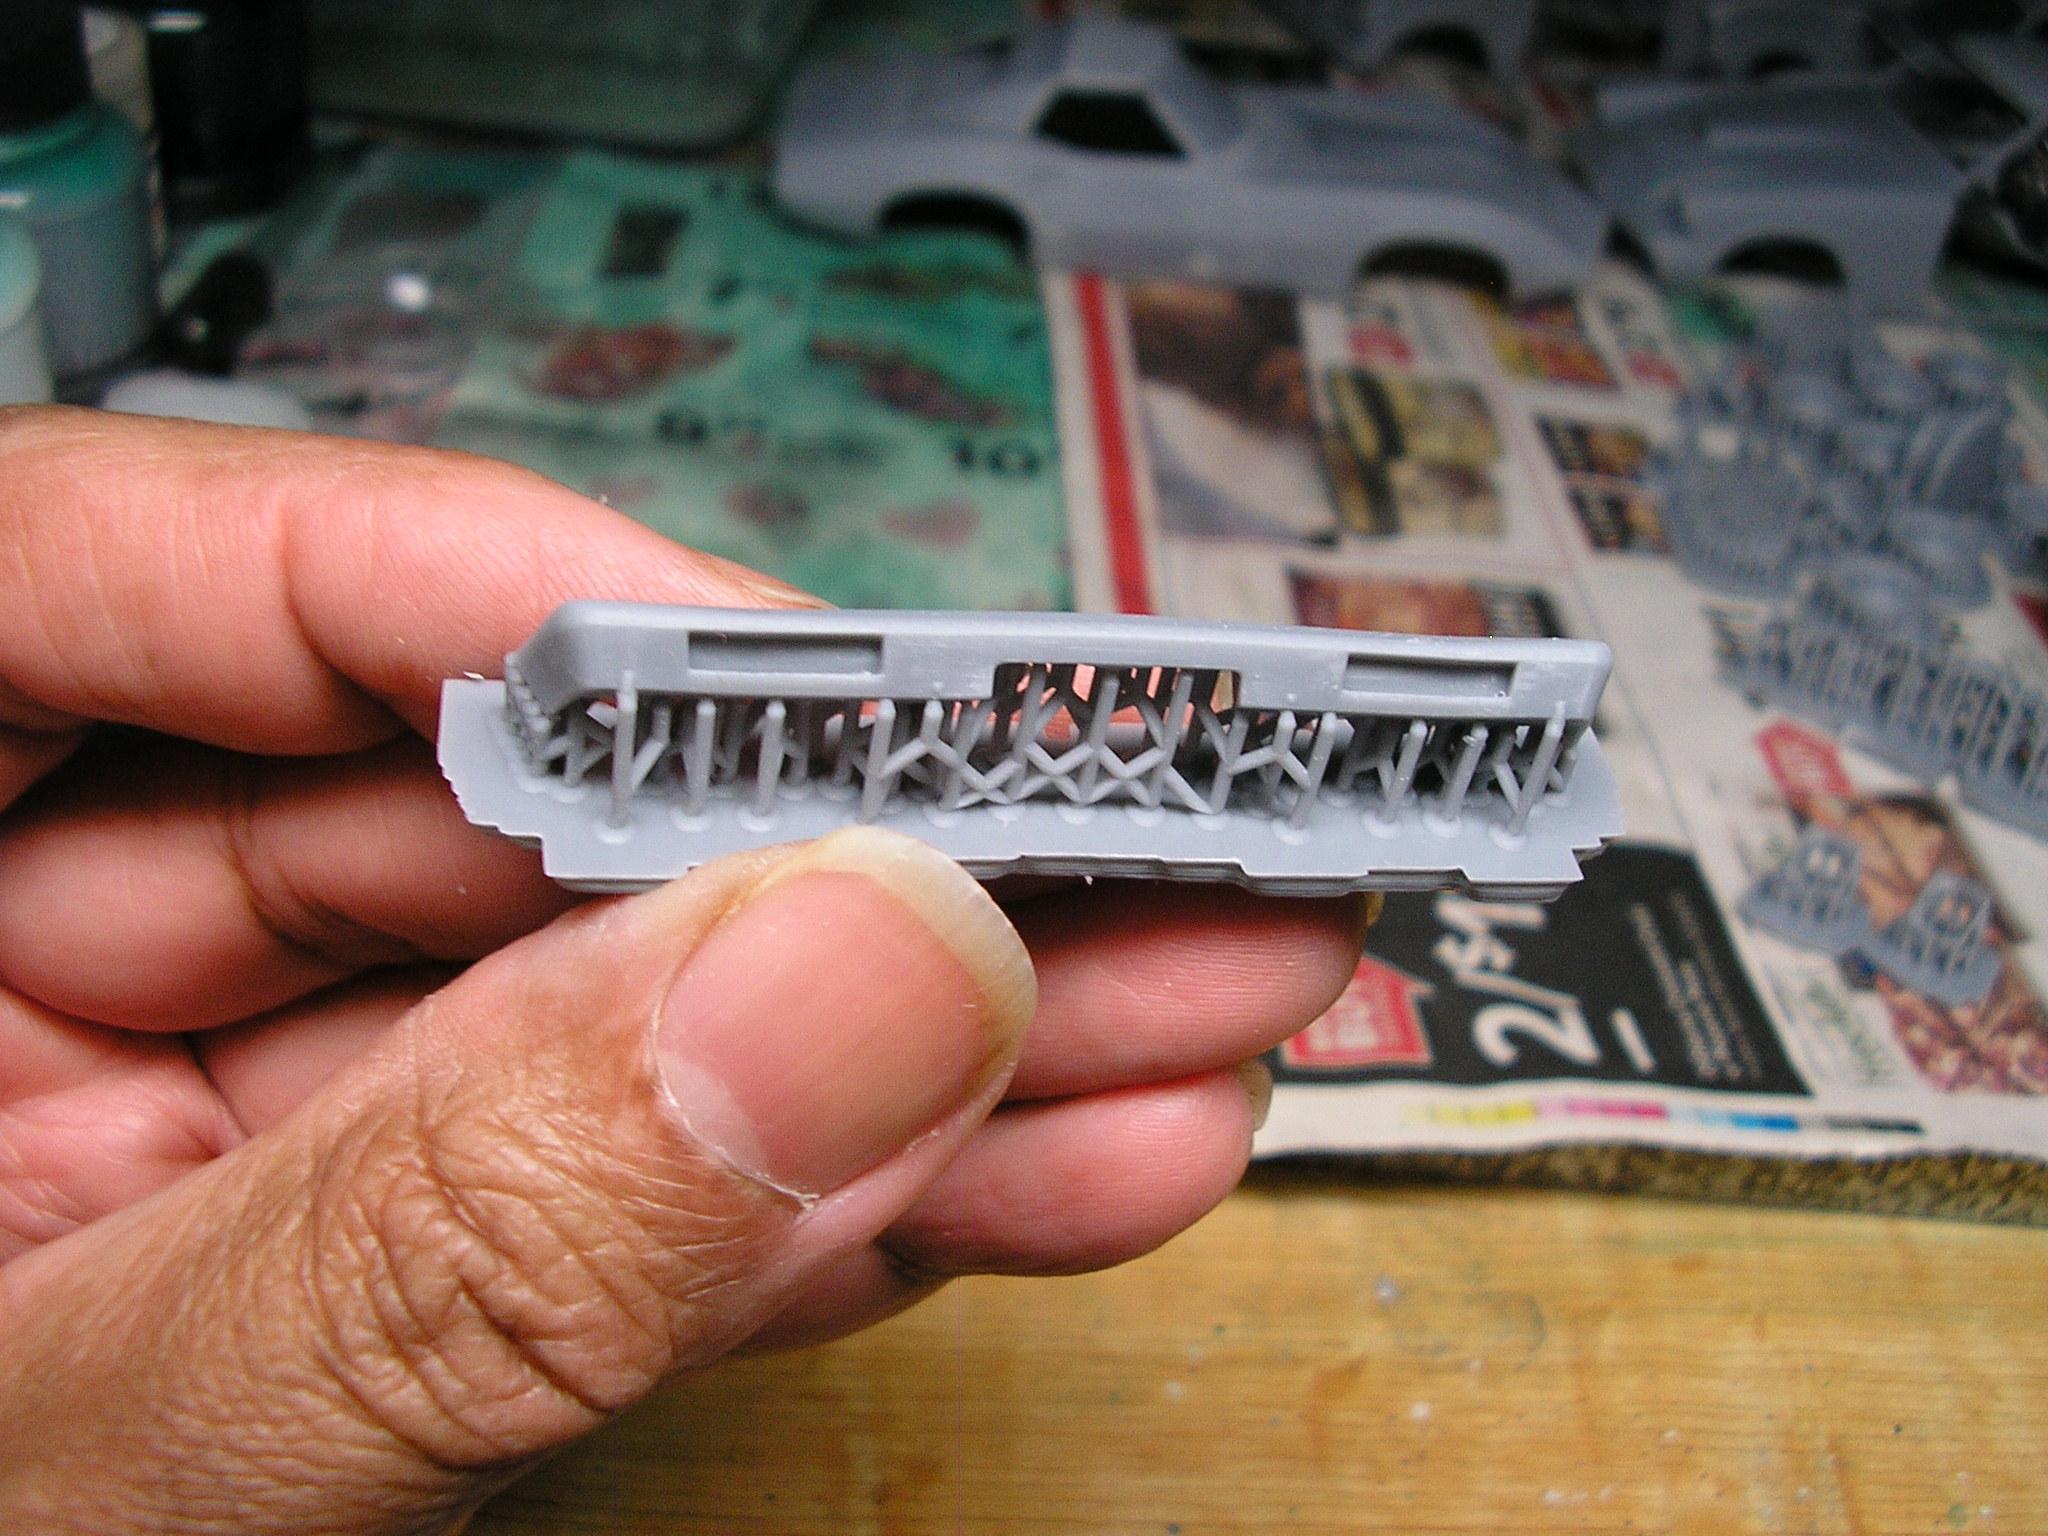
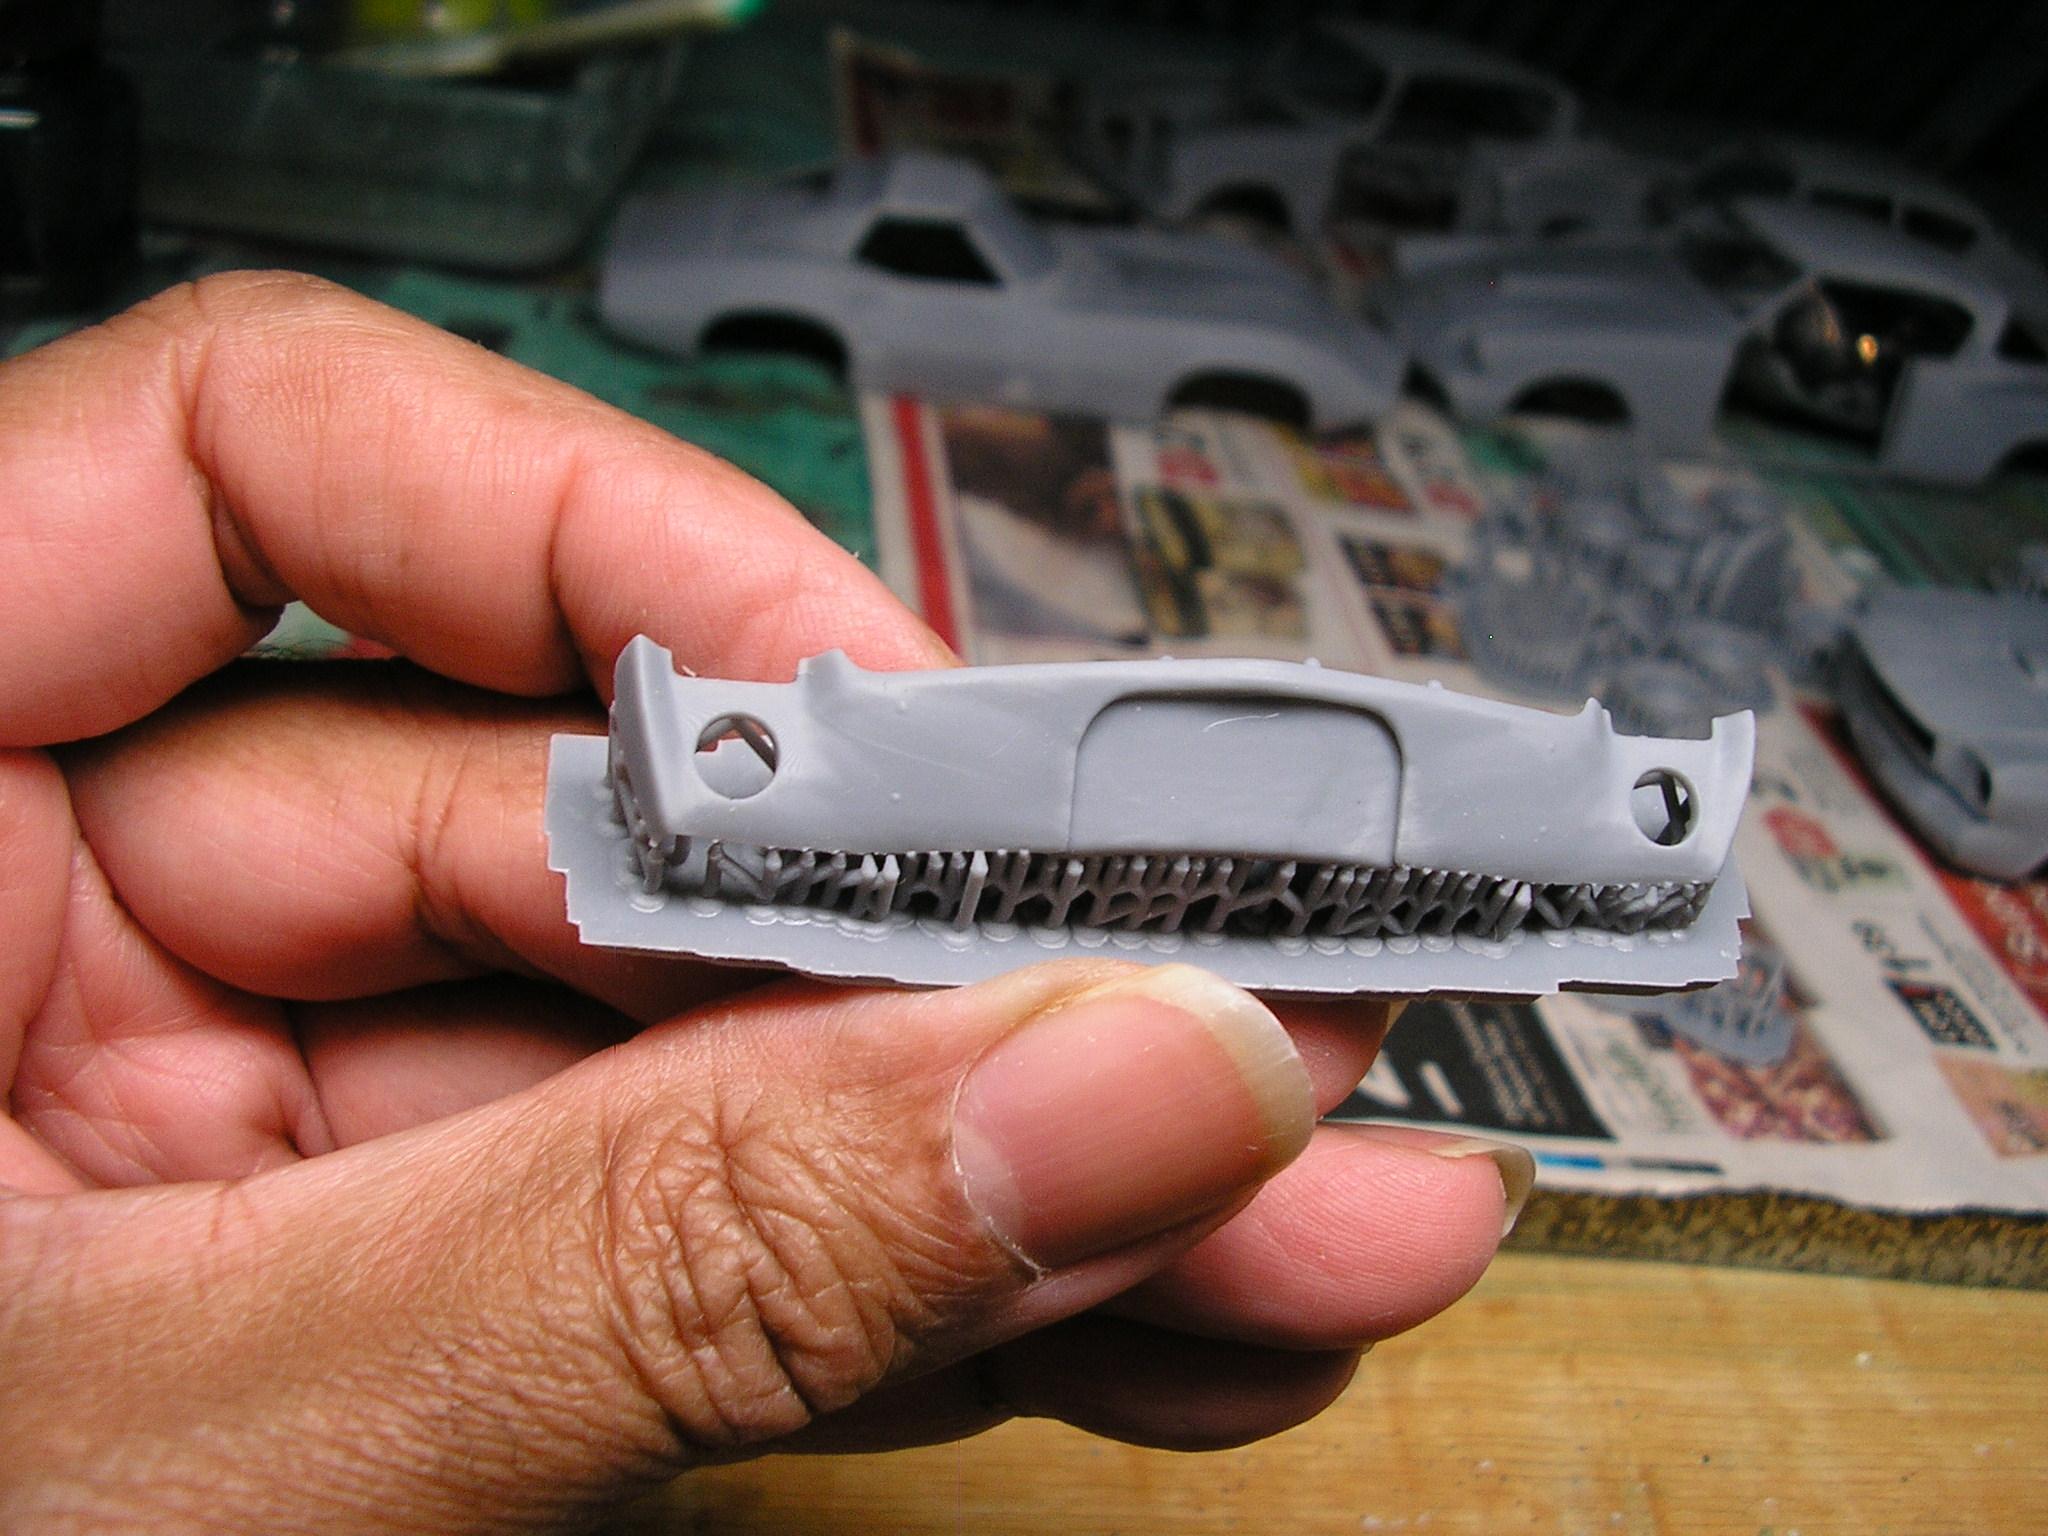
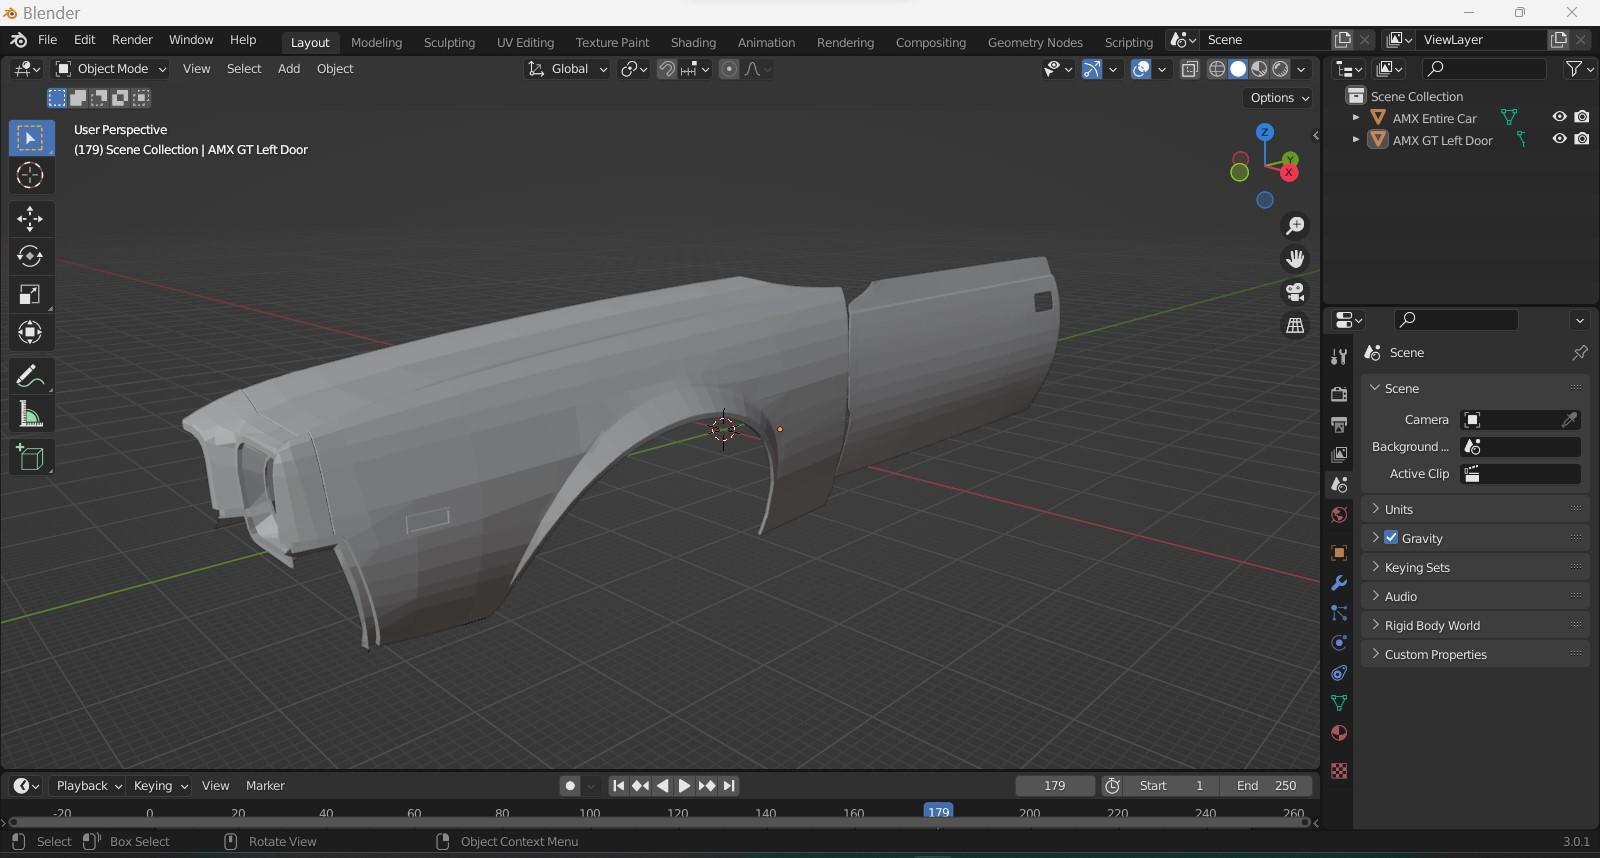
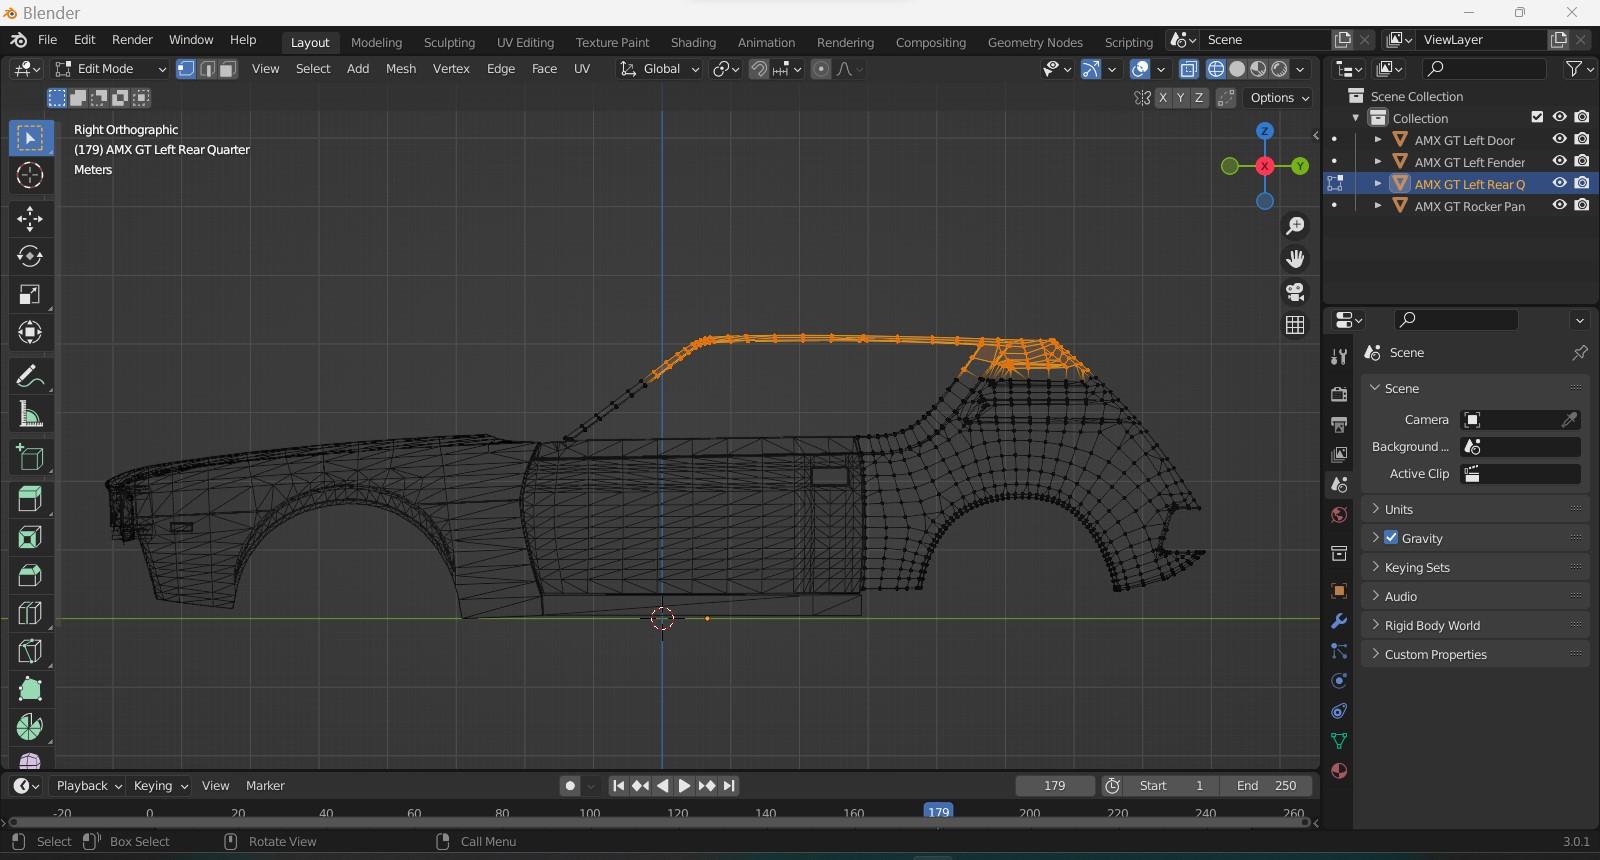
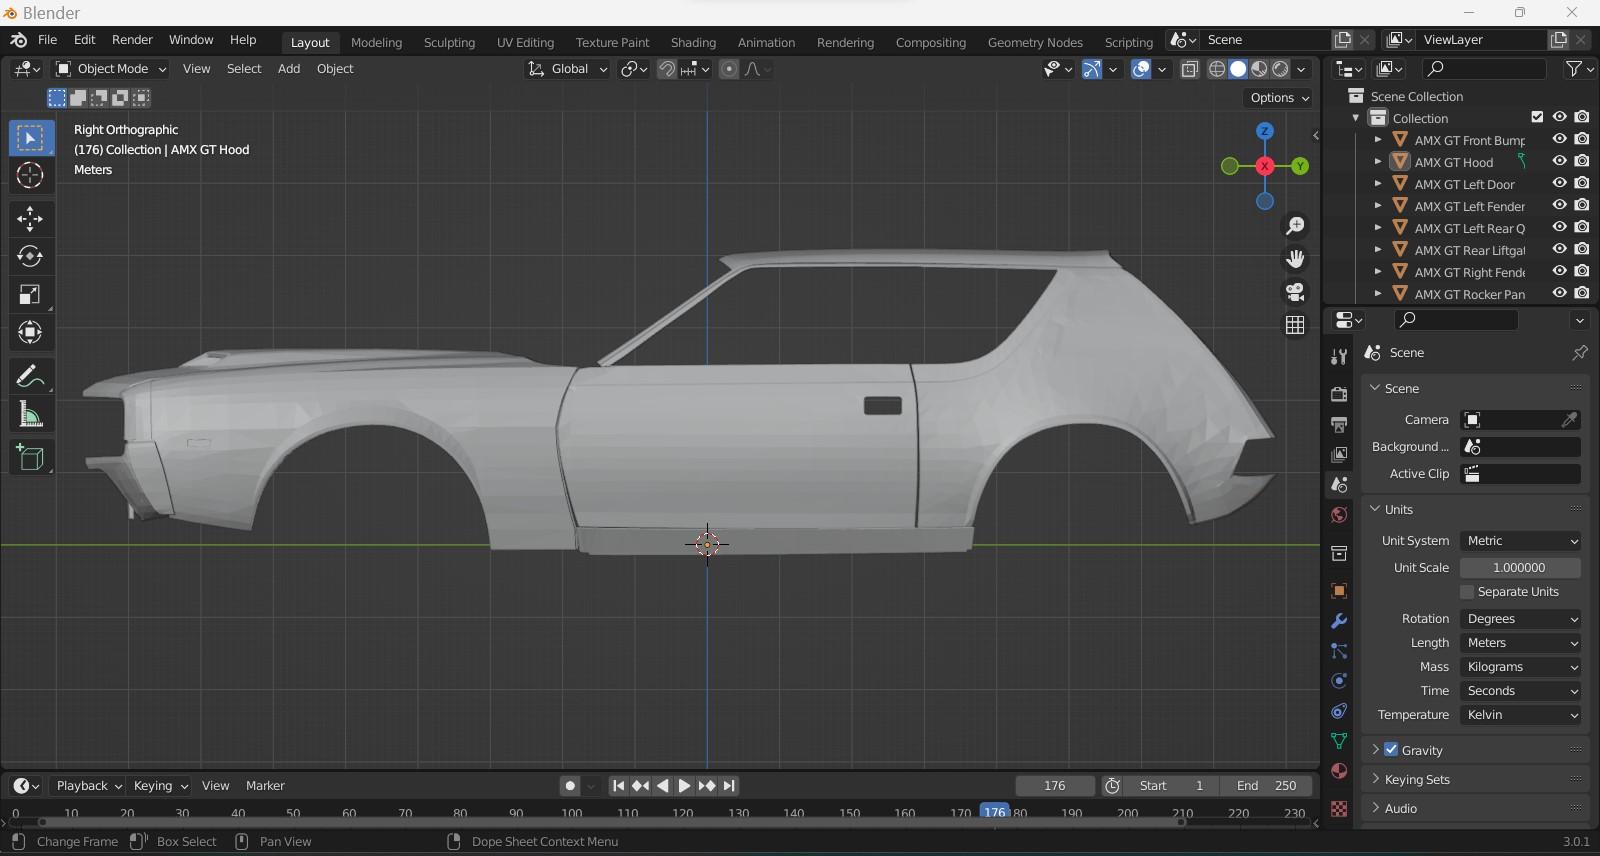
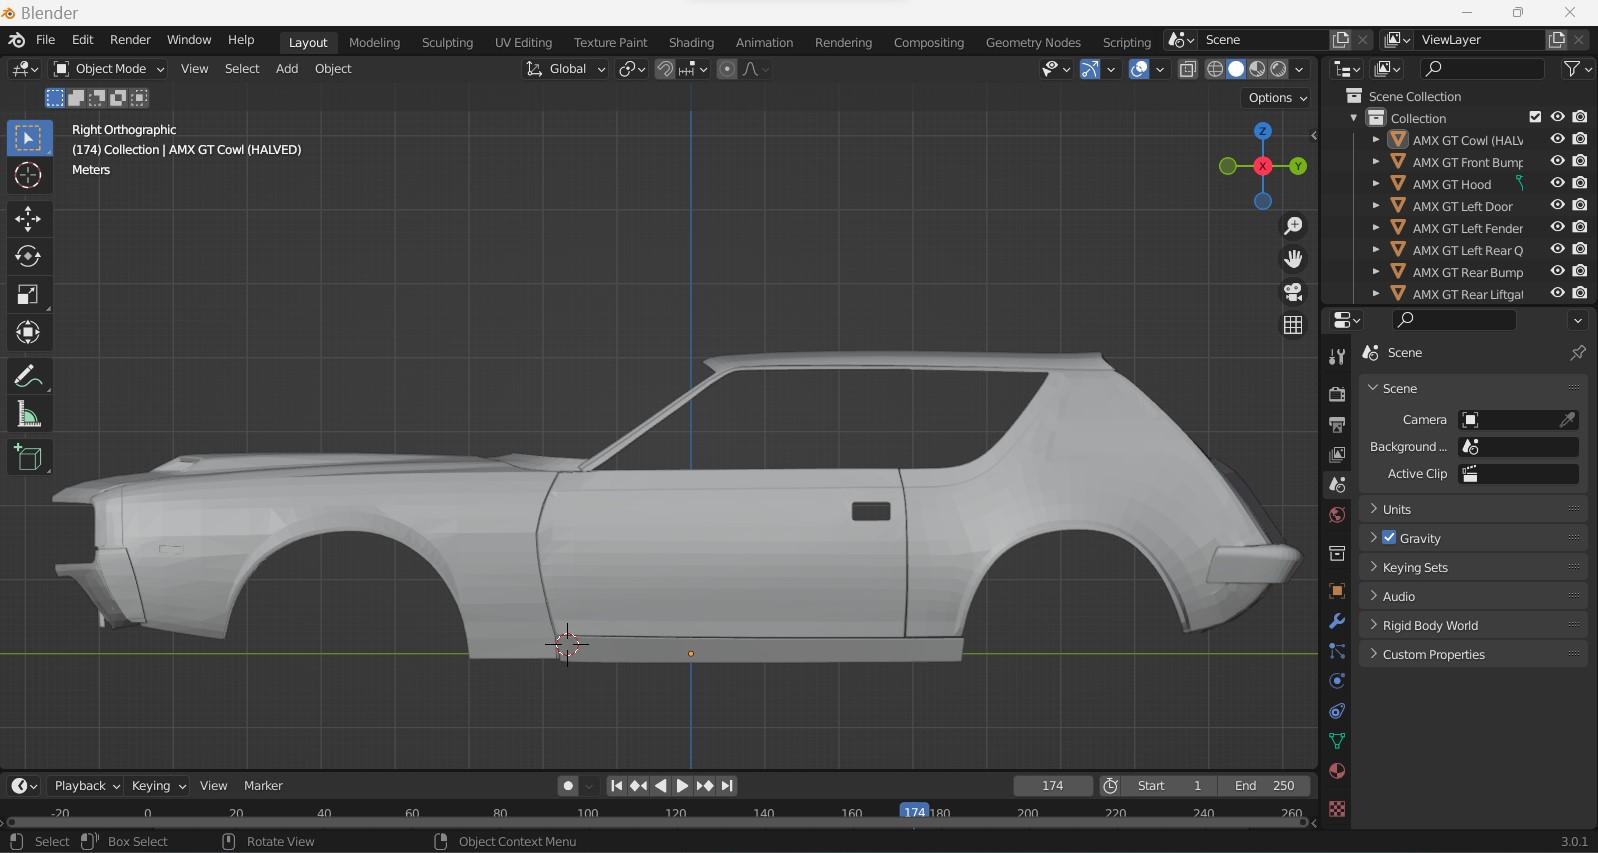
A file I'm currently working on, and one that was a topic on the forum here with @Ace-Garageguy mentioning it-------the 1968 AMX GT is another one that will probably never see the light of day as a 3D file, let alone as a glue kit. This one was tricky because you'd think as popular as the production AMX's are, there are hardly any good files of the car out there. I was able to zero in on one off the gamemodels.ru site, but it's wee bit on the crude side, which was no issue as I just wanted the front end off it it. The Gremlin for the roof and rear section was much easier to get as there are a number of files out there for those. In this case, the file being used here was from a Forza 7 Motorsports video game file, which I was able to convert and extract the parts I need to eventually make them printable. Like the Mustang "Shorty" file, a LOT of slicing and dicing/sectioning was done to get the car as close to the concept, while at the same time, I'd like to make it so that it appears somewhat production line ready had AMC gone through with this one instead of the production Gremlin we eventually got. I have a number of pics here with descriptions of what I'm doing with this file as it progresses. I really wish THIS was the car that AMC made, instead of the rather homely and to my eyes awkward Gremlin. Well, at least we can now do 3D prints of the car. After I extracted the left side front fender of the AMX file, and the left door of the Gremlin file (they shared doors in 1:1), I had to set about making the contours match one for the other. I could have used the doors off the AMX, but that would have been a lot more work as the parts didn't separate the way most .obj files do. I'm using the rear section of the Gremlin anyway, so at least the door would suit it, especially at the trailing edge. The concept to my sight appears to have a bit of lowered roof. In Blender, I highlighted the area I wanted to be lower, then scaled this accordingly. Now with the lowered roof section............ I have a file for a '70 Javelin SST, so I extracted the hood out of that as it's nearly an exact match for the hood on the concept. Of course, since the hood is of a completely different origin from the other files, I had to shape and tweak it accordingly. Some further tweaking of the side profile of the car. The fender was straightened up a little bit as it seemed too tilted to me. The car it came from had a bit of a rake to it (not production like) so that meant everything else had to tilt with it to be more level. The very top roof section is now getting worked on, with it eventually getting a raised windscreen header as the concept car had it slightly up into the roof. I also enlarged the rear wheel wells a bit as those just seemed too small to my eyes. Revised the rocker panel a bit to be a bit more level------the show car had side pipes, and I'm not sure ultimately how to handle that after it's printed. They look an awful lot like mid year Corvette side pipes, so that may be what I go with. I tightened up the shut lines as well as the door gaps seemed too large. The rear bumper and tailgate I tackled next. The concept had no taillights in the tailgate like the production car, so I edited those out and made this section smooth. I made recesses in the bumper for taillights as that's what looks to be what the concept had. For those wondering why some parts are in half....it's MUCH easier to work with a 3D file car body in halves as what work is done, can be mirrored for the other side when all is finished. Oddball out of place parts such as badges, scripts and other items.........they can be extracted and saved as their own files, and then added back on after everything is done. The cowl section is what I'm working on now. I need to expand the outer radius of the cowl to capture the A pillar, as that will need as much support as possible for printing. Underneath the A pillar, I'll add a bit more support-----a mini "dogleg" if you will as this is a critical area to get the model off the supports without that section tearing/breaking. I'm going to further modify the headlight doors in the fenders, and in fact----I'll probably separate those altogether to make it easier for thickening, and to make the headlight bezels separate items for printing. After the file is completely done, the entire model will be scaled in Blender for length/width, so when it comes time to print, I don't have to worry about constantly checking to make sure each part is in scale in relation to each other in the slicer.
-
My Future 3D WIP's (LOTS of pics)
MrObsessive replied to MrObsessive's topic in Car Aftermarket / Resin / 3D Printed
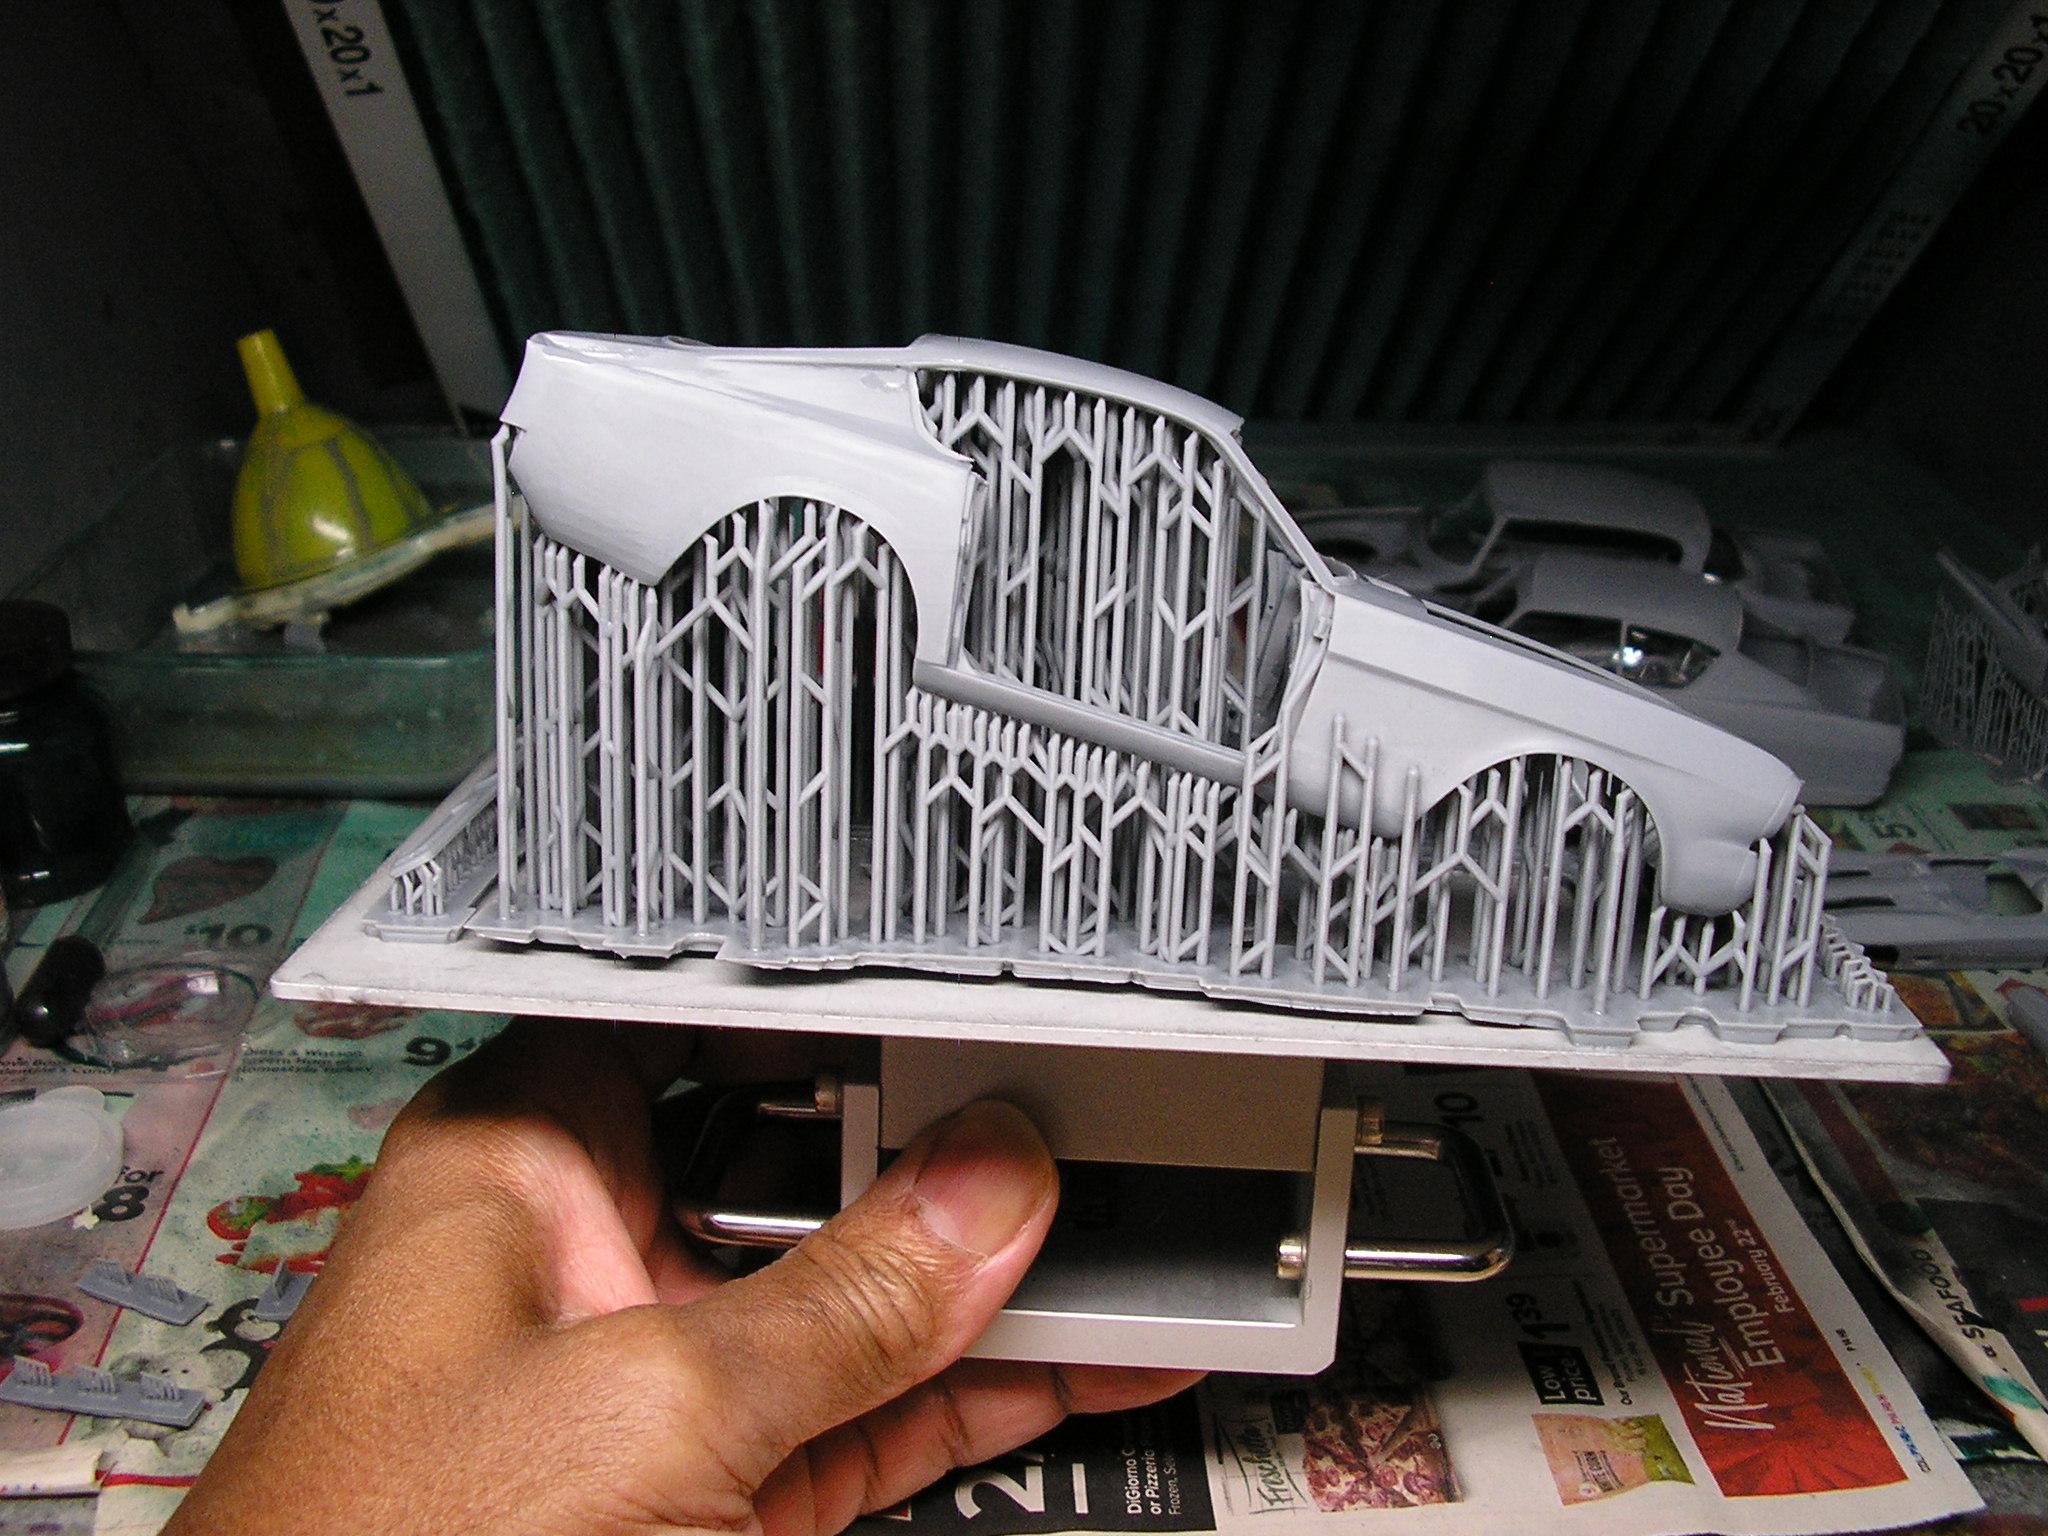
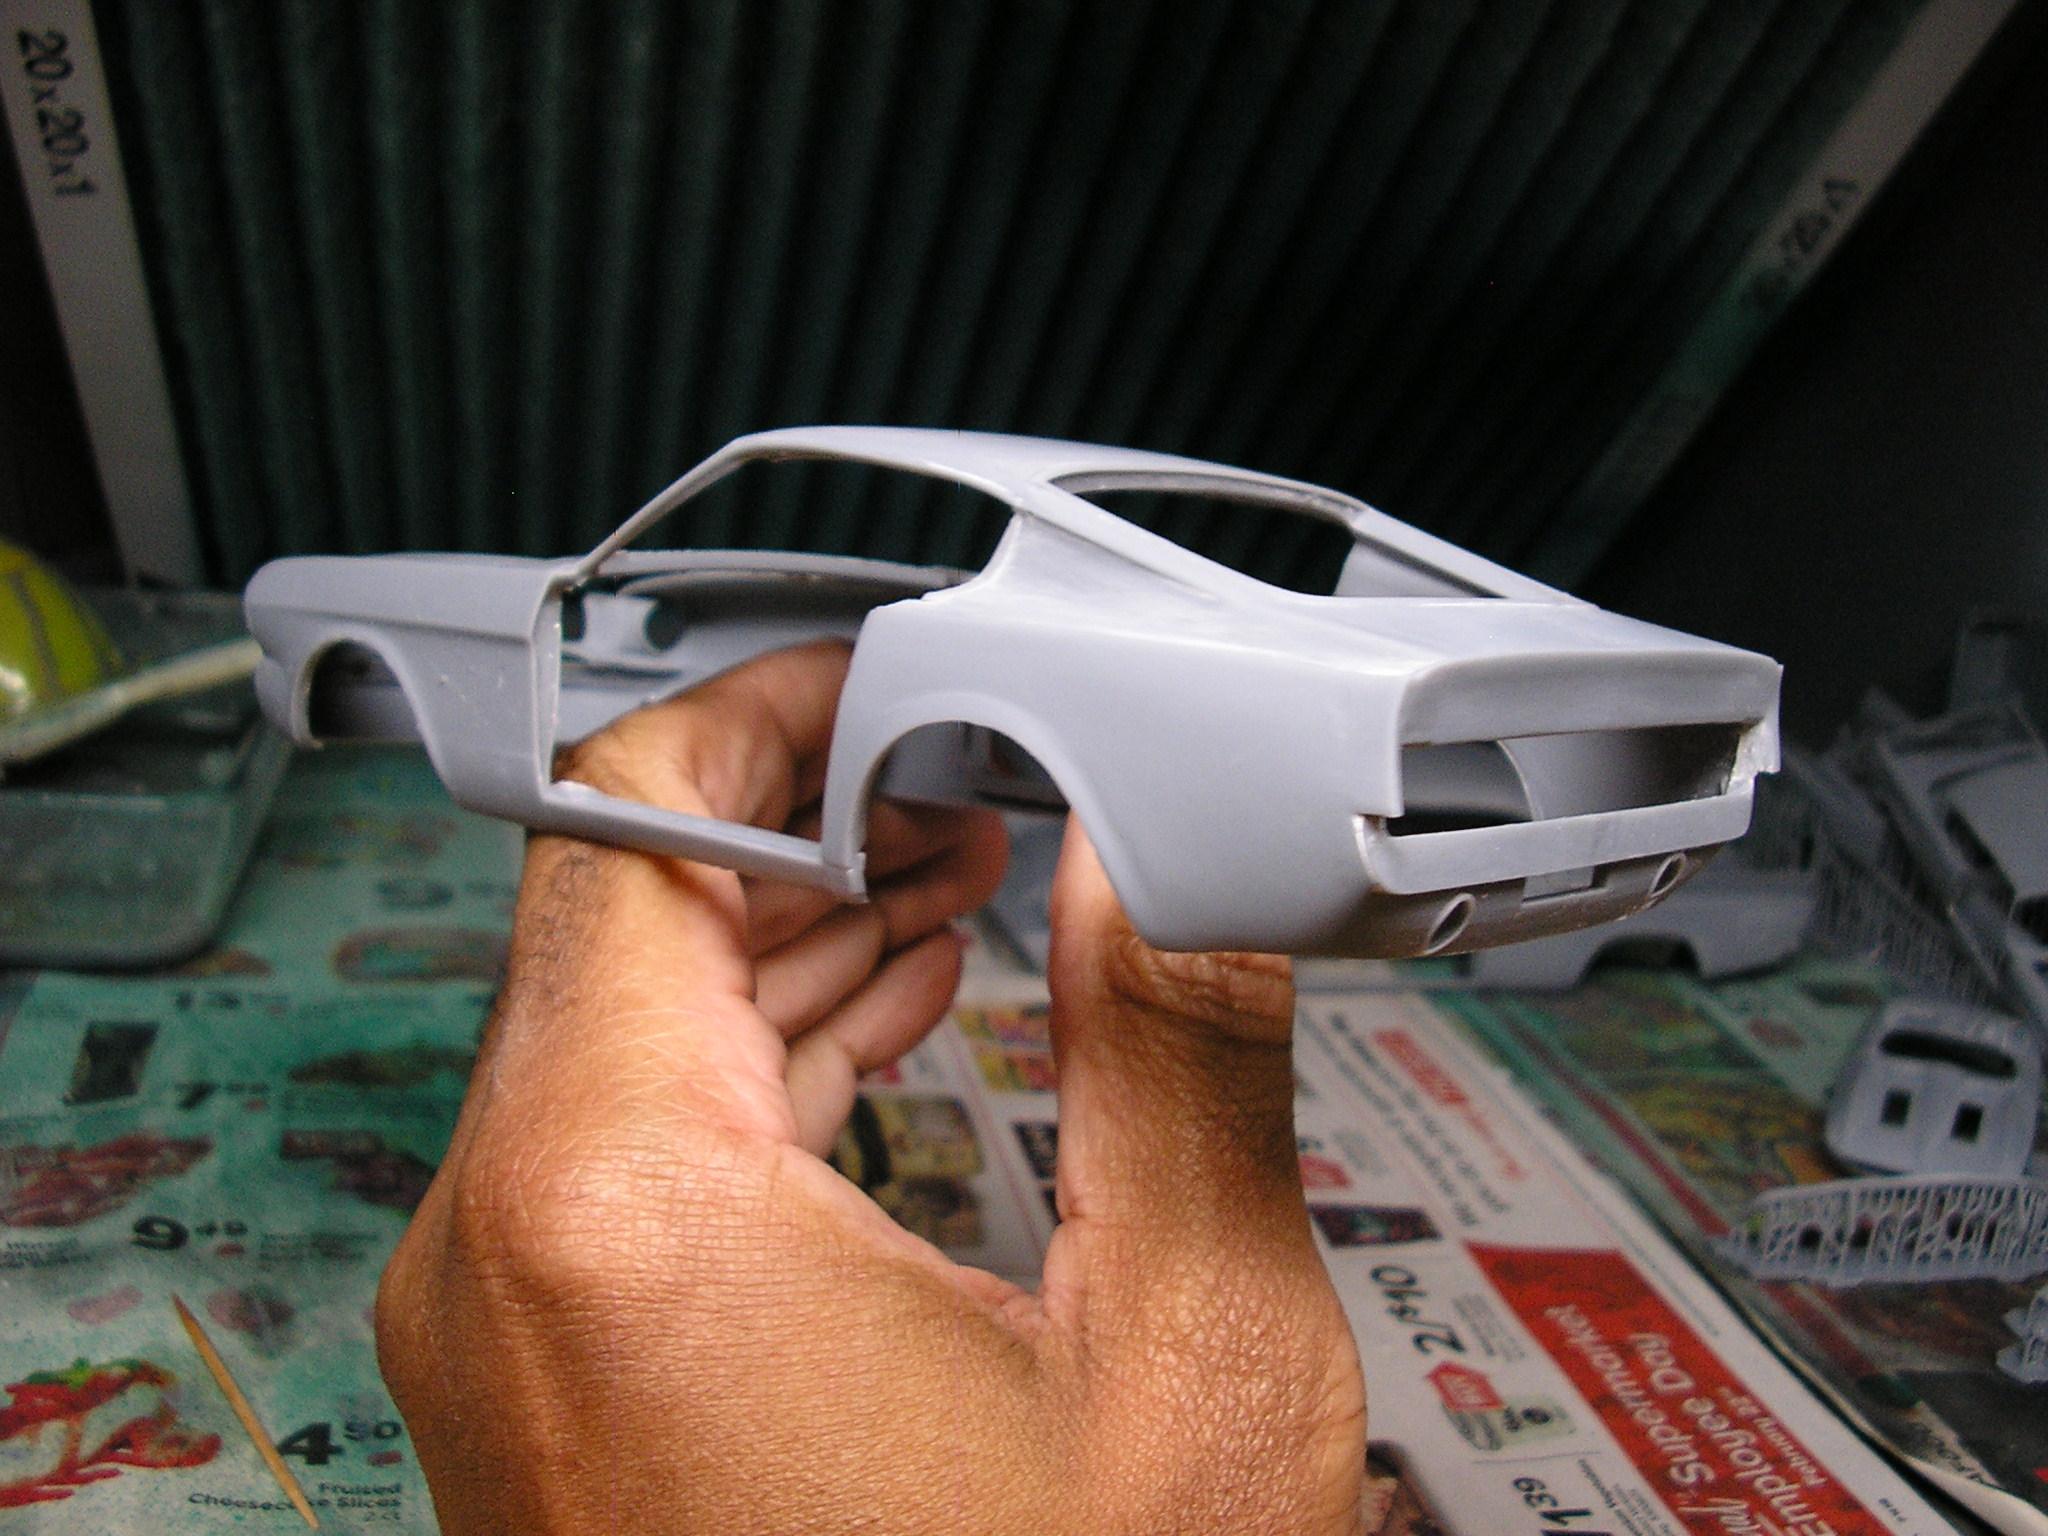
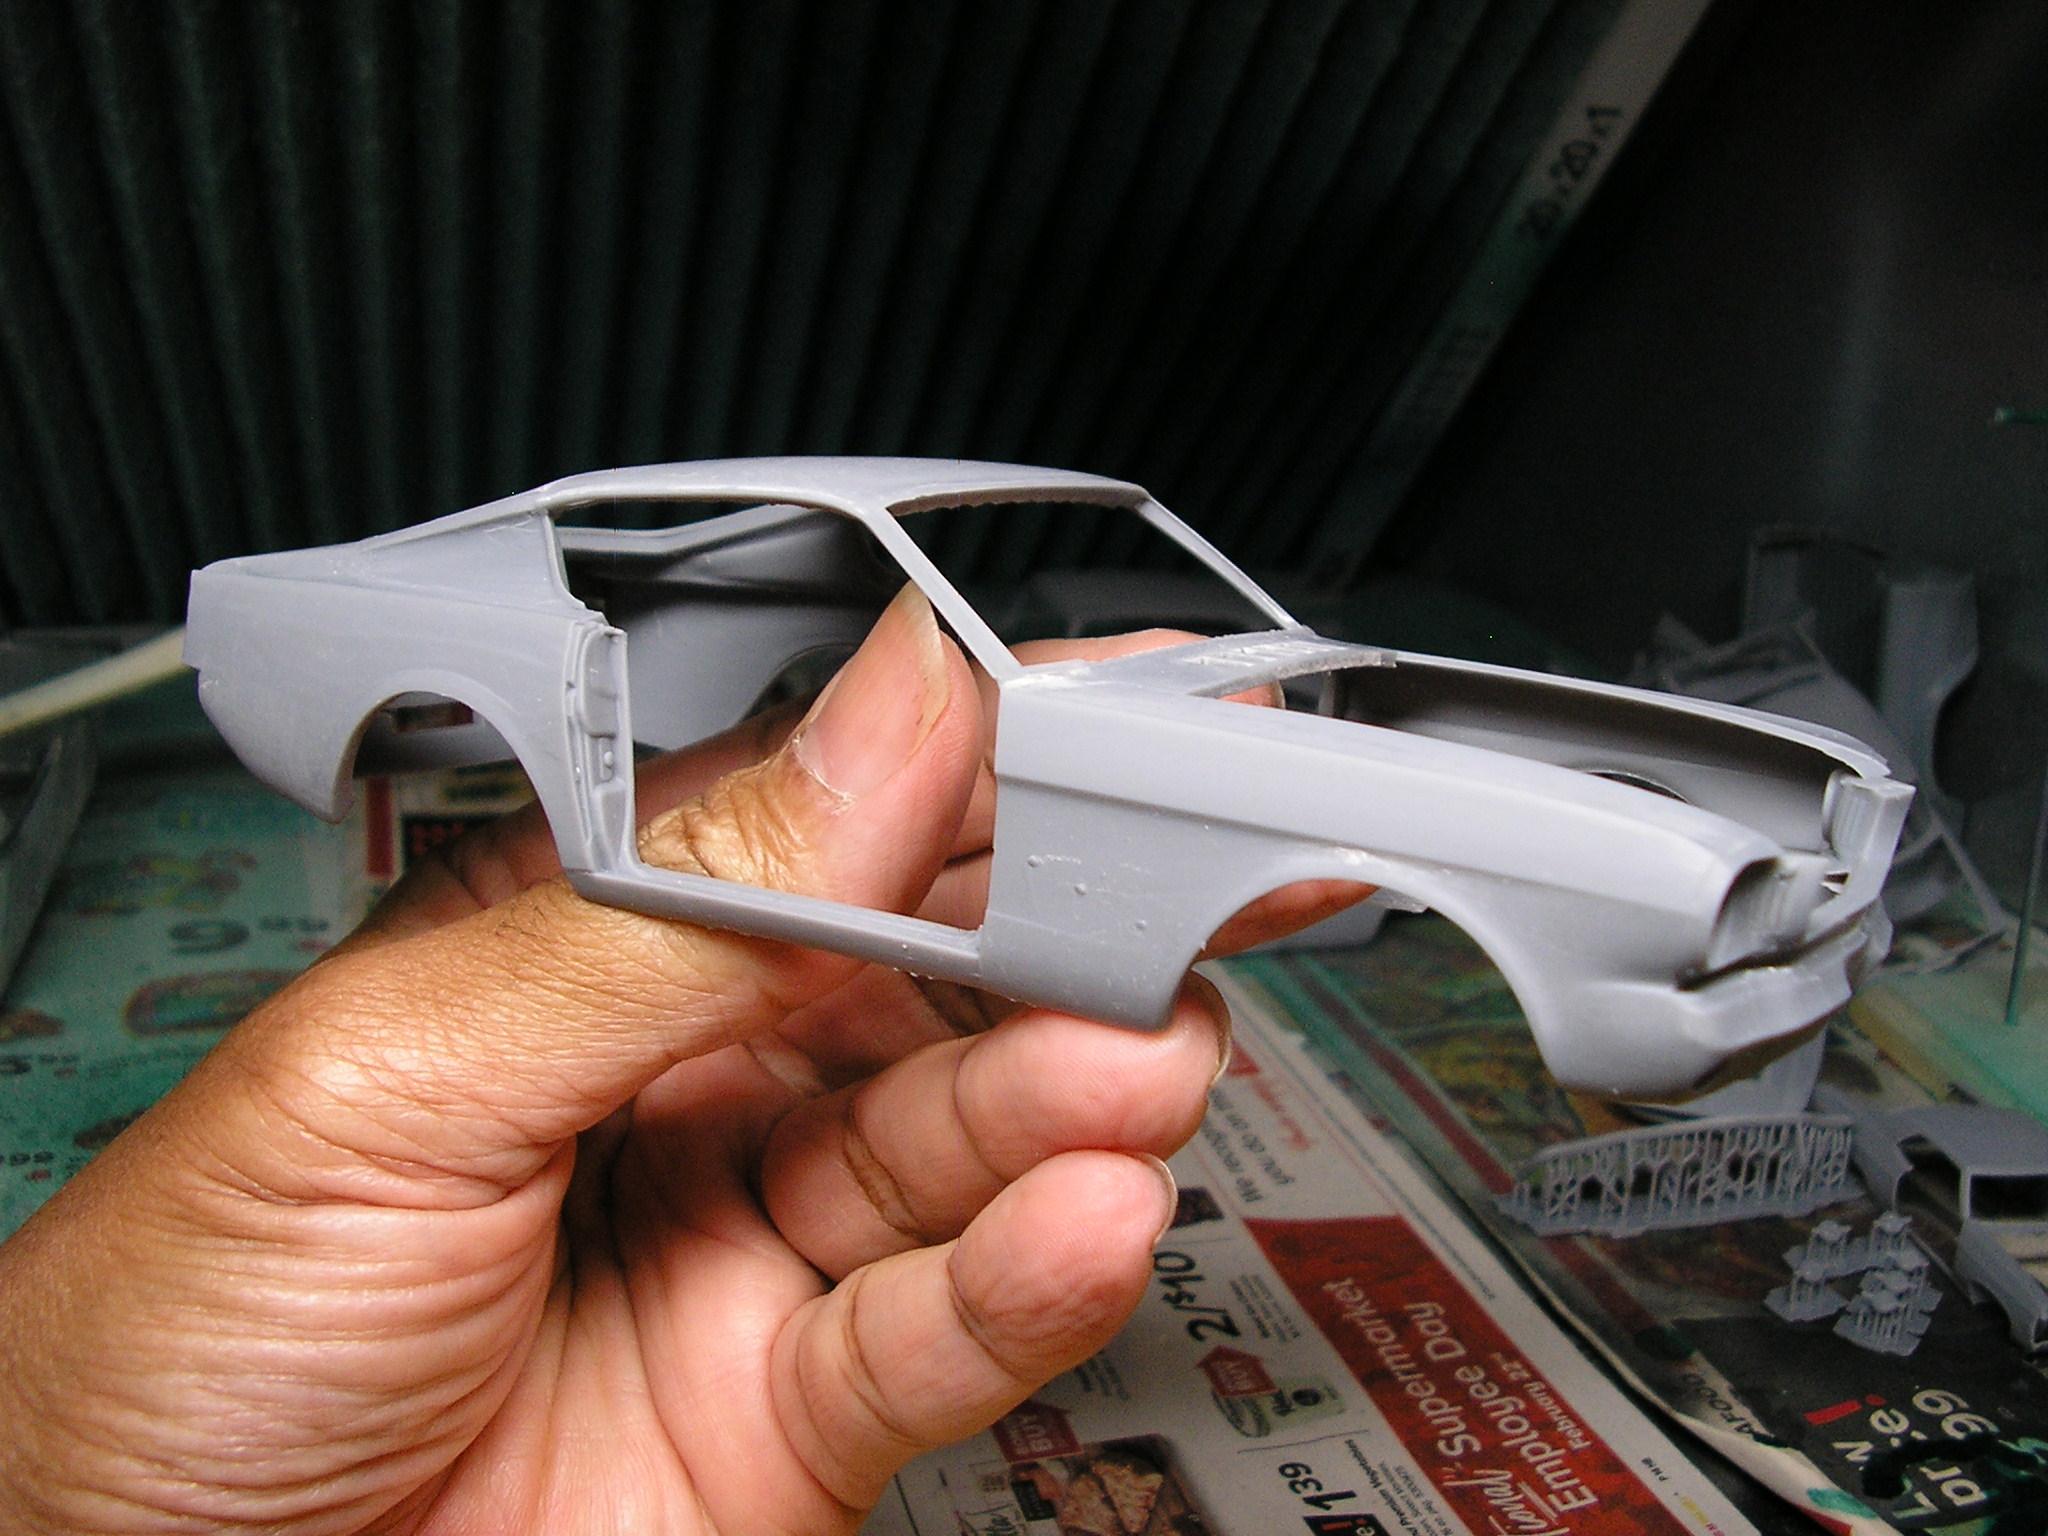
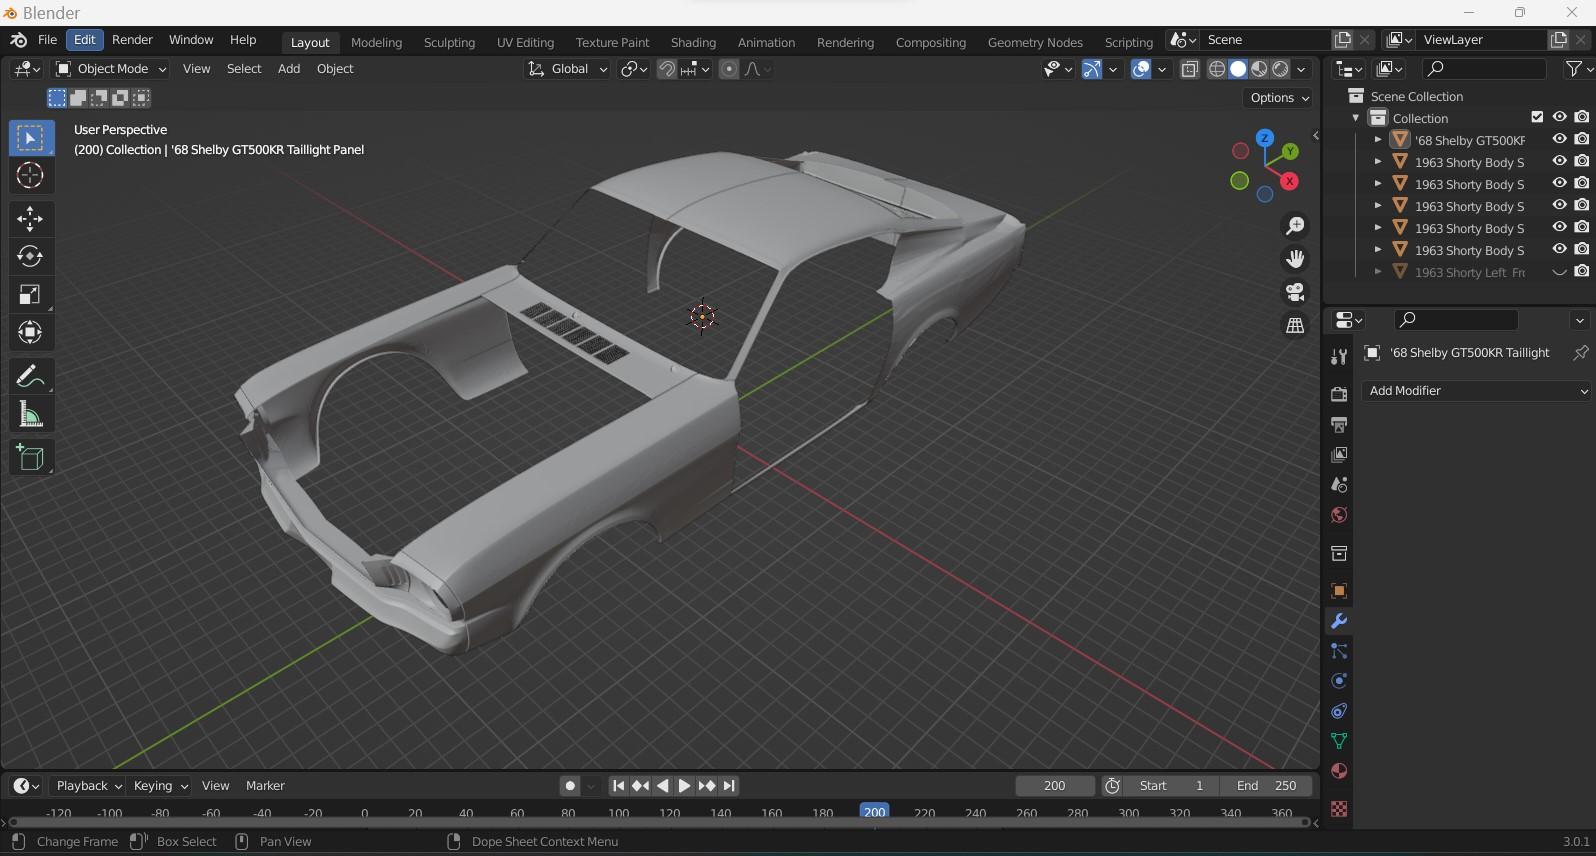
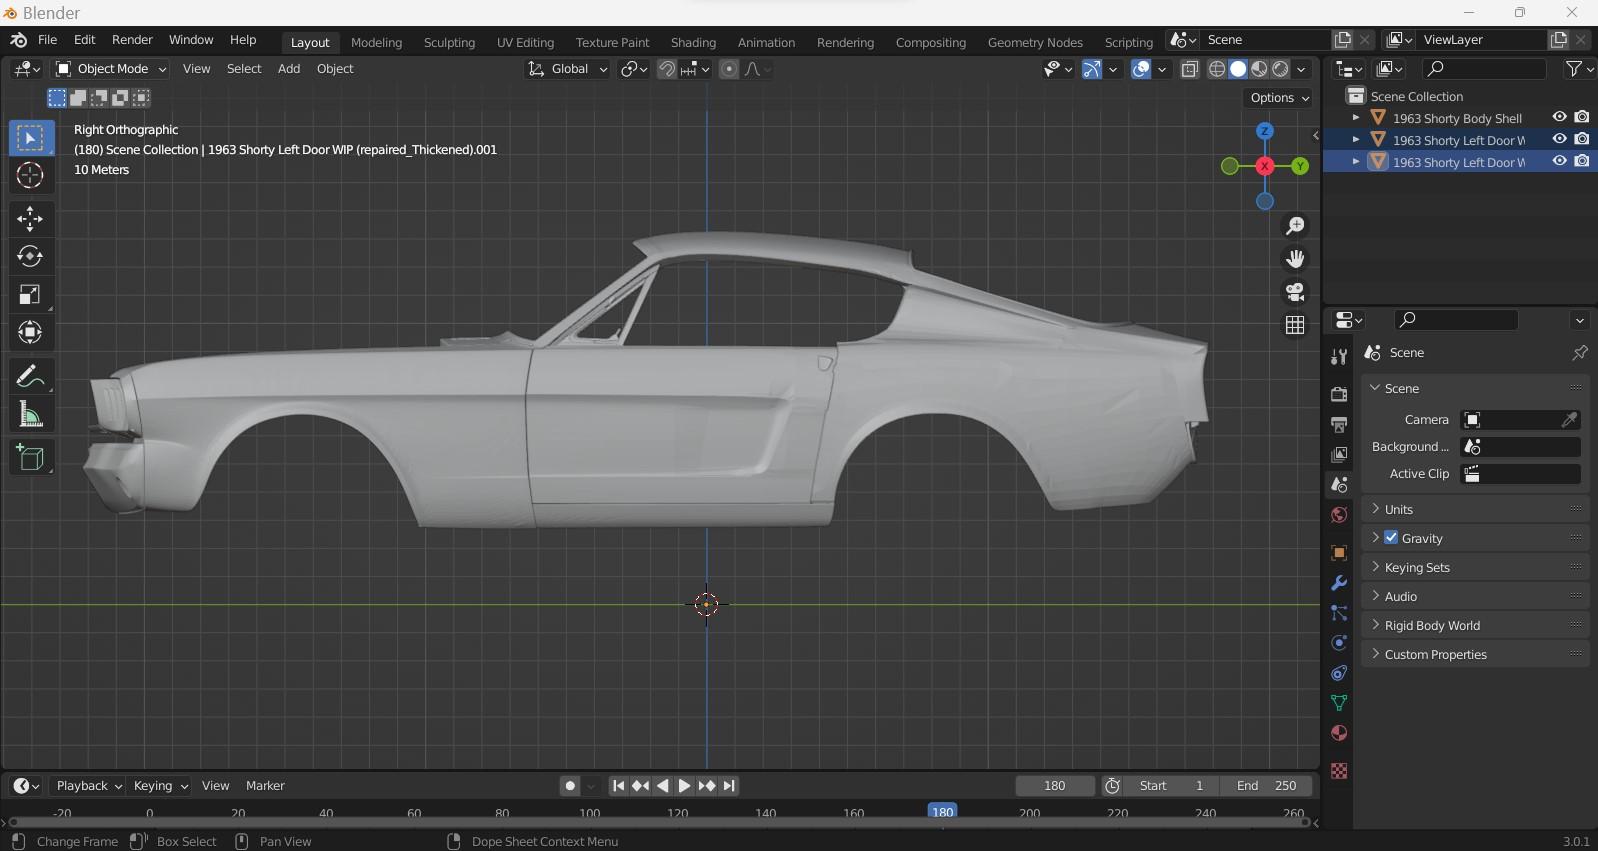
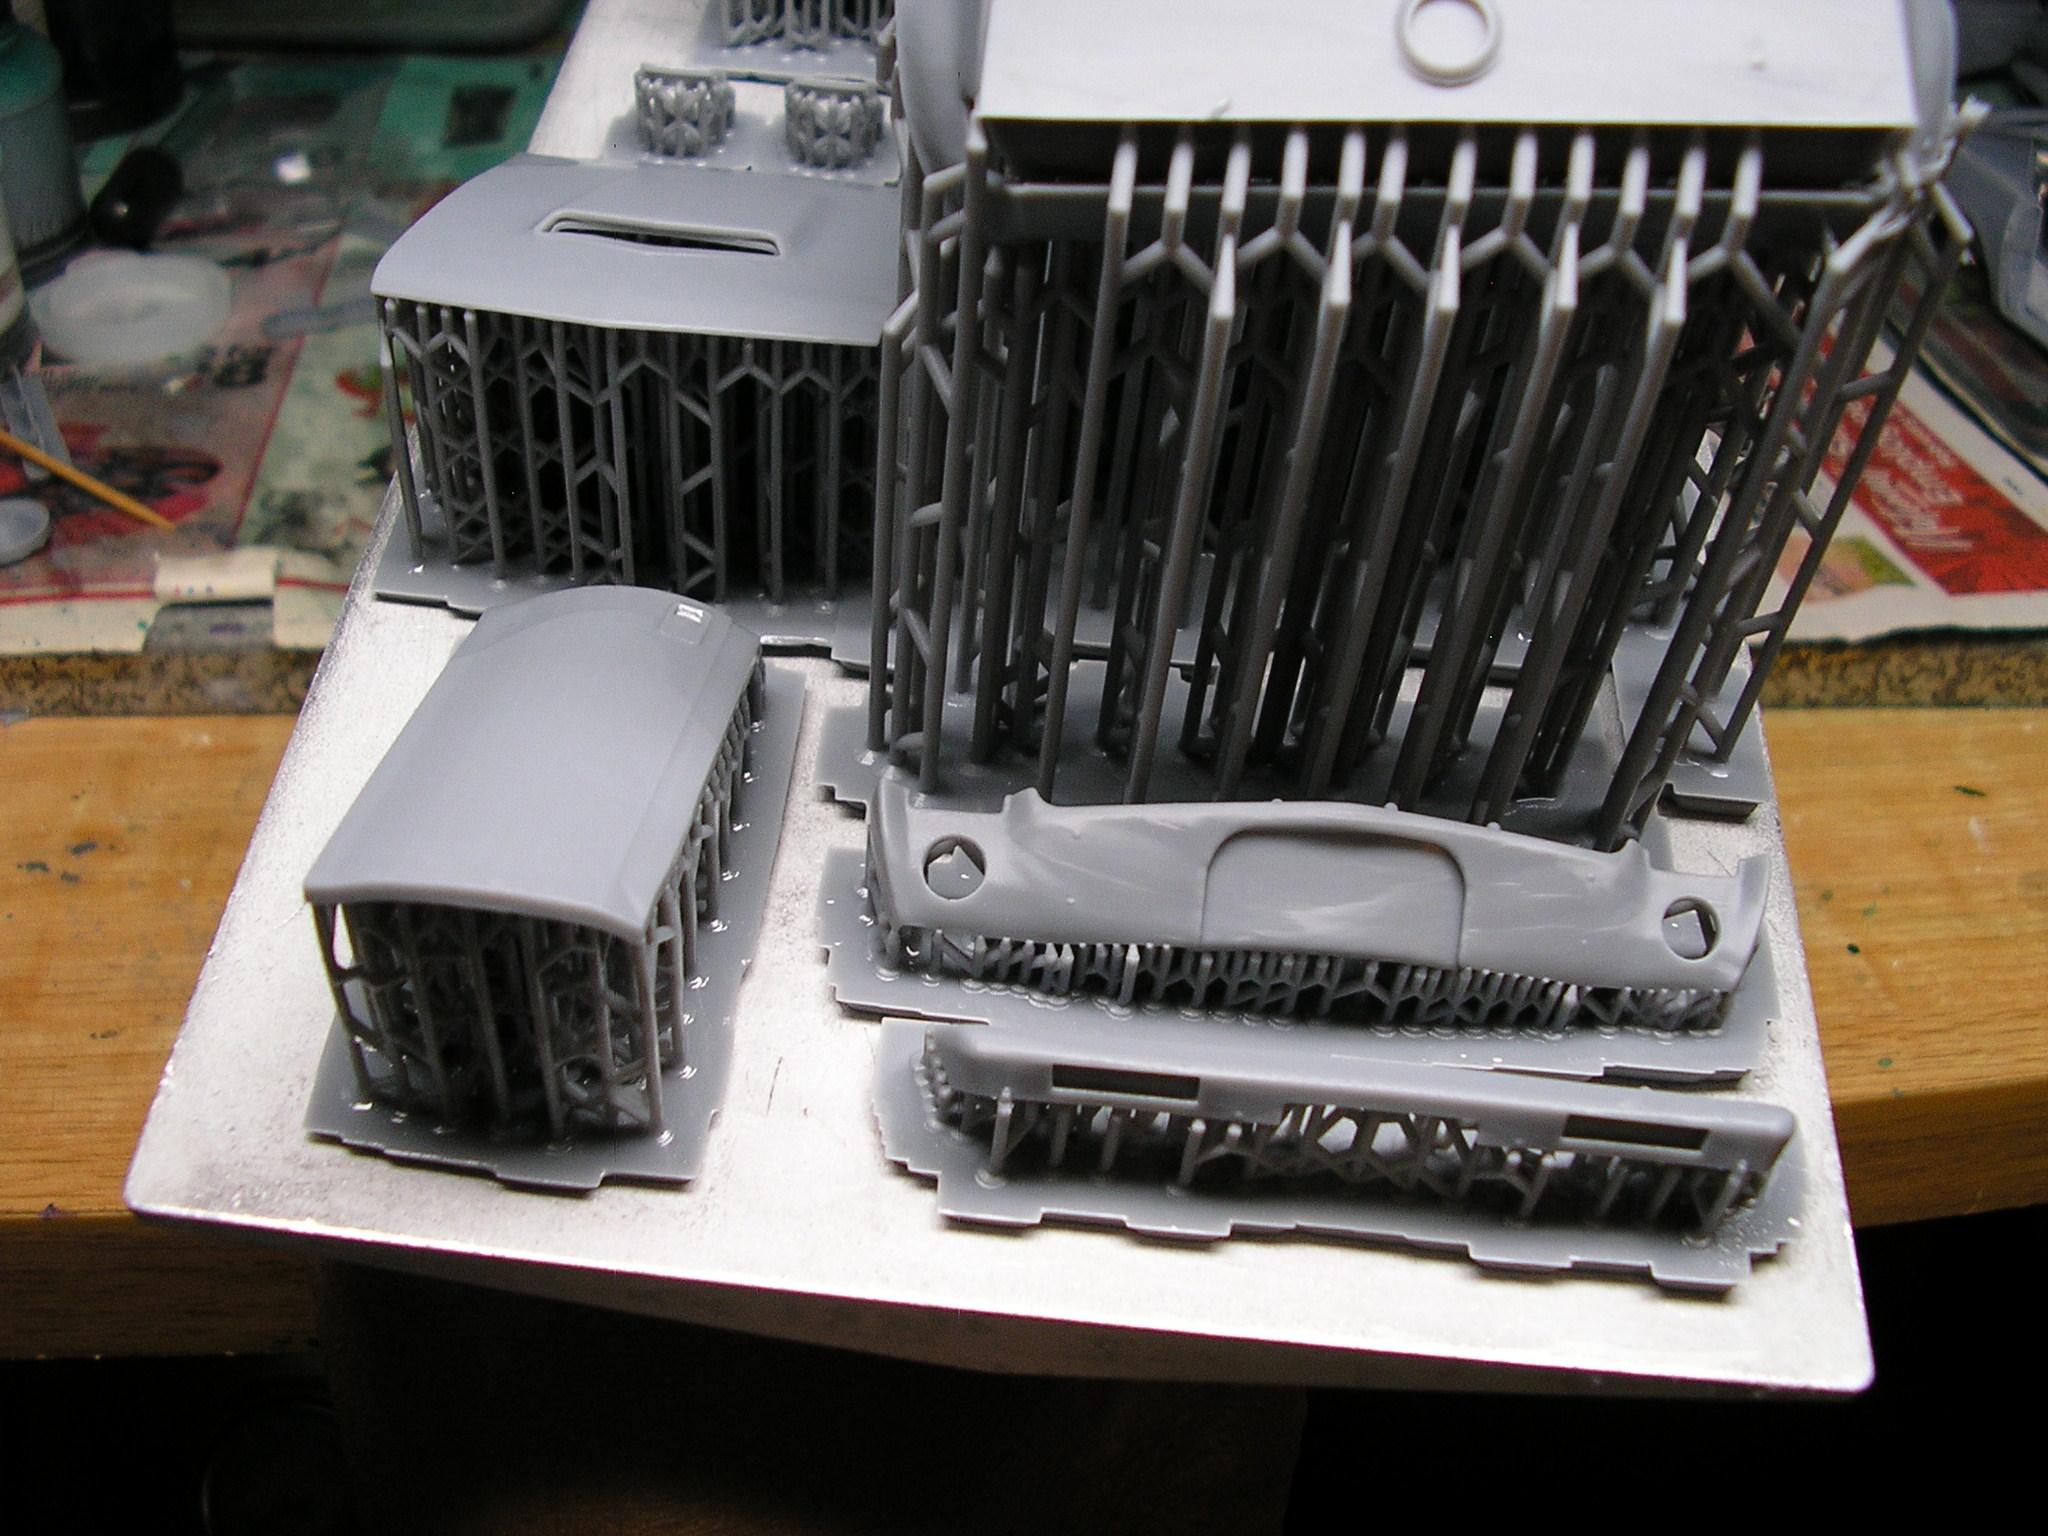
It's been a bit since I added to this, and I almost forgot that I made this thread! ? In the future since a lot of you don't do FB, I'll try to put my latest prints and designs here. Just a little update about what's happened to me over the past couple weeks for those that hadn't heard...........I just got out of the hospital after an eight day stay this past Friday. I went in on the 13th with severe shortness of breath, to the point that a next door neighbor of mine called the ambulance. I was rushed to the hospital in the pouring rain in critical condition, and it turned out to be multiple blood clots on my lungs that were on the verge of bursting. I spent two days in ICU, and then the rest of the time in a regular room. I'm doing fine now, if not a bit tired at times, but MUCH, much better than I did just two weeks ago when I thought I was coming down with a bad cold. Ok, I'm now trying to get back into the swing of things, and my latest print was one I was going to print the morning of the 13th, but bad weather (possible power outage) and my simply not feeling well made me decide not to bother with it. It's just as well as just hours later I found myself in the ER at our local hospital. This '64 Mustang "shorty" I designed is very much based on an actual car, which was made just before the production Mustangs hit the road. I used two different 3D files for the model.........a '66 Shelby GT350 was used for the front and roof section, and a video game file of a '65 Mustang hardtop was used for the rear quarters as I wanted the straighter fender tops as opposed to the fastback. LOTS of slicing and dicing was done to get the contours the way I wanted 'em, and the print in total was somewhere around 12-13 hours from start to finish. Here are pics of the results............... Still some sanding and cleanup to do, but that's one of the things about 3D printing that can't be beat..........you can create just about anything you want, as I can guarantee there would NEVER be a file of this car out there. I wanted to make this car as if Ford had put it in production for the '65-'66 model year as some sort of Shelby, thus the Shelby taillight panel. A shortened '67 Mustang chassis would eventually go underneath with a bunch of other tweaks.
-
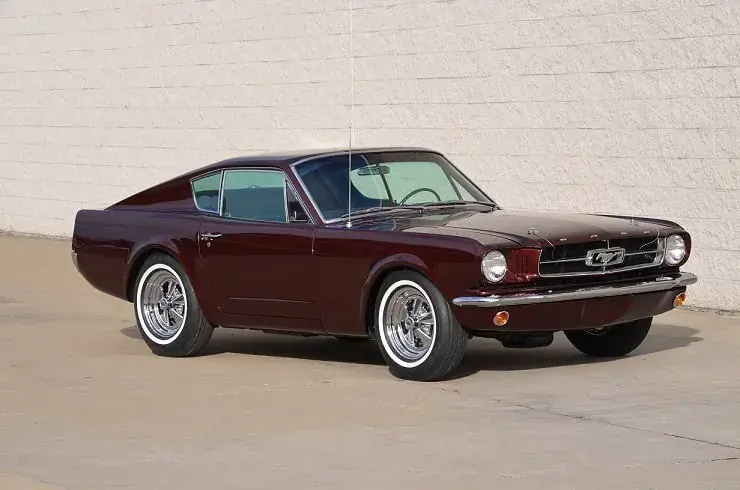
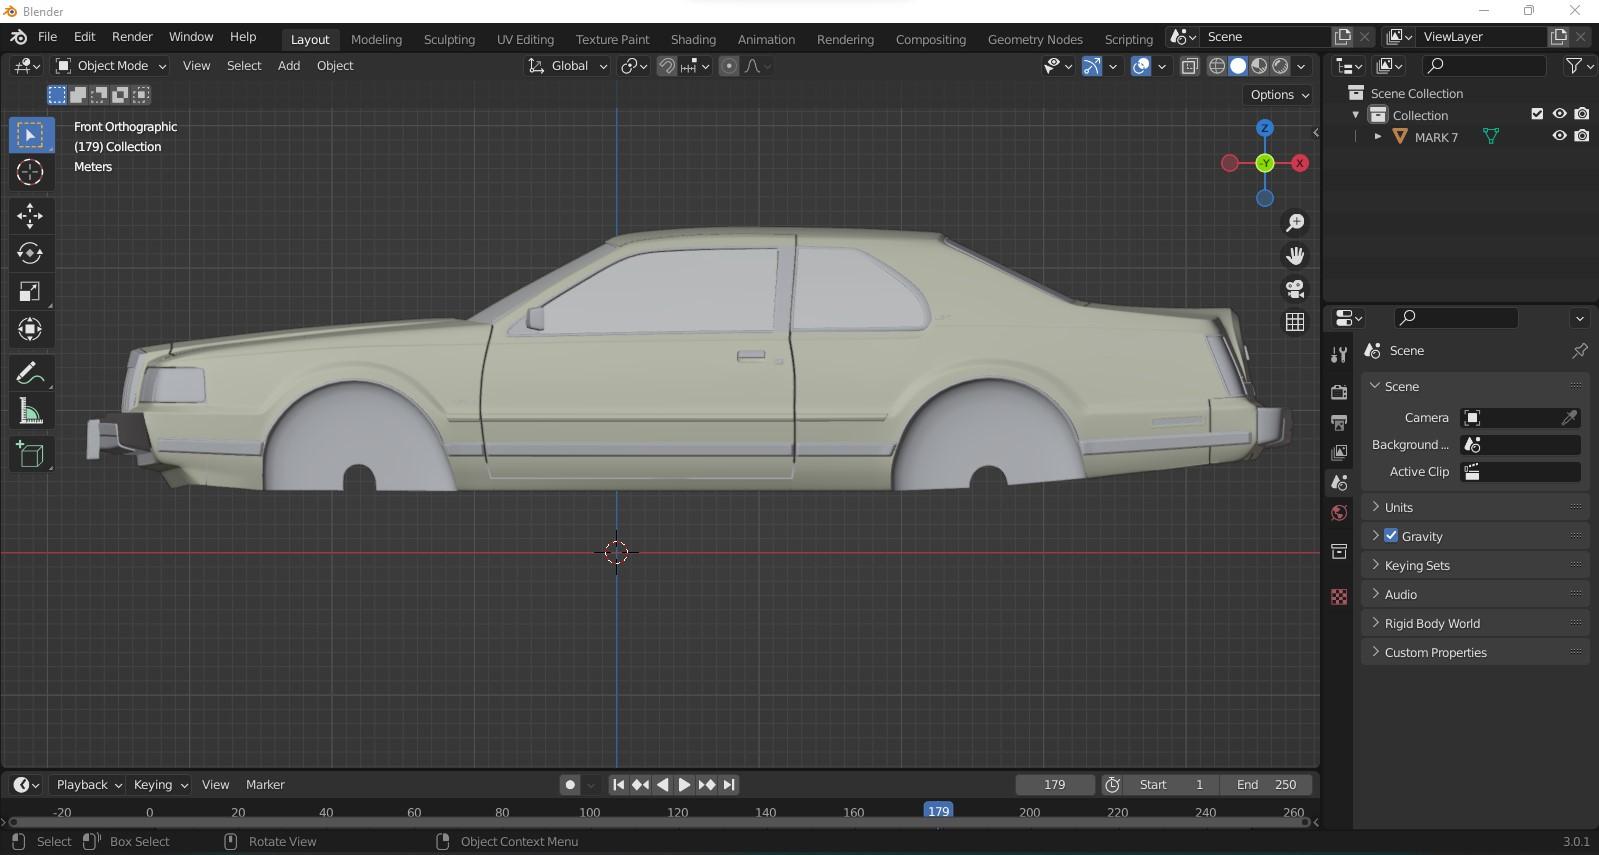
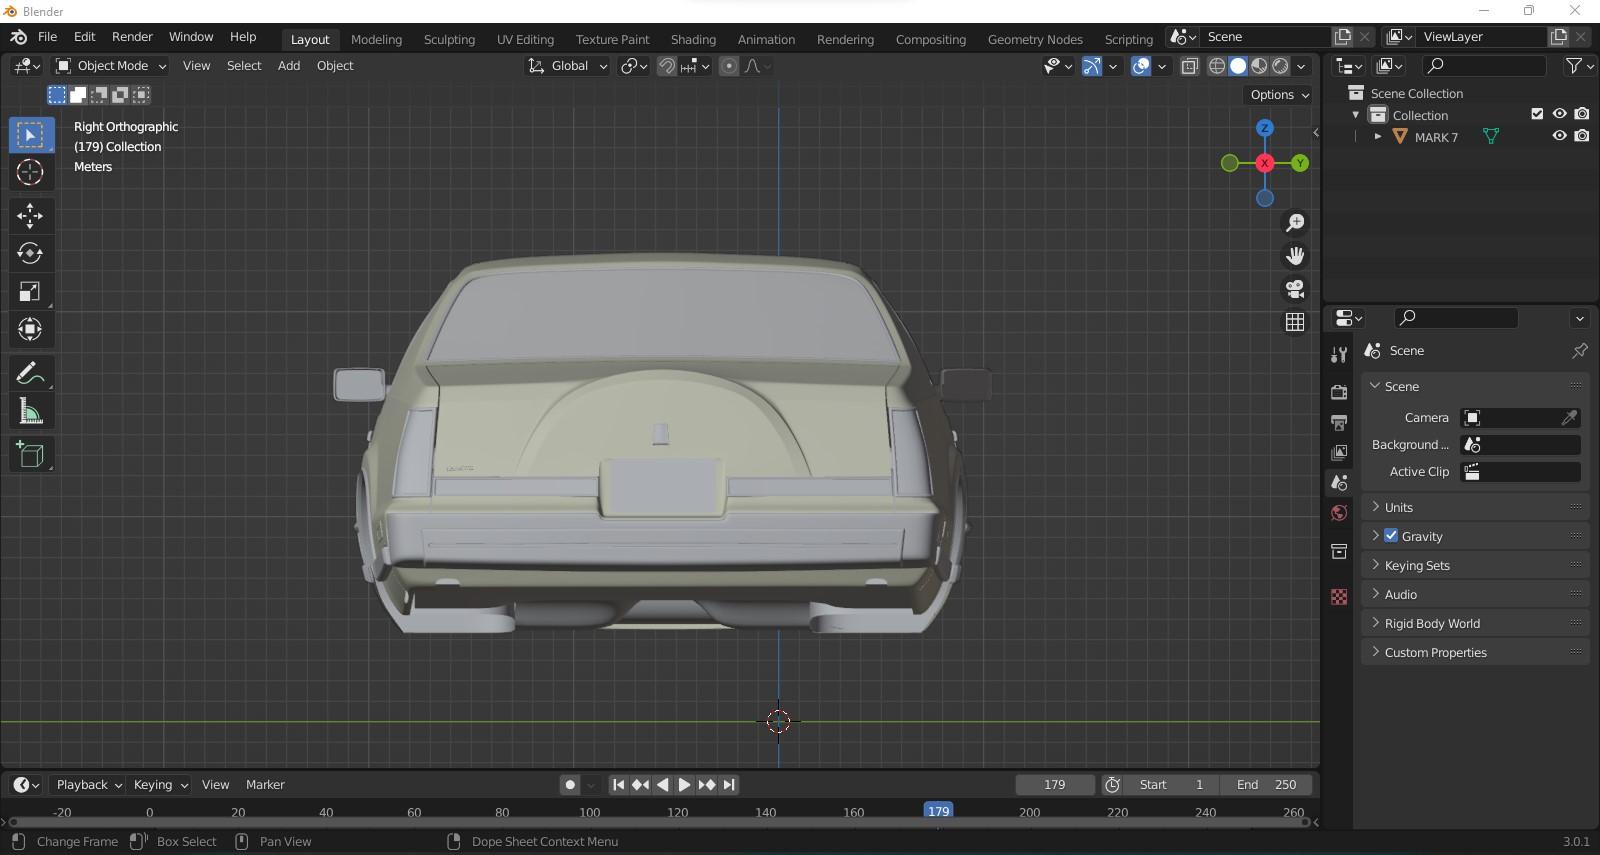
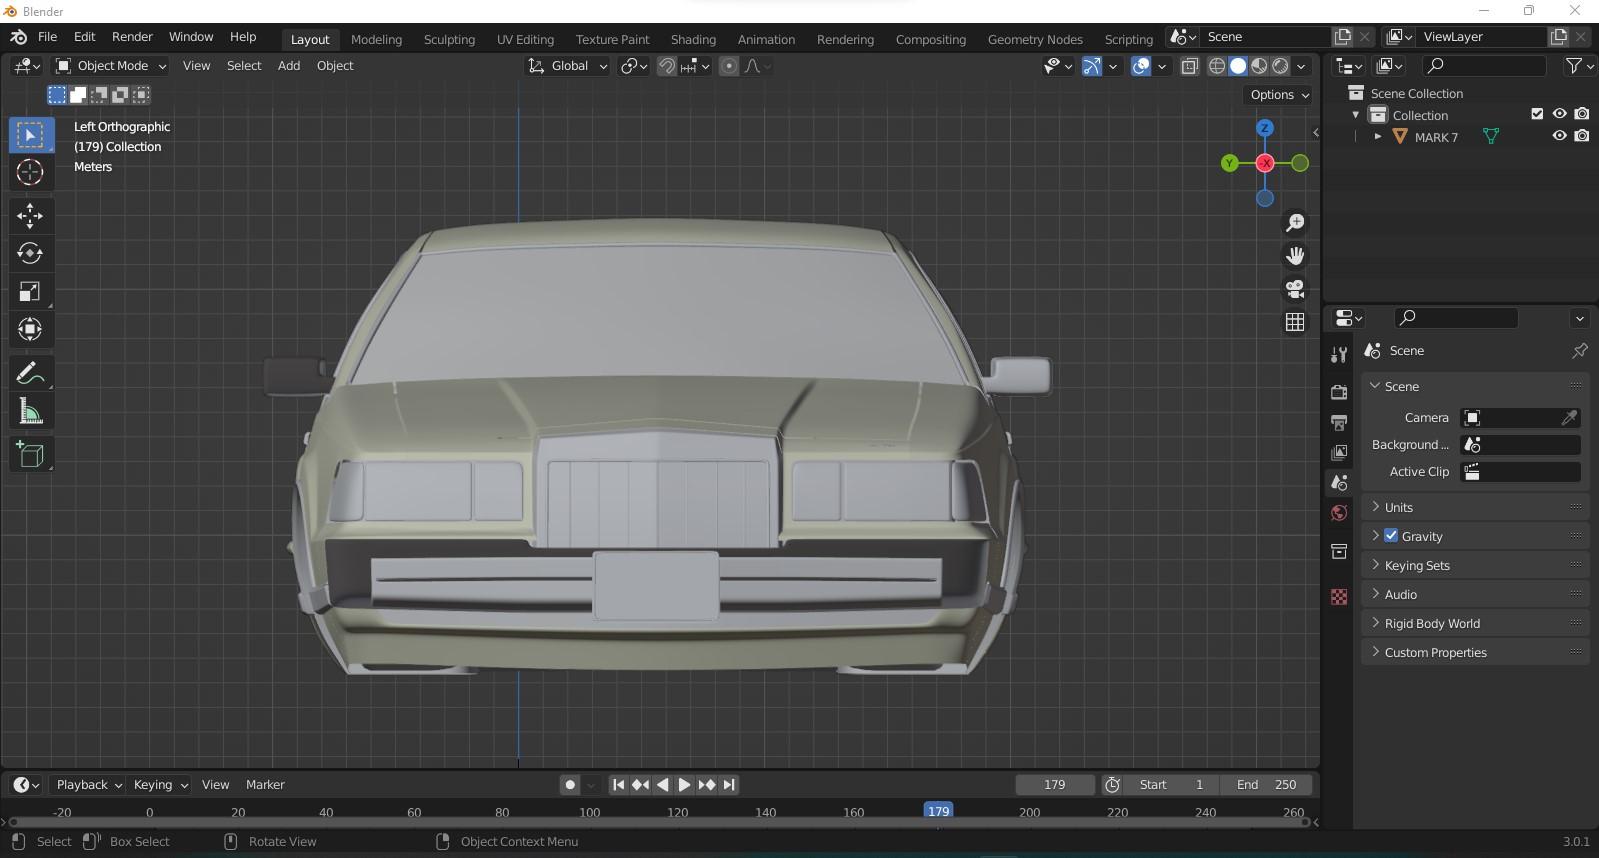
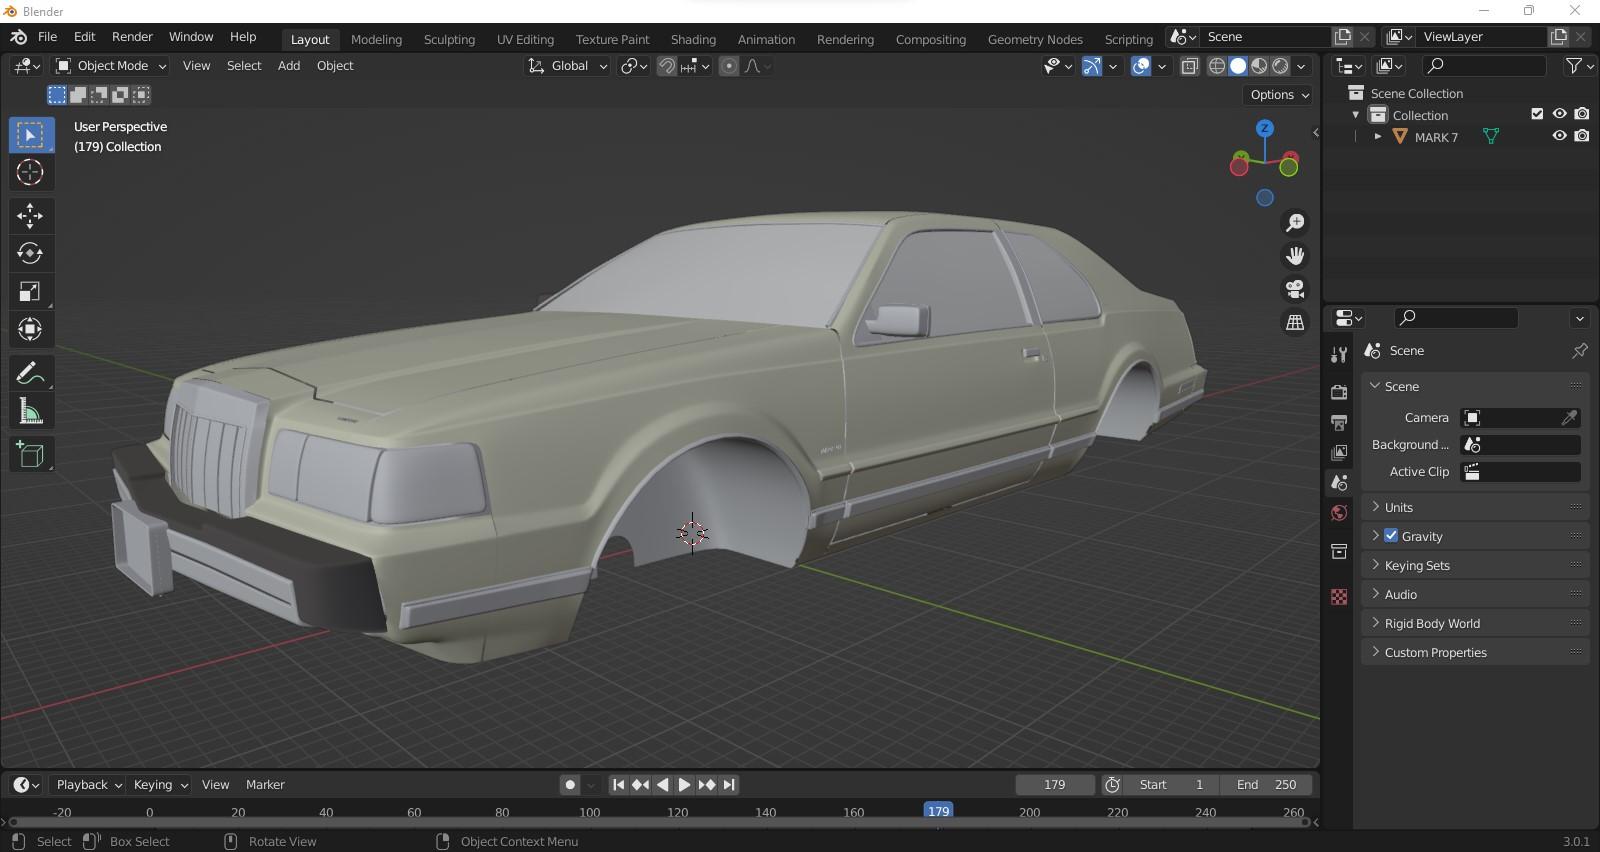
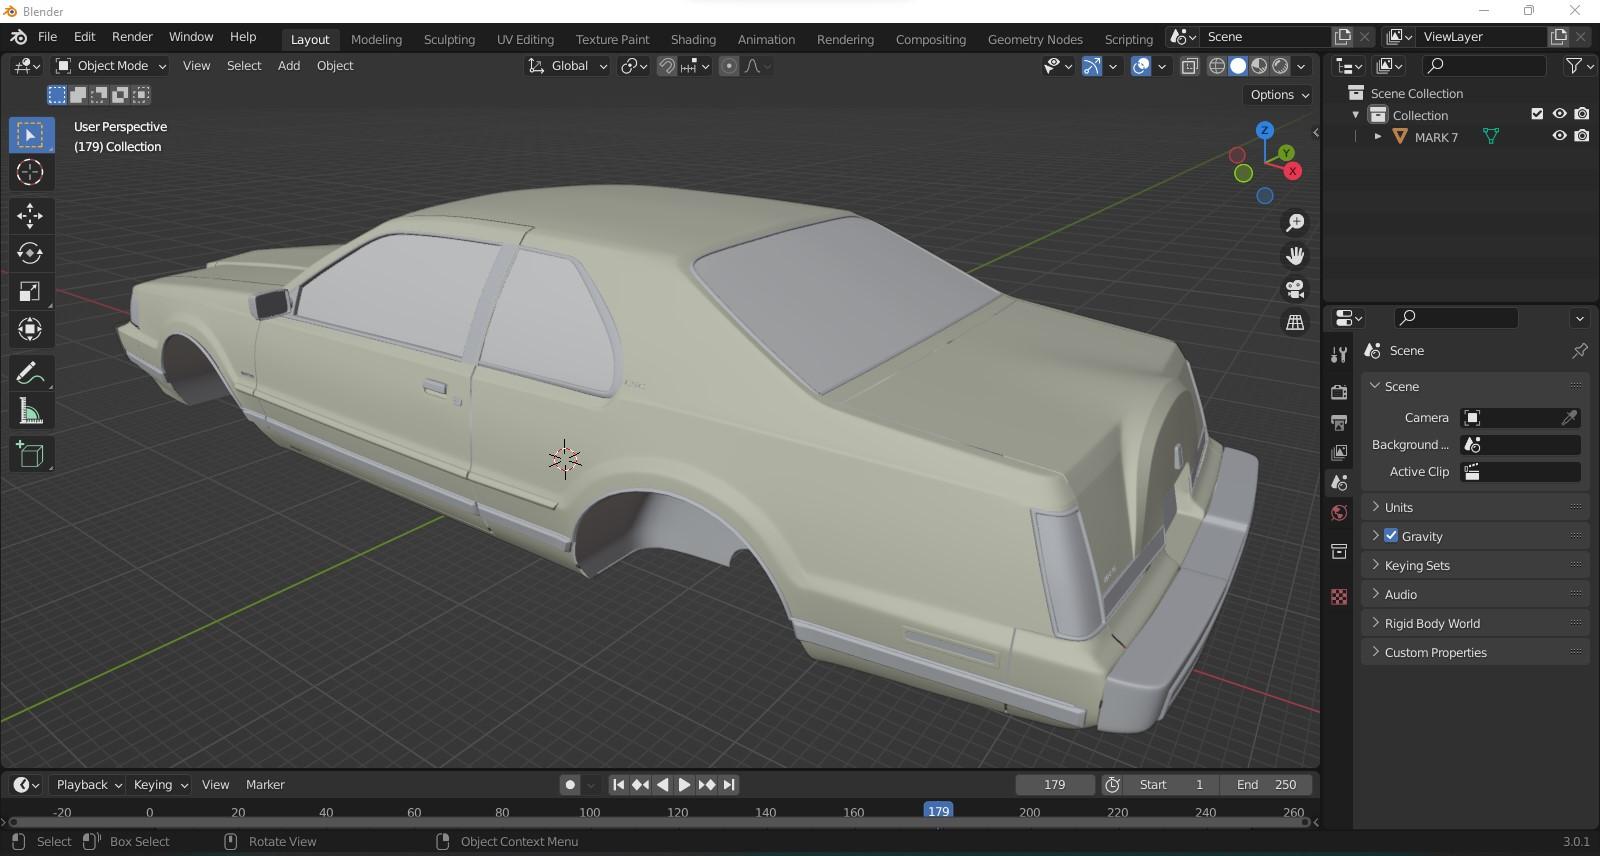
Revell Lincoln LSC Pro Street reissue
MrObsessive replied to Justin Porter's topic in Car Kit News & Reviews
Nice to see this one back with us! As far as 3D prints, I have 3D files of this car, but just haven't had the ambition as of yet to convert all that's needed to make them printable. Very well done (and inexpensive) files from Eric at EDM3DModel. The fancy will strike me one of these days to print up a Mark VII . ??
-
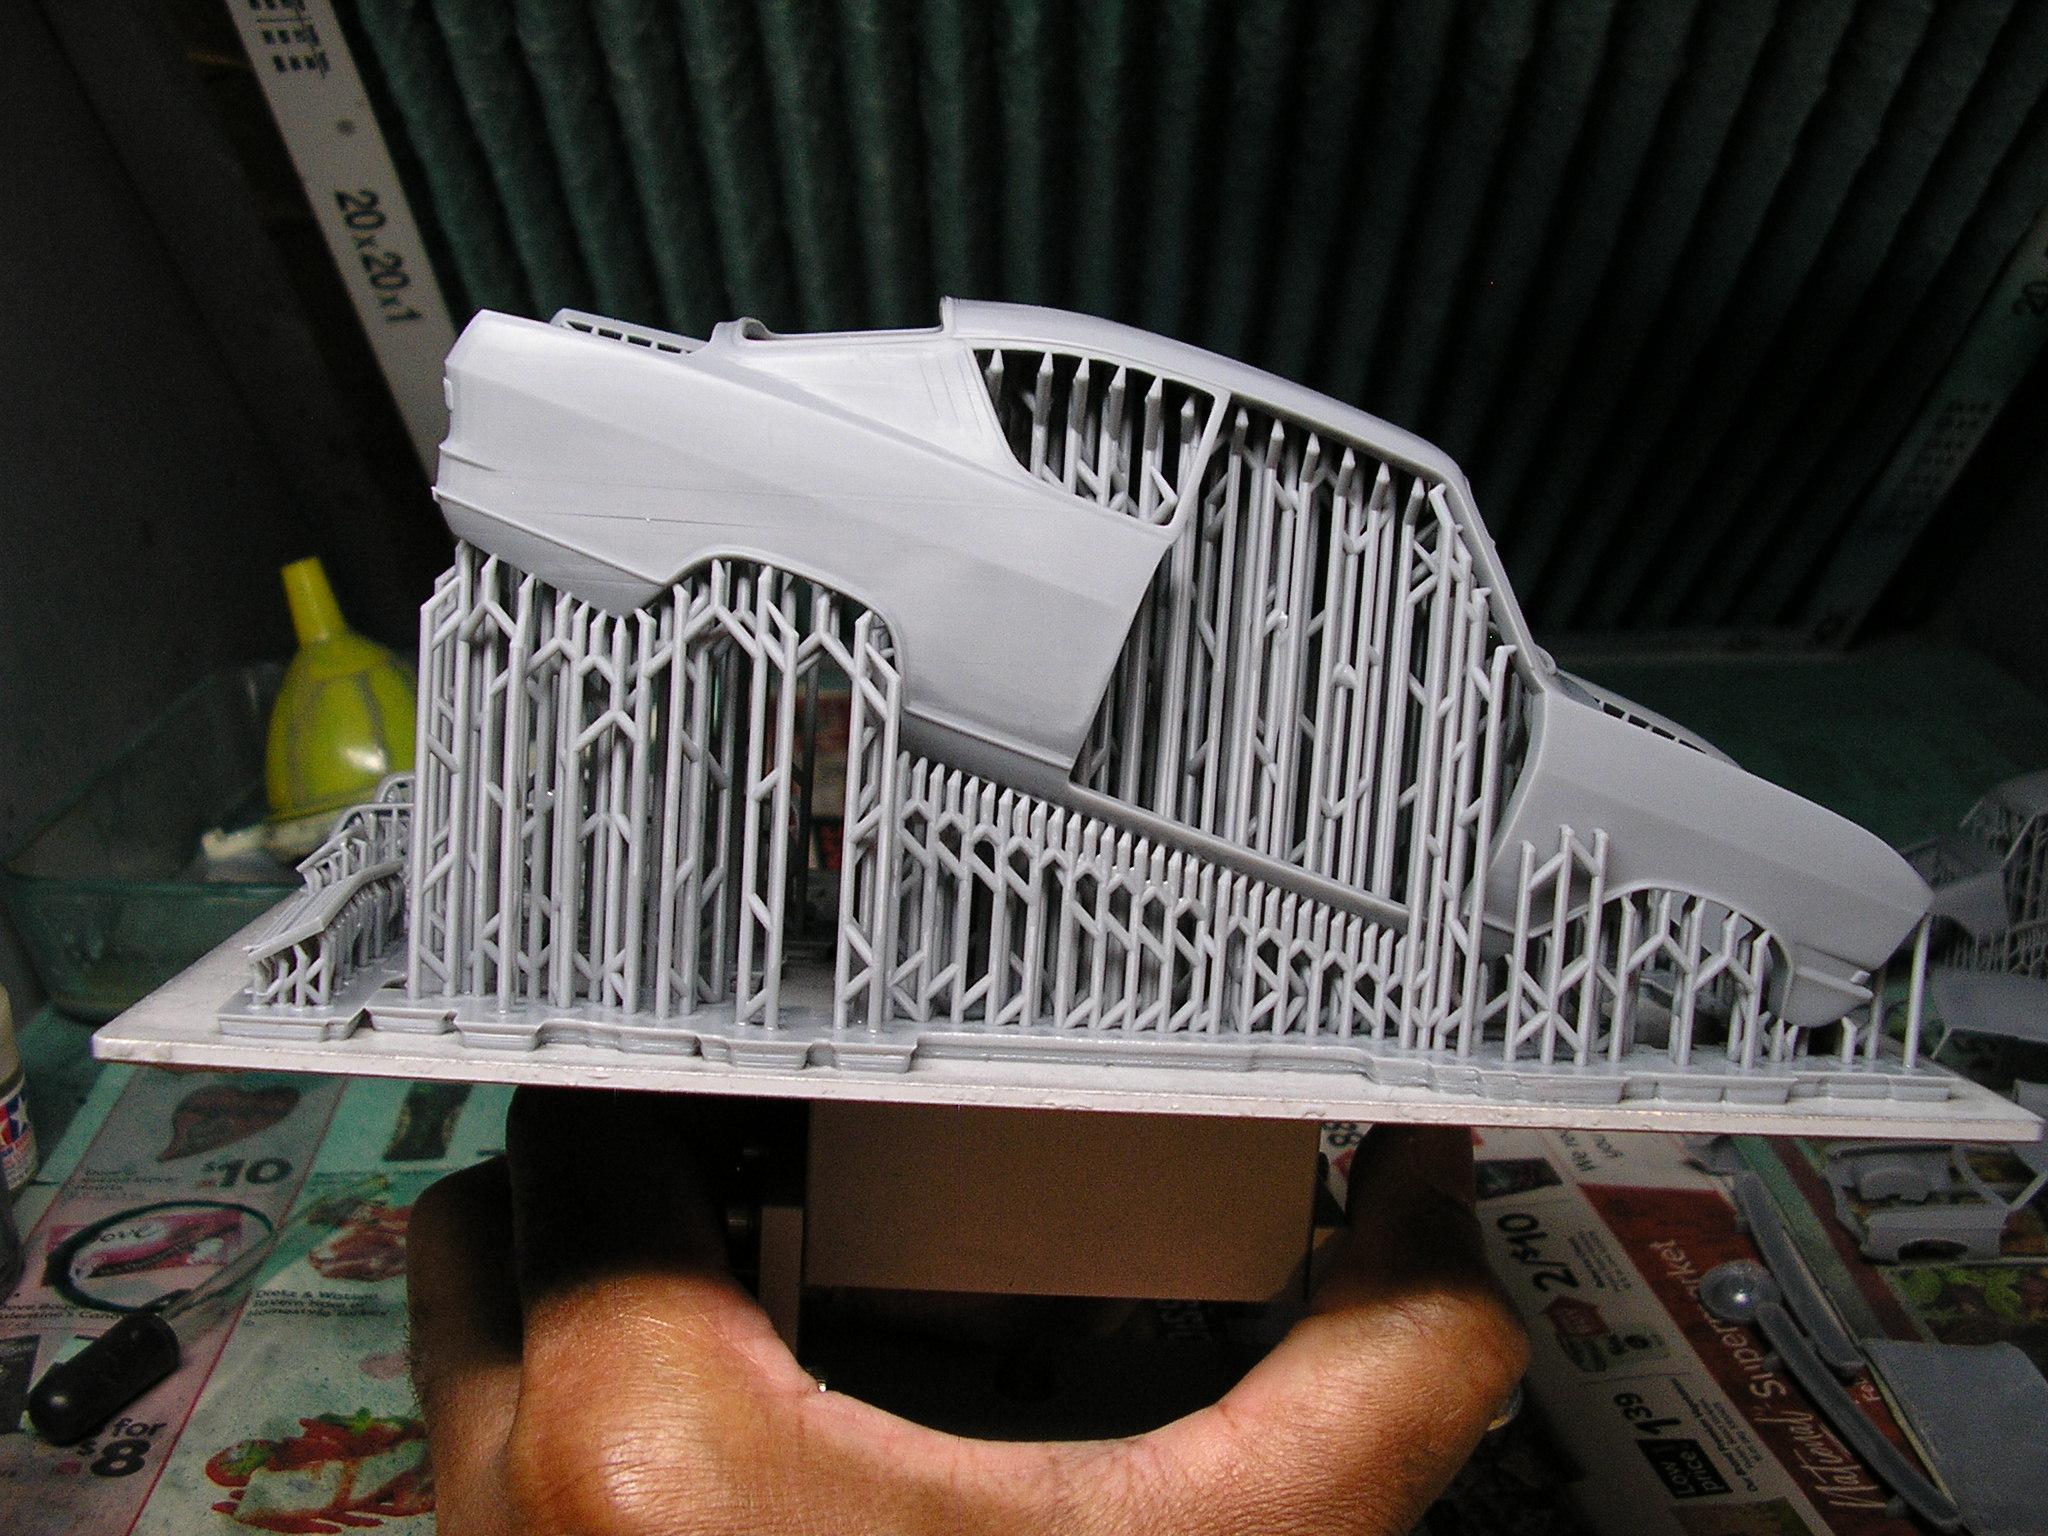
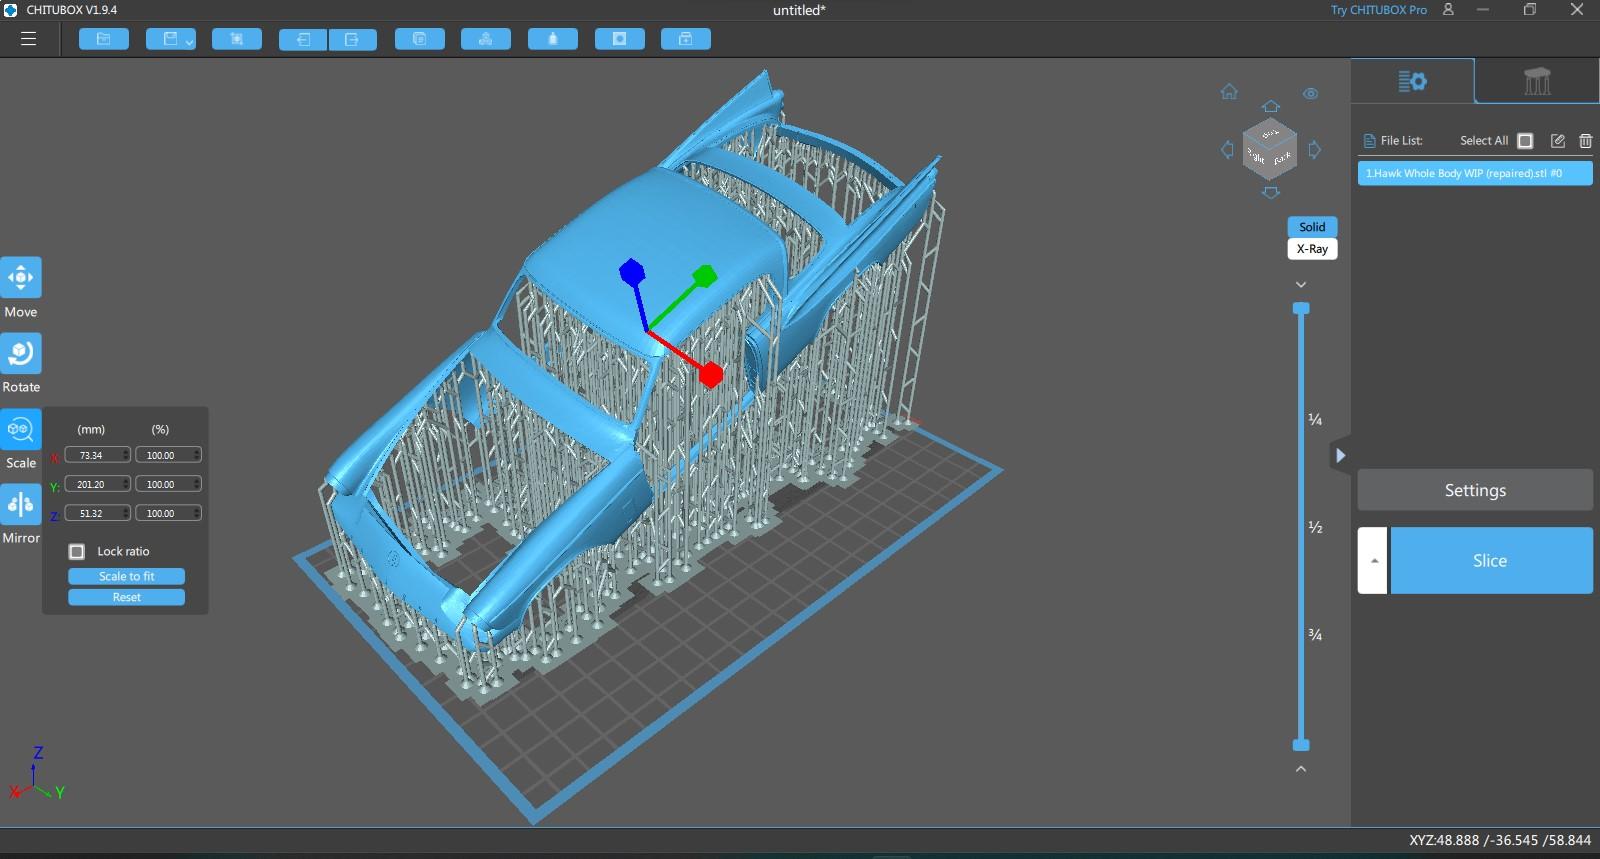
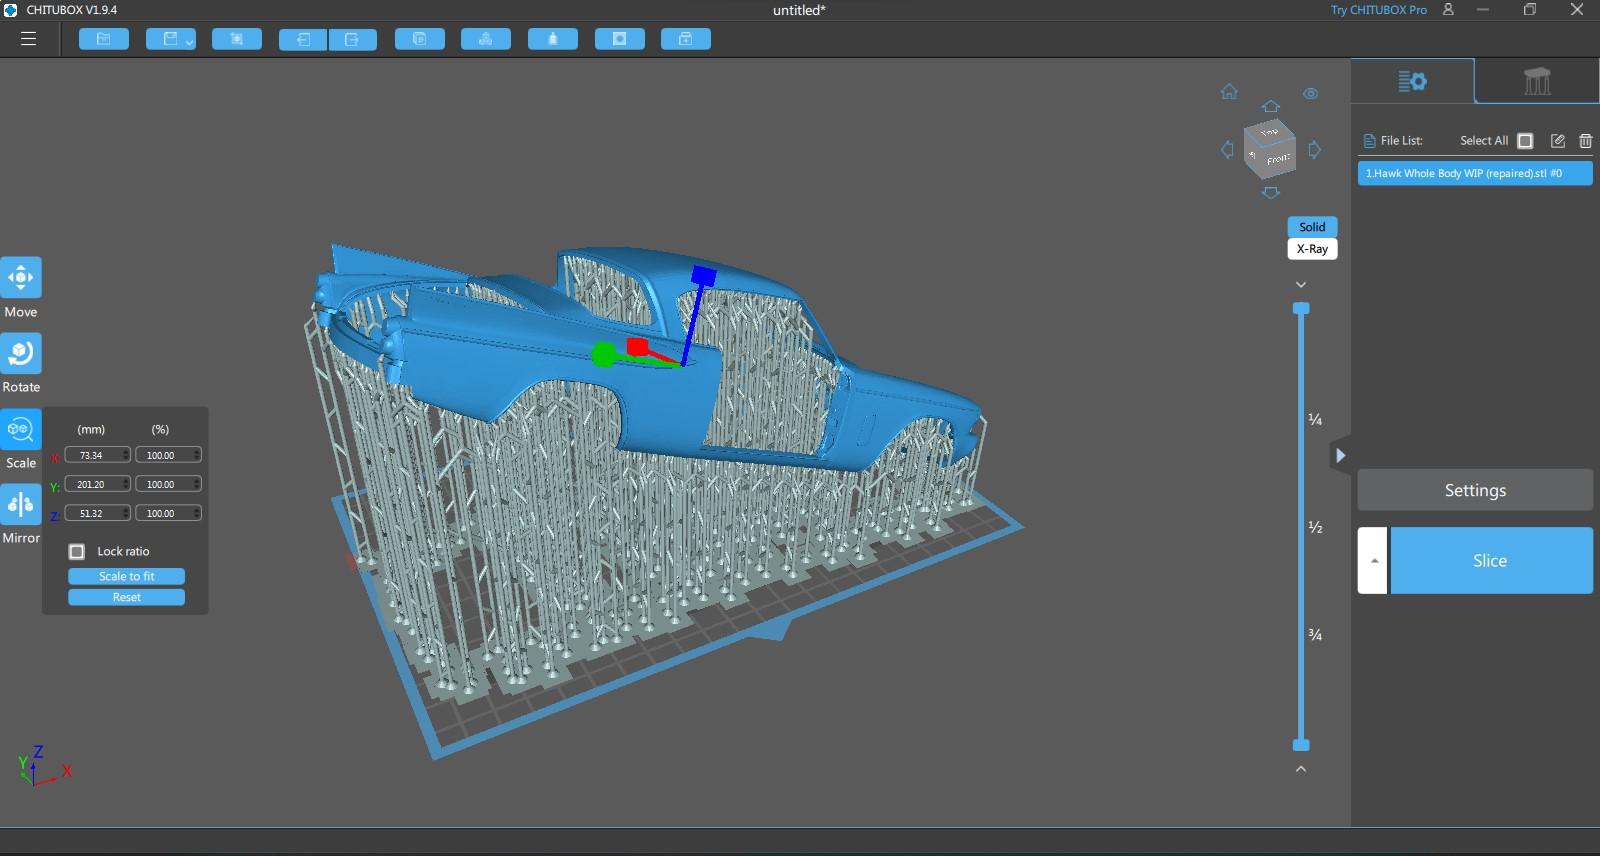
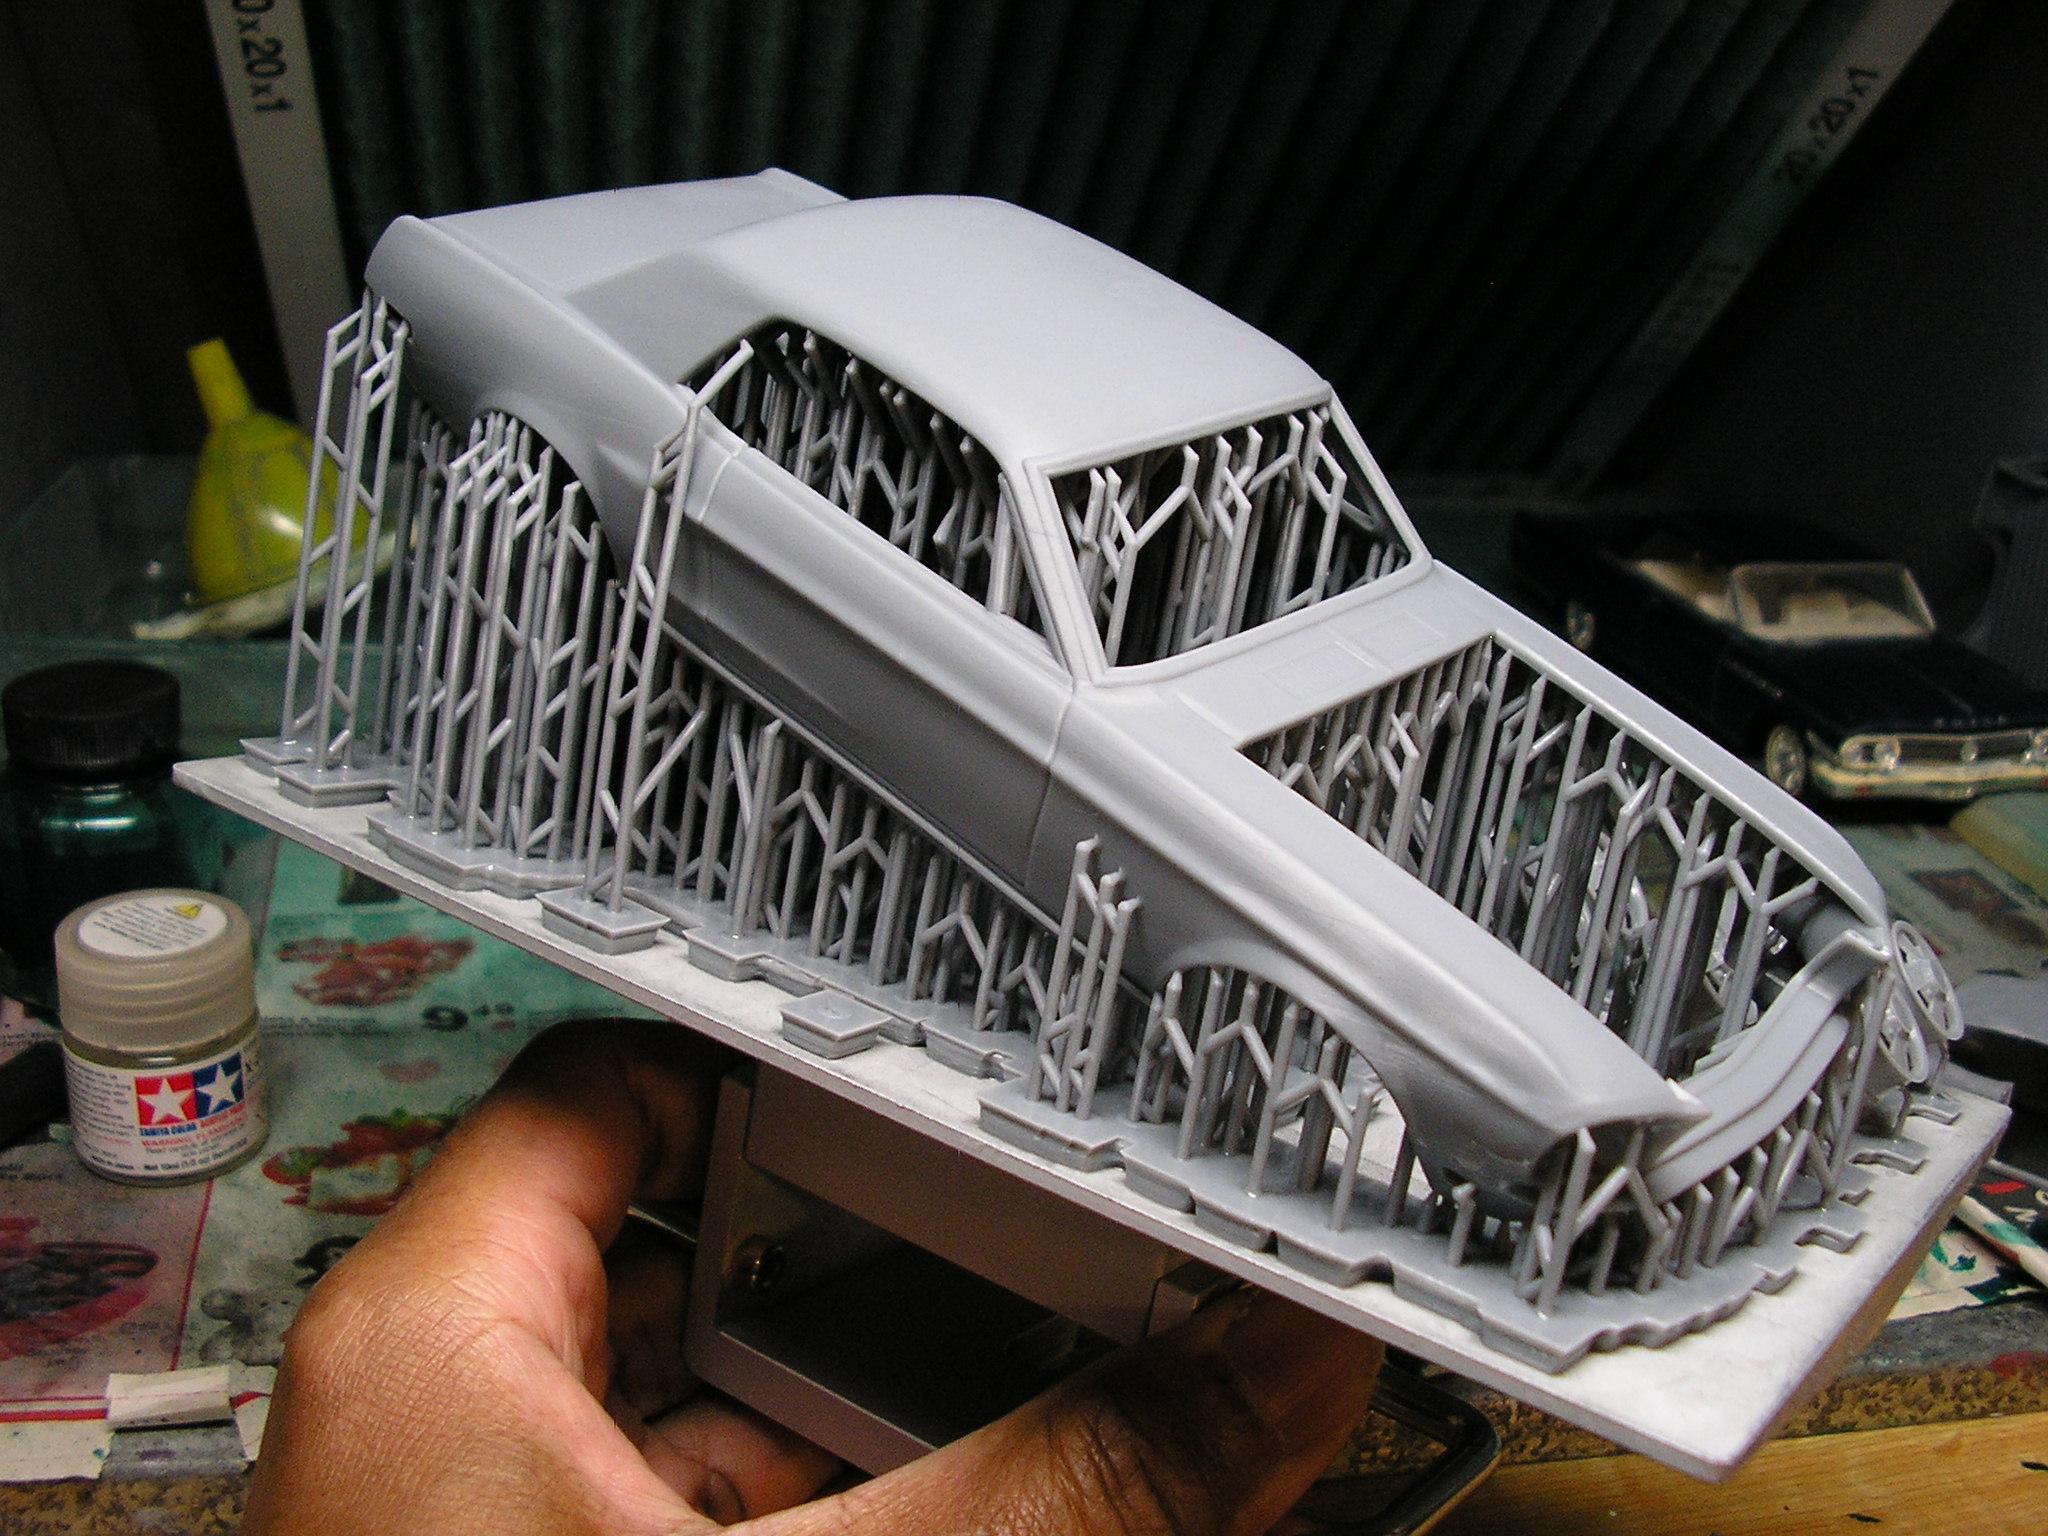
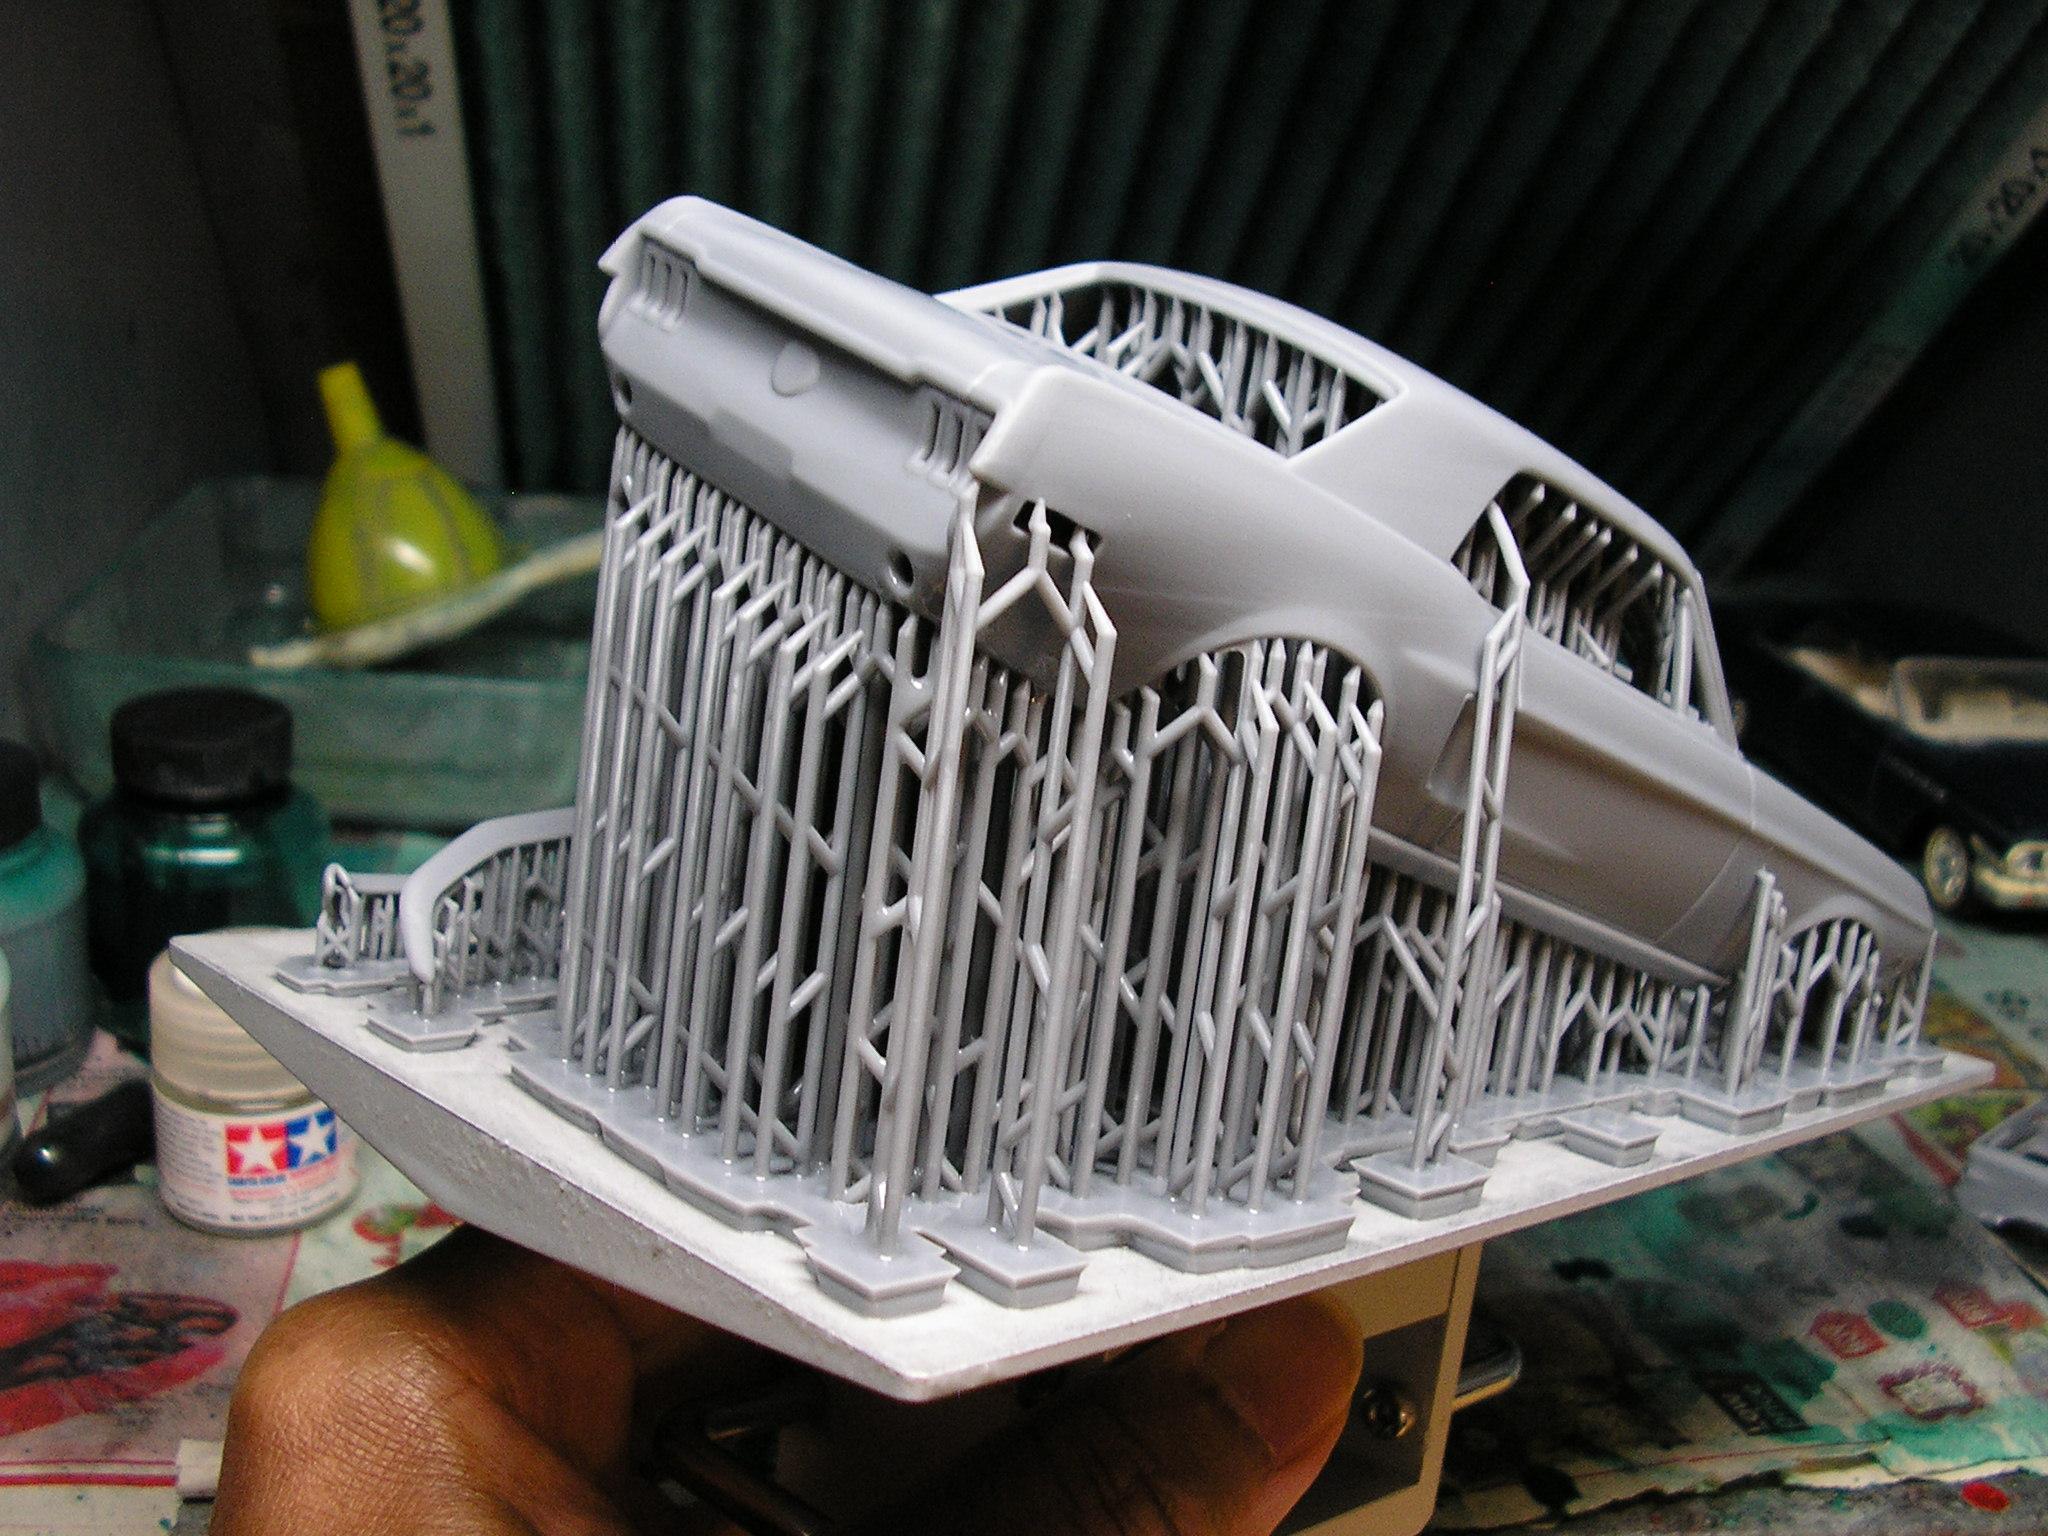
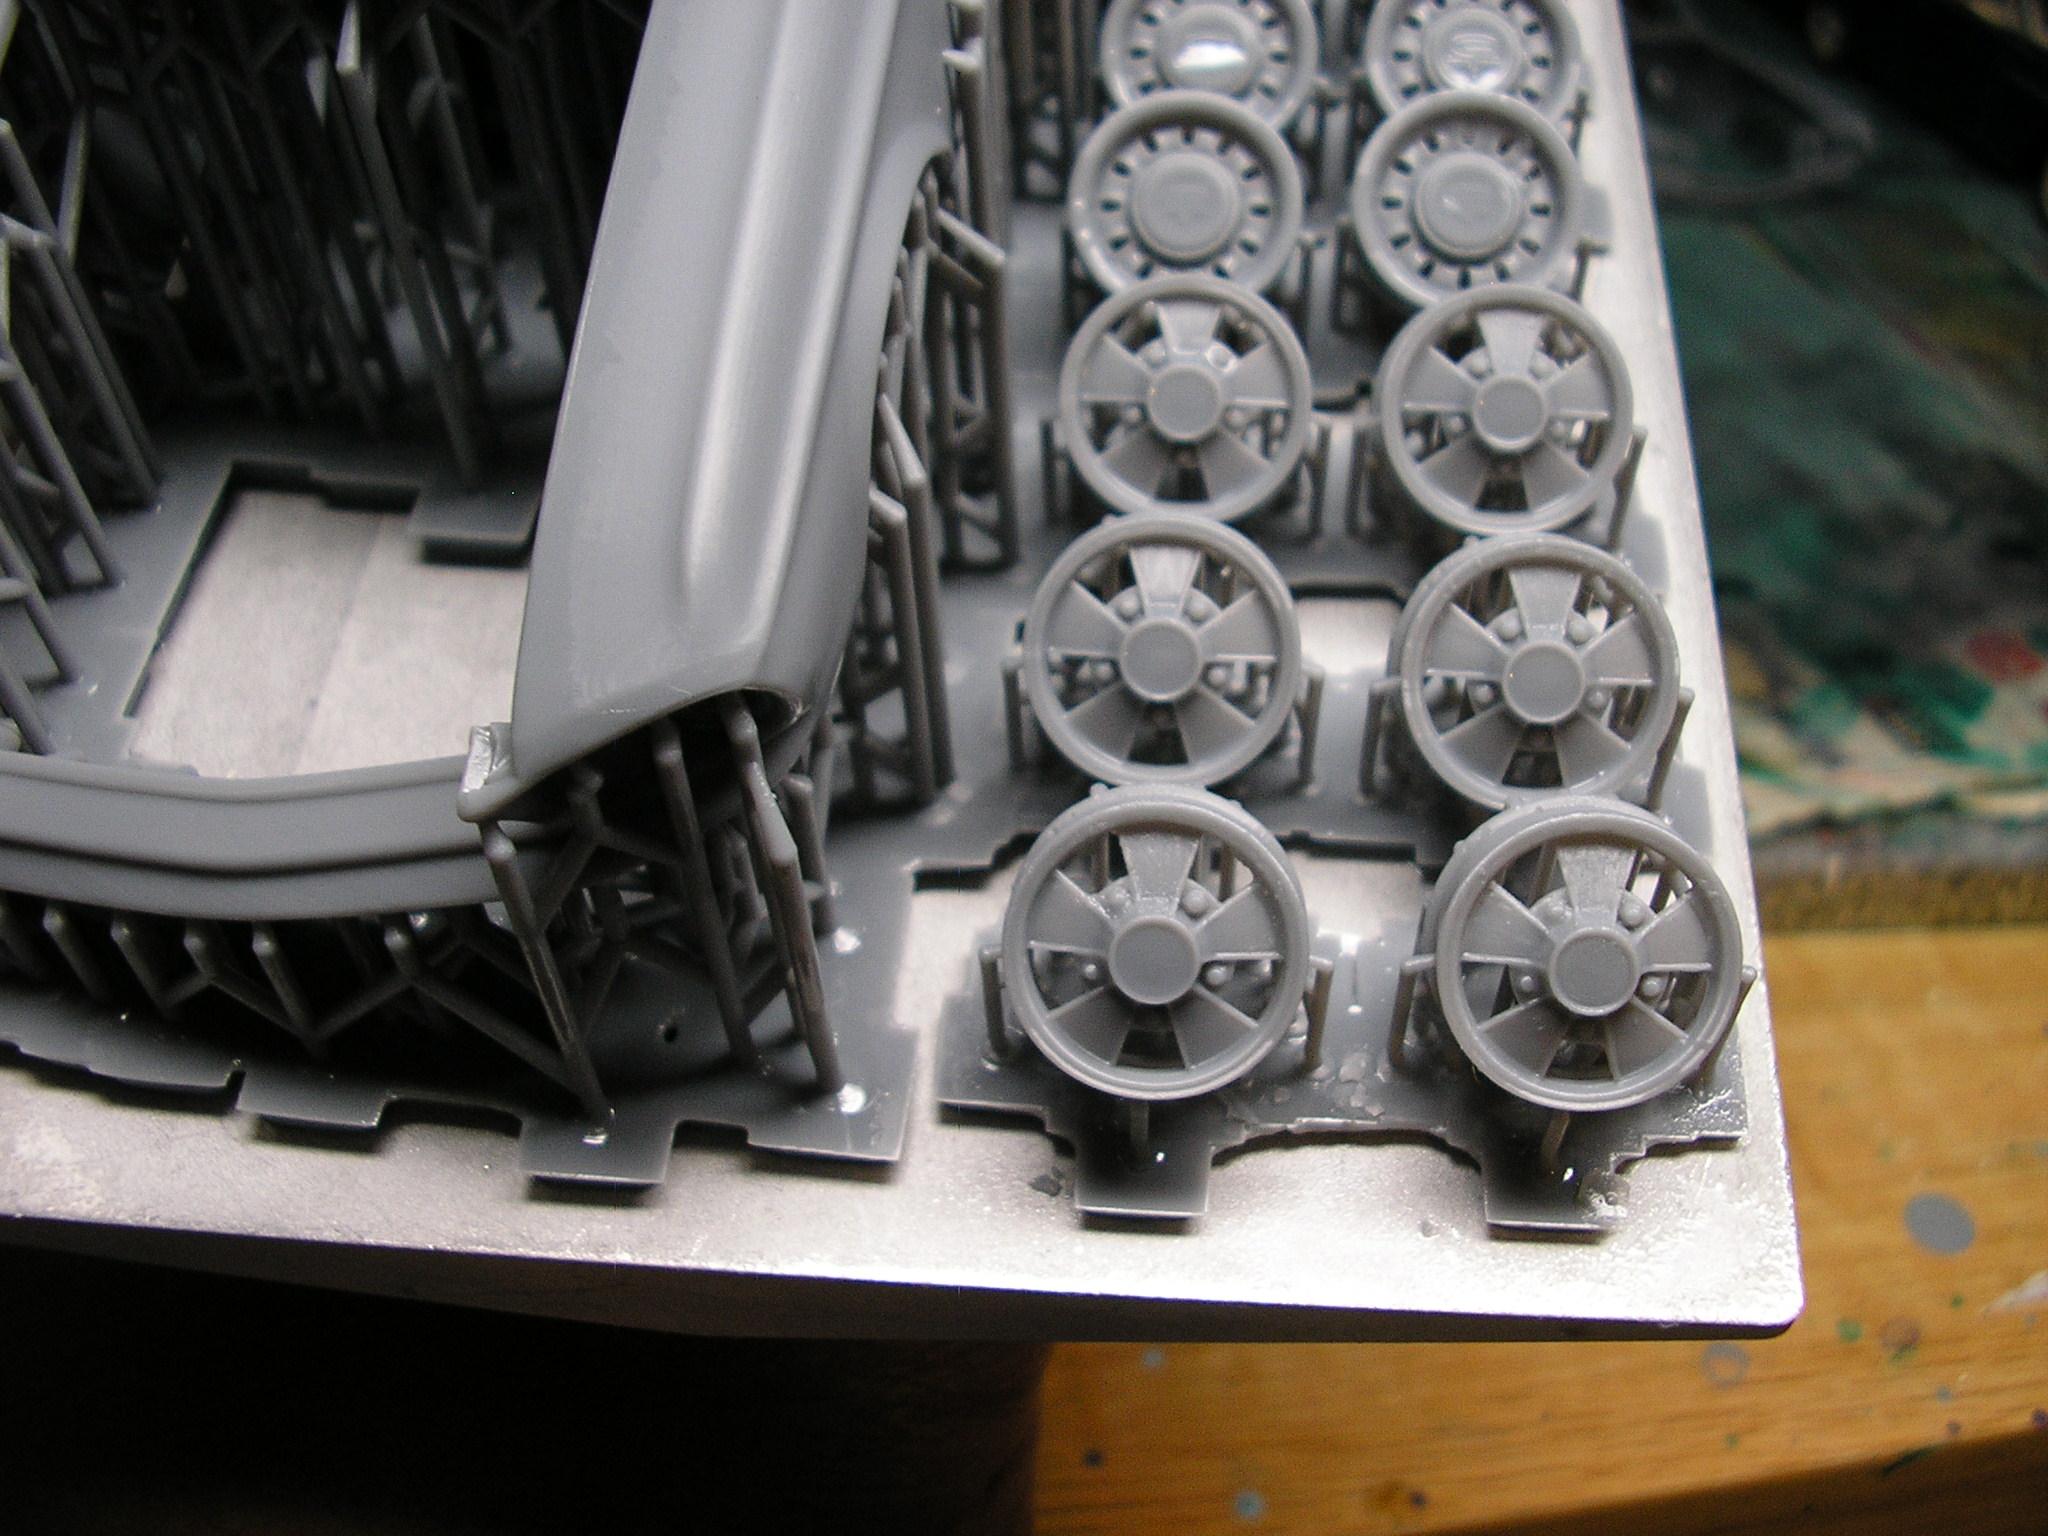
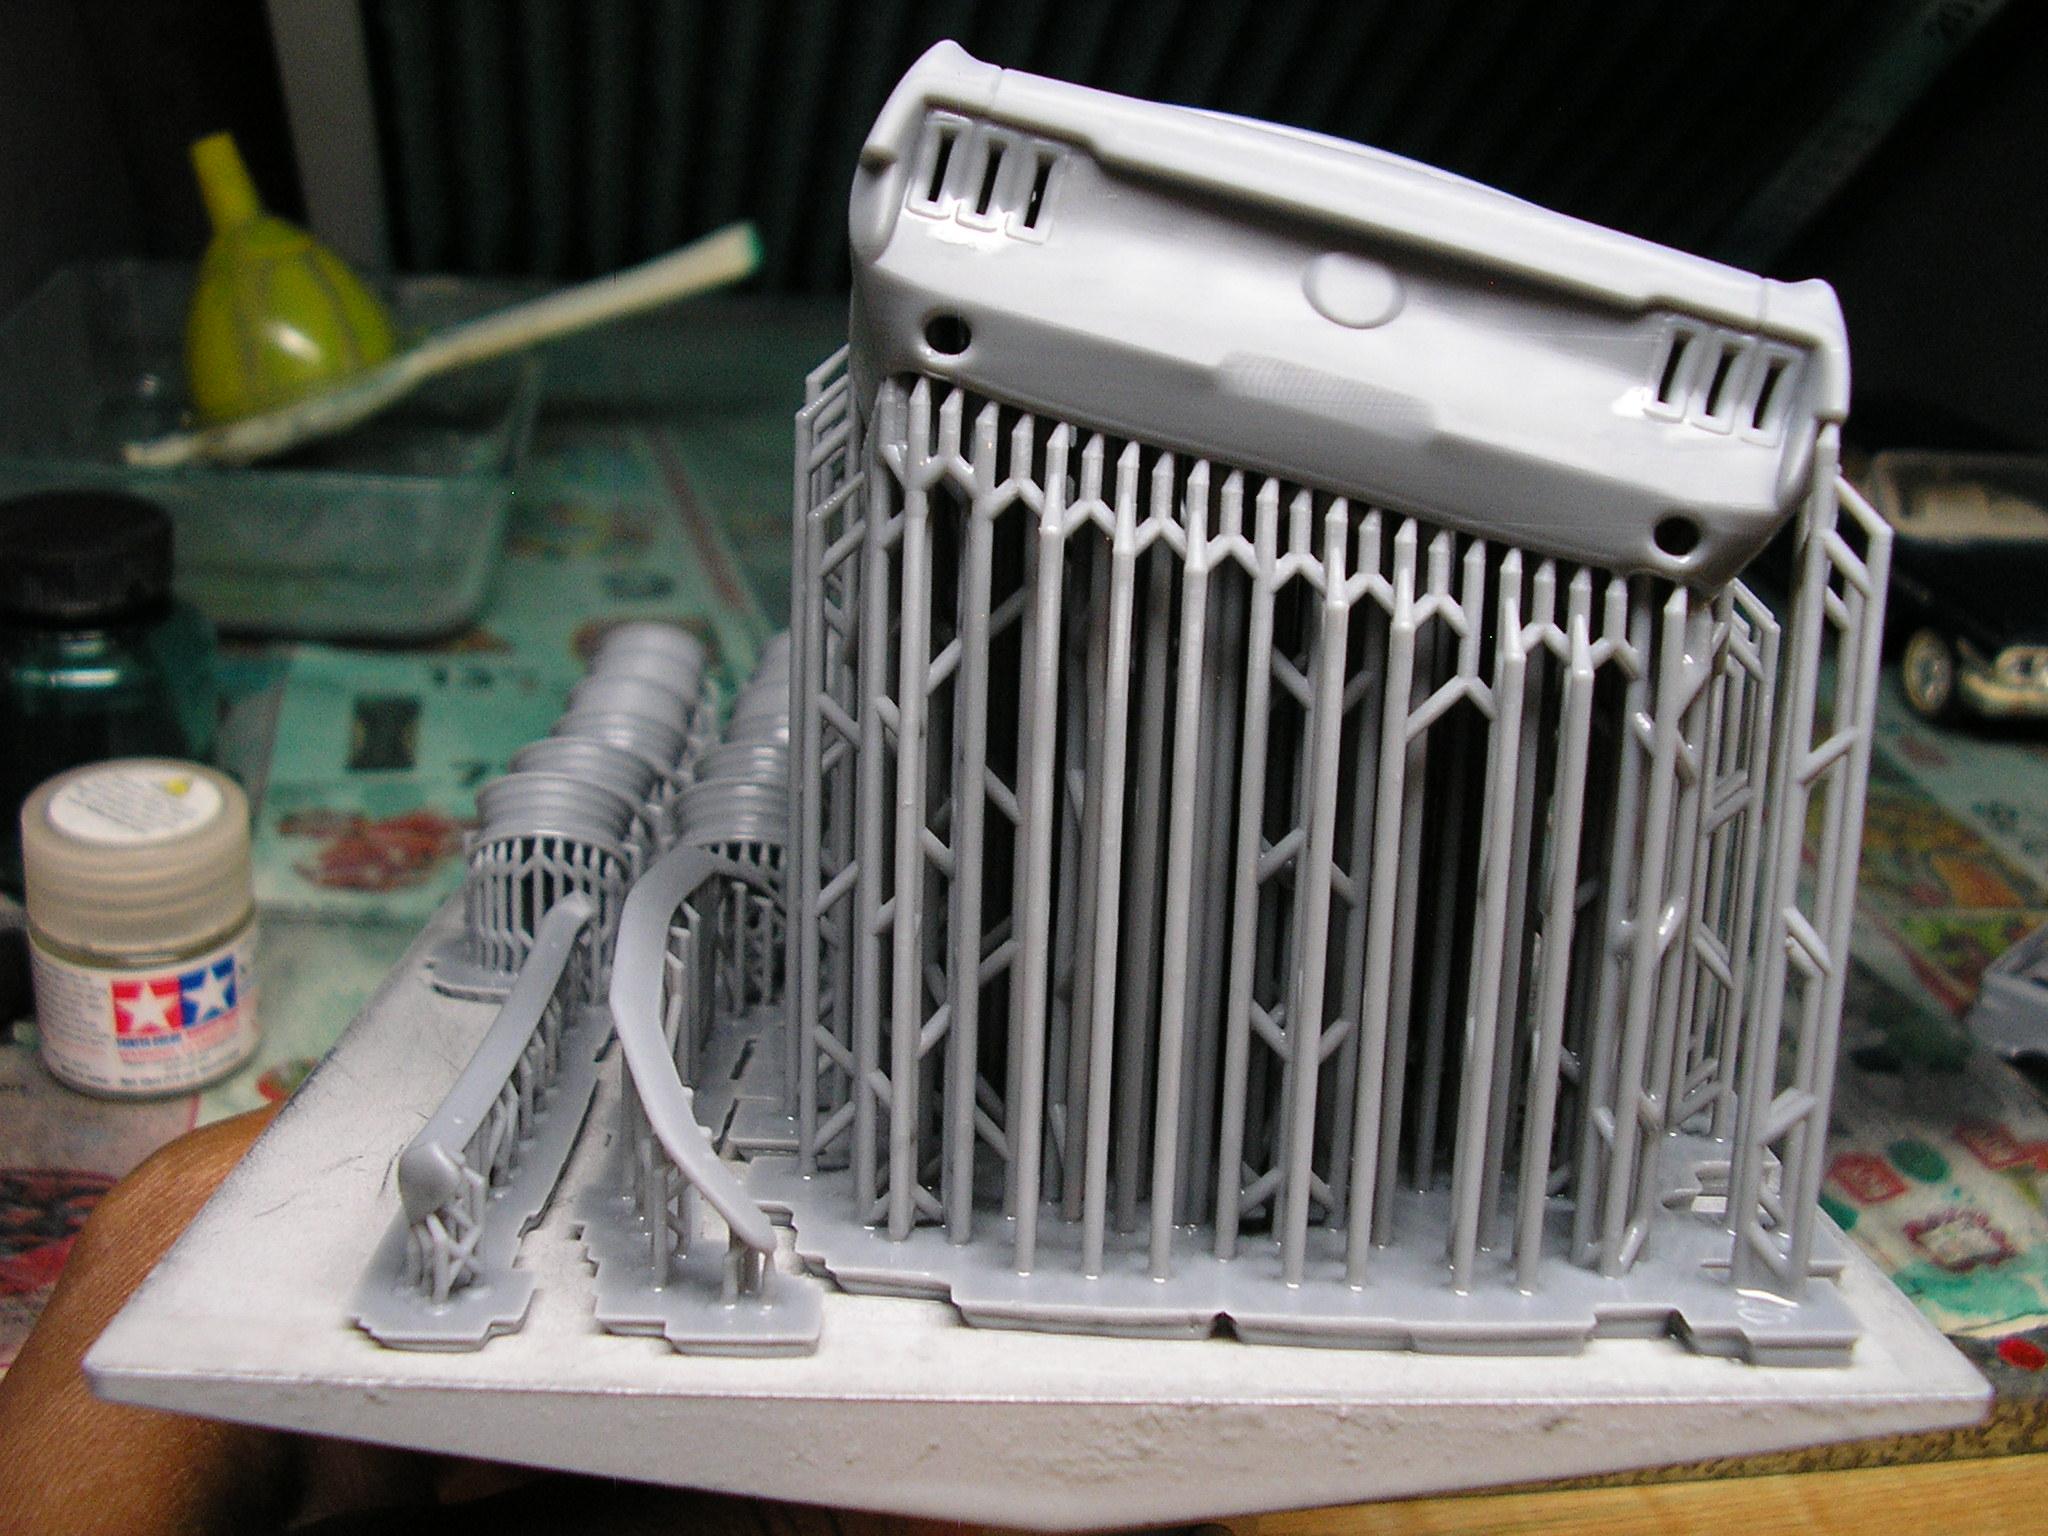
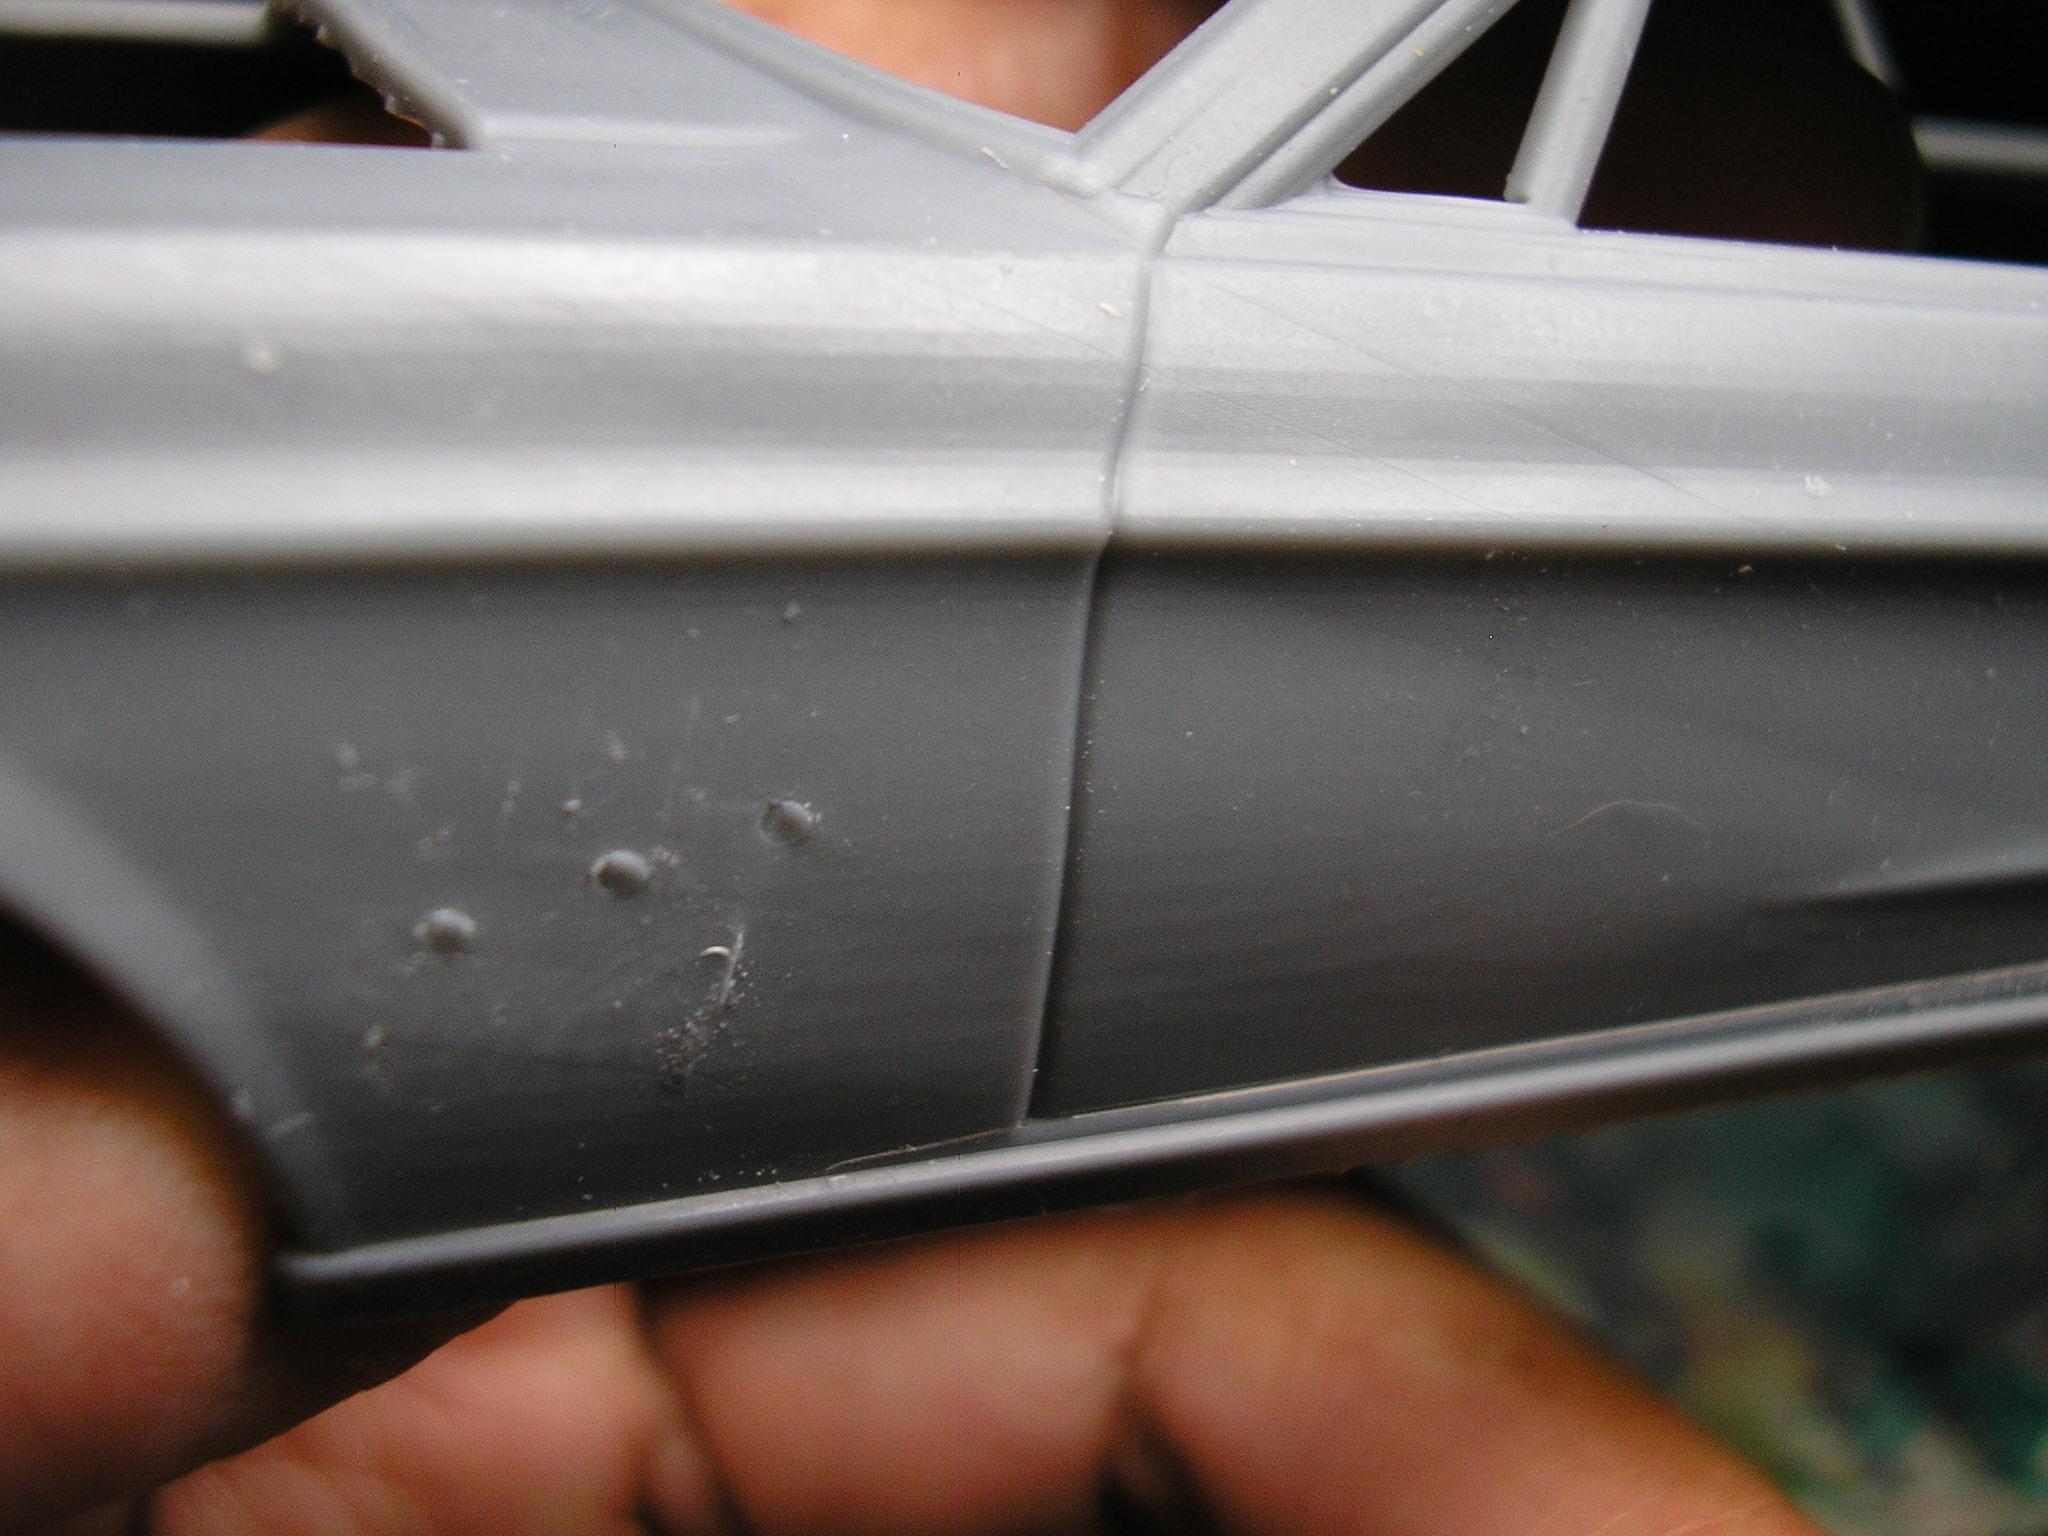
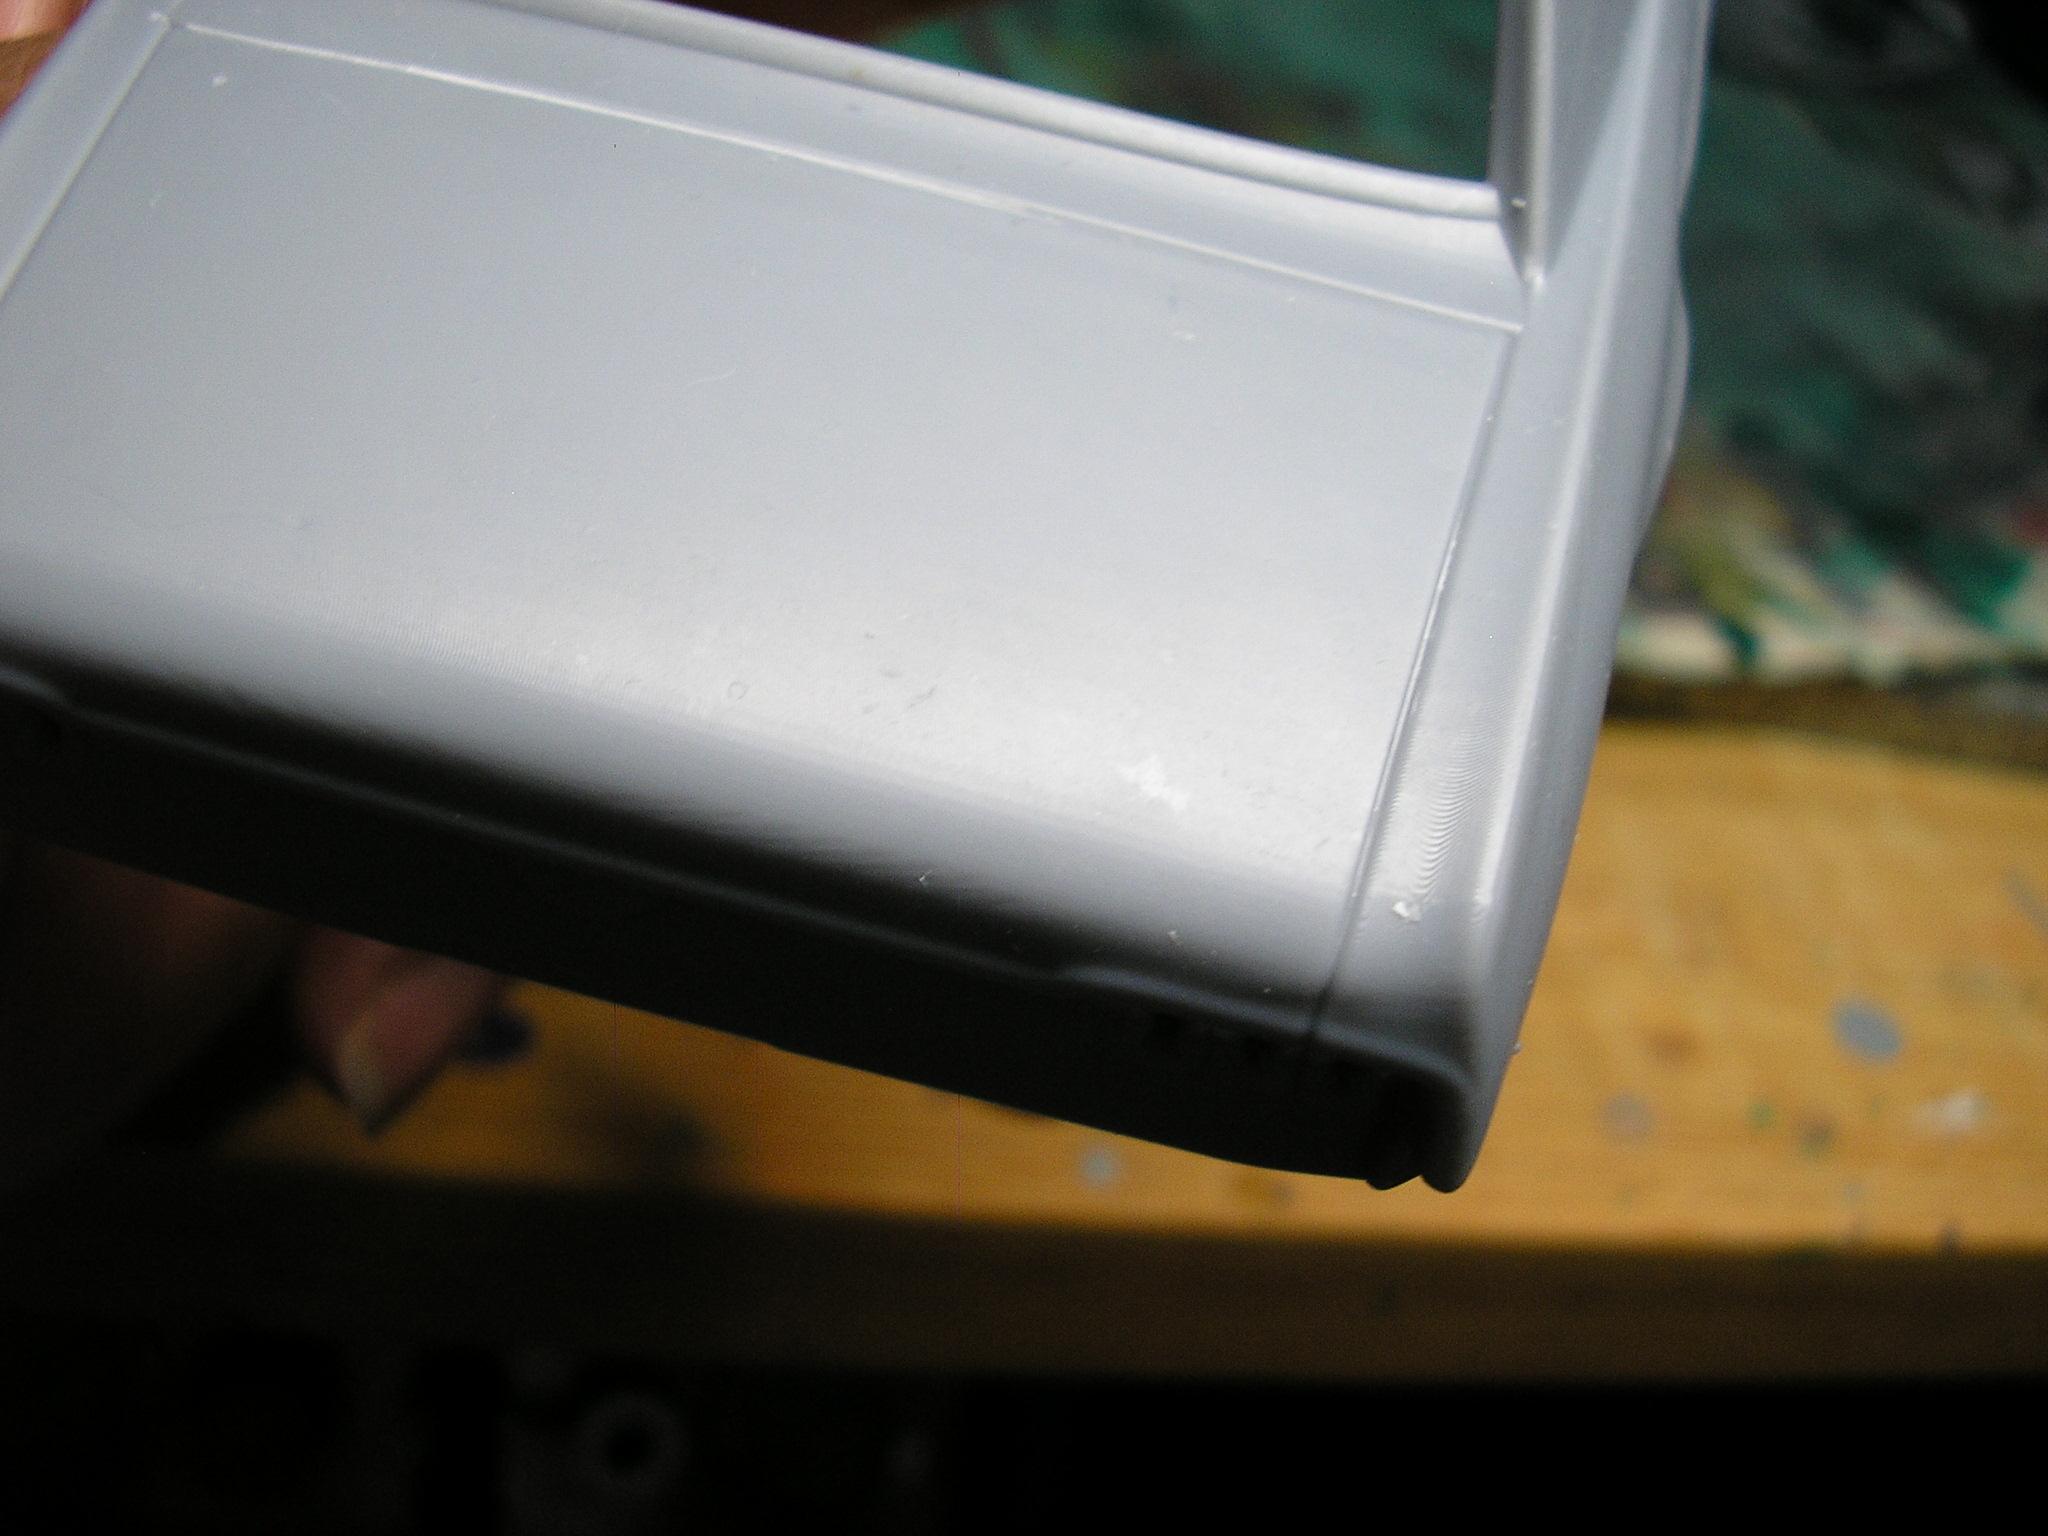
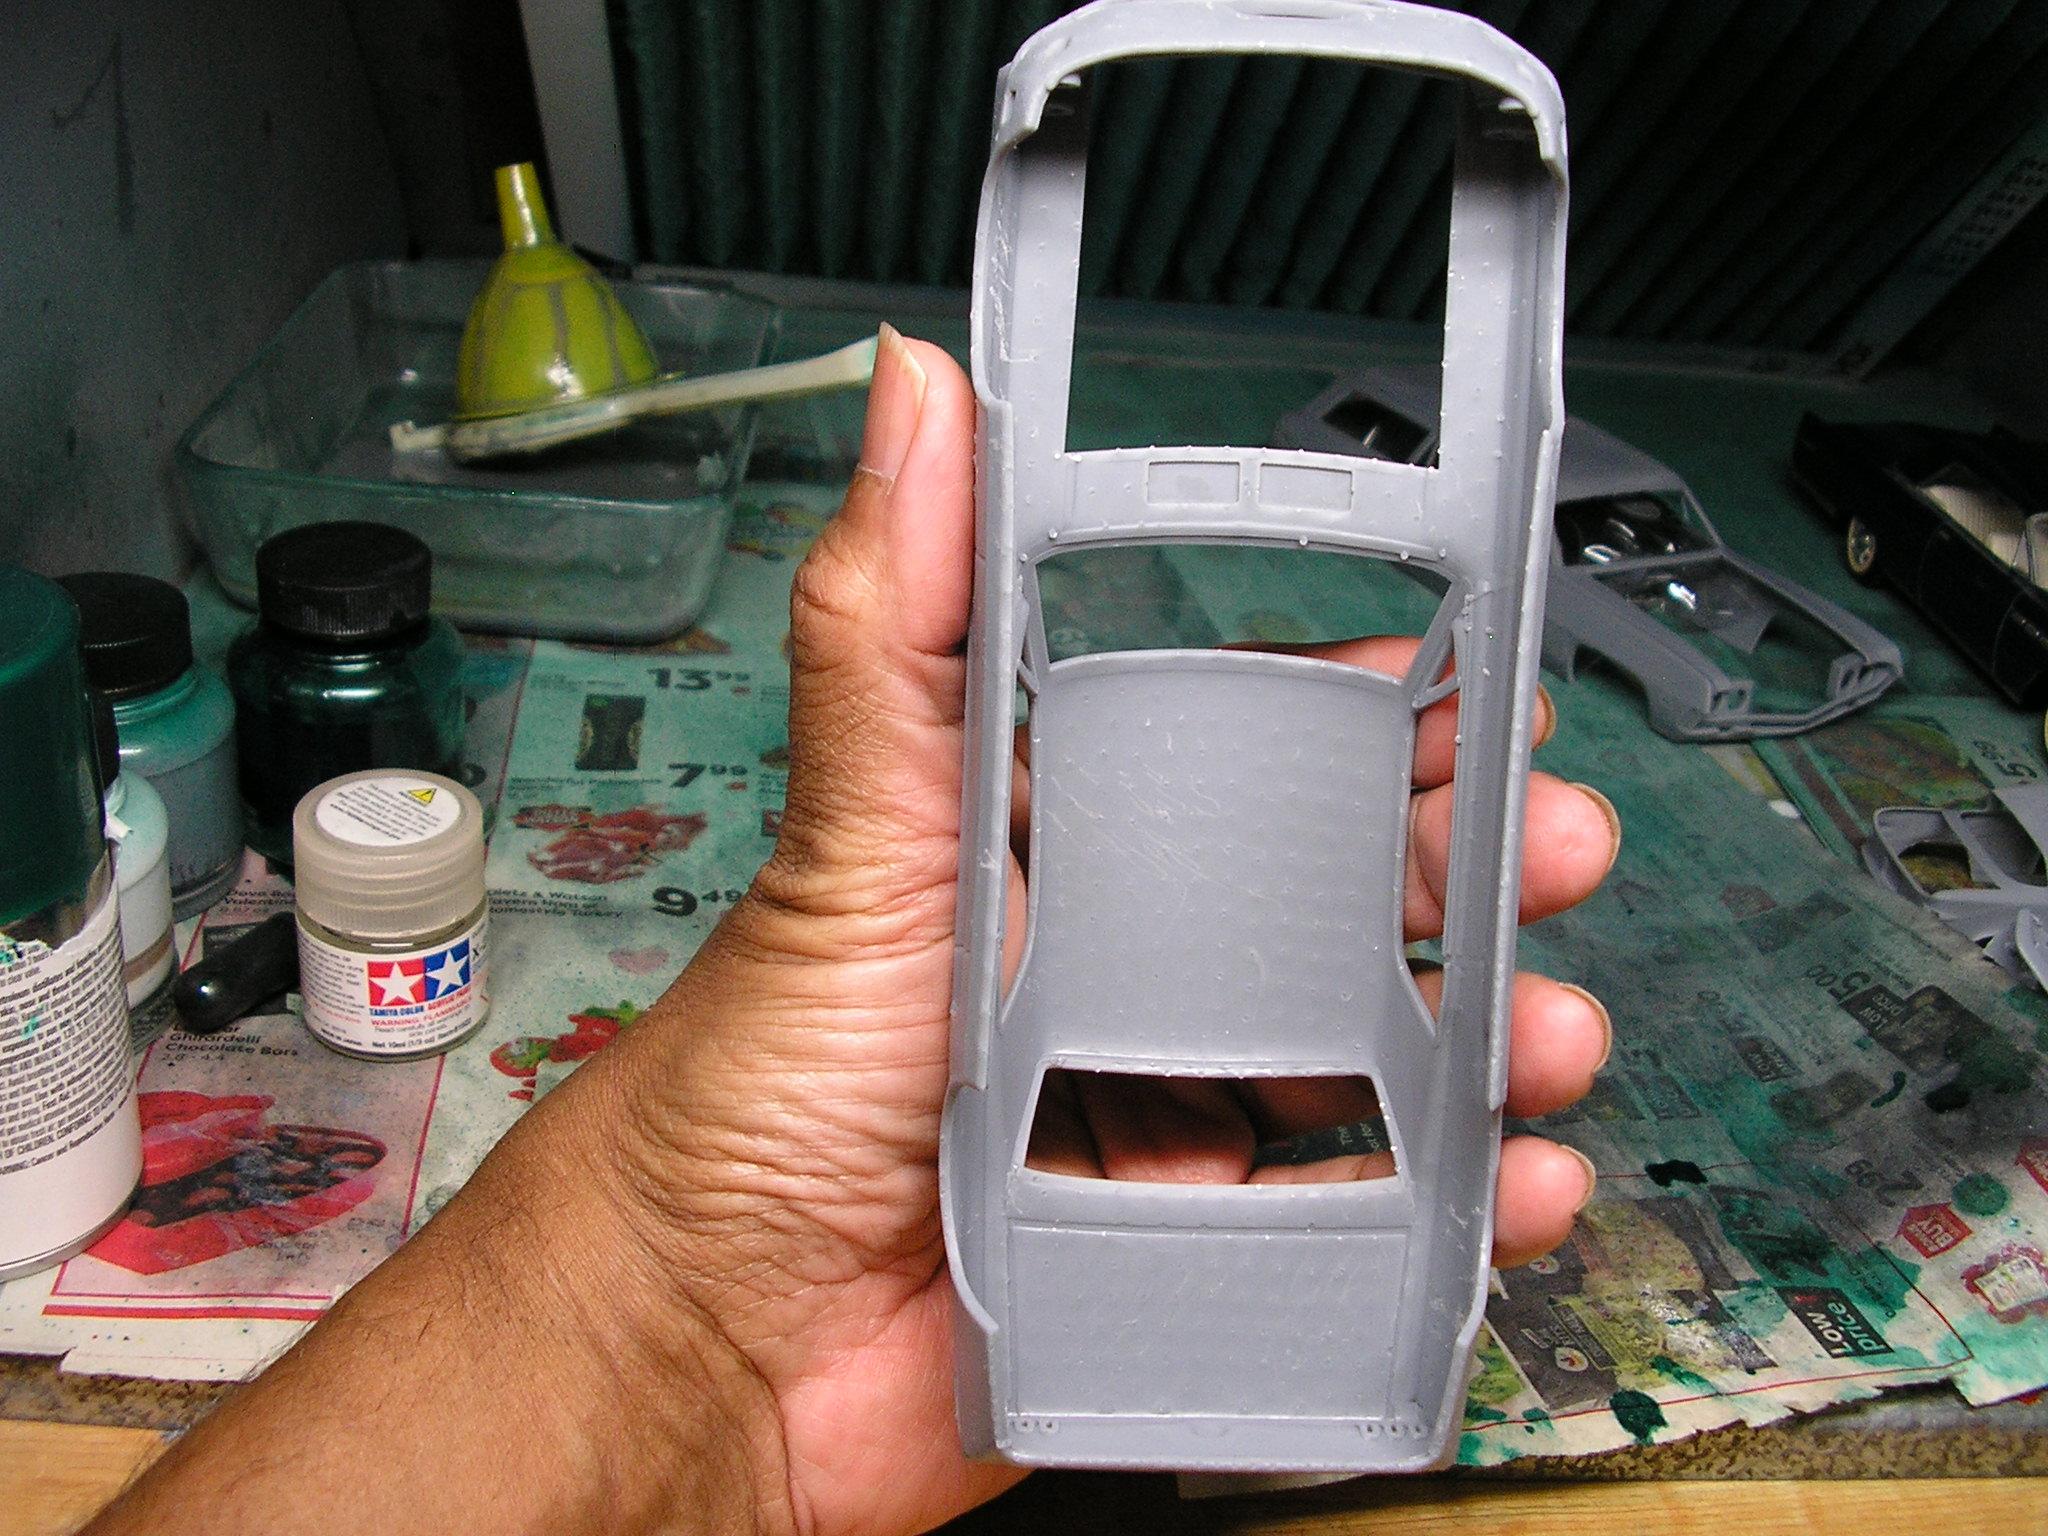
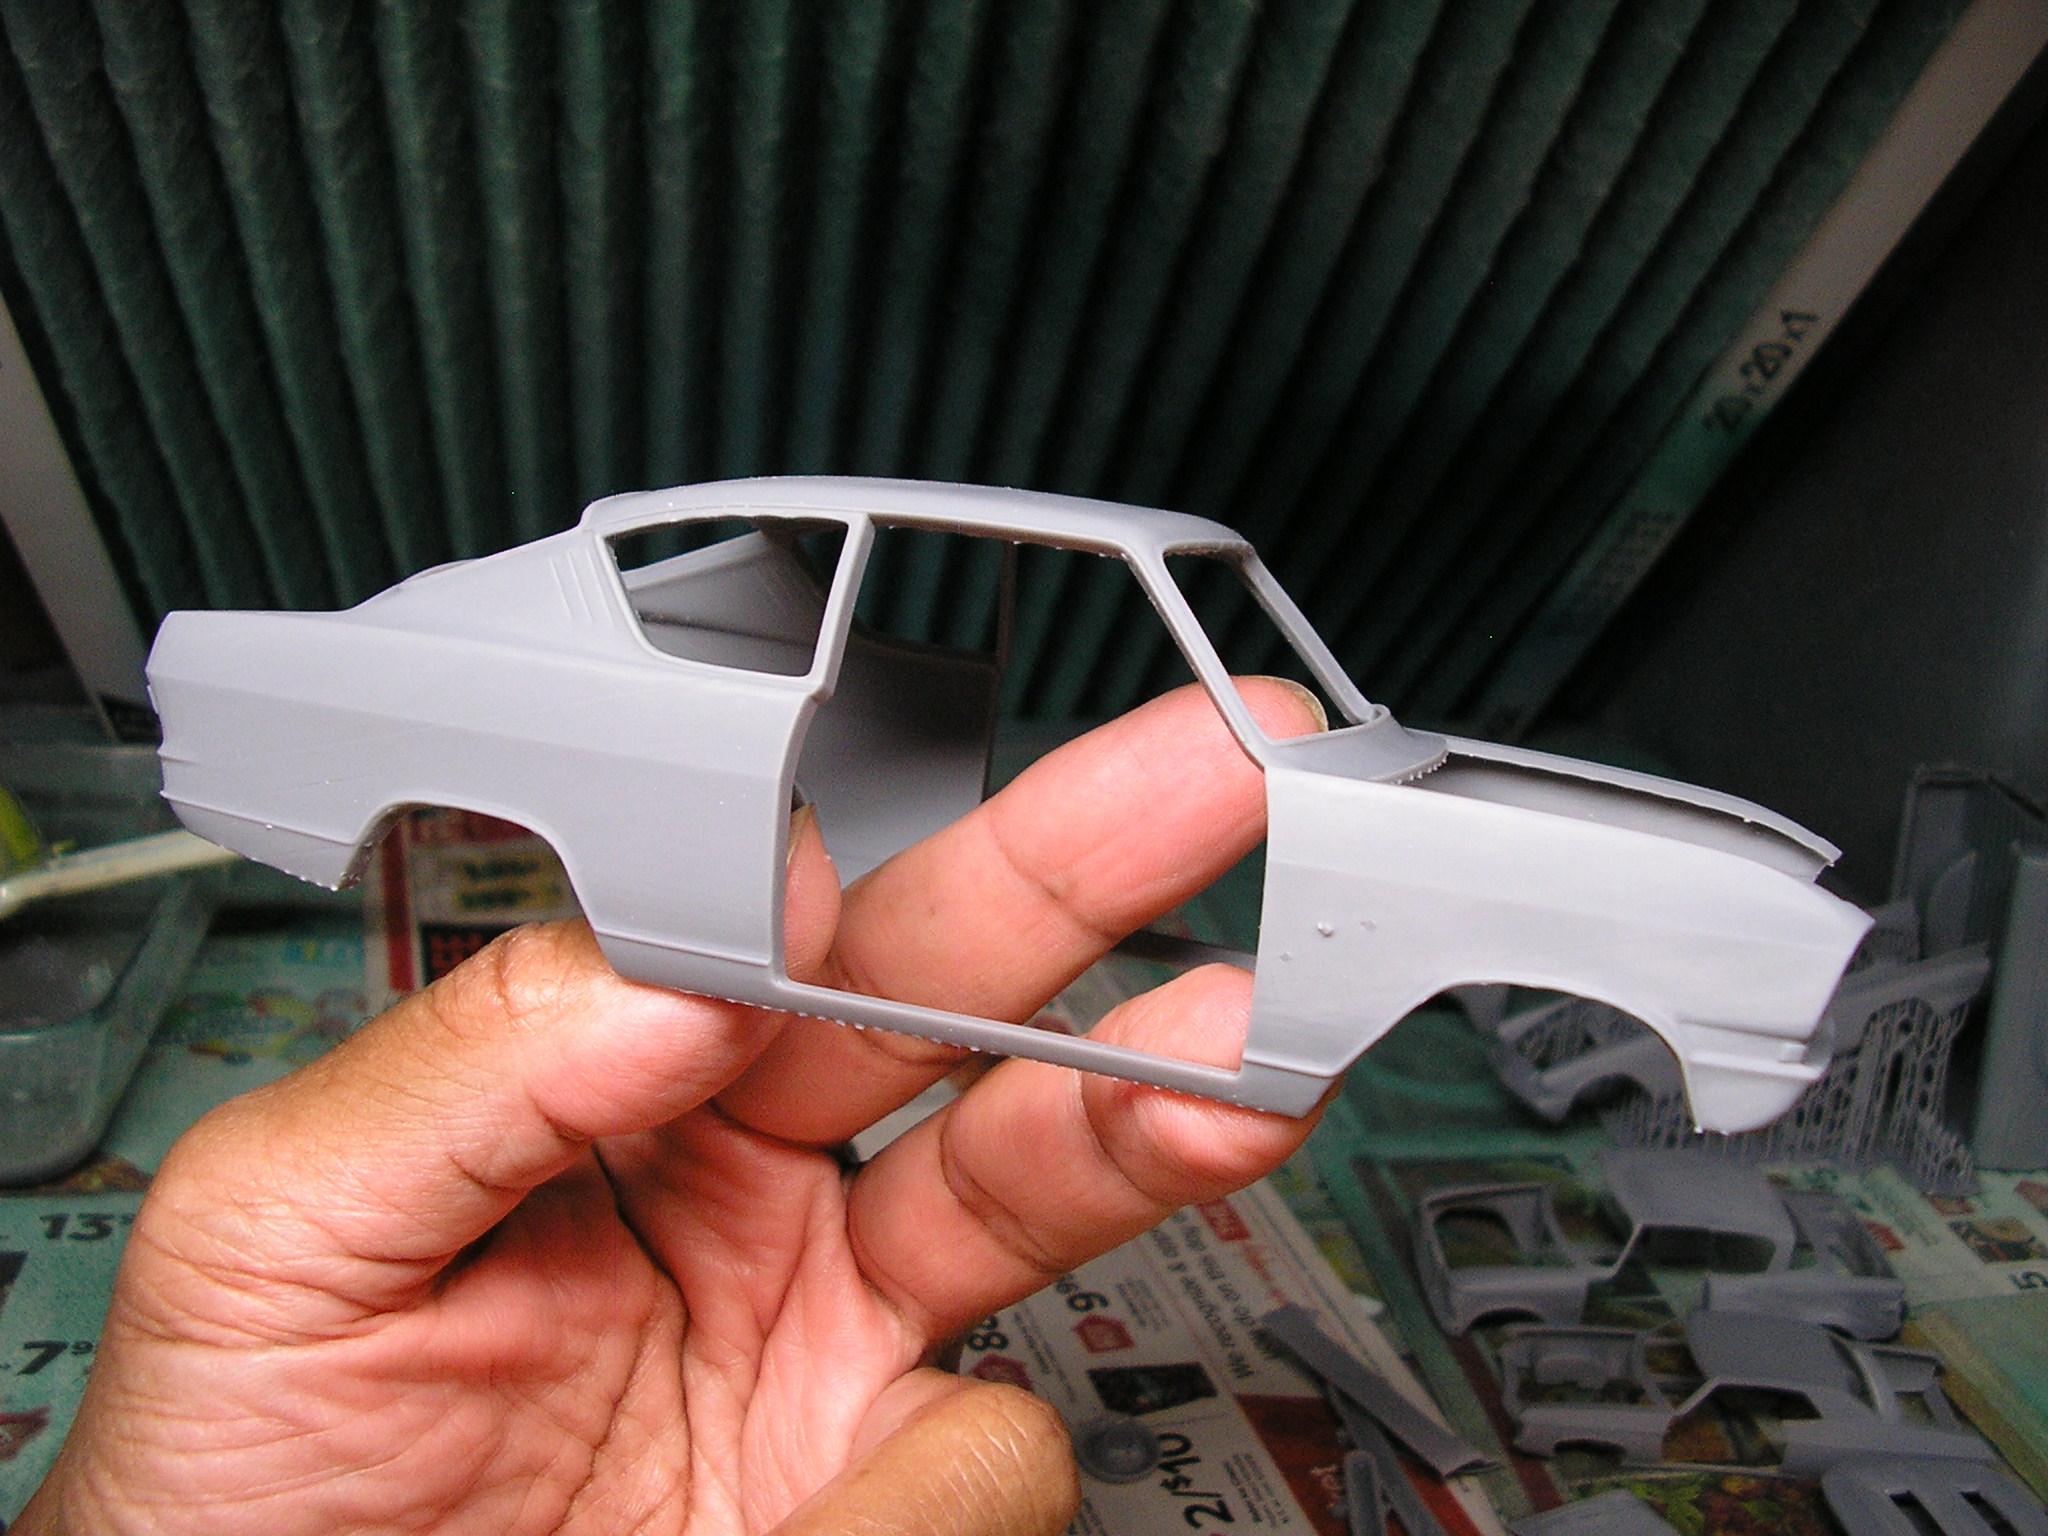
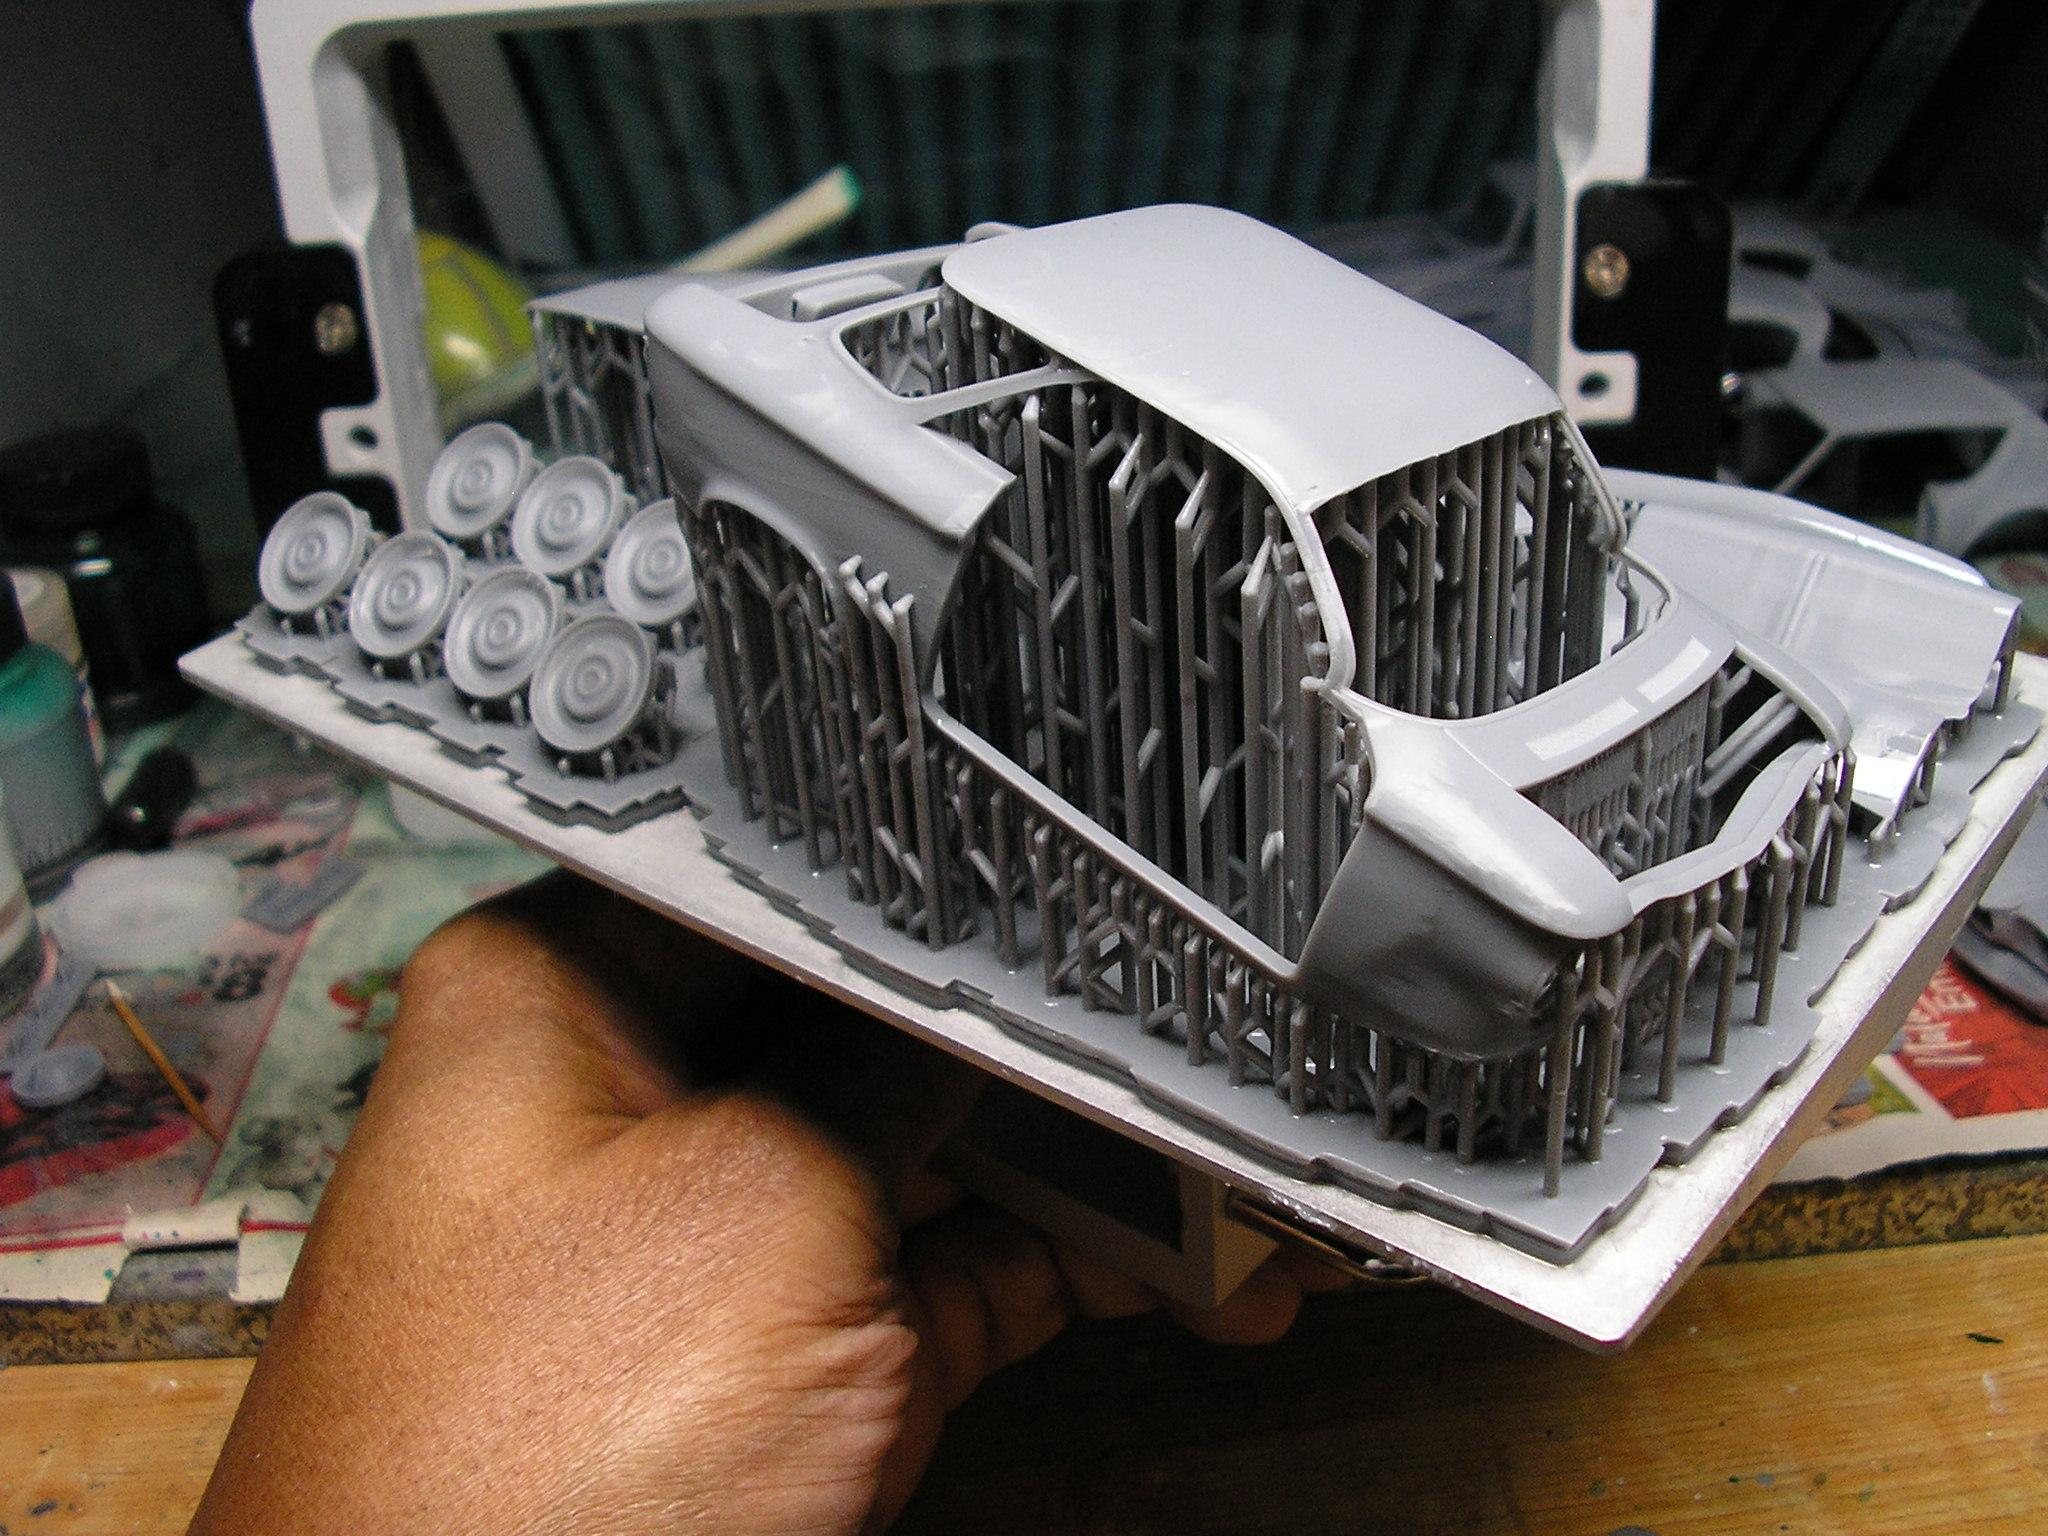
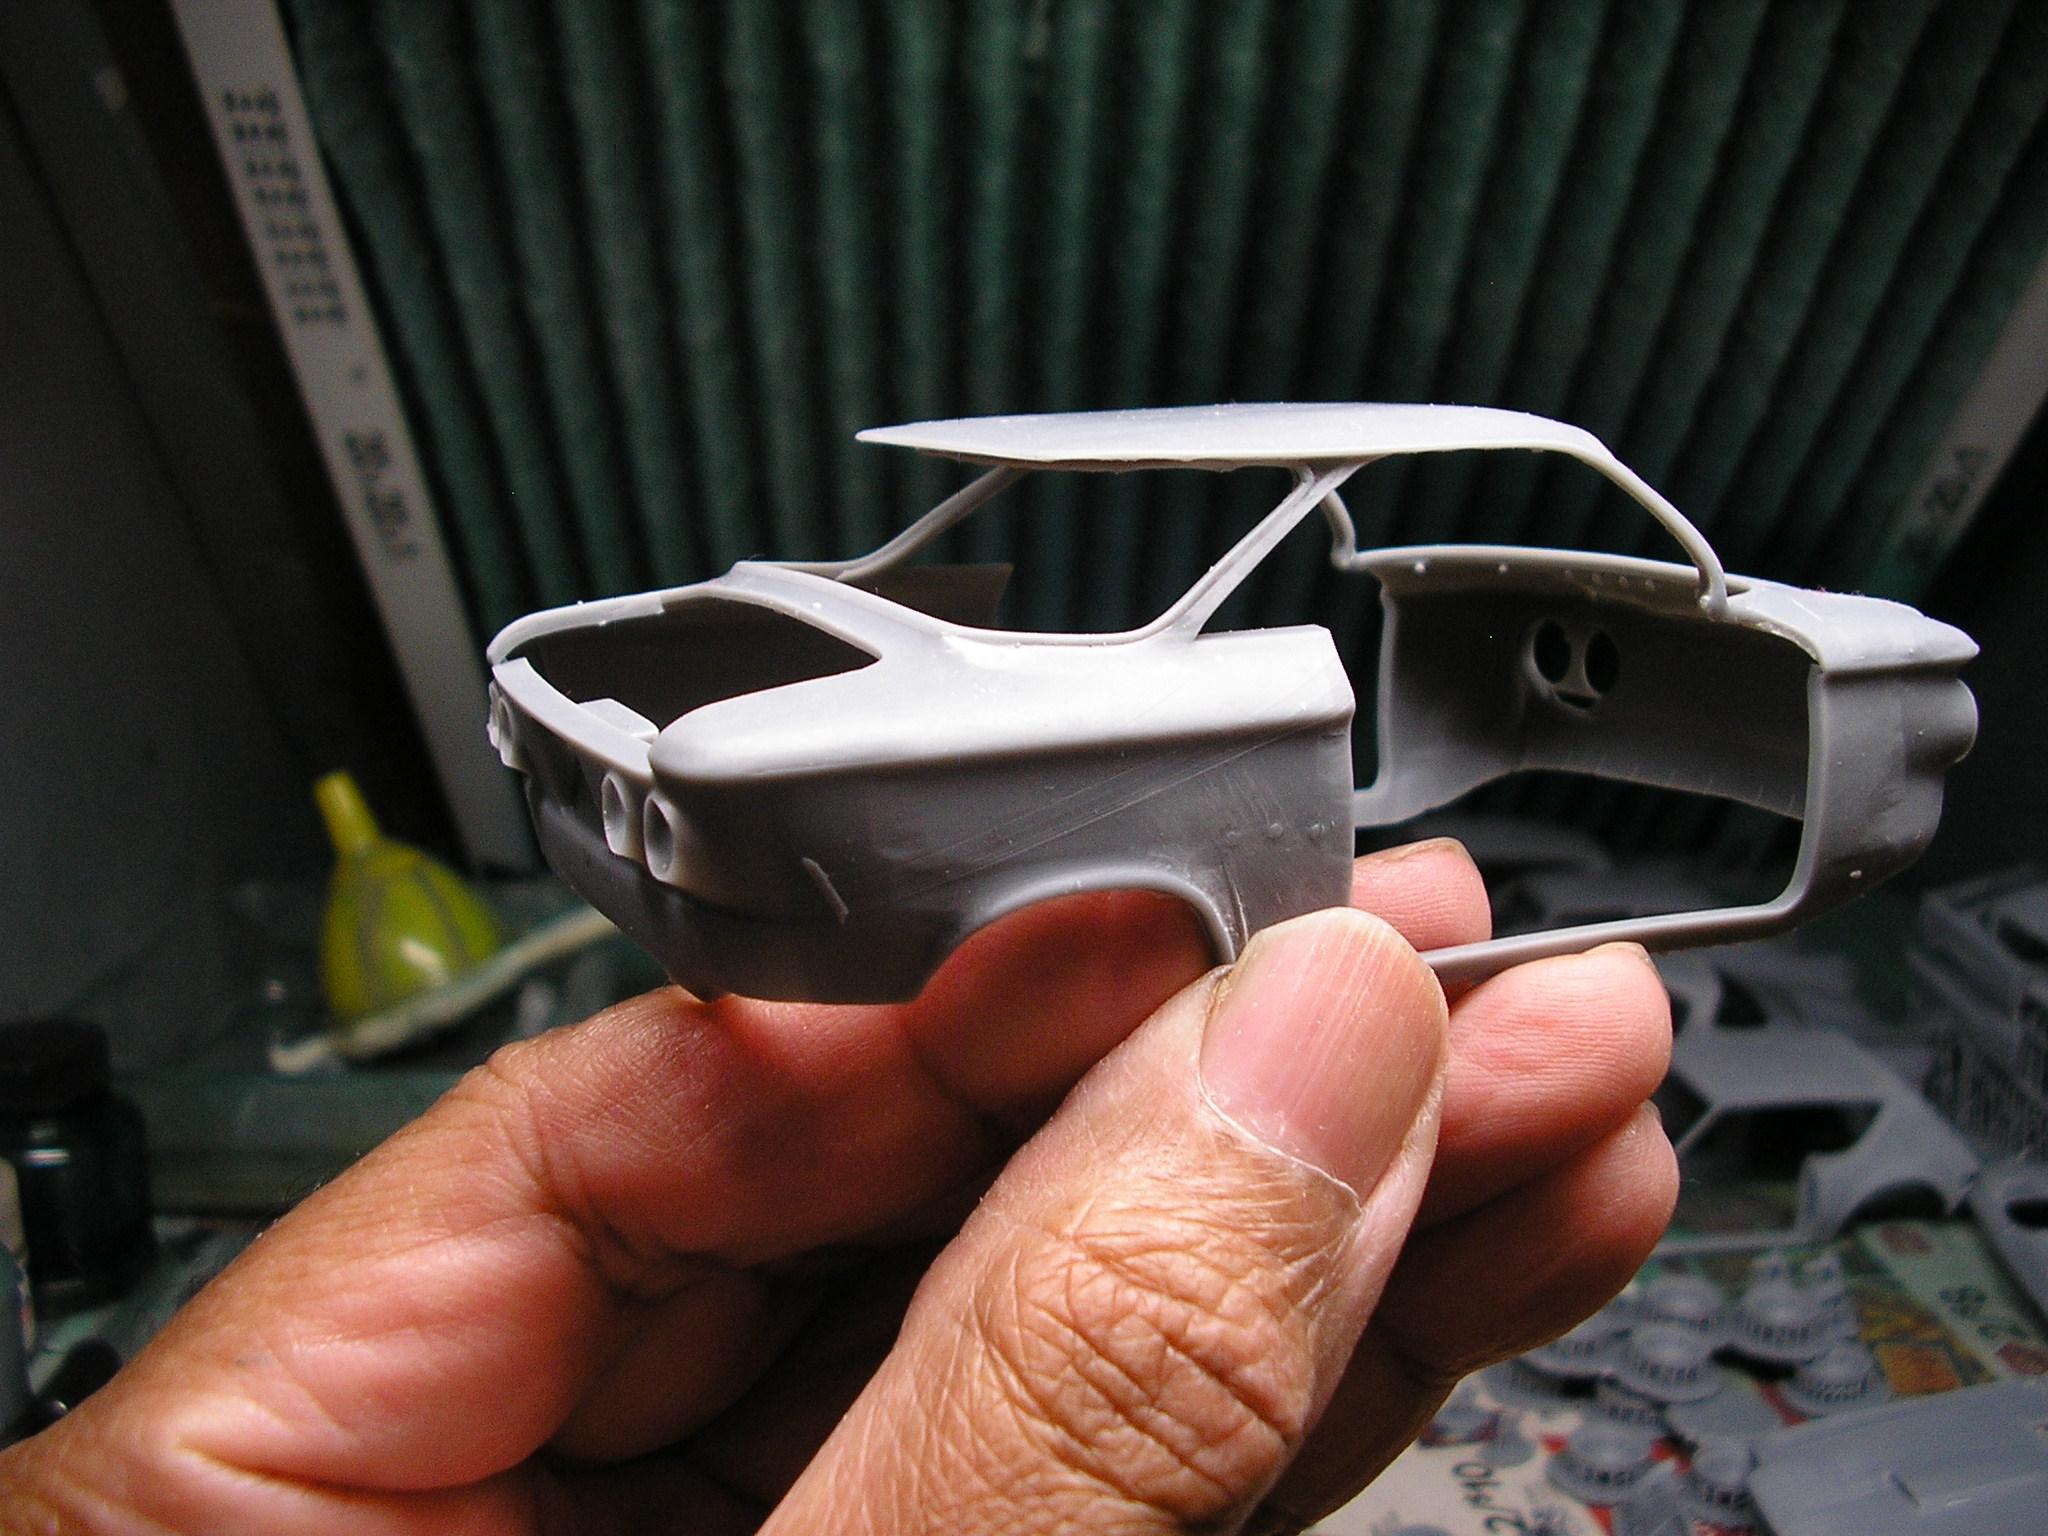
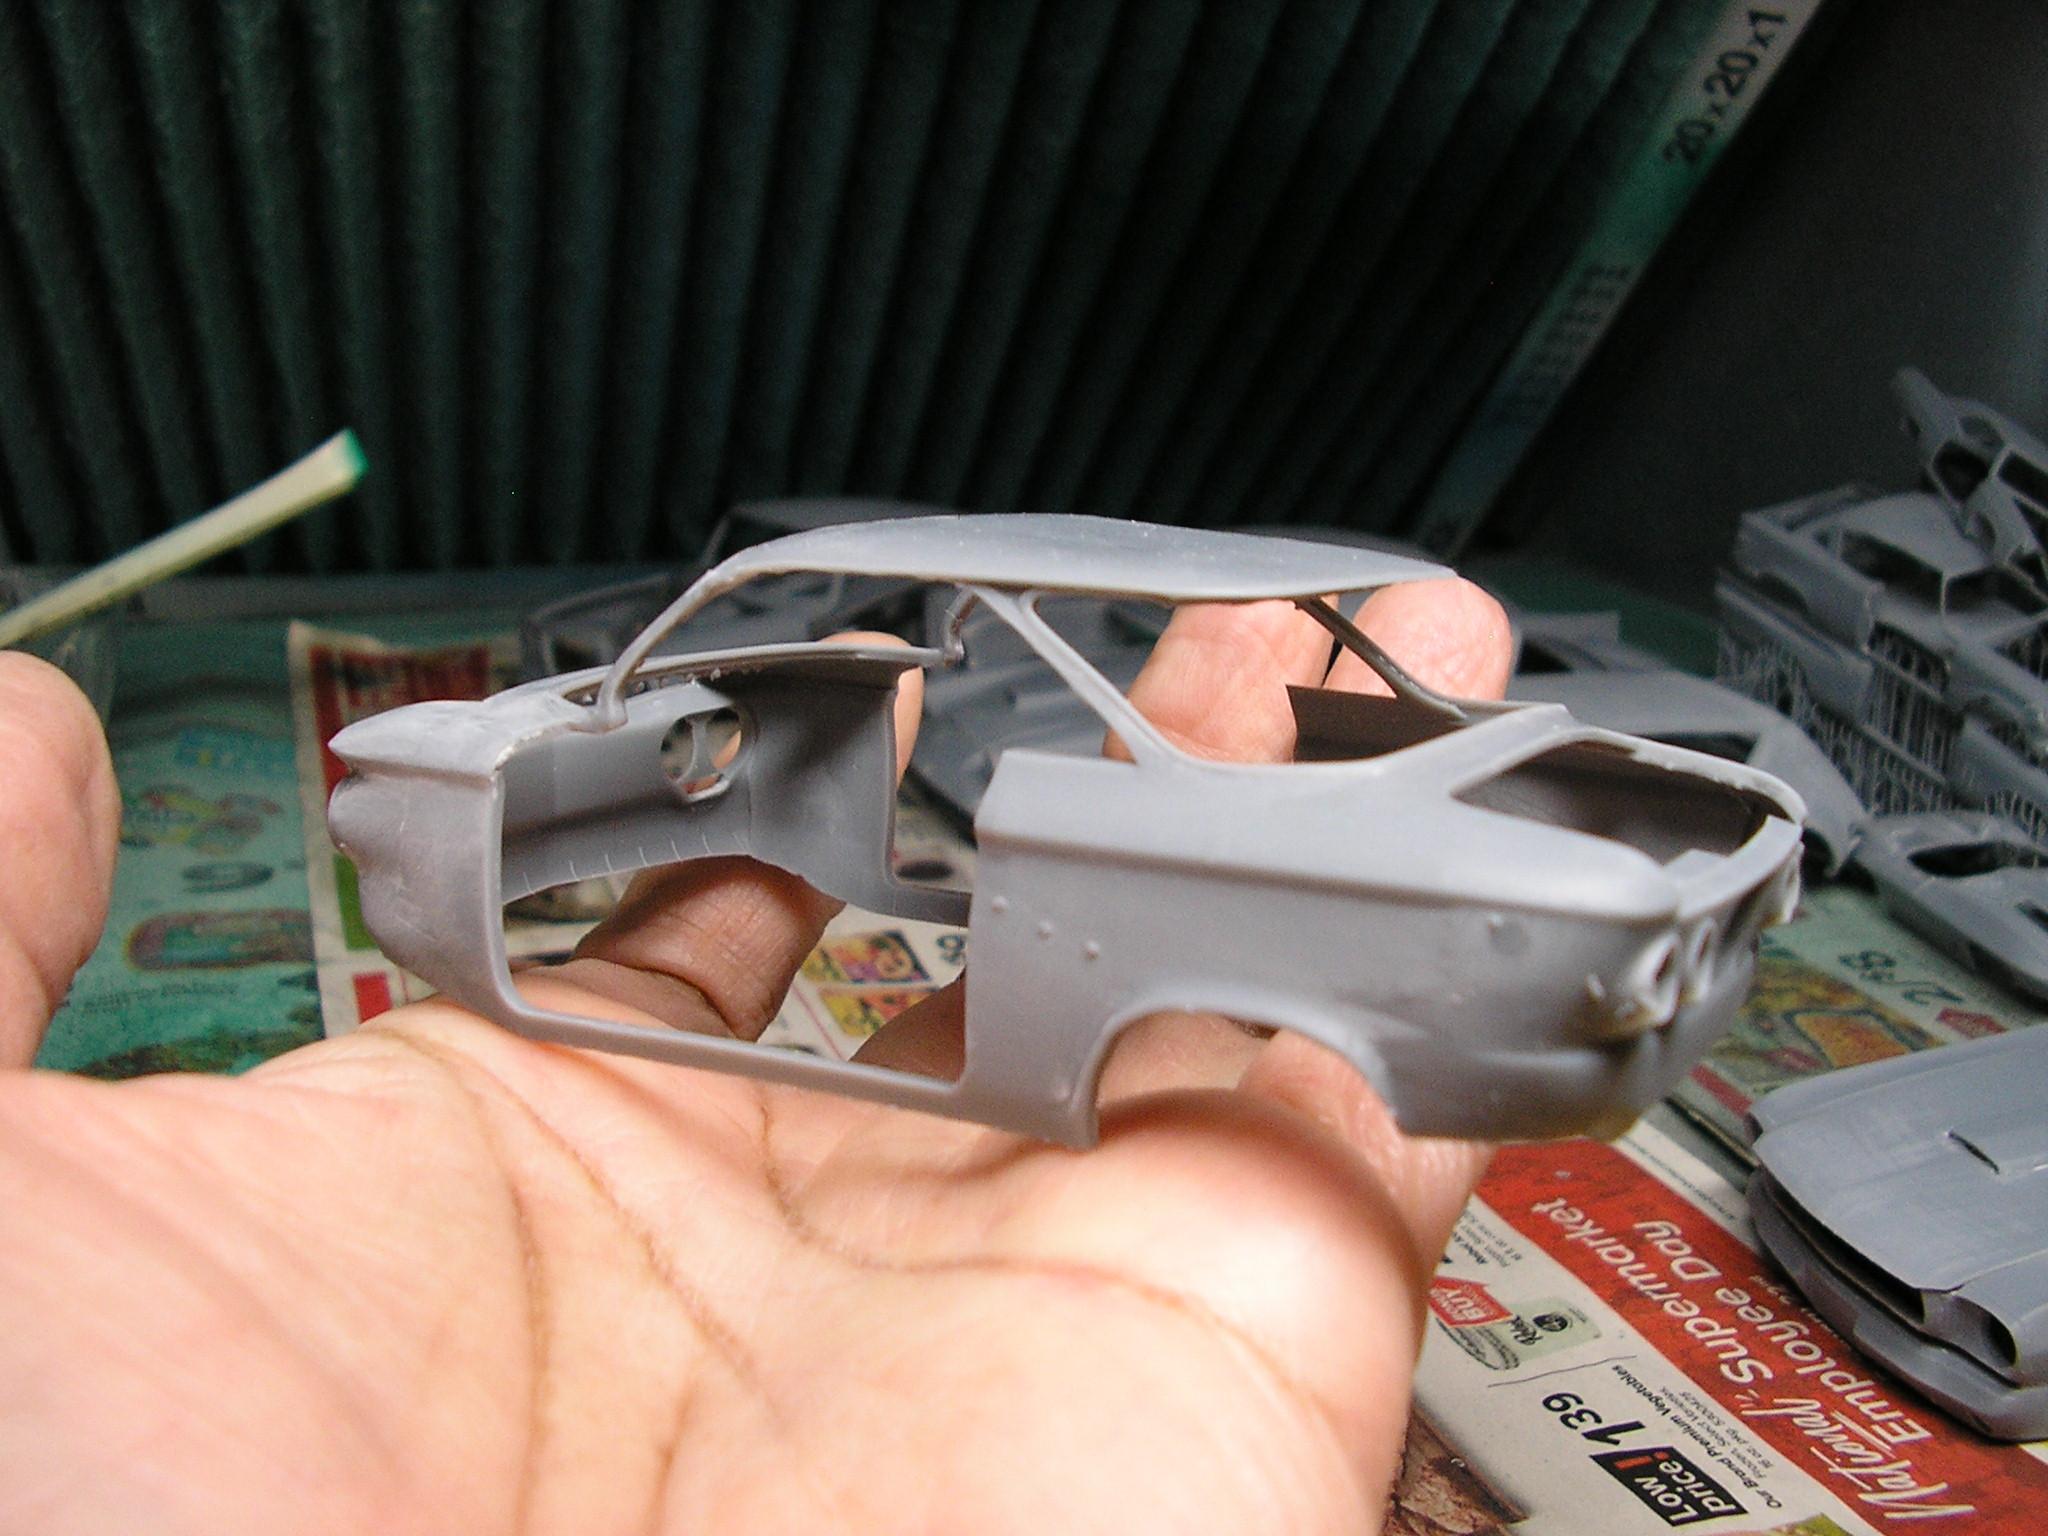
This is one that finished printing overnight, and it's another file I got from EDM 3D Garage. A car that I saw a resin kit of on eBay maybe three years ago, but got outbid BIG TIME as the resin ended up going for well over $400. 1/25th 1967 Opel Kadett coupe which has the rarer fastback roofline you don't see out there on the roads any longer. Print time was about 15 hours with layer height @.030mm, and 2673 layers on a Phrozen Sonic Mighty 4K. I posted this over on FB, and folks have gone crazy over it. I get the questions from time to time, what do I plan to do with the bodies? My intent isn't always to build the car I print, I just happen to like that particular car, and want a model of it. I also know due to the subject matter, the car will never see the light of day on the hobby shelves. I also have to put up a disclaimer on FB posts that I do NOT sell my converted files, or do I print for others. That would VERY quickly turn into a burden, and be a hobby killer. OK.......a bunch of pics of how it turned out............ The hood and trunk will get printed later in the smaller printer. I can tell you that converting the files for this was MANY keyboard hours on the laptop, and some parts of it were trickier than others. I was just having the conversation with someone that 3D printing is far from plug and play due to all the conversion/scaling work, and then there's getting the proper wall thickness so it will print properly. I made this one particularly on the body, a bit over 2mm thick due to the roof shape at the C pillar. What's next? I just finished up the conversion work for this............... 1958 Packard Hawk also from EDM. That I'll run sometime tomorrow, and this was VERY tricky to get the wall thickness dialed in due to those tailfins. I did a tiny 1/43 test run last week, which showed up some trouble spots. I got those sorted out and this should print without much issue.
-
Oh yeah, I've been doing that for quite a while in Blender. The problem comes in however that not all models are designed that way, as I've got a number of them that no matter what you do, Blender will not separate the parts UNLESS you manually copy the faces in edit mode, duplicate the object, save it, then go back and delete the faces and import the object again under a new part name after it's been separated. Many times, this isn't known until AFTER you bought the file and have to find out. The designer if available, should be able to tell you what parts are separated where and how.
-
The first one is printable, but to be honest, it looks like it's meant more for a FDM printer (filament), than a SLA printer which is the vat type. The second one is a .obj file and could be made printable, but not without a lot of work to get the proper wall thickness. The third one while printable, I wouldn't trust it as looking at the rockers and wheel wells, is just too thin for me. It'll print, but then you might have a tough time getting it off the supports with the risk of the resin "tearing". The last one also looks like it's meant for a FDM printer also. The topology on that one is reeeeeaaal rough. You'd have to do an awful lot of editing in Blender to straighten that one out, and if it's too much for Blender to handle, the program can crash without warning. Models that are solid like that can be edited to be hollow, but get set for a great deal of work to get rid of all the faces/vertices on the bottom and inside the body. There's no way really to tell if a file can be separated without first contacting the designer. It'll all depend on how they formatted the file, and how they designed what parts are to be separated where. The printable files can be tough to thicken up if too thin, as they've already been "altered". Yet again another reason I'd rather do my own files from the very beginning (.obj), than to try and fix another file that's already been thickened up in many cases. On Cults, usually if the model is displayed in blue, the file is already printable. The file type should be listed on the side------.STL files mean they are printable, but that can be very subjective from file to file.
-
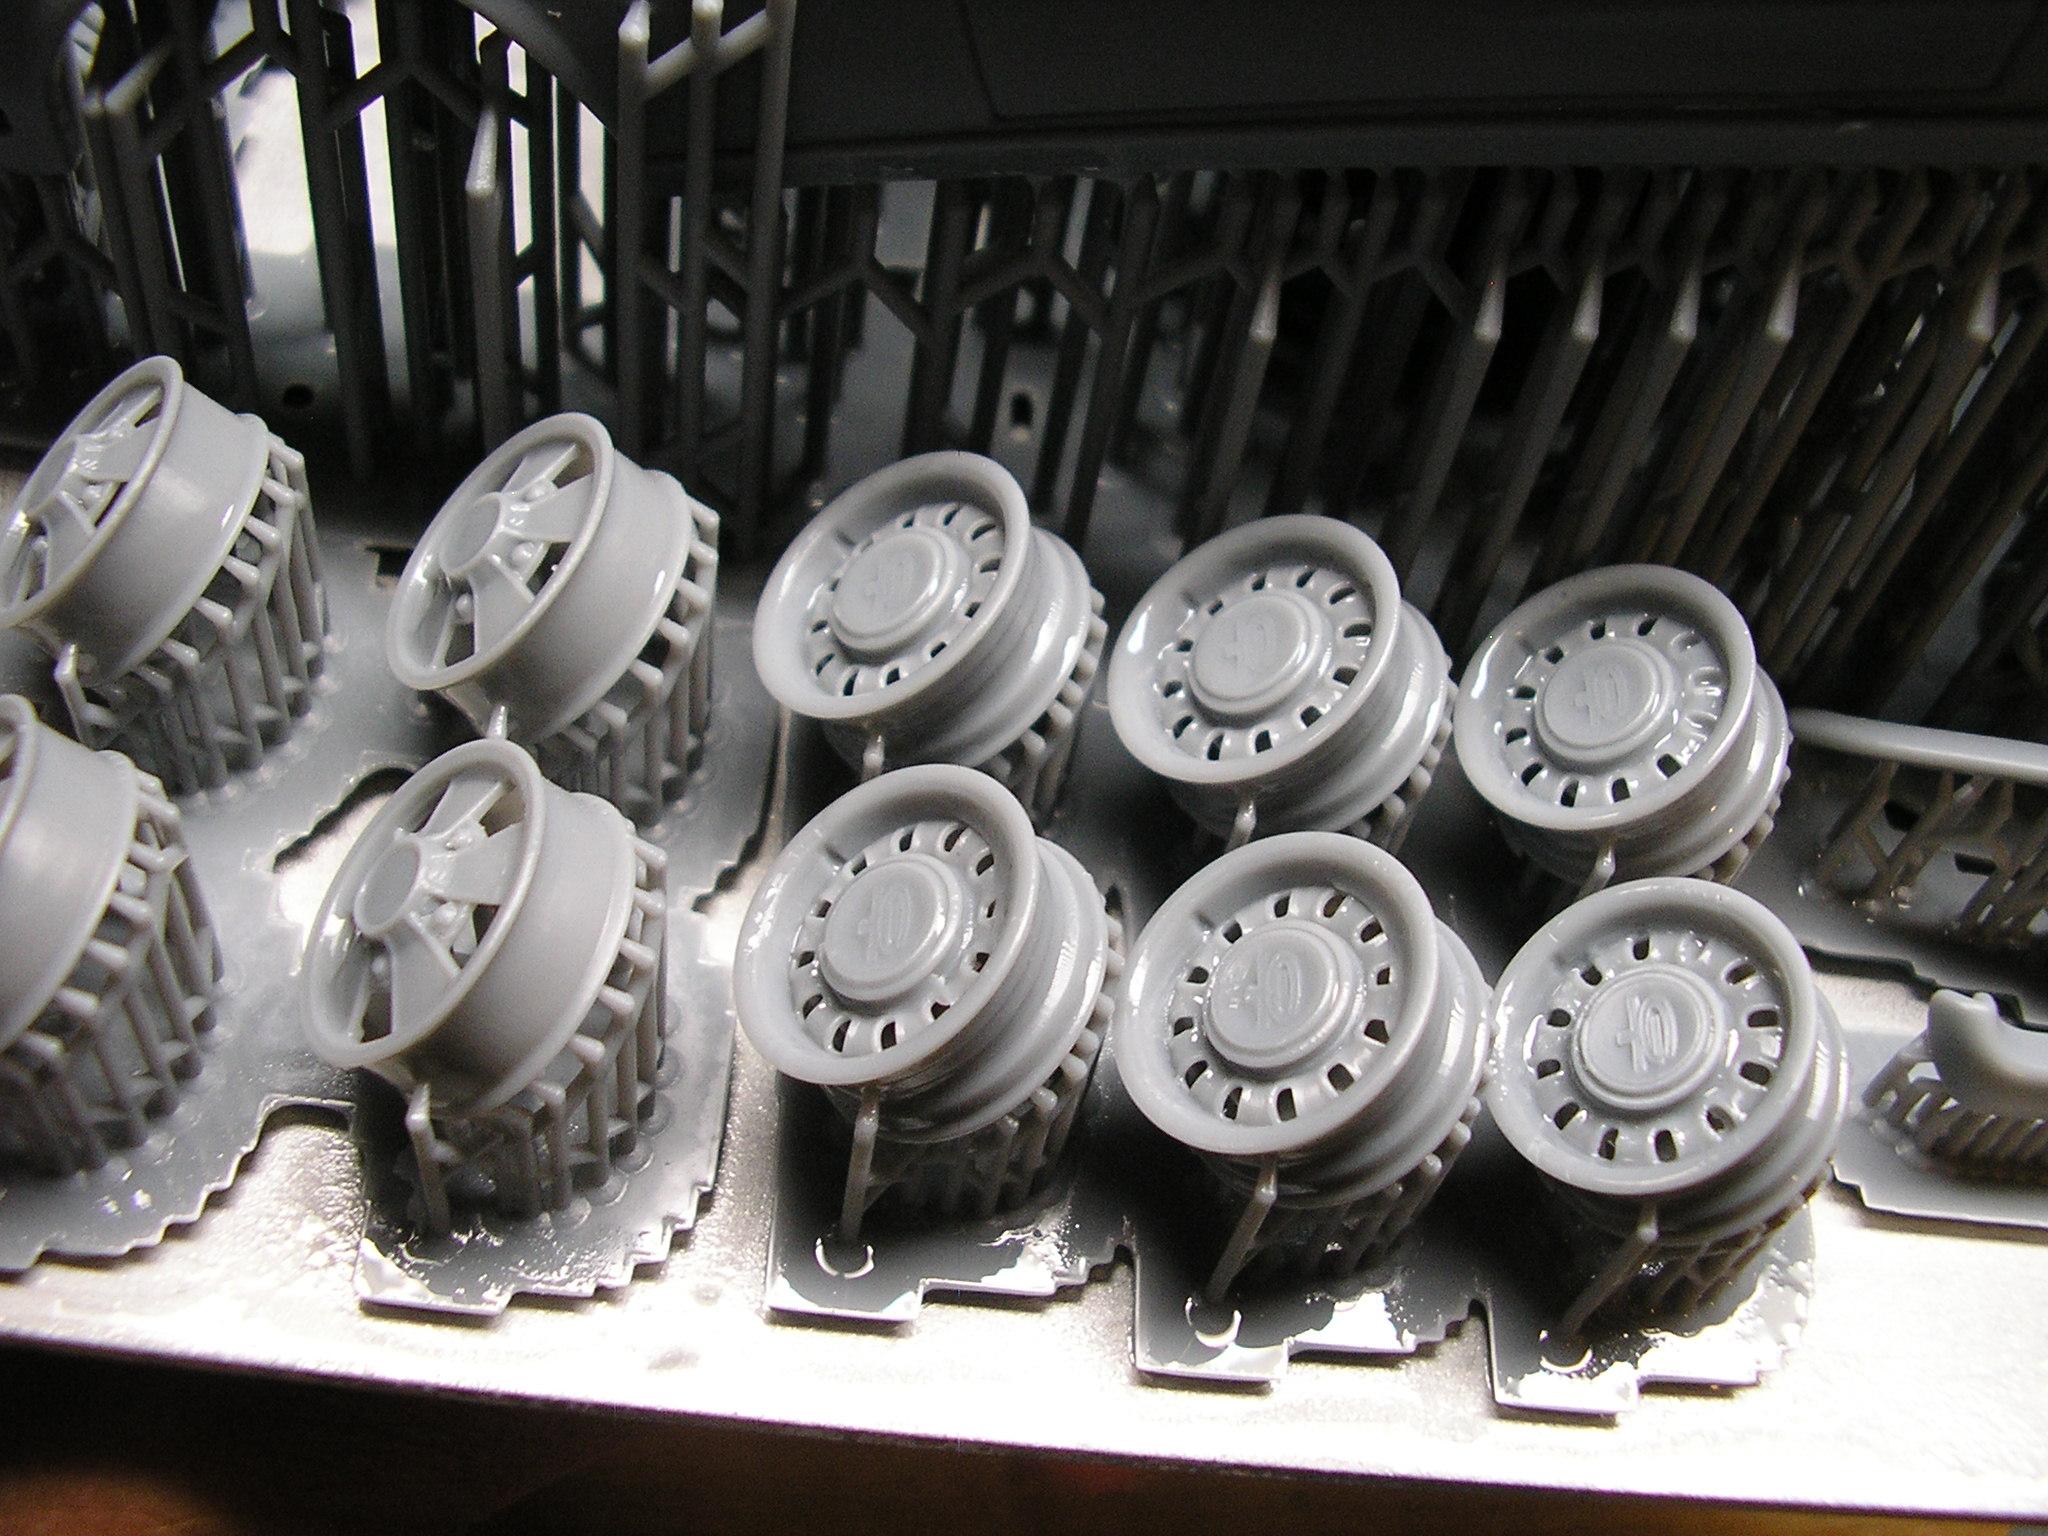
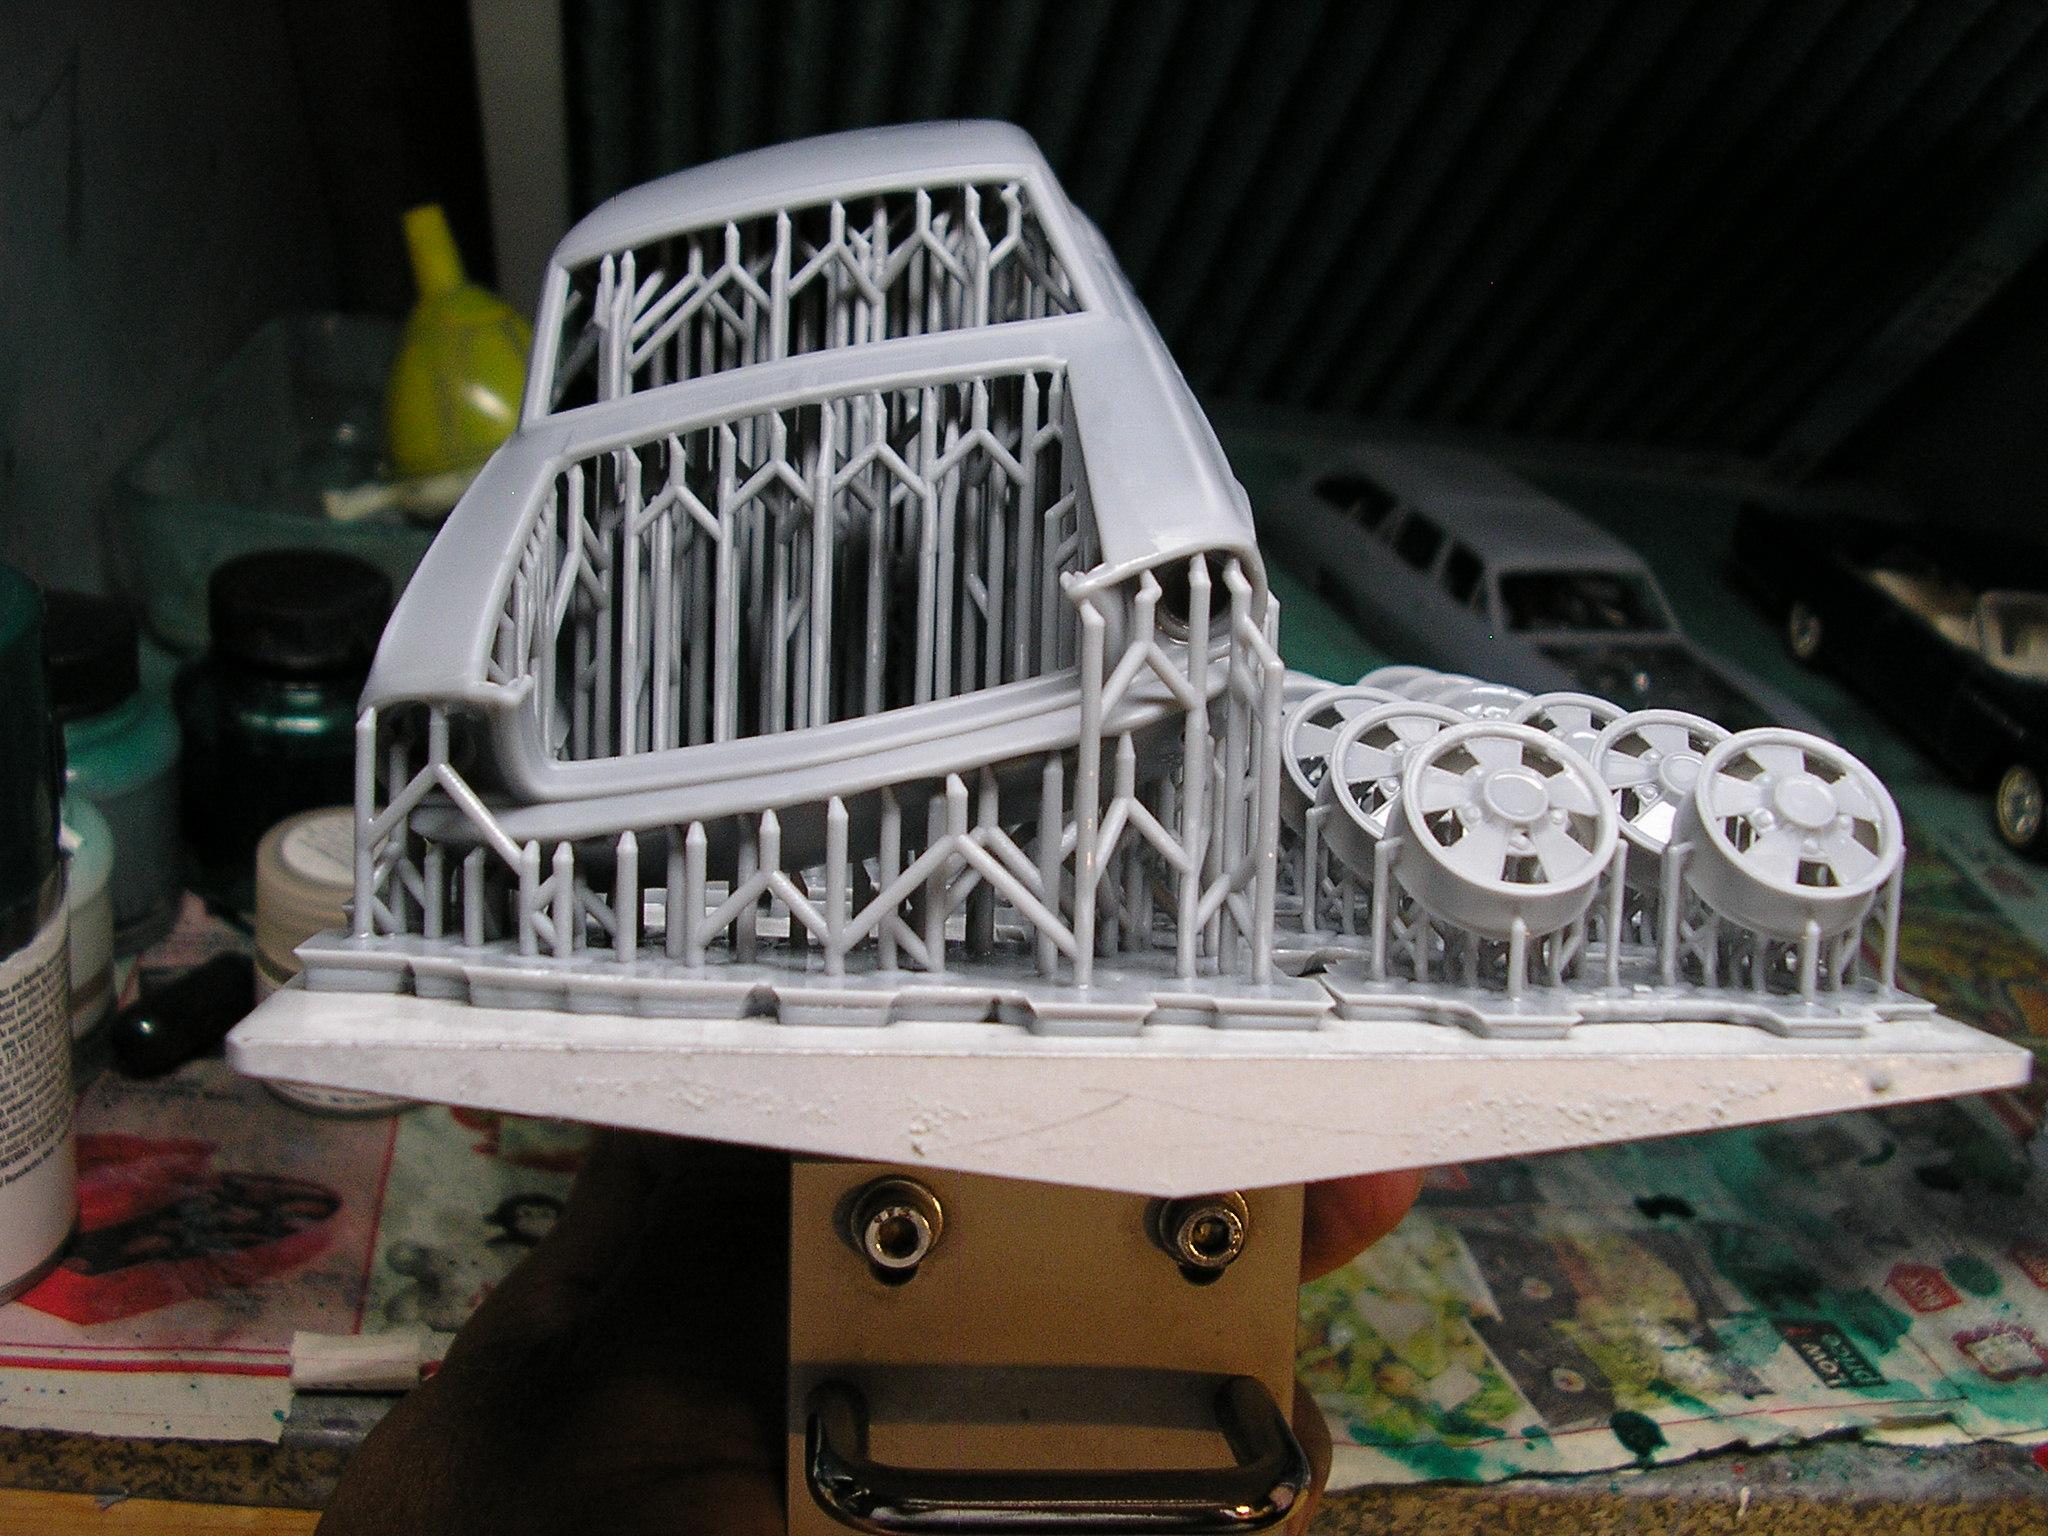
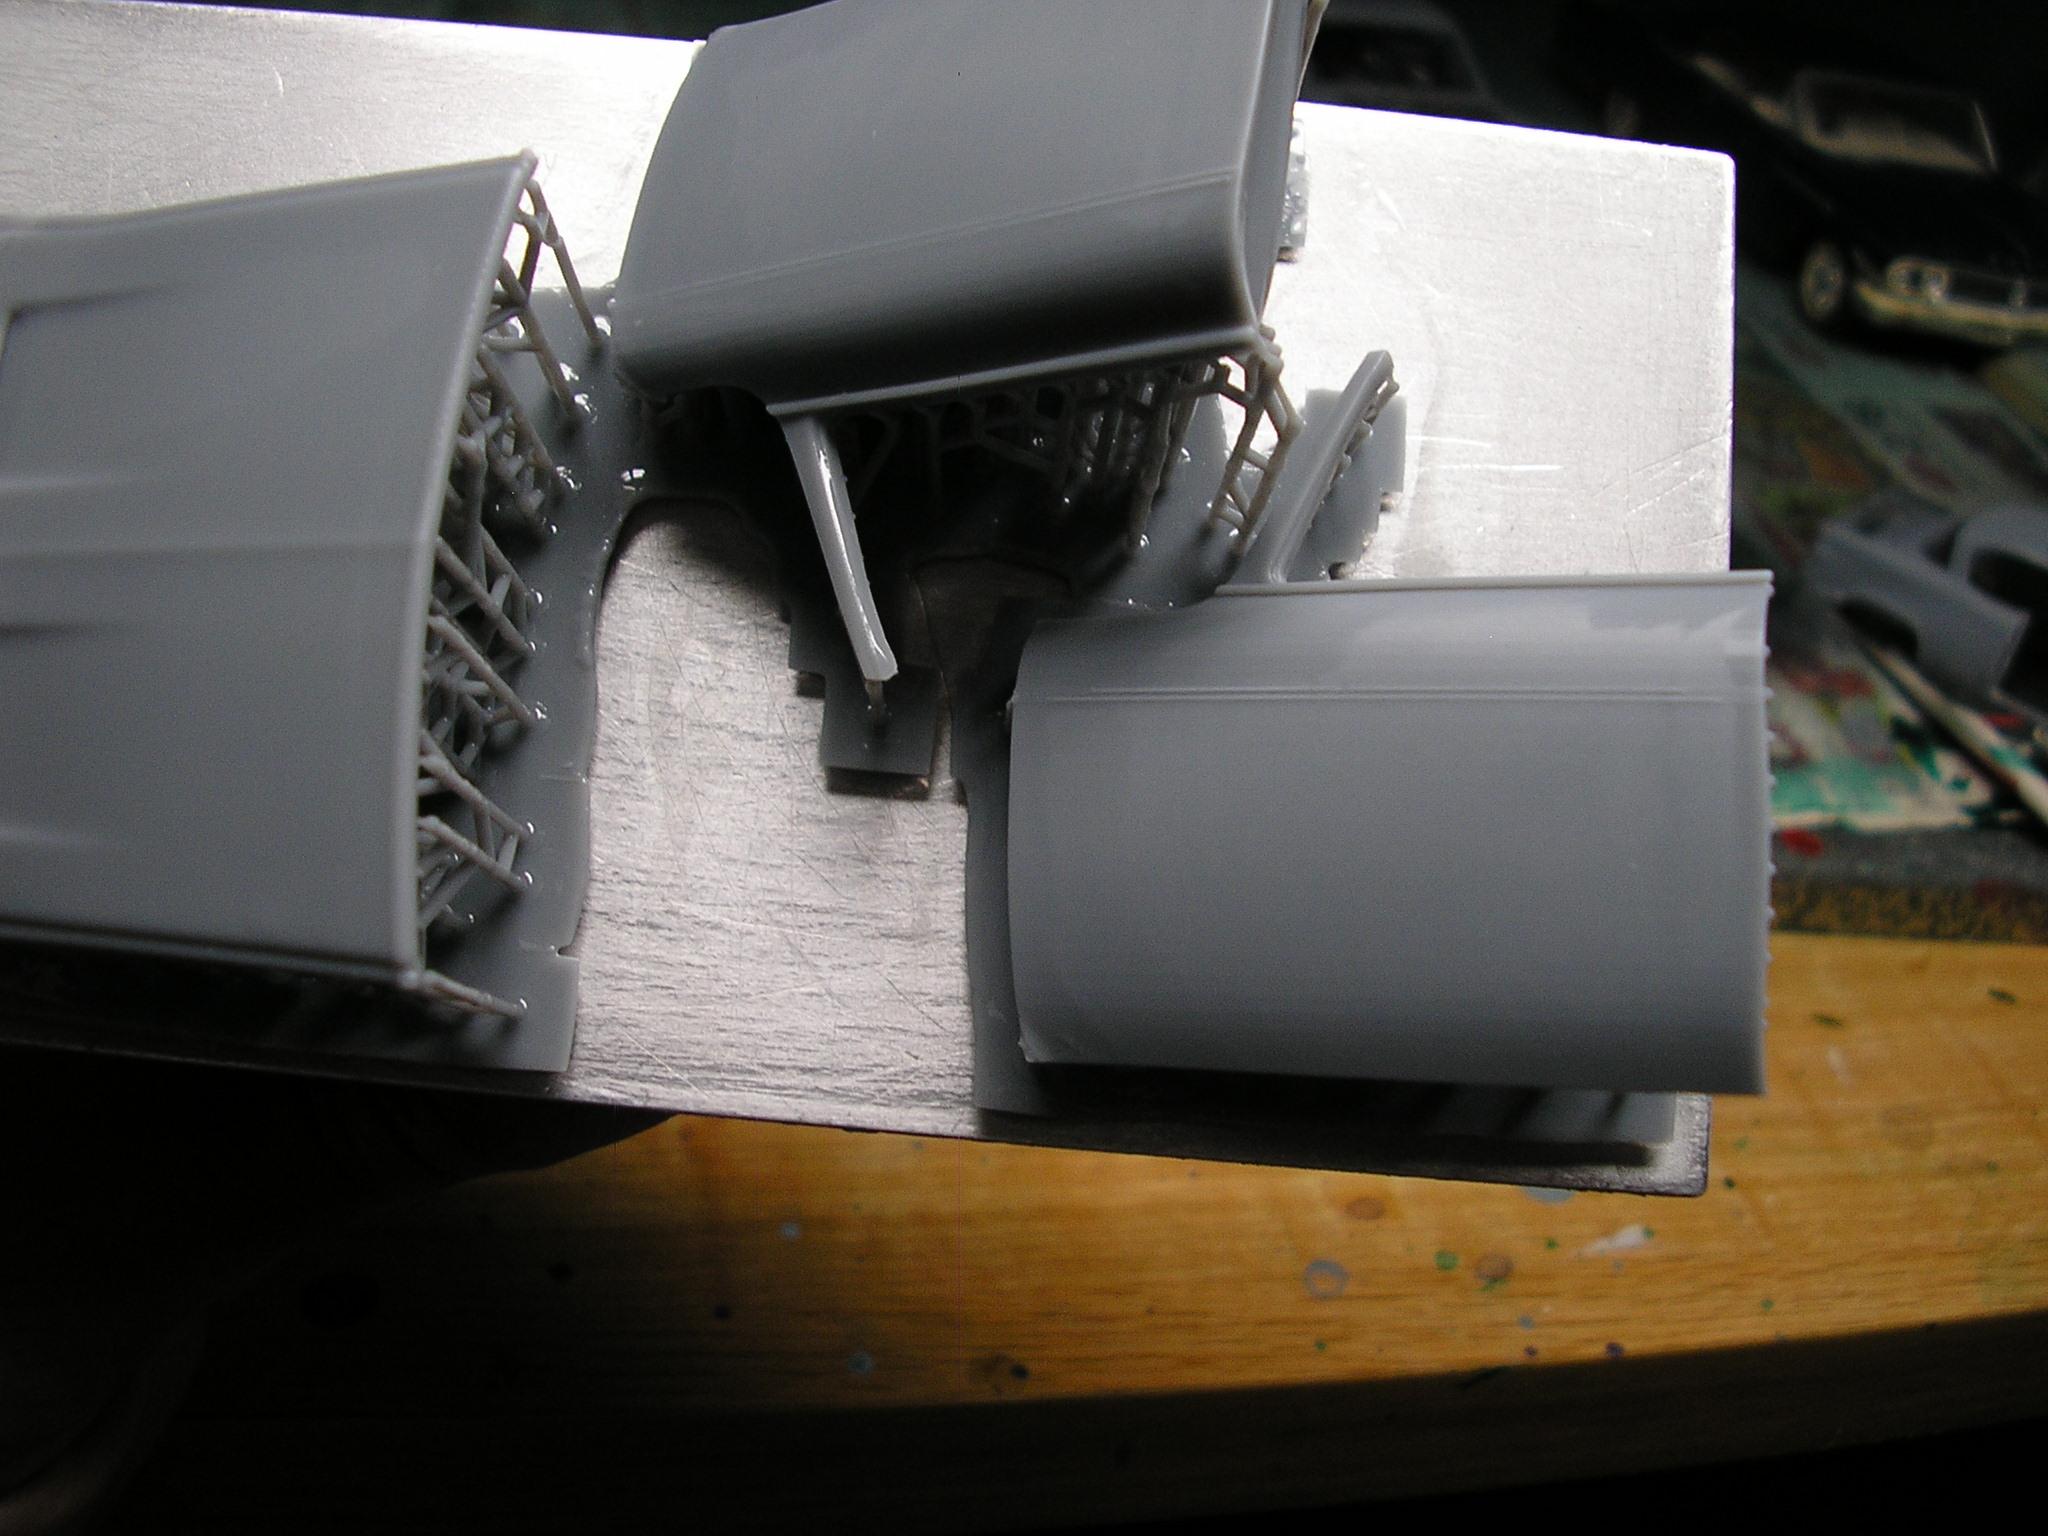
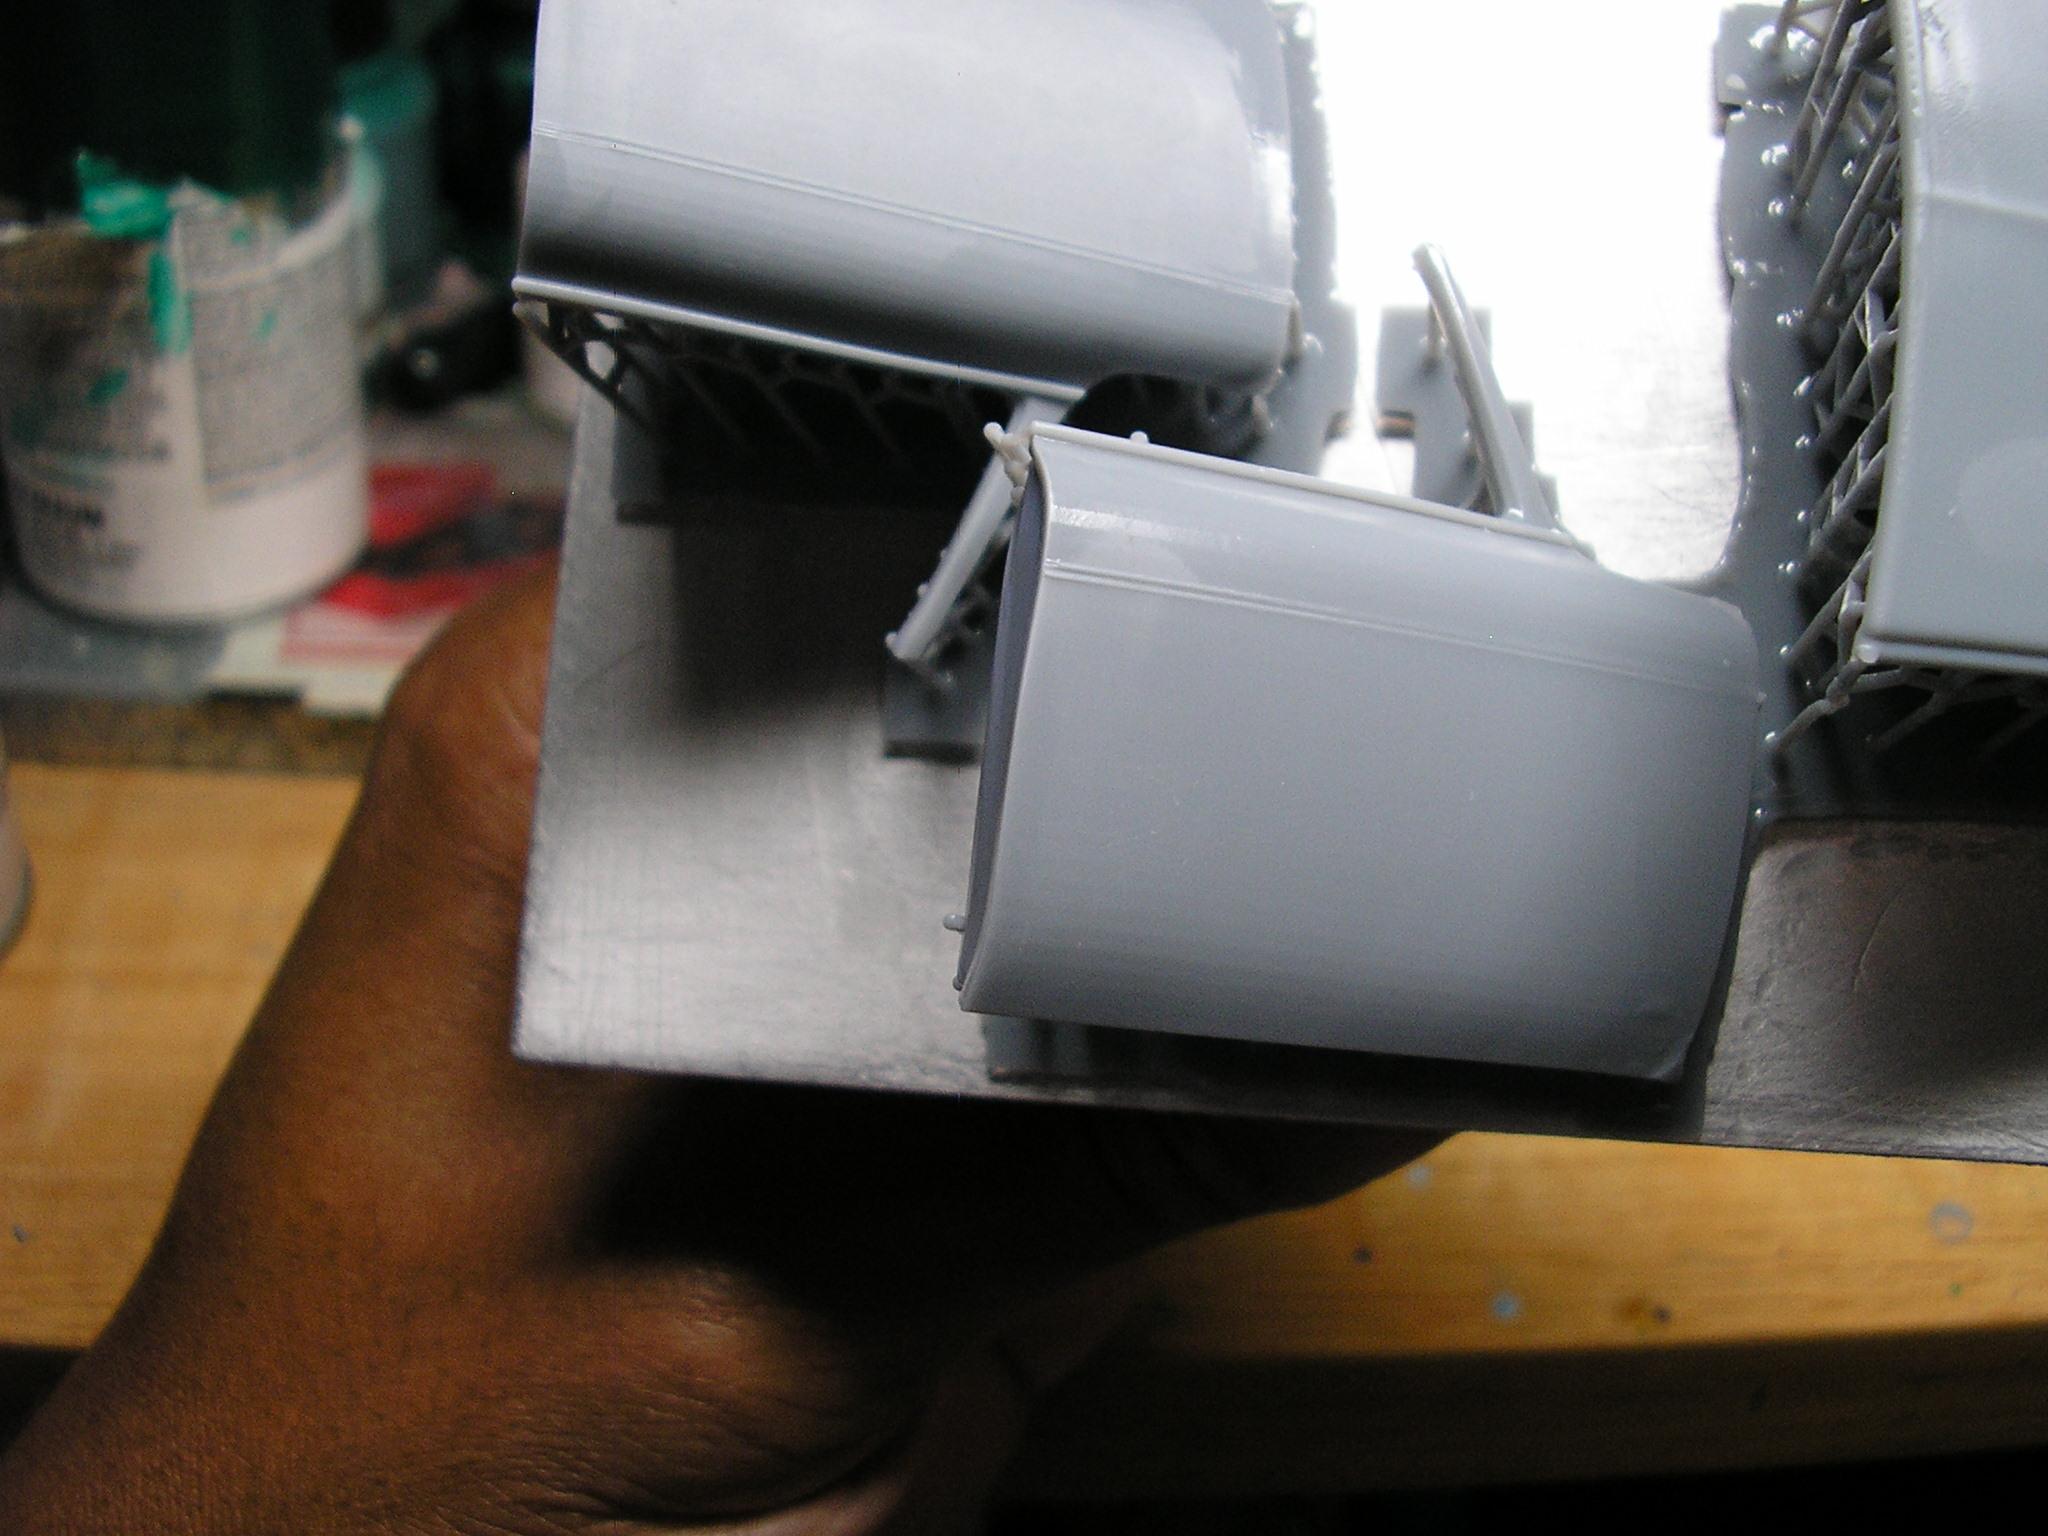
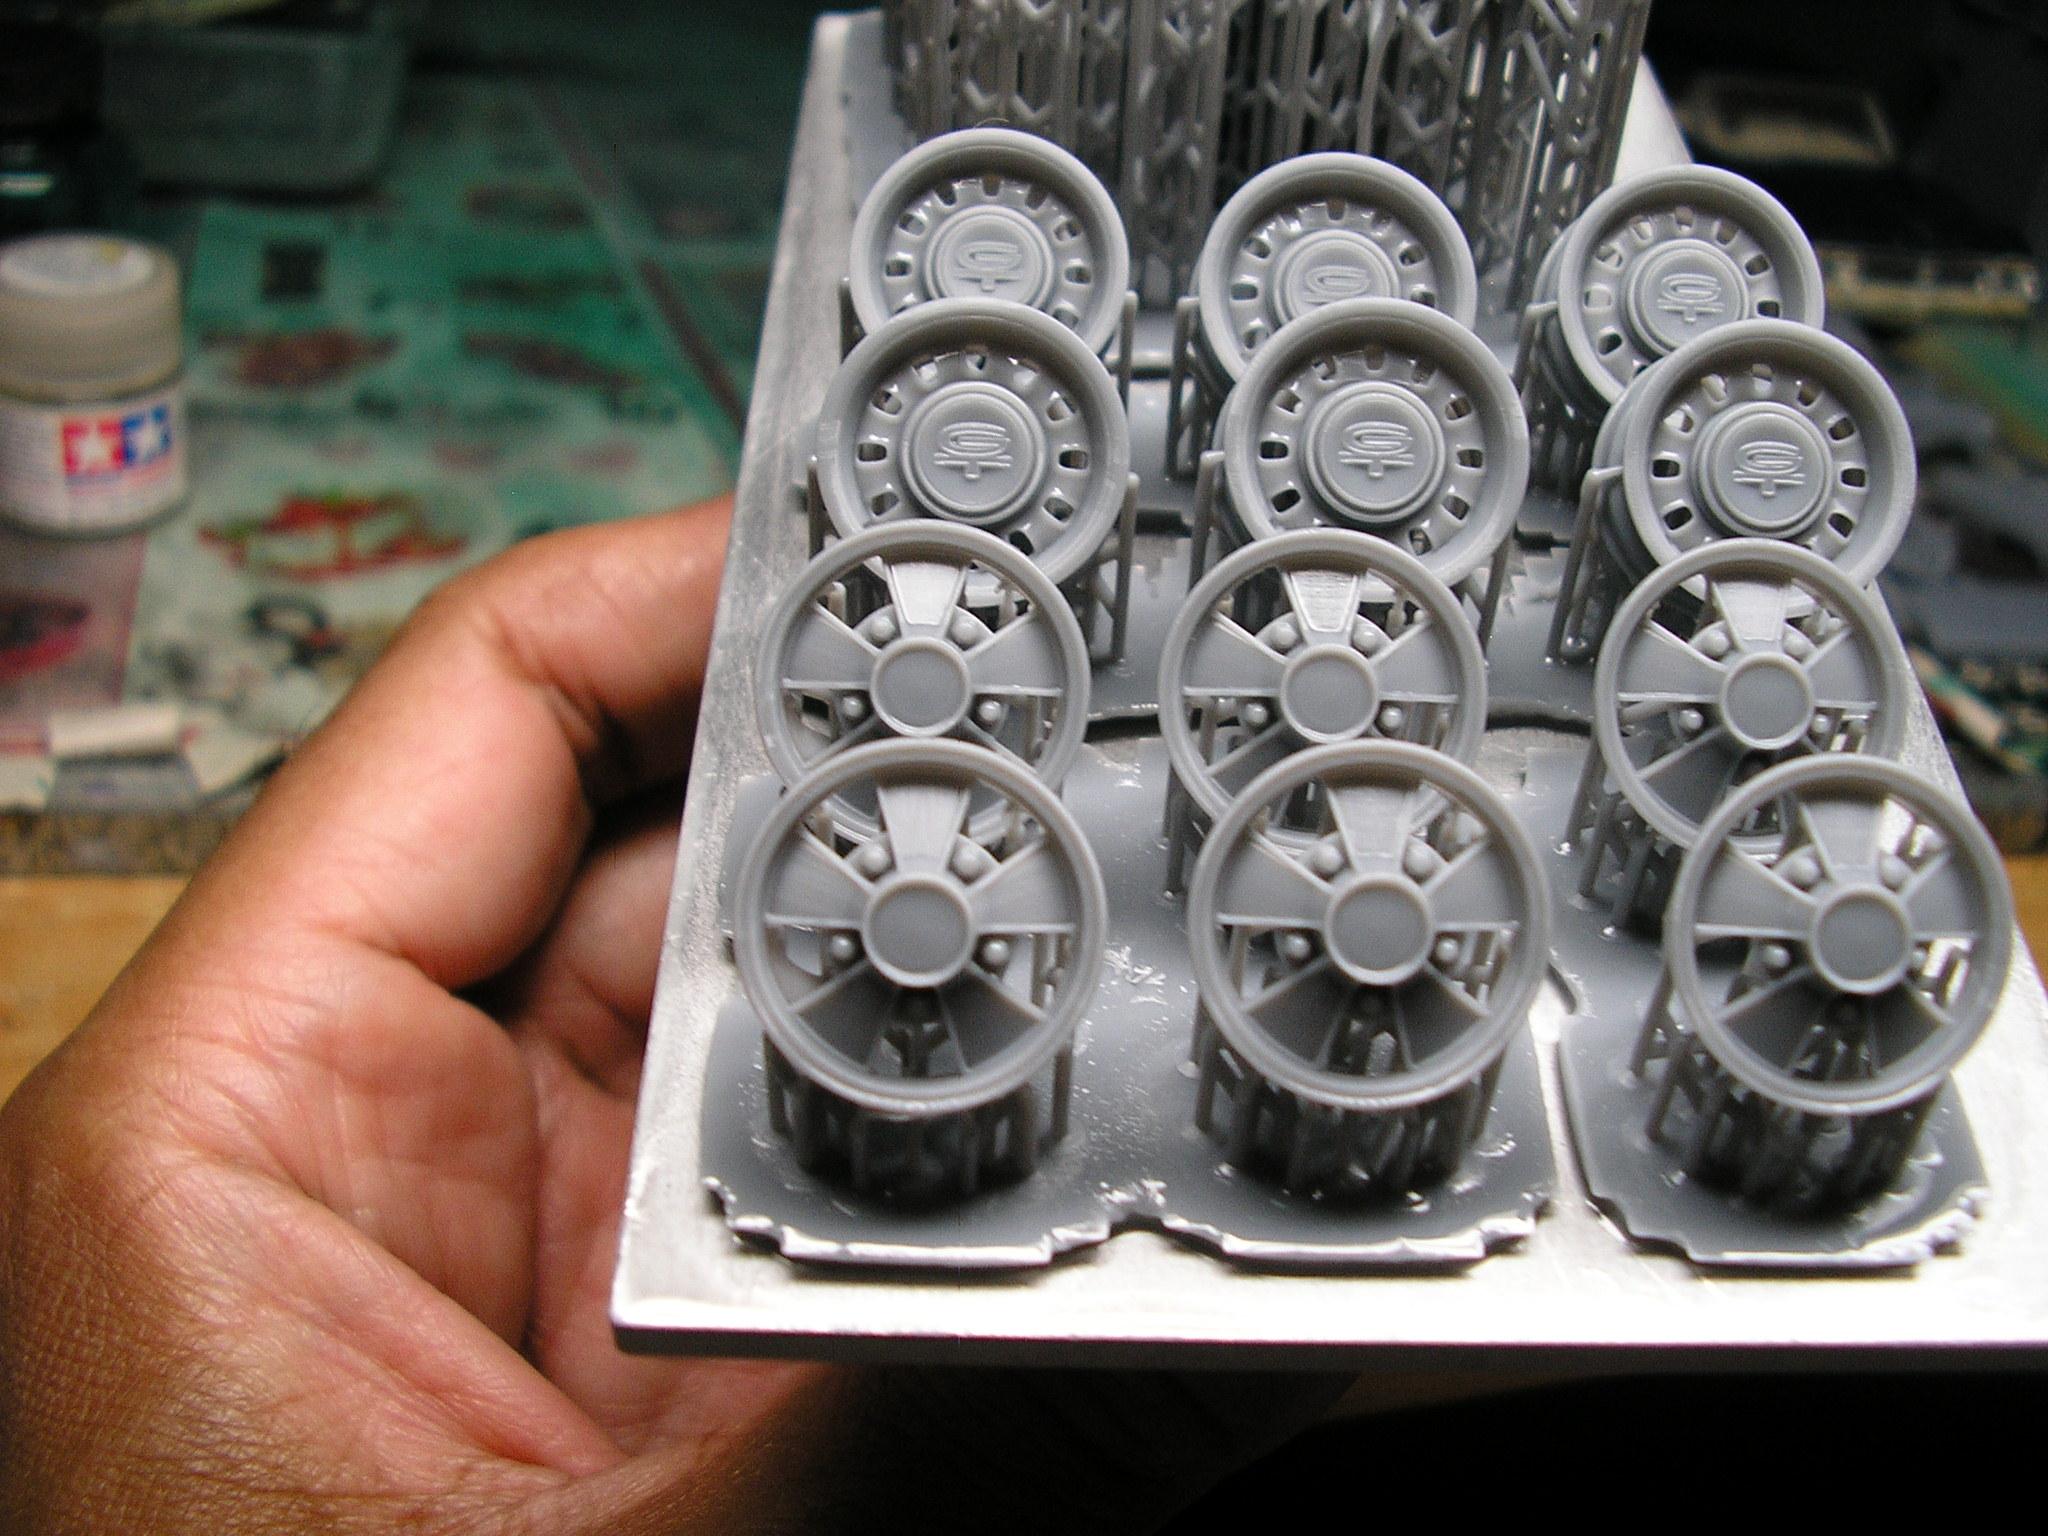
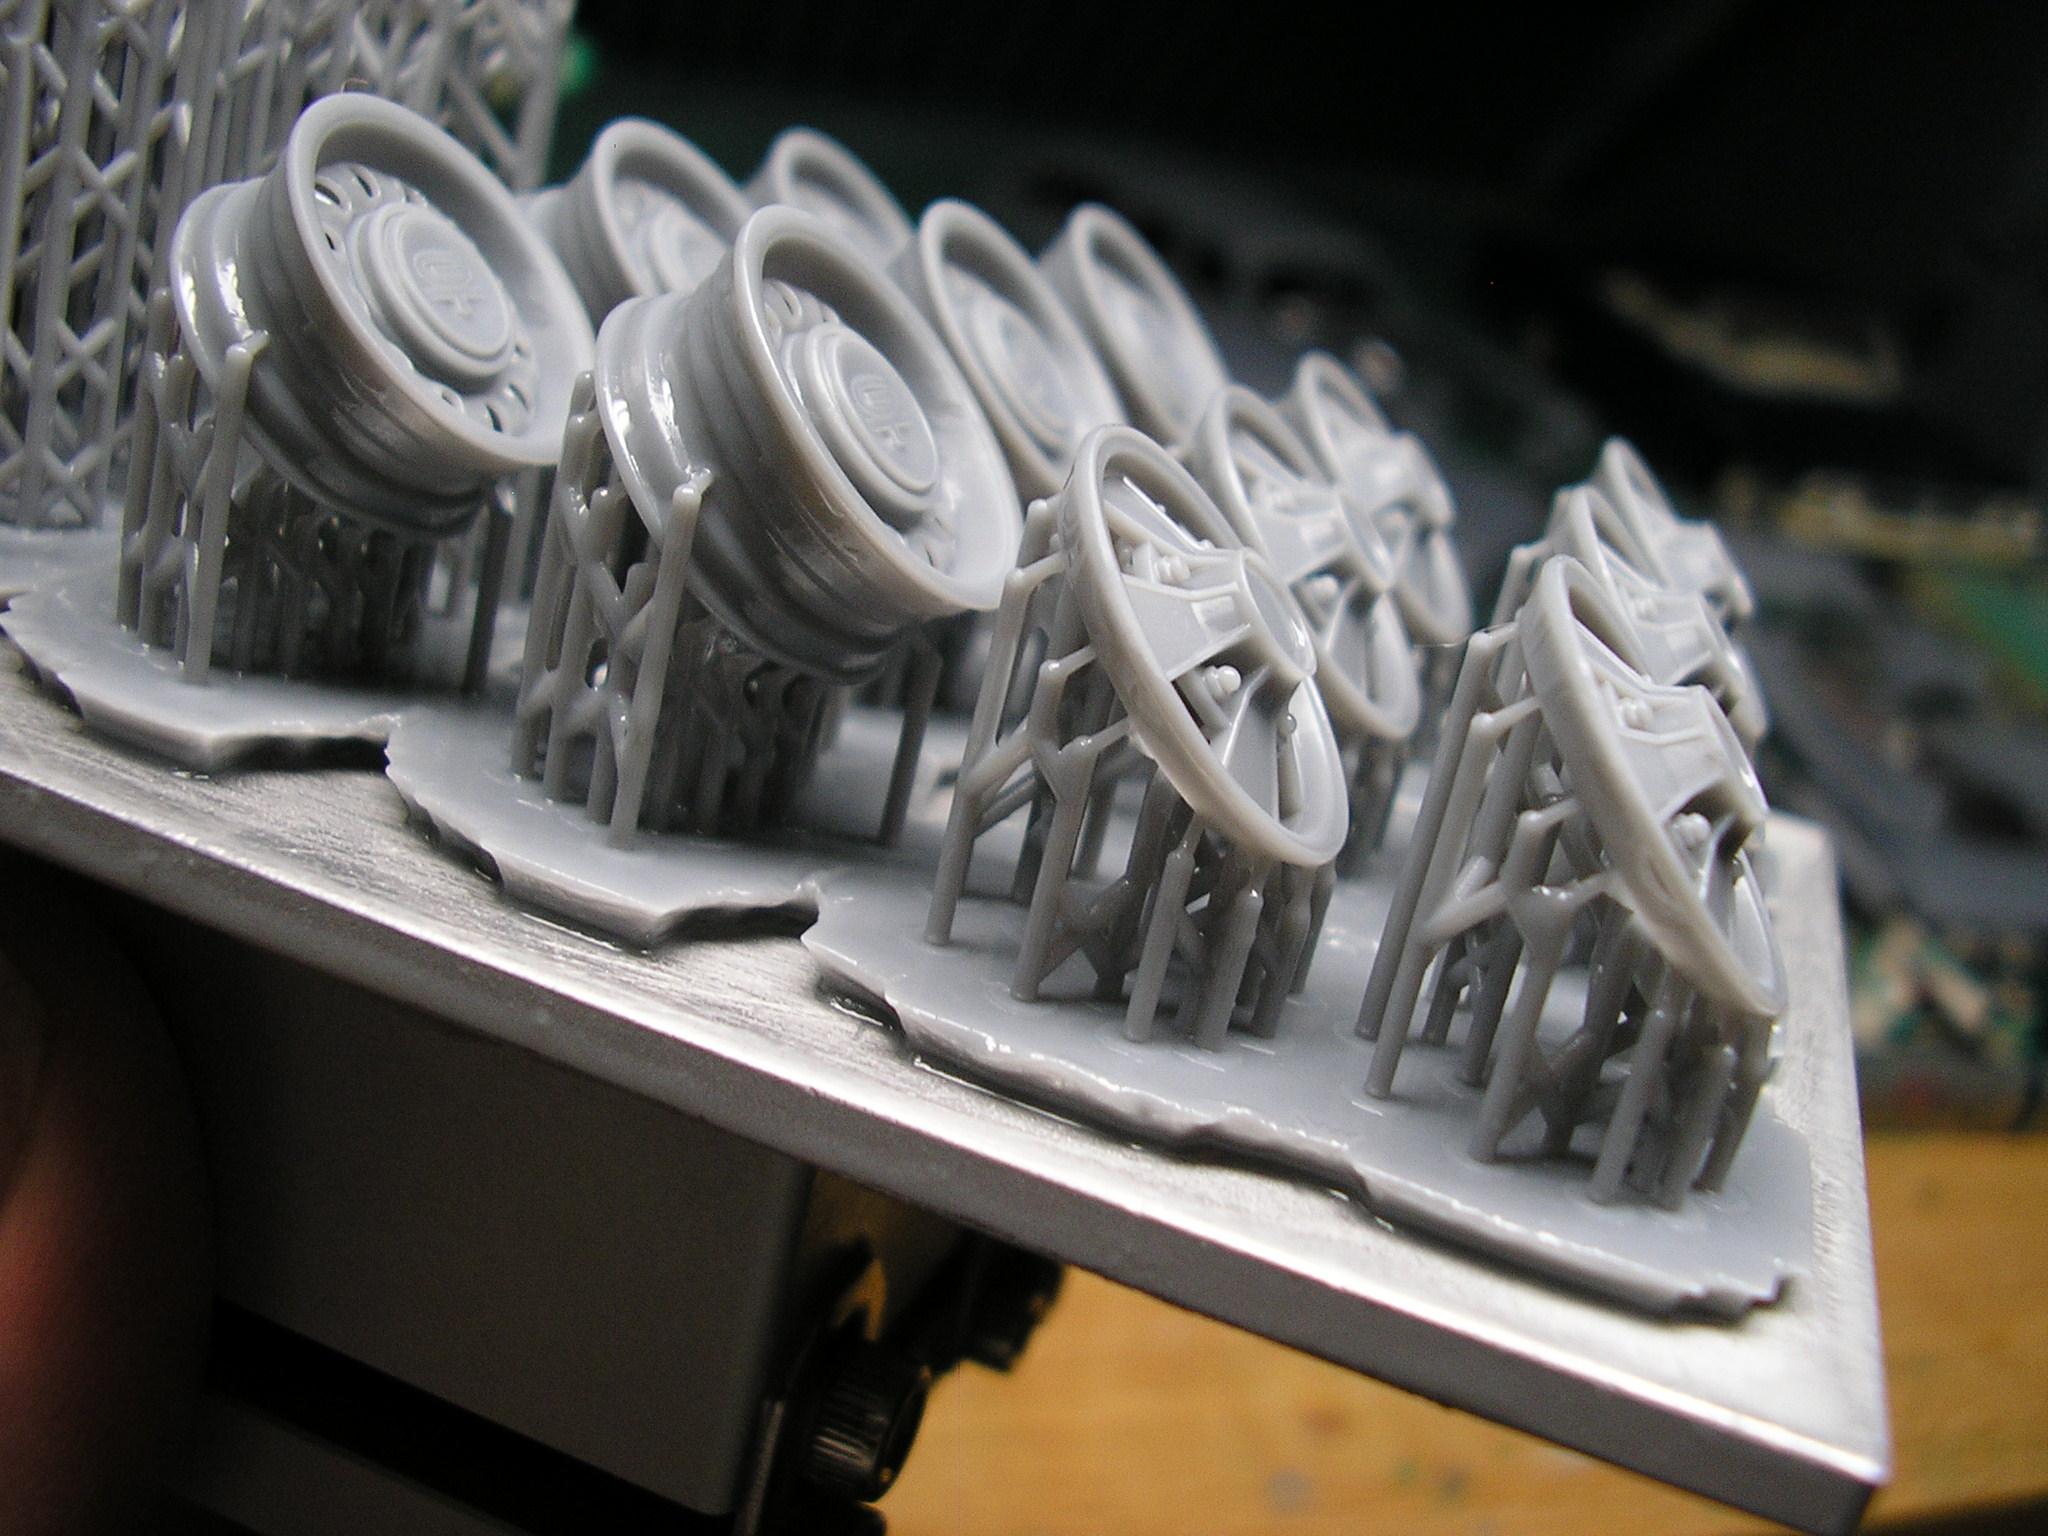
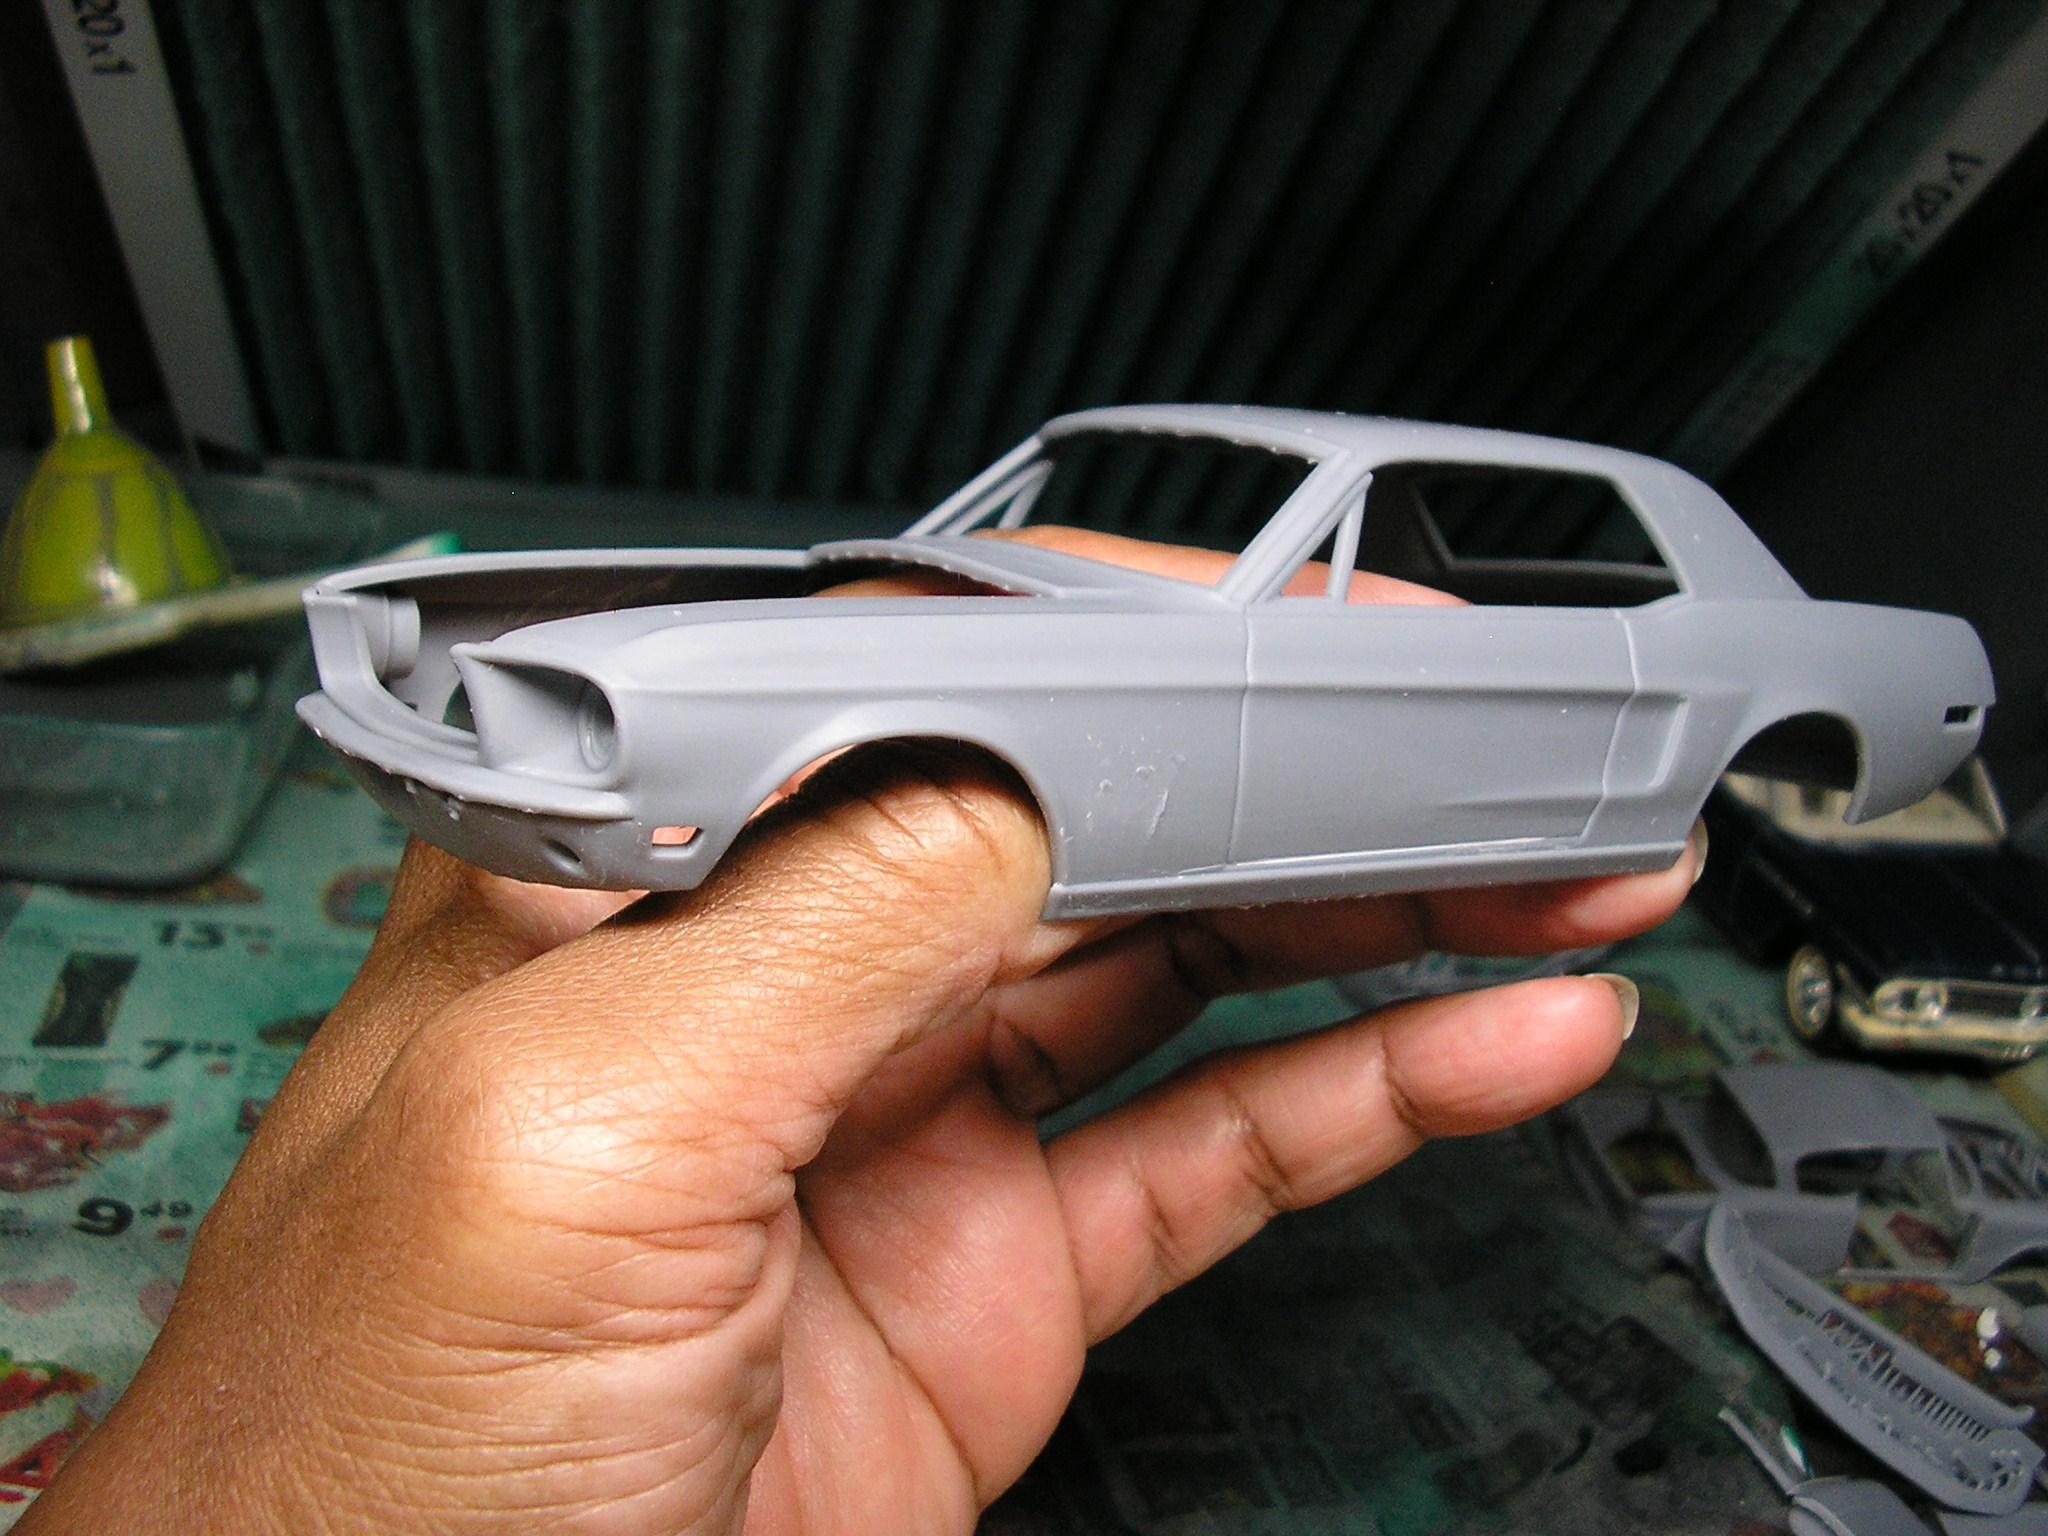
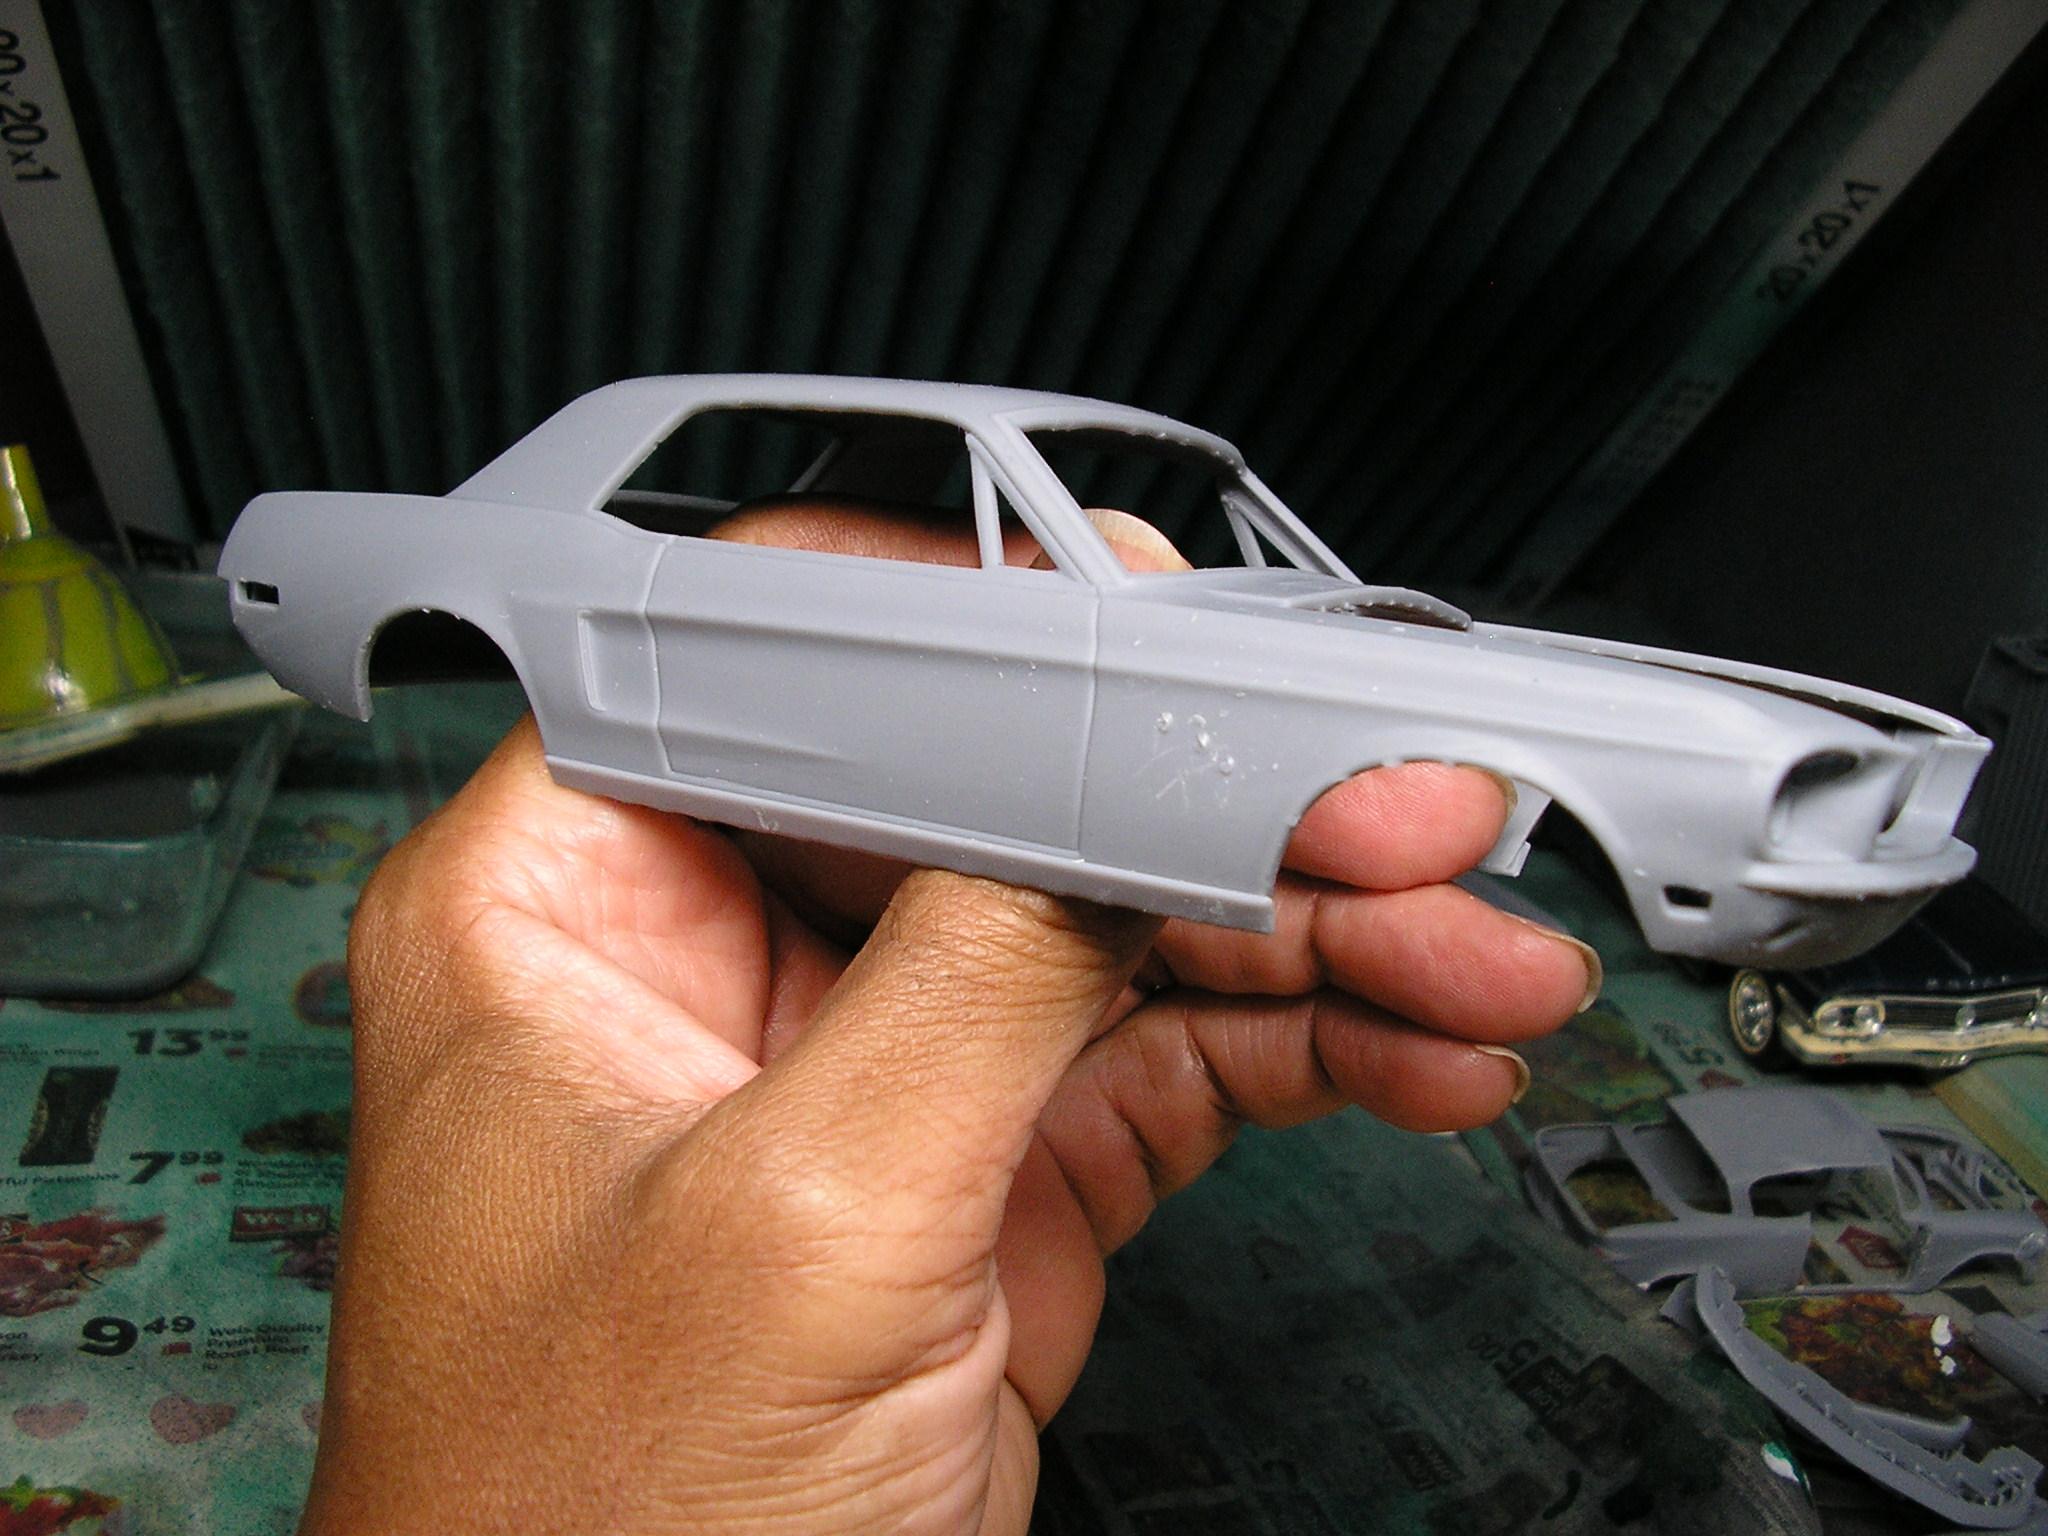
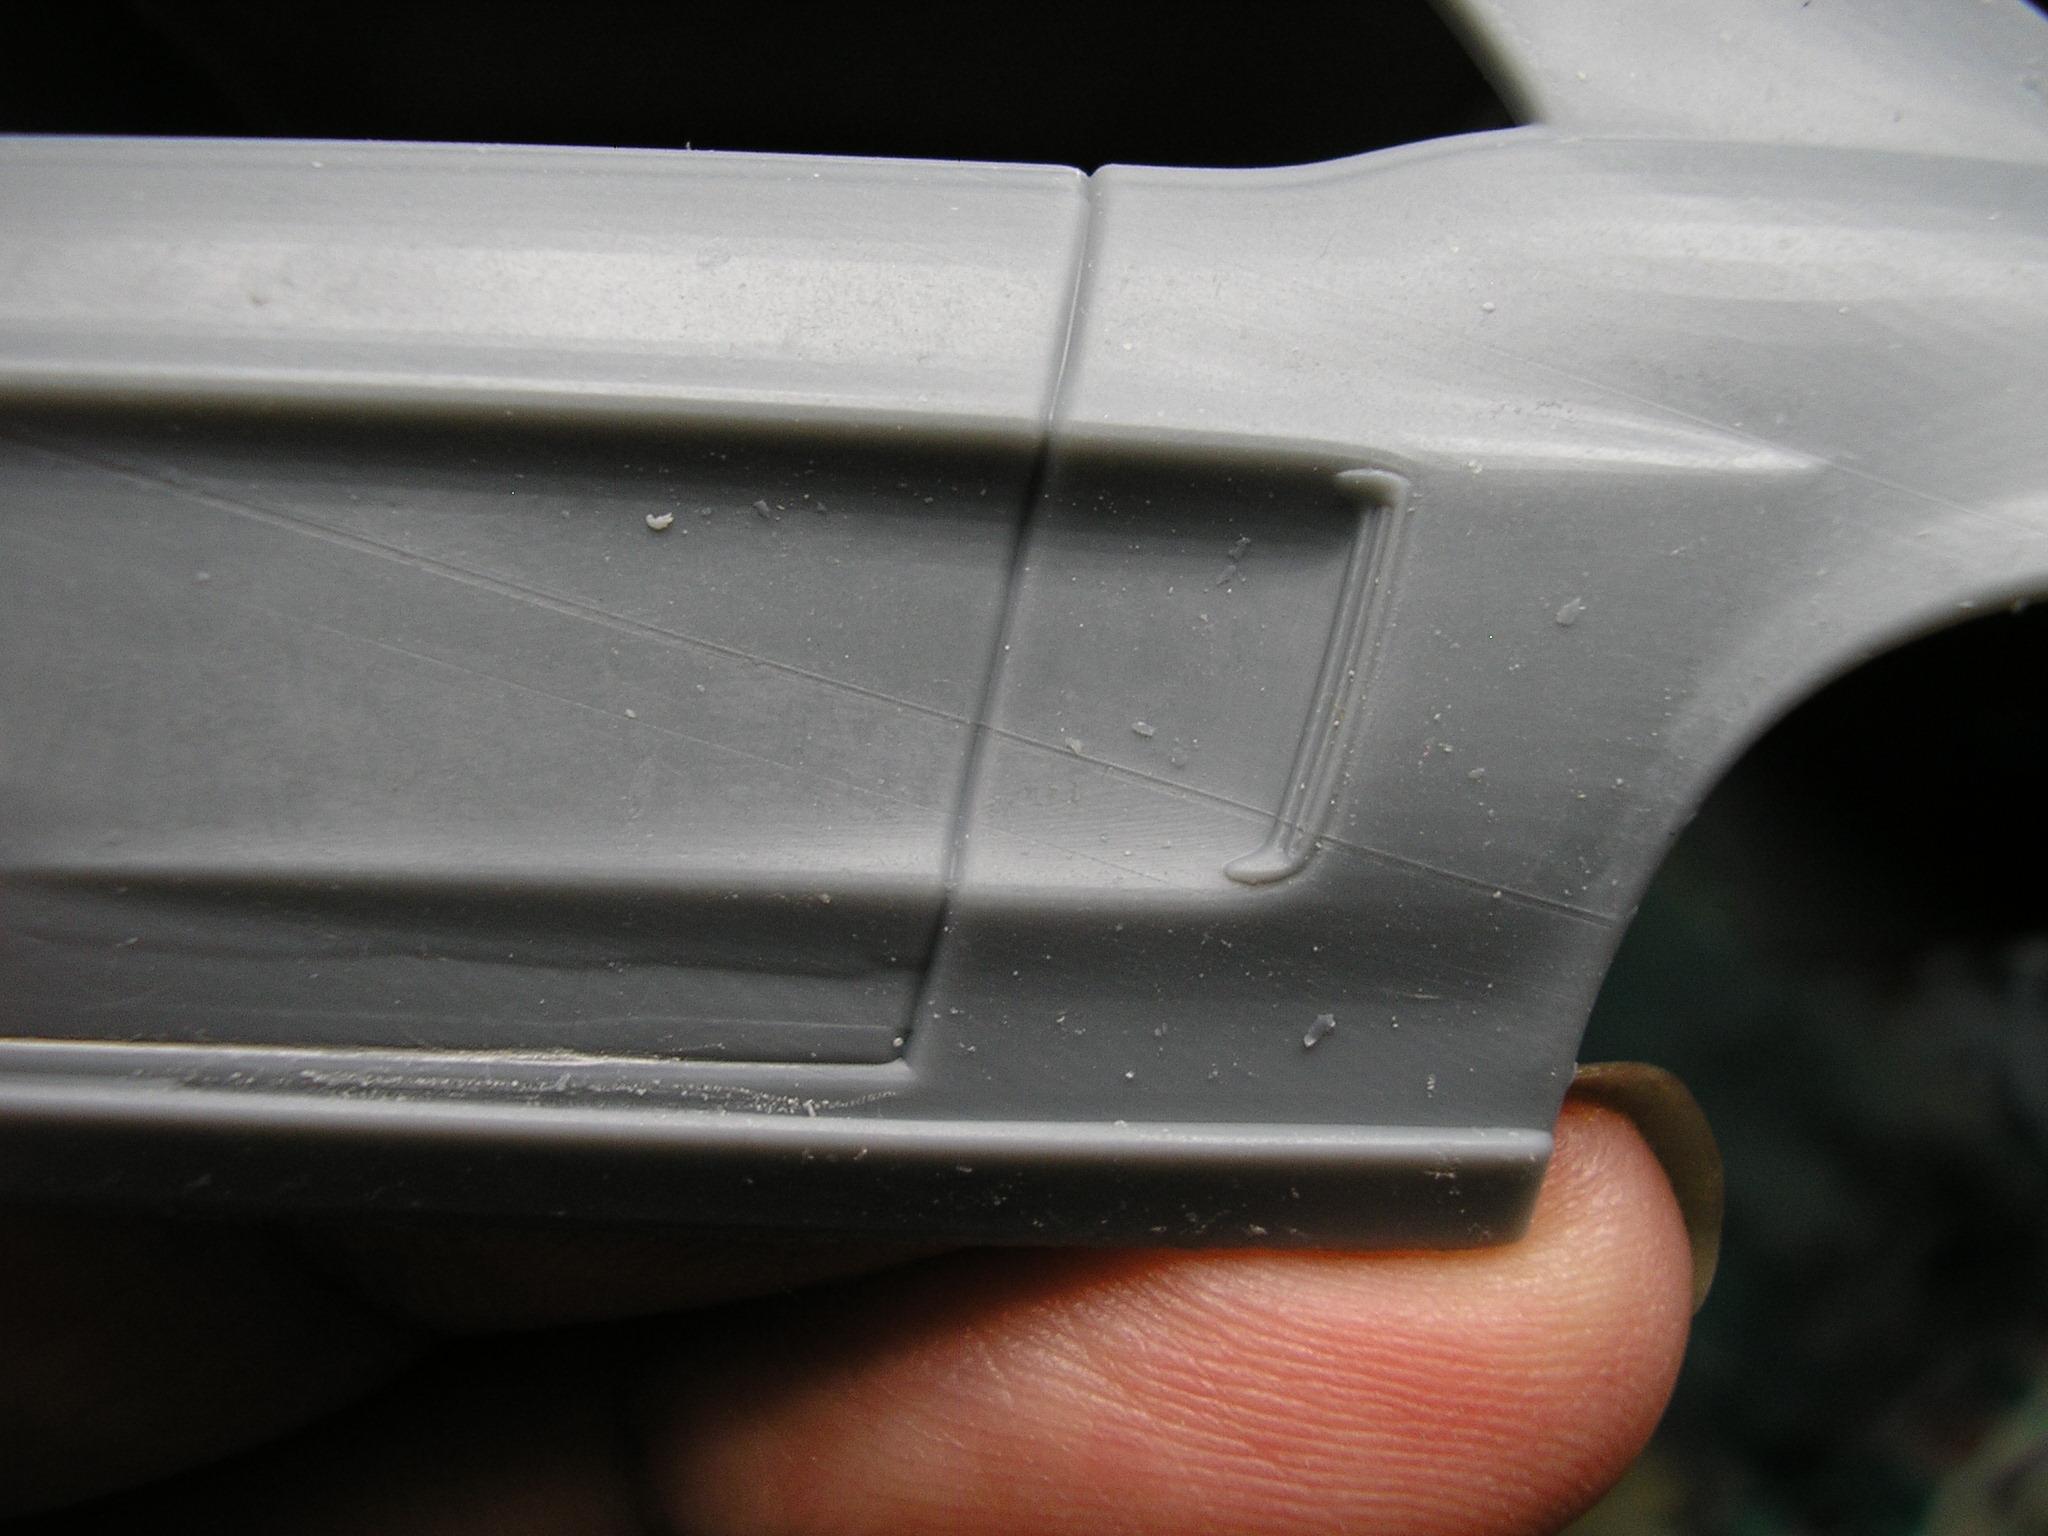
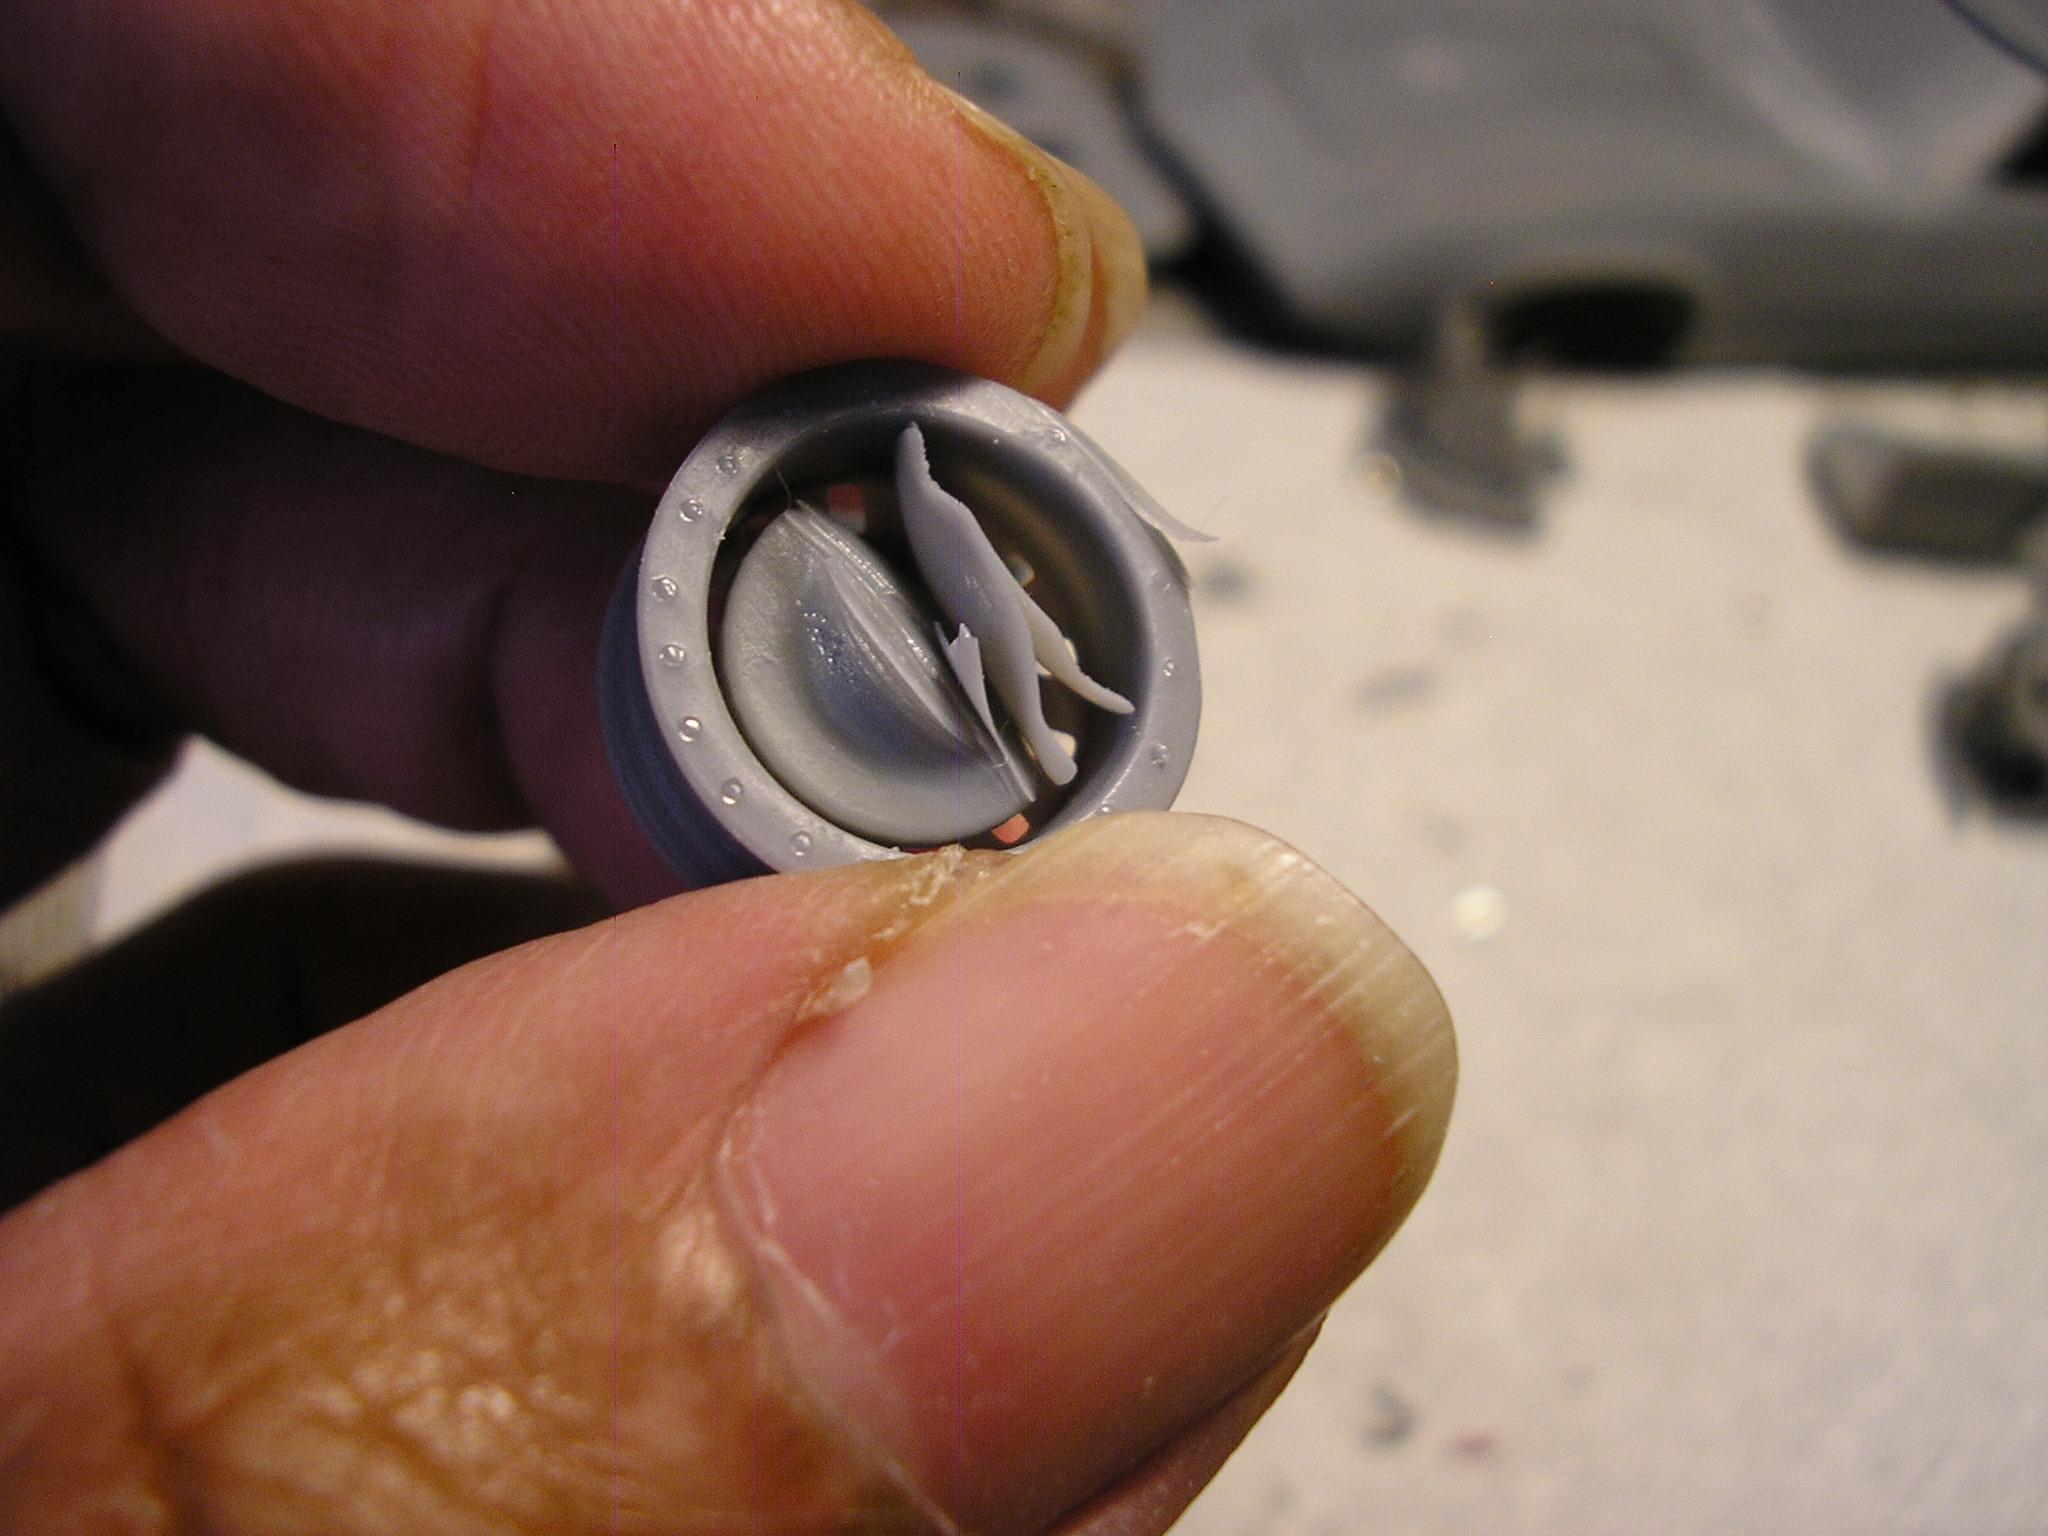
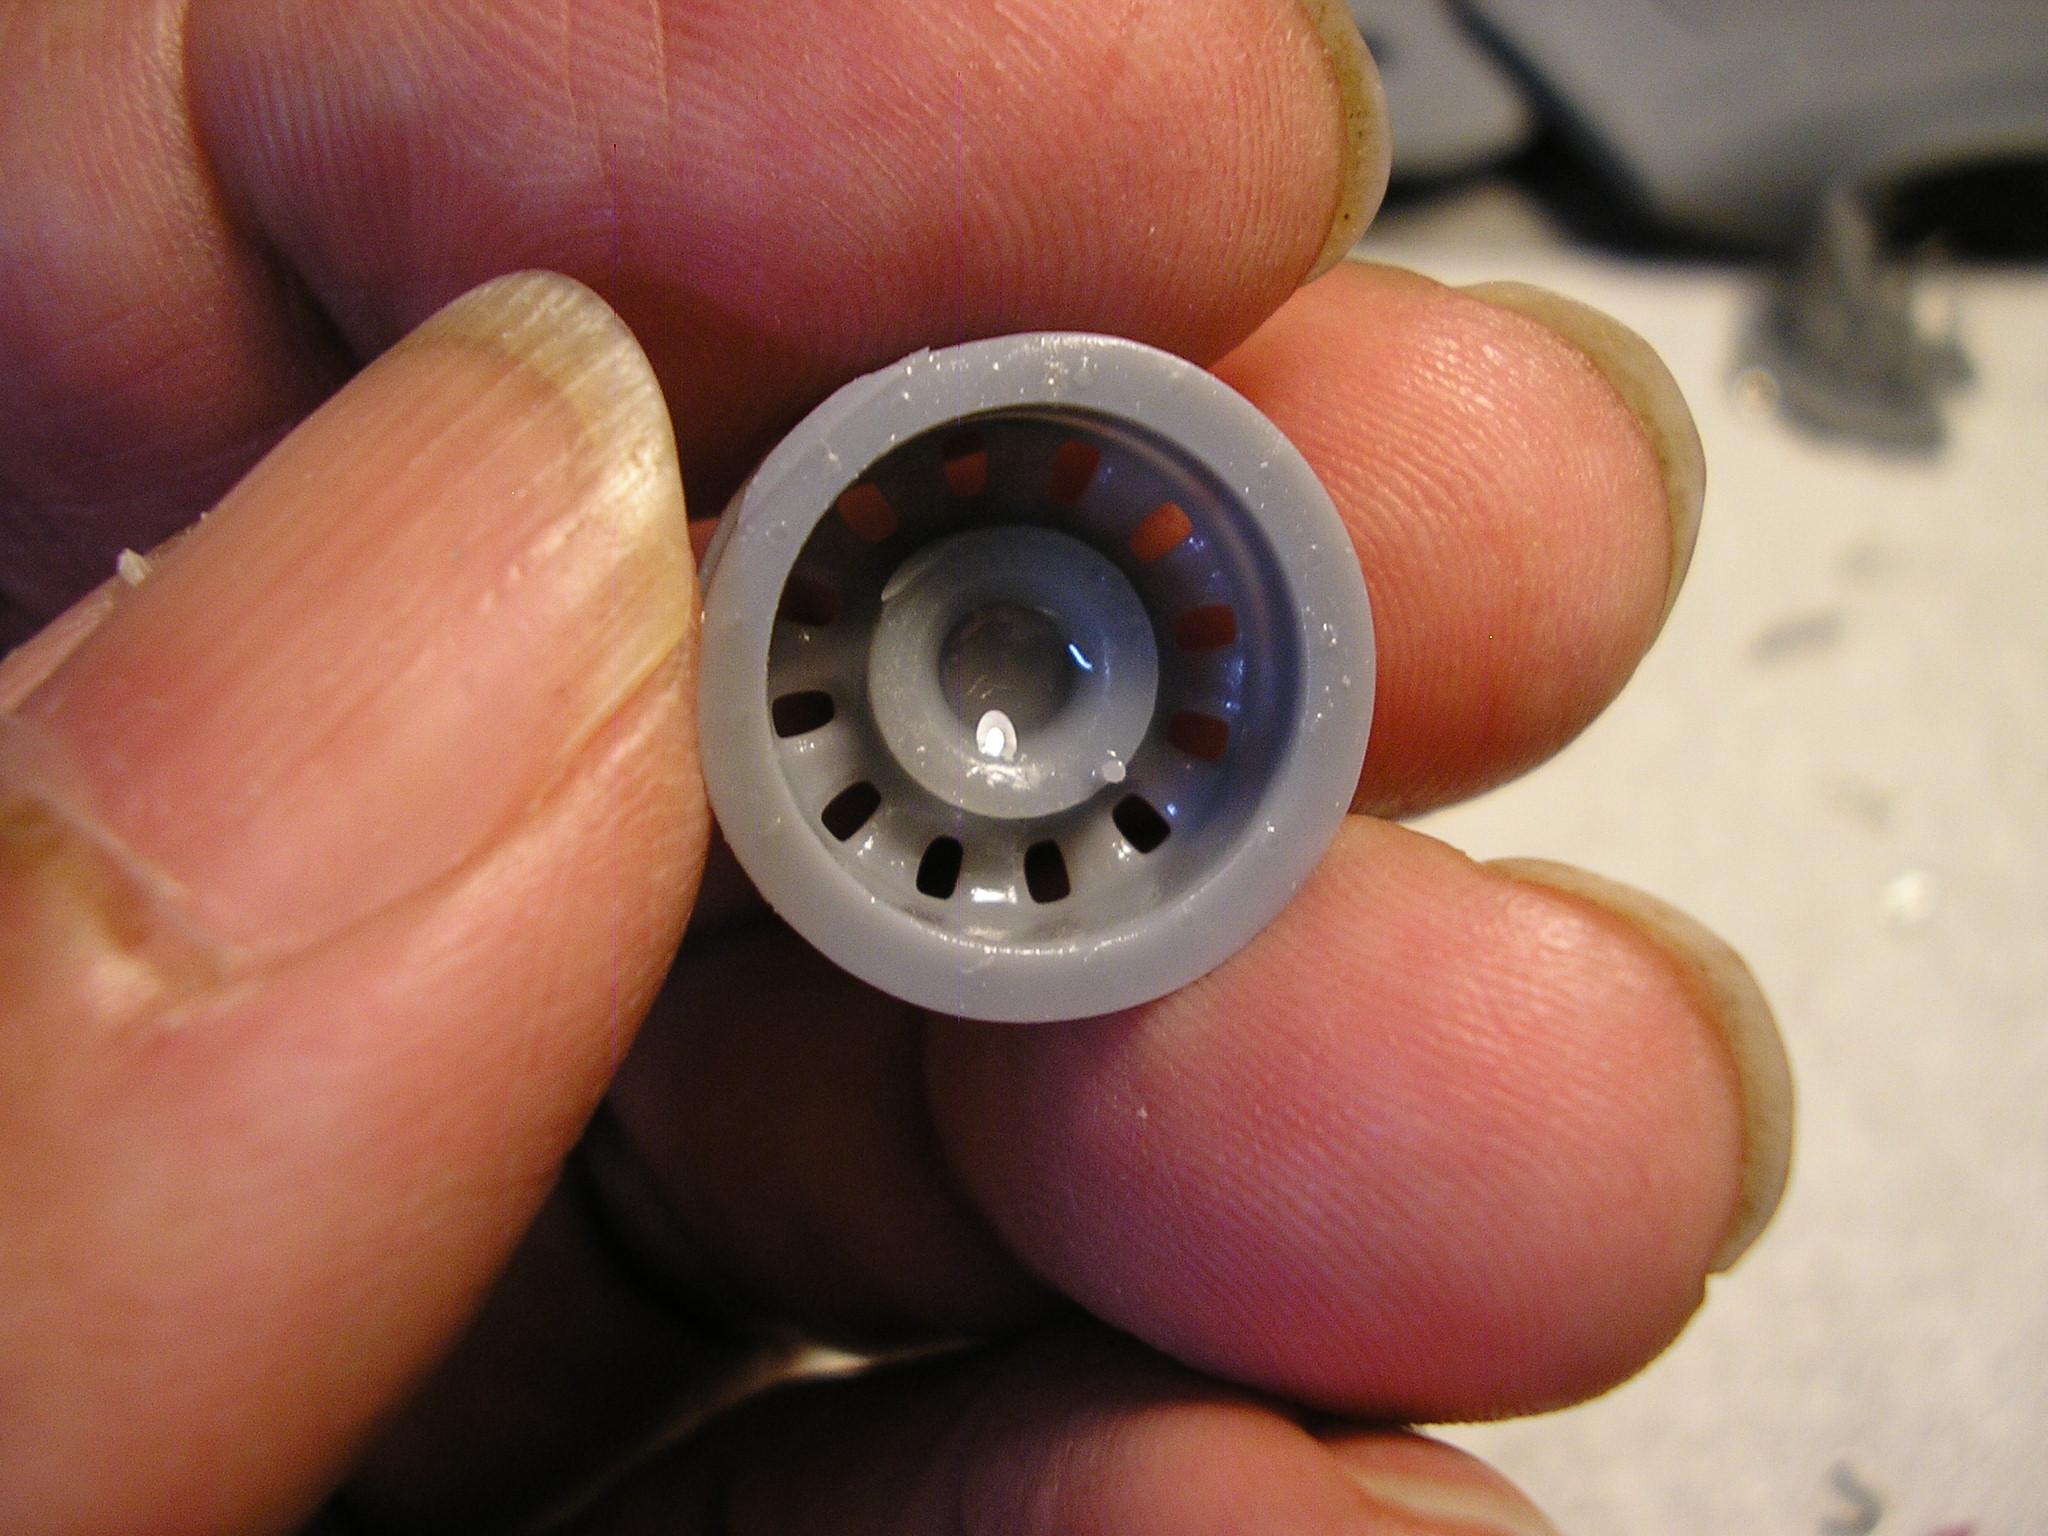
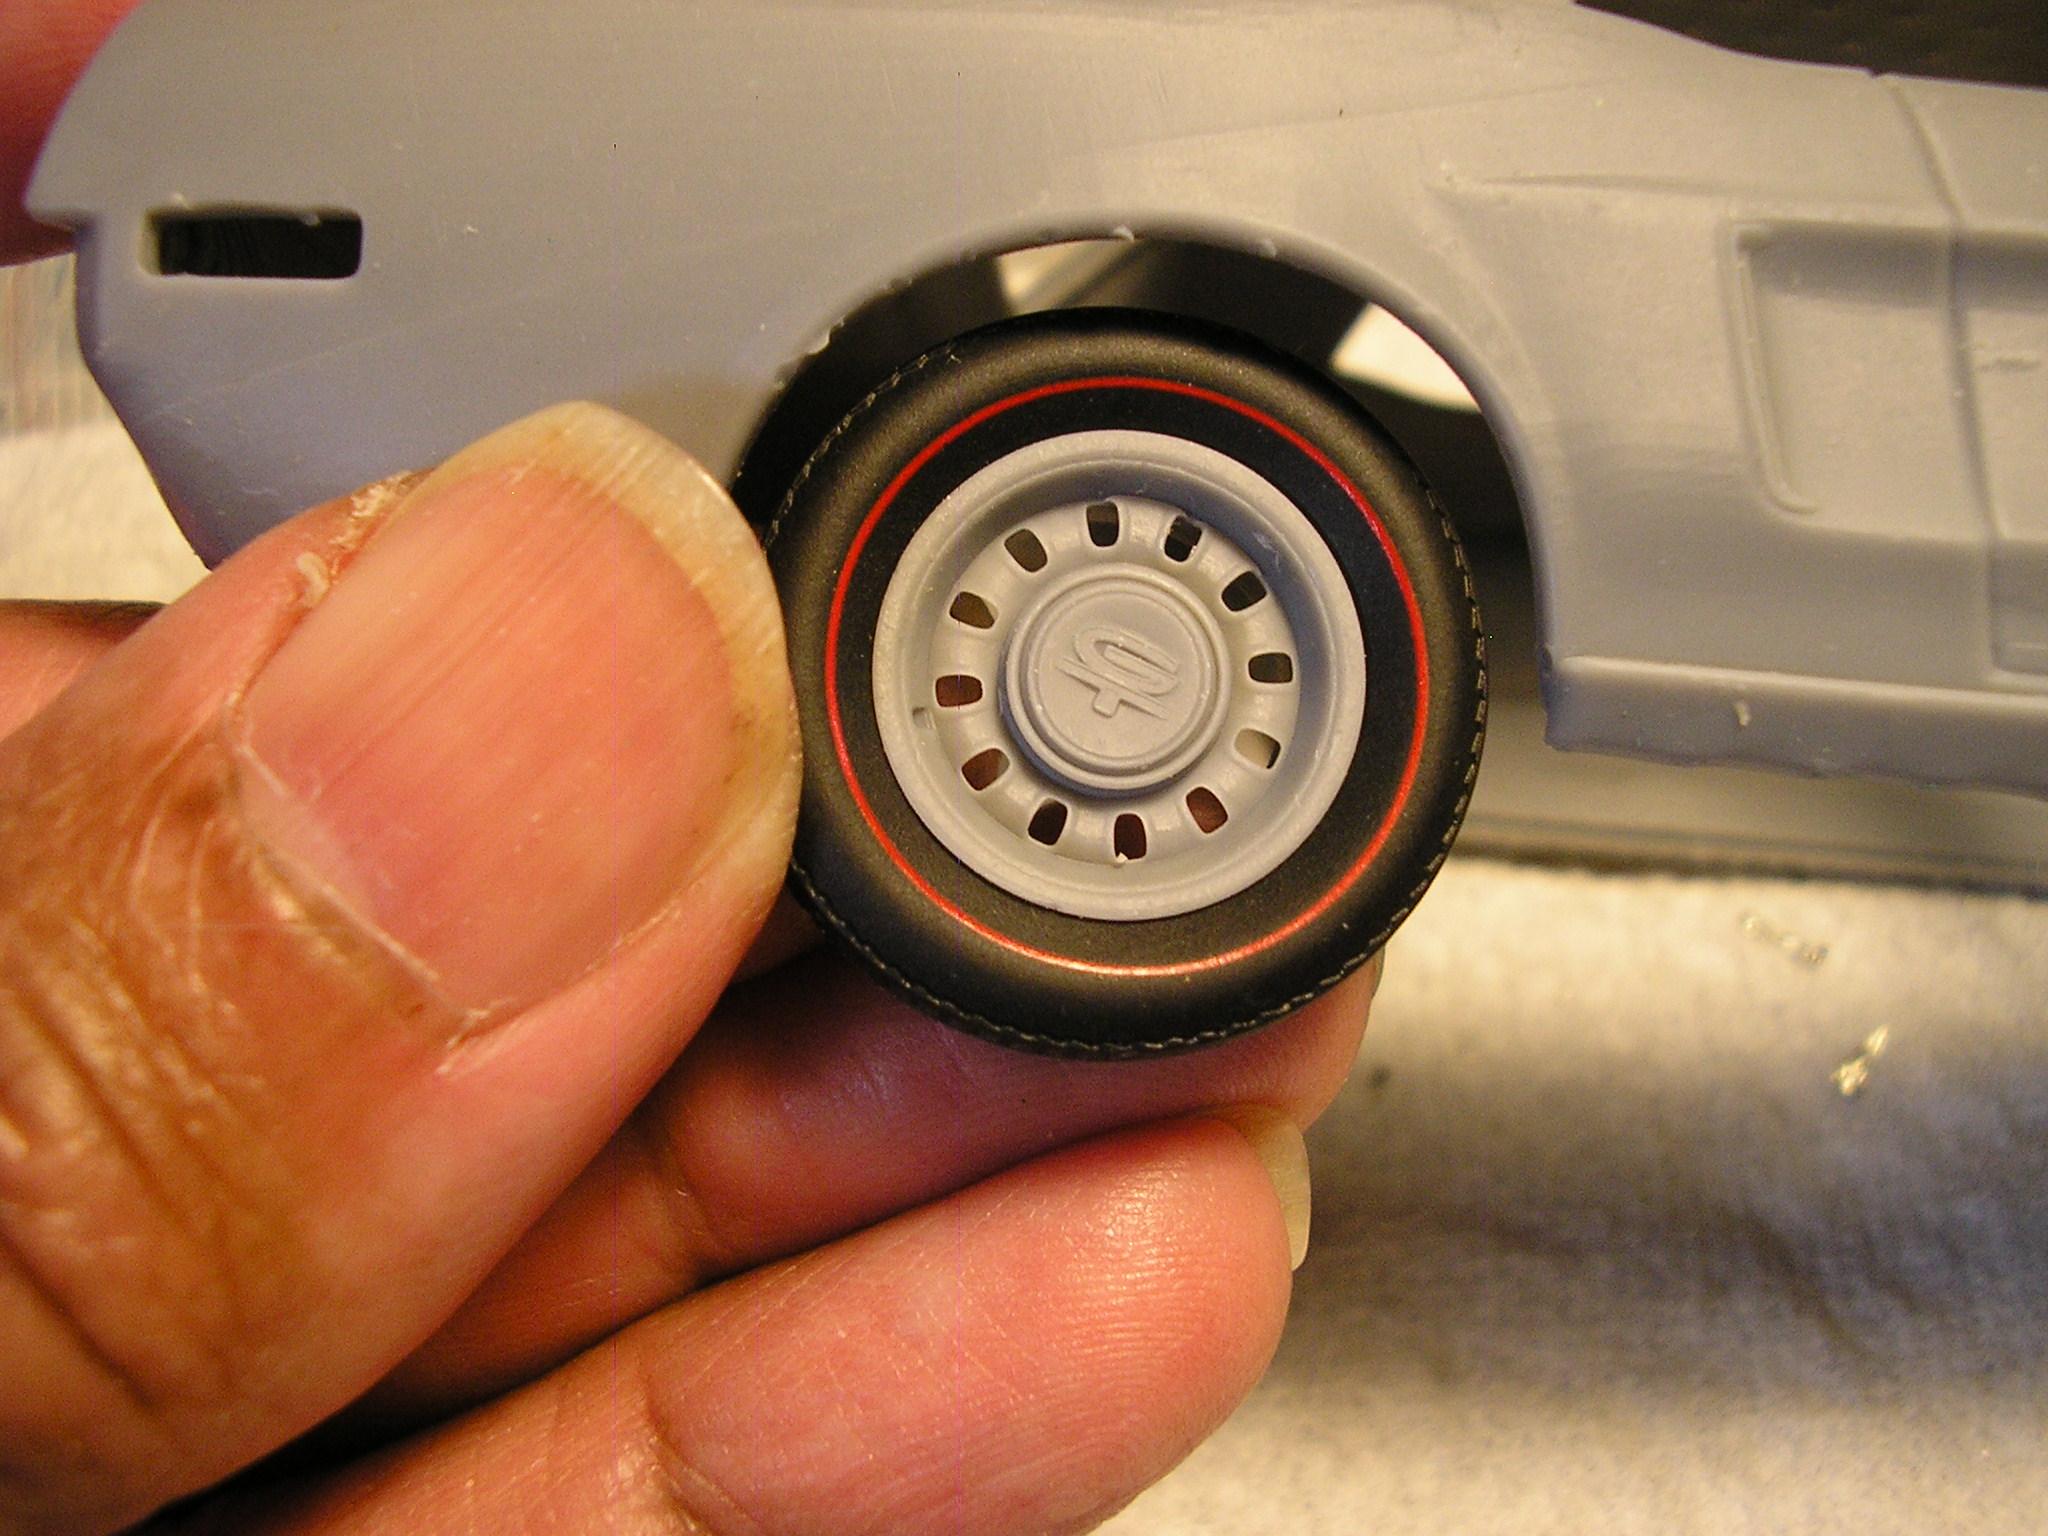
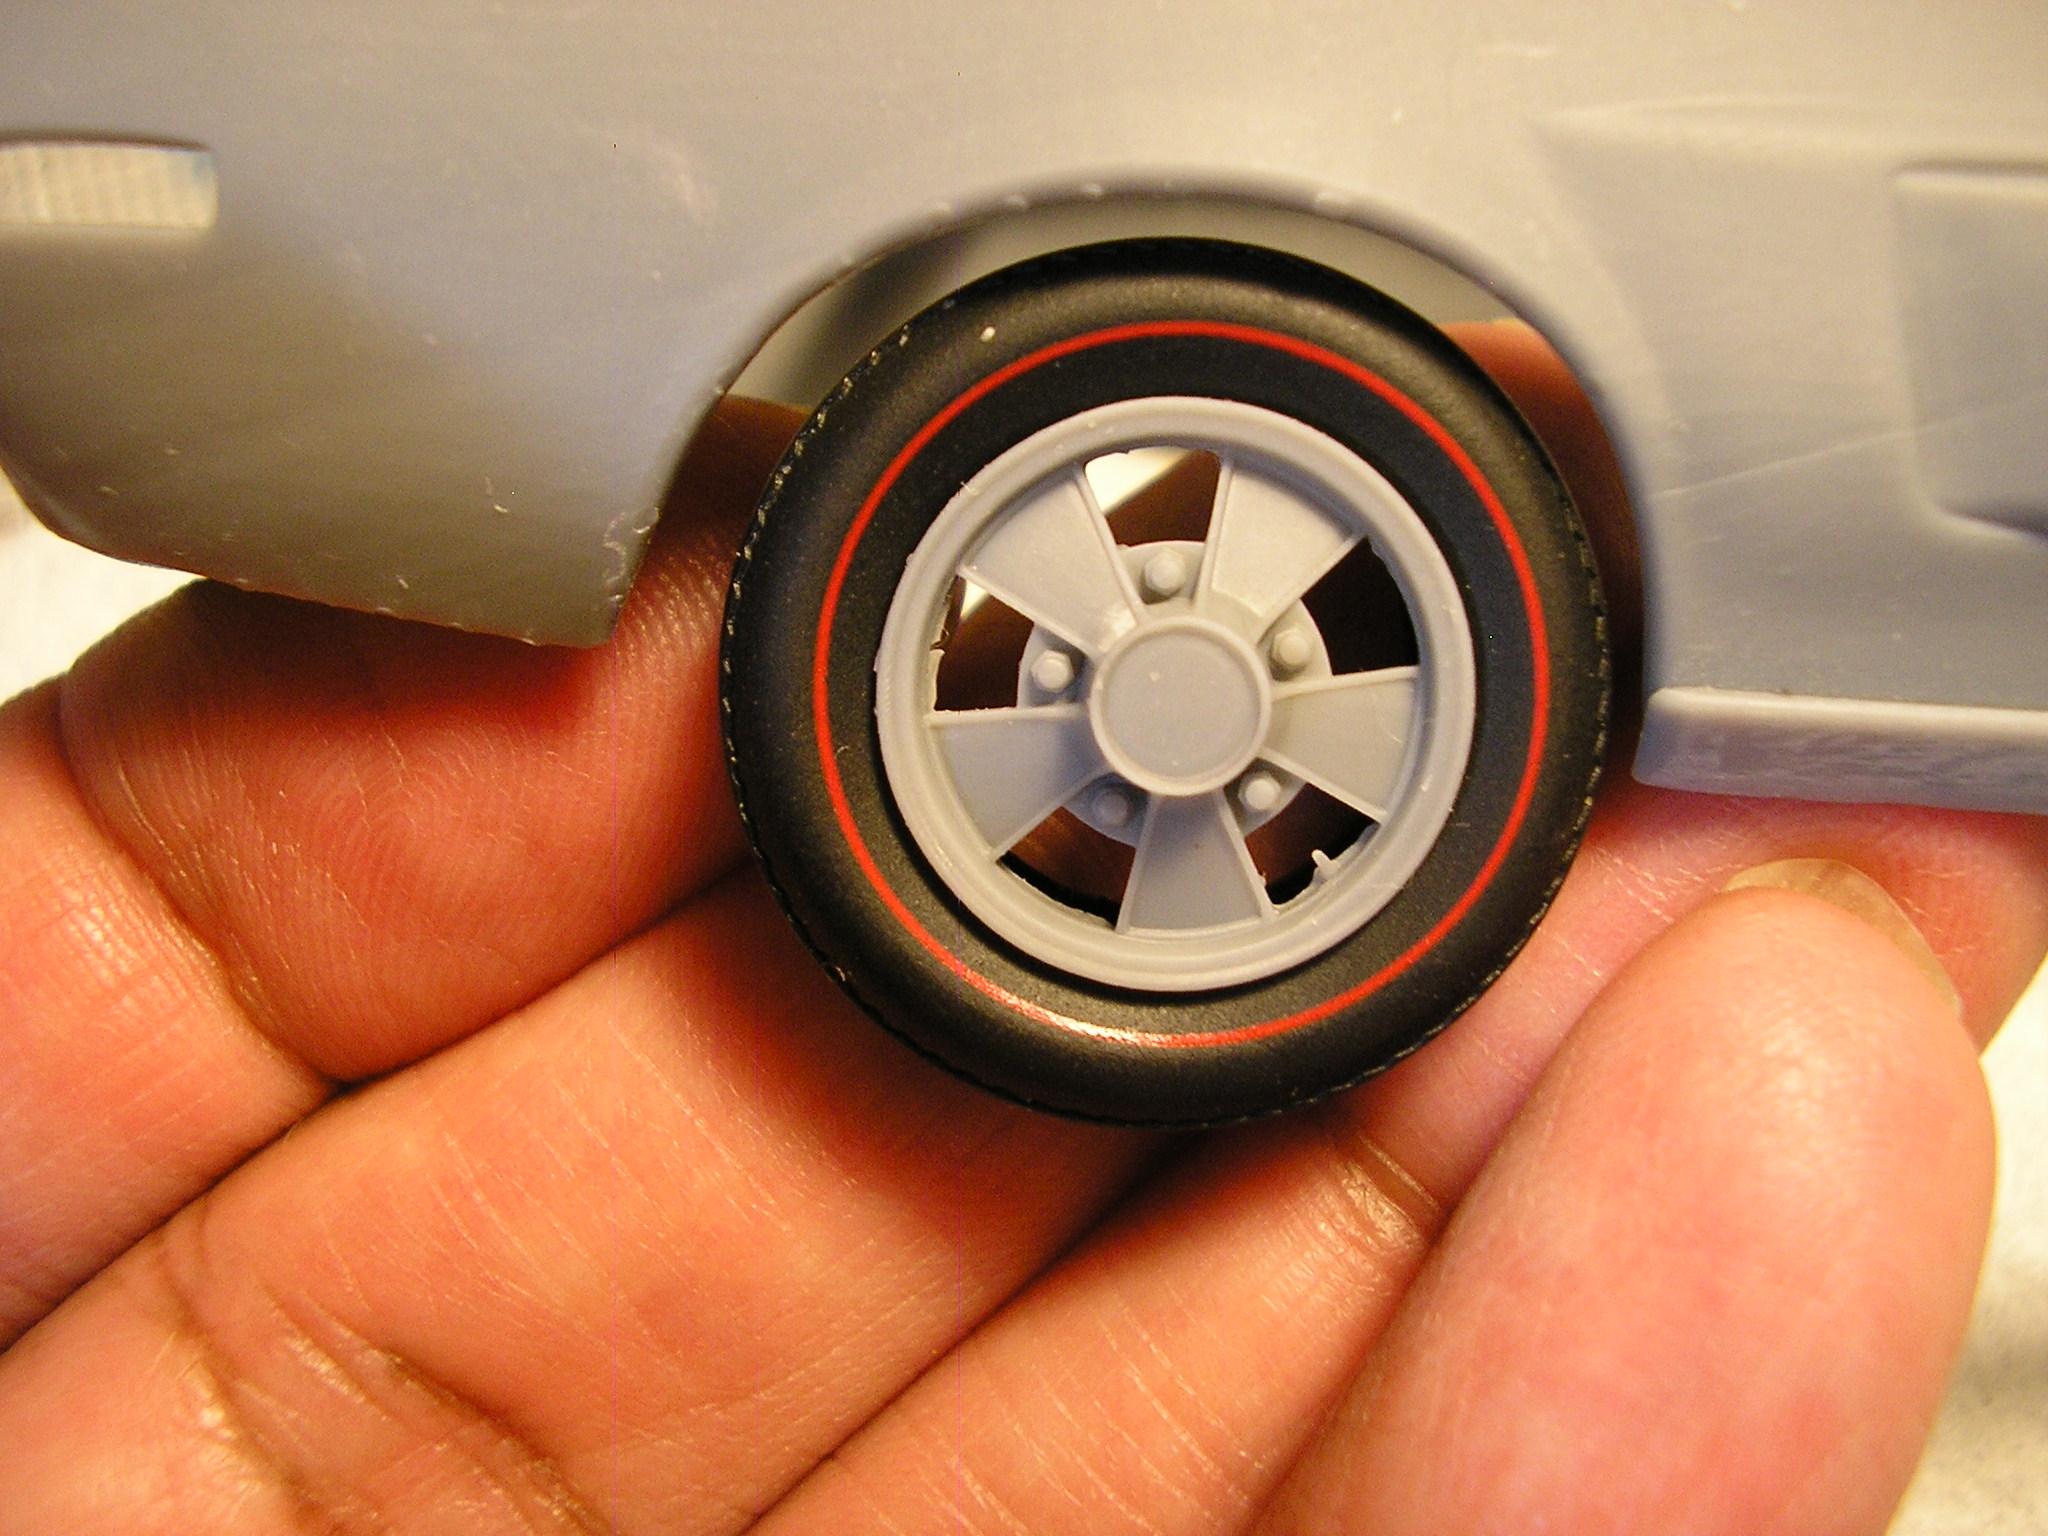
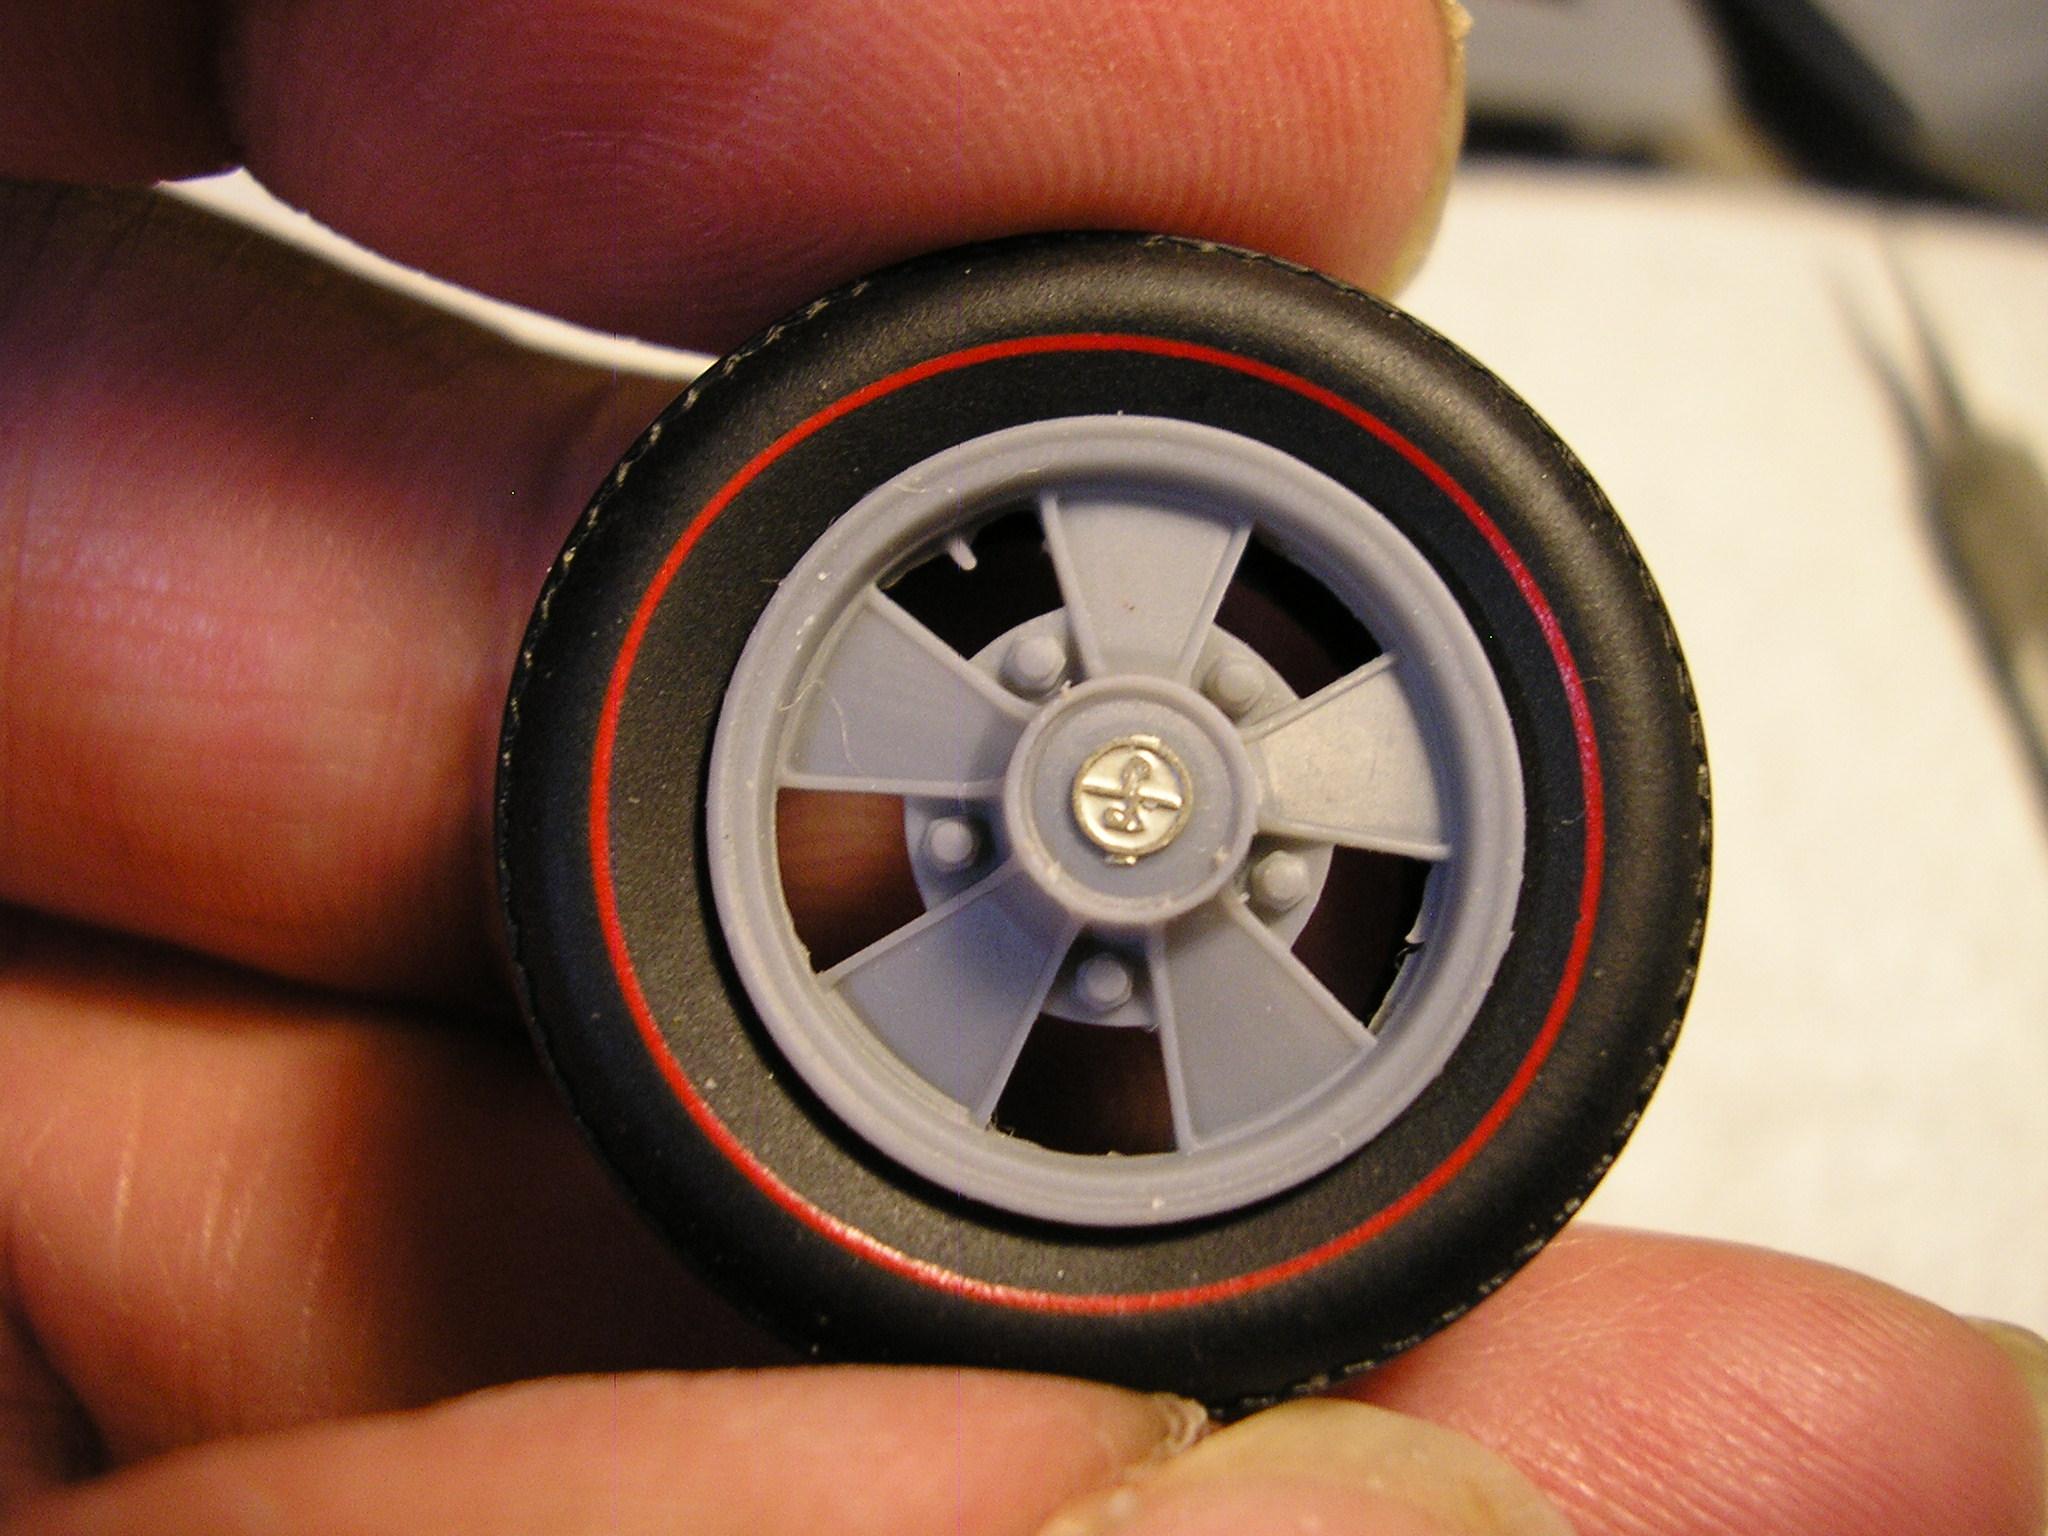
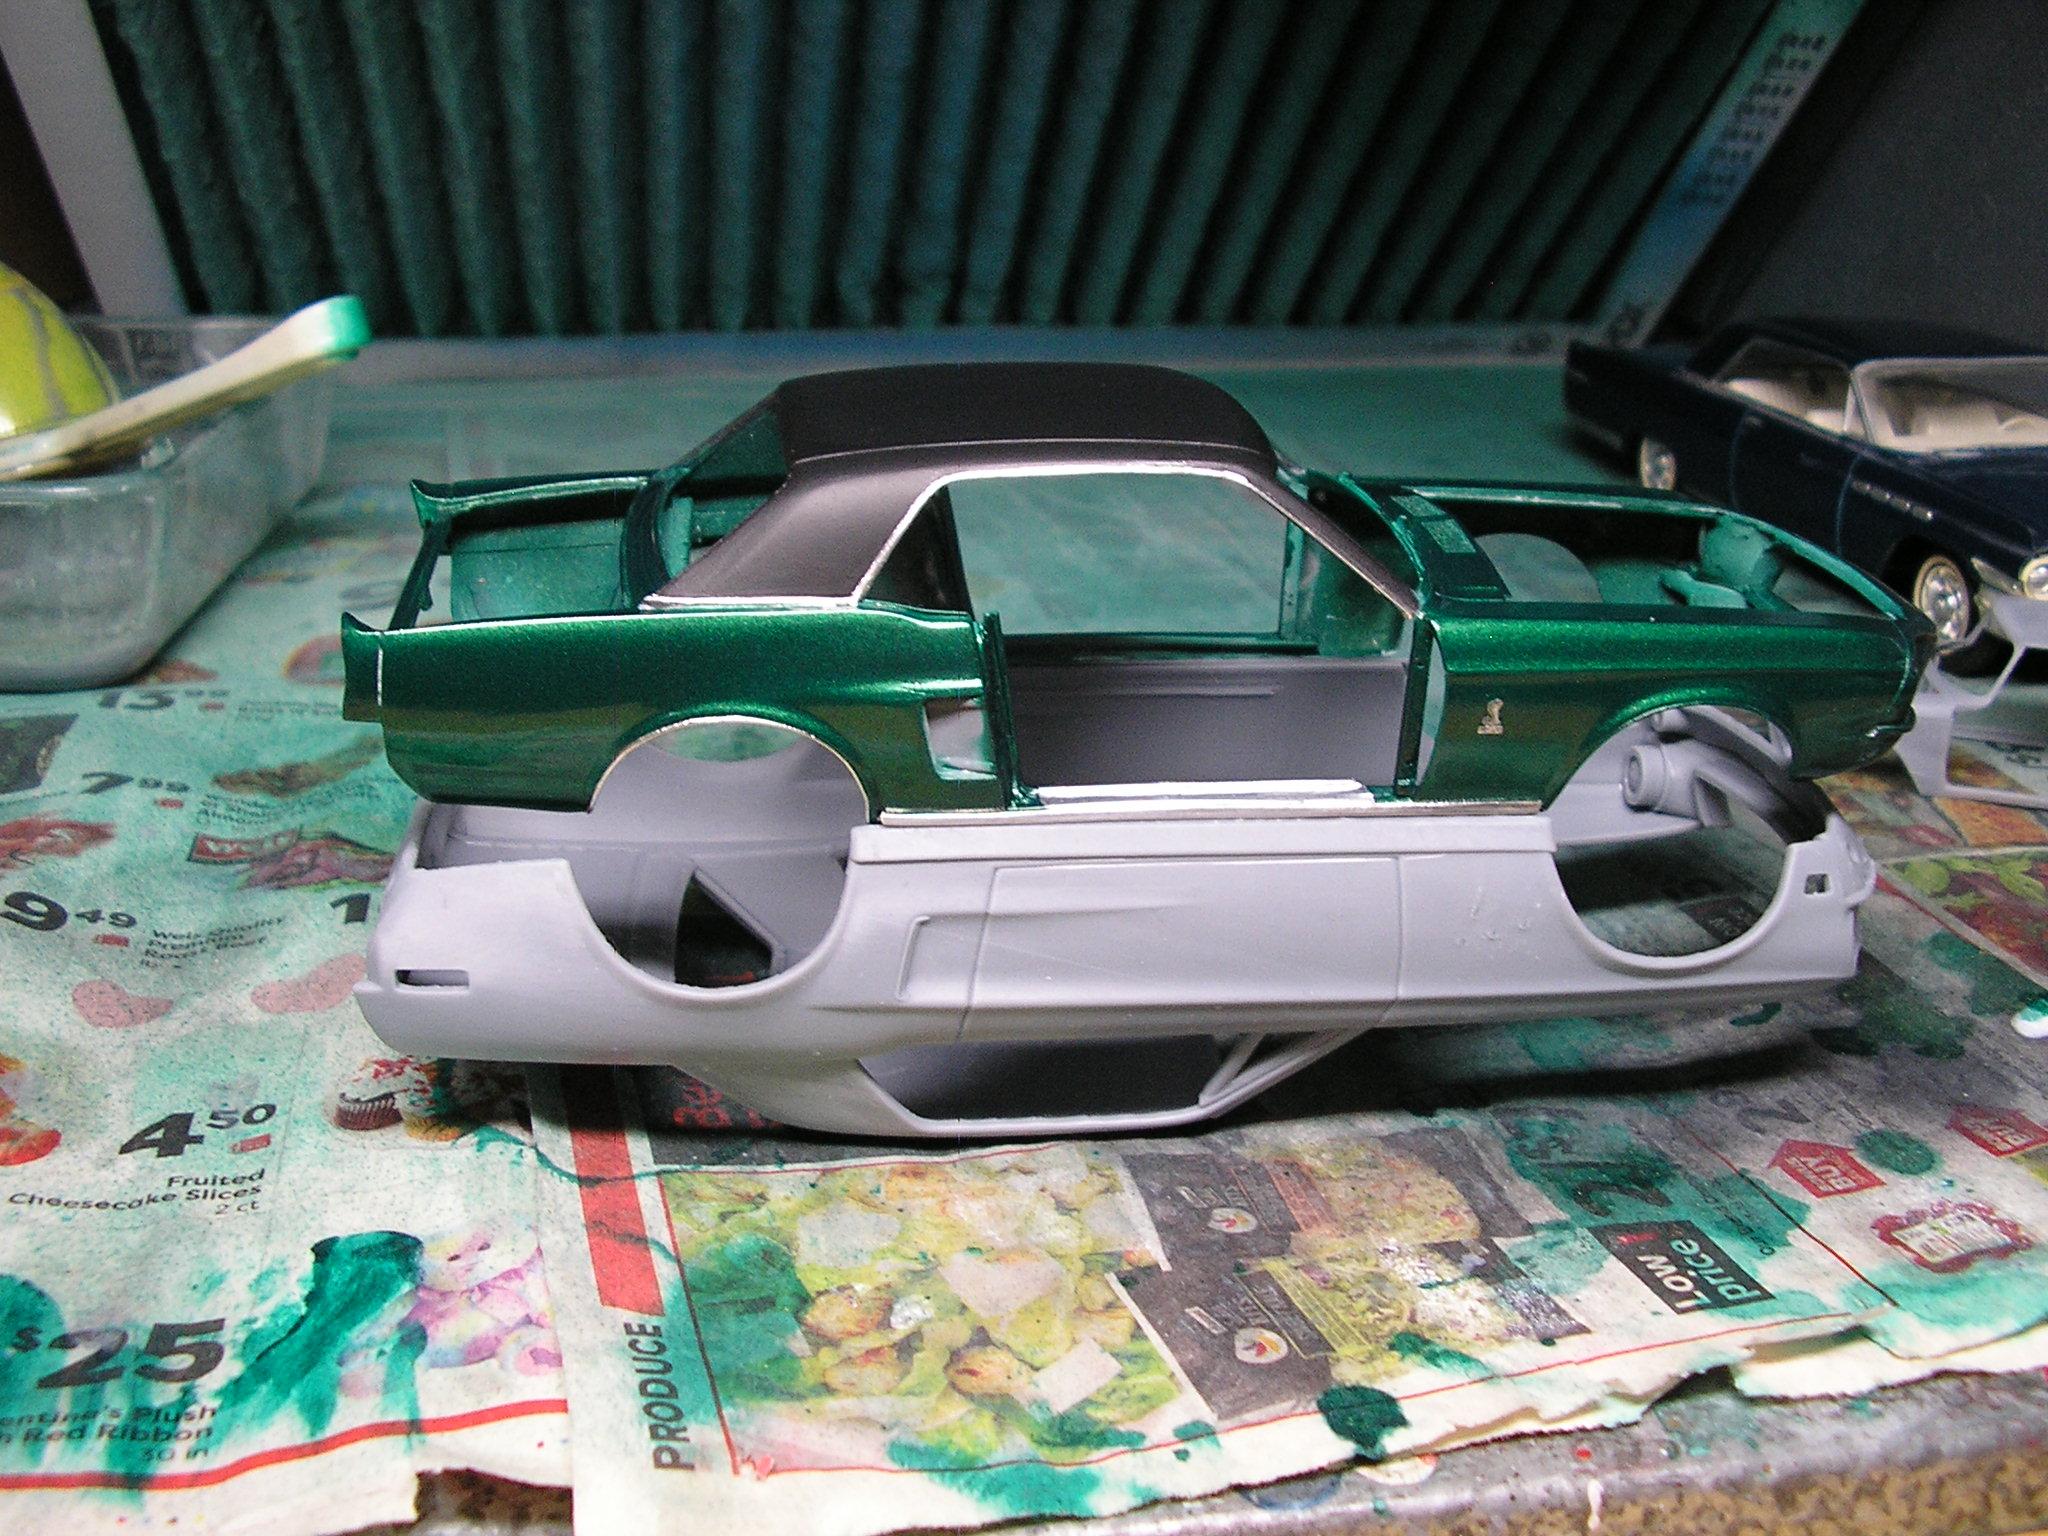
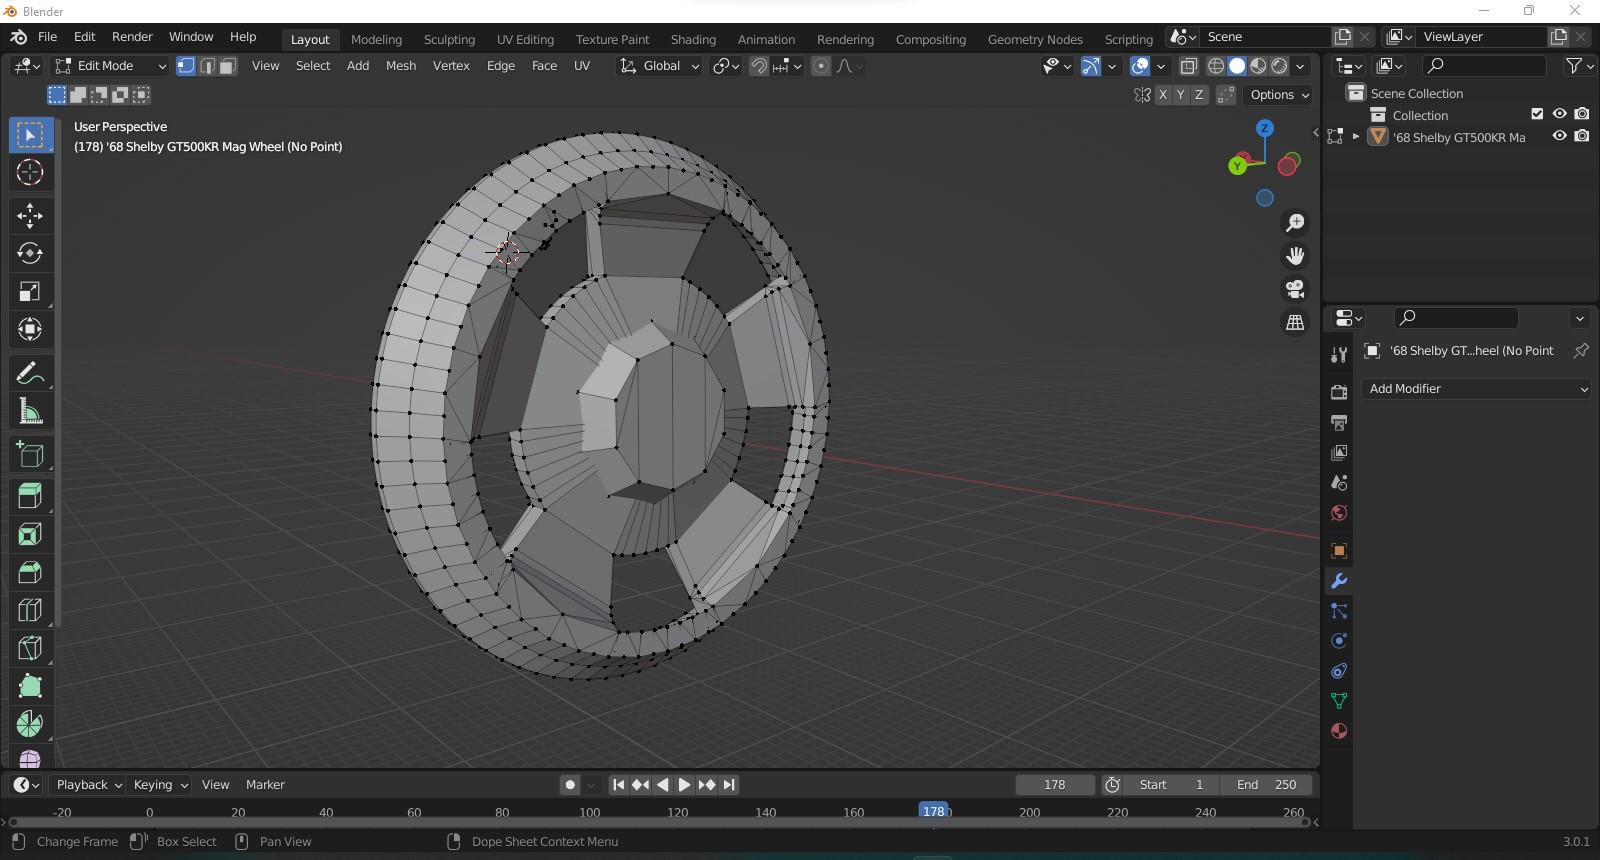
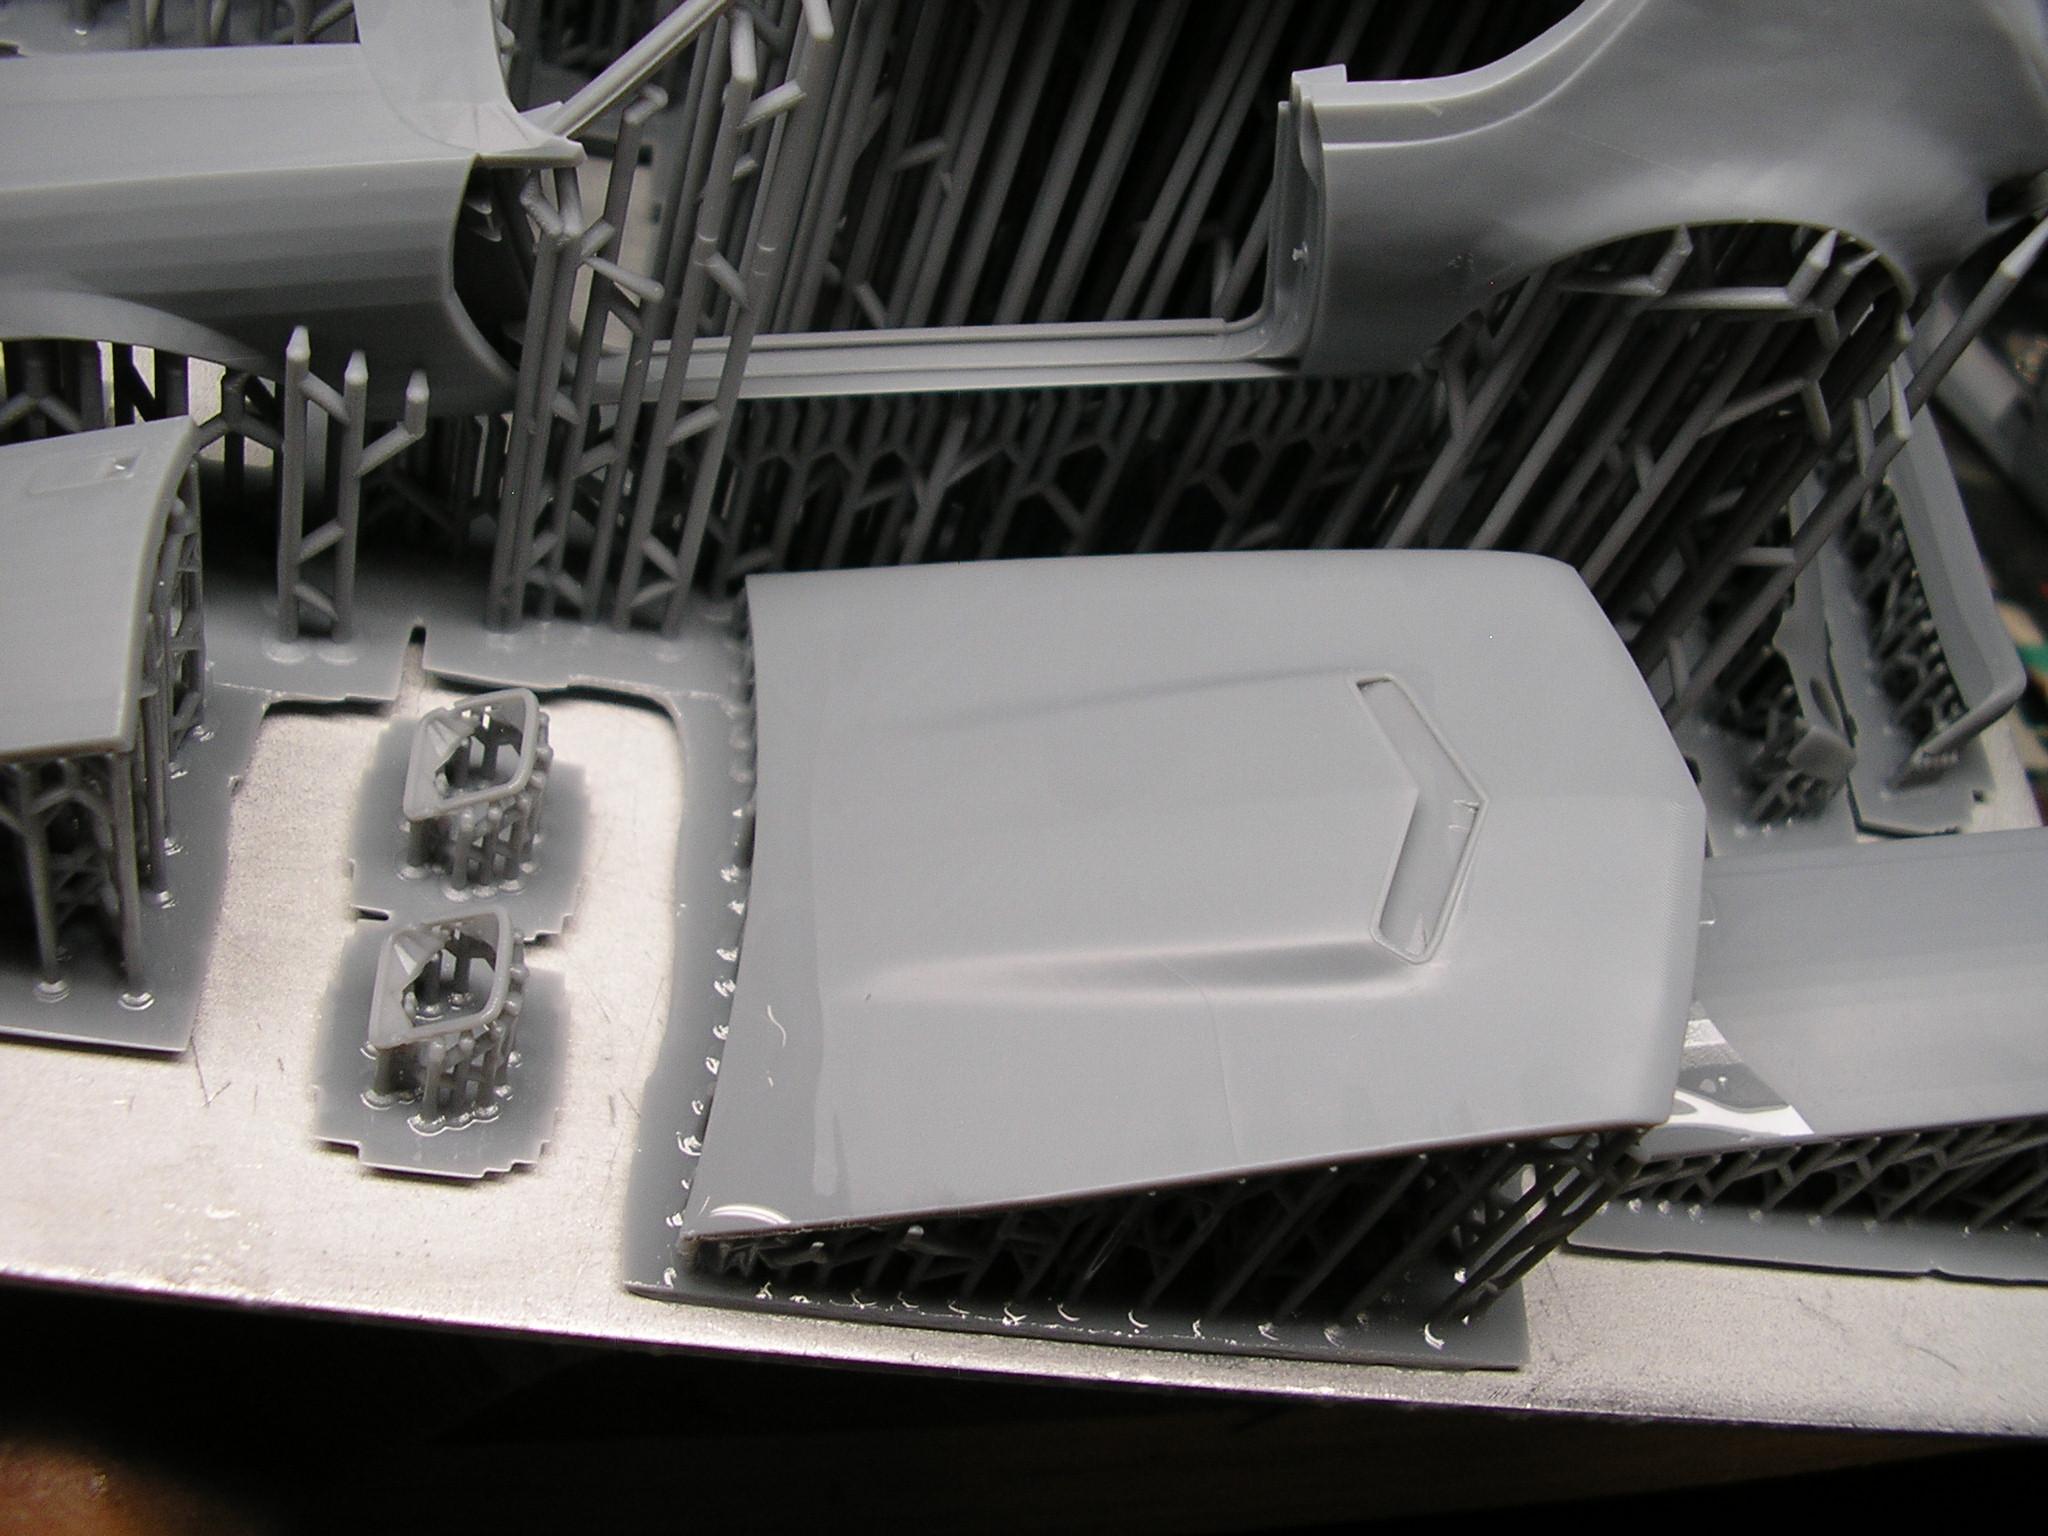
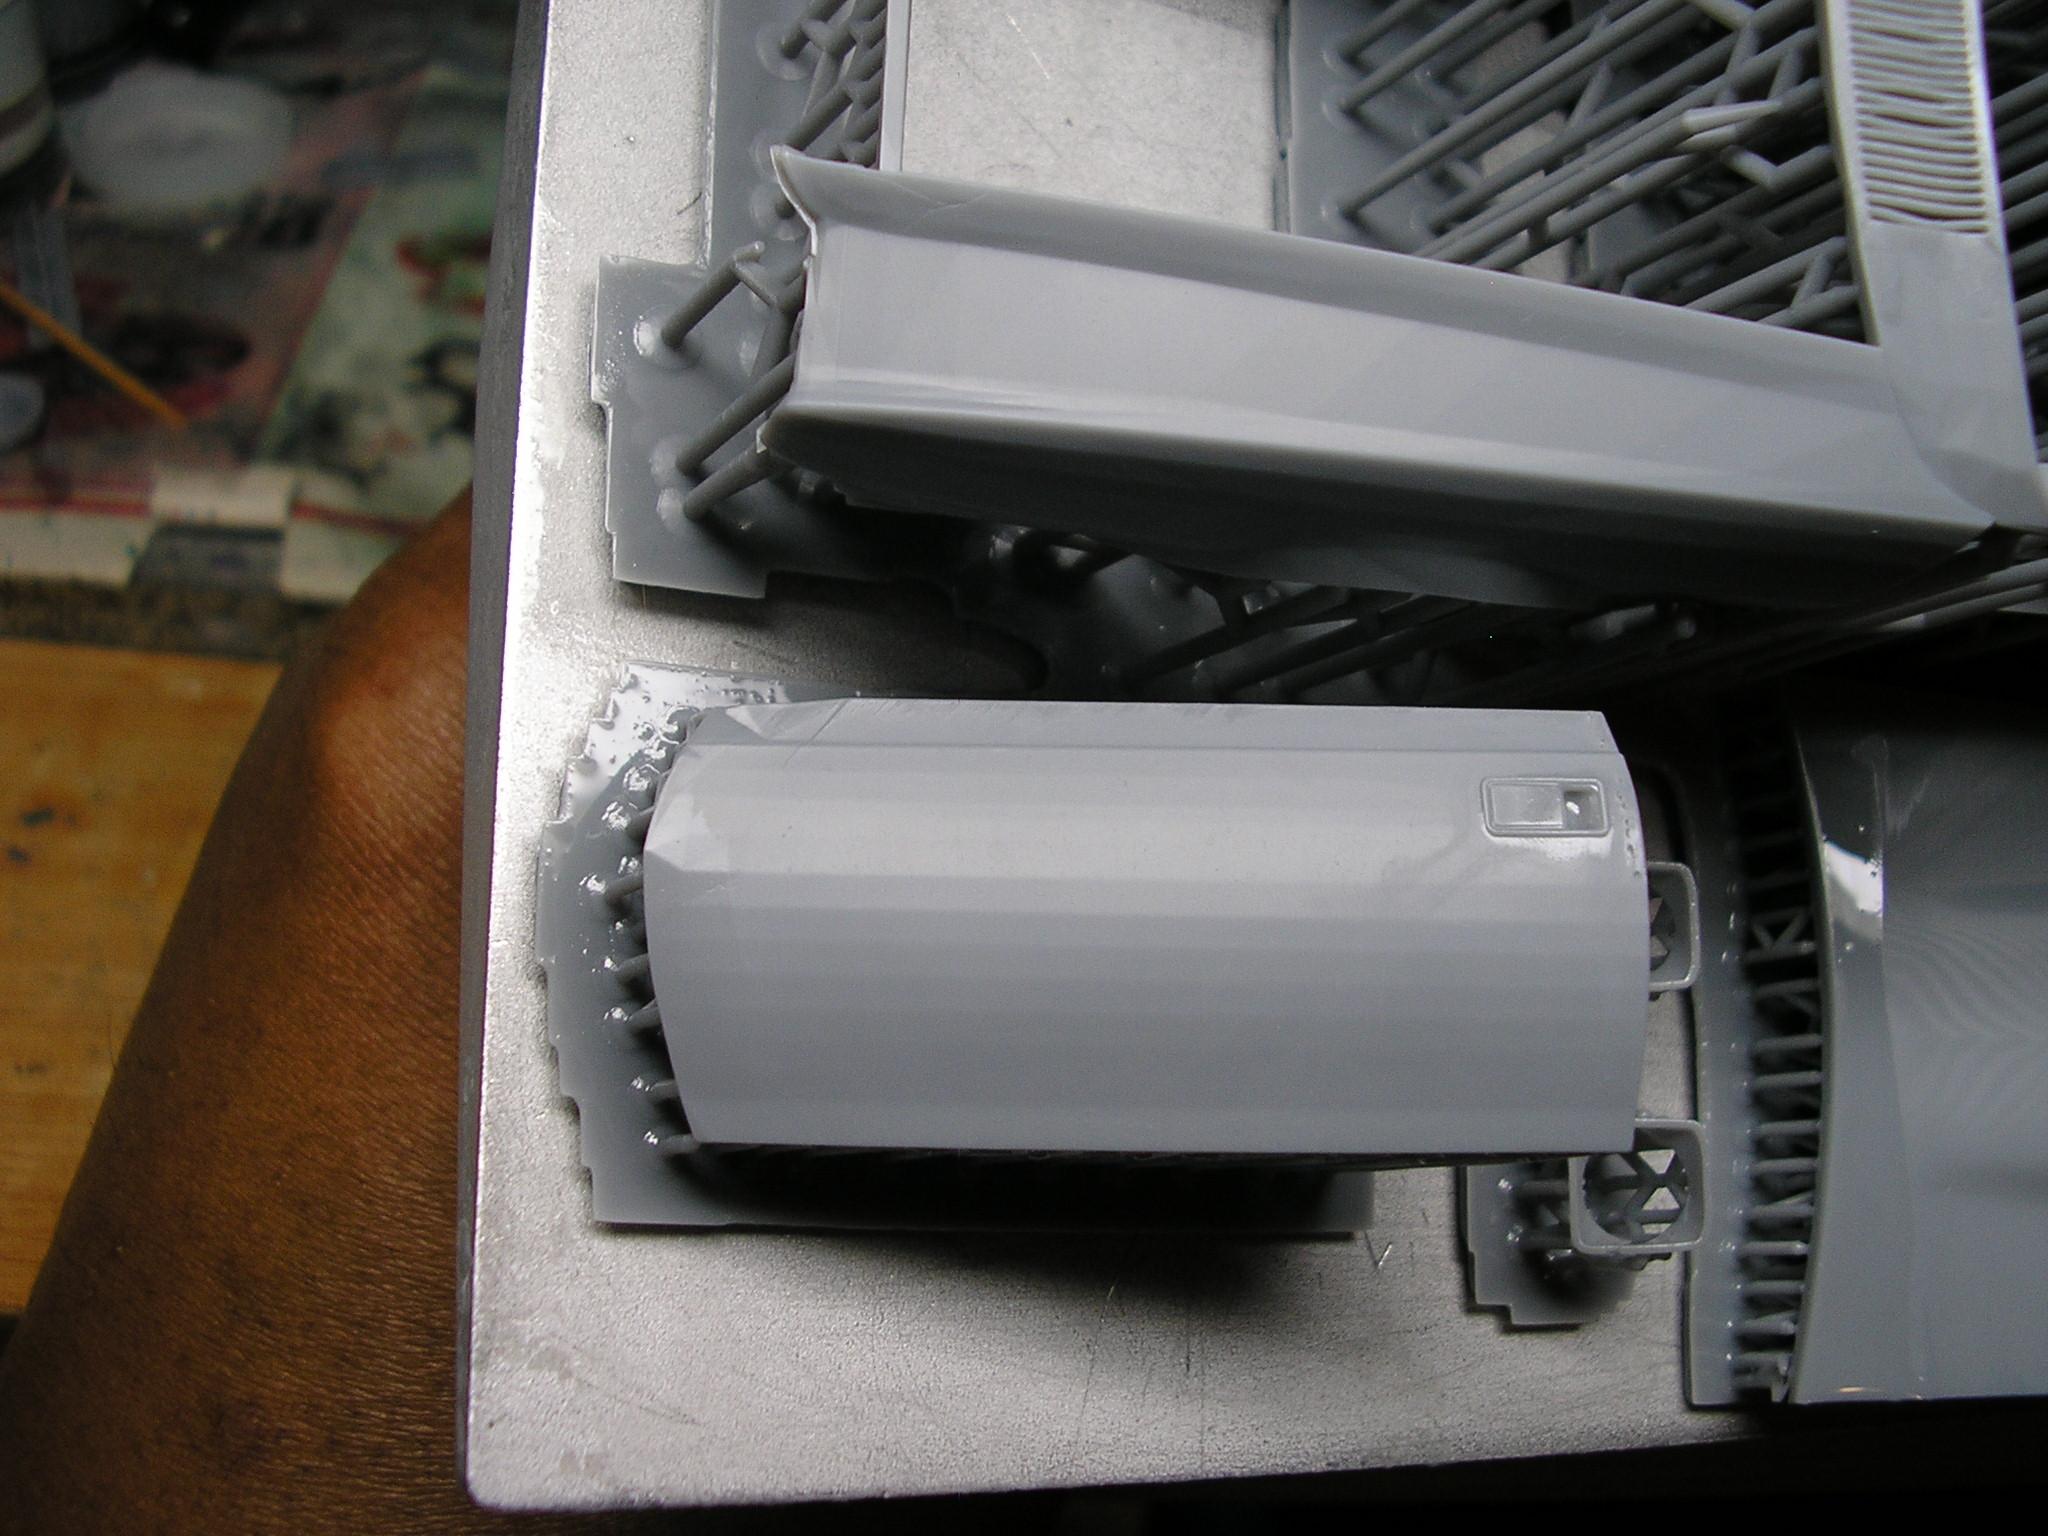
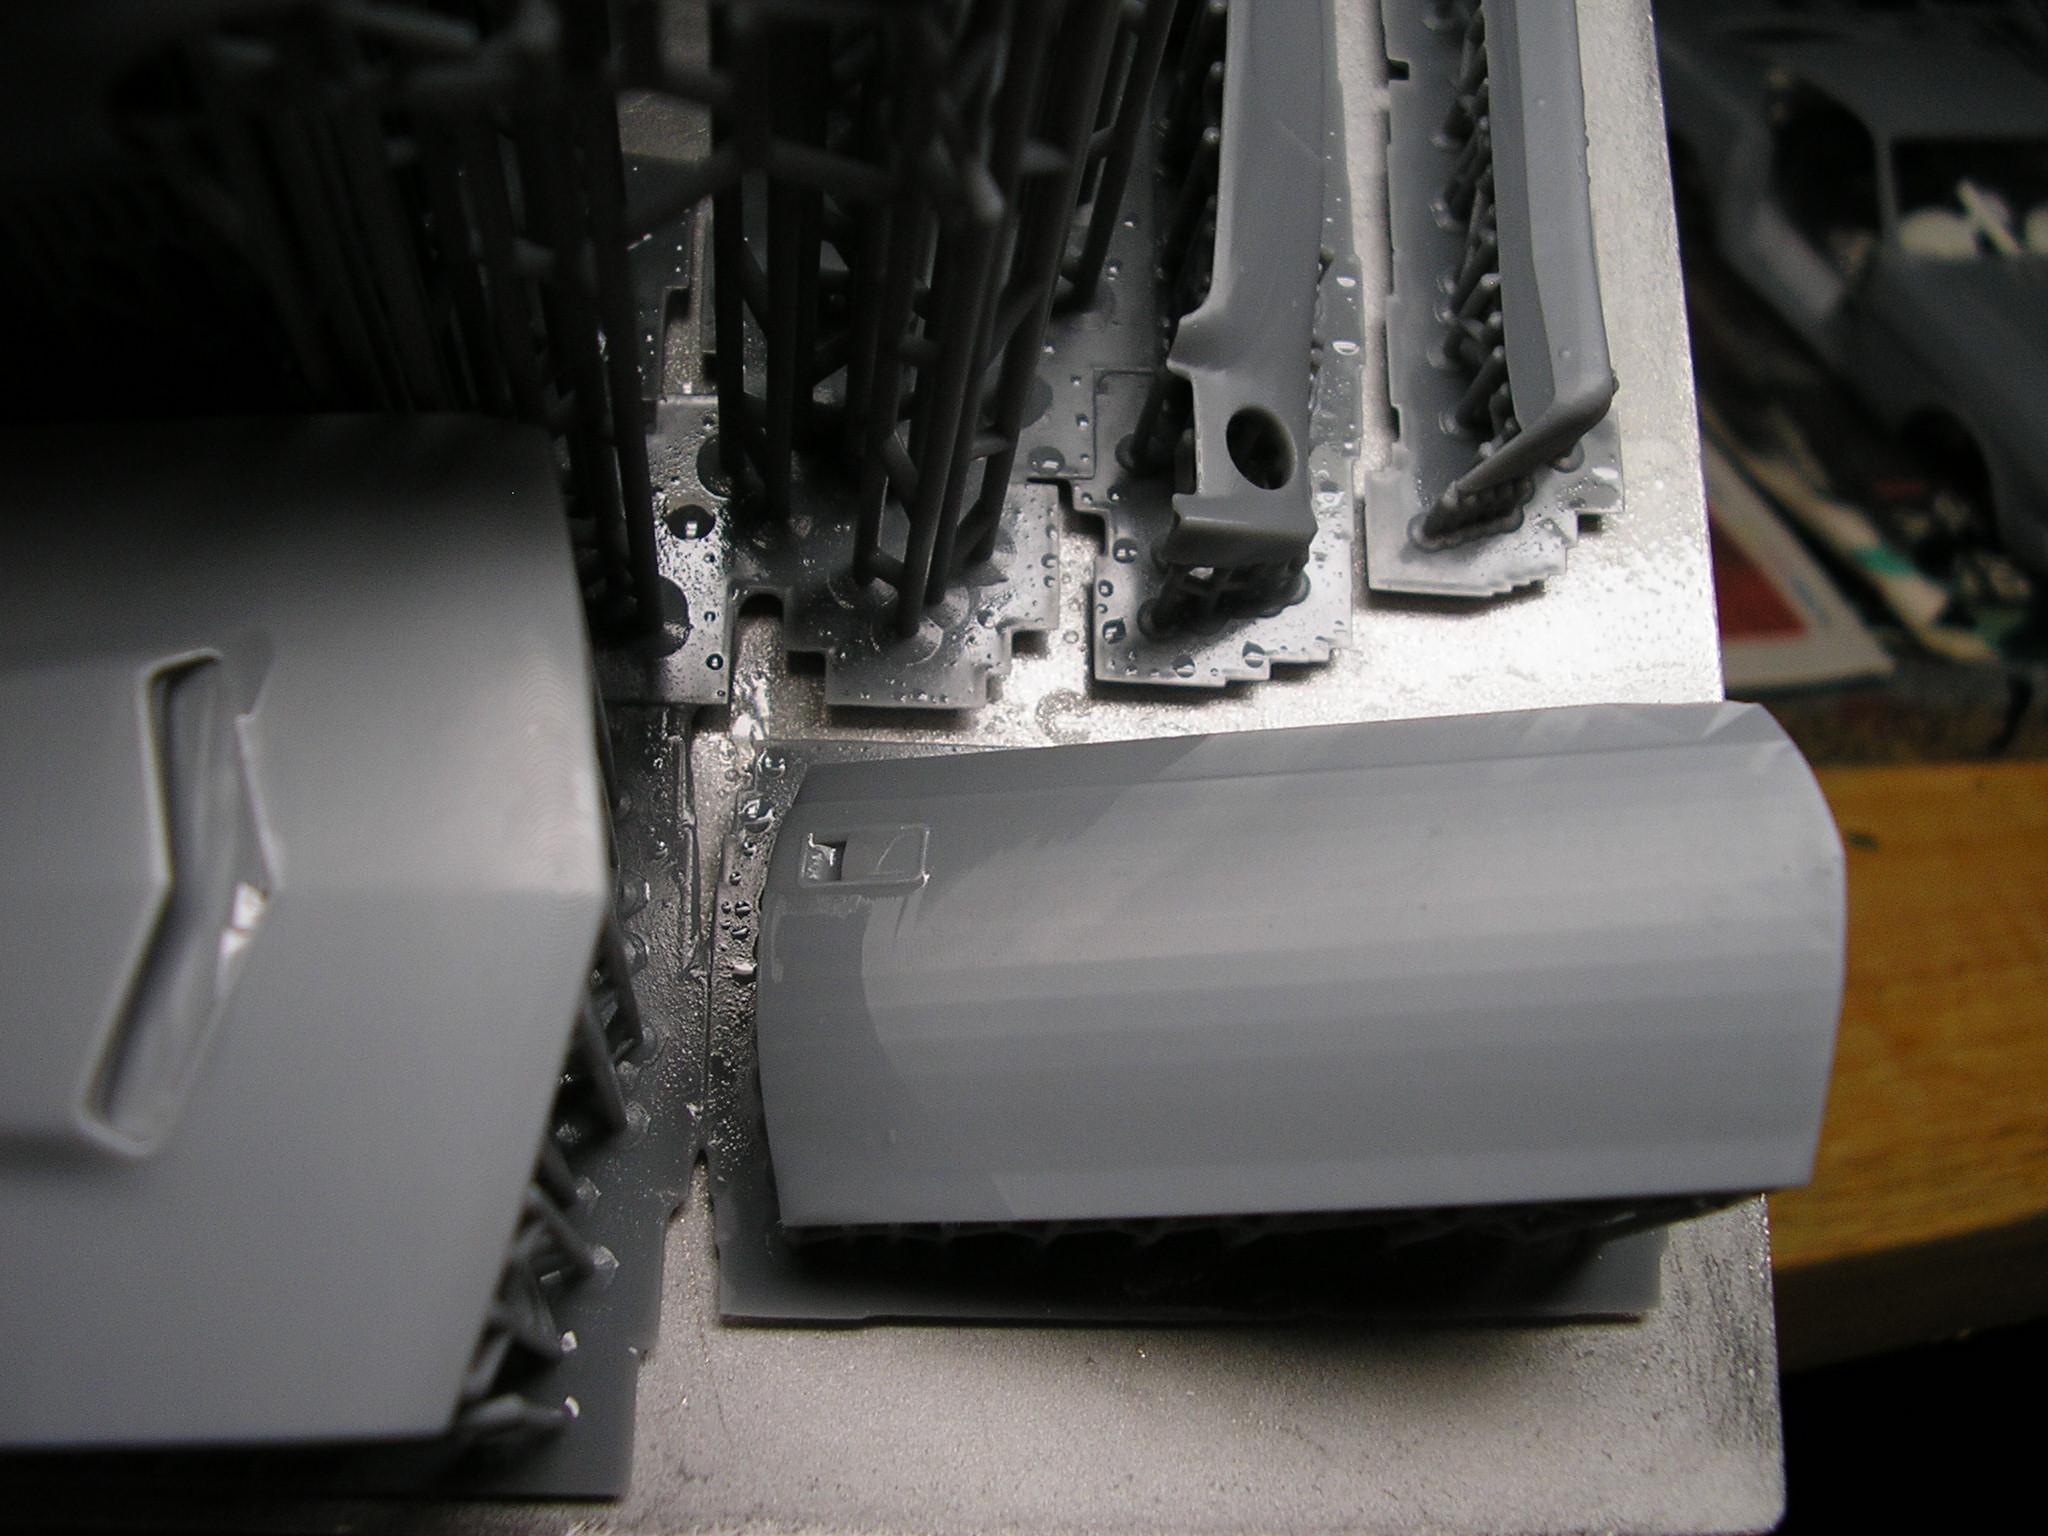
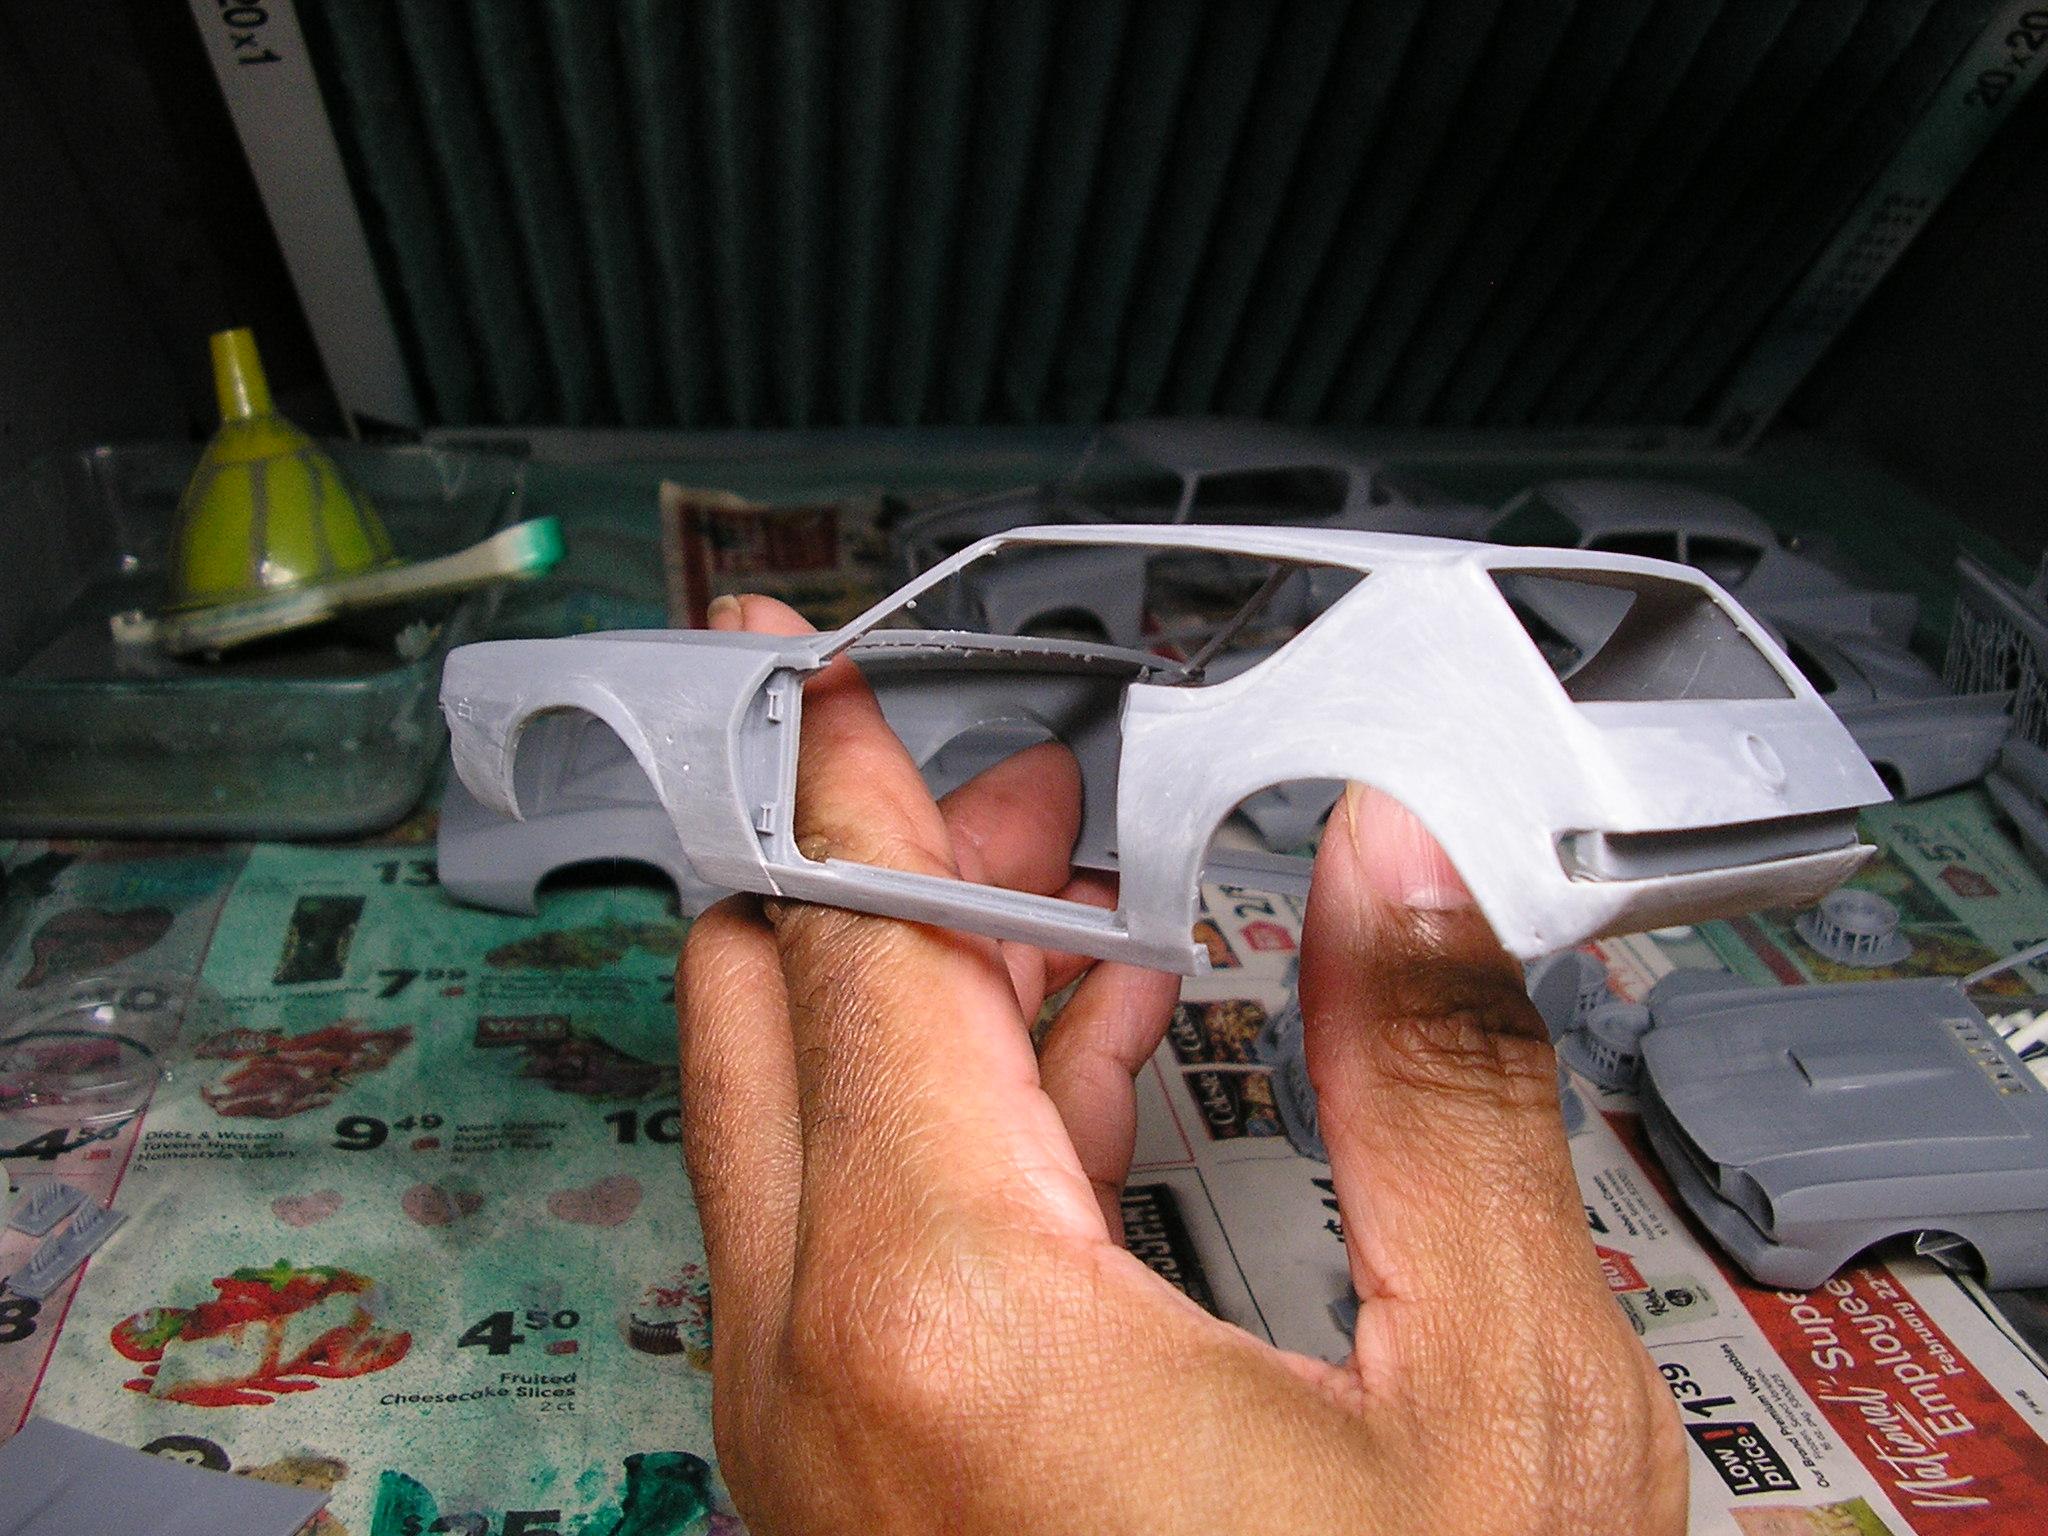
I've 3D printed the '68 Mustang coupe before and showed it here, this time around however I did a considerable amount of editing the original file, and also got a hold of some nice wheel files to go with it. For those of you that don't like FB, I had posted it there and they're still talking about it! The printable file which can be found on Cults3D.com, was intended as an open door model, which for me is no big deal as I can fabricate hinges and door jambs for models. I thought it would be interesting to try a closed door car, but this time make it so that the door and trunk shut lines are much more visible as they were all but invisible when I tried this before, and I thought the shut lines were way too shallow. So working in Blender, I heavily edited the doors and trunk so that there was some "depth" to the shut lines, and also put a "lip" or "flange" around the three sides of the doors/trunk so that they could mesh with the inside vertices/faces in the body, and not get lost during printing. The results turned out very well, and it's another car that for whatever reason, the model makers won't touch. I've got a bunch of pics to show, along with some Shelby mag wheels files that I converted from a video game file and made those printable. There's also a set of GT wheels I printed, which are part of the original .obj files of the car which I have. The first set of wheels to my sight I thought could have been a little better defined. I would do these wheels again as you'll see in the pics below, after some heavy editing of the files. I've got a 1960 Studebaker Lark two door hardtop conversion (I converted it from a four door sedan file), that I just finished up, and the hardtop doors I ran with the Mustang hood (which turned out bad-----explanation a little later, they came out pretty good, albeit the trim is a bit faint. This was attempt number 1 with the hood, I did do some changes to the hood so it wouldn't be quite so wide after it's printed, but it came out badly which is interesting, as I had ran the file just last week for my Mustang CS and there was no issue. I got the Shelby Mag wheels off of a video game file car (Forza Horizon) which were actually part of a '68 Barracuda, which is an EXCELLENT file BTW, and one definitely worth printing sometime. I knew that Ford used this same wheel for their car, so I converted the files to be printable, and while they don't look bad, I thought they could have turned out better. My first edit was to get rid of the peak or "point" in the center of the hub. If some sort of decal or PE is to go in the center, that peak would be annoying. The wheel on the right is where you can see the peak was flattened. I know that in order for the wheels to be printable, the object itself has to be fully "closed" with no open areas which will lead to trouble with printing. I went around the entire circumference of the back of the wheel, and closed everything off. This was after I narrowed the wheel itself to be more of wheel cover which the 1:1 car actually had. I tried again with the next printing, and the results were much, MUCH better and cleaner. The GT wheels also were problematic. The original file has some sort of hub against the back of the wheel, and it was trapping resin. I thought I better edit out the hub and try these again, as trapped resin will be troublesome weeks or months down the road. You can see here where the back of wheel wasn't quite printing correctly which told me the hub was an issue. One could put in drain holes, but that still doesn't solve the issue that the hub should be printing solid to begin with. The second set of wheels after the hub was edited out. The liquid you see is water as I literally was taking pics not long after the IPA took off the excess resin, washed, cured, and were still a bit wet. The GT wheels fitted in a set of AMT's parts pack redlines. I scaled the wheels to be somewhere around 17mm so that they would fit in the bead of the tire properly, and not slip through. Much cleaner appearing this time compared to the first run. The same with the Shelby mags.........around 17mm so they would fit in the tires. The PE emblem I have is a bit small for the hub. This would be better suited if a snake decal could be made to fit inside the hub. The following are pics of the car now off the build plate, washed up and cured......... From my .obj files, I did convert, scale and edit in the side "vent" which the original printable file doesn't have, and I also added rocker panel trim. Side support marks are very easily sanded down, and are NECESSARY to keep the print as steady as possible to prevent print shift, and distorted side panels. As can be seen, the trunk shut lines are much better defined. I put my Green Hornet I'm working on against the print body. If AMT's body is on the mark for 1/25, I'd say my scaling came out darn near perfect. BTW, the Green Hornet is on the downside of getting done. BMF, and fitting of the glass is all that's needed and then it's final assembly. I printed the hood again just this morning-----I took pics but they're on my phone. It came out perfect, and the issue was another part I edited in that I wanted to print with that. This was the upper grille section, but after the second attempt which failed, I edited the file again and took off the grille section and printed it as its own part. Both printed great, and that solves that issue with the hood. I've had comments about what do I do with all the cars I print......I respond back to them that my intention isn't always to build a particular car at once after I print it. I may print the car as I just happen to like that particular car. Same with a model kit. We buy kits not with the intention of always building it, we just happen to like that car. Thanks for reading this very long post!


.jpg.c07ce37b088e5ec142320b308a8bcbaa.jpg)
.jpg.ead5fe508ba8333a4103ebcd25274973.jpg)