MrObsessive
-
Posts
9,785 -
Joined
-
Last visited
Content Type
Profiles
Forums
Events
Gallery
Everything posted by MrObsessive
-

3D Printed 1958 Facel Vega HK500
MrObsessive replied to MrObsessive's topic in Car Aftermarket / Resin / 3D Printed
@Ace-Garageguy I already got this car scaled out when the times comes for me to want to print it. I like to keep specs on hand as I'll need the percentage I'm using to do the other parts too later on.
-
3D Printed 1958 Facel Vega HK500
MrObsessive replied to MrObsessive's topic in Car Aftermarket / Resin / 3D Printed
Thanks Bill! Those pics help a lot! If I can get pics of what the floor looked like underneath, that would be great! Wow............that sure is a lot of swiss cheesed steel huh?? ? -
It would be for Tamiya's 1/24 '66 Karmann Ghia engine. That would be the kit (running gear and chassis) I'd be using to build a 3D printed Karmann Ghia Type 34 I did a few weeks ago. It'll be a bit before I'd get to it........I've got the Shelby to finish up yet, and then there's a resin '77 Cutlass Supreme on deck after that. Here's a few pics of the Type 34.............. I've since smoothed out the body where the halves meet, and put it away until it's time to get to it.
-
3D Printed 1958 Facel Vega HK500
MrObsessive replied to MrObsessive's topic in Car Aftermarket / Resin / 3D Printed
Hey, that's not bad! I wish it had the wraparound windshield like the later cars.......I might wanna steal some stuff off of that! I've got a ton of files to do the Pegaso. Full opening everything, including interior, tires, and wire wheels. There's two body files with it.......one with it split up for smaller printers, and another with the entire body. Separate doors, hood, trunk, etc. I've got a lot of pics of it, but for the life of me I cannot find chassis pics of this car. I know it had a rear transmission and a De Dion rear end, but dang if I can find pics of one being restored or on a lift. -
3D Printed 1958 Facel Vega HK500
MrObsessive replied to MrObsessive's topic in Car Aftermarket / Resin / 3D Printed
?? I didn't know there was a diecast.......do you know who makes it? I'm curious to check out the proportions on that. Yeah, I've been trying to get files of cars that I know will probably NEVER see the light of day from any of the major kit manufacturers. I do believe that's where the hobby is heading.......instead of buying a kit from the kit makers, you'd just buy the file and print it out, or have it printed somewhere. I've been saying for years now that this is the next big wave, and it looks like it's arrived! EDIT: I just came across an HK500 from Sunstar in 1:18. Not bad! They're VERY prolific in putting out oddball stuff that you just don't see. -
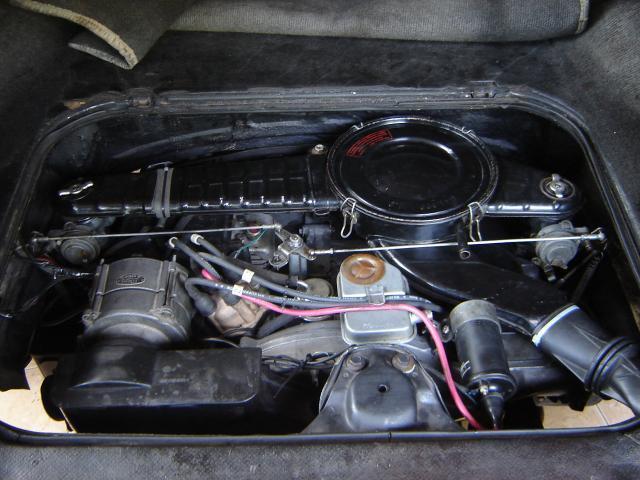
This might be kinda "out there", but for us VW fans.....especially the Type 3 variants, I'd LOVE to see the proper air cleaner and fan shroud that those had. It's how these cars had "two" trunks as the lower profile of the fan and air cleaner led to much more space above the engine. Here are a few pics of it out of a Type 34 Karmann Ghia which will be a project for me in the not too distant future. Air cleaner........ Fan shroud........
-
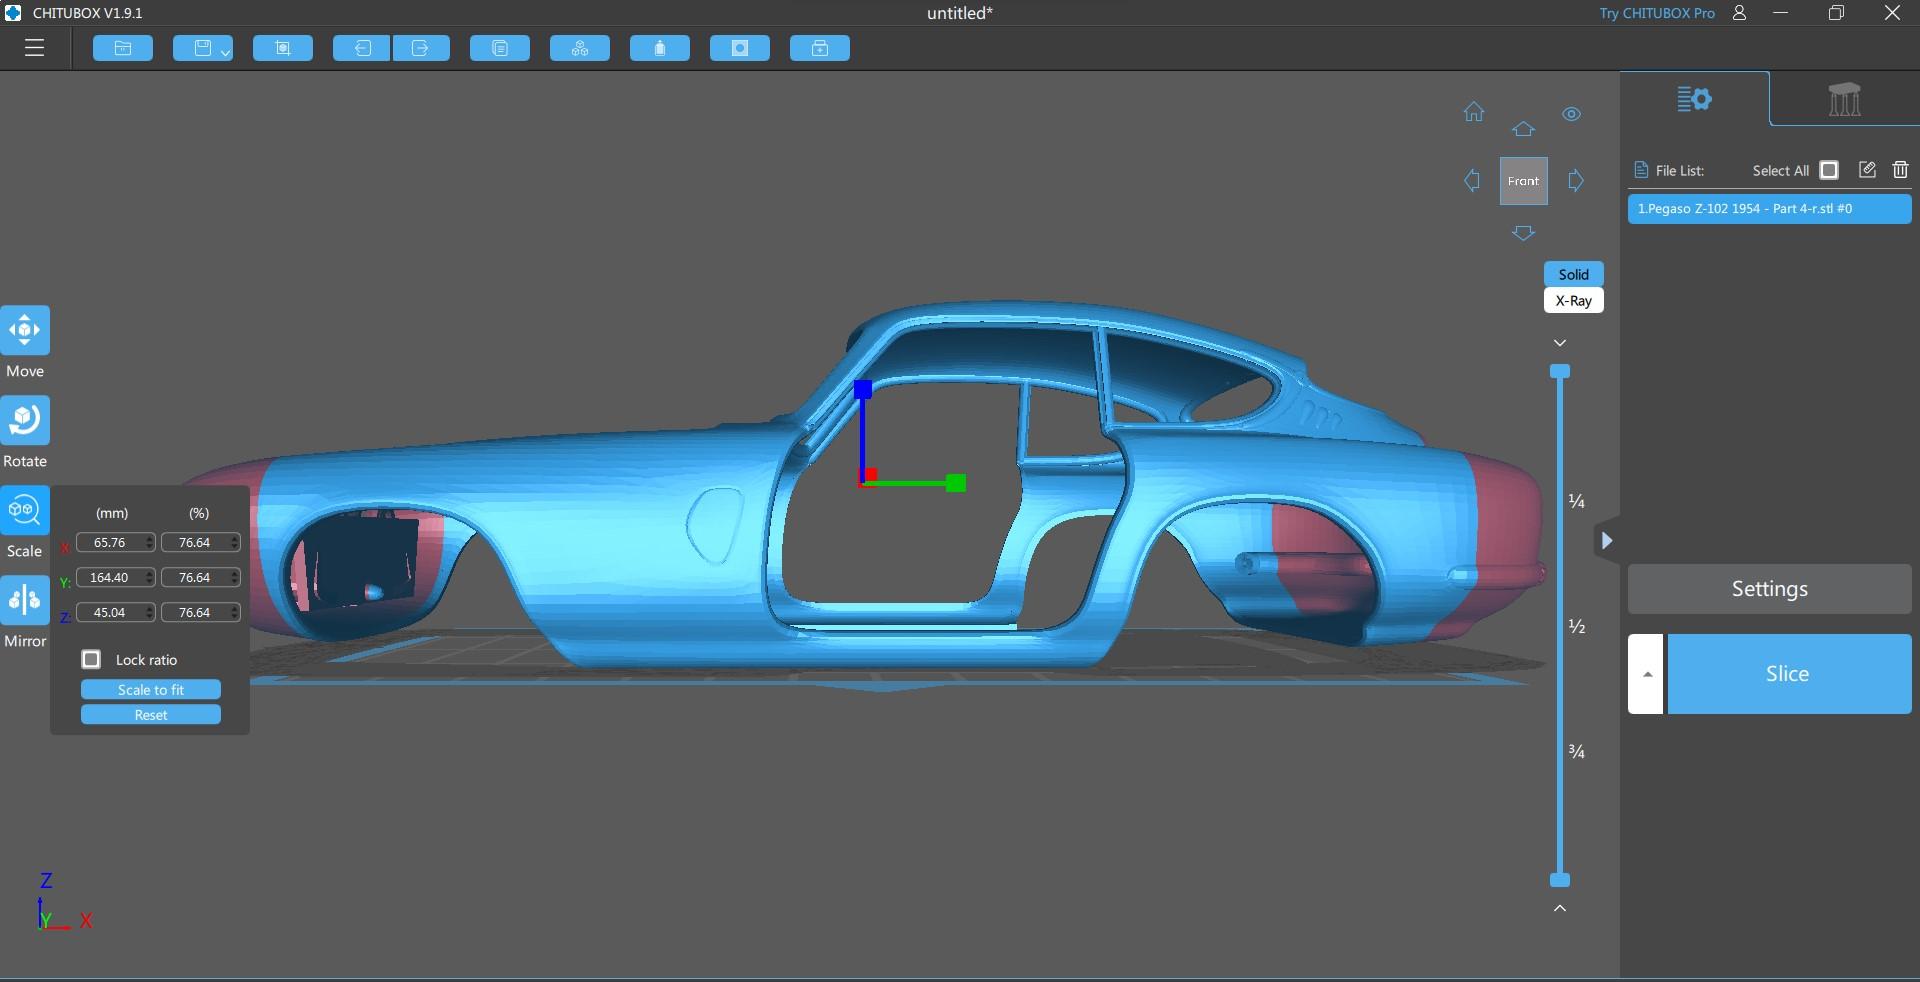
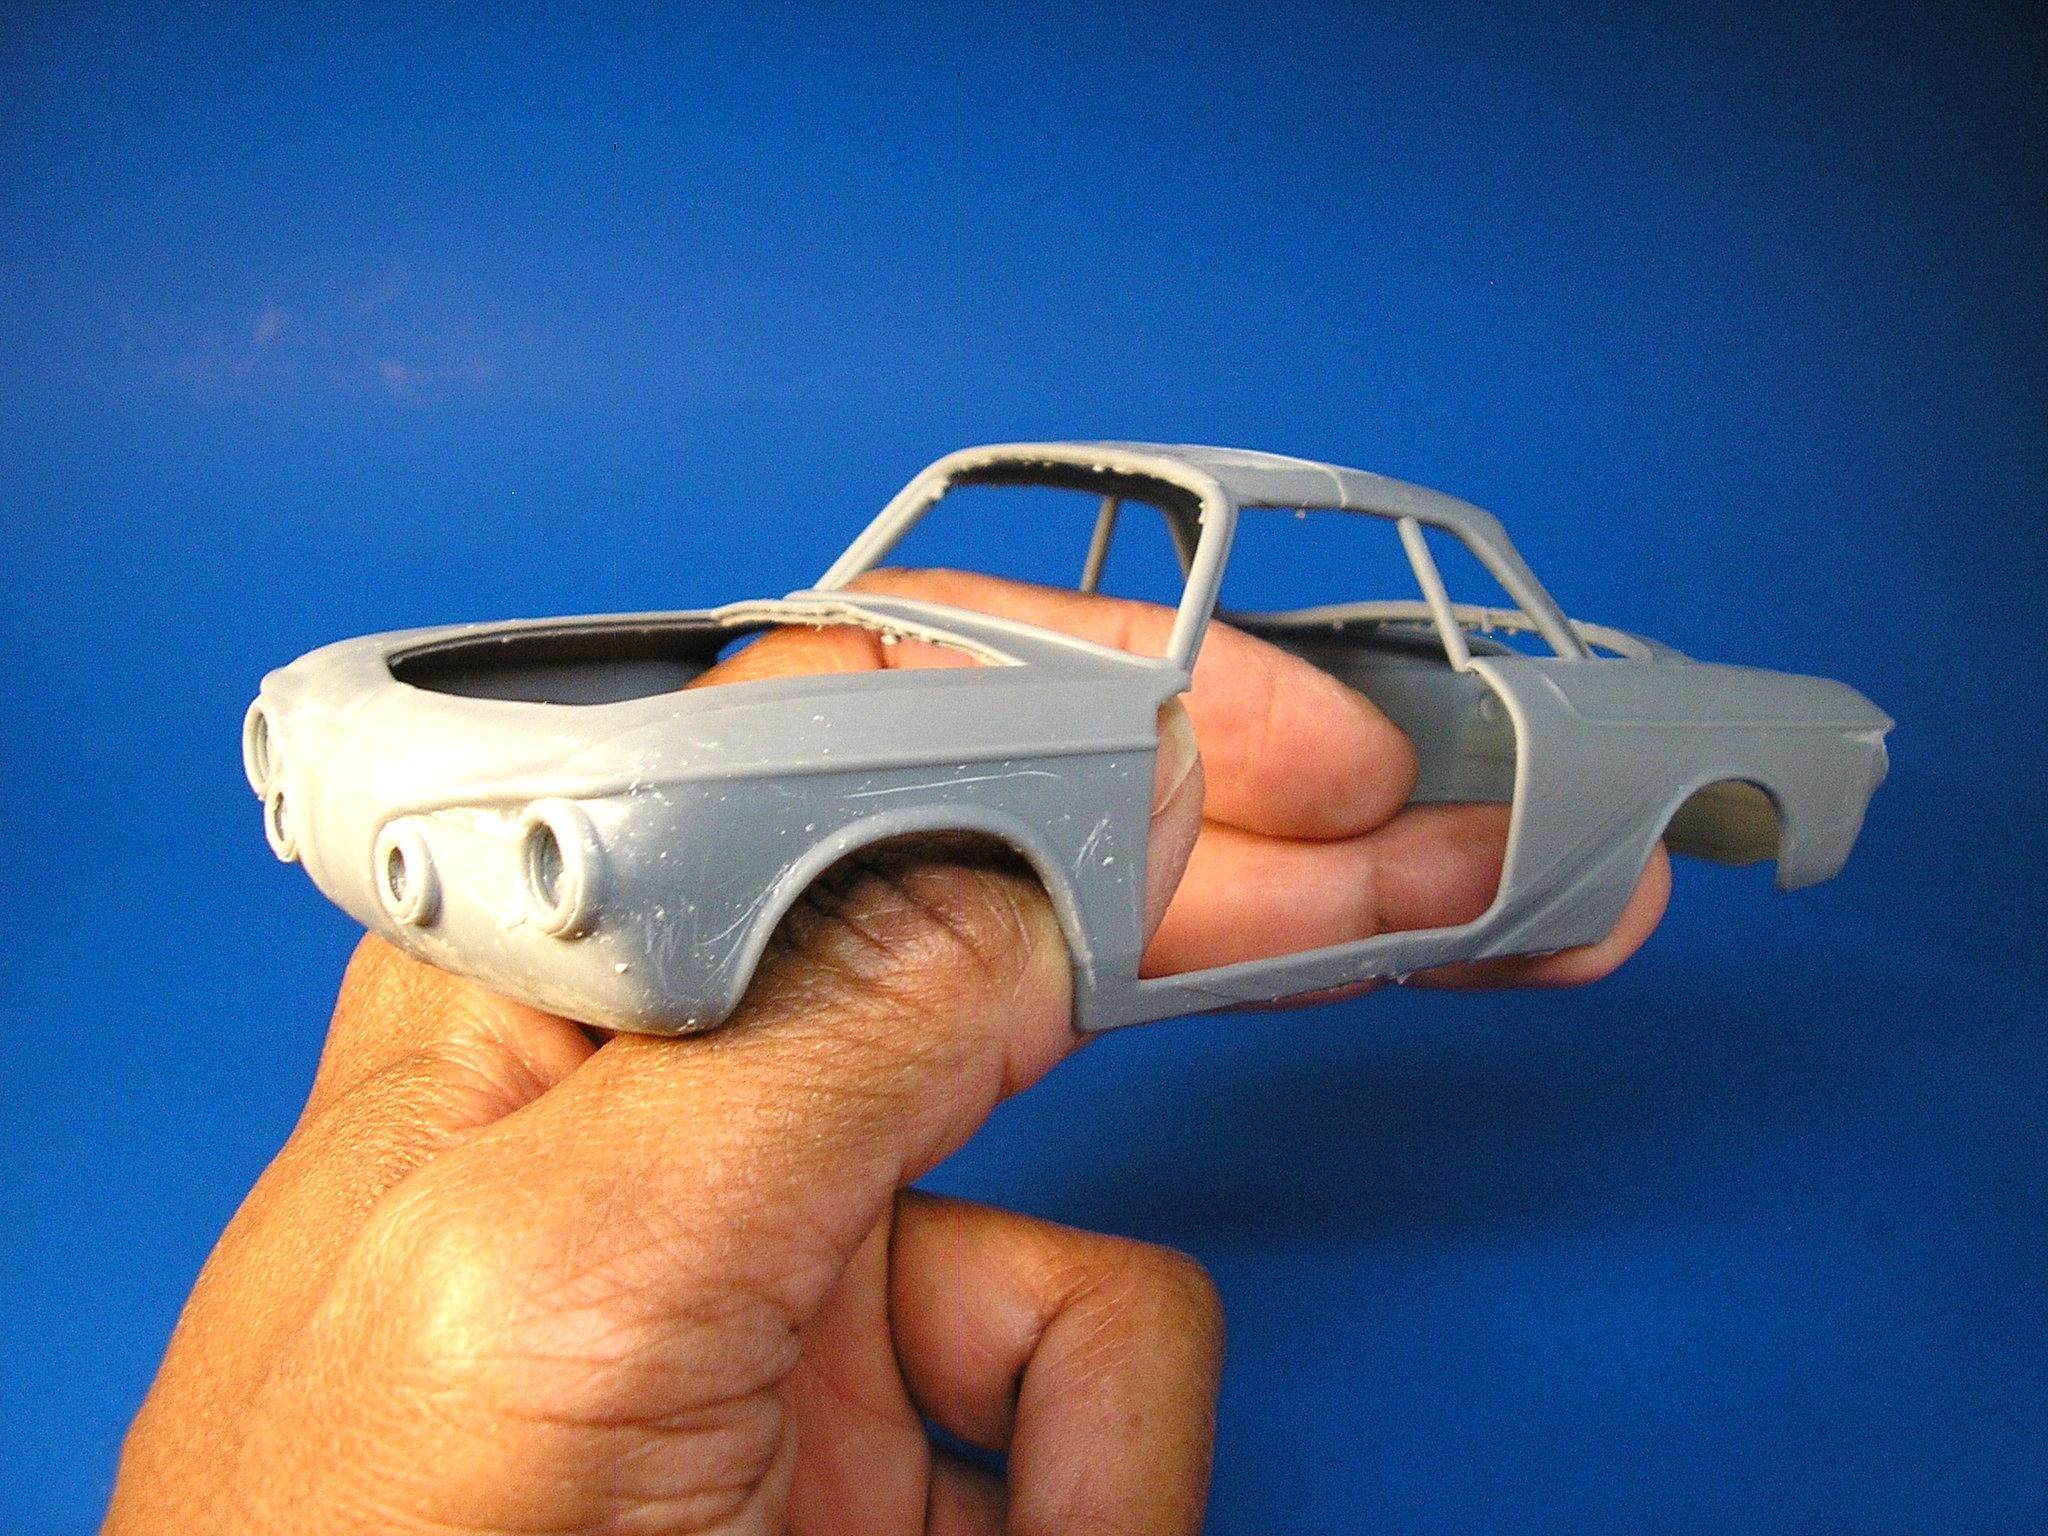
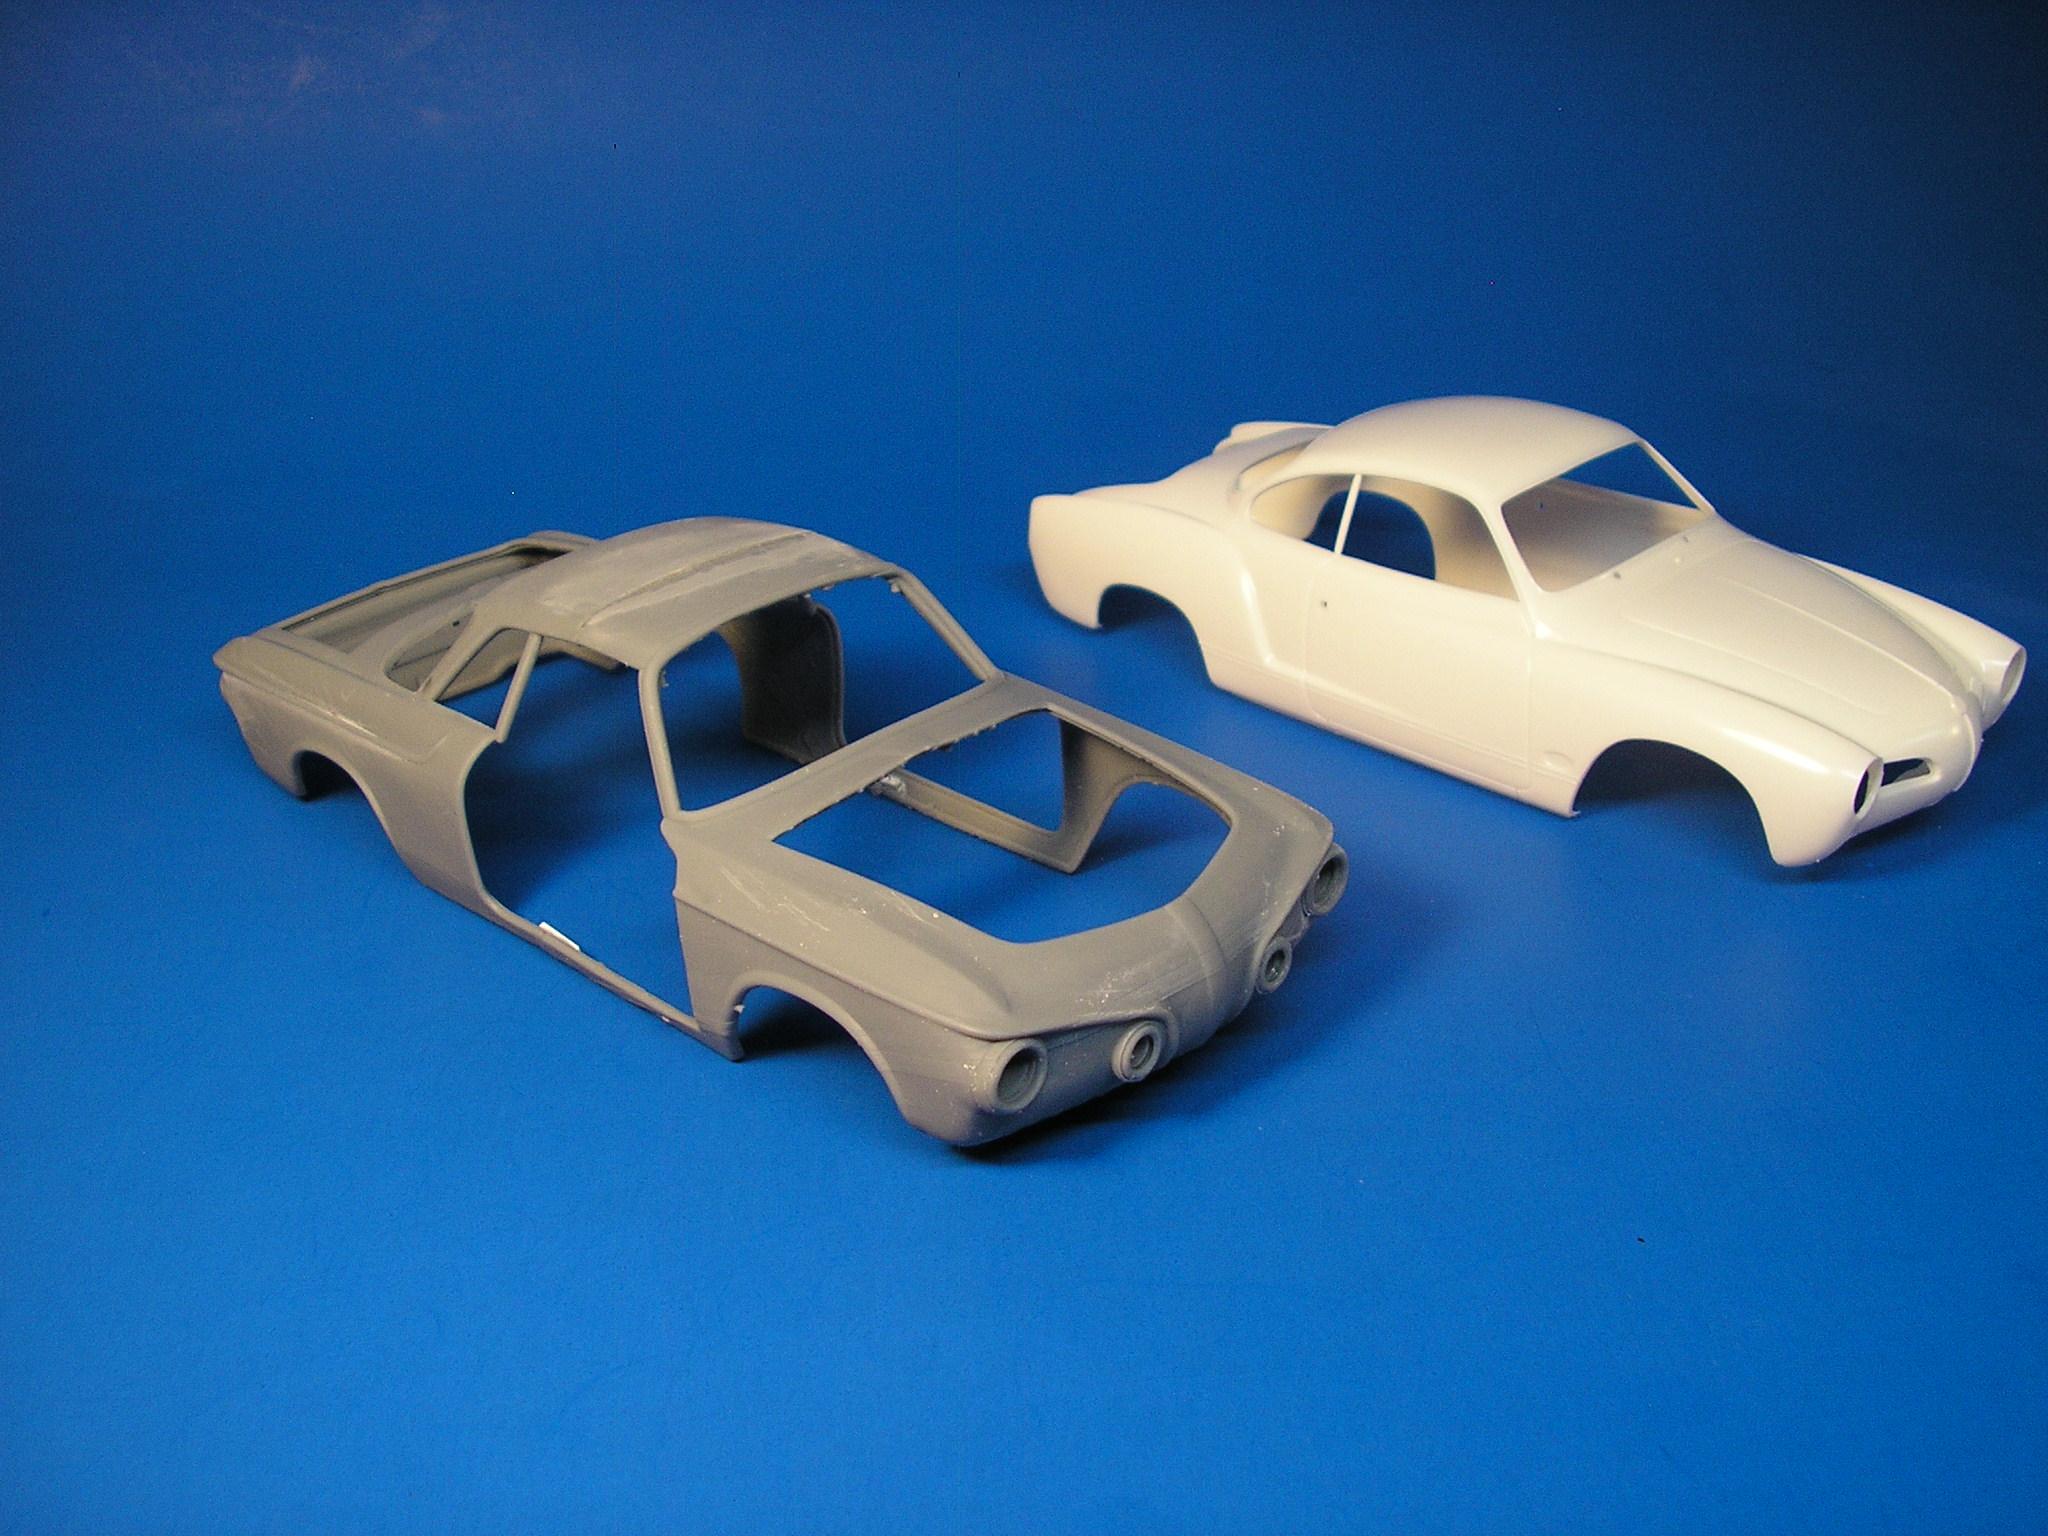
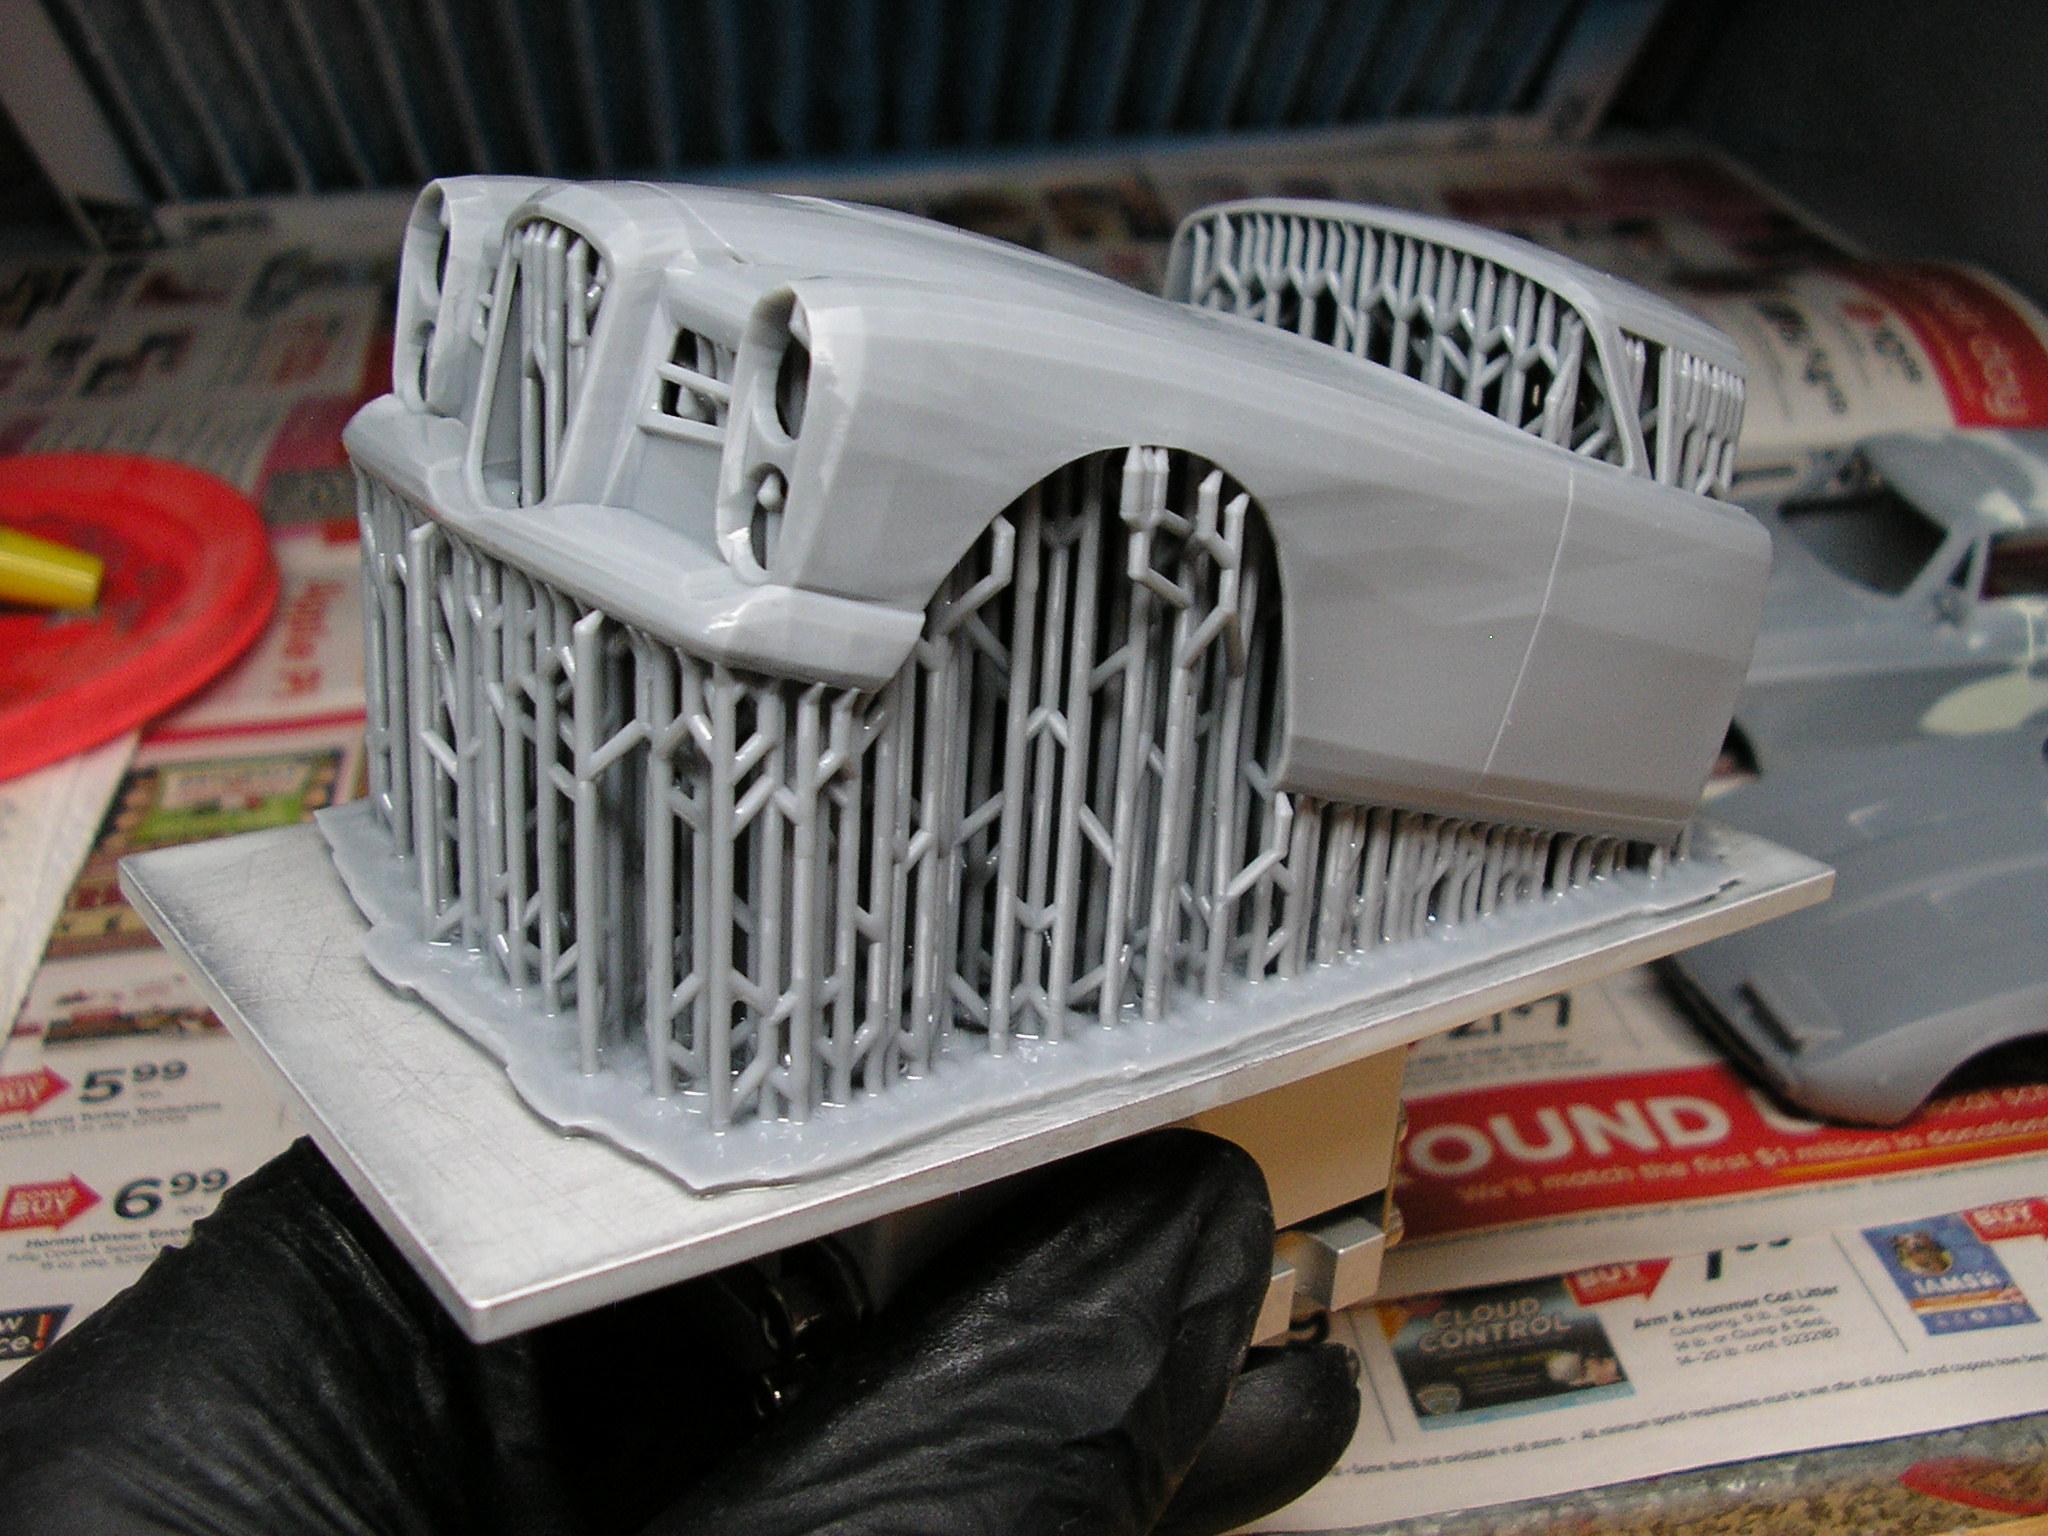
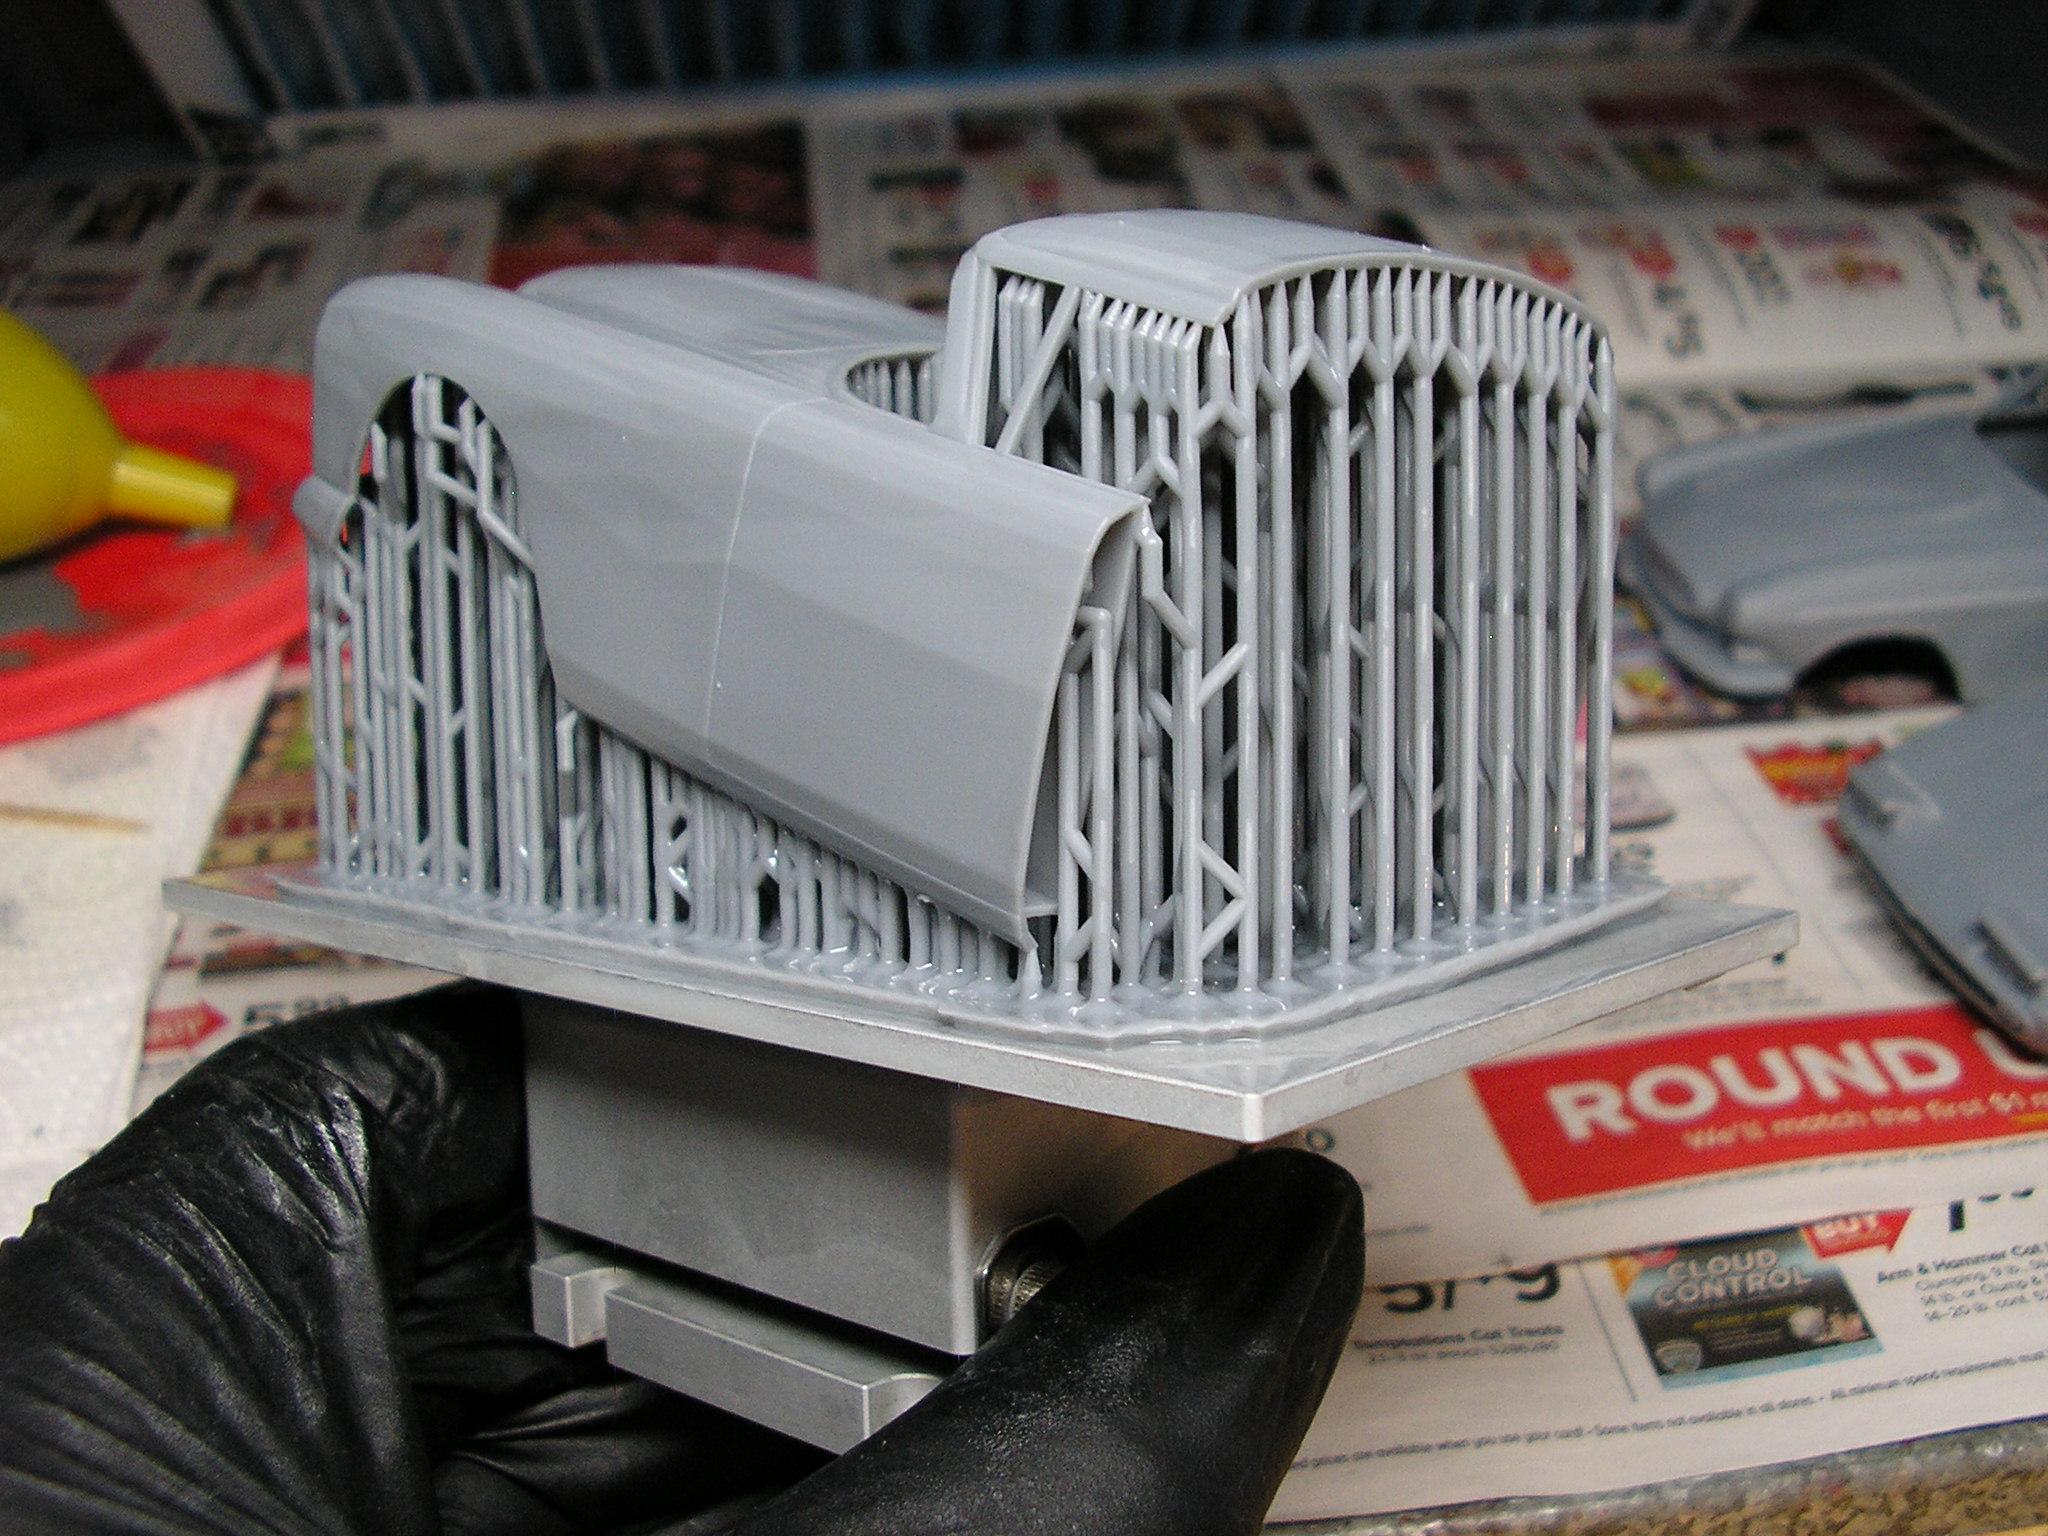
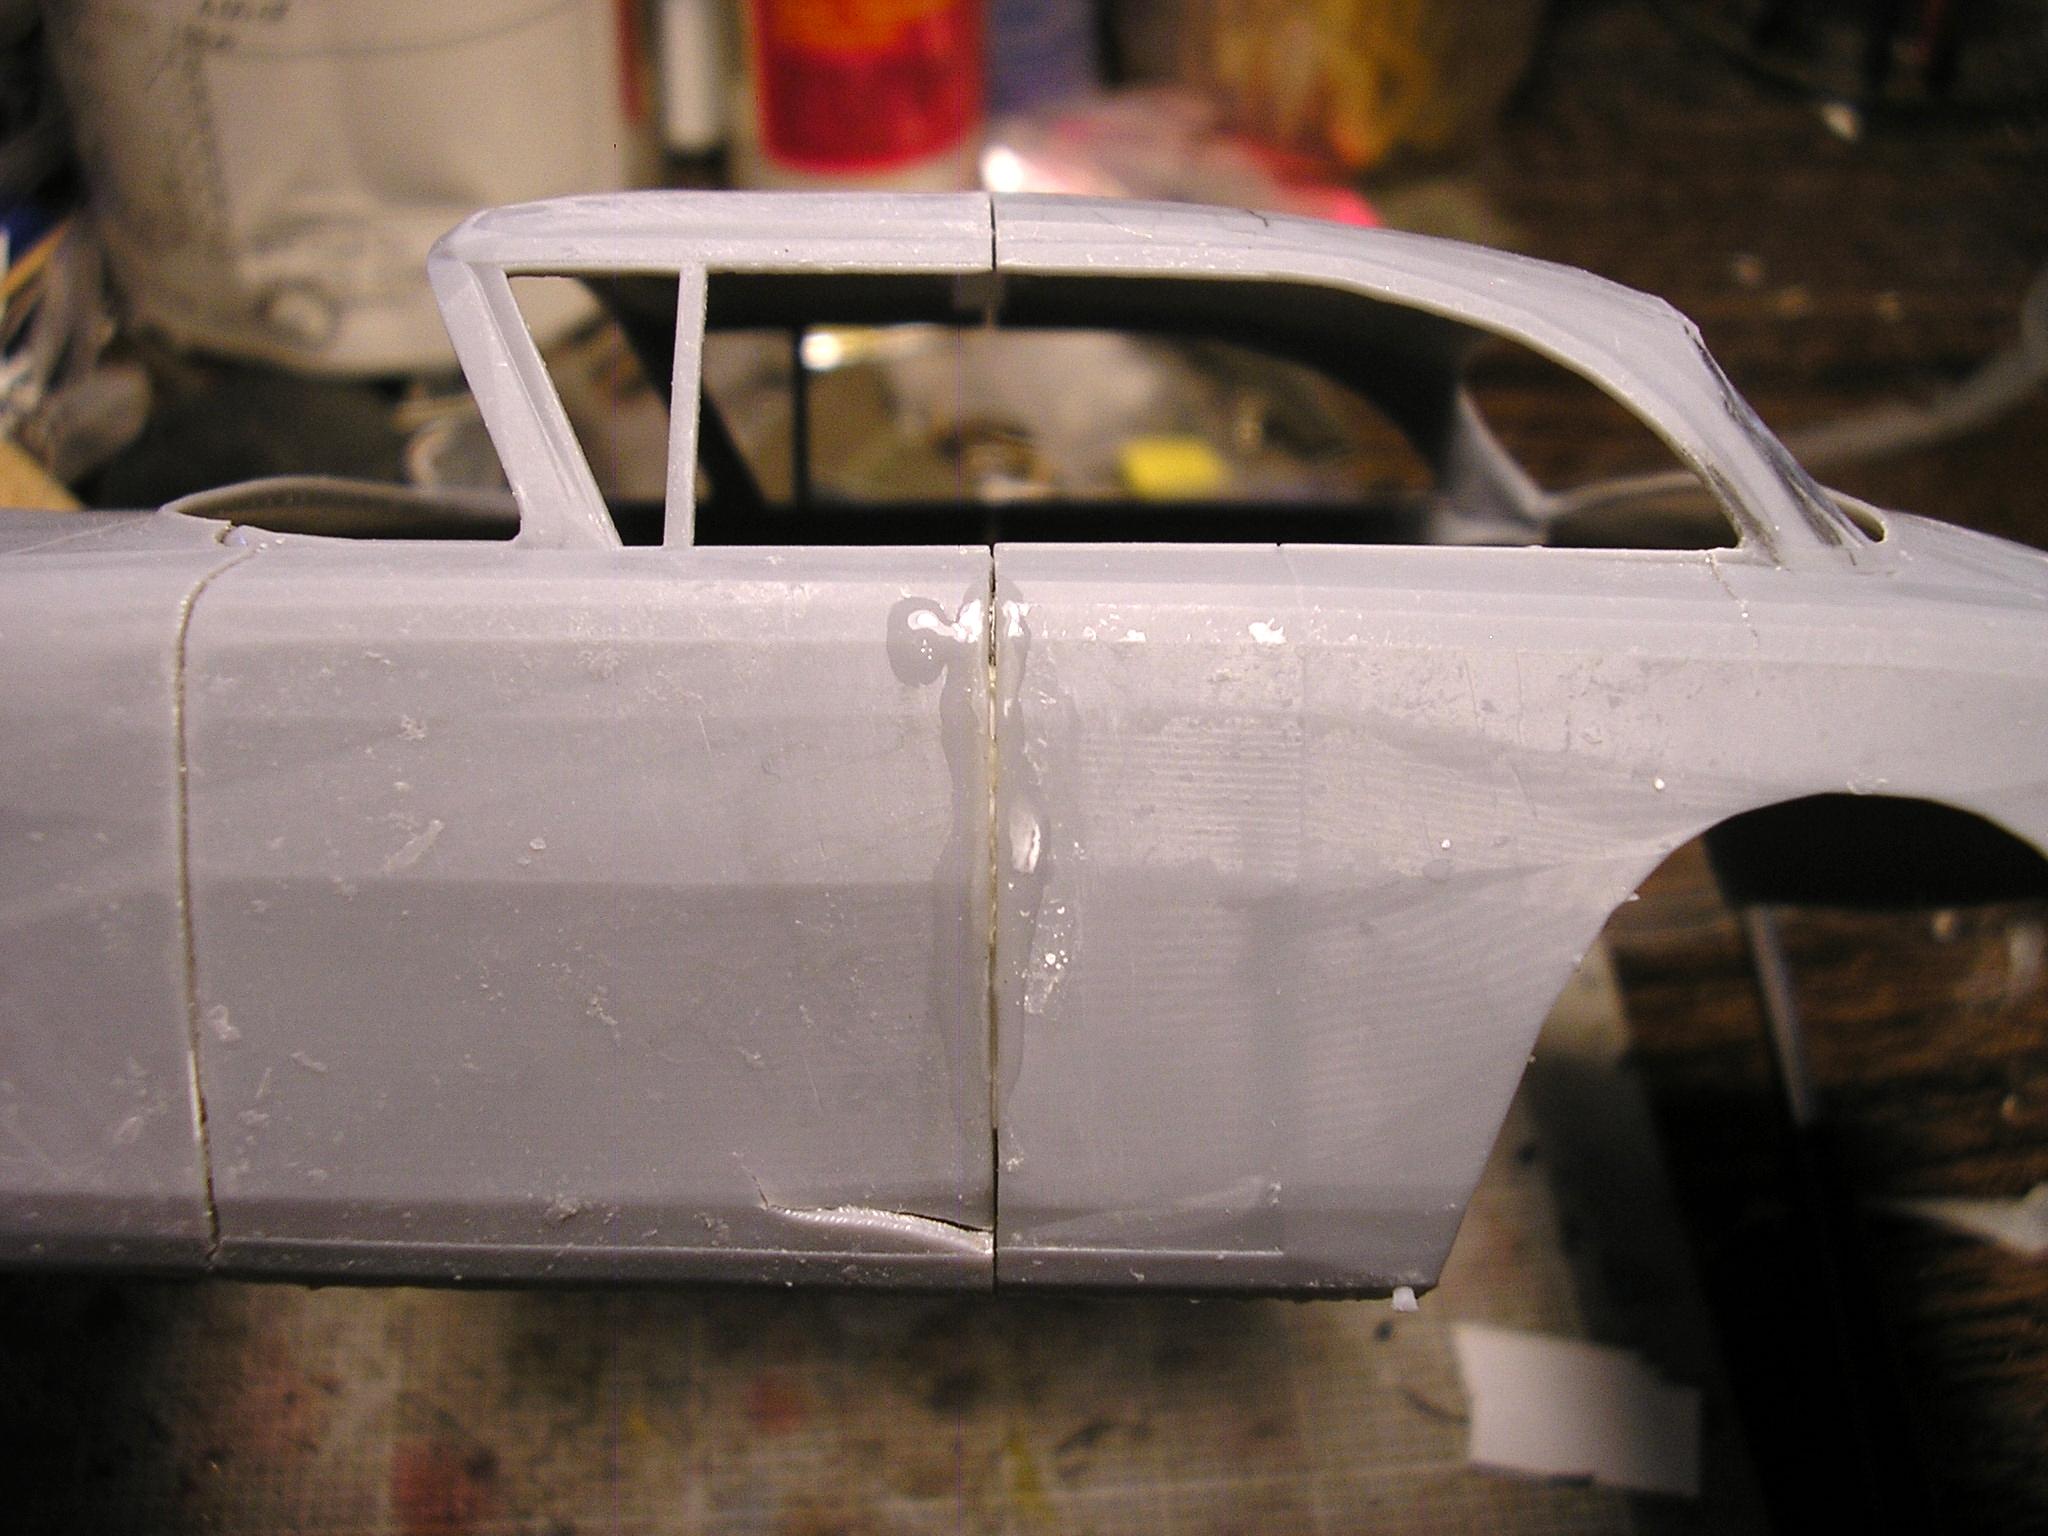
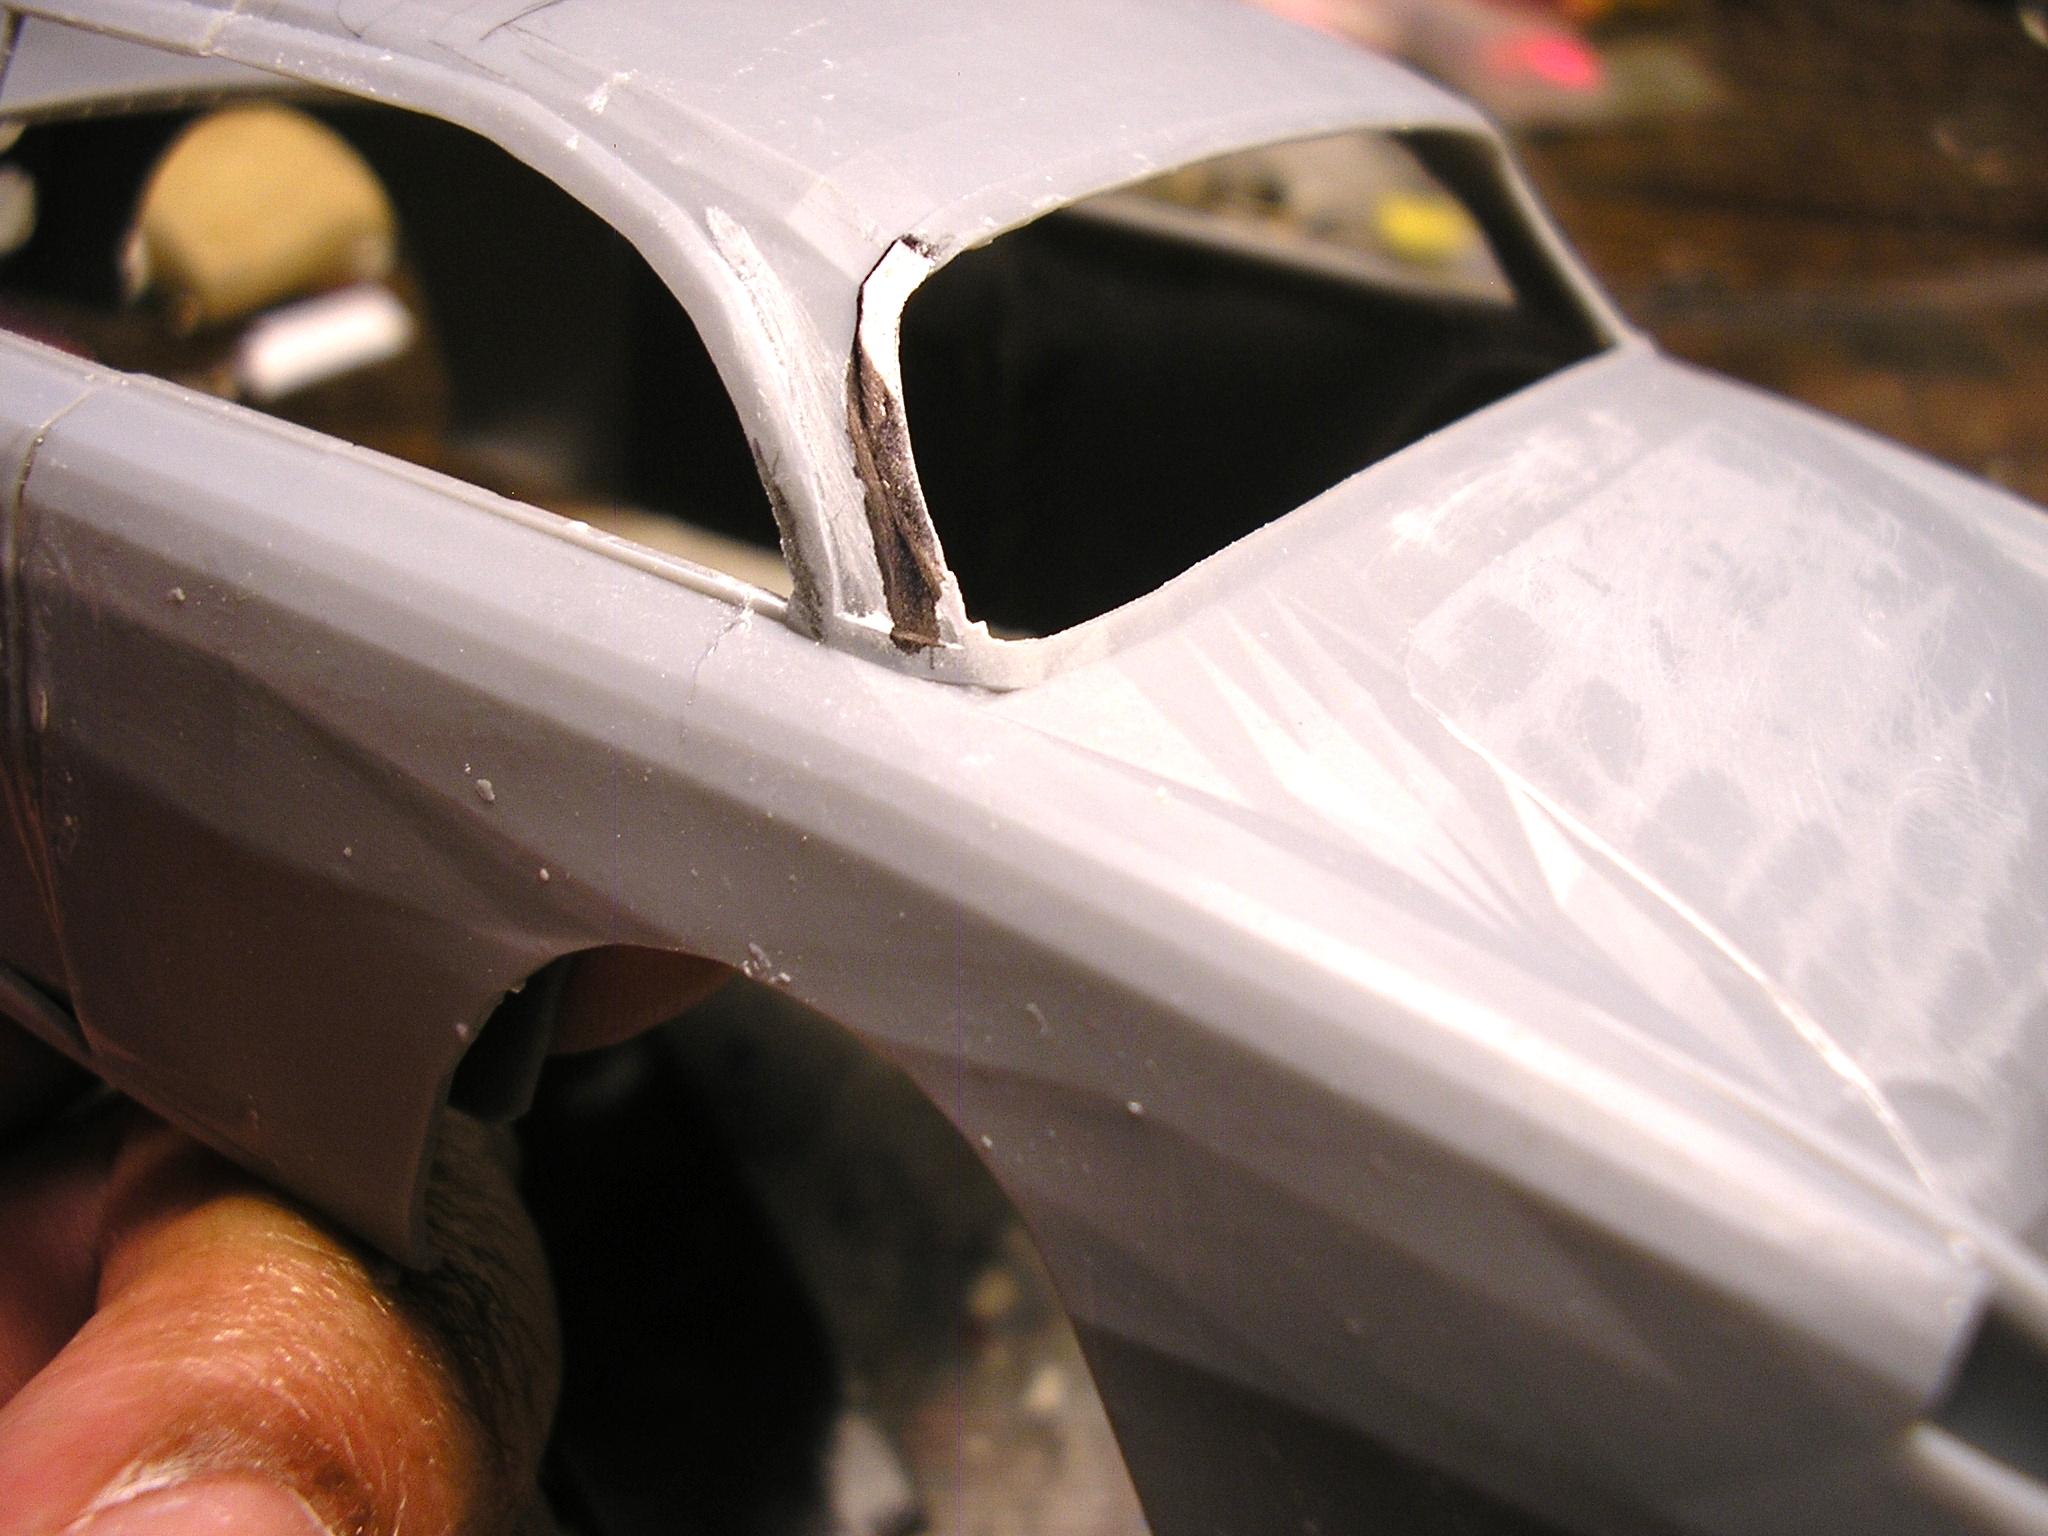
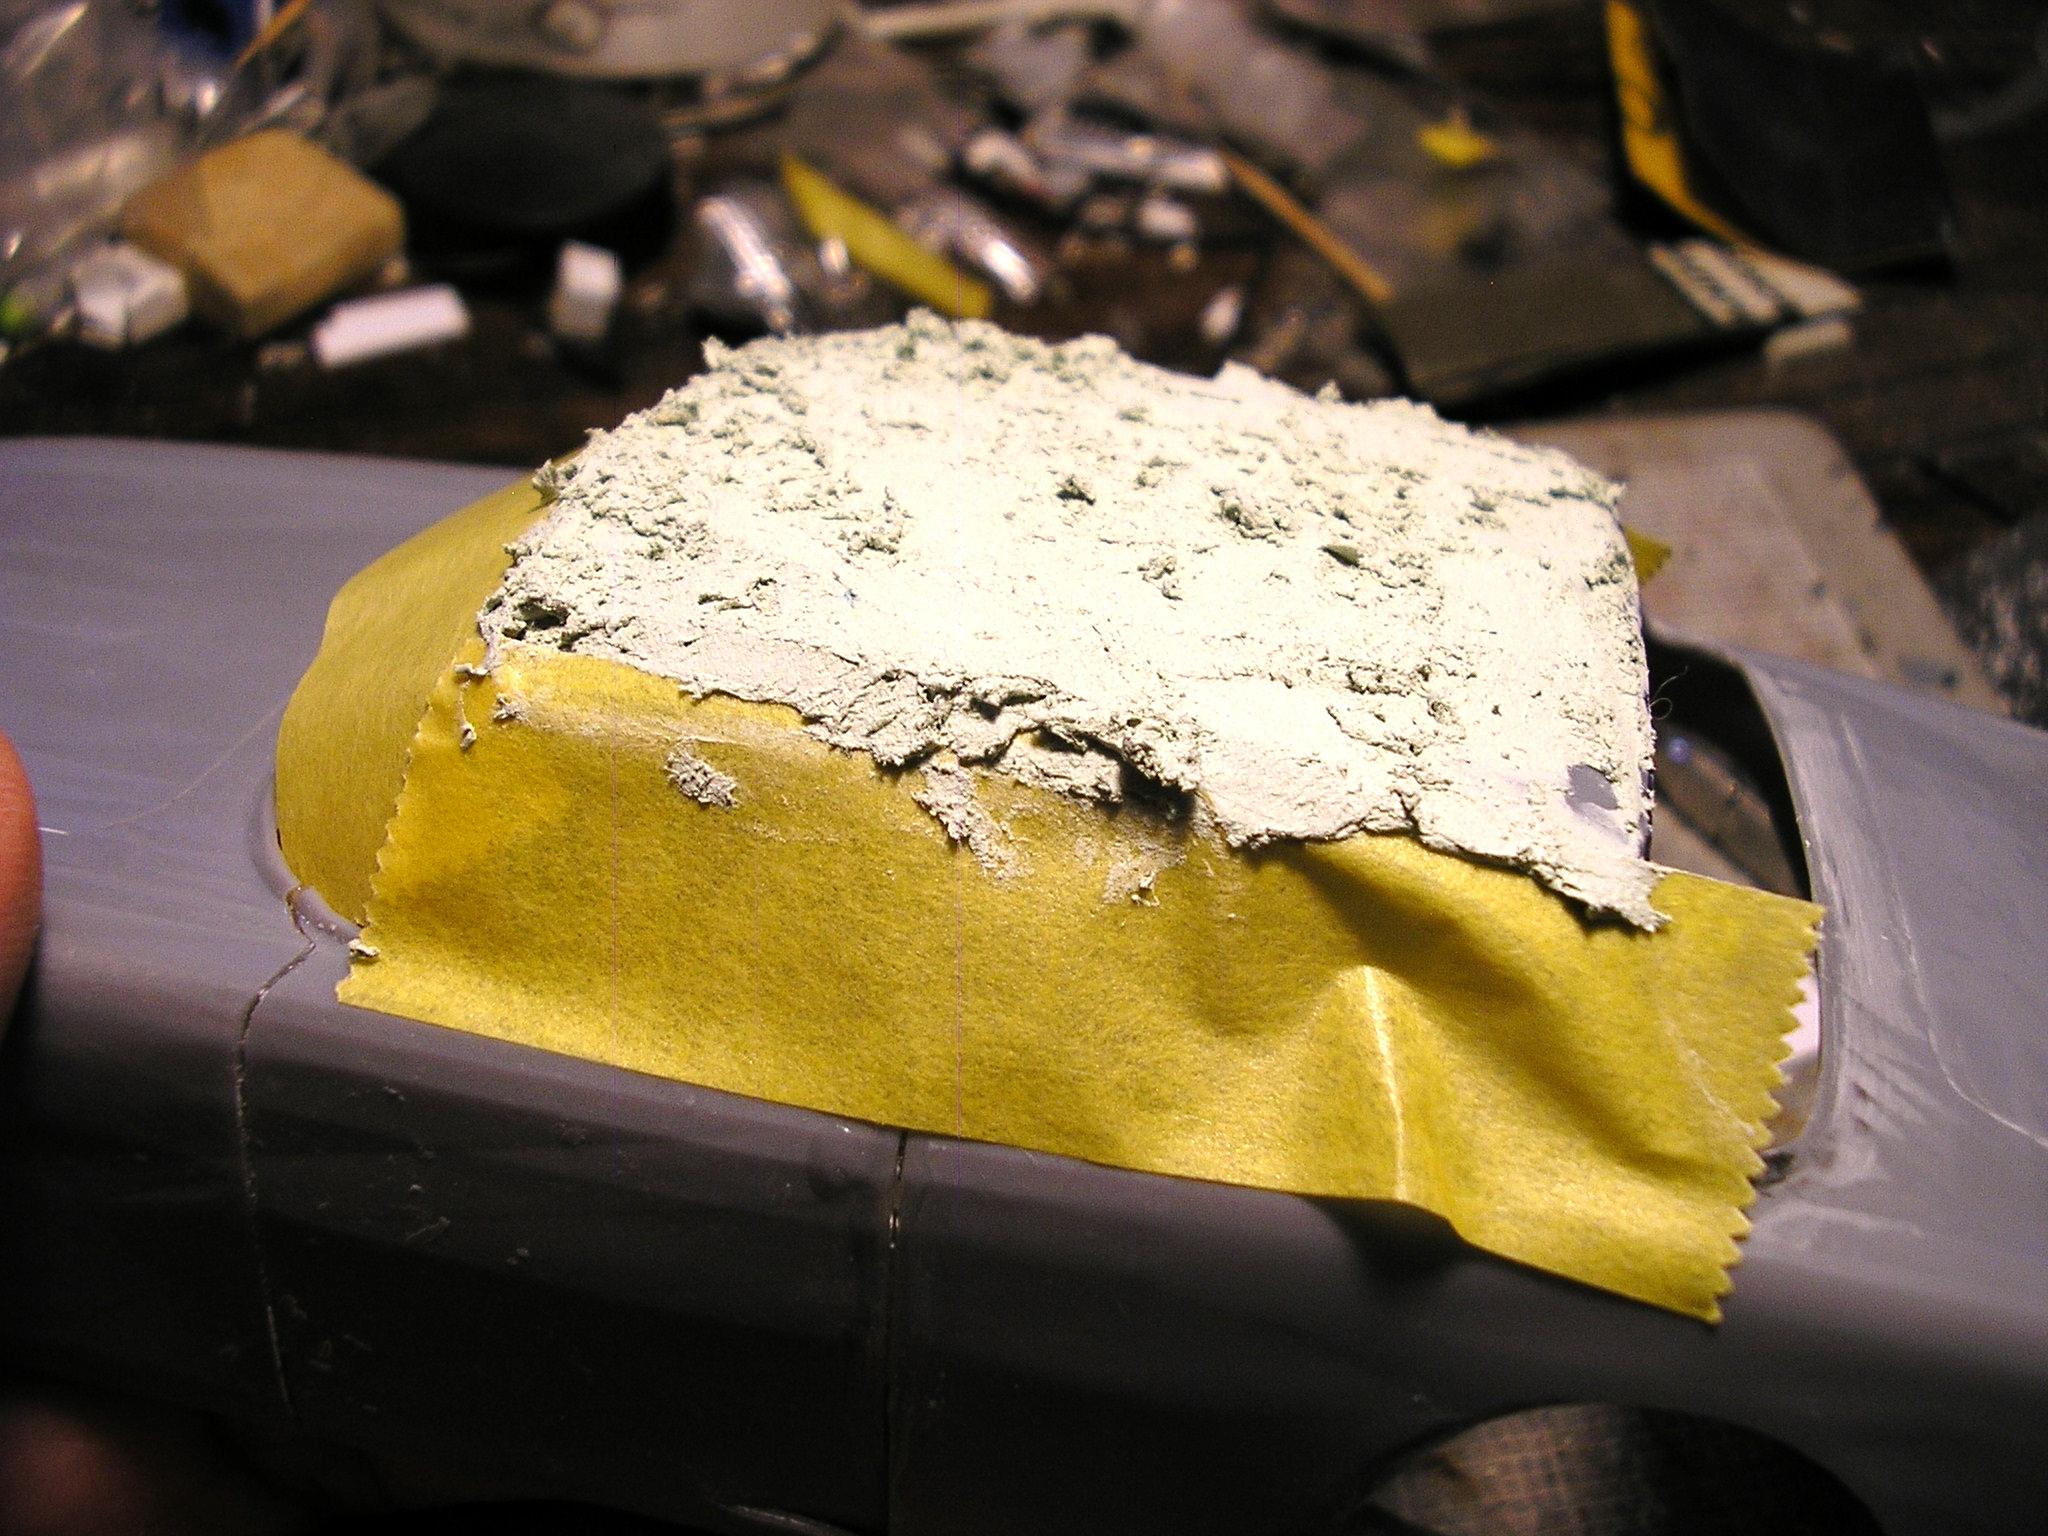
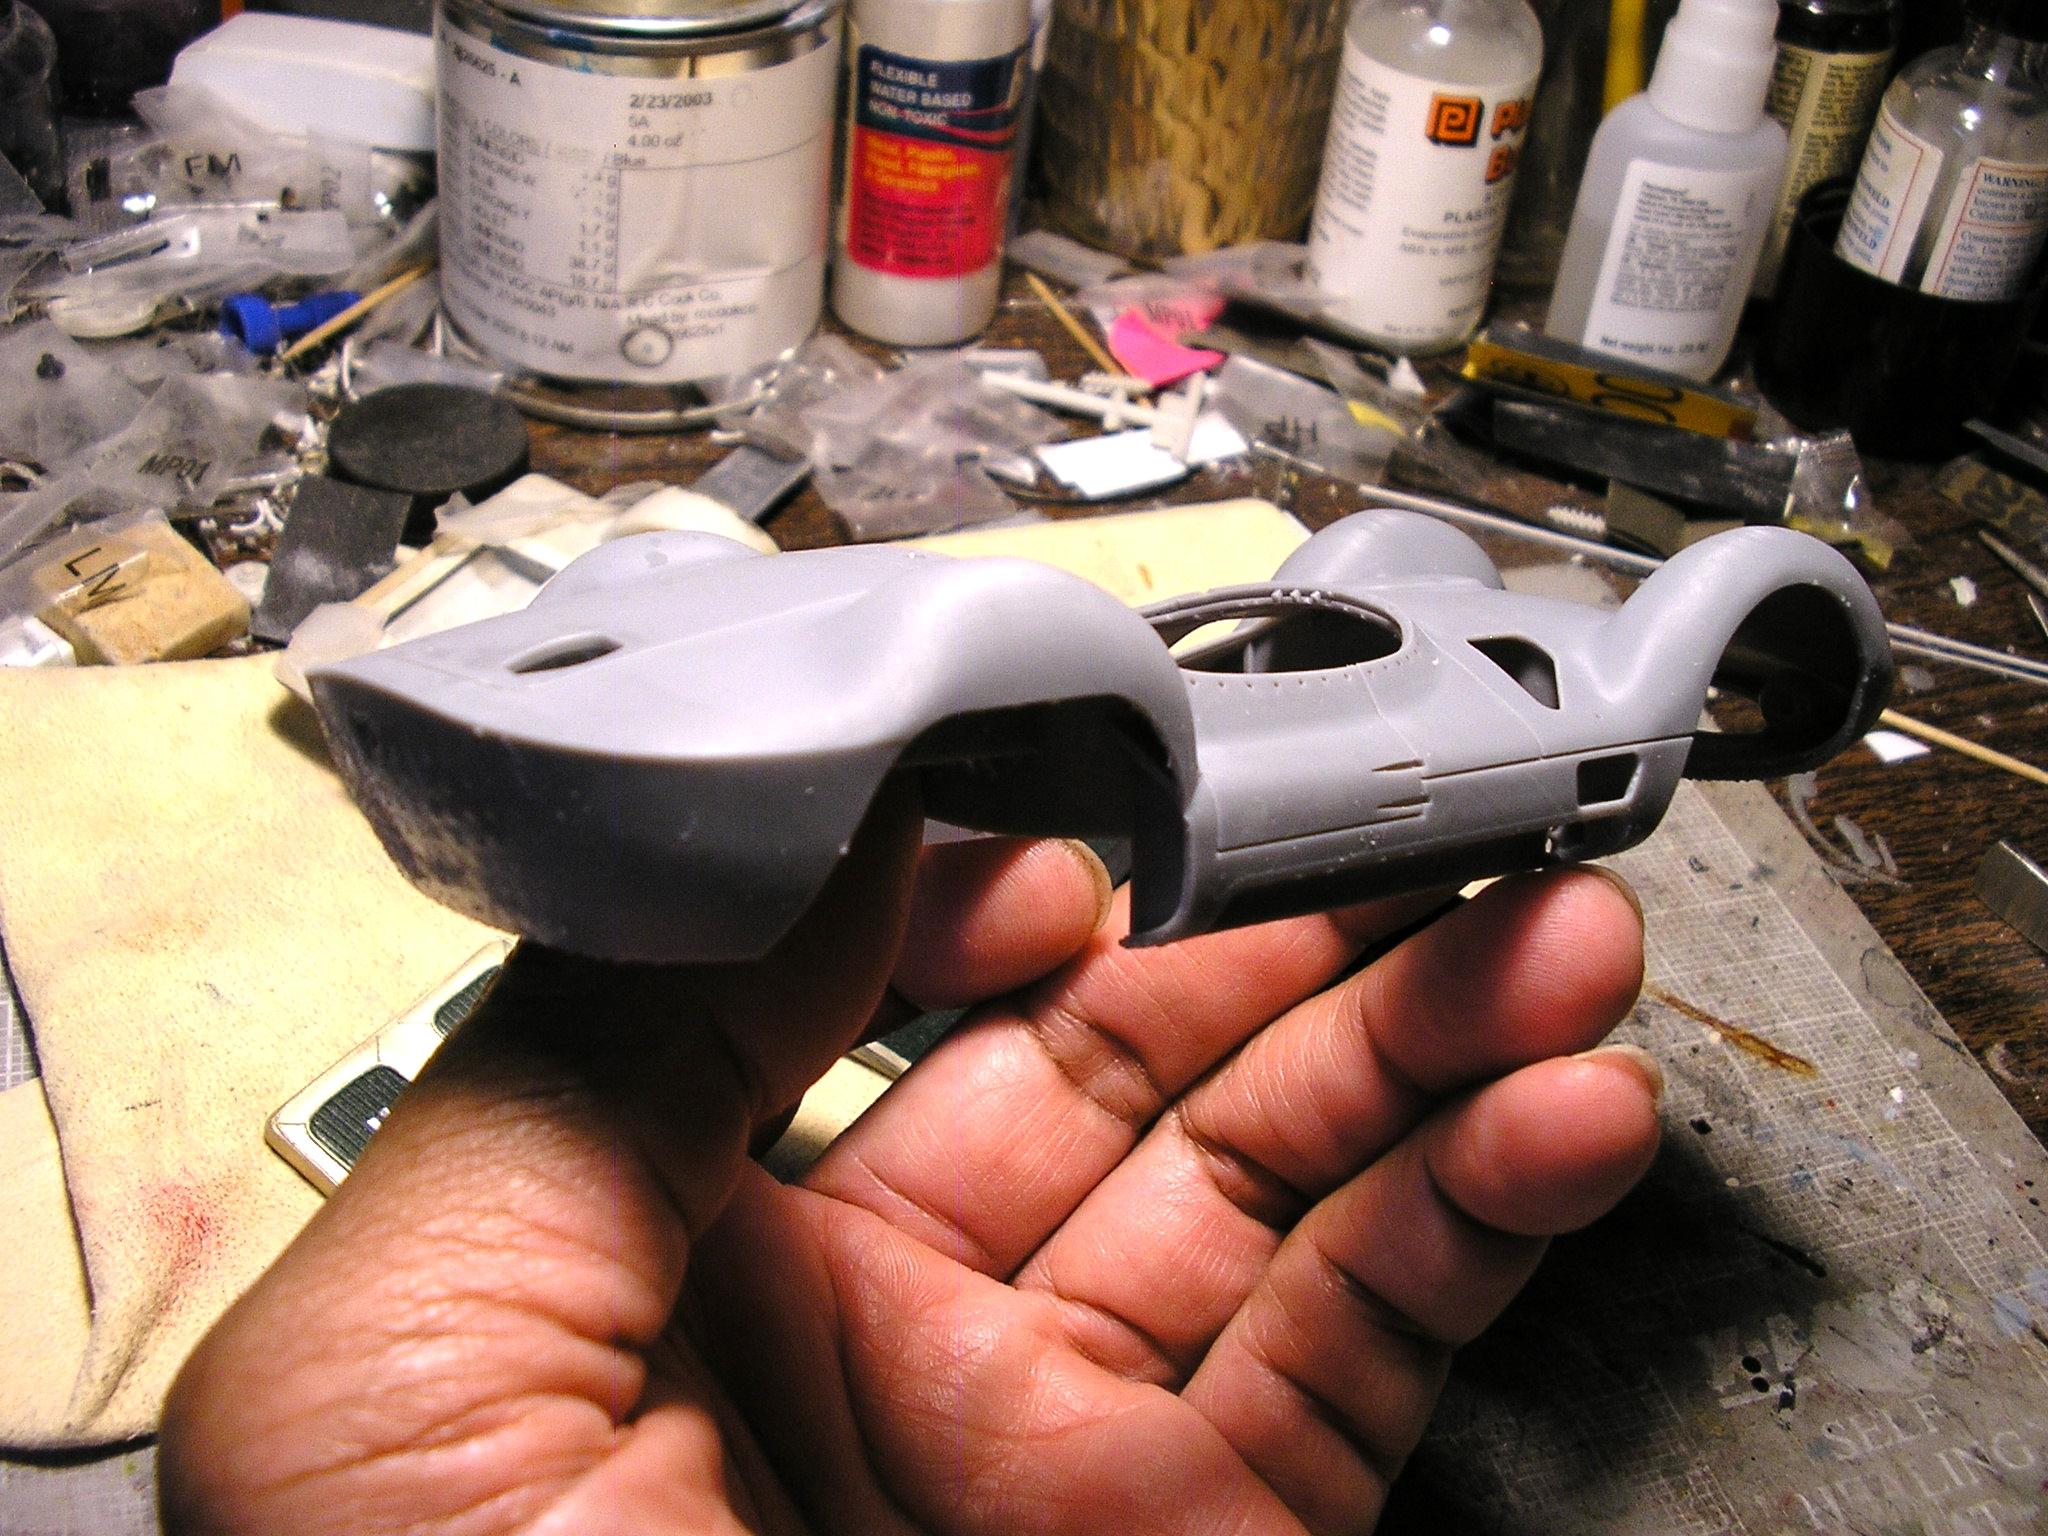
Before I got the Maserati Birdcage files, I was given this file for free by Mitch Verhey of 3DScaleCars on FB. It's a 1958 Facel Vega HK500, although depending on the engine, it could be a version through 1961. I had to split this one as it would be too big for the build plate, so I ran the body file through 3D Builder, and split it in half. It printed OK as far as it goes, but as you can see the body is very heavily "faceted". As I mentioned, it was a free file and I've tackled difficult body projects before. You've seen my roof swaps, split roof mods, among other things, so this while it'll take a bit to correct, it's not impossible in the least. Eventually, I'd use a modified '57 Chrysler 300 frame with the front end components possibly from a '60 Ford. I've got LOTS and LOTS of pics of this car inside and out, including a vid on the steering mechanism being restored and working. Hemi engine out of the Chrysler would work as well, and I'd be heavily modifying an interior, especially scratchbuilding the dash which is quite unique. Here are some pics of it on the build plate, and with it glued together.............. The file was done in 1/10 scale, so I dug around to find the 1:1's specs and went from there to scale things to 1/25th. Here's the body after it was split in my program. One thing I found interesting is that I did not have the "missing support" issue with this file like I had with others that had the opening doors, trunk and hood. I strongly believe that there's something with that configuration that the slicer can't "see", so it doesn't know to keep the supports going to connect where those areas are open. This time everything completed as far as the supports going top to bottom, and as far as it goes, the body halves came out well. One MAJOR issue with this file is the roof was too flat. I used my tried and true Dynatron Putty-Cote to add a higher crown to the roof, using my phone a scaled template to get the curvature like the 1:1. As can be seen above, the C pillars are way too wide, so the pencil marks are where I wanted to thin them down. As we can see, all the body panels will need some smoothing out. I did try to fix this in Blender, but the body showed up MUCH worse with the adjustments I tried to make. Either which way, this can be worked with, and I can whip it in to shape with some effort. Eventually new trim will be added to the body, and I'd like to (carefully) cut out the hood and trunk. I won't open the doors on this........the wall thickness is a bit thin, despite me changing that setting in Chitubox. That would cause trouble at the doglegs of the A pillars, so I'll avoid doing that. No matter.............. ?
-
3D Printed 1960 Maserati Birdcage Tipo 60
MrObsessive replied to MrObsessive's topic in Car Aftermarket / Resin / 3D Printed
I previewed it somewhat on FB as I had a screenshot of the body that had to be split. That one needs a complete makeover from bumper to bumper as there's some issues with it. I can't complain though as the file was FREE. You can't beat that, and I know of nowhere else you can get a printable file of a Facel Vega HK500 UNLESS you pay a ton of money for it such as sites like Hum3d, or CGtrader. Stay tuned.......I'm going to create a thread for that one too shortly. ? -
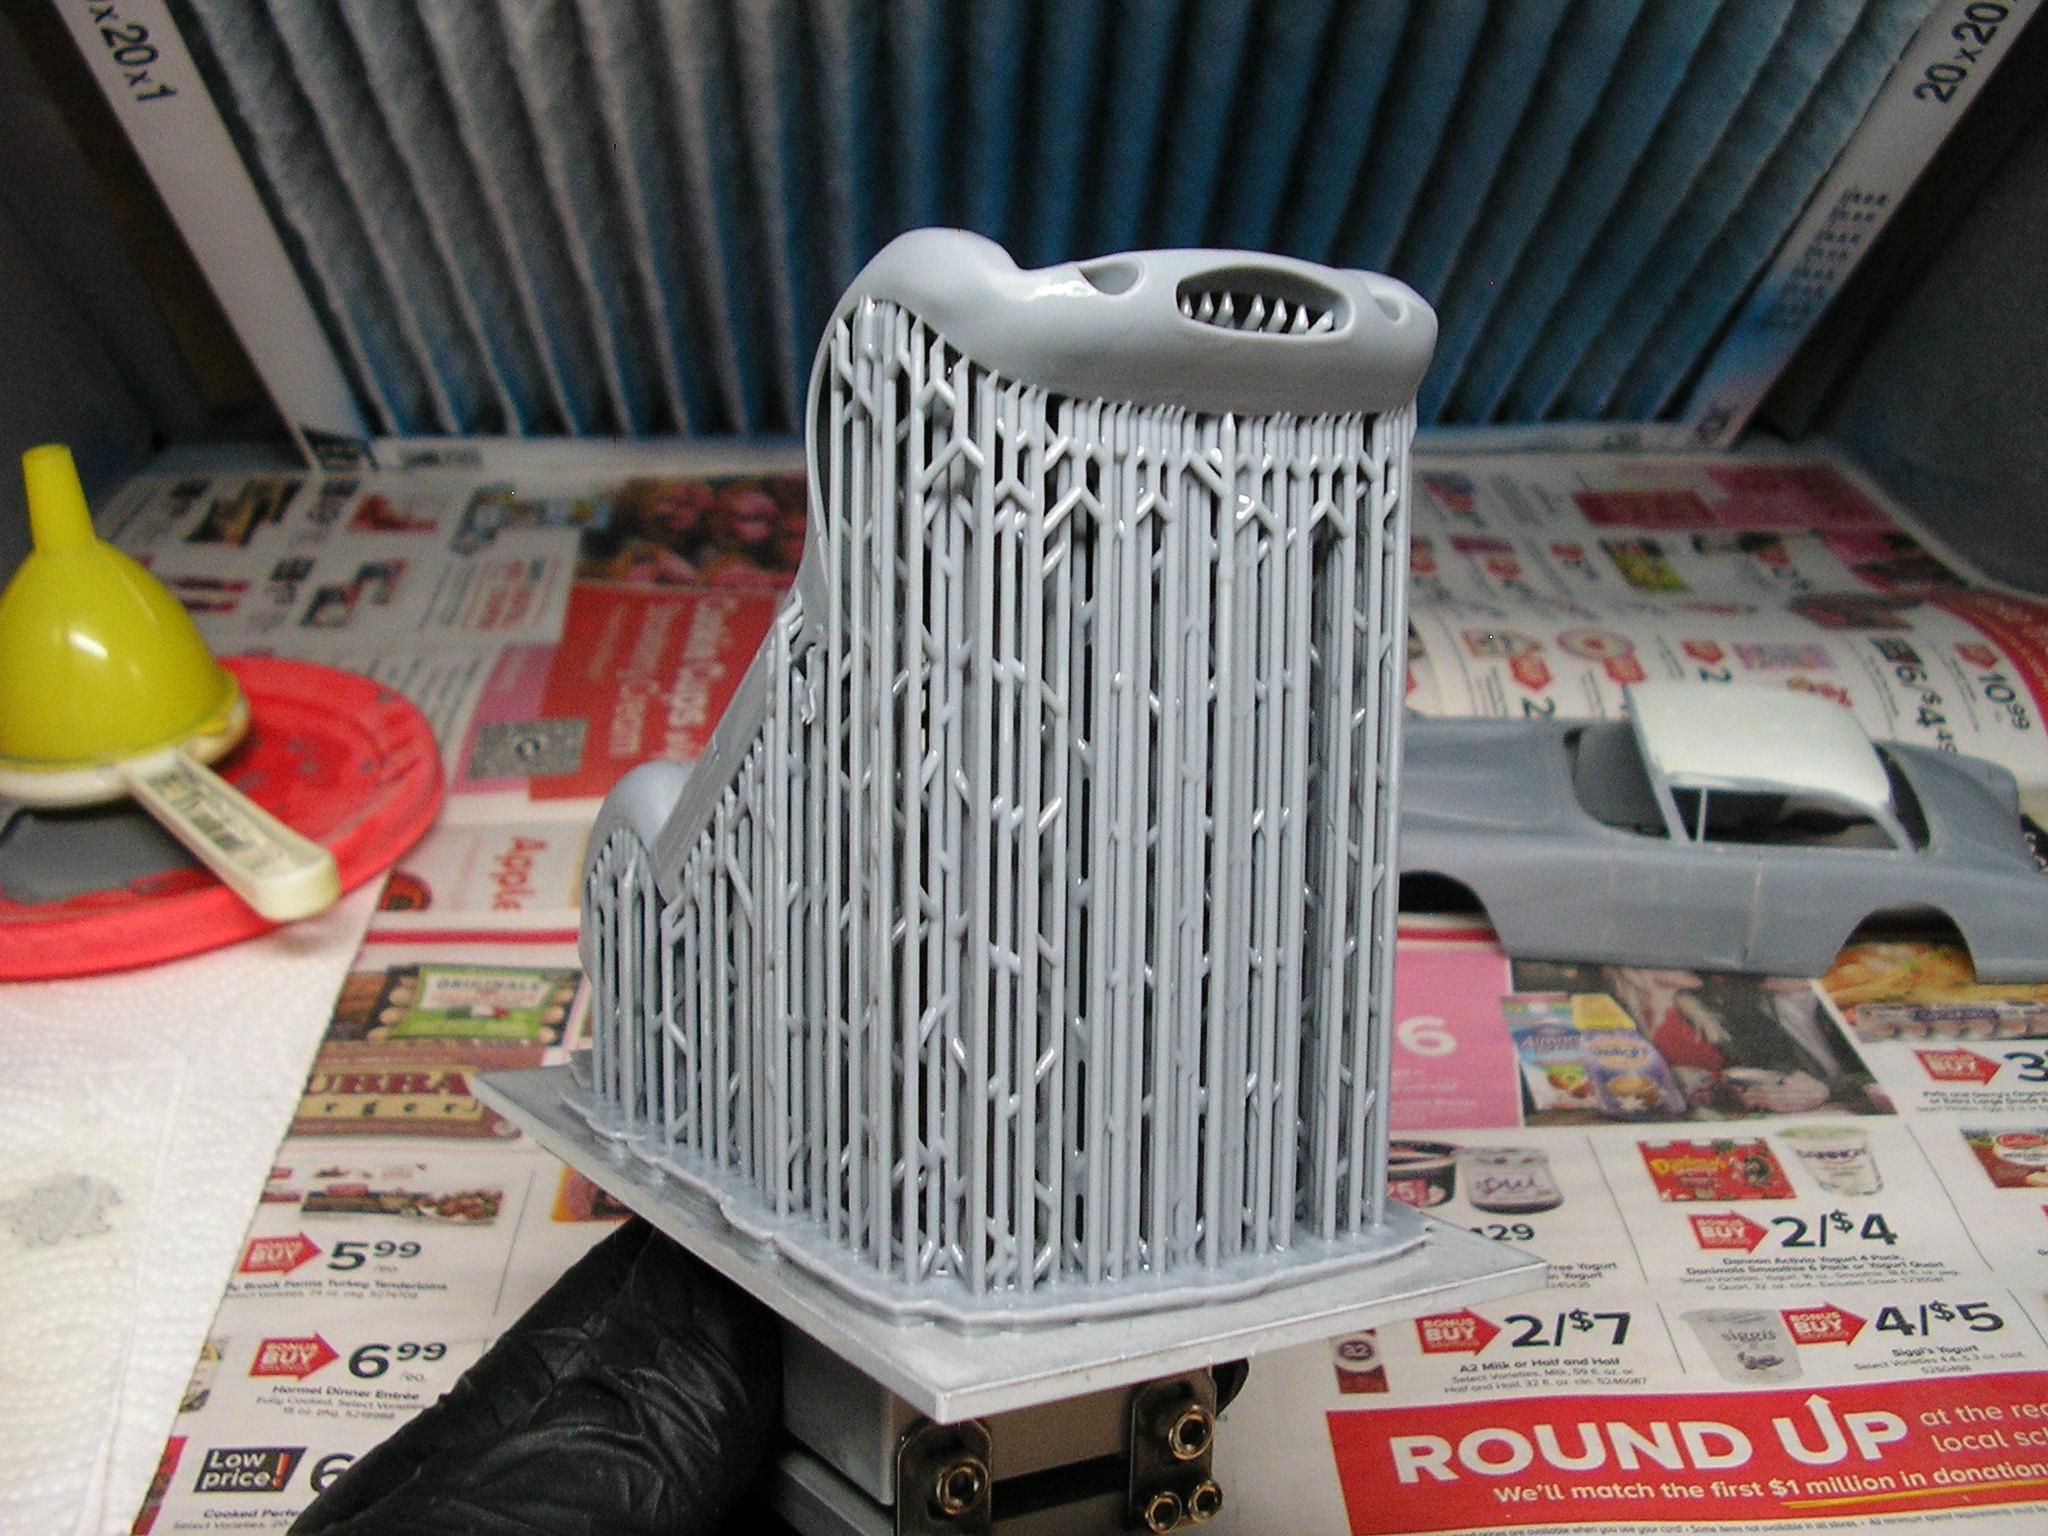
I was curious to see if my printer would do a whole body without fuss, so I recently got very nice files from William David Cunningham on FB to do a Maserati Birdcage. Due to the print plate size, I had to angle the body on a rather steep angle, so I wouldn't get any error messages from the slicer. Print time was about 16 hours (I'm in NO hurry), and it came out pretty well. This won't be a WIP for some time as there's other models I want to get done and finish up, and the Shelby is not too far from being on the downside of finally getting done. Here are some pics of how it all turned out................ According to specs of the 1:1, William had this scaled to 1/24th. I decided to shrink this just a tad to 1/25, due to the very small nature of the car, and this is the rare example where I did want scale to come into play compared to other models I have. Preview in the slicer..............Yup.....everything fits within Phrozen's parameters. How it showed up just as it was done on the build plate. Now with all the supports off and cured in my UV box............... I still have LOTS to print yet when the time comes for me to make this a full build.......full interior, windshield bucks for vacuforming, the chassis skeleton, wire wheels, tires, floor, etc. The chassis files are such that it's only seen below the windshield, and in the interior where it's quite visible. I've collected a ton of pics of the 1:1 as far as what the complete skeleton chassis looks like.......I may get brave and do a complete chassis along with a scratchbuilt/modified inline 4 cylinder engine. We'll see.................. Anyway, as I've been saying for quite some time now, with 3D printing the sky's literally the limit as any car can be done if you have good files to print. ?
-
DeAgostini 1/8 1967 Shelby GT 500....Update! 2/5/19
MrObsessive replied to MrObsessive's topic in WIP: Model Cars
WOOOOWWW!! ? Thanks for the heads up Bruce! I haven't touched mine since pack #16.........the Shelby Green Hornet is priority now since GSL is coming up next year, plus there's one more I'd like to get underway for that. DeAgostini just sent pack #22 the other day.........this is the rear section plus the two lower sides of the car. The doors when I get to that section, I'll definitely keep a close eye on that, and try to come up with how to get them to fit without such drama! I painted the inner door panels/jambs body color on mine.........I don't know if that will affect things much or not. Someone in my model club is also building this. I'm going to drop him a line to see if he ran into the same issue, if he got that far along as of yet. If not, it'll be a fair warning! I don't know if you're a part of Modelspace's Forum. They have a number of guys on there building this too. It looks like one of them came up with a good solution. -
DeAgostini 1/8 1967 Shelby GT 500....Update! 2/5/19
MrObsessive replied to MrObsessive's topic in WIP: Model Cars
?????? -
DeAgostini 1/8 1967 Shelby GT 500....Update! 2/5/19
MrObsessive replied to MrObsessive's topic in WIP: Model Cars
You're welcome Bruce! You know I'll be following along! I don't remember anything reallly troublesome about the kit except when it comes time to mount the dash. You might want to narrow it down a bit on the sides, along with the door panels. Otherwise, the leading edge of the doors may stick out further than they should when it comes time to mount those. I don't know if you ran into this issue with your SuperSnake (CONGRATS on that!), but it's something to keep in mind as I had the early issues of the kit (2017). Thanks for the well wishes, and the same goes out to you!? -
Wow! I'm sorry to hear that. 93 was a good long life! IIRC, she was very good friends with Elizabeth Montgomery, and I can remember watching an interview with her (might have been a Liz Montgomery spotlight), and she said that Liz actually hated twitching her nose. I don't know at what point she hated doing that, but it probably became an annoyance after the show was gone, and each time she was out in public, people asked her to do that. ?
-
Anyone doing any projects in 3D-printed plastic?
MrObsessive replied to ibj40's topic in Tips, Tricks, and Tutorials
I superglued a strip of styrene from side to side on one half of the body, and then superglued the halves together. Eventually, I'll get a second bigger printer, but after spending upwards of SEVEN HUNDRED DOLLARS for a full tank of oil for the house the other day, that's going to be quite a while now. ? -
Anyone doing any projects in 3D-printed plastic?
MrObsessive replied to ibj40's topic in Tips, Tricks, and Tutorials
I recently 3D printed this '61 Volvo P1800, and due to the printer size, I had to cut the file and print it in halves. I joined them back together with superglue, and the filled the rest in with Dynatron Putty-Cote which is a two part body putty much like Bondo. No issues, everything feather-edged out nicely, but more than likely when this becomes a full WIP and painting time arrives, I'll put a coat of BIN-Zinnser under the primer to ward off any paint surprises with the body putty/resin combo.
-
1969 Sportwagon 3D resin
MrObsessive replied to yellowsportwagon's topic in Car Aftermarket / Resin / 3D Printed
You're gonna have to keep checking his page. He seems to have a pattern of putting up a group buy every couple months or so. Perhaps in April? You'll have to keep an eye on things. -
Up-to-date for convertibles
MrObsessive replied to misterNNL's topic in Model Building Questions and Answers
When I did the roof swap on my "Revell" '59 Chevy using their '60 roof, the swap was made with no issue in size difference, and the Revell '60 is definitely 1/25. In the days of Monogram (which my '59 was), everything they did was marked in 1/24, and when Revell came in and did the takeover, new tooling was done in 1/25 if memory serves me. I have Revell in quotes as it was originally a Monogram kit, and then a few years later Revell came in and took over the show. I'm quite certain when Monogram did their '59 Cadillac in the early '90's, that kit was 1/25 as it would have been TREMENDOUS in size compared with other 1/24th's given the actual size of the 1:1. In fact, curiosity struck, and I'm looking at the original Monogram box pink Cadillac 'vert from '92, and it's marked 1/25th. So yeah........those early boxes may in fact have had the wrong scale on 'em........I just want them to look correct without out of place proportions/dimensions. Bill, is it possible those very early kits were a bit undersized? Like Johan, AMT might have scaled their models so they'd all fit in the same type boxes. Remember who their clientele was in those days.......drug stores and your Mom and Pop five and dime/hobby shops. They might have had criteria that dictated certain size boxes need to fit on the store shelves without a lot of drama. ? -
Autoquiz 548 - Finished
MrObsessive replied to carsntrucks4you's topic in Real or Model? / Auto ID Quiz
GOT IT! I also know the car that's sitting next to it! ? -
If we had known each other and lived in each other's area back then, I could have sold you mine. I let mine go due to the rear end failing. It was one of those cases where I kept hearing noises, to the point that I took it to the Volvo dealer, and they told me the seals in the differential were bad and it would cost something like $1500 (in 1992) to rebuild it. I balked at that as I hardly paid that much for the entire car, so I ended up selling it to a Volvo collector here in the area, as he a whole warehouse full of 'em. The engine was tight and leaked no oil, it had a good trans/clutch (with electric OD no less), I had recently before that put a new fuel pump on, and the car was solid with some very light surface rust underneath. I hated to let it go, but I already had my '69 AMX still, and that would soon go by the wayside later that year as I was about to be stationed down in Ft. Jackson, SC and I couldn't take the car with me. I'd love to have another P1800, but prices for those are OUTTA SIGHT now, so a model that I make on my own is I guess the next best thing. ?
-
If you have Windows 8 or 10 on your PC, you should have 3D builder already loaded in your program files. I have 11 and I had to download it as Microsoft in their infinite wisdom got rid of it. Pretty easy to use, and there are quick vids out there to make the best use of it.
-
Tried my hand at this the last couple days.........now I need to shore up those thin rocker panels with built up door jambs! ? This is a 1961-'63 Volvo P1800. I originally saw this file on Cults3d, but it was taken down. I tracked down the STL file maker on FB, and he gladly sold me the file. I ran it through Blender to smooth things out, sliced the body in half with 3D builder, and ran the halves on different days. It's got other parts printed also, but they did come out a little oversized in relation to the door/trunk openings. That's not a bad thing as I can "size those down" to keep huge gaps/shut lines at bay. Here are a few pics.................... One of the doors ended up with print lines.........I can fill those in and smooth those out with some body putty. I've no idea when this will be a full-fledged WIP, but I once owned a '65MY of this car and it does tickle me to FINALLY have this in scale, although I do have an old resin. The body lines on this one however do look better and I've got tons of pics of this car to do a bunch of detail inside and out.
-
That's a neat looking little kit! ? Yes, I print at 0.03mm layer height, and while it takes longer..........the resolution is much better as you don't have what can be those wicked layer lines to get rid of. At best, your sanding won't be as intense trying to get rid of them.
-
Bruce, I have through Pack #21 so far. I see they have the rest of the PDF instructions through #24 on the site, so I downloaded them to my hard disc. I see in those PDFs the rest of the body sections for it. I've still have yet to build I think #15 or #16? I've been so busy with other things that I've just been putting the boxes aside for now. I haven't even started on the Jag yet and they're soon to send #7 on that! ?
-
Here's a perfect example of another file I got the other day. A car that for whatever reason, there's never been a full glue kit of it except for some very crude early '60's examples. Now I don't think this will actually fit and finish printing in my printer without big issues. I was tweaking the settings somewhat and went past Phrozen's platform limit. Just the same, if I want a 1961-'62 Volvo P1800 with opening doors and all, I can now have one. ?
-
Yesterday afternoon, I was in the one room in my house where I have all my unbuilt models stored still in moving boxes. I was trying to find the extra donor kit I was using for my Shelby before I moved. I did find it, but it was like looking for a needle in a haystack. As I was searching for it, I came across kits that I've had for quite some time------some of them were for "up and coming" projects where I'd need to either backdate, or use a body part or two to modify something else. The thought occurred to me that indeed with 3D printing, someone like myself or others that have printers, the idea of "kitbashing" might have just become obsolete. Example: One of the kits was an extra of RC2's '58 Plymouth. I remembered the reason I bought it was either to turn it into a corrected version of what it should be, and even more recently, turn it into a four door hardtop. Well, wouldn't you know it------I just happened to run across an .STL file for a '57 Plymouth Belvedere four door hardtop, and what would be many months of work just became unnecessary. ? Now granted, this isn't for everyone and a lot of folks will never get into 3D printing, but the possibilities are endless. Bodies (and other parts) of cars we'd never thought would see the light of day are in fact possible with this new tech. So, in the case of the Plymouth if/when the time comes for me to start that project, I just saved probably six months worth of time by not having to correct/scratchbuild a body for a particular version of that car.