MrObsessive
-
Posts
9,785 -
Joined
-
Last visited
Content Type
Profiles
Forums
Events
Gallery
Everything posted by MrObsessive
-
You'll be able to get it here, but it's not quite ready for prime time.
-
 In the mid '80s, I had a 1971 MG Midget (actually a Healey). NO WAY I'd have that car today! Waaaaayyy too many big trucks and SUV's on the roads. They'd ram into into me and swear they never saw me. ? And yes, I was able to get into it. I don't think I'd be able to now though!
 -
Tamiya "basic" putty. The light gray stuff. I like it because it doesn't shrink near as much (or at all if applied in light layers) than the Squadron. It's got some aluminum in it I believe which helps a lot in its low shrinkage properties. For larger bodywork where some major filling in is needed.........this is my go-to brand........

-
You'll want to get in touch with Robert Burns on FB. His page there is "Too Many Projects", and every so often he offers a group buy of the cars he has. He only does this every couple months or so, and then he only offers a 10 day window for those on his page to request what they'd like from him. I embedded the link under his group name. The models have no interiors or glass, so one is on their own to come up with that. I think in the future he may offer full kits, but this last go round he got absolutely swamped with orders.
-
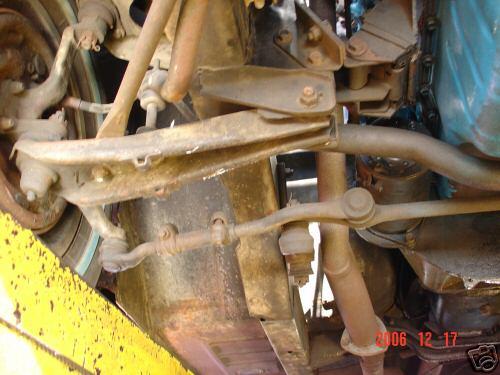
Rambler/AMC Front suspension help needed
MrObsessive replied to KelRob's topic in Model Building Questions and Answers
??????? -
Rambler/AMC Front suspension help needed
MrObsessive replied to KelRob's topic in Model Building Questions and Answers
I'd take a very close look at any of the modern AMT Mustang kits, particularly the '67. They look an awful lot like AMC's trunion setup with the springs mounted in the upper part of the inner fenders. While it may not be bolt for bolt exact, it's pretty dang close. Here's underneath a '65 Mustang for example........the '67 kit would have the same setup. Hope this helps!
-
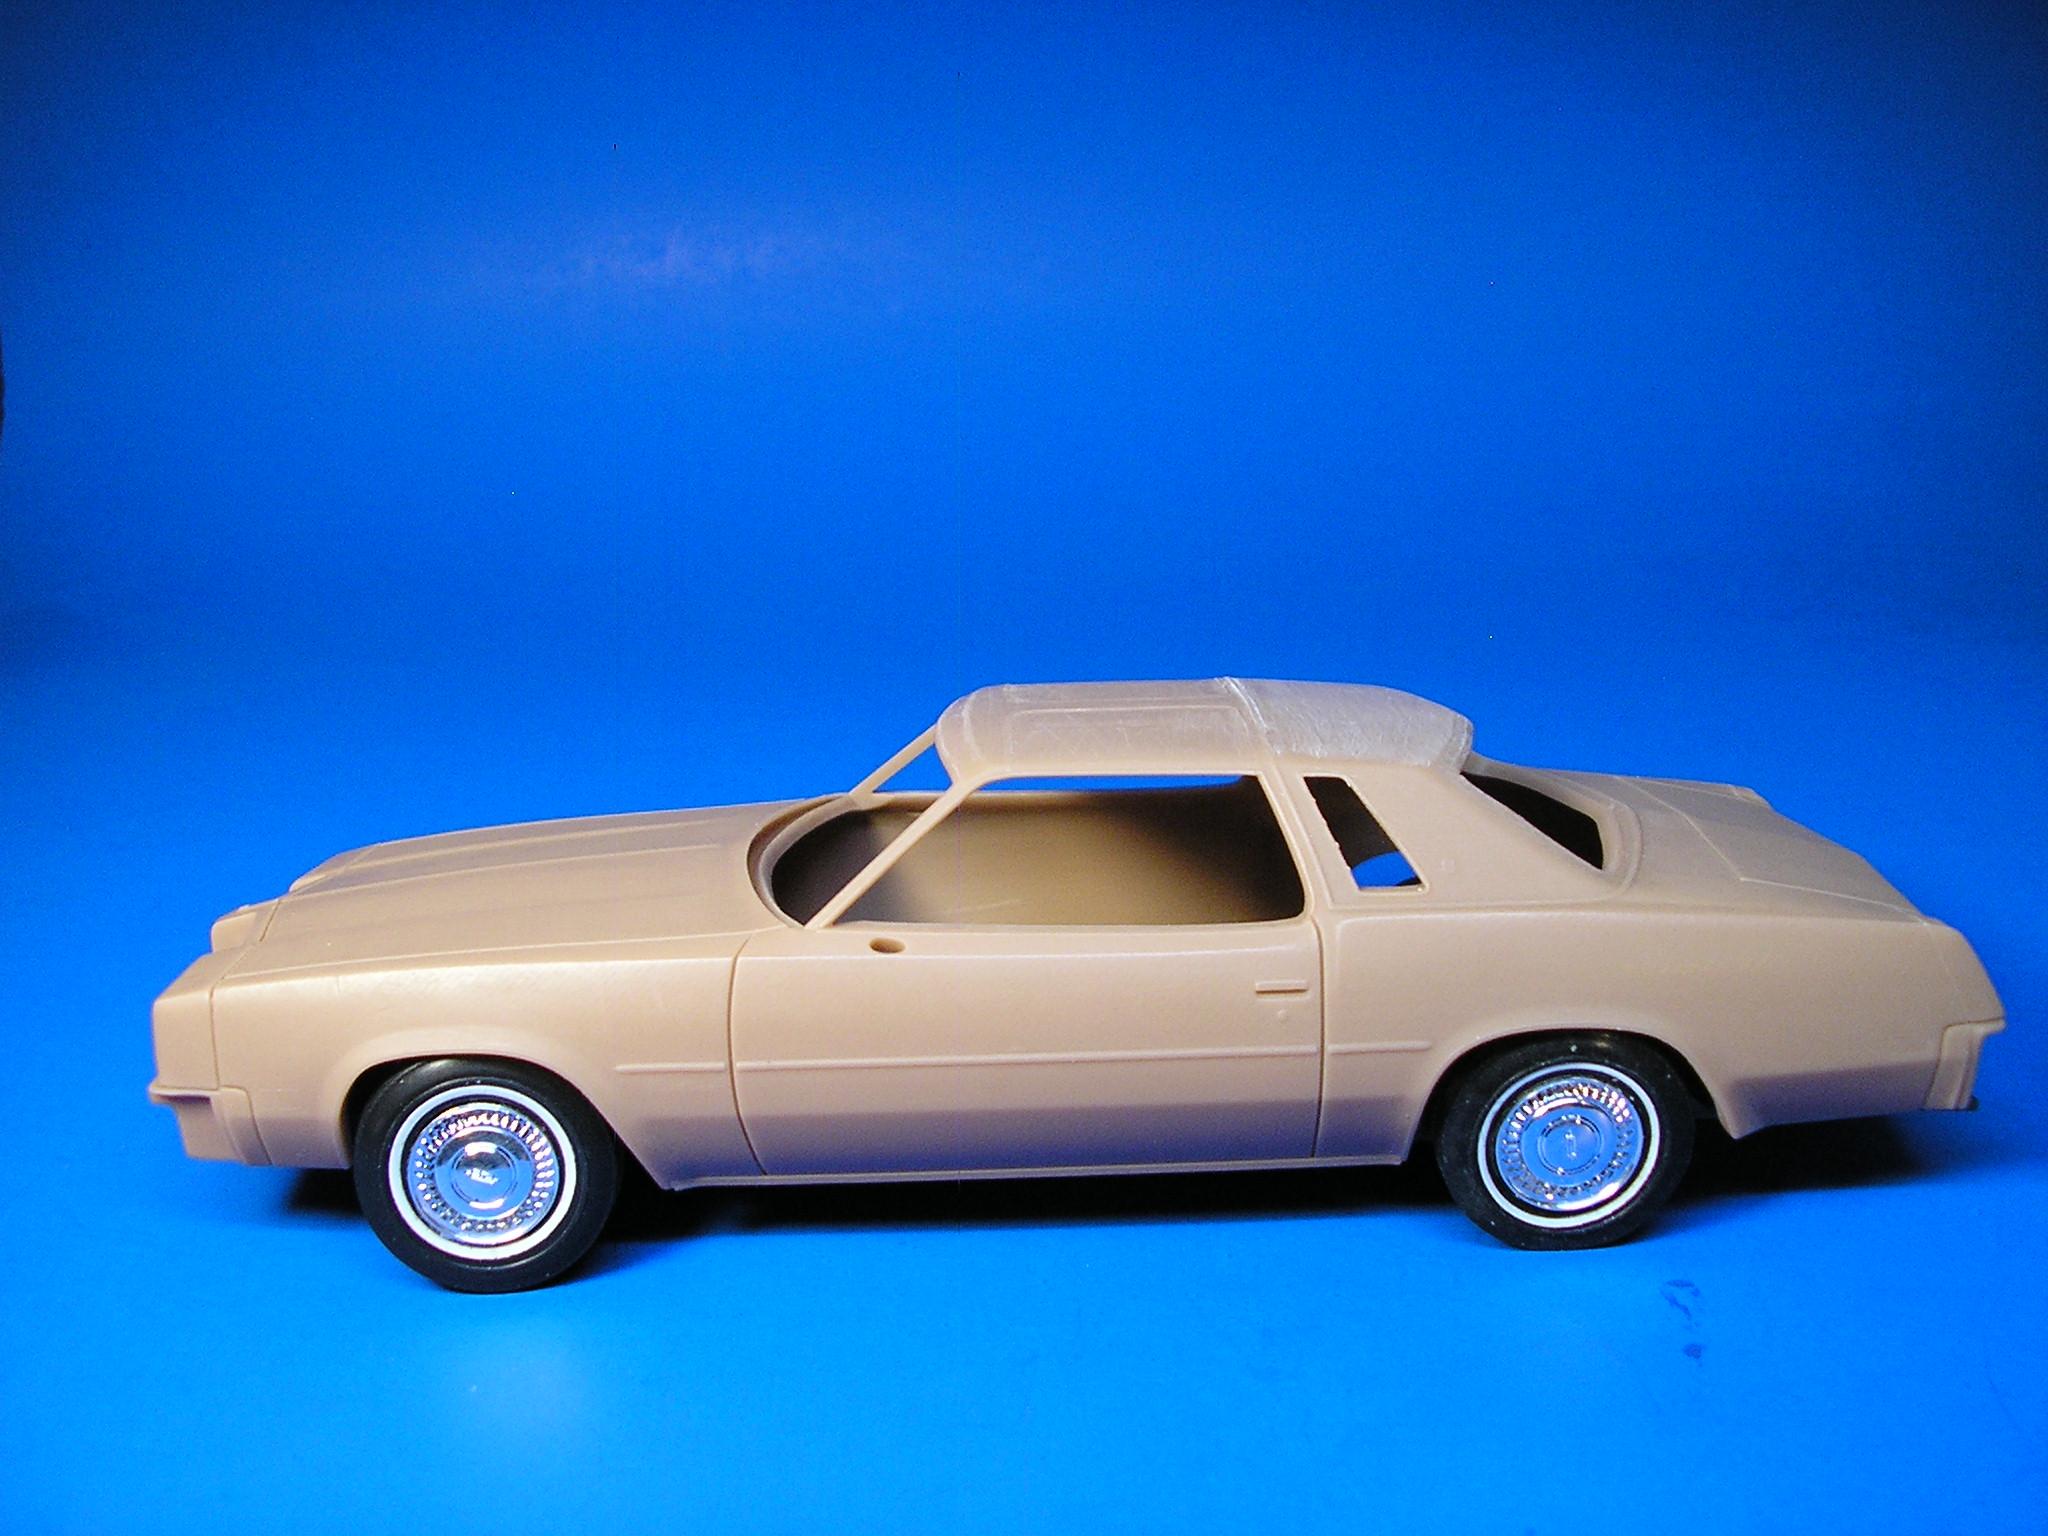
Yup.........It'll be this one..........a car I've been wanting to do for a loooooong time. This '76-'77 Cutlass body was 3D printed by Robert Burns on FB (Too Many Projects), and I have all that's needed now to get it together. Interior, detailed chassis and engine, and some of my own stuff out of the parts box.
-
BTW, despite having to change the file extensions in 3D Builder, Chitubox did load up the .STL file, so there won't be any drama when it comes time for the printer to run this.
-
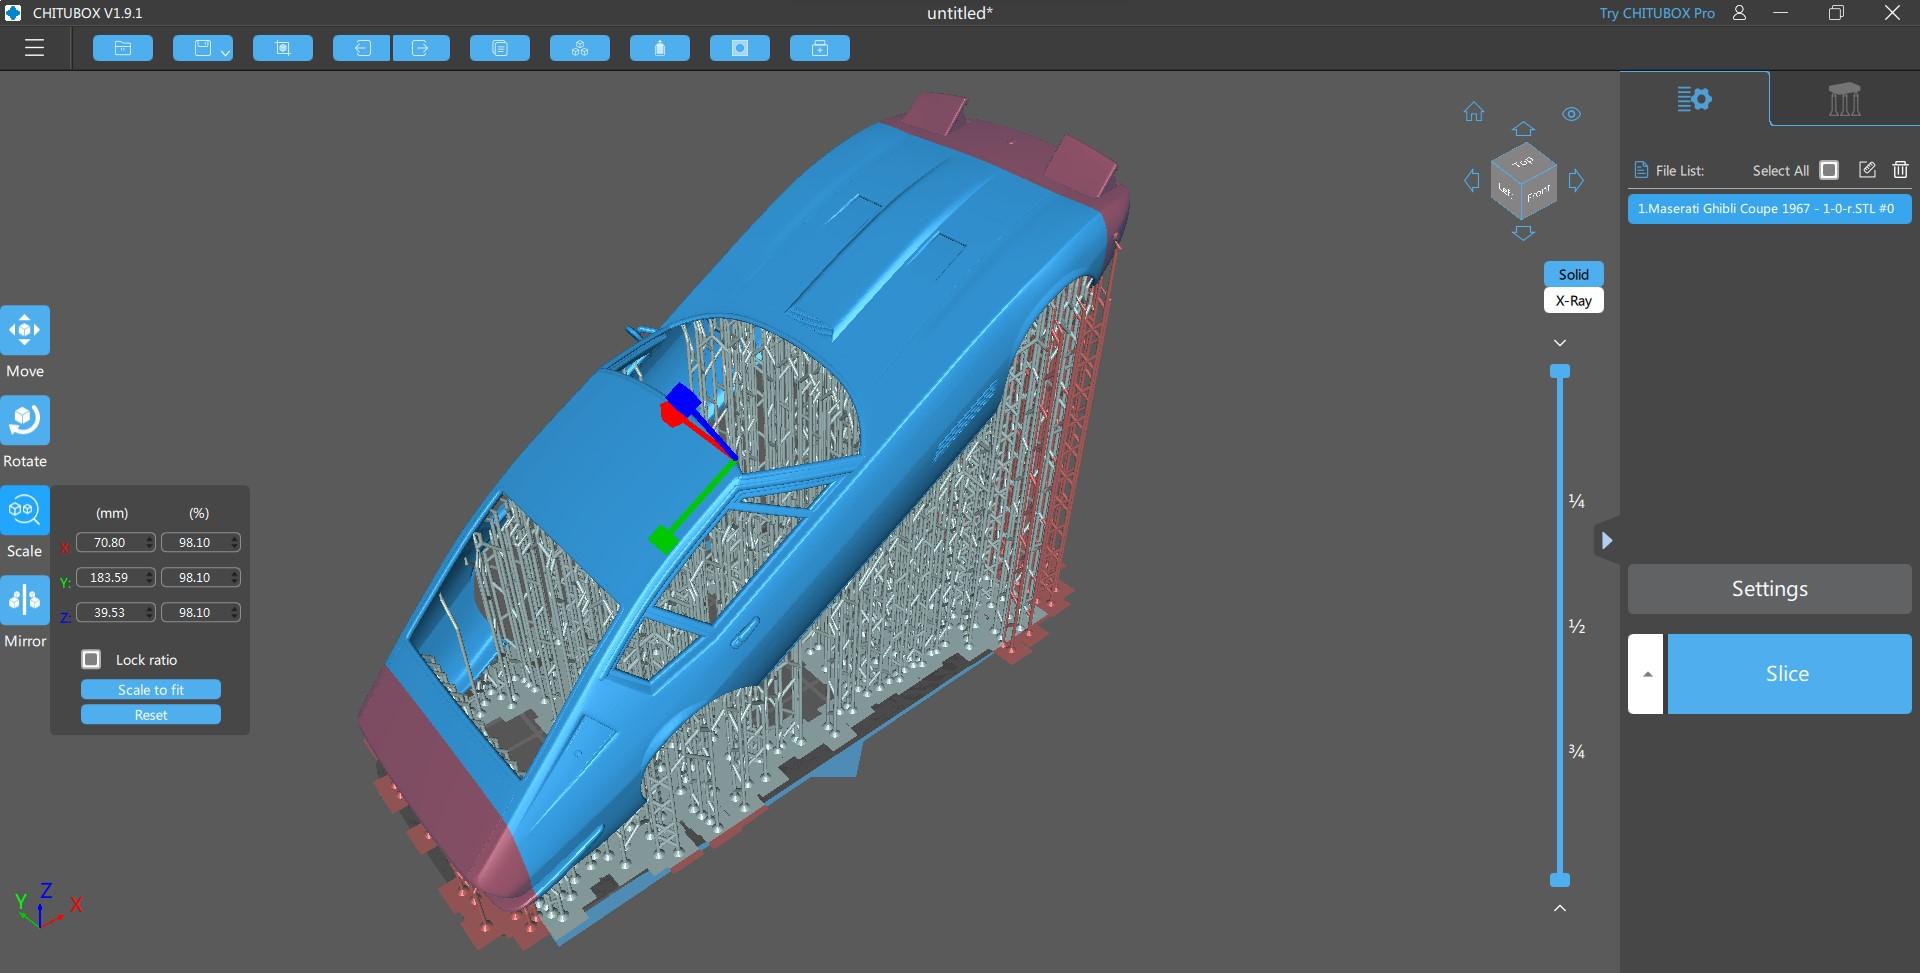
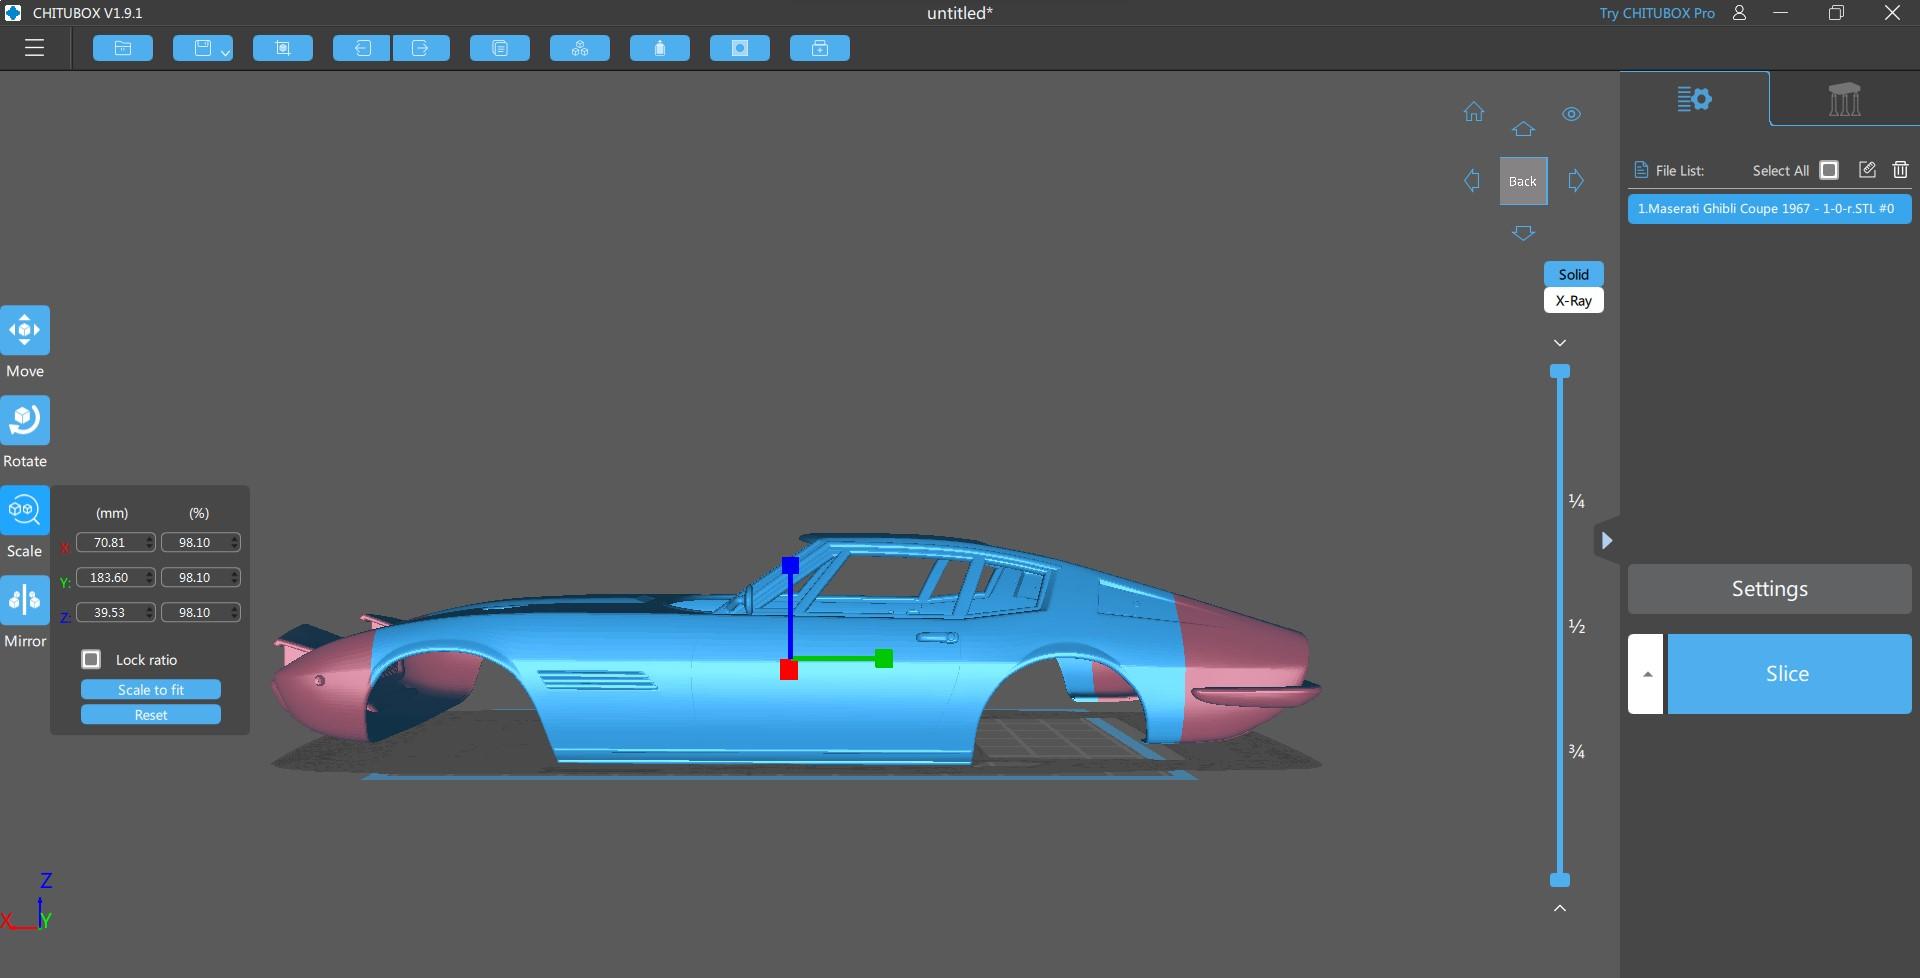
OK! This is what I got.........as you'll see in the corner of the pic, this was the issue I kept running into for whatever reason. It could be this is a Windows 11 laptop, and there are some things that don't play nice with the software. Either which way, the next challenge would be scaling the two halves so that they're in 1/25th. Also, getting them to match up like I mentioned without them looking "out of place". I gotta tell ya, this was a bit of an annoyance to get the program to work....when I'm up to it, I think there were some missed steps/shortcuts that the fellow in the video may have missed. I'll dig around for those. Here's the elusive split Maserati Ghibli coupe.............
-
OK............I got one half of the body to split, but I'm going to have to try this over again and again till I get the hang of it where I can save both halves.......and they'll match up with no drama if/when the time comes to print, and the both halves are not appearing disjointed. If it turns into to much of a hassle, I've got a second larger printer on the way, and I'll just print it per normal. I don't need much more gray hairs to get software to cooperate.
-
Thanks Rob! I had to download the program as it wasn't on my Windows 11. I'll take a look at the video and play around with the software. Meanwhile, I learned an interesting trick in Blender in getting rough surface bodies MUCH more smoothed out for final printing. It's too much to go into explaining here, but I tried this on a Karmann Ghia Type 34 file I have which was on the rough side. Looks MUCH better, and I'll have to remember this technique if I run into any more files that are "less than acceptable". I'll let you know if I was able to split the body or not.
-
Yeah, I REALLY need to finish up the Shelby before I get started on anything else. Then, there's GSL coming up the middle of next year, and I have a definite project in mind for that. I do want to get started on the Jag, but I'm afraid if I do I'll never stop! Building these large scales can be addicting! ? The next car after the Shelby would be a bit of a first for me......it'll be one of the 3D printed bodies I got recently (Cutlass) and this will be a change from having a ready made kit on hand to build. I'll definitely get to the E-Type.....I just better not get too far off track if I want to get to finishing the other one before say this time next year.
-
This one looks reeeeaaall tempting! Gotta finish up (actually get started) on the Jag E-Type first though.
-
It's actually 3Dprintable.shop. Be careful............LOTS of good stuff in there which can lead to an emptying of one's bank account! ?
-
Hmmm.....That's a thought. The only issue I can see with that is knowing where the cut off point would be, and then getting those two sections joined up again without the body looking awkward. I'll have to see if Chitubox can handle that, and where the stopping points would be. I did get this file from the same place yesterday, and it does fit in the slicer with no issue even after scaling it for 1/25 scale. It's a 1968 (or '69?) Fiat 850 coupe. Another one I could build and make it full detail with engine and all. ? Come to think of it, I remember seeing this body offered on eBay from a seller, but my curiosity is up to see if I can run this with this particular printer. The body would definitely need some cleaning up afterward, as the vertices on this particular file are not as tight or well done as the Maserati.
-
Yes, it would still get cut off. The maximum I believe is 130mm, and it's just too long for that.
-
Douglas, I had to leave the roll-up windows on the cutting room floor on the Shelby. I'm at a point in life that I'll have to leave things like that to a larger scale. 20 years ago? Yeah I could do that all day long, but the eyes and hands ain't what they used to be as you know! Thanks for following my page.......I'll have an update here on the Shelby in the not too distant future. ?
-
Now that interior looks TERRIFIC! ? I see what you mean about the pedals..........actually the lever part of the pedals could be smaller. A closed in car like you mentioned, it won't be seen. If the time comes when I'm going to build this, I'd either scratchbuild my own levers, or thin those out a bit. I gotta tell ya........you work fast! It would take me at least a week (or more) to get the interior together like that! I'm working on the dash of my Shelby, and it's been several days so far. I did have to do some modifying though.
-
It is! At one point when I had it in Blender, it showed all the mesh in the body. I should've taken a screenshot of it, but I can say that it's VERY highly tuned. Whoever did the original file, they got the body lines pretty much exact. ? One nice advantage of that file also, is they give you a variety of wall thicknesses. If you want a larger scale (or real small), that can be a huge help. Major kudos to those folks there at 3DPrintable!
-
Where do you GET inspiration?
MrObsessive replied to iBorg's topic in General Automotive Talk (Trucks and Cars)
The first cars I ever saw when I first knew what a car was (early '60's) ALL had tailfins on 'em and lots of chrome. I wouldn't know what years (or brands) were what till I was older, but those bring back memories of cars that either my Dad had, or what other relatives were driving. Come the high school years (mid '70's), muscle cars and cheap American compacts filled the parking lot. They were a dime a dozen, and if you broke 'em up, you just went out and got another one! Can't do that today though.......cars are waaaay too expensive! The occasional exotic will light my fancy, even the oddball foreign stuff I saw as a kid will pique my interest, where I'll start to gather reference pics for that "someday" project. In fact, lately I've been finding pics and info on VW's Type 34 Karmann Ghia. A real oddball you don't see on the roads here, but I used to walk past one every day on my way to school in the late '60's. I just had no idea what it was. ? -
Here's a pic with the body at an angle..........still too big noting the brown areas. Keep an eye on your email...............
-
Blender for whatever reason, won't cut this particular body into sections. Each time I try the modifiers, the program crashes. I do believe because the body has very tight vertices (I checked 'em out in Blender), the program can't handle it. Same thing with MeshMixer. When I attempt to edit the body to cut it in two using their edit functions, the program crashes. I tried the "cube" method to get it to separate...........nope. No dice. Even when tilted up, it would still get cut off due to the size of the build plate. Those brown areas you see is the program telling you that it's too big. Even after scaling it down to 1/25.
-
Thanks! I'll certainly get in touch with him. ?
-
I got a very clean STL file off of 3Dprintables.shop the other day, but as I scaled it to 1/25th, it's a bit too big for my printer. I have Blender, but darn if that program will not let me split the body. I've tried every which way from Sunday using different techniques to get Blender to cooperate, but no.......the program crashes when it gets to a certain point. I did have Blender 3.0, but I downgraded to the previous 2.91 version----still no go. BTW, the car happens to be this one...... A 1967 Maserati Ghibli coupe. I have everything else needed to make this car.......if I could just get the program to cooperate and split the body.
-
Now that is one BEAUTIFUL car! I still have about six months to go on the '61 Jag sub (haven't even started pack #1 yet), but I may give a very close look at that one. Before that though.........I'm going to have to build another bookcase or two. Eventually, I'm going to reach the limit of where to put these huge 1/8 scales!