MrObsessive
-
Posts
9,785 -
Joined
-
Last visited
Content Type
Profiles
Forums
Events
Gallery
Everything posted by MrObsessive
-
 Those look EXCELLENT! And yes, it is TERRIFIC to be able to make your own parts! The other day, I was printing out part of the files that @my66s55 sent to me for printing the 1958 Plymouth Poly Head V8. One of the files had a set of pulleys in it, and they came out really nice! It then occurred to me I don't have to buy these any longer..........I can simply print 'em out. ? I'm going to check out Fusion 360..........they have a free version for hobbyists. I have Blender, but man oh man----I can't get that to work to save my life. It's CONSTANTLY crashing whenever I need it to do a task, such as splitting a body. I've been told it's memory, but this is a new laptop with 12GB's of RAM. That should be plenty to handle that program. Thanks for posting those Jesse.......I now have an idea I'd like to design once I get a hang of the program.
 -
Gluing Rearview Mirror on Windshield
MrObsessive replied to TransAmMike's topic in Model Building Questions and Answers
I did what Lee mentioned to my Turbine Car windshield. Mixed up a small amount of five minute epoxy, waited till it started to set up, put my base into place (a cut off pin with the head filed flat), then I put my mirror on after I let it set up overnight to make sure it was rock solid.
-
❤️❤️❤️❤️❤️??
-
Ray, here are a couple partial screenshots of the door instructions. The top of the door snaps are separate pieces, but later on in the build you have to assemble the working door latches on the inner door panel.
-
Another amazing Paul Hettick model
MrObsessive replied to peteski's topic in General Automotive Talk (Trucks and Cars)
Paul I suspect has a loyal following (some no doubt with deep pockets), that will spend that much and MUCH more for his one of kind models. I have seen some where they've not met the reserve, while other times I've seen the auctions go for waaaaaay more than the 3K this one went for. -
Another amazing Paul Hettick model
MrObsessive replied to peteski's topic in General Automotive Talk (Trucks and Cars)
Erik, I've gotten a number of resin kits from Paul in the last couple years (one very recently in fact), and he packs them VERY WELL. You could throw them against the wall, and they'd not break they were packed so well. I've also read his feedback later on for auctions where someone won his cars.............they've all complemented him on how well they were packed. I watched that auction as it was running, and I suspected the Lincoln would cross the $3k barrier. It's definitely a one of kind model with interior and all, as Robert has been making only bodies for others. How many of them will get built like this one? -
I want to add Bruce that if you haven't done so yet, and I don't know if you've gotten this far, you may want to partially insert that pin that goes in the collar for the one shaft of the steering column. Like the 1:1, there's two shafts with a collar that connects both of them so the steering will work with the steering wheel. You have to position the shaft with the collar through a split in the headers (like the real car) and connect those two shafts by squeezing the pin through the collar with some needle nose pliers. I can't remember which shaft it was, but I think the shaft that comes off the steering box has a U-joint on it. Once again, just like the real thing. It's a tricky step, and it's one of those things you don't see until you're almost the point of buttoning everything down as Agora doesn't mention it UNTIL you're at that point. If you miss it, you'll have to disassemble everything to get to it. As I've mentioned, there were some hair raising steps to building this!
-
Bruce, I remember using a combination of Acetone and Lacquer thinner to strip the wheels. I think the Acetone worked a bit better as there were instances where the other thinner barely stripped away at the paint. I guess it depends on what type they were using on any given day when that kit was being made. I polished them up with successive grits of polishing cloths. To get the initial roughness out of the wheels, I started with 600 grit----all the way to 12,000 to get them to shine up like chrome. Get set to keep cleaning your cloths! It's a dirty job as you're wearing away the diecast metal like dust. For the lettering on the tires, I simply used Tamiya's acrylic white and painted each letter one by one by hand. Yes----of all the 1/8 kits I've done so far, that one was the most intense with all the wires! ? All I can say is it wouldn't hurt to keep checking where the wires are when you're attaching the body to the chassis. There's so many that it wouldn't take much to pinch one under a screw, and then something might not work such as one of the lights. Thanks for the nice words! I surely hope the mystery car that Agora keeps showing under cover on their site is in fact the Shelby Daytona Coupe. That one will be a MUST BUY if indeed it is that car.
-
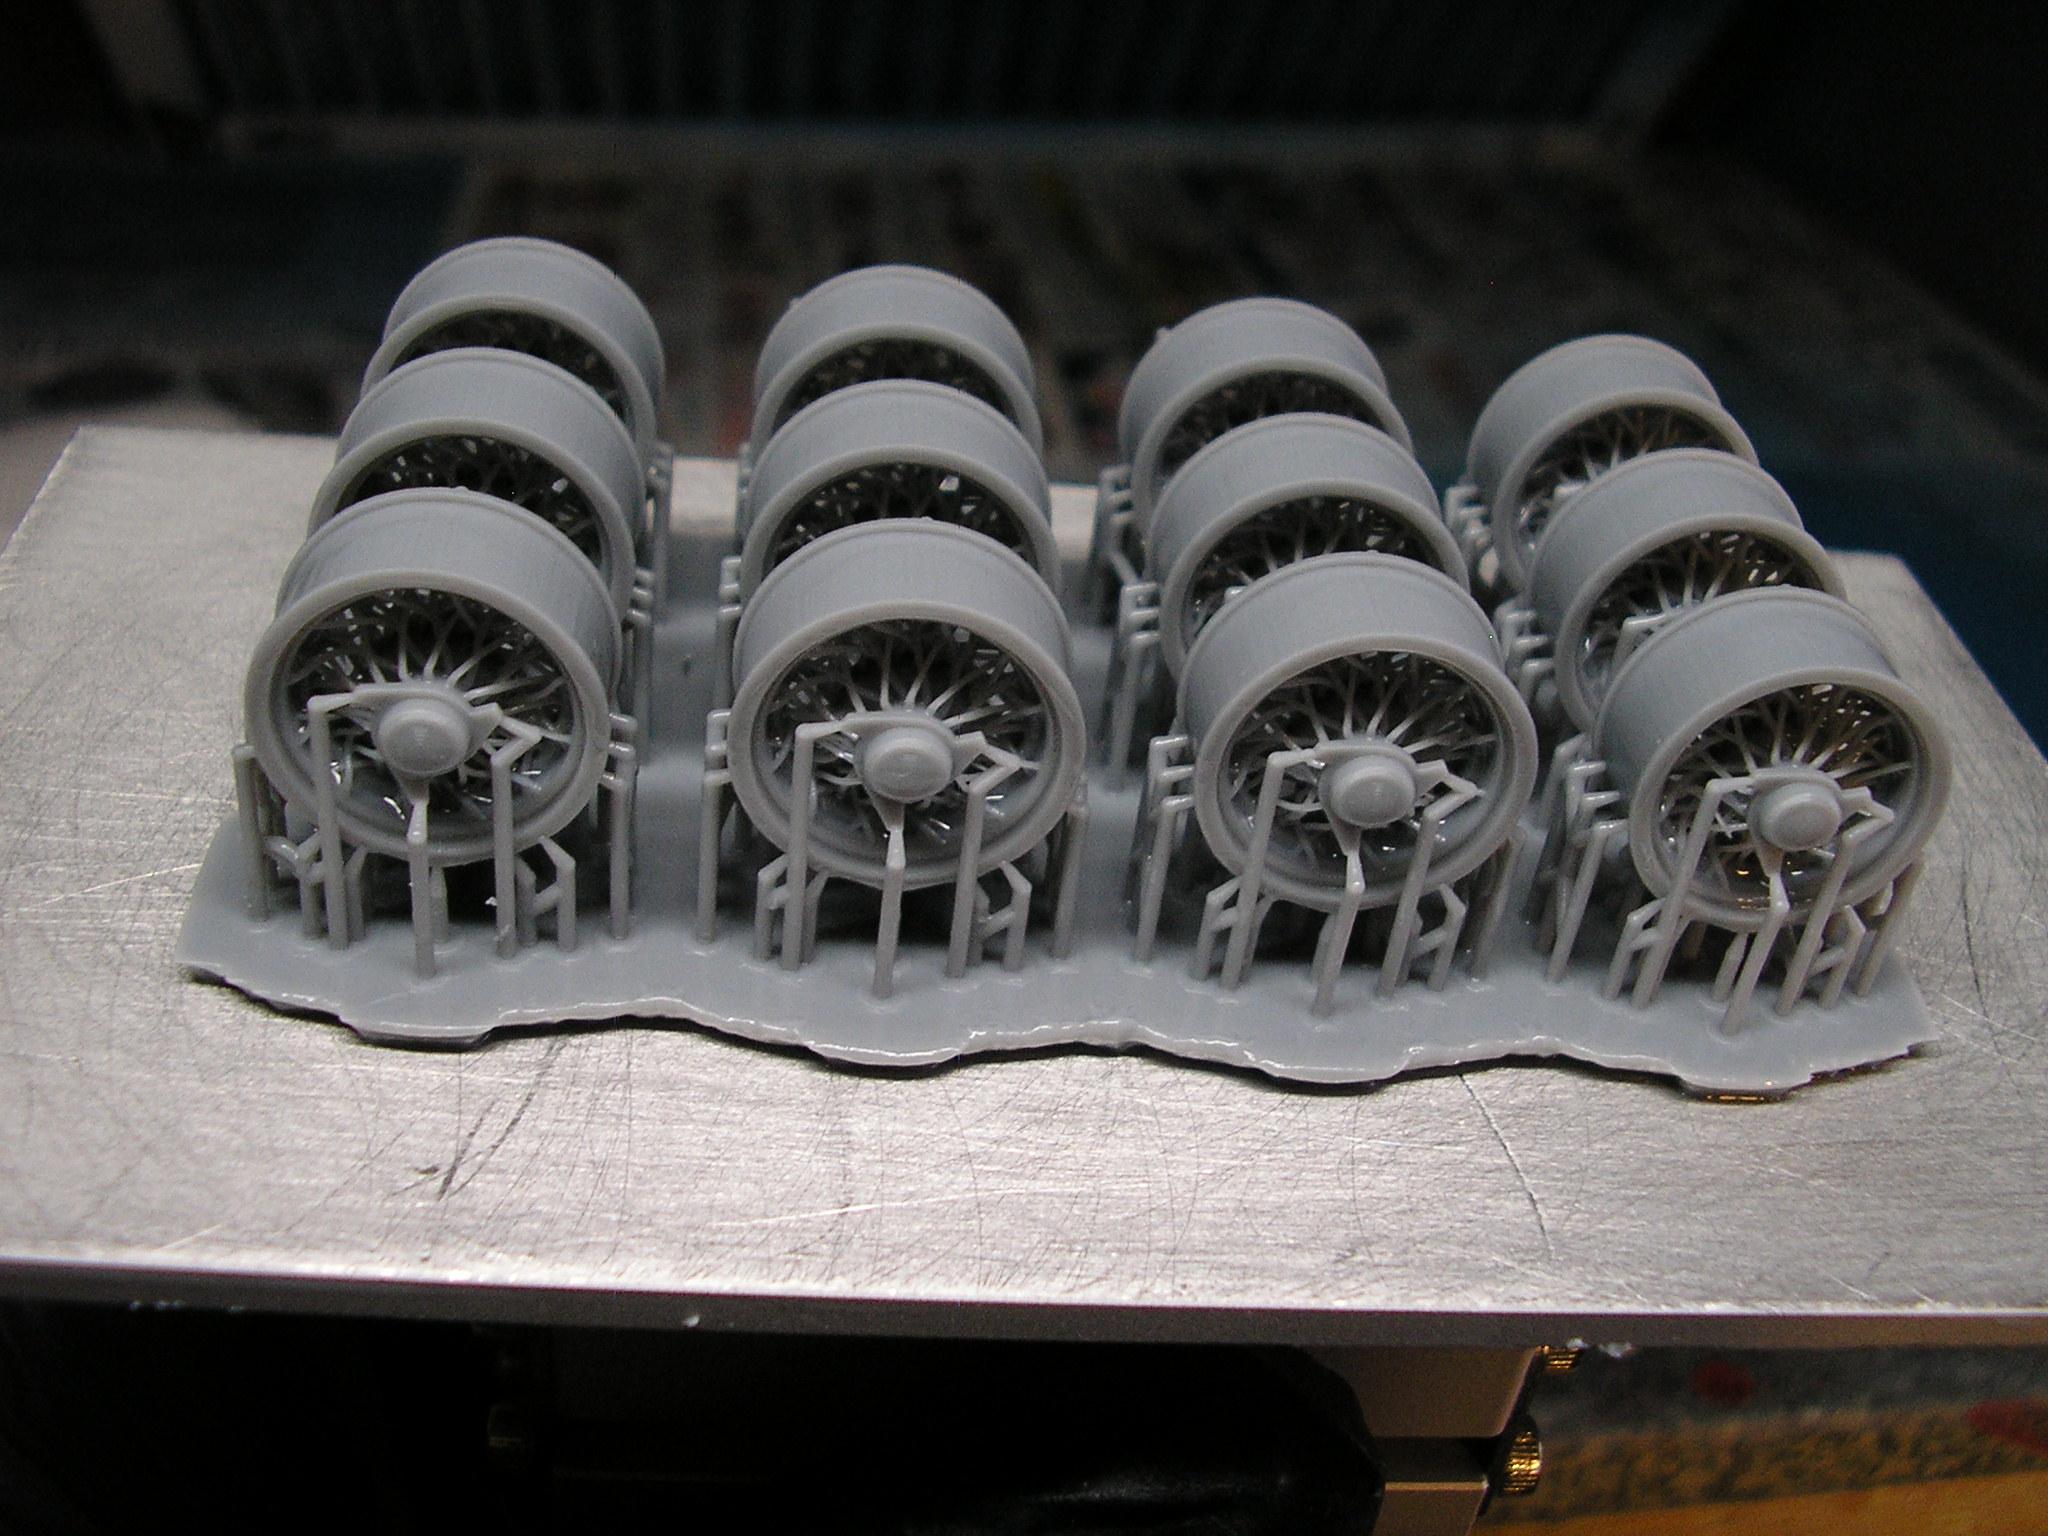
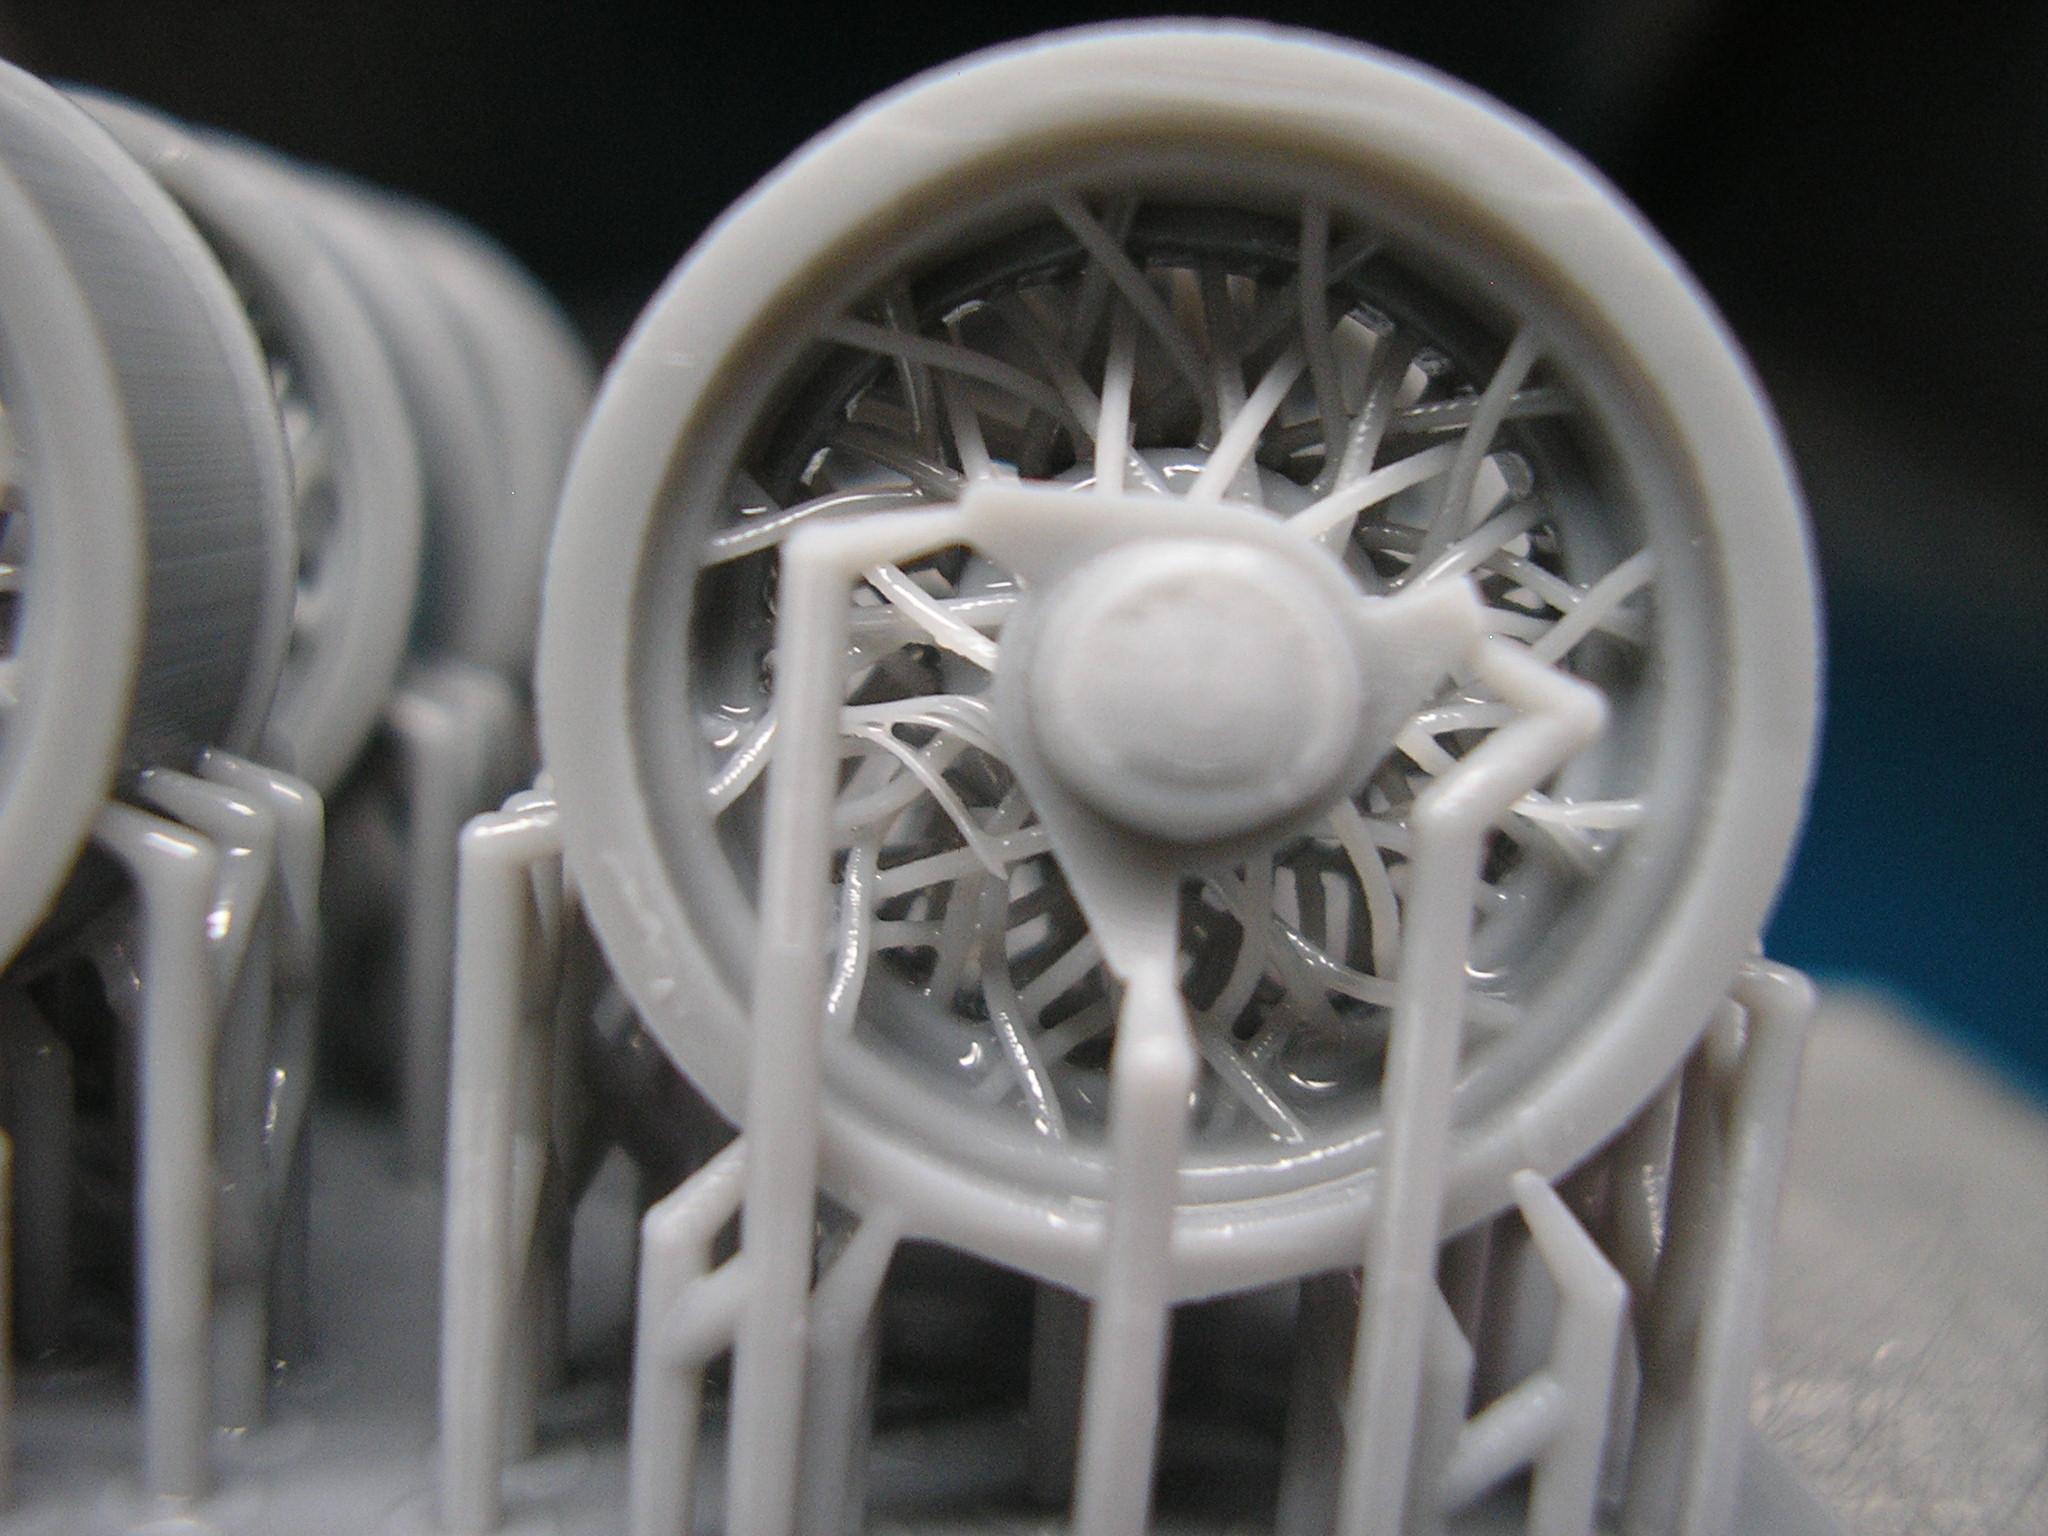
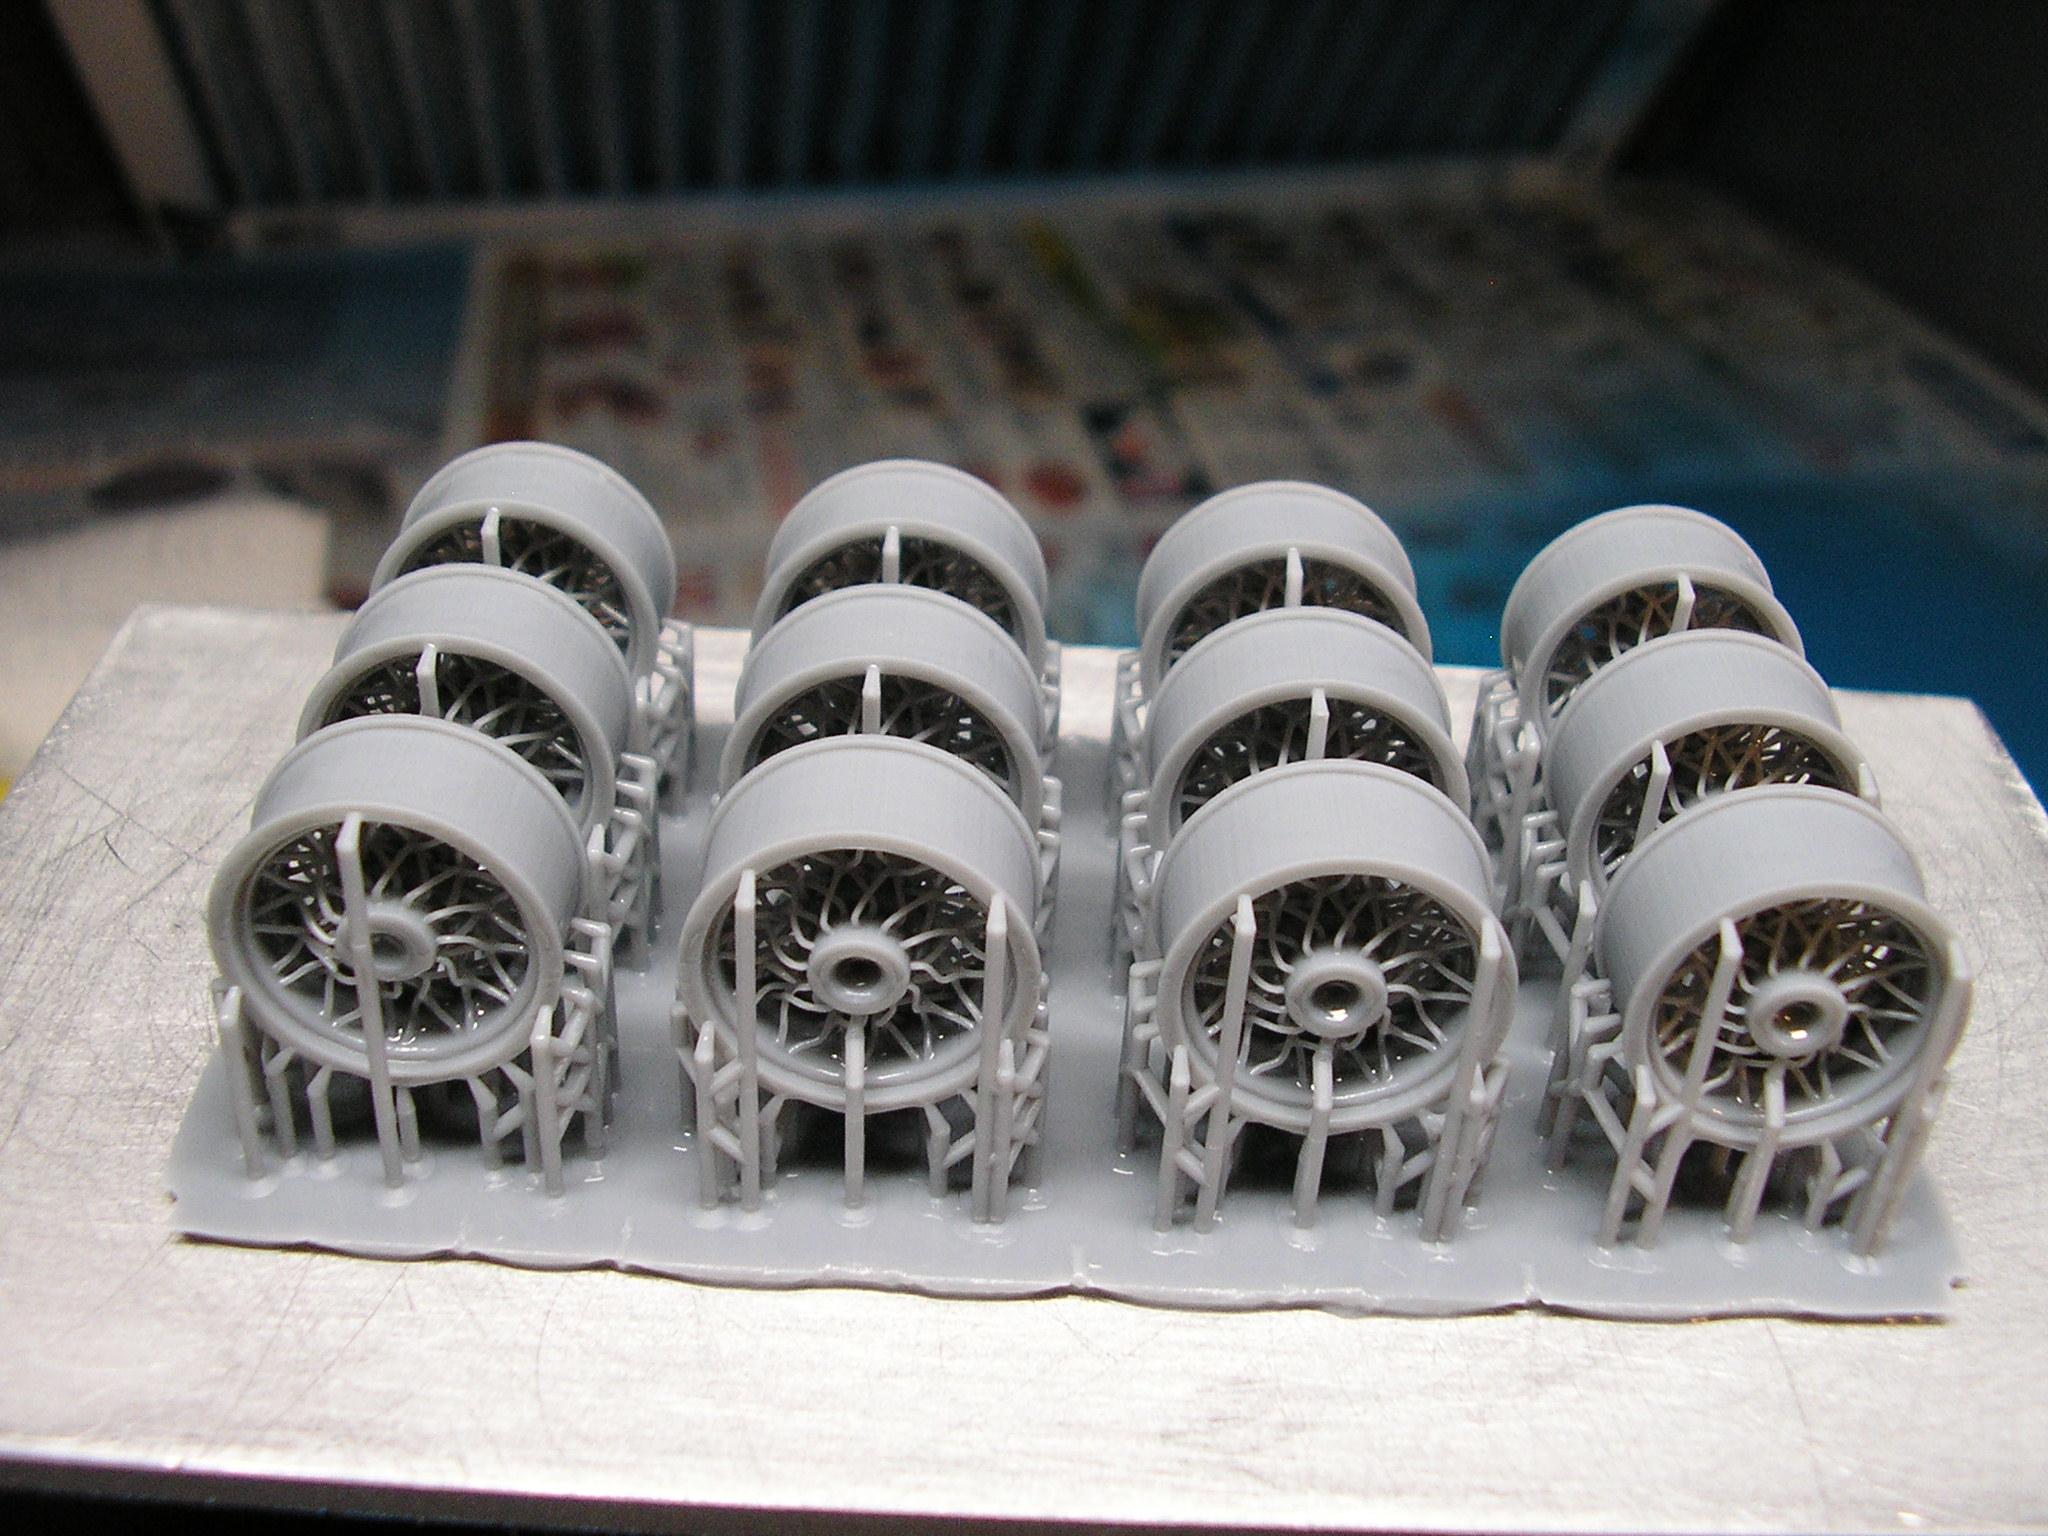
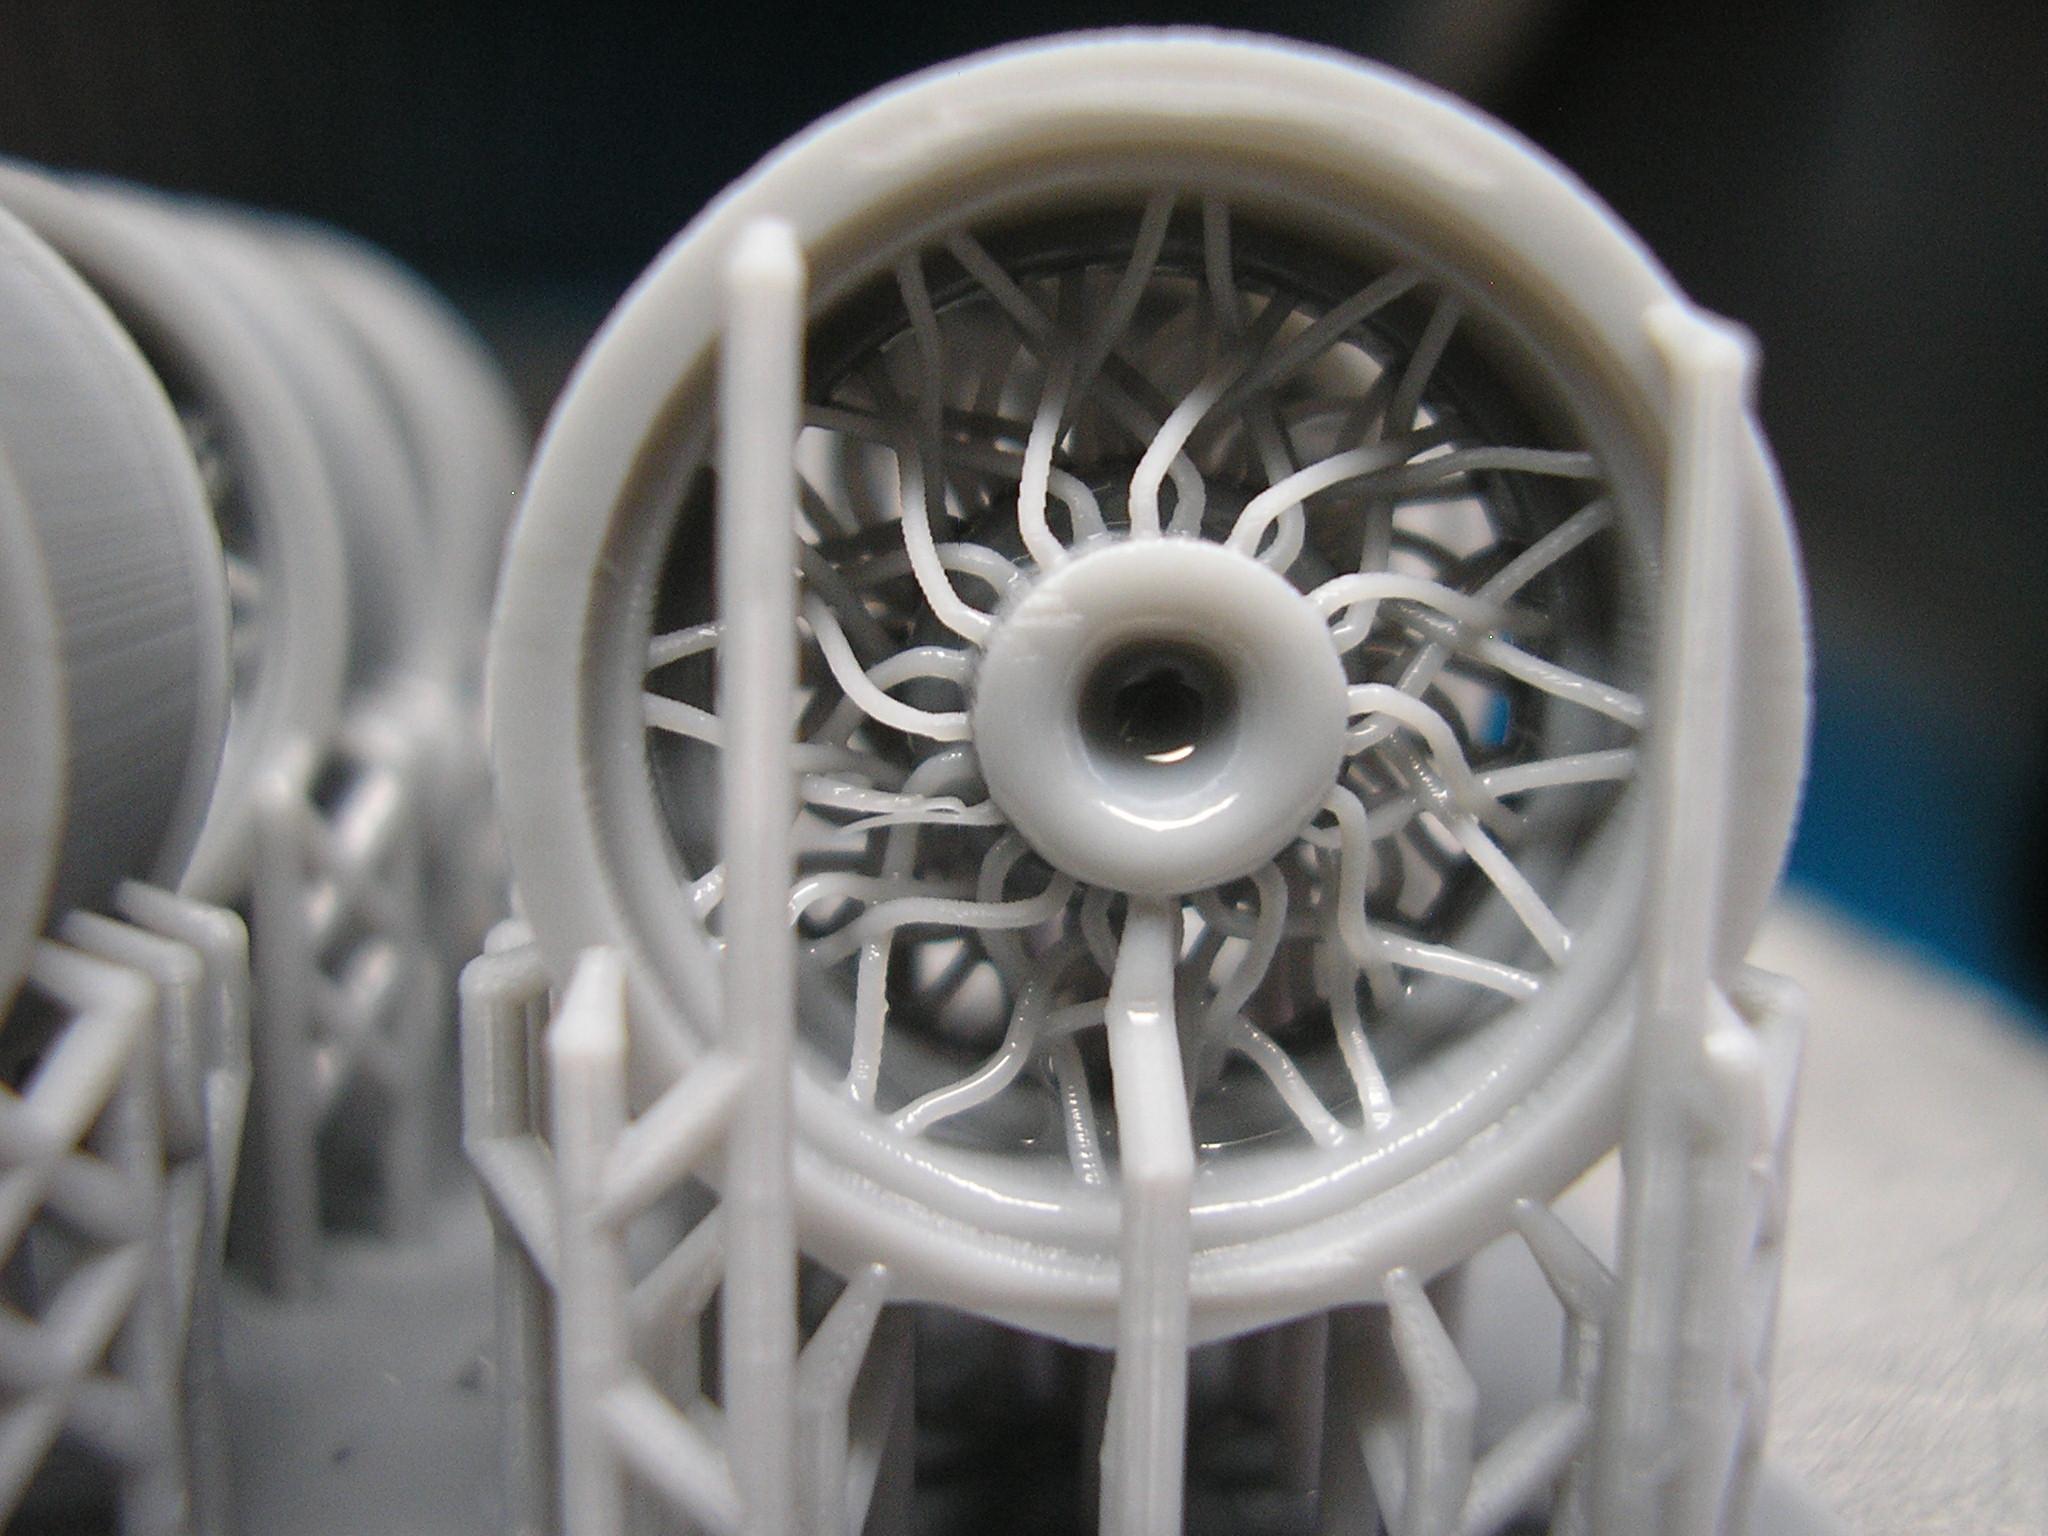
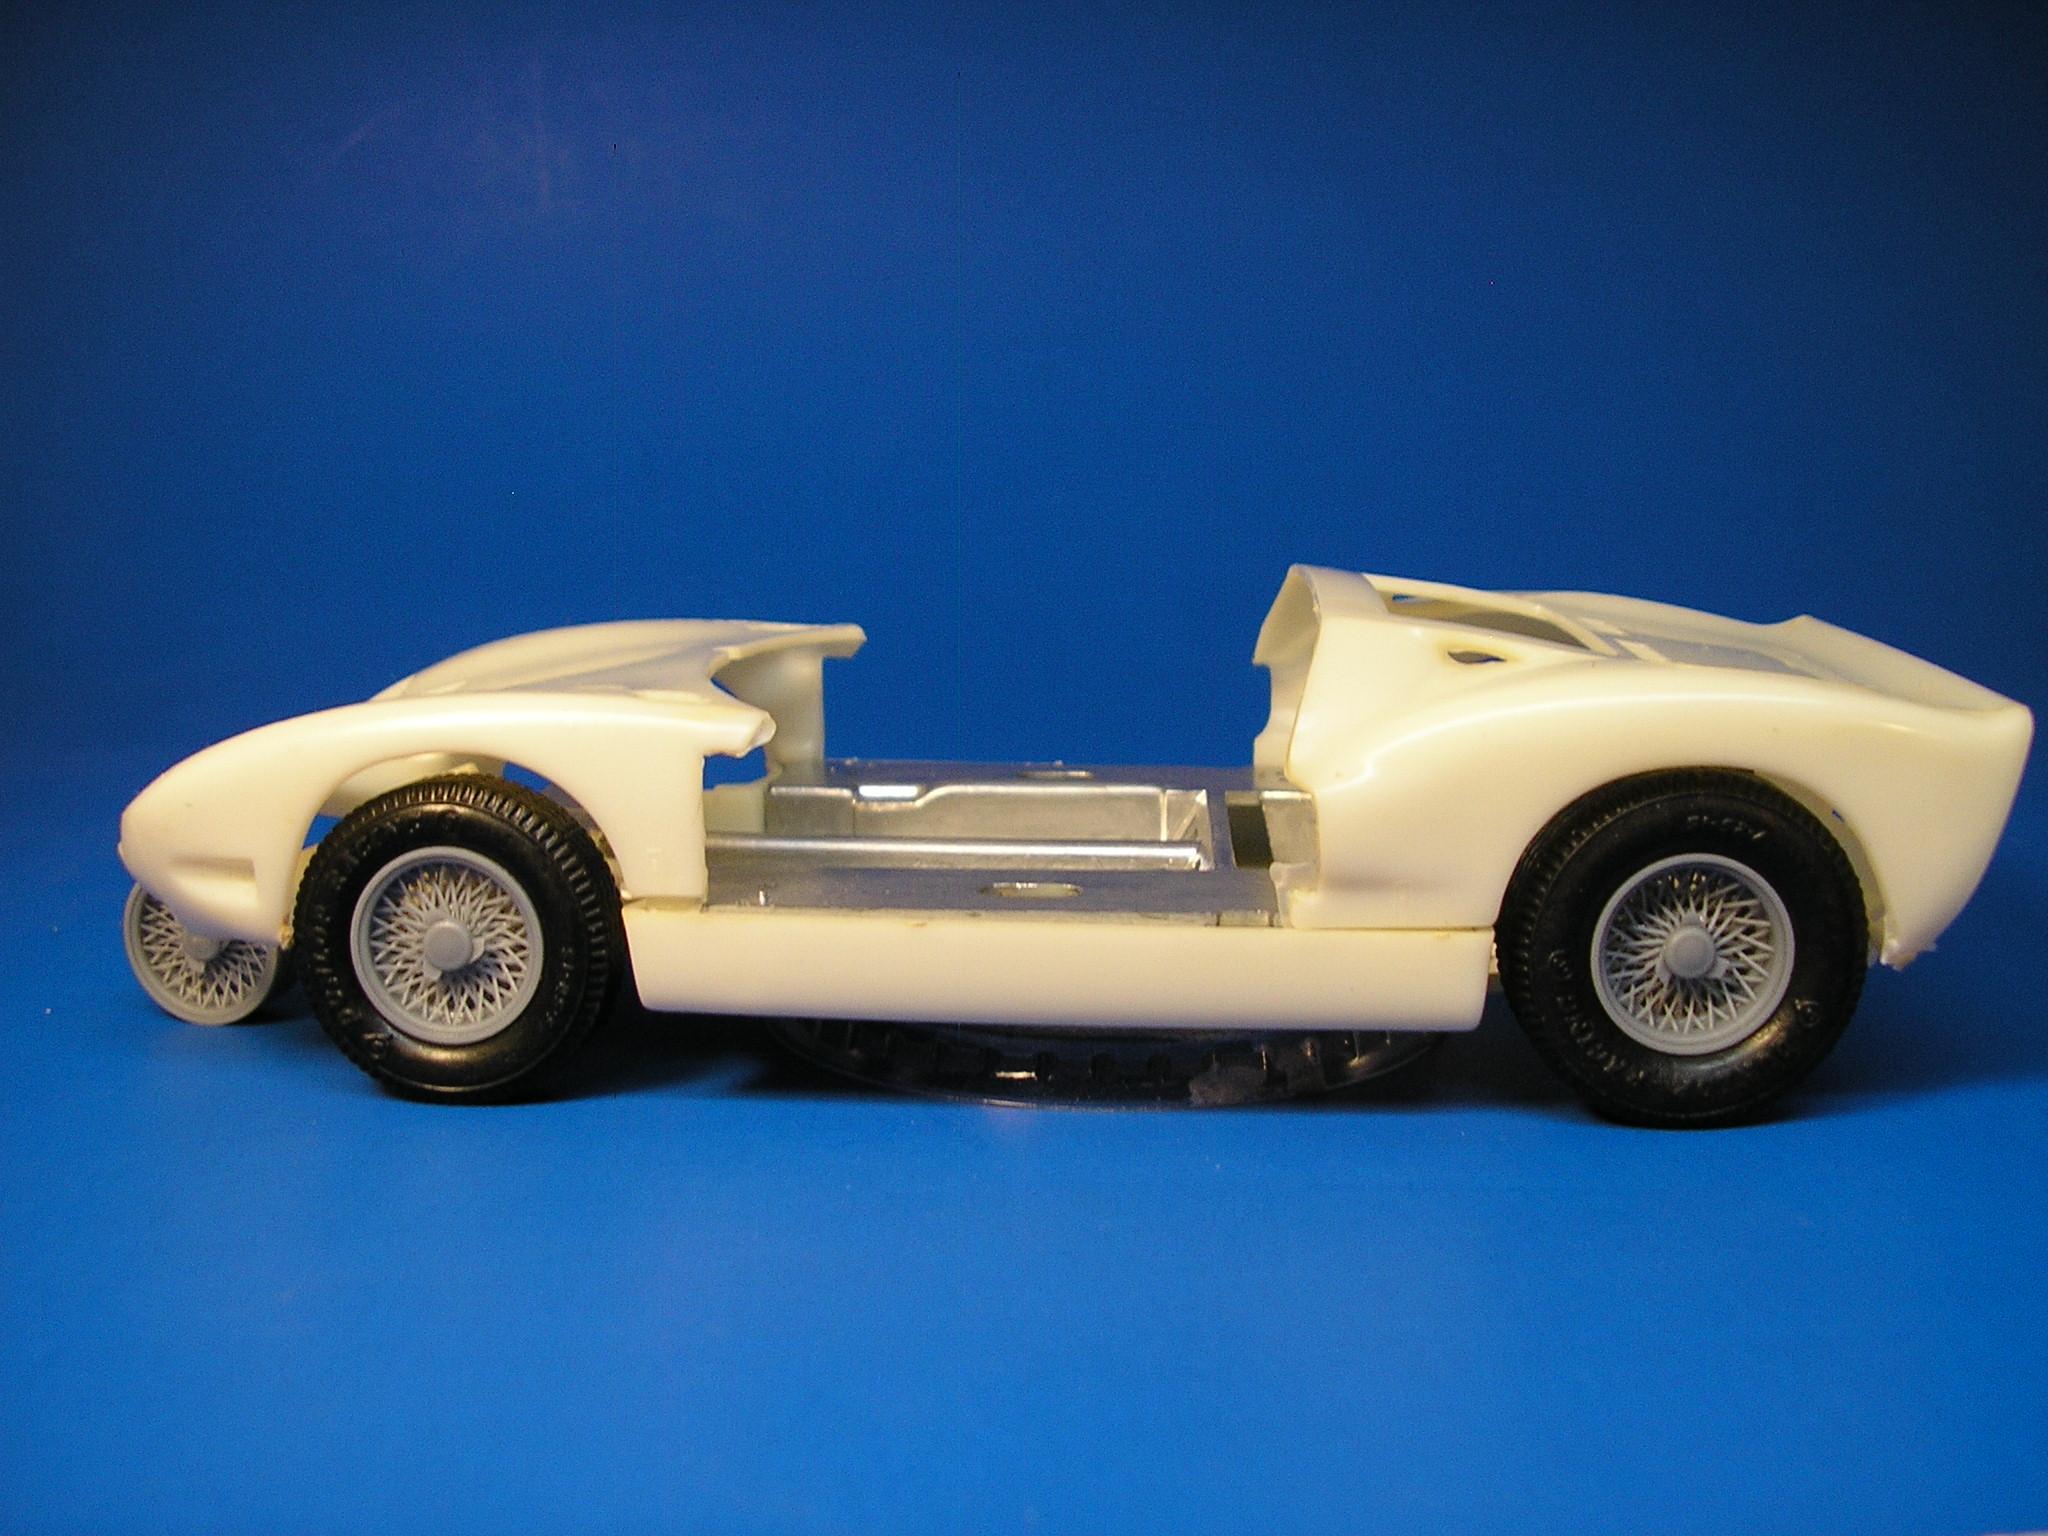
I printed up these wire wheels from a file I got from a follower on FB. At first, the wheels would not cooperate as I kept getting either warped rims, or a number of the spokes wouldn't come out right. I decided to position them in Chitubox at 90 degrees with light supports all around, except I wanted none touching the spokes. I think that's what the problem was earlier. Chitubox automatically wants to place some supports there, so I went in and deleted them where they were touching. I went for broke and printed a dozen of them............they're in two different widths for the front and rear. These are the wheels I want to use on the 1/25 IMC kit '64 Ford GT40 which the 1:1 initially ran with wire wheels early on. Here are some pics................. A few wheels had a couple of "distressed" spokes.......... While the spoke might appear "curved", once they were cleaned off, dried, and then put in my UV curing box, they did straighten out. I'm going to adjust the bottom exposure time just a bit more. Right now it's set at 25.000s/mm, but I'm going to drop it down to about 20/22. Too low of a setting, and the parts won't adhere to the build plate, but I hope that alleviates some of the "sticking" and "catching" on the FEP in the initial layers which causes issues early on with printing. Oh! Almost forgot...............I originally printed a set of wheels with a shallower rim for the GT40. I mocked those up on the IMC model as shown below. While those weren't bad, Walid Khier of FB (the designer of the .STL file) had said he can make the file so that it has a larger rim which he did. Those are the wheels I just printed out and will eventually be used on this future WIP.
-
The polished windshield frame looks great Bruce! I was gonna do that on mine, but I didn't want to lose the plastic retainers that hold the vent windows in place. I dunno why Agora did it that way, but I get their wanting to keep this as drama free as possible when it comes to building. It was a must for me to strip the wheels on DeAgostini's Shelby Mustang wheels. They did the same thing...............painted them silver. UGGGH! I stripped those and polished 'em up so they look more like chrome than painted wheels.
-
Yeah, there just had to be that killjoy that came in and left a turd in the pool for all to see. ? I'm glad it was of help, and I have a bunch of '61 Pontiac pics including a lot of engine and chassis shots. I'm going to have another big project after I finish my Shelby Green Hornet, but after that one's done, I'd like to get the Pontiac going. I saw this kit in its original test shot form at a show, and was really excited to see it finally come out. Now I hope to get mine actually built and done sometime.
-
That is a neat kit from Moebius, and it's definitely on my to-do lists of WIP's. You might want to take a look at a thread I started years ago, where I zeroed in on a building issue I could see happening. It could save you some trouble when you get to these points in your build. You can check out my thread below..........
-
I did a quick search, and I found my review of the '68 Chevelle. It does have the separate frame/floorpan, so I'll have to check that one out further. ?
-
Hey! Forgot about that one and that car rode a 112" wheelbase as well. I have that kit, but it's buried somewhere in one of the boxes where I keep my kits stored. I'll have to see about digging that one out, and IIRC, that one has a separate frame/floorpan. I suspect though because of the Cutlass's tuck under bodywork at the rockers, I still have a bit of work to do in getting that to fit the way I'd like.
-
Hmmm...........according to this here, the coupe like you mention would have had the 112" wheelbase, while the others would have been running 116". What I measured above would be correct then as 112" reduced to 1/25th scale would come out to about 4 1/2". Weird what they did with essentially the same chassis, but mixed and matched the lengths though. I still have my work cut out for me.......the chassis I want to use for full detail will need some "shrinking and tweaking". That's good to know what Robert is doing is measuring out to 1/25th for the bodies in this case. BUT.........those that want full interiors and such in some cases will have their work cut out for 'em.
-
Yeah, I don't get too crazed over scale. As you said....as long as it looks right, a bit underscale is no biggie. Nothing drives me crazier in this hobby than body lines that are waaaay off. Interesting in that the mock-up I did in my first post, that was a Johan '75 Olds Cutlass chassis underneath. The wheels line up 'bout perfect......it's just the that chassis itself will need some trimming and tweaking to fit inside the body. So, I guess that original Johan may have been a bit undersized too, which doesn't surprise me.
-
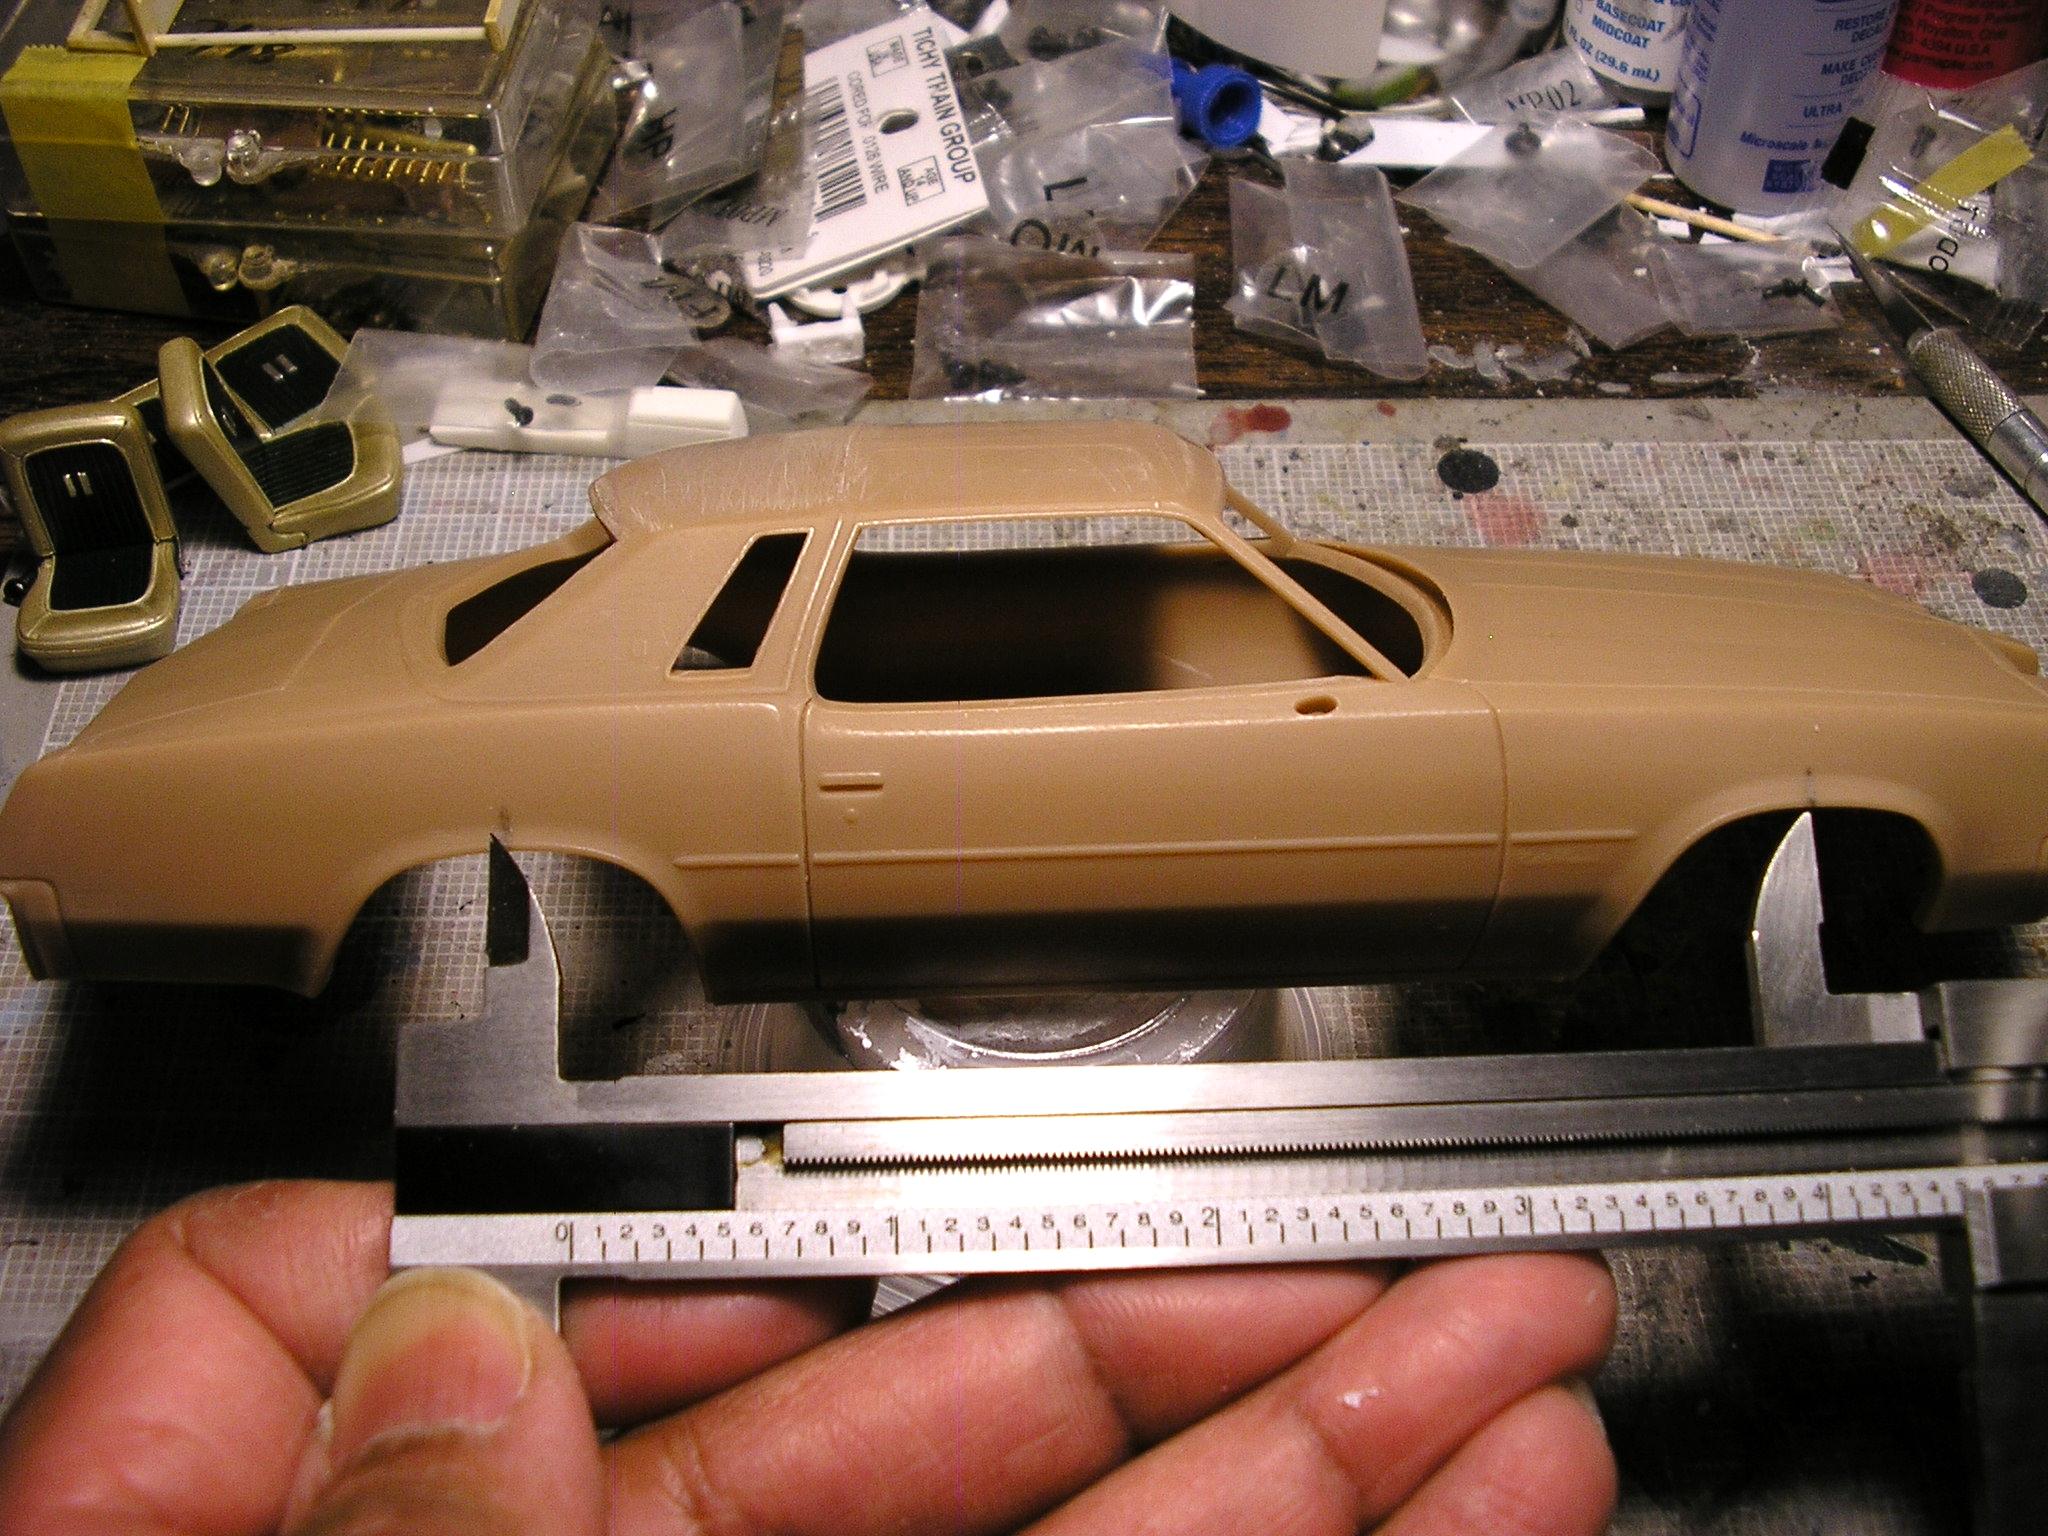
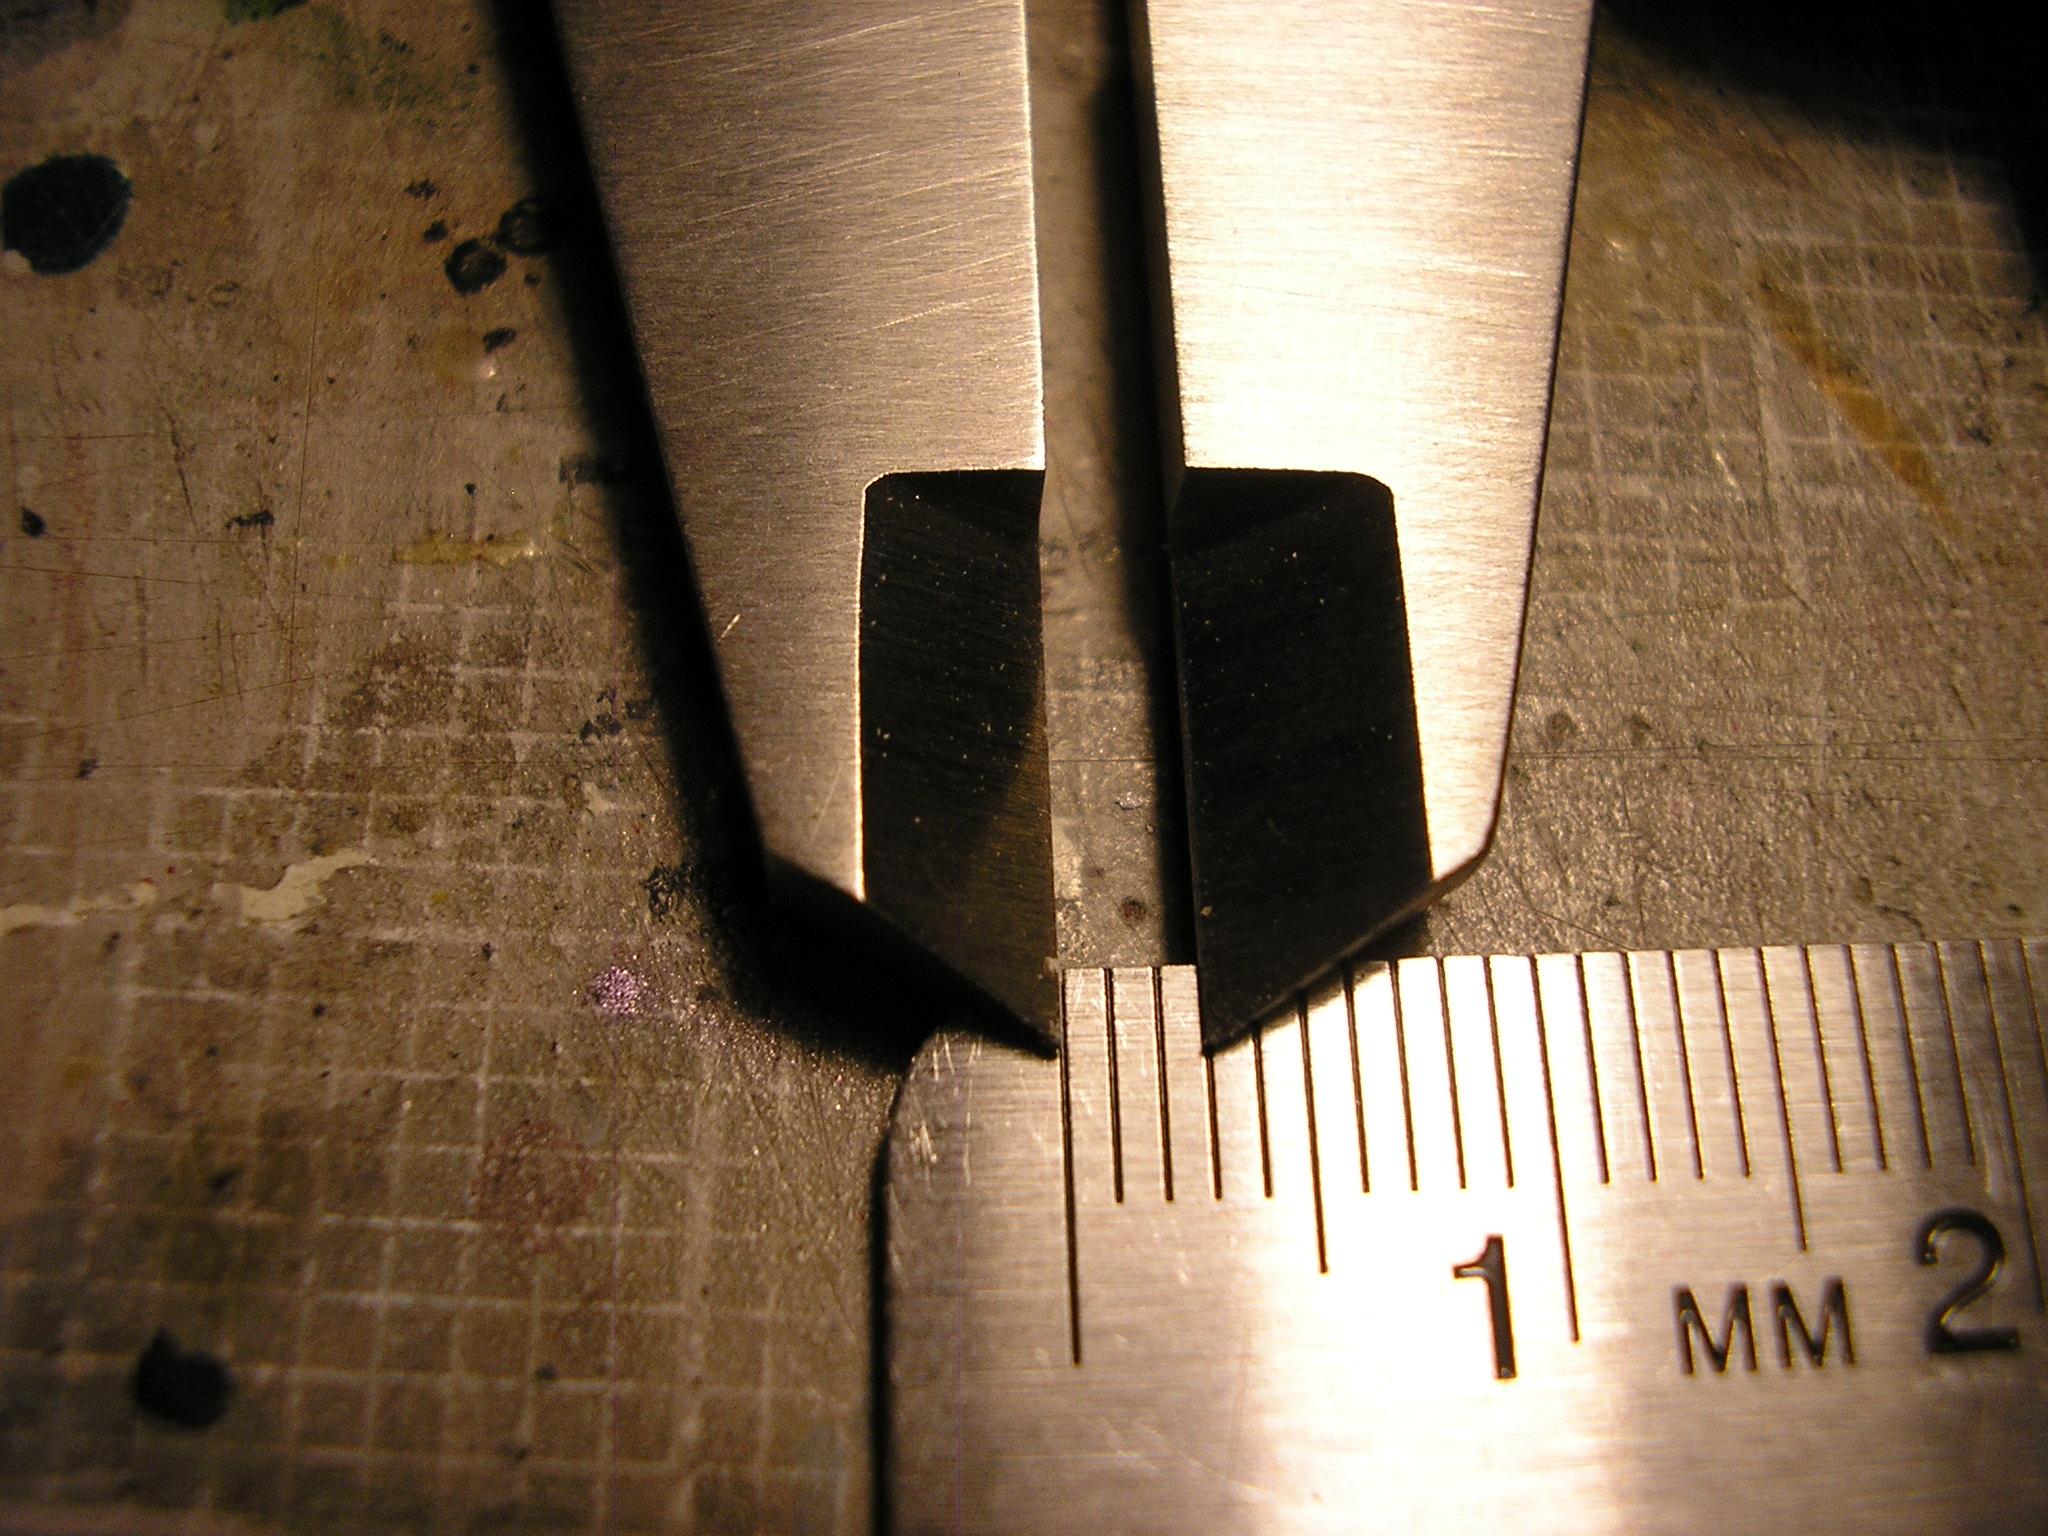
Some (interesting) observations........... My curiosity got the best of me, so I decided to dig out a '66 Olds 442 kit I bought some time ago as a donor for this kit. I wanted this one for various reasons-----namely the separate frame and floorpan as I suspect this will need a bit of tweaking/reshaping to fit, and it's easier to do this in plastic with separate items. Well, as I suspected, I can see the body on this Cutlass is a bit smaller than 1/25. Assuming that AMT did their homework correctly, and the body/frame of the '66 car is correct, the '77 is coming out a bit shorter than it should be. I measured from center-line to center-line of the wheel wells as close as I could, and this is what I got below............ I'm getting 4 1/2" from mark to mark. I did the same thing for the '66 body............. The measurements are coming out about 3/32" longer. If this is indeed true to scale, the wheelbase for a 1966 Olds Cutlass (A body) would have been coming out to 115", while in '77 the wheelbase was at 116". Here's another pic showing the difference in size........... Yeah.........definitely shorter. This isn't a deal breaker for me as I can deal with the shorter dimensions and make changes accordingly. But.........for those that aren't as able to do work such as that, you may want to keep this in mind when ordering any 3D printed body from a vendor. This is no slight on Robert in the least, just a caveat for those that may have in mind "X" chassis and floorpan will work for this and that, but may not be the case at all.
-
He does do a '57 Caballero wagon though..........I have one of 'em. ? As far as the Century hardtop, many years ago, I picked up an already painted '57 at a show. I don't know who made it, but I suspect it's an R&R body. I'd like to do either of those someday, but I need really good shots of the undersides as the chassis' on those were a bit different than the other divisions.
-
1969 Sportwagon 3D resin
MrObsessive replied to yellowsportwagon's topic in Car Aftermarket / Resin / 3D Printed
You'll want to go here.........he's got a loooooong list. I'd hurry, he's only taking orders for the next couple days. Just mention what you want in the comments. In his post, he says how to order when paying through PayPal. -
Good question about the body thickness............ I got nosy and got out my dial calipers, and measured at the front wheelwells. Now granted, those flares account for some of the thickness, but here's what I'm seeing......... I'd say overall about 2-3mm thick. Definitely thicker than your average kit body, but then we're dealing with resin, which can be tricky and more susceptible to warping if things get a bit too warm. The thickness seems consistent throughout the entire body. I'd want to cut open the hood on this.........I better get out my Dremel. ? I dug out the bucks for the glass while I was at it, and dry fitted those in......... Definitely larger than the windshield and backlite openings. That's a GOOD thing as I'd rather have them too large, than too small. I can sand them down to the right size, and then there's the vacuformed glass itself which can be just a smidge larger than the buck when formed. Your point about what's going to be done with these is a good one. I'd say probably 90% (or better) of these bought will not ever be built. I can bet that most of them are bought for the sole reason that there's nothing else out there as you said, and then there's the "nostalgia" factor as most of these are cars we either remember as little kids, or in the case of this Olds, drove these as brand new cars either for our Driver's Ed in school, or our parents bought 'em. For some, this could have been the first new car they ever bought. I do intend to build this one, as I'd like to definitely get to GSL next year, and I want this one either done, or very much along as a WIP as I intend to take several more cars there.
-
He's made it so that you put in the windshield from the outside of the car. That's no problem since more than likely I'll be vacuforming the glass for this among other cars. I can glue in some sort of instep for the glass to lay on. Cars of this era had near flush glass, so this would be the way to get it to look realistic, and for the glass to not have that "tunneled" appearance. With the glass bucks that he gives you, it's made my job that much easier. It's just a matter of smoothing and polishing 'em up, "boxing those in", filling them with Plaster of Paris, and then vacuform away.
-
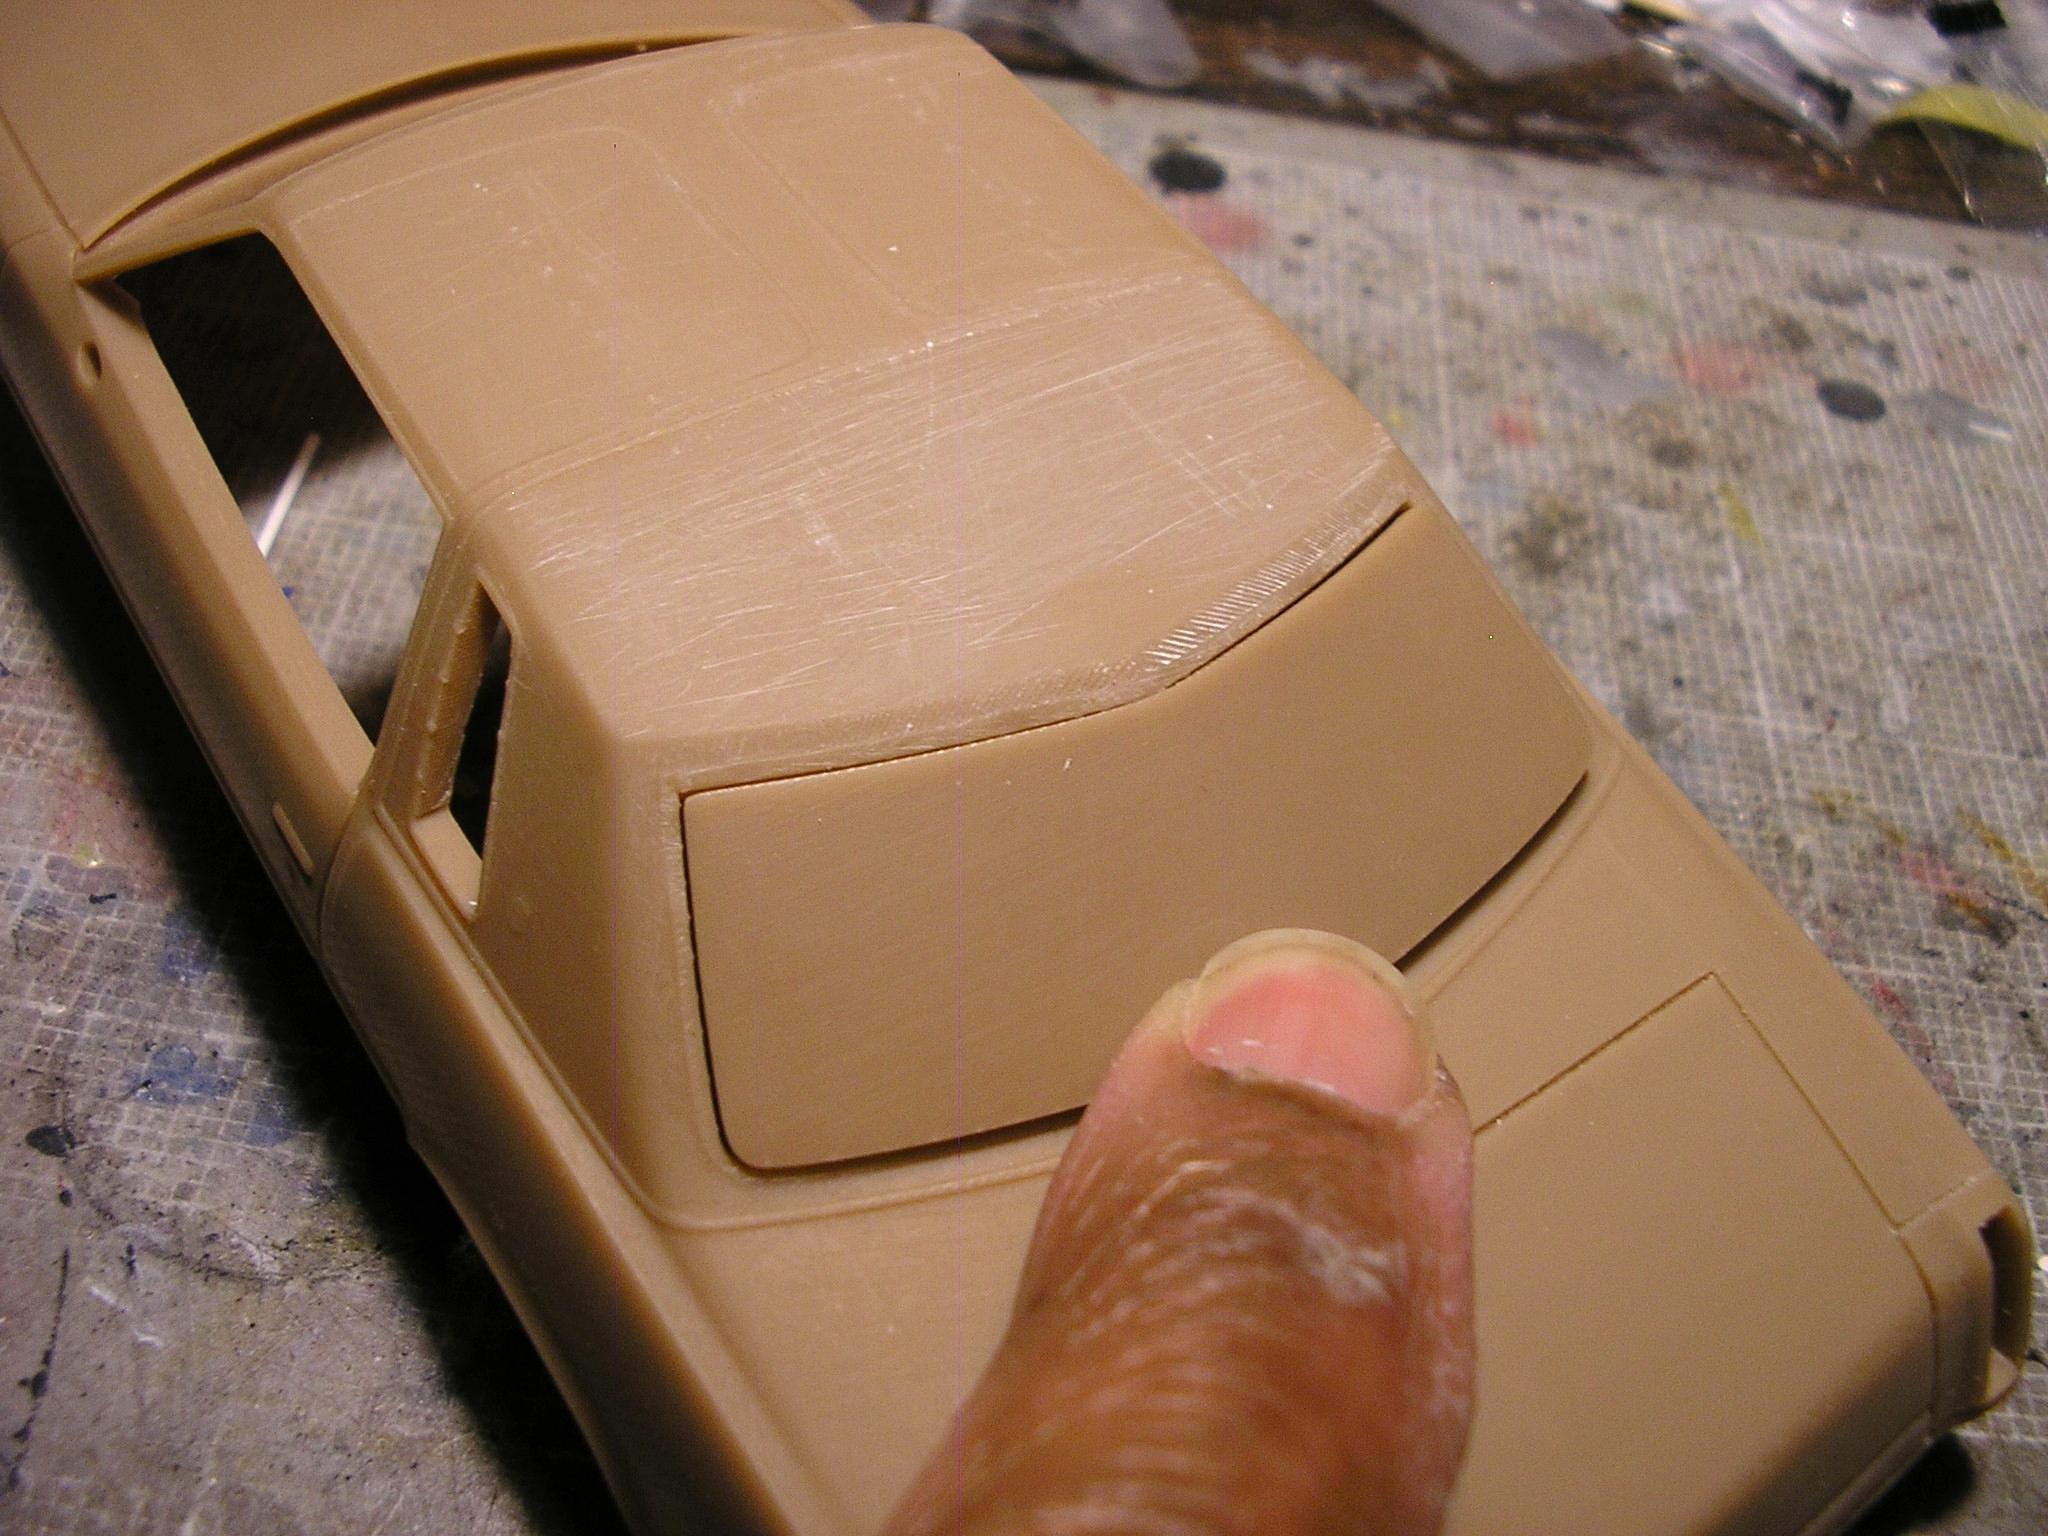
One will need to take their time, and do a little bit of bodywork to make these look really nice. The body surface is OK.........but due to some 3D printing lines that can still be seen (faint), you're going to need to completely go over the body and smooth things out. Not a hard job, as it's no different than going over a kit body, and getting rid of mold/parting lines and sink marks. One will also need to get creative and come up with a chassis, running gear, and interior for any of his bodies at the moment. Judging by the response he got on his FB page, that's not deterring the "lunatics" among us that have wanted a particular car that we know the major kit manufacturers will never produce. Looks like there might have been a production boo-boo on my example. It's hardened up like it may be some filler resin or two part body putty. With all that I do to get bodies ready for painting and whatnot, I didn't get crazed over it.
-
1969 Sportwagon 3D resin
MrObsessive replied to yellowsportwagon's topic in Car Aftermarket / Resin / 3D Printed
???? -
1969 Sportwagon 3D resin
MrObsessive replied to yellowsportwagon's topic in Car Aftermarket / Resin / 3D Printed
OK Tim...........now you've done it! Now you've got me about to order this one from Robert too! These types of wagons have been a MUCH overlooked subject, as they keep getting requested among those that want new kits. The '72 Olds Revell did would have been a "natural" for a Vista Cruiser, but I get the kit manufacturers want to play it safe these days. I keep telling those that dismiss 3D printing not to do so...........It IS the big wave in the hobby right now and it'll be the only way short of someone creating the body from scratch, we get any of those long wanted models. -
Peter, he mentions two types of castings..........the brown resin as I have, and a white resin. He describes the white resin as needing more work and the brown as "smoother". I take it that he tries to get the masters as clean as he can, but he does say they'll need further cleaning up. The white resin ones are cheaper (and more work to clean up), but the main thrust for me in getting these is the body lines are DEAD ON accurate. Judging by the response he's getting on his FB page, he's going to be shipping out quite a few bodies in the next couple months. I've been following him for maybe two/three years now, and his notoriety in the stuff he offers has simply EXPLODED. I think somewhere down the road, he's going to offer complete kits as he had a post asking for requests specifically for show and concept cars. I thought he said he'd need to sell at least eight or more to make it worth his while as complete kits. Well, needless to say, he got quite a few requests on that also, including a couple from me.