MrObsessive
-
Posts
9,785 -
Joined
-
Last visited
Content Type
Profiles
Forums
Events
Gallery
Everything posted by MrObsessive
-
Tom, those look REALLY great! I take it you got your bodies from Robert Burns? He does excellent 3D prints and I also have the '76 Olds 98 and just recently got the '70 Plymouth. On his FB page, he listed a bunch of bodies he's offering to his followers for a limited time. I broke down and got his '77 Olds Cutlass Supreme (a '76 is pictured though), '76 Olds Delta 88, and the '73 Buick Riviera. I should be getting them in the next month or two. I can come up with interiors for them as needed and in fact, the Cutlass I definitely want to be a GSL entry when that show rolls around for the last time in '23. Quick question: What did you use as a base for your Olds 98 interior? To my eyes, that looks exceptionally nice! I loved the "loose pillow" look Olds offered back then for that car. ?
-

1956 Studebaker Golden Hawk (56J): Sunglow over Yellowstone
MrObsessive replied to mr moto's topic in Model Cars
Manuel, this is BEYOND gorgeous! You're the only one I've seen take this kit and make a brilliant gem out of it! Many years ago, I got this kit from Ray, but what stopped me was the Packard engine that was needed among other things. With your suggestions, I've since bought a Cadillac parts pack engine which can now give me the basic "bones" to get it correct. Thanks for finishing this one up..........Studebaker Hawks are among my favorite of vintage '50's/'60's cars out there, and it's too bad that there aren't more kits of these available. -
Thanks everyone for the nice words! It's good to finish something "normal" after a number of the big scale stuff I've done this year (I've built others I haven't posted here yet), and now I get to really zero in on the Shelby Green Hornet that's been languishing for a couple years now. Down the road, I'm going to attempt the same type of "rescue" with a '58 Studebaker Golden Hawk I built many years ago, but got wrecked by one of my cats about 20 years ago. I got a junker Danbury Mint diecast of a '57 Hawk (never thought that looked correct) and I'd like to use some of its interior and some other bits and pieces and make mine a '57. I have a few pics of it shown here........a number of body changes on it I'll need to do to make it a bit more accurate while I'm at it.
-
The 2022 Cannonball Run Year of Birth Build Thread
MrObsessive replied to disconovaman's topic in Community Builds
Interesting! My birthday is October of 1961, so I guess I could slip a '62 in there as they would have been barely hitting the dealer showrooms at that time. OTOH, there's so many '61's to choose from as I have models (either whole kits or restos) of the following............. Out of all of them, the '61 Pontiac Ventura is leading the pack since I have that kit untouched with detail stuff ready to use. Hmmm...............Decisions, Decisions..........
-
Finally! After 16 years and fixing a major mishap with the bodywork, this old gal is finally done! I've gone as far as I'm going to go with it......some touch-ups here and there, and I'd like to find some small Ford decals to go on the hubcaps. The PE set for the '53 Ford (Lindberg) are too big. They may suit the actual '53, but the hubcaps came from that kit so I don't really think so. I took some "creative license" with the hood ornament. The wings of the jet should actually swoop downwards, but mine are upwards a bit to give the appearance of flying. Scripts and some of the badging were carefully removed off the junk diecast and applied with epoxy or clear paint. Color is the same (redone) 1955 Regency Purple and Snowshoe White. Vacuformed windows, and as the progress pics showed, this model came from essentially two different kits and a junker Danbury Mint diecast. The glass was tinted with a mix of Tamiya X-22 clear, clear green, and clear blue. It was put on with a sponge brush (no brush strokes) and in better light, you can see the slight bluish-green shading of the glass. IMO, this year Ford to my eyes looked a bit better than the '55 Chevy.....I like the straighter lines better than the somewhat bulbous curves the Chevy sports. Interesting enough, you don't see many of these at the car shows. You'll see '55-'57 Chevy's all day long, but the Fords must not have had as large a following, not to mention that Ford's build quality probably left much to be desired, especially when it came to keeping rust at bay particularly in the rust belt states. Why no one's ever done a glue kit of this car is beyond me......at least I've got my copy of it, and there's no doubt this was one of the tougher ones I've done among all the models I've ever built. If you'd like, you can go here to see the original progress pics of what was done to create the body. You'll see the older pics date back to 2005. Here are the pics.............. Edit: With a nod to the late great Harry P, I did NOT forget the mirrors!
-
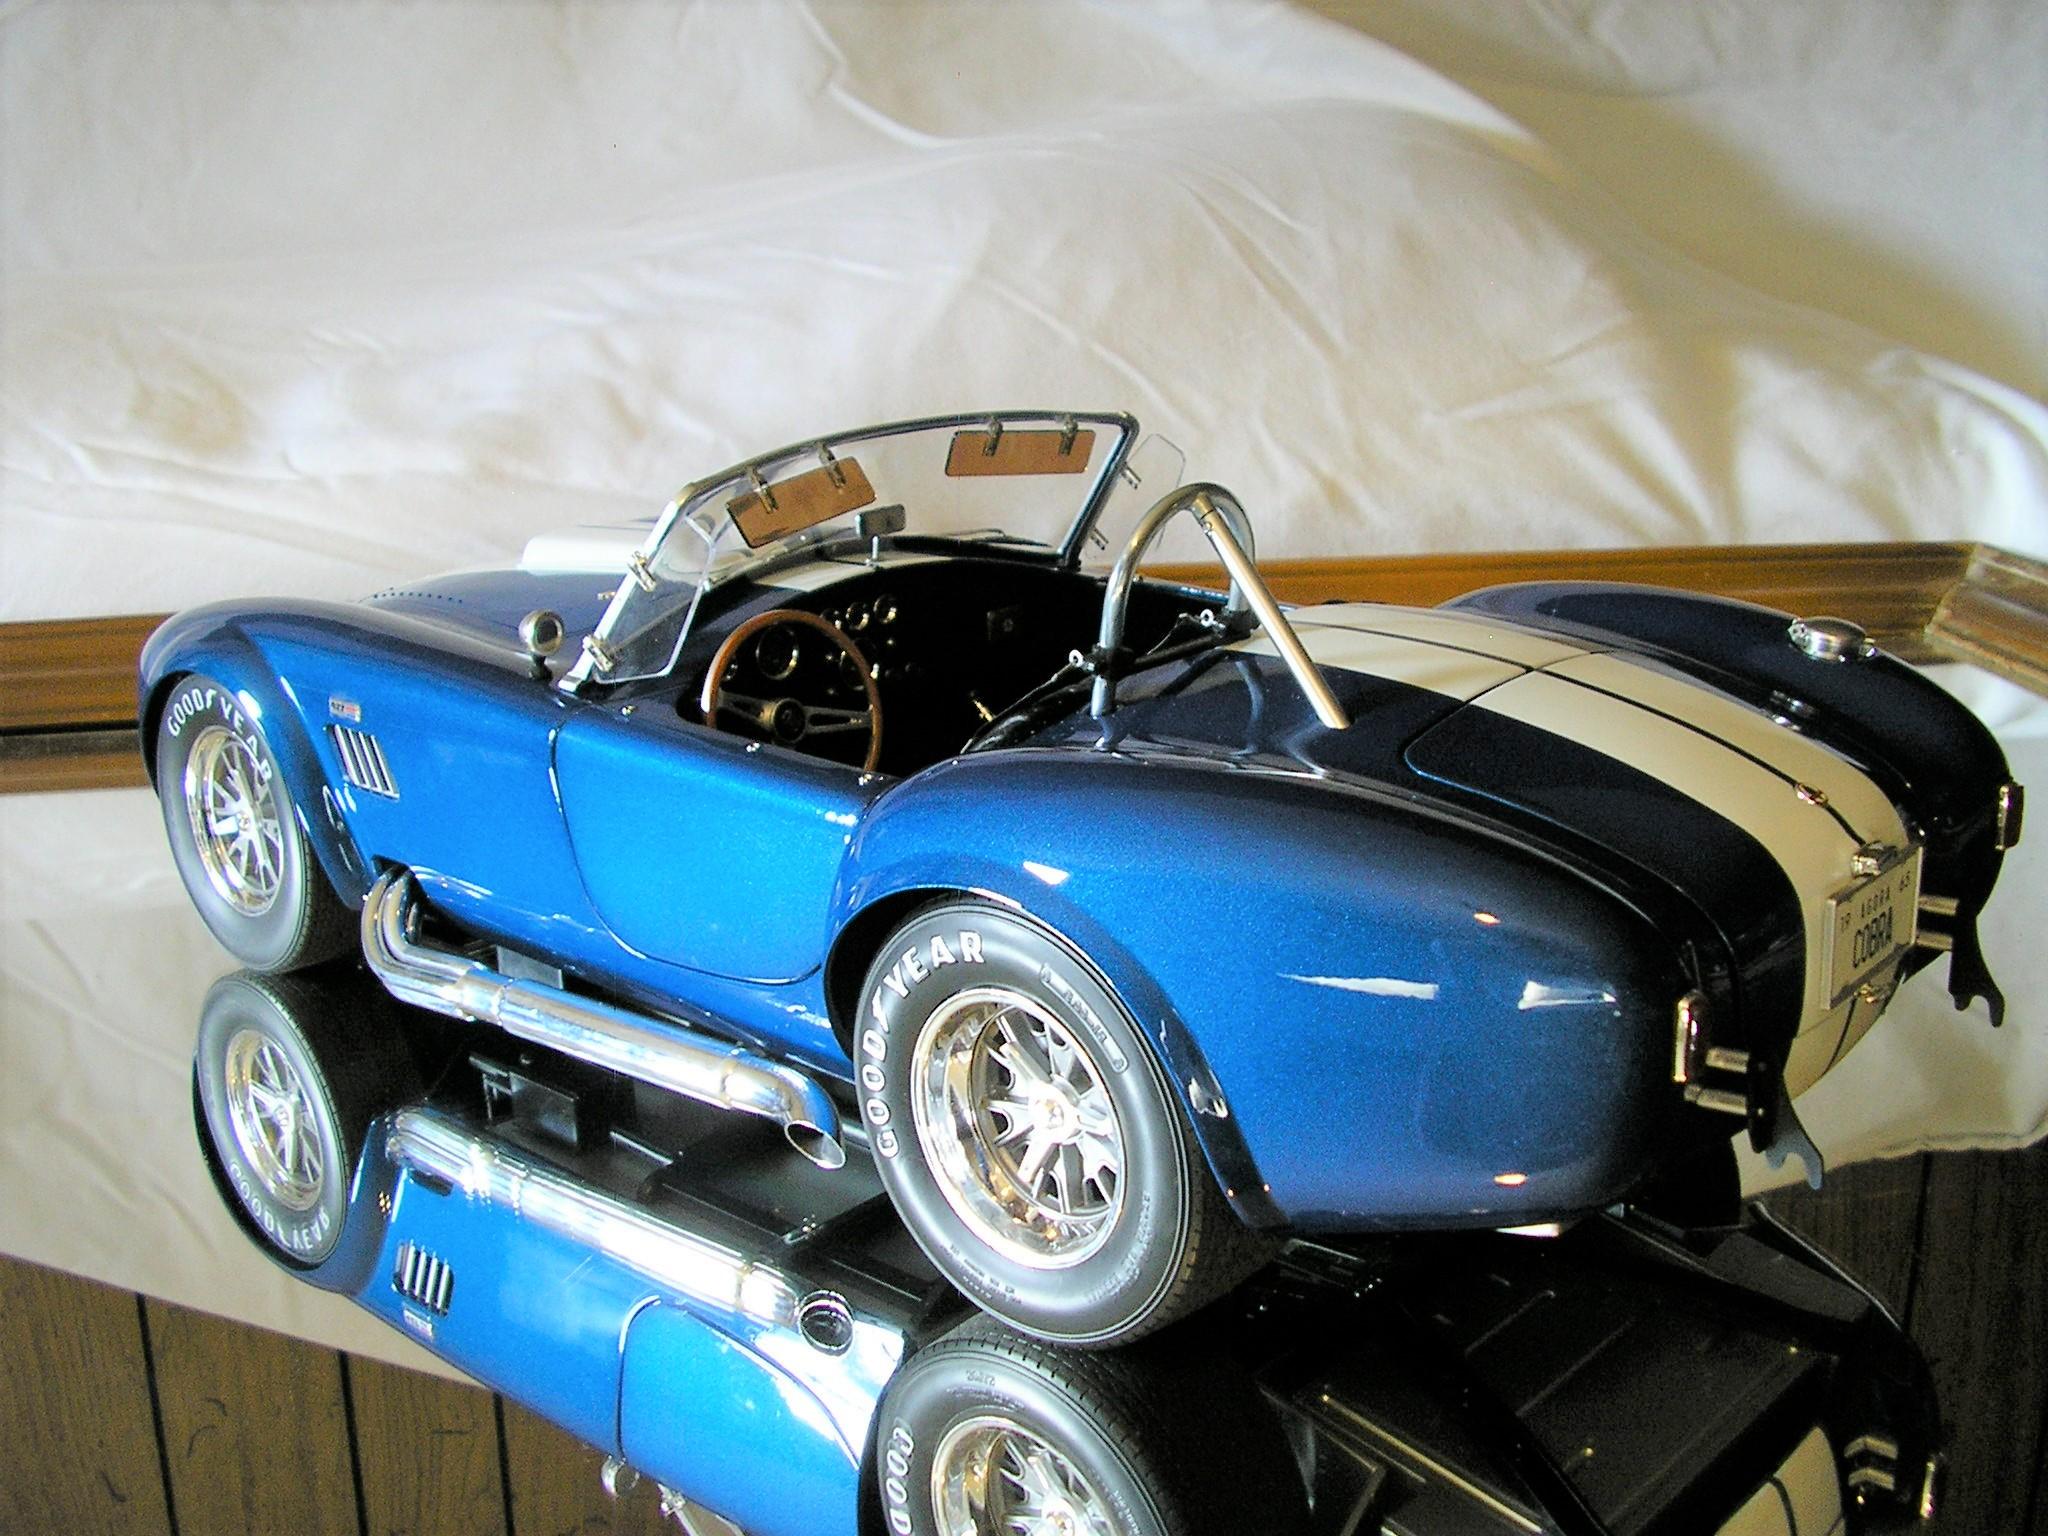
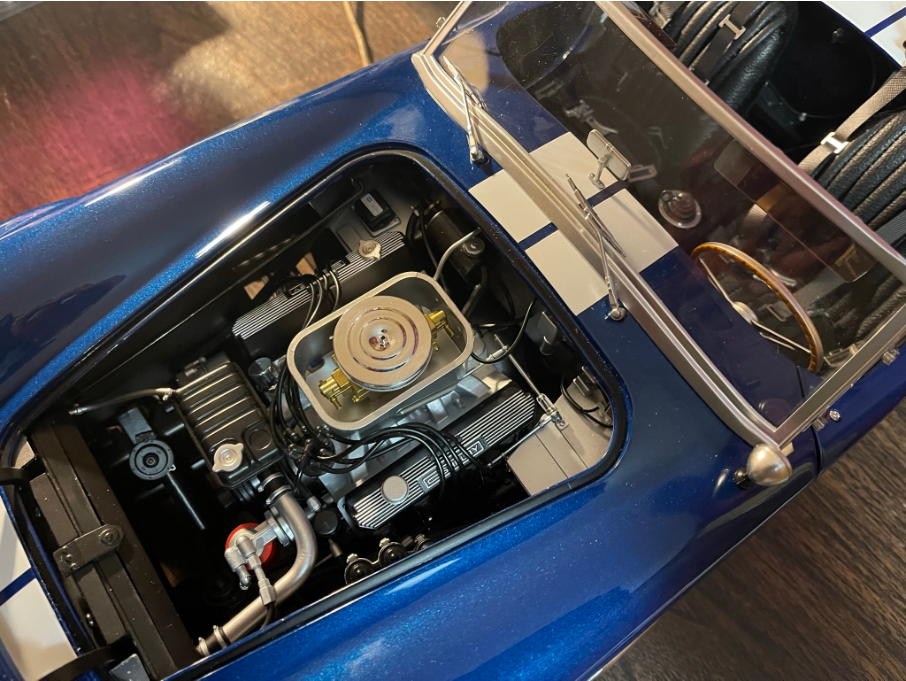
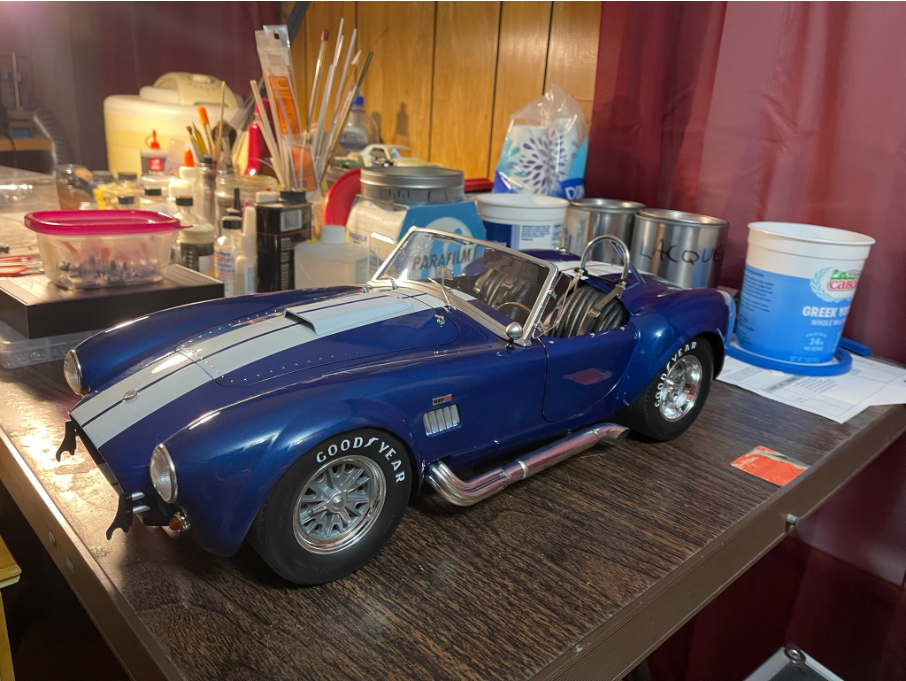
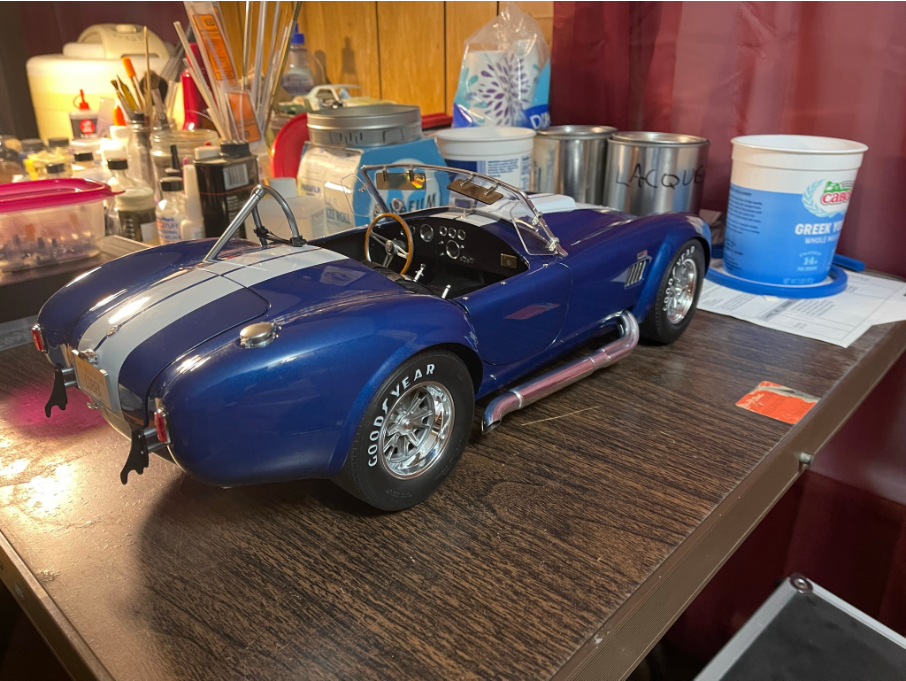
Agora 1/8 1965 Shelby Cobra SC
MrObsessive replied to MrObsessive's topic in Other Racing: Road Racing, Salt Flat Racers
At some point, you'll need to attach the coupling that connects the two steering rods. Just like in the actual car, you have a "middle" connection that attaches the two. They don't mention this in the instructions until after the fact, but you'll want to make sure that the pin is threaded and partially through before going any further. I don't remember which step it was, but that's one of the pitfalls if you want the steering to function with the steering wheel. Keeping the coupling between the headers was tricky. You'll definitely want to have some needle nose pliers at the ready. Another is the electrics. LOTS of wiring to deal with that have to be tucked inside the transmission tunnel, and this is where you have to check, check, and double check to make sure you don't have any trapped/pinched wires when it comes time to mate the chassis to the body. Any packaging you'll get when it comes to the body parts, I strongly suggest you keep and not throw out. In my case, since this was a partwork, you can literally have items sitting for months before you use/attach them. One example was the hood. That was the first thing they sent, but it would be about six/seven months before I attached it to the hinges and body. You're going to be turning this thing upside down............a LOT. They sent the body in the 11th pack encased in two styrofoam halves. I recommend you keep those as you'll need them to rest the body on to keep the windshield frame intact as you build up the chassis and undersides. The frame is solid metal, but the weight of the body along with any movement in the wrong direction could break it. There are some other foibles too during the construction........I recommend following the instructions to a T! Any missed steps can have you taking things apart all over again as certain things cannot be attached/placed after a certain point. If you run into trouble, drop me a line and I'll try to help where I can. -
It's all now finished and posted in the "Under Glass" section fellas. Here's a sneak peak at 'er.........
-
I've had this finished for a bit, but due to its size and the kind of lights I have, it's difficult for me to get halfway decent pics as opposed to my little "studio" setup I have for the much smaller stuff. Anyway, here are some pics of what she looks like now. As I've mentioned before in other threads, kits like this are not for the beginner at all and dare I say, they're geared more to the advanced builder as there are certain skills you'll need to deal with different assembly issues. Screw together construction notwithstanding...........there were steps that were particularly difficult to get done. While the sun was shining bright in the room, I figured I'd better take advantage of the morning sun and grab a few pics. Here are a few just as it was pretty much done on my work table.......... My attempt as some "beauty" shots. OK.............now it's back to "normal" in building the 1/24-1/25 cars! I do have parts now coming in for Agora's 1/8 1961 Jaguar E-Type convertible, but I need a break from the big scales for a bit and it'll probably be some time before I get started on that. Thanks for looking!
-
1/25 AMT 1978 Ford Bronco "Wild Hoss"
MrObsessive replied to Casey's topic in Truck Kit News & Reviews
FINALLY! I guess I yelled loud enough on their videos last year about this kit, and they heard me! Good to see this one back! I've had this kit for years, but mine is a bit warped. I guess it could be worked with after some "coaxing". It'll be fun actually to see the prices for these tumble like a rock on eBay after some of the crazy high prices I saw a bit ago. -
Thanks for the heads up Bruce! I'm pretty much building the GT40 out of the box except for some paint changes as far as the insides of the doors and such. Other changes I've made is I've stripped the wheels of the aluminum paint, and shined up the bare metal so it looks more like chrome. For the time being I shelved mine since like you, parts were few and far between, and I wanted to zero in more on the Cobra getting done. Agora is now sending me parts for the '61 Jaguar as I've gotten two packs so far.......I had paid ahead of time for four packs, but I want to focus more on the smaller scale stuff for the foreseeable future. With GSL coming up in about a year and a half, I do have something in particular I will be making specifically for that show. I'm keeping mum about it for now........when I get started on it before the middle of next year (possibly within a couple months), it'll definitely have a running thread. ..........and it'll be 1/25 scale. The same here when it comes to space-----I'll no doubt be building more shelves/bookcases for future large scale models. There'll be a point though where I'll have to stop building them as I'll simply have no more room to put 'em!
-
Bruce, I wonder if part of the hold-up in getting parts has a lot to do with DeAgostini "reorganizing"? I see that pack #20 is on the site as far as the PDF, but I've not received it yet. Of course, with the supply chain issues with the cargo ships, that's not helping matters either. Actually, I have packs #16-19 to do yet...........so many models and not enough hours in the day! I sure hope they don't pull an "Eaglemoss" and stop delivering parts altogether. BTW, I haven't forgotten about taking and posting decent pics of the finished 1/8 Cobra.....been way busy before the holiday, during, and now I'm back to work.
-
WOW! Lookin' good Phil! We've been hoping Revell would have come out with a Ranchero variant by now, but at this point it's unlikely. Very good bodywork so far! ?
-
The last I bought BMF was back in February. I remember because I wrote the date on the envelope when it came in. Perhaps that was the time there was a change after that? The sheet I have there were no problems......I do remember getting it directly from the company. It's too bad if the original stuff has gone by way of the Dodo Bird. I do remember it being a bit more pliable in the past and the sheet I have now I've noticed is a bit stiffer, but I've had no problems with it sticking. I read the embedded thread on this.........I had NO idea that it's gotten that bad. I went on eBay and bought three sheets of the Matte Aluminum. I can buff the heck out of that to make it shine like chrome. I'm of the mind that window trim (and even side trim) is not as brilliant as bumper chrome.....there is a slight dullness to it. The way I build those three sheets should last me literally for years. BTW, there was a builder here from Brazil that had a very good video on using cheap kitchen foil (MUCH thinner) and an adhesive for getting impressive results. It's probably still on YT somewhere and it's worth taking a look.
-
It never seems to fail this time of year, you've got a lot of these sharks circling the waters to see who they can bite next. Seems as though these jerks have been doing this for some time, so it's EXCELLENT they finally got snagged. On a more off topic note, I have to give our AG here in PA a HUGE load of thanks for coming to an excellent resolution to this case involving myself and a bunch of others.
-
Aaaahh............OK! I learned something new today! I never paid much attention to the front ends of the B/C cars, particularly the differences in the trunk. The hardtop come to think of it, I don't think I've ever seen in person as far as the 1:1. Interesting that Porsche made those that way........pretty much the way the American 1:1 manufacturers did their early hardtops. They were nothing more than convertible bodies with the roof welded on. The '51 Ford Victoria comes to mind. ?
-
I do believe this is the one you're looking for. Yes, this kit is tough as nails to find. I have one.....in fact I remember buying it at our yearly toy show in York PA a number of years ago. No.....I do NOT want to part with it! I learned that once something is let go as far as models, they can be all but unobtainium in the future if you want it again. Either price wise or availability.
-
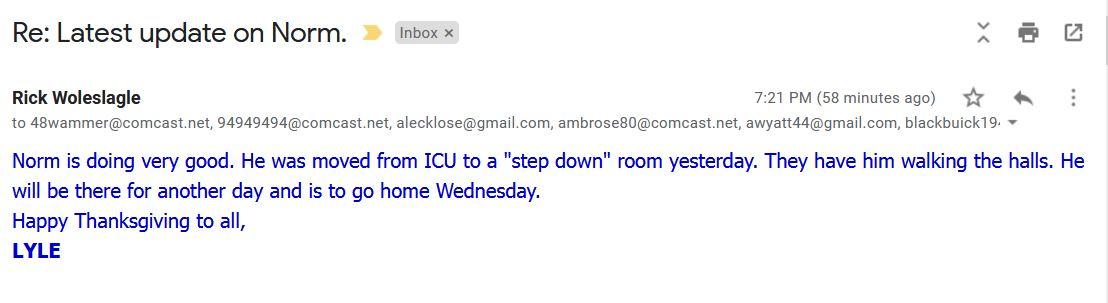
Replicas & Miniatures Company of Maryland
MrObsessive replied to vamach1's topic in General Automotive Talk (Trucks and Cars)
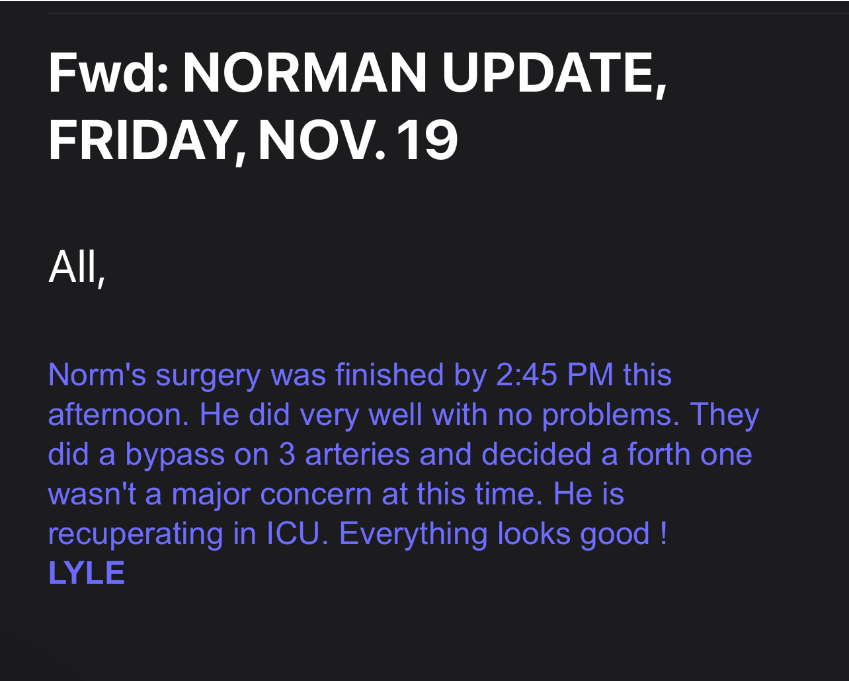
I got a very good update on Norm here............. ?
-
'69 GTX convertible roof
MrObsessive replied to Mr mopar's topic in Car Aftermarket / Resin / 3D Printed
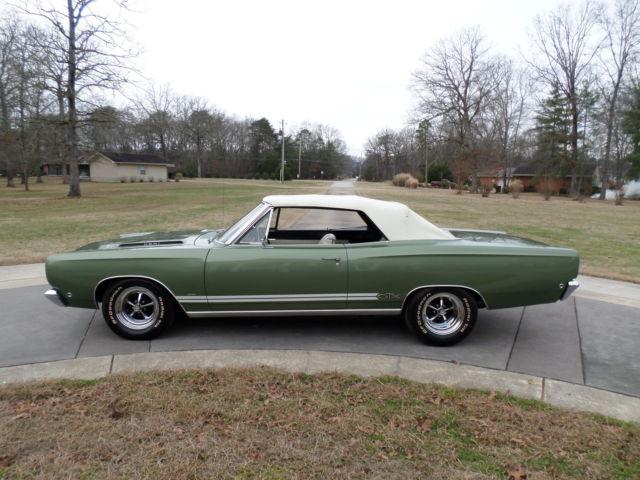
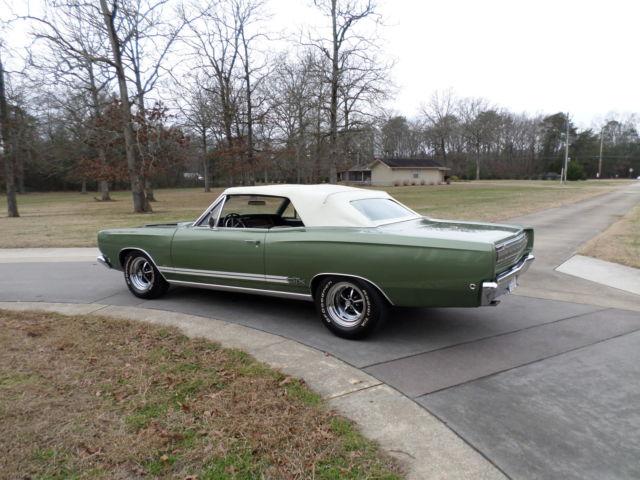
Hmmm............I'd have to see this in person, but here's a few pics of the 1:1's uptop shape. ?? This is a '68 I've got a ton of pics of, but the top frame rails and top-up shape would be the same through 1970.
-
Ahhhh! So that's the culprit! I have a very restorable '80 kit......but it has a fractured fender and thankfully the piece is there to fix it. Other color option decals would be GREAT! The metallic brown isn't bad, but there are those of us that would like more variety in case we want to paint the body another color and not just polish the plastic. As far as pricing $120 or slightly north of that would still be a terrific bargain compared to what I see these go for on eBay. There's one on there right now, still sealed, and they want $700 for it! ? The average I've seen for complete, untouched kits go for anywhere between $300-$400.
-
Robert, the reissued kit you have pictured there is pretty much the same one as the original. That was intro'd back around '77 or so when it was originally just Monogram. The Revell name got stuck on the kits at some point. Not a bad kit at all as far as how it goes together. In fact, that was the very first kit I ever attempted when I started building back in 1978. To my eyes, there are some proportional issues, but if you want a nice shelf model without a ton of drama building it, this one should fill the bill.
-
I too would LOVE to see the '79 Trans AM back! Those go for INSANE prices on the 'Bay! Even busted up ones can go for crazy money. I do hope this time around Revell uses better plastic than the originals. For whatever reason, a lot of those "fracture" like glass particularly the body panels when they get damaged. ?
-
Replicas & Miniatures Company of Maryland
MrObsessive replied to vamach1's topic in General Automotive Talk (Trucks and Cars)
I got this update from Lyle Willits................
-
Bruce, I think you'll really like how this goes together! Mine's all done.......just haven't had time to take some decent pics because it's so big. One thing to watch out for is the last step which was for me pack #12. Super-Duper fiddly, and there was some cursing involved to get thing to cooperate. I didn't sink a lot of detail/changes into this. I like to use these larger scales as more of a stress reliever (almost) from the small super detailed stuff I do. Hopefully during next week when I'm off for Thanksgiving, I can get some "Under Glass" pics up of mine.
-
VERY nice and squeaky clean! Great save on the A pillar.......that's not always an easy fix depending on the model. I have this same kit as a unpainted built-up with box and all, but dang if it's missing a taillight which I can never seem to run across on the 'Bay.
-
Masking Tape Leaking -2 tone Paint Job
MrObsessive replied to 69NovaYenko's topic in Tips, Tricks, and Tutorials
I swear by Tamiya Tape! For doing stripes and such as what Steve showed on his Dodge, it's pretty much the best stuff to use. Here are stripes I did on my '05 Mustang GT. The clear stuff is Parafilm to mask off the rest. The suggestion of using clear coat along the edges is a good one. Another choice I've used in the past for masking two tones (or black trim around windows) is BMF. Expensive, but you'll get a super clean edge with nary a bleed under if burnished down properly.


.JPG.221715c289866f04fe0bd89fd3fa41f8.JPG)
.JPG.3774f004dff5a0c8e3263b37b1812e36.JPG)