

highway
-
Posts
5,380 -
Joined
-
Last visited
Content Type
Profiles
Forums
Events
Gallery
Everything posted by highway
-
 Thanks Chris, and everyone else that helped with the choice! I even asked the better half last night what she thought (even though she thought the idea of a roo bar was dumb when I first wanted to do it ) and she even thought it looked nice black, so black is what it will stay. It probably won't be warm enough here for me to spray any Alclad till spring, anyway! Yeah, I better stay on Rommel's good side, too. Until I get a few of my wrecker ideas built, I got to call him! Maybe he will at least give me a break on the tow price!
 -
How can you be cheating by starting early?!?!
-
No problem at all, Winston, this is for everyone who's interested! If you do change tractors, just let me know so I can edit the list.
-
OK, it will be added, too. I know what you mean, all my painting takes place outside, too, and I'm already waiting for spring!
-
OK, Winston, I have you on the list, and after you post the pics, I'll add the make and models of the trucks. Don't feel bad about not knowing what your tractor trailer entry will be either. This is my build and I don't even know what I'm building yet! I have a general idea, but I don't know what tractors I'm using for the trailers!
-
It should be! I'm almost speachless, and I look forward to seeing the results of all three! I'll add the Aeromax to the build list, too, if that's OK with you!
-
Kevin, I don't want to overtake Nick's great work, but I just have to say I think this is the first T/A I've seen with a 4.9 Liter equipped with a Shaker! I love the later Snowflake wheels, too! Also, by the way, you have to watch the decals for the hood on these year T/As. The non turbo and Shaker equipped cars use the bird that is on your 1:1, but if you look at the pic Nick posted in his second post in this thread of the box art of the kit, the Turbo bird is completely different. The non turbo bird looks to the passenger side of the hood and has a small flame coming out of the beak, but the Turbo bird faces the drivers side and a large flame that was designed to fit the turbo "bump" in the hood. Of course, the bird in the 10th Anniversary kit I seen you mention in an earlier post, is a unique bird to that car. That bird is called the "SuperBird", it is larger than the regular bird and the only bird ever put on a T/A to extend off the hood and onto the front fenders. One last thing, then back to Nick's build, I have a set of birds that might work for your build of your 1:1, but they are for a 1/8 scale kit. If you can make your own decals or know someone who could do that for you, PM me and I will send you the scan I have of them. Of course, since they are for a 1/8 scale kit, they would also have to be resized to fit the 1/25 scale hood. A 1/25 scale T/A could park on the hood of my 1/8 scale kit! Now back to Nick's regularly scheduled build!
-
Just wondering, is the dash in the 4300 the same as the Paystar, or does it have the round gauges? If the 4300's dash has the correct round gauges, would that dash fit in place of the Paystar's, since, at least to me, they look like the same cab?
-
Welcome, Tony, I'm happy you joined up! When I seen the Pete and KW last night, I was very impressed, but you just blew my mind with that Ford! You may not concider that a model, but I know Tamiya never did a R/C in their lineup like that! If you want to finish it up for this, I'll add it to the list, too. How did you do the flames on the skirts and flaps? They are awesome! By the way, don't worry about taking over the section, this thread is for everyone to post their progress in, and everyone is welcome to post as much as they want. I know you have WIP threads for the Pete and KW, but don't forget to post some progress pics here, too!
-
For once, I actually have something on the bench on a Saturday. I've been doing some work on and mock ups of my Ford LTL 9000, trying to get it wrapped up for a community build on another site that's due Dec 1.
-
The permits are in the mail!
-
Thanks so far guys. Here are the pics you guys asked for, I mocked it up with the tanks in place and most all of the other pieces that will be shiny bits. Now use your imagination guys, the two rear sets of tanks are hanging level with the others, the roof wing, fenders, and frame toolboxes are are covered in aluminum or chrome! Here is a closer shot from the front.
-
Me too! Before you get too much more finished, why not join in the tractor trailer community build I have going here. Here's a link to it: http://www.modelcarsmag.com/forums/index.php?showtopic=37529&st=0 Hope to see you there! EDIT: Bring that nice Kenworth cabover to the fun, too!
-
New dually wheels
highway replied to Ben's topic in WIP: Model Trucks: Pickups, Vans, SUVs, Light Commercial
With procucts like that, THEY NEED ONE!!!! Those are super cool, Ben, thanks for posting them! I have some custom wreckers in mind in the future, and those would be great! -
That doesn't sound bad at all.
-
Nah, Clay, the wheels in that and the Kenworth version are a pain! A few of the guys who built these use some thin super glue along the bead of the tire to hold them against the wheels. It might help get the distortion out of them as well. I think there might have even been one build of these where the builder used craft foam donuts cut to the size of the tire to help them back to shape.
-
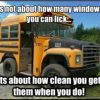
I have a small update and need some help as well. I have the bumper's final shape finished, but I want your opinion on color. Should I keep it black or should I chrome it? Here's what it looks like black with a few of the cross bars in place.
-
Now that you point that out, I see what you mean. I never noticed the lack of the air cleaner and stack on the driver's side! By the way, I think J Bot's will do all of them. I just checked the site and it says "I provide 3 striping versions, lettering, and all the license plates. As a bonus I also provide the markings on Will's truck (before he teamed up with Sonny)." http://www.jbot.ca/cars/trucks/movinon.shtml
-
I already said you were OK Clay!!
-
OK, DW, I have you updated. By the way, it depends on which Movin On truck you are going for, an early or late one. I think I've read that suspensions and such are incorrect, too, but as for the small sleeper, the AMT kit would make the early first and, I think, second season truck. The larger bunk truck wasn't until about season 3 or 4, if I remember what I've read correctly.
-
Thanks for reminding me, Dan! My C.R.S. (we all know what that stands for! ) kicked in again and I totally forgot, sorry Chris! Anyway, since Dan reminded me, I have the pics for now both of you, and anyone else for that matter! The little "square" I mentioned where you start the thin super glue. After you put a couple drops of thin super glue in that area, hold the trailer at about a 45 degree angle like this, and that will allow the super glue to run down the joint where the roof and walls meet. If you use a little too much, like I did, don't worry, it will just run down the front bulkhead like this. The flash on the camera makes it look bad, but without the extra light, it is barely noticable, it get quite dark in there! EDIT: By the way, these are the mini clamps I used on mine, and you can get a small bucket of 20 or 25 for about $5 at Big Lots just in case you don't have any or not enough. This is a better close up pic of how you can hold the roof in place while you are gluing it down, just fold the little pads out on the clamp and put one in the first cutout in the top of the wall and the other on the lip of the botom of the roof. The pic I posted earlier I had them on the molded in rivets on the top if the roof, but if you look real close, you can see a few slipped into this position. I also did this before gluing, that way the roof is in line with the top of the wall and you get the channel for the super glue to run down in.
-
I just wanted to make sure, Dan. By the way, you have me VERY curious about the load now! I can't wait to see it! No problem, Aaron, and I have you updated in the list.
-
I agree, I know there has to be somebody with the AMT kit in their stash! I'd like to, but all I have is a regular R model and the Freuhauf tanker, and the Mack ain't gonna have a can on the back, it's already reserved for a lowboy! Great video, too, the captions had me laughing the entire way through it! That is one nice truck, too. I seen a Dodge like that in the video I posted and thought the same thing. There's nothing nicer than an old square hood truck!
-
1 ounce jar of paint enough? 1/25 scale
highway replied to DrewCfromSC's topic in Tips, Tricks, and Tutorials
Drew, even though I don't use an airbrush, I think Lee and Mike hit the nail on the head. It really all depends on the size of the body, the number of parts, and the number of coats you use to get the look your after. Even though I use spray cans instead of airbrushing, I've used as little as a half a can of the small Testors sprays all the way up to a can and a half of the large 12 oz spray cans on various projects. Of course the half a can of Testors was on a small car and the can and a half of the big cans was on a large tractor trailer! -
Scott, I have to agree with Dave, that thing is a beast! As for color choice, I have to ask you a question first. What color are you thinking of for the lowboy? There are a couple construction companies around here that have their lowboys painted the same colors as their tractors. One uses a red cab and trailer paint sceme with black truck frames and the other uses a totally orange paint sceme on everything.