
Sport Suburban
-
Posts
1,057 -
Joined
-
Last visited
Content Type
Profiles
Forums
Events
Gallery
Everything posted by Sport Suburban
-
yup, you caught me! I believe the factory stripes are also one piece decals and cut and rolled into the jams. On the model I usually put it on in one piece and let the setting solution sink it into the jamb. Some I cut and some I leave alone.
-
 29,400 for the Model Factory Hiro Shelby Cobra Daytona 427 Super Coupe. Of course that is in Japanese Yen and worked out to be $245 shipped directly from MFH at that time. The dollar is still pretty strong against the Yen and when this kit first came out I could not get it for under $350. So yes I did take advantage of it and was being cheap. Currently it would be about $275 shipped.
 -
How is this? Just took it for you.
-
Here is the boot fitted along with the spoiler. The MPC interior tub is actually correct for a convertible and the boot fits great! and for comparison, my convertible conversion right next to another 70 GTO Judge that I built.
-
Here are a few shots of the body in the ruff with the resin windshield frame. This is the rear section after I flattened out the quarters. The black is permanent marker to help guide me in shaping the quarters. The body was thick enough and didn't need any putty. Here is the damaged roof and why I got the kit. It was perfect for what I had in mind. and for comparison the Modelhaus copies of the conv boots. Top is MPC 68 & 69 GTO, bottom is AMT 69 Chevelle.
-
Since I'm sharing some of my builds this 70 GTO Judge convertible is one that has been bounced around my workbench in many forms for many years. The actual build here restarted in early 2014 when I acquired an unbuilt MPC 70 GTO in a trade and it had a damaged A pillar. At that point is when it became a 70 model. Before that it was to be a 71 Judge convertible that was starting with a glue bomb 72 GTO build that I cut the roof off and was trying the kit bashing. That build started sometime in 2008. The Judge rear spoiler is from AFX-N-Scale and dates back to that time. So does the Modelhaus 69 Chevelle conv windshield frame and convertible boot. I bought a Chevelle boot but it didn't work out and later used a Modelhaus 69 GTO convertible boot. The chassis is AMT 69 Olds 442 and the engine is from the Revell 68 Firebird. I had most of the kitbashing done on the 72 and was working on converting the interior to a 71. So when the 70 kit came along I restarted the bodywork buy cutting the roof off and reshaping the rear quarters. Lots of details were added to this build that I don't normally do like, plug wires, heater hoses, brake and fuel lines, carpet flocking, seat belts, armrests, some photo etch, key in ignition, separate door handles. Well here is the finished build and I will add some posts of the construction. All questions and comments are welcome.
-
72 Pontiac GTO bumper
Sport Suburban replied to Kmb0319's topic in Car Aftermarket / Resin / 3D Printed
Thanks, but no apology needed. I don't know why that kit has a smaller rear bumper but it looks great to me on the 71 and 72 kits. I don't have any other versions of the 70 GTO to check but I always wondered why that kit was different. -
Now I'm going to have to post some more. I have six that I have finished this year so far but these are the first two that I have shown.
-
On this one I did use Tamiya spray cans. Most of the time I airbrush the paint. But this one was a bit of a rush job and I sat down and focused on it. The clear coat is airbrushed though.
-
Thanks for the comments. I do appreciate them very much.
-
72 Pontiac GTO bumper
Sport Suburban replied to Kmb0319's topic in Car Aftermarket / Resin / 3D Printed
The issue you need to look into is this kit. I have 4 of this kit and it's bumper is smaller and fits the bodys very nicely! For comparison I have two original issue 1971 GTO's, and 4 of the 72 issues, oldest one is red and molded in the 80's, two grey ones from 2004 and a new one in orange. I don't have any original 70 kits and your only reference is from a 70 promo. I'm not saying that you are wrong just that the last 88 issue of the 70 GTO has a smaller bumper. Here is a 70 I just finished. The body is not widened and the bumper is unmodified. -
I really didn't do anything to the glass. It was bagged separately from Revell and well protected. I didn't really polish it. I did clean it real good and made sure to clean off all the fingerprints from the inside just before I installed the interior for the last time. The outside also got the same cleaning when it was finished. One last wipe down with disposable lens cleaner right before photos helps too. Also the grill is molded open right from Revell also so no detail painting was done. I did however clean up any flash that was present in the grill. My wagon example was much better in this regard that the chrome tree in my Modelking 57 Custom Police issue.
-
72 Pontiac GTO bumper
Sport Suburban replied to Kmb0319's topic in Car Aftermarket / Resin / 3D Printed
The rear bumper from the MPC 70 GTO fits much better. It is now hard to find separately. Also before you send any money to Reliable Resin you might want to look for reviews on him. -
Go for it!
-
Missing Link resin has offered one recently. I bought one and it is pretty nice.
-
That was me being lazy. I needed to connect the exhaust and realized I could use the cats and cut at the cross member. Then use the rest of the factory exhaust from the 57 from that point. I built this in three weeks for a club theme. The hood emblem was the only body mod I did to this one. I personally didn't like it there either.
-
I used Sherwin Williams CC939 automotive clear coat. It is great paint but I would not recomend it for models for a few reasons. First it is expensive at about $500 a gallon (350 for clear, 120 for hardener, 75 for reducer). If you need to strip a model if you mess up, purple pond and brake fluid will not remove it. Those methods have to get to the base coat and will strip it away but the clear will come off in sheets. I have used scotch tape to pull the clear off first. Also it seams to bond well to Tamiya and Scale Finishes paint but I have problems with Testors paints. It has pealed off during foiling or additional masking. I have a 70 AMX that I had to strip and start over because the clear lifted right off the paint when I masked for the shadow mask. The real reason I use it is because I have about a quart left over from painting my real car. It is great paint when used properly with a proper base but risky with other model paints. I have not had any issues with it when it comes to decals.
-
That's funny and thanks.
-
Thank you and yes, whom ever did the master for this did a great job. My Modelhaus catalog from 2007 does not give any credit. I look forward to building the Revell kit and will get to it. I have both the first Hurst version and the latest Hurst pace car version with all the extra stock parts. I also built a 70 Olds 442 Pace Car convertible resin from All American resin and it is well done also.
-
It is brush painted over the semi gloss black. I'll thin it a little more so the black shows though the brush strokes and looks similar to real wood.
-
I considered pearl white with the candy red. It would have made the foil stand out more.
-
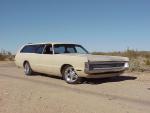
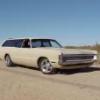
I have not been posting many of my builds so I figured I would post a few and see what you guys think. Here is a 57 Del Rio Wagon built somewhat Pro Touring style. I was going thinking of building it with a 427 Cammer engine for something different. I didn't have one of them in my stash and saw an article using the new Boss 302 motor. I had that and thought why not! I did use the motor and fan shroud along with reworking the air intake parts to get it all to work. I love the way it cam out and looks like it belongs. I also used the rear axle from the Boss 302 kit and had to lengthen the driveshaft. Wheels are from the Revell 59 Corvette kit and work great. Breaks are from the Boss 302. The interior is mostly stock with a floor shifter added for the 6 speed trans along with a custom steering wheel from my parts box. Paint is Tamiya spray TS-30 silver and TS-39 red with real auto clear coat. Fell free to ask any questions or post any comments.
-
I have not been showing many of my builds so I figured I would post a few of them. Here is one I have had waiting for a long time and I figured I would get this one built. It is a Modelhaus resin 72 Olds 442 convertible along with their 71/72 W30 conversion kit. I bought this stuff back in 2008 along with the Fred Cady decals to do the pace car. Figures that in 2010 Revell releases their kit. I have two of them and will build one some day. This one is based on the Johan kit. Don't worry no Johan original Johan parts were used in this build. The chassis is AMT 69 442. I used Scale Finished Fire Orange and real automotive clear coat. Door handles are from the Revell 66 Chevelle wagon. Please feel free to post any comments or questions.
-
Revell 70 Boss 302.
-
Model King AMT 59 Imperial.
