Cool Hand
-
Posts
2,110 -
Joined
-
Last visited
10 Followers


Recent Profile Visitors
20,815 profile views


Cool Hand's Achievements
MCM Ohana (6/6)
-
Starting to piece together the front end.
-
Nah, just stuff I learnt at trade school 30 years ago. Well I try plan and measure, but most of the time it doesnt work out in one way or another so I just make adjustments where I can and settle for it is what is. Its just plastic and a poser build with no concern for scale accuracy. It just needs to look cool on my shelf 😁
-
Engine rough mounted in the frame. Decided to go with a front plate, as its much easier than trying fit up to the side of the block and clearance the headers. And im still futzing around with the headers, they always cause me problems with this type of build. One more modification and hopefully they will be sorted and I can move onto the suspension
- 24 replies
-
- 3
-

-
- streetmachine
- ddacollectibles
- (and 2 more)
-
Rough engine mock up to help figure out the location and how it will mounted into the frame.
- 24 replies
-
- 1
-
-
- streetmachine
- ddacollectibles
- (and 2 more)
-
33 days until Summernats. Scratch built basic chassis frame complete. No doubt some alterations will be needed as other components are fitted.
- 24 replies
-
- 4
-
-
- streetmachine
- ddacollectibles
- (and 2 more)
-
Now the build will start to become more interesting and challenging. Basic chassis frame design layout.
- 24 replies
-
- 1
-
-
- streetmachine
- ddacollectibles
- (and 2 more)
-
Its taken me about 20 years to learn that taking the time to properly prepare before paint does make a big difference. Its time consuming and boring but the end result always makes it worth the effort. And its a never ending learning process which kinda keeps it interesting, especially when trying to keep up with modern materials and techniques. Appreciate the kind words and encouragement.
-
35 days until Summernats. Another boring update. Applied Mr Primer Surfacer 1000. One step closer to applying the colour coat.
- 24 replies
-
- 3
-
-
- streetmachine
- ddacollectibles
- (and 2 more)
-
Nice one Michael, good to see you got it finished. Thats a lotta engine, good thing it has the meaty wides on the rear. The Aoshima Enkei dish wheels were a wise selection for Hakosuka. Well done.
-
36 days until Summernats. Made some good progress with the body prep. Nothing overly impressive to look out, just the usual scribing and block sanding. And some modifications. Opened the lower section of the nose cone. Filled in the wiper and side mirror mounting holes. Filled the gas cap and spoiler mounting holes, removed number plate mount and filled the holes. Opened the side gill vents and thinned the b pillar as I wont be installing the door glass. And filled in the bonnet/hood hinge notches and removed the engine bay insert screw posts. Just needs a final wet sand with 1500 and 2500 Infini sanding sponge, then I will apply a good coat of Mr Primer Surfacer 1000.
- 24 replies
-
- 3
-
-
- streetmachine
- ddacollectibles
- (and 2 more)
-
Yeah mate my work bench is always organized and tidy. Hey Steve. Appreciate the kind words. If all goes well and I can stick to the plan and stay motivated it should be a cool and typical Aussie Summerats style car.
-
Appreciate the comments fellas 37 days until Summernats, guess I should start getting serious and get stuck into it. Being that time is short I will be using 2 bodies, one for mock ups and test fitting, the other I will start preparing for paint. Ive tried this type of build a few times, only been successful once making it through to completion. But I plan to use the deadline for this build as motivation to get it done.
- 24 replies
-
- 5
-
-
- streetmachine
- ddacollectibles
- (and 2 more)
-

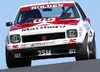
1972 chrysler vh valiant charger new south wales highway patrol car
Cool Hand replied to michelle's topic in Model Cars
Good one Michelle. Shouldnt be long and DDA will release a plastic kit. They have the pre painted pink light up plastic version available for pre order. So I am going to assume a full plastic kit will follow that release sometime during Q1 next year. -
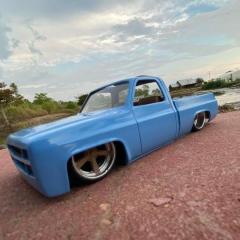
Wheel mock up. Stance will be adjusted once the chassis is sorted out.
- 24 replies
-
- 3
-
-
- streetmachine
- ddacollectibles
- (and 2 more)