
clayton
-
Posts
1,006 -
Joined
-
Last visited
Content Type
Profiles
Forums
Events
Gallery
Everything posted by clayton
-
That is a 1970's Amt Peterbilt 359.
-
I started to have a white border on the upper part of the pink/watermelon as it is called. I may look in too in a few days when the paint drys good. Dupli color primer,enamel white the rest is krylon there after. That paint drys in 10 Min's that I like just not crazy about the gloss I prefer flats or stain's. They lay down and dry better than gloss.there new EZ Touch 360 tip helps too,if they would have more flats that would be great.
-
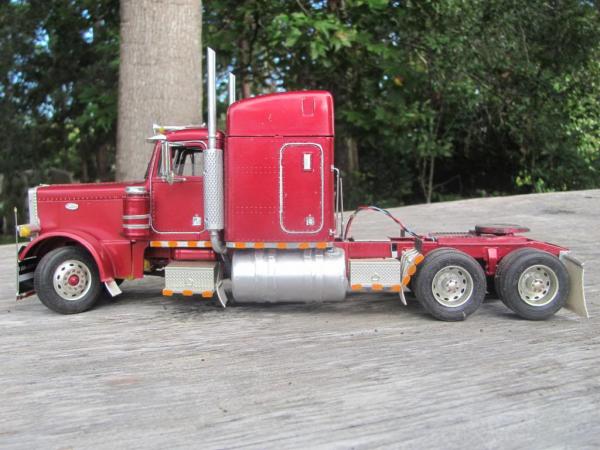
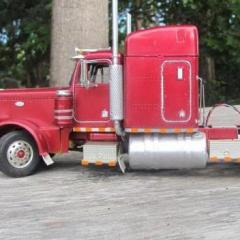
Started this Christmas as a junk yard,spent this week painting. while looking for idea's I found a photo of one painted like this. It is close I think it will work. Need to clean up and go over a few spots. It's going to be some time before I try this again. The chrome had to be removed for that will use dupli color bumper chrome. (Does any one have a set of the tiny lights that goes on the fender?) resin will work as well. Clayton Well what do ya think now. Had to remove the chrome will repaint with bumper chrome next week. And the sleeper from the parts box for those that don't know it is call a mercury.
-
Peterbilt 378 w/36" sleeper
clayton replied to mackinac359's topic in WIP: Model Trucks: Big Rigs and Heavy Equipment
Ouch thats Sharp! -
I remember a few years ago that the warehouse in Holly wood Burt too the ground,they lost 1000's of old move's going back to the 1920 or so,most of them had no copy. Guess the Movin on was one of them since there depending on a out side source.
-
REAL ALUMINUM TRUCK WHEELS!!!!!!
clayton replied to Ben's topic in WIP: Model Trucks: Big Rigs and Heavy Equipment
sharp,would look good on a old kit. -
bull hauler by clay
clayton replied to clayton's topic in WIP: Model Trucks: Big Rigs and Heavy Equipment
I found these photo's while looking in the folder's over the weekend. I got the tools from other kits over the years,and so I finely put them to good use. The oil can's I made them from flat sheet stock. Trying too make them to scale was the hard part,I think there close. -
First Truck Project
clayton replied to Duntov's topic in WIP: Model Trucks: Big Rigs and Heavy Equipment
glue, bandage,bailing wire, filler spit shine good as new. -
bull hauler by clay
clayton replied to clayton's topic in WIP: Model Trucks: Big Rigs and Heavy Equipment
Yeah the air ride is scratched it's one of the first few I made not all that dead on. It is longer 2 kits in one came out a 50' or a 55',ruler moved on me. And thanks. -
4300 eagle
clayton replied to cowboysevens's topic in WIP: Model Trucks: Big Rigs and Heavy Equipment
:lol: :lol: :lol: HAHAH. -
What I built in 2010
clayton replied to mackinac359's topic in WIP: Model Trucks: Big Rigs and Heavy Equipment
started this back in the Winter/Spring of 010 still a WIP may be one day. When the Deepwater happen I was too far into it to stop so I'm going forword any way. -
Model Truck Big Wreck
clayton replied to ewaskew's topic in WIP: Model Trucks: Big Rigs and Heavy Equipment
I got a few that have lived threw 3 kid's,1 nephew 2 niece's. -
bull hauler by clay
clayton replied to clayton's topic in WIP: Model Trucks: Big Rigs and Heavy Equipment
Thanks all. No,no WIP did not have a camera till after,but as many times I have had to rebuild it I should have. The gates are made from Q-tip tubing,toothpicks and sheet aluminum. Kinda got the idea from a trailer siting at the stock Yard one day,that was the best I could come up with. Working landing legs. Dupli color brake caliber bronze. rubber around the doors is phone wire (black). thanks all and great job too you all as well. -
On and off again, now got a 8 year old that wont keep sticky finger off it, it's on now. extra work on the truck is the sleeper 12'. and Bull horns on the hood. APU from a FORD Tories(SP). had to rework the Sat and AC. And double hump fenders.sleeper detail from the camper kit and bass wood. Trailer is the re-pop Willson 2 kit's and make it a 50 or 55'.toolbox from flat sheet.with home made air ride(not happy with that may rework it)and a cow bell on bumper. Decals from wal mart and Mag. Has 2 working toolbox's with some tools. Better photos coming soon. I am wrong about the build date I started this back on 9-11 so that would be what 9 years in the making. Oh snow chains from KFS,wow that was a job rite there.
-
AMT METAL AXLES
clayton replied to truckman1981's topic in WIP: Model Trucks: Big Rigs and Heavy Equipment
just use a coat hanger.you may have to drill out the hub's just a bit. unless it they have the snap on hub's then what. -
assemble as much as you can before you paint. Build the frame then paint. build the cab then paint and so on and so on. What are you building or what kind?
-
July paint - Polished in November
clayton replied to mackinac359's topic in WIP: Model Trucks: Big Rigs and Heavy Equipment
[A technique I've been told works really well is to wet sand the 2nd clear coat, then apply another coat of clear on top of that and polish if needed. I haven't tried this yet.. but will. A modeler who does this on many small-scale model cars has fantastic results.] That's what I do(if I do not rush)the paint and it really stands out. find your self a good move and sit back that does take a lot time. -
AMT sleeper question
clayton replied to rssschris's topic in WIP: Model Trucks: Big Rigs and Heavy Equipment
Also try a sleeper from AIT.My link Home page link is My linkgtg, -
Covering red plastic
clayton replied to Steven1's topic in WIP: Model Trucks: Big Rigs and Heavy Equipment
Painting over floor wax. I've got a igloo for sale in FLA. Seen that article before but have not had the brass to try it. But it does work. -
Covering red plastic
clayton replied to Steven1's topic in WIP: Model Trucks: Big Rigs and Heavy Equipment
I've had the same thing happen to me.I used a white primer(forgot the brand).I let it set a few days and scarped off a bit of paint, it was pink like the paint soaked up the dye. Use a sealer Hummm will have too try that. -
Peterbilt 6x6
clayton replied to mackinac359's topic in WIP: Model Trucks: Big Rigs and Heavy Equipment
Cool job there. -
Don't know if I posted this before so let me know if I did. this was our last ride.1995?? 379 with 3408,13 over and 377 driver's?. I been building on this since last Winter not a lot left on the list such as door hinges,cat, fuel tanks and decal's. I used the Revell 359 for the sleeper interior it is real close too what ours was( I think). The hood is resin from GW resin(hood,grill,front springs.)
-
Looks like too me you may need a filler plate on the hood between the fender and cab(I see a BIG gap there). But for custom hoods no idea.
-
That's it and Ma's resin.
-
Roadway Express Mack R600
clayton replied to fire12's topic in WIP: Model Trucks: Big Rigs and Heavy Equipment
I use a nail about the same size as the hanger,sounds like a hanger works better. What I do is get a set of glad hands from STS,last time I got some they have a tiny tab on the end insert that in to a brass tube then insert the wire into the other end of the tube. Also you can paint the tubing the color of the line to look like grips. For the trailer find the location for the trailer glad hand drill 2 holes and insert the tabs. http://www.autotrucktoys.com/semi-truck-accessories/Sloan-Transportation-Semi-Truck-Dura-Grip-Air-Hose-Gladhand-Disconnect-PRD13537.aspx