
futurattraction
-
Posts
1,647 -
Joined
-
Last visited
Content Type
Profiles
Forums
Events
Gallery
Everything posted by futurattraction
-
That looks really good so far, Darren. I'll look forward to more updates!
-
Hi Dan, Ed Fluck has been casting my bodies. I don't cast them. He uses Vagabond resin, and has been for a number of years. What I'm using for my smaller components is Smooth-On resin.
-

1/16 Scale Army Vega Funny Car - Finished 10/14/2018
futurattraction replied to Mooneyzs's topic in WIP: Drag Racing Models
Your boots turned out looking super, Chris. Looking forward to updates... -
Things are shaping up great, Joe. Your RacePak and brakes both look great! I definitely know what you're talking about when it comes to long-term projects and the ol' motivation factor....
-
Harry, Leaving inner fender panels out of 1:1s isn't all that uncommon, at least if it's a drag-race inspired car. It's a great way to reduce weight on the front end of the car. Less weight up front aids in weight transfer, and weight, in general, is the nemesis of any drag racer who is trying to go faster, class rules notwithstanding. Engine bay trash/dirt isn't really a factor in the race application because of a presumably clean track surface and they won't be racing if the track is wet. Guys who build streeters that mimick drag cars don't necessarily have the same factors that come into play, but as the old saying goes, "imitation is the sincerest form of flattery." Given the size of the tires on Ron's build, it looks his build is drag strip inspired, and he is running an alternator bracket!
-
I've been using Smooth-On 300 and 305 resin. Over the past 2-3 years I've used a combination of Smooth-On, Alumilite and MicroMark molding rubber, depending on the parts I'm molding.
-
70.5 Z28 10.5 Outlaw (WIP....Update 7.9.13)
futurattraction replied to hOLMS's topic in WIP: Drag Racing Models
That's turning out really nice, Jeff. I, too, am glad to see you're going to finish this one out with an engine. It's too cool not to! -
I wanted to put a great word in for Brodie_83. He and I traded some stuff a couple-three weeks ago and it went smoothly. We both ended up with something we can put to use (or probably trade in Brodie's case! - LOL). Scott
-
Man - that is so cool! I love what you're doin' Tyrone...
-
1/16 Scale Army Vega Funny Car - Finished 10/14/2018
futurattraction replied to Mooneyzs's topic in WIP: Drag Racing Models
Stunning work, bro. I can't get over the amount of detail you're putting into this, but then it wouldn't be right if you didn't at this point. That bar is set, way, way way up there for the rest of us! -
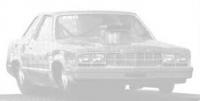
Thanks to all of you who have commented. I really appreciate them, as I guess we all do. I'm going to try to devote more of Sundays to "fun" building and stay as much away from "business/work" stuff as possible, so hopefully that'll provide more time to make progress on this project. Al - your question is a great one, and it is one that I have "battled with" regarding different aspects of my entire Fairmont project. I'm going to go off on a rabbit trail, but I promise I'll come back and answer your question... I have had a vision of what I want a finished product to look like, whether it be my Fairmont, the strut front end, or whatever, and have worked toward those goals, sometimes successfully, sometimes not. My long-range intent has been to offer my Fairmont as a high-end multi-media "staged" kit. The builder/buyer purchases as much or little as he wants and fabs or kitbashes the rest. In my mind, it should go together like a mass-produced kit, thus some of the locating pins, etc, I have incorporated. What makes this project different from one builder building one model is: as I master a set of pieces that assemble together as a larger unit, I must reproduce them before mockup, so I am not potentially damaging/defacing the master - in case everything goes as planned and I can use it for remolding. If stuff goes together like it is supposed to, I can proceed; if not, I get to rehash and tweak things until they are right. That's what happened with the original bare front frame rail system I began, then abandoned. They were to hard to successfully cast, and even when they came out okay, they did not offer the strength they really need. My bad. My most recent frame rail/tin set will work for strength and look nice but I discovered after I had cast a few sets and started assembling the front end that the front wheel/tire placement didn't look right. It wasn't realistic in its appearance. I am currently reworking the aluminum tinwork and have tweaked it so the upper strut mounts will locate approximately .060" farther inboard. I have also made one other change to it. I have made the downward sloping (forward) part of the tin angle more steeply down toward the frame rail. It will permit more radiator setback which accomplishes two things. It will create a bit more radiator/hood clearance, which was virtually nil and will also help me achieve a more accurate spacing between the fan shroud I intend to incorporate and the engine/fan. In this case, less, literally, is more. Now, to answer your question, Al... I'm thinking out loud, here... There are at least two places in each piece of tinwork where there will likely be interference that will require holes/reliefs: steering and headers. Should I do it or should I let the builder do it? Since I haven't gotten the new tinwork/tubing pieces finished I can't mock anything up, plus final placement of steering arms and steering rack aren't set, so steering linkage reliefs can't be added. When I do figure it out, I may be able to use a punch and create clearance holes for the tie rod ends to go through - not certain of that. Food for thought. Similarly, header clearance is guesswork. IF I knew everyone was going to use my 351C with the headers I intend to provide, I could make cutouts for headers, but what happens if someone wants to use the big block and headers from the '56 Ford top sportsman kit, or perish the thought, a BBC? (LOL) I don't think there will be ground clearance for under chassis headers, but... In that regard, I may be safer not cutting out for headers, but I know that leaving them intact and making the builder figure out where to cut them away will be a real challenge without cutting out more than necessary. Another option may be what I mentioned earlier in the thread and remove much of the resin tinwork have custom PE panels designed to fit different headers (if there's that much difference). Sorry for rambling, but the above is why I lose as much sleep as I do... LOL By the way, here is an example of a modern day Fairmont that I'm sort of envisioning as the model for what I'm striving for, with different wheels and scoop.
-
70.5 Z28 10.5 Outlaw (WIP....Update 7.9.13)
futurattraction replied to hOLMS's topic in WIP: Drag Racing Models
Looking fantastic, Jeff. I really like your piecing the wheelie bars together with the aluminum tubing. I'm already waiting for updates! LOL -
I am adjusting on the fly to get the front suspension pieces where I want them. Try as I might, the front tires currently set too far outboard to make them have a realistic placement. In the meantime, I am working on some sub-assemblies. I am using photo etch OEM-style Lenco hand levers. I drew them up them with very small alignment pins on both the detent levers and hand levers but am debating whether I want to remove the pins and add RB Motion rod ends and hardware. The pins make alignment pretty straight-forward, but the hardware detail would be cool too. I added the tiny .050" OD PE buttons to the grip portion of the hand levers to simulate the phenolic grips on the 1:1 levers. Here is a profile of the Lenco trans with the detent levers attached. The small PE pins will bend, so I can adjust the angle as necessary when attaching the linkage tubes. I am planning to add mounting tabs and slide mount. Just haven’t gotten there yet. The struts consist of a stainless tube that simulates the piston rod. Attached to the upper end of it is the spring retainer and a small centering disc that attaches to the underside of the retainer. An .032” drill but is used to enlarge the holes in the retainer and centering disc so the piston rod will slide up through. The small sleeve slides over the stainless tube and attaches to the top of the retainer. The sleeve then will fit inside the collar/mount on the upper strut tube. Here you can see some of the detail on the chassis-side of the strut. The body itself is resin with an .063” aluminum tube sleeve inside. PE steering arms and resin calipers have yet to be installed and the spring assembly added. I added RB Motion bolt heads to simulate hardware attaching the caliper brackets to the strut. More to come. Comments welcome!
-
I agree totally. I forgot to mention them earlier...
-
Wally Booth's ProStock Gremlin
futurattraction replied to Doctordarryl's topic in WIP: Drag Racing Models
That looks great! Detailing is spot-on... -
1966 Chevy Wagon Twin Turbo(FINISHED)
futurattraction replied to mikey's topic in WIP: Drag Racing Models
I'm not sure how I missed this build, but you're doing a heck of a job on it. I loved your turbo fab tutorial and the overall look is really gonna knock 'em dead. I'll be sure to keep track of this build, now that I know what it is... -
Beautiful color, Steve, AND beautiful job. Can't wait to see more!!!
-
You're doing an absolutely knock-out job on your build, Leonard. Everything is first-class all the way! Keep up the fabulous work...
-
70.5 Z28 10.5 Outlaw (WIP....Update 7.9.13)
futurattraction replied to hOLMS's topic in WIP: Drag Racing Models
That's looking great Jeff. A question about the slicks. Are those the 2-piece slicks? If so, I'm really curious to hear how you incorporated the back side section in and blended it all together... I hope that makes sense. lol -
Those are some nice updates, Tyrone! Are RG engines typically 1/24th scale? I don't know - just wondering?? Your side-by-side pic of the two engines certainly makes it appear that it's a different scale from the kit engine.
-
70.5 Z28 10.5 Outlaw (WIP....Update 7.9.13)
futurattraction replied to hOLMS's topic in WIP: Drag Racing Models
Amazing start, Jeff! -
I made a bit of progress last night. I’ve got one side of the front suspension pieced together. The question, now, is whether I can match the driver’s side to the passenger side… LOL I got the chassis pan and center frame rail section soaked in Bleche White last night. My goal is to get the 4-link chassis-side 4-link brackets attached this weekend. Here’s a pic of the 4-link kit like I’m using. Getting the brackets installed will allow me to establish the final position for the center frame rail so I can trim the main rails to match up to the forward frame section. I am intending to recycle the 9-inch rear end I originally put together for my previous Fairmont project that ended up stalling. It should work fine for this build. I’ll probably hop around on various subassemblies in this thread, since that’s the way I seem to work. Not saying that’s the smartest or most efficient, but there’s no point in my fighting myself… Comments welcome!
-
Tom, I don't have struts or rear end components as of now. I'm going to investigate making a multi-media strut front end and I've had hopes for a long time of making a pro mod style Strange Ultra-4 Link housing but that's only in the drawing stage right now. The struts will be a much more straight-forward project than the Strange rear. I am going to have brake rotors, brackets and tabs, an assortment of levers, some NOS bottle mounts and hopefully a transmission one of these times that will all be 1/16th scale.
-
Leonard, I was just going back through this thread again and had originally missed that you'd lowered the front wheel well openings, but that makes a world of difference in its overall looks and definitely lends to the "in the weeds" look you're striving for. Looks like you also added a bit of material to the leading edge of the opening to reduce the fore-aft dimension, too. You did a fantastic job of blending everything back in together up front. A great and very subtle detail...
-
Thanks Jeff, Joe and Chris. Coming from any of you means a lot. Coming from all of you means that much more because I consider each of you fantastic builders. Yes - Chris, your e-mail came through. I'm sorry I didn't send a reply to you to let you know...