
Prostreet
-
Posts
1,338 -
Joined
-
Last visited
Content Type
Profiles
Forums
Events
Gallery
Everything posted by Prostreet
-
1/12 Top Fuel Motorcycle (Larry "Spiderman" McBride)
Prostreet replied to ScrappyJ's topic in WIP: Drag Racing Models
Amazing work Dirk, I cheated and looked through your Fotki Photos. -
Nice work Steve.
-
71 Duster,416stroked monster SB..update 12/3/12
Prostreet replied to mopar01lee's topic in WIP: Model Cars
Very nice Scratch building, Looks great. -
Nice work Bill, Like yourself i like skinner tires. I think those tires look good on there plus running a really wide rear offsets it nice.
-
Al, I use the miter box also. Key is slow cuts and don't force it let the saw do the work, For fishmouthing i use a triangle looking file to get a line started maybe a 1/32" deep then used a round file to do the rest until i get the fit that i want. As far as glue i use Tenax7r and zap-a-gao CA, for the aluminum parts and some styrene parts that i need more time to position i used 30min. epoxy. for the chassis i use all Rod in sizes .060", .080" and .100" , keep in mind though i'm working in 1/16th scale. everything applies for 1/25th also except the rod sizes.
-
Lots of great ideas and craftmanship in this thread. Ted , When i setup my frontend i did it opposite of what Scott did. Scott's is a little more technical than what i do ( I don't mean that in a bad way) When i did mine i used alot of reference pictures to start, then from there i used the scaled down wheel base and pretty much aligned the wheels to the body for my liking to make it look right, For the width i again went off the body and sat the front wheels where i wanted to my liking, Once i figured that out and since i allready had my struts from Jim (micronitro) i mounted the wheels and tires and built a little Jig on my chassis table to hold the front wheel exactly where i wanted it. As far as the caster i just leaned the strut back to what i thought looked good going off pictures, once i had all that stuff aligned i built my lower A-arms and upper strut mounts off that. Don't get me wrong i do alot of measuring but i also do alot of eyeball engineering. I love this thread, lots of great ideas and techniques.
-
Thx. Scott. looking for some ideas of stuff i can use for injectors, maybe some of you guys can give me some input. I have acctually seen a couple turbo cars that use the blower intake with mechanical injection, But that would be the easy way out. I know it's gonna be hard to be accurate biengs they are gonna be so small.
-
I'll play. All this stuff is 1/16th scale Promod chassis Master cylinder, Turned the caps down on my lathe Wheel tubs with scale motorsports decals. Turbo headers Fuel and oil tank with caps i turned down. Scratch built all the electronics, besides the wires and decals Turbo manifold built out of Brass and renshape, still in progress.
-
I agree with everyone else. reference material is your friend, Also look at other builds on the site. There are alot of extremely talneted builders on this forum, I was in the same boat as you and decide to take the plunge and build my own chassis. I'm working in 1/16th scale so i had no choice but to build my own, If your just starting on doing chassis i would start with the kit floor pan like many guys do and go from there. The more you build the more confident you will get doing chassis. Here's a couple pics of my build, keep in mind this is the first chassis i ever built. There were alot of mess ups but in the end i tackled it and i'm very happy with how it turned out. Have any questions feel free to Pm me anytime and i will help to the best of my knowledge. Here's a link to my Photobucket and Fotki if you would like to see the different stages of the chassis. http://s862.photobucket.com/albums/ab187/HITMAN_063/57%20Chevy%20Turbo%20ProMod/ http://public.fotki.com/prostreet502/116th-57-chevy-promod/
-
Thx. for the feed back and compliments guys. Jim, I love the look of that room, IS that all done in pine then stained? I'm still planning out my upstairs hobby room and may redo it, I love that look.
-
Yeah I'm not sure on that Ted, I wouldn't want to leave that running all the time. I just did the container to keep dust off of stuff. Maybe a couple small vent holes would help.
-
Thx. Guys, really excited to get started on the engine. Forgot a picture of the underside.
-
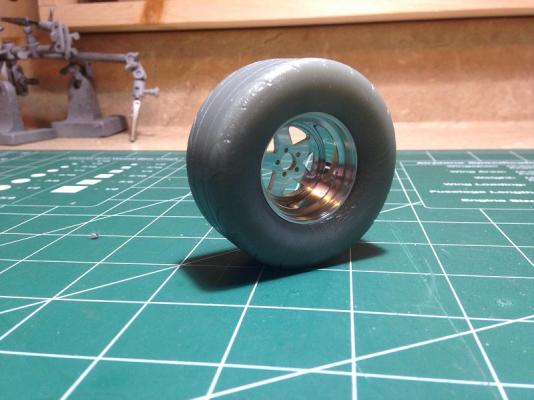
Thx. and no problem Dave, always looking for insight. Didn't do much today, I installed some Dzus fastners on the center carbon panel and installed it along with the tubs and the ARB. If i decide to display with the one wheel off i will do some more detail work inside the wheel wells. I cleaned the bench so i can start on the motor tommarrow after work.
-
Really nice clean build, Great job.
-
Great work Greg, Thx. for the idea on bending the tubing for the exhaust. I did my headers the same exact way you did, worked out great.
-
Anybody want a Liberty Transmission?
Prostreet replied to TedsModeling's topic in Car Aftermarket / Resin / 3D Printed
X2 in 1/12th -
Good to know dave, I know Tony (AJwheels) is working on a Dart intake also, I hinted at him about doing a procharger hehe.
-
The not so secret , secret build (police w/ working LEDs)
Prostreet replied to martinfan5's topic in WIP: Model Cars
Very cool build, really dig the working lights. -
Project: "Inferno" 49 Merc - *Update p17* 3/13/15
Prostreet replied to JasonFL's topic in WIP: Model Cars
Nice work, airbags turned out great. -
Nice work Bill, still waiting to see that chassis
-
Looking good Jack, you do some nice brass work.
-
Thx, guys, Ted, They are very hard to work with and i broke 4 of the Yokes trying to drill them out, so i ended up using a tiny round file to open them up and then had to sand down the tube to fit. Next time i will use solid rod and drill them out to work so the caps look better, not sure what material they are made of. Wonder if they could be printed in the white material and they would be stronger?
-
Good bye my Friends
Prostreet replied to scbaker's topic in General Automotive Talk (Trucks and Cars)
Maybe the people complaning need to take this advice also, Just sayin. not taking sides. -
1/12 Top Fuel Motorcycle (Larry "Spiderman" McBride)
Prostreet replied to ScrappyJ's topic in WIP: Drag Racing Models
Can't wait to see more of this amazing Build Dirk, Is this the bike i seen on jim( Micro nitro's Face book page)? If so it looks incredible. -
1-8 scale 69 camaro pro mod (mike hill's car)
Prostreet replied to comp1839's topic in WIP: Drag Racing Models
Nice Dave, so what power plant will you be using? and will it be N/A?