av405
-
Posts
1,202 -
Joined
-
Last visited
Content Type
Profiles
Forums
Events
Gallery
Everything posted by av405
-
Hi Steve. Can you comment on how extensive the decal sheet will be?
-
Looks great!
-
A great example of how to make a "simple" snap kit pop. Nicely done!
-

Need help, what to do? Paint related.
av405 replied to Mattilacken's topic in Model Building Questions and Answers
Agreed! No need to strip the hood, just sand and reshoot the black and clear. For the hood, I would definitely use TS-13. I would set the hood aside until you can get some more Tamiya Black and Clear. -
What is your favorite Youtube model channel?
av405 replied to Dragline's topic in Tips, Tricks, and Tutorials
These two are my favorites. I wonder why Mods has been MIA though. -
MPC 1981 Chevy Stepside Pickup Sod Buster (1:25 SCALE)
av405 replied to av405's topic in Truck Kit News & Reviews
If I remember correctly, the initial word that came out with the announcement of this kit is that they would go for multiple variations down the road. You have to figure that investment in creating new/improved parts is already a good sign. I don't know if a LWB is in the cards, we will have to wait and see. -
Thank you Cliff!
-
Thank you both!
-
MPC 1981 Chevy Stepside Pickup Sod Buster (1:25 SCALE)
av405 replied to av405's topic in Truck Kit News & Reviews
Steve, any word on how the decal sheet might look? Such as badging, interior/dash details, etc? -
MPC 1981 Chevy Stepside Pickup Sod Buster (1:25 SCALE)
av405 replied to av405's topic in Truck Kit News & Reviews
I had no idea he offered a bench seat as well, I'll have to reach out. Thanks. -
Thanks guys! I have to give a shoutout to @Texas_3D_Customs for printing the cab and @Oldmopars for designing it for print.
-
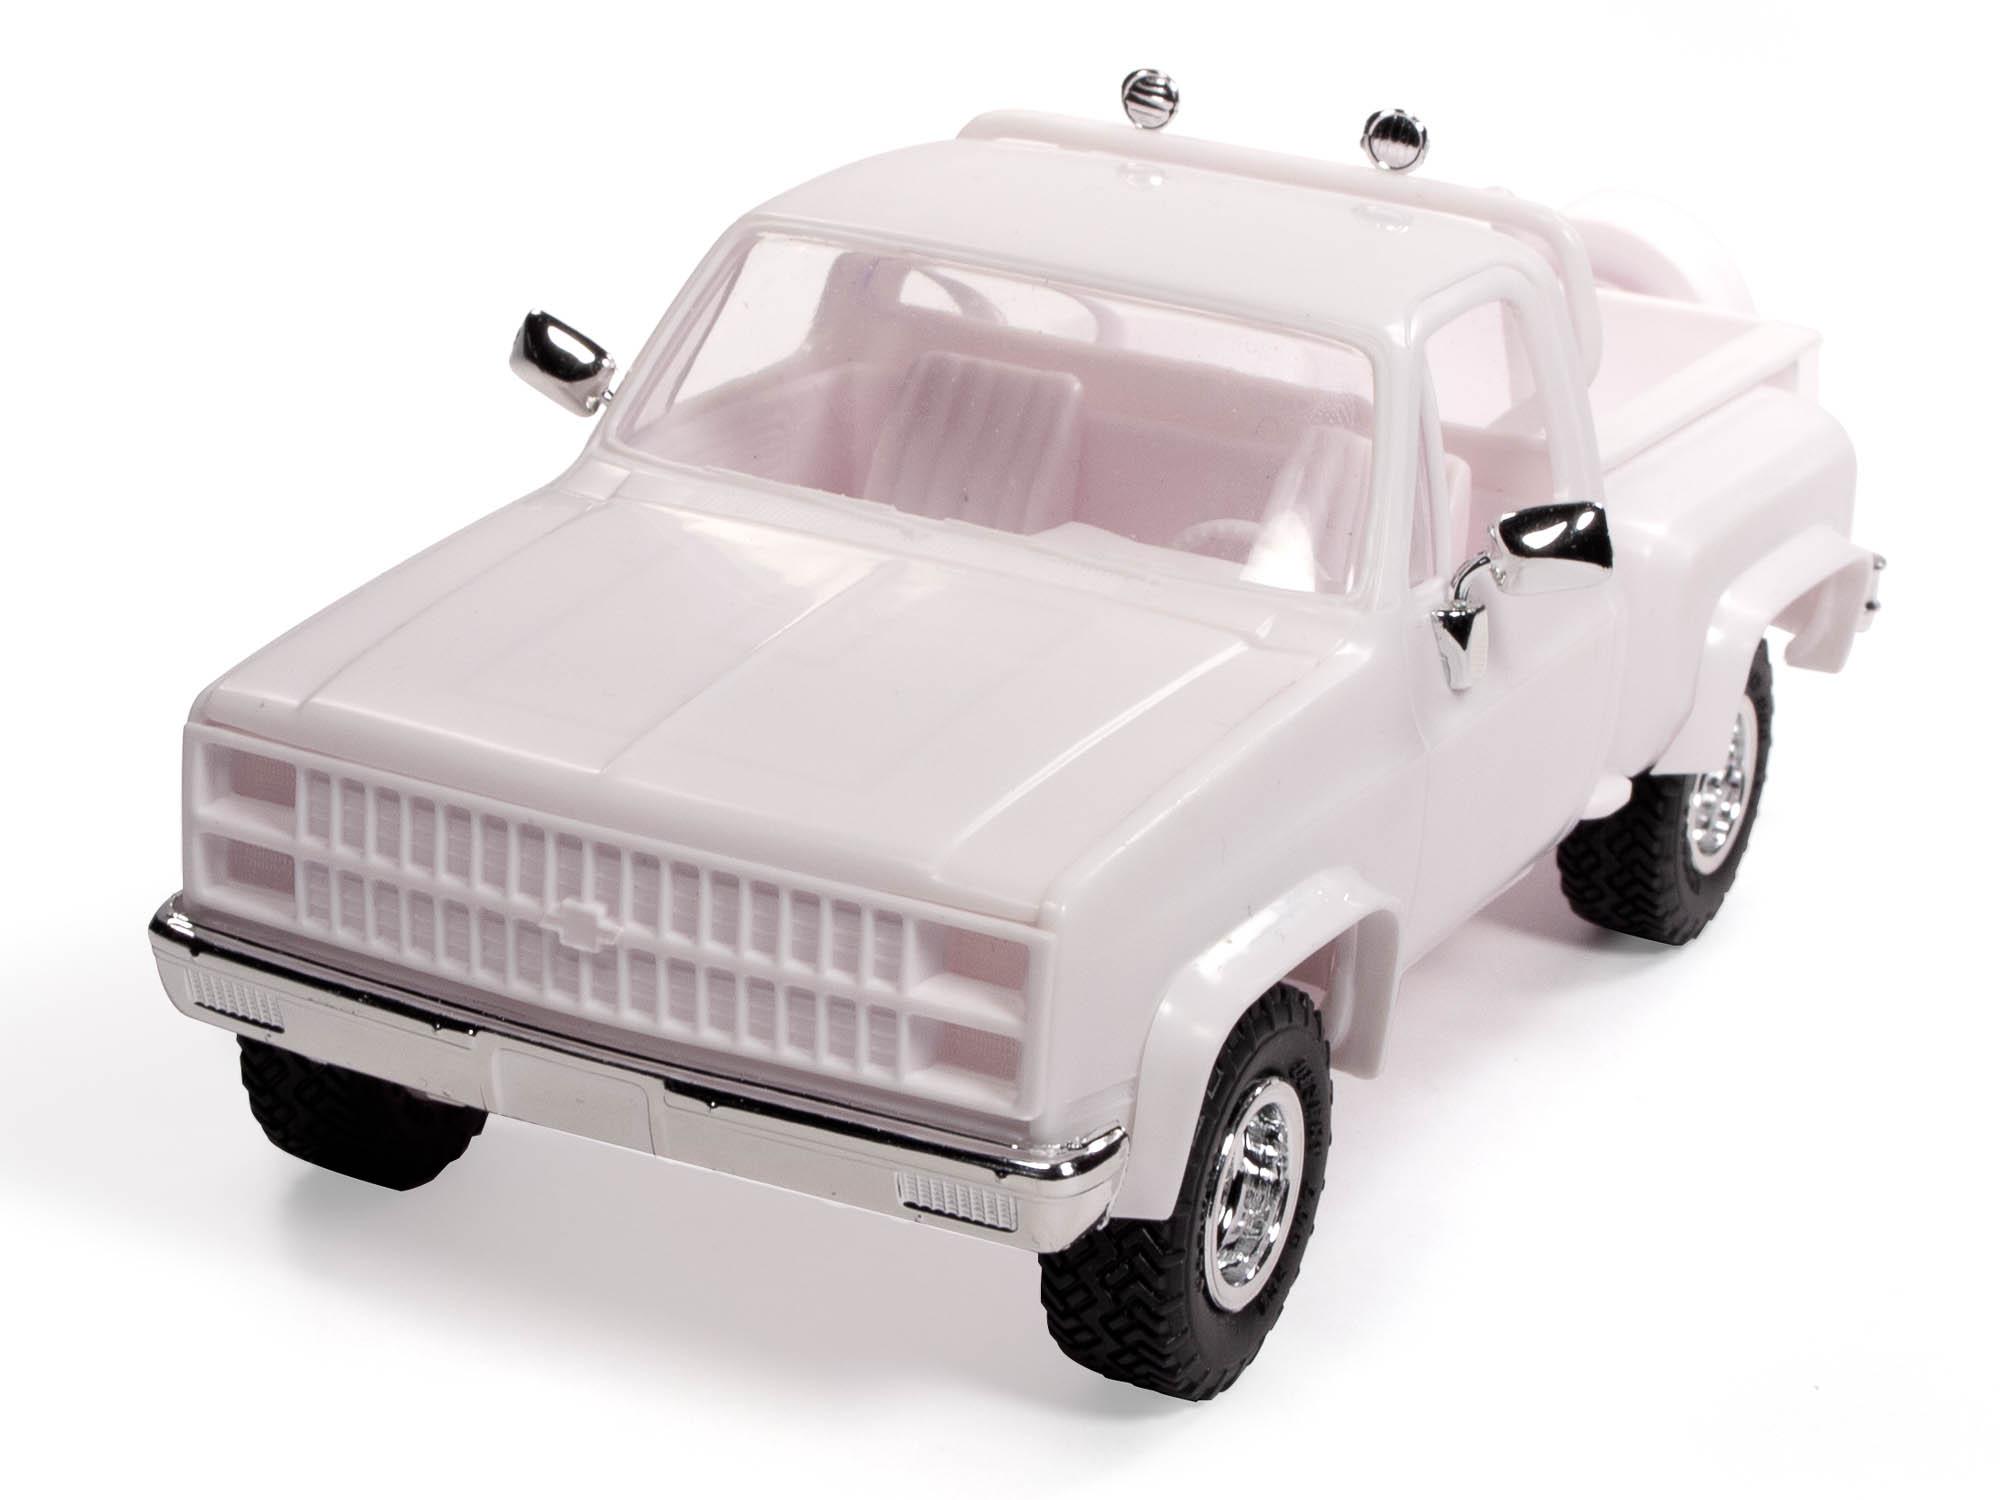
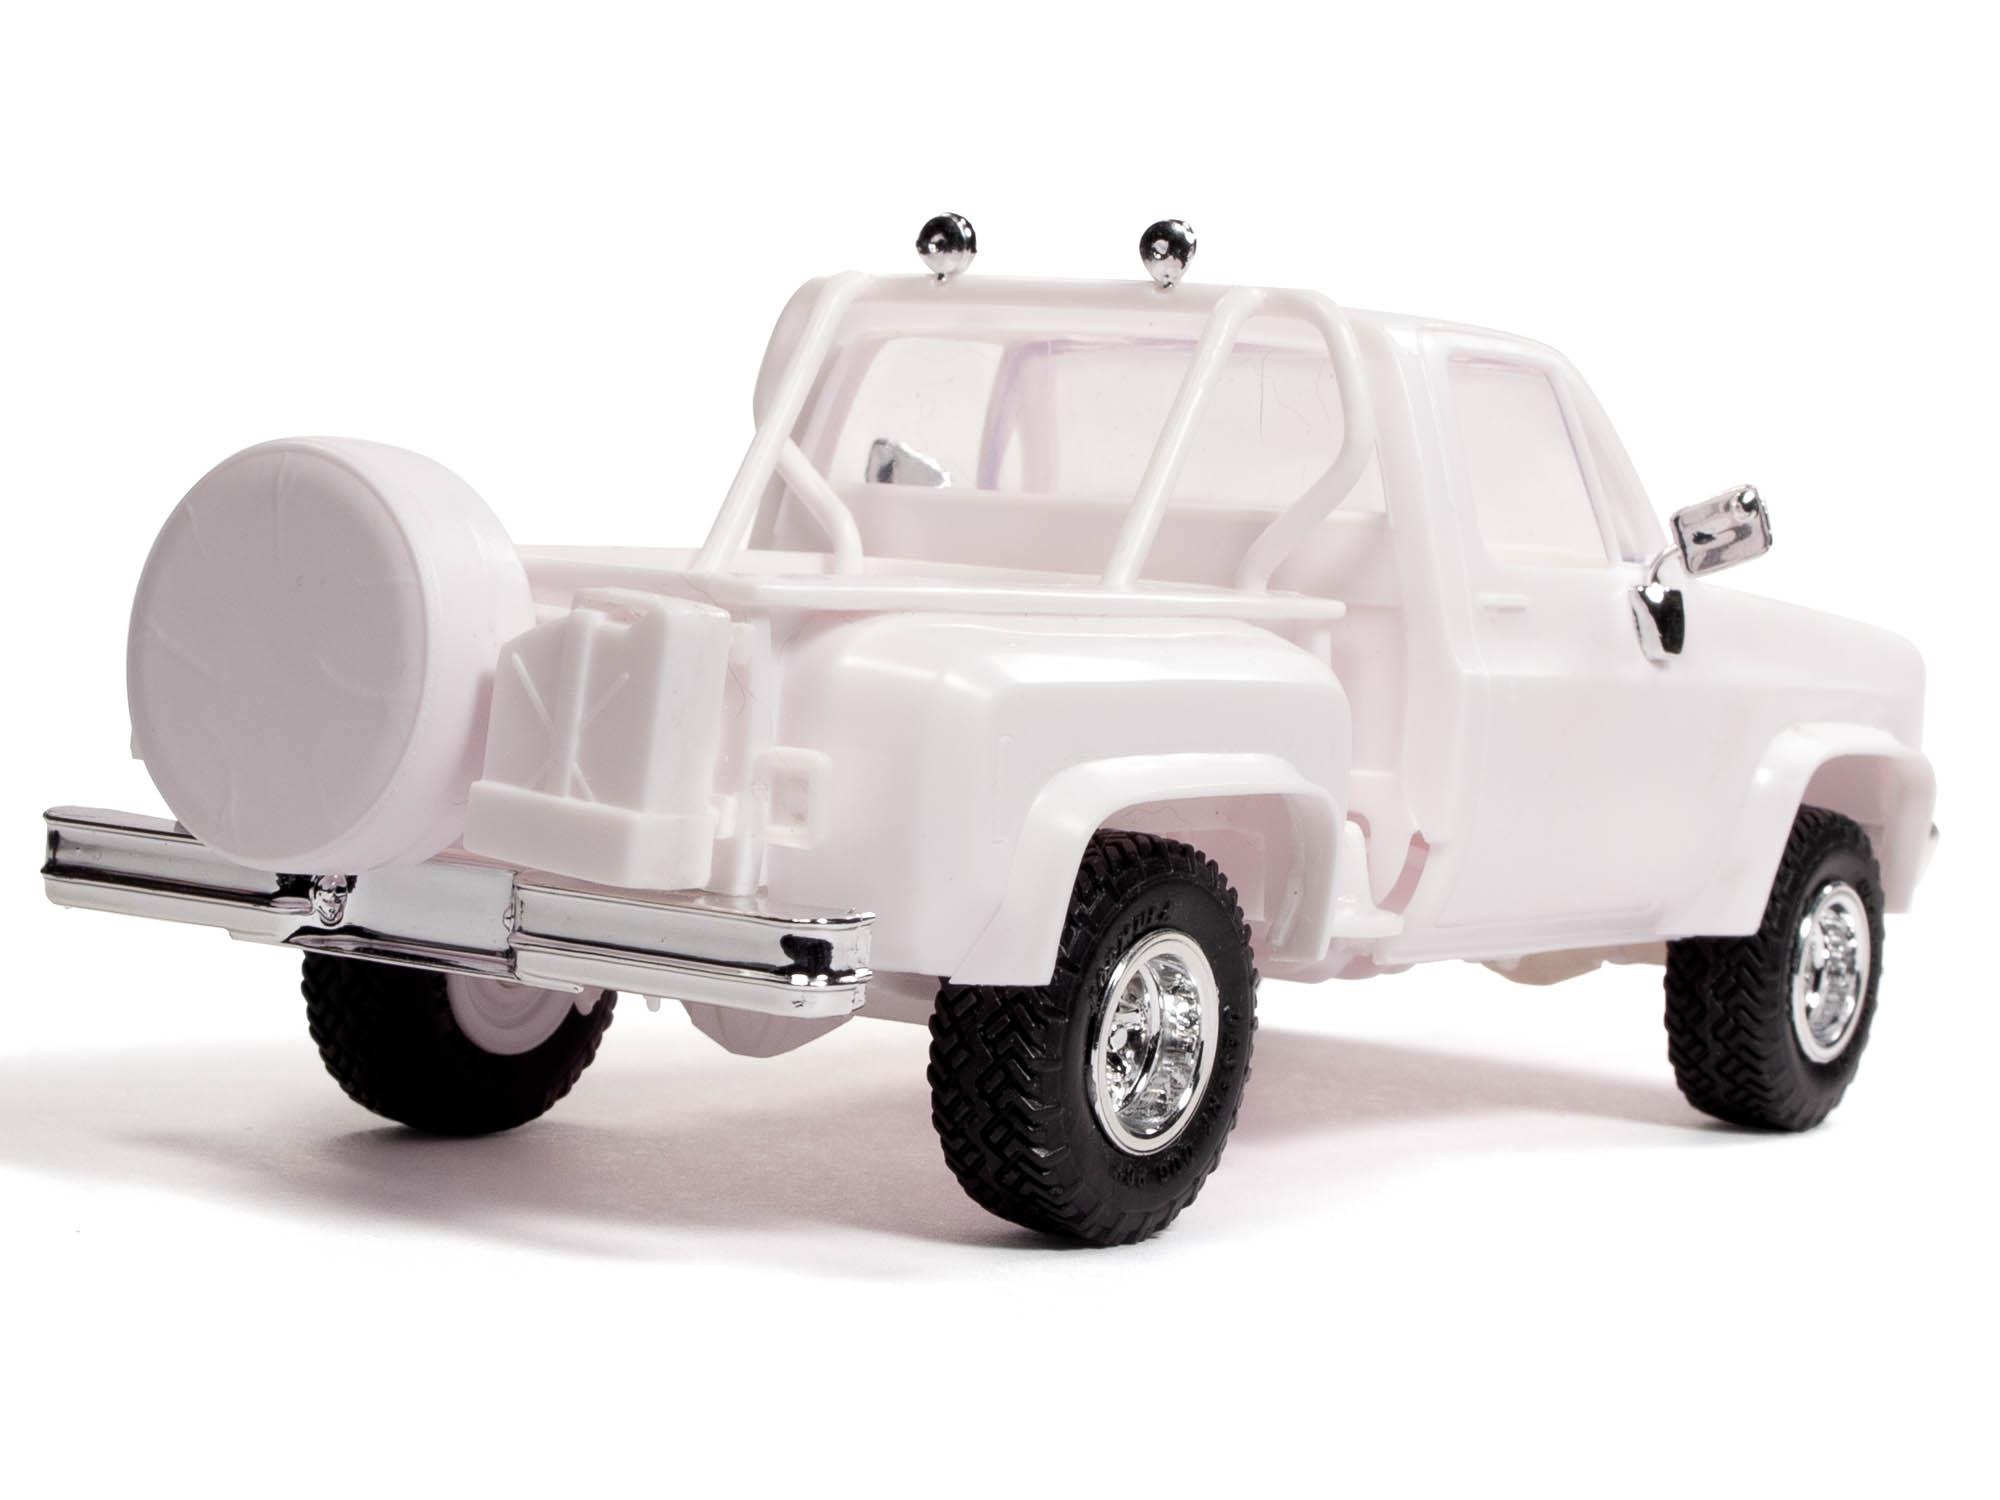
Just released info from Round 2: Coming soon! The 1981 Chevy Stepside Pickup modified reissue. Based on the GMC Deserter kit, we’ve retooled the front grill to bring the 1981 Chevy Sod Buster! With retooling needed we took the opportunity to improve this kit with all-new clear headlamps as well! Look for the Sod Buster to hit hobby shelves Early 2023! Due Early 2023. 3D Mockup samples subject to improvements in production. #MPC972

-
Thanks guys! I appreciate the support!
-
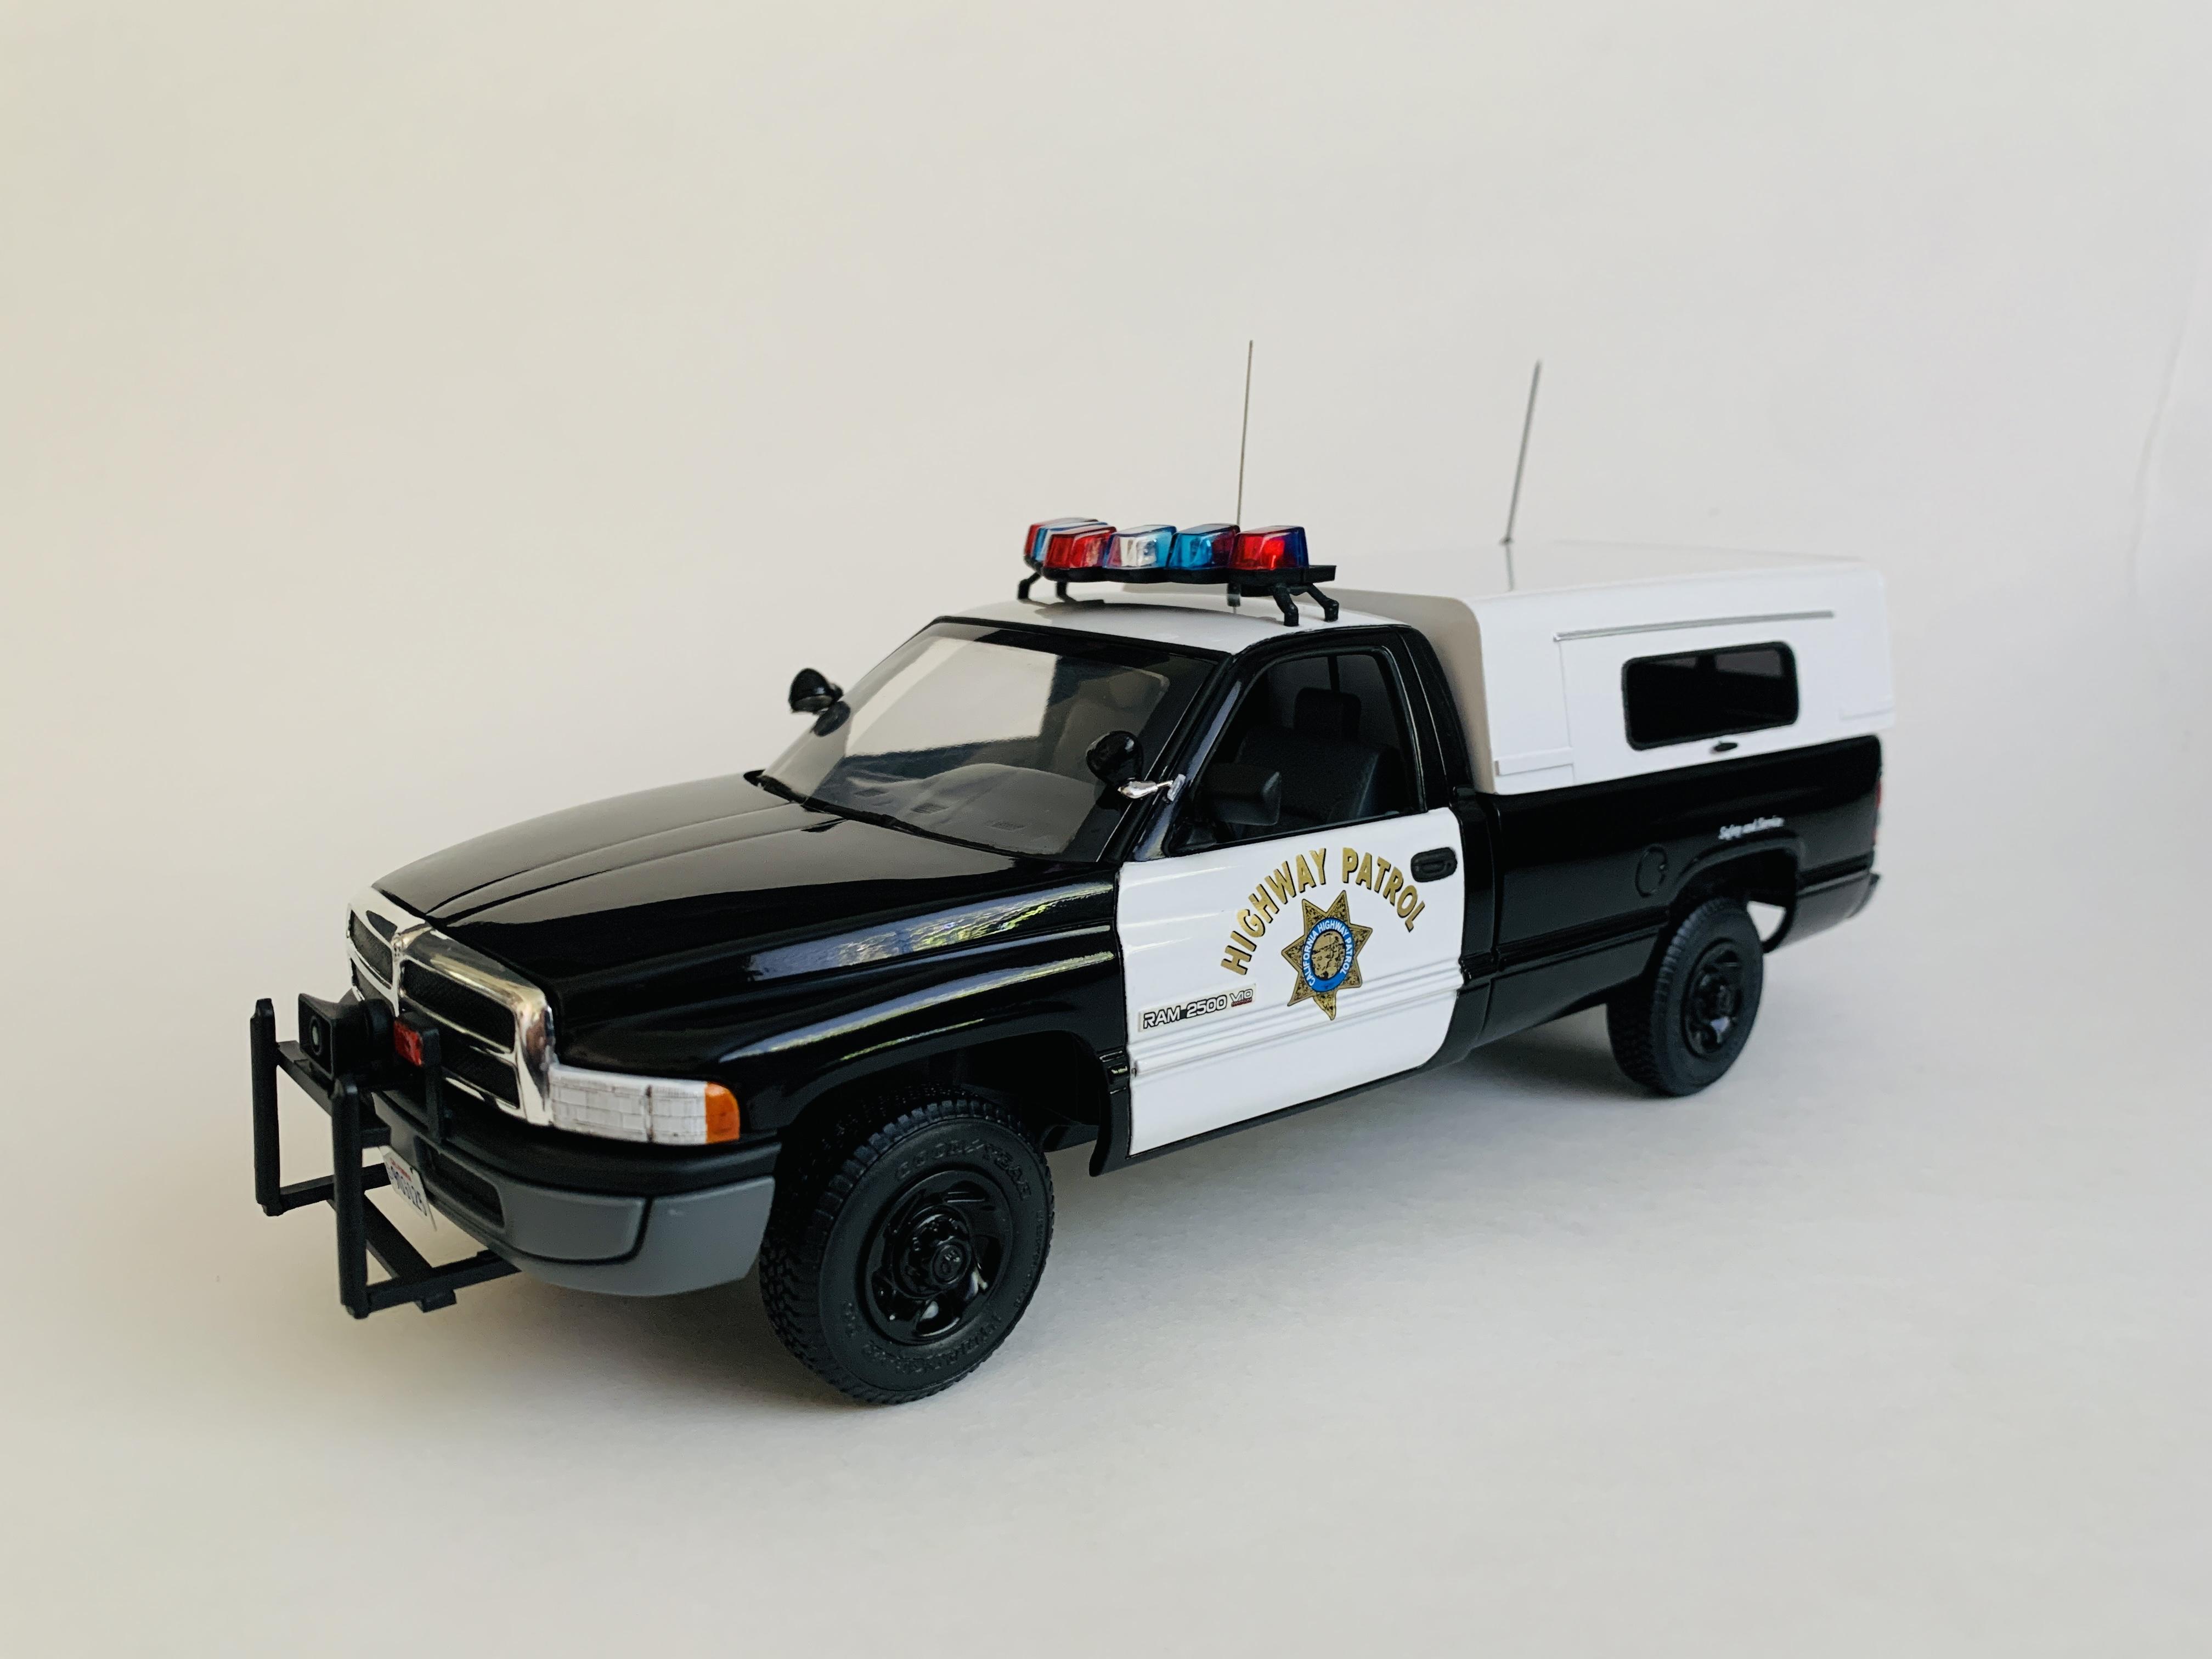
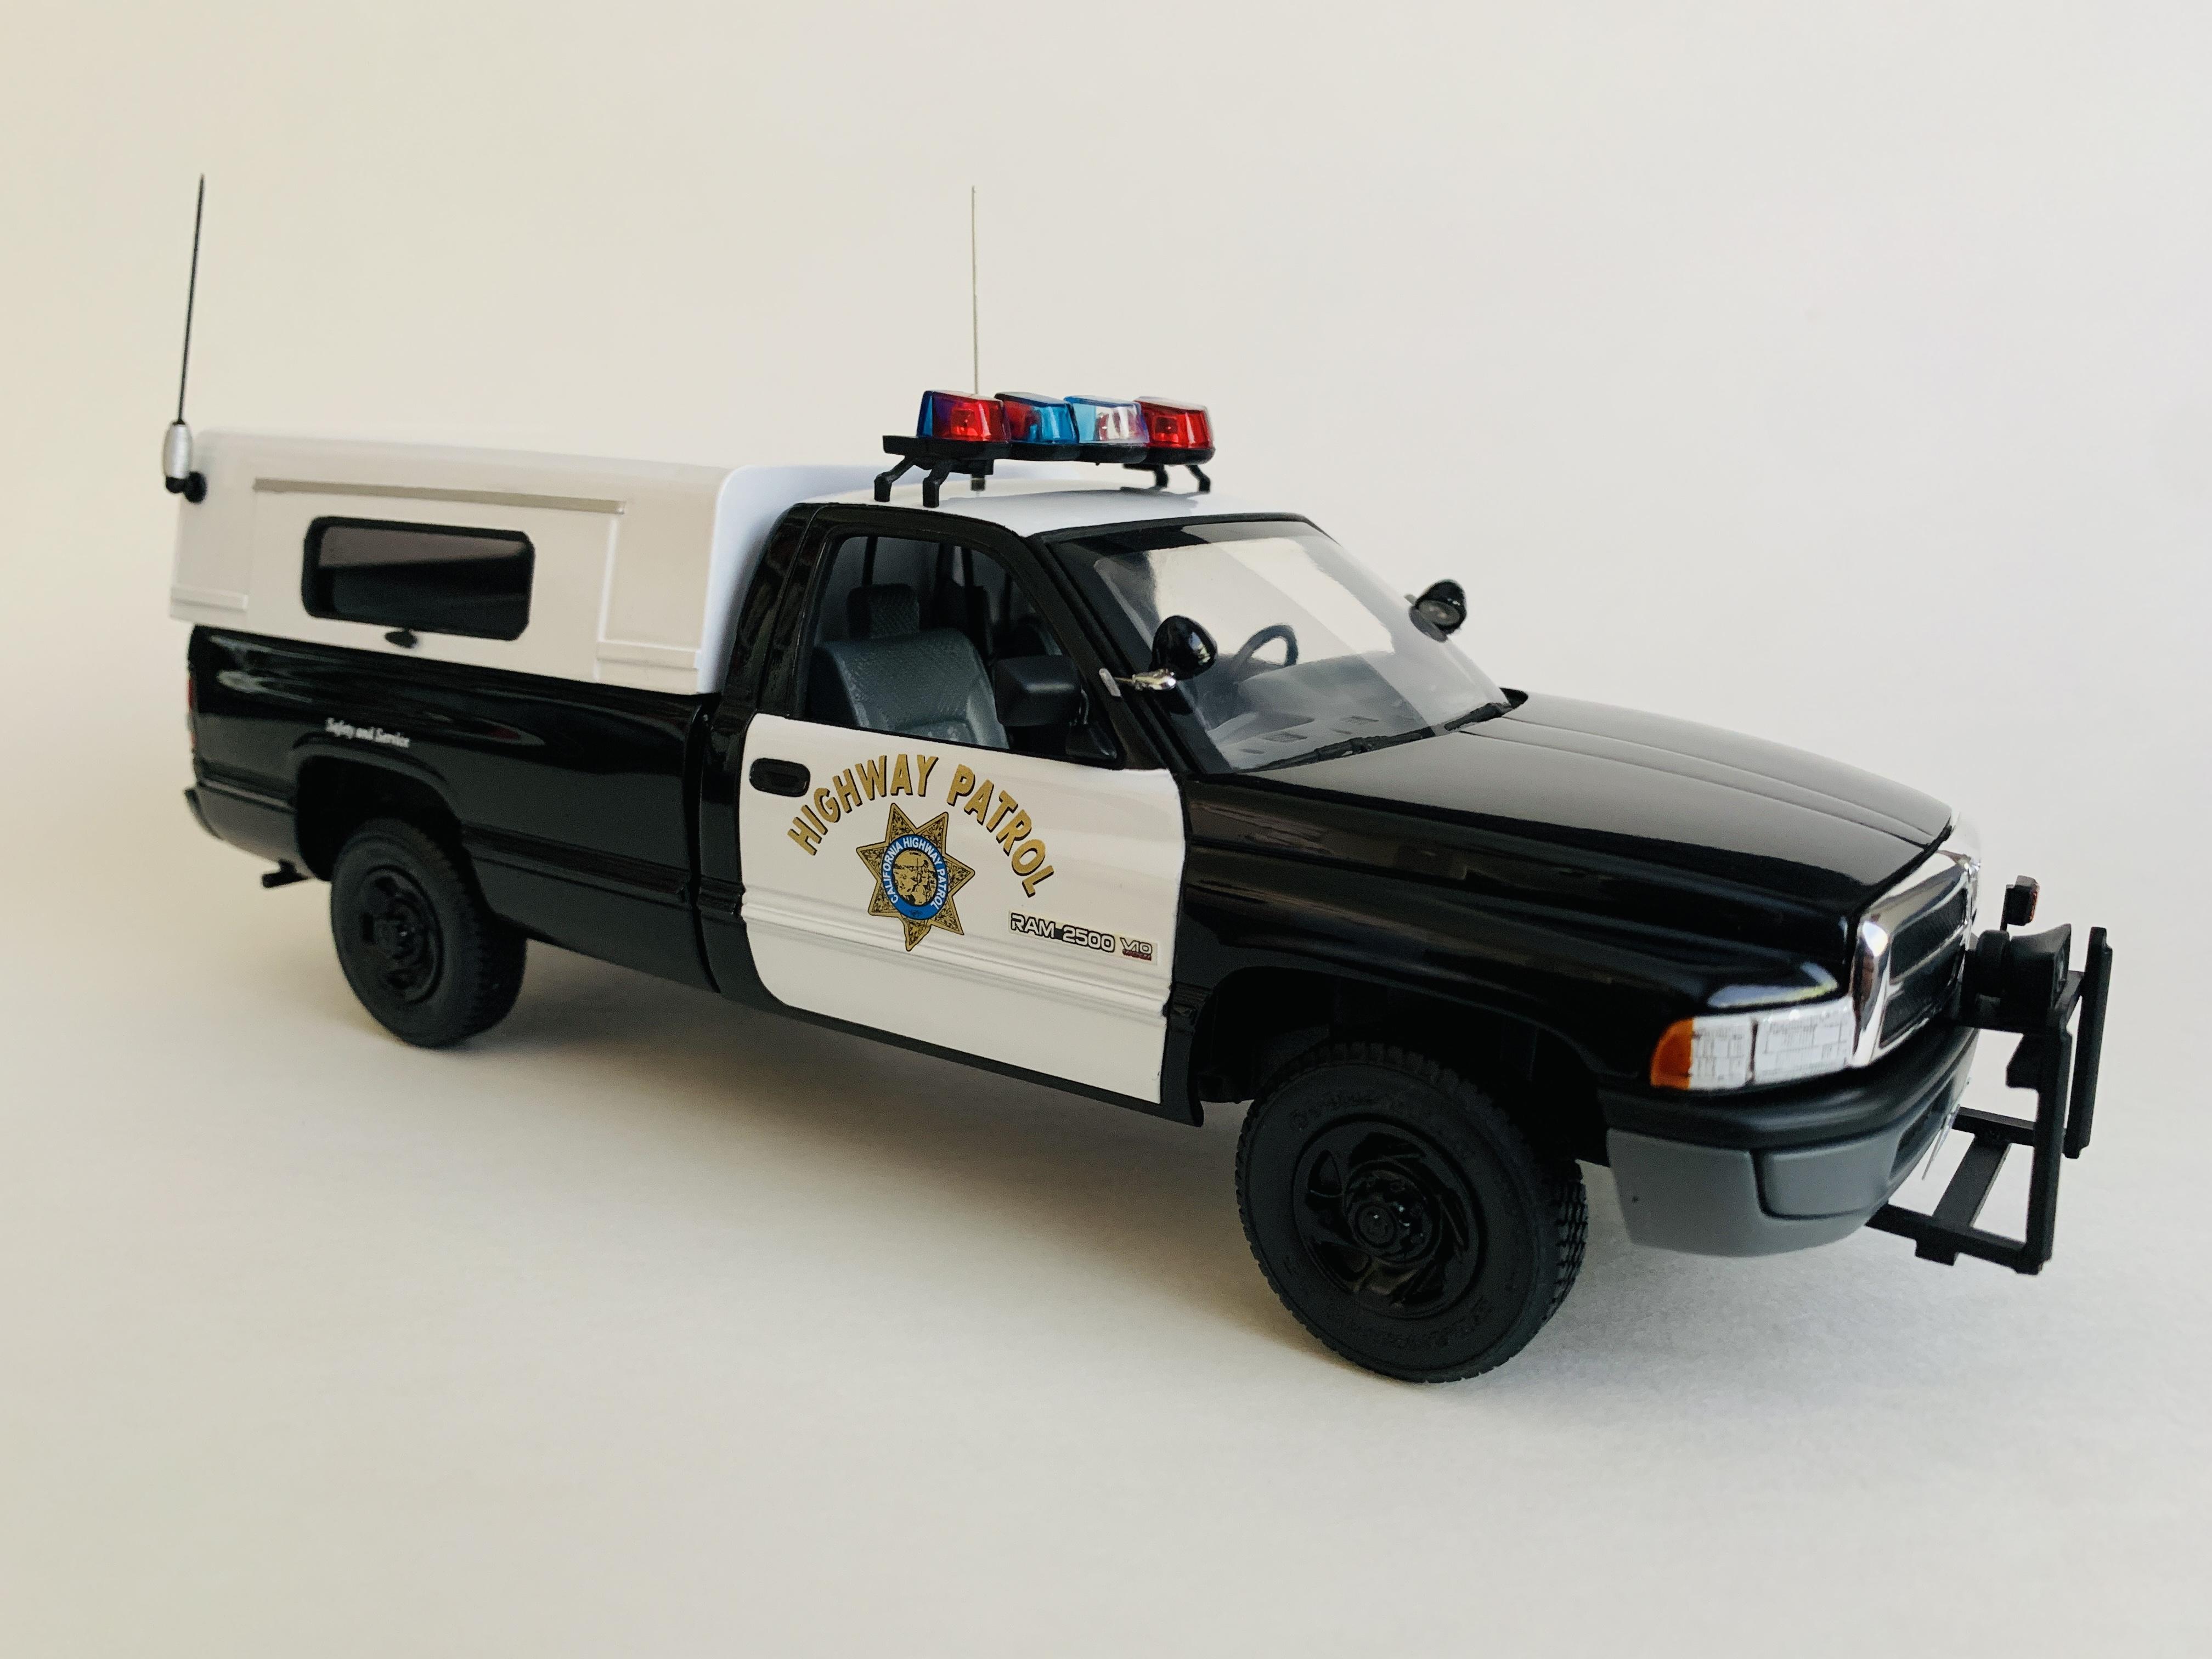
The truck is complete!
-
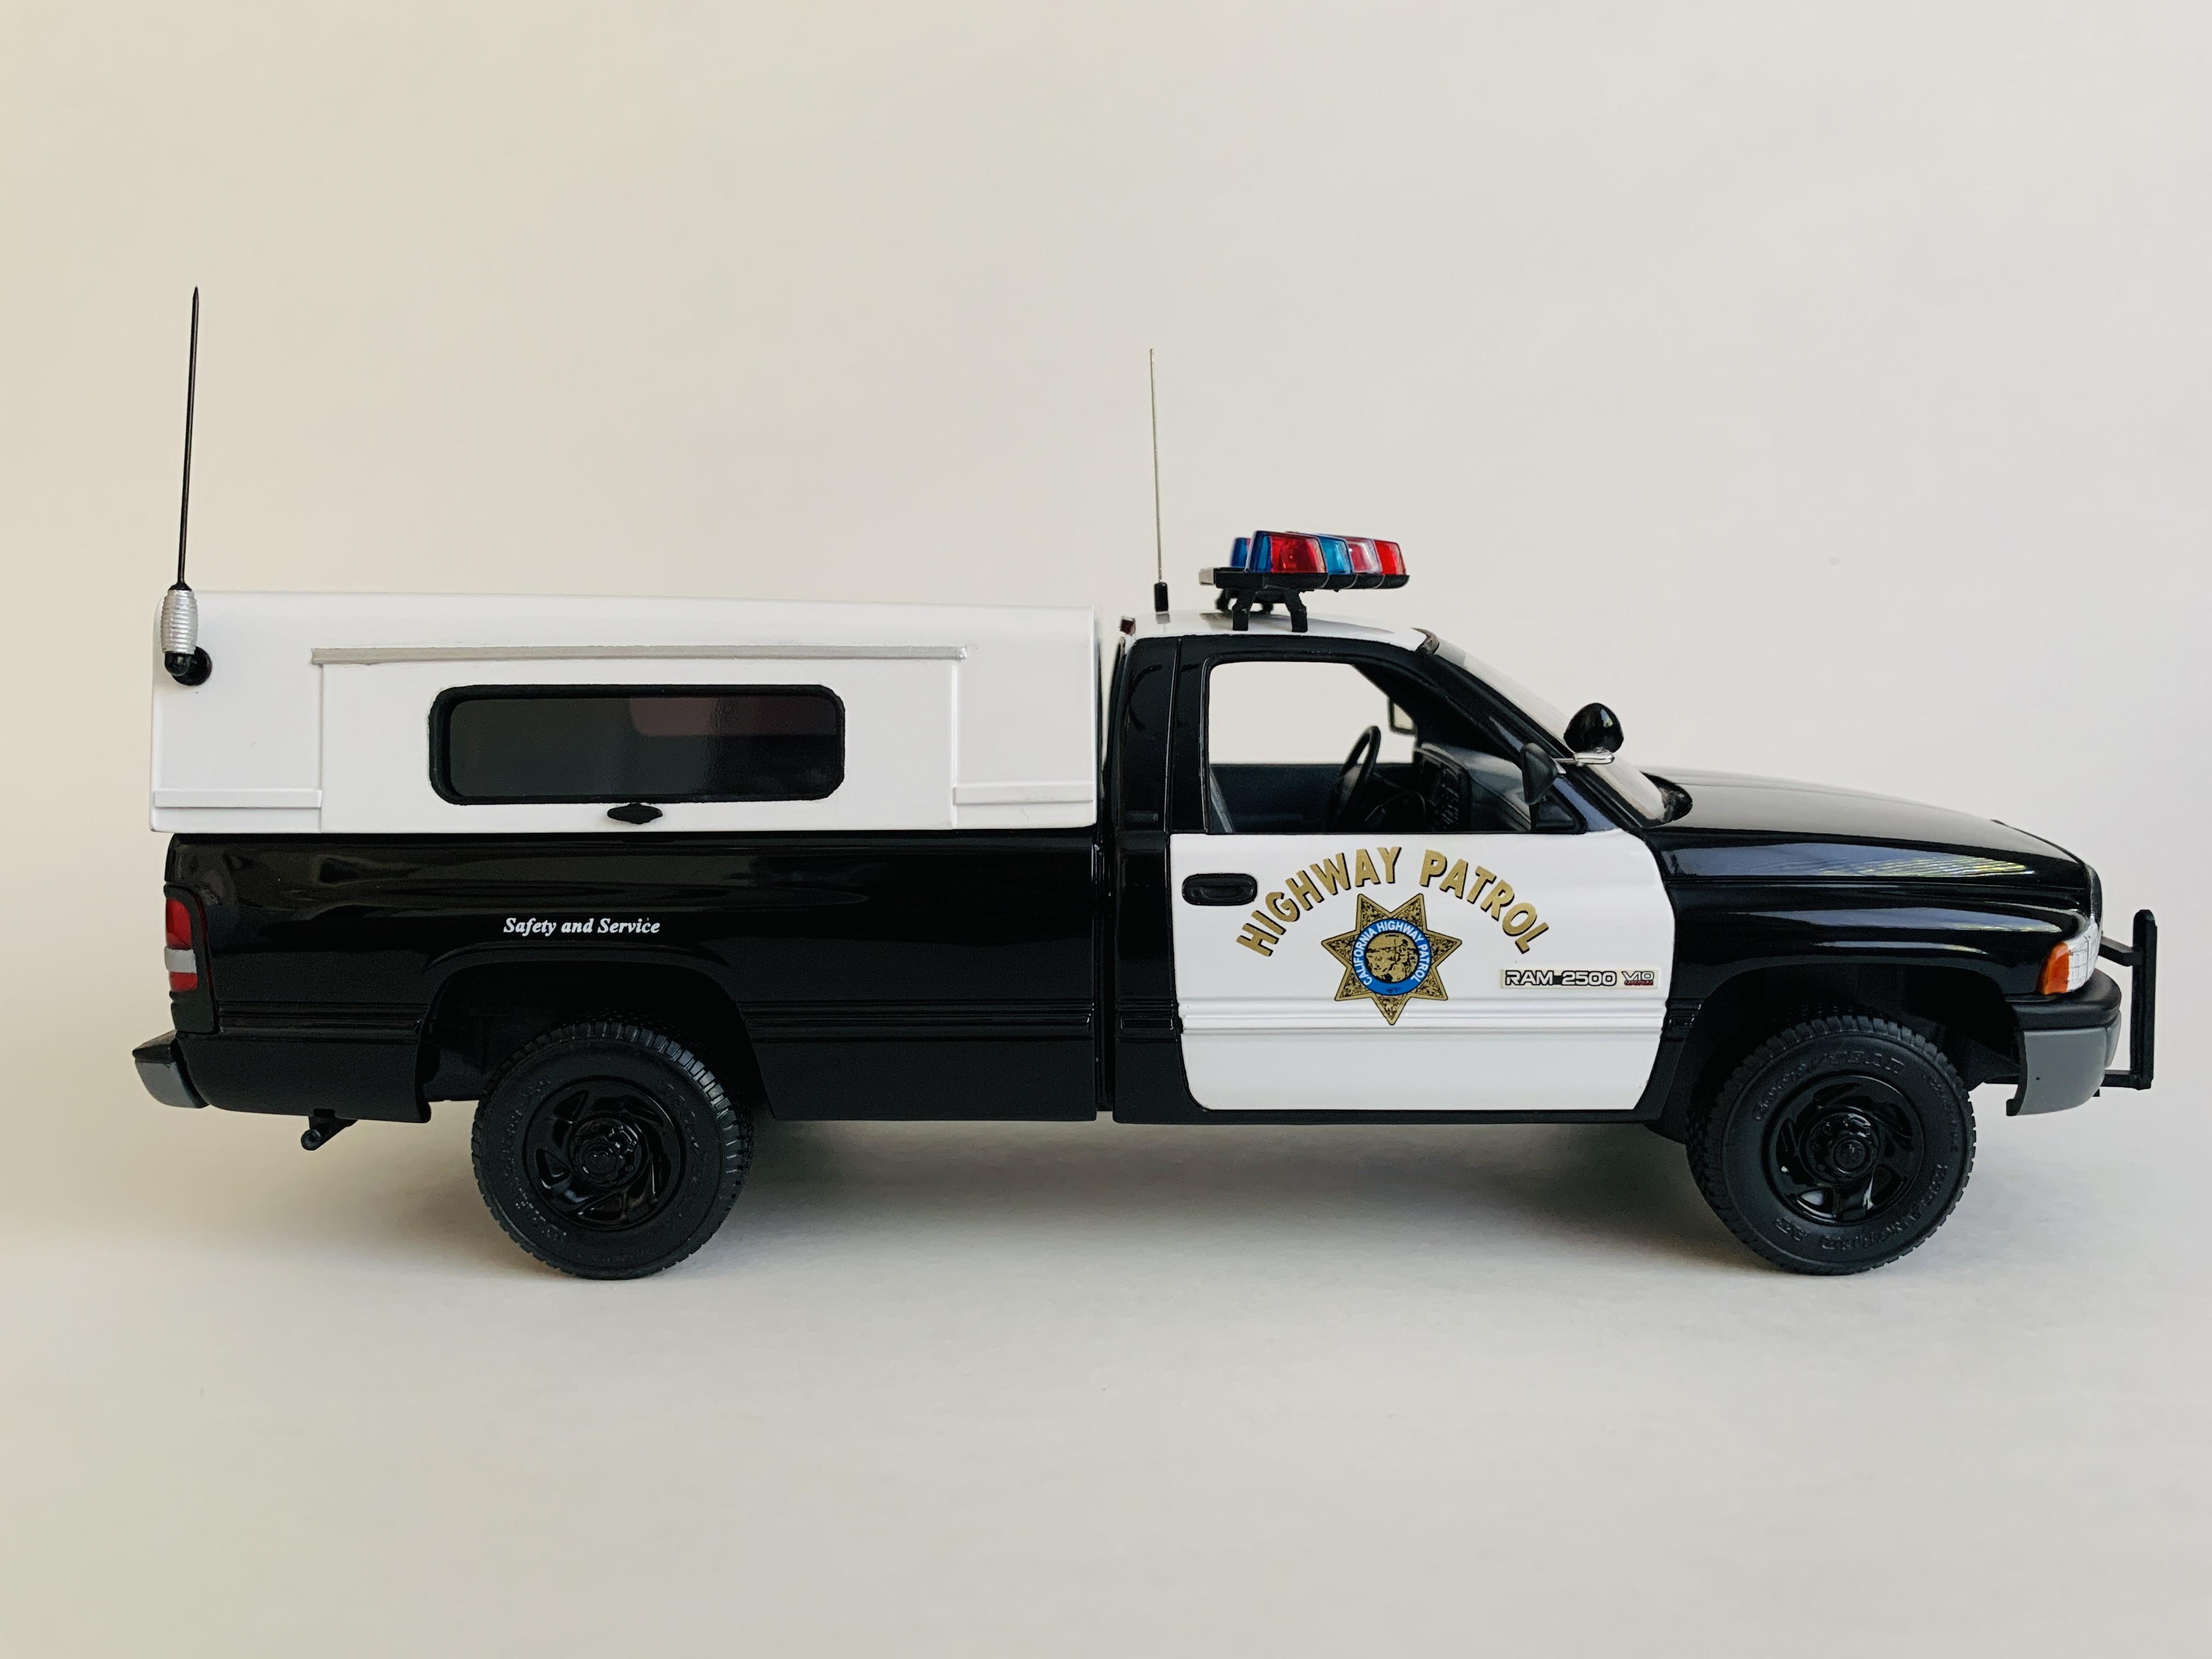
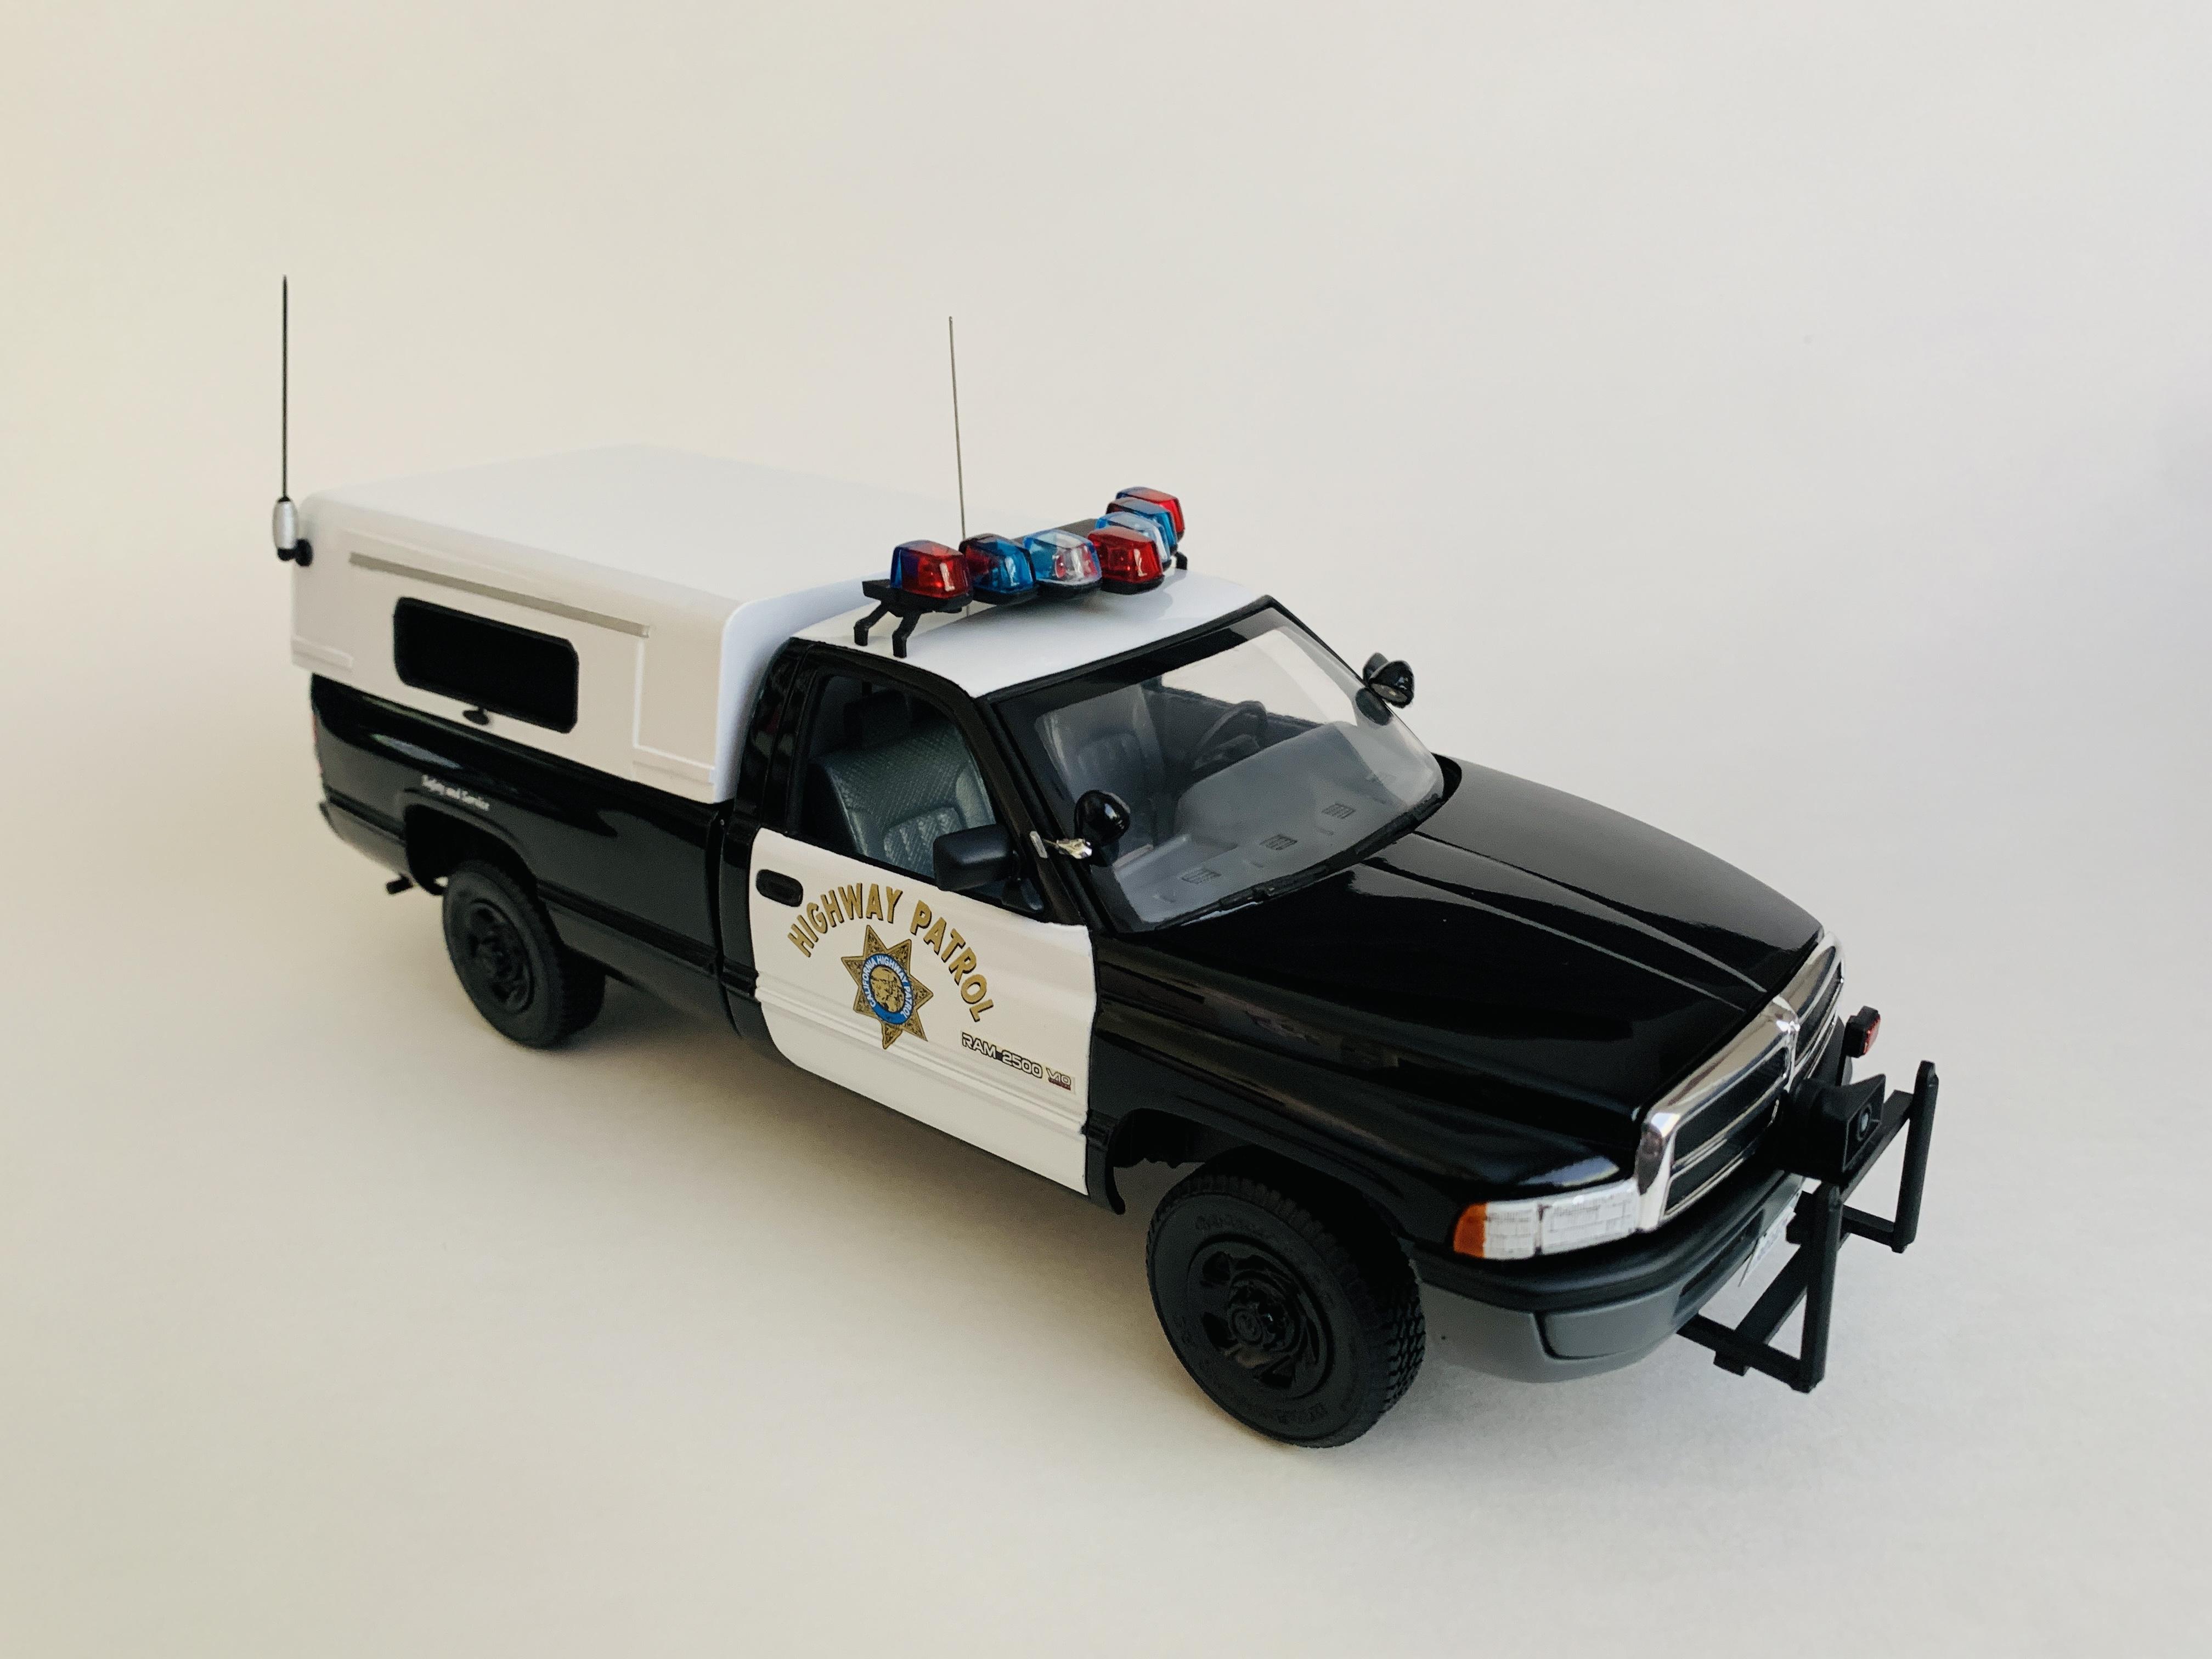
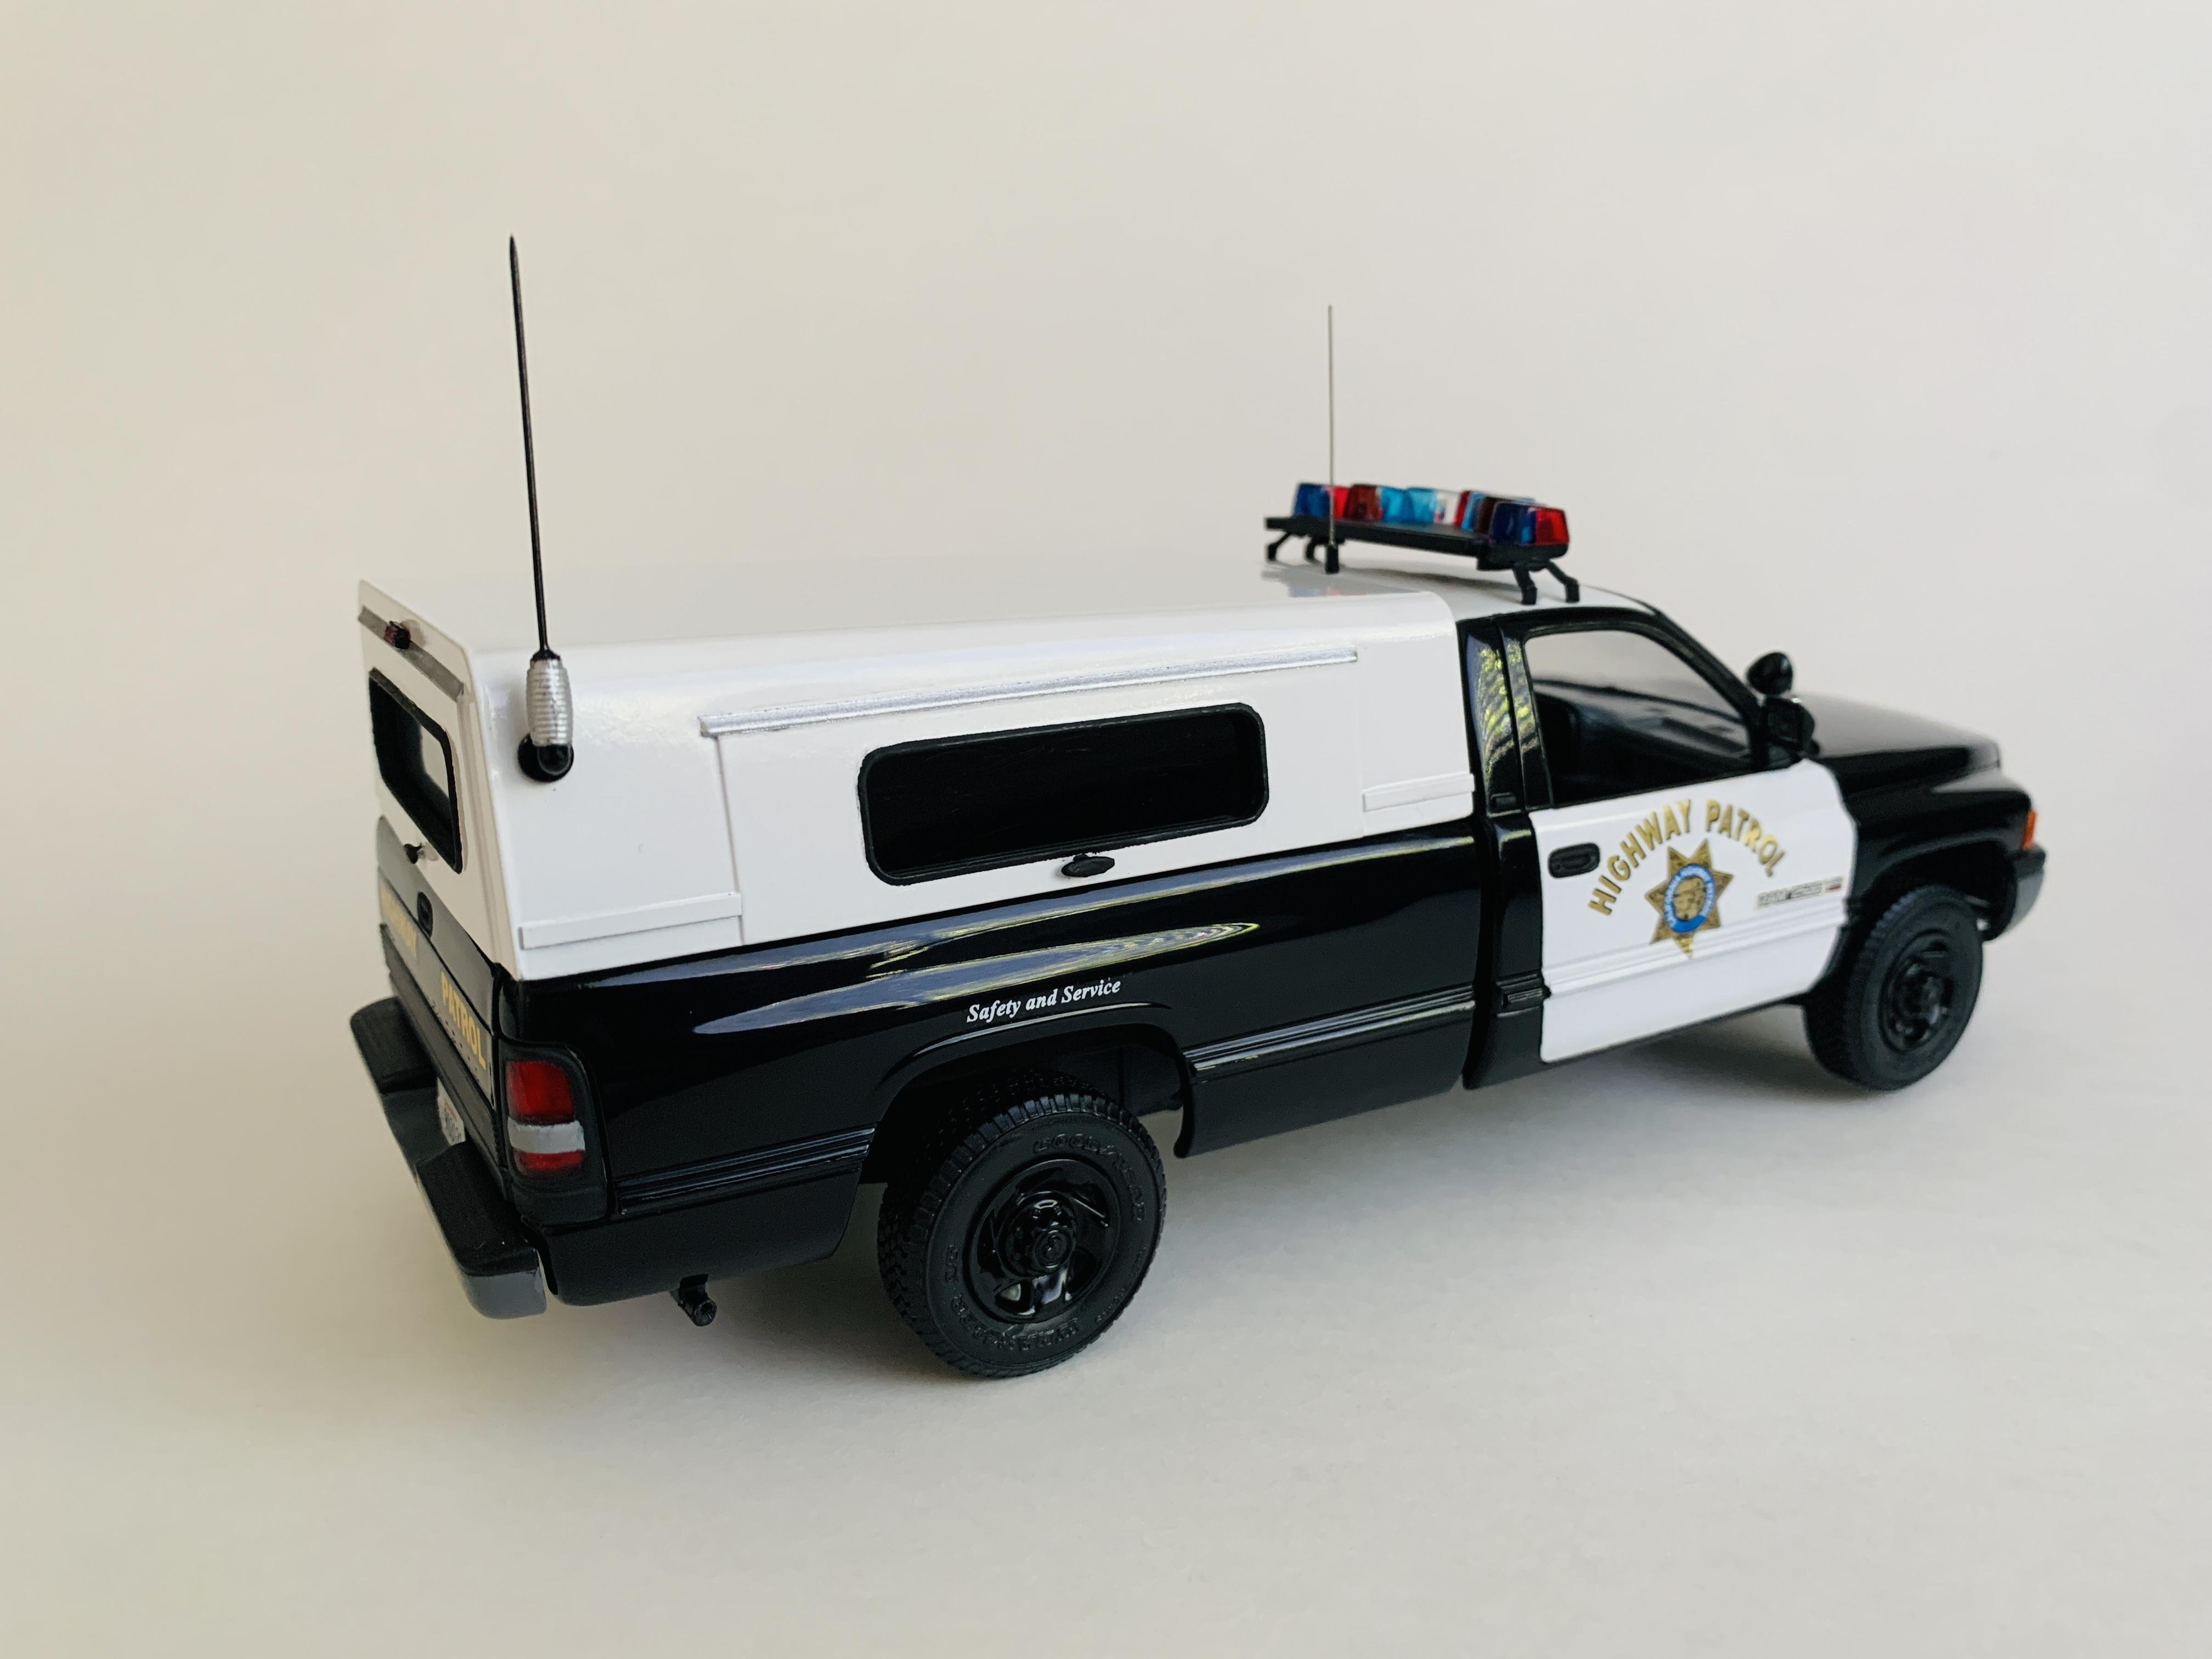
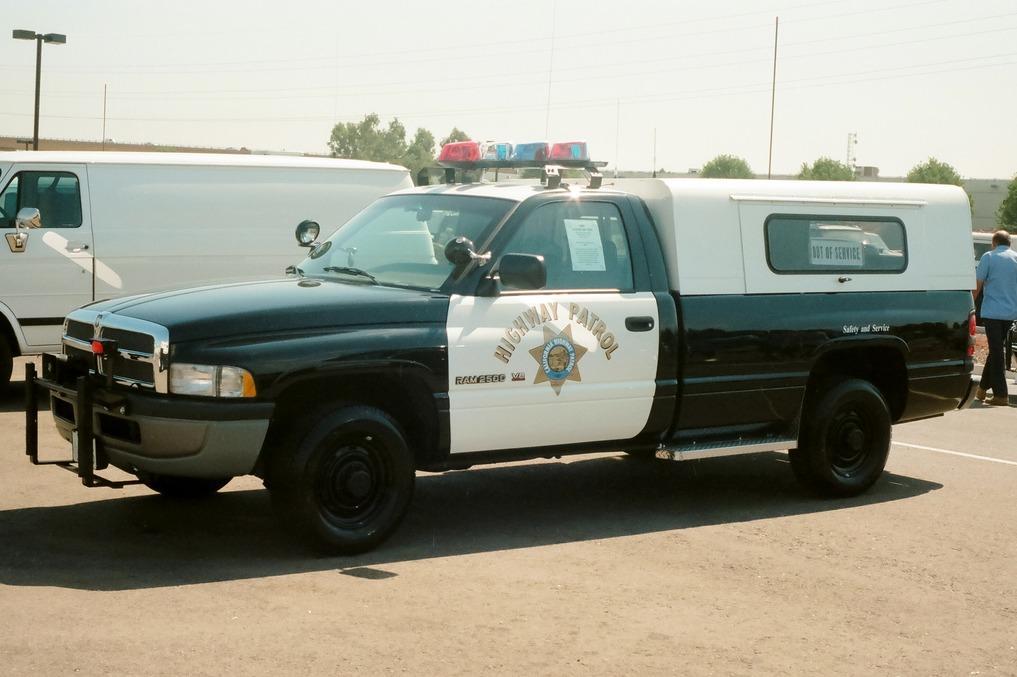
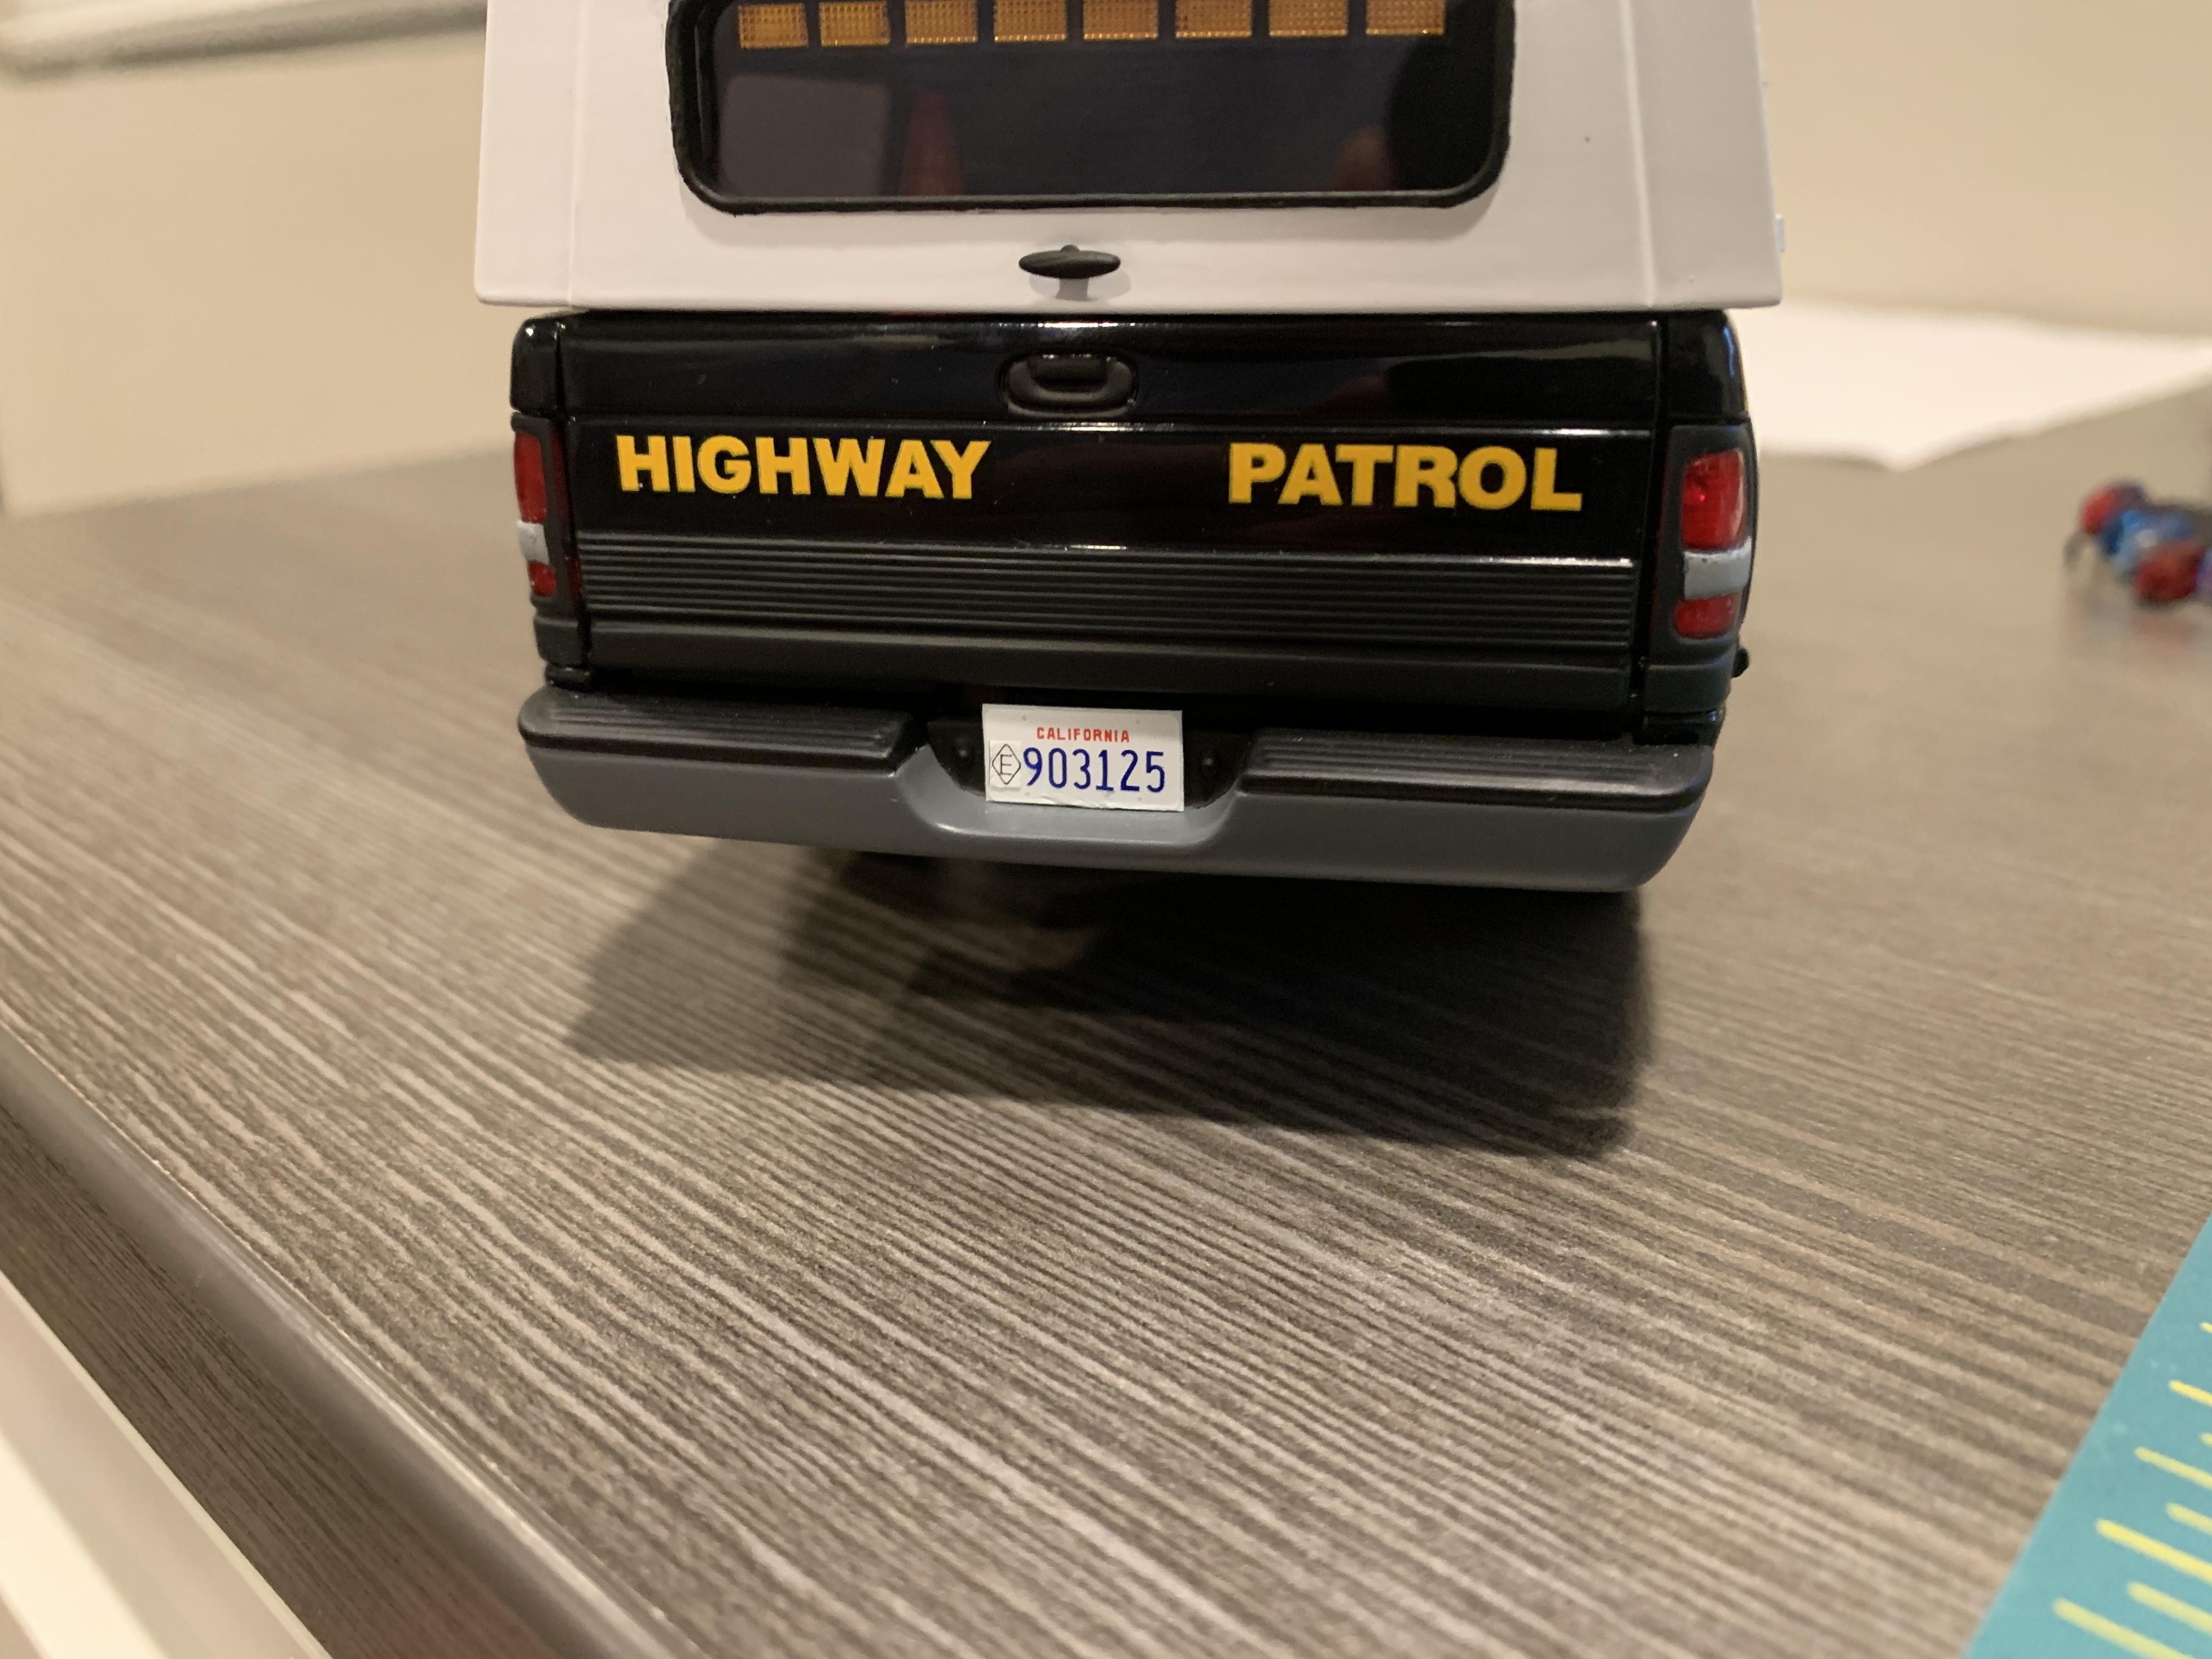
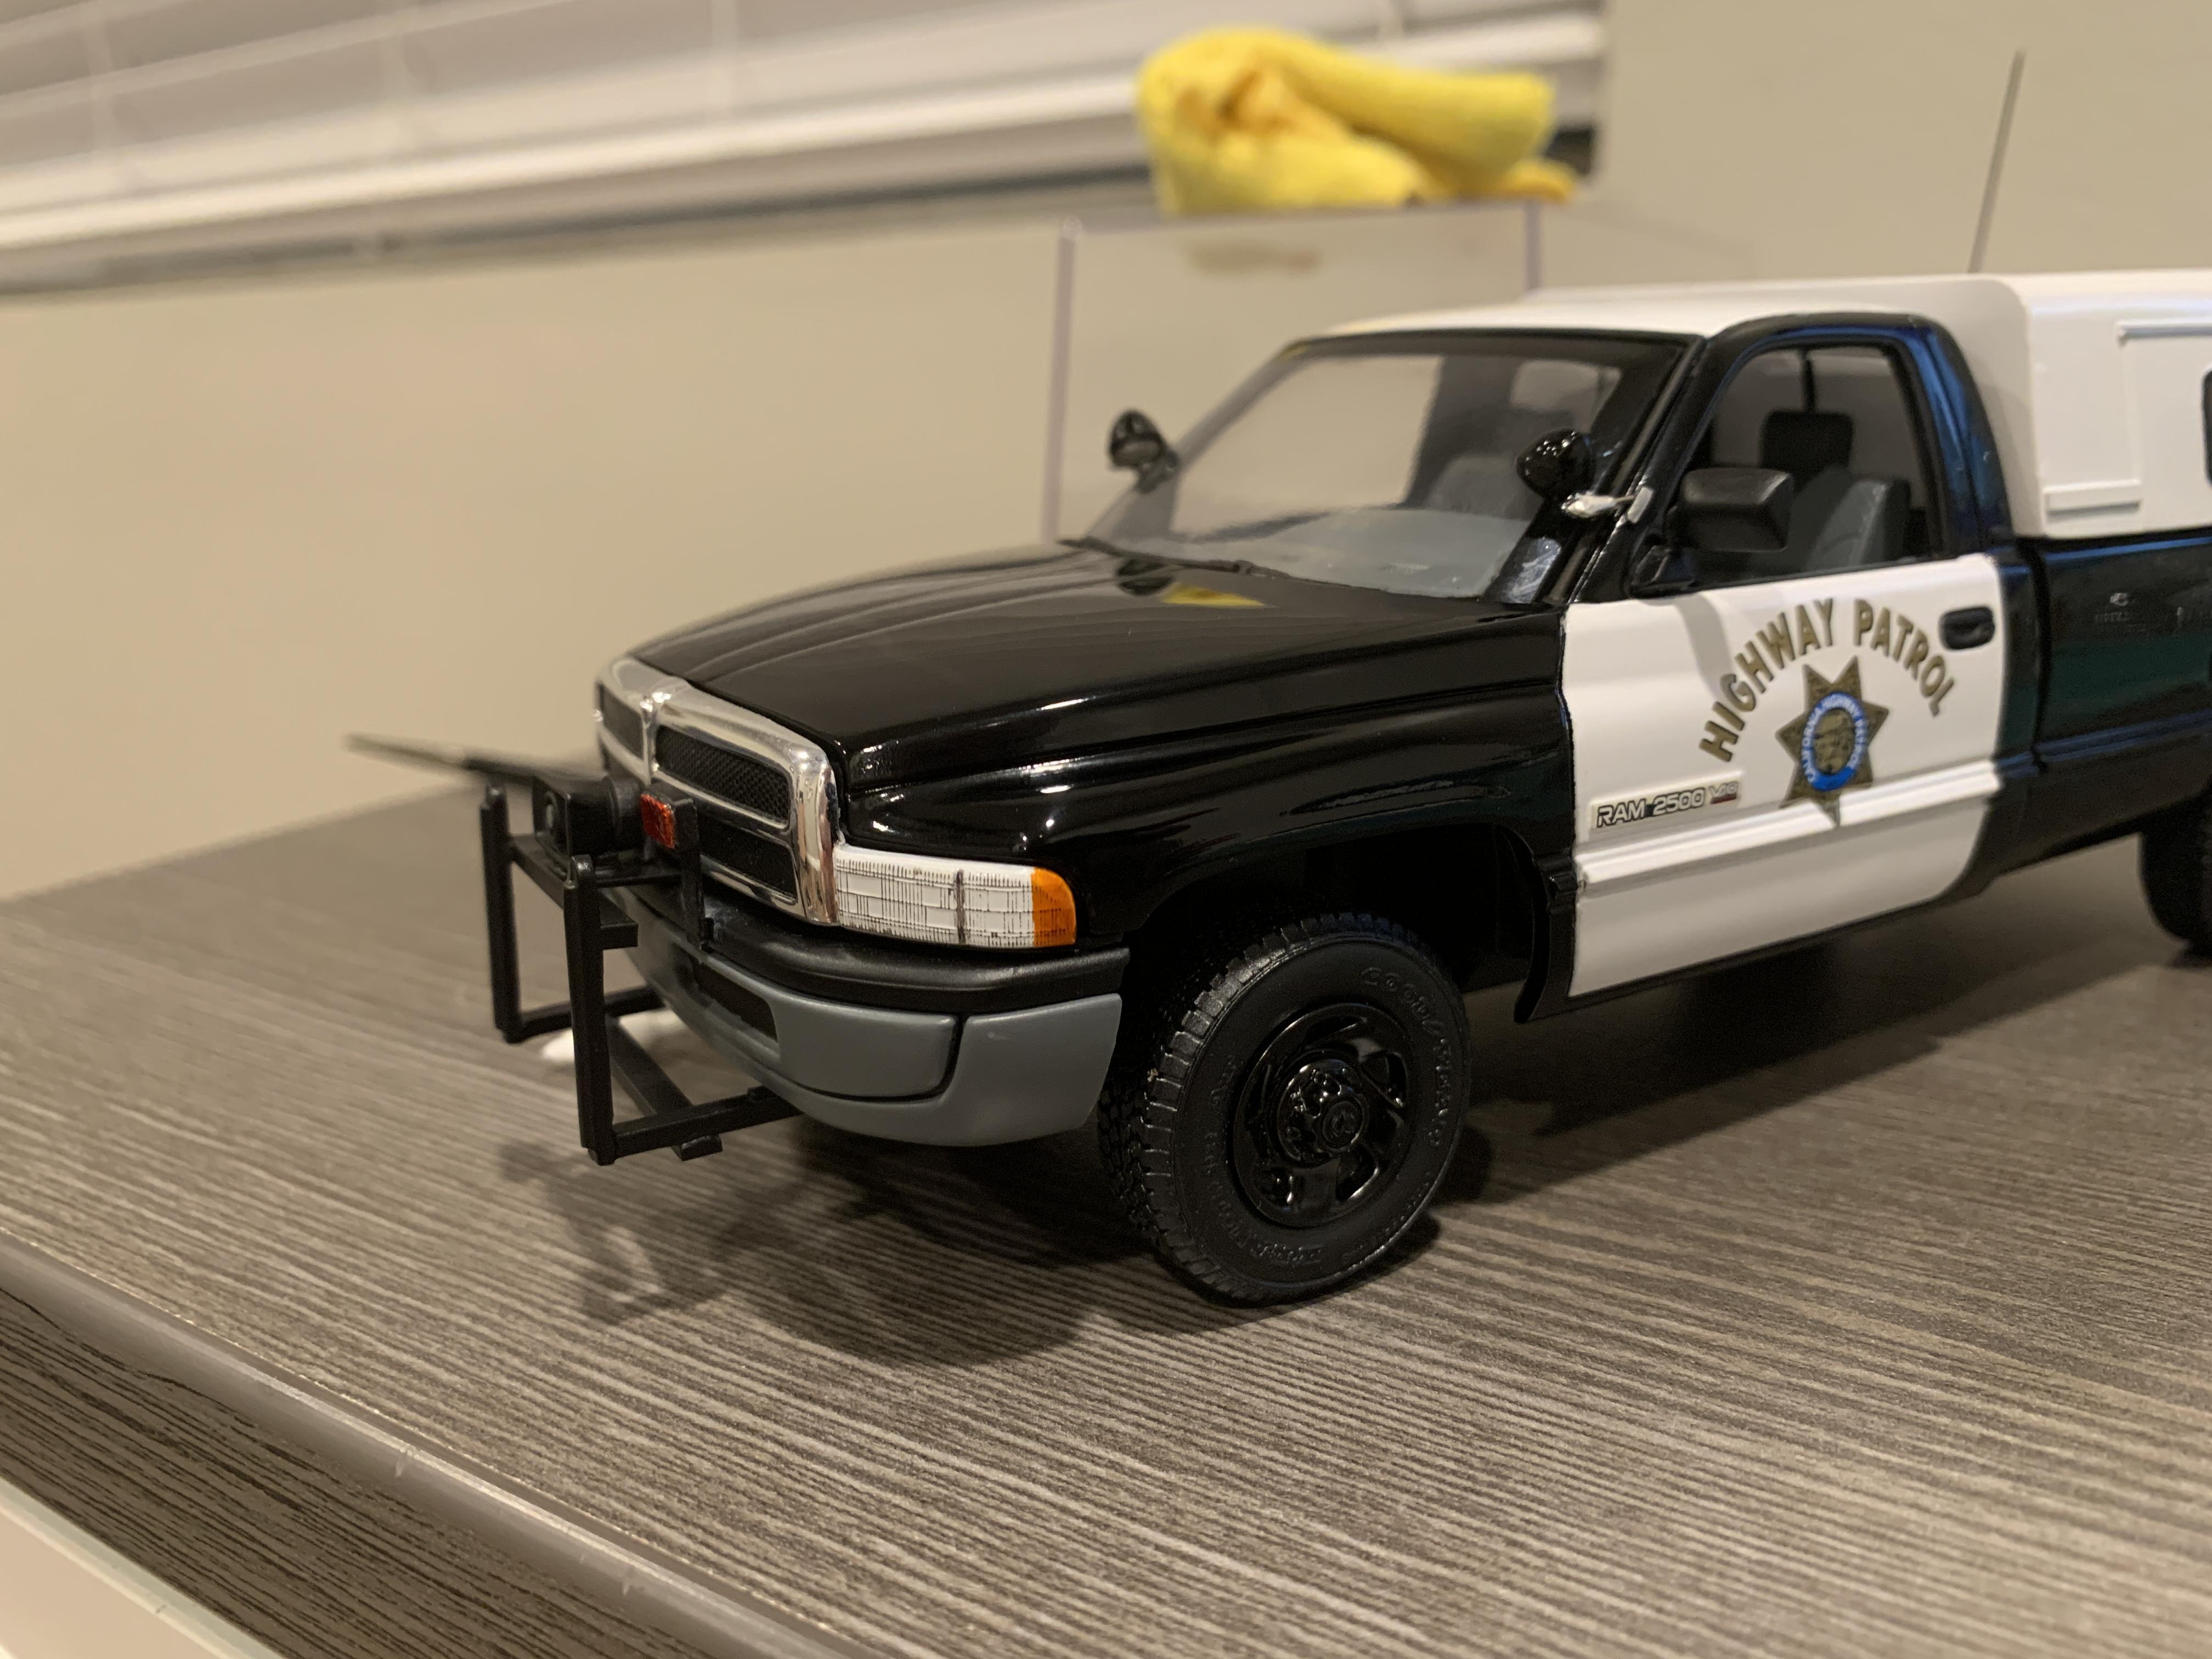
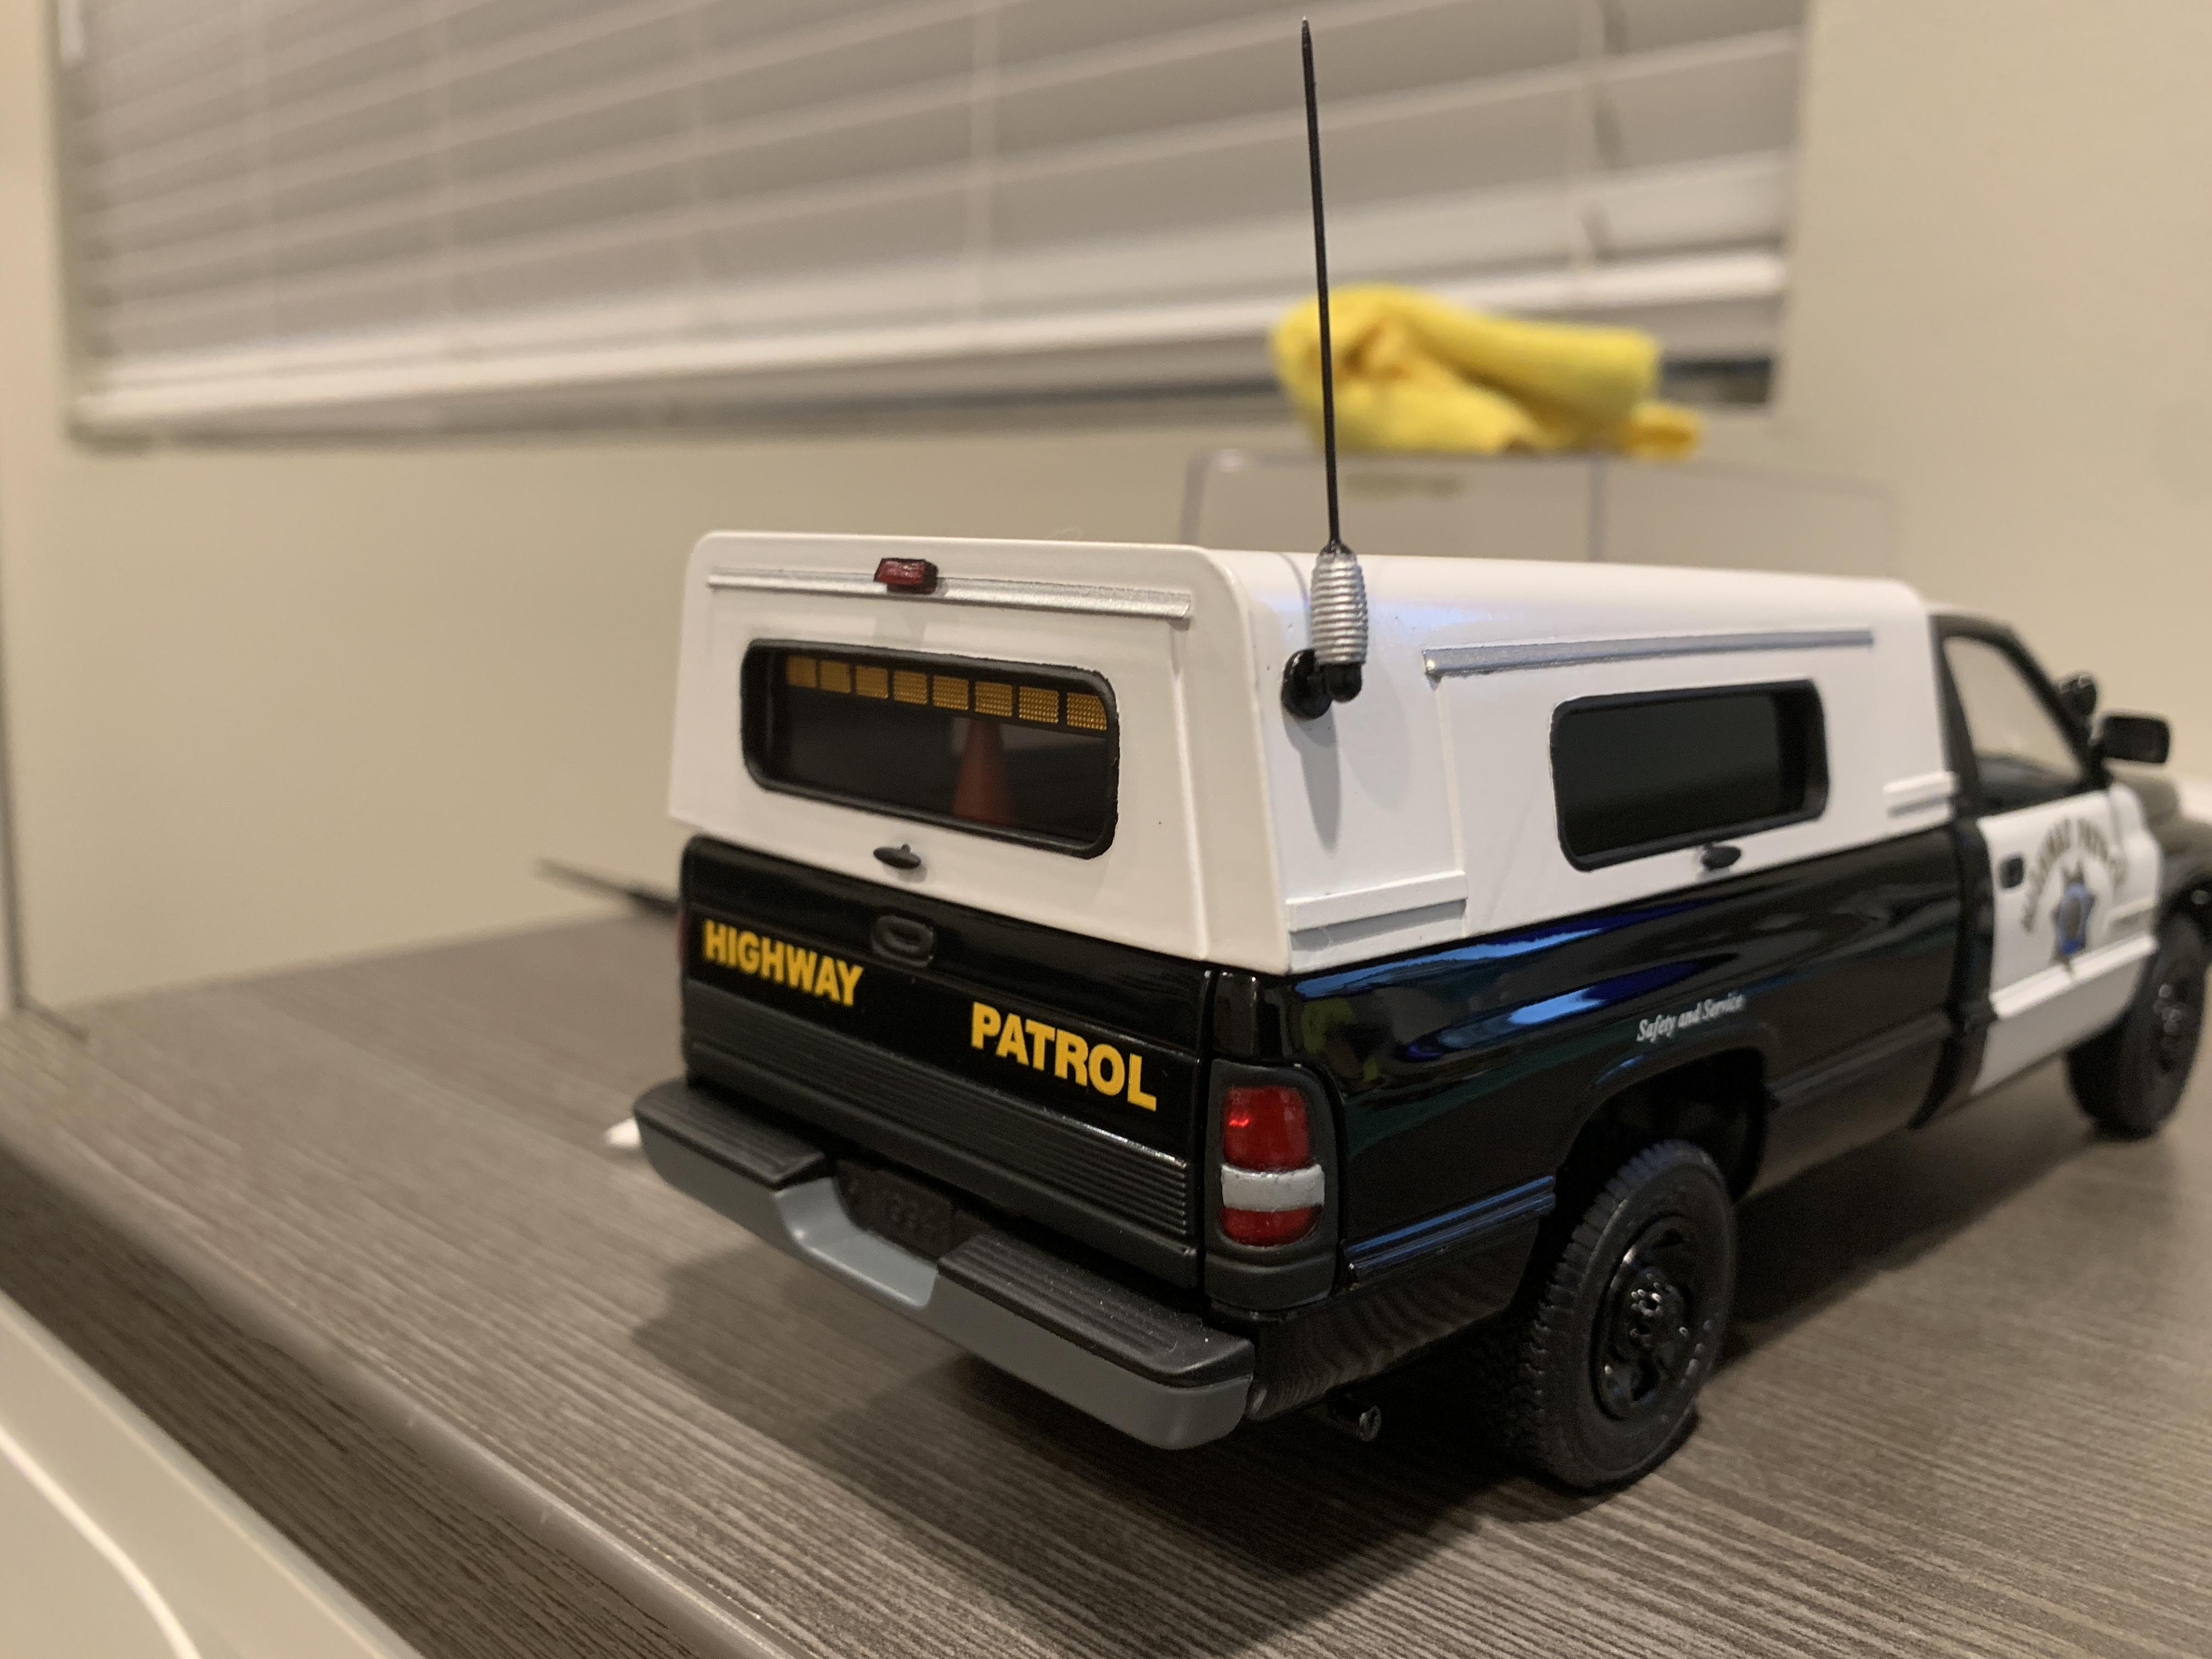
Here's my completed CHP Dodge Ram 2500 Commercial Vehicle Enforcement truck: Here's the WIP thread I did for this project:
-
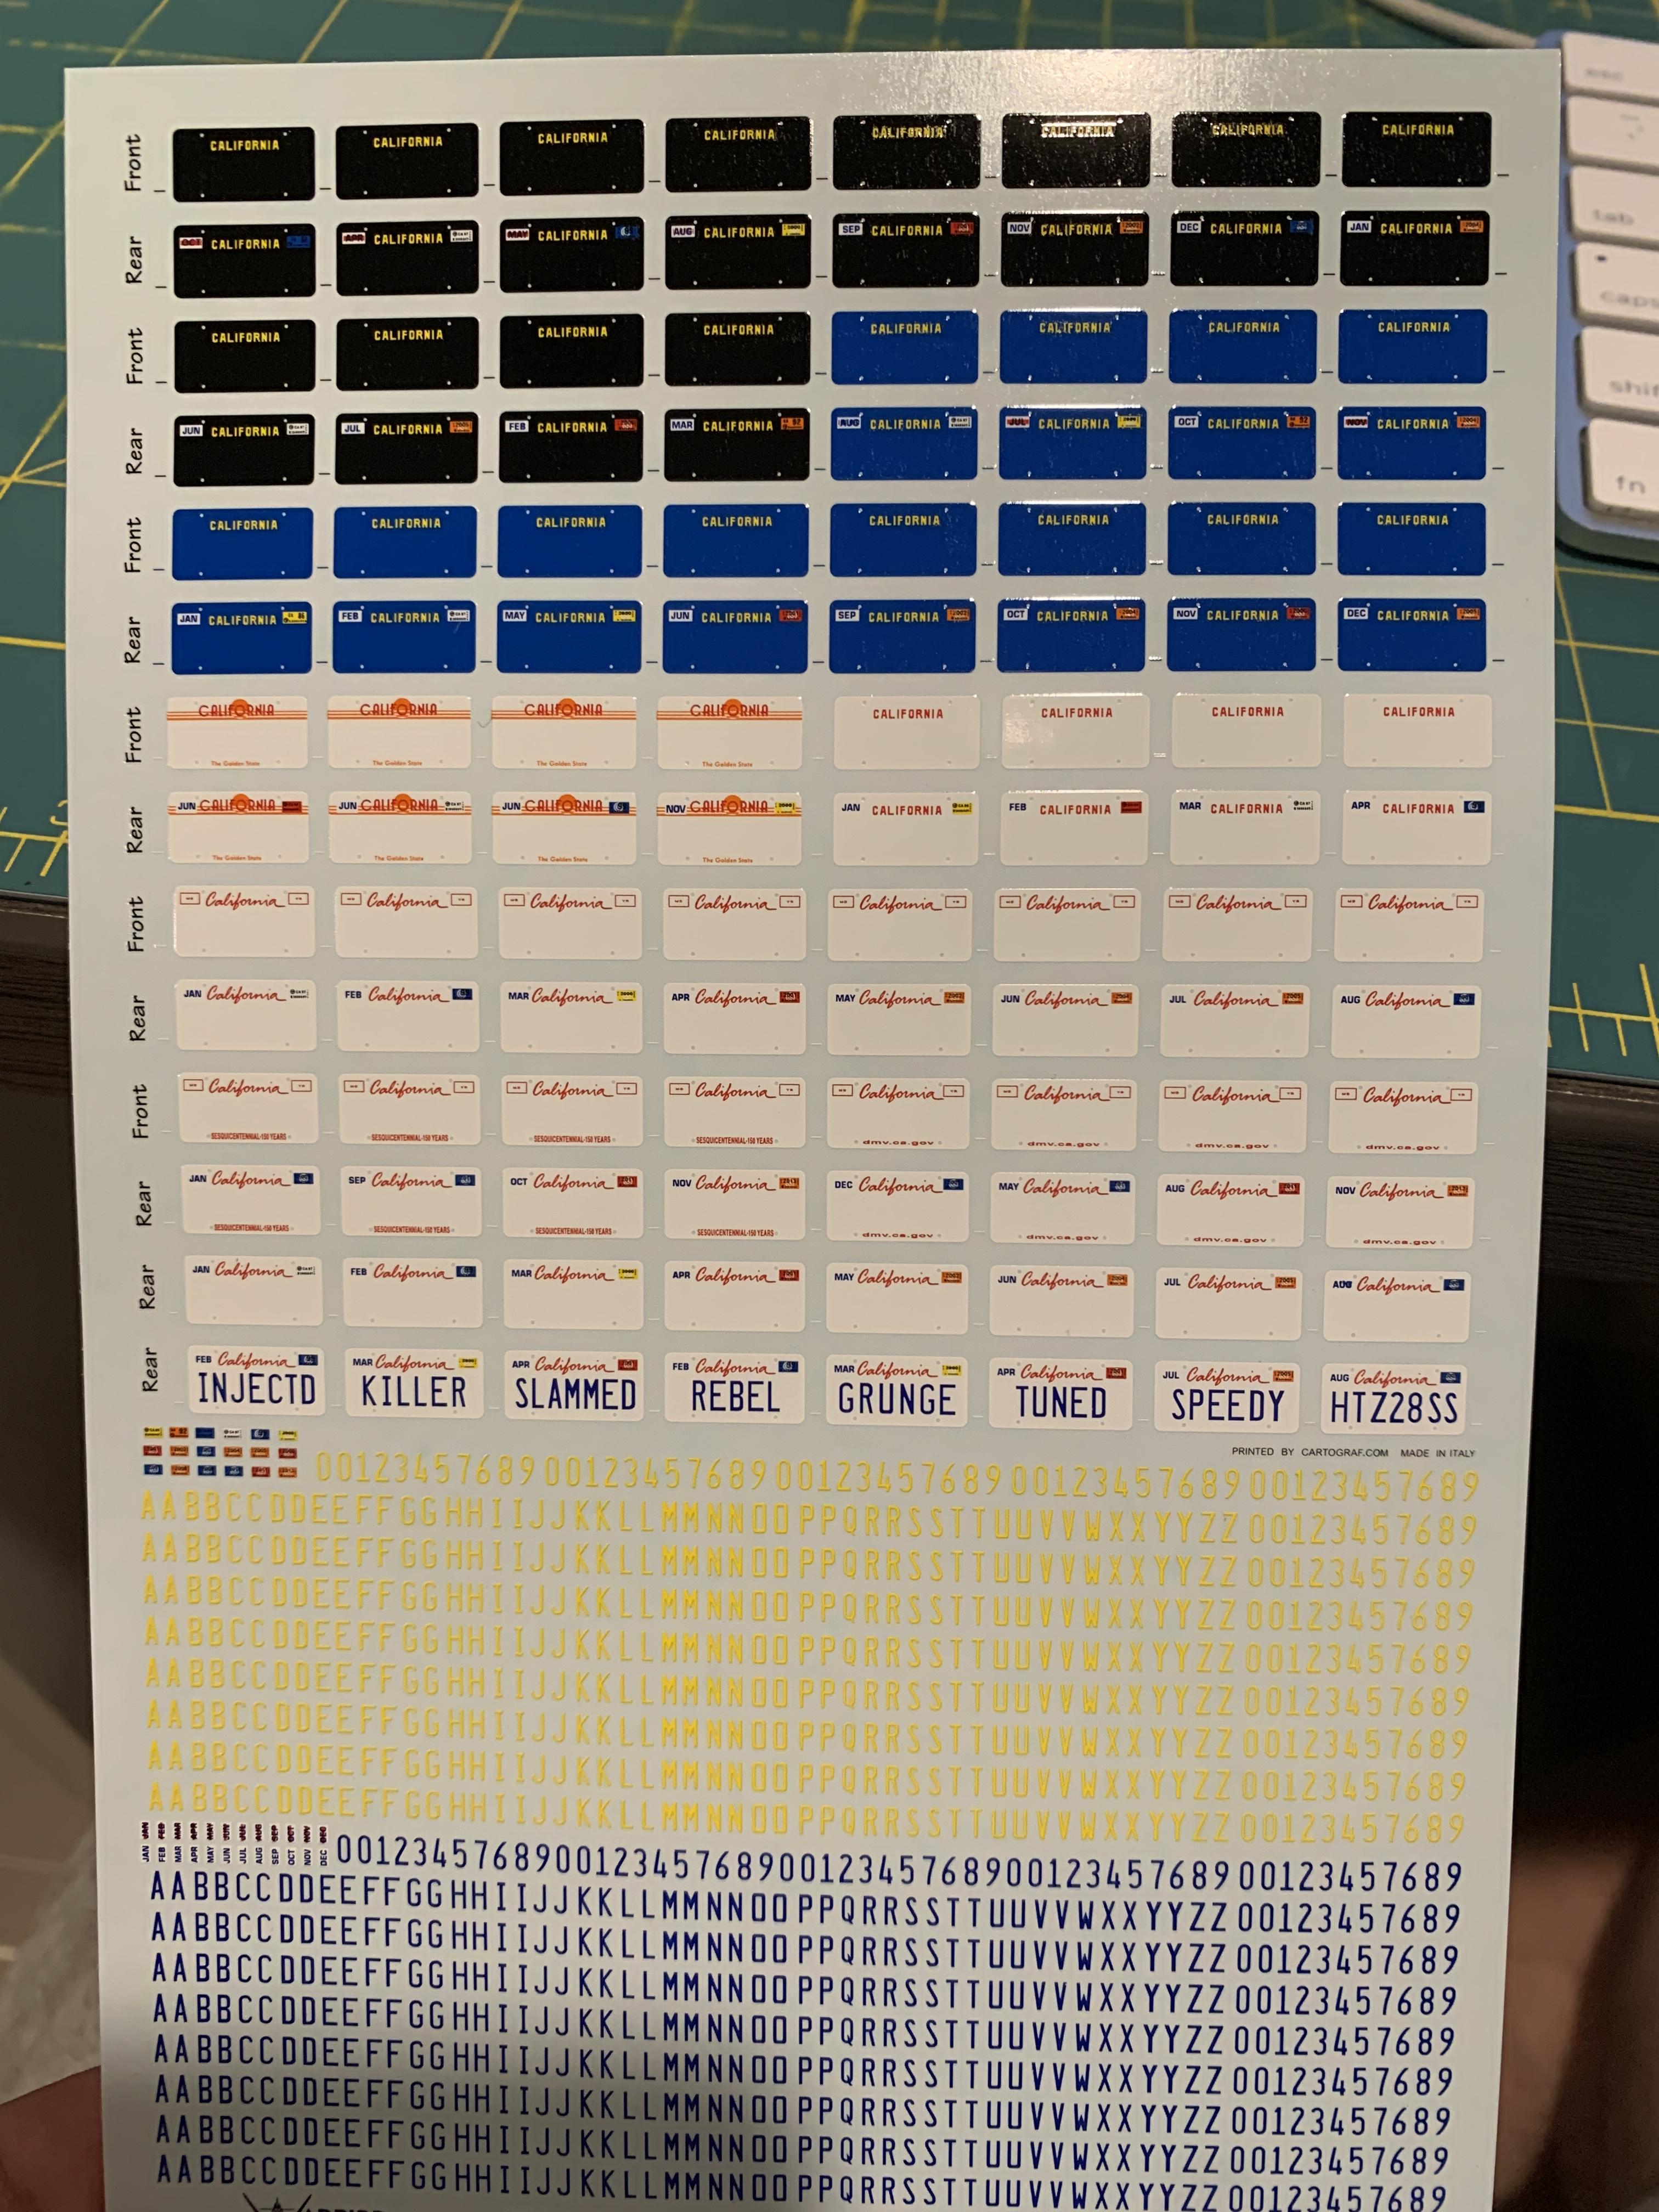
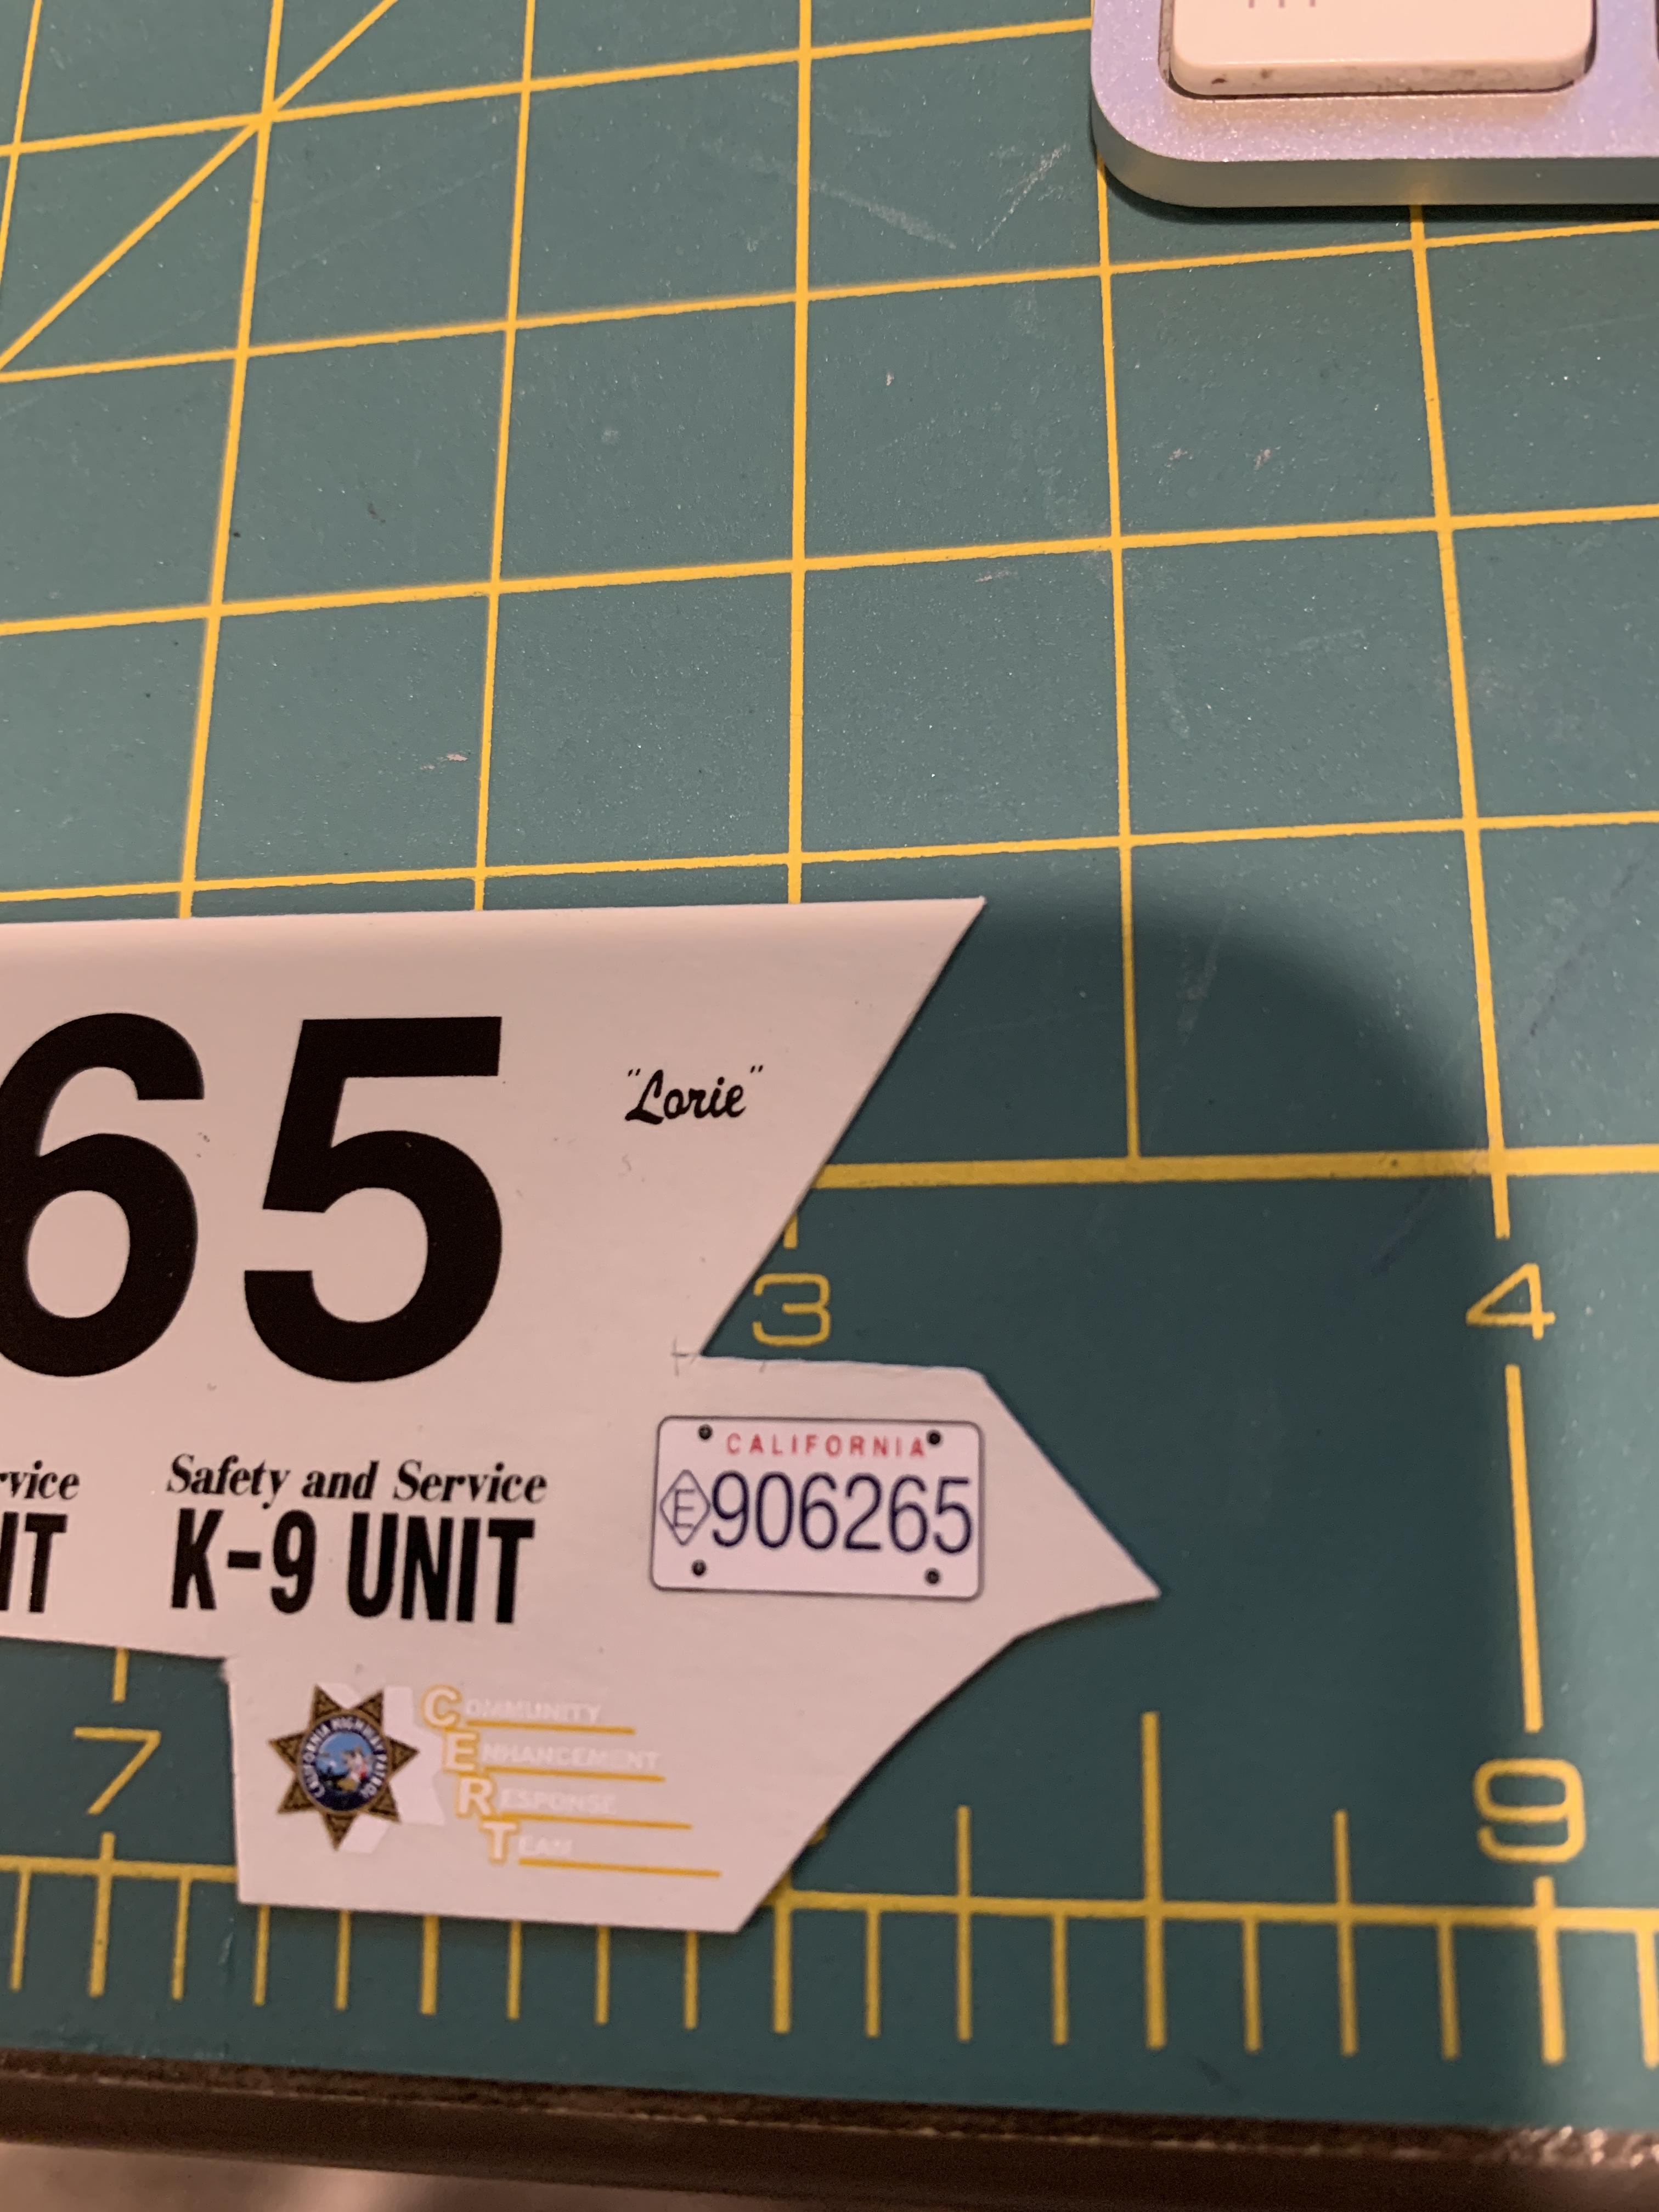
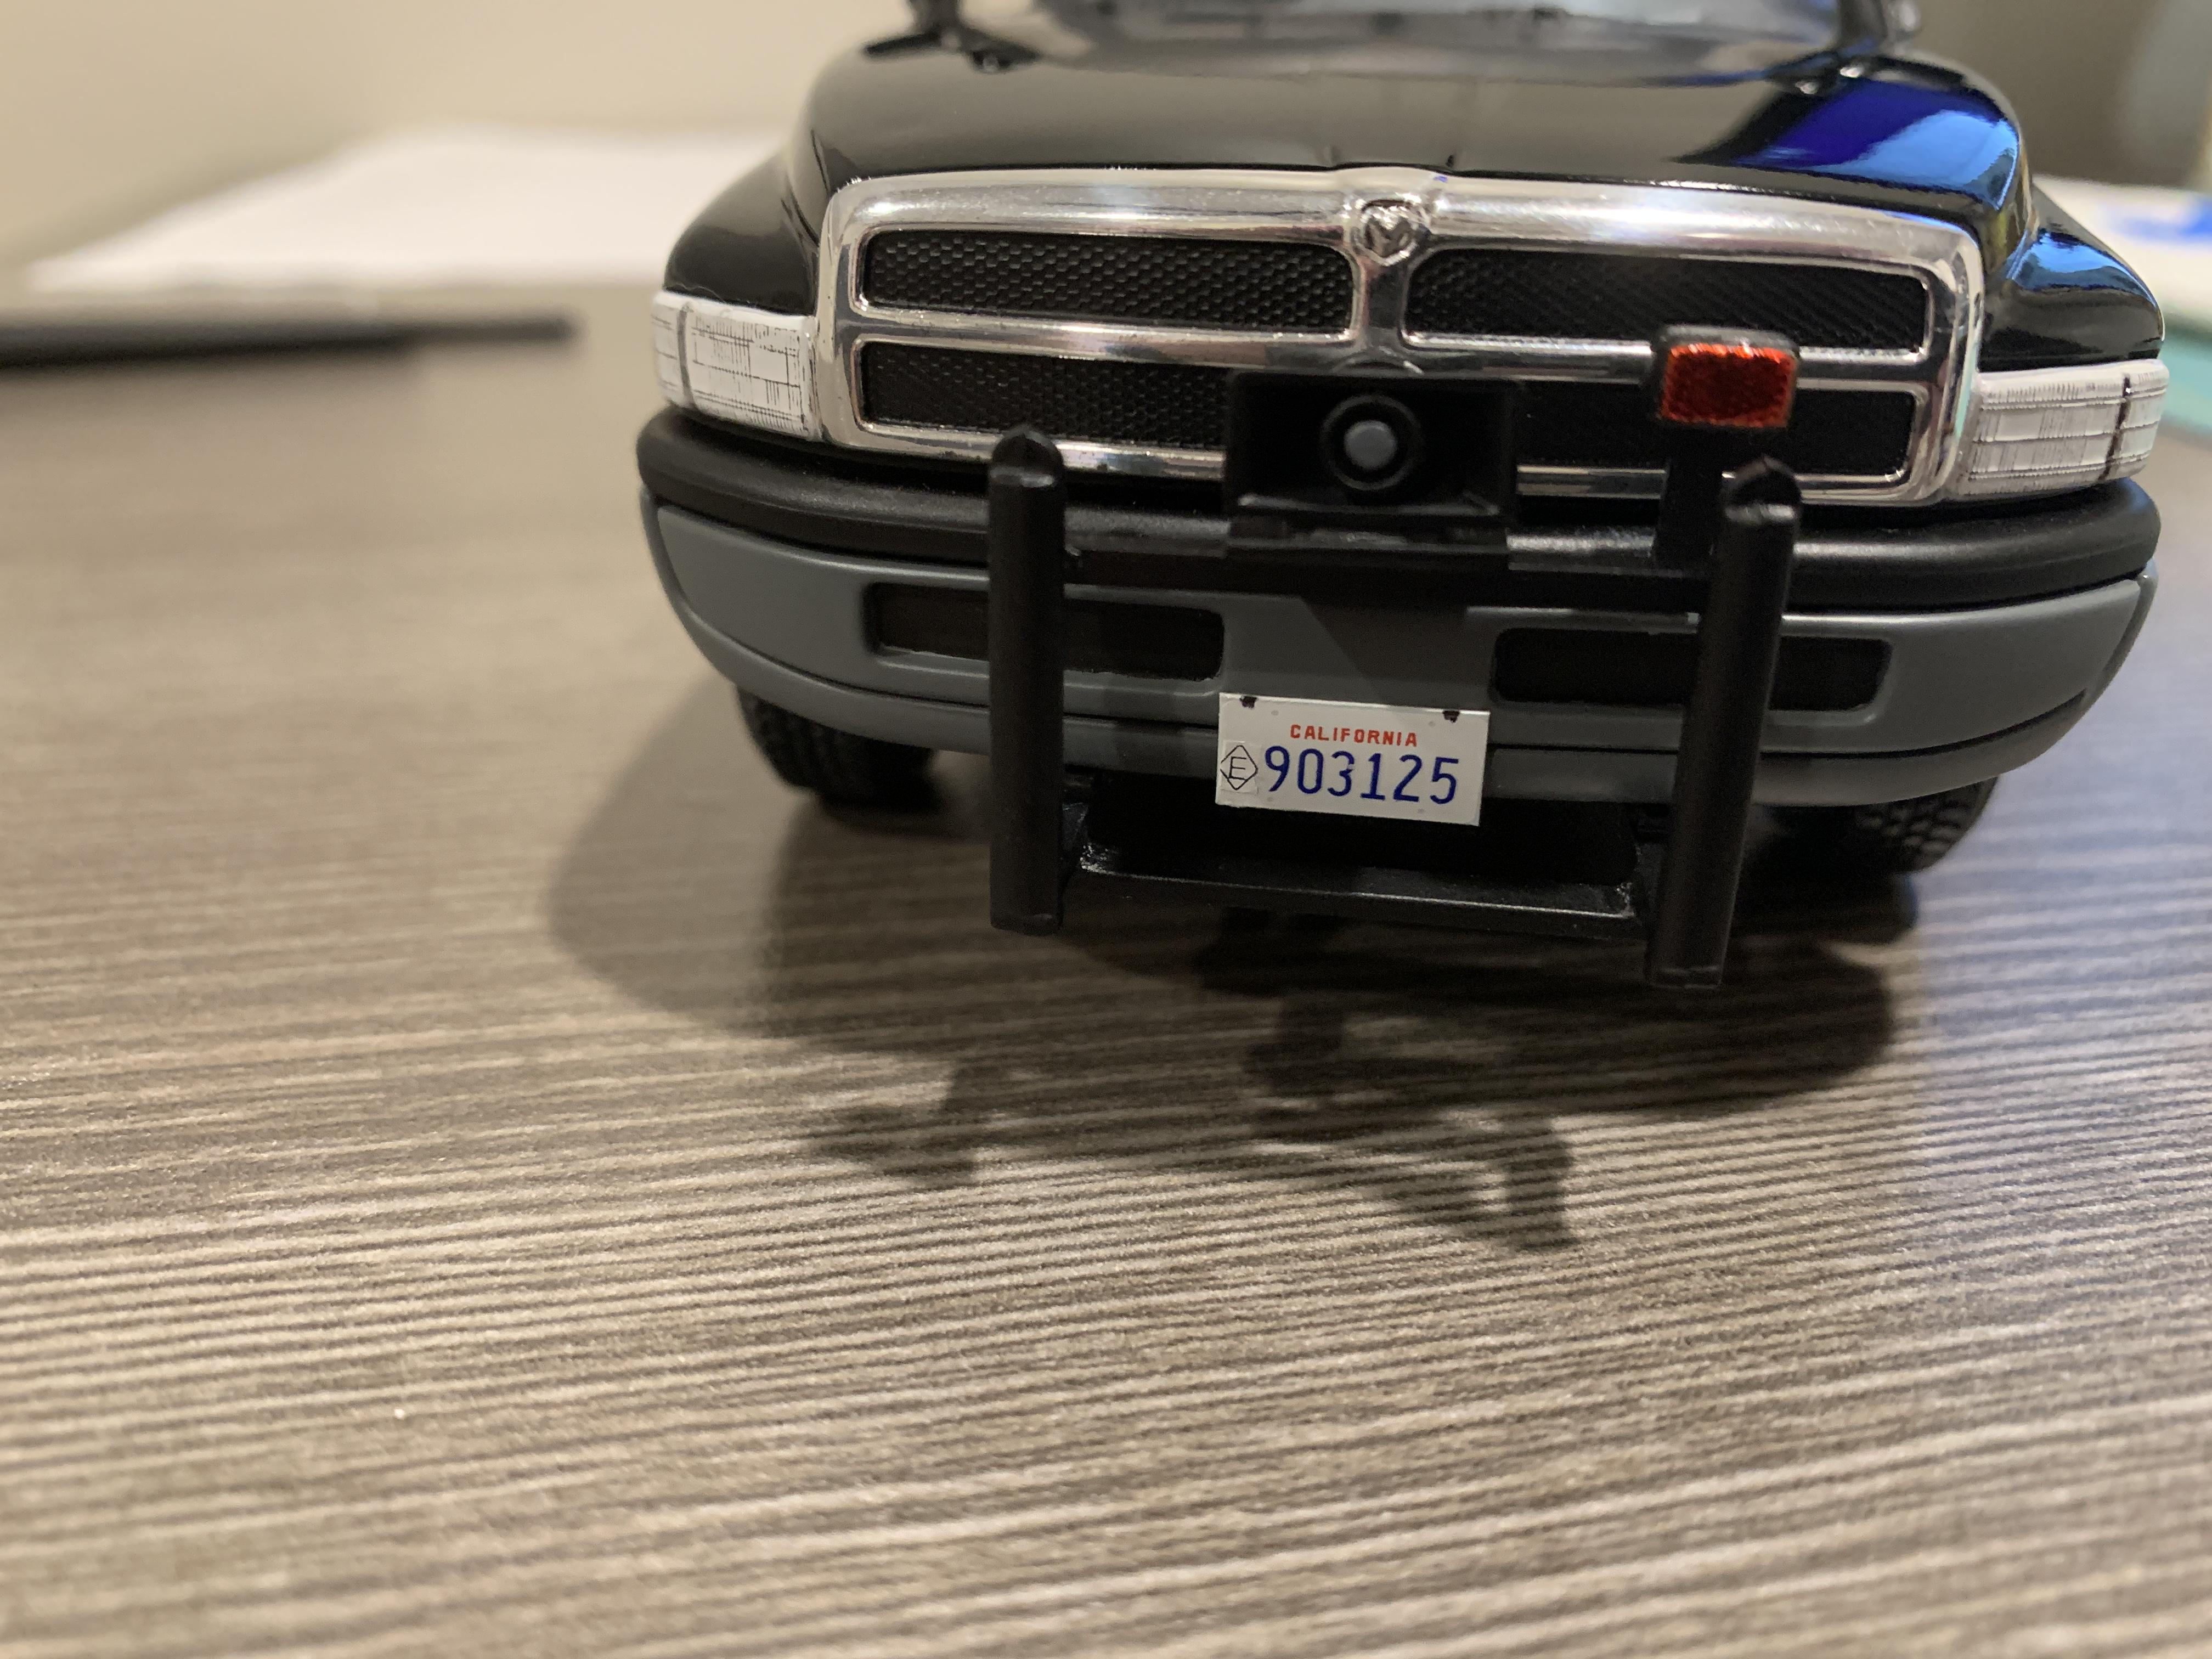
So I lied in my last post...sort of. I forgot to mention that I had to add license plates. I have many California law enforcement decal sheets, but most don't contain the specific kind of exempt license plate I needed. And the plates that I did have that were period correct looked a bit cartoonish. So I dug into my stash and found this excellent Warbird decals California license plate sheet. It had the correct plate that I needed, but unfortunately does not contain the "diamond" style E that signified an exempt plate during this time. So I decided to remove the diamond E from this CHP set that I had: Being the glutton for punishment that I am, I cut out the diamond and each number individually and then added it to the blank plate. I am more or less satisfied with the results, though the diamond E decal is thicker and literally stands out more:
-
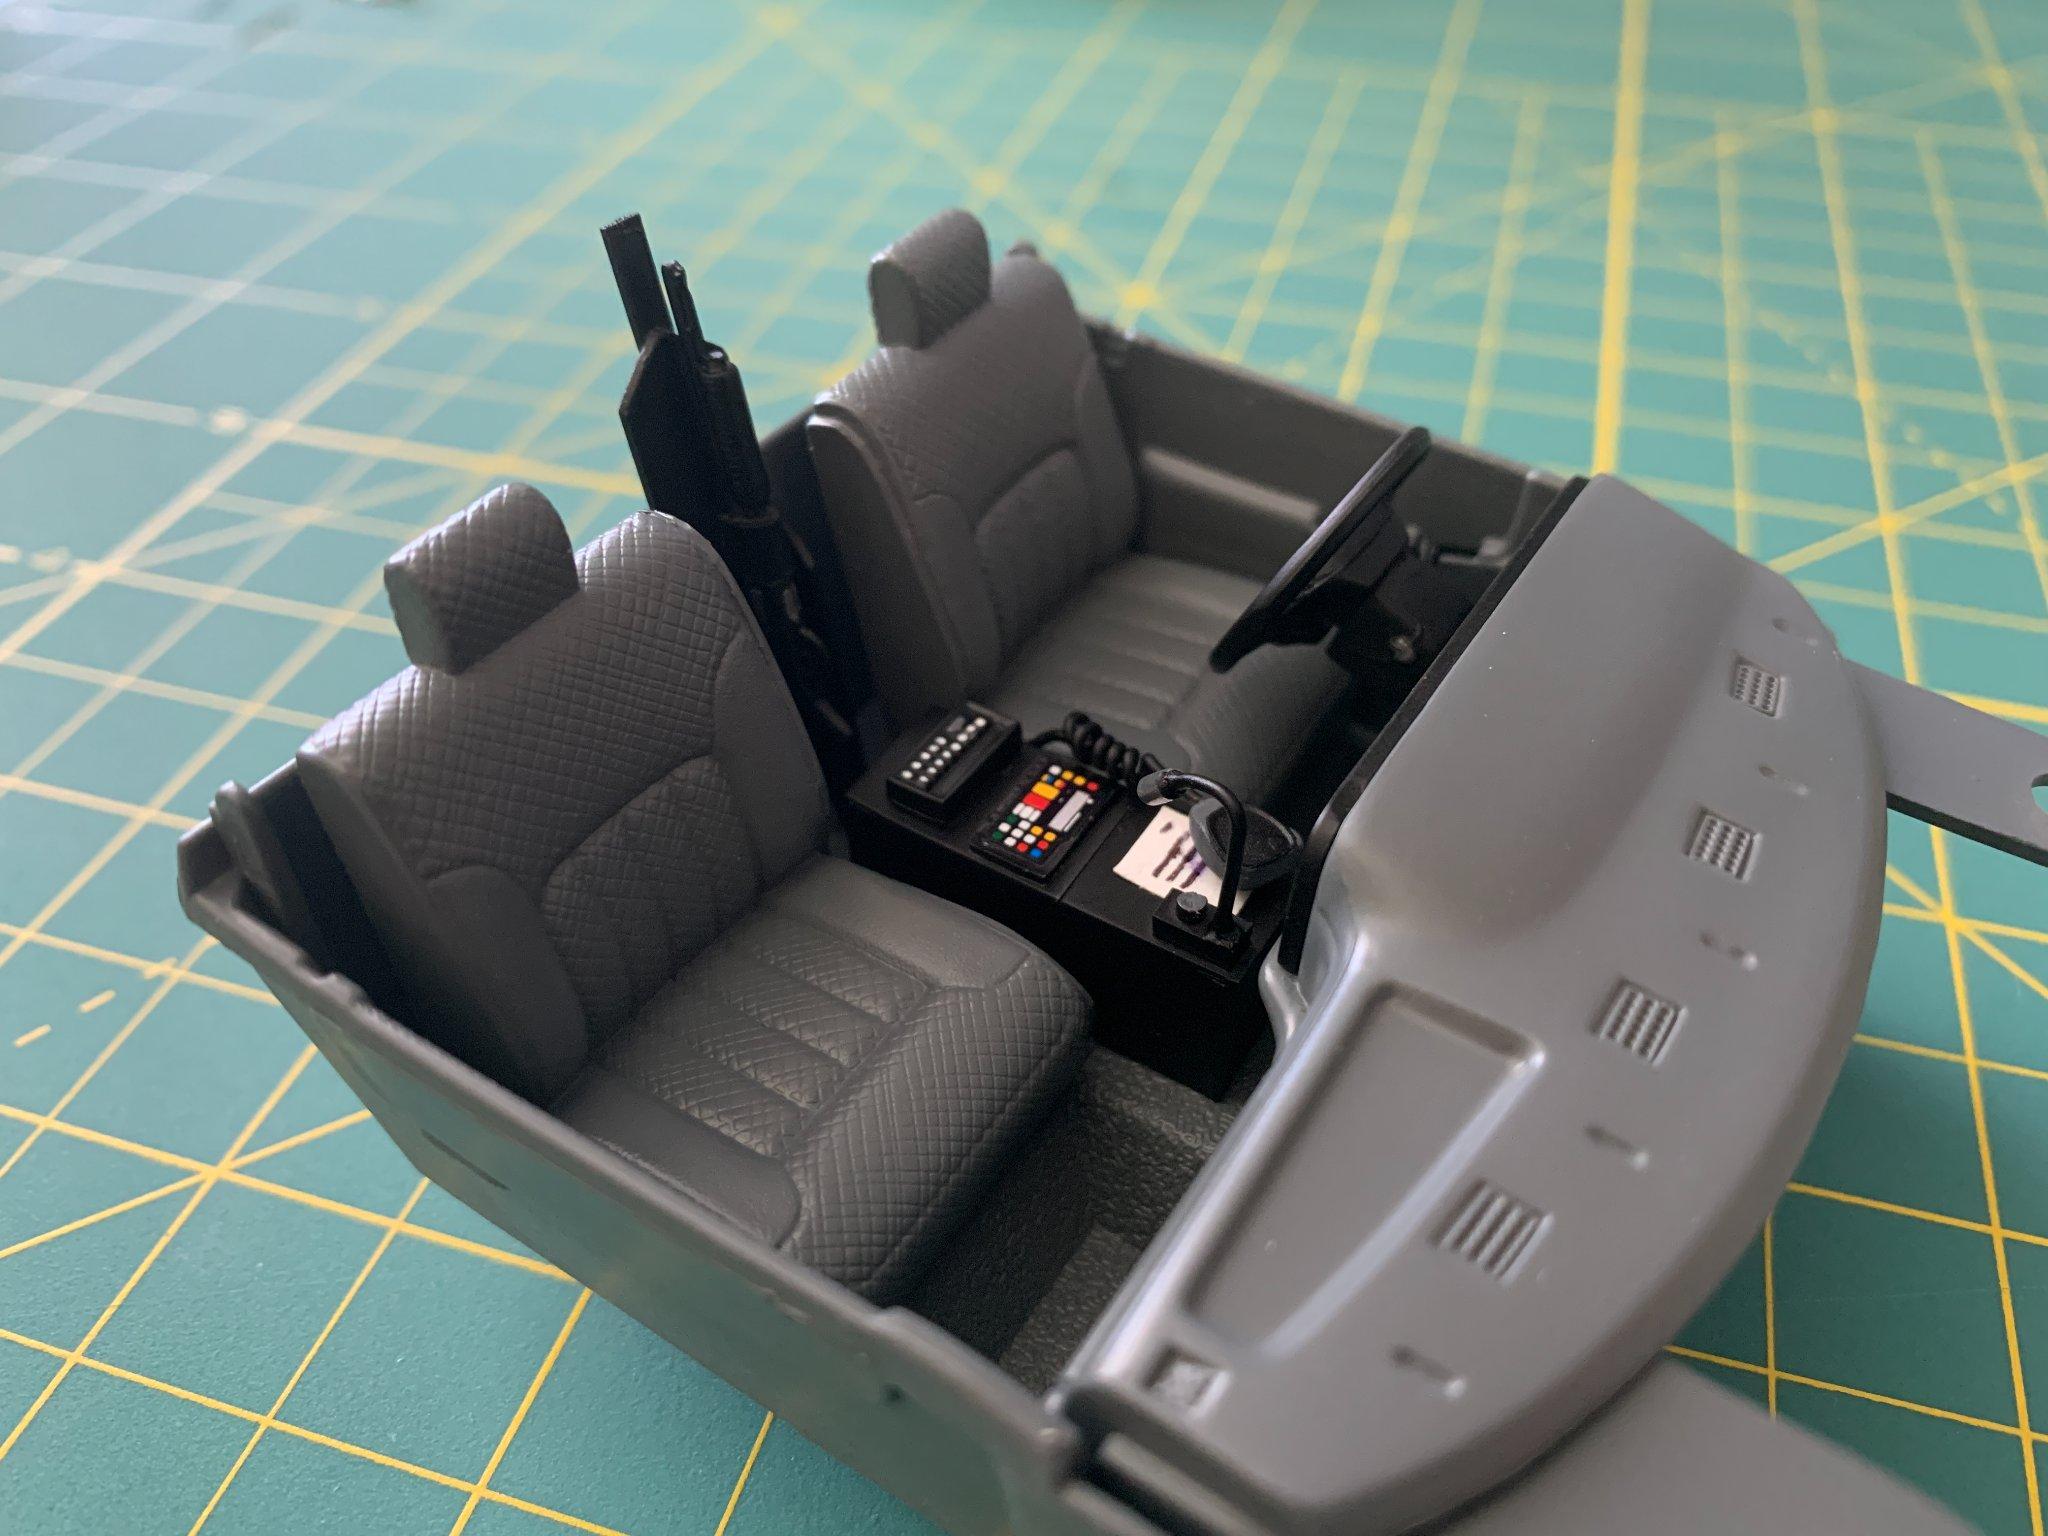
I got hit with the building bug last night and managed to do a lot of work. The topper shell is done and has been mounted in place. The third brake light was made from scrap clear plastic and I placed a 1/24 scale cone inside of the bed. I glued the front push bar, bumper-mounted red light, side mirrors, and spot lights into place. The truck is 99% done. I just have to mount the light bar and some extra antennas into place and it'll be done! This will be the last WIP post, the next shots will go Under Glass.
-
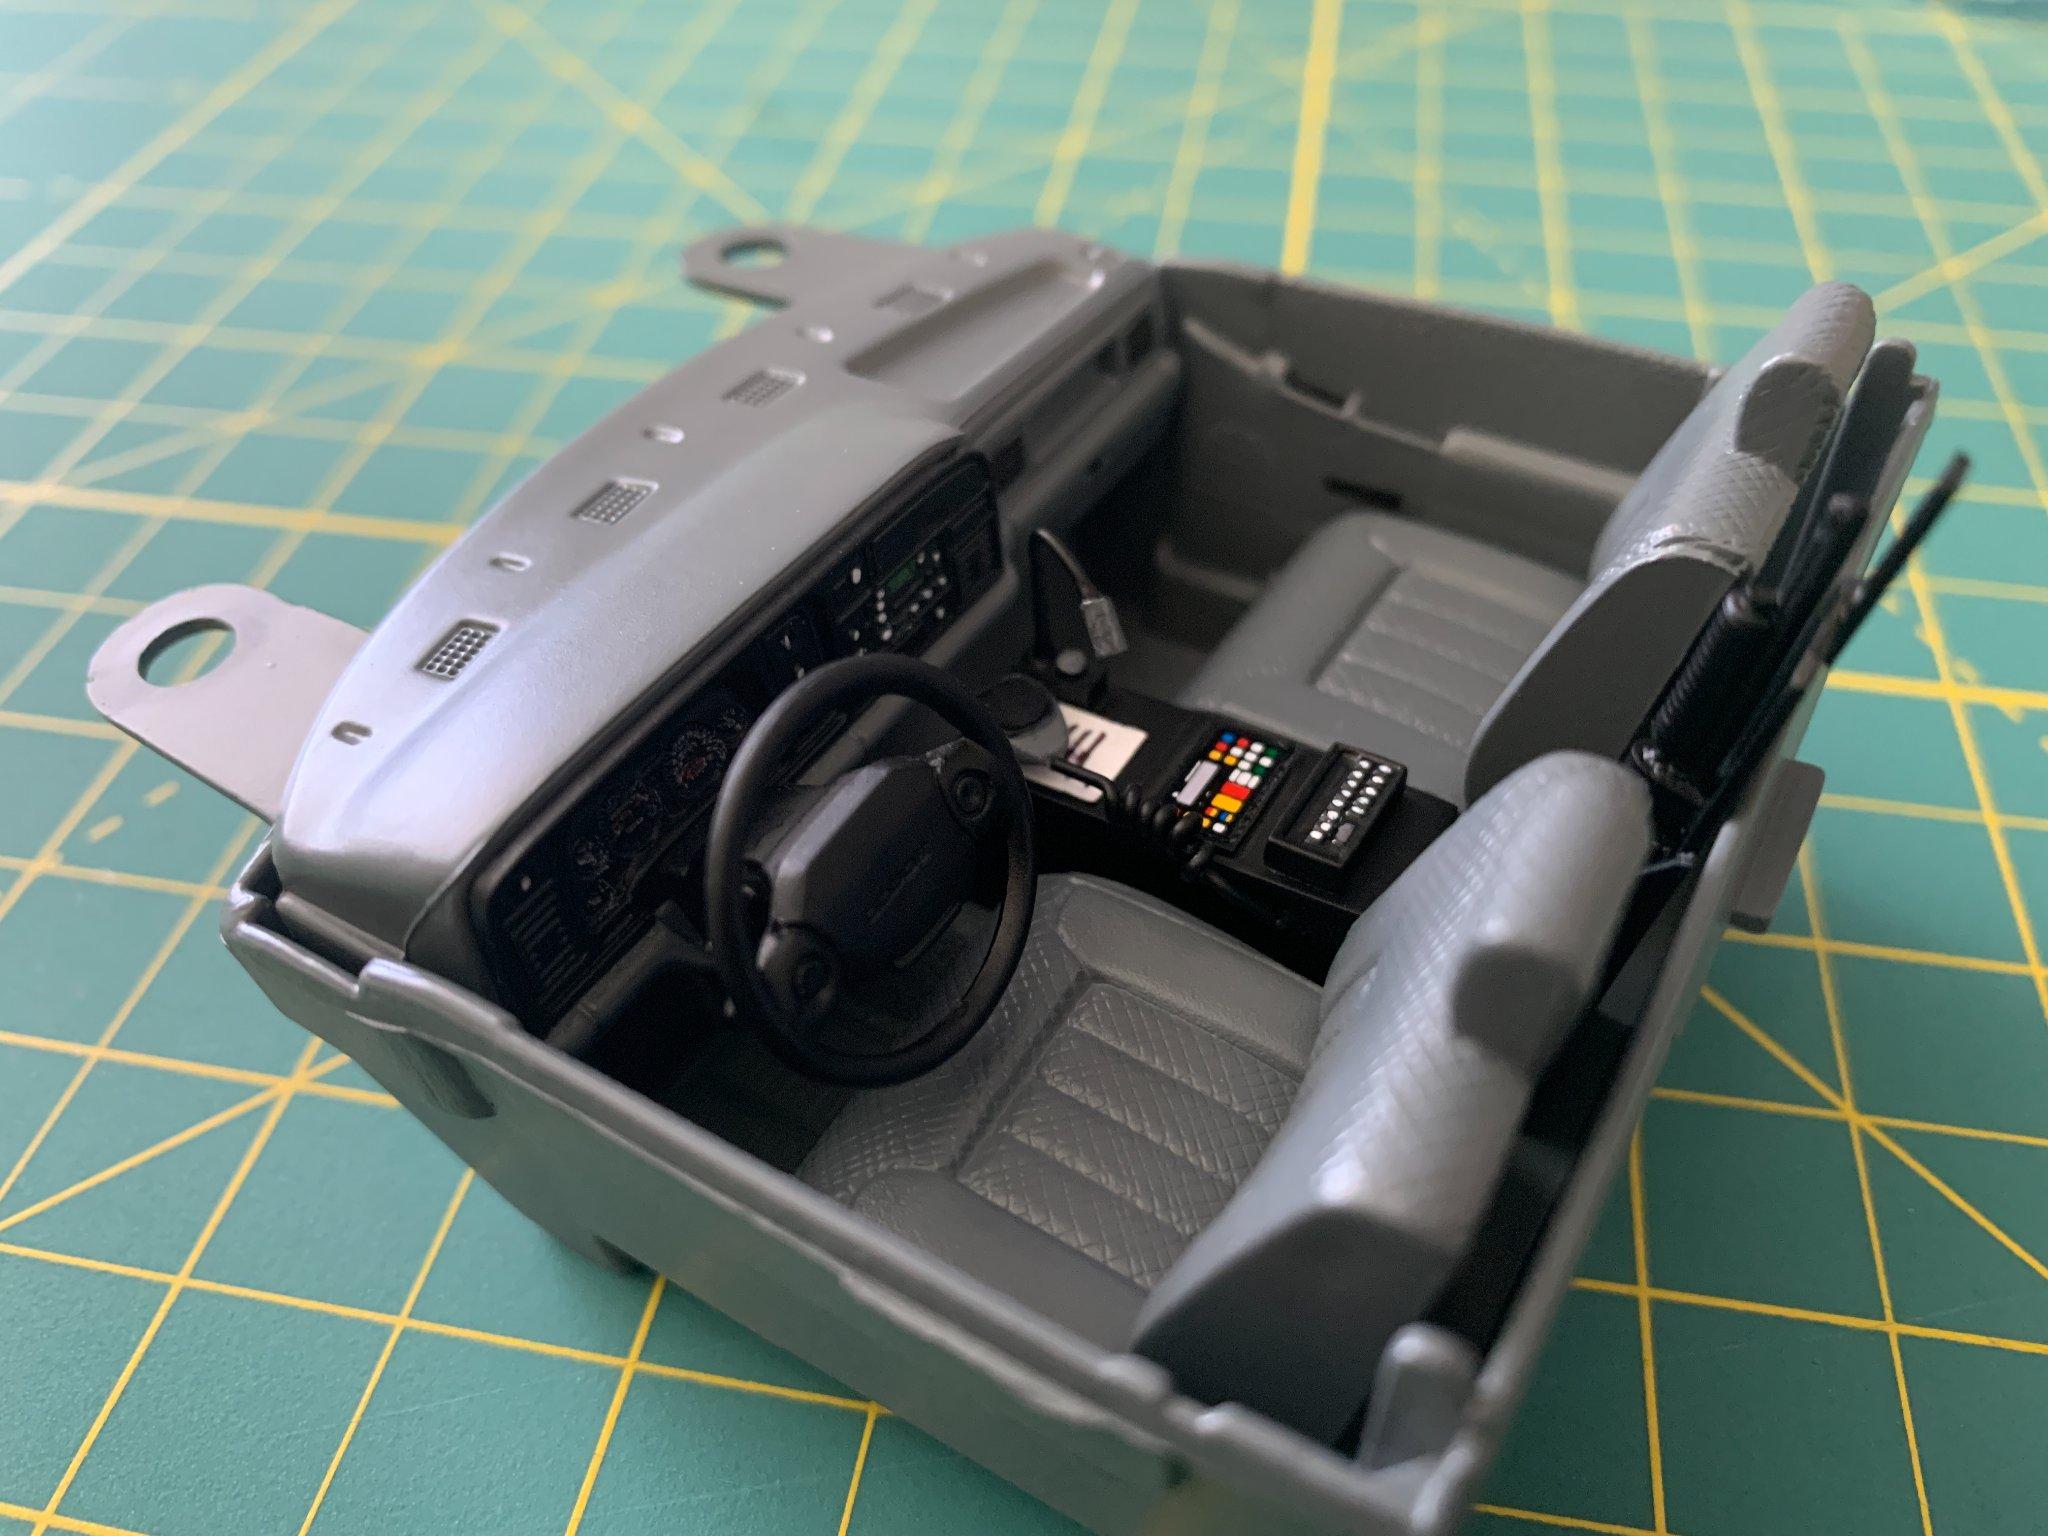
I know it's been a while since my last update but I ran into issues with the topper, including warpage issues, BMF issues, and an accident in which I dropped some thinner on it. Combining that with being busy at work, I decided to put the project away for a few weeks because we all know that we shouldn't work on projects while frustrated. Well, I'm finally coming back to it. I sanded and repainted the portions where thinner fell and I settled on using Tamiya X-11 Chrome Silver to paint the aluminum hinges. I'm going to continue working on the aluminum and black trim portions. I was hoping this project would be done a few weeks ago, but sometimes you have to set this hobby aside for a bit to recharge.
-
Haven't posted here in a while. Here's my cumulative haul from the last 2 weeks from various online and brick and mortar sources. Most of it was bought at some type of discount.
- 39,082 replies
-
- 1
-

-
- johan
- glue bombs
- (and 1 more)
-
They always have. Even the previous cases (same design, but they were previously sold under a different brand).
-
1990 GMC Sierra C2500
av405 replied to Chuck Most's topic in Model Trucks: Pickups, Vans, SUVs, Light Commercial
Looks fantastic! -
Interesting. During my visit, there was actually a 3rd 1/24 display case on the shelf. Unfortunately that one had no plastic wrap and there was a deep cut/break along one side of the case. It was still $6.99. I tried to get it for a deeper discount but was told that they couldn't as it was already on sale. In principle I disagreed given its state and decided not to buy it.
-
I finally went to my local Hobby Lobby specifically to buy a 1/24-1/25 display case and to see what the fuss was all about with clearances. The only kit I found on clearance was the Slammers 1998 Chrysler Concorde kit for less than $5. But to my pleasant surprise, the display cases were all marked down! Normally the 1/24-1/25 case is $9.99 but they were listed at $6.99. I picked up both remaining cases and a 1/18 case as well. All in all, I essentially got a 1/24-1/25 case for free.
-
Thanks for the continued encouragement fellas!
-
Thank you. It's never too late to dust off old plans ?