buildnething
-
Posts
106 -
Joined
-
Last visited
Content Type
Profiles
Forums
Events
Gallery
Everything posted by buildnething
-
Yea I use that technique, I just didnt want to bother with it. But I may give some though to just cutting it and adding some aluminum tubing. Not sure yet. Thanks for the tip espo.
-
Wow! Really? Thanks, I really enjoyed the weathering process. I have a nack for it. I guess. Too bad its not very visible. But when is it? LOL. Now if I could just get a flawless exterior. Thats my main problem. My body painting is not that great. I just do not have the sanding and polishing technique down yet.
-
I have a vise, the thing is the bits are not big enough. Those tips on the exhaust are huge compared to those tiny bits. That would take forever to drill out with those. I would think. I will just paint the ends black.
-
Exhaust is from the kit! I dont really care for it because it has flat ends there is no concave or drilled out hole so it doesnt look realistic and I have no idea how to drill them out big enough.
-
Really quite simple. For the interior there is no molded in wood grain, but it needs to look like wood grain. So what I did was I utilized Tamiya Desert Yellow XF-59 for the light wood grain, then I used Tamiya Nato Brown XF-68 for the dark wood grain panels. Both through an airbrush. But you can use any brown and tan colors you like or feel are accurate. This is just what I had handy. It obviously was taped off, Thats the hard part. Tight spaces and had a curve over the wheel well. Then I cleared that. Upon drying of the clear coat, I made a wash utilizing Master's Touch oil colours Raw Umber HO540, and just coated the entire surface. I then took a dry wide/flat brush and put streaks through the wash to simulate a wood grain effect. I plan on doing the same on the outside but I will use the wood grain decals provided for exterior. They look really good.
-
Thanks restoman Mike! This really is a fun kit, even with the elaborate painting. But it will be worth it in the end. This is really pushing my boundaries yet allowing me to utilize many painting techniques. Think its going to turn out nicely.
-
Progress Update #2 Interior assembled and mounted to chassis, and beginning work on the chassis and drive train assemblies. Mock ups Interior. Engine Mocked up.

-
 Awesome painting so far! Will keep my eye on this! Thanks for sharing.
 -
Bat mobile from Dark Knight Trilogy. The Christian Bale movies. But they called it the Tumbler though. Pretty awesome vehicle.
-
Moebius Batman V Superman Batmobile parts photos
buildnething replied to Dave Van's topic in Car Kit News & Reviews
Right on! I will check that out. Thanks! -
He actually did it though! Here is the link. http://www.ebay.com/itm/ALFA-ROMEO-COUPE-33-1-16-BIG-MODEL-KIT-OTAKI-JAPAN-rare-one-/361444761488?hash=item5427c95f90:g:rfEAAOSwxN5WZPVA Good luck! Awesome looking kit, of an awesome looking car. But a little too rich for my blood.
-
Moebius Batman V Superman Batmobile parts photos
buildnething replied to Dave Van's topic in Car Kit News & Reviews
YES! That is exactly the way I want to do mine! What color did you use? Is that Modern Sand Camo? Keep us posted on these guys! Thanks -
Granted my knowledge of hotrods is limited, not really my style. Im only 32 keep in mind. But what is this exactly? It doesnt look like a 34 Roadster, nor does it look like a 34 Pickup! The body looks nothing like a roadster. The roadster curves down in the back not up. This looks like a sedan with the roof chopped off and a shortened truck bed! Am I wrong or is google images not giving me the right info?
-
'48 Ford Surf Woody- ready for high tide
buildnething replied to StyreneDestinations's topic in Model Cars
Appropriately shared! I am currently working on the 41' at the moment. I kinda wish I could find those stock wheels. I would much rather use those than the seventies style wheels in the kit. -
I agree, these kits really show their age, when they have setups that were modern back in the seventies! But I guess that is whats good about the aftermarket or buying newer car kits. You can get modern LS or Coyote motors..now in resin. I dont mind the old stuff though. It makes for a period correct model for its time. Thank you for checking it out and complimenting the build. A little bit of detail painting and weathering goes a long way! I try to do as much as I can with what is in the box. But I am venturing out more and more to get that impressive details.
-
Yea some conical air filter.
-
Yes this is the latest Round 2 kit thats been out for awhile now. This is the only option you get. No stock option. Which disappoints me. I dont really care for this set up, but its pretty crazy looking.
-
Thanks Slush! Not the easiest kit, at least in terms of painting. I think the skill level rankings should take that into consideration. LOL. I definitely think this particular vehicle requires some techniques that some may not have. But overall assembly and fit is easy enough. Lots of sanding though, to remove mold lines and flash. Overall a fun and educating experience so far. That is all that matters. I try to learn something new on each build.
-
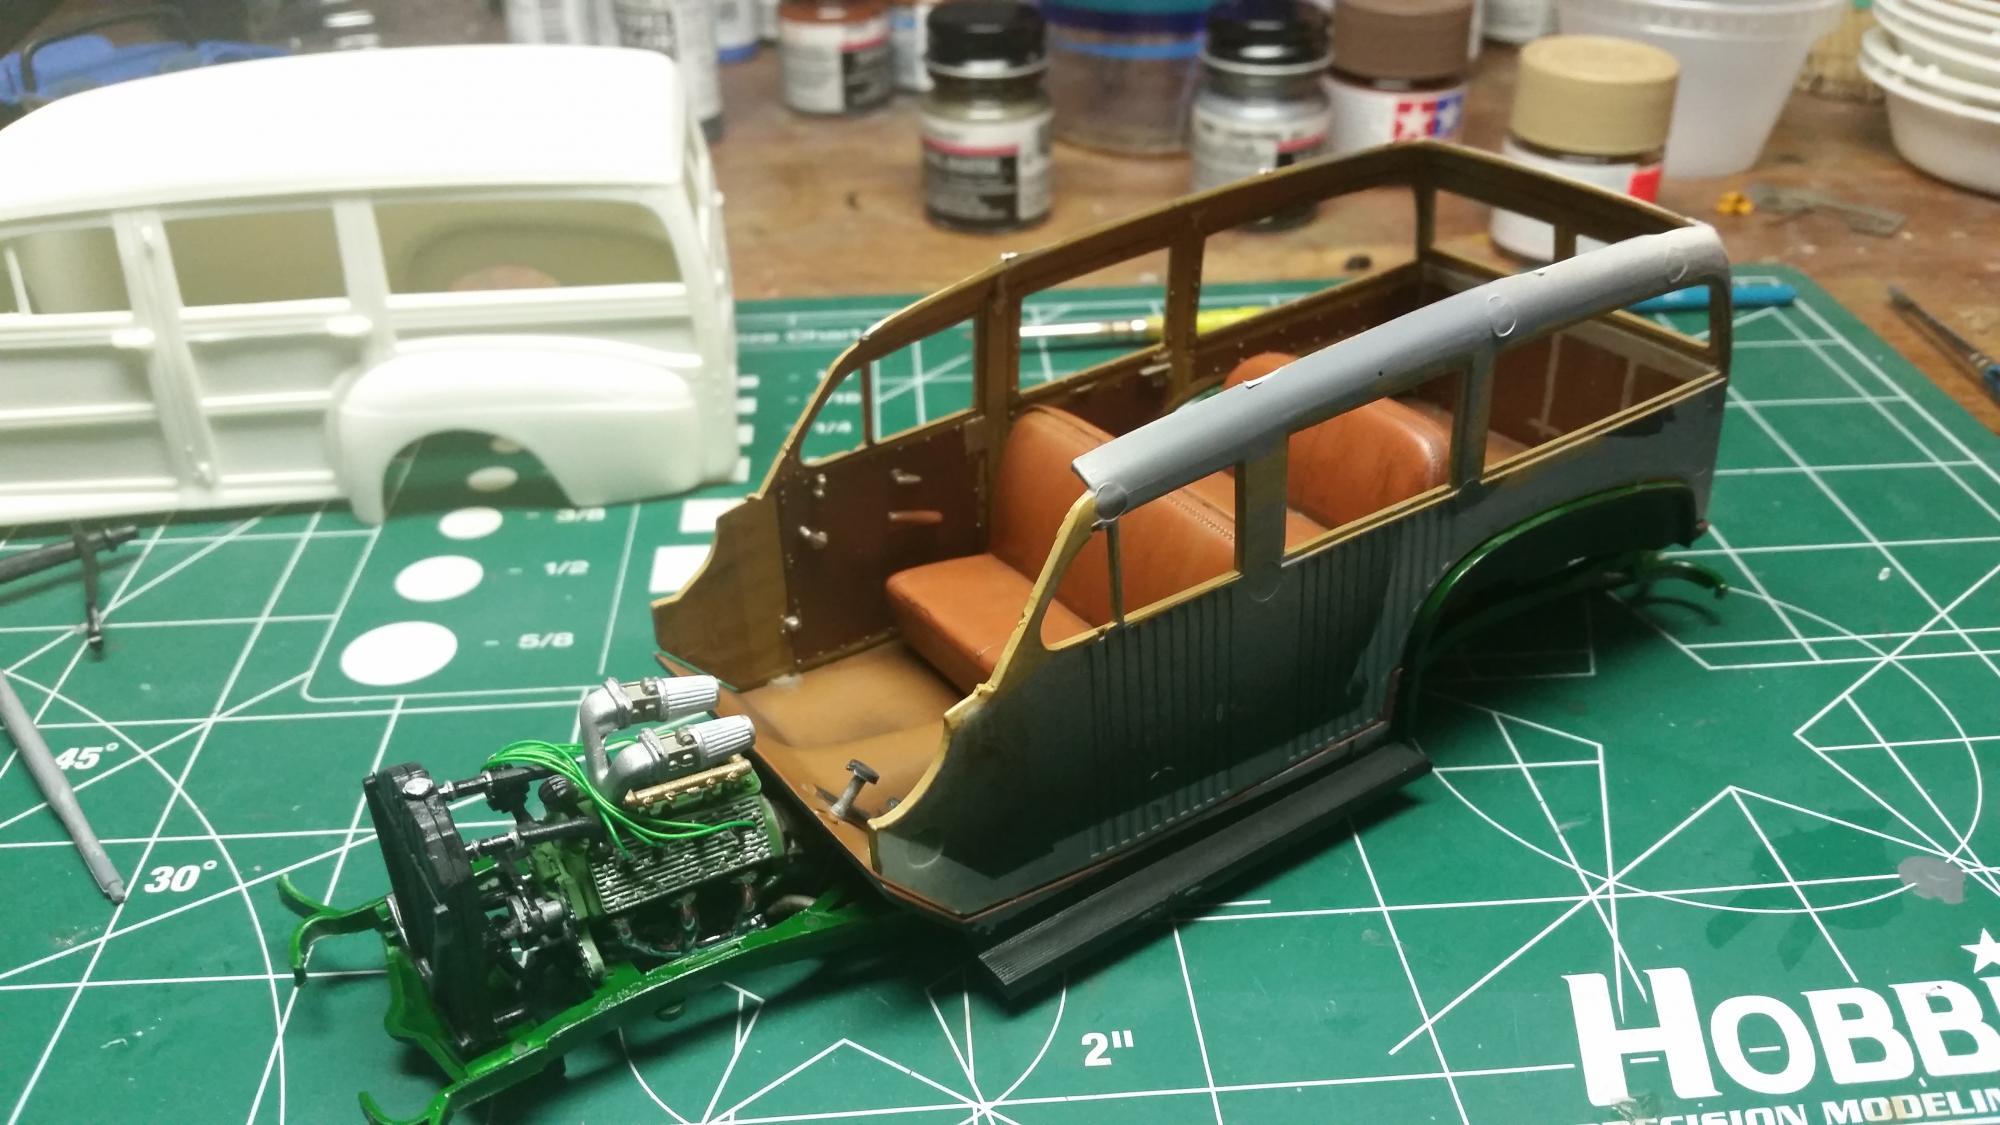
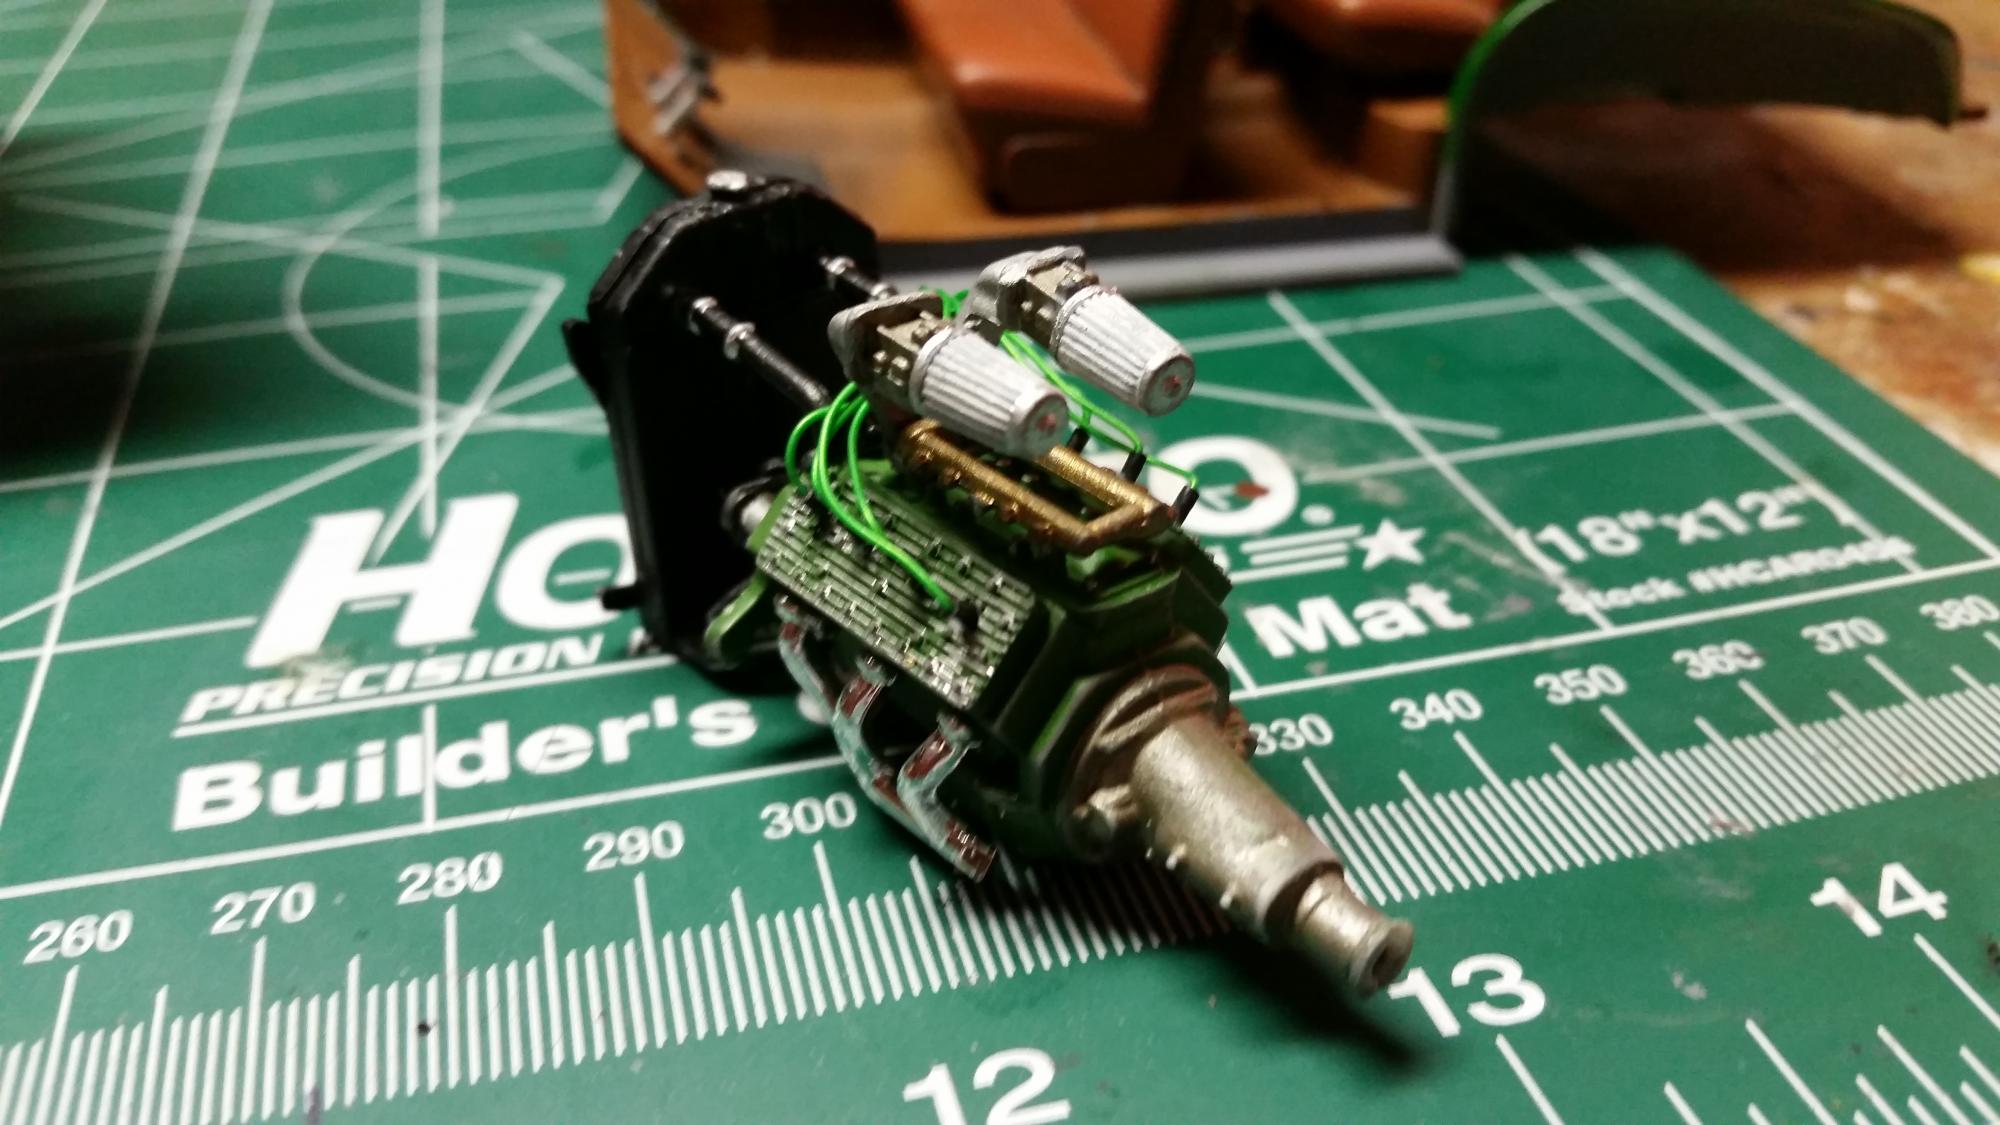
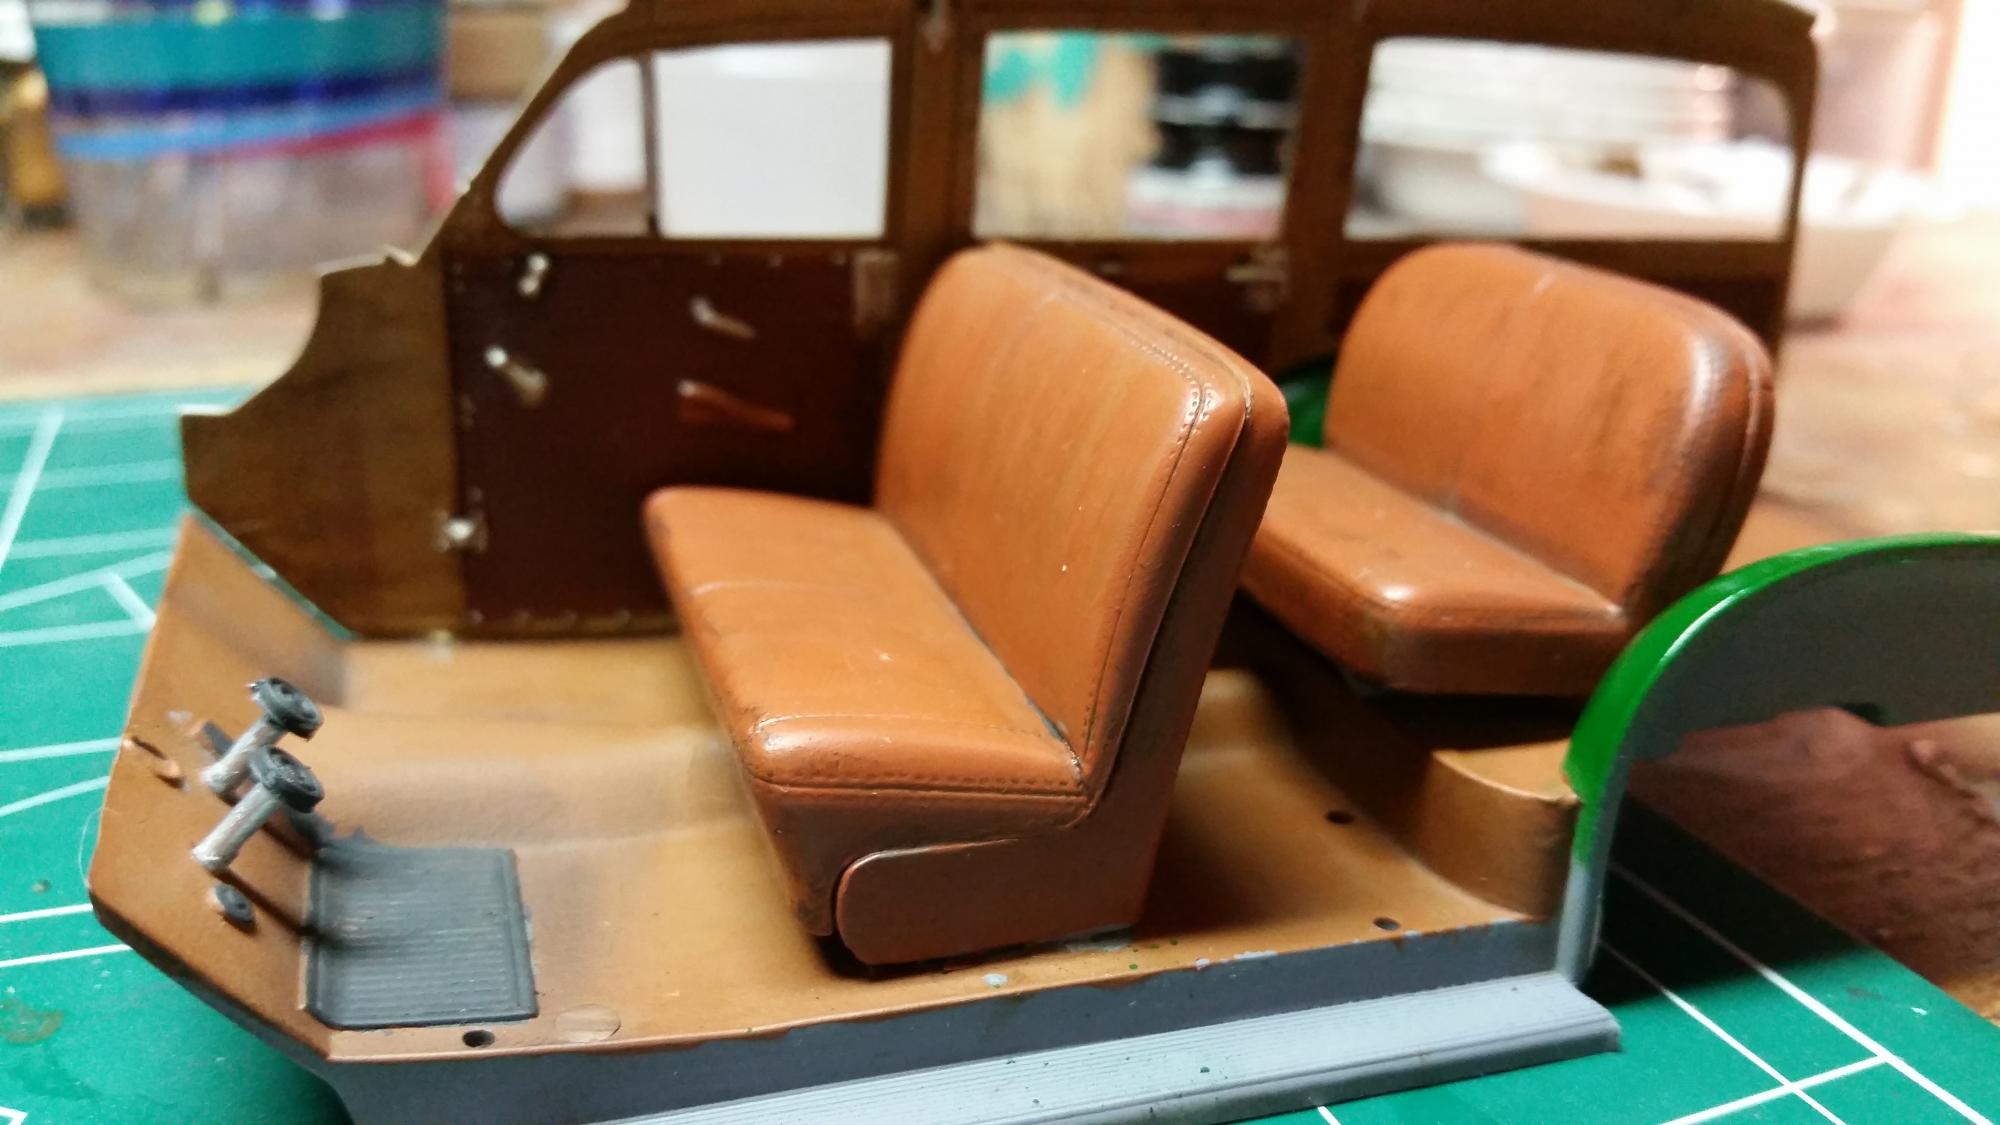
So I have a terrible habit of diving into builds and then not posting progress pics...But I guess I will share this. Along with the Accurate Minatures Grandsport Vette, I am building this Classic Woody. I am going for a true, grungy looking surfboard hauler, with some custom touches. Mainly going to build it box stock, but I added plug wires, and plan to scratch build a roof mounted surfboard rack. I am using copper tubing and plastruct 1.0 x 3.2 mm Styrene strips. This will be my first go at scratch building and my first attempt at soldering! Wish me luck! This wont be a show queen custom woody but more of a weathered daily. Here is what I have done so far. Shout out to my amazing girlfriend for shooting these pics, admiring my work, and being supportive of my hobby/addiction. Colors used: Vallejo Model Color uniform green, Chrome silver for the head cover detail, Jet Exhaust for the trans, Gold, Flat white, and semi-gloss black. Can anyone tell me what engine and intake setup this is? I know its a flat-head but that is about it. The weathered grungy interior. So many paint colors used on this interior alone. Man masking those doors was a job but absolutely necessary. Airbrushed, clear coated, then used an Ochre oil wash, then used pastels for dusting and grime. The woody will be Tamiya's dark racing green.
-
Goodbye Scion
buildnething replied to martinfan5's topic in General Automotive Talk (Trucks and Cars)
It only makes sense. Now hopefully they can continue the FR-S as the GT-86 here, and put some more TRD versions out. Really what Toyota should have done is instead of creating a whole new line and brand, they should have developed TRD more and made it a true in house tuning/performance division. For example, M in BMW, Polestar in Volvo, AMG in Mercedes, F in Lexus, SVT/ST/Shelby with Ford, and what not. TRD should have been something similar imo. I think that is what they will do. They will release that "supra" prototype as the flagship, the FR-S will move over to the toyota brand to be a cheaper alternative. -
1972 Dodge Charger?
buildnething replied to buildnething's topic in General Automotive Talk (Trucks and Cars)
Thank Bill for all the insight, I havent purchased the hood or grill yet, waiting on reference pics from my uncle to confirm, so I am okay on that front atm. I have only glanced at it a few times, and from what my memory is telling me its y4 Honey Dew Yellow, with Black stripes and I believe it to have the rallye option wheels from the goldish one in the pic. Now the door indentations would be beyond my skill level. I will check out missing link! I dont mind spending extra if it makes my life easier! LOL -
1972 Dodge Charger?
buildnething replied to buildnething's topic in General Automotive Talk (Trucks and Cars)
Thank You Jeff... Cherish the moments as they say! Sorry you never got to do something similar, but I know they are looking down proudly on you! I just know it! I am excited to start this build and share it with everyone. I also just purchased an original MPC Dodge Daytona Turbo Z off ebay, and will be doing my other grandmother's car from 1984 I believe. She had a black one, with the red trim. Funny story, as a kid, I used to call her my black grandma to differentiate her from the other, since her car was black. LOL Kids say the darnedest things. -
1972 Dodge Charger?
buildnething replied to buildnething's topic in General Automotive Talk (Trucks and Cars)
I literally just found them! I think I will get the hide away grill, and the flat hood for this build! Thanks. -
1972 Dodge Charger?
buildnething replied to buildnething's topic in General Automotive Talk (Trucks and Cars)
Thanks everyone! All very helpful information. At the moment I am simply researching and waiting for current photos of the car for reference. My Grandfather still owns the car, and its been in storage most of its life. I hardly ever get to see it because of him living about 1 hour away, besides I never really thought to ask, always busy with being with family. But he is getting older, and I just felt like it would be a cool build to do for him and myself. This will be quite the project, and will be sometime before I will get anything up on here in the workbench section. But please anyone with any information, tips, or parts would be helpful. Derrick -
1970 Challenger T/A build (Revell 1/24)
buildnething replied to Shelbytona's topic in WIP: Model Cars
I love this kit! Isnt it a FUN kit? But one question..why are the seatbelts only on one side of the seat? Im confused. Dont lap belts connect from both sides??