mecklm
-
Posts
174 -
Joined
-
Last visited
Content Type
Profiles
Forums
Events
Gallery
Everything posted by mecklm
-
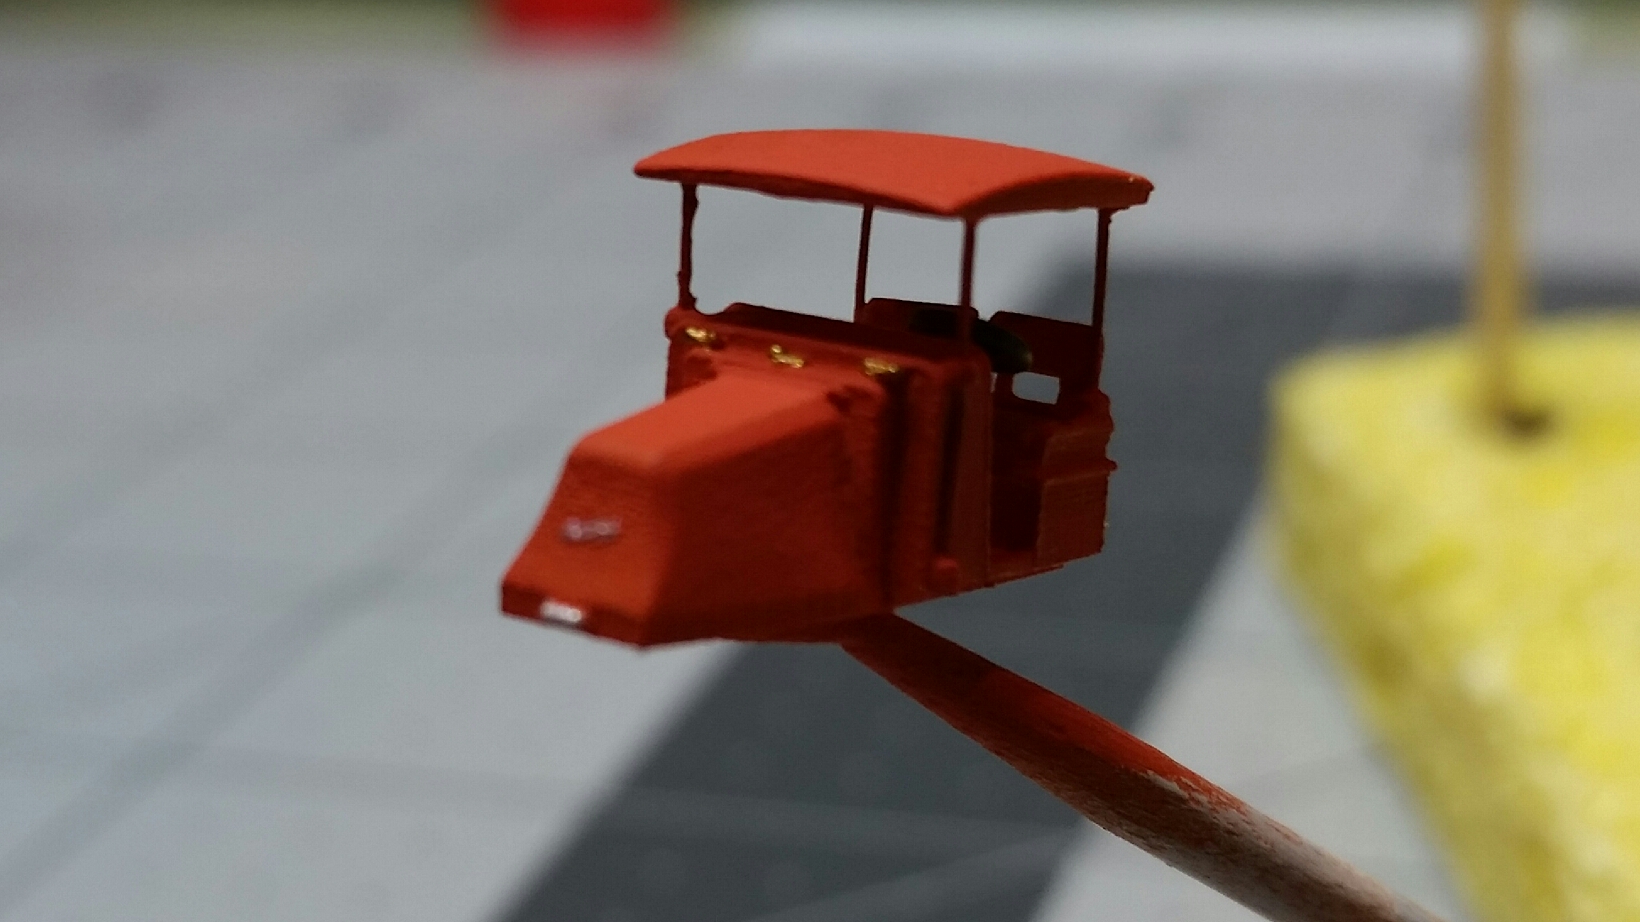
 Okay, back to the truck build. You may have noticed the roof construction in the CAD image above, and how it's basically a convex panel supported by four posts fastened to the corners of the cab. There was no question that these four posts would not be possible as part of the print. What I elected to do was provide holes in the cab and the underside of the roof and cut the posts from some brass rod (wire). I used 0.008" diameter rod, which equates to 1.28" in 1:1 - not too bad, especially considering it would be fairly strong given the short lengths. As accurate as the printing process is, I still had to chase the holes, mainly to remove that plastic/wax boundary layer. I happen to have a variety of micro drills so I used a 0.21mm diameter (0.0083") to clear out the holes. To be honest, a #80 drill would have worked just as well as sometimes a little extra clearance can be an advantage. I cut the four rods long and fastened them to the cab with super glue. At this time I also cut the parking brake and shift levers to correct length and fastened them to the floor. I used 0.006" diameter rod for these two items. Here's where we now stand... I put a tiny spot of white glue at the ends of the parking brake and shift levers to represent grips, knobs or any other contraption that might be found at the ends of these levers. Next up I trim the four roof posts and fasten the roof to the cab permanently. Mike
-
Hey Jim, you're correct - I'll be able to fit the first five trucks on one palm. Regarding the layout - well, after a few false starts over the years I realized I was trying to create a layout largely because that's just what was expected. I didn't enjoy too many aspects of building a layout and discovered it really felt more like work than a relaxing hobby. My true enjoyment comes from the planning and building of the variety of models associated with model railroading, especially the vintage vehicles that these build threads will be dedicated to. Once I get a few of these trucks successfully built, I think I'll create a small warehouse diorama to allow displaying them in a meaningful context.
-
Thanks Charles. Based on your avatar, I had a feeling you'd appreciate the subject matter. I think you'll get a kick out of the next few builds that are already in progress.
-
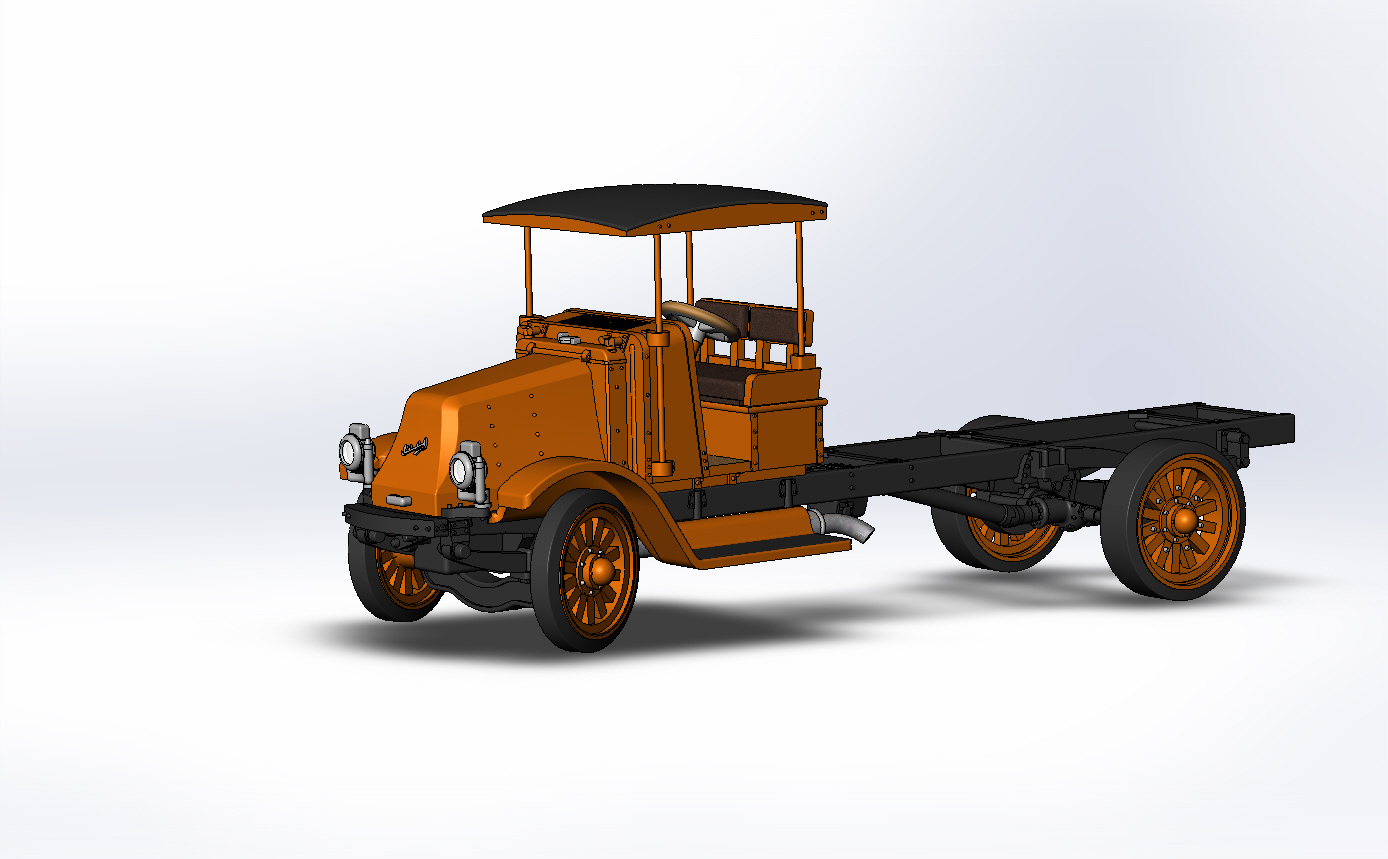
Upon first glance, you may have thought you were looking at a Mack bulldog, given the unconventional radiator placement that was surprisingly often used in those early years. However, this is, in fact, an International truck. Apparently, the very early Model 61 builds had the radiator placed behind the motor. In later years, the radiator was moved to the front, giving this truck an appearance not unlike many other trucks of the day. Since I am fond of models that are a little bit out of the norm, I definitely had to work with this early version and not one of the later styles. Mike
-
Once the parts have been soaked and then blasted, I super glued plain, round toothpicks to each one, making sure it was at the most inconspicuous spot possible. The parts then got several light coats of gray primer (Grey Surface Primer 73.601). I'm using Vallejo model paints for everything except shiny chrome, for which I use a Molotow pen (Liquid Chrome 4mm 703.103), "decanted" and applied with a small paint brush. Tomorrow I'll post some photos as the painting process gets underway. Mike
-
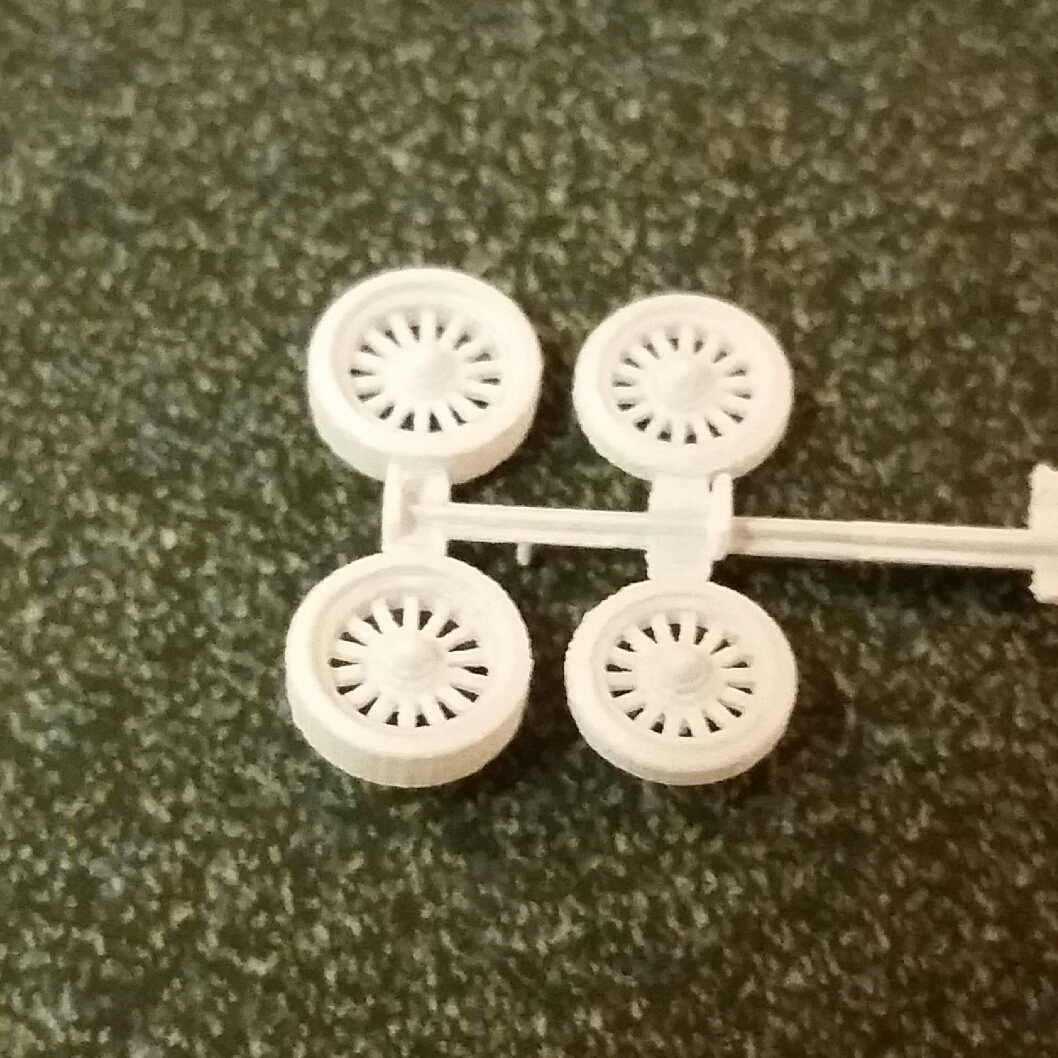
This photo shows one of the downsides of the printing process for the FED material... The fuzzy areas are a boundary zone between the plastic and the wax used as a support structure. Since details like the wheel spokes are right at the allowable minimum print size of 0.3mm (0.012"), it kind of precludes conventional clean-up tools and techniques. What I found as the ideal solution to this problem is what is referred to as an air eraser - basically an air brush sized instrument that blows abrasive media rather than paint. Here's the one I chose, and I'm using baking soda as the abrasive... This next photo shows how nicely the baking soda cleans up the parts...
-
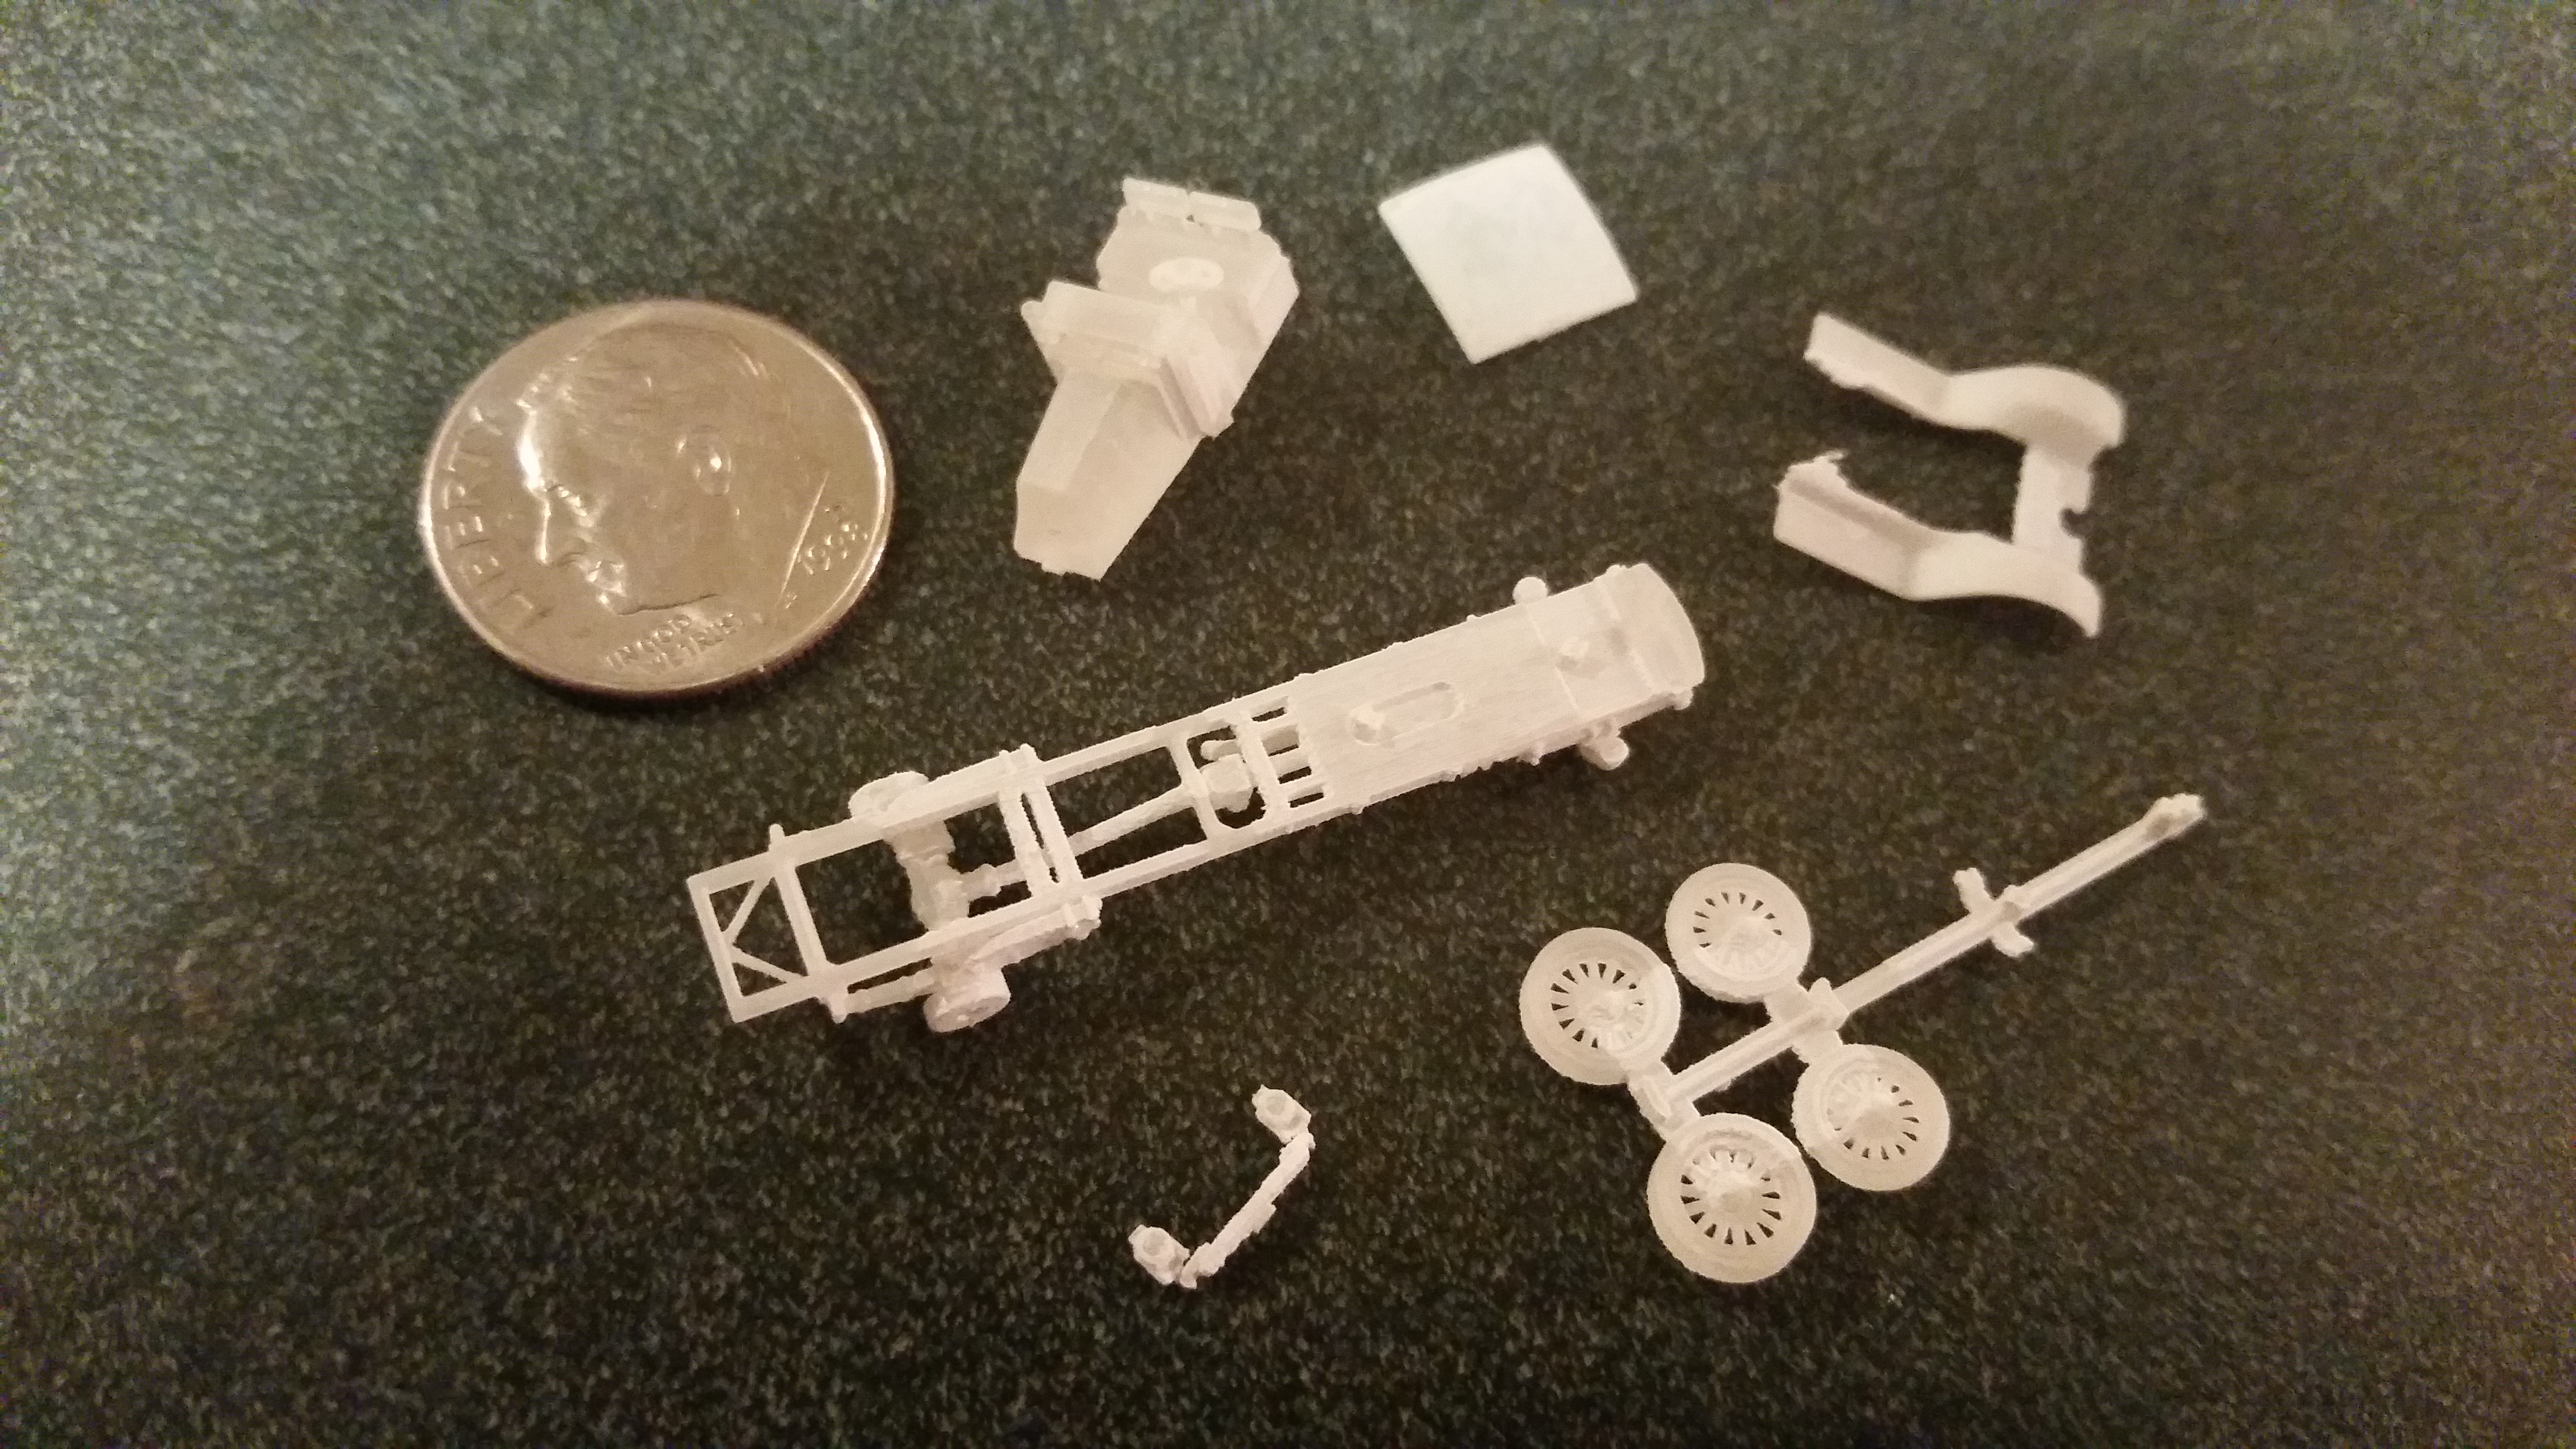
Next step in the process is a 24 hour soak in a mix of tap water and Dawn dish detergent. This removes most of the wax and oil residue from the parts. That's actually a different truck soaking than the subject build... I forgot to mention, I'm using Shapeways for the printing service and the material is their "frosted extreme detail".
-
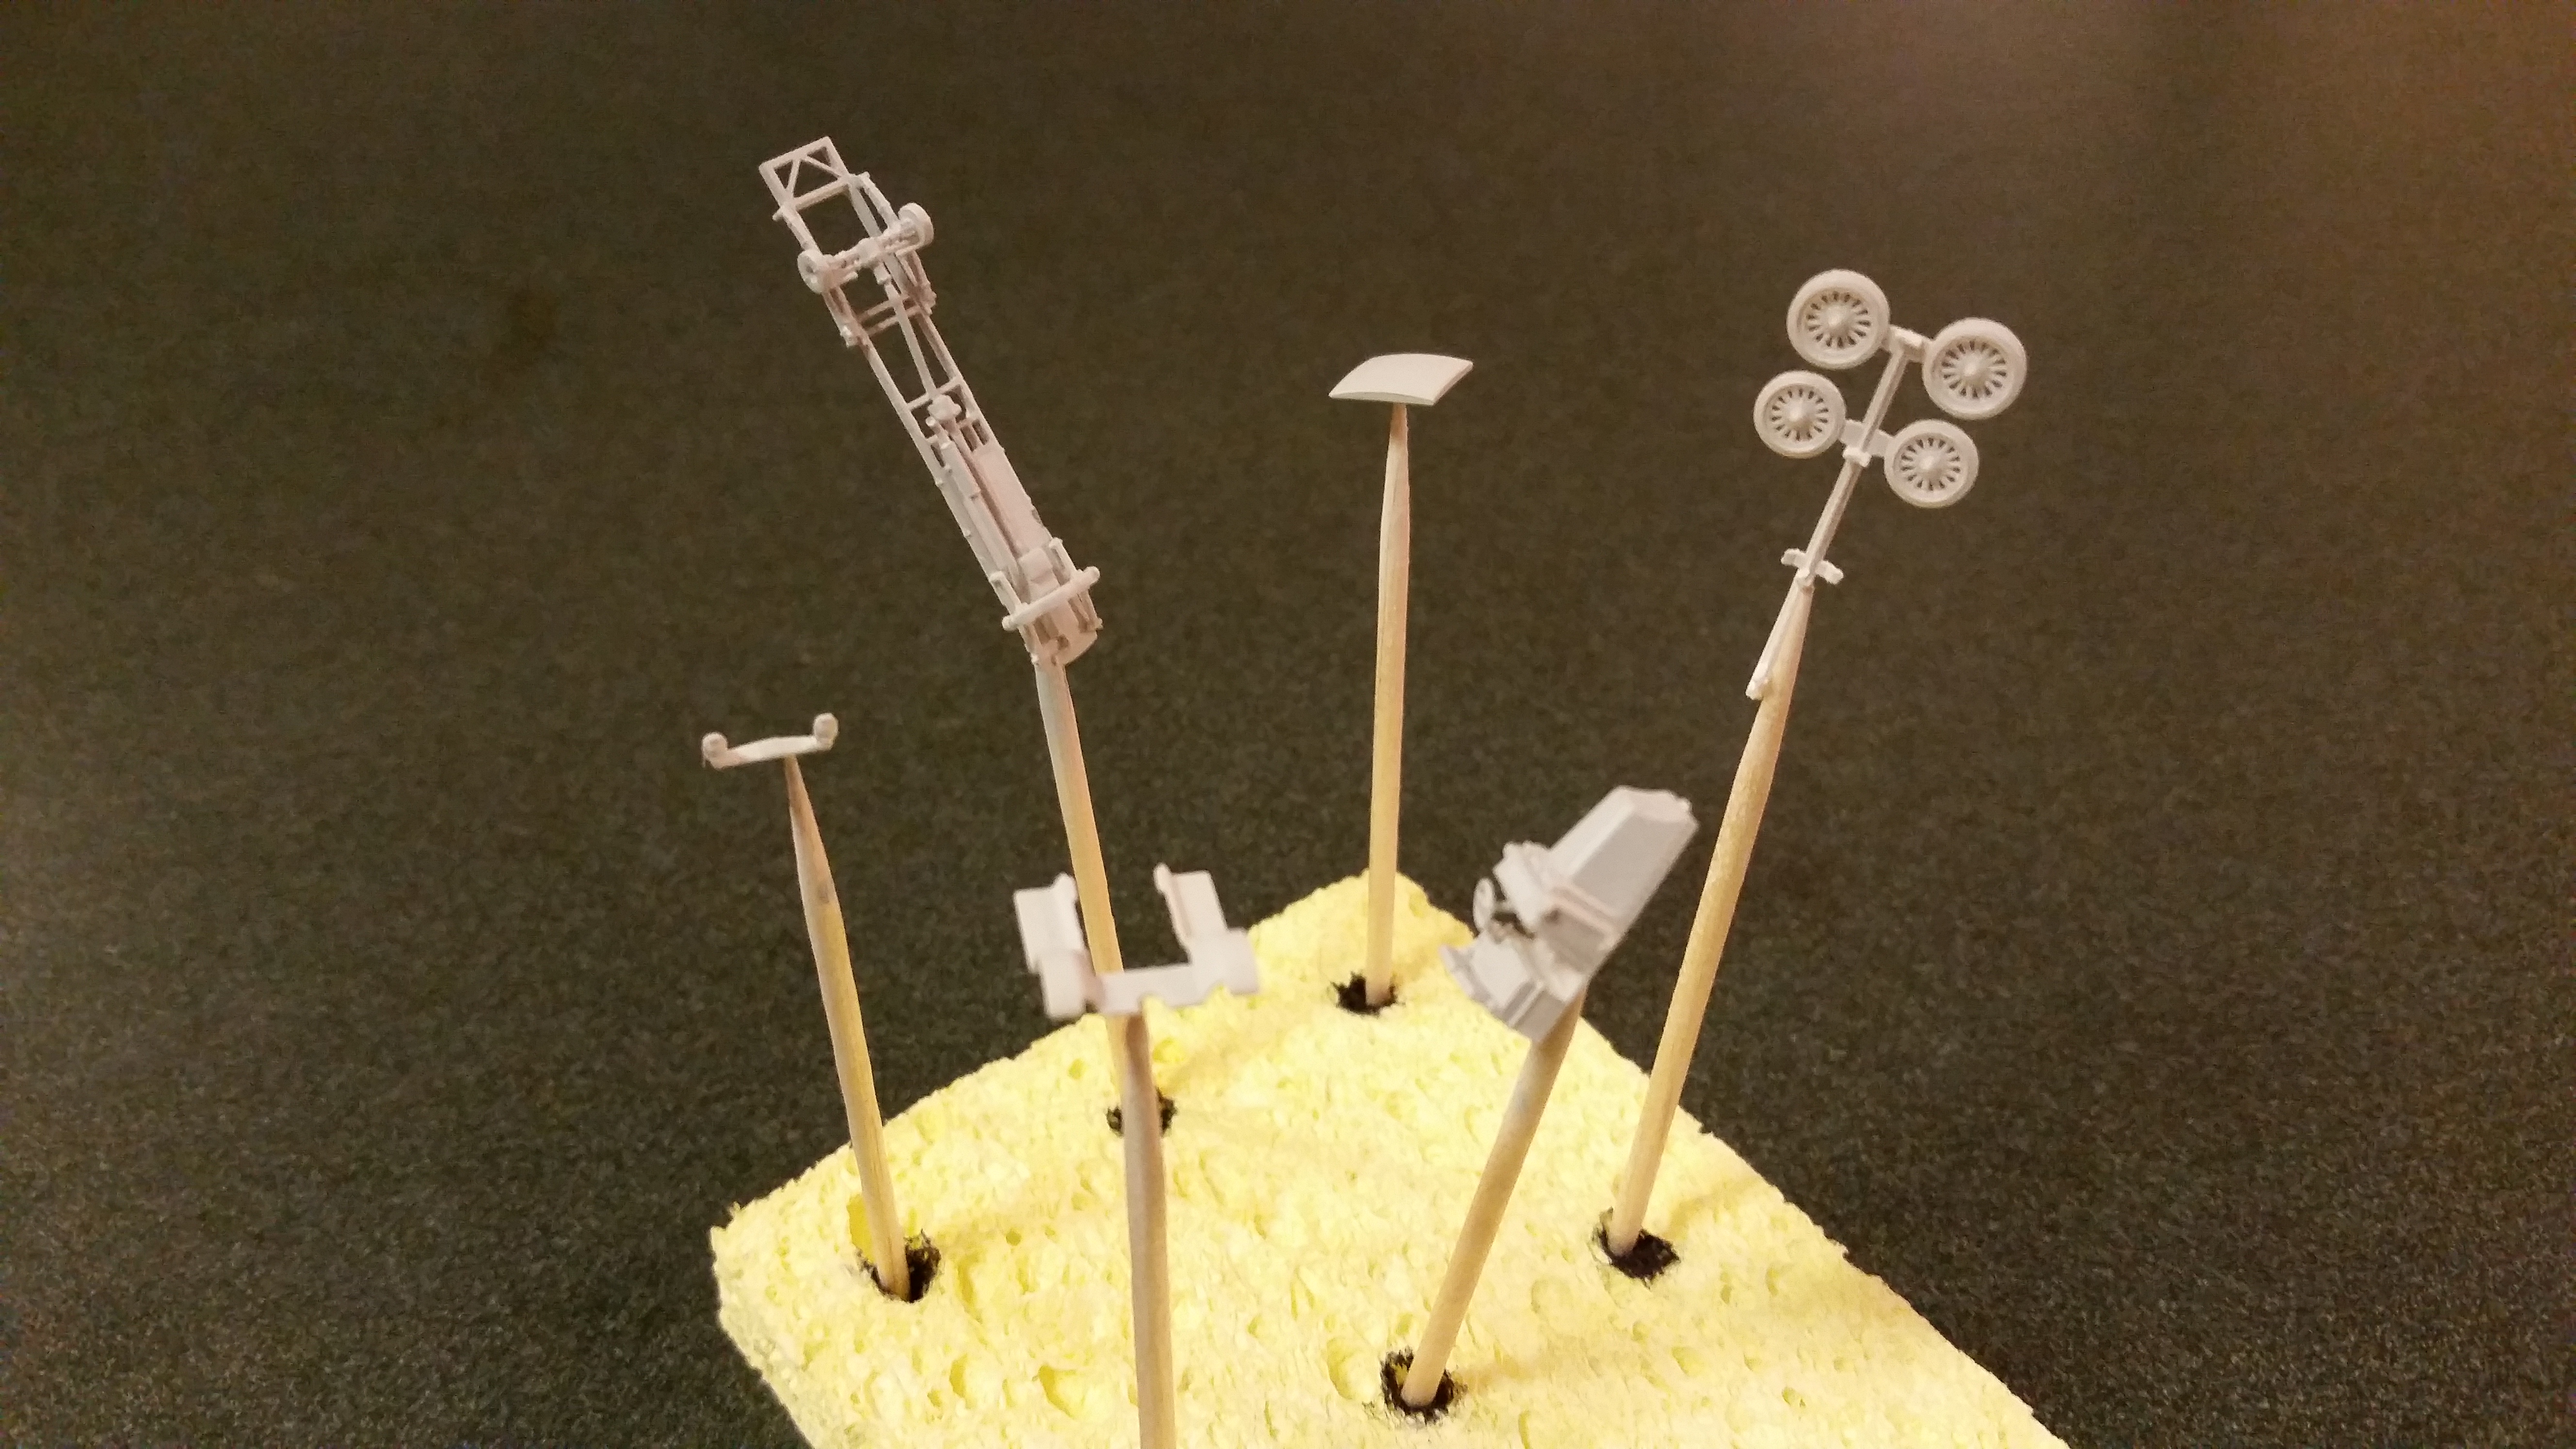
Here are the parts after being clipped off the sprue... I found this particular cutter to be absolutely perfect for snipping off the parts...
-
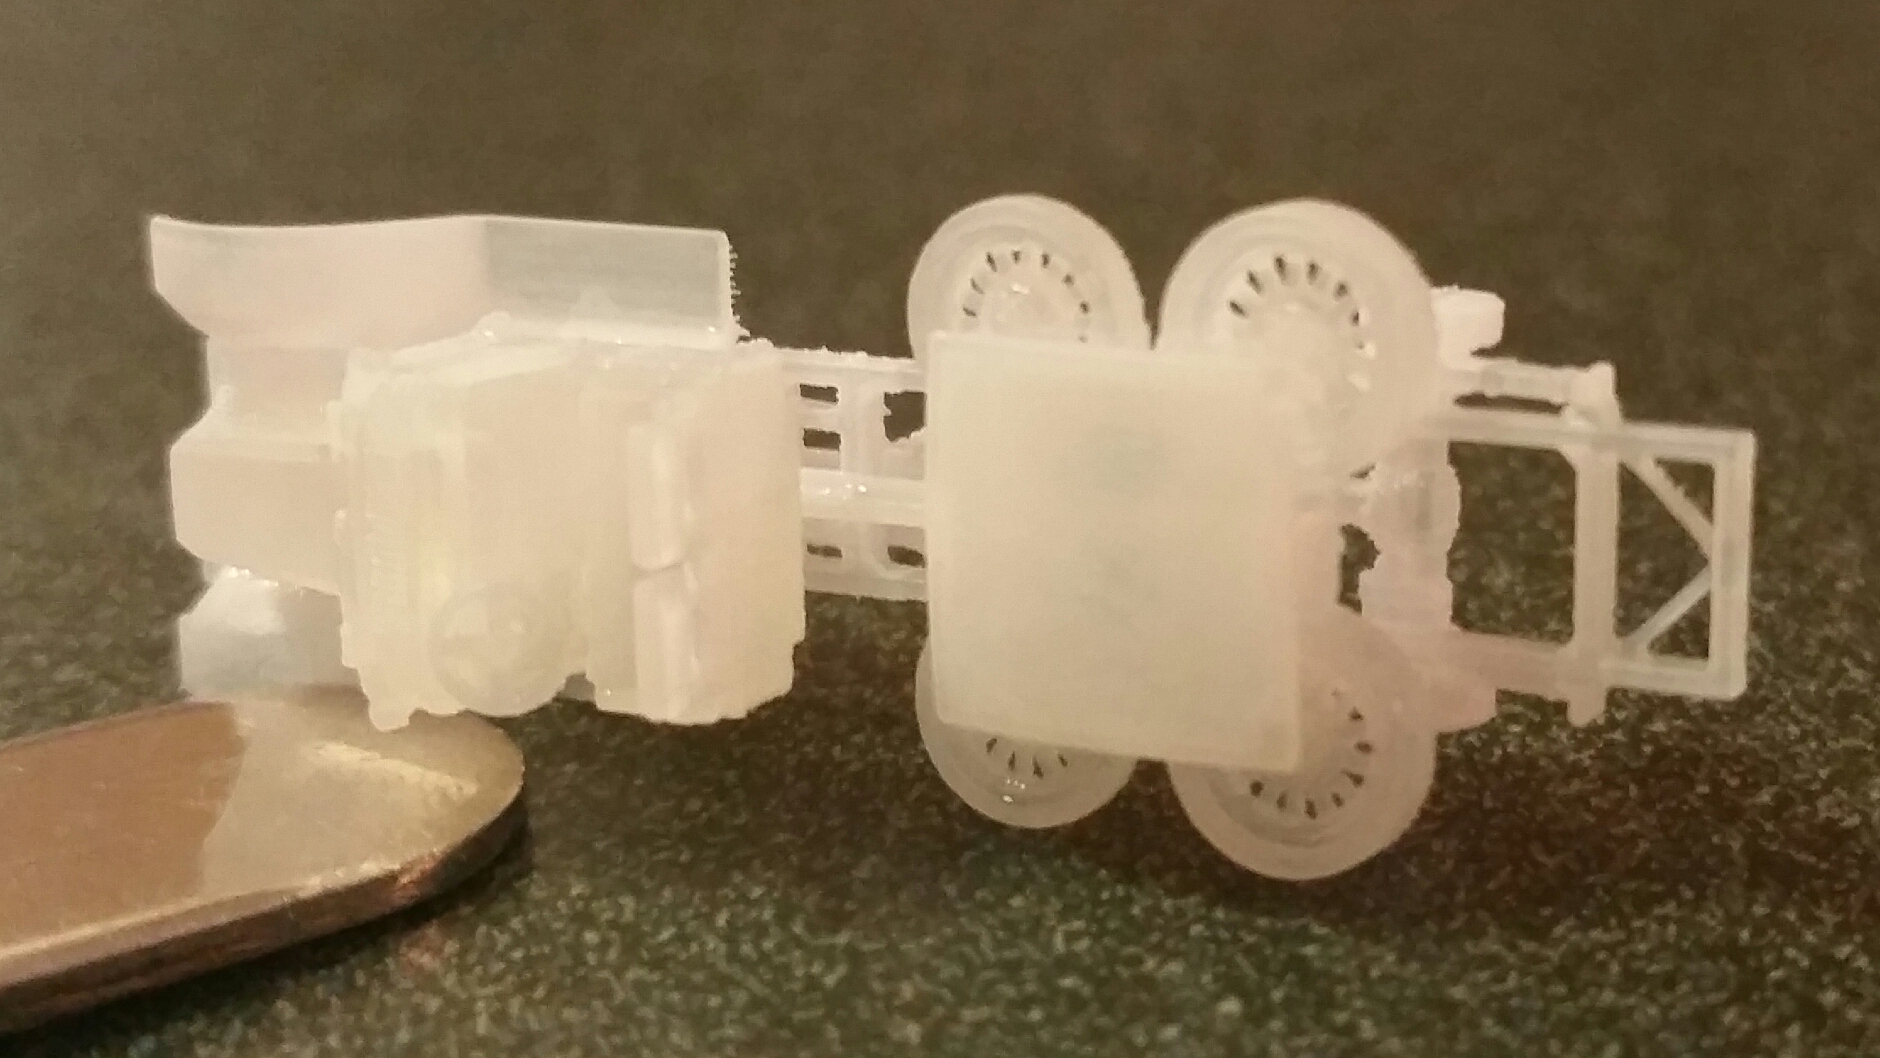
Okay, below are some pictures of the 3d print, as it arrived and after the individual parts were separated from the sprue.
-
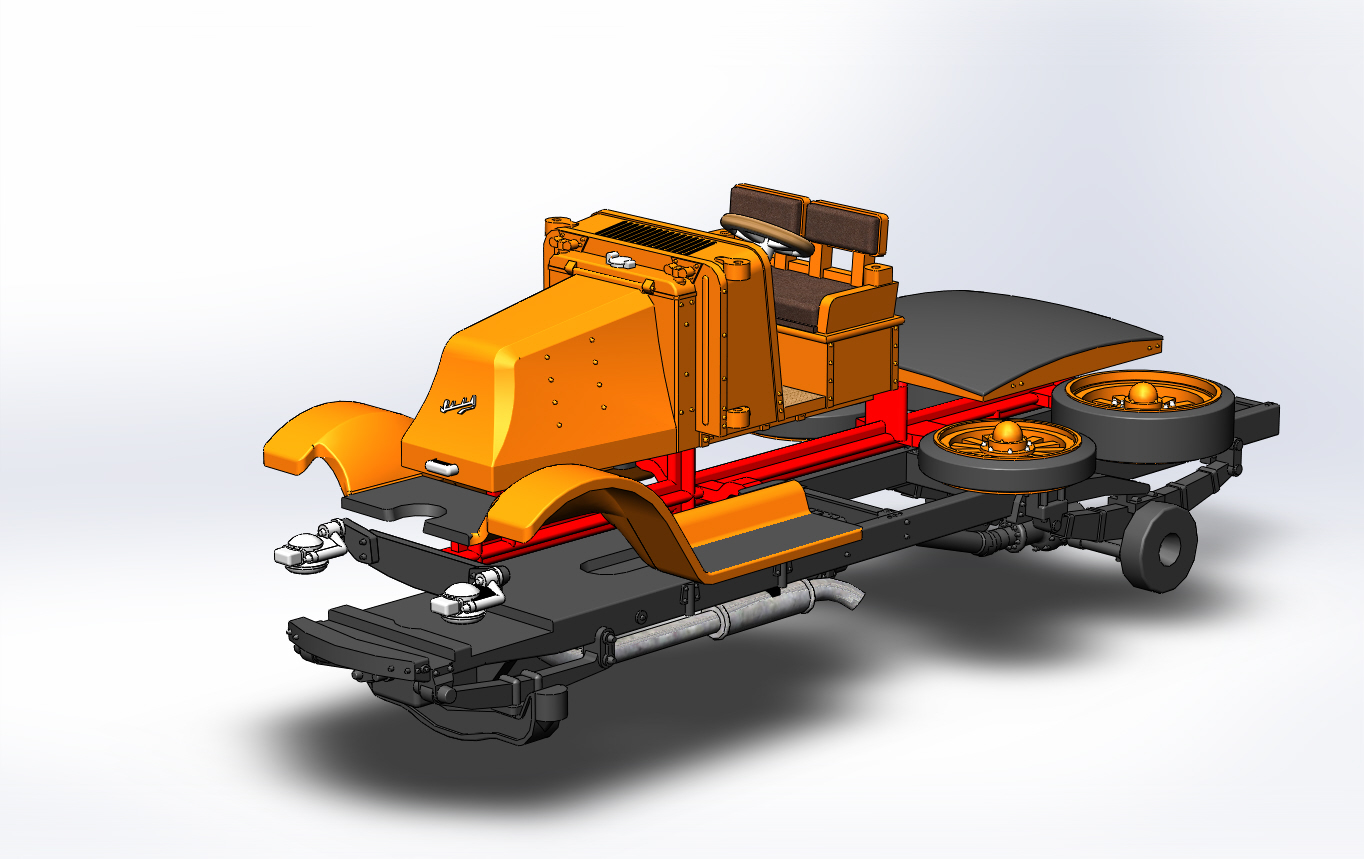
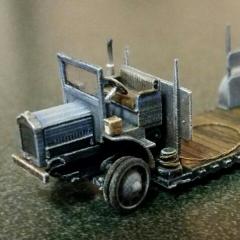
Here's the first of quite a few 1/160 (N scale) antique trucks I will be building. They will have been built from 1910 to 1930 and generally fall in the 1 to 5 ton size range. Back in the mid 80's, my fascination with model trains took an extreme turn when I decided to model N scale narrow gauge equipment. My primary interest revolved around scratch building the small geared locomotives and supporting items necessary for logging in the backwoods and mountainous areas. Of course, key items necessary to depict a complete and accurate scale scene are era correct vehicles. However, vehicles that fit my 1910-1930 time frame were nonexistent in N scale. Fast forward ten years later to the mid 90's and I couldn't wait any longer for model suppliers to create vehicles for my working era. I decided then to create my own trucks and do it in such a way as to make them available to other modelers in kit form. My first attempt was the well known Mack "bulldog". My desire for accurate details ended up requiring a multitude of media, including resin and metal casting and photo etching. While the results met my goals of accurate detail, in the long run, it proved too complex and expensive to offer any for sale. Having spent nearly 6 months designing and building the Mack, I decided it was altogether too labor intensive to try to create any additional trucks. Fast forward to a few months ago and my dreams for accurate, era correct truck builds finally seemed possible, both technically and financially. 3d printing is the manufacturing process that makes this feasible. Using some old, 1/24th scale plans, I set out designing my first build, a 1922 International Model 61 3-ton truck. I intentionally chose this one since the plans only showed a bare chassis, meaning I could focus on the truck only and keep things simple for the first design and build. I quickly found that the majority of detail elements would be at or below the minimum printing size requirements so quite a bit of time was needed to enlarge all of these elements to allow successful printing yet still attempt to present accurate details that didn't come across as way oversized and toy-like. So, this is the 3d CAD file I ended up with. First image shows the built-up truck, second image shows an exploded view and the third image shows the as-printed configuration, with a central sprue tieing all the parts together. In my next segment I'll show the 3d print and how I prepared it for the build. Stay tuned... Mike
-
Correct forum for 1/160 scale, 1910-1930 vintage truck builds?
mecklm replied to mecklm's topic in How To Use This Board
I'll just show a quick preview, as that's kind of the purpose of the build posts. I drew up 3d files and had Shapeways print them for me.
-
Cool, the nuts add even more to the illusion. Well done! Mike
-
Correct forum for 1/160 scale, 1910-1930 vintage truck builds?
mecklm replied to mecklm's topic in How To Use This Board
Thanks! That's exactly the kind of guidance I was looking for. Mike -
Hahaha, that certainly explains the realism. Very clever as you can't tell that it's only a 2d representation. Always enjoy how you place the subject car into your diorama to illustrate that it's being worked on. Mike
-
Wow, what techniques did you use on the flywheel/clutch? It looks remarkably realistic. Oh, nice save on the rest of the car.
-
Dear moderators, I'm starting work on a series of truck builds and I'd like to place them in the correct forum. The scale I'm working in is 1/160 (N scale). The trucks I have planned were built between 1910 and 1930. They range in size from 1 ton to 5 ton, as they were originally advertised. These would have been the largest trucks of the era. Please advise where you feel these best fit within the various forums. Thanks in advance for your help!
-
1/16 Beach City Corvette: On the bench 8/19/17
mecklm replied to John Teresi's topic in WIP: Drag Racing Models
Unbelievable, as always! Have you ever done a tutorial on painting and weathering tires? I'd love to find out what colors you use and how many layers of weathering you apply. Not sure how it's possible but your tires look more realistic than 1:1 tires. -
I keep coming back to this post to look at the awesome photos again. This build has that "Big Red" feel to it, even though it isn't a '69. Love it! Now do an equivalent Mustang!
-
34 rat rod pickup
mecklm replied to lou s's topic in WIP: Model Trucks: Pickups, Vans, SUVs, Light Commercial
An unorthodox suggestion, but what if you curved the header pipes straight up, turn them straight back into a collector situated just above the roofline and then extend with a pipe that ends at or near the back of the cab? They'd be very prominent but it sure would be different... -
Very, very nice! That shade of green suits it well. Just curious, in those last two photos the cab looks a lot like the International pickup truck cab. Is it possible that this type of truck used the exact same cab as the pickup or is it just a case of family resemblance?
-
Another remarkable replica you've created and I'm sure many modelers will be thrilled to be able to purchase one. Now that the basic truck "bones" are complete, can you share what you have in mind for your first build of it? My apologies if you've already covered this...
-
What's truly remarkable is that I keep zooming in further and further and there is absolutely zero loss of fidelity. Normally you don't have to zoom in far at all before you see ragged edges, file/tool marks, etc. I find it almost impossible to believe that this is 1/25 as there are plenty of large scale models that can't stand up to that kind of scrutiny. Well done sir, well done! There's a handful of models/modelers that are truly inspirational and you are without a doubt one of those rare, blessed souls. Keep up the excellent modeling as there's a bunch of us out here that are becoming addicted to your updates!
-
69 pro mod chevelle, chassis started mock ups
mecklm replied to mr68gts's topic in WIP: Drag Racing Models
Many thanks for the detailed explanation. In a nutshell, your technique is pretty much how I envisioned doing it. When I loft nowadays I almost always use guide lines in order to control the final solid. More often than not, if I don't use them the results are usually not what I'm expecting. I was really hoping you wouldn't go to all the trouble of crafting a tutorial, as I hate to be responsible for holding up your modeling time, but I appreciate your explanation. Take care. -
69 pro mod chevelle, chassis started mock ups
mecklm replied to mr68gts's topic in WIP: Drag Racing Models
You have me intrigued with the sculpting of this injector hat. I don't get to do this much with the kind of parts I design so when I encounter it, I merely loft between two sketches and then shell the result. Without bogging you down with a tutorial, can you describe in some basic words how you achieved that shape? Fascinating stuff! -
Very nice build. I really enjoy the attention to detail that you're applying to this car. By the way, there's a contradiction between the metric and imperial dimensions you mention for the engine setback. 3mm is close to 1/8" and 6mm is close to 1/4".