
ScottH454
-
Posts
179 -
Joined
-
Last visited
Content Type
Profiles
Forums
Events
Gallery
Everything posted by ScottH454
-

How to make seat belts?
ScottH454 replied to crazyjim's topic in Model Building Questions and Answers
Well which part is to thick? Where yoir overlapping it to glue? Can you post a picture to show what your issue is? If it is your glue point you may just need to glue it then clamp it to keep it squished flatter. Wondering if you have the ribbon that is a shinny nylon with ruffles on the edges. -
There is gonna be different types of bottles sold for hobby usen the ones branded for your hobby store. Particularly I bought some thick slow cure that has a metal pin installed in the cap so it will insert into the bottle opening. Now I am not sure if it came with this or it was a replacement cap an nozzle the sell along with the glue. I can look on Hobbytown website if it is listed or do a search for replacement tops for glue bottles.
-
Accurate top for Revell Model A Coupe
ScottH454 replied to Johnny99's topic in Car Aftermarket / Resin / 3D Printed
That still doesn't explain anything.
-
Accurate top for Revell Model A Coupe
ScottH454 replied to Johnny99's topic in Car Aftermarket / Resin / 3D Printed
What year first of all, an what do you mean by accurate? I am geting ready to pour the mold on a '30 Model A roof I corrected by extending it forward. -
Don't use masking tape, people can tell the difference. I haven't fit the ribbon I have to the photoetch, but it is the most realistic I found. This stuff is more like a cloth, no frills on the edges, an not shiney like most ribbon. You can buy black and white then use a blue marker on the white ribbon. Link to ebay listing, you will want 2mm: https://rover.ebay.com/rover/0/0/0?mpre=https%3A%2F%2Fwww.ebay.com%2Fulk%2Fitm%2F401110263622
-
I sand my basecoat on all but the last coat. The first coat is more like an expensive guide coat. If you are getting orange peel that soon then your paint is to thick.
-
Turbo duct silicone couplers
ScottH454 replied to Jantrix's topic in Model Building Questions and Answers
Yeah best bet is make your own. Find a hardware store that sells heatshrink tubing an get some black for the tube an blue for couplers. Use solder or soft wire to form the pipe as needed, then heat your black tubing over it, then do the same with sections of blue. For the clamps smash a section of thin soft wire flat. Wrap the flat part around the coupler leaving a part of the round wire coming off to wrap thinner wire around it like a coil. Thin wire that would be wrapped in strands of regular electrical wire. That make sense? -
Looking for Nova Parts
ScottH454 replied to mred2nice's topic in Car Aftermarket / Resin / 3D Printed
I could get some of that together an a bit more that I can get molded. My shipping rate starts at $3 for a 4x4x4 box usps. You might need to get more descriptive on some of the stuff your looking for. Like is that for the stock 2" cowl hood or one of those obnoxious high ones. Fuel pump for on the block or drag use style. -
AB issues,, still a struggle
ScottH454 replied to aurfalien's topic in Model Building Questions and Answers
Still have yet to understand why so many use lacquer thinner to thin thier paints. If you are getting orange peel then you are dealing eith paint flow an it drying to fast. I would assume lacquer thinners are made differently an you probably won't figure out the temperature at which to spray lacquer. Find a automotive paint atore an invest in a proper reducer for your temperatures. I own ppg 70 an 95 an do great. -
Embossing Powder and heat
ScottH454 replied to Back after 50 years's topic in Model Building Questions and Answers
-
Embossing Powder and heat
ScottH454 replied to Back after 50 years's topic in Model Building Questions and Answers
I will see if I can make a video with the footage I took using heat. While it didn't look right because the coloring separated it still worked. I have noticed how the members of this forum respond an they have done the same to me. As I read your original question an hopefully addressed it that should encourage you to keep asking so you might get that one intelligent response. The one post that I remember the most was when they wrote I would fail as a resin caster because I didn't know who Modelhaus was. If you need more help I am action-modeler.com also on Facebook an Youtube. -
Detail Master 1427 Coolant Hose
ScottH454 replied to 250 Testa Rossa's topic in Car Aftermarket / Resin / 3D Printed
So what makes that hose special you think you need it? What I am using is thin wall heat shrink tubing heated over wire. The trick will be finding the combination of the two that gives you a 1/25 3" diameter. Bonus if you find tubing in a grayer flat finish with writing on it. Heat Shrink 3/64ths -
Embossing Powder and heat
ScottH454 replied to Back after 50 years's topic in Model Building Questions and Answers
I did do it for floormats with thier versamark adheasive an the heat gun designed for it, girlfriend already had the setup. It works but the colored powder I used turned white where it lost it's coloring. Stuck pretty good an it was a rubber look. I did record a video but since it whited out I didn't post it. With any other heatgun or even embossing heater I still would put the part on a wet cloth to help. Just use heat that can focus on a small area. -
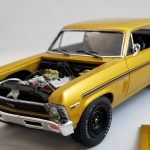
The Revell '69 Z/28 engine is my favorite. I am including a photo of reference. The bottom engine is the 69 Nova, top right is the 69 Camaro, an top left is a resin block I made from the Camaro block an the diorama pieces from the AMT 66 Nova kit.
-
Using air brush; coats and times etc...
ScottH454 replied to aurfalien's topic in Model Building Questions and Answers
Well other than using lacquer thinner you sound good. You can't control the dry time, evaporation rate of thinner. I have done the trick of mixing clear an paint with models, but I did it with full scale cars on areas like under the hood when you don't want full exterior gloss. Plus less chance to dry spray when spraying a separate clear coat. -
Using air brush; coats and times etc...
ScottH454 replied to aurfalien's topic in Model Building Questions and Answers
That is what I try to do in reguards to how wet to spray. I tend to want to go to light an worry it dries to quick an ends up like a coat of overspray. Can't tell anything from the photo so what issues do yoi think you have? I didn't know you could mix lacquer thinner with acrylics. I ise an actual automotive grade ppg reducer based on spray temp. -
Oh awesome, that is perfect. I have bought probably 100 kits looking for key parts an have missed out on most so this is great. If you need stuff let me know, I am trying not to cast box stock so don't have much ready. Look for stuff by action-modeler an that is me.
-
Ok thanks, but I'm a caster myself an looking for where to find original kit parts.
-
I wanted to ask about the valve covers reguarding what kit had them. Looked at a 1/24 65 corvette black rat kit but those didn't look in thier.
-
Still looking? This is the first seat from the mold painted in black.
-
this is how to do it from my understanding of ghost flames. Something you don't see apparent in the paint until the sunlight highlights them. Be sure to thin oit the pearl an don't think you need to spray alot, to much an they'll show even in the shade. Flames under candie paint is just faint flames to me, nothing ghost about them. An also candie is just color mixed with clear, if you clear with an airbrush nothing to be afraid of.
-
Ok now I'm ready to make the mold, should be happy with the detail now.
-
Ok well this is what I have so far. Doing some scratch fill-in with some primer an might consider it done.
-
Ahh yes, I know which seats you want. Best choice are from the MPC annual Camaro kits. I have some that I planned to clean up an cast. Was gonna sacrifice the interior tub to cast the rear seat in the same style as the newer amt 70 1/2 camaro. Probably could make a mold of the fronts only pretty quick if you can wait. Otherwise you can find sellers on ebay parting out vintage kits.
-
Aftermarket Door Handles
ScottH454 replied to Back after 50 years's topic in Car Aftermarket / Resin / 3D Printed
Probably this place, from the aftermarket directory sticky. Owencraft - http://www.owencraft.com/handle.html#index


