
Jdurg
-
Posts
212 -
Joined
-
Last visited
Content Type
Profiles
Forums
Events
Gallery
Everything posted by Jdurg
-
I hope you do! I love the large scale Corvettes, but hell, any large scale build is great to follow. The detail in the kits, and the ability to add our own detail to them, makes these large scale kits a ton more for fun that the "normal" 1/24 type kits.
-
That paint job looks incredible. GREAT job on that!
-
 This may sound weird, but I just got back from the hospital after a severe aggravation of a Groin Strain. Was just cleaning up around the house when I made a sudden lateral movement to my left, and the pain in my left groin I've been putting up with for the past 6 months just became unbearable. I HATE doing it, but I had to go to the E.R. since at 1:00 A.M. on a Sunday Morning, there will never be a walk-in clinic open. (I was cleaning up around the house as I had moved stuff around earlier in the day and saw all the dust sitting around here. So I tried to clean things up when the incident happened). I was in a ton of pain and couldn't fall asleep, so that's why I went to the E.R. Amazingly, because of Daylight Savings time, I left the E.R. before I got there. I arrived at 1:30, and left at 1:29. Turns out I have a Grade 2 strain of my left groin muscle that I've had since mid May, but aggravated this past night. I was happy when the doctor who examined me said that there's nothing super damaging here and that physical therapy has a 75% chance of clearing this up. But she also said that groin injuries can take over a year to heal since it's a part of the body that can't be fully rested unless you are immobilized. I was able to ensure that I wasn't prescribed any opioid medications since I'm too tolerant to those after so many injuries in the past, and that I'd rather not go to sleepy-fantasy land after taking them. I was only given some Naproxen to reduce inflammation and a muscle relaxer (not Cyclobenzaprine) to release the tension in the area. It sucks that I'm hurt, but I still have my insurance to cover the E.R. visit. No x-rays, CT Scans, or MRIs were done so the visit will be fully covered. Also, due to the Daylight Savings Time change, I wasn't able to have insurance cover the prescriptions. Thankfully, they were generics so it only cost me $30. I just hope this heals soon. I survived Hurricane Sandy, but don't need some nagging groin injury to keep me out of commission. These things don't feel good.
 -
I've got the images held on imageshack.us so I wonder if their server was temporarily down for a bit. I can still see them and can see them at the imageshack.us site, and they are all set to public viewing. I'd try reloading the pages again and see if they show up. May just be a temporary thing.
-
Wow. I really can't wait for the day for 3D printing to become cost-effective and efficient so that the manufacturers can start producing kits using 3D printing. Imagine not having to remove mold lines, sink marks, pits, etc. etc. That engine looks incredible. Great paint job too!
-
All that work looks amazing. Trust me, once you get the belt material dyed/painted and placed on the seats, it will make you pull back and go "wow!" Happened to me on my '67 Vette. I still look in the side windows and admire how incredible the seatbelts look. What made it feel the most real to me is when my roommate took a look at the belts and the hardware I scratch-built and said "Holy <censored>. This looks just like a real seatbelt to me." That engine you've put together looks so real it should be illegal.
-
For sure! The Goodwood Green Metallic will look amazing in the sunlight. I'm VERY happy with the way the paint job came out. So happy I found this site that sells the paint in aerosol cans and they are happy to hear that it works on scale model cars. It's incredible here in the inside lights. Once I get a chance to clear out my driveway (once the leaves have dried out a bit so I can remove them) I'll bring the car outside and take some photos. As it is right now, and pictures can't do it justice, it's remarkable. Thank you so much for the kind words. Makes the whole post here worth it.
-
Thanks Dave! Without your assistance in sending me those tail-lights, I never would have been able to finish it. Taking it outside for a photo is a great idea. I'll just need to wait until after I've cleared the insane amount of tree leaves off of my driveway once they get a chance to dry out. Sandy dumped a bunch of tree leaves and junk all over my place. Thankfully, there was no damage and I got my power back shortly after it went out.
-
Thank you everyone for your thoughts and prayers. Today, I got my power back and the great realization that there is no property damage for me. Today is a calm, sunny, warm day outside and I JUST got my power back about ten minutes ago. I am so happy right now. Last year I went forever without power and it was horrible. Right now I have power while only being out for a short period of time. I am ecstatic. Wow. For any other members here up in the NE quarter of the country, I hope you have been able to survive.
-
Thanks Don. While the media are really still hyping this thing like it will be another Katrina, what I'm seeing with regards to the rain pattern in the storm and the direction it's still going, I don't think this will be as bad as Irene was for us just last year. All the rain and convection in the storm appears to be on the Westward side of the storm and based on its pattern, it looks like my area is just going to get some good wind and not a huge amount of rain. Another thing is that The Weather Channel keeps talking about all the projected paths showing it coming to New Jersey, yet they forget about the one model track that shows it continuing to head northeast and turn AWAY from land. If that one, still being projected as a possibility, track takes place, then we'll get very little if anything. It's already a bit windy out there and that's taking many of the leaves off of the trees. Heh. I had my lawn cleared out by landscapers just this past Thursday, and all the leaves that have fallen the past couple of days have it all covered again. (Just had a pretty good wind gust come in right now and this storm is still down by the Carolinas). I just have a feeling that this isn't going to be as bad as they are making it out to be. I'll likely still lose power, but perhaps not for as long as I did last year with Irene. (10-14 days. I can't fully remember how long I was out).
-
Didn't get anything modeling related today. Just got, what now appears to be 100% confirmation that things are going to get absolutely horrible out here early next week. Two feet of rain and sustained winds of over 70 mph here in SE, Connecticut. Looks like I'll be without power for at least a week like I was with the hurricane last year, but now I get this disgusting, sick feeling that there will be significant wind damage. Without having a job, I simply cannot afford severe damage to my property. Two feet of rain over a 36 hour period will cause massive flooding in my basement which would likely cause severe damage to my house. Of course homeowner's insurance does not cover flooding, and since I don't live in a flood prone area and it takes once in a lifetime storms like this one to do flood damage, I don't pay the exhorbinantly higher fees to include flood insurance. Don't know why, but I just feel like things are going to be terrible for me.
-
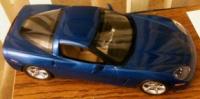
Today I finished up this project. The paint job on the exterior has cured, I was able to wriggle the chassis into the body (Though this didn't go quite so well as planned and some fit problems arose making it not look perfect from underneath (as one of the exhaust pipes didn't match up with the engine due to the fit issues, but I don't notice it when it's being displayed so I don't care), and I got all the exterior trim on. This one is now finished and proudly sitting on top of my cable box in my living room right now for a temporary display spot. Now here's the pictures. Overhead view of the engine bay. Top view with the headlights down. View of the driver's side of the car. Back view with my custom decal of my license plate numbers which I've blurred out of the photo. Front view with another of my custom license plate decals. This one has the headlights down. And finally, another front view but this time with the headlights up. I really enjoyed building this kit, and the paint job turned out amazing. It's rock hard and took the polish so very well. I am quite please with it. My first attempt at some true body work scratch building and it worked. In the future, I will likely build this kit again, but instead of as a coupe I'll chop it and turn it into a convertible with opening convertible hatch, properly functioning convertible top (which I'll be able to make out of fabric and custom made photo-etch hardware), and working headlights again. This time, I'll cut them out a bit better and ensure that the headlights on each side are the same size. Thanks for watching!
-
Wire Wheels for the RM Deuce.......
Jdurg replied to ajwheels's topic in Car Aftermarket / Resin / 3D Printed
Wow. Once 3D printing becomes less costly and more widely available, it will REALLY help out the scale model hobby. Imagine if in the future there are no mold-seams, sink-marks, etc. as manufacturers figure out how to create everything with 3D printing! (This, if it can happen, would be well into the future as I imagine the printing process is quite time consuming. But if it can become more readily available, I can see companies setting up multiple 3D printers to print out multiple complete kits on the same printer, and being able to put numeric part numbers in inconspicuous areas via the 3D printer.) -
Thanks guys! Went out today and got some silver spray paint in order to properly paint the bumper pieces as the brush paint just left way too many brush strokes and an uneven finish. While there will be an issue with not all of the "chrome" parts having the same finish to them, I'll just have to deal with that as the work involved in getting everything to be the same sheen of silver would be way too much. Something to put on my list of "lessons learned" when I tackle this project again. (In the future, I do plan on doing a major conversion on this kit into a convertible so that I can reproduce the L89 Rally Red with Black Interior version of the car that is my dream car. That one would included opening headlights, opening doors, and an opening convertible hood with an actually expanding convertible top that I would make using self produced photo-etch metallic frame and fabric material). But that build will be quite a while in the future.
-
The only aftermarket parts I know of are the Model Car Garage photo-etch set which includes the pieces for the 1967 build, or if you wanted to do some modifications to the kit, the 1966 model year Corvette as well.
-
Clear decals are decals that are printed on a clear film so that whatever color you've painted on the part will show through the non-printed part of the decal. E.G. if you have a car painted metallic dark blue and have a decal with the capital letter "D" on it, the interior part of the letter "D" will show the dark blue metallic paint underneath. White decals are decals printed out on white backing material. In the example given above, if your decal was on white decal paper, the center of the capital letter "D" would be white in color and not let the dark blue metallic paint show through. As for coverage, the ink/material used on decals is not very opaque. That is, the color of the part that the decal is applied to will tend to affect the hue of the decal itself. If you put a white colored decal over a part painted gloss black, the white printing/material will end up becoming a not-so-white color as the black paint will show through the decal a tiny bit. A way to avoid this is to place another decal with the exact same printing on top of the first one. This can be VERY difficult, if not impossible, to do. For which type of decal is the best, it depends on what type of decal it is and what the color of the part the decal is being applied to is. Dark printing on the decal will show up just fine over a dark paint finish as the color bleed from the part color won't really impact the decal. For white decals, or white printing on the decals, the bleed through will be fairly noticeable. This is why I only use decals when absolutely necessary, and am happier if I just use bare metal foil (BMF) to mask off areas I don't want painted for things such as stripes on cars. (I paint the first coat of paint the stripe color that I am looking to use, then I mask off the striping that I want with BMF, apply the final body color coat, then remove the BMF that was being used as a mask. The BMF is very thin and prevents any major differences where the lines meet, and the BMF also adheres well to the surface and prevents bleed through.
-
Whenever I wind up with some minor orange peel in the base color coat, if it's not too severe I just go and apply my clear coats to it and then sand the clear coat down, use rubbing compound, then use a polishing compound to bring out the shine. If you use multiple clear coats, like I always do, you'll be able to sand the orange peel out of the clear coat without biting into the base color coat. Just always check your sandpaper and white cloth used to rub away the sanding debris to make sure that you haven't sanded through to the color. For minor orange peel, this always seems to work out the best. For major orange peel, I wet sand the color and apply another color coat on top but hold the can a little bit closer to the surface so as to avoid the peel issue. It's always nerve-wracking doing that, however, as I'm always paranoid that the color coat will run or sag.
-
The The enamels I was using, back when I first started building model cars in the 1990's, were the Testors Model Master enamels. Didn't/don't have an airbrush so they were just applied with a good ol' rattlecan. I would let them "cure" for at least a week after applying the final color coat, yet I would still wind up with a noticeable fingerprint in the places where I held onto the body while joining it to the chassis, or while holding it to carefully detail parts of the exterior. I've found that automotive grade enamels cure a bit harder, but I still end up with fingerprints or ding marks showing through after handling the parts for a while. (Mostly on the engines as I use the engine enamel paints to get the proper color). As stated earlier, I now just use automotive touch-up lacquers from an online site that has every color for every make and model of car out there. I LOVE how quickly they dry, how hard they cure, and how amazing they look on the finished model.
-
Looking online, the only red color paint I see for a 2010 Ford Mustang is "Colorado Red" with the paint coes of "D3, M7042A." There are many places online that will sell that EXACT color code in bottles or aerosol cans if needed. Otherwise, next time you are a local AutoZone or other automobile repair shop, you should be able to find the match you are looking for there if you look up the color code of the finish you want to replicate.
-
The advice I would give is to practice, practice, practice! When I was building model cars back in the 1990's, I exclusively used Testors enamels as I thought that real automotive paints would be way too "hot" and dissolve the plastic parts. It wasn't until later in my first model car building section of my life that I tried out a Dupli-Color automotive touch up paint. Once I tried it and got some experience with using it, I was hooked. Now, EVERY model car I build is painted using automotive touch-up paints for the exterior, and interior paints for the.... well.... interior. (I recently discovered that the Dupli-Color vinyl/leather "dye paint" creates a PERFECT sheen for interior components. Only bad thing is that the color choices are very limited with this). But practice is the best thing to do. Before you apply any automotive paints to your kit, test out the paint by spraying it on scrap parts or sprue from the kit. This way you'll know ahead of time if the paint will eat up the plastic. To play it safe, I ALWAYS put a coat or two of primer on the parts that are going to be painted with the auto paint just to make sure that the plastic will be protected prior to color paint going on. In addition, the primer always shows any flaws in the prep-work that I may not have been aware of. Always best to discover these BEFORE your first color basecoat goes on. More advice is to always play it safe and use the same paint manufacturers primer as you will use for the color coats. This ensures that there is no compatibility issues, but be aware that this not always the case. (I have only experienced this once when the primer and color coat from Rust-O-Leum didn't get along well and resulted in a never drying paint finish that had to be removed and done over again. I will state that automotive paints are incredible for use on the bodies of model car kits. As many, if not all, of them are lacquer paints, they dry VERY quickly and when cured are VERY hard. This prevents you from accidentally leaving a fingerprint in the paint due to it being too soft. On the downside, it also means that more work needs to be done to smooth out the finish as the harder paint coats make it a tad bit more difficult to smooth it out. Still, the fast drying time, overall hardness, and great ability to cover the plastic makes it great for finishing as you can use any 1:1 car rubbing/polishing compound to really bring out a beautiful color. After I discovered http://www.automotivetouchup.com when looking for a proper paint match for the 1996 Grand Sport Corvette Converitible I was building, I won't go back to any other brand of paint. They have a HUGE selection of paints available on their website, and if the specific color that you are looking for isn't listed there, you can contact them via phone or e-mail and they will mix up a batch for you. They offer small bottles, aerosol cans, and larger cans of paint for purchase. It's all a very well mixed type of paint that goes on with great coverage and dries quickly while still allowing the paint to level out and reduce orange peel. The only negative is that a simple 12 oz. aerosol can of color paint is approximately $20.00 and shipping is only done via ground shipping as the aerosol cans cannot be shipped via air. I've had two issues with the Gloss Clear Coat in the times that I've purchased from them, and the issues have been with the nozzle on the can malfunctioning and causing the gloss clear to shoot out of the top like a fountain. A quick call to the company and a replacement was shipped to me immediately, free of charge, both times. Once you start using automotive paints for your model cars, trust me, you'll never go back to using Testors/Tamiya/etc. paints ever again.
-
Different EYE CANDY
Jdurg replied to Dr. Cranky's topic in General Automotive Talk (Trucks and Cars)
After looking at those pics, I now suffer from "Eye-Hyperglycemia." -
Really? With the fantastic amount of experience with scale model cars that you have, I thought you would have built dozens of these by now. All with fully functional doors, convertible tops that fully work, functioning lights, etc. etc. I will have to say that you are going to be in HEAVEN with the amount of detail you will be able to put into a large scale build. It's the most important thing to me with regards to model cars; the ease with regards to detailing all parts. Engine block, engine bay, chassis, interior, etc. I think it's safe to say that like many of us who loiter here in the Big Boyz forum, the more large scale kits made available to us all, the better. (I'm still giddy with my '67 Vette and the rotating headlights (my first "major" modification to a model car body), the great detail in the engine bay, the beautiful interior, and the amazing body finish). Can't wait to see pics for this one. I can only imagine how incredible this will turn out.
-
For a great sheen for the seats, I would suggest taking one part Testors Semi-Gloss Acrylic paint and one part Testors Flat Acrylic paint, mixing them together well, and then applying to the interior parts that you want to cover. This combination of clear paints results in a sheen that is just about perfect for leather type material. Even better, the drying time of the Testors Acrylic paints allows you to brush it on the parts and it will self level out as it dries. I've mixed up a bottle of this myself and am always using it on interior parts that I need to have the proper sheen to it.
-
The end is near! I rubbed out the final clear coat, and while there is still some orange peel present, it's close enough for my tastes. The headlights have been permanently intstalled, and the photos below show them in the raised position. I also got the emblems attached to the body and the rear work done. The front and rear bumpers are still undergoing the silver painting, but it's looking REALLY good right now. Cant' wait to finish this.
-
Kurt Wilson`s: 23 T` Bucket new project 10/9/12
Jdurg replied to John Teresi's topic in WIP: Model Cars
This. Is. Awesome! Great job!