
Jdurg
-
Posts
212 -
Joined
-
Last visited
Content Type
Profiles
Forums
Events
Gallery
Everything posted by Jdurg
-

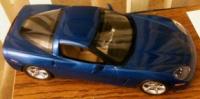
MPC 1988 Corvette Convertible. Completed 22-May-2012!
Jdurg replied to Jdurg's topic in WIP: Model Cars
Just wanted to make a quick update here. Don't have any photos to post, but have some updates. I ran out of the silver Rustoleum paint used to paint the hood and the doors and switched to Duplicolor. I thought that my local Autozones were stopping their touch-up paint sales, but it turns out they were just switching from Rustoleum to Duplicolor. Thankfully, I was able to pick up a can of the Duplicolor silver touch-up which is supposed to match the same silver that my Rustoleum paint was. It's VERY close, but I can sense that the Rustoleum seemed to have slightly bigger "specks" of metal in the paint. However, I haven't put the clear coat on and that may hide it. The difference isn't huge, and certainly not huge enough for me to re-do everything. Definitely not worth the hassle. Anyway, I got the silver and black bottom parts of the body painted. Next weekend I'll put the clear coat on and the paint on the body will be finished. I discovered a fairly significant fit problem with the hood and the body once the underpart of the hood was added, but was able to see that it was caused by the passenger's side wheel well area. So I took out the Dremel and ground away the wheel well area on the body (as this will be painted semi-gloss black once the clear coat on the full body is done). The hood now fits PERFECT! The interior has had the mats I made epoxied on there and they look amazing. I also went and created gas/brake/clutch pedals and have them in there. Although not fully detailed, they'll be fairly hidden by the dashboard but they still look better than the molded in pedals. I have finally become happy with the seatbelt parts and the paint on those is drying. I'll attach them to the seats and then epoxy the seats to the interior pan and that will pretty much complete the interior. I still need to find a dark-room style light so I can go and get the photo-etch kit I have up and running. I printed out the images on the film and will be able to line them up perfectly. They turned out amazing. Once I get the time to go and get the photo-etching complete, I'll have the last parts I need to finish up the interior (seat belt parts, speaker grills) and the engine (The top alternator bracket needed to attach the alternator to the engine, and the TPI plate). I will need to find some black tubing of sorts in order to re-make the radiator hoses as the ones in the kit had massive fit problems and wouldn't fit properly. I will likely go and use some black electrical tape for the belts on the engine, and then I'll FINALLY be able to fit the engine to the chassis. While picking up paint for the body, I found some tan colored painters tape which looks GREAT as seatbelts, and is thin enough where I can take two pieces, attach the sticky sides, then cut a thin strip the width I want and have it be a very convincing belt. One other "test" I need to do is see if the Elmers 5-minute epoxy I have will be compatible with the tire material. I will take a little dab of it and try it on an inside facing part of the tire. I need to do this as the wheels fit somewhat loosely inside the tire, and if I attach the tires to the spindles the rotation of the internal parts is a bit tight. Therefore, the wheels themselves will rotate inside the tires instead of the tire/wheel assembly rotating. If the epoxy is compatible, I'll be able to squeeze some inside the tires and attach it to the wheels, thus solidifying them. More to come next weekend when the whether clears and I've given the body plenty of time to cure, wet sand lightly with very fine sandpaper, then spray a few coats of clear on it. Overall, it's looking good. -
That just ain't right.
Jdurg replied to Bartster's topic in General Automotive Talk (Trucks and Cars)
I pretty much can't watch any movie or show where there is a good deal of forensic analysis done, or any type of chemistry. Mostly because what they do and show is so horrifically off that if a real chemist or forensic scientist did that, they'd be fired immediately. Generally speaking, it's things like when they go and grab samples or evidence, and you never see them fill out a chain of custody form or signature. Or when they go and grab a biological sample that is just sitting out at ambient temperatures. (For ALL biological samples, the sample is kept in a refridgerator and when it needs to be investigated, a small sample is taken from the main sample with a full chain of custody documentation done). You also see things like "chemists" wearing goggles that would be useless for what they are doing, or not wearing the proper gloves when handling certain materials. It's also funny how they butcher compound names or state that someone could make some mystical explosive in their own home. (Put it this way, it is possible to make things that go boom, but it's not with stuff you get from your local grocery store, nor will it go KABOOM as greatly as it's exaggerated in the movies. However, I can understand the purposeful misnaming of compounds or just making things up. This way, they don't have any liabilities if some idiot goes and kills himself trying to make it.) I like how on the show Mythbusters when they made the nitrocellulose in one episode, they bleeped out the names of the compounds they were using and the labels on the bottles, but I still knew exactly what they were doing due to my degree. -
OT: Humber pitches a perfect game!
Jdurg replied to Harry P.'s topic in General Automotive Talk (Trucks and Cars)
It was great seeing that. I don't care what team it is, but I was getting jitters watching that last inning and I wasn't even playing the game or a fan of the team! You could tell that he was nervous too by the way he was overthrowing and getting to three ball counts. I got a bit tense when Rios caught that flyball to right field with just one hand. GET UNDER THE ###### THING AND USE TWO HANDS!!!!! If he dropped that ball I'd have felt horrible for Humber. Watching that last inning reminded me of 2001 when Mussina was one strike away from a perfecto and Carl Everett blooped a single into right field. The only Boston baserunner of the game. Ah well. As a Yankees fan, yesterday was pretty sweet. The White Sox where perfect, while the Red Sox were as far from perfect as it gets. -
I've been away on a business trip this past week, and although I didn't pick up anything model related this week, I did pick up a great reference from an executive VP. I put in an application today and hopefully I'll have good news next week. I'm really positive right now.
-
Does spray paint ever go bad?
Jdurg replied to Action Jackson's topic in General Automotive Talk (Trucks and Cars)
Scientifically speaking, it shouldn't go "bad". The can is/was pressurized and devoid of oxygen. For most paints, they work by evaporation of the solvents and if the can is sufficiently sealed, the solvent can't evaporate out. Yes, the pressurization of the can can fail, but if the spray can was designed well it would retain the pressure. The paint itself really can't go bad unless it cures via a chemical reaction. For spray paint, that is very unlikely. So it's not all that shocking that it survived. -
Lol. I'm 50% Lithuanian, 25% German, and 25% Irish. So I was born with a strong liver and a propensity for beer. Thanks for the advice though. I've talked with my mortgage company and they are willing to help me out. It's just difficult for me right now as this is the first time I've ever had to deal with it. Ah well. I'm sure this will only make me stronger, and hey, if my current company doesn't keep me aboard, I will work my ass off to ensure that they regret every minute of it. This motivation may be something I needed.
-
Thanks Darren and Joe. (And Joe, nice to see another Lithuanian descent here on the board. ) Yeah, overall it's still too early to tell. Just going through the standard reactionary feelings right now. (Working with a lot of psychiatrists, I've learned quite a bit. At first it's being shocked, then being angry, then denying that it's going to happen, then being scared, then being indifferent about it. Finally, returning back to normal). Right now, I think I'm still in the "being VERY angry" phase as I've told my boss that I will need to work from home for the next couple of weeks because if I'm in our open space environment at the office and people who were given jobs start talking about it openly, I will have a VERY difficult time remaining professional. What's funny is that the company I left six years ago to take my current job has announced that they are shutting down the office I worked in and laying everybody off. So in the end, whether I stayed with my former company or moved to where I am now, I'd have lost my job. So it looks like this was in my destiny anyway. Heh. The only thing that I am truly regretting at the moment was buying a house five years ago. I now wish that I had just gotten myself an apartment and paid rent each month, or bought a condominium which would have had a lower upkeep cost and is generally easier to sell than a full house. As a result of this, I am not able to just live off of unemployment and start taking classes to obtain a Master's Degree. That's the real big "should have, could have, would have" thing that I think about. But oh well. I can't change things now. I can only try and apply for other jobs in the company as well as looking elsewhere. It won't be easy, and there will be a period where I will likely have to live without luxuries I have grown used to, but that's just the way it is.
-
Didn't get anything model related, but did get something that will severely impact my model building. I received notification from my employer that my services are no longer needed in their new organization and that I will be laid off. I haven't been given an official date, but it's likely to be sometime during the next two months. So I've been spending hours updating my resume and looking for new jobs. Both within the organization in a different division, and outside of the company. Frankly, there's nothing out there right now. It seems that my lack of obtaining a masters degree upon gaining my bachelor's degree is negatively impacting me. I need to find a job that has a salary within 20% of my current salary, but they just don't exist out there. This is going to be difficult but I'll find a way through it. If anything, I have a strong motivation to work for a competitor to my current employer and provide them with my talents. I'm sure everything is going to be fine, but man, this stinks.
-
Do you use a Hot Box to dry paint?
Jdurg replied to rel14's topic in General Automotive Talk (Trucks and Cars)
Oh there are no worries. By faulty lightbulb, I mean one that would short out at the connection due to poor construction, or ones that develop a crack in the seal so while they won't light up, the electricity still goes through them. I've, unfortunately, had a few of those in my lifetime where I put the bulb in, then had a quick spark and flash and the bulb was quickly replaced. Scared the ###### out of me for a bit though. lol. -
What do you do if you won what I won?
Jdurg replied to tiking's topic in General Automotive Talk (Trucks and Cars)
If you're talking about the old school ones (more like barbie dolls than the ones that came out in the 1980's), then I believe you are correct. Those were about 12" tall, and if you figure the height of the average man to be six feet tall, that would be a perfect scale. -
Do you use a Hot Box to dry paint?
Jdurg replied to rel14's topic in General Automotive Talk (Trucks and Cars)
Just curious, but are there ventilation fans/ports in there so the vapors can escape? After a while, you'd figure that the box would get saturated in vapors/fumes and then the vapors would have a tough time escaping from the curing paint as the air would be fully saturated. Also for safety reasons, you might want to avoid having flammable vapors/fumes in a box where a faulty lightbulb could create issues. I'm not trying to be critical and mean here! Just curious as I may want to build one of these to help me dry the parts of the kits I'm building. -
Inspection and registration
Jdurg replied to hotrod59f100's topic in General Automotive Talk (Trucks and Cars)
In Connecticut, they've done away with the registration stickers. So no more stickers on the windshield or license plates. All they do is give you a piece of paper in the mail that you have to keep in your glove compartment and provide to an officer if you are pulled over. The inspection stuff is all kept in the state computers, so no stickers there either. -
Duplicolor paint health concerns?
Jdurg replied to CEKPETHO BCE's topic in General Automotive Talk (Trucks and Cars)
That is a GREAT point Dingo. The respirator really does no good if there are gaps between the respirator and your skin. If possible, you may want to look into getting some contact lenses just for cases such as this where you can't wear your glasses. -
MPC 1988 Corvette Convertible. Completed 22-May-2012!
Jdurg replied to Jdurg's topic in WIP: Model Cars
Okay, it's been a while since I've posted photos of my progress and I have a fair amount to talk about. I've spending a TON of time, and creating tons of styrene sheet shaving, trying to scratchbuild the seat belt buckles for the interior, and keep needing to make adjustments. First it was the design. Second was the width of the buckle. Right now, it's the depth. The width is just fine, but the things are coming out way too thick and look horribly out of scale. This is in addition to not sitting properly on the seats. So back to the drawing board to try and figure out how to make the width come out proper. I still have my photo-etch kit that I need to start building from, and this past week I was able to get the to-size frets designed in Illustrator and Photoshop, then finally print them out on the clear sheets provided in the kit. They came out BEAUTIFUL on the transparent film that is provided, and I was able to print them out in Photoshop with the addition of registration marks on the outside so that I can line them up on the front and back of the metal sheet. When I lined up the registration marks on the film and held it up to the light, it was spot on perfect. So that's a good sign. On the metal sheet, I'm going to drill very small holes in the center of where the registration marks are so that it lines up just as perfect. The only hold up for me right now is trying to find a UV Free place where I can work with the photosensitive film. Once that's all set, I'll be fine. (I'll probably end up making a bunch of these frets as I like building this model and may want to get another in the future and do some mods to it). The fret will contain speaker grills for the interior behind the seats, the seat belt insertion parts of the buckles, hardware for the seat belts and another tie down belt that was molded into the interior but I'll replace with actual belt, the nose and gas cap Corvette Emblem, the Tuned Port Injection plate for the engine, and the top bracket for the alternator. Anyway, onto my photos. After doing a bunch of sanding and filling, I got my first primer coat on the body. It came out great and I just have one more tiny little area to fix. Otherwise, the body is in good shape and will be ready for a wet sanding and first coat of silver in a few weeks. (Have a LOT going on at work, and will be travelling to Dallas for a meeting the week of the 16th. Also am looking into employment options as I have a feeling the layoffs going around at work are going to hit me in the next couple of weeks. The next one is the hood after putting another coat of silver on it (after sanding out the particles that got onto the previous one), followed by a clear coat which was put on yesterday. While the clear coat won't need any sanding, I will put some rubbing compound on it to smooth it out just a little bit. One TINY speck of something got into the clear on the drivers side of the "bulge", and on the driver's side nose part of it, the paint collected as it was being applied and the ###### thing developed a little bubble which I'd have to strip the entire roof for in order to correct. I'm just going to deal with it and treat it as a bit of "character" on the finished build. Just need to let this dry out and will polish it out later this week and put a black wash into the headlight lamps, but only a very fine one as I don't want it to be sharp black, but I do want it to be a little bit darker. Here's the underside portion of the hood. This is all set aside from trim around the headlights which I'll get to later. The main black parts are semi-gloss with the depressed inner panels flat black to match the paint applied to the underside of the hood itself. Headlights are the same silver as the hood with a gloss coat over it. I also got a bit more work done on the engine. I started attaching the components from the belt/pulley assembly that came in the kit molded as one big piece. The belts were about as thick as the chassis rail on the car, so I cut everything apart with plans on building new belts out of thin styrene. Well, foolish me forgot to measure everything before chopping it apart and therefore was put in a bad spot. So I decided that what I would do would be to take a very close look at the instruction sheet and the photos of the real engine, as well as the pictures on the box in order to figure out where all the parts go. I then took some pieces of thin styrene to use as brackets to attach the parts to the engine block. The only parts not attached yet is the gear that connects to the alternator via the alternator top bracket. That will be attached once the bracket is made from the photo etch kit. Once that is done, I'll be able to take some thin electrical tape, which I have some in a flat black color, and cut a strip out and wind it around everything. It will then be in a good scale and look really good. I also wound up cutting the radiator hoses and shaving off an attachment point (seen as the orange part on the photo above) so that I can take some tubing and wind it around the parts so it will fit in the finished model. I cut the hoses where clamps or other items were on the molded pieces so the join will look just fine. Even if I wasn't putting my own gears and belts etc. on here, from my dry fits it didn't look like the stock hoses would fit properly in there. By using tubing (which will likely be wire insulation after I pull the wire out of it) I'll be able to wind it around how I need it to go. I got the outside and inside of the doors finished. Attaching the mirrors was the BIGGEST P.I.T.A. yet. There were no mounting points for the mirrors on the doors, and it's really hard to tell where the mirrors need to be until the entire thing is built. I have done some test fitting and just hope everything turns out okay. (I know already that the attachment of the dashboard to the top in the body shell and having it sit right in the interior tub is going to be a real pain). The exterior image has the silver top and black bottom painted, smoothed out, and clear coated so it is done. I still need to apply the center trim black paint and paint the upper part of the handle inset black. Not sure if this is how it is on stock cars as I've seen photos of both. The interior parts were painted according to every photo I've seen of tan 1988 interior Corvettes. The top half is flat interior tan from Model Master which I then coated in semi-gloss clear, and the bottom part that is tan has also had flocking applied to it. It looks perfect. Dashboard is also done. It's done factory correct with the top half black, and the bottom half the interior color (tan) and I also applied flocking to the tan part of it which also came out well. (Flocking is super easy to do with the Testors Acryl flat clear coat. It dries at just the right pace to allow you to put the flocking on there and have it stick just right). The detail painting on this came out incredibly sweet. With perhaps the most steady hand I have ever had, the gauge details and the Corvette Emblem on the steering wheel came out nice and sharp. The very well molded details from the stock pieces came out great. Finally, some scratch built stuff. Having picked up a pack of very thin styrene sheet, it's given me the opportunity to try out different thing. Looking at the interior hub, the floormats molded into the tub just don't look right. So I went and took some paper and was able to trace out the shape of the mats. I then took my sheet styrene and cut out two mats for each side of the interior. On one of the mats, I took a pencil and made a fine line around the edge in order to create the raised edge seen in the photos above. With a steady hand and a sharp X-acto knife, I cut out the perimeter. With a little bit of liquid plastic cement, I was able to fit the two together, tape it while the glue did its magic, and later remove the tape with the two piece of styrene nicely bound. While the border isn't 100% the same width all the way around, it did come out good enough for my level of acceptance. I then sanded the exterior smooth so there was no seam visible, and applied a coat of the tan paint to the whole thing to match my interior. Once dry, the Acryl flat clear was applied to the inside part and flocking quickly added and pressed down. The finished product is fantastic. Even better is that before I did the painting, I was able to bend the styrene so that it will fit snugly inside the interior and won't even need to be glued. This will make it look like it is actually sitting on the carpet like real mats would. In the middle, you'll see the latest iteration of the seat belt buckles that I am trying to create. The width of the buckle is just fine and it looks incredible, but the depth is about twice as thick as it should be. I need to figure out how to build the front part of it that has an angled top part that goes back, and also build the exterior shell with the thin styrene. The difficult part is the interior buckle part. Thankfully, the detail master scale GM belt buckle set I picked up has a ton of parts which will let me perhaps use those to build the interior. I'll figure out something, but I'm going to get this right before I call it done. So that's my progress thus far. I think it's coming out great and I can't wait to get the body painted. I just hope I have enough silver paint and clear coat as trying to find cans of the Rustoleum auto touch-up paint around here is next to impossible. The local AutoZone stores are phasing out carrying touch-up paints as they seem to only want to cater to the folks putting the "bling-bling" on their cars, and not anybody who would want to touch up a paint mar or use the paints for other reasons. -
Duplicolor paint health concerns?
Jdurg replied to CEKPETHO BCE's topic in General Automotive Talk (Trucks and Cars)
As has already been mentioned in this thread, the main reason for the at times frightening warnings on paint bottles/can, pharmaceutical products, etc. are for legal reasons. This way if someone does something that results in heavy exposure to the paint, or has an adverse event come up with the pharmaceutical product, the company that made the product won't be sued into oblivion by the end user. Having been in the pharmaceutical industry for a decade now, I've learned quite a bit about how medications come to market and the insane amount of testing that they go through. The extensive testing is to not only see if the product works, but to test out the product in a very large number of subjects with all different types of backgrounds to see if there are any dangers there. Safety is the number one priority and the amount of data that comes in regarding adverse events experienced, and other health related measurements, is simply staggering. At the end of the testing phases, and when the product is submitted to the FDA/MHRA/EMA for approval, terabytes of data relating to the side effects of the drug are reported as well. If the product is approved, the companies are required to report out any adverse events that occurred in a certain percentage of the subjects, and any serious adverse events which have occurred even if it happened to just 1 subject out of the tens of thousands of subjects that participated in clinical trials. Therefore, on things like bottles of aspirin or prescription medications, you'll see pamphlets talking about the possibility of loss of life or blindness or strokes, or other things that you would never expect to happen. Whether it was just a coincidence or it was caused because a subject in a study didn't tell the company about their entire medical history, they are required to report it. Both for the legal safety of the company, and the safety of the people using it. With chemicals like paints and glues and the other stuff we use, the same reasoning applies. The companies must let us know what could happen if we were to be exposed to these chemicals no matter how rare or unlikely the chance is that something could happen. Having a degree in the chemistry field, I learned that there is absolutely no such thing as a completely non-toxic substance. EVERY substance in this universe can be dangerous to you. This all has to do with quantity. In small quantities, something like water is perfectly harmless to you. In large quantities, however, water can be incredibly dangerous. (Remember that story about the mother in Seattle who drank multiple gallons of water in order to win a Wii video game system and died as a result?) The nature of the chemical itself also has to do with the toxicity of it with regards to long term exposures. If a chemical is readily removed from the body and doesn't accumulate, it really poses no real long term danger. If the body isn't able to clear it out quickly, or at all, then it will build up and cause problems. (This is the case with many heavy metals like lead and mercury). A key document which exists for every compound out there is the Material Safety Data Sheet (MSDS). This sheet describes the chemical reactivity of a substance, biological dangers, safe exposure levels, potential dangers if mixed with other chemicals, etc. When you read an MSDS, if you aren't fully knowledgeable in chemistry, they can appear incredibly frightening even for things as simple as water or carbon dioxide. But if you have a good background in chemistry, you'll be able to understand the exposure levels and LD50 levels, and the other exposure limits that are posted for the compounds. In addition, you'll know whether the dangerous reactions they post are likely to happen, or are one-in-a-million events that would require immense levels of stupidity for them to happen. So some good advice is to take the MSDS sheets you'll read as a guidance for safely using the substances and a description of worst case scenarios that could happen while using the substances. With the chemicals we use in our hobby, reducing exposure can't do you any harm. Don't paint or glue in a concealed space lacking ventiliation, don't use your chemicals in areas where you eat or drink or sleep, don't purposely apply the chemicals to your body, don't ingest them, and always ensure that there is good ventilation wherever you are painting or gluing or puttying. As an aside with regards to examples of things which are dangerous, but not really something to worry about in small quantities, take a look at radiation. If you've ever had an x-ray done, you'll remember how they covered the parts of your body not being x-rayed in a lead sheet, and how the x-ray technician leaves the room and goes behind a thick leaded glass or lead lined wall when the x-ray is done. You may be getting kind of nervous wondering why he is getting behind all that shielding and you're just sitting there being exposed to it. Well, it comes down to quantity once more. That day, you were getting x-rayed once. During the full day at work, the technician is likely taking dozens upon dozens of x-rays. The one time exposure for you will do no harm. But if you had dozens upon dozens of x-rays done in one day, harm would definitely be done. So the technician needs to be shielded to prevent an overexposure for him. The area of your body exposed to the radiation also plays a key part in the safety of it. If you have a bunch of x-rays done on your extremities, like I have in the past couple years, it's not big deal. This is because your extremities don't have a great number of dividing cells which are the most susceptible to radiation damage. Your core of your body, however, is highly susceptible because of all the dividing cells which could be damaged and possibly mutate if exposed to radiation. One final thing to mention, which I find to be fairly humorous, is the reaction people have when you mention that they are being exposed to radioactive material. The human body has evolved over the years to be able to handle exposure to small quantities of radiation because radioactivity is around us and always has been. If you have ever taken a cross-country or transatlantic/pacific flight, you will have exposed yourself to a great deal of radiation due to the cosmic rays that are going right through the plane that aren't blocked by the atmosphere that is doing that job for us here on the ground. If you happen to have a geiger counter available to you, take that geiger counter and turn it on around a bottle of salt substitute (Potassium chloride) or a pile of bananas. You'll hear the geiger counter start clicking madly due to the potassium in there. Potassium naturally occurs in multiple isotopes (atoms with the same number of protons, but different neutron numbers), with one of those isotopes (Potassium-40) being radioactive. Therefore, things with a lot of potassium in them will be naturally radioactive. It's low levels and very weak, but it is there. It's just hilarious to me to see people start freaking out when the hear the clicking. -
MPC 1988 Corvette Convertible. Completed 22-May-2012!
Jdurg replied to Jdurg's topic in WIP: Model Cars
Okay, I finally got a postable picture. Here you can see the hood of the Corvette. Unfortunately, I didn't get any images of the hood before I did my clean-up work. There were some nasty sink marks and the such all over the hood. The Corvette Emblem was also positioned right up at the front, but since I'm making my emblems with the photo-etch kit I built, I had to sand off the built in ones. Afterwards, I did have to take some putty to the area and I have to say that the spot where it was is not even noticeable anymore. There is one layer of silver paint now on the hood, and as mentioned earlier, some dust particles got in there which I'm unable to sand out without going down to primer. So I will be putting on another layer of silver. Overall, it looks good. Once the second coat goes on tomorrow, and then the clear coat goes over that, it will look great. The body still has some work to be done. I need to apply another thin layer of putty, or more likely, some superglue with baking soda thrown on for hardness purposes. Although I can't feel the poor spots with my fingers, I can see them after a very light mist coat is applied so I need to work on that a little bit more. The fit of the body over the interior tub and the chassis is still a concern of mine. The model has opening doors which leaves a VERY thin area in the middle of the body shell that is undoubtedly warped a bit. So when I go to put the interior tub inside and then the chassis, some fit problems may occur which will concern me with the paint and the glue. I think I'll pick up some five minute clear epoxy so that if there are some gaps I don't have to worry about it, plus the epoxy won't go and mess up the paint. The paint job is going to first be a coat of silver paint over the entire model to seal out the red styrene plastic on the kit, then I'll mask off the top half of the model and apply the black paint for the bottom. The C4 Corvette design has a molding right down the middle of the model which makes masking super easy. The full size cars were available in some two-tone color schemes, with silver and black being one of them. I will be able to put some masking tape over the molding, then using an x-acto blade and a steady hand, follow the molding line to cut off the tape and leave it right there in the midline. At the front end, I just need to mask off the front nose piece and that is it. Since the molding is right at the seam, I don't need to worry about any paint "seams". Plus, once the clear coat goes down and covers everything, I'll go and take some flat black to paint over the molding itself to help it stand out a little bit. This thing is going to be gorgeous. -
Loving how this is turning out. The engine build is always my favorite part, and the clean-up work you've done on your engine is orgasmic. Well done!
-
MPC 1988 Corvette Convertible. Completed 22-May-2012!
Jdurg replied to Jdurg's topic in WIP: Model Cars
Thanks Fabrizio. I know I promised pictures, but the photos I took turned out poor so I can't really post them. Still, I got the second coat of silver paint on the hood today, and frustratingly some dust fell on the wet paint which means I'll need to sand them out. Hopefully it doesn't go through to the primer, but I'll likely need to put another coat of silver on there. I pray that I don't use too much of the silver paint because my sources of Rustoleum Auto-Touch pain have dried up. The two AutoZone stores I go to in order to get the paint I need has stopped selling touch-up paint! I asked why, and the workers there said that too many kids were buying paint to huff the fumes, or people were buying paints for purposes other than touching up their cars. I frustratingly asked them why they would stop selling paint to people buying it for things other than car touch-ups, and the douche of an employee said "We are here to help people repair their cars, so if you're not buying things to fix a car we don't want you here." I then told him that he just lost a customer and sales, and can understand why the store is in financial trouble. I don't understand why it's so hard to find auto touch-up paints. I was able to get one can of silver paint and black paint for the body of the car, but they were out of clear coat and don't plan on re-stocking. I'll have to buy paint online now which will cause me to have to wait a good week to get it in the mail, plus extra shipping. SOOOOOOOOOOOOOOOOOOOOO frustrating. Anyway, I got the flocking done and will probably put another layer of flocking on there. The Testors Acryl flat paint, when diluted with distilled water, does a great job of re-enforcing an already applied flocking layer without making it clump up. The doors and dashboard (which has a layer of "fuzz" under the black top to it) have turned out great. I got the doors primed today, and will get them painted with the silver paint tomorrow. The black lower section will go on after the silver as the silver does a GREAT job of sealing the red-colored styrene, and the black/silver combo will look great with the tan interior. I'm really psyched by this build, and I promise, once I get good photos I will post more. Today/tonight I went and re-did the seat-belt latches I had made earlier. This time, I used the 1/124th scale GM buckles I bought from Detail Master. When I use them as the logos on the 1/16th scale car, they are a perfect match. I now only need to create the actual insertion parts in the photo-etch sheet I'm making. I had hoped to get that done this weekend, but since I've never done this before, I'm being super careful when using this kit. I still think this is turning out great, and I really appreciate the good words you are all leaving. Gives me the motivation to continue. I love building large scale Corvettes. I think I'll have to bite the bullet and pay the higher prices out there now for the 1/12th Scale 1967 Revell Corvette. -
MPC 1988 Corvette Convertible. Completed 22-May-2012!
Jdurg replied to Jdurg's topic in WIP: Model Cars
I got my flocking in the mail today, along with some GM seatbelt work. The seatbelt hardware is designed for 1/24th scale cars, but I figure out how to use it for my 1/16th scale Corvette. I can use the litany of seatbelt latches to make the logo I need for my Corvette. Therefore, I don't need to make this out of the photo-etch I'm toying with. I'm happy. I have just finished applying the flocking to my interior, and this looks AWESOME! Once the paint dries, I'll take photos and update this thread. I'm super psyched. Today, I also put the final primer coat on the hood of my Vette and it is silky smooth. I got the silver and black paint that I need, and I'll have the body worked out by the end of this weekend. This is becoming my best model build ever. I can't wait to post the final product in the Under Glass section. Thank you to EVERYONE for your support. -
MPC 1988 Corvette Convertible. Completed 22-May-2012!
Jdurg replied to Jdurg's topic in WIP: Model Cars
Thanks Eric! I'm having a ton of fun building this. If anybody is looking to build a large scale Corvette, this is a GREAT kit to build. Today, my first day of vacation as I am taking time off of work through Monday of next week, I went and attached all of the pulleys/gears to the engine block. I have discovered that even had I kept the initial pulley/gear part intact, there would be fit issues with the engine block, pulley/gear assembly, and the radiator hoses. I will have to cut the radiator hoses apart and put my own parts in there. I have a bunch of perfect diameter tubing I can use for the hoses in order to weave their way around the parts that are now cemented to the engine block. I'll cut some tape apart this weekend in order to route the belt. I also plan, on Saturday, to do my first work with my photo-etch kit. I have the fret already designed in Illustrator, then converted to a raster image in Photoshop with a resolution of 3200 DPI. It's a massive file size, but this will work perfect for printing on the film that the kit provides. I can't wait for this to come out. If it comes out right, I'll make a bunch of these for future 88 Corvette builds in this scale. If anybody else wants to build one of these, providing the photo-etch work comes out right, I'll be willing to help out. Can't wait to finish up this build. While on vacation, I'll get the body paint done. Can't wait! Edit: I just put the first coat of the Rustoleum gray primer on the hood. It came out SUPER smooth and looks fantastic. I ran out at the end, but I needed to go to AutoZone tomorrow anyway to get the metallic silver and black color for the top coats, and another can of clear coat just to make sure I had enough. Applying a coat of paint to a main part, like the body, just gives a feeling that words can't describe. This is why I am so happy to be back into modeling. I can't WAIT to get the photo-etch stuff done this weekend. I found an LED flashlight that emits ZERO UV rays which I can use to work on the photo-resist application, and also have a bunch of compact fluorescent bulbs around the house which I can use to expose the photoresist. I'm really psyched about this. I expect my first go around to not be all that great, but if it's acceptable to me, I'll go ahead and use it. I ditched the seat belt latches I had made previously, and while they looked fantastic, I figured that making them in scale with my photo-etched buckles and gear will be best off. I will be getting my tan colored flocking in the mail tomorrow, and will then be able to finish up the interior. It's already looking so good, and I think I can now call this my best model build ever. While I love the old school Corvettes (and I need to get me a 1953 model to super detail since it's the start of the series), the modern era Corvettes are just so much fun to build. The engine compartments on the newer Vettes just look so good when properly detailed, and while the AMT/Ertl line of Corvette kits have generally been much poorer with regards to detail than the Revell/Monogram lines, the MPC large scale kits which are no longer in production always come out great. I've already built a 1963 split window 1/16 scale kit, and am VERY happy with this 1988 Vette. Seeing it available on Amazon for only $40.00 is a STEAL. If you are a Corvette fan, I suggest checking it out, even if it means I may not be able to get another one. -
MPC 1988 Corvette Convertible. Completed 22-May-2012!
Jdurg replied to Jdurg's topic in WIP: Model Cars
Got a little bit more work done on the Vette the past few days. I went and shaved/sanded off the gears/pulleys on the assembly and began to mount them to the engine. I am creating a bunch of mounts/brackets so that the alternator, A/C compressor, power steering gear, etc. etc. can mount directly to the engine block and I can then make a belt and wrap it around. Overall, I think this is coming out pretty damned good as the belt will be perfectly to scale as opposed to the MASSIVELY thick belt molded into the original gear assembly, and in addition I don't have to worry about the fact that I forgot to measure the part before cutting it apart. For the mounts that don't look so good, I will have them hidden in the engine assembly once it's on the chassis so that is a positive. The only issue I'm coming across is that I can't get accurate measurements since any place selling the parts doesn't provide measurements, and I keep getting ignored or laughed at when I go to 1:1 scale Corvette forums and ask for help. I guess I'll just have to wing it and hope it comes out well, or find a repair manual that gives all of the dimensions. Regardless, I think I'm going to pick up another one of these kits since it's a VERY well made kit and we don't seem to have a whole lot of good modern era Corvettes. With the next version of the kit, I think I'll try and scratch build a TON of parts and make a 1996 Corvette Grand Sport. With the Micro-Mark Photo-Etch kit I picked up, I think I'll be able to do a lot of that. Making the engine for the Grand Sport will probably be the toughest part. I'm taking some vacation days later this week, and I think I'll go ahead and prime and put the first couple base coats of silver on the body this weekend. The silver/black exterior (The lower portion of the car will have the black paint) with the tan interior is going to look VERY sharp. Can't wait to get this done. I got my seatbelt latches made, but now that I have the photo-etch kit I think I'm going to scratch the parts I've made and just go and build new ones out of the sheet styrene I have and use the photo-etch kit to design the buckles and latches. I'll update my "how to make your own seat belt hardware" thread once I'm done with the new versions. -
I have to clarify the statement you made here Art. It's not exactly correct. Chlorine bleach is a solution of sodium hypochlorite in water. Sodium hypochlorite (NaOCl) is the sodium salt of hypochlorus acid (HOCl). Hypochlorus acid forms when chlorine gas is dissolved in water via the reaction Cl2(g) + H2O(l) => HOCl(aq) + HCl(aq). Hypochlorus acid does not exist on its own. To make the bleach that we know of, the chlorine gas is dissolved in a solution of sodium hydroxide (NaOH) so that as soon as the hypochlorus acid forms, it is neutralized by the sodium hydroxide to form sodium hypochlorite and water. If you have a basic solution, the equilibrium of the reaction stays on the right side causing the OCl- ions to remain in solution. If you acidify the solution, then the equilibrium shifts to the left and you wind up getting the generation of chlorine gas. Therefore, NEVER under ANY circumstances mix an acidic item with bleach. Bases are generally safer to mix with bleach, but to be honest, you really shouldn't mix anything with bleach. While most bases are safe to mix with bleach, there is one common household base that is very dangerous, and that's ammonia. Ammonia (NH3) mixed with bleach causes the formation of chloramine gas (NH2Cl) which is very toxic. Other nasty byproducts can form such as hydrazine and other chlorine based gases. Now you are correct in that chlorine gas is a nasty halogen that was used as a chemical weapon in WWI. The human body has evolved to sense small amounts of Cl2 well before it reaches a dangerous level. In fact, when you get a whiff of bleach you are indeed smelling chlorine gas as part of the natural equilibrium of the reaction in which NaOCl was formed. As someone with a degree in forensic chemistry, I just had to step in and correct the chemistry error in your statement.
-
I'm currently in a position where my employment future is uncertain. A large number of my buddies recently felt the bite of a local office being shut down, and by the end of this year I too may feel that bite. As a result, I need to really watch what I spend money on and understand that at some point this year I may be without a job and therefore need to sell a great deal of my possessions in order to just pay my rent. Therefore, when I am buying something for this hobby I need to make sure that it will be worth it in the long run. I like building Corvettes and pretty much only build those. As a result, much of what I want to build is a kit that is no longer in production since the major manufacturers seem to have stopped making Corvette kits. So the number of kits I build each month is limited to maybe just one. (Like right now, I'm building a 1988 Corvette 1/16th Scale kit from MPC that I bought for $40.) What it also means is that when I build something, I put a full effort into it and make sure that it's built to my satisfaction. Recently, I went and bought the Micro-Mark Photo-Etch kit so that I could build photo-etch components myself. Up front, it's a high cost, but in the long run I think this will be well worth it. That's pretty much the goal of my purchases now. Buy stuff that will be cheaper in the long run.
-
Open it up, make sure every part is in there and there are no major "fixes" that need to be done, then use my sprue cutters to remove any sprue from the body and give it a nice sanding with fine grade sandpaper to remove any mold lines and see where any putty needs to be applied. Once putty has then been applied and allowed to cure, I sand the body down and apply a primer coat on it in order to ensure that it is fully cured and dried when I eventually get around to painting the body.
-
MPC 1988 Corvette Convertible. Completed 22-May-2012!
Jdurg replied to Jdurg's topic in WIP: Model Cars
No more pictures at this point, but I have gotten more tools needed for my build. The Micro-Mark Photo-Etch kit arrived a few days ago, and I am now working on all of the photo-etched items that I will want to use. A couple of these replace decals that I had planned on using. Thought it may take some practice runs, I plan on producing photo-etched versions of the following: Tuned Port Injection Emblem on the Throttle Body. Nose Corvette Emblem. Gas Cap Corvette Emblem. GM Seat Belt Buckle. Seat Belt Latch. Seat Belt Hardware. Interior Speaker Grilles. Alternator Top Bracket. This is what I need to create via Photo-Etch. If I had gotten the kit earlier, I would have made my wire looms and associated parts via photo-etch, but I still think the styrene sheet came out fine. Today, I got the interior painted and the semi-gloss clear coat put on top. It's turning out REALLY nice, and once the proper colored flocking comes in the mail, I'll be able to put that on and get the interior finished. Again, I can't express how much I freaking love the Testors Acryl paints. They go on so smooth and just look so good.