
Jdurg
-
Posts
212 -
Joined
-
Last visited
Content Type
Profiles
Forums
Events
Gallery
Everything posted by Jdurg
-
VERY nice! Always love me some Corvette builds.
-

MicroMarks photo etch kit
Jdurg replied to moparmagiclives's topic in Model Building Questions and Answers
Got my kit today. I'm still working on getting my artwork finalized, so I likely won't give it a go until next weekend. I may try some trial pieces with the insanely thin sheets that came with the kit, but probably will want something slightly thicker for the end product. -
I don't think it's that bad. I certainly would not use it for any detailed work where tight tolerances are needed, but when I need to paint a large area with a color (things like interior pieces, clearcoats, chassis, etc.) it works just fine. For only $25 I think it's well worth the money. I honestly consider it to be a very good set of "airbrush training wheels".
-
What's your favorite paint?
Jdurg replied to SuperStockAndy's topic in General Automotive Talk (Trucks and Cars)
For painting the bodies of cars, I like to use Dupli-Color and Rust-o-leum automotive sprays. I have yet to have any bad reactions with styrene (probably because I'm super anal retentive about using primer), and I love how thin the coats go on, how quickly they dry, and how well they cover. Generally speaking, in about a day or so after spraying the bodies I'm able to lightly wet sand and polish them. Once the clear coats go on, the bodies just look super thick and wet, yet all the detail is still there. I love them. For everything else, I've really grown VERY fond of the Testors Acryl paints. The clean up is super easy, the paints all seem to go on quite smoothly and free of brush strokes, I haven't run into a paint that doesn't cover well, and they dry super quick. All of that adds up to great finishes and coverage. I pretty much exclusively use their clear coats when I'm painting blacks or, anything really, and need different depths of gloss. Still, I tend to use a lot of Testors Model Master paints and it seems like each bottle is a crapshoot with regards to quality. Their metallic paints like brass, steel, aluminum, and silver chrome trim all cover INCREDIBLY well, don't leave brush strokes, and dry in a good amount of time. The semi-gloss black paint bottle I have works well and gets great coverage, but the black metal bottle I've bought never dries. I've stirred it up, shaken it up, mixed it up extensively, but when applying the paint to a part even a week later the paint is still somewhat tacky. Not sure if it's a bad bottle or just a bad color, but I will never use it again. Currently, I'm painting the inside of the '88 Vette kit I'm putting together and using the Model Master Interior Flat Tan color. It's incredibly frustrating because the paint goes on soooooooooooooooooooooooooooo thick and dries so incredibly quickly. Thankfully, the bulk of the interior is going to be covered with flocking so the many brush strokes won't appear through the flocking. I'm going to be letting this dry for a few weeks before I put the flat Acryl coat over it in order to bind the flocking to the interior. But for things like the seats and the interior panels that aren't covered with flocking I'm going to have to spend some time to VERY lightly sand it, apply a semi-gloss clear over it, and just hope it turns out well. This paint would be great if it didn't dry so quickly and end up so thick. I'm thinking that maybe I need to pick up some thinner and mix that into the bottle in order to thin this down a bit for the final couple of coats. -
MicroMarks photo etch kit
Jdurg replied to moparmagiclives's topic in Model Building Questions and Answers
One thing that I have read about is that the "fineness" of the detail is limited by the thickness of the metal you are using. If your metal sheet is only 0.10 mm thick, then the thinnest "detail" you can have on the photo-etched product is 0.10 mm thick. This is especially true around edges because of where the resist rests, the etchant will still eat a little bit underneath it. So if you have a fine detail too close to the edge, when the etchant eats underneath the resist it will likely go right through the detail. I have already got my images setup in Illustrator, both front and back sides. This should help me do a lot of "half-etching" like on the gas cap and nose emblems where I need to etch out part of the top, but not all the way through the piece. Where I need to make cuts all the way through, I'll just leave the back side open. I'm REALLY looking forward to getting the kit. Per the shipping instructions, I should have it tomorrow and get to use it this weekend. Amazingly, while digging around in my basement I found a red photograph developers lightbulb which is used for photographic work. I'll use that when I need to see, but don't want to exposed the film. -
MicroMarks photo etch kit
Jdurg replied to moparmagiclives's topic in Model Building Questions and Answers
You'll have to let you me know how it goes. My kit just shipped out to me today. I'm building a 1/16 scale Corvette for which there are no photo-etch parts out there so I've had to make my own. This was the only way how since there are no companies out there willing to custom make photo-etch parts. I'm getting excited waiting for it to arrive. -
It will take it some time to get here, but I had a good night playing cards this week and therefore had the money to pick up the Micro-Mark Photo-Etch system. I'll use that to create the Corvette Emblems on my 1/16 scale '88 Vette that I'm building, as well as other detail parts that just aren't included in the kit. Can't wait for it to arrive and to give it a shot.
-
I have one of those Testors spray brush things. Works great and I love using it, but the one I have always seems to "stick" so that when I press down on the button it doesn't stop spraying. I have to then pull the "lid" off in order to stop it and this wastes a ton of the air. Of course, the connection is a proprietary thing so this means I have to buy more Testor's air. If I figure out how to get this little "lid" to connect to an air compressor that I have, I'll pass the instructions along here.
-
Where Do Good Ideas Come From?
Jdurg replied to Dr. Cranky's topic in General Automotive Talk (Trucks and Cars)
My inspiration tends to be random. I guess that's why I like the fact that I have subscribed to Scale Auto Enthusiast. It comes out every two months, so when my mind is growing blank a new issues comes in the mail and gets me going again. Speaking of random, when I parked my car at work today I ended up parking next to a brand new Corvette. I know it's new since the only sticker on it was the employee parking sticker on the windshield and not a registration one. (My state got rid of the registration stickers about a year ago, so a new car in the past year or two will not have one). I was fortunate to arrive at the same time as this person, and mentioned how I was a car model enthusiast who focuses on Corvettes. He was pretty happy to meet another Corvette enthusiast and actually let me sit in the car. First time I have ever sat in a Corvette. It just felt sooooooooooooooooooooooooooooooo comfortable. I told him how I build model cars, and he said that if I ever wanted to take some photos for reference to just let him know. I think I'm going to pick up another modern model 'Vette and build a replica of his car. I'll be able to take photos of such high detail that I'll be able to completely replicate that car. I may even do a good thing and build an exact replica of his car and then give him the model. It's a beautiful yellow with a black interior. Quite stunning, if I can say so myself. But I think that's a great example of where my inspiration comes from. I love the old school Corvettes (I think I need to build me a 1953 just for the sake of it), but I really love the modern era cars in terms of model building. This 1988 I'm building is way too much fun. -
I still miss the 1967 large scale Vette that they made. Yes, it had it's issues, but overall it was a great kit. I still have a Detail Master Photo-Etch set in reserve for when finances allow me to pick that set up. (Perhaps that will be my next kit after I finish up this 1988 MPC kit I have?)
-
I don't have photos, but while cleaning up some mold lines and removing some pins that weren't lined up right, I put a brand new X-Acto blade right into my right thumb. The blood that soon poured out was pretty nasty. After applying pressure and soaking through a bunch of band-aids, I decided that I needed to get this wound sealed up. I poured some 90% isopropyl alcohol into a shot glass and just dipped my thumb in it. The pain was horrific, but I knew it would sterilize the wound. I then took some superglue and applied it to the wound. It sealed up instantly and stopped bleeding. A few weeks later, and the glue finally rubbed off. No scars, no infections, but a very bad memory. Not a fun incident, and a lesson in making sure the blade ALWAYS is being pushed AWAY from your body when trimming things.
-
Sorry to hear that. Having broken MANY bones in the past couple of years, the only advice I can give you is to listen to your doctors. Last October, I broke my right ankle. It healed quickly and my orthopedist said that I should take some physical therapy sessions to build up muscle/ligament strength. I didn't listen to my doctor. A few weeks ago, I went and did a great deal of walking while travelling for work. While in Mid-Town Manhattan, I walked about 5 miles over the course of a few nights. The next day, while resting at home for the weekend, my right ankle started to really hurt again. A day later, I couldn't put weight on it without drawing tears. I manned up and saw my doctor and had some x-rays done. Turns out, because my muscles and ligaments hadn't been strengthened like they should have (something physical therapy would have done for me), my right tibia had to support all the forces placed upon it while walking. As a result, the fracture in my right medial malleolus that I got from turning my ankle last October had fractured again. A stress fracture. As a result, for the past three weeks, I've been on crutches and hobbling once more. The doctor prescribed me medication for the pain, and I hate having to take it. I have a VERY high pain tolerance. A few years ago, I had a nasty accident while skiing. (the first and LAST time in my life). I shattered every bone in my right foot because of that. I walked on the broken foot for a week before the inability to sleep or function forced me to see a doctor. I wish I had gone to the doctor sooner. Just listen to your doctor and take it very easy. Look at this as an opportunity to get some modeling done while you heal. The broken bones got me back into modeling and it's a good way to take your mind off of the pain and the discomfort. You will recover from this. Just listen to your doctor and don't go too far too soon.
-
Well by "crud" I mean the balled up paint and stuff that sticks to the plastic via static-electricity. The sanding is something I do with all parts that I have de-chromed, and really isn't required to remove the "crud". A simple brush with a paper towel gets rid of it.
-
MPC 1988 Corvette Convertible. Completed 22-May-2012!
Jdurg replied to Jdurg's topic in WIP: Model Cars
Don't have any more photos to post, but I've gotten some more work done on the build. The chassis has been painted, and I LOVE how quickly the Acryl paints dry and how smooth a finish they leave. This weekend, I'll apply the flat clear coat to the proper parts of the chassis and put some semi-gloss over the rails. I've attached the upper part of the front suspension and painted the A-Arms silver as my reference photos have shown. The lower part of the suspension has been painted the proper silver and black (silver for the tension spring and lower A-Arms, and black for the structural portions), and the entire thing was sprayed semi-gloss to give it a nice "hard" finish to it, and the proper sheen. I finished up the construction of the seat belt buckles for the interior, and put the base silver coat on it. I have decided to go with a silver exterior with a tan interior. With the body being molded in red plastic, the silver color for the exterior will help cover the red. I think the silver/tan combo will look quite nice when finished. This weekend I hope to get the rolling chassis built and start on the interior. I need to work on heavily modifying the exhaust system due to how the manifolds attached to the engine block. (I'm going to need to go and heat the exhaust where it is supposed to connect to the manifolds and warp it so that it will connect properly. I may need to fabricate some spacers in order to make it fit). In addition, I think I'm going to need to search online for a spare pulley/gear assembly as I foolishly cut mine apart before measuring it in order to properly create belts from strip styrene. Ah well. Lesson learned. Overall, this is still coming along great and it is definitely going to end up being my most detailed build ever. -
I've become a fan of Easy-Off. No matter how thick the undercoating is, Easy-Off always seems to peel it off. Being a chemist by nature, I am fully aware of the nasty nature of NaOH and always wear gloves, eye protection, and respiratory protection. (If NaOH is around, some strong vinegar is around to neutralize it). But EO has always removed the chrome and the undercoat in mere minutes. Some light sanding to get rid of the crud left on it, and the surface is ready for a nice coat of paint.
-
I didn't "get" anything today, but I did learn that there's a Michael's near me and I can go there for supplies, items to use on my model, and perhaps pick up an airbrush one day when the funds allow. So that was good to see.
-
That looks awesome. Once I finish my '88 Vette and have a model year that shows the distributor, I'll be coming back to this!
-
How To Make Seat Belt Buckles From Styrene Sheet
Jdurg replied to Jdurg's topic in Tips, Tricks, and Tutorials
Thanks. I just painted a silver coating on my '88 Corvette model, and tomorrow I'll put on the interior color for it. It looks AWESOME. I'll be starting the latch and other hardware shortly. This has turned out incredible. So easy to do, and so incredibly accurate. -
How To Make Seat Belt Buckles From Styrene Sheet
Jdurg posted a topic in Tips, Tricks, and Tutorials
I'm currently building a 1/16th scale 1988 Corvette Convertible and trying to add as much detail as I can. While the MPC Kit has a lot of pieces, seat belt buckles and other seat belt gear were not included. Since this is a Convertible, the details on the inside are easily seen so I wanted to spruce it up. Part of that is creating seat belts and all the hardware. Having a few sheets of styrene (0.015 and 0.040 mm thick) I was able to create some seat belt buckles myself. The tutorial I have here is for the more modern, top button release belts that you see in modern cars. For my 1988 Vette build, they used the older side-button buckles which were also encased in an interior colored molding. I have not yet finished the putty and sanding and painting on those two buckles, but once they are done I'll update this thread with further tutorial images. Anyway, to do this build you will need a VERY sharp X-Acto blad, a ruler, a sharp pencil, some Cyanoacrylate Glue, and some putty. The first thing I did was create a mock-up of my pieces on paper so that I could have a plan of attack on this build. In the first image, you will see a lineup of all the separate styrene pieces you will need. Please note that this is for the creation of ONE buckle. To make a full set, you'll need to multiply all these parts by the number of buckles you need to make. A: 0.015 mm styrene (Outside portion of buckle). B: 0.015 mm styrene (Outside portion of buckle). C: 0.015 mm styrene (Inside spacer to create gap in top of buckle). D: 0.040 mm styrene (Structural part of buckle, and also forms the button release on the top of the buckle). E: 0.015 mm styrene (Side portion of buckle). F: 0.015 mm styrene (Side portion of buckle). So cut these out and set them aside. For part D, you can at this point round over the corners and edges to make it a bit smoother. The first part of the actual "build" is to take some superglue and glue together the internal parts. The part that was used to make the button, and the gap creator piece of thin styrene. With parts C and D bonded together, you then want to take parts A and B and glue them to the outside of the now bonded C&D. Again, use the CA Glue to ensure it bonds quickly and strongly, and be super certain that the tops of parts A and B are in line with each other on the opposite sides of the buckle. Also, as you can see in the image here, parts C and D are much wider than the actual external buckle part. This is fine, and in fact it's a good idea to do this since you can now use your sharp X-Acto blade to trim the excess off and leave a nice, smooth, flat surface for the next step. With A, B, C, and D glued together, you can now glue the side pieces of styrene to the buckle. The key thing here is to make sure that the tops of the side pieces are level with the tops of sheets A and B. If the side pieces are wider than the resulting belt buckle, that's fine as you can use your X-Acto blade to trim it down. At this point, you now have your buckle fully built. It's just a matter of cleanup. The longer appendages at the bottom are really just there to make things easier when trying to glue everything together. For the one prototype I built, I ended up cutting the excess off and rounded the bottom of the buckle out as well as the sides. This gives the buckle a rounded rectangular profile to it which looks good. I then added in some squadron green putty to fill gaps, and sealed it up with some more superglue which was then sanded further. Primer and color coats were added, followed by adding a black wash into the "gap" where the seat belt latch is inserted. This was built for a 1/16th scale kit where I can also use the thin styrene to make the belt latch for the kit. If you are building this for a smaller scale kit, I would suggest picking up some seat belt hardware photo-etch parts to get a good idea of what size you are going to need to build your buckle(s) out of. Below are pictures of the one part I did build and paint up. Picture quality is poor, but this should give you a good idea of how it looks. I am QUITE happy with this and can't wait to get the full production versions of the buckle used in the 1988 Corvette. The lighting makes this appear white, but it's actually the same color tan as in the previous photo. -
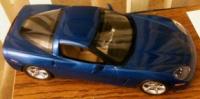
Rust-Oleum Automotive Touch-Up Paint Medium Quasar Blue CC followed by a couple of wet coats of Rust-Oleum Automotive Touch-Up Clear. Then it was wet VERY lightly wet-sanded with 3000 grit paper, then a rubbing compound to remove any marks from the feather-light wet-sanding, then some 3M automotive polishing compound, and we get what you see here. Photo taken by my iPhone. I need to find my camera so I can take better pictures, but I think the overall quality comes out in this photo.
-
Only if the car had a radio in it. Without a radio, there was no need for the chrome shielding over the distributor. Still, even with the chrome covering, there are still many angles where you can go and see the distributor and the wiring.
-
Another Corvette builder. Having built many Corvettes in my life, and just getting back into the hobby myself, what I can tell you is that there is no need for a distributor for the 1998 Corvette. The engine used in the '98 Vette is built in such a way that you can't see the distributor in the engine compartment as it is covered by other parts of the engine. For some reference material, I HIGHLY suggest you check out http://www.corvetteimages.com. They have a database of thousands of images of Corvettes from every single year. You can use their filters to bring up images of the exact model year car you are building and you will get a LOT of reference material. For the '98 Vette, all the images of the engine compartment I have seen do not show the distributor. In fact, the spark plug wiring really isn't visible at all either. So if you are looking to get some engine wiring done, I would suggest an earlier year Corvette to try it on. Something from the C3 generation or earlier as once the C4 models came out, the distributor got hidden by other parts of the engine. The wiring can still be seen in the C4 models, but that's about it. (In the "On The Workbench" forum, you can check out my 1988 Corvette build where my first wiring job was done).
-
I think another one I can add to this list is how frustrating it is to have your parts painted, and in the process of adding other parts to the piece or holding it while the glue sets you wind up rubbing off paint from high areas of the part you had previously painted. Or, the paint is soft enough that you end up leaving a fingerprint on there. REALLY frustrating.
-
Getting Back Into The Hobby
Jdurg replied to Jdurg's topic in General Automotive Talk (Trucks and Cars)
Thanks for the info! I'll certainly go ahead and look into that. -
When I was a kid, I always thought that the R/M Vette models were much better than the AMT/Ertl counterparts. I would agree that the '67 Vettes, coupe and convertible, were the best of them all. One reason is that my dream car would be to get a 1967 L89 Convertible with side pipes painted Torch Red with the black interior and black stripe down the middle. Chance are I'll never own it because a VERY small number were made, but with the R/M kits I can kind of say that I do. One of my best model kits I built before I had to take a break from the hobby was the large scale (can't remember the exact scale) 1967 Coupe kit. I have a Detail Master photo-etch set for that kit, so one of these days I'll have to dig around and try to find one to build. It would look good next to my 1/16 scale 1963 Split Window, and the 1/16 scale 1988 Convertible I'm currently building. (LOTS of pictures in my thread in the Workbench forum). I guess another good kit, even though it has lots of inaccuracies in there, is the R/M 1996 Corvette Grand Sport Convertible. I LOVE the paint scheme on that car and had fun building it. I need to find me one of those kits to build. The AMT/Ertl version was pretty nasty and lacked a lot of detail. (Back then, it seemed that most of the kits from AMT/Ertl were very devoid of detail while the R/M kits always had a lot more parts, or more detail on the parts. The 58 Pro-Modeler was a great kit and I loved building that as a kid). Nice thread, and thanks for the welcome back!