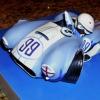
cobraman Posted May 16, 2015 Posted May 16, 2015 (edited) After finishing the 1935 Mercedes I felt I needed something a bit more simple for my next build. Got a good deal on this kit on ebay . This kit looks to be very simple. No engine and not much interior detail. The body looks good to my eye. I wonder if this was ever a slot car body. I have a couple simple mods planned that should help it look a tad better. Edited May 27, 2015 by cobraman
Crazy Ed Posted May 17, 2015 Posted May 17, 2015 (edited) Hi Ray. Yep it was intended as either a Curbside or Slot Car. The hole in the right rear (which'll need to be filled) is for a bar that went to a counter weight that made the Wing move on turns. There's also 4 openings in the cockpit that will need to be addressed. Oh, and because you want to keep it simple, build it as the Qualifying version not as Raced - You'll need to add an external kluge Oil Cooler for that. Edited May 17, 2015 by Crazy Ed
Ace-Garageguy Posted May 17, 2015 Posted May 17, 2015 Such a good looking old race car we rarely ever see built...should be another fine model from you.
cobraman Posted May 17, 2015 Author Posted May 17, 2015 Such a good looking old race car we rarely ever see built...should be another fine model from you. Thanks Bill, I can hope ! : )
Snake45 Posted May 18, 2015 Posted May 18, 2015 I've been playing with one of these off and on for maybe a decade. Keep us posted on your progress--I could use the inspiration and ideas!
wayne swayze Posted May 18, 2015 Posted May 18, 2015 Wow Ray! You are building a ton of different subjects lately! Not into sport cars much, but I will watch what you do with it.
cobraman Posted May 18, 2015 Author Posted May 18, 2015 Thanks guys. Yes Wayne your right,I have been building different subjects. Trying to keep things interesting. I have a 41 Lincoln and a 1912 Henderson motorcycle and a Tamiya 1/6 Harley in the pipeline.
Danno Posted May 18, 2015 Posted May 18, 2015 I LOVE Chaparrals. Did I mention I LOVE Chaparrals? I do. Great subject, Ray!
cobraman Posted May 18, 2015 Author Posted May 18, 2015 Ed, if your around I m not sure what hole you mentioned that needs to be filled. Anyway, I filled a couple of sink holes on the rear sides of the body. I also drilled out where the exhaust pipes are so I can add either aluminum or plastic tubing. Body being primed now. Also you will see a photo of what represents the engine. I am going to try and improve this part at least a little.
Crazy Ed Posted May 18, 2015 Posted May 18, 2015 Hi Ray. The opening thats just barely showing behind the Fin. Let's see if this helps. Sharp Hap_image012_0000.jpg
cobraman Posted May 18, 2015 Author Posted May 18, 2015 I don't see a hole in the body where the photo would indicate but there is a rectangle hole in the body between the window and the fin. Is this what you mean ? Might help if I post a pic which I will do shortly.
Crazy Ed Posted May 18, 2015 Posted May 18, 2015 Is this the hole we are talking about ? Yep That's the one. As the picture i linked shows the Wing was moved by a rod that's 1" or less in diameter and is located just inside the roof line opening.
superbike-shaun Posted May 19, 2015 Posted May 19, 2015 Cobraman,I WAS not aware you had such varied taste according to what I have previously known about you.and the thing is everything you've touched absolutely looks gorgeous! I guess you're not a 1 cobra and pony show. Lol
cobraman Posted May 19, 2015 Author Posted May 19, 2015 Shaun, first off thank you. Secondly, yes lately I have been building some of just about everything. I think that sometimes you need to use different styles of building and sometimes can learn something that you can apply to your other builds. It also helps me when I start to feel I am getting into a rut. I think before too long I will be building one of the 1/16 Cobra kits. Built one a long time ago when they were first released but it was destroyed by a nephew. I have 3 in my unbuilt Cobra collection and they have been catching my eye lately. : )
cobraman Posted May 19, 2015 Author Posted May 19, 2015 Ok, the hole is now filled. A little more work and it will be ready for primer.
Art Laski Posted May 19, 2015 Posted May 19, 2015 This is cool, Ray. Neat subject,and I'm sure you'll do it justice. I'll be watching!
cobraman Posted May 19, 2015 Author Posted May 19, 2015 Thanks ! No clear yet. That's enamel. Should be dry in 2 weeks ! : )
oldscool Posted May 20, 2015 Posted May 20, 2015 Thanks ! No clear yet. That's enamel. Should be dry in 2 weeks ! : ) If you are lucky I have used enamel that took months to dry. Nice work so far.
Recommended Posts
Create an account or sign in to comment
You need to be a member in order to leave a comment
Create an account
Sign up for a new account in our community. It's easy!
Register a new accountSign in
Already have an account? Sign in here.
Sign In Now